LG 32LE5300 Manual de usuario
- Categoría
- Televisores LCD
- Tipo
- Manual de usuario

OWNER’S MANUAL
LED LCD TV / LCD TV
PLASMA TV
Please read this manual carefully before operating
your set and retain it for future reference.
The model and serial number of the TV is located
on the back and one side of the TV.
Record it below should you ever need service.
MODEL
SERIAL
The extended owner’s manuals that contain informa-
tion on the advanced features of this LG TV are
located on the CD-ROM provided in an electronic
version.
To read these files, you will need to use the personal
computer (PC) equipped with a CD-ROM drive.
P/NO : MFL59166649 (1111-REV03)
www.lg.com
LED LCD TV MODELS
22LE5300
26LE5300
32LE5300
37LE5300
42LE5300
47LE5300
55LE5300
LCD TV MODELS
26LD350
32LD350
32LD460
37LD460
42LD460
47LD460
37LD461C
42LD461C
22LE6500
26LE6500
32LE4600
42LE4600
47LE4600
55LE4600
32LE4300
42LE4300
32LD420C
42LD420C
32LD460H
42LD460H
32LD460B
42LD460B
32LD465
37LD465
42LD465
47LD465
32LD420
42LD420
PLASMA TV MODELS
42PJ230
50PJ230
42PJ250
50PJ250
42PJ350
50PJ350

2
WARNING / CAUTION
The lightning flash with arrowhead
symbol, within an equilateral trian-
gle, is intended to alert the user to
the presence of uninsulated “dan-
gerous voltage” within the product’s enclo-
sure that may be of sufficient magnitude to
constitute a risk of electric shock to persons.
The exclamation point within an equi-
lateral triangle is intended to alert
the user to the presence of important oper-
ating and maintenance (servicing) instruc-
tions in the literature accompanying the
appliance.
TO REDUCE THE RISK OF ELECTRIC
SHOCK DO NOT REMOVE COVER (OR
BACK). NO USER SERVICEABLE PARTS
INSIDE. REFER TO QUALIFIED SERVICE
PERSONNEL.

3
SAFETY INSTRUCTIONS
IMPORTANT SAFETY INSTRUCTIONS
Read these instructions.
Keep these instructions.
Heed all warnings.
Follow all instructions.
1
Do not use this apparatus
near water.
2
Clean only with dry cloth.
3
Do not block any ventilation
openings. Install in accordance
with the manufacturer’s
instructions.
4
Do not install near any heat
sources such as radiators, heat
registers, stoves, or other appa-
ratus (including amplifiers) that
produce heat.
5
Protect the power cord from
being walked on or pinched
particularly at plugs, conve-
nience receptacles, and the
point where they exit from the
apparatus.
6
Only use attachments/acces-
sories specified by the manu-
facturer.
7
Use only with the cart, stand,
tripod, bracket, or table speci-
fied by the manufacturer, or
sold with the apparatus. When
a cart is used, use caution
when moving the cart/appara-
tus combination to avoid injury
from tip-over.
8
Unplug this apparatus during
lighting storms or when unused
for long periods of time.
9
Refer all servicing to qualified service per-
sonnel. Servicing is required when the appa-
ratus has been damaged in any way, such
as power-supply cord or plug is damaged,
liquid has been spilled or objects have fallen
into the apparatus, the apparatus has been
exposed to rain or moisture, does not oper-
ate normally, or has been dropped.
10
Never touch this apparatus or antenna dur-
ing a thunder or lighting storm.
11
When mounting a TV on the wall, make sure
not to install the TV by the hanging power
and signal cables on the back of the TV.
12
Do not allow an impact shock or any objects
to fall into the product, and do not drop
onto the screen with something.
13
CAUTION concerning the Power Cord:
It is recommend that appliances be placed
upon a dedicated circuit; that is, a single
outlet circuit which powers only that appli-
ance and has no additional outlets or
branch circuits. Check the specification
page of this owner's manual to be certain.
Do not connect too many appliances to the
same AC power outlet as this could result in
fire or electric shock.
Do not overload wall outlets. Overloaded
wall outlets, loose or damaged wall outlets,
extension cords, frayed power cords, or
damaged or cracked wire insulation are
dangerous . Any of these conditions could
result in electric shock or fire. Periodically
examine the cord of your appliance, and if its
appearance indicates damage or deteriora-
tion, unplug it, discontinue use of the appli-
ance, and have the cord replaced with an
exact replacement part by an authorized
servicer. Protect the power cord from phys-
ical or mechanical abuse, such as being
twisted, kinked, pinched, closed in a door, or
walked upon. Pay particular attention to
plugs, wall outlets, and the point where the
cord exits the appliance.
Do not make the TV with the power cord
plugged in. Do not use a damaged or loose
power cord. Be sure do grasp the plug
when unplugging the power cord. Do not
pull on the power cord to unplug the TV.

4
SAFETY INSTRUCTIONS
14
WARNING - To reduce the risk
of fire or electrical shock, do not
expose this product to rain,
moisture or other liquids. Do
not touch the TV with wet
hands. Do not install this prod-
uct near flammable objects
such as gasoline or candles or
expose the TV to direct air
conditioning.
15
Do not expose to dripping or
splashing and do not place
objects filled with liquids, such
as vases, cups, etc. on or over
the apparatus (e.g. on shelves
above the unit).
16
GROUNDING
Ensure that you connect the earth ground wire
to prevent possible electric shock (i.e. a TV with
a three-prong grounded AC plug must be con-
nected to a three-prong grounded AC outlet). If
grounding methods are not possible, have a
qualified electrician install a separate circuit
breaker.
Do not try to ground the unit by connecting it to
telephone wires, lightening rods, or gas pipes.
Power
Supply
Short-circuit
Breaker
17
DISCONNECTING DEVICE FROM MAINS
Mains plug is the disconnecting device. The
plug must remain readily operable.
18
As long as this unit is connected to the AC
wall outlet, it is not disconnected from the AC
power source even if you turn off this unit by
SWITCH.
19
Cleaning
When cleaning, unplug the power cord and
scrub gently with a soft cloth to prevent
scratching. Do not spray water or other liquids
directly on the TV as electric shock may
occur. Do not clean with chemicals such as
alcohol, thinners or benzene.
20
Moving
Make sure the product is turned off,
unplugged and all cables have been
removed. It may take 2 or more people to
carry larger TVs. Do not press against or put
stress on the front panel of the TV.
21
Ventilation
Install your TV where there is proper ventila-
tion. Do not install in a confined space such
as a bookcase. Do not cover the product
with cloth or other materials (e.g.) plastic
while plugged in. Do not install in exces-
sively dusty places.
22
Take care not to touch the ventilation open-
ings. When watching the TV for a long
period, the ventilation openings may
become hot.
23
If you smell smoke or other odors coming
from the TV, unplug the power cord and con-
tact and authorized service center.
24
Do not press strongly upon the
panel with hand or sharp object
such as nail, pencil or pen, or
make a scratch on it.
25
Keep the product away from direct sunlight.
26
Dot Defect
The Plasma or LCD panel is a high technol-
ogy product with resolution of two million to
six million pixels. In a very few cases, you
could see fine dots on the screen while
you’reviewing the TV. Those dots are deacti-
vated pixels and do not affect the perfor-
mance and reliability of the TV.
27
Generated Sound
“Cracking” noise: A cracking noise that occurs
when watching or turning off the TV is gener-
ated by plastic thermal contraction due to
temperature and humidity. This noise is com-
mon for products where thermal deformation
is required.
Electrical circuit humming/panel buzzing: A
low level noise is generated from a high-speed
switching circuit, which supplies a large amount
of current to operate a product. It varies
depending on the product.
This generated sound does not affect the per-
formance and reliability of the product.

5
28
For LED LCD TV/LCD TV
If the TV feels cold to the touch, there may be
a small “flicker” when it is turned on. This is
normal, there is nothing wrong with TV.
Some minute dot defects may be visible on
the screen, appearing as tiny red, green, or
blue spots. However, they have no adverse
effect on the monitor’s performance.
Avoid touching the LCD screen or holding your
finger(s) against it for long periods of time.
Doing so may produce some temporary dis-
tortion effects on the screen.
ON DISPOSAL
(Only Hg lamp used LCD TV)
The fluorescent lamp used in this product con-
tains a small amount of mercury. Do not
dispose of this product with general house-
hold waste. Disposal of this product must be
carried out in accordance to the regulations of
your local authority.

6
CONTENTS
HOW TO USE THE OWNER'S MANUAL ON THE CD-ROM
To view the Owner's Manual on the CD-ROM, Adobe Acrobat Reader must be installed on your PC.
The “ACRORD" folder on the CD-ROM contains the installation programs for them.
If you want to install those programs, Open the “My Computer”
➜ Open the “LG”➜ Open the
“ACRORD”
➜ double-click your language.
TO VIEW THE OWNER'S MANUAL ON THE CD-ROM
The Owner's Manual files are included in the supplied CD-ROM.
Load the supplied CD-ROM into the CD-ROM drive of your PC.
After a while, the web page of the CD-ROM will open automatically. (for Windows only)
►If the web page does not appear automatically, open the Owner's Manual file
directly.
Open the “My computer”
➜ Open the “LG”➜ Open the “index.htm” file.
!
?
!
?
NOTE
When you click, display the PDF file.
You can find the
desired contents
easily using the
bookmark.
WARNING / CAUTION
. . . . . . . . . . . . . . . . . . . . . . . 2
SAFETY INSTRUCTIONS
. . . . . . . . . . . . . . . . . . . . 3
PREPARATION
Accessories . . . . . . . . . . . . . . . . . . . . . . . . . . . . . . . . . . . . . . . . . . . . . . . . 7
Stand Instruction
. . . . . . . . . . . . . . . . . . . . . . . . . . . . . . . . . . . . . . 10
VESA Wall Mounting
. . . . . . . . . . . . . . . . . . . . . . . . . . . . . . . . . 18
Cable Management
. . . . . . . . . . . . . . . . . . . . . . . . . . . . . . . . . 20
Desktop Pedestal Installation
. . . . . . . . . . . . . . . . . . . . . 24
Swivel Stand
. . . . . . . . . . . . . . . . . . . . . . . . . . . . . . . . . . . . . . . . . . . . . 24
Attaching the TV to a Desk
. . . . . . . . . . . . . . . . . . . . . . . 25
Kensington Security System
. . . . . . . . . . . . . . . . . . . . . . 25
WATCHING TV
Connecting your TV . . . . . . . . . . . . . . . . . . . . . . . . . . . . . . . . . . 26
Turning On TV
. . . . . . . . . . . . . . . . . . . . . . . . . . . . . . . . . . . . . . . . . . 27
Initial Setting
. . . . . . . . . . . . . . . . . . . . . . . . . . . . . . . . . . . . . . . . . . . 27
On-Screen Menus Selection
. . . . . . . . . . . . . . . . . . . . 28
APPENDIX
Troubleshooting . . . . . . . . . . . . . . . . . . . . . . . . . . . . . . . . . . . . . . . . 29
Maintenance
. . . . . . . . . . . . . . . . . . . . . . . . . . . . . . . . . . . . . . . . . . . . . 32
Open Source Software Notice
. . . . . . . . . . . . . . . . . . . 33
Product Specifications
. . . . . . . . . . . . . . . . . . . . . . . . . . . . . 34
➜ ➜

7
ACCESSORIES
PREPARATION
Ensure that the following accessories are included with your TV. If an accessory is missing, please con-
tact the dealer where you purchased the TV.
The accessories included may differ from the images below.
Option Extras
* Wipe spots on the exterior only
with the polishing cloth.
* Do not wipe roughly when remov-
ing stain. Excessive pressure may
cause scratch or discoloration.
Polishing Cloth
Not included with all models
1.5V 1.5V
1,5Vcc 1,5Vcc
D-sub 15 pin Cable
When using the VGA (D-sub 15
pin cable) PC connection, the
user must use shielded signal
interface cables with ferrite cores
to maintain standards compli-
ance.
Plasma TV
Protection Cover
(Refer to P.10 )
Cable Holder
(Refer to P.20)
x 2
Screws for stand assembly
(Refer to P.10)
x 3
(M5 x 14)
x 4
(M4 x 28)
Power Cord
1.5V 1.5V
1,5Vcc 1,5Vcc
32LD350, 32/37/42/47LD460, 37/42LD461C, 32/37/42/47LD465, 32/42LD460H, 32/42LD460B
Screws for stand assembly
(Refer to P.11)
Screw for stand fixing
(Refer to P.25)
Protection Cover
(Refer to P.11)
x 8
(M4 x 20)
(Except 47LD460,
47LD465)
Power Cord
1.5V 1.5V
1,5Vcc 1,5Vcc
32/42LD420, 32/42LD420C
Protection Cover
(Refer to P.12)
Power CordScrews for stand assembly
(Refer to P.12)
Screw for stand fixing
(Refer to P.25)
(M4 x 24)
x 4
1.5V 1.5V
1,5Vcc 1,5Vcc
1.5V 1.5V
1,5Vcc 1,5Vcc
1.5V 1.5V
1,5Vcc 1,5Vcc
ENERGY
CHVOL
1 2
3
4 5 6
7 8
0
9
SAVING
TV
AV MODE
INPUT
FAV
RATIO
MUTE
MARK
Q.VIEW
LIST
FREEZE
P
A
G
E
ENTER
MENU
GUIDE
Q.MENU
INFO
BACK
EXIT
Owner’s Manual
Remote Control,
Batteries (AAA)
CD Manual EzSign TV Editor
S/W & Manual
RF Adapter (Some models)
You must connect it to the
antenna wire after fixing in
Antenna Input. This adapter is
for supplied in Argentina.
(For 32/42LD460B)

PREPARATION
8
22/26LE5300
Cable Tie
(Refer to p.23)
AC/DC Adaptor
Power Cord
1.5V 1.5V
1,5Vcc 1,5Vcc
Ring spacers
(Refer to p.19)
x 4
(For 26LE5300)
Screws for stand assembly
(Refer to P.13, 15)
x 4
(M4 x 14) (M4 x 20)
x 4
(For 26LE5300)
32/37/42/47/55LE5300, 32/42/47/55LE4600, 32/42LE4300
Cable Holder
(Refer to p.23)
Component gender cable,
AV gender cable
x 2
Screw for stand fixing
(Refer to P.25)
(For 32LE5300,
32/42/47/55LE4600,
32LE4300)
Screws for stand assembly
(Refer to P.15)
x 4
(M4 x 16)
x 4
(M4 x 22)
(32LE5300,
32/42/47/55LE4600,
32LE4300)
x 4
(M4 x 26)
(47/55LE5300)
x 4
(M4 x 24)
(37/42LE5300,
42LE4300)
x 2
x 2
Woofer PEM nut
(Refer to P.17)
Woofer Fixing Screw
(Refer to P.17)
22/26LE6500
Cable Tie
(Refer to p.22)
AC/DC Adaptor
Power Cord
1.5V 1.5V
1,5Vcc 1,5Vcc
Screws for stand assembly
(Refer to P.14)
x 2
(M4 x 16)
(32/42/47/55LE4600)

9
OPTIONAL EXTRAS (FOR 32/37/42/47/55LE5300, 32/42LE4300)
Optional extras can be changed or modified for quality improvement without any notification.
Contact your dealer for buying these items.
This device only works with compatible LG LED LCD TV, LCD TV, or Plasma TV.
Wireless Media Box
(AN-WL100W)

PREPARATION
10
STAND INSTRUCTIONS
(For Plasma TV)
ꔛ
Image shown may differ from your TV.
INSTALLATION
!
?
!
?
NOTE
► When assembling the desk type stand,
make sure the screws are fully tightened (If
not tightened fully, the TV can tilt forward
after the product installation). Do not over
tighten.
1
Carefully place the TV screen side down
on a cushioned surface to protect the
screen from damage.
2
Assemble the parts of the STAND BODY
with the STAND BASE of the TV.
3
Assemble the TV as shown.
4
Fix the 4 screws securely using the holes
in the back of the TV.
STAND BASE
STAND BODY
M5 x 14
M4 x 28
DETACHMENT
PROTECTION COVER
After removing the stand, install the included
PROTECTION COVER over the hole for the
stand.
Press the PROTECTION COVER into the TV
until you hear it click.
When installing the wall mounting bracket, use
the PROTECTION COVER.
1
Carefully place the TV screen side down
on a cushioned surface to protect the
screen from damage.
2
Remove the screws that hold the stand on.
3
Detach the stand from TV.
PROTECTION COVER
Fix a guide to the outside.

11
STAND INSTRUCTIONS
(For 32LD350, 32/37/42/47LD460, 37/42LD461C, 32/37/42/47LD465, 32/42LD460H 32/42LD460B)
ꔛ
Image shown may differ from your TV.
!
?
!
?
NOTE
► When assembling the desk type stand,
make sure the screws are fully tightened
(If not tightened fully, the TV can tilt for-
ward after the product installation). Do
not over tighten.
1
Carefully place the TV screen side down on
a cushioned surface to protect the screen
from damage.
2
Assemble the parts of the STAND BODY
with the STAND BASE of the TV.
3
Assemble the TV as shown.
4
Fix the 4 screws securely using the holes in
the back of the TV.
M4X20
M4X20
INSTALLATION
M4X20
M4X20
STAND BASE
STAND BODY
M4 x 20
M4X20
M4 x 20
DETACHMENT
PROTECTION COVER
After removing the stand, install the included
PROTECTION COVER over the hole for the
stand.
Press the PROTECTION COVER into the TV
until you hear it click.
1
Carefully place the TV screen side down
on a cushioned surface to protect the
screen from damage.
2
Remove the screws that hold the stand
on.
3
Detach the stand from TV.

PREPARATION
12
STAND INSTRUCTIONS (For 32/42LD420, 32/42LD420C)
ꔛ
Image shown may differ from your TV.
1
Carefully place the TV screen side down
on a cushioned surface to protect the
screen from damage.
2
Assemble the TV as shown.
3
Install the 4 screws into the holes shown.
INSTALLATION
!
?
!
?
NOTE
► When assembling the desk type stand,
make sure the screws are fully tightened
(If not tightened fully, the TV can tilt for-
ward after the product installation). Do not
over tighten.
M4 x 24
DETACHMENT
PROTECTION COVER
After removing the stand, install the included
PROTECTION COVER over the hole for the
stand.
Press the PROTECTION COVER into the TV until
you hear it click.
When installing the wall mounting bracket, use
the PROTECTION COVER.
1
Carefully place the TV screen side down on
a cushioned surface to protect the screen
from damage.
2
Remove the screws that hold the stand on.
3
Detach the stand from TV.

13
STAND INSTRUCTIONS
(For 22LE5300)
ꔛ
Image shown may differ from your TV.
INSTALLATION
!
?
!
?
NOTE
► When assembling the desk type stand,
make sure the screws are fully tightened (If
not tightened fully, the TV can tilt forward
after the product installation). Do not over
tighten.
1
Carefully place the TV screen side down
on a cushioned surface to protect the
screen from damage.
2
Assemble the parts of the STAND BODY
with the STAND BASE of the TV.
3
Assemble the TV as shown.
4
Fix the 4 screws securely using the holes
in the back of the TV.
STAND BASE
STAND BODY
M4 x 14
DETACHMENT
1
Carefully place the TV screen side down
on a cushioned surface to protect the
screen from damage.
2
Remove the screws that hold the stand
on.
3
Detach the stand from TV.

PREPARATION
14
STAND INSTRUCTIONS
(For
22/26LE6500
)
ꔛ
Image shown may differ from your TV.
1
Carefully place the TV screen side down
on a cushioned surface to protect the
screen from damage.
2
Assemble the TV as shown.
3
Install the 2 screws into the holes shown.
INSTALLATION
!
?
!
?
NOTE
► When assembling the desk type stand,
make sure the screws are fully tightened (If
not tightened fully, the TV can tilt forward
after the product installation). Do not over
tighten.
M4 x 16
DETACHMENT
1
Carefully place the TV screen side down
on a cushioned surface to protect the
screen from damage.
2
Remove the screws that hold the stand on.
3
Detach the stand from TV.

15
STAND INSTRUCTIONS
(For 26/32/37/42/47/55LE5300, 32/42/47/55LE4600, 32/42LE4300)
ꔛ
Image shown may differ from your TV.
INSTALLATION
!
?
!
?
NOTE
► When assembling the desk type stand,
make sure the screws are fully tightened (If
not tightened fully, the TV can tilt forward
after the product installation). Do not over
tighten.
2
Assemble the parts of the STAND BODY
with the STAND BASE of the TV.
3
Assemble the TV as shown.
1
Carefully place the TV screen side down on
a cushioned surface to protect the screen
from damage.
4
Assemble the part of the STAND
REAR COVER with the TV.
5
Install the 4 screws into the holes shown.
STAND BASE
STAND BODY
STAND REAR
COVER
M4 x 22 M4 x 24 M4 x 26M4 x 20
M4 x 16M4 x 14
For 26LE5300
26LE5300
Other models
32LE5300,
32/42/47/55LE4600,
32LE4300
37/42LE5300,
42LE4300
47/55LE5300

PREPARATION
16
DETACHMENT
1
Carefully place the TV screen side down on
a cushioned surface to protect the screen
from damage.
2
Remove the screws that hold the stand on.
3
Detach the STAND REAR COVER from TV.
4
Detach the stand from TV.

17
WOOFER INSTALLATION: WHEN USING THE WALL
MOUNT (For 32/42/47/55LE4600)
1
Carefully place the TV screen side down
on a cushioned surface to protect the
screen from damage.
2
Remove the screws from the TV.
3
Detach the STAND REAR COVER and
STAND from TV.
4
Detach the WOOFER from the stand.
5
Assemble the WOOFER with the TV.
Turn the PEM nut for the woofer using a
flathead driver and install the 2 screws as
shown.
When installing the woofer in the TV, make
sure that the power cord is not twisted,
bent or pinched.

PREPARATION
18
VESA WALL MOUNTING
Install your wall mount on a solid wall perpendicular to the floor. When attaching to other building mate-
rials, please contact your nearest installer.
If installed on a ceiling or slanted wall, it may fall and result in severe personal injury.
We recommend that you use an LG brand wall mount when mounting the TV to a wall.
LG recommends that wall mounting be performed by a qualified professional installer.
Model
VESA (A
*
B)
A
B
Standar Screw Quantity
Wall Mounting Bracket
(sold separately)
22LE5300,
22LE6500,
26LE5300,
26LE6500
100
*
100 M4 4
LSW100B, LSW100BG
32LD350,
32LD420,
32LD420C,
32LD460,
32LD465,
32LD460H,
32LD460B,
32LE5300,
32LE4600,
32LE4300
200
*
100 M4 4
LSW100B, LSW100BG
37LD460,
37LD461C,
37LD465,
37LE5300,
42LD460,
42LD461C,
42LD465,
42LD420,
42LD420C,
42LD460H,
42LD460B,
42LE5300,
42LE4600,
42LE4300,
47LD460,
47LD465,
47LE5300,
47LE4600
200
*
200 M6 4
LSW200B, LSW200BG
55LE5300,
55LE4600
400
*
400 M6 4
LSW400B, LSW400BG
42/50PJ230,
42/50PJ250,
42/50PJ350
400
*
400 M6 4
PSW400B PSW400BG

19
!
?
!
?
CAUTION
► Do not install your wall mount kit while your TV is turned on. It may result in personal injury due to
electric shock.
!
?
!
?
NOTE
► Screw length needed depends on the wall
mount used. For further information, refer to
the instructions included with the mount.
► Standard dimensions for wall mount kits are
shown in the table.
► When purchasing our wall mount kit, a detailed
installation manual and all parts necessary for
assembly are provided.
► Do not use screws longer than the standard
dimension, as they may cause damage to the
inside to the TV.
► For wall mounts that do not comply with the
VESA standard screw specifications, the length
of the screws may differ depending on their
specifications.
► Do not use screws that do not comply with the
VESA standard screw specifications.
Do not use fasten the screws too strongly, this
may damage the TV or cause the TV to a fall,
leading to personal injury. LG is not liable for
these kinds of accidents.
► LG is not liable for TV damage or personal
injury when a non-VESA or non specified wall
mount is used or the consumer fails to follow
the TV installation instructions.
Place the on the set before installing the wall mounting
bracket so that the inclination of the backside of the set
can be adjusted perpendicularly.
For 26LE5300
4-RING SPACERS
ꔛ
Image shown may differ from your TV.
For 32/42/47/55LE4600
3.6 cm (1.4 inches)
1 cm (0.4 inches)
WOOFER
The clearance from the wall is 3.6 cm (1.4 inches) for this
product.

PREPARATION
20
CABLE MANAGEMENT
Plasma TV
ꔛ
Image shown may differ from your TV.
CABLE HOLDER
1
After connecting the cables as necessary,
install the CABLE HOLDER as shown
and bundle the cables.

21
32LD350, 32/37/42/47LD460, 37/42LD461C, 32/37/42/47LD465, 32/42LD460H 32/42LD460B
ꔛ
Image shown may differ from your TV.
1
Connect the cables as necessary.
To connect additional equipment, see the
EXTERNAL EQUIPMENT SETUP section.
2
Open the CABLE MANAGEMENT CLIP
as shown.
3
Put the cables inside the CABLE
MANAGEMENT CLIP and snap it closed.
AC IN
AC IN
AC IN
AC IN
AC IN
AC IN
AC IN
AC IN
AC IN
CABLE MANAGEMENT CLIP

PREPARATION
22
32/42LD420, 32/42LD420C
1
Connect the cables as necessary.
To connect additional equipment, see the
EXTERNAL EQUIPMENT SETUP section.
2
Open the CABLE MANAGEMENT CLIP as
shown.
3
Put the cables inside the CABLE
MANAGEMENT CLIP and snap it closed.
22/26LE6500
1
After connecting the cables as necessary,
install the CABLE TIE as shown and bundle
the cables.
CABLE MANAGEMENT CLIP
CABLE TIE

23
ꔛ
Image shown may differ from your TV.
CABLE HOLDER
CABLE HOLDER
2
After connecting the cables as necessary,
install CABLE HOLDER as shown and
bundle the cables.
1
Secure the power cord with the CABLE
HOLDER on the TV back cover.
It will help prevent the power cable from
being removed by accident.
32/37/42/47/55LE5300, 32/42/47/55LE4600, 32/42LE4300
22/26LE5300
1
After connecting the cables as necessary,
install CABLE TIE as shown and bundle
the cables.
CABLE TIE

PREPARATION
24
DESKTOP PEDESTAL INSTALLATION
SWIVEL STAND
(Except
22LE5300, 22LE6500
)
After installing the TV, you can adjust the TV set manually to the left or right direction by 20 degrees
to suit your viewing position.
ꔛ
Image shown may differ from your TV.
For proper ventilation, allow a clearance of 4 inches on all four sides from the wall.
4 inches
4 inches
4 inches
4 inches
!
?
!
?
CAUTION
► Ensure adequate ventilation by following the clearance recommendations.
► Do not mount near or above any type of heat source.

25
ATTACHING THE TV TO A DESK
(For 32LD350, 32/37/42LD460, 37/42LD461C, 32/37/42LD465, 32LE5300, 32/42LD420,
32/42LD420C, 32/42/47/55LE4600, 32LE4300, 32/42LD460H, 32/42LD460B)
The TV must be attached to a desk so it cannot be pulled in a forward/backward direction, poten-
tially causing injury or damaging the product.
1-Screw
( provided as parts of the product)
Desk
Stand
KENSINGTON SECURITY SYSTEM
ꔛ
This feature is not available for all models.
- The TV is equipped with a Kensington Security System con-
nector on the back panel. Connect the Kensington Security
System cable as shown below.
- For the detailed installation and use of the Kensington Security
System, refer to the user’s guide provided with the Kensington
Security System.
For further information, contact http://www.kensington.com,
the internet homepage of the Kensington company. Kensington
sells security systems for expensive electronic equipment such
as notebook PCs and LCD projectors.
NOTE: The Kensington Security System is an optional accessory.
!
?
!
?
WARNING
► To prevent TV from falling over, the TV should be securely attached to the floor/wall per installa-
tion instructions. Tipping, shaking, or rocking the machine may cause injury.

PREPARATION
26
To connect an additional equipment, see the External Equipment Setup section in CD Manual.
Component
3
Composite
4
You can use a adapter to connect
DVI to HDMI, but you will only
have 2 channel stereo for sound.
The adapter is not needed when
connecting a PC.
* Typical Layout
Make sure
you don't
mix up the
colors.
DVI
2
Sorry, A phone
Jack to stereo
1/8" (0.32 cm)
headphone plug
adapter is not
included. It is
available from
most stores that
carry electronics.
Use Composite
for the video
connection if
available.
Match the jack
colors.
ANTENNA
IN
DC-IN
RGB IN (PC)
AUDIO IN
RGB/DVI
(DVI)
OPTICAL
DIGITAL
AUDIO OUT
/DVI IN
AV IN
RS-232C IN
(
CONTROL&SERVICE)
1 2
VIDEO
AUDIO
L(MONO)
R
CABLE IN
VIDEO
AUDIO
Y P
B
P
R
L R
COMPONENT IN
DC-IN
RGB IN (PC)
AUDIO IN
RGB/DVI
OPTICAL
DIGITAL
AUDIO OUT
COMPONENT IN
AV IN
RS-232C IN
(
CONTROL&SERVICE)
VIDEO
AUDIO
L(MONO)
R
VIDEO
AUDIO
Y P
B
P
R
L R
(DVI)
/DVI IN
1 2
HDMI OUTPUT
ANTENNA/
CABLE IN
DC-IN
RGB IN (PC)
AUDIO IN
RGB/DVI
OPTICAL
DIGITAL
AUDIO OUT
COMPONENT IN
AV IN
RS-232C IN
(
CONTROL&SERVICE)
VIDEO
AUDIO
L(MONO)
R
VIDEO
AUDIO
Y P
B
P
R
L R
(DVI)
/DVI IN
1 2
L R
DVI OUTPUT
AUDIO
Y L RPB PR
ANTENNA
IN
CABLE IN
HDMI
1
Use HDMI to connect
external devices when
available. If not avail-
able, use DVI or
Component.
Connection Order
1
2
HDMI is the best way to connect a
device. If it's not available, move down
the list in order until you find a con-
nection that's available on each device.
HDMI
DVI
3
4
Component
Composite
ANTENNA
IN
Use this connection when you need to
connect directly to an antenna or cable
system instead of using a cable box.
Antenna/Cable
Antenna
RF Coaxial
Wire (75 Ω)
Be careful not
to bend the
copper wire.
Cable TV
OR
WATCHING TV
CONNECTING YOUR TV
ANTENNA
IN
DC-IN
CABLE IN
RGB IN (PC)
AUDIO IN
RGB/DVI
(DVI)
OPTICAL
DIGITAL
AUDIO OUT
/DVI IN
VIDEO
AUDIO
L(MONO)
R
VIDEO
AUDIO
Y PB PR
L R
COMPONENT IN
AV IN
RS-232C IN
(
CONTROL&SERVICE)
1 2
H/P USB IN
H/P USB IN
IN 3
ANTENNA
IN
DC-IN
RGB IN (PC)
AUDIO IN
RGB/DVI
(DVI)
OPTICAL
DIGITAL
AUDIO OUT
/DVI IN
AV IN
RS-232C IN
(
CONTROL&SERVICE)
1 2
VIDEO
AUDIO
L(MONO)
R
CABLE IN
VIDEO
AUDIO
Y PB PR
L R
COMPONENT IN
DC-IN
RGB IN (PC)
AUDIO IN
RGB/DVI
OPTICAL
DIGITAL
AUDIO OUT
COMPONENT IN
AV IN
RS-232C IN
(
CONTROL&SERVICE)
VIDEO
AUDIO
L(MONO)
R
VIDEO
AUDIO
Y PB PR
L R
(DVI)
/DVI IN
1 2
HDMI OUTPUT
ANTENNA/
CABLE IN
DC-IN
RGB IN (PC)
AUDIO IN
RGB/DVI
OPTICAL
DIGITAL
AUDIO OUT
COMPONENT IN
AV IN
RS-232C IN
(
CONTROL&SERVICE)
VIDEO
AUDIO
L(MONO)
R
VIDEO
AUDIO
Y PB PR
L R
(DVI)
/DVI IN
1 2
L R
DVI OUTPUT
AUDIO
Y L RP
B
P
R
ANTENNA
IN
CABLE IN
ANTENNA
IN
DC-IN
RGB IN (PC)
AUDIO IN
RGB/DVI
(DVI)
OPTICAL
DIGITAL
AUDIO OUT
/DVI IN
AV IN
RS-232C IN
(
CONTROL&SERVICE)
1 2
VIDEO
AUDIO
L(MONO)
R
CABLE IN
VIDEO
AUDIO
Y PB PR
L R
COMPONENT IN
DC-IN
RGB IN (PC)
AUDIO IN
RGB/DVI
OPTICAL
DIGITAL
AUDIO OUT
COMPONENT IN
AV IN
RS-232C IN
(
CONTROL&SERVICE)
VIDEO
AUDIO
L(MONO)
R
VIDEO
AUDIO
Y PB PR
L R
(DVI)
/DVI IN
1 2
HDMI OUTPUT
ANTENNA/
CABLE IN
DC-IN
RGB IN (PC)
AUDIO IN
RGB/DVI
OPTICAL
DIGITAL
AUDIO OUT
COMPONENT IN
AV IN
RS-232C IN
(
CONTROL&SERVICE)
VIDEO
AUDIO
L(MONO)
R
VIDEO
AUDIO
Y PB PR
L R
(DVI)
/DVI IN
1 2
L R
DVI OUTPUT
AUDIO
Y L RP
B
P
R
ANTENNA
IN
CABLE IN
DC-IN
RGB IN (PC)
AUDIO IN
RGB/DVI
(DVI)
OPTICAL
DIGITAL
AUDIO OUT
/DVI IN
COMPONENT IN
RS-232C IN
(
CONTROL&SERVICE)
1 2
VIDEO
AUDIO
Y PB PR
L R
DC-IN
RGB IN (PC)
AUDIO IN
RGB/DVI
OPTICAL
DIGITAL
AUDIO OUT
COMPONENT IN
AV IN
RS-232C IN
(
CONTROL&SERVICE)
VIDEO
AUDIO
L(MONO)
R
VIDEO
AUDIO
Y PB PR
L R
(DVI)
/DVI IN
1 2
HDMI OUTPUT
AV IN
VIDEO
AUDIO
L(MONO)
R
L R
VIDEO
AUDIO
RGB IN (PC)
WIRELESS
CONTROL
AUDIO IN
(RGB/DVI)
RS-232C IN
(
CONTROL&SERVICE)
OPTICAL
DIGITAL
AUDIO OUT
/DVI IN
AV IN 1
VIDEO
AUDIO
L(MONO)
2
1
R
VIDEO
AUDIO
COMPONENT IN
2
1
Y P
B
P
R
L R
Y L RPB PR
ANTENNA
IN
CABLE IN
ANTENNA
IN
CABLE IN
ANTENNA
IN
CABLE IN

27
TURNING ON THE TV
1
First, connect power cord correctly.
At this moment, the TV switches to
standby mode.
ꔛ
In standby mode to turn TV on, press
the
/ I, INPUT, CH (ꕌ or ꕍ) button
on the TV or press the POWER, INPUT,
CH (
ꕌ or ꕍ), Number (0~9) button on
the remote control.
2
Select the viewing source by using
the INPUT button on the remote con-
trol.
3
When finished using the TV, press the
POWER button on the remote control.
The TV reverts to standby mode.
INITIAL SETTING
This Function guides the user to easily set the
essential items for viewing the TV for the first
time when purchasing the TV. It will be displayed
on the screen when turning the TV on for the first
time. It can also be activated from the user
menus.
ꔛ
Default selection is “Home Use”. We recom-
mend setting the TV to “Home Use” mode
for the best picture in your home environ-
ment.
ꔛ
“Store Demo” Mode is only intended for use
in retail environments. Customers can adjust
the “Picture menu - Picture mode” manu-
ally while inspecting the TV, but the TV will
automatically return to preset in-store mode
after 5 minutes.
ꔛ
“Store Demo” Mode is an optimal setting for
displaying at stores. “Store Demo” mode
initializes the TV to set the image quality.
Step2. Mode setting
Step4. Time Zone
1
ENTER
Select Menu Language.
1
ENTER
Select On or Off.
1
ENTER
Select Home Use.
Step5. Auto Tuning
1
ENTER
Check your antenna connection and
start Auto Tuning.
Step1. Selecting Language
Step 5. Auto Tuning
ꕉ Previous ꔉ Next
Before starting,
be sure that the
TV antenna is connected.
Step3. Power Indicator
(For LED LCD TV)
Step 3. Power Indicator
ꕉ Previous ꔉ Next
Standby Light ◀ Off ▶
ꔛ
This function is disable in “Step2. Mode
Setting - Store Demo”.
1
Select Time Zone option.
2
ENTER
Select Daylight Saving
option.
WELCOME!
Thank you for choosing LG
ꔉ Next
Step 1. Language
Português
English
Español
Home Use Store Demo
• Demo Mode Off
Step 2. Mode Setting
Selecting the environment.
Choose the setting mode you want.
Select [Home Use] to use this TV at home.
To use this TV at store, select [Store Demo].
ꕉ Previous ꔉ Next
i
Step 4. Time Zone
ꕉ Previous ꔉ Next
Time Zone ◀ Brasilia ▶
Daylight Saving Auto

WATCHING TV
28
ON-SCREEN MENUS SELECTION
Your TV's OSD (On Screen Display) may differ slightly from that shown in this manual.
1
MENU
Display each menu.
2
ENTER
Select a menu item.
3
ENTER
Accept the current selection.
4
EXIT
Return to TV viewing.
CHANNEL
PICTURE
AUDIO
TIME
LOCK
PICTURE
ꔂ Move ꔉ Enter
• Aspect Ratio : 16:9
• Picture Wizard
• ꕊ Energy Saving : Off
• Picture Mode : Standard
• Backlight 70
• Contrast 100
• Brightness 50
• Sharpness 70
TIME
ꔂ Move ꔉ Enter
• Clock
• Off Time : Off
• On TIme : Off
• Sleep Timer : Off
LOCK
ꔂ Move ꔉ Enter
• Set Password
• Lock System : On
• Block Channel
• Rating
• Input Block
• Key Lock : Off
AUDIO
ꔂ Move ꔉ Enter
• Auto Volume : Off
• Clear Voice II : Off �3
• Balance 0
• Sound Mode : Standard
•
Infinite Sound: Off
• Treble 50
• Bass 50
• Reset
L R
CHANNEL
ꔂ Move ꔉ Enter
• Auto Tuning
• Manual Tuning
• Channel Edit
• Scan Option
• System Color
APPENDIX
OPTION
OPTION
ꔂ Move ꔉ Enter
• Language
• Caption : Off
• Power Indicator
• Initial Setting
• Set ID : 1
• Mode Setting : Home Use
• IR Blaster : Off
!
?
!
?
NOTE
► ISM Method: For Plasma TV.
► Backlight, TruMotion, Power Indicator:
For LED LCD TV/LCD TV.
ꔛ
For further information, refer to the
optional “Wireless Media Box”
manual for operating instructions.
Except 32/42LD460B

29
TROUBLESHOOTING
Abnormal Operation
The remote control
doesn’t work
ꔛ
Check to see if there is any object between the product and the remote
control causing obstruction. Ensure you are pointing the remote control
directly at the TV.
ꔛ
Ensure that the batteries are installed with correct polarity (+ to +, - to -).
ꔛ
Ensure that the correct remote operating mode is set: TV, VCR etc.
ꔛ
Install new batteries.
TV turns off suddenly
ꔛ
Is the sleep timer set?
ꔛ
Check the power control settings. Power interrupted.
ꔛ
If there is no signal, the TV turns off automatically in 15 minutes.
Video Problems
No picture &No sound
ꔛ
Check whether the product is turned on.
ꔛ
Try another channel. The problem may be with the broadcast.
ꔛ
Is the power cord inserted into wall power outlet?
ꔛ
Check your antenna direction and/or location.
ꔛ
Test the wall power outlet, plug another product’s power cord into the
outlet where the product’s power cord was plugged in.
Picture appears slowly
after switching on
ꔛ
This is normal, the image is muted during the product startup process.
Please contact your service center, if the picture has not appeared after
five minutes.
No or poor color or
poor picture
ꔛ
Adjust Color in menu option.
ꔛ
Keep a sufficient distance between the product and the VCR.
ꔛ
Try another channel. The problem may be with the broadcast.
ꔛ
Are the video cables installed properly?
ꔛ
Activate any function to restore the brightness of the picture.
Horizontal/vertical bars
or picture shaking
ꔛ
Check for local interference such as an electrical appliance or power
tool.
Poor reception on
some channels
ꔛ
Station or cable product experiencing problems, tune to another station.
ꔛ
Station signal is weak, reorient antenna to receive weaker station.
ꔛ
Check for sources of possible interference.
Lines or streaks in pic-
tures
ꔛ
Check antenna (Change the direction of the antenna).
No picture when con-
necting HDMI
ꔛ
If an HDMI cable doesn’t support High Speed HDMI, it can cause flickers
or no screen display. In this case use the latest cables that support High
Speed HDMI.
*This feature is not available for all models.
APPENDIX

APPENDIX
30
Audio Problems
No output from one
of the speakers
ꔛ
Adjust Balance in menu option.
Unusual sound from
inside the product
ꔛ
A change in ambient humidity or temperature may result in an unusual
noise when the product is turned on or off and does not indicate a fault
with the product.
No sound
when connecting
HDMI/USB
ꔛ
Check High Speed HDMI cable.
ꔛ
Check USB cable over version 2.0.
ꔛ
Use normal MP3 file.
PC Mode Problems
The signal is out of
range
ꔛ
Adjust resolution, horizontal frequency, or vertical frequency on the PC.
ꔛ
Check the input source.
Vertical bar or stripe
on
background &
Horizontal Noise &
Incorrect position
ꔛ
Activate the Auto configure feature or adjust size, phase, or H/V position.
(Option)
Screen color is unsta-
ble or single color
ꔛ
Check the signal cable.
ꔛ
Reinstall the PC video card.
When connecting the
HDMI cable to the PC,
there is no audio.
ꔛ
Check the manual for the video card in the PC to see if it supports
HDMI audio and how to set it up properly.
*This feature is not available for all models.

31
Movie List Problems
The file does not
appear on the Movie
List.
ꔛ
Check whether the extension is supported.
Message is displayed
saying “This file is
invalid” or the audio is
working normally but
the video is not work-
ing normally.
ꔛ
Check whether the file is playing normally on a PC. (Check whether the
file is damaged.)
ꔛ
Check whether the resolution is supported.
ꔛ
Check whether the video/audio codec is supported.
ꔛ
Check whether the frame rate is supported.
Message is displayed
saying “Unsupported
Audio” or the video is
working normally but
the audio is not work-
ing normally.
ꔛ
Check whether the file is playing normally on a PC. (Check whether the
file is damaged.)
ꔛ
Check whether the audio codec is supported.
ꔛ
Check whether the bit rate is supported.
ꔛ
Check whether the sample rate is supported.
Subtitle is not working.
ꔛ
Check whether the file is playing normally on a PC. (Check whether the
file is damaged.)
ꔛ
Check whether the video file and subtitle file name are the same.
ꔛ
Check whether the video file and subtitle file are located in the same
folder.
ꔛ
Check whether the subtitle file is supported.
ꔛ
Check whether the language is supported. (When you open the subtitle
file in Memo Pad, you can check the language of the subtitle file.)

APPENDIX
32
MAINTENANCE
Early malfunctions can be prevented. Careful and regular cleaning can extend the amount of time you
can enjoy your new TV.
Caution: Be sure to turn the power off and unplug the power cord before you begin any cleaning.
Cleaning the Screen
Here’s a great way to keep the dust off your screen for a while. Wet a soft cloth in a mixture of
lukewarm water and a little fabric softener or dish washing detergent. Wring the cloth until it’s
almost dry, and then use it to wipe the screen.
Make sure the excess water is off the screen, and then let it air-dry before you turn on your TV.
Cleaning the Cabinet
ꔛ
To remove dirt or dust, wipe the cabinet with a soft, dry, lint-free cloth.
ꔛ
Please be sure not to use a wet cloth.
Extended Absence
2
1
!
?
!
?
CAUTION
► If you expect to leave your TV dormant for a long time (such as a vacation), it’s a good idea to
unplug the power cord to protect against possible damage from lightning or power surges.

33
OPEN SOURCE SOFTWARE NOTICE
The following GPL executables and LGPL, MPL libraries used in this product are subject to the GPL2.0/
LGPL2.1/MPL1.1 License Agreements:
GPL EXECUTABLES:
Linux kernel 2.6, busybox, e2fsprogs, gdbserver, jfsutils, mtd-utils, procps, u-boot, udhcpc
LGPL LIBRARIES:
directFB, glibc, gconv
MPL LIBRARIES:
Nanox
LG Electronics offers to provide source code to you on CD-ROM for a charge covering the cost of per-
forming such distribution, such as the cost of media, shipping and handling upon e-mail request to LG
Electronics at: opensource@lge.com
This offer is valid for a period of three (3) years from the date of the distribution of this product by LG
Electronics.
You can obtain a copy of the GPL, LGPL, MPL licenses on the CD-ROM provided with this product.
Also you can obtain the translation of GPL, LGPL licenses from
http://www.gnu.org/licenses/old-licenses/gpl-2.0-translations.html,
http://www.gnu.org/licenses/old-licenses/lgpl-2.1-translations.html.
This product includes other open source software
► expat:
- copyright © 1998, 1999, 2000 Thai Open Source Software Center Ltd and Clark Cooper
- copyright © 2001, 2002, 2003, 2004, 2005, 2006 Expat maintainers.
► freetype: copyright © 2003 The FreeType Project (www.freetype.org).
► ICU: copyright © 1995-2008 International Business Machines Corporation and others.
► libcurl: copyright © 1996 - 2008, Daniel Stenberg.
► libjpeg: This software is based in part on the work of the Independent JPEG Group copyright © 1991
– 1998, Thomas G. Lane.
► libmng: copyright © 2000-2007 Gerard Juyn, Glenn Randers-Pehrson
► libpng: copyright © 1998-2008 Glenn Randers-Pehrson
► md5: copyright © 1991-2, RSA Data Security, Inc
► md5 checksum : copyright © 1999, 2000, 2002 Aladdin Enterprises
► ncurses: copyright © 1998 Free Software Foundation, Inc.
► openSSL:
- cryptographic software written by Eric Young.
- software written by Tim Hudson.
- software developed by the OpenSSL Project for use in the OpenSSL Toolkit. (http://www.openssl.org)
►strace :
- copyright © 1991, 1992 Paul Kranenburg.
- copyright © 1993 Branko Lankester.
- copyright © 1993 Ulrich Pegelow.
- copyright © 1995, 1996 Michael Elizabeth Chastain.
- copyright © 1993, 1994, 1995, 1996 Rick Sladkey.
- copyright © 1998-2003 Wichert Akkerman.
- copyright © 2002-2008 Roland McGrath.
- copyright © 2003-2008 Dmitry V. Levin.
- copyright © 2007-2008 Jan Kratochvil.
► tinyxml: copyright © 2000-2006 Lee Thomason
► xyssl: copyright © 2009 Paul Bakker
► zlib: copyright © 1995-2005 Jean-loup Gailly and Mark Adler
All rights reserved.
Permission is hereby granted, free of charge, to any person obtaining a copy of this software and asso-
ciated documentation files (the "Software"), to deal in the Software without restriction, including without
limitation the rights to use, copy, modify, merge, publish, distribute, sublicense, and/or sell copies of the
Software, and to permit persons to whom the Software is furnished to do so, subject to the following
conditions:
THE SOFTWARE IS PROVIDED "AS IS", WITHOUT WARRANTY OF ANY KIND, EXPRESS OR IMPLIED,
INCLUDING BUT NOT LIMITED TO THE WARRANTIES OF MERCHANTABILITY, FITNESS FOR A
PARTICULAR PURPOSE AND NONINFRINGEMENT. IN NO EVENT SHALL THE AUTHORS OR
COPYRIGHT HOLDERS BE LIABLE FOR ANY CLAIM, DAMAGES OR OTHER LIABILITY, WHETHER IN
AN ACTION OF CONTRACT, TORT OR OTHERWISE, ARISING FROM, OUT OF OR IN CONNECTION
WITH THE SOFTWARE OR THE USE OR OTHER DEALINGS IN THE SOFTWARE.

APPENDIX
34
PRODUCT SPECIFICATIONS
Power requirement AC100-240 V ~ 50/60 Hz
Television System NTSC, PAL-M/N, SBTVD
Program Coverage VHF 2-13, UHF 14-69, CATV 1-135
External Antenna Impedance 75 Ω
Environment
condition
Operating Temperature 32 ~ 104 °F (0 ~ 40 °C)
Operating Humidity Less than 80 %
Storage Temperature -4 ~ 140 °F (-20 ~ 60 °C)
Storage Humidity Less than 85 %
ꔛ
The specifications shown above may be changed without prior notice for quality improvement.
MODELS
42PJ230 (42PJ230-SB)
42PJ250 (42PJ250-SA)
42PJ350 (42PJ350-SA)
50PJ230 (50PJ230-SB)
50PJ250 (50PJ250-SA)
50PJ350 (50PJ350-SA)
Dimensions
(Width x
Height
x Depth)
With stand
988.0 mm x 678.7 mm x 260.0 mm
(38.8 inch x 26.7 inch x 10.2 inch)
1171.4 mm x 781.8 mm x 309.7 mm
(46.1 inch x 30.7 inch x 12.1 inch)
Without stand
988.0 mm x 617.8 mm x 55.3 mm
(38.8 inch x 24.3 inch x 2.1 inch)
1171.4 mm x 720.9 mm x 55.3 mm
(46.1 inch x 28.3 inch x 12.1 inch)
Weight With stand
21.6 kg (47.6 lbs) 30.0 kg (66.1 lbs)
Without stand
20.0 kg (44.0 lbs) 27.6 kg (60.8 lbs)
Current Value
2.5 A 3.5 A

35
Power requirement AC100-240 V ~ 50/60 Hz
Television System NTSC, PAL-M/N, SBTVD
Program Coverage VHF 2-13, UHF 14-69, CATV 1-135
External Antenna Impedance 75 Ω
Environment
condition
Operating Temperature 32 ~ 104°F (0 ~ 40°C)
Operating Humidity Less than 80 %
Storage Temperature -4 ~ 140°F (-20 ~ 60°C)
Storage Humidity Less than 85 %
ꔛ
The specifications shown above may be changed without prior notice for quality improvement.
MODELS
42LD460 (42LD460-SA)
42LD465 (42LD465-SA)
42LD461C (42LD461C-SA)
42LD460H (42LD460H-SA)
42LD460B (42LD460B-SA)
47LD460 (47LD460-SA)
47LD465 (47LD465-SA)
Dimensions
(Width x
Height
x Depth)
With stand
1023.0 mm x 685.0 mm x 261.0 mm
(40.2 inch x 26.9 inch x 10.2 inch)
1136.0 mm x 757.0 mm x 270.0 mm
(44.7 inch x 29.8 inch x 10.6 inch)
Without stand
1023.0 mm x 644.0 mm x 76.6 mm
(40.2 inch x 25.3 inch x 3.0 inch)
1136.0 mm x 706.0 mm x 76.5 mm
(44.7 inch x 27.7 inch x 3.0 inch)
Weight With stand
15.4 kg (33.9 lbs) 19.6 kg (43.2 lbs)
Without stand
13.7 kg (30.2 lbs) 17.6 kg (38.8 lbs)
MODELS 26LD350 (26LD350-SB) 32LD350 (32LD350-SB)
Dimensions
(Width x
Height
x Depth)
With stand
663.0 mm x 484.0 mm x 206.8 mm
(26.1 inch x 19.0 inch x 8.1 inch)
800.0 mm x 565.0 mm x 206.8 mm
(31.4 inch x 22.2 inch x 8.1 inch)
Without stand
663.0 mm x 423.0 mm x 79.9 mm
(26.1 inch x 16.6 inch x 3.1 inch)
800.0 mm x 509.0 mm x 73.8 mm
(31.4 inch x 20.0 inch x 2.9 inch)
Weight With stand
7.3 kg (16.0 lbs) 9.2 kg (20.2 lbs)
Without stand
6.2 kg (13.6 lbs) 8.2 kg (18.0 lbs)
Current Value 1.0 A 1.2 A
MODELS
32LD460 (32LD460-SA)
32LD465 (32LD465-SA)
32LD460H (32LD460H-SA)
37LD460 (37LD460-SA)
37LD465 (37LD465-SA)
37LD461C (37LD461C-SA)
Dimensions
(Width x
Height
x Depth)
With stand
799.0 mm x 555.0 mm x 207.0 mm
(31.4 inch x 21.8 inch x 8.1 inch)
916.0 mm x 625.0 mm x 261.0 mm
(36.0 inch x 24.6 inch x 10.2 inch)
Without stand
799.0 mm x 516.0 mm x 73.5 mm
(31.4 inch x 20.3 inch x 2.8 inch)
916.0 mm x 584.0 mm x 77.4 mm
(36.0 inch x 22.9 inch x 3.0 inch)
Weight With stand
9.6 kg (21.1 lbs) 12.9 kg (28.4 lbs)
Without stand
8.6 kg (18.9 lbs) 11.2 kg (24.6 lbs)
Current Value
1.2 A 1.6 A
Current Value
1.9 A 2.6 A
MODELS 32LD460B (32LD460B-SA)
Dimensions
(Width x
Height
x Depth)
With stand
799.0 mm x 555.0 mm x 207.0 mm
(31.4 inch x 21.8 inch x 8.1 inch)
Without stand
799.0 mm x 516.0 mm x 73.5 mm
(31.4 inch x 20.3 inch x 2.8 inch)
Weight With stand
9.6 kg (21.1 lbs)
Without stand
8.6 kg (18.9 lbs)
Current Value 1.3 A

APPENDIX
36
MODELS 22LE5300 (22LE5300-SA) 26LE5300 (26LE5300-SA)
Dimensions
(Width x
Height
x Depth)
With stand
542.9 mm x 407.1 mm x 155.4 mm
(21.4 inch x 16.0 inch x 6.1 inch)
652.0 mm x 480.8 mm x 191.4 mm
(25.7 inch x 18.9 inch x 7.5 inch)
Without stand
542.9 mm x 357.6 mm x 34.4 mm
(21.4 inch x 14.1 inch x 1.4 inch)
652.0 mm x 420.3 mm x 34.4 mm
(25.7 inch x 16.5 inch x 1.4 inch)
Weight With stand
4.2 kg (9.3 lbs) 6.1 kg (13.4 lbs)
Without stand
3.9 kg (8.6 lbs) 5.1 kg (11.2 lbs)
MODELS 22LE6500 (22LE6500-SA) 26LE6500 (26LE6500-SA)
Dimensions
(Width x
Height
x Depth)
With stand
533.0 mm x 400.0 mm x 187.0 mm
(20.9 inch x 15.7 inch x 7.3 inch)
650.0 mm x 469.0 mm x 187.0 mm
(25.5 inch x 18.4 inch x 7.3 inch)
Without stand
533.0 mm x 349.0 mm x 39.9 mm
(20.9 inch x 13.7 inch x 1.5 inch)
650.0 mm x 418.0 mm x 39.9 mm
(25.5 inch x 16.4 inch x 1.5 inch)
Weight With stand
3.4 kg (7.4 lbs) 4.9 kg (10.8 lbs)
Without stand
3.1 kg (6.8 lbs) 4.6 kg (10.1 lbs)
ꔛ
The specifications shown above may be changed without prior notice for quality improvement.
Power Requirement 22LE5300: 24 V , 1.7 A
22LE6500: 24 V , 1.7 A
26LE5300: 24 V , 1.8 A
26LE6500: 24 V , 2.1 A
Adapter (DC Power) In: AC100-240 V ~ 50/60 Hz
Out: DC 24 V, 3.42 A
Television System NTSC, PAL-M/N, SBTVD
Program Coverage VHF 2-13, UHF 14-69, CATV 1-135
External Antenna Impedance 75 Ω
Environment
condition
Operating Temperature 32 ~ 104°F (0 ~ 40°C)
Operating Humidity Less than 80 %
Storage Temperature -4 ~ 140°F (-20 ~ 60°C)
Storage Humidity Less than 85 %

37
ꔛ
The specifications shown above may be changed without prior notice for quality improvement.
Power requirement AC100-240 V ~ 50/60 Hz
Television System NTSC, PAL-M/N, SBTVD
Program Coverage VHF 2-13, UHF 14-69, CATV 1-135
External Antenna Impedance 75 Ω
Environment
condition
Operating Temperature 32 ~ 104°F (0 ~ 40°C)
Operating Humidity Less than 80 %
Storage Temperature -4 ~ 140°F (-20 ~ 60°C)
Storage Humidity Less than 85 %
MODELS 32LE5300 (32LE5300-SA) 37LE5300 (37LE5300-SA)
Dimensions
(Width x
Height
x Depth)
With stand
784.6 mm x 558.1 mm x 221.0 mm
(30.8 inch x 21.9 inch x 8.7 inch)
905.0 mm x 630.0 mm x 270.0 mm
(35.6 inch x 24.8 inch x 10.6 inch)
Without stand
784.6 mm x 499.5 mm x 39.9 mm
(30.8 inch x 19.6 inch x 1.5 inch)
905.0 mm x 568.0 mm x 39.9 mm
(35.6 inch x 22.3 inch x 1.5 inch)
Weight With stand
12.4 kg (27.3 lbs)
15.3 kg (33.7 lbs)
Without stand
10.5 kg (23.1 lbs)
12.8 kg (28.2 lbs)
MODELS 42LE5300 (42LE5300-SA) 47LE5300 (47LE5300-SA)
Dimensions
(Width x
Height
x Depth)
With stand
1016.0 mm x 692.0 mm x 270.0 mm
(40.0 inch x 27.2 inch x 10.6 inch)
1126.6 mm x 757.9 mm x 284.4 mm
(44.3 inch x 29.8 inch x 11.1 inch)
Without stand
1016.0 mm x 630.0 mm x 29.3 mm
(40.0 inch x 24.8 inch x 1.1 inch)
1126.6 mm x 692.0 mm x 29.3 mm
(44.3 inch x 27.2 inch x 1.1 inch)
Weight With stand
19.2 kg (42.3 lbs)
22.6 kg (49.8 lbs)
Without stand
16.7 kg (36.8 lbs)
19.6 kg (43.2 lbs)
MODELS 55LE5300 (55LE5300-SA)
Dimensions
(Width x
Height
x Depth)
With stand
1306.0 mm x 867.0 mm x 345.0 mm
(51.4 inch x 34.1 inch x 13.5 inch)
Without stand
1306.0 mm x 797.0 mm x 30.7 mm
(51.4 inch x 31.3inch x 1.2 inch)
Weight With stand
34.0 kg (74.9 lbs)
Without stand
28.8 kg (63.4 lbs)
Current Value
1.3 A 1.4 A
Current Value
1.5 A 1.7 A
Current Value 2.0 A

APPENDIX
38
ꔛ
The specifications shown above may be changed without prior notice for quality improvement.
Power requirement AC100-240 V ~ 50/60 Hz
Television System NTSC, PAL-M/N, SBTVD
Program Coverage VHF 2-13, UHF 14-69, CATV 1-135
External Antenna Impedance 75 Ω
Environment
condition
Operating Temperature 32 ~ 104°F (0 ~ 40°C)
Operating Humidity Less than 80 %
Storage Temperature -4 ~ 140°F (-20 ~ 60°C)
Storage Humidity Less than 85 %
MODELS
32LD420 (32LD420-SA)
32LD420C (32LD420C-SA)
42LD420 (42LD420-SA)
42LD420C (42LD420C-SA)
Dimensions
(Width x
Height
x Depth)
With stand
805.0 mm x 583.0 mm x 224.0 mm
(31.6 inch x 22.9 inch x 8.8 inch)
1028.0 mm x 715.4 mm x 297.0 mm
(40.4 inch x 28.1 inch x 11.6 inch)
Without stand
805.0 mm x 531.0 mm x 79.9 mm
(31.6 inch x 20.9 inch x 3.1 inch)
1028.0 mm x 658.6 mm x 87.8 mm
(40.4 inch x 25.9 inch x 3.4 inch)
Weight With stand
10.8 kg (23.8 lbs) 17.3 kg (38.1 lbs)
Without stand
9.7 kg (21.3 lbs) 15.5 kg (34.1 lbs)
Current Value
1.4 A 1.9 A
MODELS 32LE4600 (32LE4600-SA) 42LE4600 (42LE4600-SA)
Dimensions
(Width x
Height
x Depth)
With stand
786.0 mm x 562.0 mm x 272.0 mm
(30.9 inch x 22.1 inch x 10.7 inch)
1018.0 mm x 696.0 mm x 318.0 mm
(40.0 inch x 27.4 inch x 12.5 inch)
Without stand
786.0 mm x 500.0 mm x 39.9 mm
(30.9 inch x 19.6 inch x 1.5 inch)
1018.0 mm x 627.0 mm x 29.8 mm
(40.0 inch x 24.6 inch x 1.1 inch)
Weight With stand
14.5 kg (31.9 lbs)
21.9 kg (48.2 lbs)
Without stand
10.6 kg (23.3 lbs)
17.2 kg (37.9 lbs)
Current Value
1.3 A 1.5 A
MODELS 47LE4600 (47LE4600-SA) 55LE4600 (55LE4600-SA)
Dimensions
(Width x
Height
x Depth)
With stand
1128.0 mm x 759.0 mm x 318.0 mm
(44.4 inch x 29.8 inch x 12.5 inch)
1311.0 mm x 866.0 mm x 330.0 mm
(51.6 inch x 34.0 inch x 12.9 inch)
Without stand
1128.0 mm x 693.0 mm x 29.8 mm
(44.4 inch x 27.2 inch x 1.1 inch)
1311.0 mm x 798.0 mm x 31.4 mm
(51.6 inch x 31.4 inch x 1.2 inch)
Weight With stand
24.9 kg (54.8 lbs)
36.6 kg (80.6 lbs)
Without stand
20.3 kg (44.7 lbs)
30.3 kg (66.7 lbs)
Current Value
1.7 A 2.0 A
MODELS 32LE4300 (32LE4300-SA) 42LE4300 (42LE4300-SA)
Dimensions
(Width x
Height
x Depth)
With stand
786.0 mm x 559.0 mm x 221.0 mm
(30.9 inch x 22.0 inch x 8.7 inch)
1018.0 mm x 692.0 mm x 270.0 mm
(40.0 inch x 27.2 inch x 10.6 inch)
Without stand
786.0 mm x 500.0 mm x 39.9 mm
(30.9 inch x 19.6 inch x 1.5 inch)
1018.0 mm x 627.0 mm x 29.8 mm
(40.0 inch x 24.6 inch x 1.17 inch)
Weight With stand
12.4 kg (27.3 lbs)
19.7 kg (43.4 lbs)
Without stand
10.6 kg (23.3 lbs)
17.2 kg (37.9 lbs)
Current Value
1.3 A 1.5 A

39

OWNER’S MANUAL
LED LCD TV / LCD TV
PLASMA TV
Please read this manual carefully before operating
your set and retain it for future reference.
The model and serial number of the TV is located
on the back and one side of the TV.
Record it below should you ever need service.
MODEL
SERIAL
The extended owner’s manuals that contain informa-
tion on the advanced features of this LG TV are
located on the CD-ROM provided in an electronic
version.
To read these files, you will need to use the personal
computer (PC) equipped with a CD-ROM drive.
P/NO : MFL59166647 (1111-REV03)
www.lg.com
LED LCD TV MODELS
22LE5300
26LE5300
32LE5300
37LE5300
42LE5300
47LE5300
55LE5300
LCD TV MODELS
26LD350
32LD350
32LD460
37LD460
42LD460
47LD460
37LD461C
42LD461C
22LE6500
26LE6500
32LE4600
42LE4600
47LE4600
55LE4600
32LE4300
42LE4300
32LD420C
42LD420C
32LD460H
42LD460H
32LD460B
42LD460B
32LD465
37LD465
42LD465
47LD465
32LD420
42LD420
PLASMA TV MODELS
42PJ230
50PJ230
42PJ250
50PJ250
42PJ350
50PJ350

MANUAL DE USUARIO
TELEVISOR LCD CON LED
/ LCD / PLASMA
Lea atentamente este manual antes de poner en marcha su equipo y
guárdelo para futuras consultas.
El número de modelo y serie del televisor se
encuentra en la parte posterior y en un lateral del
televisor respectivamente.
Anótelo a continuación para tenerlo disponible en
caso de necesitar asistencia.
MODELO
SERIE
El manual de usuario que contiene informacion de
las funciones avanzadas de esta Television LG se
encuentra ubicado en el CD-ROM proveido en una
version electronica.
Para leer los archivos, usted necesita una computa-
dora personal (PC) equipada con un dispositivo para
leer CD.
www.lg.com
TELEVISOR LCD CON LED
22LE5300
26LE5300
32LE5300
37LE5300
42LE5300
47LE5300
55LE5300
TELEVISOR LCD
26LD350
32LD350
32LD460
37LD460
42LD460
47LD460
37LD461C
42LD461C
22LE6500
26LE6500
32LE4600
42LE4600
47LE4600
55LE4600
32LE4300
42LE4300
32LD420C
42LD420C
32LD460H
42LD460H
32LD460B
42LD460B
32LD465
37LD465
42LD465
47LD465
32LD420
42LD420
TELEVISOR PLASMA
42PJ230
50PJ230
42PJ250
50PJ250
42PJ350
50PJ350

2
ADVERTENCIA / PRECAUCIÓN
El símbolo de descarga dentro del trian-
gulo equilátero, señala al usuario la
presencia de voltaje peligroso sin aisla-
miento en el interior del aparato de tal
intensidad que podría presentar riesgo de des-
carga eléctrica.
El símbolo de admiración dentro del
triangulo equilátero, indica al usuario
que el manual que acompaña a este
aparato contiene instrucciones referentes a su
funcionamiento y mantenimiento.
PARA REDUCIR EL RIESGO DE DESCARGA
ELECTRICA NO RETIRE LA CUBIERTA NI LA
PARTE POSTERIOR DE ESTE APARATO.
ADVERTENCIA / PRECAUCION
RIESGO DE CHOQUE ELECTRICO
NO ABRIR

3
ADVERTENCIA
INSTRUCCIONES DE SEGURIDAD IMPORTANTES
Lea estas instrucciones.
Guarde estas instrucciones..
Tenga en cuenta todas las advertencias.
Siga todas las instrucciones.
1
No utilice este producto
cerca del agua.
2
Límpielo sólo con un paño
seco.
3
No bloquee las aberturas de
ventilación. Instale siguiendo
las instrucciones del fabri-
cante.
4
No lo coloque cerca de fuen-
tes de calor, como radiad-
ores, rejillas de aire caliente,
estufas u otros aparatos
(incluidos los amplificadores)
que emitan calor.
5
Proteja el cable de aliment-
ación para que no lo pisen ni
aplasten, especialmente en
las clavijas, las tomas y el
punto de salida del aparato.
6
Utilice únicamente acopla-
mientos y accesorios espe-
cificados por el fabricante.
7
Utilícelo sólo con el estante
fijo o con ruedas, trípode,
soporte o mesa especifica-
dos por el fabricante o con el
accesorio suministrado con
el aparato. Si utiliza un carri-
to, tenga cuidado al moverlo
junto con el aparato para evi-
tar lesiones en caso de que
éste se caiga.
8
Desenchufe este producto en
caso de no utilizarlo durante un
largo periodo de tiempo.
Desenchufe este equipo
durante tormentas con
aparato eléctrico o si no
piensa usarlo durante largos
períodos de tiempo.
9
Sólo el personal calificado puede encar-
garse del servicio técnico. La asistencia téc-
nica es necesaria si el aparato presenta
algún daño, como por ejemplo, si el cable o
la clavija de alimentación están dañados, si
se derrama líquido o se introducen objetos
dentro del aparato, si el aparato ha estado
expuesto a la lluvia o humedad, si no opera
correctamente o si se ha caído.
10
No toque el aparato o la antena durante
una tormenta eléctrica.
11
Cuando monte el televisor en la pared,
asegúrese de no colgar el televisor en
cables eléctricos y de señal de la parte
trasera.
12
No golpee el producto ni permita que le
caigan objetos encima ni en la pantalla.
13
PRECAUCIÓN en cuanto al cable de ali-
mentación: Se recomienda colocar la may-
oría de los aparatos en un circuito dedica-
do. Es decir, un circuito de salida única que
alimenta sólo a ese aparato y que no tiene
tomas o circuitos adicionales.
Compruebe la página de especificaciones de
este manual del propietario para estar seguro.
No conecte demasiados electrodomésticos
a la misma toma de pared de corriente
alterna ya que hacerlo podría suponer ries-
go de incendio o choque eléctrico.
No sobrecargue las tomas de pared. Las
tomas de pared sobrecargadas, sueltas o
dañadas, los alargadores, los cables de ali-
mentación deshilachados o el aislante agri-
etado de los cables podrían resultar peligro-
sos. Cualquiera de estas condiciones podría
provocar un incendio o una descarga eléc-
trica. Examine periódicamente el cable de
su aparato y si parece dañado o deteriorado,
desenchúfelo, deje de usarlo y solicite al
centro de servicio técnico autorizado que lo
sustituyan por un nuevo equivalente. Proteja
el cable de alimentación de daños físicos o
mecánicos y evite doblarlo, aplastarlo, pelliz-
carlo o pisarlo con una puerta o caminar
sobre él. Ponga especial atención en los
enchufes, tomas de pared y el punto por
donde el cable sale del aparato.
No utilice cables de alimentación dañados
o mal conectados. No tire del cable de ali-
mentación para desenchufar la TV.
Asegúrese de desenchufar el cable de ali-
mentación sujetando el enchufe.

4
ADVERTENCIA
14
ADVERTENCIA - A fin de reducir
el riesgo de incendio o choque
eléctrico, no exponga este
aparato a la lluvia, humedad u
otros líquidos. No toque la TV
con las manos mojadas. No
instale este producto cerca de
objetos inflamables como gaso-
lina o velas, ni exponga la TV al
flujo directo de aparatos de aire
acondicionado.
15
No exponga este aparato a
goteos o salpicaduras, ni colo-
que sobre él objetos que con-
tengan líquidos, como floreros,
tazas, etc. (por ejemplo en
estantes sobre la unidad).
16
TOMA A TIERRA
Asegúrese de conectar el cable de toma a
tierra para evitar posibles descargas eléctricas.(
es decir, que una TV con un enchufe de tres
polos, debe conectarse a una toma de pared
con tres polos). Si no es posible la puesta a
tierra, contacte con un electricista calificado
para que instale un interruptor automático
independiente.
No intente conectar la unidad a tierra mediante
cables telefónicos, pararrayos o tuberías de gas.
Alimentación
Interruptor
diferencial
17
DESCONECTAR EL DISPOSITIVO DE LA RED
Este dispositivo se desconecta desenchufán-
dolo del cable de red. El enchufe debe contar
con un acceso sin obstáculos.
18
Mientras esta unidad esté conectada a un
tomacorriente de CA se desconectará de
dicha fuente aunque apague la unidad medi-
ante el INTERRUPTOR DE PRENDIDO.
19
Limpieza
Antes de iniciar labores de limpieza, desen-
chufe el cable de alimentación y limpie cui-
dadosamente la unidad con un paño suave
para evitar arañazos superficiales. No rocíe
directamente agua vaporizada u otros líqui-
dos sobre la TV para evitar posibles choques
eléctricos. No limpie la unidad con productos
químicos como alcoholes, disolventes o ben-
ceno..
20
Transporte
Asegúrese de que el producto esté apagado,
desenchufado y que todos los cables hayan
sido desconectados. Harán falta dos o más
personas para transportar TVs de gran tamaño.
No someta el panel frontal de la TV a pre-
siones o esfuerzos excesivos.
21
Ventilación
Instale su TV en un lugar que disponga de
ventilación apropiada. No la instale en espa-
cios cerrados como, por ejemplo, una
estantería. No cubra el producto con paños
u otros materiales, como plásticos, mientras
esté enchufada. No instale la unidad en
lugares con exceso de polvo.
22
Tener cuidado de no tocar las aberturas de
ventilación. Al ver la televisión durante un
largo período, las aberturas de ventilación
pueden calentarse.
23
Si huele humo u otros olores que provienen
de la TV, desconecte el cable de alimentación
y comuníquese con un centro de servicio
autorizado.
24
No presione en exceso el panel
con sus manos u objetos afila-
dos, como tornillos, lápices o
bolígrafos, y evite rayarlo.
25
Mantenga el producto lejos de la luz directa
del sol.
26
Defecto de puntos
El plasma o panel LCD es un producto de
alta tecnología con resolución de dos a seis
millones de píxeles. En muy pocos casos,
podría ver puntos minúsculos en la pantalla
mientras mira la TV. Esos puntos son píxeles
desactivados y no afectan el rendimiento ni
la confiabilidad de la TV.
27
Sonido generado
Ruido de "chasquidos": se genera un ruido
de chasquidos que ocurre al mirar o apagar
la TV por la deformación térmica plástica,
debido a la temperatura o la humedad. Este
ruido es común en productos donde se
requiere la deformación térmica.
Zumbido en el circuito eléctrico o en el
panel: se genera un ruido microscópico en
el circuito de conmutación a alta velocidad
que suministra una gran cantidad de corri-
ente para hacer funcionar un producto.
Varía según el producto.
Este sonido que se genera no afecta el ren-
dimiento ni la confiabilidad del producto.

5
28
Para la Televisor LCD con LED/ Televisor LCD
Si siente la TV fría al tocar, puede que haya un
pequeño “flicker” cuando se ha encendido.
Esto es normal, no hay nada malo con la TV.
Unos pocos defectos de puntos pueden ser
visibles en la pantalla, apareciendo en un color
rojo, verde o azul. Pero ellos no tienen ningún
efecto equivocado para la función del monitor.
Evitese a tocar la pantalla LCD o agarrarla con
su(s) dedo(s) por un periodo largo de tiempo.
Si lo hace, eso puede provocar una distorción
temporal en la pantalla.
DISPOSICIÓN
(Sólo lámpara de Hg utilizada en TV LCD)
Lámpara fluorescente usada en este producto
contiene una cantidad mínima de mercurio.
No disponga este producto con basura normal
de la casa. Disposición de este producto debe
ser manejado de acuerdo a la autoridad local
de su provincia.

6
CONTENIDO
ADVERTENCIA / PRECAUCIÓN
. . . . . . 2
ADVERTENCIA
. . . . . . . . . . . . . . . . . . . . . . . . . . . . . . . . . . . . . . 3
PREPARACIÓN
Accesorios. . . . . . . . . . . . . . . . . . . . . . . . . . . . . . . . . . . . . . . . . . . . . . . . . . 7
Instrucciones
. . . . . . . . . . . . . . . . . . . . . . . . . . . . . . . . . . . . . . . . . . . . 10
Montaje para la pared VESA
. . . . . . . . . . . . . . . . . . . . . 18
Organizador de cables
. . . . . . . . . . . . . . . . . . . . . . . . . . . . . 20
Instalación de un pedestal de escritorio
. . . . . 24
Soporte del eslabon giratorio
. . . . . . . . . . . . . . . . . . . . 24
Unión del televisor a un escritorio
. . . . . . . . . . . . . . 25
Sistema de seguridad Kensington
. . . . . . . . . . . . . 25
VER LA TV
Conectando el Televisor . . . . . . . . . . . . . . . . . . . . . . . . . . . . 26
Encendido del TV
. . . . . . . . . . . . . . . . . . . . . . . . . . . . . . . . . . . . . 27
Configuracion Inicial
. . . . . . . . . . . . . . . . . . . . . . . . . . . . . . . . 27
Selección y ajuste del menú pantalla
. . . . . . . . 28
APÉNDICE
Lista de verificación de problemas . . . . . . . . . . . . 29
Mantenimiento
. . . . . . . . . . . . . . . . . . . . . . . . . . . . . . . . . . . . . . . . . 32
Aviso sobre software de código abierto
. . . . . 33
Especificaciones del producto
. . . . . . . . . . . . . . . . . . 34
COMO USAR EL MANUAL DE USUARIO EN EL CD-ROM
Para ver el manual de usuario en el CD-ROM, Adobe Acrobat Reader debe ser instalado en su PC
La carpeta “ACRORD" en el CD-ROM contiene los programas de instalacion.
Si uested quiere instalar estos programas, abra “My Computer”
➜ abra “LG”➜ abra “ACRORD”➜ doble click en
tu lenguaje.
PARA vER EL MANUAL DE USUARIO EN EL CD-ROM
El archivo del manual de usuario esta incluido en el CD-ROM.
Inserte el CD-ROM dentro del lector de CD de su PC.
Despues de un tiempo, la pagina Web del CD-ROM sera abierta automaticamente. (Solo para Window)
►Si la pagina Web no aparece automaticamente, abra el archivo de manual de usuario
directamente.
Abra “My computer”
➜ abra “LG”➜ abra el archivo“index.htm” .
!
?
!
?
NOTA
Al seleccionar,
el archivo PDF se desplegara.
➜ ➜
Usted puede encontrar
el contenido deseado
usando la opcion de
bookmark.

7
PREPARACIÓN
ACCESORIOS
Asegurese de que los siguientes accesorios estén incluidos con su TV. Si algún accesorio no está inclu-
ido, favor de contactar al distribuidor del producto en el lugar donde realizó la compra.
Los accesorios que se incluyen pueden ser diferentes a los de las imágenes a continuación.
26/32LD350, 32/37/42/47LD460, 37/42LD461C, 32/37/42/47LD465, 32/42LD460H, 32/42LD460B
para la base ensamblada
(
Refiérase a la
P.11)
Tornillos para fijación
vertical
(
Refiérase a la
P.25)
Cubierta de protección
(
Refiérase a la
P.11)
x 8
(M4 x 20)
Televisor Plasma
(Excepto 47LD460,
47LD465)
Cubierta de protección
(Refiérase a la P.10)
Sujetacables
(
Refiérase a la
P.20)
x 2
x 3 x 4
para la base ensamblada
(
Refiérase a la
P.10)
(M5 x 14) (M4 x 28)
Cable de Alimentación
Cable de Alimentación
1.5V 1.5V
1,5Vcc 1,5Vcc
1.5V 1.5V
1,5Vcc 1,5Vcc
Opciones Extras (Adicionales)
* Solo limpie las manchas exteriores con un
paño.
* No limpie con demasiada fuerza para
intentar quitar las manchas. Tenga cuida-
do, ya que si limpia con demasiada fuerza
podría rayar o decolorar la superficie.
Paño de limpieza
No incluido en todos los modelos
1.5V 1.5V
1,5Vcc 1,5Vcc
Cable D-sub de 15
terminales
Cuando utilice la conexión VGA
(cable D-sub de 15 pins) para la
PC, el usuario debe usar cables de
interfaz de señal recubiertos
(cable D-sub de 15 clavijas) con
núcleos de ferrita para mantener
el cumplimiento estándar del pro-
ducto.
32/42LD420, 32/42LD420C
Cubierta de protección
(
Refiérase a la
P.12)
Cable de Alimentación
(M4 x 24)
para la base ensamblada
(
Refiérase a la
P.12)
Tornillos para fijación
vertical
(
Refiérase a la
P.25)
x 4
1.5V 1.5V
1,5Vcc 1,5Vcc
1.5V 1.5V
1,5Vcc 1,5Vcc
1.5V 1.5V
1,5Vcc 1,5Vcc
ENERGY
CHVOL
1 2
3
4 5 6
7 8
0
9
SAVING
TV
AV MODE
INPUT
FAV
RATIO
MUTE
MARK
Q.VIEW
LIST
FREEZE
P
A
G
E
ENTER
MENU
GUIDE
Q.MENU
INFO
BACK
EXIT
Manual de
Usuario
Control Remoto,
Baterías (AAA)
Manual en CD
Manual y el software del
Editor de TV EzSign
Adaptor RF (Algunos modelos)
Debe conectarlo al cable de antena
tras la fijación en la entrada de
antena. Este adaptador es suminis-
trado únicamente en Argentina.
(Para 32/42LD460B)

PREPARACIÓN
8
22/26LE5300
Sujetador de cables
(Refiérase a la
P.23)
para la base ensamblada
(Refiérase a la P.13, 15)
x 4
(M4 x 20)
x 4
(M4 x 14)
Adaptador AC/DC
Separadores de
anillo
(Refiérase a la
P.19)
(Para 26LE5300)
x 4
Cable de
Alimentación
1.5V 1.5V
1,5Vcc 1,5Vcc
(Para 26LE5300)
32/37/42/47/55LE5300, 32/42/47/55LE4600, 32/42LE4300
Sujetacables
(Refiérase a la
P.23)
Cable genero
Componente, cable
genero AV
x 2
Tornillos para fijación
vertical
(
Refiérase a la
P.25)
(Para 32LE5300,
32/42/47/55LE4600,
32LE4300)
para la base ensamblada
(Refiérase a la P.15)
x 4
(M4 x 16)
x 4
(M4 x 22)
(32LE5300,
32/42/47/55LE4600,
32LE4300)
x 4
(M4 x 26)
(47/55LE5300)
x 4
(M4 x 24)
(37/42LE5300,
42LE4300)
x 2
x 2
PEM nut del Woofer
(Refiérase a la P.17)
Tornillo para fijar el
Woofer (Refiérase a la
P.17)
22/26LE6500
Sujetador de cables
(Refiérase a la
P.22)
Adaptador AC/DC
Cable de
Alimentación
1.5V 1.5V
1,5Vcc 1,5Vcc
para la base ensamblada
(Refiérase a la P.14)
x 2
(M4 x 16)
(32/42/47/55LE4600)

9
OPCIONES ADICIONALES (
Para
32/37/42/47/55LE5300, 32/42LE4300)
Las opciones adicionales pueden cambiarse o modificarse para mejorar la calidad sin ninguna notifi-
cación. Póngase en contacto con su distribuidor para comprar estos elementos. Este dispositivo sólo
es compatible con LG LED LCD TV, LCD TV o Plasma TV.
Caja multimedia inalámbrica
(AN-WL100W)

PREPARACIÓN
10
INSTRUCCIONES
(Para Televisor Plasma)
ꔛ
La imagen puede ser diferente a la de su televisor.
INSTALACIÓN
1
Coloque con cuidado la pantalla de la TV
sobre una superficie acolchada que la pro-
teja de posibles daños.
2
Monte las piezas del SOPORTE DEL
CONJUNTO con la BASE DEL SOPORTE
del televisor.
3
Monte la TV como se ilustra.
4
Coloque los 4 tornillos en los orificios
mostrados.
BASE DEL SOPORTE
SOPORTE DEL CONJUNTO
M5 x 14
M4 x 28
!
?
!
?
NOTA
► Al realizar un montaje de sobremesa,
compruebe que los tornillos estén apreta-
dos correctamente. (De no ser así, el pro-
ducto podría inclinarse hacia delante tras
su instalación). Si, por el contrario, apretara
los tornillos en exceso, podría deformarse
por abrasión en el área de apriete del
mismo. No sobreapriete los tornillos.
SEPARACIÓN
CUBIERTA DE PROTECCIÓN
Tras extraer el soporte, instale la CUBIERTA DE
PROTECCIÓN incluida sobre el hueco dejado
por este.
Inserte la CUBIERTA DE PROTECCIÓN en el
televisor hasta que escuche un sonido de chas-
quido.
Al instalar la unidad en un soporte de pared, uti-
lice la cubierta de protección.
1
Coloque con cuidado la pantalla de la TV
sobre una superficie acolchada que la pro-
teja de posibles daños.
2
Retire los tornillos que sujetan la base.
3
Separar el soporte del televisor.
Proteccion de cobertura
Fije una guía al exterior.

11
INSTRUCCIONES
(Para 26/32LD350, 32/37/42/47LD460, 37/42LD461C, 32/37/42/47LD465, 32/42LD460H, 32/42LD460B)
ꔛ
La imagen puede ser diferente a la de su televisor.
1
Coloque con cuidado la pantalla de la TV
sobre una superficie acolchada que la pro-
teja de posibles daños.
2
Monte las piezas del SOPORTE DEL
CONJUNTO con la BASE DEL SOPORTE
del televisor.
3
Monte la TV como se ilustra.
4
Coloque los 4 tornillos en los orificios
mostrados.
M4X20
M4X20
INSTALACIÓN
BASE DEL SOPORTE
M4X20
M4X20
SOPORTE DEL
CONJUNTO
M4 x 20
M4X20
M4 x 20
!
?
!
?
NOTA
► Al realizar un montaje de sobremesa,
compruebe que los tornillos estén apreta-
dos correctamente. (De no ser así, el pro-
ducto podría inclinarse hacia delante tras
su instalación). Si, por el contrario, apretara
los tornillos en exceso, podría deformarse
por abrasión en el área de apriete del
mismo. No sobreapriete los tornillos.
SEPARACIÓN
CUBIERTA DE PROTECCIÓN
Tras extraer el soporte, instale la CUBIERTA
DE PROTECCIÓN incluida sobre el hueco
dejado por este.
Inserte la CUBIERTA DE PROTECCIÓN en el
televisor hasta que escuche un sonido de chas-
quido.
Al instalar la unidad en un soporte de pared,
utilice la cubierta de protección.
1
Coloque con cuidado la pantalla de la TV
sobre una superficie acolchada que la
proteja de posibles daños.
2
Retire los tornillos que sujetan la base.
3
Separar el soporte del televisor.

PREPARACIÓN
12
INSTRUCCIONES
(Para
32/42LD420, 32/42LD420C
)
ꔛ
La imagen puede ser diferente a la de su televisor.
1
Coloque con cuidado la pantalla de la TV
sobre una superficie acolchada que la
proteja de posibles daños.
2
Monte la TV como se ilustra.
3
Coloque los 4 tornillos en los orificios
mostrados.
INSTALACIÓN
!
?
!
?
NOTA
► Al realizar un montaje de sobremesa,
compruebe que los tornillos estén apreta-
dos correctamente. (De no ser así, el pro-
ducto podría inclinarse hacia delante tras
su instalación). Si, por el contrario, apretara
los tornillos en exceso, podría deformarse
por abrasión en el área de apriete del
mismo. No sobreapriete los tornillos.
M4 x 24
SEPARACIÓN
CUBIERTA DE PROTECCIÓN
Tras extraer el soporte, instale la CUBIERTA DE
PROTECCIÓN incluida sobre el hueco dejado
por este.
Inserte la CUBIERTA DE PROTECCIÓN en el
televisor hasta que escuche un sonido de chas-
quido.
Al instalar la unidad en un soporte de pared, uti-
lice la cubierta de protección.
1
Coloque con cuidado la pantalla de la TV
sobre una superficie acolchada que la pro-
teja de posibles daños.
2
Retire los tornillos que sujetan la base.
3
Separar el soporte del televisor.

13
INSTRUCCIONES
(Para 22LE5300)
ꔛ
La imagen puede ser diferente a la de su televisor.
INSTALACIÓN
1
Coloque con cuidado la pantalla de la TV
sobre una superficie acolchada que la pro-
teja de posibles daños.
2
Monte las piezas del SOPORTE DEL
CONJUNTO con la BASE DEL SOPORTE
del televisor.
3
Monte la TV como se ilustra.
4
Coloque los 4 tornillos en los orificios
mostrados.
BASE DEL SOPORTE
SOPORTE DEL
CONJUNTO
M4 x 14
!
?
!
?
NOTA
► Al realizar un montaje de sobremesa,
compruebe que los tornillos estén apreta-
dos correctamente. (De no ser así, el pro-
ducto podría inclinarse hacia delante tras
su instalación). Si, por el contrario, apretara
los tornillos en exceso, podría deformarse
por abrasión en el área de apriete del
mismo. No sobreapriete los tornillos.
SEPARACIÓN
1
Coloque con cuidado la pantalla de la TV
sobre una superficie acolchada que la pro-
teja de posibles daños.
2
Retire los tornillos que sujetan la base.
3
Separar el soporte del televisor.

PREPARACIÓN
14
INSTRUCCIONES
(Para
22/26LE6500
)
ꔛ
La imagen puede ser diferente a la de su televisor.
1
Coloque con cuidado la pantalla de la TV
sobre una superficie acolchada que la pro-
teja de posibles daños.
2
Monte la TV como se ilustra.
3
Coloque los 2 tornillos en los orificios
mostrados.
INSTALACIÓN
!
?
!
?
NOTA
► Al realizar un montaje de sobremesa,
compruebe que los tornillos estén apreta-
dos correctamente. (De no ser así, el pro-
ducto podría inclinarse hacia delante tras
su instalación). Si, por el contrario, apretara
los tornillos en exceso, podría deformarse
por abrasión en el área de apriete del
mismo. No sobreapriete los tornillos.
M4 x 16
SEPARACIÓN
1
Coloque con cuidado la pantalla de la TV
sobre una superficie acolchada que la
proteja de posibles daños.
2
Retire los tornillos que sujetan la base.
3
Separar el soporte del televisor.

15
INSTRUCCIONES
(Para 26/32/37/42/47/55LE5300, 32/42/47/55LE4600, 32/42LE4300)
ꔛ
La imagen puede ser diferente a la de su televisor.
INSTALACIÓN
2
Monte las piezas del SOPORTE DEL
CONJUNTO con la BASE DEL SOPORTE
del televisor.
3
Monte la TV como se ilustra.
1
Coloque con cuidado la pantalla de la TV
sobre una superficie acolchada que la pro-
teja de posibles daños.
4
Monte la partes de la CUBIERTA
POSTERIOR DE LA BASE con la TV.
5
Coloque los 4 tornillos en los orificios
mostrados.
BASE DEL SOPORTE
SOPORTE DEL
CONJUNTO
CUBIERTA
POSTERIOR DE
LA BASE
M4 x 22 M4 x 24 M4 x 26M4 x 20
M4 x 16M4 x 14
Para 26LE5300
26LE5300
Otros modelos
32LE5300,
32/42/47/55LE4600,
32LE4300
37/42LE5300,
42LE4300
47/55LE5300
!
?
!
?
NOTA
► Al realizar un montaje de sobremesa,
compruebe que los tornillos estén apreta-
dos correctamente. (De no ser así, el pro-
ducto podría inclinarse hacia delante tras
su instalación). Si, por el contrario, apretara
los tornillos en exceso, podría deformarse
por abrasión en el área de apriete del
mismo. No sobreapriete los tornillos.

PREPARACIÓN
16
SEPARACIÓN
1
Coloque con cuidado la pantalla de la TV
sobre una superficie acolchada que la pro-
teja de posibles daños.
2
Retire los tornillos que sujetan la base.
3
Separe la CUBIERTA POSTERIOR DE LA
BASE de la TV.
4
Separar el soporte del televisor.

17
INSTALACION DE WOOFER: CUANDO SE MONTA
A UNA PARED (Para 32/42/47/55LE4600)
1
Coloque con cuidado la pantalla de la TV
sobre una superficie acolchada que la
proteja de posibles daños.
2
Retire los tornillos que sujetan la base.
3
Desmonte la base y la cubierta posterior
de la TV.
4
Desmonte el Woofer de la base.
5
Ensamble el Woofer con la TV.
Gire la tuerca PEM del woofer usando un
desarmador plano e instale los 2 dos tor-
nillos, como se muestra a continuación.
Cuando se encuentre instalando el Woofer
en la TV, asegúrese que el cable de poder
no se encuentre torcido, doblado o muy
apretado.

PREPARACIÓN
18
MONTAJE PARA LA PARED VESA
Realice la instalación mural sobre una pared sólida, perpendicular al suelo. Al montar sobre otros mate-
riales de construcción, por favor, póngase en contacto con su instalador más cercano.
En instalaciones del techo o sobre paredes inclinadas, la unidad puede caer y provocar graves daños
personales.
Le recomendamos que utilice un soporte de montaje de pared de la marca LG, cuando ud. ponga la
TV en la pared.
LG recomienda que el montaje de pared lo realice un instalador profesional calificado.
Modelos
VESA (A
*
B)
A
B
Tornillo
estándar
Cantidad
Soporte para instalación en pared
(de venta por separado)
22LE5300,
22LE6500,
26LE5300,
26LE6500,
26LD350
100
*
100 M4 4
LSW100B, LSW100BG
32LD350,
32LD420,
32LD420C,
32LD460,
32LD465,
32LD460H,
32LD460B,
32LE5300,
32LE4600,
32LE4300
200
*
100 M4 4
LSW100B, LSW100BG
37LD460,
37LD461C,
37LD465,
37LE5300,
42LD460,
42LD461C,
42LD465,
42LD420,
42LD420C,
42LD460H,
42LD460B,
42LE5300,
42LE4600,
42LE4300,
47LD460,
47LD465,
47LE5300,
47LE4600
200
*
200 M6 4
LSW200B, LSW200BG
55LE5300,
55LE4600
400
*
400 M6 4
LSW400B, LSW400BG
42/50PJ230,
42/50PJ250,
42/50PJ350
400
*
400 M6 4
PSW400B PSW400BG

19
Coloque los separadores de anillo en el equipo antes de
instalar el soporte de pared de forma que la inclinación de
la parte posterior del equipo se pueda ajustar perpendicu-
larmente.
Para 26LE5300
4-SEPARADORES DE ANILLO
!
?
!
?
NOTA
► La longitud de los tornillos necesarios varía en
función de la pared en la que se realice el
montaje.
Para obtener más información, consulte las
instrucciones incluidas con el equipo de mon-
taje.
► Las dimensiones estándar para el equipo de
montaje mural se muestran en la tabla.
► Al adquirir nuestro equipo de montaje mural,
le será suministrado un manual de instruccio-
nes detallado y todas las piezas necesarias
para la instalación.
► No utilice tornillos más largos que los de
dimensión estándar mostrados, ya que podría
dañar el interior de la TV.
► Para montajes murales que no cumplan con
las especificaciones para tornillos del estándar
VESA, la longitud de estos puede diferir
dependiendo de sus especificaciones.
► No utilice tornillos que no cumplan con las
especificaciones relativas a los mismos del
estándar VESA.
No apriete los tornillos en exceso, ya que
podría dañar la TV o provocar que cayera pro-
vocando daños personales. LG no se hace
responsable de este tipo de accidentes.
► LG no se hace responsable por los daños oca-
sionados en la TV o las lesiones personales
producidas cuando no se utilice un equipo de
montaje que cumpla con el estándar VESA o
se monte sobre un muro que no haya sido
especificado o si el cliente no sigue las
instrucciones de instalación de la TV.
!
?
!
?
PRECAUCIÓN
► No instale su equipo de montaje mural mientras la TV está encendida. Eso podría provocar lesio-
nes personales por choques eléctricos.
ꔛ
La imagen puede ser diferente a la de su televisor.
Para 32/42/47/55LE4600
3.6 cm (1.4 inches)
1 cm (0.4 inches)
WOOFER
La distancia entre la pared y la TV debe ser de 3.6 cm (1.4 in).

PREPARACIÓN
20
ORGANIZADOR DE CABLES
Televisor Plasma
ꔛ
La imagen puede ser diferente a la de su televisor.
SUJETACABLES
1
Tras conectar los cables necesarios,
instale el SUJETACABLES como se indi-
ca para agruparlos.

21
26/32LD350, 32/37/42/47LD460, 37/42LD461C, 32/37/42/47LD465, 32/42LD460H, 32/42LD460B
ꔛ
La imagen puede ser diferente a la de su televisor.
1
Conecte los cables necesarios.
Para conectar un equipo adicional, vea la
sección de CONEXIONES DE EQUIPO
EXTERNO.
2
Instale el ORGANIZADOR DE CABLES
como la imagen.
3
Introduzca los cables en el interior de
ORGANIZADOR DE CABLE y ciérrelo a
presión.
AC IN
AC IN
AC IN
AC IN
AC IN
AC IN
AC IN
AC IN
AC IN
ORGANIZADOR DE CABLES

PREPARACIÓN
22
32/42LD420, 32/42LD420C
1
Conecte los cables necesarios.
Para conectar un equipo adicional, vea la
sección de CONEXIONES DE EQUIPO
EXTERNO.
2
Instale el ORGANIZADOR DE CABLES
como la imagen.
3
Introduzca los cables en el interior de
ORGANIZADOR DE CABLE y ciérrelo a
presión.
22/26LE6500
1
Tras conectar los cables necesarios, instale
el SUJETADOR DE CABLES como se indi-
ca para agruparlos.
SUJETADOR DE CABLES
ORGANIZADOR DE CABLES

23
ꔛ
La imagen puede ser diferente a la de su televisor.
SUJETACABLES
SUJETACABLES
2
Tras conectar los cables necesarios,
instale el SUJETACABLES como se indi-
ca para agruparlos.
1
Fije el cable de alimentación con la
SUJETACABLES de la cubierta posterior
de la TV.
Ayudará a evitar que el cable de aliment-
ación se desenchufe accidentalmente.
32/37/42/47/55LE5300, 32/42/47/55LE4600, 32/42LE4300
22/26LE5300
1
Tras conectar los cables necesarios,
instale el SUJETADOR DE CABLES
como se indica para agruparlos.
SUJETADOR DE CABLES

PREPARACIÓN
24
INSTALACIÓN DE UN PEDESTAL DE ESCRITORIO
SOPORTE DEL ESLABON GIRATORIO
(Excepto
22LE5300, 22LE6500
)
Despues de instalar la TV, puede ajustar el TV manualmente 20 grados a la izquierda y derecha para
satisfacer su angulo de vision.
ꔛ
La imagen puede ser diferente a la de su televisor.
Para conseguir una ventilación adecuada, deje un espacio de 10,1 cm de separación entre la pared y
los costados del televisor.
10,1 cm
10,1 cm
10,1 cm
10,1 cm
!
?
!
?
CUIDADO
► Asegure la ventilación adecuada dejando el espacio recomendado.
► No instale la unidad próxima o sobre ninguna fuente de calor.

25
SOPORTE DEL ESLABON GIRATORIO
(Excepto
22LE5300, 22LE6500
)
UNIÓN DEL TELEVISOR A UN ESCRITORIO
(Para 26/32LD350, 32/37/42LD460, 37/42LD461C, 32/37/42LD465, 32LE5300, 32/42LD420,
32/42LD420C, 32/42/47/55LE4600, 32LE4300, 32/42LD460H, 32/42LD460B)
Recomendamos que el televisor se una a un escritorio, de modo que no se mueva hacia adelante o
hacia atrás, causando posibles lesiones o daños en el producto.
1-Tornillo
(incluidos como las partes del producto)
Escritorio
Soporte
SISTEMA DE SEGURIDAD KENSINGTON
ꔛ
Esta característica no se encuentra disponible para todos los
modelos.
- El televisor tiene instalado un conector de Sistema de seguri-
dad Kensington en el panel posterior. Conecte el cable de
Sistema de seguridad Kensington como se indica a continu-
ación.
- Para obtener información detallada sobre la instalación y uso
del Sistema de seguridad Kensington, consulte la guía del usu-
ario que se incluye con este sistema.
Para obtener información adicional, visite http://www.kensing-
ton.com, la página Web de Kensington. Esta empresa vende
sistemas de seguridad para equipos electrónicos de alto costo,
como PC portátiles y proyectores LCD.
NOTA: El Sistema de seguridad Kensington es un accesorio
opcional.
!
?
!
?
CUIDADO
► Para evitar que se caiga el televisor, debe estar sujetado seguramente al piso o pared según las
instrucciones de la instalación. Si inclina, sacude o balancea la máquina, podría causar lesiones.

PREPARACIÓN
26
Para conectar un equipo adicional, vea la seccion de instalacion de un equipo externo en el CD Manual.
Component
3
Video Compuesto
4
Usted puede usar un adaptador
para conectar DVI a HDMI, pero
usted solo tendra 2 canales de
estereo para sonido.
El adaptador no es necesario para
conectar la PC.
* Layout Tipico
Asegurese
de no
mezclar los
colores.
DVI
2
Disculpe. El adap-
tador phone Jack
para entrada de
audifono 0.32 cm
(1/8”) no esta
incluido.
Disponible en la
mayoria de las
tiendas de electro-
nicos.
Use Video
Compuesto
para la conex-
ion de video si
esta disponible.
Relacione los
colores.
ANTENNA/
CABLE IN
DC-IN
RGB IN (PC)
AUDIO IN
RGB/DVI
(DVI)
OPTICAL
DIGITAL
AUDIO OUT
/DVI IN
AV IN
RS-232C IN
(
CONTROL&SERVICE)
1 2
VIDEO
AUDIO
L(MONO)
R
VIDEO
AUDIO
Y P
B
P
R
L R
COMPONENT IN
Y L RPB PR
ANTENNA/
CABLE IN
DC-IN
RGB IN (PC)
AUDIO IN
RGB/DVI
OPTICAL
DIGITAL
AUDIO OUT
COMPONENT IN
AV IN
RS-232C IN
(
CONTROL&SERVICE)
VIDEO
AUDIO
L(MONO)
R
VIDEO
AUDIO
Y PB PR
L
R
(DVI)
/DVI IN
1 2
HDMI OUTPUT
ANTENNA/
CABLE IN
DC-IN
RGB IN (PC)
AUDIO IN
RGB/DVI
OPTICAL
DIGITAL
AUDIO OUT
COMPONENT IN
AV IN
RS-232C IN
(
CONTROL&SERVICE)
VIDEO
AUDIO
L(MONO)
R
VIDEO
AUDIO
Y PB PR
L R
(DVI)
/DVI IN
1 2
L R
DVI OUTPUT
AUDIO
HDMI
1
Use HDMI para conec-
tar aparatos externos
cuando este dis-
ponible. Si no esta dis-
ponible, use DVI o
componente
Orden de Conexion
1
2
HDMI es la mejor manera de conectar
un aparato. Si no esta disponible, vea la
lista de abajo hasta encontrar una con-
exion
qu e este disponible en cada aparato.
HDMI
DVI
3
4
Componente
Video Compuesto
ANTENNA
IN
Use esta conexion
cuando usted necesite conectarse
directamente a una antena o sistema
de cable en vez de una caja de cable
Antenna/Cable
Antenna
RF Cable
Coaxial (75 Ω)
Cable TV
O
VER LA TV
CONECTANDO EL TELEVISOR
ANTENNA
IN
DC-IN
CABLE IN
RGB IN (PC)
AUDIO IN
RGB/DVI
(DVI)
OPTICAL
DIGITAL
AUDIO OUT
/DVI IN
VIDEO
AUDIO
L(MONO)
R
VIDEO
AUDIO
Y PB PR
L R
COMPONENT IN
AV IN
RS-232C IN
(
CONTROL&SERVICE)
1 2
H/P USB IN
H/P USB IN
IN 3
ANTENNA
IN
DC-IN
RGB IN (PC)
AUDIO IN
RGB/DVI
(DVI)
OPTICAL
DIGITAL
AUDIO OUT
/DVI IN
AV IN
RS-232C IN
(
CONTROL&SERVICE)
1 2
VIDEO
AUDIO
L(MONO)
R
CABLE IN
VIDEO
AUDIO
Y PB PR
L R
COMPONENT IN
DC-IN
RGB IN (PC)
AUDIO IN
RGB/DVI
OPTICAL
DIGITAL
AUDIO OUT
COMPONENT IN
AV IN
RS-232C IN
(
CONTROL&SERVICE)
VIDEO
AUDIO
L(MONO)
R
VIDEO
AUDIO
Y PB PR
L R
(DVI)
/DVI IN
1 2
HDMI OUTPUT
ANTENNA/
CABLE IN
DC-IN
RGB IN (PC)
AUDIO IN
RGB/DVI
OPTICAL
DIGITAL
AUDIO OUT
COMPONENT IN
AV IN
RS-232C IN
(
CONTROL&SERVICE)
VIDEO
AUDIO
L(MONO)
R
VIDEO
AUDIO
Y PB PR
L R
(DVI)
/DVI IN
1 2
L R
DVI OUTPUT
AUDIO
Y L RP
B
P
R
ANTENNA
IN
CABLE IN
ANTENNA
IN
DC-IN
RGB IN (PC)
AUDIO IN
RGB/DVI
(DVI)
OPTICAL
DIGITAL
AUDIO OUT
/DVI IN
AV IN
RS-232C IN
(
CONTROL&SERVICE)
1 2
VIDEO
AUDIO
L(MONO)
R
CABLE IN
VIDEO
AUDIO
Y PB PR
L R
COMPONENT IN
DC-IN
RGB IN (PC)
AUDIO IN
RGB/DVI
OPTICAL
DIGITAL
AUDIO OUT
COMPONENT IN
AV IN
RS-232C IN
(
CONTROL&SERVICE)
VIDEO
AUDIO
L(MONO)
R
VIDEO
AUDIO
Y PB PR
L R
(DVI)
/DVI IN
1 2
HDMI OUTPUT
ANTENNA/
CABLE IN
DC-IN
RGB IN (PC)
AUDIO IN
RGB/DVI
OPTICAL
DIGITAL
AUDIO OUT
COMPONENT IN
AV IN
RS-232C IN
(
CONTROL&SERVICE)
VIDEO
AUDIO
L(MONO)
R
VIDEO
AUDIO
Y PB PR
L R
(DVI)
/DVI IN
1 2
L R
DVI OUTPUT
AUDIO
Y L RP
B
P
R
ANTENNA
IN
CABLE IN
DC-IN
RGB IN (PC)
AUDIO IN
RGB/DVI
(DVI)
OPTICAL
DIGITAL
AUDIO OUT
/DVI IN
COMPONENT IN
RS-232C IN
(
CONTROL&SERVICE)
1 2
VIDEO
AUDIO
Y PB PR
L R
DC-IN
RGB IN (PC)
AUDIO IN
RGB/DVI
OPTICAL
DIGITAL
AUDIO OUT
COMPONENT IN
AV IN
RS-232C IN
(
CONTROL&SERVICE)
VIDEO
AUDIO
L(MONO)
R
VIDEO
AUDIO
Y PB PR
L R
(DVI)
/DVI IN
1 2
HDMI OUTPUT
AV IN
VIDEO
AUDIO
L(MONO)
R
L R
VIDEO
AUDIO
RGB IN (PC)
WIRELESS
CONTROL
AUDIO IN
(RGB/DVI)
RS-232C IN
(
CONTROL&SERVICE)
OPTICAL
DIGITAL
AUDIO OUT
/DVI IN
AV IN 1
VIDEO
AUDIO
L(MONO)
2
1
R
VIDEO
AUDIO
COMPONENT IN
2
1
Y P
B
P
R
L R
Y L RPB PR
ANTENNA
IN
CABLE IN
ANTENNA
IN
CABLE IN
ANTENNA
IN
CABLE IN

27
ENCENDIDO DEL TV
1
Primero conecte el cable de alimentación
correctamente.
En este momento, el TV cambia al modo en
espera.
ꔛ
En el modo de espera para encender el TV,
presione los botones
/ I, INPUT, CH (ꕌ o
ꕍ) en el TV o presione, INPUT, CH (ꕌ o ꕍ),
números (0~9) del control remoto.
2
Seleccione la fuente de visualización utili-
zando el botón INPUT en el control remoto.
3
Cuando deje de usar la TV, presione el
botón POWER en el control remoto. El tele-
visor vuelve al modo apagado.
CONFIGURACIÓN INICIAL
Esta función guía al usuario para que pueda con-
figurar fácilmente los elementos escenciales para
ver el televisor por primera vez cuando lo adqui-
ere. Se visualizará en la pantalla cuando encienda
el televisor por primera vez. También puede acti-
varse desde los menús del usuario.
ꔛ
La selección preestablecida es “Usar en
Casa”. Recomendamos el establecimiento
de la televisón a modo “Usar en Casa” para
la mejor imágen en su entorno familiar.
ꔛ
“Demo de Tienda” Modo sólo destinado
para su utilización en entornos de venta al
por menor. Los clientes pueden ajustar el
“menú Modo imagen” manualmente mien-
tras que la inspección de la televisión, pero
la televisión regresará automáticamente a la
preestablecida en almacén después de 5
minutos.
ꔛ
El modo “Demo de Tienda” proporciona un
ajuste óptimo para la visualización de la uni-
dad en establecimientos de venta al por
menor. El modo “Demo de Tienda” inicia la
TV para ajustar la calidad de la imagen.
Paso2. Configuración de Modo
Paso 4. Zona horaria
1
ENTER
Seleccione Idioma del menú.
1
ENTER
Seleccione Encendido o
Apagado.
1
ENTER
Seleccione Usar en Casa.
Paso 5. Sintonización automática
1
ENTER
Verifique su conexión de antena y
ejecute la función Sintonización
automática.
Paso1. Selección de idioma
Paso3. Indicador de Poder (Para
Televisor LCD con LED)
ꔛ
Esta función está desactivada en “Paso2.
Configuración de Demo de Tienda”.
1
Seleccione Zona horaria.
2
ENTER
Seleccione Horario de
verano.
BIENVENIDOS!
Gracias por elegir LG.
ꔉ Siguiente
Paso 1. Lenguaje
Português
Inglés
Español
Usar en Casa Demo de Tienda
• Modo Demo. Apagado
Paso 2. Configuración de modo
Seleccionando el entorno.
Escoja modo de config. que desee.
Seleccione [Usar en Casa] para usar esta TV en
casa. Para usar esta TV en la tienda, seleccione
[Demo de Tienda].
ꕉ Anterior
ꔉ Siguiente
i
Paso 3. Indicador de Poder
ꕉ Anterior ꔉ Siguiente
Luz de Apagado ◀ Apagado ▶
Paso 4. Zona horaria
ꕉ Anterior
ꔉ Siguiente
Zona horaria ◀ Este ▶
Horario de verano Automático
Paso 5. Sintonización automática
ꕉ Anterior
ꔉ Siguiente
Antes de comenzar
asegúrese de que la
antena del TV esté conectada.

VER LA TV
28
APÉNDICE
SELECCIÓN Y AJUSTE DEL MENÚ PANTALLA
El OSD (On Screen Display, Despliegue En la Pantalla) de su TV puede ser un poco diferente que este manual.
1
MENU
Visualizar todos los menús.
2
ENTER
Seleccione un elemento del
menú.
3
ENTER
Acepte la selección actual.
4
EXIT
Regresar a la pantalla del televisor.
CANAL
OPCIÓN
IMAGEN
AUDIO
HORA
BLOQUEAR
IMAGEN
ꔂ Mover ꔉ Ingresar
•
Relación de Aspecto
: 16:9
• Asistente de imagen
• ꕊ
Ahorro de energía
: Apagado
• Modo imagen : Estándar
• Luz de Fondo 70
• Contraste 100
• Brillo 50
• Nitidez 70
HORA
ꔂ Mover ꔉ Ingresar
• Reloj
• Hora de Apagado : Apagado
• Hora de Encendido : Apagado
• Temporizador : Apagado
BLOQUEAR
ꔂ Mover ꔉ Ingresar
• Fijar Contraseña
• Sist. de Bloqueo : Encendido
• Bloquear Canales
• Clasificación
• Bloqueo de entradas
• Bloqueo de Teclas : Apagado
OPCIÓN
ꔂ Mover ꔉ Ingresar
• Lenguaje
• Subtítulo : Apagado
• Indicador de Poder
• Configuración Inicial
• ID del Televisor : 1
•
Configuración de modo
: Usar en Casa
• Transmisor de IR : Apagado
AUDIO
ꔂ Mover ꔉ Ingresar
•
Volumen automático
: Apagado
• Voz Clara II : Apagado �3
• Balance 0
• Modo de audio : Estándar
•
Sonido Infinito: Apagado
• Agudos 50
• Graves 50
• Restablecer
L R
CANAL
ꔂ Mover ꔉ Ingresar
• Sintonización automática
• Sintonización manual
• Edición de Canales
• Opción de búsqueda
• Sistema de color
!
?
!
?
NOTA
► Método de ISM: Para Televisor Plasma.
► Luz de Fondo, TruMotion, Indicador de
Poder: Para Televisor LCD con LED/
Televisor LCD.
ꔛ
Para obtener más información, con-
sulte la sección “Caja Multimedia
Inalámbrica” del manual de instruc-
ciones.
Excepto 32/42LD460B

29
APÉNDICE
LISTA DE VERIFICACIÓN DE PROBLEMAS
Funcionamiento anómalo
El control remoto no
funciona
ꔛ
Verifique para ver si hay algún objeto entre el producto y el control remoto
causando la obstrucción. Asegúrese de apuntar el control remoto directa-
mente al televisor. Están puestas las baterías con la polaridad correcta
(+con + y -con -)?
ꔛ
Está correcta la configuración del modo remoto de la operación: TV, VCR
etc.?
ꔛ
Ponga nuevas baterías.
La TV se apaga
repentinamente
ꔛ
Está configurado el tiempo para dormir?
ꔛ
Verifique las configuraciones de control de la potencia. La potencia
interrumpida.
ꔛ
El Televisor se apagará automáticamente en 15 minutos en caso de que
no haya señal.
Problemas de video Verifique
No imagen
No sonido
ꔛ
Verifique si el producto está encendido.
ꔛ
Intente otro canal. El problema puede ser con la transmisión.
ꔛ
Se encuentra conectado el cordón de alimentación dentro de la toma de corrien-
te de la pared?
ꔛ
Verifique la dirección y/o la ubicación de su antena.
ꔛ
Pruebe el tomacorriente, enchufe un cordón de alimentación de otro
producto en el tomacorriente donde estaba enchufado el cordón de ali-
mentación del producto.
La imagen aparece
lentamente después
de enceder la TV
ꔛ
Es normal, la imagen es muda durante el proceso de inicio del produc-
to. Favor de contactar a su centro de servicio, si la imagen no aparece
cinco minutos después.
Color o imagen defici-
ente, o No color
ꔛ
Ajuste Color en la opción del menú.
ꔛ
Mantenga una distancia suficiente entre el producto y el VCR.
ꔛ
Intente otro canal. El problema puede ser con la transmisión.
ꔛ
Están instalados apropiadamente los cables de video?
ꔛ
Active cualquier función para restablecer el brillo de la imagen.
Barra horizontal/vertical
o imagen temblante
ꔛ
Verifique la interferencia local como aparatos eléctricos o herramientas
de potencia.
Recepción pobre en
algunos canales
ꔛ
Estación o cable con problemas experimentales, sintonice a otra estación.
ꔛ
Si la señal de estación es débil, reubique la antena para recibir estación más debil.
ꔛ
Verifique las fuentes de la interferencia posible.
Lineas o rayas en las
imagenes
ꔛ
Verifique la antena (Cambie la dirección de la antena).
No hay recepción de
imagen al conectar la
toma HDMI
ꔛ
Si un cable HDMI no admite HDMI de alta velocidad, puede provocar
parpadeos o no mostrar la imagen. Si este es el caso, utilice cables
recientes que admitan HDMI de alta velocidad.
* Esta característica no se encuentra
disponible para todos los modelos.

APÉNDICE
30
Problemas de audio
No salida de una de
las bocinas
ꔛ
Ajuste el Balance en la opción del menú.
Sonido raro desde
interior del producto
ꔛ
Un cambio en la ambiente de humedad o temperatura puede causar
un sonido raro cuando enciende o apaga el producto y esto no significa
la falla delproducto.
No hay sonido al
conectar tomas HDMI/
USB
ꔛ
Compruebe el cable HDMI de alta velocidad.
ꔛ
Verifique que el cable USB admite la versión 2,0.
ꔛ
Lea archivos MP3 normales.
Problemas del modo PC
La señal está fuera del
rango (Formato no
válido)
ꔛ
Ajuste la resolución, la frecuencia horizontal o vertical.
Verifique la fuente de la entrada.
Barra o raya vertical en
el fondo, ruido hori-
zontal y posicion
incorrecta
ꔛ
Ponga a trabajar auto-configuración o ajuste el reloj, la fase o la posición
H/V. (opción)
El color de pantalla es
inestable o color único
ꔛ
Verifique el cable de señal. Reinstale la tarjeta de video de la PC.
Al conectar el cable
HDMI al PC, no se
transmitirá el audio.
ꔛ
Examine el manual de la tarjeta gráfica del PC para verificar si ésta
admite audio HDMI y como ajustarla correctamente.
* Esta característica no se encuentra
disponible para todos los modelos.

31
Problemas de la lista de películas
El archivo no aparece
en la lista de películas.
ꔛ
Verificar si su extensión está admitida.
Se indica el mensaje
“Este archivo no es
váldo” o el audio fun-
ciona con normalidad
pero el video no lo
hace.
ꔛ
Verifique si el archivo se lee con normalidad en el PC. (Verifique si el
archivo está dañado).
ꔛ
Verifique si su resolución está admitida.
ꔛ
Verifique si el códec de video/audio está admitido.
ꔛ
Verifique si la velocidad de imagen está admitida.
Se indica el mensaje
“Audio no compatible”
o el video funciona
con normalidad pero
el audio no lo hace..
ꔛ
Verifique si el archivo se lee con normalidad en el PC. (Verifique si el
archivo está dañado).
ꔛ
Verifique si el códec de audio está admitido.
ꔛ
Verifique si la velocidad de bits está admitida.
ꔛ
Verifique si la frecuencia de muestreo está admitida.
Los subtítulos no fun-
cionan.
ꔛ
Verifique si el archivo se lee con normalidad en el PC. (Verifique si el
archivo está dañado).
ꔛ
Verifique si el archivo de video y el de subtítulos tienen el mismo nombre.
ꔛ
Verifique si el archivo de video y el de subtítulos están situados en la
misma carpeta.
ꔛ
Verificar si el archivo de subtítulos está admitido.
ꔛ
Verificar si el idioma está admitido. (Al abrir el archivo de subtítulos en
el Bloc de notas, podrá verificar el idioma del archivo de subtítulos).

APÉNDICE
32
MANTENIMIENTO
Las malfunciones anticipadas pueden ser prevenidas. La limpieza regular y cuidadosa puede extender
la suma de tiempo que ud. va a tener su nueva TV. Asegurese apagar la TV y desenchufar el cordón
de alimentación antes de empezar cualquier tipo de limpieza.
Limpiando la pantalla
Aqui hay una buena manera para mantener su pantalla limpia por un tiempo. Moje una tela
suave en una mezcla de agua tibia con un poco de suavizante de ropa, o detergente de platos.
Escurra la tela hasta que esté casi seca, luego limpie la pantalla con ella.
Asegurese que no haya exceso de agua por la pantalla, luego dejela secar por el aire antes de
encender su TV.
Limpiando el gabinete
ꔛ
Para remover la suciedad o polvo, limpie el gabinete con una tela suave, seca y sin pelusa.
ꔛ
Favor de asegurarse no usar una tela mojada.
Ausencia Extendida
2
1
!
?
!
?
PRECAUCIÓN
► Si ud. espera dejar su TV por un tiempo largo (como las vacaciones), será buena idea desench-
ufar el cordón de alimentación para proteger la TV contra el daño posible por alguna descarga
electrica.

33
AVISO SOBRE SOFTWARE DE CÓDIGO ABIERTO
Las siguientes licencias públicas generales (GPL) ejecutables, así como las bibliotecas de licencias públicas
generales limitadas (LGPL) y licencias públicas de Mozilla (MPL), utilizadas en este producto están sujetas a
los acuerdos de licencia GPL2.0/LGPL2.1/MPL1.1:
GPL EJECUTABLES:
Linux kernel 2.6, busybox, e2fsprogs, gdbserver, jfsutils, mtd-utils, procps, u-boot, udhcpc
BIBLIOTECAS DE LGPL:
directFB, glibc, gconv
BIBLIOTECAS DE MPL:
Nanox
LG Electronics ofrece el suministro del código fuente en CD-ROM por un importe que cubre el costo de
llevar a cabo la distribución. Este importe incluye, por ejemplo, el costo de los medios y los gastos de envío
generados por las solicitudes enviadas a LG Electronics mediante correo electrónico a: opensource@lge.com.
Esta oferta es válida por un período de tres (3) años a partir de la fecha de distribución de este producto por
parte de LG Electronics.
Puede obtener una copia de las licencias GPL, LGPL y MPL en el CD-ROM suministrado con este producto.
Además, puede obtener la traducción de las licencias GPL y LGPL en
http://www.gnu.org/licenses/old-licenses/gpl-2.0-translations.html,
http://www.gnu.org/licenses/old-licenses/lgpl-2.1-translations.html.
Este producto incluye otro software de código abierto
► expat:
- copyright © 1998, 1999, 2000 Thai Open Source Software Center Ltd y Clark Cooper
- copyright © 2001, 2002, 2003, 2004, 2005, 2006 Personas encargadas de las actualizaciones de
Expat.
► freetype: copyright © 2003 Proyecto FreeType (www.freetype.org).
► ICU: copyright © 1995-2008 International Business Machines Corporation y otros.
► libcurl: copyright © 1996 - 2008, Daniel Stenberg.
► libjpeg: este software se basa en forma parcial en el trabajo de Independent JPEG Group, copyright ©
1991 – 1998, Thomas G. Lane.
► libmng: copyright © 2000-2007 Gerard Juyn, Glenn Randers-Pehrson
► md5: copyright © 1991-2, RSA Data Security, Inc
► md5 checksum : copyright © 1999, 2000, 2002 Aladdin Enterprises
► ncurses: copyright © 1998 Free Software Foundation, Inc.
► openSSL:
- software criptográfico escrito por Eric Young.
- software escrito por Tim Hudson.
- software desarrollado por el proyecto OpenSSL para utilizarse en el conjunto de herramientas de
OpenSSL (http://www.openssl.org)
►strace :
- copyright © 1991, 1992 Paul Kranenburg.
- copyright © 1993 Branko Lankester.
- copyright © 1993 Ulrich Pegelow.
- copyright © 1995, 1996 Michael Elizabeth Chastain.
- copyright © 1993, 1994, 1995, 1996 Rick Sladkey.
- copyright © 1998-2003 Wichert Akkerman.
- copyright © 2002-2008 Roland McGrath.
- copyright © 2003-2008 Dmitry V. Levin.
- copyright © 2007-2008 Jan Kratochvil.
► tinyxml: copyright © 2000-2006 Lee Thomason
► xyssl: copyright © 2009 Paul Bakker
► zlib: copyright © 1995-2005 Jean-loup Gailly and Mark Adler
Todos los derechos reservados.
Por la presente se otorga permiso, sin cargo, a toda persona que obtenga una copia de este software y los
archivos de documentación asociados (el “Software”), para realizar operaciones con el Software sin restric-
ciones, lo que incluye sin limitación alguna el derecho a usar, copiar, modificar, asociar, publicar, distribuir,
otorgar en sublicencia y/o vender copias del Software, y para otorgar a las personas a quienes se propor-
ciona el Software permiso para realizar estas acciones, sujeto a las siguientes condiciones:
EL SOFTWARE SE SUMINISTRA “TAL CUAL”, SIN GARANTÍA DE NINGÚN TIPO, EXPRESA O IMPLÍCITA,
INCLUIDAS SIN LIMITACIÓN LAS GARANTÍAS DE COMERCIABILIDAD, IDONEIDAD PARA UN
DETERMINADO FIN Y AUSENCIA DE INFRACCIÓN. BAJO NINGUNA CIRCUNSTANCIA LOS AUTORES O
PROPIETARIOS DE COPYRIGHT ASUMEN RESPONSABILIDAD ALGUNA POR CUALQUIER RECLAMACIÓN,
DAÑO U OTRA RESPONSABILIDAD, YA SEA POR UNA ACCIÓN CONTRACTUAL, UN AGRAVIO U OTRO
MOTIVO, GENERADO POR, DERIVADO DE O RELACIONADO CON EL SOFTWARE, SU USO U OTROS
TRATOS CON EL SOFTWARE.

APÉNDICE
34
ESPECIFICACIONES DEL PRODUCTO
MODELOS
42PJ230 (42PJ230-SB)
42PJ250 (42PJ250-SA)
42PJ350 (42PJ350-SA)
50PJ230 (50PJ230-SB)
50PJ250 (50PJ250-SA)
50PJ350 (50PJ350-SA)
Dimensiones
(Ancho x
Altura x
Profundidad)
incluyendo la base
988,0 mm x 678,7 mm x 260,0 mm
(38,8 pulgadas x 26,7 pulgadas x 10,2 pulgadas)
1171,4 mm x 781,8 mm x 309,7 mm
(46,1 pulgadas x 30,7 pulgadas x 12,1 pulgadas)
excluyendo la base
988,0 mm x 617,8 mm x 55,3 mm
(38,8 pulgadas x 24,3 pulgadas x 2,1 pulgadas)
1171,4 mm x 720,9 mm x 55,3 mm
(46,1 pulgadas x 28,3 pulgadas x 12,1 pulgadas)
Peso incluyendo la base
21,6 kg (47,6 libras) 30,0 kg (66,1 libras)
excluyendo la base
20,0 kg (44,0 libras) 27,6 kg (60,8 libras)
Potencia requerida AC 100-240 V ~ 50/60 Hz
Sistema de la TV NTSC, PAL-M/N, SBTVD
Cobertura de programas VHF 2-13, UHF 14-69, CATV 1-135
Impedancia de Antena Externa 75 Ω
Condición
de ambiente
Temp.de operación 0 °C - 40 °C (32 °F - 104°F)
Humedad de operación Menos de 80 %
Temp.para almacenar -20 °C - 60 °C (-4 °F - 140°F)
Humedad para almacenar Menos de 85 %
ꔛ
Las especificaciones mostradas arriba se pueden cambiar sin previo aviso para la mejora de calidad.
Corriente de consmo
2,5 A 3,5 A

35
Potencia requerida AC 100-240 V ~ 50/60 Hz
Sistema de la TV NTSC, PAL-M/N, SBTVD
Cobertura de programas VHF 2-13, UHF 14-69, CATV 1-135
Impedancia de Antena Externa 75 Ω
Condición
de ambiente
Temp.de operación 0 °C - 40 °C (32 °F - 104°F)
Humedad de operación Menos de 80 %
Temp.para almacenar -20 °C - 60 °C (-4 °F - 140°F)
Humedad para almacenar Menos de 85 %
ꔛ
Las especificaciones mostradas arriba se pueden cambiar sin previo aviso para la mejora de calidad.
MODELOS 26LD350 (26LD350-SB) 32LD350 (32LD350-SB)
Dimensiones
(Ancho x
Altura x
Profundidad)
incluyendo la base
663,0 mm x 484,0 mm x 206,8 mm
(26,1 pulgadas x 19,0 pulgadas x 8,1 pulgadas)
800,0 mm x 565,0 mm x 206,8 mm
(31,4 pulgadas x 22,2 pulgadas x 8,1 pulgadas)
excluyendo la base
663,0 mm x 423,0 mm x 79,9 mm
(26,1 pulgadas x 16,6 pulgadas x 3,1 pulgadas)
800,0 mm x 509,0 mm x 73,8 mm
(31,4 pulgadas x 20,0 pulgadas x 2,9 pulgadas)
Peso incluyendo la base
7,3 kg (16,0 libras) 9,2 kg (20,2 libras)
excluyendo la base
6,2 kg (13,6 libras) 8,2 kg (18,0 libras)
Corriente de consmo 1,0 A 1,2 A
MODELOS
32LD460 (32LD460-SA)
32LD465 (32LD465-SA)
32LD460H (32LD460H-SA)
37LD460 (37LD460-SA)
37LD465 (37LD465-SA)
37LD461C (37LD461C-SA)
Dimensiones
(Ancho x
Altura x
Profundidad)
incluyendo la base
799,0 mm x 555,0 mm x 207,0 mm
(31,4 pulgadas x 21,8 pulgadas x 8,1 pulgadas)
916,0 mm x 625,0 mm x 261,0 mm
(36,0 pulgadas x 24,6 pulgadas x 10,2 pulgadas)
excluyendo la base
799,0 mm x 516,0 mm x 73,5 mm
(31,4 pulgadas x 20,3 pulgadas x 2,8 pulgadas)
916,0 mm x 584,0 mm x 77,4 mm
(
36,0 pulgadas x 22,9 pulgadas x 3,0 pulgadas)
Peso incluyendo la base
9,6 kg (21,1 libras) 12,9 kg (28,4 libras)
excluyendo la base
8,6 kg (18,9 libras) 11,2 kg (24,6 libras)
Corriente de consmo
1,2 A 1,6 A
MODELOS
42LD460 (42LD460-SA)
42LD465 (42LD465-SA)
42LD461C (42LD461C-SA)
42LD460H (42LD460H-SA)
42LD460B (42LD460B-SA)
47LD460 (47LD460-SA)
47LD465 (47LD465-SA)
Dimensiones
(Ancho x
Altura x
Profundidad)
incluyendo la base
1023,0 mm x 685,0 mm x 261,0 mm
(40,2 pulgadas x 26,9 pulgadas x 10,2 pulgadas)
1136,0 mm x 757,0 mm x 270,0 mm
(44,7 pulgadas x 29,8 pulgadas x 10,6 pulgadas)
excluyendo la
base
1023,0 mm x 644,0 mm x 76,6 mm
(
40,2 pulgadas x 25,3 pulgadas x 3,0 pulgadas)
1136,0 mm x 706,0 mm x 76,5 mm
(44,7 pulgadas x 27,7 pulgadas x 3,0 pulgadas)
Peso incluyendo la base
15,4 kg (33,9 libras) 19,6 kg (43,2 libras)
excluyendo la
base
13,7 kg (30,2 libras) 17,6 kg (38,8 libras)
Corriente de consmo
1,9 A 2,6 A
MODELOS 32LD460B (32LD460B-SA)
Dimensiones
(Ancho x
Altura x
Profundidad)
incluyendo la base
799,0 mm x 555,0 mm x 207,0 mm
(31,4 pulgadas x 21,8 pulgadas x 8,1 pulgadas)
excluyendo la base
799,0 mm x 516,0 mm x 73,5 mm
(31,4 pulgadas x 20,3 pulgadas x 2,8 pulgadas)
Peso incluyendo la base
9,6 kg (21,1 libras)
excluyendo la base
8,6 kg (18,9 libras)
Corriente de consmo 1,3 A

APÉNDICE
36
MODELOS 22LE5300 (22LE5300-SA) 26LE5300 (26LE5300-SA)
Dimensiones
(Ancho x
Altura x
Profundidad)
incluyendo la base
542,9 mm x 407,1 mm x 155,4 mm
(21,4 pulgadas x 16,0 pulgadas x 6,1 pulgadas)
652,0 mm x 480,8 mm x 191,4 mm
(25,7 pulgadas x 18,9 pulgadas x 7,5 pulgadas)
excluyendo la base
542,9 mm x 357,6 mm x 34,4 mm
(21,4 pulgadas x 14,1 pulgadas x 1,4 pulgadas)
652,0 mm x 420,3 mm x 34,4 mm
(25,7 pulgadas x 16,5 pulgadas x 1,4 pulgadas)
Peso incluyendo la base
4,2 kg (9,3 libras) 6,1 kg (13,4 libras)
excluyendo la base
3,9 kg (8,6 libras) 5,1 kg (11,2 libras)
MODELOS 22LE6500 (22LE6500-SA) 26LE6500 (26LE6500-SA)
Dimensiones
(Ancho x
Altura x
Profundidad)
incluyendo la base
533,0 mm x 400,0 mm x 187,0 mm
(20,9 pulgadas x 15,7 pulgadas x 7,3 pulgadas)
650,0 mm x 469,0 mm x 187,0 mm
(25,5 pulgadas x 18,4 pulgadas x 7,3 pulgadas)
excluyendo la base
533,0 mm x 349,0 mm x 39,9 mm
(20,9 pulgadas x 13,7 pulgadas x 1,5 pulgadas)
650,0 mm x 418,0 mm x 39,9 mm
(25,5 pulgadas x 16,4 pulgadas x 1,5 pulgadas)
Peso incluyendo la base
3,4 kg (7,4 libras) 4,9 kg (10,8 libras)
excluyendo la base
3,1 kg (6,8 libras) 4,6 kg (10,1 libras)
ꔛ
Las especificaciones mostradas arriba se pueden cambiar sin previo aviso para la mejora de calidad.
Potencia requerida 22LE5300: 24V , 1,7 A
22LE6500: 24V , 1,7 A
26LE5300: 24V , 1,8 A
26LE6500: 24V , 2,1 A
Adaptador (alimentación AC/DC) Entrada: AC100-240 V ~ 50/60 Hz
Salida: DC 24 V, 3.42 A
Sistema de la TV NTSC, PAL-M/N, SBTVD
Cobertura de programas VHF 2-13, UHF 14-69, CATV 1-135
Impedancia de Antena Externa 75 Ω
Condición
de ambiente
Temp.de operación 0 °C - 40 °C (32 °F - 104°F)
Humedad de operación Menos de 80 %
Temp.para almacenar -20 °C - 60 °C (-4 °F - 140°F)
Humedad para alma-
cenar
Menos de 85 %

37
ꔛ
Las especificaciones mostradas arriba se pueden cambiar sin previo aviso para la mejora de calidad.
Potencia requerida AC 100-240 V ~ 50/60 Hz
Sistema de la TV NTSC, PAL-M/N, SBTVD
Cobertura de programas VHF 2-13, UHF 14-69, CATV 1-135
Impedancia de Antena Externa 75 Ω
Condición
de ambiente
Temp.de operación 0 °C - 40 °C (32 °F - 104°F)
Humedad de operación Menos de 80 %
Temp.para almacenar -20 °C - 60 °C (-4 °F - 140°F)
Humedad para alma-
cenar
Menos de 85 %
MODELOS 32LE5300 (32LE5300-SA) 37LE5300 (37LE5300-SA)
Dimensiones
(Ancho x
Altura x
Profundidad)
incluyendo la base
784,6 mm x 558,1 mm x 221,0 mm
(30,8 pulgadas x 21,9 pulgadas x 8,7 pulgadas)
905,0 mm x 630,0 mm x 270,0 mm
(35,6 pulgadas x 24,8 pulgadas x 10,6 pulgadas)
excluyendo la base
784,6 mm x 499,5 mm x 39,9 mm
(30,8 pulgadas x 19,6 pulgadas x 1,5 pulgadas)
905,0 mm x 568,0 mm x 39,9 mm
(35,6 pulgadas x 22,3 pulgadas x 1,5 pulgadas)
Peso incluyendo la base
12,4 kg (27,3 libras)
15,3 kg (33,7 libras)
excluyendo la base
10,5 kg (23,1 libras)
12,8 kg (28,2 libras)
MODELOS 42LE5300 (42LE5300-SA) 47LE5300 (47LE5300-SA)
Dimensiones
(Ancho x
Altura x
Profundidad)
incluyendo la base
1016,0 mm x 692,0 mm x 270,0 mm
(40,0 pulgadas x 27,2 pulgadas x 10,6 pulgadas)
1126,6 mm x 757,9 mm x 284,4 mm
(44,3 pulgadas x 29,8 pulgadas x 11,1 pulgadas)
excluyendo la base
1016,0 mm x 630,0 mm x 29,3 mm
(40,0 pulgadas x 24,8 pulgadas x 1,1 pulgadas)
1126,6 mm x 692,0 mm x 29,3 mm
(44,3 pulgadas x 27,2 pulgadas x 1,1 pulgadas)
Peso incluyendo la base
19,2 kg (42,3 libras)
22,6 kg (49,8 libras)
excluyendo la base
16,7 kg (36,8 libras)
19,6 kg (43,2 libras)
MODELOS 55LE5300 (55LE5300-SA)
Dimensiones
(Ancho x
Altura x
Profundidad)
incluyendo la base
1306,0 mm x 867,0 mm x 345,0 mm
(51,4 pulgadas x 34,1 pulgadas x 13,5 pulgadas)
excluyendo la base
1306,0 mm x 797,0 mm x 30,7 mm
(51,4 pulgadas x 31,3pulgadas x 1,2 pulgadas)
Peso incluyendo la base
34,0 kg (74,9 libras)
excluyendo la base
28,8 kg (63,4 libras)
Corriente de consmo
1,3 A 1,4 A
Corriente de consmo
1,5 A 1,7 A
Corriente de consmo 2,0 A

APÉNDICE
38
ꔛ
Las especificaciones mostradas arriba se pueden cambiar sin previo aviso para la mejora de calidad.
Potencia requerida AC 100-240 V ~ 50/60 Hz
Sistema de la TV NTSC, PAL-M/N, SBTVD
Cobertura de programas VHF 2-13, UHF 14-69, CATV 1-135
Impedancia de Antena Externa 75 Ω
Condición
de ambiente
Temp.de operación 0 °C - 40 °C (32 °F - 104°F)
Humedad de operación Menos de 80 %
Temp.para almacenar -20 °C - 60 °C (-4 °F - 140°F)
Humedad para alma-
cenar
Menos de 85 %
MODELOS 32LE4600 (32LE4600-SA) 42LE4600 (42LE4600-SA)
Dimensiones
(Ancho x
Altura x
Profundidad)
incluyendo la base
786,0 mm x 562,0 mm x 272,0 mm
(30,9 pulgadas x 22,1 pulgadas x 10,7 pulgadas)
1018,0 mm x 696,0 mm x 318,0 mm
(40,0 pulgadas x 27,4 pulgadas x 12,5 pulgadas)
excluyendo la base
786,0 mm x 500,0 mm x 39,9 mm
(30,9 pulgadas x 19,6 pulgadas x 1,5 pulgadas)
1018,0 mm x 627,0 mm x 29,8 mm
(40,0 pulgadas x 24,6 pulgadas x 1,1 pulgadas)
Peso incluyendo la base
14,5 kg (31,9 libras)
21,9 kg (48,2 libras)
excluyendo la base
10,6 kg (23,3 libras)
17,2 kg (37,9 libras)
MODELOS 47LE4600 (47LE4600-SA) 55LE4600 (55LE4600-SA)
Dimensiones
(Ancho x
Altura x
Profundidad)
incluyendo la base
1128,0 mm x 759,0 mm x 318,0 mm
(44,4 pulgadas x 29,8 pulgadas x 12,5 pulgadas)
1311,0 mm x 866,0 mm x 330,0 mm
(51,6 pulgadas x 34,0 pulgadas x 12,9 pulgadas)
excluyendo la base
1128,0 mm x 693,0 mm x 29,8 mm
(44,4 pulgadas x 27,2 pulgadas x 1,1 pulgadas)
1311,0 mm x 798,0 mm x 31,4 mm
(51,6 pulgadas x 31,4 pulgadas x 1,2 pulgadas)
Peso incluyendo la base
24,9 kg (54,8 libras)
36,6 kg (80,6 libras)
excluyendo la base
20,3 kg (44,7 libras)
30,3 kg (66,7 libras)
MODELOS
32LD420 (32LD420-SA)
32LD420C (32LD420C-SA)
42LD420 (42LD420-SA)
42LD420C (42LD420C-SA)
Dimensiones
(Ancho x
Altura x
Profundidad)
incluyendo la base
805,0 mm x 583,0 mm x 224,0 mm
(31,6 pulgadas x 22,9 pulgadas x 8,8 pulgadas)
1028,0 mm x 715,4 mm x 297,0 mm
(40,4 pulgadas x 28,1 pulgadas x 11,6 pulgadas)
excluyendo la base
805,0 mm x 531,0 mm x 79,9 mm
(31,6 pulgadas x 20,9 pulgadas x 3,1 pulgadas)
1028,0 mm x 658,6 mm x 87,8 mm
(40,4 pulgadas x 25,9 pulgadas x 3,4 pulgadas)
Peso incluyendo la base
10,8 kg (23,8 lbs) 17,3 kg (38,1 lbs)
excluyendo la base
9,7 kg (21,3 lbs) 15,5 kg (34,1 lbs)
Corriente de consmo
1,4 A 1,9 A
Corriente de consmo
1,3 A 1,5 A
Corriente de consmo
1,7 A 2,0 A
MODELOS 32LE4300 (32LE4300-SA) 42LE4300 (42LE4300-SA)
Dimensiones
(Ancho x
Altura x
Profundidad)
incluyendo la base
786,0 mm x 559,0 mm x 221,0 mm
(30,9 pulgadas x 22,0 pulgadas x 8,7 pulgadas)
1018,0 mm x 692,0 mm x 270,0 mm
(40,0 pulgadas x 27,2 pulgadas x 10,6 pulgadas)
excluyendo la base
786,0 mm x 500,0 mm x 39,9 mm
(30,9 pulgadas x 19,6 pulgadas x 1,5 pulgadas)
1018,0 mm x 627,0 mm x 29,8 mm
(40,0 pulgadas x 24,6 pulgadas x 1,17 pulgadas)
Peso incluyendo la base
12,4 kg (27,3 libras)
19,7 kg (43,4 libras)
excluyendo la base
10,6 kg (23,3 libras)
17,2 kg (37,9 libras)
Corriente de consmo
1,3 A 1,5 A

39

NOTE
ENG
Some video codecs listed in the manual may not be
supported, depending on the region (country).
POR
Alguns codecs de vídeo listados no manual podem não
ser suportados, dependendo da região (país).
POL
Niektóre kodeki wideo wymienione w instrukcji mogą
nie być obsługiwane, w zależności od regionu (kraju).
SPA
Algunos códecs de vídeo que figuran en el manual
pueden no ser compatibles, dependiendo de la región
(país).
THA

MANUAL DE USUARIO
TELEVISOR LCD CON LED
/ LCD / PLASMA
Lea atentamente este manual antes de poner en marcha su equipo y
guárdelo para futuras consultas.
El número de modelo y serie del televisor se
encuentra en la parte posterior y en un lateral del
televisor respectivamente.
Anótelo a continuación para tenerlo disponible en
caso de necesitar asistencia.
MODELO
SERIE
El manual de usuario que contiene informacion de
las funciones avanzadas de esta Television LG se
encuentra ubicado en el CD-ROM proveido en una
version electronica.
Para leer los archivos, usted necesita una computa-
dora personal (PC) equipada con un dispositivo para
leer CD.
www.lg.com
TELEVISOR LCD CON LED
22LE5300
26LE5300
32LE5300
37LE5300
42LE5300
47LE5300
55LE5300
TELEVISOR LCD
26LD350
32LD350
32LD460
37LD460
42LD460
47LD460
37LD461C
42LD461C
22LE6500
26LE6500
32LE4600
42LE4600
47LE4600
55LE4600
32LE4300
42LE4300
32LD420C
42LD420C
32LD460H
42LD460H
32LD460B
42LD460B
32LD465
37LD465
42LD465
47LD465
32LD420
42LD420
TELEVISOR PLASMA
42PJ230
50PJ230
42PJ250
50PJ250
42PJ350
50PJ350
-
 1
1
-
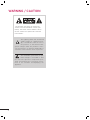 2
2
-
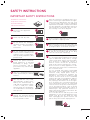 3
3
-
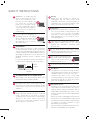 4
4
-
 5
5
-
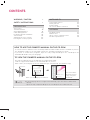 6
6
-
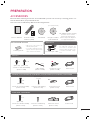 7
7
-
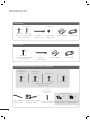 8
8
-
 9
9
-
 10
10
-
 11
11
-
 12
12
-
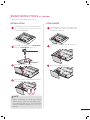 13
13
-
 14
14
-
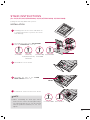 15
15
-
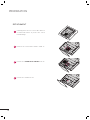 16
16
-
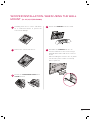 17
17
-
 18
18
-
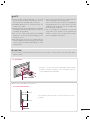 19
19
-
 20
20
-
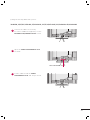 21
21
-
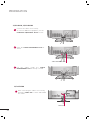 22
22
-
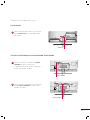 23
23
-
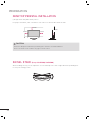 24
24
-
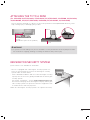 25
25
-
 26
26
-
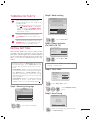 27
27
-
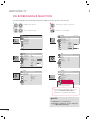 28
28
-
 29
29
-
 30
30
-
 31
31
-
 32
32
-
 33
33
-
 34
34
-
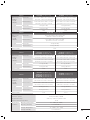 35
35
-
 36
36
-
 37
37
-
 38
38
-
 39
39
-
 40
40
-
 41
41
-
 42
42
-
 43
43
-
 44
44
-
 45
45
-
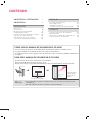 46
46
-
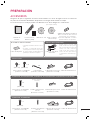 47
47
-
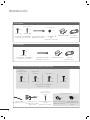 48
48
-
 49
49
-
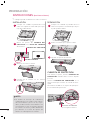 50
50
-
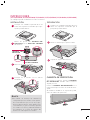 51
51
-
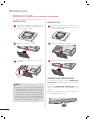 52
52
-
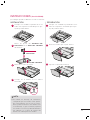 53
53
-
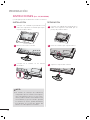 54
54
-
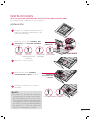 55
55
-
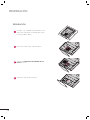 56
56
-
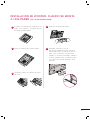 57
57
-
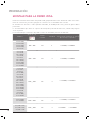 58
58
-
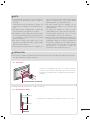 59
59
-
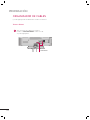 60
60
-
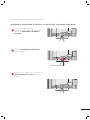 61
61
-
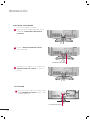 62
62
-
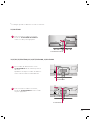 63
63
-
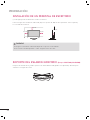 64
64
-
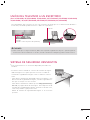 65
65
-
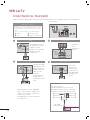 66
66
-
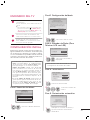 67
67
-
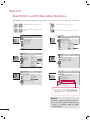 68
68
-
 69
69
-
 70
70
-
 71
71
-
 72
72
-
 73
73
-
 74
74
-
 75
75
-
 76
76
-
 77
77
-
 78
78
-
 79
79
-
 80
80
-
 81
81


LG 32LE5300 Manual de usuario
- Categoría
- Televisores LCD
- Tipo
- Manual de usuario
en otros idiomas
- English: LG 32LE5300 User manual
Artículos relacionados
-
LG 42LD465 Manual de usuario
-
LG 42LD460 Manual de usuario
-
LG 32LU660H guía de instalación rápida
-
LG 37LD460 Manual de usuario
-
-
LG 37LD460 El manual del propietario
-
-
-
LG LSW400B Manual de usuario
-
LG 26LD310 Manual de usuario