

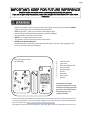
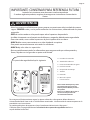
A. Extension Pins
B. Tape Pads
C. Bolt with Rubber Pads
D. Tension Knobs
E. Mounng Cups
F. Screws
G. Extension
H. Gate Frame
I. Wrench
Note: When you inially
unpack your gate there is a gap
between the swinging door and
gate frame. This is not a defect.
The gap will close once
properly mounted.
To ensure safe operaon, addional or replacement parts should be obtained only from North States or
its authorized distributors. Contact informaon appears on the cover of these instrucons. Replacement
parts can be ordered at
hp://northstatesind.com/main/shop-parts/
Any damage to property during installaon or your safety gate is the sole responsibility of the end user.
F
B
Your safety gate contains
the following:
x2
x4
x1
I
E
D
C
B
A
H
G
• Children have died or been seriously injured when gates are not securely installed. ALWAYS
install and use gates as directed using all required parts.
• STOP using when a child can climb over or dislodge the gate.
• Install only with locking/latching mechanism securely engaged.
• To prevent falls, never use at top of stairs.
• NEVER use to keep child away from pool.
• This product will not necessarily prevent all accidents.
• NEVER leave child unaended.
• Periodically check all fasteners to be sure they are ght a
nd secure, stop using gate if any
parts are missing or become damaged.
Page 2

Installation
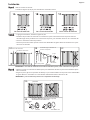
2A
2 2CB
3B
3A
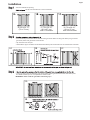
tMeasure width of the opening.
1A, 1B, 1C to determine the correct installation.
Step 1
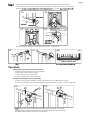
Step 2
Step 3
tSecure the gate, fasten the mounting cups to the wall by aligning them with the bolts with rubber pads.
Use double coated tapes or screw provided as shown in 3B.
IMPORTANT: Never install this gate without mounting cups!
tInsert extension pins into hole on the outside of the gate frame. Note: The long ends of the pins go into the
gate frame, short ends go into the extension 2B.
tSlip extensions over the pins.
tSlide both the upper and lower tension bolts with rubber pads into the holes on the outside of the extension.
Page 3
28.25 to 30.75”
(72 to 78 cm)
31.75 to 34.25 ”
(81 to 87 cm)
With 1 extension
35.75 to 38.25 ”
(91 to 97 cm)
With 2 extensions

3
1
4
2
4
1
2
4C
4E 4F 4G
4D
5A
5B
4A
4B
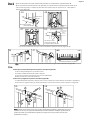
Step 4
tTighten both of the bottom tension knobs 4A by turning them clockwise at the same time 4B.
tTighten both of the upper tension knobs 4C by turning them clockwise at the same time, so the gap
between
t6TFUIFXSFODIQSPWJEFEUPFBTFUVSOJOHUIFUFOTJPOLOPCT Figure 4E, 4F.
1. Rotate the locking handle to the vertical position.
2. Depress the release button as shown.
3. Lift the door up until it swings freely.
4. Swing the door open in desired direction.
Operation
1. Simply release the gate and allow it to swing closed (unless the Stay-Open feature is used).
2.
To activate the triple latch, rotate the locking handle to the horizontal position, as shown in gure 5B.
Note: Verify proper gate installation by partially opening and releasing it several times.
The door will swing closed and double-latch automatically.
Regularly check tension knobs
Opening the gate locking system (see Figure 5A):
Closing and latching the gate (see Figure 5B):
Note: When tightening, the distance between the 4 tension bolts shoul
Page 4
1.5~2mm
and rubber pads to make sure the gate is securely in place.

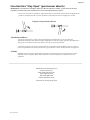
Swing to the open positions
Stay-Open Feature
Troubleshooting:
If the gate does not remain closed, the locking handle is too close to the corner of the locking housing.
This can be corrected by loosening the upper tension knobs by turning them outward, creating the
proper distance, as described in step 4 /Figure 4D.
If the gate does not remain in its opening, it was not installed properly. Remove and reinstall the gate,
Care:
CLEANING: Clean the safety gate using warm water and a mild detergent. Use a soft cloth or sponge to
avoid scratches. Never use solvents or chemicals to clean the safety gate.
IMPORTANT: Stay-Open Feature should be used only by adults, because the auto-close feature will be disabled,
allowing children to freely pass through the gate.
tTo make use of the Stay-Open Feature, simply swing the door slightly past 90 degrees open in either
direction. The door will remain open until it is swung closed.
Distributed in the United States by
North States Industries, Inc.
5455 Highway 169 N
Plymouth, MN 55442
www.northstatesind.com
Manufactured in Guang Dong, China
Page 5

Productos de calidad
para su estilo de vida
INSTRUCCIONES PARA LOS MODELOS 4916 / 4917
IMPORTANTE: ¡CONSERVE COMO REFERENCIA FUTURA!
Para obtener consejos útiles e instrucciones, visite nuestro sitio web: www.northstatesind.com, o
Comuníquese con nuestro Departamento de Atención al Cliente por correo electrónico:
CustomerService@northstatesind.com
Teléfono: +1 (763) 486-1756 o número gratuito: (800) 848-8421
Diseñado para usarse con niños de 6 a 24 meses de edad

F
x2
x4
x1
I
E
D
C
B
A
H
G
Página 7
IMPORTANTE: CONSERVAR PARA REFERENCIA FUTURA
Lea todas las instrucciones antes de armar e instalar este producto.
Si vende o regala este producto, asegúrese de entregar estas instrucciones al nuevo dueño.
Gracias.
ADVERTENCIA
t/J×PTIBONVFSUPPTVGSJEPMFTJPOFTHSBWFTQPSRVFVOBQVFSUBOPFTUBCBJOTUBMBEBEFNBOFSB
segura. SIEMPRE instale y use la puerta conforme a las instrucciones, utilizando todas las piezas
requeridas.
tDEJE de usarla cuando un niño pueda trepar sobre la puerta o desprenderla.
t̓*OTUÈMFMBÞOJDBNFOUFDPOFMNFDBOJTNPEFCMPRVFPZFOHBODIFEFCJEBNFOUFFOHBODIBEP
t̓1BSBFWJUBSDBÓEBTOVODBVUJMJDFMBQVFSUBFOMBQBSUFTVQFSJPSEFMBTFTDBMFSBT.
tNUNCA debe usarse para mantener a un niño alejado de una piscina.
t&TUFQPSUØOOPOFDFTBSJBNFOUFFWJUBUPEPTMPTBDDJEFOUFT
tNUNCA deje a los niños sin supervisión.
t3FWJTBSQFSJØEJDBNFOUFUPEPTMPTBöBO[BEPSFTQBSBBTFHVSBSTFEFRVFFTUÏOBQSFUBEPTZ
öSNFTEFKFEFVTBSTJBMHVOBEFTVTQBSUFTFTUÈEB×BEB
Pasadores de extensión
Almohadillas adhesivas
Perno con almohadillas de goma
Perillas de tensión
3FDFQUÈDVMPTEFNPOUBKF
Tornillos
Extensión
Marco de la puerta
Llave de tuercas
A.
B.
C.
D.
E.
F.
G.
H.
I.
Nota: cuando desempaca la puerta
por primera vez, hay un espacio
entre la puerta batiente y el marco
de la puerta.
Esto no es un defecto. El espacio se
cerrará una vez que esta esté
correctamente instalada.
Su puerta de seguridad incluye lo siguiente:
Para asegurar el funcionamiento seguro, las piezas adicionales o de repuesto deben obtenerse
únicamente de North States o de sus distribuidores autorizados. La información de contacto aparece en la
portada de estas instrucciones.
Se pueden pedir piezas de repuesto en http://northstatesind.com/main/shop-parts/
Cualquier daño a la propiedad durante la instalación de su puerta de seguridad es exclusiva
responsabilidad usario fínal.

2A
2 2CB
3B
3A
Instalación
Página 8
t.JEBFMBODIPEFMBBCFSUVSB
t$POTVMUFMBTöHVSBT"#Z$QBSBEFUFSNJOBSMBJOTUBMBDJØODPSSFDUB
Paso 1
Sin marco de extensión
Con 1 marco de extensión Con 2 marcos de extension
Paso 2
t4JBHSFHBSÈFYUFOTJPOFTDPOTVMUFMBTöHVSBT"#
t*OUSPEV[DBMPTQBTBEPSFTEFFYUFOTJØOFOFMPSJöDJPFOMBQBSUFFYUFSOBEFMNBSDPEFMBQVFSUB/PUBMPT
extremos largos de los pasadores van en el marco de la puerta, y los extremos cortos van en la extensión 2B.
t%FTMJDFMBTFYUFOTJPOFTTPCSFMPTQBTBEPSFT
t%FTMJDFMPTQFSOPTEFUFOTJØOTVQFSJPSFJOGFSJPSDPOBMNPIBEJMMBTEFHPNBEFOUSPEFMPTPSJöDJPTFOMBQBSUF
externa de la extensión.
perilla
de tensión
perno
marco de extensión
pasador de extensión
el extremo largo se introduce en
el marco de la puerta
extremo
largo
marco de la puerta
extensión
Paso 3
t$PMPRVFMBQVFSUBFOMBBCFSUVSBEFNPEPRVFMBQBSUFJOGFSJPSEFMNBSDPEFMBQVFSUBFTUÏUPUBMNFOUFQMBOP
sobre el suelo 3A.
t"TFHVSFMBQVFSUBöKFMPTSFDFQUÈDVMPTEFNPOUBKFBMBQBSFEBMJOFÈOEPMPTDPOMPTQFSOPTDPOMBTBMNPIBEJMMBT
de goma. Utilice las cintas doble cara o los tornillos suministrados como se muestra en 3B.
IMPORTANTE: ¡nunca instale esta puerta sin los receptáculos de montaje!
IMPORTANTE: no instale dos extensiones en el mismo lado de la puerta, como se muestra en la gura 2C.
¡Correcto!
almohadilla
de goma
cinta doble cara
tornillo
'JKFMPTSFDFQUÈDVMPTEFNPOUBKFBMBQBSFE
con tornillos o cinta doble cara.

3
1
4
2
4
1
2
4C
4E 4F 4G
4D
5A
5B
4A
4B
Página 9
Paso 4
t"KVTUFMBTEPTQFSJMMBTEFUFOTJØOJOGFSJPSFT"HJSÈOEPMBTFOTFOUJEPIPSBSJPBMNJTNPUJFNQP#
t"KVTUFMBTperillas de tensión superiores$HJSÈOEPMBTFOTFOUJEPIPSBSJPBMNJTNPUJFNQPEFNPEPRVFFM
espacio entre la puerta y la esquina superior derecha se reduzca, deje un espacio de 1.5 - 2 mm como se
muestra en la gura 4D.
perilla de tensión
ajuste hacia
adentro
ajuste hacia
adentro
marco de la puerta
una distancia entre
el panel de la puerta y
la esquina superior derecha
mantenga esta distancia
aproximadamente
1.5 - 2mm
(el espesor de una
moneda de 5 cent.
de USD).
t6TFMBMMBWFTVNJOJTUSBEBQBSBHJSBSDPONÈTGBDJMJEBEMBTQFSJMMBTEFUFOTJØO'JHVSB&'
Las distancias deben ser iguales
Nota: al ajustar, la distancia entre los 4 pernos de tensión debe ser igual
, como se muestra en la Figura
4G.
1. Gire la manija de bloqueo a la posición vertical.
2. Presione el botón de liberación como se muestra.
3. Levante la puerta hacia arriba hasta que se mueva libremente.
4. Abra la puerta en la dirección que desee.
Uso
1. Simplemente libere la puerta y deje que esta se cierre (a menos que esté usando la característica “Stay-Open”).
2.
Para activar el enganche triple, gire la manija de bloqueo a la posición horizontal, como se muestra en la gura 5B.
Cómo abrir el sistema de bloqueo de la puerta (consulte la Figura 5A):
Cómo cerrar y enganchar la puerta (consulte la Figura 5B):
Nota: WFSJöRVFMBJOTUBMBDJØODPSSFDUBEFMBQVFSUBBCSJÏOEPMBQBSDJBMNFOUFZTPMUÈOEPMBWBSJBTWFDFT
-BQVFSUBTFDFSSBSÈZTFFOHBODIBSÈEPCMFNFOUFFOGPSNBBVUPNÈUJDB7FSJöRVFSFHVMBSNFOUFMBT
perillas de tensión y las almohadillas de goma para asegurarse de que la puerta esté colocada
rmemente en su lugar

Rev 04/2017
Página 10
Empujar a las posiciones abiertas
Característica “Stay-Open” (permanecer abierta)
IMPORTANTE: la característica “Stay-Open” debe ser usada únicamente por adultos, ya que la función de cierre
automático se desactivará y esto permitirá que los niños pasen libremente por la puerta.
t1BSBVTBSMBDBSBDUFSÓTUJDBi4UBZ0QFOwTJNQMFNFOUFBCSBMBQVFSUBIBTUBVOQPDPNÈTEFVOÈOHVMPEF
HSBEPTFODVBMRVJFSEJSFDDJØO-BQVFSUBQFSNBOFDFSÈBCJFSUBIBTUBRVFTFMBFNQVKFQBSBDFSSBSMB
Solución de problemas:
4JMBQVFSUBOPQFSNBOFDFDFSSBEBMBNBOJKBEFCMPRVFPFTUÈEFNBTJBEPDFSDBEFMBFTRVJOBEFM
BMPKBNJFOUPEFCMPRVFP&TUPQVFEFDPSSFHJSTFBGMPKBOEPMBTQFSJMMBTEFUFOTJØOTVQFSJPSFTHJSÈOEPMBTIBDJB
afuera para crear la distancia adecuada, como se describe en el paso 4, Figura 4D.
Si la puerta no queda en la abertura, significa que no se instaló correctamente. Quite y vuelva a instalar la
QVFSUBBTFHVSÈOEPTFEFRVFFTUÏQMBOBEFSFDIBZQFSQFOEJDVMBSBMTVFMPDPNPTFNVFTUSBFOMBGJHVSB"
Cuidado:
LIMPIEZA: limpie la puerta de seguridad con agua tibia y un detergente suave. Use un paño suave o una
esponja para evitar rasguños. Nunca utilice solventes o sustancias químicas para limpiar la puerta de
seguridad.
Distribuido exclusivamente en los
Estados Unidos por
North States Industries, Inc.
5455 Highway 169 N
Plymouth, MN 55442
www.northstatesind.com
Fabricado en Guang Dong, China
-
 1
1
-
 2
2
-
 3
3
-
 4
4
-
 5
5
-
 6
6
-
 7
7
-
 8
8
-
 9
9
-
 10
10


NORTH STATES 4917 Instructions Manual
- Tipo
- Instructions Manual
- Este manual también es adecuado para
en otros idiomas
- English: NORTH STATES 4917
Artículos relacionados
-
 NORTH STATES 8620 Instructions Manual
-
 NORTH STATES 8750 Instructions Manual
-
 NORTH STATES 5455 MyPet Wide Walk Thru EasyPass Pet Gate Manual de usuario
-
NORTH STATES 5428 Manual de usuario
-
NORTH STATES 5455 MyPet Wide Walk Thru EasyPass Pet Gate Manual de usuario
-
 NORTH STATES 5446 Wide Deco EasyPass Pet Gate Manual de usuario
-
 NORTH STATES 8750 Superyard Colorplay Ultimate Instrucciones de operación
-
 NORTH STATES 5446 Manual de usuario
-
 NORTH STATES 8800 Manual de usuario
-
NORTH STATES 5441 Manual de usuario


Otros documentos
-
 North States MyPet 4917 Manual de usuario
-
 North States MyPet 4944 Manual de usuario
-
 North States MyPet 5274 Manual de usuario
-
Saeco HD8943/21 Manual de usuario
-
Saeco HD8946/01 Manual de usuario
-
LG DLEX7700VE El manual del propietario
-
Andersen HD2SS30WH Guía de instalación
-
Andersen E4S36WH Guía de instalación
-
Samsung WA95U3WDP/XAX Manual de usuario
-
LG DLGX7701WE Owner's Manual English, Spanish 14,747K


