GE Americana 18 El manual del propietario
- Categoría
- Neveras
- Tipo
- El manual del propietario
Este manual también es adecuado para

Top-Freezer
Refrigerators
Write the model and serial
numbers here:
Model #
Serial #
You can find them on a label on
the upper left side of the fresh food
compartment.
Safety Information
Connecting Electricity .......... 3
Extension Cords ............... 3
Safety Precautions .............. 2
Operating In#ructiom"
Automatic Icemaker ............ 5
Care and Cleaning ............. 6
Shelves ....................... 4
Storage Drawers .............. 4, 5
Temperature Controls ........... 4
Installation In#ructions
Preparing to Install
the ReflJgerator ............... 7
Reversing the Door Swing ... 11-14
Water Line Installation ....... 8-10
Tronbleshooting Tips
Before You Call
For Service ................ 15, 16
Normal Operating Sounds ...... 15
Consumer Support
Consumer Support ............ 20
Product Re_strafion ........ 17, 18
Warranty .................... 19
www.A meriea naApp lia nees. corn
Models 16, 17, 18
.÷_' Printedinthe United States
PrintedonRecyc/edPaper 19705984PO04 49-60522 07-07 JR

IMPORTANTSAFETYINFORMATION.
READALL INSTRUCTIONSBEFOREUSING.
WARNING'!
Use this appliance only for its intended purpose as described in this Owner's Manual
SAFETYPRECAUTIONS
When using electrical appliances, basic safety precautions should be followed, including the following:
This refligerator must be properly installed
and located in accordance with the Installation
Instructions before it is used.
_Do not allow children to climb, stand or hang
on the shelves in the refligerator. They could
damage the refligerator and seriously i_jure
themseNes.
_Do not touch the cold surfaces in the fleezer
compamnent when hands are damp or wet.
Skin may stick to these exuemely cold
stlrfaces.
H{_IDonot store or use gasoline or other flammable
vapors and liquids in the vicinity of this or any
other appliance.
In refligerators with automatic icemakers,
avoid contact with the moving parts of the
ejector mechanism, or with the heatng
element that releases the cubes. Do not place
fingers or hands on the automatc icemaking
mechanism while the refligerator is plugged in.
_Keep fingers out of the "pinch point" areas;
clearances between the doors and between
the doors and cabinet are necessarily small.
Be careflfl closing doors when children are
in the area.
_Unplug the refligerator before cleaning and
making repairs.
NOTE:Westrong/}/recommendthat an}/servicingbe
performedbya qualifiedindividual
H{_iTurningthe control to the 0 position does
not remove power to the light circuit.
H{_IDonot refleeze flozen foods which have
thawed completely.
A DANGER! RISK OFCHILD ENTRAPMENT
PROPERDISPOSALOFTHEREFRIGERATOR
Child enuapment and suff\mation are not
problems of the past. Junked or abandoned
refligerators are still dangerous...even if they
will sit for "just a few days." If you aIe gettng
rid of your old refligerato_; please follow the
insuuctions below to help prevent accidents.
Before YouThrowAway YourOld
Refrigerator or Freezer:
;_,Take off the doors.
I,eave the shelves in place so that children
may not easily climb inside.
Refrigerants
All refligeration products contain refligerants,
which under federal law must be removed prior
to product disposal. If you are gettng rid of an
old refligeraton product, check with the
company handling the disposal about what
to do.
2

IMPORTANT SAFETYINFORMATION.
READALLINSTRUCTIONS BEFOREUSING.
www.AmericanaAppliances.com
WARNING!
HOWTOCONNECTELECTRICITY
Do not, under any circumstances, cut or remove the third (ground) prong from the power cord.
For personal safety, this appliance must be properly grounded.
The power cord of this appliance is equipped
with a 3-prong (grounding) plug which mates
with a standard 3-prong (grounding) wall outlet
to minimize the possibility of elecuic shock
hazard flom this appliance.
Have the wall outlet and circuit checked by a
qualified electrician to make sure the outlet is
properly grounded.
Where a standard 2-prong wall oudet is
encountered, it is your personal responsibility
and obligation to have it replaced with a
properly grounded 3-prong wall outlet.
The refiigerator should ahvays be plugged into
its own individual electrical outlet which has a
voltage rating that matches the rating plate.
This provides the best performance and also
prevents overloading house wiring circuits which
could cause a fire hazard flom overheated wires.
Never unplug your refligerator by pulling on the
power cord. Ahvays grip plug firmly and pull
straight out flom the outlet.
Repair or replace immediately all power cords
that have become flayed or otherwise damaged.
Do not use a cord that shows cracks or abrasion
damage along its length or at either end.
X_rllell moving the refligerator away flom the
wall, be careflfl not to roll over or damage the
power cord.
USEOFEXTENSIONCORDS
Because of potential safety hazards under certain conditions, we strongly recommend against
the use of an extension cord.
Howevei, if you must use an extension cord, it is absolutely necessary that it be a UI,-listed (in the
United States) or a CSA-listed (in Canada), 3-wire grounding type appliance extension cord having a
gxounding type plug and outlet and that the elecuical xafing of the cord be 15 ampexes (minixmml)
and 120 volts.
READAND FOLLOWTHISSAFETYINFORMATIONCAREFULLY.
SAVE THESEINSTRUCTIONS
3

Aboutthetemperaturecontroldial.
Turningthe dialto 0 stops cooling in both compartments--fresh food and freezer.It does notshut off power to the refrigerator.
Temperature Control Dial (on some models)
Tile temperature control dial has nine Insert a coin into file slot in flae middle
settings plus 0. I is the warmest. 9 is tile of tile dial and you can nlrn tile dial to
coldest. At first, set file dial at 5. the setting that is best suited to your needs.
After using the refi'igeratoI; adjust the dial Allow 24 hours fbr the refi'igerator to
if necessary, get cold.
Aboutthefreshfoodcompartmentshelves.
Shelf supports at various levels allow youto custom-space your shelves. Not all features are on all models.
Half- Width Shelves
ITITilt up
One end of die shelf rests oil a molded side-
wall support; a bracket oil the other end
hooks into a track oil the rear cahinet wall.
Toremove,lift the shelf up at fi'ont, then off
the support and out of file u'ack.
Toreplace,select desired shelf height. With shelf
fiont raised slightly, hook the bracket's top lug into
rite track, then lower rite shelf onto rite support.
NOTE:Theshelftotherightofthetrackis
designedtohookintotheright-handslot,theshelf
totheleftisdesignedtohookintotheleft-handslot.
1 _Lift iear
i ii
Toremovethefull-widthshelves
Full- Width Shelves
Some models have a steel wire sliding shelf, a
stationary tempered glass shelf, a spillproof
shelf or me steel wire stationary shelves.
These shelves can be moved to another place
in tile fresh food compartment.
Tile fifll:_ddth sliding shelf has stop-locks.
¼qlen placed correctly on the shelf supports,
the shelf will stop before coming completely
out of the refiigerator and will not tilt Mien
you place food on it or remove food fi'om it.
Toremoveafull-width shelf when thefresh
food compartmentdoor cannot be openedfully
II II
Spillproof Shelves (on some models)
Spillproof shelves have special edges
to help prevent spills from dripping
to lower shelves. To remove or replace
tile sheNes, see tile above insu_ucdons.
About the freezer compartment shelves.
Step Shelf
Toremovethestepshelf:
[--_]I_ift left side of shelf slightl):
[2-]Move shelf to tile left to flee its right
ends flom holes in tile cabinet wall.
[-_]I,ower fight side of shelf, move shelf to
tile right and rake it out.
Toreplace thestepshelf:
[--__¥ith shelf tilted as shown, fit left ends
of shelf into holes in cabinet wall.
[2--]I,iff left side of shelf slightly, swing shelf
tap, fit fight ends of shelf into holes in
cabinet wall, and lower shelf into place.
About the storage drawers.
Not all features are on all models.
Fruit and Vegetable Drawers
Excess water that may accumulate in tile
bottom of tile drawers should be empded
and tile drawers wiped dry.

About the storage drawers, www.AmericanaAppliances.com
Utility Drawer
The utility drawer can be moved to the
most useflll location for your famib,'s needs.
About storage drawer and cover removal.
Not aft features are on aft models.
Humidity Control
HIGH LOW
Adjustable Humidity Drawer (onsomemodels)
Slide the control all the way to the Slide the control all fl,e way to the LOW
HIGHsetting to provide high humidity setting to provide lower humidity levels
recommended for most vegetables, recommended for most fruits.
Drawer and Cover Removal
Drawers can be removed easily by grasping the sides and lifting up slightly while pulling
drawers past the stop location.
Full-Width Drawer with Plastic Cover
Toremovethecover,lift it off its supports,
pull it forward, tilt it and rake it out.
/
/17
Twin Drawer Shelf
Toremove:
[Z] Remove the drawers.
r_9--]Reach in, push the flont of glass cover
up, and at the same time, pull it forward
as flu as it will come.
Tilt it and take it out. Avoid cleaning the cold
glass cover with hot water because *lie extreme
{emperature difference may cause it to break.
[7_ Remove the drawer flmne. (Always
'"' remove the ,glasscover before you rake
out the drawer flame.)
Lift the fi'mne off the supports at each side
and back, pull it forwax'd, flit it and take it out.
Toreplace:
F-_ Lower the frame until it rests on the
supports at each side and back.
_--]Replace the glass covei; pushing its rear
edge firmly into the rear flame channel
and gently lowering the flont into place.
[j] Replace the dmwe_s.
About the automatic icemaker so e odels).
A newly-installed refrigerator may take 12-24 hours to begin making ice.
P0werSwitch
Icemaker
/
0 rLigh
FeelerArmin
i theSTOP
Fee]erArmin (up)p0siti0n
theOR (down) ............
p0atJ0n
The icemaker will produce approximately
3 to 3 1/2 lbs. of ice in a 24-1]om period,
depending on the freezer compartment
temperature, room temperature, tmmber
of door openings and other use conditions.
If the refligerator is operated before the water
connection is made to the icemaket; mo_e rite
feeler arm to the STOP(up) position.
%Then the refligerator has been connected
to the water supply; move the f;eeleram, to
the ON(down) position.
The icemaker willfill with water when it cools
to 15°E A newly-installed refiigerator may rake
12 m 24 hours to begin making ice cubes.
Once the icemaker starts to make ice, it ma_
take up to 48 hours to fillthe bin, depending
on the temperature seuings and munber of
door openings.
You will hear a buzzing sound each time
the icemaker fills with wares:
Throw away the fi_t f;ewbatches of ice to
allow the water line to clear
Be sme nothing inmrfe.res with the sweep
of the feeler arm.
When the bin fills to the level of the fe.eler
arm, d,e icemaker will stop producing ice.
It is normal for several cubes to be joined
together
If ice is not used flequentl 5 old ice cubes
will become cloudy, tasm stale, shrink or
fuse together
On power switch models, fl,e gTeen power
light will blink if ice cubes get stuck in the
icemaker To correct this, set the power
swimh to 0 (Off)and remove the cubes. Set
the power switch to I (On)to restart the
icemaker After the icemaker h_ksbeen
turned on again, there will be a delay of
about 45 minums before the icemaker
resumes operation.
NOTE:In homeswith lower-than-averagewater
pressure,youmayhear the icemakercycle multiple
times when makingonebatch of ice.
Icemaker accessory kit:
Ifyour refiigerator did not aheady come
equipped with an automa/ic icemaket; an
icemaker accessory kit is available at extra cost.
Check the back of the refligemtor for
the specific icemaker kit needed
for your model. 5

Care and cleaning of the refrigerator.
Cleaning the Outside
Thedoorhandlesandtrim (on some models). Clean
with a cloth dampened with soapy wateL Dry Mtb a
soft cloth.
Keep theoutsideclean.Wipe with a clean cloth lightly
dampened with kitchen appliance wax or mild liquid
dish detergent. Dry and polish with a clean,
soft cloth.
The stainless steel panels and door handles (on some
models) can be cleaned with a commercially available
stainless steel cleaneL Do not use appliance wax or polish
on tile stainless steel.
Donot wipetherefrigeratorwitha soileddishclothor wet
towel Thesemay.leavearesiduethatcanerodethepaint.
Donot usescouringpads,powderedcleaners,bleachorcleaners
containingbleachbecausetheseproductscanscratchand
weakenthepaint finish.
Cleaning the Inside
To helppreventodors,leave an open box of baking soda
in tile fiesh food and freezer compartments.
Unplugtherefrigeratorbeforecleaning.
If this is not practical, wring excess moisture out of
sponge or cloth when cleaning around switches, lights
or controls.
Use warm water and baking soda solution--about a
tablespoon (15 ml) of baking soda m a quart (1 liter)
of water. This both cleans and neutralizes odors. Rinse
and wipe dry:
After cleaning tile door gaskets, apply a thin layer of
petroleum .jelly to tile door gaskets at tile hinge side.
This helps keep the gaskets from socking and bending
out of shape.
Avoidcleaningcoldglassshelves(onsomemodels)with hotwater
becausetheextremetemperaturedifferencemay.causethemto
break.Handleglassshelvescarefully.Bumpingtemperedglasscan
causeit to shatter.
Donot washany.plasticrefrigeratorpartsin thedishwasher.
Condenser
There is no need for routine
condenser cleaning in
normal home operating
environments. However; in
environments that may be
gleaningthocondonsorcoils, particularly dusty or greasy,
the condenser should be
cleaned periodically for efficient refrigerator operation.
To clean tile condense_; turn tile temperature control
dial to 0. Sweep away or vacuum up dust.
For best results, use a brush specially designed for this
purpose. It is available at most appliance parts stores.
6
Moving the Refrigerator
Be careflfl when moving tile refligerator away flom
tile wall. All types of floor coverings can be damaged,
particularly cushioned coverings and those with
embossed surfaces.
Turn file leveling legs at each flont corner of die
refligeramr counmrclockwise until tile rollers support
tile refligemtoL Pull tile refligeramr smfight out and
reunn it to position by pushing it snaight in. Moving
therefrigeratorin a side directionmaltresultin damage
tothefloorcoveringorrefrigerator.
When pushing the refrigerator back, make sure you don't roll over
the power cord or icemaker supply,line (onsome models).
After rolling tile refligerator back into place, mrn tile
legs clockwise unOl tile legs again bear tile weight of tile
refiigeratoL
Light Bulb Replacement
To replace a burned-out bulb, unplug tile refligerator
flom its elecuical oudet, unscrew tile bulb when cool
and replace it with an appliance bulb of tile same or
lower wattage.
Turningthe control to the Oposifion does not remove power to
the light circuit.
Preparing for Vacation
For long vacations or absences, remove food and
unplug tile refligerator. Move tile temperature control
dial to tile 0 position, and clean tile interior with a
baking soda solution of one tablespoon (15 ml) of
baking soda to one quart (1 liter) of wateL I,eave tile
doors open.
Move the feeler arm to the STOP (up) position and
shut off tile water supply to tile refligeratoL
If tile temperature can drop below fleezing, have a
qualified servicer drain the water supply system (on
some models) to prevent serious property damage
due to flooding.
Preparing to Move
Secure all loose items such as grille, sheh'es and drawers
by roping them securely in place to prevent damage.
Besuretherefrigeratorstaysin anuprightposition&flog moving.

Installation Instructions
ff you have questions, call 1.800.432.2737
Models 16,17,18
BEFORE YOU BEGIN
Read these instructions completely and carefully.
" IMPORTANT - S.vethese
instructions if)r local inspector's use.
" IMPORTANT - Obseive.ll
governing codes and ordinances.
* Note to Installer - Be sure to leave these
instructions with tlle Consumer.
* Note to Consumer - Keepthese instructions
for furore reference.
* Skill level - Installation of this appliance requires
basic mechanical skills.
* Completion time - Refligerator Installation
15 minutes
Reversing tile Door Swing
1 hour
* Proper installation is tile responsibility of tile
installer.
* Product failure due to improper installation is not
covered under the _!arIanty.
WATER SUPPLY TO THE ICEMAKER
(on some models)
If tile refligerator has an icemaker, it will have to be
connected to a cold water lille. A water supply kit
(containing copper tubing, stmtoff vane, fittings and
instructions) is available at extra cost from your dealm;
by visiting our Website at ge.com (ill Canada at
www.geappliances.ca) or fiom Parts and Accessories,
1.800.661.1616.
REFRIGERATOR LOCATION
• Do not install tile refligerator where file temperature
will go below 60°F (16°C) because it will not run often
enough to maintain proper mmperamres.
• Install it oil a floor suong enough to support it dilly
loaded.
CLEARANCES
Allow file following clearances for ease of installation,
proper air circulation and plmnbing and electrical
COllnectioIIs.
• Sides 3/4" (19 mm)
• Top 1" (25 nnn)
• Back 1" (25 mm)
ROLLERS AND LEVELING LEGS
Leveling legs near each flont corner of tile refligerator
are adjustable. They firmly position tile refiigerator
and prevent it flom moving when tile doors are
opened. I,eveling legs should be set so tile flont of tile
refligerator is raised just enough that tile doors close
easily when opened about halfk,vay.
Turn tile leveling legs clockwise toraise tile
refrigeratoi, counterclockwisetolower it.
Rollers next to tile leveling legs allow you to move tile
refligerator away flom tile wall for cleaning.
Turn tile legs counterclockwise until tile weight of tile
refligerator is uansferred flom them to tile rollers.
Afker rolling tile refligerator back into place, turn tile
legs clockwise until tile legs again bear tile weight of
tile refligeratoL

Installation instructions
iNSTALLiNG THE WATER LiNE (oNSOMEMODELS)
BEFORE YOU BEGIN
Recommended copper water supply kits are _FX8X2,
WX8X3 or WX8X4, depending on the amount of
tubing you need. Approved plastic water supply lines
are GE SmartConnect F''Ref)igerator Tubing
(WX08X10006, WX08X10015 and WX08X10025).
When connecting your refligerator to a GE Reverse
Osrnosis Water System, the only approved installation
is with a GE RXqCdt. For other reverse osmosis water
systems, follow the manufhcmrer's recommendations.
This water line installation is not warranted by the
refiigerator or icemaker manufhcmrer. Follow these
instructions careflflly to minimize the risk of expensive
water damage.
Water hammer (water banging in the pipes) in house
plumbing can cause damage to refiigerator parts and
lead to water leakage or flooding. Call a qualified
plumber to correct water hammer before installing
the water supply line to the ref}igerator
To prevent burns and product damage, do not hook
up the water line to the hot water line.
If you use your refligerator before connecting the
water line, make sure the feeler arm is in the STOP
(up) position.
Do not install the icemaker robing in areas where
temperatures fall below fieezing.
When using any electrical device (such as a power
drill) during installation, be stue the device is double
insulated or grounded in a manner to prevent the
hazard of electric shock, or is battery powered.
All installations must be in accordance with local
plumbing code requirements.
WHAT YOU WiLL NEED
• Copper or GE SmartConnect T_'Refrigerator Tubing
kit, 1/4" outer diameter to connect the ref_igerator
to the water supply. If using coppe_; be sure both
ends of the robing are cut square.
To determine how much tubing you need: measure
the distance fYom the water valve on the back of the
refiigerator to the water supply pipe. Then add 8"
(2.4 m). Be sure there is sufficient extra robing
(about 8" [2.4 m] coiled into 3 turns of about 10"
[25 cm] diameter) to allow the refiigerator to move
out fiom the wall after installation.
WHAT YOU WILL NEED (CONT.)
GE SmartConnect'" Refrigerator Tubing Kits are
available in the following lengths:
6' (1.8 m) -_qX08X10006
15' (4.6 m) -X4qX08X10015
25' (7.6 m) -_i_qX08X10025
Be sure that the kit you select allows at least 8' (2.4 m)
as described above.
NOTE: The only GE approved plastic tubing is that
supplied in GE SmartConnect TM Refrigerator Tubing
kits. Do not use any other plastic water supply line
because the line is under pressure at all times. Certain
types of plastic will crack or rupture with age and
cause water damage to your home.
• A GE water supply kit (containing tubing, shutoff
vane and fittings listed below) is available at exua
cost fiom your dealer or fiom Parts and Accessories,
1.800.661.1616.
• A cold water supply. The water pressure must be
between 20 and 120 p.s.i. (1.4-8.1 bar).
• Power drill. _._
• 1/2" or adjustable wrench.
• Straight and Phillips
blade screwdriver.
• Two 1/4" outer diameter compression nuts and
2 ferrules (sleeves)--to connect
the copper tubing to the shutoff .___2_'-_-,_
vah'e and the refrigerator water valve. __"-_
OR
• If you are using a GE SmartConnect'" Refiigerator
Tubing kit, the necessa_ T fittings are preassembled
to the tubing.
• If your existing copper water line has a flared fitting
at the end, you will need an adapter (available at
plumbing supply stores) to connect the water line to
the refligerator OR you can cut off the flared fitting
with a tube cutter and then use a compression
fitting. Do not cut formed end flom GE
SmartConnect"* Refrigerator robing.
• Shutoff valve to connect to the cold water line.
The shutoff valve should have a water inlet with a
minimum inside diameter of 5/32" at the point of
connection to the COLD WATER LINE. Saddle-type
shutoff valves are included in many water supply kits.
Before purchasing, make sure a saddle-type vane
complies with your local plumbing codes.
8

Installation instructions
Install the shutoff vaNe on the nearest frequently used drinking water line.
m SHUT OFF THE MAIN WATER
SUPPLY AND UNPLUG
REFRIGERATOR
Turn on the nearest faucet (counterclockwise) long
enough to clear the line ofwatm.
[] DRILL THE HOLE FOR THE VALVE
Ghoose a location for the vane that is easily
accessible. It is best to connect into the side of a
vertical water pipe. When it is necessary to connect
into a horizontal water pipe, make the connection
to the top or side, rather than at the bottom, to
avoid drawing off"any sediment from the water pipe.
Drill a 1/4" hole in the water pipe (even if using a
self-piercing valve), using a sharp bit. Remove any
burrs resulting from drilling the hole in the pipe.
Take care not to allow water to drain into the drill.
Failure to drill a 1/4" hole may result in reduced
ice production or smaller cubes.
F
I_ FASTEN THE SHUTOFF VALVE
Fasten the shutoff vaNe to the cold water pipe with
the pipe clamp.
Tighten the clamp screws until the sealing washer
begins to swell.
NOTE: Do not overtighten or you may crush the
tubing.
PipeClamp-_N4k, _
ClampScrew#
Saddle-Type_/'
ShutoffValve
,)
Washer
[/_lnlet End
VerticalCold
WaterPipe
NOTE: Gommonwealttl of Massachusetts Plumbing
Godes 248GMR shall be adhered to. Saddle vanes
are illegal and use is not permitted in Massachusetts.
Gonsult with your licensed plumbe_.
9
I_ ROUTE THE TUBING
Route the tubing between the cold water line and
the refligerator.
Route the tubing through a hole drilled in the wall
or floor (behind the refligerator or adjacent base
cabinet) as close to the wall as possible.
NOTE: Be sure there is sufficient extra robing
(about 8 feet [244 cm] coiled into 3 turns of about
10" [25 cm] diameter) to allow the refligerator to
move out flom the wall after installation.
CONNECT THE TUBING
TO THE VALVE
Place the compression nut and ferrule (sleeve)
for copper robing onto the end of the tubing and
connect it to the shutoff valve.
Make sure the robing is fitly inserted into the
valve. Tighten the compression nut securely.
For plastic robing flom a GE SmartGonnecff'*
Refligerator Tubing kit, insert the molded end
of the tubing into the shutoff valve and tighten
compression nut until it is hand tight, then tighten
one additional turn with a wrench. Overtightening
may cause leaks.
_ression
Nut
Saddle-Type
ShutoffValve SmartConnecU
Tubing
PackingNut--
Outlet Valve, -- Ferrule (sleeve)
NOTE: Gommonwealth of Massachusetts Plumbing
Godes 248GMR shall be adhered to. Saddle vanes
are illegal and use is not permitted in Massachusetts.
Gonsult with your licensed plumber.
FLUSH OUT THE TUBING
Turn the main water supply on (counterclockwise)
and flush out the tubing until the water is clea_.
Shut the water off at the water valve after about
one quart (1 liter) of water has been flushed
through the tubing.

Installation instructions
I1,1 INSTALLING THE WATER LINE (CONT.)
[] CONNECT THE TUBING TO THE
REFRIGERATOR
NOTES:
" Betbr_ making the connection to the rcfligcmtor, be sur_
the rcfligecator power cord is not plugged into the wall
outlet.
• We recommend installing a water filter if your water supply
has sand or paildcles that could clog the screen of the
refligecator's water *_tl_e. Install it in the water line near the
refligemtor. If using GE SmartConnecf <Refligecator Tubing
kit, you will need an additional robe (_N08X10002) to
connect the filter. Do not cut plastic robe to install filte,:
Ren/ove the access cover.
_J
Remoxe tile plastic flexiMe cap flon_ the water
xaEe (refl'igenmw connection).
©
Place the compression nut and tcrrule (sleeve) onto tile end
of the robing as shown. On GE SmartConnect "_ Refl'igemtor
Tubing kit, the nuls are already assembled/o the nlbing.
Insert tile end of tile robing into tile wamr valve connection
as tin as possible. _¢\_file holding the robing, fighmn the
fitting.
For plastic robing flom a GE SmartConnecff '_Refligemtor
Tubing kit, insert the molded end of tile robing into tile
shutoff valve and fighmn corn pression nut until it is hand
fight, then tighten one additional turn with a wrench.
Overfigh/ening m_W cause leaks.
Fasten the tubing into the clamp provided to hold it in
a vertical position. You may need to pry open the clamp.
1/4"Copper
Tubing
TubingClamp
1/4"Compression
Nut
(sleeve)
Refrigerator
Connection
SmartConnectT_
Tubing
Fif]TURN THE WATER
ON AT THE
SHUTOFF VALVE
Tighten any connections
that leak.
[9] PLUG IN THE REFRIGERATOR
Arrange the coil of tubing so that it does not xibrate
against the back of the refl'igerator or against the wall.
Push the refl'igerator back to the wall.
[_ START THE ICEMAKER
On power switch models, set the icemaker power
switch to the / (On) position. On feeler arm models,
move the feeler arm to the ON (down) position. The
icemaker will not begin to operate until it reaches
its operating temperature of 15°F (-9°C) or below.
It will then begin operation automatically.
Power switch model
in
the ON (down) position
Feeler arm model
NOTE: In lower water pressure conditions, tile
water valve may turn oi1 up to 3 times to deliver
enough water to tile icemakeL
10

REVERSING
Installation instructions
THE DOOR SWING
IMPORTANT NOTES
When reversing the door swing:
• Read the instructions all the way through before
starting.
• Handle parts carefldly to avoid scratching paint.
• Set screws down by their related parts to avoid using
them in the wrong places.
• Provide a non-scratching work surface for
the doors.
IMPORTANT: Once you begin, do not move the
cabinet until door-swing reversal is complemd.
These insu_ucfions are for changing the hinges flom
the right side to the left side--if you ever want to change
the hinges back to the right side, follow these same
insu-ucfions and reverse all references to left and right.
TOOLS REQUIRED
Phillipsscrewdriver
Maskingtape
5/16" hex-head
socketdriver
T20or T25Torxdriver
(neededfor somemodels)
Puttyknife orthin-blade
screwdriver
5/16" open-end
wrench
[] REMOVE THE FREEZER DOOR
2.1 Tape the door shut with masking tape.
2.2 With a 5/16" hex-head socket drivm, remove the
screws that hold the top binge to the cabinet.
2.3 I,ift the hinge (and the shim glued to it) straight
tap to flee the hinge pin fiom the socket in
the top of the door and set it aside, along with
its screws.
TopHinge
2.4 Remove the rope and tilt the (loot away flom the
cabinet. I,ift it off the center binge pin.
2.5 Set the (loot on a non-scratching surface with
the outside up.
I_ BEFORE YOU START
1.1 Unplug the refrigerator from its electrical
outlet.
1.2 Empty all door shelves, including the dairy
compartment.
CAUTION: Do not let either (loot drop to the
floor. To do so could damage the (loot stop.
2.6 Transfer tim 2 screws flom tim opposite side of
the cabinet to the screw holes vacated by the
top hinge removal.
11

Installation instructions
B REVERSING THE DOOR SWING (CONT.)
[] REMOVE THE FRESH FOOD DOOR
3.1 Tape the door shut with masking tape.
3.2
Using a 5/16" hex-head socket screwdriver and
a 5/16" open-end wrench, remove the two
screws holding the center binge (and the shim
glued to it) to the cabinet. I,ift the center hinge
to flee its pin flom the socket in the top of the
door, and set hinge and screws aside. Be careful
not to lose the center hinge spacer and washer.
3.3 Remove dm tape and flit die door away flom file
cabinet. I,ift file door flom file pin in the bottom
hinge bracket. (If the plastic washer socks to the
door bottom, put it back on file hinge.)
3.4 Set tile door outside-up on a non-scratching surface.
REMOVE THE FRESH FOOD DOOR (CONT.)
3.5 Transfer tlle two screws flom tlle opposite side of tile
cabinet to tile screw holes vacated by tile center
hinge removal.
3.6 Transfer tile washer (if your model has one) to tile
opposite side.
3.7 _ke one of file screws removed in stop 2 and start
it in the oummlost screw hole on the opposite side.
Do not drive it all the way down-ileave enough space
under the screw head for thickness of shim and
bracket.
REVERSING THE HARDWARE
4.1 Moxe the bottom hinge bracket (and shim glued to it)
and plastic washer fiom the right side to the left side.
Plastic
--'_ I., __1Washer
Switchthehinge pintothe ®[¢"I _1_1_
oppositesideofthebracket. II_--__:_
Hinge
Bracket
12

Installation instructions
I
I_ REVERSING THE HARDWARE (CONT.)
4.2 Interchange hinge (and the shim glued to it) and
screws at top right with screws at top left of cabinet.
Do not tighten screws on hinge side at this time.
Installingthe hingeonthe left. Installingthe hingeonthe right.
NOTES:
• Some hinges have four holes. Which holes you
use for installing tile hinge depends on which
side you install tile hinge.
• Tile outer edge of tile hinge should be parallel
to tile edge of tile case for correct installation.
I-_ REVERSING THE DOOR HANDLES
5.1 Transfer fresh food door handle
5.1.1 Remove tile handle plug using a rope-tipped
putty knife under tile edge, and remove tile
screw underneath. Remove tile two screws
holding tile handle to tile top of tile dooL
Plug'_
5.1.2 Remove tile handle.
5.1.3 Remove tile screws from tile right edge of tile
door top and insert them into tile handle screw
holes on tile opposite side.
Screws
for Handle
Holes
I
[] REVERSING THE DOOR
HANDLES ICONT.I
5.1 Transfer fresh food door handle (cont.)
5.1.4 With tape-tipped putty knife or thin-blade
screwdriver, pry out tile plug button flom tile
hinge hole on the left side of tile door and
insert it into tile hole on tile opposite side that
was vacated by removal of tile top hinge.
PlugBu_
5.1.5 Pull tile plug button flom tile flont of tile door
and transfer it to tile opposite side.
PlugButton
Toreattachthe
handleonthe
oppositeside.
5.2 Transfer door stop
5.2.1 Move tile metal
door stop from
tile right end to
tile left end.
DoorStop
Left_:_"
5.2.2 Move any
screws froII1
tile left end to
tile right end.
RightSi_........_
5.3
Reinstalling the Fresh Food Door
Handle
5.3.1 Attach tile handle to
tile right side of tile I ---"-_
door with screws at
tile top and under
tile handle plug. _
5.3.2 Reinstall the
handle plug.
13

Installation instructions
REVERSING THE DOOR SWING (CONT.)
i51 REVERSING THE DOOR HANDLES (CONT,)
5.4 Transfer Freezer Door Handle
5.4.1 Remove the screw
holding the handle
to the top of the
door and the two
screws holding the
handle to the 1)ottom
of the door.
5.4.2 Remove the handle.
5.4.3 Remove the screw tiom the
right top edge of the door
and insert it into the
handle screw hole on the
left side.
5.4.4 Transfer the door stop as shown in preceding
I
section 5.2.
5.4.5 Attach the handle to the
right edge of the door I
with screws at top and
l)ottom, using bottom holes
_cated 1)y remowd of the
door stop screws.
I-_RE-HANGING THE DOORS
6.1 Re-hang the fresh food door
6.1.1 Lower the fresh food door onto the
bottom hinge pin. Be sure the washer
is in place on the pin.
Hinge__o
Bracket
Plastic
Washer
I-6]RE-HANGING THE DOORS (CONT.)
washer, on the hinge pin.
NOTE: The center hinge must
be turned over as shown when
mounted on the led side.
6.1.2 Insert the pin on the center hinge into the socket in
the top of the door. Place the spacer, then the
and Spacer
6.1.3 Tilt the door toward the cabinet. As the door is
1)rought into position, slide the hinge under the head
of the screw which earlier had been partly driven into
the outermost hole. Insert the remaining screw, then
tighten 1)oth screws securely.
6.2 Re-hang the freezer door
6.2.1 Lower the freezer door
onto the center hinge
pin. Be sure the Center Hing
washer and spacer
are in place on the pin. __
and Spacer
6.2.2 Tilt the door toward the cabinet, lifting the top hinge
so the pin fits into the socket on the top of the door.
6.2.3.
Make sure the door is slightly above the top of the
cabinet and the gap between the doors is even across
the tiont. Tighten the top hinge screws. Do not
overtighten these screws-tighten them until they are
just snug, then turn them another one-half turn.
14

Normal operating sounds. AmerioanaApplianoesoom
Newer refrigerators sound different from older refrigerators. Modem refrigerators have more features
and use newer technology.
Do you hear what I hear? These sounds are normal.
• The.ewhighefr,cie.cy HUMMM...
conlpressor nlay Ytln
_lllfll fllAl_ Ill
f.s_e,..d longe,_ha. -- wnuuon...
your old refrigerator
and you may hear a high-pitched hum or pulsadng
sound while it is operadng.
• You may hear a whooshing sound when the doors close.
This is due m pressure equalizing within the refligemmL
CLICKS, POPS,
CRACKS and CHIRPS
• You may hear cracking or popping sounds when file
refligerator is fi_t plugged in. This happens as the
reflJgemtor cools m the correct mmpemmre.
• The compressor may cause a dicking or chiIping sound
when attempting m restart (dds could rake
up m 5 mint]ms).
• Expan0on and cormaction of cooling coils during and
_ffterdeflost can cause a crocking or popping sound.
• On models wkh an icemake_; _ffteran icemaking cycle, you
mW hear the ice cubes dropping into file ice bucket.
WHIR!
• You may hear the fans spinning at
high speeds.
This happens when the refligerator
is first plugged in, when the doors
are opened flequenfly or when
a large amount of food is added to the refrigerator or
fleezer compartments. The fans are helping to
maintain the correct temperatures.
WATERSOUNDS
• The flow of refrigerant through the freezer cooling coils
mW make a gurgling noise like b41ing wateL
• Wamr dropping on file deflost heater can cause a sizzling,
popping or buzzing sound during the deflost cycle.
• Awater dfippi_g n4se may (_2ctlrduring file defrost cycleas
ice melts flom file evaporator mad flowsinto file &vfinDin.
• Closing file door mW cause a gurgling sound due m
pressure equalization.
Before you call for service...
Troubleshooting Tips
Save time and money!/ Review the charts on the following
pages first and you may not need to call for service.
Refrigeratordoesnot
operate
What ToDo
• _(Mfitabout 30 minutes for defrost cycle to end.
• Move file mmpemmre conUol dial m a mmpemmre
setting.
• Push the plug complemly into the outlet.
• Replace filse or reset the breakeL
PossibleCauses
Refrigerator in defrost cycle.
Temperature control dial
in 0position.
Refrigerator is unplugged.
The fuse is blown/circuit
breakeris tripped.
Roller screwsor leveling legs
need adjusting.
Temperature control dial
not set cold enough.
Warm weather or frequent
door openings.
Door left open.
Package blocking air duct in
freezer compartment.
Vibrationorrattling(slight • See RollersandLevelingLegs.
vibrationisnormal)
Freshfoodorfreezer • See Aboutthetemperaturecontroldial.
compartmenttoowarm
• Set file temperature cormel dial one step comet.
SeeAboutthetemperaturecontroldial
• Check to see if packalge is holding door open.
• Check m see if packalge is Necking air duct in fleezer
co[ilpartlllent.
15

Before you call for service...
Troubleshooting Tips
PossibleCauses What ToDo
Motor operates for long Normal when refrigerator
periods or cycles on and is first plugged in.
offfrequently. (Modern Often occurs when large * This is hernial.
refrigerators with more amounts of food are
storage space and a larger placed in refrigerator.
space and a larger freezer
require more operating Door left open. • Check to see if package is holding door open.
time. Theystart and stop Hot weather or frequent * This is natural.
oftento maintain even door openings.
temperatures.)
Temperature control dial * See About the temperature control dial.
set at the coldest setling.
Grille and condenser • See Care and cleaning.
need cleaning.
Frost orice crystals Door left open. • Check to see if package is hoMing door open.
on frozen food Too frequent or too long
(frost within package door openings.
isnormal)
Automatic icemaker Icemaker is not on. • Move the feeler ann to the ON (down) position.
does not work Water supply turned off or * See Installing the water line.
(onsomemodels) not connected.
Freezer compartment • Wait 24 hems for the refligemtor to completely
too warm. cool down.
Piled up cubes in the storage • Level cubes by hand.
bin cause the ieemaker
to shut off.
Frequent"buzzing" sound Icemaker is on but the water * Move the feeler am1 m the STOP(up)position. Keeping it
supply to the refrigerator has on will damage file water valve.
not been connected.
Cubestoosmall Water shutoff valve connecting * (hll the plumber to clear file valve.
refrigerator to water line may
be clogged.
SIowice cube freezing Door left open. * Check to see if package is hoMing door open.
Temperature control dial * See About the temperature control dial.
not set cold enough.
Ice cubes have Ice storage bin needs cleaning. * EInpb, and w;ksh bin. Discard aM cubes.
odor/taste Food transmitting odor/taste * XVmp foods well.
to ice cubes.
Interior of refrigerator • See Care and cleaning.
needs cleaning.
Moisture forms on Not unusual during * \Vipe surface dxT and reset temperature control dial
cabinetsurface periods of high humidity, one setting coldeL
between the doors
Moisture collectsinside Too frequent or too
(inhumid weather, air long door openings.
carriesmoisture into
refrigeratorwhen doors
are opened)
Refrigeratorhas odor Foods transmitting * Foods with strong oclo_s shouM be tightly wrapped.
odor to refrigerator. * Keep an open box of t)aking soda in the refligemtor;
replace every three months.
Interior needs cleaning. • See Care and cleaning.
* Wait 24 horns for file refligemtor to complete b,
cool down.
/6

GE Service Protection Plus TM
GE, a name recognized worldwide for quality and dependability, offers you
Service Protection Plus'_'--comprehensive protection on all your appliances--
No Matter What Brand!
Benefits Include:
* Backed by GE
* All brands covered
* Unlimited service calls
* All parts and labor costs included
* No out-of-pocket expenses
* No hidden deductibles
* One 800 number to call
We71 CoverAny Appliance.
Anywhere. Anytime.*
You will be completely satisfied with our service protection or you may request your money back
on the remaining value of your contract. No questions asked. It's that simple.
Protect your refligeratot, dishwasher, washer and dtTer, range, TV, VCR and much more--any brand!
Plus there's no extra charge for emergency service and low monthly financing is available. Even icemaker
coverage and food spoilage protection is offered. You can rest easy; knowing that all your valuable
household products are protected against expensive repairs.
e_.ceyo_. _o.fide.ce i. CE..d _.U.s i. the U.S.ton-ftee.t 800.626.2224
if)r more information.
+b\ll brands c(+vcred, up 1(+ 20 years old, in lhe c(mlinenlal U.N.
Please place in envelope and mail to:
General Electric Company
Warranty Registration Department
P.O. Box 34980
Louisville, KY 402324980
/7

Consumer Product Ownership Registration
Dear Customer:
Thank you for purchasing our product. Registration for Americana '*is provided by GE.
Thank you for placing your confidence in us. We are proud to have you as a customer!
Follow these three steps to protect your new appliance investment:
Complete and mail
your Consumer
Product Ownership
Registration today.
Have the peace of
mind of knowing we
can contact )ou in
the unlikely event of a
satet} modification.
After mailing the
registration bel(m,
store this document
in a sate place. It
contains intormation
)ou will need should
)ou require service.
Our service number in
the USA is: 800 C,E
(;ARES (800.432.2737).
Read }our Owner's
Mamml carefully.
It will help )ou
operate }otlr ilew
appliance properly.
Model Number Serial Number
Important: If you did not get a registration card with your
product, detach and return the form below to
ensure that your product is registered.
Consumer Product
I , , ,
.................................... _,.._ Cut here
Ownership Registration
Model Number Serial Number
,,,,,,,I I,,,,,,
Mr. l Ms.::;! Mrs.::;! Miss
First ]
Name I I I I I I
I I,ast I
I I I Name I I I I I I I I I I I I
Street
I
Address I I I I I I I I I I I I I I I I I I I I
Ap,.#l I t I , I I I I E-mailAddress*
I)at_ Pla<¢d
"'_'1, I Da,I, I ,_arl, I Phone
N.mberl I. I-I.. I-I . .
Mon th
GE Consumer & Industrial
Appliances
General Electric Company
Louisville, K¥ 40225
ge.com
* Please provide your e-mail address to receive, via e-mail, discotmts, special oflk'rs and other important
commtmications fi'om GE Appliances (GEA).
Check here if )ou do not want to receive commtmications ti'om GEA's carefull) selected partners.
FAILURE TO COMPLETE AND RETURN THIS CARD DOES NOT DIMINISH YOUR
X,tSkRRANTY RIGHTS.
For intormation about GEA's privac) and data usage polic); go to ge.com and click on "Privacy Policy"
or call 8(i)(i).626.2224.
18 www.A meri canaA pp liances, corn

Refrigerator Warranty.
All warranty services for Americana TM are provided by GE Factory
Service Centers, or an authorized Customer Care®technician.
Toschedule service, call 800.432.2737.Please have serial number
and model number available when cafling for service.
Staple your receipt here.
Proof of the original purchase
date is needed to obtain service
under the warranty.
Fromthedate ofthe
originalpurchase
We Will Replace:
Anypartof die refligemtor which fails due m a defect in materials or workmanship.
During [his limited one-year warranty, we will also provide, free ofcharge, all labor
and related service to replace the defective part.
Service trips to your home to teach you how to use the
product.
Improper installation, delivery or maintenance.
Failure of the product if it is abused, misused, or used for
other than the intended purpose or used commercially.
Loss of food due to spoilage.
Damage caused after delivery.
Products which are not defective, broken, or which are
working as described in the Owner's Manual.
Replacement of house fuses or resetting of circuit
breakers.
Replacement of light bulbs.
Damage to the product caused by accident, fire, floods
or acts of God.
Incidental or consequential damage caused by possible
defects with this appliance.
Product not accessible to provide required service.
EXCLUSION OFIMPLIED WARRANTIES--Your sole and exclusive remedy isproduct repair as provided in this
Limited Warranty. Any implied warranties, including the implied warranties of merchantability or fitness for a
particular purpose, are limited to one year or the shortest period allowed by law.
This warranty is extended to the original purchaser and any succeeding owner for products purchased for home
use within the USA. If the product is located in an area where service by a GEAuthorized Servicer is not available,
you may be responsible for a trip charge or you may be required to bring the product to an Authorized GEService
location for service. In Alaska, the warranty excludes the cost of shipping or service calls to your home.
Some states do not allow the exclusion or limitation of incidental or consequential damages. This warranty gives
you specific legal rights, and you may also have other rights which vary from state to state. Toknow what your
legal rights are, consult your local or state consumer affairs office or your state's Attorney General
Warrantor: General Electric Company.Louisville, KY 40225
19

ConsumerSupport.
ScheduleService
Expert GE repair service is only one step away from your dooL Schedule service at your convenience by calling
800.432.2737 during nomlal business hours.
In Canada, call 1.800.561.3344
ExtendedWarranties
Purchase a GE extended warranty and learn about special discounts that are available while your warranty is still
in eff)ct. You can purchase it by calling 800.626.2224 during nomml business hems. GE Consumer Home Services
will still be there after your warmnly expires. In Canada, call 1.888.261.2133
PartsandAccessories
IndMduMs quMified m seiMce dleir own appliances can have parts or accessories sent direcdy m their homes
(VISA, MasmrCard and Discover cards are accepted). Order by phone at 800.626.2002 during normal business
hotlI'S.
Instructionscontainedinthismanualcoverprocedurestobeperformedbyanyuser.Otherservicing generallyshouldbe
referredtoqualifiedservicepersonnelCautionmustbeexercised,since improperservicing maycauseunsafeoperation.
Customers in Canada should consult the yellow pages for the nearest Mabe service center; or call 1.888.261.3055.
ContactUs
vvvvvv.AmericanaAppliances,com
If you are not satisfied Mill die se_Mce you receive flom GE, send a letter m GE. Please include your phone
numbeL _A/lite to: (;eneral Manage_; Customer Relations
GE Appliances, Appliance Park
I,ouisville, KY 40225
In Canada: XA/riteto: Directo_; Consumer Relations, Mabe Canada Inc.
Suim 310, 1 Factory I,ane
Moncton, N.B. E1C 9M3
,÷'_" Printedi)_theUnitedStates
_ PrintedonRecycledPaper

Congelador superior
Refrigeradores
Escriba aqui el modelo y el numero
de serie:
Modelo #
Serie #
Encuentre estos nfimeros en la
etiquem en el lado izquierdo de la
parte superior del compartimiento
del refrigeradon
Informaci6n de seguridad
Cables de extensi6n ................ 3
(_6mo conecmr la electricidad ........ '.4
Precauciones de seguridad ........... 2
Instrucciones de operaci6n
Comrol ........................ 4
Cuidado y limpieza .............. 6
Estantes ........................ 4
Gavetas de ahnacenamiento ...... 4, 5
Mfiquina de hielos automMica ...... 5
Instrucciones para la instalaci6n
C6mo inverfir el vaiv_n de
la puerta ................... 11-14
Instalaci6n de la tuberfa
del agua ..................... 8-10
Preparaci6n para instalar
el refl'igerador . ................. 7
Consejos para la soluci6n
de problemas
Antes de solicitar un servicio . . .15, 16
Sonidos normales de operaci6n .... 15
Soporte al consumidor
Garan tfa ...................... 19
Soporte al consumidor . .......... 20
www.A mericcmctApplicmces, corn
Modelos 16, 17, 18
_*_" impreso en los Estados Unidos
197D5984PO04 49-60522 07-07 JR

IMPORTANTEINFORMACIONDESEGURIDAD.
LEATODASLASINSTRUCCIONESANTESDESUUSO.
Zl iAD VERTENCIA!
Use este aparato s61ocon el fin para el cual fue disefiado como se describe en este Manual del propietario.
PRECAUCIONESDESEGURIDAD
AI usar aparatos el6ctricos, se deben seguir precauciones b#sicas de seguridad, incluyendo las siguientes:
Este rcfligcrador debe insmlarse y ubicarse
correctamente segdn las Instrucciones de instalaci6n
antes de su uso.
No permita que los niflos se suban, se paven
o se cuelguen de los esmntes en el tefligcradon
Podrfan daflar el tefligcrador y sufiir graves daflos.
No toque las superficies Dfas en el compartimiento
del congelador con las manos hdmedas o mojadas.
La piel se puede pe_lr a estas superficies
extremadamente fifas.
No almacene o use _lsolina u otros vapores y
lfquidos inflamables ell las fireas cercanas a este
o a cualquier otro apai'ato.
Ell los refligei-adoies con mdquinas de hielo
autom_ticas, evite el contacto con las partes ell
movimiento dcl mecanismo eycctoJ; o con el
elemento calefactor localizado en la parte iilfkiior
del dispositivo para hacer hielo. No coloque los
dedos o las manos ell el mecanismo de la mdquina
de hielos mienmts el refligcrador est_ conectado.
Mantcnga los dedos alcjados de las drcas estrechas;
los espacios entre las puertas y entre las puertas
y los gabinetes son necesariamente pequefios.
Tcn_l cuidado al cerrar las puerms cuando haya
nifios en el _irea.
Desconecte el refiigerador antes de limpiar y hacer
repaiaciones.
NOTA:Recomendamosenfaticamentequecualquierservicio
searea/izadoporunindividuoca/ificado.
Fijm el control ell la posici6n 0 (apagado)no elimina
la corriente hacia el circuito de luces.
No vuelva a congelar alimentos que se hart
descongelado pot completo.
Zl iPELIGRO! RIESGODE QUELOSNIl[lOS
SE QUEDEN ATRAPADOS
f
ELIMINACIONAPROPIADADELREFRIGERADOR
Los problemas de que los Ififlos se queden
atrapados y se sofoquen no son cosas del pasado.
Los refligen_dores desechados o abandonados
siguen siendo peligrosos, afin si s01o estdJl pot
"unos pocos dfas'. Si es_ desechando su
refrigen_dor viejo, por favor si_ las insuucciones
a confinuacidn para wudarle a evimr accidentes.
Antes de desechar su viejo refrigerador
o congeladon
Qtfftele las pu ertas.
_{Deje los estmltes en su lugm; de manera que los
niflos no puedan subirse fik:ilmente al intefioi:
Refrigerantes
Todos los aparatos de refligeraci6n condenen
refrigerantes, los cuales se deben retirar antes
de la eliminaci6n del producto de acuerdo con
la ley federal. Siva a desechar algfin aparato
antiguo de refrigeraci6n, consulte con la
compaflfa a cargo de desechar el aparato
para saber qu_ hace_-:
2

www.AmericanaAppliances.com
iAD VERTENCIA!
COMOCONECTARLAELECTR/C/DAD
Bajo ninguna circunstancia, no corte ni retire la tercera pata (conexiSn a tierra) del cable de electricidad.
Per seguridad personal, este aparato debe estar correctamente conectado a tierra.
E1cable el_ctrico de este apamto est_iprovisto de
un enchufe de tres paros (cone_dn a fierra) que
encaja en un mmacorriente est_ndar de 3 orificios
(conexidn a tierm) para minimizar la posibilidad
de peligro de un choque el_ctrico de este apamm.
Haga que el tomacorfiente de la pmed y el circuito
sean revisados pot un electficism calificado pare
asegumr que el tomacorfiente tiene la conexidn a
tierm apropiada.
Cuando haya un tomacorfiente es_ndar de dos
patas, es su responsabilidad y obligacidn personal
reemplazarlo con un tomacorriente adecuado de
tres orificios correctamente conectado a tierm.
E1 refligemdor deben_ siempre esmr conecmdo en
su propio tomacorriente el&:trico indMdual que
tenga un nivel de volt_oe que se ajuste a la placa de
potencia.
Esto ofrece el mejor desempeflo y mmbi_n evim
sobrecar_u los circuims el_cuicos de la casa que
podr_an causar un incendio a partir de los cables
recalenmdos.
Nunca desconecte su refligerador halando del
cable el_ctrico. Siempre mine el enchufe
firmelnente y h_lelo direcmmeme del
tomacolTiente.
Repare o reemplace de inmediato todos los cables
eldctficos que se ba)'an desgasmdo o daflado. No
use un cable que tenga gfiems o daflos de abrasidn
en su longitud o en cualquier extremo.
AI retirar el refligemdor de la pared, tenga cuidado
de no enrollar o daflar el cable el_ctrico.
USODECABLESDEEXTENSION
Debido a peligros potenciales de seguridad bajo ciertas condiciones, nos oponemos al use de cables de
extension.
Sin embargo, si debe usar un cable de extensidn, es absolummente necesafio que sea un fipo de cable
de extensidn pare aparatos con cone_dn a tierm de tres cables, que est_ en la lista de UL (en los Esmdos
Unidos) o en la lism CSA (en Cana&i), que tenga un enchufe de tipo conexi6n a tiena y salida y que
el grado el_ctrico del cable sea de 15 amperios (m_nimo) y 190 voltios.
LEAYSIGACUIDADOSAMENTEESTAINFORMACION
DESEGURIDAD.
CONSERVEESTASINSTRUCCIONES
3

Sobreel dial de controlde la temperatura.
Girar el dial a 0 interrumpe el enfriamiento en ambos compartimientos: el compartimiento de alimentos frescos y
el congelador, aunque no apaga el suministro de corriente hacia el refrigerador.
Dial de control de la temperatura (enalgunosmodelos)
E1dial de control de la tcmpe_Uura fiene nuevc Insertc una moneda en la ranura en el centro
nivelcs m_is O. I es el nivc] mils caliente y 9 es d del dial y pooh5 g'irar el dial hacia el nivel qne
nivel mils Kfo. Iniciahnente, ti.je el (IM en 5. mejor _ adaptc a sus necesidades.
Despu_s de usar el rcflig_rado_; ajuste el dial Permita 24 horas para qta el rcfligerador
de set necesario, se enf)'fc.
Sobrelosestantesdel compartimientode alimentosfrescos.
Los soportes de los estantes en diferentes niveles le permiten adaptar el espacio de los estantes segEmsus
necesidades. No todas las caracterfsticas est#n presentes en todos los modelos.
[] Levantehacia
E_ nclinehaciaarriba
Estantes medios
Un extremo del cstantc descansa sobre un soportc
moldeado en el costado; el soportc en el otto
extremo se engancha en un riel en la parte
posterior de la pared del gabinetc.
Pararetirar,lexante el estantc en la parte debmtera,
luego stque del soportc yfllera del riel.
Parareemplazar,seleccione la almra deseada para
el csmnte. Con el mmnte delmKero lc_anmdo
ligermnente, enganche la oreja superior del soportc
en el riel, luego 1)_jeel esmnm hasta el sopotle.
NOTA: El estante hacia /a derecha de/de/esta
disefiado para engancharse en /a ranura de/a derecha;
el estante hacia /a izquieMa esta disefiado para
engancharse en /a ranura izquierda.
Levantelapateposterior
_la frente
Para retirar los estantes de
tamafio completo
Estantes completos
Mg-unos modelos rienen un estante deslizante en
almnbre dc a(_ro, un estante de vidrio tempe_Mo
estacionario, un estante a pruelx_ de salpicadur_ts
o dos estantes estadonarios en almnl)te de aceI'o.
Estos estantes se pueden too\ er h_miaotto lugar
en el compartimiento de alimentos frescos.
E1estanm deslizanm de tam_fflo completo fiene
fX'enos.(hlando se coloca conectamentc en los
soportes dcl estante, el estante fiena rakes de
salirse complemmente del tefi'igerador y no se
inclinaM cuando coloque o retire _dimentos
del mismo.
Para retirarun estante detamafio completo
cuando la puertadel compartimientode alimentos
frescos nosepuedaabrir completamente
Estantes a prueba de salpicaduras
(en algunos modelos)
Los estantes a prueba de salpicaduras
tienen bordes especiales para evimr que
las salpicaduras se rieguen a los esmntes
infEriores. Para retirar o reemplazar los
estantes, yea las instrucciones arribas
Sobre los estantes del compartimiento del congelador.
Estante de escalon
Para retirar el estantede escalon: _ Muc_a el estante hacia la izquierda
para liberar los extremos dcrechos de los
E_] Lexante el lado izquierdo del escal6n
lig-ctvunente, oriticios en la pared del gabinete.
Baje el costado dcrecho dcl estante, mucxa
el estante hacia la dcrecha ys_iqnelo.
Para reemplazar el estante de escalon:
-_ Con el estmKe inclinado como aparece, ajuste
los extremos del lado izquierdo del estmKe en
los orificios de la pared del gabinete.
l,evante el costado izquierdo del estante
ligeramente, mueva el estante hacia arril)a,
@lste los extremos del lado derecho del
estante en los orificios de la pared del gal)inete
) b_je el estante a su lugur.
Sobre las gavetas de almacenamiento.
No todas las caractedsficas est#n presentes en todos los modelos.
8avetas para frutas y vegetales
Se debe refirar el exceso de agua que se
pueda acumular al rondo de las gavems
y se deben secar las gavetas.

Sobre las gavetas de almacenamiento.
I1_ JC Gaveta de refrigerios
La gmeta de refrigerios se puede
mo_er a la posici6n m_is fitil segfin
las necesidades de su f:amilia.
Sobre la remocion de la gaveta de almacenamiento y cubierta.
No todas las caractedsticas est#n presentes en todos los modelos.
Humidity Control Gaveta preservadora de humedad ajustable (enalgunosmodelos)
Deslice el control completamentc hasta Lleve el control pot completo hasta la
me, tow la posicidn HIGH(aho) para ofiecer la aha posicidn LOW(bajo) para ofrecer los nivcles
humedad recomendada pare la mworfa bajos de humedad recomendados para la
de los vcgctales, inayotia de las flutas.
Remocion de la gaveta y cubierta
Se pueden retirar las ga_etas f_cilmente tomando los cosmdos ) le_antando ligeramente
mientras hala las gaxetas rags allg de la ubicaci6n del freno.
i i
il iiiiI' / iiii i i
Gaveta de tama_o complete con cubierta plastica
Pard retirar la cubierta, ]m,'ame de los
SOl)ortes, hale hacia delante, incl/nela
) s_iquela.
Estante pard las gavetas gemelas
Pardretirar:
7] Retire las gmetas.
-_ mpuje el flente de la cubierta de xidrio
hacia arriba, y al mismo tiempo, hale hacia
delante tanto como _ pueda.
Inclfnela y sfiquela. Evim limpiar la cubierta de
vidrio ti4a con agua caliente ya que la diierencia
de tempetaturas extremas podrfa catls;|r que se
quiebre.
[_] etire el marco de la gmeta. (Siempre retire
la cul)ierta de xidrio antes (le sacar el marco
de la gm'eta.)
Levanm d marco de los soportcs en cada costado
y atrgs, hale hacia delante, incline y saque.
Parareemplazar:
[7] Baje el marco hasta flue descanse sol)re
h)s soportes en cada costado y atrgs.
--1 eemplace la cubierta de xidrio,
empujando su horde posterior
firmemente en el canal del marco
posterior ? suaxemente l)_je el flente
hacia su lugan
[2] Reemplace las gaxetas.
Sobrela maquinade hielos automMica.
Un refrigerador recientemente instalado puede tomar entre 12y 24 heros pard empezar a hacer hielo.
corriente Braz0indicad0r
[lenadohacia
BrazodeIienado la posici6n
haciala posici6n STOP(hacia
ON(haciaabajo) arriba)
I,a mSquina de hielos pmdudr_i aproximadameote
entre 3 y 3,5 lib_as de hielo en un pe_fodo de
24 horas, depeodieodo de la mmpe_amra del
compm_t_fieoto del coogelado_; la temperatura del
cuarm, el nSmero de veces que se abre la puerta
y otms coodidooes de uso.
Si el refi'igerador se opera mates de hacer la cooexidn
del agua ha('ia la i'0_quin;-i de hielo, illtle\_t el brazo
de lleoado ha('ia la posicidn STOP(hacia arriba).
Cuando se h_'a cooectado el refiigemdor a]
sumioistro de agua, IIlUC_t el brazo de lleoado ha(ia
la posiddn ON (h_Lciaab@)).
i,a mfiquina de hielos se lleoar, i de agua cumldo se
enfi[e hasta ] 5-'F.Uo refiigerador reci&_ iostalado se
puede tomar eotre 12 y 24 horas pm'a empez_r a
h_L(er cubos de hielo.
Uoa vez que la m_quina de hielos empieza a hacer
hielo, puede tomar hasta 48 hotas !_,a llenm _el
compmtimieoto, dependieodo de los oixvles de
temperatuta y del nfimero de veces que se abra la
puerta.
Escuchm_ uo zumbido cada vez que la mSquioa de
hielos se lleoe de agua.
Desedle los primeros cubos de hielo para pemfitir
que la lfllea del agua se limpie.
Asegdrese de que oada interfiera con el moximienu)
del b*azo iodicad(m
Cuando el contenedor se llene al tfivel del bmzo
indicadot; la m_kluina de hielos (tejai'_ide produdr hielos.
Es norm_d que xarios cubos de hielo sej umeo.
Si el hielo oo se usa coo tiecueocia, los cubos de hielo
viejo se ug_vrfin mrbios, con sabot mncio y se
encogei_ii1.
En los modelos de imerrupmr de ene*g[a, la luz verde
se volver_i iotermitente si los cubos de hielo se atascan
en la mfiquioa de hielos. Para corregir esto, t)(mga el
ioten uptor de corrieote eo la posici6o de 0 (apagado)
y retire los cubos. Regrese el interruptor de corfiente
a la posicido de I (encendido) 10amreiniciar la
mfiquioa de hielos. Despu& de haber eoceodido de
nuexo la mfiquioa de hielos, habrfi turn demola de
45 minutos antes de que la mfiquina de hielos reioicie
las opera(Jones.
NOTA:Enhogaresconpreszbndeaguafffferiora/promedio,es
posib/eque escucheel c_21ode/ambquinadehiebsvariasveces
al hacerunIotedehieb.
Kit de accesoriosde la maquinade hblos
Si su refiigerador no _ene )a equipado con t_m
mSquioa de hielos m,mmfitica, existe uo kit accesorio
pma la mfiquina de hielos que estfi dispooible pot uo
costo adidooaL
Revise en la parte posWfior del refiige_ador eo busca
del kit para la mfiquina de hielos especNca que 5
necesita para su modelo.

Cuidadoy limpiezadel refrigerador.
Limpieza exterior
Lasmanijasde la puerta y accesorio (en algunos modelos).
Limpie con un patio humedecido con aguajabonosa. Seque
con un patio seco.
Mantenga el exterior limpio.I,impielo con un patio ligcramente
humedecido con cera de cocina para electrodom6sticos o
detetgente llquido suave para platos. Seque y brille con un
patio limpio y seco.
Lospaneles ylas manijasde laspuertasde acero inoxidable (eta
algunos modelos) pueden sex limpiados con un limpiador
pata acero inoxidable para usos comcrciales. No utilice cem
para electrodom6sticos sobre el acero inoxidable.
No I/mp/e el refr/geradorcon unpatio suc/oparap/atos o conuna
toa//a mojada.Estospuedendejar res/duosy puedeneros/onarla
p/ntura. No use almohad//lasderestregar,I/mp/adoresenpolvo,
blanqueadoreso I/mp/adoresquecontenganblanqueadoresyaque
estosproductospuedenraspar / deb//itar el acabadode p/ntura.
Limpieza interior
Para ayudar a evitar olores,dcje una caja abierm de
bicarbonato eta los compartimientos dc alimentos f_escos
yen el congelador
Desconecteel refrigeradorantesde limpiarlo.Si esto no es
pr_ctico, escurm la humedad excesiva con una esponja o patio
al limpiar alrededor de los interruptores, luces o controles.
Use una soluci6n de agua tibia y bicafl)onato--una cucharada
(15 ml) de bicarbonato para un cuarto (1 litro) de agua. Esm
limpia y neutmliza los olores. Enjuague y seque.
Despu6s de limpiar los empaques de la puerta, aplique
una capa delgada de vaselina eta los empaques de la puerta
eta el costado de la bisagra. Esto ayuda a evimr que los
empaques se peguen y se doblen hasm perder su fbrma.
Ev/teI/mp/arlos estantes de vidrio frfos(enalgunosmodelos)con
aguacal/ente yaque la d/ferenc/ade/as temperaturasextremas
puede causarque sequ/ebren.Man/pu/e los estantesde vidriocon
cu/dado.Go/pearel vidrio templadopuede causarquese qu/ebre.
No laven/ngunapartep/fist/cade/refr/geradorenla lavadoradep/atos.
Condensador
No hay necesidad de una limpieza de rudna del condensador
eta ambientes de operacidn de
hombres normales. Sin
embargo, eta ambientes que
puedan sex particularmente
poh_orientos o gqasosos, el
Limpiezadelos
serpentines def €Ondensador condensador debe limpiatse
periddicamente pat-a una
operaci6n eficiente del refrigemdor.
Para limpiar el condensadoJ; gire el dial de control de la
temperamra a 0. Barra o aspire el polvo.
Para mcjorcs rcsulmdos me un cepillo especiahnente
disetiado para este fin. Est5 disponible eta la ma}_da dc
tiendas de partes de electrodom6sticos.
6
Mover el refrigerador
Tenga cuidado al mover el refiigemdor lejos de la pared.
Todos los tipos de cubierms dc piso se pueden datiaJ,
particularmente las cubiertas acojinadas y aquellas con
superficies con disetios en relieve.
Hale el refiigerador en linea rccmy regq6selo a su posici6n
empuj_indolo dc la misma fbrma. Mover el refrigeradoren una
direccionlateral puederesultarenda_osa lasuperficie delpiso
o al refrigerador.
Cuandoempuje de nuevoel refrigerador,asegEiresede nopisar el
cable e/ectrico ola Ifneade suministroa/a mfiquinadehie/os
(ena/gunosmode/os).
Despu6s de rodar el refligerador a su posicidn, gire
las patas del refligerador en el sentido de las manecillas
del reloj hasta que las paros sostcngan nuevamente el peso
del refrigerador.
Reposicion de la bombilla
Para reemplazar una bombilla quemada, desconecte el
refligerador del tomacorrientc el6ctrico, desenrosque la
bombilla cuando est6 fiia y reemplficela con una bombilla
para refrigeradores de similar o inferior vohaje.
G/rarel control ala pos/c/_n0 nodesconectala corrientede/
c/rcuito dela luz.
Como prepararse para las vacaciones
Pma una largas xacaciones o ausencias, retire los alimentos
y desconecte el refiigemdoL Gire el dial de control de
la temperattua hacia la posicidn 0 (apagado),y limpie el
interior con una solucidn de una cucharada de
bicarbonam (15 ml)y un cuarto (1 litro) de _tta.
Deje las puerms abierms.
Mueva el brazo de llenado a la posicidn STOP (hacia
arriba) y cierre el suministro de] agua hacia el refrigeradoL
Si la temperatura puede caer pot debajo del punto de
congelmniento, haga que una persona calificada drene el
sistema del suministro de agua (en algunos modelos) pare
evimr serios dafios a la propiedad causados pot
inundaciones.
Como prepararse para trasladarse
Asegure todos los artfculos sueltos como la rejilla, los
esmntes y cajones peg:andolos con cinta en su lugar para
evimr dafios. Aseg&esede queel refrigeradorpermanezcaen
unaposiciGnverticalduranteel traslado.

Instrucciones para
la instalacion
Si tiene preguntas, Ilame a1800.432.2737
17, 18
ANTES DE INiCIAR
Lea estas instrucciones completa y cuidadosamente.
• IMPORTANTE - G_,a_,_66s_,s
instrucciones para uso de] inspector local.
• IMPORTANTE - o1,_6,,__od,,slo_
cddigos y 6rdenes de ley:
• Nora al instalador - a_6gfir6_6 d6 d_jar 6sta_
instrucci(mes con el consumidor.
• Nota al consumidor - Conserveestasinstrucciones
para referencia flmtra.
• Nivel de destreza - La instalacidn de este aparato
requiere de destrezas mec_hficas bfisicas.
• Tiempo de ejecuci6n - Instalacidn del refligerador
15 minutos
Imertir el xaix_n de la puerta
1 hora
* l,a instalacidn apropiada es la responsabilidad del
instalador.
* La fidla del producto debido a tma instalaci6n
inadecuada no estg cubierta pot la garantfa.
SUIVIINISTRO DE AGUA HACIA
LA MAQUlNA DE HIELOS
(en algunos modelos)
Si el refrigerador tien6 una m_iquina (16hielos, s6 tendril qu6
conectar a utla tuber/a de agua potable frfa. Un kit de
suministro de agua (contiene tuber/a (16cobre, xfilxula de
cierre, accesorios e instrucciones) est_i disponible con un
costo adicional a trax_s de su proxeed(m xisitando ntlestra
pfigina Web ge.com o bien a traxds de Partes y Accesorios,
1.800.661.1616.
UBICACION DEL REFRIGERADOR
• No instale el refligerador donde la tcmperatun_ b:!je de 60°F
(16°C) ya que no correr_i con suficiente fl'ecuencia para
mantener hastempenmlras apropiadas.
• Instfilela 611un pi_so fllertc para que lo soporm con ca_ga
completa.
AREA
Permita el siguiente espacio para una fi_cilinstalacidn,
apropiada circulacidn del aire x conexiones de plomerfa )
eldctricas.
• _2 tt
• (,ostados o/4 (19 ram)
• Arriba 1" (25 ram)
• Amis 1" (25 ram)
RODILLOS Y PATAS NIVELADORAS
Laspatasniveladorascerca de cada esquina delantera
del refiigerador son ajustables, t_sms colocan
firmemente el refrigerador y evitan que se muex_
cuando las puertas se abran. Las paras niveladoras
se deben colocar de manera que el fl-ente del
refrigerador se levante lo suficiente para que las
puertas se cierren fficilmente cuando se abran hasm
la mired.
Gire las paras nixeladoras enel sentidode Ins manecillas
del relojpara levantare] refrigerador, y en el sentido
contrariopara bajarlo.
Los rodillos al lado de las paras nixeladoras le permiten
moxer el refrigerador lejos de la pared para limpiarlo.
(;ire las paras ell el sentido contrario de las manecillas
del reloj hasta que el peso del refrigerador se traslade
de _stas hacia los rodillos. Despu_s de rodar el
refrigerador de nuevo hacia su lugar, gire las paras en
el sentido de las manecillas del reloj hasta que las paras
sostengan nuevamente el peso del refrigeradoL

Instrucciones para la instalacion
ILl COIVIO INSTALAR LA TUBERtA DEL AGUA
(EN ALGUNOS IVIODELOS)
ANTES DE INIClAR
][x)s kits de cobre recomendados para el suministro de
agua son _%8X2, ¼,_8X3 o ¼,_KSX4, dependiendo de 1;l
cantidad de mberfa necesaria. ][,as tube_Sas plSsticas
aprobadas para el suminism) d e agua son las tuberfas pata
el refrigemdor SmartConnecff" de GE (¼._K08X10006,
V_.%08X10015 y V_.%08X10025).
N conecmr su refiigerador a un Sistema de Agua de
()smosfs Invetsa de GE, 1;ldnica insmlaci6n aprobada es
con un kit de ()sin°sis Invet3a de (;E. Pata otros sistemas
de agua de dsmosis inversa, siga las instrucciones del
fabricante.
Esta insmlacidn de 1;l tuberfa del agua no est_ gamnfizada
pot el fabricante del retiJgerador o de la mSquina de
hielos. Siga estas instrucciones cuidadosamente para
ufiniufizar el fiesgo de un dafio costoso debido al agua.
E1 mautilleo del agua (agua golpeando contm la tuberfa)
en la tubetSa de la casa puede causar daflos a las partes del
refligetador y conducir atm goteo o inundacidn por el
agua. ilame a un plomero caIificado para co,Tear el
martilleo del agua antes de insmlar la tuberfa del agua
;ll reitJgeradoi;
Pare evimr quemaduras y dafios con el prod ucto, no
conecte la tuberfa del agua a la mberfa del agua caliente.
N usa el refrigetador anms de conecmr 1;l tuberfa,
asegdrese de que el bmzo de llenado est_ en la posicidn
STOP(hacia atTiba).
No insmle la tuberfa de la mfiquina de hielos en tugares
donde la temperamra caiga pot deb;oo del nivel de
congelaufiento.
_ usar cualquier aparaU) el&trico (como un taladro
el4ctrico) dumnte la insm]aci6n, asegfirese de que el
apamto est4 aislado o conecmdo de manera que evite el
peligro de una descarga el4ctrica, o se <)pete por bamrfas.
Todas las insmlaciones se deben realizar segdn los
requisitos del cddigo local de plomerfa.
QUI NECESITA
• Kit de tuberia de cobre para el refrigerador o
SmartConnect TM de GE, 1/4" de di_metro externo para
conectar el refrigemdor a] sumin[stro de ;_-ua. Si usa
cobre, asegfirese de que ambos extremos de la tuberfa
se corten tu_iforlnemente.
Para determinar la cantidad de tuberfa que necesim: mida
la dismncia desde la v;ilvula del agua en la parte postelior
del refrigerador hasm el mbo de suminisu-o de agua.
Luego agregue 8 pies (2,4 m). Asegfirese de que haya
suficiente mberfa adicional (unos 8 pies [9,4 m] em-ollado
en tres _stelms de unas 10 pulgadas [95 cm] de diAmetro)
para permitir que el refiigerador se pueda mo_er de la
pared despu_s de la insmlaci6n.
8
QUE NECESITA (CONT.)
I,os kits de tuber/a para el refligerador SmartConnecff" de
GE est,in disponibles ell las siguientes longitudes:
6' (1,8 m) -WX08X10006
15' (4,6 m) - WX08X10015
25' (7,6 m) - WX08X10025
Asegfirese de que el kit que haya seleccionado permita al
menos 8 pies (2,4 m) como se describe arriba.
NOTA: La finica tuberia de plastieo aprobada de GE
es la que viene provista con los kits de tuberia para el
refrigerador SmartConnect'" de GE. No use ninguna otra
tuberia plfistica para el suministro del agua ya que la tuberia
estfi bajo presion todo el tiempo. Ciertos tipos de plfistieo se
fraeturarfin o se romperfin con el tiempo y causarfin dafios en
su casa debido al agua.
• Un kit de suministro de agua de GE (contiene tuberfa,
wilvula de cierre y accesorios enumerados abajo) estfi
disponible a un costo adicional en su tienda o pot medio de
Partes y Accesorios, 1.800.661.1616.
• Un suministro de ag_ua fria. [,a presidn del agua debe estar
entre 20 } 120 p.s.i. (1,4-8,1 bar). i_ =
• Taladro el_ctrico.
• Llave de 1/2" o ajustable.
• Destornillador piano
y de estrella.
• Dos tuercas de compresion de 1/4"
de difimetro exterior y 2 f6rulas
(mangas) - para conectar la tuberfa
de cobre a lav, ilvula de cierre y l
a v,ilvula del agua del refiigerador.
O BIEN
• Si estfi usando un kit de tul)erfi_ para el refiigerador
SmartConnect _'' de GE, los accesorios necesarios w_ vienen
preinstalados ell la tuberfa.
• Si su tuberfi_ existente de cobre para el agua tiene un
accesorio con vuelo en el extremo, necesitar_i un adaptador
(disponible en las tiendas de suministros de plomerfa) para
conectar la lfnea del agua al refligerador O BIEN, podrfi
cortar el accesorio con vuelo con un cortador de tubos y
luego usar un accesorio de compresidn. No corm el
extremo tormado de la tuberfa para el relrigerador
SmartConnect >' de GE.
• Vfilvula de cierre para conectar a la lfnea del agua flfa. I,a
wilvula de cierre deberfi tenet una entrada de agua con un
digmetro interno mfnimo de 5/32" en el punto de
conexidn a la TUBERIA DEL AGUA FRIA. I,as wilvulas de
apagado tip() silla vienen incluidas en muchos kits de
suministro de agua. Antes de comprat; asegdrese de que
una wilvula tipo silla cumple con los cddigos de plomerfa en
su localidad.

Instrucciones para la instalacion
Insmle la _;_lvula de cierre en la tuberfa del agua de consumo mils fi-ecuentemente utilizada.
[il CIERRE EL SUMINISTRO
PRINCIPAL DE AGUA Y
DESENCHUFE EL REFRIGERADOR
Abra el grifo rims cercano en contra del senfido de las
agujas del reloj por suficiente fiempo para limpiar la
tuberfa del agua.
SELECCIONE LA UBICACION
DE LA VALVULA
Seleccione una ubicaci6n para la vSlvula que sea
filcilmente accesible. Es mejor conecmrla eta el
costado de una tuberfa vertical de agua. Cuado sea
necesario conecmrla eta una tuberfa horizontal de
agua, haga la conexidn en la parte superior o al lado,
eta vez de hacerlo eta la parte de abajo, para evitar
retirar cualquier sedimento de la tuberfa del agua.
Perlore un otificio de 1/4" eta la tubetia del agua
(incluso si est:i usando una vSlvula auto perloradora),
usando una broca afilada. Retire cualquier sobrante
que resulte de perlorar el otificio en la tuberfa. Tenga
cuidado de no permitir que se filtre agua hacia el
taladro. No perfbt-ar un orificio de 1/4" puede resulmr
en menor produccidn de hielo o cubos mils pequefios.
?
1311NSTALE LA VALVULA DE CIERRE
Una la vfilvula de cierre a la tubeAa de agua t_-fa
con la abrazadera para el tubo.
Apriete los tornillos de la abrazadera hasta que la
arandela sellante empiece a hincharse.
NOTA: No apriete demasiado la tuberfa ya que
podrfa romperse.
Abrazadera
deltubo
Tornillode la
abrazadera
Valvulade _4_
cierretipo silla_/
Arandela
_Extremo de
entrada
Tuberiavertical
deaguafr[a
NOTA: Se deberM: seguir los Cddigos 248CMR
de Plomerfa para el Estado de Massachusetts. Las
vfilvulas tipo silla son ilegales y su uso no est_i
permitido en Massachusetts. Consulte con un
plomero licenciado.
9
I_ DIRIJA LA TUBERiA
Dirija la tubctYa entre la lflma del agua 5fa y el refigerador
Dirija la tuberfa a travds de un orificio pertorado eta la
pared o eta el piso (detr_s del refiigeFador o del gabinete
de la base adyacente) lo re:is cerca posible a la pared.
NOTA: Asegfirese de que haya suficiente mberfa
adicional (unos 8 pies [2,4 m] enrollada eta tres vuehas de
alrededor de 10" [25 cm] de digunetro) para pemfitir que
el retiigerador se pueda mover de la pared despuds de la
insmlacidn.
I-_ CONECTE LA TUBERiA
A LA VALVULA
Coloque la tuerca de compresidn y f_rula para
la tuberfa de cobre (manga) eta el extremo de la
tuberfa y condctela a la vMvula de cierre.
Asegfirese de que la tuberfa est_ complenlente
insermda eta la vMvula. Apriete la tuerca de
compresidn firmemente.
Para tuberfa de plfistico de un kit de tuberfa para
el refrigerador SmartConnec[" de GE, inserte el
extremo moldeado de la tuberfa eta la vMvula de cierre
y apriete la merca de compresi6n basra que estd
firmemente apretada a mano, luego apriete otro giro
con una llave. Apretar demasiado puede causar fugas.
Valvula
tipo silla Tuber[a
Tuercade
compresi6n
Tuercadeem
Valvuladesalida-- F6rula(manga)
NOTA: Se deberM_ seguir los C6digos 248CMR
de Plonmrfa para el Estado de Massachusetts.
ias vSlvulas tipo silla son ilegales y su uso no estfi
permitido eta Massachusetts. Consuhe con un plomero
licenciado.
LAVE LA TUBERIA
Abra el suministro principal de agua en contta del
sentido de las agujas del reloj y line la tuberla hasta
que el agua estd limpia.
Cierre el agua eta la xMx_ula despuds de que un cuarto
(1 litro) de agua se haya eliminado pot la mberia.

Instrucciones para la instalaci6n
CONlO INSTALAR LA TUBERJA DEL AGUA (CONT.)
171CONECTE LA TUBERIA AL
REFRIGERADOR
NOTAS:
Antes de hacer la conexi6n al refrigeradoi, asegfrese
de que el cable de corriente del refiigerador no est_
conectado en el tomacorriente de la paved.
Recomendamos instalar un filtro de agua si su
suministro de agua tiene arena o partfculas que
podrfan obstruir la malla de la vfilvulade agua del
refiigeradoa: Instfilelo en la tube6a del agua cerca
al refi-igeradoa: Siusa un kit de tube6a para el
refiigerador SmartConnect '' de GE, necesitarfi un tubo
adicional (WX08X10002) para conectar el filtro. No
corte la tuberfa plSstica para
insmlar el filtro.
Retire la cubierta del acceso.
Retire la tapa flexible de pl_istico
de la vfilvuladel agua (conexi6n
del refiigerador).
Coloque la tuerca de compresi6n y
la f&ula (manga) eta el extremo de
la tube6a como se muestra. Etael
kit de tube6a para el refiigerador
SmartConnect" de GE, las tuercas
ya vienen armadas con la tuberfa.
Inserte el extremo de la tuberfa eta la conexidn de la
v_ilvuladel agua lo m_isque se pueda. Mientras sostiene
la tube6a, apriete el accesorio.
Para tuberfa de plfistico de tan kit de tuberfa para el
refrigerador SmartConnect _"de GE, inserte el extremo
moldeado de la tube6a eta la v_ilvulade cierre y apriete
la tuerca de compresi6n hasta que est_ firmemente
apretada a mano, luego apriete otra vuelta con una llave.
Apremr demasiado puede causar fugas.
Una la tube6a a la abrazadera provista para sostenerla
eta una posici6n vertical. Quizzesnecesite apalancar
la abrazadera. Abrazadera
dela
Tuberia de 1/4" tuberia
Tuercade
compresi6n
de1/4"
Ferula
(manga)
Tubode Conexi6ndel
SmartConnecff refrigerador
Reemplace la cubierta de acceso. [_
I-_ ABRA LA LLAVE DEL AGUA
EN LA VALVULA DE CIERRE
Apriete cualquier conexi6n que pueda presentar fl/gas.
I-_ CONECTE EL REFRIGERADOR
Organice el cable de la tuberfa de manera que no vibre
contra la parte trasera del refiigerador o contra la pared.
Empa_e el refrigerador hacia la pared.
I_ INICIE LA IVIAQUINA DE HIELO
En los modelos de interruptor de energfa, fije el
interruptor de la mfiquina de hielos en la posicidn de
/ (encendido). Eta los modelos & bmzo de llenado mueva
el bmzo de llenado a la posici6n ON(hacia ab;oo).
La mfiquina de hielos no empezarfi a operar hasta que
alcance su temperatura de operaci6n de 15°F (-9°C) o
menoa: Luego, empezar_ a operar autom_ticamente.
ModelodelInterruptordeenergia
j ,,,,v
......"_"- Brazode
.S Ilenadohacia
laposici6n
Brazode STOP(hacia
Ilenadohaciala arriba)
posiciOnON
(haciaabajo)
ModelodelBrazodeIlenado
NOTA: En condiciones de menor presi6n del agua,
la wilvula de agua puede encenderse hasm 3 veces
para suministrar suficiente agua a la m_quina de
hielos.
10

Instrucciones para la instalaci6n
COMO INVERTIR EL VAIVl N DE LA PUERTA
NOTAS IMPORTANTES
A1 invertir el vaiv6n de la puerta:
• Lea las instrucciones completamente antes de
e IIl p e zar.
• Maneje las partes con cuidado para evitar raspar la
pintura.
• Ponga los tornillos con su parte correspondiente para
evimr usarlas en el lugar equNocado.
• Disponga de una superficie de trabajo que no se
raspe para las puerms.
IMPORTANTE: Una vez que empiece, no mueva el
gabinete basra que hwa complemdo el proceso de
invertir el vaiv_n de la puerto.
Esms instrucciones son para cambiar las bisagras del
lade derecho al izquierdo, si alguna vez desea cambiar
las bisagras al lade derecho nuevamente, siga las
mismas instrucciones e invierta toda las referencias
hacia la izquierda y derecha.
HERRAMIENTAS REQUERIDAS
Destornilladordeestrella
Cintadeenmascarar
Destornilladordecasquillo
concabezade5/16"
DestornilladorTerx®
T200T25,(necesitado
paraalgunosmodela)
Cuchilloparamasilla
(espatula)odestornillador
delgade
Llaveabierta
de5/16"
[] RETIRE LA PUERTA
DEL CONGELADOR
2.1 Pegue la puerto cenada con cinm de enmascarm.
2.2 Con un desmrnillador de casquillo de cabeza
hexagonal de 5/16," retire los mmillos que sosdenen
la bisagra superior del gabinete.
2.3 Levante la bisagra (y la lfimina adjunta) direcmmente
hacia arfiba pare liberar el pasador de la bisagra del
casquillo en la parte superior de la puerto y coldquela
a un lade, j unto con los mrnillos conespondientes.
Bisagrasuperior__ l
>¢
2.4 Retire la cinm y le_ante la puerta hacia flmra del
gabinete. LmAntela del pasador de la bisagra central.
2.5 Coloque la puerto sobre una superficie que no raye
con la parte exterior hacia arfiba.
IT]ANTES DE INICIAR
1.1 Desconecte el refrigerador del tomacorriente el6ctrico.
1.2 Desocupe redes los estantes de la puerta, incluyendo el
compartimiento de lficteos.
PRECAUCION: No permita que ninguna puerta se
caiga al piso, ya que esm podtia dafiar el fleno de la
puerta.
11
2.6 Traslade los (los tomillos del lade opuesto del
gabinete hacia los orificios de los tomillos
desocupados aJ retirar la bisagra superior:

Instrucciones para la instalaci6n
IFJICOMO INVERTIR EL VAIVI N DE LA PUERTA (CONT.)
I-_ RETIRE LA PUERTA DE
ALIMENTOS FRESCOS
3.1 Pegue la puerta cerrada con cinta de enmascarar.
0
/
3.2 Usmldo un destomillador de casquillo de cabeza hexagonal
de 5/16" y una lla\v abierta de 5/16," retire los (los tornillos
que sostienen la bisagm central (y la lfimina adjunta) a]
gabinete. Le\ante la bisagra central para liberal el pasador
del casquillo en la parte superior de la puerta y coloque la
Nsagra y los tomilbs a un lado. Tenga euidado de no
perder el espadador y la arandela de la bisagra central.
I_RETIRE LA PUERTA DE
ALIMENTOS FRESCOS (CONT.)
3.7 Tome uno de los tomillos retirados en el paso 2 y
coldquelo en el orificio para tornillo m_s exterior
en el lado opuesto. No amrnille pox completo, deje
suficiente espacio debajo de la cabeza del tomillo
pare el ancho de la l_mina y el soporte.
141COMO INVERTIR LOS
ELEIVIENTOS DE SOPORTES
4.1 Muma el soporte de la /I ! Arandela
bisagFa inferior (y l_mina "-"_1, ,I Plastica
derecho al izquierdo.
S0p0rtede _ ....
Cambieel pasadorde la bisagra la bisagra/" _"
al ladoopuestodelsoporte.
3.3 Retire la cinm e incline la puerta hacia fimm del
D_binete. Lm,ante la puerto del pasador en el soporte
de la bisagm infefiox: (Si la arandela pl_istica se pega al
fondo de la puerto, coldquela de nuevo en la bisagm.)
3.4 Coloque la puerta con el exterior hacia arfiba en una
superficie que no mye.
3.5 Traslade los (los tornillos de] lado opuesto del gabinete
a los oriticios de los tornillos desocupados al retirar la
bisagm central.
3.6 Traslade la armldela _:_--2
(si su modelo la inclu}e)
hacia el cosmdo opuesto.
/
4.2 Intercambie la bisagra (yla lfimina a(_unta) y los
tornillos en la palm superior derecha con los mrnillos
en la parm superior izquierda del gabinem. No apriete
los tornillos en el lado de la bisagra en este momento.
Instalaci6ndela bisagra Instalaci6ndela bisagra
ala izquierda, aladerecha.
NOTAS:
• Algunas bisagras tienen cuatro ofificios. Los
orificios a utilizar pma la insmlacidn de la bisagra
dependen del lado que instale la bisagra.
• E1borde externo de la bisagm deber_ esmr pmalelo
al borde de la caja pare una insmlaci6n conecm.
12

Instrucciones para la instalacion
I
[] COMO INVERTIR LAS IVIANIJAS
DE LAS PUERTAS
5.1 Traslade la manija de la puerta
de alimentos frescos
5.1.1 Retire el mpdn de la manija por debajo del borde
usando un cuchillo de masilla con la punta fon ada
con cinm, y retire el mrnillo que es_ pot deb;jo.
Retire los dos mrnillos que sostienen la manija con
la parte superior de la puert;_
li' Partesuperior
Tap6n_
5.1.2 Retire la manija.
5.1.3
Retire los tortfillos del borde derecho de la parte
superior de la puerto e ins&telos en los orff'icios de
los mrnillos de la manija en el lado opuesto.
I
5.1 Traslade la manija de la puerta de
alimentos frescos (cont.)
5.1.5Retire el tapdn del frente Tap6n
-.....q
de la puerta ? traslfidelo l
al lado opuesto.
6
Paravolverainstalarla
manijaenel ladoopuesto.
5.2 Traslade el freno de la puerta
5.2.1 Mueva el ffeno
met(dico de la puerta
del extrento derecho
hacia el extrento
izquierdo.
Lade Frenode
izquierdo lapuerta
5.2.2 Retire cualquier
tomillo del exrremo
izquierdo hacia el
exrremo derecho.
Ladederec_
5.3
Como reinstalar la manija de la
puerta de los alimentos frescos
5.3.1 t'egue la manija en el lado
derecho de la puerta con
los tornillos que est_n en
la parte superior y debajo
del tapdn de la manija.
5.3.2Vuelva a insmlar el mpdn
de la manija.
5.1.4
Con tm cuchillo de masilla con la puma foirada con
cinta o un destornillador de pala ddgado, levmtm el
botdn del orificio de la bi_gm en el lado izquierdo
de la puerto e im&telo en d orificio eta el lado
opuesto que se desocup6 a] retirar la bisagra superior.
13
5.4 Traslade la manija de la puerta
del congelador
5.4.1 Retire el tornillo que sostiene
la man_a con la parte
superior de la puerto y
los dos tomillos que
sostienen la man_a con
la parre inferior de
la puerto.
5.4.2 Retire la manija.
Partesuperior
Parteinferior

Instrucciones para la instalacion
IFJICOMO INVERTIR EL VAIVI N DE LA PUERTA (CONT.)
I
[]COIVIO INVERTIR LAS MANIJAS
DE LA PUERTA (CONT.)
5.4.3 Retire el tornillo del borde
superior derecho de la puerto
e ins_rtelo en el orificio del
mrlfillo de la manija ell el
lado izquierdo.
5.4.4 Traslade el freno de la puerta, como se muestra
en la seccidn 5.2 anterioL
5.4.5 Una la man_a al borde
derecho de la puerto con
tornillos en la parte superior
e inferioI; usando los
orff'icios que quedan al
retirar los tortfillos del freno
de la puerta.
[]COMO VOLVER A COLGAR
LAS PUERTAS
6.1 Vuelva a colgar la puerta de los
alimentos frescos
6.1.1 B;oe la puerta de los alimentos frescos al pasador
de la bisagra inferior. Asegfirese de que la arandela
est6 en su lugar en el pasador.
I Arandela
6.1.2
Inserm el pa_dor en
la bi_gnt central en
el casquillo de la
parte supeFior de
la puerto. Coloque
el espaciadot; Arandelaplasticay espaciador
luego la amndela
en el pan,dot de la bi_gra. NOTA: La bisagm
central debe gJia_e como se muestra al instala_e
en el lado izquierdo.
Pasadordelabisagra
I
COMO VOLVER A COLGAR
LAS PUERTAS (CONT.)
6.1.3 Incline la puerta hada el gabinete. A medida que la
puerto _a/ehe a su posMdn, deslice la bisagra debajo de la
cabeza del tomillo que m_teriormente se habfa insertado
pmcialmente en el orificio mf_sextemo. Inserte el tornillo
restante, luego apfiete mnbos tomillos fim_emente.
I _ I
Vuelva a colgar la puerta
del congelador
congelador al
!)!_sador de la Pasadorde
b,sagm cenmd, bisagraceniraL_X..._l I
Cerdorese de que __ _ --..-
la arandela y el e __ 7
spaciador est6n en _
su lugar en el pasador. I_"'"
plasticay espaciador
6.2.2 Incline la puerta hacia el gabinete, levantando la
bi_g, Ta superior de manera que el pasador se @rote
en el casquillo en la parte superior de la puerta.
14
6.2.3
Cercidrese de que la puerto est_ ligeramente pot
encima de la parte superior del gabinete y el
espacio entre las puerms est6 unifonne pot el
ti_enm. Apriem los tomillos de la bisagra supefion
No apriete demasiado estos tornillos, apri_mlos
basra que est6n ajusmdos, luego d_ otto medio giro.

Sonidosnormalesde operacion. AmerioanaApplianoesoom
Los refrigeradores m#s nuevos producen sonidos diferentes a los modelos m#s antiguos. Los refrigeradores
modemos tienen m#s funciones y usan tecnologfa m#s reciente.
gListed escucha Io que tlo escucho ?Estos sonidos son normales.
• E]..e,o,omp,esoF HMMMM...
alta eficiencia p ued e
funcionar mils rSpido y -- WHOOSH...
durar mils que el de su
refiigerador anterior y puede escuchar un zmnbido
de tono aim o un sonido pulsante mientras opera.
• Puede escuchar un sonido de soplido cuando las
puerms se cienan. Esm se debe a que la presi6n se
es_ esmbilizando dentro del refrigeradon
CHASQUIDOS,
ESTALLIDOS, CRUJID O,
GORJEOS
• Puede escuchar sonidos como de crt_ido o esmllidos
cumldo el refrigemdor se conecm por primera vez. Esto
pasa a medida que el refrigen_dor see, lflfa hasm la
temperatun_ cor,ecta.
• E1 compresor puede causar un chasquido o un goljeo
cutmdo intenm _obe, a a,rtmca, (esto puede tomar
hasm 5 minums).
• Expansi6n y conm_cci6n de las bobinas durmlte o
despu4s del ciclo de descongelacidn puede causar
solfldos como de crtoido o esmllidos.
• En modelos con mSquina de hielos, despu4s de
complemr un ciclo de hacer hielo, se pueden escuchar
los cubos de hielo cuando caen a la bandeja de hielos.
WHIR! " Puede escuchai los xentiladoles
mo_4_ndose a g,an xelocidad. Esto pasa
_(_1_ cuando el ,efrige,ado, se conecm [)or
prinmra xez, cuando las puertas se abren
frecuentemente o cuando se guarda
gran cantidad de alimentos en el refligerador o en los
compartimientos del congeladon Los ventiladores estdn
ayudando a mantener las temperaturas correctas.
SONIDOSDEAGUA
• E1 fluido del ,efrige,ante a tmv4s de las bobinas puede
producir un so_fido de borboteo (:omo de agua
hirviendo.
• E1 agua que cae en el calenmdor de descongelacidn
puede causar un chisponoteo, esmllido o zumbido
dunmte el ciclo de descongelaci6n.
• Un ruido de agua cayendo se puede escuchar du,ante el
ciclo de descongelaci6n a medida que el hielo se denire
del evaporador y fluye hacia la bandeja de drenaje.
• E1 cierre de las puertas puede producir un sonido de
gorgomo debido a la esmbilizaci6n de la presi6n.
Antesde Ilamar a solicitarservicio...
Consejospara la soluci6n de problemas
iAhorre tiempo y dinero! Revise las tablas en las siguientes p@inas
primero y quiz#s no neces#e Ilamar a soficitar el servicio.
Elrefrigeradornoopera
Posibles causas aue hacer
Vibraci6notraqueteo(una
vibracionligeraesnormal)
Hieloocristalesdehieloen
losalimentoscongelados(El
hielodentrodeunpaquete
esnormal)
Loscubosson
muypeque#os
E1 refrigerador estfi en * Espere unos 30 minutos hasm que el ciclo
el ddo de descongelado, de descongelado temfine.
El dial de control de la temperatura * Mueva el dial de control de la tempenmm_
estfi en posiddn 0 (apagado). a un nixel de temperature.
E1 refrigerador estfi desconectado. * Empuie el enchufe completmnente e,l el tomaconiente.
E1 fusible estfi quemado / el *Reemplace el fusible o f_e el interruptor.
interruptor automfitico se salto.
Los rodillos o patas * Consulte la secci6n Roclillos y paras nivelacloras.
niveladoras necesitan aiuste.
La puerta se deia abierta. * Revise si un paquete estfi ,eteniendo la puerto abierm.
Abrir la puerta con mucha
frecuenda o por mucho tiempo.
La vfilvula de cierre del agua que " Elaine al plomero para que limpie la vfih+fia.
conecta el refrigerador a la linea
del agua puede estar obstruida.
15

Antes de i/amar a solicitar servicio...
Posibles causas Que hacer
Elmotor opera con Normal cuando el refrigerador * Espere 24 horas hasm que el ret_Jge:ador se e:d_fe
frecuencia par largos se conecta inicialmente, par complero.
periodos o ciclos de Con frecuencia ocurre cuando * Esto es normal.
forma intermitente (Los grandes cantidades de alimentos
retrigeradores modemos se almacenan en el refrigerador.
con mas espacio de
almacenamiento y un La puerta se deja abierta. * Revise si tm paquete estfi reteniendo la puerta abierm.
congelador mas grande E1 clima caliente o abrir * Esto es natural.
requieren de mas tiempo la puerta frecuentemente.
de operaciOn.Arrancan y El dial de control de la temperatura * Cons_dte la seccidn Sabra ol dial do control do la tomporatura.
paran con frecuencia estfin en en el nivel mils frio.
para mantener La rejilla y el condensador * Consulte la secci6n Cuidado y Iimpieza
temperaturas uniformes.) necesitan limpieza.
Elcompartimiento de El control de la temperatura no esfft * Consldte la secddn Sabre el dial de control de la temperatura.
alimentos frescos o el en un nivel suficientemente frio.
congelador no estan muy E1 clima caliente o abrir * Fije el control de la temperature a m_ hive] re;is flfo.
frios la puerta frecuentemente. Consulte la secci6n Sabre el dial do control do la tomporatura.
La puerta se deja abierta. * Revise si tm paquete estfi reteniendo la puerta abierta.
Un paquete eslfi obs_ruyendo * Revise si h W tm paquete bloqueando el conducm
el conducto del aire en el del aire en el compartimiento del congelado::
eompartimiento del eongelador.
La mfiquina de hielos no * Mueva el brazo de lleml(lo a la posicidn ON (hacia abajo).
estfi eneendido.
Lamaquinadehielos
automMicanofunciona
(enalgunosmodelos)
• Consulte la seccidn COmainstalar la tuberfadol agua.
• Espere 24 horas para (isle el refrigemdor se enflfe
cotnplemrnente.
• Nivele los cubos con la mano.
Zumbido
frecuente
Congelamientolentode
loscubosdehielo
Loscubosdehielotienen
olor/ sabor
Seformahumedaden
lasuperficie del gabinete
entrelaspuertas
Humedadse formaal
interior(enclimah#medo,
elaimIlevalahumedad
alrefrigeradorcuando
/aspuertasseabren!
Elrefrigeradortieneolor
E1 suminisaro dd agua estfi
apagado o no estfi conectado.
E1 comparfimiento del
congelador no es muy frio.
Hay cubos amontonados en
el recipiente de almacenamiento
que causan que la mfiquina de
hielos se apague.
La mfiquina de hielos estfi en
la position de encendido, pero
el suminis_ro de agua hada el
refrigerador no es*fi conectado.
La puerta se deia abierta.
El dial de conax)l de la temperatura no
es_ en un nivel suficientemente frio.
E1recipiente de almacenamiento
de hielos necesJta limpieza.
Hay alimentos que trasmiten
olaf / sabor a los cubos de hielo.
E1interior del refrigerador
necesita limpieza.
No es rata durante
periodos de alta humedad.
Abrir la puerta con mucha
frecuenda o por mucho tiempo.
Hay alimentos que trasmiten
olor / sabor al refrigerador.
E1interior necesita limpieza.
• Mueva el brazo de llenado a la posici6n STOP(hacia
atriba). Mantener el bmzo en la posicidn ON (hacia
abajo) dafiar_ la xdlvula del _L_-tta.
• Revise si un paquete estfi reteniendo la puerto abierm.
• Cons_dtela secddn Sabreel dialdo controldolatomporatura.
• Desocupe el recipiente y lfivelo. Deseche los cubos viejos.
• Emsmlva bien los alimenms.
• Consulte la seccidn de Cuidadoylimpioza.
• Sequela superficie, luego fije el control de la
temperature a un nivel m_isfifo.
• Los alimentos con olores flmrtes deben eiwolverse fimlemente.
• Mantenga una czoa abierm de bicarbonaro
en el refrigemdo_; reemplficela cada rres meses.
• Consulte la seccidn de Cuidado y Iimpioza.
/6

Notas.
www.AmericanaAppliances,com
17
m
=.= - ,=wa
==.. v=
w
m

Notas.
m
w

Garantiadel refrigerador.
Todos los servicios de la garantfa para Americana 'Mson
proporcionados por GE centros de f_brica o nuestros
prestadores Customer Care®autorizados. Para concertar
una cita de servicio, Ilame al 1.800.432.2737.Cuando Ilame
para soficitar servicio, por favor tenga a mano el ngmero
de serie y el ngmero de modelo.
Grapeaquf surecibo.
Serequiere facilitar prueba de
la fecha de compra original para
obtener un servicio bajo
la garantfa.
A part#de la fecha
deCompraoriginal
GEreemplazar&
gualquierparte (]el refrigemdor que falle debido a un defecto en materiales o en la fabficaci6n.
Durante esta garantia limitadade una6o,(;E mmbi_n proporcionm%, Sill COStO,mano de obra y
servicio relacionado--pam reemplazar las partes defectuosas.
Viajes de servido a su hogar para ensefiarle c6mo usar
el producto.
Instalaci6n o entrega inapropiada, o mantenimiento
impropio.
Fallas del producto si hay abuso, mal uso, o uso para
otros propositos que los propues*os, o uso para fines
comerciales.
; P6rdida de alimentos por averias.
Causar dafios despu6s de la entrega.
i Productos que no est6n defectuosos, rotos, o que
no funcionen segtln lo prescrito en el Manual del
Propietario.
Reemplazo de fusibles de su hogar o reajuste de
interruptores de drcuito.
Reemplazo de las bombillas.
Dafio al producto causado por accidente, fuego,
inundaciones, o actos de Dios.
Dafio incidental o consecuendal causado por posibles
defectos con el aparato.
Producto no accesible para facilitar el servicio requerido.
EXCLUSIONDE GARANT]AS IMPL]CITAS--Su #nico y exclusivo derecho es la reparacion del producto, tal y
como se indica en esta Garantia limitada. Cualquier garantia implicit& incluyendo las garantias implicitas de
comerciabilidad o adecuacion para un fin determinado, estan limitadas a un a#o o el periodo de tiempo mas
breve permitido por la ley.
Esta garantfa se extiende al comprador original y cualquier comprador posterior de productos comprados para uso
residencial dentro de Estados Unidos. Si el producto est# situado en un #rea que no dispone de servicio por parte
de un proveedor de servicio autorizado de GE,podda tener que hacerse cargo de los costes de envfo o bien podda
soficit#rsele que fleve el producto a una centro de servicio de GE autorizado para realizar la reparaciSn. EnAlaska,
la garantfa excluye el costo de envfo o las visitas de servicio a su casa.
Algunos estados no permiten la exclusiSn o las limitaciones de dafios incidentales o consecuenciales. Esta garantfa
da derechos legales especfficos, y usted podrfa tener otros derechos que variar#n de estado a estado. Para saber curies
son sus derechos legales, consulte a la oficina de asuntos del consumidor local o la oficina del Attomey General en
su Iocalidad.
Garante: General Electric Company.Louisville, KY 40225
19

Soportea/ consurnidor.
Soliciteunareparaci6n
E1servicio de expertos (;E esbi a tan s61o un paso de su puerta, t)rogmme el servicio a su corn e_fiencia
llamando al 800.432.9137 dunmte horas normales de oficina.
garantfasamplbdas
Compre una garaHtfa ampliada y obtei/ga detalles sobre descueiltos especiales dispoHibles mieiltms su
garamfa estfi adIl acti_a. Puede compmrla llamando al 800.626.2224 durante horns normales de oficina.
(}E Coi/sumer Home Services esmrfi adil ahf cuando su gatantfa termbm.
PiezasYaccesorios
Aquellos individuos con la calificacidn necesaria pare reparar sus propios elecnodom_sticos pueden
pedir que se les malden las piezas o accesorios direcmmente a sus ho_ues (acepmmos las m_jems
VISA, MastetCard y Discover). Haga su pedido llamando al 800.626.2002 dunmte horas normales de
oficina.
Lasinstruccionesdescritasenestemanualcubrenlosprocedimientosa seguirporcualquierusuario.Cualquier
otrareparaciondeberia,porreglageneral,referirseapersonalcalificadoautorizado.Debeejercerseprecaucion
yaquelasreparacionesincorrectaspuedencausarcondicionesdefuncionamientoinseguras.
POngaseencontactoconnosotros vvvvvv.AmericanaAppliances.com
Si Ilo est5 safisfecho con el servicio que recibe de GE, era're tma carm a GE. Pot fhvor, incluya su nfimero de
tel4fono.
Escrfi)ai/os a: General Manager, Customer Relations
GE Appl>ilces, Appl>ilce Park
Louisville, KY 40225
impresoonlosEstadosUnidos
_ /mpreso on papel rec/clado
-
 1
1
-
 2
2
-
 3
3
-
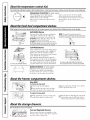 4
4
-
 5
5
-
 6
6
-
 7
7
-
 8
8
-
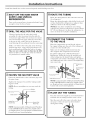 9
9
-
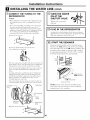 10
10
-
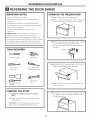 11
11
-
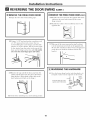 12
12
-
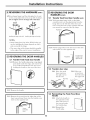 13
13
-
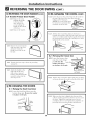 14
14
-
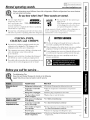 15
15
-
 16
16
-
 17
17
-
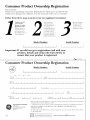 18
18
-
 19
19
-
 20
20
-
 21
21
-
 22
22
-
 23
23
-
 24
24
-
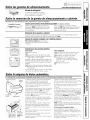 25
25
-
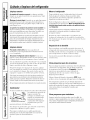 26
26
-
 27
27
-
 28
28
-
 29
29
-
 30
30
-
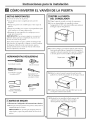 31
31
-
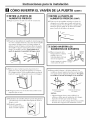 32
32
-
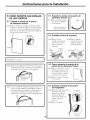 33
33
-
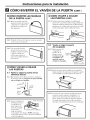 34
34
-
 35
35
-
 36
36
-
 37
37
-
 38
38
-
 39
39
-
 40
40


GE Americana 18 El manual del propietario
- Categoría
- Neveras
- Tipo
- El manual del propietario
- Este manual también es adecuado para
en otros idiomas
- English: GE Americana 18 Owner's manual
Artículos relacionados
Otros documentos
-
Hotpoint HTS16BBRRWW Manual de usuario
-
GE 17 Manual de usuario
-
Hotpoint GTS18HBMWW El manual del propietario
-
-
AMERICANA A3316ABSBB El manual del propietario
-
 Americana Appliances Americana A3316ABS Manual de usuario
-
 Americana Appliances A3317ABRWW Manual de usuario
-
 Americana Appliances Refrigerator 15 Manual de usuario
-
-
RCA MTT14EABWW El manual del propietario


