Kichler Lighting 44082BK Manual de usuario
- Tipo
- Manual de usuario

Date Issued: 09/26/17 IS-44082-US
We’re here to help 866-558-5706
Hrs: M-F 9am to 5pm EST
CAUTION – RISK OF SHOCK –
Disconnect Power at the main circuit breaker panel or main
fusebox before starting and during the installation.
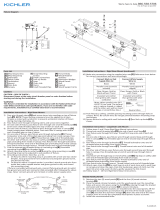
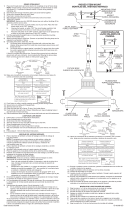
13) Securexturetoceilingwithlockwashers[11]andlock-up
knobs[12].
14) Insertrecommendedbulbs(notsupplied).
15) Carefullyraiseglass[13]uptothexture.Passthesmaller
openingoverthebulbandsocket.Twisttheglassintothe
socketcup[14]tosecureglass(Donotover-tighten).
16) Repeatstep15forremainingglass.
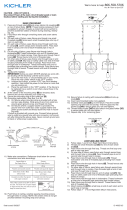
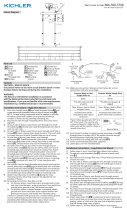
LOOP/LINK/LINK MOUNT
1) Followsteps1and2fromRigidStemMountInstructions.
2) Threadonesmallthreadedpipe[3]intoendofeachsmall
loop[15].
3) Passxturewirethroughrstloop.Threadonerstlooponto
endofeachlaststem.
4) Ononesideofxture,passxturewirethroughsecondloop
andthroughholeincanopy[4].Passthreadedpipeatendof
secondloopthroughholeincanopy.
5) Passxturewirethroughholeinlockwasher[5].Thread
lockwasherontoendofthreadedpipeprotrudingfrominside
canopy.
6) Passxturewirethroughholeinhexnut[6].Threadhexnutonto
endofthreadedpipe.
7) Onothersideofxture,passxturewirethroughsecondloop
andthroughholeincanopy.Passthreadedpipeatendofsec-
ondloopthroughholeincanopy.
8) Passxturewirethroughlooponendofsafetycable[7].Slip
looponsafetycableoverendofthreadedpipeprotrudingfrom
insideofcanopy.
9) Passxturewirethroughholeinlockwasher.Threadlockwash-
erontoendofthreadedpipeprotrudingfrominsidecanopy.
10)Passxturewirethroughholeinhexnut.Threadhexnutonto
endofthreadedpipe.
11)Attachlockinglink[16]tosmallloopatendofeachstemandto
eachlooponcanopy.
12)Followsteps7-16fromRigidStemMountInstructions.
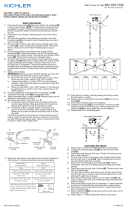
RIGID STEM MOUNT
1) Passwirethroughstems[1]andscrewstemsintocouplings[2]
ontopofxturebody.NOTE: Threadlockingcompoundmust
beappliedtoallstemthreadsasnotedwitharrowsymbolto
preventaccidentalrotationofxtureduringcleaning,relamp-
ing,etc.
2) Passxturewirethroughremainingstemsandscrewstems
together.
3) Oneachsideofxture,passxturewirethroughonesmall
threadedpipe[3].Screweachsmallthreadedpipeontotopof
stemoneachside.
4) Oneachsideofxture,passxturewiresthrougheachhole
incanopy[4].Lowercanopydowntowardsstems.Passeach
holeincanopyoverendofeachthreadedpipeontopof
stems.
5) Ononesideofxture,passxturewirethroughholein
lockwasher[5].Threadlockwasherontoendofthreadedpipe
protrudingfrominsidecanopy.Passxturewirethroughholein
hexnut[6].Threadhexnutontoendofthreadedpipe.
6) Onothersideofxture,passxturewirethroughlooponend
ofsafetycable[7].Sliplooponsafetycableoverendofthread-
edpipeprotrudingfrominsideofcanopy.Passxturewire
throughholeinlockwasher.Threadlockwasherontoendof
threadedpipeprotrudingfrominsidecanopy.Passxturewire
throughholeinhexnut.Threadhexnutontoendofthreaded
pipe.
7) TURNOFFPOWER.
IMPORTANT:Beforeyoustart,NEVERattemptanyworkwith-
outshuttingofftheelectricityuntiltheworkisdone.
a) Gotothemainfuse,orcircuitbreaker,boxinyourhome.
Placethemainpowerswitchinthe“OFF”position.
b) Unscrewthefuse(s),orswitch“OFF”thecircuitbreaker
switch(s),thatcontrolthepowertothextureorroomthat
youareworkingon.
c) Placethewallswitchinthe“OFF”position.Ifthextureto
bereplacedhasaswitchorpullchain,placethoseinthe
“OFF”position.
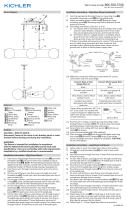
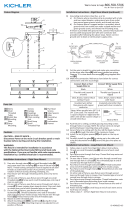
8) Atthecenterofthemountingstrap[8]areknockoutslots.
Removethesetthatmatchesyouroutletbox.
9) Securethemountingstraptotheoutletbox[9].
10) Groundinginstructions:(SeeIllus.AorB).
A) Onxtureswheremountingstrapisprovidedwithahole
andtworaisedimples.Wrapgroundwirefromoutletbox
aroundgreengroundscrew,andthreadintohole.
B) Onxtureswhereacuppedwasherisprovided.Put
groundwirefromoutletboxundercuppedwasherand
greengroundscrewandthreadscrewintoholeinmount-
ingstrap.
Ifxtureisprovidedwithgroundwire.Connectxtureground
wiretooutletboxgroundwirewithwireconnector,(notprovid-
ed)afterfollowingtheabovesteps.Neverconnectgroundwire
toblackorwhitepowersupplywires.
11) Makewireconnections(connectorsnotprovided.)Reference
chartbelowforcorrectconnectionsandwireaccordingly.
12) Pushxturetoceiling,carefullypassingmountingscrews[10]
throughholesincanopy.NOTE:Becertainwiresdonotget
pinchedbetweenmountingstrapandcanopy.
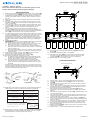
GREEN GROUND
SCREW
CUPPED
WASHER
OUTLET BOX
GROUND
FIXTURE
GROUND
DIMPLES
WIRE CONNECTOR
OUTLET BOX
GROUND
GREEN GROUND
SCREW
FIXTURE
GROUND
A
B
Connect Black or
Red Supply Wire to:
Connect
White Supply Wire to:
Black White
*Parallel cord (round & smooth) *Parallel cord (square & ridged)
Clear, Brown, Gold or Black
without tracer
Clear, Brown, Gold or Black
with tracer
Insulated wire (other than green)
with copper conductor
Insulated wire (other than green)
with silver conductor
*Note: When parallel wires (SPT I & SPT II)
are used. The neutral wire is square shaped
or ridged and the other wire will be round in
shape or smooth (see illus.)
Neutral Wire
OUTLET BOX
12
9
5
6
11
LOOP/LINK/LOOP MOUNT
3
2
1
4
7
8
10
►
►
►
► ►
►
►
►
13
14
OUTLET BOX
9
5
6
7
8
10
12
11
RIGID STEM MOUNT
16
15
3
4
OUTLET BOX
12
9
5
6
11
LOOP/LINK/LOOP MOUNT
3
2
1
4
7
8
10
►
►
►
► ►
►
►
►
13
14
OUTLET BOX
9
5
6
7
8
10
12
11
RIGID STEM MOUNT
16
15
3
4

Date Issued: 09/26/17 IS-44082-US
Estamos aquí para ayudarle 866-558-5706
Horario: Lunes-Viernes 9am a 5pm EST (hora ocial del este)
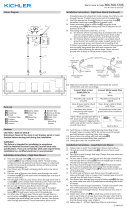
12) Empujelajaciónaltecho,pasandocuidadosamentelostor-
nillosdemontaje[10]atravésdeagujeroseneldosel.NOTA:
Asegúresedequeloscablesnosepellizquenentrelacorreade
montajeyeldosel.
13) Fijarlajaciónaltechoconloslatiguillos[11]ylasperillasde
bloqueo[12].
14) Insertelasbombillasrecomendadas(nosuministradas).
15) Levanteconcuidadoelvidrio[13]hastaelaccesorio.Pasela
aberturamáspequeñasobrelabombillayelzócalo.Enrosque
elvidrioenelreceptáculo[14]paraasegurarelvidrio(nolo
aprietedemasiado).
16)Repitaelpaso15paraelvidriorestante.
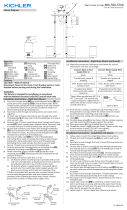
MONTAJE DE LAZO/ ESLABÓN DE CADENA
1) Sigalospasos1y2delasInstruccionesdemontajedelvástago.
2) Atornilleeltuboroscado[3]enelextremodecadalazo
pequeño.
3) Paseelalambredelartefactoatravésdelprimerlazo
pequeño.Fijeellazopequeñoalextremodelúltimovástago.
4) Paseelcableporunladodelartefactoatravésdelsegundo
anilloyluegoporeloriciodelescudete[4].Paseeltuboros-
cadoqueestáconectadoalextremodelsegundoanilloporel
oriciodelescudete.
5) Paseelalambredelartefactoatravésdelagujeroenlaaran-
deladeseguridad[5].Rosquelaarandeladeseguridaddentro
delextremodeltuboroscadoquesobresaledelescudete
interior.
6) Paseelalambredelartefactoatravésdelagujeroenlatuerca
hexagonal[6].Rosquelatuercahexagonalsobreelextremo
deltuboroscado.
7) Paseelcableporelotroladodelartefactoatravésdelse-
gundoanilloyluegoporeloriciodelescudete.Paseeltubo
roscadoqueestáconectadoalextremodelsegundoanillopor
eloriciodelescudete.
8) Paseelcabledelartefactoporelanillosituadoenelextremo
delcabledeseguridad[7].Corraelanillodelcabledesegu-
ridadsobreelextremodeltuboroscadoquesobresaledela
carainteriordelescudete.
9) Paseelalambredelartefactoatravésdelagujeroenlaaran-
deladeseguridad.Rosquelaarandeladeseguridaddentrodel
extremodeltuboroscadoquesobresaledelescudeteinterior.
10) Paseelalambredelartefactoatravésdelagujeroenlatuerca
hexagonal.Rosquelatuercahexagonalsobreelextremodel
tuboroscado.
11) Fijeeleslabóndebloqueo[16]aunpequeñolazoenelex-
tremodecadavástagoyacadabucleeneldosel.
12) Sigalospasos7al16delasInstruccionesdemontajedel
vástago.
MONTAJE DEL VÁSTAGO NERVADO
1) Paseelalambredelartefactoatravésdelvástagoyatornilleel
vástagoaltopedelartefacto[1][2] NOTA:Elcompuestopararosca
estancasedebeaplicaratodaslasroscasdelvástagocomose
notóconelsímbolo(3)paraimpedirlarotaciónaccidentaldelarte-
factodurantelalimpieza,instalacióndeunabombillanueva,etc.
2) Paseelalambredelartefactoatravésdelosvástagosrestan-
tesyatornillelosvástagosjuntos.
3) Encadaladodelartefacto,paseelalambredelartefactoa
travésdeuntuboroscadopequeño[3].Enrosquecadatubo
roscadopequeñoenlapartesuperiordelvástagoencadalado.
4) Encadaladodelartefacto,paselosalambresdelartefactoa
travésdecadaagujeroenelescudete[4].Bajeelescudete
hacialosvástagos.Pasecadaagujeroenelescudetesobreel
extremodecadatuboroscadoarribadelosvástagos.
5) Enunladodelartefacto,paseelalambredelartefactoatravés
delagujeroenlaarandeladeseguridad[5].Enrosquelaaran-
deladeseguridadenelextremodeltuboroscadoquesobre-
saledesdedentrodelescudete.Paseelalambredelartefacto
atravésdelagujeroenlatuercahexagonal[6].Enrosquela
tuercahexagonalenelextremodeltuboroscado.
6) Enelotroladodelartefacto,paseelalambredelartefacto
atravésdelanilloenelextremodelcabledeseguridad[7].
Desliceelanilloenelcabledeseguridadsobreelextremodel
tuboroscadoquesobresaledesdedentrodelescudete.Pase
elalambredelartefactoatravésdelagujeroenlaarandelade
seguridad.Enrosquelaarandeladeseguridadenelextremo
deltuboroscadoquesobresaledesdedentrodelescudete.
Paseelalambredelartefactoatravésdelagujeroenlatuerca
hexagonal.Enrosquelatuercahexagonalenelextremodel
tuboroscado.
7) APAGUELAALIMENTACIÓNELÉCTRICA.
IMPORTANTE: Antesdecomenzar,NUNCAtratedetrabajar
sinantesdesconectarlacorrientehastaqueeltrabajose
termine.
a) Vayaalacajaprincipaldefusibles,ointerruptorocajade
circuitosdesucasa.Coloqueelinterruptordelacorriente
principalenposicióndeapagado“OFF”.
b) Desatornilleel(los)fusible(s),ocoloqueelinterruptoro
interruptoresdelbreakerenposicióndeapagado“OFF”,
quecontrola(n)lacorrientehaciaelartefactoohabitación
dondeestátrabajando.
c) Coloqueelinterruptordeparedenposicióndeapagado
“OFF”.Sielartefactoquesevaareemplazartieneun
interruptorocadenaquesejala,colóquelosenlaposición
deapagado“OFF”.
8) Enelcentrodelacorreademontaje[8]estánlasranurasde
cierre.Retireelconjuntoquecoincidaconsucajadesalida.
9) Fijelacorreademontajealacajadesalida[9].
10) InstruccionesdeconexiónatierrasolamenteparalosEstados
Unidos.(VealailustracionAoB).
A) Enlaslámparasquetieneneleje,demontajeconun
agujeroydoshoyuelosrealzados.Enrollarelalambrea
tierradelacajatomacorrientealrededordeltornilloverde
ypasarloporelaquiero.
B) Enlaslámparasconunaarandelaacopada.Fijarelalam-
breatierradelacajatomacorrientedelajodelaarandela
acoadaytornilloverde,ypaserporelejedemontaje.
Silalámparavieneconalambreatierra.Conecterelalambre
atierradelalámparaalalambreatierradelacajatomacor-
rienteconunconectordealambres(noincluido)espuésde
seguirlospasosanteriores.Nuncaconectarelalambraatierra
alosalambreseléctrosnegrooblanco.
11) Hagalesconexionesdelosalambres(noseproveenlos
connectores.)Latabladereferenciadeabajoindicalasconex-
ionescorrectasylosalambrescorrespondientes.
ARANDELA
CONCAVA
TIERRA DE LA
CAJA DE SALIDA
TORNILLO DE TIERRA,
VERDE
DEPRESIONES
TIERRA
ARTEFACTO
CONECTOR DE ALAMBRE
TIERRA DE LA
CAJA DE SALIDA
TORNILLO DE TIERRA,
VERDE
TIERRA
ARTEFACTO
A
B
Conectar el alambre de
suministro negro o rojo al
Conectar el alambre de
suministro blanco al
Negro Blanco
*Cordon paralelo (redondo y liso)
*Cordon paralelo (cuadrado y estriado)
Claro, marrón, amarillio o negro
sin hebra identificadora
Claro, marrón, amarillio o negro
con hebra identificadora
Alambre aislado (diferente del verde)
con conductor de cobre
Alambre aislado (diferente del
verde) con conductor de plata
*Nota: Cuando se utiliza alambre paralelo
(SPT I y SPT II). El alambre neutro es de forma
cuadrada o estriada y el otro alambre será de
forma redonda o lisa. (Vea la ilustracíón).
Hilo Neutral
PRECAUCIÓN – RIESGO DE DESCARGA ELÉCTRICA –
Desconecte la electricidad en el panel principal del interruptor
automático o caja principal de fusibles antes de comenzar y
durante la instalación.
OUTLET BOX
12
9
5
6
11
LOOP/LINK/LOOP MOUNT
3
2
1
4
7
8
10
►
►
►
► ►
►
►
►
13
14
OUTLET BOX
9
5
6
7
8
10
12
11
RIGID STEM MOUNT
16
15
3
4
OUTLET BOX
12
9
5
6
11
LOOP/LINK/LOOP MOUNT
3
2
1
4
7
8
10
►
►
►
► ►
►
►
►
13
14
OUTLET BOX
9
5
6
7
8
10
12
11
RIGID STEM MOUNT
16
15
3
4
-
 1
1
-
 2
2


Kichler Lighting 44082BK Manual de usuario
- Tipo
- Manual de usuario
en otros idiomas
- English: Kichler Lighting 44082BK User manual
Artículos relacionados
-
 Kichler Lighting 44205PN Manual de usuario
-
 Kichler Lighting 44081BK Manual de usuario
-
 Kichler Lighting 44077BK Manual de usuario
-
 Kichler Lighting 44296WWW Manual de usuario
-
 Kichler Lighting 44250NI Manual de usuario
-
 Kichler Lighting 44180BKT Manual de usuario
-
 Kichler Lighting 44043AUB Manual de usuario
-
 Kichler Lighting 44038NI Manual de usuario
-
 Kichler Lighting 44340WNWLED Manual de usuario
-
 Kichler Lighting 42436AP Manual de usuario


