Vornado HU1-0029-06 Guía del usuario
- Categoría
- Humidificadores
- Tipo
- Guía del usuario

CL3-0211 R-
CL7-0211 R-, V01
Vornado Air, LLC
415 East 13th Street, Andover, Kansas 67002
800.234.0604 | www.vornado.com
Speak your mind www.vornado.com/reviews
évaluer ce produit en ligne www.vornado.com/reviews
Hable con franqueza www.vornado.com/reviews
READ AND SAVE THESE INSTRUCTIONS
Evaporative Vortex Humidifi er Owner’s Guide
LEER Y GUARDAR ESTAS INSTRUCCIONES
Guía para el usuario
LISEZ ET CONSERVEZ CES INSTRUCTIONS
Manuel d’utilisation
www.vornado.com
model EVAP2

Designed, engineered and supported in Andover, Kansas.
Pensado, diseñado y respaldado en Andover, Kansas.
Conception, mise au point et soutien technique effectués à Andover, au Kansas.
Questions or comments?
¿Preguntas o comentarios?
Questions ou commentaires?
www.vornado.com [email protected] 1-800-234-0604
VORNADO AIR LLC
Garantía Limitada de 5 años
Vornado Air LLC (“Vornado”) garantiza al comprador o consumidor original
que este Vornado Evaporative Vortex Humidifi er Evap2 (“Producto”) contra
defectos de material o mano de obra durante un período de cinco (5) años. Si
se descubriera cualquiera de estos defectos dentro del período de garantía,
Vornado reparará o reemplazará el Producto, a su discreción, sin costo alguno.
Las reparaciones no cubiertas por la garantía o fuera del período de garantía
requerirán de un pago cubriendo el costo de materiales, manipuleo y envío.
Esta garantía no se aplica a defectos producidos por el abuso del Producto, por
su modifi cación, alteración, reparación o mantenimiento por personas ajenas a
Vornado Air LCC, por mal manejo del mismo, mantenimiento inadecuado, uso
comercial o daños producidos durante el envío o atribuibles a fuerza mayor.
LA REPARACIÓN O REEMPLAZO QUE SE OFRECE BAJO ESTA GARANTÍA
ES LA ÚNICA SOLUCIÓN PROPORCIONADA PARA EL CLIENTE. VORNADO
NO SERÁ RESPONSABLE POR NINGÚN DAÑO INCIDENTAL O INDIRECTO
POR EL INCUMPLIMIENTO DE CUALQUIER GARANTÍA EXPRESA O IMPLÍCITA
DE ESTE PRODUCTO. EXCEPTO HASTA EL ALCANCE PROHIBIDO POR LAS
LEYES VIGENTES, TODA GARANTÍA IMPLÍCITA DE APTITUD O IDONEIDAD
PARA UN USO EN PARTICULAR DE ESTE PRODUCTO QUEDA LIMITADA A LA
DURACIÓN DE ESTA GARANTÍA.
Algunos estados no permiten limitaciones con respecto a cuánto dura
una garantía implícita o la exclusión o limitación de daños imprevistos o
consiguientes, por lo tanto las exclusiones o limitaciones anteriores pueden no
aplicarse en su caso. Esta garantía le otorga derechos legales específi cos; usted
puede también tener otros derechos, los que varían de estado a estado.
Por garantía o servicio de reparaciones, llame al 1-800-234-0604 o mande un
correo electrónico a [email protected] para obtener el formulario
de Autorización de Retorno (“RA”). Por favor, cuando contacte a Vornado por la
garantía, tenga a mano o incluya en el envío los números de modelo y de serie
de su Producto, así como su nombre, dirección, ciudad, estado, código postal
y número de teléfono. Después de recibir el formulario RA, despache su
Producto a:
Vornado Air LLC
Attn: Garantía y reparación
415 East 13th Street
Andover, KS 67002
Para su conveniencia, por favor tenga a mano los números de modelo y de serie
cuando contacte Vornado por solicitudes de servicio.
Para asegurar el manejo adecuado, los embalajes deben estar claramente
marcados con el número de RA. Los paquetes que no estén marcados
claramente con dicho número de RA podrían ser rechazados en la dársena de
recepción. Por favor espere entre 1 y 2 semanas después de la recepción del
Producto para dar tiempo a la reparación y devolución del mismo. Para sus
registros:
Abroche o adjunte su recibo original de compra a esta ‘Guía del Usuario’. Por
favor, también escriba aquí abajo el número de serie de su Producto (ubicado en
la calcomanía de especifi caciones de su producto).
N° de serie ______________________________________
Registre su producto en línea en www.vornado.com
©2012 Vornado Air LLC Andover, KS 67002
Patentes pendientes. Especifi caciones del producto sujetas a cambio sin previo
aviso.
Vornado
® son marcas registradas de Vornado Air LLC.
Diseñado y Maquinado en E.U.A. Fabricado en China.
REGISTRO DEL PRODUCTO DISPONIBLE EN INTERNET EN
WWW.VORNADO.COM
SERVICIO AL CLIENTE DE VORNADO
www.vornado.com
1.800.234.0604
Español | 31

REEMPLAZO DEL FILTRO
El fi ltro puede acumular minerales y otras impurezas que se producen
naturalmente en el suministro de agua. Si bien el humidifi cador viene
equipado con un fi ltro, usted deberá cambiarlo ya que los fi ltros duran
entre 4 y 8 semanas aproximadamente, según el uso. Usted deberá cambiar
el fi ltro cuando se ponga duro y ya no absorba el agua de forma efi caz.
Cambie el fi ltro únicamente por un fi ltro original de marca Vornado®. Si bien
pueden instalarse otras marcas en nuestras unidades, esos fi ltros no tienen
la misma calidad y vida útil que nuestros propios fi ltros y pueden disminuir el
rendimiento del humidifi cador.
PARA CAMBIAR EL FILTRO
PASO 1 - Desenchufe la unidad.
PASO 2 – Quite el tanque de agua (A).
PASO 3 – Quite y deseche el fi ltro usado.
PASO 4 - Instale un nuevo fi ltro original Vornado. Para ello, doble levemente
el fi ltro para ajustarlo a la curvatura de la unidad. Asegúrese de
que el fi ltro se alinee perfectamente con la parte inferior de la
unidad y encaje en la rejilla de entrada.
PASO 5 - Vuelva a colocar el tanque de agua.
PARA EXTENDER LA VIDA ÚTIL DE LOS FILTROS
Problema : El exceso de sodio en aguas ablandadas químicamente podría
provocar el endu recimiento de los fi ltros o que los mismos se
pongan pastosos.
Solución : Trate de usar agua no tratada o agua corriente.
Problema : Aguas duras o con excesiva cantidad de minerales tales como
cal o hierro podrían acortar la vida útil del fi ltro.
Solución : Pruebe con Bacteriostat o algún tratamiento para aguas de los
que se venden en la mayoría de las ferreterías y casas de
artículos para el hogar. O quite periódicamente los fi ltros y
límpielos, dejándolos en remojo en agua corriente fría (la sufi
ciente para cubrir los fi ltros) y dos cucharaditas de vinagre
blanco. Déjelos reposar por 20 minutos y luego enjuague
con agua corriente. Permita que escurra el exceso de agua y
séquelos antes de volver a colocarlos en la base. No los estruje.
Problema : La permanencia durante mucho tiempo de los fi ltros dentro del
humidifi cador apagado podría causar moho, hongos y
deterioro.
Solución : Si el humidifi cador está lleno, no lo deje apagado por más de
ocho horas.
PARA ENCONTRAR LOS FILTROS DE REPUESTO
Pregúntele a su vendedor u ordénelos contactando con el Servicio de
atención a clientes de Vornado al: www.vornado.com, consumerservice@
vornado.com, 1.800.234.0604.
PLAN DE REEMPLAZO AUTOMÁTICO DE FILTROS DE VORNADO
¡Este programa le ofrece una forma conveniente y libre de complicaciones
de recibir regularmente y directamente en su domicilio los fi ltros genuinos
Vornado! Elimine las complicaciones de tener que recordar los pedidos
de reposición. Mantenga la alta efi ciencia de su humidifi cador Vornado
reemplazando con regularidad los fi ltros usados por otros nuevos.
CÓMO FUNCIONA
Seleccione un plan y Vornado le enviará automáticamente los fi ltros
de recambio cuando se cumplan los intervalos recomendados de
mantenimiento. Para registrarse o para más información, visite www.vornado.
com o llame al 1- 800-234-0604. Cancele cuando lo desee.
30 | Español
DO read all instructions before using this Humidifi er.
DO turn the Humidifi er off if the relative humidity exceeds 60%. Humidity
levels above 60% may allow moisture to build up indoors and condense
on surfaces, where microorganisms can settle and grow. For accurate
humidity readings, use a hygrometer which is available at most hardware
stores and home centers.
DO unplug the Humidifi er prior to moving, cleaning or refi lling.
DO unplug and empty this Humidifi er when not in operation.
DO empty water from the unit if the Humidifi er is to be turned off
and left for more than 12 hours, as leaving the water will encourage
the growth of microorganisms. If this happens, thoroughly clean and
disinfect the unit. (Refer to the WEEKLY MAINTENANCE.)
DO remove the Water Reservoir fi rst if you need to move the Humidifi er
to another location.
This Humidifi er requires periodic cleaning. Refer to the WEEKLY
MAINTENANCE instructions provided. DO NOT clean the Humidifi er in
any manner other than as instructed in this manual.
DO NOT use this Humidifi er on an uneven surface. Always place this
Humidifi er on a fi rm, fl at surface.
DO NOT defeat the safety purpose of the polarized plug. This product
is equipped with a polarized alternating current line plug (a plug having
one blade wider than the other). This plug will fi t into the power outlet
only one way. This is a SAFETY FEATURE. If you are unable to insert the
plug fully into the outlet, try reversing the plug. If the plug still fails to fi t,
contact an electrician to replace the obsolete outlet.
DO NOT operate the Humidifi er with a damaged cord or plug, after
the Humidifi er malfunctions, or has been dropped or damaged in any
manner. Return to Vornado for examination, electrical or mechanical
adjustment or repair.
DO NOT run power cord under carpeting.
DO NOT cover cord with throw rugs, runners or similar objects. Arrange
the power cord away from traffi c areas, so it will not become a tripping
hazard.
DO NOT place the Humidifi er near heat sources such as stoves,
radiators or heaters.
DO NOT pour water through the top Outlet Air Grill on the Power Head.
DO NOT use undiluted bleach or ammonia, strong detergents,
abrasive cleansers, gasoline, paint thinner or other solvents to clean
this Humidifi er. Use only water and mild detergents to perform daily
maintenance on your Humidifi er.
READ AND SAVE ALL INSTRUCTIONS BEFORE USING THIS HUMIDIFIER.
When using electrical appliances, basic precautions should always be followed to reduce the risk of fi re, electrical shock and injury to persons,
including the following:
IMPORTANT INSTRUCTIONS
English | 3

DO NOT ATTEMPT TO DISASSEMBLE THE POWER HEAD. DOING SO
WILL VOID YOUR WARRANTY AND COULD CAUSE DAMAGE AND/
OR PERSONAL INJURY. The Power Head contains no user serviceable
parts. If you experience a problem, please see the limited warranty for
information.
DO NOT repeatedly remove and replace the Water Reservoir. This will
overfi ll the Base and water will spill out.
Humidifi ers should be kept away from children and not be placed in a
child’s room without supervision.
See page 5 for parts listing and identifi cation.
If you have any questions regarding this product, please call
Vornado Consumer Service, toll-free at 1-800-234-0604, or
SAVE THESE INSTRUCTIONS
IMPORTANT INSTRUCTIONS
4 | English
LIMPIEZA
Se recomienda mantener limpio su Humidifi cador Vornado para que éste
funcione correctamente. Sugerimos seguir el régimen de limpieza de la
AHAM (‘Asociación de fabricantes de electrodomésticos’ ó ‘Association of
Home Appliance Manufacturers’) varias veces durante la estación.
PASO 1 - Apague el humidifi cador (OFF) y desenchufe la unidad.
PASO 2 - Quite el tanque de agua y el fi ltro. (Consulte la página 30 para
obtener instrucciones).
PASO 3 - Vacíe la base y el tanque de agua y enjuáguelos con agua
corriente limpia.
PASO 4 - Como ya se indicó, las impurezas podrían acumularse más o
menos rápidamente dependiendo de la calidad del agua en su
zona. Es posible que se forme algo de sarro en el interior de la
base.
1. Prepare una solución de una (1) taza de 8 onzas de vinagre
blanco sin diluir y 1 galón de agua. Coloque la solución en la
base; deseche la solución restante. Deje que la solución repose
durante 20 minutos.
2. Vacíela después de 20 minutos y limpie las superfi cies interiores
con un cepillo suave. Humedezca un trapo blando con vinagre
blanco puro y limpie la base para remover el sarro. Use el cepillo
limpiador ubicado en la base para limpiarla bien, especialmente
alrededor del transductor.
El cepillo tiene un extremo para raspar y cerdas en el otro.
3. Antes de desinfectar la base, enjuáguela bien con agua limpia y
tibia para quitar el sarro y la solución limpiadora.
DESINFECCIÓN DE LA BASE
1. Prepare una solución de 1 cucharada de té de blanqueador de cloro y 1
galón de agua. Coloque la solución en la base; deseche la solución
restante. Deje que la solución repose durante 20 minutos. Humedezca
todas las superfi cies.
2. Vacíe la base después de 20 minutos. Enjuáguela con agua hasta que
desaparezca el olor a lavandina. Séquela con un trapo limpio o una toalla
de papel.
MANTENIMIENTO DE FIN DE ESTACIÓN
Siga las instrucciones de mantenimiento semanal al fi nal de la
estación de humidifi cación o cuando sepa que no volverá a usar el
humidifi cador durante una semana o más.
Deje secar el humidifi cador por completo antes de guardarlo. No lo
guarde en caso de que haya agua dentro del depósito o la base.
Guárdelo en un lugar fresco y seco.
Quite y deseche el fi ltro si no sirve para volver a usarlo. No guarde el
humidifi cador con el fi ltro húmedo. Si el fi ltro sirve para usarlo en el
futuro, quite el agua de la base y del tanque de agua, vuelva a colocar
el tanque de agua, gire la perilla Power (Energía) hasta la posición
velocidad del ventilador alta (High) y deje la unidad en funcionamiento
hasta que se seque totalmente el fi ltro.
No olvide comprar ahora fi ltros Vornado nuevos para que el
humidifi cador esté listo para la próxima temporada. Visite vornado.
com para comprar fi ltros nuevos o suscríbase en el Programa de
reemplazo automático de fi ltros.
Limpie el humidifi cador antes del comienzo de la próxima estación.
3. Le recomendamos que cambie el fi ltro luego de usarlo, pero para
prolongar la vida útil del fi ltro, desinféctelo. Para ello, lávelo con una
solución de una cucharada de té de blanqueador de cloro y un galón de
agua. Enjuague bien para eliminar el olor a blanqueador.
4. Coloque nuevamente el fi ltro y el tanque de agua. Para un
funcionamiento correcto, todos los componentes deben estar
correctamente instalados.
1.
2.
3.
4.
5.
Español | 29

CONSEJOS DE OPERACIÓN
LEER ANTES DE USAR
Un humidifi cador es muy útil para incorporar humedad al aire
seco. Sin embargo, debe ser usado con cuidado para evitar la
sobre-humidifi cación. Una buena regla práctica sería evaluar la
condensación o escarcha que se forme en las ventanas. Ajuste su
humidifi cador o el humidistato de su humidifi cador de manera de
mantener estos al mínimo. Este ajuste debería realizarse cada vez
que haya cambios importantes en la temperatura exterior. Los
humidifi cadores pueden colocarse en cualquier área habitable que
tenga un lugar adecuado y que ofrezca una buena distribución del
aire húmedo hacia el resto del área habitable.
La salida medida de un humidifi cador se basa en su operación
continua en condiciones estándar de especifi cación. En situaciones
donde existan variaciones normales de las temperaturas internas y
externas del ambiente, el humidifi cador no operará continuamente,
a menos de que se lo ajuste para hacerlo.
Requisitos iniciales de humedad: Cuando instale por primera vez
o al principio de cada temporada un humidifi cador provisto de
humidistato, éste podría permanecer en funcionamiento continuo
por aproximadamente un día hasta evaporar la gran cantidad
de humedad requerida. Cuando su hogar y mobiliario hayan
absorbido la humedad necesaria y se estabilicen al nivel de
humedad deseado, disminuirá la cantidad de agua consumida y la
operación del humidifi cador será solo para mantener dicho nivel de
humedad.
Además, si usted no sigue las instrucciones recomendadas de
cuidado y mantenimiento, pueden crecer microorganismos en el
agua dentro de la base y tanque del humidifi cador.
NOTAS Y SUGERENCIAS DE OPERACIÓN
Existen varias cosas que debe saber respecto al funcionamiento de su
Humidifi cador Vornado.
Es normal escuchar un ruido de burbujeos y gorgoteos cuando se
agregue agua en la base.
Si opera su humidifi cador de manera permanente, podría necesitar
volver a llenarlo de agua diariamente. Simplemente mire a través
del tanque para asegurarse que el nivel de agua en el mismo es el
adecuado para funcionar.
Evite daños en el tanque de agua. Cualquier perforación o daño
en el tanque podría provocar la pérdida total de su contenido, con
los resultantes derrames de agua en el piso u otras superfi cies.
Al instalar el fi ltro, asegúrese de que se encuentre en la posición
correcta, es decir, alineado perfectamente con la rejilla de entrada
abierta y encajado sobre la base.
Los fi ltros podrían dar un cierto olor suave durante su primer uso.
Este olor no es dañino y se irá luego de unas pocas horas de
operación. Si el olor fuera excepcionalmente fuerte, puede
eliminarlo en gran parte remojando los fi fi ltros durante 20 o 30
minutos en una solución de 1 galón de agua con 2 cucharitas de
vinagre. Luego enjuáguelos bien.
Si apaga su humidifi cador con agua dentro y no vuelve a
encenderlo dentro de las 12 horas siguientes, podría producirse el
crecimiento de cierta cantidad de algas y bacterias. Si esto
sucediera, recomendamos proceder con una limpieza profunda de
la unidad. (Vea las instrucciones de MANTENIMIENTO SEMANAL).
Recomendamos que opere su humidifi cador todo el tiempo. Esto
ayudará a mantener la humedad a lo largo del día, solo le costará
unos centavos diarios y no producirá daños a la unidad.
•
•
•
•
•
•
•
28 | Español
VORNADO
®
EVAP2
HUMIDIFIER PARTS
While your Vornado® Evaporative Humidifi er
requires no assembly, you will need to know how
to remove the Water Reservoir and Filter for
cleaning, maintenance, and fi lter replacement.
The components are as follows:
CONTROL PANEL
Easily operate with a power switch that turns
the unit ON/OFF and enables you to select the
fan speed. Offers HIGH, LOW or AUTO speed
selection. Control the humidity level between
40% -60%, or allow the unit to run continuously.
Choose FAN ONLY for increased fan speed
without humidity output. LED indicator lights
display current settings.
POWER HEAD
Powerful motor circulates
humidifi ed air throughout the
whole room.
HUMIDISTAT
Reads humidity in the room for
automatic humidity control.
CAP
Easy-to-remove Cap for convenient
Water Reservoir refi lling.
FILTER
The Vornado® evaporative Filter
wicks up water and fi lters out
impurities.
WATER
RESERVOIR
Large 1 gallon
capacity allows for
less refi lls.
INLET GRILLS
Designed for effi cient air intake.
AIR OUTLET GRILL
Initiates Vornado’s signature Vortex
circulation.
BASE
Durable and easy to clean.
English | 5

BEFORE OPERATING
DO NOT lift the Humidifi er out of the carton by the recessed handle
on the Water Reservoir. This will cause the Reservoir to detach from the
unit and might cause the Humidifi er to drop and become damaged.
Reach under the Humidifi er in the carton, grasp and lift from the
bottom.
Your new Humidifi er uses a sizable volume of water, so we recommend
checking the Base and Water Reservoir for leaks that may have
occurred due to damage caused in shipping.
Please note a visual inspection may not reveal hairline fractures.
TO CHECK FOR LEAKS:
Place Humidifi er on a water-resistant surface.
Remove the Water Reservoir and fi ll with water to inspect for
leaks (For instructions see FILLING AND INSTALLING THE
WATER RESERVOIR.)
Next, pour several cups of water into the Base to inspect for leaks.
NOT LEAKING?
Empty water from Base and install the full Water Reservoir (See
FILLING AND INSTALLING THE WATER RESERVOIR for complete
instructions).
LEAKING?
In the slight chance your Humidifi er has leaks, contact Vornado
Consumer Service and we will immediately replace these parts.
1-800-234-0604 or [email protected]
6 | English
GETTING STARTED
The following pages will provide instruction on:
Filling & Installing the Water Reservoir
How to Use
Operating Guidelines
Operating Notes and Suggestions
Cleaning
End of Season Maintenance
Filter Replacement
OPERACIÓN DEL HUMIDIFICADOR
PASO 1
Ubique la unidad de modo que no descargue directamente sobre objetos o
plantas. Enchufe la unidad en un tomacorriente de 110-120 voltios CA.
PASO 2
Para encender la unidad, presione el botón Power (Energía) (A). Las luces
de indicación de velocidad del ventilador (A) y nivel de humedad (C) se
encenderán en la confi guración predeterminada – velocidad del ventilador
ALTA, humedad constante.
PASO 3
Ajuste las confi guraciones según el funcionamiento deseado.
Botón de energía, velocidad del ventilador - ALTA, BAJA y AUTOMÁTICA
Para seleccionar la velocidad del ventilador, presione el botón de
energía hasta que se ilumine la confi guración deseada.
HIGH (Alta) – rápida humidifi cación de ambientes grandes. La velocidad
alta evaporará 2 galones de agua (+/- 10%) en 24 horas de funcionamiento
continuo. (Esto presupone condiciones ambientales de 70º F y 30% de
humedad relativa.) Funcionará en velocidad de ventilación alta hasta
alcanzar el valor de ajuste de humedad. Luego, el ventilador se apagará
hasta que el nivel de humedad disminuya por debajo del nivel de
ajuste.
LOW (Baja) — funcionamiento silencioso, uso nocturno o ambientes
pequeños. En la función LOW (Baja), el humidifi cador puede funcionar
sin tener que rellenarlo durante extensos periodos de tiempo.
Funcionará en velocidad de ventilación baja hasta alcanzar el valor de
ajuste de humedad. Luego, el ventilador se apagará hasta que el nivel
de humedad disminuya por debajo del nivel de ajuste.
AUTO (Automática) – mayor control de la humedad. La velocidad del
ventilador oscilará entre la opción alta, baja y apagado para mantener
mejor el nivel de humedad seleccionado con una cantidad mínima de
ruido del ventilador.
Control del nivel de HUMEDAD - 40% - 60%, o Continuo
Para fi jar el nivel de humedad, presione el botón HUMIDITY
(Humedad) hasta que se ilumine el nivel de humidifi cación deseado. El
humidifi cador funcionará hasta lograr el nivel de humedad deseado.
En este punto, el ventilador se apagará. La luz del indicador del nivel
de humedad permanecerá encendida. Si el ventilador no se enciende,
la confi guración de humedad puede ser inferior al nivel de humedad
del ambiente. Aumente el nivel seleccionado de humedad hasta que
el ventilador se encienda. Esto es una indicación del nivel de humedad
existente en el ambiente.
SÓLO VENTILACIÓN
Seleccione la circulación vórtice de diseño exclusivo de Vornado
sin salida de humedad. En el modo FAN ONLY (Sólo ventilación),
las opciones velocidad del ventilador (A) y humedad (B) no estarán
disponibles. La velocidad del ventilador funcionará con una
confi guración mayor y no habrá salida de humedad. Para garantizar que
no haya salida de humedad, quite el fi ltro y seque bien el interior de la
base. (Para obtener instrucciones sobre cómo quitar el fi ltro, consulte
CAMBIO DEL FILTRO en la página 30.)
Español | 27

LLENADO E INSTALACIÓN DEL TANQUE
DE AGUA
Este humidifi cador tiene una capacidad real de 1 galone y tiene una
salida de 2 galones en 24 horas. Cuando tenga que volver a llenarlo,
siga estas sencillas instrucciones: Desenchufe la unidad. Verifi que que
el humidifi cador esté sobre una superfi cie fi rme, plana y nivelada (le
recomendamos el piso). Como en el caso de cualquier artefacto lleno
de agua, puede salpicar, por lo tanto debe tener cuidado al llenar e
instalar el tanque de agua y al limpiar o mover el humidifi cador.
AGREGADO DE AGUA
Quite el tanque de agua. Para ello, sujete la manija hueca y jale hacia
usted. (A). Coloque el tanque de agua hacia abajo. Quite la tapa (B).
Si va a recargar el tanque, vacíe el agua remanente en el interior del
tanque antes de recargarlo. Coloque el tanque en el lavabo hacia
abajo. Llene el tanque con agua fría del grifo (C). Luego de llenarlo,
asegúrese de que la junta, el anillo de goma que se encuentra
alrededor de la tapa, esté bien colocado y vuelva a colocar y ajuste
la tapa. Es posible que deba presionar hacia abajo para comprimir la
junta antes de girar la tapa 1/4 en sentido de las agujas del reloj hasta
la posición correcta.
INSTALACIÓN DEL TANQUE DE AGUA
Descienda el tanque sobre la base, colocando el puerto de llenado
sobre la elevación. La elevación activará la válvula de salida de agua
dentro de la tapa una vez colocado en su lugar. Verifi que que el
tanque quede bien instalado en la base.
MANTENIMIENTO RÁPIDO DIARIO
Vacíe el tanque antes de volver a llenarlo con agua limpia. Enjuáguelo,
repáselo y séquelo con un trapo limpio o una toalla de papel.
Llene el tanque hasta la marca de llenado con agua fresca y limpia del
grifo. No lo llene de más.
Disminuya el ajuste de humedad o apague el humidifi cador si se
acumula humedad en las paredes o ventanas.
1.
2.
3.
26 | Español
FILLING & INSTALLING THE
WATER RESERVOIR
This Humidifi er has a 1 gallon capacity and 2 gallon output in 24 hours.
When it needs refi lling, follow these simple instructions: Unplug the
Humidifi er. Be sure the Humidifi er is placed on a fi rm, fl at and level
surface (we recommend the fl oor). As with any water fi lled appliance,
spills can occur, so be careful when fi lling and installing the Water
Reservoir, and cleaning or moving the Humidifi er.
ADDING WATER
Remove the Water Reservoir by grasping the recessed handle and
pulling towards you. (A). Turn the Reservoir upside down. Remove
the Cap (B). If refi lling the Reservoir, empty any water left inside the
Reservoir prior to refi lling. Place the Reservoir in the sink upside down.
Fill the Reservoir with cool tap water (C). Once fi lled, insure the Gasket,
the rubber ring around the Cap, is in position and replace and fasten
the Cap. Some downward pressure may be needed to compress the
Gasket prior to rotating the Cap 1/4 turn clockwise to the fully installed
position.
INSTALLING THE WATER RESERVOIR
Lower the Reservoir into the Base, positioning the fi ll port over the
raised bump. The bump will activate the water outlet valve inside
the Cap once in a nested position. Insure the Reservoir is setting
fi rmly in the Base.
English | 7
QUICK DAILY MAINTENANCE
Empty Reservoir before refi lling with clean water. Rinse, wipe clean and
dry with clean cloth or paper towel.
Refi ll Reservoir with cool, clean tap water. Do not overfi ll.
Lower humidity control settings or turn off Humidifi er if moisture forms
on walls or windows.
1.
2.
3.

HOW TO USE
STEP 1
Position the unit to not blow directly on objects or plants. Plug the unit
into a 110-120 volt AC outlet.
STEP 2
To turn unit on, press the Power button (A). The indicator lights for Fan
Speed (A) and Humidity level (C) will turn on in the default setting -
HIGH fan speed, Continuous humidity.
STEP 3
Adjust settings for desired operation.
8 | English
HIGH - operation for fast humidifi cation for larger rooms. High speed
operation will evaporate 2 gallons of water (+/- 10%) in 24 hours of
continuous operation. (This assumes room conditions of 70º F and 30%
relative humidity.) Will operate at High fan speed until the humidity set
point is reached. The Fan will then turn off until the humidity level drops
below set point.
LOW — operation for quiet, nighttime use or smaller rooms. On LOW
operation, your Humidifi er may run without refi lling for extended
periods. Will operate at Low fan speed until the humidity set point is
reached. The Fan will then turn off until the humidity level drops below
set point.
AUTO - operation for more precise humidity control. Fan speed will
fl uctuate between high, low and off to better maintain set humidity level
with the minimal amount of fan noise.
HUMIDITY Level Control - 40% - 60%, or Continuous
Set the humidity level by pressing the HUMIDITY button until the
desired humidifi cation level is illuminated. The Humidifi er will operate
until the desired humidity level is reached. At this point, the fan will turn
off. The humidity level indicator light will remain on. If the fan does
not turn on, the humidity setting may be lower than the room humidity
level. Increase the humidity set point until the fan turns on. This is an
indication of the level of humidity already in the room.
FAN ONLY
Select for Vornado's signature vortex circulation without humidity
output. In FAN ONLY mode - Fan Speed (A) and Humidity (B) operation
will not be available. The fan speed will run at a higher setting and there
will be no humidity output. To ensure no humidity output, remove the
fi lter and thoughly dry the inside of the Base. (For instructions on how to
remove the fi lter, see FILTER REPLACEMENT on page 11.)
Power Button, Fan Speed - HIGH, LOW and AUTO
Select the fan speed by pressing the power button until the desired
setting is illuminated.
ANTES DE USARLO
NO saque el humidifi cador de su caja tirando de la manija empotrada
del tanque de agua. Esto provocará que el tanque se desprenda del
humidifi cador y que éste pueda caer y dañarse. En lugar de esto,
lleve la mano hasta el fondo de la caja y tome y eleve al humidifi cador
desde su parte inferior.
Su nuevo humidifi cador emplea una cantidad medible de agua,
así que recomendamos revisar la base y el tanque para verifi car la
existencia de pérdidas causadas por daños durante el envío. Tenga en
cuenta de que una inspección visual podría no detectar fracturas muy
delgadas.
PARA VERIFICAR SI EXISTEN PERDIDAS:
Coloque el humidifi cador sobre una superfi cie resistente al agua.
Quite el tanque de agua y llénelo con agua para controlar la
existencia de fi ltraciones (Para obtener instrucciones, consulte
CÓMO LLENAR E INSTALAR EL TANQUE DE AGUA.)
Luego, vierta varias tazas de agua en la base para controlar la
existencia de fi ltraciones.
¿NO HAY PÉRDIDAS?
Vuelque el agua de la base e instale el tanque de agua completo
(consulte la sección ‘Llenado e instalación del tanque de agua’ para
más instrucciones).
¿HAY PÉRDIDAS?
Ante la menor sospecha de que existan fugas de agua en su
Humidifi cador, consulte con el servicio de atención a clientes e
inmediatamente reemplazaremos cualquiera de estas partes.
1-800-234-0604 ó [email protected]
Español | 25
PRIMEROS PASOS
Las siguientes páginas contienen instrucciones sobre lo
siguiente:
Cómo llenar e instalar el tanque de agua
Cómo usar
Pautas de funcionamiento
Pautas de funcionamiento y sugerencias
Limpieza
Mantenimiento de fi n de temporada
Cambio del fi ltro

24 | Español
PARTES DEL HUMIDIFICADOR DE
EVAPORACIÓN VORNADO® EVAP2
Si bien el Humidifi cador por evaporación Vornado® no
requiere ensamblado, usted debe saber cómo quitar el
tanque de agua y el fi ltro para su limpieza, mantenimiento, y
cambio del fi ltro. Los componentes son los que se indican a
continuación:
PANEL DE CONTROL
Funciona fácilmente con un interruptor de energía que enciende/apaga (ON/OFF)
la unidad y le permite seleccionar la velocidad del ventilador. Ofrece diferentes
velocidades; HIGH (Alta), LOW (Baja), o AUTO (Automática). Controla el nivel de
humedad entre 40% y 60%, o permite que la unidad funcione de forma continua.
Seleccione FAN ONLY (Sólo ventilación) para obtener una mayor velocidad de
ventilación sin salida de humedad. Las luces LED de indicación muestran las
confi guraciones seleccionadas.
CABEZAL DE POTENCIA
El motor potente hace circular
el aire humidifi cado por todo el
ambiente.
HUMIDISTATO
Mide la humedad en el
ambiente para el control
automático de humedad.
TAPA
Tapa fácil de quitar para llenar
el tanque fácilmente.
FILTRO
El fi ltro de evaporación
Vornado® absorbe agua y fi ltra
las impurezas.
TANQUE DE
AGUA
Su capacidad de
1 galone permite
llenarlo menos
seguido.
REJILLAS DE ENTRADA
Diseñadas para absorber aire de
forma efi ciente.
REJILLA DE SALIDA DE AIRE
Inicia la exclusiva circulación vortex
de Vornado.
BASE
Son duraderos y fáciles de
limpiar.
OPERATING GUIDELINES
READ BEFORE USING
A Humidifi er is quite useful in supplying necessary moisture to dry
air. It should be used with proper care to prevent over-humidifi cation.
A good rule of thumb would be to gauge the condensation or frost
on windows. Adjust your Humidifi er to a point where this condition
is at a minimum. These adjustments should be made when major
changes in outdoor temperatures occur. Humidifi ers can be placed
in any living area that has a location that is convenient and provides
distribution of the moist air to the living area.
The measured output of a Humidifi er is based upon continuous
operation at standard rating conditions. With normal variations of
indoor and outdoor conditions, the Humidistat controlled Humidifi er
will not run continuously, at maximum output, unless the controls are
set to do so.
Initial Humidity requirements: When initially installed or when
placed in operation at the beginning of each season, the Humidifi er
equipped with a Humidistat may run constantly for a day or so and
thus evaporate large quantities of moisture. When the home and its
furnishings have absorbed moisture and become stabilized at the
desired humidity level, the amount of water used will diminish and
the Humidifi er operation will maintain the desired humidity level.
If you do not follow the recommended care and maintenance
guidelines, microorganisms may be able to grow in the water within
the Humidifi er’s Reservoir and Base. (See CLEANING for care
instructions.).
OPERATING NOTES AND SUGGESTIONS
There are several things to be aware of as your Vornado® Evaporative
Humidifi er is operating.
It is normal to hear a bubbling or gurgling sound as water is
dispensed into the Base.
If you operate your Humidifi er continuously, it may need to be refi lled
with water every day. Simply look through the Reservoir to be certain
that there is an adequate water supply for operation.
Protect the Water Reservoir from damage. Any holes or other
damage to the Reservoir may cause it to dispense water onto the
fl oor or other surfaces.
When installing the Filter, make certain it is in the proper position,
fl ush along the open Inlet Grill and resting fl at on the Base.
On fi rst use, the Filters may give off a mild odor. The odor is not
harmful and will go away after the fi rst few hours of operation. If the
odor is exceptionally strong, you can help eliminate most or all of it
by soaking the Filters for 20 to 30 minutes in a solution of 1 gallon
water to 2 teaspoons white vinegar. Rinse thoroughly.
If you shut your Humidifi er off with water in the unit and do not turn
it back on for 12 hours or longer, you may experience some growth
of algae or bacteria. If this happens, we recommend a thorough
cleaning of the unit. (See CLEANING instructions.)
We recommend you operate your Humidifi er continuously. This helps
maintain humidity all day long, costs only pennies a day, and will not
harm the unit.
English | 9

CLEANING
Cleaning is recommended for proper operation of your Vornado® Humidifi er.
We suggest following the AHAM (Association of Home
Appliance Manufacturers) cleaning regiment several times
during the season.
STEP 1 - Turn the Humidifi er OFF and unplug the unit.
STEP 2 - Remove the Water Reservoir and Filter. (See page 11 for instructions).
STEP 3 - Empty the Base and Water Reservoir and rinse with clean tap water.
As noted, depending on the quality of water in your home,
impurities can build up quickly or may take some time. It is possible
that some scale may form on the inside of the Base.
TO CLEAN BASE
1. Mix a solution of one (1) 8 oz. cup of undiluted white vinegar and 1 gallon
of water. Fill the Base with the solution; discard any remaining solution. Let
solution stay for 20 minutes.
2. Empty after 20 minutes and clean all interior surfaces with soft brush.
Dampen soft cloth with undiluted white vinegar and wipe out Base to
remove scale.
3. Rinse thoroughly with clean warm water to remove scale and cleaning
solution before disinfecting the Base.
DISINFECTING THE BASE
1. Mix a solution of 1 teaspoon chlorine bleach and 1 gallon of water. Fill the
Base with the solution, discard any remaining solution. Let solution stay 20
minutes. Wet all surfaces.
2. Empty Base after 20 minutes. Rinse with water until bleach smell is gone.
Dry with clean cloth or paper towel.
3. We recommend replacing the Filter after use, but to prolong the life of the
Filter, disinfect by washing it in a solution of one teaspoon of chlorine
bleach in one gallon of water. Rinse thoroughly to get rid of the
bleach odor.
4. Reinstall the Filter and Water Reservoir. For proper operation, all
components must be properly installed.
END OF SEASON MAINTENANCE
1. Follow weekly maintenance instructions at end of humidifi cation
season or when Humidifi er will not be used for at least one week or
more.
2. Let Humidifi er dry completely before storing. Do not store with
water inside Reservoir or Base.
3. Store in cool, dry location.
4. Remove and discard the Filter if it is not suitable for reuse.
Do not store the Humidifi er with a wet Filter. If the Filter is
suitable for future use, remove and empty water from the Base and
Water Reservoir, replace the Water Reservoir, turn the Power
knob to the high fan speed and allow the unit to run until the
Filter is completely dry.
Don’t forget to purchase new Vornado Filters now so your
Humidifi er will be ready for the next season. Visit vornado.com to
purchase new fi lters or sign up for the Automatic Filter
Replacement Program.
5. Clean Humidifi er before next season begins.
10 | English
Lea todas las instrucciones antes de utilizar este humidifi cador.
Apague el humidifi cador si la humedad ambiente supera el 60%. Niveles
de humedad superiores al 60% podrían provocar la condensación sobre
las superfi cies del ambiente favorable al asentamiento y crecimiento de
microorganismos. Para obtener lecturas precisas de humedad, use un
higrómetro como los que se venden en la mayoría de las ferreterías y
casas de artículos para el hogar.
Desenchufe el humidifi cador antes de moverlo, limpiarlo o llenarlo.
Desenchufe y vacíe el humidifi cador cuando no lo use.
Vacíe el agua de la unidad si no utilizará el humidifi cador por más
de 12 horas, ya que el dejarlo con agua favorecerá el crecimiento de
microorganismos.
Si esto sucediera, limpie profundamente y desinfecte la unidad,
(Consulte las instrucciones de MANTENIMIENTO SEMANAL).
Si necesita desplazar el humidifi cador a otra ubicación, primero
remuévale el tanque de agua.
Este humidifi cador requiere una limpieza periódica. Consulte las
instrucciones de MANTENIMIENTO SEMANAL provistas. NO limpie
el humidifi cador de ninguna manera que no sea la indicada en este
manual.
NO use este humidifi cador sobre una superfi cie despareja. Colóquelo
siempre sobre una superfi cie fi rme y plana.
NO ignore el propósito de seguridad del enchufe polarizado. Este
producto viene equipado con un enchufe de alimentación de CA
polarizado (con una pata más ancha que la otra).
Este enchufe solo podrá ser conectado en un tomacorriente en una
única posición. Ésta es una MEDIDA DE SEGURIDAD. Si no puede
insertar totalmente el enchufe en el tomacorriente, pruebe rotarlo. Si
el enchufe aún no entra en el tomacorriente, llame a un electricista
califi cado para que reemplace el tomacorriente antiguo.
NO utilice el humidifi cador si el cable o el enchufe están dañados
o luego de una falla, o si ha sufrido cualquier tipo de daño o caída.
Devuelva el artefacto a Vornado para su inspección, ajuste eléctrico o
mecánico, o reparación.
NO instale el cable de alimentación debajo de alfombras.
NO cubra el cable con alfombrillas, tapetes u objetos similares. Coloque
el cable de alimentación alejado de las áreas de circulación, de manera
de que no se transforme en un riesgo de tropezones.
NO coloque el humidifi cador cerca de fuentes de calor como estufas,
radiadores o calefactores.
NO vierta agua a través de la rejilla de toma de aire superior, sobre el
cabezal eléctrico.
NO use lavandina o amoníaco sin diluir, detergentes fuertes, limpiadores
abrasivos, gasolina, diluyentes u otros solventes para limpiar este
humidifi cador. Use solamente agua y detergentes suaves para realizar el
mantenimiento diario de su humidifi cador.
NO INTENTE DESARMAR EL CABEZAL ELÉCTRICO. AL HACERLO
INVALIDARÁ SU GARANTÍA Y PODRÍA CAUSAR DAÑOS Y/O LESIONES
PERSONALES.
El cabezal eléctrico no contiene partes reparables por el usuario. Si tiene
algún problema, por favor refi érase a la información de garantía limitada.
NO quite repetidamente el tanque de agua. Esto solo provocará el
llenado de la base y se derramará agua.
Los humidifi cadores deben mantenerse alejados de los niños y no
deben colocarse en el cuarto de los niños sin supervisión.
Ver página 24 por la lista de partes y su identifi cación.
Si tiene alguna pregunta respecto a este producto, por favor llame al
número gratuito del Servicio de atención al Cliente de Vornado, al 1-800-
234-0604, o escriba a [email protected]
Por favor, lea y conserve estas instrucciones
Siempre que utilice artefactos eléctricos, deberá tomar precauciones básicas de seguridad para
reducir el riesgo de incendios, descargas eléctricas y daños personales, incluyendo las siguientes:
INSTRUCCIONES IMPORTANTES
Español | 23
La página se está cargando ...
La página se está cargando ...
La página se está cargando ...
La página se está cargando ...
La página se está cargando ...
La página se está cargando ...
Transcripción de documentos
Vornado Air, LLC 415 East 13th Street, Andover, Kansas 67002 800.234.0604 | www.vornado.com READ AND SAVE THESE INSTRUCTIONS Evaporative Vortex Humidifier Owner’s Guide LEER Y GUARDAR ESTAS INSTRUCCIONES Guía para el usuario LISEZ ET CONSERVEZ CES INSTRUCTIONS Manuel d’utilisation Speak your mind www.vornado.com/reviews évaluer ce produit en ligne www.vornado.com/reviews Hable con franqueza www.vornado.com/reviews www.vornado.com CL3-0211 RCL7-0211 R-, V01 model EVAP2 VORNADO AIR LLC Garantía Limitada de 5 años Designed, engineered and supported in Andover, Kansas. Pensado, diseñado y respaldado en Andover, Kansas. Conception, mise au point et soutien technique effectués à Andover, au Kansas. LA REPARACIÓN O REEMPLAZO QUE SE OFRECE BAJO ESTA GARANTÍA ES LA ÚNICA SOLUCIÓN PROPORCIONADA PARA EL CLIENTE. VORNADO NO SERÁ RESPONSABLE POR NINGÚN DAÑO INCIDENTAL O INDIRECTO POR EL INCUMPLIMIENTO DE CUALQUIER GARANTÍA EXPRESA O IMPLÍCITA DE ESTE PRODUCTO. EXCEPTO HASTA EL ALCANCE PROHIBIDO POR LAS LEYES VIGENTES, TODA GARANTÍA IMPLÍCITA DE APTITUD O IDONEIDAD PARA UN USO EN PARTICULAR DE ESTE PRODUCTO QUEDA LIMITADA A LA DURACIÓN DE ESTA GARANTÍA. Questions or comments? ¿Preguntas o comentarios? Questions ou commentaires? www.vornado.com [email protected] Vornado Air LLC (“Vornado”) garantiza al comprador o consumidor original que este Vornado Evaporative Vortex Humidifier Evap2 (“Producto”) contra defectos de material o mano de obra durante un período de cinco (5) años. Si se descubriera cualquiera de estos defectos dentro del período de garantía, Vornado reparará o reemplazará el Producto, a su discreción, sin costo alguno. Las reparaciones no cubiertas por la garantía o fuera del período de garantía requerirán de un pago cubriendo el costo de materiales, manipuleo y envío. Esta garantía no se aplica a defectos producidos por el abuso del Producto, por su modificación, alteración, reparación o mantenimiento por personas ajenas a Vornado Air LCC, por mal manejo del mismo, mantenimiento inadecuado, uso comercial o daños producidos durante el envío o atribuibles a fuerza mayor. 1-800-234-0604 Algunos estados no permiten limitaciones con respecto a cuánto dura una garantía implícita o la exclusión o limitación de daños imprevistos o consiguientes, por lo tanto las exclusiones o limitaciones anteriores pueden no aplicarse en su caso. Esta garantía le otorga derechos legales específicos; usted puede también tener otros derechos, los que varían de estado a estado. Por garantía o servicio de reparaciones, llame al 1-800-234-0604 o mande un correo electrónico a [email protected] para obtener el formulario de Autorización de Retorno (“RA”). Por favor, cuando contacte a Vornado por la garantía, tenga a mano o incluya en el envío los números de modelo y de serie de su Producto, así como su nombre, dirección, ciudad, estado, código postal y número de teléfono. Después de recibir el formulario RA, despache su Producto a: Vornado Air LLC Attn: Garantía y reparación 415 East 13th Street Andover, KS 67002 Para su conveniencia, por favor tenga a mano los números de modelo y de serie cuando contacte Vornado por solicitudes de servicio. Para asegurar el manejo adecuado, los embalajes deben estar claramente marcados con el número de RA. Los paquetes que no estén marcados claramente con dicho número de RA podrían ser rechazados en la dársena de recepción. Por favor espere entre 1 y 2 semanas después de la recepción del Producto para dar tiempo a la reparación y devolución del mismo. Para sus registros: Abroche o adjunte su recibo original de compra a esta ‘Guía del Usuario’. Por favor, también escriba aquí abajo el número de serie de su Producto (ubicado en la calcomanía de especificaciones de su producto). N° de serie ______________________________________ Registre su producto en línea en www.vornado.com ©2012 Vornado Air LLC Andover, KS 67002 Patentes pendientes. Especificaciones del producto sujetas a cambio sin previo aviso. Vornado® son marcas registradas de Vornado Air LLC. Diseñado y Maquinado en E.U.A. Fabricado en China. REGISTRO DEL PRODUCTO DISPONIBLE EN INTERNET EN WWW.VORNADO.COM SERVICIO AL CLIENTE DE VORNADO www.vornado.com [email protected] 1.800.234.0604 Español | 31 REEMPLAZO DEL FILTRO El filtro puede acumular minerales y otras impurezas que se producen naturalmente en el suministro de agua. Si bien el humidificador viene equipado con un filtro, usted deberá cambiarlo ya que los filtros duran entre 4 y 8 semanas aproximadamente, según el uso. Usted deberá cambiar el filtro cuando se ponga duro y ya no absorba el agua de forma eficaz. Cambie el filtro únicamente por un filtro original de marca Vornado®. Si bien pueden instalarse otras marcas en nuestras unidades, esos filtros no tienen la misma calidad y vida útil que nuestros propios filtros y pueden disminuir el rendimiento del humidificador. PARA CAMBIAR EL FILTRO PASO 1 - Desenchufe la unidad. PASO 2 – Quite el tanque de agua (A). PASO 3 – Quite y deseche el filtro usado. PASO 4 - Instale un nuevo filtro original Vornado. Para ello, doble levemente el filtro para ajustarlo a la curvatura de la unidad. Asegúrese de que el filtro se alinee perfectamente con la parte inferior de la unidad y encaje en la rejilla de entrada. PASO 5 - Vuelva a colocar el tanque de agua. pongan pastosos. Solución : Trate de usar agua no tratada o agua corriente. IMPORTANT INSTRUCTIONS Problema : Aguas duras o con excesiva cantidad de minerales tales como cal o hierro podrían acortar la vida útil del filtro. Solución : Pruebe con Bacteriostat o algún tratamiento para aguas de los que se venden en la mayoría de las ferreterías y casas de artículos para el hogar. O quite periódicamente los filtros y límpielos, dejándolos en remojo en agua corriente fría (la sufi ciente para cubrir los filtros) y dos cucharaditas de vinagre blanco. Déjelos reposar por 20 minutos y luego enjuague con agua corriente. Permita que escurra el exceso de agua y séquelos antes de volver a colocarlos en la base. No los estruje. READ AND SAVE ALL INSTRUCTIONS BEFORE USING THIS HUMIDIFIER. Problema : La permanencia durante mucho tiempo de los filtros dentro del humidificador apagado podría causar moho, hongos y deterioro. Solución : Si el humidificador está lleno, no lo deje apagado por más de ocho horas. PARA ENCONTRAR LOS FILTROS DE REPUESTO Pregúntele a su vendedor u ordénelos contactando con el Servicio de atención a clientes de Vornado al: www.vornado.com, consumerservice@ vornado.com, 1.800.234.0604. PLAN DE REEMPLAZO AUTOMÁTICO DE FILTROS DE VORNADO ¡Este programa le ofrece una forma conveniente y libre de complicaciones de recibir regularmente y directamente en su domicilio los filtros genuinos Vornado! Elimine las complicaciones de tener que recordar los pedidos de reposición. Mantenga la alta efi ciencia de su humidificador Vornado reemplazando con regularidad los filtros usados por otros nuevos. PARA EXTENDER LA VIDA ÚTIL DE LOS FILTROS Problema : El exceso de sodio en aguas ablandadas químicamente podría provocar el endu recimiento de los filtros o que los mismos se 30 | Español CÓMO FUNCIONA Seleccione un plan y Vornado le enviará automáticamente los filtros de recambio cuando se cumplan los intervalos recomendados de mantenimiento. Para registrarse o para más información, visite www.vornado. com o llame al 1- 800-234-0604. Cancele cuando lo desee. When using electrical appliances, basic precautions should always be followed to reduce the risk of fire, electrical shock and injury to persons, including the following: DO read all instructions before using this Humidifier. DO turn the Humidifier off if the relative humidity exceeds 60%. Humidity levels above 60% may allow moisture to build up indoors and condense on surfaces, where microorganisms can settle and grow. For accurate humidity readings, use a hygrometer which is available at most hardware stores and home centers. DO unplug the Humidifier prior to moving, cleaning or refilling. DO unplug and empty this Humidifier when not in operation. DO empty water from the unit if the Humidifier is to be turned off and left for more than 12 hours, as leaving the water will encourage the growth of microorganisms. If this happens, thoroughly clean and disinfect the unit. (Refer to the WEEKLY MAINTENANCE.) DO remove the Water Reservoir first if you need to move the Humidifier to another location. DO NOT defeat the safety purpose of the polarized plug. This product is equipped with a polarized alternating current line plug (a plug having one blade wider than the other). This plug will fit into the power outlet only one way. This is a SAFETY FEATURE. If you are unable to insert the plug fully into the outlet, try reversing the plug. If the plug still fails to fit, contact an electrician to replace the obsolete outlet. DO NOT operate the Humidifier with a damaged cord or plug, after the Humidifier malfunctions, or has been dropped or damaged in any manner. Return to Vornado for examination, electrical or mechanical adjustment or repair. DO NOT run power cord under carpeting. DO NOT cover cord with throw rugs, runners or similar objects. Arrange the power cord away from traffic areas, so it will not become a tripping hazard. DO NOT place the Humidifier near heat sources such as stoves, radiators or heaters. This Humidifier requires periodic cleaning. Refer to the WEEKLY MAINTENANCE instructions provided. DO NOT clean the Humidifier in any manner other than as instructed in this manual. DO NOT pour water through the top Outlet Air Grill on the Power Head. DO NOT use this Humidifier on an uneven surface. Always place this Humidifier on a firm, flat surface. DO NOT use undiluted bleach or ammonia, strong detergents, abrasive cleansers, gasoline, paint thinner or other solvents to clean this Humidifier. Use only water and mild detergents to perform daily maintenance on your Humidifier. English | 3 IMPORTANT INSTRUCTIONS DO NOT ATTEMPT TO DISASSEMBLE THE POWER HEAD. DOING SO WILL VOID YOUR WARRANTY AND COULD CAUSE DAMAGE AND/ OR PERSONAL INJURY. The Power Head contains no user serviceable parts. If you experience a problem, please see the limited warranty for information. DO NOT repeatedly remove and replace the Water Reservoir. This will overfill the Base and water will spill out. Humidifiers should be kept away from children and not be placed in a child’s room without supervision. See page 5 for parts listing and identification. If you have any questions regarding this product, please call Vornado Consumer Service, toll-free at 1-800-234-0604, or [email protected]. SAVE THESE INSTRUCTIONS 4 | English LIMPIEZA Se recomienda mantener limpio su Humidificador Vornado para que éste funcione correctamente. Sugerimos seguir el régimen de limpieza de la AHAM (‘Asociación de fabricantes de electrodomésticos’ ó ‘Association of Home Appliance Manufacturers’) varias veces durante la estación. PASO 1 - Apague el humidificador (OFF) y desenchufe la unidad. PASO 2 - Quite el tanque de agua y el filtro. (Consulte la página 30 para obtener instrucciones). PASO 3 - Vacíe la base y el tanque de agua y enjuáguelos con agua corriente limpia. PASO 4 - Como ya se indicó, las impurezas podrían acumularse más o menos rápidamente dependiendo de la calidad del agua en su zona. Es posible que se forme algo de sarro en el interior de la base. 1. Prepare una solución de una (1) taza de 8 onzas de vinagre blanco sin diluir y 1 galón de agua. Coloque la solución en la base; deseche la solución restante. Deje que la solución repose durante 20 minutos. 2. Vacíela después de 20 minutos y limpie las superfi cies interiores con un cepillo suave. Humedezca un trapo blando con vinagre blanco puro y limpie la base para remover el sarro. Use el cepillo limpiador ubicado en la base para limpiarla bien, especialmente alrededor del transductor. El cepillo tiene un extremo para raspar y cerdas en el otro. 3. Antes de desinfectar la base, enjuáguela bien con agua limpia y tibia para quitar el sarro y la solución limpiadora. DESINFECCIÓN DE LA BASE 1. Prepare una solución de 1 cucharada de té de blanqueador de cloro y 1 galón de agua. Coloque la solución en la base; deseche la solución restante. Deje que la solución repose durante 20 minutos. Humedezca todas las superficies. 2. Vacíe la base después de 20 minutos. Enjuáguela con agua hasta que desaparezca el olor a lavandina. Séquela con un trapo limpio o una toalla de papel. 3. Le recomendamos que cambie el filtro luego de usarlo, pero para prolongar la vida útil del filtro, desinféctelo. Para ello, lávelo con una solución de una cucharada de té de blanqueador de cloro y un galón de agua. Enjuague bien para eliminar el olor a blanqueador. 4. Coloque nuevamente el filtro y el tanque de agua. Para un funcionamiento correcto, todos los componentes deben estar correctamente instalados. MANTENIMIENTO DE FIN DE ESTACIÓN 1. Siga las instrucciones de mantenimiento semanal al final de la estación de humidificación o cuando sepa que no volverá a usar el humidificador durante una semana o más. 2. Deje secar el humidificador por completo antes de guardarlo. No lo guarde en caso de que haya agua dentro del depósito o la base. 3. Guárdelo en un lugar fresco y seco. 4. Quite y deseche el filtro si no sirve para volver a usarlo. No guarde el humidificador con el filtro húmedo. Si el filtro sirve para usarlo en el futuro, quite el agua de la base y del tanque de agua, vuelva a colocar el tanque de agua, gire la perilla Power (Energía) hasta la posición velocidad del ventilador alta (High) y deje la unidad en funcionamiento hasta que se seque totalmente el filtro. No olvide comprar ahora filtros Vornado nuevos para que el humidificador esté listo para la próxima temporada. Visite vornado. com para comprar filtros nuevos o suscríbase en el Programa de reemplazo automático de filtros. 5. Limpie el humidificador antes del comienzo de la próxima estación. Español | 29 CONTROL PANEL CONSEJOS DE OPERACIÓN NOTAS Y SUGERENCIAS DE OPERACIÓN LEER ANTES DE USAR Existen varias cosas que debe saber respecto al funcionamiento de su Humidificador Vornado. Un humidificador es muy útil para incorporar humedad al aire seco. Sin embargo, debe ser usado con cuidado para evitar la sobre-humidifi cación. Una buena regla práctica sería evaluar la condensación o escarcha que se forme en las ventanas. Ajuste su humidificador o el humidistato de su humidificador de manera de mantener estos al mínimo. Este ajuste debería realizarse cada vez que haya cambios importantes en la temperatura exterior. Los humidificadores pueden colocarse en cualquier área habitable que tenga un lugar adecuado y que ofrezca una buena distribución del aire húmedo hacia el resto del área habitable. La salida medida de un humidificador se basa en su operación continua en condiciones estándar de especifi cación. En situaciones donde existan variaciones normales de las temperaturas internas y externas del ambiente, el humidificador no operará continuamente, a menos de que se lo ajuste para hacerlo. Requisitos iniciales de humedad: Cuando instale por primera vez o al principio de cada temporada un humidificador provisto de humidistato, éste podría permanecer en funcionamiento continuo por aproximadamente un día hasta evaporar la gran cantidad de humedad requerida. Cuando su hogar y mobiliario hayan absorbido la humedad necesaria y se estabilicen al nivel de humedad deseado, disminuirá la cantidad de agua consumida y la operación del humidificador será solo para mantener dicho nivel de humedad. Además, si usted no sigue las instrucciones recomendadas de cuidado y mantenimiento, pueden crecer microorganismos en el agua dentro de la base y tanque del humidificador. 28 | Español • Es normal escuchar un ruido de burbujeos y gorgoteos cuando se agregue agua en la base. • Si opera su humidificador de manera permanente, podría necesitar volver a llenarlo de agua diariamente. Simplemente mire a través del tanque para asegurarse que el nivel de agua en el mismo es el adecuado para funcionar. • Evite daños en el tanque de agua. Cualquier perforación o daño en el tanque podría provocar la pérdida total de su contenido, con los resultantes derrames de agua en el piso u otras superficies. • Al instalar el filtro, asegúrese de que se encuentre en la posición correcta, es decir, alineado perfectamente con la rejilla de entrada abierta y encajado sobre la base. • Los filtros podrían dar un cierto olor suave durante su primer uso. Este olor no es dañino y se irá luego de unas pocas horas de operación. Si el olor fuera excepcionalmente fuerte, puede eliminarlo en gran parte remojando los fifi ltros durante 20 o 30 minutos en una solución de 1 galón de agua con 2 cucharitas de vinagre. Luego enjuáguelos bien. • Si apaga su humidificador con agua dentro y no vuelve a encenderlo dentro de las 12 horas siguientes, podría producirse el crecimiento de cierta cantidad de algas y bacterias. Si esto sucediera, recomendamos proceder con una limpieza profunda de la unidad. (Vea las instrucciones de MANTENIMIENTO SEMANAL). • Recomendamos que opere su humidificador todo el tiempo. Esto ayudará a mantener la humedad a lo largo del día, solo le costará unos centavos diarios y no producirá daños a la unidad. VORNADO® EVAP2 HUMIDIFIER PARTS While your Vornado® Evaporative Humidifier requires no assembly, you will need to know how to remove the Water Reservoir and Filter for cleaning, maintenance, and filter replacement. The components are as follows: Easily operate with a power switch that turns the unit ON/OFF and enables you to select the fan speed. Offers HIGH, LOW or AUTO speed selection. Control the humidity level between 40% -60%, or allow the unit to run continuously. Choose FAN ONLY for increased fan speed without humidity output. LED indicator lights display current settings. HUMIDISTAT Reads humidity in the room for automatic humidity control. AIR OUTLET GRILL Initiates Vornado’s signature Vortex circulation. POWER HEAD Powerful motor circulates humidified air throughout the whole room. WATER RESERVOIR Large 1 gallon capacity allows for less refills. INLET GRILLS Designed for efficient air intake. BASE Durable and easy to clean. FILTER CAP The Vornado® evaporative Filter wicks up water and filters out impurities. Easy-to-remove Cap for convenient Water Reservoir refilling. English | 5 BEFORE OPERATING DO NOT lift the Humidifier out of the carton by the recessed handle on the Water Reservoir. This will cause the Reservoir to detach from the unit and might cause the Humidifier to drop and become damaged. Reach under the Humidifier in the carton, grasp and lift from the bottom. Your new Humidifier uses a sizable volume of water, so we recommend checking the Base and Water Reservoir for leaks that may have occurred due to damage caused in shipping. Please note a visual inspection may not reveal hairline fractures. GETTING STARTED humedad relativa.) Funcionará en velocidad de ventilación alta hasta alcanzar el valor de ajuste de humedad. Luego, el ventilador se apagará hasta que el nivel de humedad disminuya por debajo del nivel de ajuste. LOW (Baja) — funcionamiento silencioso, uso nocturno o ambientes pequeños. En la función LOW (Baja), el humidificador puede funcionar sin tener que rellenarlo durante extensos periodos de tiempo. Funcionará en velocidad de ventilación baja hasta alcanzar el valor de ajuste de humedad. Luego, el ventilador se apagará hasta que el nivel de humedad disminuya por debajo del nivel de ajuste. AUTO (Automática) – mayor control de la humedad. La velocidad del ventilador oscilará entre la opción alta, baja y apagado para mantener mejor el nivel de humedad seleccionado con una cantidad mínima de ruido del ventilador. The following pages will provide instruction on: Filling & Installing the Water Reservoir How to Use Operating Guidelines Operating Notes and Suggestions Cleaning End of Season Maintenance Filter Replacement TO CHECK FOR LEAKS: Place Humidifier on a water-resistant surface. Remove the Water Reservoir and fill with water to inspect for leaks (For instructions see FILLING AND INSTALLING THE WATER RESERVOIR.) Next, pour several cups of water into the Base to inspect for leaks. NOT LEAKING? Empty water from Base and install the full Water Reservoir (See FILLING AND INSTALLING THE WATER RESERVOIR for complete instructions). LEAKING? In the slight chance your Humidifier has leaks, contact Vornado Consumer Service and we will immediately replace these parts. 1-800-234-0604 or [email protected] 6 | English OPERACIÓN DEL HUMIDIFICADOR PASO 1 Ubique la unidad de modo que no descargue directamente sobre objetos o plantas. Enchufe la unidad en un tomacorriente de 110-120 voltios CA. PASO 2 Para encender la unidad, presione el botón Power (Energía) (A). Las luces de indicación de velocidad del ventilador (A) y nivel de humedad (C) se encenderán en la configuración predeterminada – velocidad del ventilador ALTA, humedad constante. PASO 3 Ajuste las configuraciones según el funcionamiento deseado. Botón de energía, velocidad del ventilador - ALTA, BAJA y AUTOMÁTICA Para seleccionar la velocidad del ventilador, presione el botón de energía hasta que se ilumine la configuración deseada. HIGH (Alta) – rápida humidificación de ambientes grandes. La velocidad alta evaporará 2 galones de agua (+/- 10%) en 24 horas de funcionamiento continuo. (Esto presupone condiciones ambientales de 70º F y 30% de Control del nivel de HUMEDAD - 40% - 60%, o Continuo Para fijar el nivel de humedad, presione el botón HUMIDITY (Humedad) hasta que se ilumine el nivel de humidificación deseado. El humidificador funcionará hasta lograr el nivel de humedad deseado. En este punto, el ventilador se apagará. La luz del indicador del nivel de humedad permanecerá encendida. Si el ventilador no se enciende, la configuración de humedad puede ser inferior al nivel de humedad del ambiente. Aumente el nivel seleccionado de humedad hasta que el ventilador se encienda. Esto es una indicación del nivel de humedad existente en el ambiente. SÓLO VENTILACIÓN Seleccione la circulación vórtice de diseño exclusivo de Vornado sin salida de humedad. En el modo FAN ONLY (Sólo ventilación), las opciones velocidad del ventilador (A) y humedad (B) no estarán disponibles. La velocidad del ventilador funcionará con una configuración mayor y no habrá salida de humedad. Para garantizar que no haya salida de humedad, quite el filtro y seque bien el interior de la base. (Para obtener instrucciones sobre cómo quitar el filtro, consulte CAMBIO DEL FILTRO en la página 30.) Español | 27 LLENADO E INSTALACIÓN DEL TANQUE DE AGUA FILLING & INSTALLING THE WATER RESERVOIR Este humidifi cador tiene una capacidad real de 1 galone y tiene una salida de 2 galones en 24 horas. Cuando tenga que volver a llenarlo, siga estas sencillas instrucciones: Desenchufe la unidad. Verifique que el humidificador esté sobre una superfi cie fi rme, plana y nivelada (le recomendamos el piso). Como en el caso de cualquier artefacto lleno de agua, puede salpicar, por lo tanto debe tener cuidado al llenar e instalar el tanque de agua y al limpiar o mover el humidificador. This Humidifier has a 1 gallon capacity and 2 gallon output in 24 hours. When it needs refilling, follow these simple instructions: Unplug the Humidifier. Be sure the Humidifier is placed on a firm, flat and level surface (we recommend the floor). As with any water filled appliance, spills can occur, so be careful when filling and installing the Water Reservoir, and cleaning or moving the Humidifier. ADDING WATER Remove the Water Reservoir by grasping the recessed handle and pulling towards you. (A). Turn the Reservoir upside down. Remove the Cap (B). If refilling the Reservoir, empty any water left inside the Reservoir prior to refilling. Place the Reservoir in the sink upside down. Fill the Reservoir with cool tap water (C). Once filled, insure the Gasket, the rubber ring around the Cap, is in position and replace and fasten the Cap. Some downward pressure may be needed to compress the Gasket prior to rotating the Cap 1/4 turn clockwise to the fully installed position. AGREGADO DE AGUA Quite el tanque de agua. Para ello, sujete la manija hueca y jale hacia usted. (A). Coloque el tanque de agua hacia abajo. Quite la tapa (B). Si va a recargar el tanque, vacíe el agua remanente en el interior del tanque antes de recargarlo. Coloque el tanque en el lavabo hacia abajo. Llene el tanque con agua fría del grifo (C). Luego de llenarlo, asegúrese de que la junta, el anillo de goma que se encuentra alrededor de la tapa, esté bien colocado y vuelva a colocar y ajuste la tapa. Es posible que deba presionar hacia abajo para comprimir la junta antes de girar la tapa 1/4 en sentido de las agujas del reloj hasta la posición correcta. INSTALACIÓN DEL TANQUE DE AGUA Descienda el tanque sobre la base, colocando el puerto de llenado sobre la elevación. La elevación activará la válvula de salida de agua dentro de la tapa una vez colocado en su lugar. Verifique que el tanque quede bien instalado en la base. 26 | Español INSTALLING THE WATER RESERVOIR Lower the Reservoir into the Base, positioning the fill port over the raised bump. The bump will activate the water outlet valve inside the Cap once in a nested position. Insure the Reservoir is setting firmly in the Base. MANTENIMIENTO RÁPIDO DIARIO 1. Vacíe el tanque antes de volver a llenarlo con agua limpia. Enjuáguelo, repáselo y séquelo con un trapo limpio o una toalla de papel. 2. Llene el tanque hasta la marca de llenado con agua fresca y limpia del grifo. No lo llene de más. 3. Disminuya el ajuste de humedad o apague el humidificador si se acumula humedad en las paredes o ventanas. QUICK DAILY MAINTENANCE 1. Empty Reservoir before refilling with clean water. Rinse, wipe clean and dry with clean cloth or paper towel. 2. Refill Reservoir with cool, clean tap water. Do not overfill. 3. Lower humidity control settings or turn off Humidifier if moisture forms on walls or windows. English | 7 HIGH - operation for fast humidification for larger rooms. High speed operation will evaporate 2 gallons of water (+/- 10%) in 24 hours of continuous operation. (This assumes room conditions of 70º F and 30% relative humidity.) Will operate at High fan speed until the humidity set point is reached. The Fan will then turn off until the humidity level drops below set point. LOW — operation for quiet, nighttime use or smaller rooms. On LOW operation, your Humidifier may run without refilling for extended periods. Will operate at Low fan speed until the humidity set point is reached. The Fan will then turn off until the humidity level drops below set point. AUTO - operation for more precise humidity control. Fan speed will fluctuate between high, low and off to better maintain set humidity level with the minimal amount of fan noise. HOW TO USE STEP 1 Position the unit to not blow directly on objects or plants. Plug the unit into a 110-120 volt AC outlet. STEP 2 To turn unit on, press the Power button (A). The indicator lights for Fan Speed (A) and Humidity level (C) will turn on in the default setting HIGH fan speed, Continuous humidity. STEP 3 Adjust settings for desired operation. Power Button, Fan Speed - HIGH, LOW and AUTO Select the fan speed by pressing the power button until the desired setting is illuminated. 8 | English HUMIDITY Level Control - 40% - 60%, or Continuous Set the humidity level by pressing the HUMIDITY button until the desired humidification level is illuminated. The Humidifier will operate until the desired humidity level is reached. At this point, the fan will turn off. The humidity level indicator light will remain on. If the fan does not turn on, the humidity setting may be lower than the room humidity level. Increase the humidity set point until the fan turns on. This is an indication of the level of humidity already in the room. FAN ONLY Select for Vornado's signature vortex circulation without humidity output. In FAN ONLY mode - Fan Speed (A) and Humidity (B) operation will not be available. The fan speed will run at a higher setting and there will be no humidity output. To ensure no humidity output, remove the filter and thoughly dry the inside of the Base. (For instructions on how to remove the filter, see FILTER REPLACEMENT on page 11.) ANTES DE USARLO PRIMEROS PASOS NO saque el humidificador de su caja tirando de la manija empotrada del tanque de agua. Esto provocará que el tanque se desprenda del humidifi cador y que éste pueda caer y dañarse. En lugar de esto, lleve la mano hasta el fondo de la caja y tome y eleve al humidifi cador desde su parte inferior. Su nuevo humidificador emplea una cantidad medible de agua, así que recomendamos revisar la base y el tanque para verifi car la existencia de pérdidas causadas por daños durante el envío. Tenga en cuenta de que una inspección visual podría no detectar fracturas muy delgadas. Las siguientes páginas contienen instrucciones sobre lo siguiente: PARA VERIFICAR SI EXISTEN PERDIDAS: Coloque el humidificador sobre una superfi cie resistente al agua. Cómo llenar e instalar el tanque de agua Cómo usar Pautas de funcionamiento Pautas de funcionamiento y sugerencias Limpieza Mantenimiento de fin de temporada Cambio del filtro Quite el tanque de agua y llénelo con agua para controlar la existencia de filtraciones (Para obtener instrucciones, consulte CÓMO LLENAR E INSTALAR EL TANQUE DE AGUA.) Luego, vierta varias tazas de agua en la base para controlar la existencia de filtraciones. ¿NO HAY PÉRDIDAS? Vuelque el agua de la base e instale el tanque de agua completo (consulte la sección ‘Llenado e instalación del tanque de agua’ para más instrucciones). ¿HAY PÉRDIDAS? Ante la menor sospecha de que existan fugas de agua en su Humidificador, consulte con el servicio de atención a clientes e inmediatamente reemplazaremos cualquiera de estas partes. 1-800-234-0604 ó [email protected] Español | 25 PANEL DE CONTROL PARTES DEL HUMIDIFICADOR DE EVAPORACIÓN VORNADO® EVAP2 Si bien el Humidificador por evaporación Vornado® no requiere ensamblado, usted debe saber cómo quitar el tanque de agua y el filtro para su limpieza, mantenimiento, y cambio del filtro. Los componentes son los que se indican a continuación: Funciona fácilmente con un interruptor de energía que enciende/apaga (ON/OFF) la unidad y le permite seleccionar la velocidad del ventilador. Ofrece diferentes velocidades; HIGH (Alta), LOW (Baja), o AUTO (Automática). Controla el nivel de humedad entre 40% y 60%, o permite que la unidad funcione de forma continua. Seleccione FAN ONLY (Sólo ventilación) para obtener una mayor velocidad de ventilación sin salida de humedad. Las luces LED de indicación muestran las configuraciones seleccionadas. HUMIDISTATO Mide la humedad en el ambiente para el control automático de humedad. REJILLA DE SALIDA DE AIRE Inicia la exclusiva circulación vortex de Vornado. El motor potente hace circular el aire humidificado por todo el ambiente. TANQUE DE AGUA Su capacidad de 1 galone permite llenarlo menos seguido. REJILLAS DE ENTRADA Diseñadas para absorber aire de forma eficiente. READ BEFORE USING There are several things to be aware of as your Vornado® Evaporative Humidifier is operating. A Humidifier is quite useful in supplying necessary moisture to dry air. It should be used with proper care to prevent over-humidification. A good rule of thumb would be to gauge the condensation or frost on windows. Adjust your Humidifier to a point where this condition is at a minimum. These adjustments should be made when major changes in outdoor temperatures occur. Humidifiers can be placed in any living area that has a location that is convenient and provides distribution of the moist air to the living area. Initial Humidity requirements: When initially installed or when placed in operation at the beginning of each season, the Humidifier equipped with a Humidistat may run constantly for a day or so and thus evaporate large quantities of moisture. When the home and its furnishings have absorbed moisture and become stabilized at the desired humidity level, the amount of water used will diminish and the Humidifier operation will maintain the desired humidity level. If you do not follow the recommended care and maintenance guidelines, microorganisms may be able to grow in the water within the Humidifier’s Reservoir and Base. (See CLEANING for care instructions.). BASE 24 | Español OPERATING NOTES AND SUGGESTIONS The measured output of a Humidifier is based upon continuous operation at standard rating conditions. With normal variations of indoor and outdoor conditions, the Humidistat controlled Humidifier will not run continuously, at maximum output, unless the controls are set to do so. CABEZAL DE POTENCIA Son duraderos y fáciles de limpiar. OPERATING GUIDELINES FILTRO TAPA El filtro de evaporación Vornado® absorbe agua y filtra las impurezas. Tapa fácil de quitar para llenar el tanque fácilmente. It is normal to hear a bubbling or gurgling sound as water is dispensed into the Base. If you operate your Humidifier continuously, it may need to be refilled with water every day. Simply look through the Reservoir to be certain that there is an adequate water supply for operation. Protect the Water Reservoir from damage. Any holes or other damage to the Reservoir may cause it to dispense water onto the floor or other surfaces. When installing the Filter, make certain it is in the proper position, flush along the open Inlet Grill and resting flat on the Base. On first use, the Filters may give off a mild odor. The odor is not harmful and will go away after the first few hours of operation. If the odor is exceptionally strong, you can help eliminate most or all of it by soaking the Filters for 20 to 30 minutes in a solution of 1 gallon water to 2 teaspoons white vinegar. Rinse thoroughly. If you shut your Humidifier off with water in the unit and do not turn it back on for 12 hours or longer, you may experience some growth of algae or bacteria. If this happens, we recommend a thorough cleaning of the unit. (See CLEANING instructions.) We recommend you operate your Humidifier continuously. This helps maintain humidity all day long, costs only pennies a day, and will not harm the unit. English | 9 CLEANING Cleaning is recommended for proper operation of your Vornado® Humidifier. We suggest following the AHAM (Association of Home Appliance Manufacturers) cleaning regiment several times during the season. STEP 1 - Turn the Humidifier OFF and unplug the unit. STEP 2 - Remove the Water Reservoir and Filter. (See page 11 for instructions). STEP 3 - Empty the Base and Water Reservoir and rinse with clean tap water. As noted, depending on the quality of water in your home, impurities can build up quickly or may take some time. It is possible that some scale may form on the inside of the Base. TO CLEAN BASE 1. Mix a solution of one (1) 8 oz. cup of undiluted white vinegar and 1 gallon of water. Fill the Base with the solution; discard any remaining solution. Let solution stay for 20 minutes. 2. Empty after 20 minutes and clean all interior surfaces with soft brush. Dampen soft cloth with undiluted white vinegar and wipe out Base to remove scale. 3. Rinse thoroughly with clean warm water to remove scale and cleaning solution before disinfecting the Base. DISINFECTING THE BASE 1. Mix a solution of 1 teaspoon chlorine bleach and 1 gallon of water. Fill the Base with the solution, discard any remaining solution. Let solution stay 20 minutes. Wet all surfaces. 2. Empty Base after 20 minutes. Rinse with water until bleach smell is gone. Dry with clean cloth or paper towel. 3. We recommend replacing the Filter after use, but to prolong the life of the Filter, disinfect by washing it in a solution of one teaspoon of chlorine bleach in one gallon of water. Rinse thoroughly to get rid of the bleach odor. 4. Reinstall the Filter and Water Reservoir. For proper operation, all components must be properly installed. 10 | English END OF SEASON MAINTENANCE 1. Follow weekly maintenance instructions at end of humidification season or when Humidifier will not be used for at least one week or more. 2. Let Humidifier dry completely before storing. Do not store with water inside Reservoir or Base. 3. Store in cool, dry location. 4. Remove and discard the Filter if it is not suitable for reuse. Do not store the Humidifier with a wet Filter. If the Filter is suitable for future use, remove and empty water from the Base and Water Reservoir, replace the Water Reservoir, turn the Power knob to the high fan speed and allow the unit to run until the Filter is completely dry. Don’t forget to purchase new Vornado Filters now so your Humidifier will be ready for the next season. Visit vornado.com to purchase new filters or sign up for the Automatic Filter Replacement Program. 5. Clean Humidifier before next season begins. INSTRUCCIONES IMPORTANTES Por favor, lea y conserve estas instrucciones Siempre que utilice artefactos eléctricos, deberá tomar precauciones básicas de seguridad para reducir el riesgo de incendios, descargas eléctricas y daños personales, incluyendo las siguientes: Lea todas las instrucciones antes de utilizar este humidificador. Apague el humidificador si la humedad ambiente supera el 60%. Niveles de humedad superiores al 60% podrían provocar la condensación sobre las superficies del ambiente favorable al asentamiento y crecimiento de microorganismos. Para obtener lecturas precisas de humedad, use un higrómetro como los que se venden en la mayoría de las ferreterías y casas de artículos para el hogar. Desenchufe el humidificador antes de moverlo, limpiarlo o llenarlo. Desenchufe y vacíe el humidificador cuando no lo use. Vacíe el agua de la unidad si no utilizará el humidificador por más de 12 horas, ya que el dejarlo con agua favorecerá el crecimiento de microorganismos. Si esto sucediera, limpie profundamente y desinfecte la unidad, (Consulte las instrucciones de MANTENIMIENTO SEMANAL). Si necesita desplazar el humidificador a otra ubicación, primero remuévale el tanque de agua. Este humidificador requiere una limpieza periódica. Consulte las instrucciones de MANTENIMIENTO SEMANAL provistas. NO limpie el humidificador de ninguna manera que no sea la indicada en este manual. NO use este humidificador sobre una superficie despareja. Colóquelo siempre sobre una superficie firme y plana. NO ignore el propósito de seguridad del enchufe polarizado. Este producto viene equipado con un enchufe de alimentación de CA polarizado (con una pata más ancha que la otra). Este enchufe solo podrá ser conectado en un tomacorriente en una única posición. Ésta es una MEDIDA DE SEGURIDAD. Si no puede insertar totalmente el enchufe en el tomacorriente, pruebe rotarlo. Si el enchufe aún no entra en el tomacorriente, llame a un electricista calificado para que reemplace el tomacorriente antiguo. NO utilice el humidificador si el cable o el enchufe están dañados o luego de una falla, o si ha sufrido cualquier tipo de daño o caída. Devuelva el artefacto a Vornado para su inspección, ajuste eléctrico o mecánico, o reparación. NO instale el cable de alimentación debajo de alfombras. NO cubra el cable con alfombrillas, tapetes u objetos similares. Coloque el cable de alimentación alejado de las áreas de circulación, de manera de que no se transforme en un riesgo de tropezones. NO coloque el humidificador cerca de fuentes de calor como estufas, radiadores o calefactores. NO vierta agua a través de la rejilla de toma de aire superior, sobre el cabezal eléctrico. NO use lavandina o amoníaco sin diluir, detergentes fuertes, limpiadores abrasivos, gasolina, diluyentes u otros solventes para limpiar este humidificador. Use solamente agua y detergentes suaves para realizar el mantenimiento diario de su humidificador. NO INTENTE DESARMAR EL CABEZAL ELÉCTRICO. AL HACERLO INVALIDARÁ SU GARANTÍA Y PODRÍA CAUSAR DAÑOS Y/O LESIONES PERSONALES. El cabezal eléctrico no contiene partes reparables por el usuario. Si tiene algún problema, por favor refiérase a la información de garantía limitada. NO quite repetidamente el tanque de agua. Esto solo provocará el llenado de la base y se derramará agua. Los humidificadores deben mantenerse alejados de los niños y no deben colocarse en el cuarto de los niños sin supervisión. Ver página 24 por la lista de partes y su identificación. Si tiene alguna pregunta respecto a este producto, por favor llame al número gratuito del Servicio de atención al Cliente de Vornado, al 1-800234-0604, o escriba a [email protected] Español | 23-
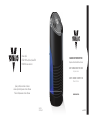 1
1
-
 2
2
-
 3
3
-
 4
4
-
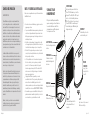 5
5
-
 6
6
-
 7
7
-
 8
8
-
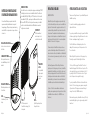 9
9
-
 10
10
-
 11
11
-
 12
12
-
 13
13
-
 14
14
-
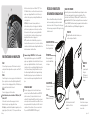 15
15
-
 16
16


Vornado HU1-0029-06 Guía del usuario
- Categoría
- Humidificadores
- Tipo
- Guía del usuario
En otros idiomas
- français: Vornado HU1-0029-06 Mode d'emploi
- English: Vornado HU1-0029-06 User guide