Yamaha YM-2000 El manual del propietario
- Categoría
- Instrumentos musicales
- Tipo
- El manual del propietario
Este manual también es adecuado para

MULTI METRONOME
YM-2000
YM-2000
OWNER’S MANUAL / MODE D’EMPLOI
BEDIENUNGSANLEITUNG /
RHYTHM
TEMPO
STEP MUTE
NOTE
PITCH
MUTE
UP
DOWN
RHYTHM
NOTE
TEMPO
PITCH
POWER
MUTE
YM-2000
MULTI METRONOME

MULTI METRONOME
YM-2000
YM-2000
OWNER'S MANUAL
■ PRECAUTIONS
◆ To prevent damage, do not use the metronome in the following
locations:
• places where the unit will be in direct sunlight;
• places subject to temperature and humidity extremes;
• places that are sandy or dusty.
◆ To power the metronome, use only a CR-2025 lithium battery.
◆ For maximum battery life, always be sure the metronome is turned
OFF when not in use.
◆ If an exhausted battery is left in the unit for an extended period of time,
it may leak and cause malfunctioning of the unit. When the battery
becomes exhausted, always remove it and replace it as soon as
possible.
◆ Do not use press or bump on the LCD panel.
◆ If the indications on the LCD panel are difficult to see, adjust the
viewing angle.
◆ Do not subject the metronome to strong physical shock or vibration. Do
not use excessive force on any of the controls.
◆ Never use solvents such as benzene or thinner to clean the
metronome. Wipe clean with a soft, dry cloth.
◆ After reading the owner's manual, keep it in a safe place for future
reference.
■ SPECIFICATIONS
Indicators : Display (LCD panel), tempo indicator
Tempo : 30 – 240 beats/minute, accuracy ±0.2 %
Metronome beats : 1 – 7 beats, duplets, triplets, quintuplets
Rhythm patterns : 30 preset patterns
Note setting range : C4 – B4 (in half-tone steps), accuracy ±1
cent
Standard pitch setting range
: 438 Hz – 445 Hz
Auto Power Off Function : Metronome mode — after approx. 15
minutes
Note/standard pitch setting mode — after
approx. 5 minutes
Other Functions : Operation confirmation beep, memory
backup function
Connector : 3.5 ear phone jack (monaural)
Power Source : Lithium battery x 1 (CR-2025)
Battery Life : Approx. 45 hours
Dimensions (W x H x D) : 102 x 12 x 64 mm (4-1/8" x 1/2" x 2-1/2")
Weight (including battery) : 65 g (2.1 oz)
Accessories : Lithium battery x 1 (CR-2025),
Hard case (can be used as stand)
* Specifications and design subject to change without notice.
Thank you for purchasing the YAMAHA YM-2000 Multi
Metronome.
Please read this manual thoroughly and keep it in a safe place for
future reference.
Never dispose of used batteries by burning them.
Also make sure to keep batteries away from children.
■ FEATURES OF THE YM-2000
● Metronome Function
11 beat patterns (1 to 7 beats, duplets, triplets, quintuplets) and 30
rhythm patterns can be played at a variable tempo (30 to 240 beats
per minute).
● Note/Standard Pitch Sound Generating Function
The unit can generate a tuning note selectable within one octave (C –
B) in half-tone steps. The standard pitch (for note A) can be set within
the range of 438 to 445 Hz.
●
Other Functions
* Operation Confirmation Beep
When a button is pressed, a beep sound will comfirm the
operation.
The confirmation beep will also be produced when the metronome
sound is muted.
* Auto Power Off Function
When the unit is used in metronome mode and none of the buttons
is pressed for approximately 15 minutes, the power will
automatically turn off.
When the unit is set to note/standard pitch setting mode and none
of the buttons is pressed for approximately 5 minutes, the power
will automatically turn off.
* Memory Backup Function
This function retains all current settings in memory when the unit is
turned off (POWER button or Auto Power Off). The MUTE function,
however, will be released, and sound will be heard when the unit is
turned on again.
■ THE HARD CASE
The hard case can be used as a
stand as shown in the illustration on
the right.
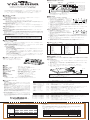
■ COMPONENTS
UP
DOWN
RHYTHM
NOTE
TEMPO
PITCH
POWER
MUTE
YM-2000
MULTI METRONOME
UP button
Earphone jack
This jack allows connection of a standard earphone (3.5 ).
If a stereo headphone is connected, sound will be produced
from one side only. When connecting an earphone the
internal speaker is muted automatically.
DOWN button
POWER button
MUTE button
TEMPO button
PITCH button
RHYTHM button
NOTE button
Speaker
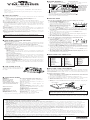
■ OPERATION
● Selecting a Rhythm Pattern and Setting the Tempo
1. Press the RHYTHM button.
"RHYTHM" on the display will blink.
2. Press the UP or DOWN button to
select a rhythm pattern. Each time the
button is pressed, the number on the
display will increase/decrease by one.
When the button is kept pressed, the
number will change continuously.
3. Press the TEMPO button. "TEMPO" on the display will blink.
4. Press the UP or DOWN button to set the desired tempo. Each time
the button is pressed, the tempo value will increase/decrease by
one. When the button is kept pressed, the tempo value will change
continuously.
5. To use without metronome sound, press the MUTE button.
"MUTE" will appear on the display.
* The 8 STEP indicator segments at the bottom of the display light up or
blink according to the rhythm pattern.
* The setting can be returned to its initial value (default) by pressing the
UP and DOWN buttons simultaneously.
● Selecting the Note and Setting the Standard Pitch
1. Press the NOTE button. "NOTE" on the
display will blink and the currently set
note will sound.
2. Press the UP or DOWN button to select
the desired note. Each time the button
is pressed, the note will change in half-
tone steps. However, the note will not
change continuously if the button is kept pressed.
3. Press the PITCH button. "PITCH" on the display will blink.
4. Press the UP or DOWN button to adjust the standard pitch (A)
between 438 and 445 Hz. Each time the button is pressed, the pitch
value will change by 1 Hz. However, the pitch will not change
continuously if the button is kept pressed.
5. To set the note and pitch without sound, press the MUTE button.
"MUTE" will appear on the display.
* The standard pitch (438 – 445 Hz) will always be set for note A.
* The setting can be returned to its initial value (default) by pressing the UP
and DOWN buttons simultaneously.
Tempo indicator
The indicator dots light up from left
to right in the set tempo.
Display (LCD Panel)
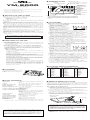
■ BATTERY REPLACEMENT
When the battery weakens, the display indications will fade and the
tempo indicator dots grow dim, while the sound volume decreases. In this
case, replace the battery with a new one (CR-2025 lithum battery) as
soon as possible.
◆ Replacement Procedure
1. Remove the battery cover fixing screw at the bottom of the unit and
remove the battery cover by sliding it in the direction of the arrow as
shown in the illustration below.
2. Lift out the old battery using a pointed tool (tweezers etc.).
3. Insert the new battery with its - pole facing down (+ pole must be
visible when inserted).
4. Attach the battery cover and secure it using the fixing screw.
* Always press the POWER button to turn off the unit before changing the
battery.
Bottom
side
After battery replacement, turn on the power to check if
operation is normal. If the unit is operating abnormally,
press the reset button on the bottom side, and then turn on
the power again to check the operation.
* The default settings after resetting the unit are as follows:
Metronome mode, tempo "120", rhythm "11", note "A", pitch "440" Hz
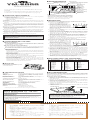
■ RHYTHM PATTERN LIST
No. Rhythm Pattern
0 1 BEAT (weak)
1 1 BEAT (strong)
2 2 BEATS
3 3 BEATS
4 4 BEATS
5 5 BEATS
6 6 BEATS
7 7 BEATS
8 DUPLETS
9 TRIPLETS
10 QUINTUPLETS
11 ROCK 1
12 ROCK 2
13 ROCK 3
No. Rhythm Pattern
14 16 BEAT 1
15 16 BEAT 2
16 POPS 1
17 POPS 2
18 FUNK 1
19 FUNK 2
20 DISCO
21 BALLAD 1
22 BALLAD 2
23 SHUFFLE 1
24 SHUFFLE 2
25 SWING
26 ROCK WALTZ
27 JAZZ WALTZ
No. Rhythm Pattern
28 BOSSA NOVA
29 SAMBA
30 JAZZ SAMBA
31 SONGO
32 BOLERO
33 TANGO
34 CHA CHA
35 MAMBO
36 RHUMBA
37 BEGUINE
38 WALTZ
39 MARCH
40 ONDO
* No. 0: Single weak beat No. 1: Single strong beat
RHYTHM
TEMPO
STEP MUTE
NOTE
PITCH
MUTE
FCC INFORMATION (U.S.A.)
1. IMPORTANT NOTICE: DO NOT MODIFY THIS UNIT!
This product, when installed as indicated in the instructions contained in this manual, meets FCC requirements. Modifications not expressly
approved by Yamaha may void your authority, granted by the FCC, to use the product.
2. IMPORTANT: When connecting this product to accessories and/or another product use only high quality shielded cables. Cable/s supplied with
this product MUST be used. Follow all installation instructions. Failure to follow instructions could void your FCC authorization to use this
product in the USA.
3. NOTE: This product has been tested and found to comply with the requirements listed in FCC Regulations, Part 15 for Class ”B” digital devices.
Compliance with these requirements provides a reasonable level of assurance that your use of this product in a residential environment will not
result in harmful interference with other electronic devices. This equipment generates/uses radio frequencies and, if not installed and used
according to the instructions found in the users manual, may cause interference harmful to the operation of other electronic devices. Compliance
with FCC regulations does not guarantee that interference will not occur in all installations. If this product is found to be the source of interfer-
ence, which can be determined by turning the unit ”OFF” and ”ON”, please try to eliminate the problem by using one of the following measures:
Relocate either this product or the device that is being affected by the interference.
Utilize power outlets that are on different branch (circuit breaker or fuse) circuits or install AC line filter/s.
In the case of radio or TV interference, relocate/reorient the antenna. If the antenna lead-in is 300 ohm ribbon lead, change the lead-in to co-
axial type cable.
If these corrective measures do not produce satisfactory results, please contact the local retailer authorized to distribute this type of product. If
you can not locate the appropriate, please contact Yamaha Corporation of America, Electronic Service Division, 6600 Orangethorpe Ave, Buena
Park, CA 90620
The above statements apply ONLY to those products distributed by Yamaha Corporations of America or its subsidiaries.
THIS DIGITAL APPARATUS DOES NOT EXCEED THE “CLASS B” LIMITS FOR RADIO NOISE EMISSIONS
FROM DIGITAL APPARATUS SET OUT IN THE RADIO INTERFERENCE REGULATION OF THE CANADIAN
DEPARTMENT OF COMMUNICATIONS.
Printed in Hong Kong
Battery cover
Reset button
Screw hole

■ MESURES DE PRECAUTION
◆ Afin de ne pas endommager le métronome ne l’utilisez pas dans des
endroits soumis aux conditions suivantes :
• plein soleil,
• humidité ou températures excessives,
• sable ou poussière.
◆ Pour alimenter le métronome, utilisez exclusivement une pile au lithium
CR-2025.
◆ Mettez toujours le métronome hors tension lorsque vous ne l’utilisez
pas afin de prolonger au maximum la durée de vie de la pile.
◆ Des fuites pouvant provoquer des anomalies de fonctionnement
peuvent se produire si une pile usée est laissée à l’intérieur du
métronome pendant une période prolongée. Veillez à remplacer la pile
le plus rapidement possible lorsqu’elle est usée.
◆ N’appuyez pas sur l’affichage à cristaux liquides et évitez de le cogner.
◆ Si les indications de l’affichage sont difficiles à lire ajuster l’angle de
vision.
◆ Ne soumettez pas le métronome à des chocs ou à des vibrations
importantes. Ne le manipuler jamais avec une force excessive.
◆ N’utilisez jamais de solvants, tels que benzine ou diluant, pour nettoyer
le métronome. Essuyez-le avec un chiffon doux et sec.
◆ Après avoir lu ce mode d’emploi, conservez-le en un lieu sûr pour
future référence.
Nous vous remercions d’avoir porté votre choix sur le multi
métronome YAMAHA YM-2000.
Veuillez lire attentivement ce mode d’emploi et conservez-le en
un lieu sûr pour future référence.
MULTI MÉTRONOME
YM-2000
YM-2000
MODE D'EMPLOI
■ NOMENCLATURE
Ne jetez jamais les piles au feu et conservez-les
toujours hors de portée des enfants.
■ UTILISATION
● Sélection d’un motif rythmique et réglage du tempo
1. Appuyez sur la touche [RHYTHM].
L’indication “RHYTHM” se met à
clignoter sur l’affichage.
2. Appuyez sur la touche [UP] ou
[DOWN] pour sélectionner un motif
rythmique. Chaque fois que vous
appuyez sur une de ces touches, le
numéro indiqué sur l’affichage
augmente/diminue de un. Lorsque vous maintenez une de ces
touches enfoncée, les numéros défilent de manière continue.
3. Appuyez sur la touche [TEMPO]. L’indication “TEMPO” se met à
clignoter sur l’affichage.
4. Appuyez sur la touche [UP] ou [DOWN] pour régler le tempo.
Chaque fois que vous appuyez sur une de ces touches, la valeur
du tempo indiquée sur l’affichage augmente/diminue de un.
Lorsque vous maintenez une de ces touches enfoncée, les valeurs
de tempo défilent de manière continue.
5. Pour rendre le son du métronome inaudible, appuyez sur la touche
[MUTE]. “MUTE” apparaît sur l’affichage.
* Les segments de l’indicateur 8 STEP s’allument ou clignotent à la
partie inférieure de l’affichage selon le motif rythmique sélectionné.
* La valeur de réglage initiale (par défaut) peut être rétablie en appuyant
en même temps sur les touches [UP] et [DOWN].
● Sélection d’une note et réglage de la hauteur standard
1.Appuyez sur la touche [NOTE].
L’indication “NOTE” se met à clignoter
sur l’affichage et vous pourrez entendre
le son de la note sélectionnée.
2.Appuyez sur la touche [UP] ou
[DOWN] pour sélectionner la note que
vous souhaitez. Chaque fois que vous
appuyez sur une de ces touches, la note change par bonds de un
demi-ton. Dans ce cas, cependant, les notes ne défileront pas de
manière continue lorsque vous maintenez une de ces touches
enfoncée.
3. Appuyez sur la touche [PITCH]. L’indication “PITCH” se met à
clignoter sur l’affichage.
4. Appuyez sur la touche [UP] ou [DOWN] pour régler la hauteur
standard (A) entre 438 et 445 Hz. Chaque fois que vous appuyez
sur une de ces touches, la hauteur augmente/diminue de un. Dans
ce cas, cependant, la hauteur ne changera pas de manière continue
lorsque vous maintenez une de ces touches enfoncée.
5. Pour régler la note et la hauteur avec le son inaudible, appuyez sur
la touche [MUTE]. “MUTE” apparaît sur l’affichage.
* La note A est toujours réglée à la hauteur standard (438 – 445 Hz).
* Le réglage initial (par défaut) peut être rétabli en appuyant en même
temps sur les touches [UP] et [DOWN].
RHYTHM
TEMPO
STEP MUTE
UP
DOWN
RHYTHM
NOTE
TEMPO
PITCH
POWER
MUTE
YM-2000
MULTI METRONOME
Haut-parleur
Indicateur de tempo
Les points de l’indicateur s’allument
de gauche à droite en suivant le
tempo sélectionné.
Affichage
(à cristaux liquides)
Prise d’écouteur
Cette prise permet de brancher un écouteur standard (
3,5 ).
Si vous utilisez un casque d’écoute stéréo, le son ne sera
audible que d’un seul côté. Le son produit par le haut-parleur
interne est automatiquement coupé lorsque vous branchez un
écouteur.
Touche de rythme
[RHYTHM]
Touche de tempo
[TEMPO]
Interrupteur
d’alimentation
[POWER]
Touche de baisse [DOWN]
Touche de montée [UP]
Touche de note
[NOTE]
Touche
d’assourdissement
[MUTE]
Touche de hauteur
[PITCH]
NOTE
PITCH
MUTE
■ FONCTIONS DU YM-2000
● Fonction métronome
11 motifs de temps (1 à 7 temps, duolets, triolets, quintolets) et 30
motifs rythmiques peuvent être reproduits à un tempo variable (30 à
240 temps par minute).
● Fonction génération de son de hauteur standard/note
Le métronome peut générer une note d’accord sélectionnable sur
une plage de une octave (C – B) par paliers de un demi-ton. La
hauteur standard (note A) peut être réglée entre 438 et 445 Hz.
●
Autres fonctions
* Bip de confirmation d’utilisation
Lorsque vous sollicitez une touche, un bip est produit pour
confirmer l’opération.
Le bip de confirmation est produit même lorsque le son du
métronome est assourdi.
* Fonction de coupure automatique de l’alimentation
Lorsque l’unité est utilisée en mode métronome, son alimentation
sera automatiquement coupée si aucune touche n’est sollicitée
pendant environ 15 minutes.
Lorsque l’unité est en mode de réglage de hauteur standard/note,
Son alimentation sera automatiquement coupée si aucune touche
n’est sollicitée pendant environ 5 minutes.
* Fonction de conservation de la mémoire
Cette fonction permet de conserver tous les réglages en mémoire
lorsque l’alimentation de l’unité est coupée (au moyen de
l’interrupteur [POWER] ou par coupure automatique de
l’alimentation). La fonction MUTE sera désactivée, cependant, et
le son sera de nouveau audible lorsque vous remettez le
métronome sous tension.
■ LE BOÎTIER
Le boîtier peut être utilisé comme
support de la manière illustrée ci-
contre.
■ FICHE TECHNIQUE
Indicateurs : Affichage (cristaux liquides), indicateur de
tempo
Tempo : 30 – 240 temps par minute, précision ±
0,2%
Temps de métronome :1 à 7 temps, duolets, triolets, quintolets
Motifs rythmiques : 30 motifs programmés
Plage de réglage de note : C4 – B4 (par paliers de un demi-ton),
précision ± centième
Plage de réglage de hauteur standard
: 438 Hz – 445 Hz
Coupure automatique de l’alimentation
: Mode métronome — au bout de 15 minutes
environ
Mode de réglage de hauteur standard/note
— au bout de 5 minutes environ
Autres fonctions : Bip de confirmation, conservation de la
mémoire
Connecteur : Prise de jack d’écouteur (mono)
Source d’alimentation : Pile au lithium x 1 (CR-2025)
Durée de vie de la pile : Env. 45 heures
Dimensions
(L x H x P) : 102 (L) x 12 (H) x 64 (P) mm
Poids (pile incluse) : 65 g
Accessoire : Pile au lithium x 1 (CR-2025),
boîtier (pouvant être utilisé comme support)
* Les spécifications et l'aspect externe peuvent être modifiés sans aucun avis.
LE PRESENT APPAREIL NUMERIQUE N'EMET PAS DE
BRUITS RADIOELECTRIQUES DEPASSANT LES LIMITES
APPLICABLES AUX APPAREILS NUMERIQUES DE LA
"CLASSE B" PRESCRITES DANS LE REGLEMENT SUR LE
BROUILLAGE RADIOELECTRIQUE EDICTE PAR LE MINIS-
TERE DES COMMUNICATIONS DU CANADA.
■ LISTE DES MOTIF RYTHMIQUES
No. Motif rythmique
0 1 temps (faible)
1 1 temps (fort)
2 2 temps
3 3 temps
4 4 temps
5 5 temps
6 6 temps
7 7 temps
8 Duolets
9 Triolets
10 Quintolets
11 Rock 1
12 Rock 2
13 Rock 3
No. Motif rythmique
14 16 Beat 1
15 16 Beat 2
16 Pops 1
17 Pops 2
18 Funk 1
19 Funk 2
20 Disco
21 Balade 1
22 Balade 2
23 Shuffle 1
24 Shuffle 2
25 Swing
26 Valse rock
27 Valse jazz
No. Motif rythmique
28 Bossa nova
29 Samba
30 Samba jazz
31 Songo
32 Boléro
33 Tango
34 Cha Cha
35 Mambo
36 Rhumba
37 Béguine
38 Valse
39 Marche
40 Ondo
* No. 0: Un temps faible No. 1: Un temps fort
■ REMPLACEMENT DE LA PILE
Lorsque la pile se vide, les indications de l’affichage deviennent plus
claires et les points de l’indicateur de tempo s’assombrissent alors que le
volume diminue. Remplacez alors la pile le plus rapidement possible par
une pile neuve (pile au lithium CR-2025).
◆ Procédure de remplacement
1. Retirez la vis de fixation du couvercle du logement de la pile au dos
du métronome et enlevez le couvercle en le faisant glisser dans le
sens de la flèche de la manière illustrée.
2. Soulevez la pile usée à l’aide d’un objet pointu (pincettes, etc.).
3. Placez la pile neuve avec son pôle - dirigé vers le bas (le pôle + doit
être visible lorsque la pile est en place).
4. Reposez le couvercle du logement et fixez-le à l’aide de la vis.
* N’oubliez pas d’appuyer sur l’interrupteur [POWER] pour couper
l’alimentation du métronome avant de changer la pile.
Couvercle du
logement de la pile
Bouton de remise
à l’état initial
Dos du
métronome
Trous de la vis
Une fois que vous avez remplacé la pile, mettez le
métronome sous tension pour vérifier qu’il fonctionne
normalement. Si le métronome ne fonctionne pas
normalement, appuyez sur le bouton de remise à l’état
initial qui se trouve au dos et remettez sous tension pour
vérifier si le fonctionnement est normal.
* Les réglages par défaut rétablis après la remise à l’état initial sont les
suivants :
Mode métronome, tempo “120”, rythme “11”, note “A”, hauteur “440” Hz.

■ VORSICHTSMASSREGELN
◆ Verwenden Sie das Metronom nicht an Orten, wo es den folgenden
schädlichen Einflüssen ausgesetzt ist:
• Direktes Sonnenlicht
• Extreme Temperaturen und hohe Luftfeuchtigkeit
• Sand oder Staub
◆ Verwenden Sie als Stromquelle ausschließlich Lithiumbatterien des Typs
CR-2025.
◆ Schalten Sie das Metronom nach Gebrauch stets aus, um die Batterie zu
schonen.
◆ Wenn eine verbrauchte Batterie längere Zeit im Gerät gelassen wird, kann
sie auslaufen und Schäden verursachen. Wenn die Batterie schwächer
wird, sollten Sie sie daher entnehmen und so bald wie möglich durch eine
frische ersetzen.
◆ Drücken Sie nicht zu stark auf das Display (Flüssigkristallanzeige), und
setzen Sie es auch keinen Stößen aus.
◆ Wenn die Anzeigen auf dem Display nicht gut lesbar sind, ändern Sie bitte
den Betrachtungswinkel.
◆ Schützen Sie das Metronom vor starken Schlägen und Erschütterungen.
Wenden Sie beim Betätigen der Bedienelemente nicht zu viel Kraft auf.
◆ Verwenden Sie zum Säubern des Metronoms keine Lösungsmittel wie
Benzin oder Verdünner. Entfernen Sie Staub und Schmutz mit einem
weichen, trockenen Tuch.
◆ Bewahren Sie diese Anleitung nach dem Durchlesen gut auf.
Vielen Dank für den Kauf des YAMAHA Multi-Metronoms
YM-2000.
Lesen Sie diese Bedienungsanleitung bitte aufmerksam durch, und
bewahren Sie sie danach für später anfallende Fragen gut auf.
■ BEDIENELEMENTE
MULTI-METRONOM
YM-2000
YM-2000
BEDIENUNGSANLEITUNG
Bescheinigung des Importeurs
Hiermit wird bescheinigt, daß der / die / das
MULTI METRONOME Typ : YM-2000
Gerät, Typ, Bezeichnung)
in Übereinstimmung mit den Bestimmungen der
VERFÜGUNG 1046/84
(Amtsblattverfügung)
funkentstört ist.
Der Deutschen Bundespost wurde das Inverkehrbringen dieses
Gerätes angezeigt und die Berechtigung zur Überprüfung der Serie
auf Einhaltung der Bestimmungen eingeräumt.
YAMAHA Europa GmbH
Name des Importeurs
■ DAS ETUI
Das Etui kann, wie rechts abgebildet,
auch als Metronomständer
verwendet werden.
■ TECHNISCHE DATEN
Anzeigen : Display (Flüssgkristallanzeige), Tempoanzeige
Tempo : 30 bis 240 Schläge/Minute, Genauigkeit ±0,2 %
Taktschlagmuster : 1 Schlag bis 7 Schläge, Duolen, Triolen,
Quintolen
Rhythmusmuster : 30 vorprogrammierte Muster
Noteneinstellbereich : C4 bis B4 (in Halbtonschritten), Genauigkeit ± 1
Cent
Standardtonhöhen-Einstellbereich
: 438 bis 445 Hz
Abschaltautomatik : Metronom-Modus — nach ca. 15 Minuten
Noten-/Tonhöheneinstellmodus — nach ca. 5
Minuten
Andere Funktionen : Bestätigungston, Speicherschutzfunktion
Anschluß : 3,5 mm Ohrhörerbuchse (Mono)
Stromquelle : eine Lithiumbatterie (CR-2025)
Batterie-Lebensdauer : ca. 45 Stunden
Abmessungen (BxHxT) : 102 x 12 x 64 mm
Gewicht (einschließlich Batterie)
: 65 g
Zubehör : Lithiumbatterie (CR-2025)
Etui (dient auch als Ständer)
* Änderungen der technischen Daten und des Designs vorbehalten.
Rücksetztaste
Schraubenbohrung
Batteriefachdeckel
Unterseite
Schalten Sie das Metronom nach dem Auswechseln der
Batterie ein, um seine Funktion zu prüfen. Sollte es nicht
ordnungsgemäß arbeiten, drücken Sie die Rücksetztaste
an der Unterseite und schalten das Gerät danach zur
erneuten Funktionsprüfung wieder ein.
* Die Vorgabeeinstellungen nach der Rücksetzung sind wie folgt:
Metronom-Modus, Tempo “120”, Rhythmus “11”, Note “A”,
Tonhöhe “440” Hz
UP
DOWN
RHYTHM
NOTE
TEMPO
PITCH
POWER
MUTE
YM-2000
MULTI METRONOME
Lautsprecher
Tempoanzeige
Die Punkte dieser Anzeige leuchten
von links nach rechts im jeweils
gewählten Tempo auf.
Display
(Flüssigkristallanzeige)
RHYTHM-Taste
(Rhythmus)
PITCH-Taste
(Standardtonhöhe)
NOTE-Taste
(Stimmnote)
MUTE-Taste
(Stummschaltung)
POWER-Taste
(Ein/Aus)
TEMPO-Taste
Ohrhörerbuchse
An diese Buchse können Sie einen gewöhnlichen
Ohrhörer (3,5 mm Steckerdurchm.) anschließen.
Wenn Sie Stereokopfhörer anschließen, ist der
Ton nur von einer Seite zu hören. Beim
Anschließen eines Ohrhörers wird der interne
Lautsprecher automatisch stummgeschaltet.
UP-Taste (höher)
DOWN-Taste (niedriger)
■ BATTERIEWECHSEL
Wenn die Batterie schwächer wird, leidet der Displaykontrast, und die Punkte
der Tempoanzeige werden dunkler, während die Lautstärke proportional
abnimmt. In diesem Fall sollten Sie die Batterie so bald wie möglich durch eine
frische (CR-2025) ersetzen.
◆ Auswechseln der Batterie
1. Entfernen Sie die Halteschraube vom Batteriefachdeckel an der
Unterseite, um den Deckel danach wie in der Abbildung in Richtung des
Pfeils abzuziehen.
2. Nehmen Sie die alte Batterie mit einer Pinzette oder einem ähnlichen
Werkzeug aus dem Batteriefach.
3. Legen Sie die neue Batterie mit dem Minuspol (–) nach unten ein. (Der
Pluspol der eingelegten Batterie muß sichtbar sein.)
4. Schieben Sie den Batteriefachdeckel wieder auf, um ihn danach mit der
Schraube zu arretieren.
* Schalten Sie das Metronom vor dem Auswechseln der Batterie stets mit der
POWER-Taste aus.
■ RHYTHMUSMUSTER-VERZEICHNIS
Nr. Rhythmusmuster
0 1 Schlag
(schwach)
1 1 Schlag (stark)
2 2 Schläge
3 3 Schläge
4 4 Schläge
5 5 Schläge
6 6 Schläge
7 7 Schläge
8 Duolen
9 Triolen
10 Quintolen
11 Rock 1
12 Rock 2
13 Rock 3
Nr. Rhythmusmuster
14 16-Beat 1
15 16-Beat 2
16 Pops 1
17 Pops 2
18 Funk 1
19 Funk 2
20 Disco
21 Ballade 1
22 Ballade 2
23 Shuffle 1
24 Shuffle 2
25 Swing
26 Rock-Walzer
27 Jazz-Walzer
Nr. Rhythmusmuster
28 Bossanova
29 Samba
30 Jazz-Samba
31 Songo
32 Bolero
33 Tango
34 Cha-cha-cha
35 Mambo
36 Rumba
37 Beguine
38 Walzer
39 Marsch
40 Ondo
* Nr. 0: einzelner schwacher Schlag Nr. 1: einzelner starker Schlag
■ BEDIENUNG
● Auswählen eines Rhythmusmusters und Einstellen des Tempos
1. Drücken Sie die RHYTHM-Taste. Die
Anzeige “RHYTHM” blinkt nun zur
Betätigung auf dem Display.
2. Drücken Sie die UP- bzw. DOWN-Taste,
um das gewünschte Rhythmusmuster
zu wählen. Die Nummer auf dem Display
nimmt bei jedem Tastendruck um den
Wert 1 zu bzw. ab. Wenn Sie die Taste gedrückt halten, ändert sich die
Nummer fortlaufend.
3. Drücken Sie die TEMPO-Taste. Die Anzeige “TEMPO” blinkt zur
Bestätigung auf dem Display.
4. Drücken Sie die UP- bzw. DOWN-Taste, um das gewünschte Tempo
einzustellen. Der Tempowert auf dem Display nimmt bei jedem
Tastendruck um 1 zu bzw. ab. Wenn Sie die Taste gedrückt halten,
ändert sich der Wert fortlaufend.
5. Zum Stummschalten des Metronomtons drücken Sie die MUTE-Taste.
“MUTE” wird danach zur Bestätigung auf dem Display angezeigt.
* Die 8 STEP-Segmente am unteren Displayrand leuchten bzw. blinken im
Rhythmus des gewählten Musters.
* Zum Rücksetzen einer Einstellung zum Anfangswert (Vorgabeeinstellung)
drücken Sie gleichzeitig auf die Tasten UP und DOWN.
● Auswählen der Stimmnote und Einstellen der Standardtonhöhe
1. Drücken Sie die NOTE-Taste. Die
Anzeige “NOTE” blinkt nun auf dem
Display, und der Stimmton (gegenwärtig
eingestellte Note) ist zu hören.
2. Drücken Sie die UP- bzw. DOWN-Taste,
um die gewünschte Note zu wählen. Die
Note auf dem Display ändert sich bei
jedem Tastendruck um einen Halbtonschritt. Bei gedrückt gehaltener
Taste erfolgt jedoch keine fortlaufende Weiterschaltung.
3. Drücken Sie die PITCH-Taste. Die Anzeige “PITCH” auf dem Display
blinkt danach zur Bestätigung.
4. Drücken Sie die UP- bzw. DOWN-Taste, um die Standardtonhöhe (für
Kammerton A) auf einen Wert zwischen 438 und 445 Hz einzustellen.
Der Tonhöhenwert auf dem Display ändert sich bei jedem Tastendruck
um 1 Hz. Bei gedrückt gehaltener Taste erfolgt jedoch keine fortlaufende
Weiterschaltung.
5. Zum Stummschalten des Stimmtons drücken Sie die MUTE-Taste.
“MUTE” wird danach zur Bestätigung auf dem Display angezeigt.
* Die Standardtonhöhe (438 bis 445 Hz) wird stets für Kammerton A eingestellt.
* Zum Rücksetzen einer Einstellung zum Anfangswert (Vorgabeeinstellung)
drücken Sie gleichzeitig auf die Tasten UP und DOWN.
RHYTHM
TEMPO
STEP MUTE
NOTE
PITCH
MUTE
Achten Sie bitte auf korrekte Entsorgung verbrauchter
Batterien. Batterien dürfen nicht verbrannt werden!
Achten Sie bitte auch darauf, daß Batterien nicht in
Kinderhände geraten.
■ FUNKTIONEN DES YM-2000
● Metronomfunktion
11 Taktschlagmuster (1 Schlag bis 7 Schläge, Duolen, Triolen, Quintolen)
und 30 Rhythmusmuster können in variablem Tempo (30 bis 240
Schläge/Minute) gespielt werden.
● Noten-/Tonhöheneinstellfunktion
Das Gerät kann eine Stimmnote erzeugen, die innerhalb des Bereichs
einer Oktave (C bis B) wählbar ist. Die Standardtonhöhe (für Kammerton
A) ist innerhalb des Bereichs von 436 bis 445 Hz feineinstellbar.
●
Andere Funktionen
* Bestätigungston
Beim Drücken einer Taste bestätigt das Gerät die Bedienung durch
einen Piepton. Der Bestätigungston wird auch bei stummgeschaltetem
Metronomton gegeben.
* Abschaltautomatik
Wenn im Metronom-Modus etwa 15 Minuten lang keine Taste betätigt
wurde, schaltet das Gerät automatisch ab.
Wenn im Noten-/Tonhöheneinstellmodus etwa 5 Minuten lang keine
Taste betätigt wurde, schaltet das Gerät automatisch ab.
* Speicherschutzfunktion
Die aktuellen Einstellungen im Speicher bleiben auch beim
Ausschalten des Metronoms erhalten. Die einzige Ausnahme ist die
Stummschaltungsfunktion (MUTE), die deaktiviert wird, so daß beim
erneuten Einschalten wieder Ton zu hören ist.
Transcripción de documentos
■各部の名称とはたらき MULTI METRONOME スピーカー テンポランプ 液晶パネル テンポに合わせて左右にスキャンします。 YM-2000 リズムスイッチ テンポスイッチ OWNER’S MANUAL / MODE D’EMPLOI BEDIENUNGSANLEITUNG / 取扱説明書 パワースイッチ UP RHYTHM TEMPO POWER ミュートスイッチ DOWN NOTE PITCH MUTE ピッチスイッチ YM-2000 このたびはヤマハ・マルチメトロノーム・YM-2000をお買い求めいただ き、まことにありがとうございます。 お使いになる前にこの取扱説明書をよくお読みになり、正しくご使用くださ い。また、お読みになった後は保証書と共に大切に保管してください。 ノートスイッチ MULTI METRONOME アップスイッチ ダウンスイッチ イヤホンジャック イヤホン接続用端子(3.5 )です。ステレオタイプのヘッドホンなど を接続した場合は、片側のみから聞こえます。 イヤホン接続時はスピーカーから発音しません。 ■ご使用上の注意 ■操作方法 ◆ 使用する場所 故障の原因となりますので、次のような場所でご使用にならないでください。 ・ 直射日光の当たる場所 ・ 温度や湿度が非常に高い場所や低い場所 ・ 砂やホコリの多い場所 ◆メトロノームとしてお使いになる場合 1. RHYTYMスイッチを押します。液晶パネルの “RHYTHM”が点滅します。 RHYTHM TEMPO 2. UPスイッチまたはDOWNスイッチを押してリ ズムパターンを選択します。スイッチを押す毎 STEP MUTE にリズムパターンの番号が1ずつ変わります。 押し続けると速く変化します。 3. TEMPOスイッチを押します。液晶パネルの“TEMPO”が点滅します。 4. UPスイッチまたはDOWNスイッチを押してテンポを調節します。スイッチを押 す毎にテンポが1ずつ変わります。押し続けると速く変化します。 5. 発音させずに使用する場合は、MUTEスイッチを押します。液晶パネルの “MUTE”が点灯します。 ◆ 電池について ・ YM-2000は、 リチウム電池 (CR-2025) で作動します。 ・ ご使用にならない時は、パワースイッチをOFFにしておいてください。 ・ 電池が切れたままで長時間放置しますと、電池の液漏れなど、故障の原因となり ます。お早めに電池交換してください。 ◆ 液晶パネルについて ・ 液晶パネルを強く押したり、叩いたりしないでください。 ・ 液晶パネルの表示は、角度によって見にくい場合があります。角度を調整してお 使いください。 ◆ 取り扱いはやさしく ※ 液晶パネル下部の8つのブロック表示(STEP) は、 リズムパターンに合わせて点 灯・点滅を繰り返します。 ※ UPとDOWNのスイッチを同時に押すと、設定中の値がリセットされます。 スイッチや本体に無理な力を加えたり、本体を落としたりしますと、故障の原因とな ります。ご注意ください。 ◆ お手入れ 外装のお手入れの際は、必ず柔らかい布で乾拭きしてください。ベンジンやシン ナーなどの揮発性液は、絶対にご使用にならないでください。 ◆音階/基準音を発生させる場合 1. NOTEスイッチを押します。液晶パネルの “NOTE”が点滅します。 NOTE PITCH 2. UPスイッチまたはDOWNスイッチを押して 合わせたい音名を選択します。スイッチを押す MUTE 毎に音名が半音ずつ変わります。押し続けても 速く変化しません。 3. PITCHスイッチを押します。液晶パネルの“PITCH”が点滅します。 4. UPスイッチまたはDOWNスイッチを押して基準音のピッチ (A=438∼445) を調節します。スイッチを押す毎にピッチが1Hzずつ変わります。 押し続けても 速く変化しません。 5. 発音させずに使用する場合は、MUTEスイッチを押します。液晶パネルの “MUTE”が点灯します。 ◆ 保証書の手続き 製品をお買上げいただいた日より1年間は保証期間となり、修理料金は無料とさせ ていただきます。ただし、保証書に販売店印、購入年月日の記入がない場合は、保証 期間中でもサービスが有料となることがあります。必ずお求めになった販売店で保 証書の手続きを行なった後、大切に保管してください。 ◆ 取扱説明書は大切に この取扱説明書をお読みになった後は、大切に保管してください。 ご使用済みの電池は、火の中に入れないでください。 また、電池は幼児の手の届かない所に保管してください。 ※ 基準音のピッチ (438∼445) は、常にA音について設定されます。 ※ UPとDOWNのスイッチを同時に押すと、設定中の値がリセットされます。 ■YM-2000の機能 ● メトロノーム機能 1∼7拍子、2, 3, 5連符および30種類のリズムパターンを、テンポ設定 (30∼ 240回/分) して発生することができます。 ■リズムパターンリスト No. ●音階/基準音発生機能 ● リズムパターン 0 1 2 3 4 5 6 7 8 9 10 11 12 13 1オクターブ(C∼B) の基準音を半音ステップで発生することができます。基準音 のピッチはA=438∼445Hzの範囲で設定できます。 その他の付加機能 ・ 操作確認音の発生 スイッチを操作すると、操作が行われたことを示す確認音を発音します。 ミュー ト状態でも、操作確認音は発音します。 ・ オートパワーオフ機能 メトロノームとして使用している場合は、約15分間スイッチ操作が行なわれな いと、自動的に電源オフになります。 音階/基準音を発生させている場合は、約5分間スイッチ操作が行なわれない と、自動的に電源オフになります。 ・ メモリーバックアップ機能 パワースイッチ操作またはオートパワーオフにより電源オフになっても、次に電 源をオンにしたときには、電源オフする直前の各設定を記憶しています。ただ し、 ミュートの設定はオフされ、発音します。 No. 1拍子(弱)* 1拍子(強)* 2拍子 3拍子 4拍子 5拍子 6拍子 7拍子 2連符 3連符 5連符 ロック 1 ロック 2 ロック 3 14 15 16 17 18 19 20 21 22 23 24 25 26 27 リズムパターン 16ビート 1 16ビート 2 ポップス 1 ポップス 2 ファンク 1 ファンク 2 ディスコ バラード 1 バラード 2 シャッフル 1 シャッフル 2 スイング ロックワルツ ジャズワルツ No. 28 29 30 31 32 33 34 35 36 37 38 39 40 リズムパターン ボサノバ サンバ ジャズサンバ ソンゴ ボレロ タンゴ チャチャ マンボ ルンバ ビギン ワルツ マーチ 音頭 * No.0 : 弱拍音のみの1拍子, No.1 : 強拍音のみの1拍子 ■電池交換について 電池の残量が少なくなってくると、液晶パネル の表示がうすくなり、テンポランプが暗く なったり音量が下がったりします。お早めに新しい電池 (リチウム電池:CR-2025) と交換 してください。 ■付属ハードケースについて 付属のハードケースは、右図のように スタンドとして使用することができます。 ◆電池交換の方法 1. 本体裏面の電池カバーのネジをはずし、電池カバーを下図矢印の方向へスライ ドさせて取り外します。 2. 先の細いピンセットのような物で、古い電池を取り出します。 3. 電池の極性 (+, ー) を合わせて (+側が見えるようにセットします) 、新しい電池 をセットします。 4. はずしたときと逆の手順で電池カバーを取り付け、ネジを締めます。 ■仕様 ※ 電池の交換は、必ずパワースイッチをオフにしてから行なってください。 ◆表示 ◆テンポ ◆メトロノーム拍子 ◆リズムパターン ◆基準音 ◆ピッチシフト ◆オートパワーオフ機能 : : : : : : : ◆その他の機能 ◆端子 ◆電源 ◆電池寿命 ◆外形寸法 (本体) ◆重量 ◆付属品 : : : : : : : 液晶パネル、テンポランプ 30 ∼ 240回/分、精度±0.2 % 1 ∼ 7拍子、2, 3, 5連符 プリセット30パターン オクターブ4の12半音 (C∼B) 、精度±1 セント 438Hz∼445Hz メトロノーム機能時 約15分 音階/基準音発生機能時 約5分 操作確認音、メモリーバックアップ機能 3.5 イヤホンジャック (モノラル) リチウム電池 CR-2025×1個 約45時間 102 (W) ×12 (H)× 64 (D) mm 65 g(リチウム電池含む) リチウム電池 CR-2025×1個、 ハードケース (スタンド兼用) リセットスイッチ ネジ穴 裏面 電池カバー 電池交換後は、電源をオンにして動作を確認してください。正常に動作 しない場合は、本体裏面のリセットスイッチを押してから、もう一度電 源をオンにして動作を確認してください。 ※リセット時の各設定は以下の通りです。 機能:メトロノーム 、テンポ:120、 リズム:11、音名:A、 ピッチ:440 ※仕様および外観は、改良のため予告なく変更することがあります。 ■サービスについて ヤマハ電気音響製品アフターサービス拠点 〔修理受付および修理品お持込み窓口〕 1. 保証期間 本機の保証期間は、 ご購入 (保証書による) より満1ヶ年 (現金・ クレジット・月賦等による区別はございません。 また保証は日本 国内でのみ有効) と致します。 2. 保証期間中のサービス 保証期間中に万一故障が発生した場合、 お買い上げ店にご連 絡頂きますと、技術者が修理・調整致します。 この際必ず保証 書をご提示ください。保証書なき場合にはサービス料金を頂く 場合もあります。 また、お買い上げ店より遠方に移転される場合は、事前にお買 い上げ店あるいは右記のヤマハ電気音響製品アフターサービ ス拠点にご連絡ください。 移転先におけるサービス担当店をご 紹介申し上げますと同時に、引続き保証期間中のサービスを 責任をもって行なうよう手続き致します。 北海道サービスセンター 仙台サービスセンター 新潟サービスステーション 首都圏サービスセンター 東京サービスステーション* (*お持込み修理窓口) 浜松サービスセンター 名古屋サービスセンター 大阪サービスセンター 四国サービスセンター 広島サービスセンター 九州サービスセンター 〒064 〒983 〒950 〒211 〒108 札幌市中央区南十条西 1 丁目 1-50 ヤマハセンター内 TEL (011) 513-5036 仙台市若林区卸町 5-7 仙台卸商共同配送センター3F TEL (022) 236-0249 新潟市万代 1-4-8 シルバーボールビル2F TEL (025) 243-4321 川崎市中原区木月 1184 TEL (044) 434-3100 東京都港区高輪 2-17-11 TEL (03) 5488-6625 〒435 〒454 〒565 〒760 〒731-01 〒812 浜松市上西町 911 ヤマハ(株)宮竹工場内 TEL (053) 465-6711 名古屋市中川区玉川町 2-1-2 ヤマハ(株)名古屋流通センター 3F TEL (052) 652-2230 吹田市新芦屋下 1-16 ヤマハ(株)千里丘センター内 TEL (06) 877-5262 高松市丸亀町 8-7 ヤマハ(株)高松店内 TEL (0878) 22-3045 広島市安佐南区西原 2-27-39 TEL (082) 874-3787 福岡市博多区博多駅前 2-11-4 TEL (092) 472-2134 カスタマーサービス部 〒435 浜松市上西町 911 ヤマハ(株)宮竹工場内 TEL (053) 465-1158 弦 打 楽 器 営 業 部 東京支店第2 営業部 関東支店L M 営業課 大阪支店L M 営業課 名古屋支店L M 営業課 九州支店L M 営業課 北海道支店L M 営業課 仙台支店L M 営業課 広島支店L M 営業課 〒430 〒108 〒108 〒542 〒460 〒812 〒064 〒980 〒730 [本社] 3. アフターサービス 満1ヶ年の保証期間を過ぎますとサービスは有料となります が、引き続き責任をもってサービスをさせていただきます。 そ のほかご不明の点などございましたら、お買い上げ店あるいは 右記のヤマハ電気音響製品アフターサービス拠点までお問 い合わせください。 弦打楽器営業部 営業課 〒430 静岡県浜松市中沢町10番1号 053-460-2433 ヤマハ株式会社国内楽器営業本部 浜松市中沢町 10番 1号 TEL (053) 460-2433 東京都港区高輪 2-17-11 TEL (03) 5488-5476 東京都港区高輪 2-17-11 TEL (03) 5488-1688 大阪市中央区南船場 3-12-9 (心斎橋プラザビル東館) TEL (06) 252-5231 名古屋市中区錦 1-18-28 TEL (052) 201-5199 福岡市博多区博多駅前 2-11-4 TEL (092) 472-2130 札幌市中央区南十条西 1丁目 1-50 (ヤマハセンター) TEL (011) 512-6113 仙台市青葉区大町 2-2-10 TEL (022) 222-6147 広島市中区紙屋町 1-1-18 (ヤマハビル) TEL (082) 244-3749 ※住所及び電話番号は変更になる場合があります。 保証書 持込修理 品名/品番 マルチメトロノーム/YM-2000 保 証 期 間 本体:お買上げの日から1ヶ年間 ※お買上げ日 年 月 日 この度はヤマハ・マルチメトロノームをお買上げ戴きましてありがとうございま した。 本書は、本書記載内容で修理を行なう事をお約束するものです。お買上げの日 から左記期間中に故障が発生した場合は、本書をご提示の上お買上げの販売 店に修理をご依頼ください。 (詳細は裏面をご覧ください) ご住所 〒 修理(サービス)メモ お 客 様 お名前 電 話 ※ 店 名 ( 様 年 月 日 内 容 担 当 者 印 ) 印 販 売 店 住 所 電 話 ( ) ご販売店様へ ※印欄は必ずご記入してお渡しください。 弦打楽器営業部 営業課 〒430 静岡県浜松市中沢町10番1号 053-460-2433 ■ COMPONENTS MULTI METRONOME Speaker Tempo indicator The indicator dots light up from left to right in the set tempo. Display (LCD Panel) YM-2000 RHYTHM button TEMPO button OWNER'S MANUAL POWER button UP RHYTHM TEMPO POWER MUTE button DOWN Thank you for purchasing the YAMAHA YM-2000 Multi Metronome. Please read this manual thoroughly and keep it in a safe place for future reference. NOTE PITCH MUTE PITCH button YM-2000 NOTE button MULTI METRONOME UP button DOWN button Earphone jack This jack allows connection of a standard earphone (3.5 ). If a stereo headphone is connected, sound will be produced from one side only. When connecting an earphone the internal speaker is muted automatically. ■ PRECAUTIONS ◆ To prevent damage, do not use the metronome in the following locations: • places where the unit will be in direct sunlight; • places subject to temperature and humidity extremes; • places that are sandy or dusty. ◆ To power the metronome, use only a CR-2025 lithium battery. ◆ For maximum battery life, always be sure the metronome is turned OFF when not in use. ◆ If an exhausted battery is left in the unit for an extended period of time, it may leak and cause malfunctioning of the unit. When the battery becomes exhausted, always remove it and replace it as soon as possible. ◆ Do not use press or bump on the LCD panel. ◆ If the indications on the LCD panel are difficult to see, adjust the viewing angle. ◆ Do not subject the metronome to strong physical shock or vibration. Do not use excessive force on any of the controls. ◆ Never use solvents such as benzene or thinner to clean the metronome. Wipe clean with a soft, dry cloth. ◆ After reading the owner's manual, keep it in a safe place for future reference. Never dispose of used batteries by burning them. Also make sure to keep batteries away from children. ■ OPERATION ● Selecting a Rhythm Pattern and Setting the Tempo 1. Press the RHYTHM button. "RHYTHM" on the display will blink. 2. Press the UP or DOWN button to select a rhythm pattern. Each time the button is pressed, the number on the display will increase/decrease by one. When the button is kept pressed, the number will change continuously. 3. Press the TEMPO button. "TEMPO" on the display will blink. 4. Press the UP or DOWN button to set the desired tempo. Each time the button is pressed, the tempo value will increase/decrease by one. When the button is kept pressed, the tempo value will change continuously. 5. To use without metronome sound, press the MUTE button. "MUTE" will appear on the display. RHYTHM TEMPO STEP MUTE * The 8 STEP indicator segments at the bottom of the display light up or blink according to the rhythm pattern. * The setting can be returned to its initial value (default) by pressing the UP and DOWN buttons simultaneously. ● Selecting the Note and Setting the Standard Pitch ■ FEATURES OF THE YM-2000 NOTE ● Metronome Function 11 beat patterns (1 to 7 beats, duplets, triplets, quintuplets) and 30 rhythm patterns can be played at a variable tempo (30 to 240 beats per minute). ● Note/Standard Pitch Sound Generating Function The unit can generate a tuning note selectable within one octave (C – B) in half-tone steps. The standard pitch (for note A) can be set within the range of 438 to 445 Hz. ● 1. Press the NOTE button. "NOTE" on the display will blink and the currently set note will sound. 2. Press the UP or DOWN button to select the desired note. Each time the button is pressed, the note will change in halftone steps. However, the note will not change continuously if the button is kept pressed. 3. Press the PITCH button. "PITCH" on the display will blink. 4. Press the UP or DOWN button to adjust the standard pitch (A) between 438 and 445 Hz. Each time the button is pressed, the pitch value will change by 1 Hz. However, the pitch will not change continuously if the button is kept pressed. 5. To set the note and pitch without sound, press the MUTE button. "MUTE" will appear on the display. Other Functions * Operation Confirmation Beep When a button is pressed, a beep sound will comfirm the operation. The confirmation beep will also be produced when the metronome sound is muted. * Auto Power Off Function When the unit is used in metronome mode and none of the buttons is pressed for approximately 15 minutes, the power will automatically turn off. When the unit is set to note/standard pitch setting mode and none of the buttons is pressed for approximately 5 minutes, the power will automatically turn off. * Memory Backup Function This function retains all current settings in memory when the unit is turned off (POWER button or Auto Power Off). The MUTE function, however, will be released, and sound will be heard when the unit is turned on again. MUTE * The standard pitch (438 – 445 Hz) will always be set for note A. * The setting can be returned to its initial value (default) by pressing the UP and DOWN buttons simultaneously. ■ RHYTHM PATTERN LIST No. 0 1 2 3 4 5 6 7 8 9 10 11 12 13 Rhythm Pattern 1 BEAT (weak) 1 BEAT (strong) 2 BEATS 3 BEATS 4 BEATS 5 BEATS 6 BEATS 7 BEATS DUPLETS TRIPLETS QUINTUPLETS ROCK 1 ROCK 2 ROCK 3 No. 14 15 16 17 18 19 20 21 22 23 24 25 26 27 Rhythm Pattern 16 BEAT 1 16 BEAT 2 POPS 1 POPS 2 FUNK 1 FUNK 2 DISCO BALLAD 1 BALLAD 2 SHUFFLE 1 SHUFFLE 2 SWING ROCK WALTZ JAZZ WALTZ * No. 0: Single weak beat ■ THE HARD CASE The hard case can be used as a stand as shown in the illustration on the right. PITCH No. 28 29 30 31 32 33 34 35 36 37 38 39 40 Rhythm Pattern BOSSA NOVA SAMBA JAZZ SAMBA SONGO BOLERO TANGO CHA CHA MAMBO RHUMBA BEGUINE WALTZ MARCH ONDO No. 1: Single strong beat ■ BATTERY REPLACEMENT When the battery weakens, the display indications will fade and the tempo indicator dots grow dim, while the sound volume decreases. In this case, replace the battery with a new one (CR-2025 lithum battery) as soon as possible. ◆ Replacement Procedure ■ SPECIFICATIONS Indicators Tempo Metronome beats Rhythm patterns Note setting range : : : : : Standard pitch setting range : Auto Power Off Function : Other Functions : Connector Power Source Battery Life Dimensions (W x H x D) Weight (including battery) Accessories : : : : : : Display (LCD panel), tempo indicator 30 – 240 beats/minute, accuracy ±0.2 % 1 – 7 beats, duplets, triplets, quintuplets 30 preset patterns C4 – B4 (in half-tone steps), accuracy ±1 cent 438 Hz – 445 Hz Metronome mode — after approx. 15 minutes Note/standard pitch setting mode — after approx. 5 minutes Operation confirmation beep, memory backup function 3.5 ear phone jack (monaural) Lithium battery x 1 (CR-2025) Approx. 45 hours 102 x 12 x 64 mm (4-1/8" x 1/2" x 2-1/2") 65 g (2.1 oz) Lithium battery x 1 (CR-2025), Hard case (can be used as stand) 1. Remove the battery cover fixing screw at the bottom of the unit and remove the battery cover by sliding it in the direction of the arrow as shown in the illustration below. 2. Lift out the old battery using a pointed tool (tweezers etc.). 3. Insert the new battery with its - pole facing down (+ pole must be visible when inserted). 4. Attach the battery cover and secure it using the fixing screw. * Always press the POWER button to turn off the unit before changing the battery. Reset button Screw hole Bottom side Battery cover After battery replacement, turn on the power to check if operation is normal. If the unit is operating abnormally, press the reset button on the bottom side, and then turn on the power again to check the operation. * Specifications and design subject to change without notice. * The default settings after resetting the unit are as follows: Metronome mode, tempo "120", rhythm "11", note "A", pitch "440" Hz FCC INFORMATION (U.S.A.) 1. IMPORTANT NOTICE: DO NOT MODIFY THIS UNIT! This product, when installed as indicated in the instructions contained in this manual, meets FCC requirements. Modifications not expressly approved by Yamaha may void your authority, granted by the FCC, to use the product. 2. IMPORTANT: When connecting this product to accessories and/or another product use only high quality shielded cables. Cable/s supplied with this product MUST be used. Follow all installation instructions. Failure to follow instructions could void your FCC authorization to use this product in the USA. 3. NOTE: This product has been tested and found to comply with the requirements listed in FCC Regulations, Part 15 for Class ”B” digital devices. Compliance with these requirements provides a reasonable level of assurance that your use of this product in a residential environment will not result in harmful interference with other electronic devices. This equipment generates/uses radio frequencies and, if not installed and used according to the instructions found in the users manual, may cause interference harmful to the operation of other electronic devices. Compliance with FCC regulations does not guarantee that interference will not occur in all installations. If this product is found to be the source of interference, which can be determined by turning the unit ”OFF” and ”ON”, please try to eliminate the problem by using one of the following measures: Relocate either this product or the device that is being affected by the interference. Utilize power outlets that are on different branch (circuit breaker or fuse) circuits or install AC line filter/s. In the case of radio or TV interference, relocate/reorient the antenna. If the antenna lead-in is 300 ohm ribbon lead, change the lead-in to coaxial type cable. If these corrective measures do not produce satisfactory results, please contact the local retailer authorized to distribute this type of product. If you can not locate the appropriate, please contact Yamaha Corporation of America, Electronic Service Division, 6600 Orangethorpe Ave, Buena Park, CA 90620 The above statements apply ONLY to those products distributed by Yamaha Corporations of America or its subsidiaries. THIS DIGITAL APPARATUS DOES NOT EXCEED THE “CLASS B” LIMITS FOR RADIO NOISE EMISSIONS FROM DIGITAL APPARATUS SET OUT IN THE RADIO INTERFERENCE REGULATION OF THE CANADIAN DEPARTMENT OF COMMUNICATIONS. Printed in Hong Kong ■ NOMENCLATURE MULTI MÉTRONOME YM-2000 Indicateur de tempo Les points de l’indicateur s’allument de gauche à droite en suivant le tempo sélectionné. Affichage (à cristaux liquides) Haut-parleur Touche de rythme [RHYTHM] MODE D'EMPLOI Touche de tempo [TEMPO] Nous vous remercions d’avoir porté votre choix sur le multi métronome YAMAHA YM-2000. Veuillez lire attentivement ce mode d’emploi et conservez-le en un lieu sûr pour future référence. UP DOWN RHYTHM TEMPO NOTE PITCH Interrupteur d’alimentation [POWER] POWER Touche d’assourdissement [MUTE] MUTE YM-2000 MULTI METRONOME Touche de hauteur [PITCH] Touche de montée [UP] ■ MESURES DE PRECAUTION ◆ Afin de ne pas endommager le métronome ne l’utilisez pas dans des endroits soumis aux conditions suivantes : • plein soleil, • humidité ou températures excessives, • sable ou poussière. ◆ Pour alimenter le métronome, utilisez exclusivement une pile au lithium CR-2025. ◆ Mettez toujours le métronome hors tension lorsque vous ne l’utilisez pas afin de prolonger au maximum la durée de vie de la pile. ◆ Des fuites pouvant provoquer des anomalies de fonctionnement peuvent se produire si une pile usée est laissée à l’intérieur du métronome pendant une période prolongée. Veillez à remplacer la pile le plus rapidement possible lorsqu’elle est usée. ◆ N’appuyez pas sur l’affichage à cristaux liquides et évitez de le cogner. ◆ Si les indications de l’affichage sont difficiles à lire ajuster l’angle de vision. ◆ Ne soumettez pas le métronome à des chocs ou à des vibrations importantes. Ne le manipuler jamais avec une force excessive. ◆ N’utilisez jamais de solvants, tels que benzine ou diluant, pour nettoyer le métronome. Essuyez-le avec un chiffon doux et sec. ◆ Après avoir lu ce mode d’emploi, conservez-le en un lieu sûr pour future référence. Ne jetez jamais les piles au feu et conservez-les toujours hors de portée des enfants. ■ FONCTIONS DU YM-2000 ● Fonction métronome 11 motifs de temps (1 à 7 temps, duolets, triolets, quintolets) et 30 motifs rythmiques peuvent être reproduits à un tempo variable (30 à 240 temps par minute). ● Fonction génération de son de hauteur standard/note Le métronome peut générer une note d’accord sélectionnable sur une plage de une octave (C – B) par paliers de un demi-ton. La hauteur standard (note A) peut être réglée entre 438 et 445 Hz. Touche de note [NOTE] Touche de baisse [DOWN] Prise d’écouteur Cette prise permet de brancher un écouteur standard ( 3,5 ). Si vous utilisez un casque d’écoute stéréo, le son ne sera audible que d’un seul côté. Le son produit par le haut-parleur interne est automatiquement coupé lorsque vous branchez un écouteur. ■ UTILISATION ● Sélection d’un motif rythmique et réglage du tempo 1. Appuyez sur la touche [RHYTHM]. L’indication “RHYTHM” se met à clignoter sur l’affichage. 2. Appuyez sur la touche [UP] ou [DOWN] pour sélectionner un motif rythmique. Chaque fois que vous appuyez sur une de ces touches, le numéro indiqué sur l’affichage augmente/diminue de un. Lorsque vous maintenez une de ces touches enfoncée, les numéros défilent de manière continue. 3. Appuyez sur la touche [TEMPO]. L’indication “TEMPO” se met à clignoter sur l’affichage. 4. Appuyez sur la touche [UP] ou [DOWN] pour régler le tempo. Chaque fois que vous appuyez sur une de ces touches, la valeur du tempo indiquée sur l’affichage augmente/diminue de un. Lorsque vous maintenez une de ces touches enfoncée, les valeurs de tempo défilent de manière continue. 5. Pour rendre le son du métronome inaudible, appuyez sur la touche [MUTE]. “MUTE” apparaît sur l’affichage. RHYTHM TEMPO STEP MUTE * Les segments de l’indicateur 8 STEP s’allument ou clignotent à la partie inférieure de l’affichage selon le motif rythmique sélectionné. * La valeur de réglage initiale (par défaut) peut être rétablie en appuyant en même temps sur les touches [UP] et [DOWN]. ● Sélection d’une note et réglage de la hauteur standard 1. Appuyez sur la touche [NOTE]. L’indication “NOTE” se met à clignoter sur l’affichage et vous pourrez entendre le son de la note sélectionnée. 2. Appuyez sur la touche [UP] ou [DOWN] pour sélectionner la note que vous souhaitez. Chaque fois que vous appuyez sur une de ces touches, la note change par bonds de un demi-ton. Dans ce cas, cependant, les notes ne défileront pas de manière continue lorsque vous maintenez une de ces touches enfoncée. 3. Appuyez sur la touche [PITCH]. L’indication “PITCH” se met à clignoter sur l’affichage. 4. Appuyez sur la touche [UP] ou [DOWN] pour régler la hauteur standard (A) entre 438 et 445 Hz. Chaque fois que vous appuyez sur une de ces touches, la hauteur augmente/diminue de un. Dans ce cas, cependant, la hauteur ne changera pas de manière continue lorsque vous maintenez une de ces touches enfoncée. 5. Pour régler la note et la hauteur avec le son inaudible, appuyez sur la touche [MUTE]. “MUTE” apparaît sur l’affichage. NOTE PITCH MUTE ● Autres fonctions * Bip de confirmation d’utilisation Lorsque vous sollicitez une touche, un bip est produit pour confirmer l’opération. Le bip de confirmation est produit même lorsque le son du métronome est assourdi. * Fonction de coupure automatique de l’alimentation Lorsque l’unité est utilisée en mode métronome, son alimentation sera automatiquement coupée si aucune touche n’est sollicitée pendant environ 15 minutes. Lorsque l’unité est en mode de réglage de hauteur standard/note, Son alimentation sera automatiquement coupée si aucune touche n’est sollicitée pendant environ 5 minutes. * Fonction de conservation de la mémoire Cette fonction permet de conserver tous les réglages en mémoire lorsque l’alimentation de l’unité est coupée (au moyen de l’interrupteur [POWER] ou par coupure automatique de l’alimentation). La fonction MUTE sera désactivée, cependant, et le son sera de nouveau audible lorsque vous remettez le métronome sous tension. * La note A est toujours réglée à la hauteur standard (438 – 445 Hz). * Le réglage initial (par défaut) peut être rétabli en appuyant en même temps sur les touches [UP] et [DOWN]. ■ LISTE DES MOTIF RYTHMIQUES ■ LE BOÎTIER Le boîtier peut être utilisé comme support de la manière illustrée cicontre. No. 0 1 2 3 4 5 6 7 8 9 10 11 12 13 Motif rythmique 1 temps (faible) 1 temps (fort) 2 temps 3 temps 4 temps 5 temps 6 temps 7 temps Duolets Triolets Quintolets Rock 1 Rock 2 Rock 3 No. 14 15 16 17 18 19 20 21 22 23 24 25 26 27 Motif rythmique 16 Beat 1 16 Beat 2 Pops 1 Pops 2 Funk 1 Funk 2 Disco Balade 1 Balade 2 Shuffle 1 Shuffle 2 Swing Valse rock Valse jazz * No. 0: Un temps faible ■ FICHE TECHNIQUE Indicateurs : Affichage (cristaux liquides), indicateur de tempo Tempo : 30 – 240 temps par minute, précision ± 0,2% Temps de métronome : 1 à 7 temps, duolets, triolets, quintolets Motifs rythmiques : 30 motifs programmés Plage de réglage de note : C4 – B4 (par paliers de un demi-ton), précision ± centième Plage de réglage de hauteur standard : 438 Hz – 445 Hz Coupure automatique de l’alimentation : Mode métronome — au bout de 15 minutes environ Mode de réglage de hauteur standard/note — au bout de 5 minutes environ Autres fonctions : Bip de confirmation, conservation de la mémoire Connecteur : Prise de jack d’écouteur (mono) Source d’alimentation : Pile au lithium x 1 (CR-2025) Durée de vie de la pile : Env. 45 heures Dimensions (L x H x P) : 102 (L) x 12 (H) x 64 (P) mm Poids (pile incluse) : 65 g Accessoire : Pile au lithium x 1 (CR-2025), boîtier (pouvant être utilisé comme support) No. 28 29 30 31 32 33 34 35 36 37 38 39 40 Motif rythmique Bossa nova Samba Samba jazz Songo Boléro Tango Cha Cha Mambo Rhumba Béguine Valse Marche Ondo No. 1: Un temps fort ■ REMPLACEMENT DE LA PILE Lorsque la pile se vide, les indications de l’affichage deviennent plus claires et les points de l’indicateur de tempo s’assombrissent alors que le volume diminue. Remplacez alors la pile le plus rapidement possible par une pile neuve (pile au lithium CR-2025). ◆ Procédure de remplacement 1. Retirez la vis de fixation du couvercle du logement de la pile au dos du métronome et enlevez le couvercle en le faisant glisser dans le sens de la flèche de la manière illustrée. 2. Soulevez la pile usée à l’aide d’un objet pointu (pincettes, etc.). 3. Placez la pile neuve avec son pôle - dirigé vers le bas (le pôle + doit être visible lorsque la pile est en place). 4. Reposez le couvercle du logement et fixez-le à l’aide de la vis. * N’oubliez pas d’appuyer sur l’interrupteur [POWER] pour couper l’alimentation du métronome avant de changer la pile. Bouton de remise à l’état initial Dos du métronome Trous de la vis * Les spécifications et l'aspect externe peuvent être modifiés sans aucun avis. Couvercle du logement de la pile Une fois que vous avez remplacé la pile, mettez le métronome sous tension pour vérifier qu’il fonctionne normalement. Si le métronome ne fonctionne pas normalement, appuyez sur le bouton de remise à l’état initial qui se trouve au dos et remettez sous tension pour vérifier si le fonctionnement est normal. LE PRESENT APPAREIL NUMERIQUE N'EMET PAS DE BRUITS RADIOELECTRIQUES DEPASSANT LES LIMITES APPLICABLES AUX APPAREILS NUMERIQUES DE LA "CLASSE B" PRESCRITES DANS LE REGLEMENT SUR LE BROUILLAGE RADIOELECTRIQUE EDICTE PAR LE MINISTERE DES COMMUNICATIONS DU CANADA. * Les réglages par défaut rétablis après la remise à l’état initial sont les suivants : Mode métronome, tempo “120”, rythme “11”, note “A”, hauteur “440” Hz. ■ BEDIENELEMENTE Tempoanzeige Die Punkte dieser Anzeige leuchten von links nach rechts im jeweils gewählten Tempo auf. Display (Flüssigkristallanzeige) MULTI-METRONOM Lautsprecher YM-2000 RHYTHM-Taste (Rhythmus) TEMPO-Taste BEDIENUNGSANLEITUNG POWER-Taste (Ein/Aus) UP Vielen Dank für den Kauf des YAMAHA Multi-Metronoms YM-2000. Lesen Sie diese Bedienungsanleitung bitte aufmerksam durch, und bewahren Sie sie danach für später anfallende Fragen gut auf. DOWN RHYTHM TEMPO NOTE POWER PITCH MUTE-Taste (Stummschaltung) MUTE PITCH-Taste (Standardtonhöhe) YM-2000 MULTI METRONOME NOTE-Taste (Stimmnote) UP-Taste (höher) DOWN-Taste (niedriger) ■ VORSICHTSMASSREGELN ◆ Verwenden Sie das Metronom nicht an Orten, wo es den folgenden schädlichen Einflüssen ausgesetzt ist: • Direktes Sonnenlicht • Extreme Temperaturen und hohe Luftfeuchtigkeit • Sand oder Staub ◆ Verwenden Sie als Stromquelle ausschließlich Lithiumbatterien des Typs CR-2025. ◆ Schalten Sie das Metronom nach Gebrauch stets aus, um die Batterie zu schonen. ◆ Wenn eine verbrauchte Batterie längere Zeit im Gerät gelassen wird, kann sie auslaufen und Schäden verursachen. Wenn die Batterie schwächer wird, sollten Sie sie daher entnehmen und so bald wie möglich durch eine frische ersetzen. ◆ Drücken Sie nicht zu stark auf das Display (Flüssigkristallanzeige), und setzen Sie es auch keinen Stößen aus. ◆ Wenn die Anzeigen auf dem Display nicht gut lesbar sind, ändern Sie bitte den Betrachtungswinkel. ◆ Schützen Sie das Metronom vor starken Schlägen und Erschütterungen. Wenden Sie beim Betätigen der Bedienelemente nicht zu viel Kraft auf. ◆ Verwenden Sie zum Säubern des Metronoms keine Lösungsmittel wie Benzin oder Verdünner. Entfernen Sie Staub und Schmutz mit einem weichen, trockenen Tuch. ◆ Bewahren Sie diese Anleitung nach dem Durchlesen gut auf. Achten Sie bitte auf korrekte Entsorgung verbrauchter Batterien. Batterien dürfen nicht verbrannt werden! Achten Sie bitte auch darauf, daß Batterien nicht in Kinderhände geraten. Ohrhörerbuchse An diese Buchse können Sie einen gewöhnlichen Ohrhörer (3,5 mm Steckerdurchm.) anschließen. Wenn Sie Stereokopfhörer anschließen, ist der Ton nur von einer Seite zu hören. Beim Anschließen eines Ohrhörers wird der interne Lautsprecher automatisch stummgeschaltet. ■ BEDIENUNG ● Auswählen eines Rhythmusmusters und Einstellen des Tempos 1. Drücken Sie die RHYTHM-Taste. Die Anzeige “RHYTHM” blinkt nun zur Betätigung auf dem Display. RHYTHM TEMPO 2. Drücken Sie die UP- bzw. DOWN-Taste, um das gewünschte Rhythmusmuster STEP MUTE zu wählen. Die Nummer auf dem Display nimmt bei jedem Tastendruck um den Wert 1 zu bzw. ab. Wenn Sie die Taste gedrückt halten, ändert sich die Nummer fortlaufend. 3. Drücken Sie die TEMPO-Taste. Die Anzeige “TEMPO” blinkt zur Bestätigung auf dem Display. 4. Drücken Sie die UP- bzw. DOWN-Taste, um das gewünschte Tempo einzustellen. Der Tempowert auf dem Display nimmt bei jedem Tastendruck um 1 zu bzw. ab. Wenn Sie die Taste gedrückt halten, ändert sich der Wert fortlaufend. 5. Zum Stummschalten des Metronomtons drücken Sie die MUTE-Taste. “MUTE” wird danach zur Bestätigung auf dem Display angezeigt. * Die 8 STEP-Segmente am unteren Displayrand leuchten bzw. blinken im Rhythmus des gewählten Musters. * Zum Rücksetzen einer Einstellung zum Anfangswert (Vorgabeeinstellung) drücken Sie gleichzeitig auf die Tasten UP und DOWN. ● Auswählen der Stimmnote und Einstellen der Standardtonhöhe ■ FUNKTIONEN DES YM-2000 ● Metronomfunktion 11 Taktschlagmuster (1 Schlag bis 7 Schläge, Duolen, Triolen, Quintolen) und 30 Rhythmusmuster können in variablem Tempo (30 bis 240 Schläge/Minute) gespielt werden. ● Noten-/Tonhöheneinstellfunktion Das Gerät kann eine Stimmnote erzeugen, die innerhalb des Bereichs einer Oktave (C bis B) wählbar ist. Die Standardtonhöhe (für Kammerton A) ist innerhalb des Bereichs von 436 bis 445 Hz feineinstellbar. ● Andere Funktionen * Bestätigungston Beim Drücken einer Taste bestätigt das Gerät die Bedienung durch einen Piepton. Der Bestätigungston wird auch bei stummgeschaltetem Metronomton gegeben. * Abschaltautomatik Wenn im Metronom-Modus etwa 15 Minuten lang keine Taste betätigt wurde, schaltet das Gerät automatisch ab. Wenn im Noten-/Tonhöheneinstellmodus etwa 5 Minuten lang keine Taste betätigt wurde, schaltet das Gerät automatisch ab. 1. Drücken Sie die NOTE-Taste. Die Anzeige “NOTE” blinkt nun auf dem Display, und der Stimmton (gegenwärtig NOTE PITCH eingestellte Note) ist zu hören. 2. Drücken Sie die UP- bzw. DOWN-Taste, MUTE um die gewünschte Note zu wählen. Die Note auf dem Display ändert sich bei jedem Tastendruck um einen Halbtonschritt. Bei gedrückt gehaltener Taste erfolgt jedoch keine fortlaufende Weiterschaltung. 3. Drücken Sie die PITCH-Taste. Die Anzeige “PITCH” auf dem Display blinkt danach zur Bestätigung. 4. Drücken Sie die UP- bzw. DOWN-Taste, um die Standardtonhöhe (für Kammerton A) auf einen Wert zwischen 438 und 445 Hz einzustellen. Der Tonhöhenwert auf dem Display ändert sich bei jedem Tastendruck um 1 Hz. Bei gedrückt gehaltener Taste erfolgt jedoch keine fortlaufende Weiterschaltung. 5. Zum Stummschalten des Stimmtons drücken Sie die MUTE-Taste. “MUTE” wird danach zur Bestätigung auf dem Display angezeigt. * Die Standardtonhöhe (438 bis 445 Hz) wird stets für Kammerton A eingestellt. * Zum Rücksetzen einer Einstellung zum Anfangswert (Vorgabeeinstellung) drücken Sie gleichzeitig auf die Tasten UP und DOWN. * Speicherschutzfunktion Die aktuellen Einstellungen im Speicher bleiben auch beim Ausschalten des Metronoms erhalten. Die einzige Ausnahme ist die Stummschaltungsfunktion (MUTE), die deaktiviert wird, so daß beim erneuten Einschalten wieder Ton zu hören ist. ■ DAS ETUI Das Etui kann, wie rechts abgebildet, auch als Metronomständer verwendet werden. ■ RHYTHMUSMUSTER-VERZEICHNIS Nr. 0 1 2 3 4 5 6 7 8 9 10 11 12 13 Rhythmusmuster 1 Schlag (schwach) 1 Schlag (stark) 2 Schläge 3 Schläge 4 Schläge 5 Schläge 6 Schläge 7 Schläge Duolen Triolen Quintolen Rock 1 Rock 2 Rock 3 Nr. 14 15 16 17 18 19 20 21 22 23 24 25 26 27 Rhythmusmuster 16-Beat 1 16-Beat 2 Pops 1 Pops 2 Funk 1 Funk 2 Disco Ballade 1 Ballade 2 Shuffle 1 Shuffle 2 Swing Rock-Walzer Jazz-Walzer * Nr. 0: einzelner schwacher Schlag Nr. 28 29 30 31 32 33 34 35 36 37 38 39 40 Rhythmusmuster Bossanova Samba Jazz-Samba Songo Bolero Tango Cha-cha-cha Mambo Rumba Beguine Walzer Marsch Ondo Nr. 1: einzelner starker Schlag ■ TECHNISCHE DATEN ■ BATTERIEWECHSEL Anzeigen Tempo Taktschlagmuster Wenn die Batterie schwächer wird, leidet der Displaykontrast, und die Punkte der Tempoanzeige werden dunkler, während die Lautstärke proportional abnimmt. In diesem Fall sollten Sie die Batterie so bald wie möglich durch eine frische (CR-2025) ersetzen. : Display (Flüssgkristallanzeige), Tempoanzeige : 30 bis 240 Schläge/Minute, Genauigkeit ±0,2 % : 1 Schlag bis 7 Schläge, Duolen, Triolen, Quintolen Rhythmusmuster : 30 vorprogrammierte Muster Noteneinstellbereich : C4 bis B4 (in Halbtonschritten), Genauigkeit ± 1 Cent Standardtonhöhen-Einstellbereich : 438 bis 445 Hz Abschaltautomatik : Metronom-Modus — nach ca. 15 Minuten Noten-/Tonhöheneinstellmodus — nach ca. 5 Minuten Andere Funktionen : Bestätigungston, Speicherschutzfunktion Anschluß : 3,5 mm Ohrhörerbuchse (Mono) Stromquelle : eine Lithiumbatterie (CR-2025) Batterie-Lebensdauer : ca. 45 Stunden Abmessungen (BxHxT) : 102 x 12 x 64 mm Gewicht (einschließlich Batterie) : 65 g Zubehör : Lithiumbatterie (CR-2025) Etui (dient auch als Ständer) ◆ Auswechseln der Batterie 1. Entfernen Sie die Halteschraube vom Batteriefachdeckel an der Unterseite, um den Deckel danach wie in der Abbildung in Richtung des Pfeils abzuziehen. 2. Nehmen Sie die alte Batterie mit einer Pinzette oder einem ähnlichen Werkzeug aus dem Batteriefach. 3. Legen Sie die neue Batterie mit dem Minuspol (–) nach unten ein. (Der Pluspol der eingelegten Batterie muß sichtbar sein.) 4. Schieben Sie den Batteriefachdeckel wieder auf, um ihn danach mit der Schraube zu arretieren. * Schalten Sie das Metronom vor dem Auswechseln der Batterie stets mit der POWER-Taste aus. Rücksetztaste Schraubenbohrung * Änderungen der technischen Daten und des Designs vorbehalten. Unterseite Bescheinigung des Importeurs Hiermit wird bescheinigt, daß der / die / das MULTI METRONOME Typ : YM-2000 Batteriefachdeckel Gerät, Typ, Bezeichnung) in Übereinstimmung mit den Bestimmungen der VERFÜGUNG 1046/84 (Amtsblattverfügung) funkentstört ist. Der Deutschen Bundespost wurde das Inverkehrbringen dieses Gerätes angezeigt und die Berechtigung zur Überprüfung der Serie auf Einhaltung der Bestimmungen eingeräumt. YAMAHA Europa GmbH Name des Importeurs Schalten Sie das Metronom nach dem Auswechseln der Batterie ein, um seine Funktion zu prüfen. Sollte es nicht ordnungsgemäß arbeiten, drücken Sie die Rücksetztaste an der Unterseite und schalten das Gerät danach zur erneuten Funktionsprüfung wieder ein. * Die Vorgabeeinstellungen nach der Rücksetzung sind wie folgt: Metronom-Modus, Tempo “120”, Rhythmus “11”, Note “A”, Tonhöhe “440” Hz 無償修理規定 1. 正常な使用状態(取扱説明書、本体貼り付けラベルなどの注意書に 従った使用状態)で故障した場合には、お買上げの販売店が無料修 理を致します。 2. 保証期間内に故障して無料修理をお受けになる場合は、お買上げの 販売店に商品と本書をご持参のうえご依頼ください。 3. ご贈答品、ご転居後の修理についてお買上げ販売店にご依頼できな い場合荷は、最寄りのヤマハ電気音響製品アフターサービス拠点に お問い合わせください。 (5) 火災、地震、風水害、落雷、その他の天災地変、公害、塩害、異 常電圧などによる故障及び損傷。 (6) 消耗部品の交換。 (7) お客様のご要望により出張修理を行なう場合の出張料金。 5. この保証書は日本国内においてのみ有効です。 This warranty is valid only in Japan. 6. この保証書は再発行致しませんので大切に保管してください。 4. 保証期間内でも次の場合は有料となります。 (1) 本書のご提示がない場合。 (2) 本書にお買上げの年月日、お客様、お買上げの販売店の記入がな い場合、及び本書の字句を書き替えられた場合。 (3) 使用上の誤り、他の機器から受けた障害または不当な修理や改造 による故障及び損傷。 (4) お買上げ後の移動、輸送、落下などによる故障及び損傷。 ※この保証書は本書に示した期間、条件のもとにおいて無料修理をお 約束するものです。したがってこの保証書によってお客様の法律上 の権利を制限するものではありませんので、保証期間経過後の修理 などについてご不明の場合は、お買上げの販売店、ヤマハ電気音響 製品アフターサービス拠点にお問い合わせください。-
 1
1
-
 2
2
-
 3
3
-
 4
4


Yamaha YM-2000 El manual del propietario
- Categoría
- Instrumentos musicales
- Tipo
- El manual del propietario
- Este manual también es adecuado para
En otros idiomas
- français: Yamaha YM-2000 Le manuel du propriétaire
- italiano: Yamaha YM-2000 Manuale del proprietario
- English: Yamaha YM-2000 Owner's manual
- Deutsch: Yamaha YM-2000 Bedienungsanleitung
- русский: Yamaha YM-2000 Инструкция по применению
- Nederlands: Yamaha YM-2000 de handleiding
- português: Yamaha YM-2000 Manual do proprietário
- dansk: Yamaha YM-2000 Brugervejledning
- polski: Yamaha YM-2000 Instrukcja obsługi
- čeština: Yamaha YM-2000 Návod k obsluze
- svenska: Yamaha YM-2000 Bruksanvisning
- 日本語: Yamaha YM-2000 取扱説明書
- Türkçe: Yamaha YM-2000 El kitabı
- suomi: Yamaha YM-2000 Omistajan opas
- română: Yamaha YM-2000 Manualul proprietarului