LG 8806084006028 El manual del propietario
- Categoría
- Lavaplatos
- Tipo
- El manual del propietario
Este manual también es adecuado para

ENGLISH
P/No. : MFL62077191
www.lg.com
OWNER’S MANUAL
DISHWASHER
Please read this owner's manual thoroughly before
operating and keep it handy for reference at all times.
LDF8574ST
LDF8072ST
LDF7561ST/WW/BB
LDF7551ST/WW/BB
ESPAÑOL

2
TABLE OF CONTENTS
TABLE OF CONTENTS
3 IMPORTANT SAFETY INFORMATION
3 Basic Safety Precautions
4 Electrical Safety
5 Before Using the Dishwasher
6 PARTS AND FEATURES
6 Features
7 Parts
8 Control Panel (steam models)
10 Control Panel (non-steam models)
11 Cycle Option Chart
11 Icons
12 Cycle Selection Chart
13 OPERATING INSTRUCTIONS
1 3 Quick Start
1 4 Loading the Lower Rack
1 5 Folding Down the Lower Tines
1 6 Loading the Silverware Basket
1 7 Loading the Upper Rack
1 7 Folding Down the Upper Tines
1 8 Height Adjustable Upper Rack
1 9 Loading the Cutlery Rack (on some models)
1 9 Height Adjustable Tray (on some models)
2 0 Adding Detergent to the Dispenser
2 1 Adding Rinse Aid to the Dispenser
22 CARE & CLEANING
2 2 Cleaning the Filters
2 3 Cleaning Metallic Parts
2 3 Cleaning the Lower Spray Arm
2 3 Cleaning the Upper Spray Arm
24 Cleaning the Top Spray Arm
24 Seasonal Maintenance and Storage
25 FAQs
THANK YOU
Congratulations on your purchase and
welcome to the LG family. Your new LG
Dishwasher combines quiet, ecient
operation with advanced cleaning
technology. By following the operating
and care instructions in this manual,
your dishwasher will provide you with
many years of reliable service.
27 TROUBLESHOOTING
2 7 Before Calling for Service
29 SMART DIAGNOSIS™ SYSTEM
2 9 SMART DIAGNOSIS™ SYSTEM
30 SPECIFICATIONS
3 0 Spe cif icati ons

ENGLISH
3
IMPORTANT SAFETY INFORMATION
IMPORTANT SAFETY IMFORMATION
READ ALL INSTRUCTIONS BEFORE USE
Your safety and the safety of others is very important.
We have provided many important safety messages in this manual and on your appliance. Always read and follow all safety messages.
This is the safety alert symbol. This symbol alerts you to potential hazards that can result in property damage or serious bodily
harm, even death.
The safety alert symbol will be followed by either the word “WARNING” or “CAUTION” then an important safety message. These
words mean:
WARNING
Indicates the possibility of serious bodily harm or death.
CAUTION
Indicates the possibility of injury or damage to property.
BASIC SAFETY PRECAUTIONS
WARNING
To reduce the risk of re, electric shock, or injury to persons when using this appliance, follow basic
precautions, including the following:
• Read all instructions carefully before using the dishwasher.
• Use the dishwasher only for its intended function.
• Only use detergents or rinse agents recommended for use in a
dishwasher. Keep all dishwasher detergents and additives out
of the reach of children.
• This appliance is not intended for use by young children.
• When loading items to be washed:
1) Load sharp items so that they are not likely to damage the
door seal.
2) Load sharp knives with the handles up to reduce the risk of
injury when reaching into the dishwasher.
y Do not wash plastic items in the dishwasher unless they are
labeled “dishwasher safe” or the equivalent. For plastic items
that are not so labeled, check the manufacturer’s recommen-
dations.
• Do not operate the dishwasher unless all enclosure panels are
properly in place.
• Do not tamper with the controls.
• Do not abuse, sit on, or stand on the door or dish racks of the
dishwasher.
• To reduce the risk of injury, do not allow children to play in or
around the dishwasher.
• Under certain conditions, hydrogen gas may be produced in
a hot water system that has not been used for two weeks or
more. HYDROGEN GAS IS EXPLOSIVE. If the hot water system
has not been used for such a period of time, turn on all hot
water faucets and let the water ow for several minutes. This
will release any accumulated hydrogen gas. Since hydrogen
gas is ammable, do not smoke or use an open ame during
this time.
• Remove the door to the wash compartment when disposing of
an old dishwasher.
• The installer must ensure that the dishwasher is completely
enclosed at the time of installation.
• WARNING : This product contains chemicals known to the
State of California to cause cancer and birth defects or other
reproductive harm. Wash hands after handling.
This manual contains very important information regarding the installation, use, and maintenance of your dishwasher. The manufacturer
cannot be responsible for injuries or damage caused by failure to follow these safety and caution instructions.

4
IMPORTANT SAFETY INFORMATION
BASIC SAFETY PRECAUTIONS
WARNING
To reduce the risk of re, electric shock, or injury to persons when using this appliance, follow basic precautions,
including the following:
For a permanently connected dishwasher:
This appliance must be connected to a grounded metal, perma-
nent wiring system, or an equipment grounding conductor must
be run with the circuit conductors and connected to the equip-
ment grounding terminal or lead on the appliance. Consult with a
qualied electrician.
Tip Hazard
Do not put excessive downward force on the open dishwasher
door prior to installation, as this could cause damage to the unit
or cause it to tip over. Do not use the dishwasher before installa-
tion has been completed in accordance with the Installation In-
structions.
ELECTRICAL SAFETY
WARNING
Electrical Shock Hazard
Failure to follow these instructions can result in death, re, or electrical shock.
• The dishwasher MUST be grounded. Connect the ground wire to the green ground connector in the terminal box.
• Do not use an extension cord with this appliance.
• The dishwasher is designed to be used with standard household current (120 Volts AC, 60Hz.). Before connecting the dishwasher, ensure
that the outlet or cable is properly grounded and polarized by circuit breakers or fuses. Failure to provide adequate grounding of this
appliance may cause electrical shock or malfunction of the appliance. Consult with a qualied electrician.
• Do not install or store the dishwasher where it will be exposed to weather conditions. Failure to observe this precaution may result in
electrical shock, re, malfunction, and/or deformation of the dishwasher.
• Do not damage or place heavy items on the power cord of the appliance. Do not use the dishwasher if it has a damaged power cord.
Power cord damage may cause re and electrical shock. Consult with a qualied electrician.
• Do not grasp the power cord or touch the dishwasher controls with wet hands. Do not use the dishwasher if it has a damaged power
cord or plug, and do not plug the dishwasher into a damaged outlet. Failure to observe these instructions may result in electrical shock.
• Disassembly or repair must be performed by experienced service persons. Improper disassembly or repair could lead to product failure
or electrical shock.

ENGLISH
5
IMPORTANT SAFETY INFORMATION
BEFORE USING THE DISHWASHER
Before using the dishwasher, please read the Important Safety
Instructions.
Water supply temperature should be a minimum of 120°F (49°C)
for better washing and reasonable cycle time.
For this reason, use the hot water supply only. It is also important
that the dishwasher is loaded according to instructions for eec-
tive cleaning. When loading the dishwasher, make sure that in-
soluble items such as bones, toothpicks, and pieces of paper have
been removed.
SAVE THESE INSTRUCTIONS
When loading the dishwasher, observe the following general
guidelines:
1. Place items with deep dish bottoms at an angle to help water
run o and speed the drying process.
2. Remove solid, burned-on scraps from dishes prior to loading
in the dishwasher.
3. Only load items that are dishwasher-safe.
Do not load utensils that are not heat-resistant, have
decorative metal trim, etc.
NOTE

6
PARTS AND FEATURES
PARTS AND FEATURES
LARGE CAPACITY
LG dishwashers allow
you to load very large
items in both the up-
per and lower racks. The
tall tub provides extra
overall capacity and the
clearance to accommo-
date large dishes. Extra
large items (max. 14 in.)
may be loaded in the
lower rack by raising the
upper rack.
FEATURES
SLIM DIRECT MOTOR™
The new Slim Direct Mo-
tor™ is inverter-controlled.
Wash power is controlled
based on cycle selection.
It also oers high energy
eciency to minimize en-
ergy use.
HYBRID DRYING SYSTEM
This system eectively
dries dishes without the
use of a heating element
that would increase en-
ergy consumption.
STEAM WASHING (not available on all models)
Steam technology pro-
vides better cleaning
performance than regu-
lar wash systems. Steam
is the most energy ef-
cient gentle care for
your nest china and
stemware.
VARIABLE SPRAY SYSTEM
Because the water spray
alternates between the
upper and lower racks,
all of the power from
the motor is directed
to one rack at a time.
This concentrates all the
cleaning power of the
motor on each rack in
turn.
BLUE LCD (not on all models) AND LIGHT
TOUCH BUTTONS
The light touch buttons
on the control panel
make selections easy
and convenient. The
blue LCD display clearly
displays the selected
cycle and options.

ENGLISH
7
PARTS
PARTS AND FEATURES
1. CONTROL PANEL
2. DOOR HANDLE
3. FRONT COVER
4. LOWER COVER
5. LEVELING FEET
6. FRONT DISPLAY SIGNALIGHT™
7. BASE
8. TOP SPRAY ARM
9. UPPER SPRAY ARM
10. STEAM NOZZLE on steam models)
11. LOWER SPRAY ARM
12. DETERGENT AND RINSE AID DISPENSER
13. DRYING VENT COVER
14. CUTLERY RACK some models)
15. UPPER RACK
16. SILVERWARE BASKET
17. LOWER RACK
18. TOP DISPLAY
19. POWER BUTTON
20. FILTRATION SYSTEM
SignaLight (front display)
When a cycle is running, the SignaLight will illuminate for the
active stage.
• Modelwith4LEDs:WASH–RINSE–DRY–CLEAN
• Modelswith2LEDs:OPERATING-CLEAN
• Modelswith1LED:OPERATING(Flickering)/CLEAN
(Lighting)
Once the cycle is complete, the CLEAN light will illuminate for
four minutes.
To keep the CLEAN light on until the door is open, turn the
power on, and then press and hold the Extra Seco(Extra Dry)
and Media Carga(Half Load) buttons on the control panel si-
multaneously until O or On appears in the display. The dish-
washer will remember this setting until manually changed.
Meshlter
Outerlter
UpperSTS
lter

8
PARTS AND FEATURES
CONTROL PANEL (steam models)
Cycles
Select your desired cycle.
VAPOR CON POTENCIA (STEAM POWER)
This cycle is for heavily and hard soiled dishes. Steam Power
defaults to the highest spray intensity and uses the power of
steam to wash heavily soiled dishes.
VAPOR DOBLE (STEAM DUAL)
This cycle washes the upper and lower racks at dierent spray
intensities. The default setting for this cycle washes the low-
er rack with strong spray intensity and the upper rack with
soft spray intensity. This provides optimum cleaning perfor-
mance for mixed loads, including ne china and stemware. If
other combinations are desired, use the steps listed below to
change the intensities or to use the Media Carga(Half Load)
feature.
HowToUseSteamDual:
1. Select Vapor doble(Steam Dual).
2. Press the Rocío(Spray) button to toggle between Soft, Me-
dium and Strong for the upper spray arm.
3. After making your selection for the upper spray arm, press
the Media Carga(Half Load) button.
4. Press the Rocío(Spray) button to toggle between Soft, Me-
dium and Strong for the lower spray arm.
5. Close the door to start the cycle.
VAPOR DELICADO (STEAM DELICATE)
This cycle adds the gentle power of steam to boost the clean-
ing power of the delicate cycle. The cycle is intended for ef-
fectively cleaning delicate items such as ne china and stem-
ware.
NORMAL
This cycle is for normally soiled, everyday loads.
LAVADO Y SECADO EXPRESS (QUICK & DRY)
This is a shortened cycle that is intended for washing and dry-
ing recently used dishes or lightly soiled loads. During this
cycle, both spray arms will run at the same time.
LAVADO EXPRESS (QUICK)
This is a shortened cycle that is intended to wash recently
used or lightly soiled loads, without drying.
CHIME ON/OFF
To enable or disable the chime, rst, turn on the dishwash-
er. Press and hold the Lavado Express(Quick) and Vapor
Delicado(Steam Delicate) buttons simultaneously for ap-
proximately three seconds.
CANCELAR (TO CANCEL A CYCLE)
To cancel a cycle, open the door and then press and hold
the Vapor Delicado(Steam Delicate) and Normal buttons to-
gether for approximately three seconds. The drain pump will
activate and the cycle will cancel. The display will show “dr”
and the dishwasher will drain the water. After the dishwasher
is drained, the power will turn o.
If power is turned on and no cycle has been selected, the
dishwasher will power o within four minutes.
Cycle Options
(Refer to the control panel on the next page)
Press the desired cycle and then select the options for that
cycle.
EXTRA SECO (EXTRA DRY)
Select the EXTRA SECO (EXTRA DRY) option for better dry-
ing performance. This option adds 60 minutes of extra dry-
ing time to the cycle. The Extra Seco(Extra Dry) button will
illuminate when the option has been selected.
ENJUAGUE (RINSE)
Repeated pressing of the Enjuague(Rinse) button will select
the desired ENJUAGUE (RINSE) option. The Sanitary, Extra
Rinse, or Sanitary and Extra Rinse lights will show in the bot-
tom left portion of the display.
HIGIÉNICO (SANITARY) ( )
This high-temperature rinse sanitizes dishes and glassware in
accordance with NSF/ANSI Standard 184 for residential dish-
washers. Certied dishwashers are not intended for licensed
food establishments.
EXTRA ENJUAGUE (EXTRA RINSE) ( R
+
)
The Extra Rinse symbol indicates that an extra rinse has
been added to the cycle. An extra rinse can help reduce hard
water spotting on dishes. To add an extra rinse, press the
Enjuague(Rinse) button repeatedly until the Extra Rinse sym-
bol appears in the display.
SÓLO ENJUAGUE (RINSE ONLY)
This cycle is a quick rinse for dishes that will not be washed
immediately. This cycle will rinse dishes that have excess soil
to soften dried on residue. Rinsing the dishes will help pre-
vent odors in the dishwasher. No detergent should be used.
To select the SÓLO ENJUAGUE (RINSE ONLY) cycle, turn the
dishwasher on, and press the Enjuague(Rinse) button once
without pressing any other cycle buttons. The SÓLO EN-
JUAGUE (RINSE ONLY) cycle is not available with any other
cycles.
Steam Models (LDF8574, LDF8072)

ENGLISH
9
PARTS AND FEATURES
CONTROL PANEL
ROCÍO (INTENSIDAD) (SPRAY (INTENSITY))
First, select the desired cycle. Press the Rocío(Spray) button
repeatedly until the desired spray intensity is selected.
Soft ( ), Medium ( ), Strong ( )
MEDIA CARGA(HALF LOAD)
For small loads, you may use just the upper or lower rack to
save energy. Each press of the Media carga(Half Load) button
cycles between upper rack only and lower rack only.
COMIENZO DIFERIDO (DELAY START)
The Delay Start feature allows you to delay the start of a se-
lected cycle. Each time the Comienzo Diferido(Delay Start)
button is pressed, the delay time will increase an hour. The
delay start time can be set from 1 to 19 hours, in one-hour
increments.
SEGURO PARA NIÑO (CHILD LOCK)
The Child Lock feature helps prevent your settings from be-
ing changed during a cycle. Selecting this feature locks all of
the buttons, except for the Encender(Power) button, on the
control panel. This feature does not lock the door.
ToactivatetheChildLock:
1. Open the dishwasher door.
2. Press the Encender(Power) button.
3. Select the cycle (and desired options).
4. Press and hold the Enjuague(Rinse) and Rocío(Spray) but-
tons for three seconds. The Child Lock indicator will illumi-
nate in the display once the Child Lock is activated.
5. Close the door to begin the cycle.
DIGITAL DISPLAY
The Digital Display on the control panel shows the ESTIMAT-
ED cycle time. When the dishwasher is powered up, the dis-
play will be blank. When the cycle and options are selected,
the display will show the total estimated time to complete
those selections. During operation, the display shows the re-
maining estimated operating time.
• The estimated time shown in the display does not in-
clude delay times for heating water, etc.
• If Delay Wash is selected, the display shows the delay
time in hours.
• Time may vary depending on the soil level of your load.
NOTE
ECO
The ECO option saves energy by using less water. This option
should only be used with light to medium soiled dishes.
The RINSE AID symbol indicates that the rinse aid
needs to be relled.
NOTE
ENCENDER(POWER)
• Press the Encender(Power) button to turn on the control
panel. If no cycle is selected within four minutes, the dish-
washer will power o.
• After the cycle is complete, the power automatically turns
o for safety and economy purposes.
• If there is a power surge, power outage, or disruption of
any kind, the PF indicator will display and power will be au-
tomatically turned o for safety. The cycle will need to be
restarted.
SMART DIAGNOSIS
Should you experience any problems with your dishwasher,
it has the capability of transmitting data to your Smart Phone
using the LG Smart Laundry & DW Application or via you tele-
phone to the LG call center.
WARNING
Steam can cause burns. Use caution in the area of the steam
nozzle, on the left side of the dishwasher, if the door is opened
during the steam portion of a cycle. Contact with the steam or
the steam nozzle can cause burns.
Display varies by model (LDF8574, LDF8072)
Display varies by model (LDF7561, LDF7551)

10
CONTROL PANEL (non-steam models)
Cycles
Select your desired cycle.
FREGADO CON POTENCIA (POWER SCRUB)
This cycle is for heavily and hard soiled dishes.
LAVADO DOBLE (DUAL WASH)
This cycle washes the upper and lower racks at dierent spray
intensities. The default setting for this cycle washes the low-
er rack with strong spray intensity and the upper rack with
soft spray intensity. This provides optimum cleaning perfor-
mance for mixed loads, including ne china and stemware.
If other combinations are desired, use the steps listed below
to change the intensities or to use the MEDIA CARGA(HALF
LOAD) feature.
HowToUseLavadoDoble(DualWash):
1. Select Lavado Doble (Dual Wash).
2. Press the Rocío(Spray) button to toggle between Soft, Me-
dium and Strong for the upper spray arm.
3. After making your selection for the upper spray arm, press
the Media Carga(Half Load) button.
4. Press the Rocío(Spray) button to toggle between Soft, Me-
dium and Strong for the lower spray arm.
5. Close the door to start the cycle.
CICLO DELICADO (DELICATE)
The cycle is intended for eectively cleaning delicate items
such as ne china and stemware.
NORMAL
This cycle is for normally soiled, everyday loads.
LAVADO Y SECADO EXPRESS (QUICK & DRY)
This is a shortened cycle that is intended for washing and dry-
ing recently used dishes or lightly soiled loads. During this
cycle, both spray arms will run at the same time.
LAVADO EXPRESS (QUICK)
This is a shortened cycle that is intended to wash recently
used or lightly soiled loads, without drying.
CHIME ON/OFF
To enable or disable the chime, rst, turn on the dishwasher.
Press and hold the Lavado Express(Quick) and Ciclo Delicado
(Delicate) buttons simultaneously for approximately three
seconds.
CANCELAR (TO CANCEL A CYCLE)
To cancel a cycle, open the door and then press and hold the
Ciclo Delicado(Delicate) and Normal buttons together for ap-
proximately three seconds. The drain pump will activate and
the cycle will cancel. The display will show “dr” and the dish-
washer will drain the water. After the dishwasher is drained,
the power will turn o.
If power is turned on and no cycle has been selected, the
dishwasher will power o within four minutes.
Display varies by model (LDF7561, LDF7551)
PARTS AND FEATURES

ENGLISH
11
Cycle
Available Spray
Level
(default bold)
Extra Dry
Sanitary
Rinse
Extra Rinse
Sanitary/
Extra Rinse
Half Load Delay Start Eco
Steam Power
or
Power Scrub
Strong
Steam Dual
or
Dual Wash
Soft
(upper arm)
Medium
Strong
(lower arm)
Steam Delicate
or
Delicate
Soft
Medium
Normal
Soft
Medium
Strong
Quick & Dry Strong
Quick Strong
Rinse Only
Medium
Strong
PARTS AND FEATURES
CYCLE OPTION CHART
The cycle guide below shows the available options for each cycle.
Steam Cycle (steam models)
Extra Rinse
Sanitary Rinse
Low, Medium, High Spray, Intensity
Upper Spray Arm
Lower Spray Arm
Child Lock
Low Rinse Aid Indicator
Eco Cycle
Cycle Time Indicator
ICONS

12
Cycle
Wash Rinse
Dry
*Water
Usage
**Cycle
Time
Spray
Intensity
Pre1 Pre2 Pre3
Main
Wash
Rinse1 Rinse2
Heated
Rinse
STEAM
POWER
140F
60C
158F
70C
6,1 gal.
23,0 L
165 Min, Strong
STEAM
DUAL
154F
68C
158F
70C
4,6 gal.
17, 5 L
147 Min,
U: Strong
L: Soft
STEAM
DELICATE
122F
50C
154F
68C
4,6 gal.
17, 5 L
141 Min, Soft
NORMAL
86–122F
30–50C
149–158F
65–70C
1,7–6,4 gal.
6,5–20,5 L
110 ~131
Min,
Medium
QUICK
&DRY
122F
50C
162F
72C
7,6 gal.
29 L
79 Min, Strong
QUICK
122F
50C
122F
50C
5,0 gal.
19 L
34 Min, Strong
RINSE
ONLY
1,0 gal.
4 L
22 Min, Medium
POWER
SCRUB
140F
60C
158F
70C
6,1 gal.
23 L
165 Min, Strong
DUALWASH
154F
68C
158F
70C
4,6 gal.
17, 5 L
147 Min
U: Strong
L: Soft
DELICATE
122F
50C
154F
68C
4,6 gal.
17, 5 L
141 Min, Soft
* Actual water consumption will vary depending on soil level and water hardness,
** Actual cycle times may vary depending on soil level, water temperature and hardness
CYCLE SELECTION CHART
The cycle guide below shows the default settings and available options for each cycle.
PARTS AND FEATURES

ENGLISH
13
OPERATING INSTRUCTIONS
QUICK START
1. LOAD THE DISHES
Scrape the dishes free of excess food, bones, and any other
hard, non-soluble residue. Pull each rack out and load the
dishes as described in this manual.
2. MEASURE THE DETERGENT
Using the guidelines in this manual, ll the detergent cup
with the recommended amount of detergent and close the
lid. If a prewash is desired, the recess on top of the lid should
also be lled with detergent.
3. TURN ON THE DISHWASHER
To turn on the display panel, press the Power button.
4. CHECK THE RINSE AID
The Rinse Aid indicator light will illuminate if the level of rinse
aid in the dishwasher is low. Add rinse aid if the level is low to
maintain the eectiveness of the dry cycle.
5. SELECT THE CYCLE AND OPTIONS
Select the cycle and options that best t the load by referring
to the Cycle Selection Chart. The display will show the esti-
mated time for the cycle and options selected.
6. CLOSE THE DOOR
The dishwasher will start automatically, after a slight delay,
when the door is closed and latched. During the cycle, the
display will indicate the estimated time remaining for the
cycle and options selected. If the door is opened during the
cycle, the dishwasher will stop. When the door is closed, the
cycle will resume from the point where it was stopped.
7. END OF CYCLE
When the cycle is complete, a chime will sound and the dis-
play will show “END.” After a short time, the display and con-
trols will shut o for safety and energy conservation.
CAUTION
Empty the lower rack rst and then the upper rack. This will avoid
water from dripping from the upper rack onto dishes in the lower
rack.
WARNING
In general, it is not advisable to open the door while the dish-
washer is in operation. If the door is opened, a safety device stops
the dishwasher. Care should be taken when opening the door im-
mediately following the cycle, as steam may escape.
AUTO-OFF
The dishwasher will automatically turn o if a cycle is not selected
or if the door is not closed within four minutes.
OPERATING INSTRUCTIONS

14
OPERATING INSTRUCTIONS
CAUTION
NON-DISHWASHER SAFE ITEMS
The combination of high water temperature and dishwasher
detergents may damage certain items. LG does not recommend
washing the following items in the dishwasher:
• Hand painted silver or gold leaf dishes
• Wood or bone handled utensils
• Iron or other rust prone utensils
• Plastic items that are not dishwasher safe
When in doubt, check the manufacturers’ recommendations.
LOADING THE LOWER RACK
The lower rack should not be used for small items such as cups,
wine glasses, or small plates. These items should be loaded in the
upper rack.
For models with steam, load heavily soiled or stained dishes in the
front left side of the lower rack with the dirty side facing down.
This is the area that the stream enters the dishwasher. The use of
hot steam maximizes the dishwasher’s cleaning performance.
The extra tall tub allows loading of dishes, pans, or other utensils
up to 14 inches high.
The lower rack is recommended for dinner plates, soup bowls,
dishes, pots, pans, lids, and grill trays. Plates should be positioned
vertically and facing the center of the rack. Pots, pans, and large
bowls must be turned so that the inside faces downward. The sil-
verware basket may be used in either the lower or upper rack.
LOADING 10 PLACE SETTINGS
LOADING 12 PLACE SETTINGS
y Load plates, soup bowls etc. between the tines.
y Load cookie sheets, cake pans and other large items on the
sides or back of the rack. Loading these items in the front of
the dishwasher can prevent the water spray from reaching the
detergent dispenser.
y Make sure that pot handles and other large items do not stop
the rotation of the spray arms.
Make sure that large items do not interfere with the
rotation of the spray arms, and do not prevent the
detergent dispenser from opening.
NOTE
RACK LOADING TIPS

ENGLISH
15
OPERATING INSTRUCTIONS
FOLDING DOWN THE LOWER TINES
DIFFICULT TO REMOVE FOOD ON
DISHES (steam models)
Load items with dicult to remove or baked-on food near the
steam spray arms, towards the left side of the lower rack, facing
down. The dishes will benet from the direct steam spray and the
lower spray arm wash action.
LOADING DISHES & POTS
LOADING POTS & BOWLS
The tines are adjustable to t dishes of various sizes.
Rear
Front

16
OPERATING INSTRUCTIONS
LOADING THE SILVERWARE BASKET
The silverware basket has separators to avoid scratching and tar-
nishing of delicate silverware. The basket can be separated into
three separate baskets that can be used individually in both the
upper and lower racks. Unlock the tabs above the left and right
side to separate.
WARNING
Be careful when loading and unloading sharp items. Load sharp
knives with the handles up to reduce the risk of personal injury.
SILVERWARE LOADING TIPS:
y For best cleaning results, use the top separators in the basket
when loading silverware. The separators will prevent nesting
of silverware.
y Load sharp items, such as knives, pointing down.
y When unloading the dishwasher, it is best to start with the sil-
verware basket. Doing so will prevent water droplets from fall-
ing on your silverware from the upper rack.
1 1 1 1 1 1
1 1 1 1 1 1
2 2 2 2 2 2 2 2 2 2 2 2 2 2
5 5 5 5
4 4
4
4 4 4 4 4
4 4 4 4 4 4
3 3 3 3 3 3 3 3
3 3
3 3 S S
5 5 5 5 5 5 5 5 5 5
S S S S S S
S
S
1 1
3 3
① ③ ④ ⑤②

ENGLISH
17
OPERATING INSTRUCTIONS
FOLDING DOWN THE UPPER TINES
LOADING THE UPPER RACK
LOADING 10 PLACE SETTINGS
Use the upper rack for small or delicate items such as small plates,
cups, saucers, glasses, and dishwasher-safe plastic items. Cups,
glasses, and bowls must be positioned upside down. Extra cups
or cooking utensils can be laid on the fold down cup racks, which
may also provide support for long stemmed glasses. Make sure
items do not interfere with the rotation of the spray arms above
and below the upper rack.
When loading larger items in the upper rack, such
as wine glasses or taller cups, it may be necessary to
remove the cutlery rack.
NOTE
LOADING 12 PLACE SETTINGS
Pull up the tine
Rotate the tine
The tines can be adjusted up or down. The right side tines have
handles for wider or small dishes.
UPPER RACK LOADING TIPS:
y Place cups and glasses in the rows between the rack tines. Plac-
ing them over the rack tines can lead to breakage and water
spots.
y To avoid chipping, do not let stem ware touch other items.
y Place items so that the open end faces down for cleaning and
drying.
y Do not stack items on top of each other.

18
OPERATING INSTRUCTIONS
HEIGHT ADJUSTABLE UPPER RACK
The upper rack adjusts up and down. Adjust the upper rack up to
allow tall and oversized items of up to 14 inches high in the low-
er rack. Adjust the upper rack down to allow placement of large
dishes of up to 12 inches high in the upper rack. The upper rack
comes in the upper position.
To raise the rack:
Simply lift the rack at the center of each side (see illustra-
tion) until the rack locks into place in the upper position. It
is not necessary to lift the lock levers to raise the rack
To lower the rack:
Hold the rack at the center of each side to support its
weight. Then, lift the lever on each side to release the rack
and lower it to the lower position.
2
1
2
1
After adjusting, make sure that dishes in the upper
and lower racks do not interfere with the rotation
of the spray arm. Do not adjust the rack while it is
loaded with dishes.
NOTE

ENGLISH
19
OPERATING INSTRUCTIONS
LOADING THE CUTLERY RACK
(on some models)
HEIGHT ADJUSTABLE TRAY
(on some models)
Each side tray can be adjusted independently to a high or low
position to accommodate dierent sizes of utensils or cutlery. Re-
move dishes before adjusting the tray.
The cutlery rack is best suited for atware and most cooking or
serving utensils. Heavily soiled utensils or items with baked on
foods should be placed in the middle rack or spoon basket for
best performance. The separators on the cutlery racks help keep
atware separated to avoid damage and improve cleaning.
Sample 10-place setting.
Right Wrong
Alternate
If the handles of your atware
are too thick, then reverse the
pieces so that the handles face
the other direction, as shown
in the bottom gure.
Each tray is adjusted by lifting it out and rotating it front to back.
Removing the Cutlery Rack
The entire cutlery rack can be removed if more space is needed on
the upper rack for larger items.
Always remove the cutlery from the rack before removing
the rack.
NOTE
Pull the rack out to the end of the rails. Then, lift the front of the
rack so that the rollers clear the stop on the end of the rail. The
rack can now be slid forward and removed from the rails.
WARNING
Be careful when loading and unloading sharp edged items. Load
sharp knives with the blade down to reduce the risk of injury.
①
①
③
③
④
④
⑤
⑤
②
②

20
ADDING DETERGENT TO THE DISPENSER
• Only use detergent intended for automatic dishwashers.
• Detergent must be put into the detergent compartment be-
fore starting any cycle, except the Rinse Only cycle.
• Use less detergent if the dishes are only lightly soiled. Using ex-
cess detergent can leave a lm on dishes and in the dishwasher
resulting in poor wash performance.
• The amount of detergent needed depends on the cycle, load
size, and soil level of dishes.
Remove the label on the dispenser prior to running
the dishwasher.
NOTE
Push button to open
If the lid is closed, press the lever on the bottom side of
the lid to open the dispenser.
Add dish washing detergent to the main wash compart-
ment until the level is between the lines marked 20 and
30. Fill to the 30 line for hard water or heavily soiled
loads. Fill to the 20 line for soft water or lightly soiled
loads.
Close the lid rmly until it clicks.
2
Place proper detergent
into this compartment
Main wash
Compartment
3
Pre wash
Compartment
Place proper detergent
into this compartment
If a prewash is desired, ll the recessed prewash com-
partment area in the lid with detergent.
CAUTION
DETERGENT INFORMATION
Use only detergent intended for automatic dishwashers. Incorrect
detergent may cause the dishwasher to ll with suds during op-
eration. Excess sudsing may reduce wash performance and may
cause the dishwasher to leak. DO NOT use hand dish washing de-
tergent in this dishwasher.
OPERATING INSTRUCTIONS
DO NOT add detergent when the Rinse Only cycle is
selected.
NOTE
Too much detergent can leave a lm on dishes and in
the dishwasher, resulting in poor wash performance.
Do not use detergent tablets for shorter wash cycles.
The tablet may not dissolve completely, causing de-
tergent residue on dishes and inecient cleaning.
NOTE

ENGLISH
21
3
OPERATING INSTRUCTIONS
ADDING RINSE AID TO THE DISPENSER
The Low Rinse Aid indicator will appear in the display when
more rinse aid is needed.
Only use liquid rinse aid in this dishwasher. The use of rinse aid is
recommended to prevent water droplet spots on dishes and to
enhance the drying performance.
1
Push button to open lid.
2
Add a liquid rinse aid to the maximum ll level. When
lling the rinse aid dispenser, aim the rinse aid at the
arrow. Make sure that the rinse aid is settled in the
dispenser while lling.
Close the lid to lock the dispenser. Rinse aid will be
dispensed automatically during the nal rinse cycle.
RINSE AID DISPENSER ADJUSTMENT
The rinse aid dispenser is set to level 3, which should provide
the best performance under most conditions. Adjust the setting
higher if you have hard water and notice calcium buildup on your
dishes.
If you notice lm on your dishes, use a lower setting. Setting the
rinse aid control too low will contribute to spotting and streaking
of dishes and poor drying performance. Setting the control too
high can cause foaming, which will cause poor wash performance.
To adjust the rinse aid dispenser setting, remove the cap and ad-
just the rinse aid lever to the desired setting. Point the arrow to
the left for a lower setting, right for a higher setting.
REFILLING THE RINSE AID
The regularity of the dispenser needing to be relled depends on
how often dishes are washed and the rinse aid setting used. If the
rinse aid level is low, the Rinse Aid light on the control panel will
illuminate.
RINSE AID FILLING TIPS:
y The Low Rinse Aid indicator will appear in the display
when more rinse aid is needed.
y Do not overll the rinse aid dispenser.
y Clean up any spilled rinse aid to prevent sudsing.
Rinse-Aid
Indicator
Adjust Lever
(Rinse)

22
CARE & CLEANING
For best results, it is important to periodically check and care for the spray arms.
WARNING
To prevent injury during care and maintenance/cleaning, wear gloves and/or protective clothing.
CLEANING THE FILTERS
1. Remove the lower rack rst.
2. Turn the mesh lter counterclockwise.
3. Take out the mesh lter, upper STS lter and outer lter.
4. Clean them if necessary.
5. Replace them in the reverse order.
•For best wash performance, clean the lter after each
load.
•Before starting a cycle, make sure that the lter is as-
sembled correctly. If the lter is not assembled
correctly
,
you may experience poor cleaning results.
•If you have hard water, it is recommended to clean this
lter at least once a month to prevent poor wash per-
formance.
NOTE
Mesh filter
Outer filter
Upper STS
filter
CARE & CLEANING
NumberofLoads
PerWeek
Ifyouwashdishes
beforeloading
Ifyouscrapeandrinse
dishesbeforeloading
Ifyouonlyscrape
dishesbeforeloading
Ifyoudonotscrape
orrinsedishesbefore
loading
1-3 Every 6 months Once a year Four times a year Once a month
4-7 Every 6 months Once a year Four times a year
Twice a month
(every 15 days)
8-12 Every 6 months Every 6 months Every 1.5 months Every week
13-14 Every 6 months Every 6 months Every 1.5 months Twice a week
Recommendedltercleaningchart:
All three lters should be cleaned according to the chart recom-
mendations below. Clean the lters using non-abrasive materials
and warm running water. A soft brush may be required to get
hard to remove soil.

ENGLISH
23
CARE & CLEANING
• Pull the upper rack forward. Make sure that the
water jet holes are not blocked by food particles.
• When cleaning is necessary, remove the upper
spray arm by turning the nut on the bottom of
the spray arm 1/8 turn counterclockwise and
pulling down.
• After cleaning the upper spray arm, press it
up into place. Turn the nut 1/8 turn clock-
wise to make sure that the nut locks back
into place.
CLEANING METALLIC PARTS
Some exterior and interior parts can be cleaned with a damp cloth
or sponge. A cloudy lm may form on the surface of the stainless
steel tub, especially with hard water.
y Make sure that the water jet holes are not blocked by food par-
ticles.
y When cleaning is necessary, remove the lower spray arm by
pulling up.
y After cleaning the lower spray arm, replace it by pushing down
until it clips into place. Be sure that the spray arm is able to turn
freely.
CLEANING THE LOWER SPRAY ARM
CLEANING THE UPPER SPRAY ARM

24
CLEANING THE TOP SPRAY ARM
Make sure that the water jet holes are not blocked
by food particles. When cleaning is necessary, use
a screwdriver to release the retainer clip from the
bracket that holds the top spray arm assembly to the
tub.
1
2
Pull the spray arm out.
3
After cleaning the top spray arm, replace it. Slide it back
into place and make sure the retainer clip engages.
SEASONAL MAINTENANCE AND STORAGE
• If you will be absent for an extended period of time during warmer months, it is recommended that you close the water valve and unplug
the power cord, or turn o the circuit breaker.
• If you will be absent for an extended period of time during colder months, and there is a possibility of freezing temperatures, it is recom-
mended that you winterize the water supply lines and the dishwasher itself. Winterization must be performed by experienced service
personnel.
CARE & CLEANING

ENGLISH
25
FAQs
COMMON PRODUCT QUESTIONS
FAQs
Is a rinse aid required to be used?
Rinse aid is strongly recommended to enhance the drying perfor-
mance of the dishwasher. In order to be more energy ecient, the
hybrid drying system does not utilize a heating element in order
to assist in drying, so a rinse aid plays an integral role in the dry
process. If a rinse aid is not used, water may remain on the dishes
and the tub. Rinse aid will help to ensure that the majority of the
water has been sheeted o of the dishes at the end of the rinse
and that the load is ready for the dry cycle.
What can be done if my dishes have a cloudy, white
lm on them after a wash?
The cloudy lm is usually caused by minerals in the water react-
ing with the dishwasher detergent. First, be certain not to use too
much detergent. Refer to the owner’s manual for recommend-
ed detergent amounts by cycle. Add an Extra Enjuague(Extra
Rinse), or run a Vapor con Potencia(Steam Power) or Fregado con
Potencia(Power Scrub) cycle. LG Dishwashers use less water than
traditional dishwashers, so adding an Enjuague Higiénico(Extra
Rinse) will aid in rinsing the lm away. If the water supply is hard,
it may be necessary to add a performance booster that addresses
the hard water condition.
What is the Sanitary Rinse and how is it activated?
Sanitary Rinse will increase the heated rinse to approximately
161 °F (72 °C). The normal heated rinse temperature will vary from
cycle to cycle.
What steps can I take to improve drying results?
Dry performance is directly aected by the amount of heat that
remains in the tub after the heated rinse is performed. If your dish-
washer is far away from your home’s hot water heater, it may be
necessary to run the hot water tap in the sink before starting a
wash cycle, to ensure that cool water is purged from the hot water
lines. This will ensure your dishwasher has a consistent supply of
hot water from start to nish. Using the Sanitary Rinse setting will
also aid in keeping the inner drum temperature and dishes hotter
before drying begins.
LG dishwashers are designed to be used in conjunction with a
rinse aid. Using a rinse aid will maximize the amount of water that
has already been sheeted away from the dishes before the dry
cycle begins. If a rinse aid is used and the performance still needs a
boost, adjust the amount of rinse aid used by the indicator on the
rinse aid cap. 3 is the default setting, but if necessary, set the level
to 4 so more rinse aid will be used.
Allow the dishwasher to completely nish the dry cycle before
opening the door. If the door is opened mid dry cycle, the heat
that is necessary for the hybrid dry system to work will escape out.
This will cause all of the dishes inside to remain wet once the cycle
nishes.
What is the hybrid drying system?
The dishwasher does not rely on a heating element for the drying
process; instead, it relies on the heat that is retained by the dishes
and the tub during the wash and rinse cycles to turn the moisture
in the tub into humidity. Warm, moist air in the dishwasher is then
pulled into a condensing duct in the door by a fan. The air then
cools, which causes the humidity to condense. Room tempera-
ture air is also drawn into the duct to help the air cool down faster.
When this moisture condenses into a liquid, it is drained out.
Rinse aid is required to enhance the drying perfor-
mance. If no rinse aid is used, water may remain on
the dishes and the tub.
NOTE
Why is there a whistling sound?
It is important to determine how long the noise occurs and when
it happens (what part of the cycle). When water is drawn into the
dishwasher, a whistling noise can be heard. This is normal. If the
water pressure is too high, it will be louder so it may be necessary
to adjust the water valve to lower the pressure if the noise is too
loud.
What is Steam Dual(Vapor Doble)?
Steam Dual(Vapor Doble) is an option that can be utilized during
wash cycles. This option enables you to fully customize the wash
cycle intensity for the upper and lower racks, independently, in
the same load. For example, by selecting a soft spray for the up-
per rack and strong spray for the lower rack, you can wash deli-
cate stemware in the upper rack while washing pots and pans in
the lower rack.
What kind of dishes can be placed in the
dishwasher?
Ensure that the dishes you place in the dishwasher are dishwasher
safe. Plastic dishware will not dry as eectively as glass and met-
al dishware. Plastic items do not retain heat as well as glass and
metal dishware. Plastic cups and dishes may require some hand
drying before being put away at the end of the cycle.
Can I perform a drain only cycle?
The dishwasher does not have a drain only function; however, the
dishwasher will drain on its own for the rst 45 seconds of a new
cycle. To drain standing water, select a wash cycle and let it run
for only 45 seconds. Then, turn the unit o and let it reset. Repeat
as necessary.

26
How long does the clean indicator stay lit after the
cycle is complete?
The clean light indicator on the dishwasher will stay lit for 4 min-
utes before turning o. You can, however, program the dishwash-
er so that the clean light stays on until the dishwasher door opens.
Why does my dishwasher continuously beep if
I open the door during a cycle or right after the
cycle has nished?
This is normal. The dishwasher is letting you know that the interior
temperatures of the unit are hot and to use caution when placing
your hands inside. Once the unit has cooled down, the beeping
will stop.
PRODUCT FEATURES AND
OPERATION
What is the benet of steam?
Steam allows for thorough cleaning of baked on foods while us-
ing less water than other power scrub methods. Steam also allows
for enhanced cleaning performance when cleaning ne china and
stemware items on a delicate cycle. Stream particles are smaller
and more active so their penetrating power is more eective.
Steam also increases the interior temperature of the dishwasher,
which helps in melting oily or waxy substances, like lipstick along
the rim of a glass.
What is Child Lock and how is it activated?
Child Lock is a feature that will prevent the controls from being
changed during the cycle. It does not prevent the door from be-
ing opened or the unit from being powered o. To activate or
deactivate, press the Enjuague(Rinse) and Rocío(Spray) buttons
simultaneously for 3 seconds.
Why is “PF” showing up on the display?
PF is not an error code indicating a malfunction. PF indicates that
there was a power failure. This function protects the dishwasher
in the event that the power goes out or the power to the unit is
disrupted. When power is returned and a button is pushed, this
will display for 10 seconds and then go away.
INSTALLATION
What size is the 90° elbow?
The 90° elbow should have a 3/8” NPT on the end that connects
to the dishwasher.
Can I add an extension to the drain hose?
No, an extension cannot be added.
FAQs

ENGLISH
27
TROUBLESHOOTING
BEFORE CALLING FOR SERVICE
Problem Possible Causes Solutions
Dishwasher will not
operate
Door is not completely closed. Make sure that the door is completely closed and latched.
Power supply or power cord is not connected. Connect the power supply or cord properly.
Fuse is blown or circuit breaker tripped. Replace the fuse or reset the circuit breaker.
Dishwasher operates too
long
Dishwasher is connected to cold water.
Check the water supply connection or water heater set-
ting. (Heating cold water takes longer.)
Odor
Previous cycle was stopped before
completion.
Operate the Lavado Express(Quick) cycle with detergent
without loading any dishes.
Water remains in tub
after completion of cycle
Drain hose is kinked or clogged. Adjust hose or clear blockage.
Spots and lming on dishes
Low water temperature.
Water supply should be at least 120°F for best wash per-
formance.
Wrong amount of detergent used. Use the recommended amount of detergent.
Overloading. Do not overload the dishwasher.
Improper loading. See the Using Your Dishwasher section.
Insucient water pressure. Water pressure should be between 20 and 120 psi.
Insucient detergent.
Add the recommended amount of detergent. See the Us-
ing Your Dishwasher section.
Rinse aid dispenser is empty. Rell rinse aid dispenser.
Extremely hard water
The best way to eliminate spots on your dishes is to install a whole house water softener in your
home. If a water softener is already installed or you do not plan on installing one, try adding the "Extra
Enjuague(Extra Rinse)" option as part of the wash cycle to help minimize this condition. To add an extra
rinse to the cycle, select the wash cycle and then press the Enjuague(Rinse) button.
NOTE: Selecting "Extra Enjuague(Extra Rinse)" will increase cycle times and water usage.
To remove hard water build up in the tub
Remove all dishes, silverware and the silverware holder from the dishwasher. Only the racks should remain
in the tub.
Fill a measuring cup with white vinegar, approximately 14~17 ounces (400~500 mL), and place the measur-
ing cup in the lower rack.
Run a Normal cycle and select ExtraEnjuague(ExtraRinse) and Higiénico(Sanitary) then
close the door.
DO NOT USE DETERGENT
NOTE: Make sure to let the dishwasher complete the entire cycle. This cleaning method should only be
done as needed.
If you have followed this troubleshooting guide and the problem persists, or if the problem you are experiencing is not listed here, please
call LGE Customer Service.

28
BEFORE CALLING FOR SERVICE
TROUBLESHOOTING
Problem Possible Causes Solutions
Food soil remains on dishes.
Improper cycle selection.
Select correct cycle based on soil level and
type of dishware being washed.
Water temperature too low.
Check water supply connection or water
heater setting.
Dish washing detergent was not used. Use recommended detergent.
Low inlet water pressure.
Water pressure should be between 20 and
120 psi.
Water jet holes on spray arms blocked. Clean the spray arms.
Improper loading of dishes
Make sure dishes do not block spray arm
rotation or interfere with detergent
dispenser.
Filters are clogged. Clean lters.
Noise
Some level of noise is normal during
operation.
Detergent cover opening.
Drain pump at the beginning of drain
cycle.
The dishwasher is not level. Adjust leveling feet.
Nozzle arm knocking against dishes. Reposition the dishes.
Cloudiness on glassware.
Combination of excessive detergent and
soft water.
Use less detergent and use a rinse aid to
minimize the problem.
Black or gray marks on dishes.
Aluminum items rubbing dishes during
cycle.
Reposition the dishes.
Yellow or brown lm on inside of surfaces
of dishwasher.
Coee or tea stains.
Eliminate the stain by using a stain
removal product.
Dishes don’t dry. Rinse agent dispenser empty.
Check and rell the rinse agent dispenser
if empty.
Lamps do not illuminate. Power is not connected. Connect power supply.
Sprays arms do not rotate smoothly.
Holes of spray arms are blocked by food
particles.
Clean the holes of spray arms.
Upper rack is crooked. Rack is poorly adjusted.
See the Height Adjustable Upper Rack
section.
Dishwasher continuously beeps when
the door is opened, during or right after a
cycle has completed.
The contents of the dishwasher are hot
and care should be used when placing
your hands inside the dishwasher.
Close the door until the dishwasher and
dishes have cooled down. The beeping
will go away if the door is closed or the
interior temperature has been cooled.
IE Error Water inlet problem.
Check for a clogged, kinked or frozen
water inlet hose.
Check water supply.
OE Error
Drainage Problem.
Check for a clogged, kinked or frozen drain
hose.
Filters are clogged. Clean Filters
FE Error Excessive Water supplied.
Please call an Authorized Service Center or
LGE Customer Service.
E1 Error Water leakage problem.
HE Error Heater circuit failure.
TE Error
Thermistor failure or very high inlet water
temperature (over 194F)
If you have followed this troubleshooting guide and the problem persists, or if the problem you are experiencing is not listed here, please
call LGE Customer Service.

ENGLISH
29
SMART DIAGNOSIS™ SYSTEM
Should you experience any problems with your dishwasher, it has
the capability of transmitting data to your Smart Phone using the
LG Smart Laundry & DW Application or via your telephone to the
LG call center.
Smart Diagnosis cannot be activated unless your dishwasher is
turned on by touching the POWER button. If your dishwasher is
unable to turn on, then troubleshooting must be done without
using Smart Diagnosis.
Smart Diagnosis Through the Call Center
1. Call the LG call center.
2. When instructed to do so by the call center agent, hold the
mouthpiece of your phonenear the hole located on the side
panel. Hold the phone no more than one inch (but not touch-
ing) the machine.
Do not touch any other buttons or icons on the display
screen.
NOTE
3. Press and hold the Enjuague(Rinse) button on the display
screen for three seconds.
4. Keep the phone in place until the tone transmission has n-
ished. This takes about 17 seconds and the display will count
down the time.
5. Once the countdown is over and the tones have stopped, re-
sume your conversation with the call center agent, who will
then be able to assist you in using the information transmit-
ted for analysis.
SMART DIAGNOSIS™ SYSTEM
Smart Diagnosis Using Your Smart Phone
1. Download the LG Smart Laundry & DW application on your
smart phone.
2. Open the LG Smart Laundry & DW application on your smart
phone.
3. Press the Smart Diagnosis button on your smart phone.
4. Press the Diagnose button on your smart phone.
5. Press the Dishwasher button on your smart phone.
6. Press the RECORD button on the smart phone and then hold
the mouth piece of the smart phone near the speaker located
on the side panel. Hold the phone no more than one inch
(but not touching) the machine.
7. Press and hold the Rinse button on the dishwasher display
for three seconds.
8. With the phone held in place, press the Smart Diagnosis
button on the phone.
9. Keep the phone in place until the tone transmission has n-
ished. This takes about 17 seconds and the display will count
down the time.
10. When the recording is complete, view the diagnosis by press-
ing the Next button on the phone.
After three seconds, the display will change from 0:22 to
17 and then start counting down the remaining time.
NOTE
Do not touch any other buttons or icons on the display
screen.
NOTE

30
SPECIFICATIONS
SPECIFICATIONS
• Power Supply: 120V, 60 Hz AC only, minimum 15A circuit breaker
• Water Pressure: 20–120 psi (140–830 kPa)
• Size (WxDxH): 23
3
/4" x 24
5
/8"x 33
1
/2" (603 mm x 625 mm x 851 mm)
• Inlet Water Temperature: 120 °F (49 °C) minimum
• Product Weight : - LDF8574 : 102.5 lbs.(46.5 kg)
- LDF8072 : 100.5 lbs.(45.6 kg)
- LDF7561 : 96.6 lbs.(43.8 kg)
- LDF7551 : 88.2 lbs.(40 kg)
The appearance and specications are subject to change without notice.

ESPAÑOL
1
www.lg.com
MANUAL DEL PROPIETARIO
LAVAVAJILLAS
Lea detenidamente este manual del propietario antes de poner en
funcionamiento el producto y consérvelo a mano para referencia
futura.
LDF8574ST
LDF8072ST
LDF7561ST/WW/BB
LDF7551ST/WW/BB
ESPAÑOL

2
TABLA DE CONTENIDOS
TABLA DE CONTENIDOS
3 INSTRUCCIONES DE SEGURIDAD
IMPORTANTES
3 Precauciones de seguridad básicas
4 Seguridad eléctrica
5 Antes de usar el lavavajillas
6 PIEZAS Y CARACTERÍSTICAS
6 Características
7 Piezas
8 Panel de control (en modelos de vapor)
1 0 Panel de control (en modelos que no sean de vapor)
1 1 Tabla de opciones de ciclos
1 1 Íconos
1 2 Tabla de selección de ciclost
13 INSTRUCCIONES DE FUNCIONAMIETO
1 3 Comienzo rápido
1 4 Carga de la bandeja inferior
1 5 Ajuste de las puntas separadoras inferiores
1 6 Carga del cesto de cubiertos
1 7 Carga de la bandeja superior
1 7 Ajuste de las puntas separadoras superiores
1 8 Bandeja superior con altura ajustable
1 9 Carga de la bandeja para cubiertos
(en algunos modelos)
1 9 Placa Con Altura Ajustable (en algunos modelos)
2 0 Cómo agregar detergente en el dispensador
2 1 Cómo agregar abrillantador en el dispensador
22 CUIDADO Y LIMPIEZA
2 2 Limpieza de los filtros
2 3 Limpieza de partes metálicas
2 3 Limpieza del brazo rociador inferior
2 3 Limpieza del brazo rociador superior
24 Limpieza del brazo rociador extremo
24 Mantenimiento y almacenamiento estacional
25 PREGUNTAS FRECUENTES
GRACIAS
Felicitaciones por su compra y bien-
venido a la familia LG. Su nuevo Lavav-
ajillas LG combina un funcionamiento
silencioso y eciente con la más avan-
zada tecnología de limpieza. Si siguelas
instrucciones de funcionamiento y cui-
dado proporcionadas en este manual,
su lavavajillas le brindará un servicio
conable por muchos años.
27 SOLUCIÓN DE PROBLEMAS
2 7 Antes de llamar al servicio técnico
29 SISTEMA SMART DIAGNOSIS™
2 9 SISTEMA SMART DIAGNOSIS™
30 ESPECIFICACIONES
3 0 Especifica ciones

ESPAÑOL
3
INSTRUCCIONES DE SEGURIDAD IMPORTANTES
INSTRUCCIONES DE SEGURIDAD IMPORTANTES
LEA TODAS LAS INSTRUCCIONES ANTES DE UTILIZAR EL LAVAVAJILLAS
Su seguridad y la de otros son muy importantes.
Tanto en este manual como en el equipo hemos proporcionado muchos mensajes de seguridad importantes. Siempre debe leer y cumplir
todos los mensajes de seguridad.
Este es el símbolo de alerta de seguridad. Este símbolo le advierte posibles riesgos que pueden ocasionar daños en el artefacto
o lesiones físicas graves, incluso la muerte.
El símbolo de alerta de seguridad siempre estará acompañado de las palabras "ADVERTENCIA" o "PRECAUCIÓN", seguido de un
mensaje de seguridad importante. Estas palabras signican:
ADVERTENCIA
Indicates the possibility of serious bodily harm or death.
PRECAUCIÓN
Indicates the possibility of injury or damage to property.
PRECAUCIONES DE SEGURIDAD BÁSICAS
ADVERTENCIA
Para disminuir el riesgo de incendios, descargas eléctricas o lesiones a las personas que usen este
artefacto, siga las precauciones básicas, incluidas las siguientes:
• Lea atentamente todas las instrucciones antes de usar el la-
vavajillas.
• Utilice el lavavajillas únicamente para la función para la que fue
diseñado.
• Sólo use detergentes y agentes de enjuague recomendados
para lavavajillas. Mantenga los detergentes para lavavajillas y
los aditivos fuera del alcance de los niños.
• Este artefacto no fue diseñado para ser utilizado por niños.
• Cuando cargue objetos para su lavado:
1) Cargue los objetos cortantes de tal forma que no dañen el
sello de la puerta.
2) Cargue los cuchillos losos con los mangos hacia arriba para
disminuir el riesgo de lesiones personales cuando coloque
las manos en el lavavajillas.
• No lave objetos plásticos en el lavavajillas a menos que tengan
la etiqueta "Apto para lavavajillas" o equivalente. Para cargar
objetos plásticos que no estén etiquetados, consulte las reco-
mendaciones del fabricante.
• No ponga en funcionamiento el lavavajillas a menos que todos
los paneles de cerramiento estén en su debido lugar.
• No utilice indebidamente los controles.
• No maltrate ni se siente o pare sobre la puerta o las bandejas
del lavavajillas.
• Para disminuir los riesgos de lesiones, no permita que los niños
jueguen con o cerca del lavavajillas.
• Bajo ciertas condiciones, podría producirse gas hidrógeno
en un sistema de agua caliente que no ha sido utilizado por
dos semanas o más. EL GAS HIDRÓGENO ES EXPLOSIVO. Si el
sistema de agua caliente no ha sido usado por tal período de
tiempo, abra todas las llaves de agua y deje que uya por vari-
os minutos. Esto eliminará el gas hidrógeno acumulado. Dado
que el gas hidrógeno es inamable, no fume ni use ninguna
llama abierta durante este proceso.
• Extraiga la puerta del compartimiento de lavado al desechar
un lavavajillas usado.
Este manual contiene información muy importante con respecto a la instalación, el uso y el mantenimiento de su lavavajillas. El fabricante
no puede responsabilizarse por las lesiones o daños y perjuicios originados por la omisión en la observación de estas instrucciones de
precaución y seguridad.

4
INSTRUCCIONES DE SEGURIDAD IMPORTANTES
PRECAUCIONES DE SEGURIDAD BÁSICAS
ADVERTENCIA
Para disminuir el riesgo de incendios, descargas eléctricas o lesiones a las personas que utilicen este
arteacto, siga las precauciones básicas, incluidas las siguientes:
Para conectar el lavavajillas de forma permanente:
Este artefacto debe estar conectado a un sistema permanente de
cableado de metal con descarga a tierra, o bien debe instalarse un
conductor de puesta a tierra del equipo con los conductores de
circuito y conectarse a una terminal de puesta a tierra del equipo
o a un extremo del dispositivo. Consulte con un electricista cali-
cado.
Sugerencias para evitar riesgos:
No aplique fuerza descendente excesiva en la puerta del lavava-
jillas abierta antes de instalarla, dado que esto podría ocasionar
daños a la unidad o que ésta se caiga. No use el lavavajillas antes
de que completar su instalación conforme a las "Instrucciones de
instalación".
SEGURIDAD ELÉCTRICA
ADVERTENCIA
Riesgo de descarga eléctrica
La omisión de estas instrucciones puede resultar en la muerte, incendio, o descarga eléctrica.
• El lavavajillas DEBE estar conectado a tierra. Conecte el cable a tierra al conector a tierra de color verde en la caja de conexiones eléctricas.
• No utilice cables de extensión con este artefacto.
• El lavavajillas está diseñado para ser utilizado con corriente estándar doméstica (120 V~ 60 Hz). Antes de conectar el lavavajillas, asegúrese
de que la salida o el cable esté conectado a tierra de forma adecuada y que esté polarizado por interruptores de circuito o fusibles. Una
conexión a tierra inadecuada podría ocasionar una descarga eléctrica o el malfuncionamiento del artefacto. Consulte con un electricista
calicado.
• No instale ni almacene el lavavajillas en un lugar donde esté expuesto a condiciones climáticas. La falta de observación de esta precau-
ción podría resultar en descarga eléctrica, incendio, mal funcionamiento y/o deformación del lavavajillas.
• No dañe ni coloque objetos pesados sobre el cable tomacorriente del dispositivo. No utilice el lavavajillas si el cable tomacorriente está
dañado. El daño del cable tomacorriente podría causar incendios o descargas eléctricas. Consulte con un electricista calicado.
• No agarre el cable tomacorriente ni toque los controles del lavavajillas con las manos húmedas. No utilice el lavavajillas si el cable o en-
chufe está dañado, y no enchufe el lavavajillas a un tomacorriente dañado. No seguir estas instrucciones podría resultar en una descarga
eléctrica.
• El desmontaje y la reparación del equipo deben ser realizados por personas de mantenimiento experimentadas. El desmontaje o la
reparación inadecuados podrían generar fallas en el producto o descargas eléctricas.

ESPAÑOL
5
INSTRUCCIONES DE SEGURIDAD IMPORTANTES
ANTES DE USAR EL LAVAVAJILLAS
Antes de usar el lavavajillas, lea las "Instrucciones de seguridad
importantes".
La temperatura del suministro de agua debería ser de un mínimo
de 120°F (49°C) para un mejor lavado y duración razonable del ci-
clo.
Por este motivo, utilice sólo el suministro de agua caliente.
Además, es importante que el lavavajillas se cargue según las in-
strucciones para lograr una limpieza efectiva. Cuando cargue el
lavavajillas, asegúrese de retirar los elementos insolubles, como
ser huesos, palillos y restos de papel.
GUARDE ESTAS INSTRUCCIONES
Cuando cargue el lavavajillas, siga las siguientes instrucciones ge-
nerales:
1. Coloque los objetos más profundos en un ángulo para ayu-
dar a que corra el agua y para contribuir con la velocidad del
proceso de secado.
2. Retire los restos sólidos o quemados de la vajilla antes de car-
garla en el lavavajillas.
3. Cargue sólo objetos que sean aptos para lavavajillas.
No cargue utensilios que no sean resistentes al calor,
que tengan decoraciones en metal, etc.
NOTA

6
PIEZAS Y CARACTERÍSTICAS
PIEZAS Y CARACTERÍSTICAS
AMPLIA CAPACIDAD
Los lavavajillas LG le per-
miten cargar objetos muy
grandes, tanto en la bande-
ja superior como en la infe-
rior. El compartimiento alto
proporciona una capaci-
dad general extra y espacio
suciente para acomodar
vajilla de gran tamaño. Se
pue-den cargar objetos ex-
tra grandes (máx. 36 cm) en
la bandeja inferior si se le-
vanta la bandeja superior.
CARACTERÍSTICAS
SLIM DIRECT MOTOR™
El nuevo Slim Direct Mo-
tor™ es un motor con-
trolado por un inversor.
La potencia de lavado se
controla según la selec-
ción del ciclo. También of-
rece una alta eciencia de
energía para minimizar el
uso de energía.
SISTEMA DE SECADO HÍBRIDO
Este sistema seca la vajilla
de forma efectiva sin usar
elementos de calor que
aumentan el consumo de
energía.
LAVADO A VAPOR (en algunos modelos)
La tecnología a vapor pro-
porciona un rendimiento
de limpieza superior a los
sistemas de lavado tradi-
cionales. El vapor aporta
el cuidado delicado más
eciente en el consumo
de energía para su vajilla
na y cubiertos.
SISTEMA DE ASPERSIÓN VARIABLE
Dado que la aspersión
de agua se alterna entre
las bandejas superior e
inferior, toda la poten-
cia proveniente del mo-
tor se dirige hacia una
bandeja por vez. Esto
concentra toda la poten-
cia de lim-pieza del mo-
tor en cada bandeja por
turno.
BOTONES (en algunos modelos) LUMINOSOS
TÁCTILES Y LCD AZUL
Los botones luminosos
táctiles en el panel de
control hacen que las
selecciones sean fáciles
y convenientes. La pan-
talla LCD azul muestra
claramente el ciclo y op-
ciones seleccionados.

ESPAÑOL
7
PIEZAS
PIEZAS Y CARACTERÍSTICAS
1. PANEL DE CONTROL
2. MANIJA DE LA PUERTA
3. CUBIERTA FRONTAL
4. CUBIERTA INFERIOR
5. PIES DE NIVELACIÓN
6. PANTALLA FRONTAL SIGNALIGHT™
7. BASE
8. BRAZO ROCIADOR EXTREMO
9. BRAZO ROCIADOR SUPERIOR
10. BOQUILLA DE VAPOR EN MODELOS DE VAPOR
11. BRAZO ROCIADOR INFERIOR
12. DETERGENTE Y DISPENSADOR DE ABRILLANTADOR
13. CUBIERTA DE VENTILACIÓN DE SECADO
14. BANDEJA PARA CUBIERTOS EN ALGUNOS MODELOS
15. BANDEJA SUPERIOR
16. CESTO DE CUBIERTOS
17. BANDEJA INFERIOR
18. PANTALLA SUPERIOR
19. BOTÓN "POWER" ENCENDER
20. SISTEMA DE FILTRADO
SignaLight (luz indicadora)
Cuando un ciclo está en funcionamiento, la SignaLight (luz in-
dicadora) se iluminará en la fase activa.
• Modelocon4LEDs:WASH(LAVADO)–RINSE(ENJUAGUE)
–DRY(SECADO)–CLEAN(LIMPIO)
• Modeloscon2LEDs:OPERATING(ENFUNCIONAMIENTO)
–CLEAN(LIMPIO)
• Modeloscon1LED:OPERATING(ENFUNCIONAMIENTO)
(Luzparpadeante)/CLEAN(LIMPIO)(Luzja)
Una vez que el ciclo haya nalizado, la luz LIMPIO se encend-
erá durante cuatro minutos.
Para mantener encendida la luz "LIMPIO" hasta que se abra la
puerta, conecte la energía y luego mantenga presionado los
botones "Extra Seco" y "Media Carga" en el panel de control
de forma simultánea hasta que la señal de "O" (Apagado) u
"On" (Encendido) aparezca en pantalla. El lavavajillas recordará
este ajuste hasta que se lo modique manualmente.
Filtrodemalla
Filtroexterior
FiltroSTS
superior

8
Ciclos
Seleccione el ciclo deseado.
VAPOR CON POTENCIA
Este ciclo es para la vajilla extremadamente sucia. La poten-
cia del vapor se activa automáticamente a la intensidad de
aspersión más elevada y utiliza la fuerza del vapor para lavar
la vajilla más sucia.
VAPOR DOBLE
Este ciclo lava las bandejas superiores e inferiores a diferen-
tes intensidades de aspersión. El ajuste predeterminado para
este ciclo lava la bandeja inferior con una fuerte intensidad de
aspersión y la bandeja superior con una intensidad más suave.
Esto proporciona un rendimiento óptimo de limpieza para
cargas mixtas, incluida la porcelana na y las copas. Si desea
realizar otras combinaciones, siga los pasos que se mencio-
nan a continuación para cambiar las intensidades o para utili-
zar la función "Media Carga".
Cómoutilizarlaintensidaddual:
1. Seleccione "Vapor Doble" .
2. Presione el botón "Rocío" para alternar entre Suave, Medio
y Fuerte para el brazo rociador superior.
3. Luego de realizar su selección para el brazo rociador supe-
rior, presione el botón "Media Carga".
4. Presione el botón "Rocío" para alternar entre Suave, Medio
y Fuerte para el brazo rociador inferior.
5. Cierre la puerta para dar inicio al ciclo.
VAPOR DELICADO
Este ciclo agrega una fuerza suave de vapor para regular la
potencia de limpieza del cliclo delicado. Este ciclo está dis-
eñado para limpiar elementos delicados de forma efectiva,
como por ejemplo porcelana na y copas.
NORMAL
Este ciclo es para las cargas diarias, de suciedad normal.
LAVADO Y SECADO EXPRESS
Este es un cliclo corto diseñado para lavar y secar vajilla re-
cién usada o cargas con poca suciedad. Durante este ciclo, los
dos brazos rociadores funcionarán al mismo tiempo.
LAVADO EXPRESS
Este es un ciclo corto diseñado para lavar cargas recién usa-
das o con poca suciedad, pero sin secado.
ALARMA ENCENDIDA/APAGADA
Para activar o desactivar la alarma, primero debe encender
el lavavajillas. Mantenga presionado los botones "Lavado
Express" y "Vapor Delicado" de manera simultánea durante
aproximadamente tres segundos.
CANCELAR
Para cancelar un ciclo, abra la puerta y mantenga presiona-
dos los botones "Vapor Delicado" y "Normal" a la vez durante
aproximadamente tres segundos. La bomba de desagüe se
desactivará y se cancelará el ciclo. En la pantalla aparecerá
"dr" y el lavavajillas desagotará el agua. Luego de que se de-
sagote el lavavajillas, la electricidad se apagará. Si conecta la
electricidad, pero no selecciona ningún ciclo, el lavavajillas se
apagará en cuatro minutos.
Cycle Options
(Consulte la sección de panel de control en la página siguiente)
Elija el ciclo deseado y luego seleccione las opciones para ese
ciclo.
EXTRA SECO
Seleccione la opción "Extra Seco" para un mejor rendimien-
to de secado. Esta opción agrega 60 minutos de tiempo de
secado extra al ciclo. El botón "Extra Seco" se iluminará cu-
ando se haya seleccionado la opción.
ENJUAGUE
Presionar repetidamente el botón "Enjuague" seleccionará
la opción de enjuague deseada. Las luces "Higiénico", "Extra
Enjuague", o "Higiénico" y "Extra Enjuague" se encenderán en
la parte izquierda del botón de la pantalla.
HIGIÉNICO ( )
Este enjuague de alta temperatura higieniza la vajilla y la cris-
talería cumpliendo con el Estándar NSF/ANSI 184 para lavava-
jillas domésticos. Los lavavajillas certicados no son aptos
para establecimientos alimentarios autorizados.
EXTRA ENJUAGUE ( R
+
)
El símbolo "Extra Enjuague" indica que se agregó un en-
juague extra al ciclo. Un enjuague extra puede ayudar a
reducir engran medida manchas de agua dura en la vajilla.
Para agregarun enjuague extra, presione el botón "Enjuague"
repetidamente hasta que aparezca el símbolo ""Extra En-
juague" en la pantalla.
SÓLO ENJUAGUE
Este es un ciclo rápido para la vajilla que no se lavará de inme-
diato.
Este ciclo enjuagará la vajilla que tenga suciedad en ex-
ce
so para ablandar los residuos adheridos. Enjuagar la vajilla
evi
tará la aparición de olores en el lavavajillas. No debe utili-
zarse detergente. Para seleccionar el ciclo "Sólo Enjuague", en-
cienda el lavavaji-llas y presione una vez el botón "Enjuague" sin
presionar ningún otro botón de ciclos. El ciclo ""Sólo Enjuague"
no está disponible con ningún otro ciclo.
ROCÍO (INTENSIDAD)
Primero, seleccione el ciclo deseado. Presione el botón
"Rocío" repetidamente hasta seleccionar la intensidad de
aspersión deseada.
Suave( ), Fuerte( ), Media( )
PIEZAS Y CARACTERÍSTICAS
PANEL DE CONTROL (en modelos de vapor)
Modelos de vapor (LDF8574, LDF8072)

ESPAÑOL
9
MEDIA CARGA
Para cargas pequeñas, puede utilizar sólo la bandeja superior
o la bandeja inferior para ahorrar energía. Cada vez que presio-
ne el botón "Media Carga", se indicará utilizar sólo la bandeja
superior o sólo la bandeja inferior.
COMIENZO DIFERIDO
La función "Comienzo Diferido" le permite retrasar el co-
mienzo de un ciclo seleccionado. Cada vez que se presiona el
botón "Comienzo Diferido", el tiempo de retraso aumentará
una hora. El tiempo de retraso de la iniciación puede establ-
ecerse de1 a 24 horas, enincrementos de una hora.
SEGURO PARA NIÑOS
La función "Seguro para Niños" ayuda a evitar que se cam-
bien los ajus-tes durante el ciclo. La selección de esta función
bloquea todos los botones, excepto el botón "Encender" en
el panel de control. Esta función no bloquea la puerta.
Paraactivarelbloqueoinfantil:
1. Abra la puerta del lavavajillas.
2. Presione el botón "Encender".
3. Seleccione el ciclo (y las opciones deseadas).
4. Mantenga presionado los botones "Enjuague" y "Rocío"
durante aproximadamente tres segundos. El indicador
"Seguro para Niños" se iluminará en la pantalla una vez
que estéactivado.
5. Cierre la puerta para dar inicio al ciclo.
PANTALLA DIGITAL
"Pantalla Digital" en el panel de control muestra el tiempo
ESTIMATIVO del ciclo. Cuando se enciende el lavavajillas, la
pantalla está en blanco. Cuando se seleccionan el ciclo y las
opciones, la pantalla muestra el tiempo estimativo total para
completar dichas selecciones. Durante el funcionamiento, la
pantalla muestra el tiempo de funcionamiento estimativo
restante.
PIEZAS Y CARACTERÍSTICAS
PANEL DE CONTROL
En algunos modelos (LDF8574, LDF8072)
En algunos modelos (LDF7561, LDF7551)
• El tiempo estimativo que se muestra en la pantalla no
incluye los retrasos del calentamiento del agua, etc.
• Si se selecciona "Lavado Retardado", la pantalla muestra
el tiempo de retraso en horas.
• El tiempo puede variar dependiendo del nivel de sucie-
dad de la carga..
NOTA
ECO
La opción ECO ahorra energía ya que utiliza menos agua.
Esta opción únicamente debe utilizarse para vajillas con-
poca suciedad o suciedad media.
ENCENDER
• Presione el botón "Encender" para encender el panel de
control. Si no se selecciona ningún ciclo en el lapso de cu-
atro minutos, el lavavajillas se apagará.
• Luego de que el ciclo naliza, la electricidad se corta au-
tomáticamente por cuestiones de seguridad y economía.
• En caso de sobrecarga de energía, pérdida de energía o
alteración de cualquier tipo, aparecerá el indicador PF y la
electricidad se cortará automáticamente por cuestiones
de seguridad. Será necesario reiniciar el ciclo.
SMART DIAGNOSIS
(DIAGNÓSTICO INTELIGENTE)
En caso de que su lavavajillas experimente cualquier prob-
lema, éste tiene la capacidad de transmitir información a su
Smart Phone mediante la aplicación "LG Smart Laundry & DW",
o al centro de atención al cliente de LG a través de su teléfono.
ADVERTENCIA
El vapor puede causar quemaduras. Si abre la puerta durante
la etapa de vapor de un ciclo, tenga cuidado con el área de la
boquilla de vapor en el lado izquierdo del lavavajillas. El con-
tacto con el vapor o con la boquilla de vapor podría causar
quemaduras.
El símbolo "RINSE AID" (ABRILLANTADOR) indica
que el abrillantador necesita recargarse.
NOTA

10
PANEL DE CONTROL (en modelos que no sean de vapor)
Ciclos
Seleccione el ciclo deseado.
FREGADO CON POTENCIA
Este ciclo es para la vajilla extremadamente sucia.
LAVADO DOBLE
Este ciclo lava las bandejas superiores e inferiores a diferen-
tes intensidades de aspersión. El ajuste predeterminado para
este ciclo lava la bandeja inferior con una fuerte intensidad
de aspersión y la bandeja superior con una intensidad más
suave. Esto proporciona un rendimiento óptimo de limpieza
para cargas mixtas, incluida la porcelana na y las copas. Si
desea realizar otras combinaciones, siga los pasos que se
mencionan a continuación para cambiar las intensidades o
para utilizar la función MEDIA CARGA.
Cómoutilizarlaintensidaddual:
1. Seleccione "Lavado Doble".
2. Presione el botón "Rocío" para alternar entre Suave, Medio
y Fuerte para el brazo rociador superior.
3. Luego de realizar su selección para el brazo rociador supe-
rior, presione el botón "Media Carga".
4. Presione el botón "Rocío" para alternar entre Suave, Medio
y Fuerte para el brazo rociador inferior.
5. Cierre la puerta para dar inicio al ciclo.
CICLO DELICADO
Este ciclo está diseñado para limpiar elementos delicados de
forma efectiva, como por ejemplo porcelana na y copas.
NORMAL
Este ciclo es para las cargas diarias, de suciedad normal.
LAVADO Y SECADO EXPRESS
Este es un cliclo corto diseñado para lavar y secar vajilla re-
cién usada o cargas con poca suciedad. Durante este ciclo, los
dos brazos rociadores funcionarán al mismo tiempo.
LAVADO EXPRESS
Este es un ciclo corto diseñado para lavar cargas recién usa-
das o con poca suciedad, pero sin secado.
ALARMA ENCENDIDA/APAGADA
Para activar o desactivar la alarma, primero debe encender
el lavavajillas. Mantenga presionado los botones "Labado
Express" y "Ciclo Delicado" de manera simultánea durante
aproximadamente tres segundos.
CANCELAR
Para cancelar un ciclo, abra la puerta y mantenga presiona-
dos los botones "Ciclo Delicado" y "Normal" a la vez durante
aproximadamente tres segundos. La bomba de desagüe se
desactivará y se cancelará el ciclo. En la pantalla aparecerá
"dr" y el lavavajillas desagotará el agua. Luego de que se de-
sagote el lavavajillas, la electricidad se apagará.
Si conecta la electricidad, pero no selecciona ningún ciclo, el
lavavajillas se apagará en cuatro minutos.
Modelos que no sean de vapor (LDF7561, LDF7551)
PIEZAS Y CARACTERÍSTICAS

ESPAÑOL
11
Ciclo
Nivel de asper-
sión disponible
(prominente por
defecto)
Extra
Seco
Enjuague
higiénico
Extra
Enjuague
Higiénico
Media
Carga
Comienzo
Diferido
Eco
VAPOR CON
POTENCIA
O
FREGADO CON
POTENCIA
Fuerte
VAPOR DOBLE
O
LAVADO DOBLE
Suave
(brazo superior)
Medio
Fuerte
(brazo inferior)
VAPOR DELICADO
O
CICLO DELICADO
Suave
Medio
NORMAL
Suave
Medio
Fuerte
LAVADO Y
SECADO EXPRESS
Fuerte
LAVADO EXPRESS
Fuerte
ENJUAGUE
Medio
Fuerte
PIEZAS Y CARACTERÍSTICAS
TABLA DE OPCIONES DE CICLOS
La siguiente guía de ciclos muestra los ajustes predeterminados y las opciones disponibles para cada ciclo.
Ciclo de Vapor
Extra Enjuague
Enjuague Higiénico
Intensidad de aspersión baja, media y alta
Brazo rociador superior
Brazo rociador inferior
Seguro para Niños
Indicador de abrillantador insuciente
Ciclo Eco
Indicador del tiempo del ciclo
ÍCONOS

12
Ciclo
Lavar Enjuagar
Secar
*Usode
agua
**Tiempo
delciclo
Intensidadde
aspersión
Pre1 Pre2 Pre3
Lavado
principal
Enjuague
1
Enjuague
2
Enjuague
caliente
VAPORCON
POTENCIA
140 F
60 C
158 F
70 C
6,1 galones
23 L
165 min Fuerte
VAPOR
DOBLE
154 F
68 C
158 F
70 C
4,6 galones
17, 5 L
147 min
Superior:
Fuerte
Inferior:
Suave
VAPOR
DELICADO
122 F
50 C
154 F
68 C
4,6 galones
17, 5 L
141 min Suave
NORMAL
86–122 F
30–50 C
149–158 F
65–70 C
1,7–6,4
galones
6,5–20,5 L
110 –131
min
Medio
LAVADO
YSECADO
EXPRESS
122 F
50 C
162 F
72 C
7,6 galones
29 L
79 min Fuerte
LAVADO
EXPRESS
122 F
50 C
122 F
50 C
5,0 galones
19 L
34 min Fuerte
SÓLO
ENJUAGUE
1,0 galones
4 L
22 min Medio
FREGADO
CON
POTENCIA
140 F
60 C
158 F
70 C
6,1 galones
23 L
165 min Fuerte
LAVADO
DOBLE
154 F
68 C
158 F
70 C
4,6 galones
17, 5 L
147 min
U: Fuerte
L: Suave
CICLO
DELICADO
122 F
50 C
154 F
68 C
4,6 galones
17, 5 L
141 min Suave
* El consumo de agua real varía según el nivel de suciedad y la dureza del agua.
** Los tiempos reales de los ciclos varían dependiendo del nivel de suciedad, la temperatura y la dureza del agua.
TABLA DE SELECCIÓN DE CICLOS
PIEZAS Y CARACTERÍSTICAS

ESPAÑOL
13
INSTRUCCIONES DE FUNCIONAMIENTO
COMIENZO RÁPIDO
1. CARGUE LA VAJILLA
Retire el exceso de comida, huesos y de cualquier otro resi-
duo no soluble de la vajilla. Tire de la bandeja hacia afuera y
cargue la vajilla tal como se lo describe en este manual.
2. MIDA EL DETERGENTE
Siguiendo las instrucciones contenidas en este manual, llene
el recipiente de detergente con la cantidad recomendada y
cierre la tapa. Si desea realizar un pre-lavado, la apertura en
la parte superior de la tapa también debe llenarse con deter-
gente.
3. ENCIENDA EL LAVAVAJILLAS
Para encender el panel de visualización, presione el botón
"Power".
4. CONTROLE EL ABRILLANTADOR
La luz indicadora del abrillantador se iluminará si el nivel de
abrillantador está bajo. Agregue abrillantador si el nivel es
bajo para mantener la efectividad del ciclo de secado.
5. SELECCIONE EL CICLO Y LAS OPCIONES
Seleccione el ciclo y las opciones que mejor se ajusten a la car-
ga según la tabla de selección de ciclos. La pantalla mostrará
el tiempo estimativo del ciclo y las opciones seleccionadas.
6. CIERRE LA PUERTA
El lavavajillas se iniciará automáticamente, luego de una
pequeña demora, una vez que se cierre y trabe la puerta.
Durante el ciclo, la pantalla mostrará el tiempo estimativo
restante del ciclo y las opciones seleccionadas. Si se abre la
puerta durante el ciclo, el lavavajillas se detendrá. Cuando se
cierra la puerta, el ciclo se reanuda desde el punto en el que
se detuvo.
7. FIN DEL CICLO
Cuando el ciclo naliza, suena una alarma y la pantalla mues-
tra "END" (FIN). Luego de un tiempo breve, la pantalla y los
controles se apagan por cuestiones de seguridad y ahorro de
energía.
PRECAUCIÓN
Vacíe primero la bandeja inferior y luego la bandeja superior. Esto
evitará que el agua de la bandeja superior caiga sobre la vajilla de
la bandeja inferior.
ADVERTENCIA
En general, no se recomienda abrir la puerta mientras el lava-
vajillas se encuentra en funcionamiento. Si se abre la puerta, un
dispositivo de seguridad detendrá el lavavajillas. Debe tener cui-
dado al abrir la puerta inmediatamente luego de la nalización
del ciclo, dado que puede producirse escape de vapor.
APAGADO AUTOMÁTICO
El lavavajillas se apaga automáticamente si no se selecciona
ningún ciclo o si no se cierra la puerta en cuatro minutos.
INSTRUCCIONES DE FUNCIONAMIENTO

14
INSTRUCCIONES DE FUNCIONAMIENTO
PRECAUCIÓN
OBJETOS NO ADECUADOS PARA EL
LAVAVAJILLAS
La combinación de agua a altas temperaturas y de detergentes
para lavavajillas puede dañar ciertos objetos. LG recomienda no
lavar los siguientes objetos en el lavavajillas:
• Vajilla pintada a mano con oro o plata
• Utensilios de madera o hueso
• Utensilios de hierro o fácilmente oxidables
• Objetos de plástico no aptos para lavavajillas
En caso de duda, consulte las recomendaciones del fabricante.
CARGA DE LA BANDEJA INFERIOR
La bandeja inferior no debe utilizarse para objetos pequeños,
tales como pocillos, copas de vino o platos pequeños. Estos el-
ementos deben colocarse en la bandeja superior.
Cargue la vajilla que esté muy sucia o manchada en el lado izqui-
erdo frontal de la bandeja inferior con el lado sucio orientado ha-
cia abajo. Esta es la zona por la que el vapor ingresa al lavavajillas.
El uso de vapor caliente maximiza el rendimiento de limpieza del
lavavajillas.
El compartimiento extra permite cargar platos, cacerolas y otros
utensilios de hasta 36 cm de alto.
Se recomienda utilizar la bandeja inferior para platos llanos,
platos soperos, pocillos, potes, cacerolas, tapas y bandejas. Los
platos deben colocarse en posición vertical, orientados hacia el
centro de la bandeja. Los potes, las cacerolas y los bowls grandes
deben girarse para que su parte interior quede orientada hacia
abajo. El cesto para cubiertos puede utilizarse tanto en la bandeja
inferior como en la superior.
CARGA DE 10 AJUSTES DE POSICIONES
CARGA DE 12 AJUSTES DE POSICIONES
• Cargar los platos, los bowls soperos, etc. entre los soportes.
• Cargue las bandejas para hornear, los moldes para tortas y
otros objetos grandes en los laterales o en la parte trasera de la
bandeja. Cargar estos objetos en la parte frontal del lavavajillas
puede evitar que la aspersión de agua alcance el dispensador
de detergente.
• Asegúrese que los mangos y otros elementos grandes no obst-
ru-yan la rotación de los brazos rociadores.
SUGERENCIAS PARA LA CARGA DE LA BANDEJA
INFERIOR:
Asegúrese de que los objetos grandes no obstruyan
la rotación de los brazos rociadores, y que no eviten
que se abra el dispensador de detergente.
NOTA

ESPAÑOL
15
INSTRUCCIONES DE FUNCIONAMIENTO
AJUSTE DE LAS PUNTAS SEPARADORAS INFERIORES
DIFICULTAD PARA QUITAR LOS
RESTOS DE COMIDA DE LA VA-
JILLA (en modelos de vapor)
Cargue los objetos que tienen restos de comida quemados o que
son difíciles de remover cerca de los brazos rociadores de vapor,
orientados hacia el lado izquierdo de la bandeja inferior y con la
cara hacia abajo. La vajilla se beneciará por la aspersión directa
del vapor y la acción de lavado del brazo rociador inferior.
CARGA DE PLATOS Y OLLAS
CARGA DE OLLAS Y BOWLS
Las puntas separadoras son ajustables para adecuarse a vajilla de diferente tamaño.
Parte trasera
Parte frontal
Boquillas de
vapor

16
INSTRUCCIONES DE FUNCIONAMIENTO
CARGA DEL CESTO DE CUBIERTOS
El cesto de cubiertos cuenta con separadores para evitar que se
raspen y manchen los cubiertos delicados. El cesto puede divi-
dirse en tres cestos separados que pueden utilizarse de forma in-
dividual tanto en la bandeja superior como en la inferior. Destrabe
los separadores sobre el lateral derecho e izquierdo para separar
el cesto.
ADVERTENCIA
Tenga cuidado al cargar y descargar objetos cortantes. Cargue
los cuchillos losos con los mangos hacia arriba para disminuir el
riesgo de lesiones personales.
SUGERENCIAS PARA LA CARGA DE CUBIERTOS:
y Para obtener mejores resultados de limpieza, utilice los sepa-
radores superiores del cesto cuando cargue los cubiertos. Los
separadores evitan que los cubiertos se amontonen.
y Cargue los objetos losos, como por ejemplo los cuchillos,
apuntando hacia abajo.
y Cuando descargue el lavavajillas, lo mejor es comenzar por el
cesto de cubiertos. Esto evitará que caigan gotas de agua so-
bre los cubiertos desde la bandeja superior.
1 1 1 1 1 1
1 1 1 1 1 1
2 2 2 2 2 2 2 2 2 2 2 2 2 2
5 5 5 5
4 4
4
4 4 4 4 4
4 4 4 4 4 4
3 3 3 3 3 3 3 3
3 3
3 3 S S
5 5 5 5 5 5 5 5 5 5
S S S S S S
S
S
1 1
3 3
① ③ ④ ⑤②

ESPAÑOL
17
INSTRUCCIONES DE FUNCIONAMIENTO
AJUSTE DE LAS PUNTAS SEPARADORAS SUPERIORES
CARGA DE LA BANDEJA SUPERIOR
CARGA DE 10 AJUSTES DE POSICIONES
Utilice la bandeja superior para cargar objetos pequeños o deli-
cados, como ser platos pequeños, tazas, platillos, vasos y objetos
plásticos aptos para lavavajillas. Las tazas, vasos y bowls deben
posicionarse hacia abajo. Las tazas extras o los utensilios de co-
cina pueden colocarse en las bandejas plegables para tazas,
que también pueden proporcionar soporte a las copas largas.
Asegúrese de que los objetos no obstruyan la rotación de los bra-
zos rociadores sobre y debajo de la bandeja superior.
CARGA DE 12 AJUSTES DE POSICIONES
Levante la punta.
Rote la punta.
Las puntas separadoras pueden ajustarse hacia arriba o hacia aba-
jo. Las puntas separadoras del lado derecho tienen agarraderas
para la vajilla más ancha o más pequeña.
SUGERENCIAS PARA LA CARGA DE LA BANDEJA
SUPERIOR:
• Ubique las copas y los vasos en las las entre las puntas sepa-
radoras de la bandeja. Colocarlos sobre las puntas separadoras
puede ocasionar quebraduras y/o manchas de agua.
• Para evitar que se astillen, no permita que tengan contacto con
otros objetos.
• Ubique los elementos con los extremos abiertos orientados ha-
cia abajo para facilitar su limpieza y secado.
• No apile los objetos.
Cuando se cargan objetos más grandes en la bandeja
superior, como por ejemplo copas de vino o copas
más largas, podría ser necesario retirar la bandeja de
cubiertos.
NOTA

18
INSTRUCCIONES DE FUNCIONAMIENTO
BANDEJA SUPERIOR CON ALTURA AJUSTABLE
La bandeja superior se ajusta hacia arriba y hacia abajo. Ajústela
hacia arriba para dar lugar a objetos altos y grandes de más de
36 cm de altura en la bandeja inferior. Ajústela hacia abajo para
dar lugar a objetos altos y grandes con más de 30,5 cm de altura
en la bandeja superior. La bandeja superior queda ubicada en la
posición superior.
Para subir la bandeja:
Simplemente, levante la bandeja del centro de cada lado
(véase ilustración) hasta que la bandeja se trabe en la
posición superior. No es necesario levantar las palancas
de bloqueo para levantar la bandeja.
Para bajar la bandeja:
Sostenga la bandeja del centro de cada lado para soportar
su peso. Luego, levante la palanca de cada lado para soltar
la bandeja y bájela hacia la posición inferior.
2
1
2
1
Luego de ajustar la altura de la bandeja, asegúrese
de que la vajilla en las bandejas superior e inferior
no interfiera con la rotación del brazo rociador. No
ajuste la bandeja cuando esté cargada con vajilla.
NOTA

ESPAÑOL
19
Right Wrong
Alternate
INSTRUCCIONES DE FUNCIONAMIENTO
CARGA DE LA BANDEJA PARA
CUBIERTOS(en algunos modelos)
La bandeja para cubiertos es la más adecuada para la cubertería
y para la mayoría de los utensilios de cocina. Los utensilios más
sucios o los elementos con comidas quemadas deberían ubicarse
en el medio de la bandeja o en el cesto para cucharas para lograr
un mejor rendimiento.
Los separadores de las bandejas de cubiertos ayudan a mantener
la cubertería separada n de evitar daños y mejorar la limpieza.
Ejemplo 10: Ajuste de posición.
Correcto
Alternar
Incorrecto
Si los mangos de sus cubiertos
son demasiado nos, gire las
piezas para que los mangos
se orienten hacia la dirección
contraria, tal como se muestra
en la gura.
PLACA CON ALTURA AJUSTABLE
(en algunos modelos)
Cada placa lateral puede ajustarse independientemente en una
posición más alta o más baja para adecuarse a los diversos tamaños
de utensilios y cubiertos. Retire la vajilla antes de ajustar la placa.
Siempre retire los cubiertos de la bandeja antes de
extraer la misma.
NOTA
Cada placa se ajusta levantándola hacia afuera y rotándola desde
adelante hacia atrás.
Extracción de la bandeja para cubiertos
La bandeja para cubiertos puede extraerse por completo en caso
de necesitarse más espacio en la bandeja superior para objetos
más grandes.
Tire la bandeja hacia afuera hasta llegar al extremo de los rieles.
Luego, levante la parte frontal de la bandeja para que los rodillos
se destraben del extremo del riel. Deslice la bandeja hacia ade-
lante y extráigala de los rieles.
ADVERTENCIA
Tenga cuidado al cargar y descargar objetos cortantes. Cargue
cuchillos losos con las hojas hacia abajo para disminuir el riesgo
de lesiones.
①
①
③
③
④
④
⑤
⑤
②
②

20
3
1
2
CÓMO AGREGAR DETERGENTE EN EL DISPENSADOR
• Utilice solamente detergente especial para lavavajillas au-
tomáticos.
• El detergente debe colocarse en el compartimiento para de-
tergente antes de comenzar cualquier ciclo, salvo para el ciclo
"Rinse Only" (Sólo enjuague).
• Utilice menos cantidad de detergente si la vajilla está ligera-
mente sucia. El uso excesivo de detergente puede dejar una
película en la vajilla y en el lavavajillas, lo que resulta en un mal
lavado.
• La cantidad de detergente necesario depende del ciclo, el
tamaño de la carga y el nivel de suciedad de la vajilla.
Si la tapa está cerrada, presione la palanca en el lado in-
ferior de la puerta para abrir el dispensador.
AdAgregue detergente para lavavajillas en el compar-
timiento principal hasta que el nivel se encuentre entre
las líneas marcadas en 20 y 30. Llénelo hasta la línea 30
en caso de agua dura o cargas con suciedad extrema.
Llénelo hasta la línea 20 en caso de agua blanda o car-
gas con poca suciedad. Cierre la tapa con rmeza hasta
que haga "clic".
Si desea efectuar un pre-lavado, llene con detergente
el área del compartimiento de pre-lavado en la tapa.
PRECAUCIÓN
INFORMACIÓN SOBRE EL DETERGENTE
Utilice únicamente detergente especial para lavavajillas automáti-
cos. El uso de detergente no adecuado podría causar que el la-
vavajillas se llene de espuma durante el funcionamiento. El exceso
de espuma puede reducir el rendimiento del lavado y hacer que
el lavavajillas gotee. NO utilice detergente para lavado a mano en
este lavavajillas.
INSTRUCCIONES DE FUNCIONAMIENTO
NO AGREGUE detergente cuando seleccione el ciclo
"Rinse Only" (Sólo Enjuague).
NOTA
El uso excesivo de detergente puede dejar una pelícu-
la en la vajilla y en el lavavajillas, lo que resulta en un
mal lavado.
No utilice detergente en pastillas para ciclos de la-
vadomás cortos. La pastilla puede no disolverse por
completo, causando ineficienciay dejando restos de
detergente en la vajilla.
NOTA
Retire la etiqueta del dispensador antes de poner en
funcio-namiento el lavavajillas.
NOTA
Presione el botón para abrir
Compartimiento de
lavado principal
Ponga la cantidad adecuada de
detergente en este compartimiento
Ponga la cantidad adecuada de
detergente en este compartimiento
Compartimiento de pre-lavado

ESPAÑOL
21
INSTRUCCIONES DE FUNCIONAMIENTO
CÓMO AGREGAR ABRILLANTADOR EN EL DISPENSADOR
El indicador de Abrillantador insuciente aparecerá en la
pantalla cuando se necesite más abrillantador.
Utilice solamente abrillantador líquido en este lavavajillas.
Se recomienda utilizar abrillantador para evitar que queden mar-
cas de gotas de agua en la vajilla y para mejorar el rendimiento
del secado.
1
Presione el botón para abrir la tapa.
2
Agregue líquido abrillantador hasta el nivel máximo
de llenado. Cuando llene el dispensador con
abrillantador, apunte con el abrillantador a la echa.
Asegúrese de que el abrillantador ingrese en el
dispensador.
3
Cierre la tapa para bloquear el dispensador. El
abrillantador se dispensará automáticamente durante
el ciclo nal de enjuague.
AJUSTE DEL DISPENSADOR DE ABRILLANTADOR
El dispensador de abrillantador viene congurado por defecto en el nivel
3, ya que es el nivel que ofrece el mejor rendimiento en la mayoría de los
casos. Reajuste la conguración a un nivel más elevado si tiene agua dura
o si nota la formación de calcio en su vajilla.
Si nota que se forma película en su vajilla, utilice un ajuste más bajo. Ajustar
el control del abrillantador a un nivel demasiado bajo producirá manchas
y vetas en la vajilla, así como también un bajo rendimiento de secado. Aju-
star el control a un nivel demasiado elevado puede causar espumación, lo
que resultará en un bajo rendimiento de lavado.
Para regular el ajuste del dispensador de abrillantador, retire la tapa y ajuste
la palanca del abrillantador hacia el nivel deseado. Coloque la echa hacia
la izquierda para un ajuste menor y hacia la derecha para un ajuste mayor.
RECARGA DE ABRILLANTADOR
La regularidad con la que se debe recargar el dispensador depende de
la regularidad con la que se lave la vajilla y el nivel de ajuste utilizado.
Si el nivel del abrillantador es insuciente, la luz "Rinse Aid" (Abrillanta-
dor) se encenderá en el panel de control.
SUGERENCIAS PARA LA RECARGA DE ABRILLANTADOR:
y El indicador de Abrillantador insuciente aparecerá en
la pantalla cuando se necesite agregar más abrillantador.
y No llene en exceso el dispensador de abrillantador.
y Limpie cualquier abrillantador que haya quedado derramado a
n de evitar la espumación.
Indicador de
Abrillantador
Palanca de ajuste
(Enjuague)

22
CUIDADO Y LIMPIEZA
Para obtener mejores resultados, es importante controlar y cuidar periódicamente los brazos rociadores.
ADVERTENCIA
Para evitar lesiones físicas durante el cuidado y el mantenimiento/limpieza, use guantes y/o prendas protectoras.
LIMPIEZA DE LOS FILTROS
1. Primero retire la bandeja inferior.
2. Gire el ltro de malla en sentido contrario a las agujas del reloj.
3. Retire el ltro de malla, eleve el ltro STS superior y el ltro
exterior.
4. Límpielos en caso de ser necesario.
5. Reemplácelos siguiendo el orden contrario.
•Para un mejor lavado, limpie el ltro después de cada
carga.
•Antes de comenzar un ciclo, asegúrese de que el ltro
se ensamble correctamente. Si el ltro no se ensambla
correctamente, pueden originarse malos resultados en
el lavado.
•Si tiene agua dura, se recomienda limpiar el ltro al me-
nos una vez por mes para evitar que se produzca un
mal lavado.
NOTA
CUIDADO Y LIMPIEZA
Cantidaddecar-
gasporsemana
Silavalavajilla
antesdecargarla
Siquitalosresiduosy
enjuagalavajillaantes
decargarla
Sisóloquitalos
residuosdelavajilla
antesdecargarla
Sinoquitalosresidu-
osnienjuagalavajilla
antesdecargarla
1a 3 Cada 6 meses Una vez por año Cuatro veces al año Una vez por mes
4a7 Cada 6 meses Una vez por año Cuatro veces al año
Dos veces por mes
(cada 15 días)
8a12 Cada 6 meses Cada 6 meses Cada un mes y medio Todas las semanas
13a14 Cada 6 meses Cada 6 meses Cada un mes y medio Todas las semanas
Tabladelimpiezadeltrosrecomendada:
Los tres ltros deben limpiarse según las recomendaciones in-
dicadas en la tabla siguiente. Limpie los ltros utilizando mate-
riales no abrasivos y agua corriente tibia. Podría necesitarse un
cepillo suave para remover la suciedad más difícil.
Filtrodemalla
Filtroexterior
FiltroSTS
superior

ESPAÑOL
23
CUIDADO Y LIMPIEZA
• Tire de la bandeja superior hacia afuera. Asegúrese
de que los oricios propulsores de agua no estén
obstruidos con partículas de alimentos.
• Cuando sea necesario realizar una limpieza,
extraiga el brazo rociador superior al girando
la tuerca ubicada en la parte inferior del brazo
1/8 en sentido contrario a las agujas del reloj, y
empújela hacia abajo.
• Luego de limpiar el brazo rociador superior, vuel-
va a colocarlo en su lugar. Gire la tuerca 1/8 en
sentido de las agujas del reloj para asegurarse de
que la tuerca se bloquee nuevamente en su lugar.
LIMPIEZA DE PARTES METÁLICAS
Algunas partes interiores y exteriores pueden limpiarse con un
trapo o esponja húmeda. Podría formarse una película turbia en
la supercie del compartimiento de acero inoxidable, especial-
mente con el agua dura.
y Asegúrese de que los oricios propulsores de agua no estén
obs-truidos con partículas de alimentos.
y Cuando sea necesario realizar una limpieza, extraiga el brazo
rociador tirando hacia arriba.
y Luego de limpiar el brazo rociador inferior, vuelva a colocar-
lo presionándolo hacia abajo hasta que encastre en su lugar.
Asegúrese de que el brazo rociador pueda girar libremente.
LIMPIEZA DEL BRAZO ROCIADOR INFERIOR
LIMPIEZA DEL BRAZO ROCIADOR SUPERIOR

24
LIMPIEZA DEL BRAZO ROCIADOR EXTREMO
Asegúrese de que los oricios propulsores de agua
no estén obstruidos con partículas de alimentos.
Cuando sea necesario realizar una limpieza, utilice un
destornillador para desajustar el gancho de sujeción
de la abrazadera que sostiene el ensamble del brazo
rociador extremo al compartimiento.
2
Tire del brazo rociador. hacia afuera y extráigalo
Luego de limpiar el brazo rociador extremo, vuelva
a colocarlo. Deslícelo nuevamente hacia su lugar y
asegúrese de que el gancho de sujeción quede bien
sujeto.
MANTENIMIENTO Y ALMACENAMIENTO ESTACIONAL
• En caso de que vaya a ausentarse por un extenso periodo de tiempo durante los meses más calurosos, se recomienda que cierre la vál-
vula de agua, desenchufe el cable tomacorriente o apague el interruptor de corriente.
• En caso de que vaya a ausentarse por un extenso periodo de tiempo durante los meses más fríos, y exista la posibilidad de que hayan
temperaturas heladas, se recomienda que prepare las líneas de suministro de agua y el mismo lavavajillas para el invierno. La prepara-
ción para el invierno debe ser realizada por personal de servicio experimentado.
CUIDADO Y LIMPIEZA
1
3

ESPAÑOL
25
PREGUNTAS FRECUENTES
PREGUNTAS COMUNES ACERCA DEL PRODUCTO
PREGUNTAS FRECUENTES
¿Es necesario utilizar un abrillantador??
Es altamente recomendable utilizar un abrillantador para mejorar
el rendimiento del secado del lavavajillas. Para ganar eciencia en
el consumo de energía, el sistema de secado híbrido no utiliza un
elemento de calor para asistir el secado, de manera que el abril-
lantador cumple un rol crucial en dicho proceso. Si no se utiliza
un abrillantador, puede quedar agua en la vajilla o en el compar-
timiento. El abrillantador ayuda a garantizar que la mayor parte
del agua sea removida de la vajilla al nal del enjuague y que la
carga esté lista para el ciclo de secado.
¿Qué puedo hacer si mi vajilla queda con una
película turbia o blanca después del lavado?
Generalmente, la película turbia se origina por los minerales del
agua que reaccionan con el detergente del lavavajillas. En primer
lugar, asegúrese de no utilizar demasiado detergente. Consulte
el manual del usuario para conocer las cantidades de detergente
recomendadas por ciclo. Añada un "Extra Enjuague" o realice un
ciclo "Vapor con Potencia" o "Fregado con Potencia". Los lavavajil-
las LG utilizan menos agua que los lavavajillas tradicionales; por lo
tanto, agregar un enjuague extra ayudará a quitar la película. Si
el suministro de agua es duro, podría necesitarse un impulsor de
rendimiento que trate la condición de agua dura.
¿Qué es el Enjuague Higiénico y cómo se activa?
La función "Enjuague Higiénico" aumentará la temperatura de
enjuague a aproximadamente 161 °F (72 °C). La temperatura de
enjuague caliente normal varía de ciclo a ciclo.
¿Qué pasos debo seguir para mejorar los resulta-
dos de secado?
El rendimiento del secado se ve directamente afectado por la can-
tidad de calor que permanece en el compartimiento luego de que
se ejecuta el enjuague caliente. Si su lavavajillas se encuentra ale-
jado del calentador de agua de su casa, podría resultar necesario
abrir la canilla de agua caliente del fregadero antes de iniciar el
ciclo de lavado, para asegurarse de que se purgue el agua fría de
las líneas de agua caliente. Esto garantizará que su lavavajillas ten-
ga un suministro consistente de agua caliente desde el comienzo
hasta el nal. La utilización del ajuste "Enjuague Higiénico" tam-
bién ayudará a mantener la temperatura del tambor interno y la
vajilla más caliente antes de que se inicie el secado.
Los lavavajillas LG están diseñados para ser utilizados conjunta-
mente con abrillantador. El abrillantador maximiza la cantidad de
agua que se elimina de la vajilla antes de que comience el ciclo de
secado. Si se utiliza un abrillantador y el rendimiento aún necesita
ser mejorado, ajuste la cantidad de abrillantador utilizada por el
indicador en la tapa del abrillantador. 3 es el ajuste predetermi-
nado, pero de ser necesario, fíjelo en el nivel 4 para que se utilice
más cantidad de abrillantador.
Permita que el lavavajillas nalice por completo el ciclo de seca-
do antes de abrir la puerta. Si la puerta se abre en pleno ciclo de
secado, el calor necesario para el funcionamiento del sistema de
secado híbrido se fugará. Esto provocará que toda la vajilla que
se encuentra en el interior del lavavajillas permanezca húmeda
cuando termine el ciclo.
¿Qué es el sistema de secado híbrido?
El lavavajillas no utiliza un elemento de calentamiento para el
proceso de secado, sino que el calor es retenido por la vajilla y
el compartimiento durante los ciclos de lavado y enjuague para
luego convertir el vapor que se produce en el compartimiento en
humedad. El aire caliente y húmero del lavavajillas se introduce
en un conducto de condensación ubicado en la puerta por medio
de un ventilador. Luego, el aire se enfría y hace que la humedad se
condense. El aire a temperatura ambiente también se introduce
en el conducto para ayudar a enfriar el aire más rápido. Cuando la
humedad se condensa en líquido, es desagotada.
Se requiere abrillantador para mejorar el rendimiento
del secado. Si no se utiliza un abrillantador, el agua
puede per-mane cer en la vajilla o en el compar-
timiento.
NOTA
¿Por qué se escucha un silbido?
Es importante determinar cuánto tiempo dura el ruido y cuándo
aparece (en qué parte del ciclo). Cuando ingresa el agua al lavava-
jillas, puede escucharse un silbido; esto es normal. Cuando la pre-
sión de agua es demasiado elevada, el sonido será más intenso;
por lo cual, podría resultar necesario ajustar la válvula de agua
para disminuir la presión si el sonido es demasiado fuerte.
¿Qué signica Vapor Doble?
Vapor Doble es una opción que puede utilizarse durante los ciclos
de lavado. Esta opción le permite personalizar por completo la
intensidad del ciclo de lavado para las bandejas superior e infe-
rior, de manera independiente, en la misma carga. Por ejemplo,
al seleccionar una aspersión suave para la bandeja superior y una
aspersión fuerte para la bandeja inferior, usted podrá lavar copas
delicadas en la bandeja superior mientras lava ollas y fuentes en
la bandeja inferior.

26
¿Qué tipo de vajilla puede colocarse en el lavavajil-
las?
Asegúrese que la vajilla que coloque en el lavavajillas sea apta
para lavavajillas. La vajilla plástica no se seca de manera tan efec-
tiva como la vajilla de cristal o de metal. Los objetos plásticos no
retienen tanto el calor como la vajilla de cristal o de metal. Las
tazas y la vajilla de plástico podrían necesitar ser secadas a mano
antes de guardarlas al nalizar el ciclo.
¿Puedo realizar solamente un ciclo de secado?
El lavavajillas no tiene una función de sólo secado; sin embargo,
el lavavajillas se desagotará durante los primeros 45 segundos de
un nuevo ciclo. Para desagotar el agua estancada, seleccione el ci-
clo de lavado y déjelo funcionar por tan sólo 45 segundos. Luego,
apague la unidad y vuélvala a encenderla. Repita este paso según
sea necesario.
¿Cuánto tiempo permanece encendido el indica-
dor de limpieza luego de que se completa el ciclo?
El indicador luminoso de limpieza en el lavavajillas permanecerá
encendido durante 4 minutos antes de apagarse. Sin embargo,
usted puede programar el lavavajillas para que la luz de limpieza
se mantenga encendida hasta que se abra la puerta del lavavaji
llas.
¿Por qué mi lavavajillas emite un pitido continuo
si abro la puerta durante o justo después de nal-
izado un ciclo?
Esto es normal. El lavavajillas le hace saber que las temperaturas
interiores de la unidad están calientes y que debe tener cuidado
cuando coloque sus manos en su interior. Cuando la unidad se
enfría, el pitido se detiene.
CARACTERÍSTICAS DEL PRODUC-
TO Y FUNCIONAMIENTO
¿Cuál es el benecio del uso de vapor?
El vapor permite que se realice una exhaustiva limpieza de los res-
tos de comida quemada utilizando menos agua que otros méto-
dos de limpieza. Además, da lugar a un rendimiento de limpieza
mejorado cuando se lava porcelana na y demás vajilla en un ciclo
delicado. Las partículas de vapor son más pequeñas y más acti-
vas, entonces su poder de penetración es más efectivo. El vapor
aumenta la temperatura interior del lavavajillas, lo que ayuda a
derretir las sustancias grasosas o cerosas, como ser el lápiz labial
en el borde de los vasos.
¿Qué es el Seguro para Niños y cómo se activa?
Seguro para Niños es una función que evita que se cambien los
controles durante el ciclo; no evita que se abra la puerta o que se
apague la unidad. Para activar o desactivar esta función, presione
los botones "Enjuague" y "Rocío" de manera simultánea durante
3 segundos.
¿Por qué aparece "PF" en la pantalla?
"PF" no es un código de error que indique un mal funcionamiento.
PF indica que hubo una falla en el suministro eléctrico. Esta fun-
ción protege el lavavajillas en caso de que se corte la electricidad
o que se interrumpa el suministro eléctrico de la unidad. Cuando
regrese la electricidad y se presione un botón, este mensaje per-
manecerá por 10 segundos y luego desaparecerá.
INSTALACIÓN
¿De qué tamaño es el codo de 90°?
El codo de 90° debe tener una rosca NPT de 3/8” en el extremo
que se conecta al lavavajillas.
¿Puedo agregar una extensión a la manguera de
desagüe?
No, no pueden agregarse extensiones.
El aparato se debe conectar a la entrada principal de agua utili-
zando un juego nuevo de mangueras; además de considerar que
no se debe reutilizar las mangueras viejas o las que se encuentran
en malas condiciones.
PREGUNTAS FRECUENTES

ESPAÑOL
27
SOLUCIÓN DE PROBLEMAS
ANTES DE LLAMAR AL SERVICIO TÉCNICO
P
ro
bl
e
m
a
Causas
p
os
i
b
l
e
s S
o
l
u
c
io
ne
s
El lavavajillas no funciona
La puerta no está bien cerrada.
El suministro de energía o el cable tomacorrien-
te no están conectados.
El fusible está quemado o el interruptor de co-
rriente está desactivado.
Asegúrese de que la puerta esté bien cerrada y trabada.
Conecte el suministro de energía y el cable tomaco-
rriente adecuadamente.
Reemplace el fusible o vuelva a encender el interruptor
de corriente.
El lavavajillas funciona por
demasiado tiempo
El lavavajillas está conectado al agua fría. Controle la conexión del suministro de agua o el ajuste
de calentamiento del agua. (Calentar el agua fría lleva
más tiempo).
Olor
El ciclo anterior se detuvo antes
de nalizar.
Ponga en funcionamiento el ciclo "Lavado Express"
con detergente sin cargar vajilla.
El agua permanece en el
compartimiento luego de
que el ciclo se complete.
La manguera de desagüe está plegada u obs-
truida.
Ajuste la manguera o elimine el bloqueo.
Manchas y películas en la
vajilla
La temperatura del agua es baja.
La cantidad de detergente es inadecuada.
La placa inferior no se trabó.
El suministro de agua debe ser al menos de 120ºF (49°C)
para un mejor rendimiento de lavado.
Utilice la cantidad de detergente recomendada.
Asegúrese de que la placa inferior esté bien cerrada y
trabada.
Sobrecarga No sobrecargue el lavavajillas.
Carga inadecuada.
Presión de agua insuciente.
Detergente insuciente.
Consulte la sección “Uso del lavavajillas”.
La presión de agua debería ser de entre 138 - 827 kPa.
Agregue la cantidad de detergente recomendada. Con-
sulte la sección “Uso del lavavajillas”.
El dispensador del abrillantador está vacío. Recargue el dispensador del abrillantador.
Agua extremadamente
du
r
a.
La mejor forma de eliminar las manchas de su vajilla es instalar un ablandador de agua en su hogar. Si ya
tiene un ablandador de agua instalado, o bien no planea instalar ninguno, pruebe agregando la opción
"Extra Enjuague" como parte del ciclo de lavado para ayudar a minimizar esta condición. Para agregar un
enjuague extra al ciclo, seleccione el ciclo de lavado y luego presione "Enjuague".
N OTA : La selección de la opción "Extra Enjuague" aumentará la duración del ciclo y el uso de agua.
Cómo eliminar el agua dura acumulada en el c
o
m
p
a
r
t
im
ie
n
to
Retire toda la vajilla, los cubiertos y el cesto para cubiertos del lavavajillas. Deben quedar únicamente las
bandejas en el compartimiento.
Llene una medida de taza con vinagre blanco, aproximadamente 14 a 17 onzas (400 a 500 mL), y coloque
la medida en la bandeja inferior.
Inicie un ciclo “Normal” y seleccione "Extra Enjuague" y "Higiénico"; luego, cierre la puerta.
NO USE DETERGENTE.
N OTA : Asegúrese de permitir que el lavavajillas complete el ciclo en su totalidad. Este método de limpieza
debe realizarse sólo si es necesario.
Si usted ha seguido esta guía de solución de problemas y el problema persiste, o si el problema que está experimentando no se encuentra
en esta guía, comuníquese con el Servicio de Atención al Cliente.

28
ANTES DE LLAMAR AL SERVICIO TÉCNICO
SOLUCIÓN DE PROBLEMAS
P
ro
bl
e
m
a
Causas
p
os
i
b
l
e
s S
o
l
u
c
io
ne
s
Quedan restos de comida en la vajilla.
El ciclo seleccionado es inadecuado. Seleccione el ciclo correcto según el nivel
de suciedad y el tipo de vajilla a lavar.
La temperatura del agua está demasiado
baja.
Controle la conexión del suministro de
agua o el ajuste de calentamiento del
agua.
No se utilizó detergente para el lavado de
la vajilla.
Use el detergente recomendado.
Hay baja presión de entrada del agua. La presión de agua debería ser de entre
138 - 827 kPa.
Los oricios propulsores de agua de los
brazos rociadores están bloqueados.
Limpie los brazos rociadores.
La carga de vajilla inadecuada. Asegúrese de que la vajilla no obstruya la
rotación del brazo rociador ni que inter-
era con el dispensador de detergente.
Los ltros están obstruidos. Limpie los ltros.
Ruido
Algunos ruidos son normales durante el
funcionamiento.
Abra la cubierta de detergente.
Desagote la bomba al inicio del ciclo de
desagote.
El lavavajillas no se encuentra a nivel. Ajuste los pies de nivelación.
El brazo de la boquilla golpea contra la
vajilla.
Reposicione la vajilla.
Opacidad en la vajilla de cristal
Hay una combinación de detergente y
agua blanda en exceso.
Use menos detergente y un abrillantador
para minimizar el problema.
Marcas negras y grises en la vajilla.
Los objetos de aluminio rozan contra la
vajilla durante el ciclo.
Reposicione la vajilla.
Película amarilla o marrón en las super-
cies internas del lavavajillas.
Manchas de té o café.
Elimine las manchas utilizando un pro-
ducto quita manchas.
La vajilla no se seca.
El dispensador del agente de enjuague
está vacío.
Controle y recargue el dispensador del
agente de enjuague si está vacío.
Las lámparas no se encienden. La electricidad está desconectada. Conecte el suministro de energía.
Los brazos rociadores no rotan normal-
mente.
Los oricios de los brazos rociadores están
bloqueados con partículas de comida.
Limpie los oricios de los brazos rociad-
ores.
La bandeja superior está torcida. La bandeja está mal ajustada. Consulte la sección "Uso del lavavajillas".
El lavavajillas emite un pitido constante
cuando la puerta está abierta, durante o
justo luego de que naliza un ciclo.
Los contenidos del lavavajillas están
calientes y debería tener cuidado cuando
coloca sus manos dentro del lavavajillas.
Cierre la puerta hasta que el lavavajillas
y la vajilla se enfríen. El pitido nalizará si
se cierra la puerta o cuando disminuya la
temperatura interior.
Error IE Hay un problema en la entrada de agua.
Controle que la manguera del agua no
esté obstruida, plegada o congelada.
Controle el suministro de agua.
Erro OE
Hay un problema en el desagüe.
Controle que la manguera del agua no
esté obstruida, plegada o congelada.
Los ltros están obstruidos. Limpie los ltros.
Error FE Excesiva cantidad de agua.
Comuníquese con un Centro de Servicio
Autorizado de LG o con el Servicio de
Atención al Cliente.
Error EI Problema de pérdida de agua.
Error HE Fallas en el circuito de calentamiento.
Error TE
Fallas en el termistor o temperatura del
agua de entrada demasiado elevada (más
de 1940F/ 90°C).
Si usted ha seguido esta guía de solución de problemas y el problema persiste, o si el problema que está experimentando no se encuentra
en esta guía, comuníquese con el Servicio de Atención al Cliente.

ESPAÑOL
29
En caso de experimentar cualquier problema con su lavavaji-
llas, éste tiene la capacidad de transmitir información a su Smart
Phone (Teléfono Inteligente) mediante la aplicación "LG Smart
Laundry & DW", o al centro de atención al cliente de LG a través
de su teléfono.
SISTEMA SMART DIAGNOSIS™ (DIAGNÓSTICO INTELIGENTE)
"Smart Diagnosis" (Diagnóstico Inteligente) no puede activarse a
menos que encienda su lavavajillas presionando el botón "Power"
(Encendido). Si su lavavajillas no enciende, entonces el problema
se deberá solucionar sin utilizar "Smart Diagnosis".
Smart Diagnosis mediante el Centro de
Atención al Cliente
1. Comuníquese con el Centro de Atención al Cliente de LG
llamando al teléfono.
2. Cuando reciba las instrucciones del representante de aten-
ción al cliente, sostenga la boquilla de su teléfono cerca del
oricio ubicado en el panel lateral. Sostenga el teléfono a no
más de 3 cm de distancia, pero sin tocar la máquina.
No toque ningún otro botón o ícono en la pantalla.
NOTA
3. Mantenga presionado el botón "Enjuague" en la pantalla du-
rante tres segundos.
4. Sostenga el teléfono en el lugar hasta que nalice el tono de
transmisión. Este proceso tomará aproximadamente 17 se-
gundos y la pantalla mostrará el tiempo restante.
5. Una vez que nalice la cuenta regresiva y se detengan los
tonos, reanude su conversación con el representante de a-
tención al cliente, quien podrá asistirlo en el análisis de la in-
formación transmitida.
SISTEMA SMART DIAGNOSIS™
Smart Diagnosis a través de su Smart
Phone
1. Descargue la aplicación "LG Smart Laundry & DW" en su Smart
Phone (teléfono inteligente).
2. Abra la aplicación "LG Smart Laundry & DW" en su Smart Phone.
3. Presione el botón Smart Diagnosis de su teléfono inteligente.
4. Presione el botón Diagnose de su teléfono inteligente.
5. Presione el botón Record de su teléfono inteligente.
6. Presione el botón RECORD (Grabar) en el teléfono inteligente y
luego sostenga la boquilla del teléfono cerca del oricio ubicado
en el panel lateral.
7. Presione y mantenga presionado el botón Enjuague en la pan-
talla del lavavajillas durante tres segundos.
8. Con el teléfono ubicado en su lugar, presione el botón Smart Di-
agnosis (Diagnóstico inteligente) en el teléfono.
9. Sostenga el teléfono en el lugar hasta que nalice el tono de trans-
misión. Este proceso tomará aproximadamente 17 segundos y la
pantalla mostrará el tiempo restante.
10. Cuando se completa la grabación, vea el diagnóstico presio-nan-
do el botón Next (Siguiente) en el teléfono.
Después de tres segundos, la pantalla cambiará de 0:22 a
17 y comenzará la cuenta regresiva del tiempo restante.
NOTA
No toque ningún otro botón o ícono en la pantalla.
NOTA

30
ESPECIFICACIONES
ESPECIFICACIONES
• Suministro de energía: 120 V~ 60 Hz 1 250 W
• Presión de agua: 20–120 psi (137 - 827 kPa)
• Tamaño (ancho x profundidad x altura): 23
3
/4" x 24
5
/8"x 33
1
/2" (603 mm x 625 mm x 851 mm)
• Temperatura del agua de entrada: un mínimo de 120 °F (49 °C)
• Peso del producto: - LDF8574 : 102,5 libras(46,5 kg)
- LDF8072 : 100,5 libras(45,6 kg)
- LDF7561 : 96,6 libras(43,8 kg)
- LDF7551 : 88,2 libras(40 kg)
• La apariencia y las especicaciones contenidas en este manual están sujetas a variaciones sin previo aviso.

31
MEMO

32
MEMO

33
MEMO

-
 1
1
-
 2
2
-
 3
3
-
 4
4
-
 5
5
-
 6
6
-
 7
7
-
 8
8
-
 9
9
-
 10
10
-
 11
11
-
 12
12
-
 13
13
-
 14
14
-
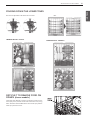 15
15
-
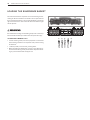 16
16
-
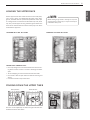 17
17
-
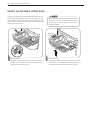 18
18
-
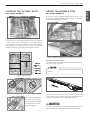 19
19
-
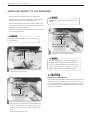 20
20
-
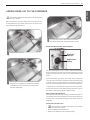 21
21
-
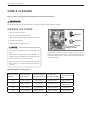 22
22
-
 23
23
-
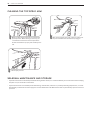 24
24
-
 25
25
-
 26
26
-
 27
27
-
 28
28
-
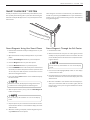 29
29
-
 30
30
-
 31
31
-
 32
32
-
 33
33
-
 34
34
-
 35
35
-
 36
36
-
 37
37
-
 38
38
-
 39
39
-
 40
40
-
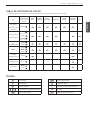 41
41
-
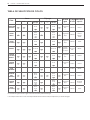 42
42
-
 43
43
-
 44
44
-
 45
45
-
 46
46
-
 47
47
-
 48
48
-
 49
49
-
 50
50
-
 51
51
-
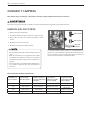 52
52
-
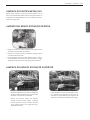 53
53
-
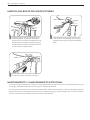 54
54
-
 55
55
-
 56
56
-
 57
57
-
 58
58
-
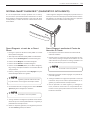 59
59
-
 60
60
-
 61
61
-
 62
62
-
 63
63
-
 64
64


LG 8806084006028 El manual del propietario
- Categoría
- Lavaplatos
- Tipo
- El manual del propietario
- Este manual también es adecuado para
en otros idiomas
- English: LG 8806084006028 Owner's manual
Artículos relacionados
-
LG LSDF795ST El manual del propietario
-
LG LDS5540ST El manual del propietario
-
-
LG LDF7774BD/00 El manual del propietario
-
LG LDS5540WW El manual del propietario
-
LG 8806084350503 El manual del propietario
-
LG LSDF9962ST El manual del propietario
-
-
-
LG LDF8072ST El manual del propietario
Otros documentos
-
LG Electronics LDT9965BD Guía de instalación
-
-
-
Forno FDWBI800424S El manual del propietario
-
Haier HDBL865ATS Manual de usuario
-
Nostalgia FCD06ASWWHC Manual de usuario
-
Viking VDWU324SS Manual de usuario
-
-
-
Power Soak Silverware Pre-Washing System Manual de usuario