Sony ICF-SW12 Manual de usuario
- Categoría
- Relojes de alarma
- Tipo
- Manual de usuario

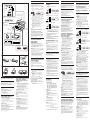
PRESENT TIME ALARM TIME
ALARM
ON/OFF
SET
WORLD T.
ALARM
LOCK
CLOCK
PRESENT TIME ALARM TIME
ALARM
ON/OFF
SET
WORLD T.
ALARM
LOCK
CLOCK
PRESENT TIME ALARM TIME
ALARM
ON/OFF
SET
WORLD T.
ALARM
LOCK
CLOCK
PRESENT TIME ALARM TIME
ALARM
ON/OFF
SET
WORLD T.
ALARM
LOCK
CLOCK
PRESENT TIME ALARM TIME
ALARM
ON/OFF
SET
WORLD T.
ALARM
LOCK
CLOCK
TUNING
VOL
SNOOZE/LIGHT
SET
WORLD T.
ALARM
LOCK
ALARM
ON/OFF
– ADJ
+
D.S.T
SUMMER T.
SW
POWER OFF
MW FM
123456789
CLOCK
PUSH OPEN
Antes de comenzar
¡Muchas gracias por la elección de este receptor de
bandas mundiales Sony! Este receptor de bandas
mundiales le ofrecerá muchas horas de servicio
fiable y de placer de escucha.
Antes de utilizar el receptor de bandas mundiales,
lea detenidamente estas instrucciones, y consérvelas
para futuras referencias.
Particularidades
Radio de FM/SW/MW con un reloj de hora mundial
para el viaje
• Receptor de 11 bandas de FM/SW1-9/MW con
gran sensibilidad y selectividad.
• Sistema de ensanchamiento de banda que le
permitirá sintonizar fácilmente emisoras de SW.
• Despertador incorporado
• Ajuste de la hora de verano
• Toma para auricular incorporado
• Función de alarma repetida (SNOOZE)
Fuentes de
alimentación
Colocación de las Pilas
(Consulte la Fig. A-a)
1 Manteniendo presionada la tapa,
deslícela en el sentido de la flecha.
2 Inserte dos pilas R6 (tamaño AA) (no
suministradas) con la polaridad
correcta.
Duración de las pilas
Aprox. 35 horas utilizando pilas R6 (AA) Sony
Reemplazo de las pilas
Cuando el sonido de la radio se distorsione o sea
inestable y el sonido de la alarma sea bajo, reemplace
ambas pilas R6 (tamaño AA).
Nota soble las piles
Cuando no vaya a utilizar la unidad durante mucho
tiempo, extraiga las pilas para evitar los daños que
podrían causar el derrame y la corrosión de las
mismas.
Colocación de la pila de
litio para protección del
reloj (Consulte la Fig. A-b)
1 Coloque la radio con su base hacia
arriba, inserte la punta de un bolígrafo,
u otro objeto similar, en el orificio
situado al lado del compartimiento de
la pila de litio, y empuje.
El portapila saldrá.
2 Coloque la pila con el lado plano (+)
hacia arriba y después inserte el
compartimiento hasta que se detenga
en su lugar con seguridad.
Duración de la pila de litio
Aprox. 1 años para el funcionamiento del reloj
utilizando una pila de litio CR2025 Sony
Reemplazo de la pila de litio
Cuando la visualización sea oscura, reemplace la pila
de litio CR2025.
Nota
Usted no podrá oír la radio colocando sólo la pila de
litio. Deberá colocar dos pilas R6 (tamaño AA) (no
suministradas).
Notas sobre las pilas
• Mantenga la pila de litio fuera del alcance de los
niños. Si alguien traga la pila, consulte
inmediatamente a un médico.
• Limpie la pila con un paño seco para asegurar un
buen contacto.
• Cuando coloque la pila, tenga en cuenta su
polaridad.
• No sujete la pila con pinzas metálicas porque
podría cortocircuitarla.
• No abra la pila ni la tire al fuego, ya que podría
causar su explosión. Deshágase de las pilas usadas
con cuidado.
PRECAUCIÓN
Si coloca incorrectamente la pila, habrá riesgo de
explosión. Reemplácela sólo por una del mismo tipo
o equivalente recomendado por la fábrica del
equipo. Deseche las pilas usadas siguiendo las
instrucciones de la fábrica.
Ajuste del reloj
Cuando coloque la pila de litio CR2025 por primera
vez, en el visualizador aparecerá la indicación 12:00
(mediodía).
1 Ponga el selector de modo en WORLD
T.
2 Presione ADJ + o – para seleccionar el
área a la que desee ajustar la hora.
(Por ejemplo, si desea ajustar la hora a
las 8:15 AM de Tokio, mueva la marca
$ hasta la posición “+9”.)
3 Ponga el selector de modo en CLOCK y
presione ADJ + o – para ajustar la hora.
Si mantiene presionada ADJ + o –, los
dígitos de los minutos avanzarán
rápidamente. Los dígitos de la hora
avanzarán uno por uno cuando los
dígitos de los minutos avancen a “00”
después de “59”.
4 Ponga el selector de modo en ALARM o
LOCK. La marca “ : ” dejará de
parpadear y el reloj comenzará a
funcionar.
Nota
Si extrae la pila de litio después de haber ajustado el
reloj, la memoria se borrará. Vuelva a ajustar el reloj.
Nota sobre la función de bloqueo
Normalmente ponga el selector de modo en LOCK de
forma que no funcionen ADJ + ni –. De esta manera,
usted podrá evitar operaciones erróreas.
Para ajustar la hora al segundos
En el paso 4, ponga el selector de modo en ALARM o
LOCK al oír la señal horaria de la radio o el teléfono.
Para ver la hora
local de la zona
horaria deseada
Los números situados arriba y abajo del mapa de las
zonas horarias indican las diferencias de la hora a
partir la posición de la hora universal coordinada
(UTC). Por ejemplo, la diferencia horaria en Tokio es
de +9 horas.
Las áreas en gris claro indican las zonas especiales
donde mantienen diferencias de hora especiales
(indicadas junto con ellas).
Ejemplo: Para ver la hora local de Nueva
York.
Ponga el selector de modo en WORLD T. y
presione ADJ + o – para mover la marca $
hasta la posición “–5”.
Si desea saber la hora local con la diferencia de la
hora en unidades de 30 minutos, añada 30 minutos a
la hora actual (o réstelos de la hora actual). (Por
ejemplo, si la diferencia de la hora es de cinco horas
y 30 minutos, mueva la marca $ hasta la posición
“+5” y añada 30 minutos a la hora visualizada.)
Sony Corporation © 1997 Printed in Japan
ICF-SW12
3-859-292-12 (1)
FM/SW1-9/MW
11 Band Receiver
Operating Instructions
Manual de instrucciones
Istruzioni per l’uso (faccita opposta)
Manual de instruções (lado inverso)
@ jack
Toma @
Display
Visualizador
R6 (AA) x2
b
CR2025
a
A
Mode selector
Selector
de modo
B
Time zone map
Mapa de las zonas horarias
}
]
]
}
Bottom
Parte
inferior
SW
FM
MW
TUNE indicator
TUNE indicador
English
Before You Begin
Thank you for choosing the Sony receiver! It will
give you many hours of reliable service and listening
pleasure.
Before operating the receiver, please read these
instructions thoroughly and retain them for future
reference.
Features
FM/SW/MW World band receiver for travelers
• FM/SW 1-9/MW 11 band receiver with high
sensitivity and selectivity
• Band spread system enables you to easily tune in
SW stations
• Built-in alarm
• Summer time adjustment
• Built-in earphone jack
• Snooze function
Power Sources
Installing Batteries (See
Fig. A–a)
1 While pressing the lid, slide it in the
direction of the arrow.
2 Insert two R6 (size AA) batteries (not
supplied) with correct polarity.
Battery life
Approx. 35 hours, using Sony batteries R6 (AA)
Replacing batteries
When the sound of the radio becomes distorted or
unstable and the alarm sound is getting lower
replace both R6 (size AA) batteries.
Note on dry battery
When the unit is not be used for a long period of
time remove the batteries to avoid damage from
battery leakage and corrosion.
Installing Lithium
Battery for Clock
Backup (See Fig. A–b)
1 Position the bottom of the radio
upward and insert a tip of a ballpoint
pen or something equivalent into the
hole next to the lithium battery
compartment and push.
The battery holder comes out.
2 Insert the battery with the flat (+) side
facing upwards, then insert the
compartment until it is locked in
position.
Lithium battery life
Approx. 1 year of clock operation, using Sony
CR 2025 lithium battery
Replacing lithium battery
When the display becomes dim, replace the CR2025
lithium battery.
Note
You cannot listen to the radio by only installing a
lithium battery. You should use two R6 (size AA)
batteries (not supplied).
Notes on batteries
• Keep the lithium battery out of reach of children.
Should the battery be swallowed, immediately
consult a doctor.
• Wipe the battery with a dry cloth to assure good
contact.
• Be sure to install the battery in the correct polarity
position.
• Do not hold the battery with metallic tweezers, as
doing so may cause a short-circuit.
• Do not break up the battery or throw it into a fire,
which might cause it to explode.
Carefully dispose of the used battery.
CAUTION
Danger of explosion if battery is incorrectly replaced.
Replace only with the same or equivalent type
recommended by the equipment manufacture.
Discard used batteries according to manufacture’s
instructions.
Setting the Clock
The display will show a 12:00 (noon) indication
when the CR2025 lithium battery is first installed.
1 Set the mode selector to WORLD T.
2 Press ADJ + or – to choose the area to
which you want to set the time.
(For example, if you want to set the
time to 8:15 AM in Tokyo, move the $
mark to the “+9” position.)
3 Set the mode selector to CLOCK and
press ADJ + or – to set the time.
When ADJ + or – is held down, the
minute digits advance rapidly.
The hour digits advance one by one
when the minute digits advance to “00”
after “59”.
4 Set the mode selector to ALARM or
LOCK. The “ : ” mark stops flashing and
the clock will now start.
Note
If you remove the lithium battery after setting the
clock, the memory will be canceled. Set the clock
again.
Note on LOCK function
Normally, set the mode selector to LOCK so that ADJ
+ and – do not function. This enables you to avoid
misoperation.
To set the time to the second
In step 4, set the mode selector to ALARM or LOCK
simultaneously with the radio or telephone time
signal.
To Check the Local Time
of the Desired Time
Zone
The numbers above and below the time zone map
indicate the time differences from the UTC
(Universal Time Coordinated) position. For example,
the time difference in Tokyo is +9 hours.
The light grey areas indicate special time zones.
These areas maintain special time differences
(written beside them).
Example: To check the local time in New
York.
Set the mode selector to WORLD T. and
press ADJ + or – to move the $ mark to the
“–5” position.
If you want to know the local time and the difference
in time in 30 minute units, add it to the present time
(or subtract it from the present time). (For example, if
the difference in time is five hours and 30 minutes,
move the $ mark to the “+5” position and add 30
minutes to the displayed time.
To change the display to
the daylight saving time
(summer time)
indication
Press D.S.T.•SUMMER T.
The s mark appears in the display and
the time indication changes to summer
time.
To cancel the summer time indication,
press D.S.T.•SUMMER T. again.
Operating the Radio
1 Select a desired band (FM, SW1-9 or
MW).
2 Tune in a station using the TUNING.
TUNE (tuning indicator) lights up when
a station is tuned in.
3 Adjust the volume using VOL (volume).
• To turn off the radio, set to POWER OFF.
To improve radio reception (See Fig.
B)
FM: Extend the telescopic antenna for better
reception.
SW: Stand the telescopic antenna vertically.
MW: Rotate the unit horizontally for optimum
reception.
A ferrite bar antenna is built into the unit.
Setting the Alarm
1 Set the mode selector to ALARM.
2 Press the ADJ + or – to set the alarm
time.
3 Set mode selector to LOCK.
4 Press ALARM ON/OFF.
(When alarm is set, the alarm time
appears in the display. If you press
ALARM ON/OFF again, the alarm time
is disappeared and is canceled.)
• The alarm sound will come on at the preset time
and will automatically turn itself off after about 60
minutes, unless it is turned off manually.
• To stop the alarm sound, press ALARM ON/OFF.
To wake to the alarm sound at the
same time the next day.
Press ALARM ON/OFF again. The time set yesterday
will show up in the display.
To doze for a few more minutes,
press SNOOZE/LIGHT.
The alarm will shut off , but will come on again after
about 9 minutes. You can repeat this process six
times at the most in an hour.
Notes
• The buzzer sound level cannot be adjusted.
• If the radio is on and earphone is connected to the
@ jack, the buzzer alarm is heard from both the
speaker and earphone.
• If the radio is off and the earphone is connected to
the @ jack, the buzzer alarm is heard only from the
speaker.
• The “m” mark flashes in the display at the preset
alarm time.
Lighting the Display
–Light Function
Press SNOOZE/LIGHT.
The display lights up for about 10 seconds.
Precautions
Before operating the unit, be sure to install the
CR2025 clock battery.
• Operate the unit on the following power sources:
Radio: 3V DC, two R6 (size AA) batteries.
Clock: 3V DC, one CR2025 lithium battery.
• Do not leave the unit in a location near heat
sources, or in a place subject to direct sunlight,
excessive dust, or mechanical shock, or in a car
with its windows closed.
• Should any solid object or liquid fall into the unit,
remove the batteries and have it checked by
qualified personnel before operating it any further.
• When the casing becomes soiled, clean it with a
soft cloth dampened with a mild detergent
solution. Never use abrasive cleansers or chemical
solvents, as they may mar the casing.
• Since a strong magnet is used for the speaker, keep
personal credit cards with magnetic coding or
spring- wound watches away from the unit to
prevent them from possible damage caused by the
magnet.
• In vehicles or in buildings, radio reception may be
difficult or noisy. Try listening near a window.
If you have any questions or problems concerning
your unit, please consult your nearest Sony dealer.
Specifications
Time display
24-hour system
Frequency range
FM: 87.5 – 108 MHz
SW1: 4.750 – 5.060 MHz (60 meter band)
SW2: 5.900 – 6.200 MHz (49 meter band)
SW3: 7.100 – 7.350 MHz (41 meter band)
SW4: 9.400 – 9.990 MHz (31 meter band)
SW5: 11.600 – 12.100 MHz (25 meter band)
SW6: 13.570 – 13.870 MHz (22 meter band)
SW7: 15.100 – 15.800 MHz (19 meter band)
SW8: 17.480 – 17.900 MHz (16 meter band)
SW9: 21.450 – 21.750 MHz (13 meter band)
MW: 530 – 1,605 kHz
Speaker
Approx. 4.5 cm (1
13
/16 inches) dia.
Power output
100 mW (at 10% harmonic distortion)
Output
@ jack (minijack)
Power requirements
Radio: 3V DC, two R6 (size AA) batteries
Clock: 3V DC, one CR 2025 lithium battery
Dimensions
Approx. 111 x 30.5 x 80.3 mm (w/h/d)
(4
3
/
8
x 1
1
/
4
x 3
1
/
4
inches) incl. projecting parts
and controls (with the lid closed)
Mass
Approx. 233 g (8.2 oz.) incl. batteries
Accessory supplied
Sony CR 2025 lithium battery (1)
Short wave guide (1)
Design and specifications are subject to change
without notice.
Español
Para cambiar la visualización
a la indicación de la hora de
ahorro de la luz diurna (hora
de verano)
Presione D.S.T.•SUMMER T.
En el visualizador aparecerá la marca s y
la indicación horaria cambiará a la hora de
verano.
Para borrar la indicación de la hora de
verano, vuelva a presionar
D.S.T.•SUMMER T.
Radiorrecepción
1 Seleccione la banda deseada (FM, SW
1-9, o MW).
2 Sintonice la emisora utilizando
TUNING.
Cuando sintonice una emisora, se
encenderá TUNE (indicador de
sintonía).
3 Ajuste VOL..
• Para desconectar la radio, ponga en POWER OFF.
Para mejorar la radiorrecepción
(Consulte la Fig. B)
FM: Extienda la antena telescópica hasta lograr la
mejor recepción posible.
SW: Extienda verticalmente la antena telescópica.
MW:Gire horizontalmente la unidad hasta obtener la
óptima recepción.
La unidad tiene incorporada una antena de
barra de ferrita.
Ajuste de la alarma
1 Ponga el selector de modo en ALARM.
2 Presione ADJ + o – para ajustar la hora
de la alarma.
3 Ponga el selector de modo en LOCK.
4 Presione ALARM ON/OFF.
(Cuando la alarma se ajuste, en el
visualizador aparecerá la hora de la
alarma. Si vuelve a presionar ALARM
ON/OFF, la hora de alarma
desaparecerá y se cancelará.)
• La alarma sonará a la hora ajustada y se silenciará
automáticamente después de unos 60 minutos a
menos que la detenga manualmente.
• Para silenciar la alarma, presione ALARM ON/OFF.
Para que la alarma suene a la misma
hora del día siguiente
Vuelva a presionar ALARM ON/OFF. En el
visualizador aparecerá la hora ajustada el día
anterior.
Para dormitar unos minutos más,
presione SNOOZE/LIGHT.
La alarma se silenciará, pero volverá a sonar unos 9
minutos después. Usted podrá repetir este proceso
seis veces como máximo en una hora.
Notas
• El nivel del sonido de la alarma no podrá ajustarse.
• Si enciende la radio y conecta un auricular a la
toma @, podrá oír la alarma tanto a través del
altavoz como del auricular.
• Si apaga la radio y conecta un auricular a la toma
@, oirá la alarma sólo a través del altavoz.
• A la hora de sonar alarma, la marca “m”
parpadeará en el visualizador.
Función de iluminación
del visualizador
Presione SNOOZE/LIGHT.
El visualizador se iluminará durante 10 segundos.
Precauciones
Antes de utilizar la unidad, cerciórese de colocar la
pila CR2025 para el reloj.
• Haga funcionar la unidad con las fuentes de
alimentación siguiente:
Radio: 3V CC, dos pilas R6 (tamaño AA).
Reloj: 3V CC, una pila de litio CR2025.
• No deje la unidad en un lugar cercano a fuentes
térmicas, ni en un lugar sometido a la luz solar
directa, polvo excesivo, golpes mecánicos, o en un
automóvil con las ventanillas cerradas.
• Si cae algún objeto sólido o líquido en la unidad,
extraiga las pilas y haga revisarla por personal
cualificado antes de reutilizarla.
• Cuando se ensucie el exterior, límpielo con un
paño suave humedecido con una solución de
detergente suave. Nunca utilice limpiadores
abrasivos ni disolventes químicos, ya que podría
dañar la terminación.
• Como el altavoz emplea un imán intenso,
mantenga las tarjetas de crédito que empleen
codificación magnética y los relojes de cuerda
alejados de la unidad para evitar posibles daños
que podría causar tal imán.
• En vehículos o en edificios, la radiorrecepción
puede resultar difícil o ruidosa. Pruebe a escuchar
cerca de una ventana.
Si tiene alguna pregunta o problema en relación con
esta unidad, póngase en contacto con su proveedor
Sony.
Especificaciones
Visualización horaria
Sistema de 24 horas
Gama de frecuencias
FM: 87,5 - 108 MHz
SW1: 4,750-5,060 MHz (Banda de 60 metros)
SW2: 5,900-6,200 MHz (Banda de 49 metros)
SW3: 7,100-7,350 MHz (Banda de 41 metros)
SW4: 9,400-9,990 MHz (Banda de 31 metros)
SW5: 11,600-12,100 MHz (Banda de 25 metros)
SW6: 13,570-13,870 MHz (Banda de 22 metros)
SW7: 15,100-15,800 MHz (Banda de 19 metros)
SW8: 17,480-17,900 MHz (Banda de 16 metros)
SW9: 21,450-21,750 MHz (Banda de 13 metros)
MW: 530 - 1.605 kHz
Altavoz
Aprox. 4,5 cm de diá.
Potencia de salida
100 mW (al 10% de distorsión armónica)
Salida
Toma @ (minitoma)
Alimentación
Radio: 3 V CC, dos pilas de R6 (tamaño AA)
Reloj: 3 V CC, una pila de litio CR2025
Dimensiones
Aprox. 111 x 30,5 x 80,3 mm (an/al/prf)
incluyendo partes y controles salientes (con la
tapa cerrada)
Masa
Aprox. 233 g incluyendo las pilas
Accesorio suministrado
Pila de litio CR2025 Sony (1)
Guía de ondas cortas (1)
Diseño y especificaciones sujetos a cambio sin previo
aviso.
Flashes
Telescopic antenna
Antena telescópia
–
ADJ
+
PRESENT TIME ALARM TIME
Present time $ mark
–
ADJ
+
PRESENT TIME ALARM TIME
Hora actual marca $
PRESENT TIME ALARM TIME
ALARM
ON/OFF
SET
WORLD T.
ALARM
LOCK
CLOCK
Parpadeando
You are cautioned that any changes or
modifications not expressly approved in this
manual could void your authority to operate this
equipment.
For the customers in the USA
Owner’s Record
The model number is located at the bottom and the
serial number is located in the battery compartment.
Record the serial number in the space provided
below.
Model No. ICF-SW12
Serial No.
INFORMATION
This equipment has been tested and found to comply
with the limits for a Class B digital device, pursuant
to Part 15 of the FCC Rules. These limits are
designed to provide reasonable protection against
harmful interference in a residential installation. This
equipment generates, uses, and can radiate radio
frequency energy and, if not installed and used in
accordance with the instructions, may cause harmful
interference to radio communications. However,
there is no guarantee that interference will not occur
in a particular installation. If this equipment does
cause harmful interference to radio or television
reception, which can be determined by turning the
equipment off and on, the user is encouraged to try
to correct the interference by one or more of the
following measures:
– Reorient or relocate the receiving antenna.
– Increase the separation between the equipment
and receiver.
– Connect the equipment into an outlet on a circuit
different from that to which the receiver is
connected.
– Consult the dealer or an experienced radio/TV
technician for help.
La página se está cargando...
Transcripción de documentos
3-859-292-12 (1) Español English FM/SW1-9/MW 11 Band Receiver Before You Begin Thank you for choosing the Sony receiver! It will give you many hours of reliable service and listening pleasure. Before operating the receiver, please read these instructions thoroughly and retain them for future reference. Operating Instructions Manual de instrucciones Istruzioni per l’uso (faccita opposta) Manual de instruções (lado inverso) Features FM/SW/MW World band receiver for travelers • FM/SW 1-9/MW 11 band receiver with high sensitivity and selectivity • Band spread system enables you to easily tune in SW stations • Built-in alarm • Summer time adjustment • Built-in earphone jack • Snooze function ICF-SW12 To change the display to the daylight saving time (summer time) indication Press D.S.T.•SUMMER T. The s mark appears in the display and the time indication changes to summer time. To cancel the summer time indication, press D.S.T.•SUMMER T. again. Operating the Radio 1 Power Sources Sony Corporation © 1997 Printed in Japan 2 Installing Batteries (See Fig. A–a) 1 While pressing the lid, slide it in the 2 D.S.T SUMMER T. SET direction of the arrow. Insert two R6 (size AA) batteries (not supplied) with correct polarity. Battery life CLOCK WORLD T. ALARM LOCK Approx. 35 hours, using Sony batteries R6 (AA) Replacing batteries When the sound of the radio becomes distorted or unstable and the alarm sound is getting lower replace both R6 (size AA) batteries. ALARM ON/OFF Note on dry battery When the unit is not be used for a long period of time remove the batteries to avoid damage from battery leakage and corrosion. – ADJ + Telescopic antenna Antena telescópia 1 yyyy ,,,, ,,,, yyyy ,,,, yyyy TUNE indicator TUNE indicador @ jack Toma @ 2 Position the bottom of the radio upward and insert a tip of a ballpoint pen or something equivalent into the hole next to the lithium battery compartment and push. The battery holder comes out. Insert the battery with the flat (+) side facing upwards, then insert the compartment until it is locked in position. Mode selector Selector de modo Replacing lithium battery When the display becomes dim, replace the CR2025 lithium battery. Notes on batteries • Keep the lithium battery out of reach of children. Should the battery be swallowed, immediately consult a doctor. • Wipe the battery with a dry cloth to assure good contact. • Be sure to install the battery in the correct polarity position. • Do not hold the battery with metallic tweezers, as doing so may cause a short-circuit. • Do not break up the battery or throw it into a fire, which might cause it to explode. Carefully dispose of the used battery. PUSH OPEN POWER OFF TUNING VOL Bottom – b Parte Set the mode selector to WORLD T. Press ADJ + or – to choose the area to which you want to set the time. ADJ + PRESENT TIME $ mark (For example, if you want to set the time to 8:15 AM in Tokyo, move the $ mark to the “+9” position.) CR2025 3 MW 4 Set the mode selector to CLOCK and press ADJ + or – to set the time. When ADJ + or – is held down, the minute digits advance rapidly. The hour digits advance one by one when the minute digits advance to “00” after “59”. Set the mode selector to ALARM or LOCK. The “ : ” mark stops flashing and the clock will now start. Note If you remove the lithium battery after setting the clock, the memory will be canceled. Set the clock again. Note on LOCK function Normally, set the mode selector to LOCK so that ADJ + and – do not function. This enables you to avoid misoperation. For the customers in the USA Owner’s Record The model number is located at the bottom and the serial number is located in the battery compartment. Record the serial number in the space provided below. Model No. ICF-SW12 Serial No. INFORMATION This equipment has been tested and found to comply with the limits for a Class B digital device, pursuant to Part 15 of the FCC Rules. These limits are designed to provide reasonable protection against harmful interference in a residential installation. This equipment generates, uses, and can radiate radio frequency energy and, if not installed and used in accordance with the instructions, may cause harmful interference to radio communications. However, there is no guarantee that interference will not occur in a particular installation. If this equipment does cause harmful interference to radio or television reception, which can be determined by turning the equipment off and on, the user is encouraged to try to correct the interference by one or more of the following measures: – Reorient or relocate the receiving antenna. – Increase the separation between the equipment and receiver. – Connect the equipment into an outlet on a circuit different from that to which the receiver is connected. – Consult the dealer or an experienced radio/TV technician for help. PRESENT TIME ALARM ON/OFF 2 3 ALARM TIME Flashes Press the ADJ + or – to set the alarm time. Set mode selector to LOCK. Radio de FM/SW/MW con un reloj de hora mundial para el viaje • Receptor de 11 bandas de FM/SW1-9/MW con gran sensibilidad y selectividad. • Sistema de ensanchamiento de banda que le permitirá sintonizar fácilmente emisoras de SW. • Despertador incorporado • Ajuste de la hora de verano • Toma para auricular incorporado • Función de alarma repetida (SNOOZE) Fuentes de alimentación PRESENT TIME deslícela en el sentido de la flecha. Inserte dos pilas R6 (tamaño AA) (no suministradas) con la polaridad correcta. 2 4 CLOCK WORLD T. ALARM LOCK • The alarm sound will come on at the preset time and will automatically turn itself off after about 60 minutes, unless it is turned off manually. • To stop the alarm sound, press ALARM ON/OFF. To wake to the alarm sound at the same time the next day. The alarm will shut off , but will come on again after about 9 minutes. You can repeat this process six times at the most in an hour. Notes • The buzzer sound level cannot be adjusted. • If the radio is on and earphone is connected to the @ jack, the buzzer alarm is heard from both the speaker and earphone. • If the radio is off and the earphone is connected to the @ jack, the buzzer alarm is heard only from the speaker. • The “m” mark flashes in the display at the preset alarm time. 1 Colocación de la pila de litio para protección del reloj (Consulte la Fig. A-b) 1 Coloque la radio con su base hacia arriba, inserte la punta de un bolígrafo, u otro objeto similar, en el orificio situado al lado del compartimiento de la pila de litio, y empuje. El portapila saldrá. Coloque la pila con el lado plano (+) hacia arriba y después inserte el compartimiento hasta que se detenga en su lugar con seguridad. Notas sobre las pilas • Mantenga la pila de litio fuera del alcance de los niños. Si alguien traga la pila, consulte inmediatamente a un médico. • Limpie la pila con un paño seco para asegurar un buen contacto. • Cuando coloque la pila, tenga en cuenta su polaridad. • No sujete la pila con pinzas metálicas porque podría cortocircuitarla. • No abra la pila ni la tire al fuego, ya que podría causar su explosión. Deshágase de las pilas usadas con cuidado. PRECAUCIÓN Si coloca incorrectamente la pila, habrá riesgo de explosión. Reemplácela sólo por una del mismo tipo o equivalente recomendado por la fábrica del equipo. Deseche las pilas usadas siguiendo las instrucciones de la fábrica. Ajuste del reloj Cuando coloque la pila de litio CR2025 por primera vez, en el visualizador aparecerá la indicación 12:00 (mediodía). Ponga el selector de modo en WORLD T. Presione ADJ + o – para seleccionar el área a la que desee ajustar la hora. 2 ADJ You are cautioned that any changes or modifications not expressly approved in this manual could void your authority to operate this equipment. To set the time to the second In step 4, set the mode selector to ALARM or LOCK simultaneously with the radio or telephone time signal. If you have any questions or problems concerning your unit, please consult your nearest Sony dealer. Specifications To Check the Local Time of the Desired Time Zone The numbers above and below the time zone map indicate the time differences from the UTC (Universal Time Coordinated) position. For example, the time difference in Tokyo is +9 hours. The light grey areas indicate special time zones. These areas maintain special time differences (written beside them). Example: To check the local time in New York. Set the mode selector to WORLD T. and press ADJ + or – to move the $ mark to the “–5” position. If you want to know the local time and the difference in time in 30 minute units, add it to the present time (or subtract it from the present time). (For example, if the difference in time is five hours and 30 minutes, move the $ mark to the “+5” position and add 30 minutes to the displayed time. Time display 24-hour system Frequency range FM: 87.5 – 108 MHz SW1: 4.750 – 5.060 MHz (60 meter band) SW2: 5.900 – 6.200 MHz (49 meter band) SW3: 7.100 – 7.350 MHz (41 meter band) SW4: 9.400 – 9.990 MHz (31 meter band) SW5: 11.600 – 12.100 MHz (25 meter band) SW6: 13.570 – 13.870 MHz (22 meter band) SW7: 15.100 – 15.800 MHz (19 meter band) SW8: 17.480 – 17.900 MHz (16 meter band) SW9: 21.450 – 21.750 MHz (13 meter band) MW: 530 – 1,605 kHz Speaker Approx. 4.5 cm (1 13/16 inches) dia. Power output 100 mW (at 10% harmonic distortion) Output @ jack (minijack) Power requirements Radio: 3V DC, two R6 (size AA) batteries Clock: 3V DC, one CR 2025 lithium battery Dimensions Approx. 111 x 30.5 x 80.3 mm (w/h/d) (4 3/8 x 1 1/4 x 3 1/4 inches) incl. projecting parts and controls (with the lid closed) Mass Approx. 233 g (8.2 oz.) incl. batteries Accessory supplied Sony CR 2025 lithium battery (1) Short wave guide (1) Design and specifications are subject to change without notice. ALARM TIME Hora actual Press SNOOZE/LIGHT. The display lights up for about 10 seconds. Before operating the unit, be sure to install the CR2025 clock battery. • Operate the unit on the following power sources: Radio: 3V DC, two R6 (size AA) batteries. Clock: 3V DC, one CR2025 lithium battery. • Do not leave the unit in a location near heat sources, or in a place subject to direct sunlight, excessive dust, or mechanical shock, or in a car with its windows closed. • Should any solid object or liquid fall into the unit, remove the batteries and have it checked by qualified personnel before operating it any further. • When the casing becomes soiled, clean it with a soft cloth dampened with a mild detergent solution. Never use abrasive cleansers or chemical solvents, as they may mar the casing. • Since a strong magnet is used for the speaker, keep personal credit cards with magnetic coding or spring- wound watches away from the unit to prevent them from possible damage caused by the magnet. • In vehicles or in buildings, radio reception may be difficult or noisy. Try listening near a window. + PRESENT TIME –Light Function marca $ (Por ejemplo, si desea ajustar la hora a las 8:15 AM de Tokio, mueva la marca $ hasta la posición “+9”.) 3 4 SET PRESENT TIME ALARM ON/OFF 2 3 ALARM TIME Parpadeando Presione ADJ + o – para ajustar la hora de la alarma. Ponga el selector de modo en LOCK. SET CLOCK WORLD T. ALARM LOCK PRESENT TIME ALARM TIME ALARM ON/OFF Presione ALARM ON/OFF. SET CLOCK WORLD T. ALARM LOCK PRESENT TIME ALARM TIME ALARM ON/OFF Nota 1 Ponga el selector de modo en ALARM. CLOCK WORLD T. ALARM LOCK 4 Cuando la visualización sea oscura, reemplace la pila de litio CR2025. – Precautions Para mejorar la radiorrecepción (Consulte la Fig. B) Cuando no vaya a utilizar la unidad durante mucho tiempo, extraiga las pilas para evitar los daños que podrían causar el derrame y la corrosión de las mismas. Usted no podrá oír la radio colocando sólo la pila de litio. Deberá colocar dos pilas R6 (tamaño AA) (no suministradas). (When alarm is set, the alarm time appears in the display. If you press ALARM ON/OFF again, the alarm time is disappeared and is canceled.) • Para desconectar la radio, ponga en POWER OFF. Ajuste de la alarma Reemplazo de la pila de litio ALARM ON/OFF 3 Seleccione la banda deseada (FM, SW 1-9, o MW). Sintonice la emisora utilizando TUNING. Cuando sintonice una emisora, se encenderá TUNE (indicador de sintonía). Ajuste VOL.. Nota soble las piles Duración de la pila de litio ALARM TIME 1 Cuando el sonido de la radio se distorsione o sea inestable y el sonido de la alarma sea bajo, reemplace ambas pilas R6 (tamaño AA). Aprox. 1 años para el funcionamiento del reloj utilizando una pila de litio CR2025 Sony PRESENT TIME Radiorrecepción Reemplazo de las pilas Duración de las pilas Aprox. 35 horas utilizando pilas R6 (AA) Sony 2 Press ALARM ON/OFF. Para borrar la indicación de la hora de verano, vuelva a presionar D.S.T.•SUMMER T. FM: Extienda la antena telescópica hasta lograr la mejor recepción posible. SW: Extienda verticalmente la antena telescópica. MW:Gire horizontalmente la unidad hasta obtener la óptima recepción. La unidad tiene incorporada una antena de barra de ferrita. ALARM TIME ALARM ON/OFF Presione D.S.T.•SUMMER T. En el visualizador aparecerá la marca s y la indicación horaria cambiará a la hora de verano. 2 (Consulte la Fig. A-a) 1 Manteniendo presionada la tapa, SET CLOCK WORLD T. ALARM LOCK Para cambiar la visualización a la indicación de la hora de ahorro de la luz diurna (hora de verano) Colocación de las Pilas Lighting the Display ] } R6 (AA) x2 SW CLOCK WORLD T. ALARM LOCK Particularidades ALARM TIME Present time FM SET To doze for a few more minutes, press SNOOZE/LIGHT. inferior B Set the mode selector to ALARM. Danger of explosion if battery is incorrectly replaced. Replace only with the same or equivalent type recommended by the equipment manufacture. Discard used batteries according to manufacture’s instructions. 1 2 } 1 Press ALARM ON/OFF again. The time set yesterday will show up in the display. The display will show a 12:00 (noon) indication when the CR2025 lithium battery is first installed. ] Setting the Alarm CAUTION Setting the Clock Aa FM: Extend the telescopic antenna for better reception. SW: Stand the telescopic antenna vertically. MW: Rotate the unit horizontally for optimum reception. A ferrite bar antenna is built into the unit. SET Note SW MW FM 1 2 3 4 5 6 7 8 9 To improve radio reception (See Fig. B) ¡Muchas gracias por la elección de este receptor de bandas mundiales Sony! Este receptor de bandas mundiales le ofrecerá muchas horas de servicio fiable y de placer de escucha. Antes de utilizar el receptor de bandas mundiales, lea detenidamente estas instrucciones, y consérvelas para futuras referencias. Lithium battery life Approx. 1 year of clock operation, using Sony CR 2025 lithium battery You cannot listen to the radio by only installing a lithium battery. You should use two R6 (size AA) batteries (not supplied). SNOOZE/LIGHT • To turn off the radio, set to POWER OFF. Installing Lithium Battery for Clock Backup (See Fig. A–b) Display Visualizador Time zone map Mapa de las zonas horarias 3 Select a desired band (FM, SW1-9 or MW). Tune in a station using the TUNING. TUNE (tuning indicator) lights up when a station is tuned in. Adjust the volume using VOL (volume). Antes de comenzar Ponga el selector de modo en CLOCK y presione ADJ + o – para ajustar la hora. Si mantiene presionada ADJ + o –, los dígitos de los minutos avanzarán rápidamente. Los dígitos de la hora avanzarán uno por uno cuando los dígitos de los minutos avancen a “00” después de “59”. Ponga el selector de modo en ALARM o LOCK. La marca “ : ” dejará de parpadear y el reloj comenzará a funcionar. Nota Si extrae la pila de litio después de haber ajustado el reloj, la memoria se borrará. Vuelva a ajustar el reloj. Nota sobre la función de bloqueo Normalmente ponga el selector de modo en LOCK de forma que no funcionen ADJ + ni –. De esta manera, usted podrá evitar operaciones erróreas. Para ajustar la hora al segundos En el paso 4, ponga el selector de modo en ALARM o LOCK al oír la señal horaria de la radio o el teléfono. Para ver la hora local de la zona horaria deseada Los números situados arriba y abajo del mapa de las zonas horarias indican las diferencias de la hora a partir la posición de la hora universal coordinada (UTC). Por ejemplo, la diferencia horaria en Tokio es de +9 horas. Las áreas en gris claro indican las zonas especiales donde mantienen diferencias de hora especiales (indicadas junto con ellas). Ejemplo: Para ver la hora local de Nueva York. Ponga el selector de modo en WORLD T. y presione ADJ + o – para mover la marca $ hasta la posición “–5”. Si desea saber la hora local con la diferencia de la hora en unidades de 30 minutos, añada 30 minutos a la hora actual (o réstelos de la hora actual). (Por ejemplo, si la diferencia de la hora es de cinco horas y 30 minutos, mueva la marca $ hasta la posición “+5” y añada 30 minutos a la hora visualizada.) (Cuando la alarma se ajuste, en el visualizador aparecerá la hora de la alarma. Si vuelve a presionar ALARM ON/OFF, la hora de alarma desaparecerá y se cancelará.) • La alarma sonará a la hora ajustada y se silenciará automáticamente después de unos 60 minutos a menos que la detenga manualmente. • Para silenciar la alarma, presione ALARM ON/OFF. Para que la alarma suene a la misma hora del día siguiente Vuelva a presionar ALARM ON/OFF. En el visualizador aparecerá la hora ajustada el día anterior. Para dormitar unos minutos más, presione SNOOZE/LIGHT. La alarma se silenciará, pero volverá a sonar unos 9 minutos después. Usted podrá repetir este proceso seis veces como máximo en una hora. Notas • El nivel del sonido de la alarma no podrá ajustarse. • Si enciende la radio y conecta un auricular a la toma @, podrá oír la alarma tanto a través del altavoz como del auricular. • Si apaga la radio y conecta un auricular a la toma @, oirá la alarma sólo a través del altavoz. • A la hora de sonar alarma, la marca “m” parpadeará en el visualizador. Función de iluminación del visualizador Presione SNOOZE/LIGHT. El visualizador se iluminará durante 10 segundos. Precauciones Antes de utilizar la unidad, cerciórese de colocar la pila CR2025 para el reloj. • Haga funcionar la unidad con las fuentes de alimentación siguiente: Radio: 3V CC, dos pilas R6 (tamaño AA). Reloj: 3V CC, una pila de litio CR2025. • No deje la unidad en un lugar cercano a fuentes térmicas, ni en un lugar sometido a la luz solar directa, polvo excesivo, golpes mecánicos, o en un automóvil con las ventanillas cerradas. • Si cae algún objeto sólido o líquido en la unidad, extraiga las pilas y haga revisarla por personal cualificado antes de reutilizarla. • Cuando se ensucie el exterior, límpielo con un paño suave humedecido con una solución de detergente suave. Nunca utilice limpiadores abrasivos ni disolventes químicos, ya que podría dañar la terminación. • Como el altavoz emplea un imán intenso, mantenga las tarjetas de crédito que empleen codificación magnética y los relojes de cuerda alejados de la unidad para evitar posibles daños que podría causar tal imán. • En vehículos o en edificios, la radiorrecepción puede resultar difícil o ruidosa. Pruebe a escuchar cerca de una ventana. Si tiene alguna pregunta o problema en relación con esta unidad, póngase en contacto con su proveedor Sony. Especificaciones Visualización horaria Sistema de 24 horas Gama de frecuencias FM: 87,5 - 108 MHz SW1: 4,750-5,060 MHz (Banda de 60 metros) SW2: 5,900-6,200 MHz (Banda de 49 metros) SW3: 7,100-7,350 MHz (Banda de 41 metros) SW4: 9,400-9,990 MHz (Banda de 31 metros) SW5: 11,600-12,100 MHz (Banda de 25 metros) SW6: 13,570-13,870 MHz (Banda de 22 metros) SW7: 15,100-15,800 MHz (Banda de 19 metros) SW8: 17,480-17,900 MHz (Banda de 16 metros) SW9: 21,450-21,750 MHz (Banda de 13 metros) MW: 530 - 1.605 kHz Altavoz Aprox. 4,5 cm de diá. Potencia de salida 100 mW (al 10% de distorsión armónica) Salida Toma @ (minitoma) Alimentación Radio: 3 V CC, dos pilas de R6 (tamaño AA) Reloj: 3 V CC, una pila de litio CR2025 Dimensiones Aprox. 111 x 30,5 x 80,3 mm (an/al/prf) incluyendo partes y controles salientes (con la tapa cerrada) Masa Aprox. 233 g incluyendo las pilas Accesorio suministrado Pila de litio CR2025 Sony (1) Guía de ondas cortas (1) Diseño y especificaciones sujetos a cambio sin previo aviso.-
 1
1
-
 2
2


Sony ICF-SW12 Manual de usuario
- Categoría
- Relojes de alarma
- Tipo
- Manual de usuario
en otros idiomas
- italiano: Sony ICF-SW12 Manuale utente
- English: Sony ICF-SW12 User manual
- português: Sony ICF-SW12 Manual do usuário
Artículos relacionados
-
Sony ICF-SW11 El manual del propietario
-
-
-
Sony ICF ICF-SW11 Operating Instructions Manual
-
-
-
Sony 3-227-586-15 Manual de usuario
-
-
Sony ICF-CD2000 Manual de usuario
-
Sony ICF-SW600 Manual de usuario