THANK YOU
quality products designed to enhance your home. Visit us online to see our full line of products available for your home improvement needs.
Thank you for choosing Hampton Bay!
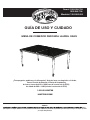
USE AND CARE GUIDE
LAUREL OAKS DINNING TABLE
1-855-HD-HAMPTON
HAMPTONBAY.COM
Item # 1003 308 705
1003 262 796
Model # 745.0300.000
Questions, problems, missing parts? Before returning to the store,
call Hampton Bay Customer Service
8 a.m. - 7
p.m., EST, Monday - Friday, 9 a.m. - 6 p.m., EST, Saturday

2
Table of Contents
Table of Contents ................................. . . 2
Safety Information ................................ . . 2
Warranty ........................................ . . 2
What is covered ................................. . . 2
What is not covered .............................. . . 2
Pre-Assembly .................................... . . 3
Planning Assembly ............................... . . 3
Hardware Included ............................... . . 3
Table Package Contents ........................... . . 4
Assembly. . . . . . . . . . . . . . . . . . . . . . . . . . . . . . . . . . . . . . . . . . 5
Care and Cleaning ................................ . . 6
Important Safety Instructions
CAUTION: Read all of the instructions in this manual
before you begin assembly. Failure to do so may result in
faulty assembly and potential injury!
Warranty
2 YEAR WARRANTY
WHAT IS COVERED
We warrant the product to be free of manufacturing defects to the original purchaser for two years.
WHAT IS NOT COVERED
It remains the customer’s responsibility for freight and packaging charges to and from our service center. This warranty does not cover
commercial use, hardware, acts of nature, freezing, or abusive use. In addition, purchased parts are not covered under this warranty.
We reserve the right to make substitutions with similar merchandise, if the model in question is no longer in production.
Contact Customer Care at 1-855-HD-HAMPTON or visit www.hamptonbay.com.
SAVE THESE INSTRUCTIONS
WARNING: FUELS USED IN LIQUEFIED PROPANE GAS APPLIANCES, AND THE PRODUCTS OF COMBUSTION OF SUCH FUELS, CAN EXPOSE YOU
TO CHEMICALS INCLUDING BENZENE, WHICH IS KNOWN TO THE STATE OF CALIFORNIA TO CAUSE CANCER AND CAUSE BIRTH DEFECTS OR OTHER
REPRODUCTIVEHARM. For more information go to: www.P65Warnings.ca.gov.
WARNING: FUELS USED IN WOOD OR CHARCOAL BURNING APPLIANCES, AND THE PRODUCTS OF COMBUSTION OF SUCH FUELS, CAN EXPOSE
YOU TO CHEMICALS INCLUDING CARBON BLACK, WHICH IS KNOWN TO THE STATE OF CALIFORNIA TO CAUSE CANCER, AND CARBON MONOXIDE,
WHICH IS KNOWN TO THE STATE OF CALIFORNIA TO CAUSE BIRTH DEFECTS OR OTHER REPRODUCTIVE HARM.
For more information go to: www.P65Warnings.ca.gov.
READ ALL INSTRUCTIONS BEFORE USE
To reduce the risk of injury to persons:
1. Close supervision is necessary when this furnishing is used by or
near children, or disabled persons, if applicable.
2. Use this furnishing only for its intended use as described in
these instructions. Do not use attachments not recommended by
the manufacturer.
3. This table is not intended to support an umbrella. Umbrellas
must have a suitable base or stand.

3
HAMPTONBAY.COM
.ecnatsissa rehtruf rof NOTPMAH-DH-558-1 tcatnoc esaelP
Pre-Assembly
PLANNING ASSEMBLY
Please read this entire instruction manual prior to assembly.
Identify all parts packed in the carton against the parts list. Remove all protective materials and place the parts on a non-abrasive surface
to avoid scratching.
NOTE: More than one person may be required to assemble
this product.
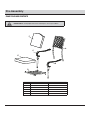
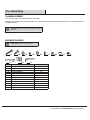
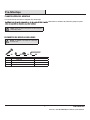
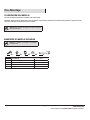
HARDWARE INCLUDED
NOTE: Hardware not shown to actual size.
Part Description Quantity
AA M8x20 Bolt
Washer
12
BB
21rehsaw gnirpSCC
12
12
DD
Bolt cap
1EE
Hex Wrench
BB CC
DD
EE
AA

4
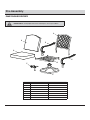
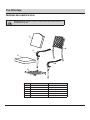
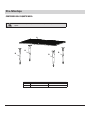
Pre-Assembly
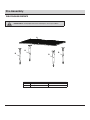
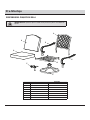
TABLE PACKAGE CONTENTS
IMPORTANT: Do not fully tighten bolts/screws until all pieces are loosely assembled.
Part Description Quantity
1pot elbaTA
4sgel elbaTB
B
B
B
B
A

A
5
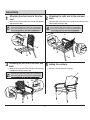
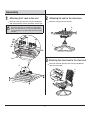
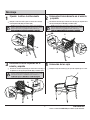
Assembly
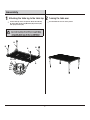
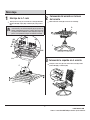
1
NOTE: Please ensure all the bolts are assembled correctly
and use the hex wrench (EE) to tighten. Do not fully tighten
bolts/screws until all pieces are loosely assembled. Adding
.
2
EE
DD
AA
BB
B
B
B
B
CC
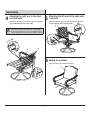
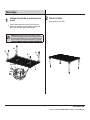
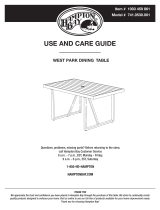
Attaching the table leg to the table top
Put the table top on the soft ground. Attach the table leg
(B) to the table top (A) using M8 bolts (AA), washers (BB)
and spring washers (CC).
Turning the table over
Turn the table over and set on the ground.

6
Care and Cleaning
Do not allow water to build up in the frames. This will cause corrosion and possible freezing damage in cold climates.
Use a mild soap and water for normal cleaning. Do not use janitorial or alcohol based cleaners. Some cleaners may be marked as
.
Rinse with clean water and dry with a soft, absorbent cloth towel.
Treat the frames with a liquid wax for maximum protection against UV rays and/or salty, damp air.

Questions, problems, missing parts? Before returning to the store,
call Hampton Bay Customer Service
8 a.m.-7 p.m., EST, Monday-Friday,
9 a.m.-6 p.m., EST, Sauturday
1-855-HD-HAMPTON
HAMPTONBAY.COM
Retain this manual for future use.

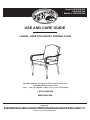
USE AND CARE GUIDE
LAUREL OAKS STATIONARY DINNING CHAIR
1-855-HD-HAMPTON
HAMPTONBAY.COM
THANK YOU
quality products designed to enhance your home. Visit us online to see our full line of products available for your home improvement needs.
Thank you for choosing Hampton Bay!
lly create
Item # 1003 308 705
1003 262 796
Model # 755.0310.000
Questions, problems, missing parts? Before returning to the store,
call Hampton Bay Customer Service
8 a.m. - 7 p.m., EST, Monday - Friday, 9 a.m. - 6 p.m., EST, Saturday

2
Table of Contents
Table of Contents .................................. . 2
Safety Information ................................. . 2
Warranty ......................................... . 2
What is covered .................................. . 2
What is not covered ............................... . 2
Pre-Assembly ..................................... . 3
Planning Assembly ................................ . 3
Hardware Included ................................ . 3
Chair Package Contents ............................ . 4
Assembly. . . . . . . . . . . . . . . . . . . . . . . . . . . . . . . . . . . . . . . . . . 5
Care and Cleaning ................................. . 6
Important Safety Instructions
CAUTION: Read all of the instructions in this manual
before you begin assembly. Failure to do so may result in
faulty assembly and potential injury!
Warranty
2 YEAR WARRANTY
WHAT IS COVERED
We warrant the product to be free of manufacturing defects to the original purchaser for two years.
WHAT IS NOT COVERED
It remains the customer’s responsibility for freight and packaging charges to and from our service center. This warranty does not cover
commercial use, hardware, acts of nature, freezing, or abusive use. In addition, purchased parts are not covered under this warranty.
We reserve the right to make substitutions with similar merchandise, if the model in question is no longer in production.
Contact Customer Care at 1-855-HD-HAMPTON or visit www.hamptonbay.com.
SAVE THESE INSTRUCTIONS
WARNING: FUELS USED IN LIQUEFIED PROPANE GAS APPLIANCES, AND THE PRODUCTS OF COMBUSTION OF SUCH FUELS, CAN EXPOSE YOU
TO CHEMICALS INCLUDING BENZENE, WHICH IS KNOWN TO THE STATE OF CALIFORNIA TO CAUSE CANCER AND CAUSE BIRTH DEFECTS OR OTHER
REPRODUCTIVEHARM. For more information go to: www.P65Warnings.ca.gov.
WARNING: FUELS USED IN WOOD OR CHARCOAL BURNING APPLIANCES, AND THE PRODUCTS OF COMBUSTION OF SUCH FUELS, CAN EXPOSE
YOU TO CHEMICALS INCLUDING CARBON BLACK, WHICH IS KNOWN TO THE STATE OF CALIFORNIA TO CAUSE CANCER, AND CARBON MONOXIDE,
WHICH IS KNOWN TO THE STATE OF CALIFORNIA TO CAUSE BIRTH DEFECTS OR OTHER REPRODUCTIVE HARM.
For more information go to: www.P65Warnings.ca.gov.
READ ALL INSTRUCTIONS BEFORE USE
To reduce the risk of injury to persons:
1. Close supervision is necessary when this furnishing is used by or
near children, or disabled persons, if applicable.
2. Use this furnishing only for its intended use as described in
these instructions. Do not use attachments not recommended by
the manufacturer.

3
HAMPTONBAY.COM
.ecnatsissa rehtruf rof NOTPMAH-DH-558-1 tcatnoc esaelP
Pre-Assembly
PLANNING ASSEMBLY
Please read this entire instruction manual prior to assembly.
Identify all parts packed in the carton against the parts list. Remove all protective materials and place the parts on a non-abrasive surface
to avoid scratching.
NOTE: More than one person may be required to assemble
this product.
HARDWARE INCLUDED
NOTE: Hardware not shown to actual size.
Part Description Quantity
01tloB 02x6MAA
BB
CC
Washer
10
10
DD
Bolt cap
1
Allen Driver
BB
CC
DD
AA

4
Pre-Assembly
CHAIR PACKAGE CONTENTS
IMPORTANT: Do not fully tighten bolts/screws until all pieces are loosely assembled.
Part Description Quantity
1kcab riahCA
B Left arm
Right arm
1
1C
1taes riahCD
E Seat cushion
Back cushion
1
1F
E
C
F
D
A
B

E
D
D
D
C
B
F
A
A
5
Assembly
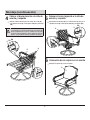
1
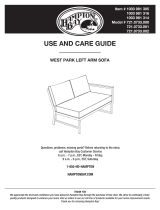
Attaching the chair back to the chair
seat
Attach the chair back (A) to the chair seat (D) using M6 bolts
(AA) and washers (BB).
NOTE: Please ensure all the bolts are assembled correctly
and use the allen driver (EE) to tighten. Do not fully tighten
bolts/screws until all pieces are loosely assembled. Adding
.
3
NOTE: Please ensure all the bolts are assembled correctly
and use the allen driver (EE) to tighten. Do not fully tighten
bolts/screws until all pieces are loosely assembled. Adding
.
2
Attaching the right arm to the seat and
back
Attach the right arm (C) to the chair seat (D) and chair back (A) using
M6 bolts (AA) and washers (BB).
NOTE: Please ensure all the bolts are assembled correctly
and use the allen driver (EE) to tighten. Do not fully tighten
bolts/screws until all pieces are loosely assembled. Adding
.
4
Adding the cushions
BB
AA
AA
AA
BB
BB
CC
DD
CC
CC
AA
BB
CC
AA
BB
CC
Attaching the left arm to the seat and
back
.)F( noihsuc kcab dna )E( noihsuc taes ddAattA ch the left am (B) to the chair seat (D) and chair back (A)
using M6 bolts (AA) and washers (BB).

6
Care and Cleaning
Do not allow water to build up in the frames. This will cause corrosion and possible freezing damage in cold climates.
Use a mild soap and water for normal cleaning. Do not use janitorial or alcohol based cleaners. Some cleaners may be marked as
.
Rinse with clean water and dry with a soft, absorbent cloth towel.
Treat the frames with a liquid wax for maximum protection against UV rays and/or salty, damp air.

Questions, problems, missing parts? Before returning to the store,
call Hampton Bay Customer Service
8 a.m.-7 p.m., EST, Monday-Friday,
9 a.m.-6 p.m., EST, Sauturday
1-855-HD-HAMPTON
HAMPTONBAY.COM
Retain this manual for future use.

THANK YOU
quality products designed to enhance your home. Visit us online to see our full line of products available for your home improvement needs.
Thank you for choosing Hampton Bay!
USE AND CARE GUIDE
LAUREL OAKS MOTION DINING CHAIR
1-855-HD-HAMPTON
HAMPTONBAY.COM
chair.
Item # 1003 308 705
1003 262 796
Model # 755.0311.000
Questions, problems, missing parts? Before returning to the store,
call Hampton Bay Customer Service
8 a.m. - 7 p.m., EST, Monday - Friday, 9 a.m. - 6 p.m., EST, Saturday

2
Table of Contents
Table of Contents ................................ . . . 2
Safety Information ............................... . . . 2
Warranty ....................................... . . . 2
What is covered ................................ . . . 2
What is not covered ............................. . . . 2
Pre-Assembly ................................... . . . 3
Planning Assembly .............................. . . . 3
Hardware Included .............................. . . . 3
Chair Package Contents .......................... . . . 4
Assembly. . . . . . . . . . . . . . . . . . . . . . . . . . . . . . . . . . . . . . . . . . 5,6
Care and Cleaning ............................... . . . 7
Important Safety Instructions
CAUTION: Read all of the instructions in this manual
before you begin assembly. Failure to do so may result in
faulty assembly and potential injury!
Warranty
2 YEAR WARRANTY
WHAT IS COVERED
We warrant the product to be free of manufacturing defects to the original purchaser for two years.
WHAT IS NOT COVERED
It remains the customer’s responsibility for freight and packaging charges to and from our service center. This warranty does not cover
commercial use, hardware, acts of nature, freezing, or abusive use. In addition, purchased parts are not covered under this warranty.
We reserve the right to make substitutions with similar merchandise, if the model in question is no longer in production.
Contact Customer Care at 1-855-HD-HAMPTON or visit www.hamptonbay.com.
SAVE THESE INSTRUCTIONS
WARNING: FUELS USED IN LIQUEFIED PROPANE GAS APPLIANCES, AND THE PRODUCTS OF COMBUSTION OF SUCH FUELS, CAN EXPOSE YOU
TO CHEMICALS INCLUDING BENZENE, WHICH IS KNOWN TO THE STATE OF CALIFORNIA TO CAUSE CANCER AND CAUSE BIRTH DEFECTS OR OTHER
REPRODUCTIVEHARM. For more information go to: www.P65Warnings.ca.gov.
WARNING: FUELS USED IN WOOD OR CHARCOAL BURNING APPLIANCES, AND THE PRODUCTS OF COMBUSTION OF SUCH FUELS, CAN EXPOSE
YOU TO CHEMICALS INCLUDING CARBON BLACK, WHICH IS KNOWN TO THE STATE OF CALIFORNIA TO CAUSE CANCER, AND CARBON MONOXIDE,
WHICH IS KNOWN TO THE STATE OF CALIFORNIA TO CAUSE BIRTH DEFECTS OR OTHER REPRODUCTIVE HARM.
For more information go to: www.P65Warnings.ca.gov.
READ ALL INSTRUCTIONS BEFORE USE
To reduce the risk of injury to persons:
1. Close supervision is necessary when this furnishing is used by or
near children, or disabled persons, if applicable.
2. Use this furnishing only for its intended use as described in
these instructions. Do not use attachments not recommended by
the manufacturer.

3
HAMPTONBAY.COM
.ecnatsissa rehtruf rof NOTPMAH-DH-558-1 tcatnoc esaelP
Pre-Assembly
PLANNING ASSEMBLY
Please read this entire instruction manual prior to assembly.
Identify all parts packed in the carton against the parts list. Remove all protective materials and place the parts on a non-abrasive surface
to avoid scratching.
NOTE: More than one person may be required to assemble
this product.
HARDWARE INCLUDED
NOTE: Hardware not shown to actual size.
Part Description Quantity
4tloB 04x8MAA
01tloB 02x6MBB
4CC
10
EE
4rehsaw gnirpS
FF
4tuN
GG
8tun rof pac tloB
CC
EE
FF
GG
HH
JJ KK LL
Washer for M8 bolt
DD
Washer for M6 bolt
AA
DD
BB
II
HH
Bolt cap for bolt AA
Bolt cap for bolt BB
10
JJ
2hcnerw xeH
II
8
KK
2Metal plate
LL
1Allen driver

4
Pre-Assembly
CHAIR PACKAGE CONTENTS
IMPORTANT: Do not fully tighten bolts/screws until all pieces are loosely assembled.
Part Description Quantity
1kcab riahCA
1mra thgiRB
1mra tfeLC
H
B
A
C
D
F
E
G
1taes riahCD
1kcor -TE
1esab riahCF
1noihsuc taeSG
1noihsuc kcaBH

D
D
E
F
5
Assembly
1
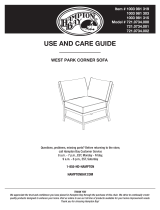
Attaching the T-rock to the seat
Attach the T-rock (E) to the chair seat (D) using M8 bolts
(AA), metal plate (KK), washers (CC and EE), and nuts (FF).
3
Attaching the chair back to the chair seat
Attach the chair back (A) to the chair seat (D) using M6 bolts
(BB) and washers (DD).
2
Attaching the seat to the chair base
Attach the seat (D) to the chair base (F).
GG
GG
HH
FF
CC
EE
KK
HH
JJ
AA
D
A
NOTE: Please ensure all the bolts are assembled correctly
and use the hex wrench (JJ) to tighten. Do not fully tighten
bolts/screws until all pieces are loosely assembled
corresponding plastic caps (GG and HH) after nal assembly
is nished.
. Add the
DD
BB
LL
II

6
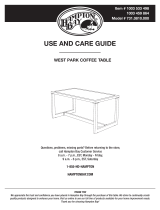
Adding the cushions
Add seat cushion (G) and back cushion (H).
B
C
A
A
H
G
6
Assembly
4
Attaching the right arm to the chair
seat and back
Attach the right arm (B) to the chair seat (D) and chairt back
(A) using M6 bolts (BB) and washers (DD).
5
NOTE: Please ensure all the bolts are assembled correctly
and use the allen driver (LL) to tighten. Do not fully tighten
bolts/screws until all pieces a
corresponding plastic caps (II) after nal assembly is nished.
re loosely assembled. Add the
BB
BB
DD
DD
II
II
BB
BB
DD
DD
II
II
Attaching the left arm to the chair seat
and back
Attach the right arm (B) to the chair seat (D) and chairt back
(A) using M6 bolts (BB) and washers (DD).

7
Care and Cleaning
Do not allow water to build up in the frames. This will cause corrosion and possible freezing damage in cold climates.
Use a mild soap and water for normal cleaning. Do not use janitorial or alcohol based cleaners. Some cleaners may be marked as
.
Rinse with clean water and dry with a soft, absorbent cloth towel.
Treat the frames with a liquid wax for maximum protection against UV rays and/or salty, damp air.

Questions, problems, missing parts? Before returning to the store,
call Hampton Bay Customer Service
8 a.m.-7 p.m., EST, Monday-Friday,
9 a.m.-6 p.m., EST, Sauturday
1-855-HD-HAMPTON
HAMPTONBAY.COM
Retain this manual for future use.

SILLA COMEDOR LAUREL OAKS
Ítem
# 1003 308 705
1003 262 796
Modelo # 755.0310.000
GUÍA DE USO Y CUIDADO
¿Tiene preguntas, problemas o la faltan partes? Antes de hacer una devolución a la tienda,
llame al Servicio de Atención al Cliente de Hampton Bay
de lunes a viernes de 8:00 a 19:00 (hora de la costa este de EEUU),
de sábado de 9:00 a 18:00 (hora de la costa este de EEUU)
1-855-HD-HAMPTON
HAMPTONBAY.COM
GRACIAS
eñados
para mejorar su hogar. Visítenos en línea para ver nuestra línea completa de productos disponibles para hacer que su hogar sea mejor. ¡Gracias
por elegir Hampton Bay!

2
Índice
Índice. ............................................ 2
Información de Seguridad ............................ 2
Garantía. . . . . . . . . . . . . . . . . . . . . . . . . . . . . . . . . . . . . . . . . . . 2
Qué Cubre ....................................... 2
Qué No Cubre ..................................... 2
Pre-Montaje ....................................... 3
........................ 3
Elementos de Montaje Incluidos ...................... 3
Contenido del paquete de silla ....................... 4
Montaje ........................................... 5
Cuidado y Limpieza ................................. 6
Información de Seguridad
CUIDADO: Lea todas las instrucciones de este manual
antes de empezar el montaje. ¡El no hacerlo podrá
resultaren un montaje con problemas y posibles lesiones!
Garantía
2 AÑOS DE GARANTÍA
QUÉ CUBRE
Garantimos el producto contra defectos de fabricación al comprador original durante dos años.
QUÉ NO CUBRE
. Esta
garantía no cubre el uso comercial, los elementos de montaje, casos de fuerza mayor, congelamiento o uso abusivo. Además, las partes
compradas no están cubiertas por esta garantía.
Reservamos el derecho de hacer reemplazos por mercaderías similares si el modelo en cuestión ya no se produce.
Comuníquese con la Atención al Cliente por el 1-855-HD-HAMPTON o visite www.hamptonbay.com.
GUARDA ESTAS INSTRUCCIONES
ADVERTENCIA: LOS COMBUSTIBLES UTILIZADOS EN ELECTRODOMÉSTICOS DE GAS PROPANO LICUADO, Y LOS PRODUCTOS DE COMBUSTIÓN
DE DICHOS COMBUSTIBLES, PUEDEN EXPONERLE A LOS PRODUCTOS QUÍMICOS, INCLUIDO EL BENCENO, QUE SE SABE QUE EL ESTADO DE
CALIFORNIA CAUSA CÁNCER Y CAUSA DEFECTOS DE NACIMIENTO U OTROS REPRODUCTIVEHARM. Para obtener más información, vaya a:
www.P65Warnings.ca.gov.
ADVERTENCIA: LOS COMBUSTIBLES UTILIZADOS EN EL ARTEFACTO DE MADERA O DE CARBÓN, Y LOS PRODUCTOS DE COMBUSTIÓN DE
DICHOS COMBUSTIBLES PUEDEN EXPONER USTED A PRODUCTOS QUÍMICOS, INCLUYENDO EL NEGRO DE CARBONO, QUE SE SABE QUE EL
ESTADO DE CALIFORNIA CAUSA CÁNCER, Y EL MONÓXIDO DE CARBONO, CONOCIDO POR EL ESTADO DE CALIFORNIA COMO CAUSANTE DE
DEFECTOS DE NACIMIENTO U OTROS DAÑOS EN LA REPRODUCCIÓN.Para obtener más información, vaya a:www.P65Warnings.ca.gov.
LEA TODAS LAS INSTRUCCIONES ANTES DEL USO
Para reducir el riesgo de lesiones a las personas:
1.
2.
Es necesaria una supervisión estricta cuando este mobiliario es
utilizado por ocerca de niños o personas discapacitadas, si
corresponde.
Utilice este mobiliario solo para su uso previsto como se describe en
estas instrucciones No use accesorios no recomendados por
el fabricante.

3
Parte Descripción
01
tloB 02x6
Perno M
AA
BB
CC 10
10
DD 1
BB
CC
DD
AA
Pre-Montaje
PLANIFICACIÓN DEL MONTAJE
Lea este manual de instrucciones completo antes del montaje.
. Quite todos los materiales de protección y ponga las partes
.
NOTA: Puede que más de una persona sea necesaria para
armar este producto.
ELEMENTOS DE MONTAJE INCLUIDOS
NOTA: Los elementos de montaje no se muestran
en tamaño real.
Cantidad
Arandela
Tapa de plástico
Llave
HAMPTONBAY.COM
Llame al 1-855-HD-HAMPTON para obtener ayuda adicional.

4
E
C
F
D
A
B
Pre-Montaje
CONTENIDO DEL PAQUETE DE SILLA
IMPORTANTE: No apretar los pernos / tornillos hasta que todas las piezas se
ensamblan sin apretar.
Parte Descripción Cantidad
A
Presidente del respaldo
Brazo izquierdo
Brazo derecho
Asiento de la silla
Cojín del asiento
Cojín trasero
1
1B
1C
1D
1E
1F

E
D
D
D
C
B
F
A
A
5
Montaje
1
Fijación la silla a la silla asiento
Coloque la silla hacia atrás (A) en el asiento de la silla (D)
usando pernos M6 (AA) y arandelas (BB).
3
2
Colocando el brazo derecho en el asiento
y espalda
Una el brazo derecho (C) al asiento de la silla (D) y al respaldo de la
silla (A) usando pernos M6 (AA) y arandelas (BB).
4
BB
AA
AA
AA
BB
BB
CC
DD
CC
CC
AA
BB
CC
AA
BB
CC
Colocando el brazo izquierdo en el
asiento y espalda
Conecte la arandela izquierda (B) al asiento de la silla (D) y al
respaldo de la silla (A) con pernos M6 (AA) y arandelas (BB).
NOTA: Por favor asegúrese de que todos los tornillos están correctamente
montados y utilizar la llave (EE) para apretar. No apretar los pernos / tornillos
hasta que todas las piezas se ensamblan sin apretar. Cubrir todos los
NOTA: Por favor asegúrese de que todos los tornillos están correctamente
montados y utilizar la llave (EE) para apretar. No apretar los pernos / tornillos
hasta que todas las piezas se ensamblan sin apretar. Cubrir todos los
NOTA: Por favor asegúrese de que todos los tornillos están correctamente
montados y utilizar la llave (EE) para apretar. No apretar los pernos / tornillos
hasta que todas las piezas se ensamblan sin apretar. Cubrir todos los
Colocación de los cojin
Coloque el cojín del asiento (E) y el cojín del respaldo (F) en la silla.
HAMPTONBAY.COM
Llame al 1-855-HD-HAMPTON para obtener ayuda adicional.

6
Cuidado y Limpieza
□ No permita la acumulación de agua en el bastidor. Ello provocará corrosión y la posibilidad de daños por congelamiento en climas
fríos.
□ Use un jabón suave y agua para la limpieza normal. No utilice productos de limpieza domésticos ni ningún producto a base de
alcohol. Algunos productos de limpieza pueden indicar que son naturales, pero algunos de sus ingredientes pueden provocar
alteraciones de color o una reacción adversa en su acabado.
□ Enjuáguela con agua limpia y séquela con una toalla de tela suave y absorbente.
□ Trate los bastidores con una cera líquida para la máxima protección contra los rayos UV y/o el aire salado y húmedo.

¿Tiene preguntas, problemas o la faltan partes? Antes de hacer una devolución a la tienda,
llame al Servicio de Atención al Cliente de Hampton Bay
de lunes a viernes de 8:00 a 19:00 (hora de la costa este de EEUU),
de sábado de 9:00 a 18:00 (hora de la costa este de EEUU)
1-855-HD-HAMPTON
HAMPTONBAY.COM
Guarde este manual para utilizarlo en el futuro.

GUÍA DE USO Y CUIDADO
MESA DE COMEDOR REDONDA LAUREL OAKS
Ítem # 1003 308 705
1003 262 796
Modelo# 745.0300.000
¿Tiene preguntas, problemas o la faltan partes? Antes de hacer una devolución a la tienda,
llame al Servicio de Atención al Cliente de Hampton Bay
de lunes a viernes de 8:00 a 19:00 (hora de la costa este de EEUU),
de sábado de 9:00 a 18:00 (hora de la costa este de EEUU)
1-855-HD-HAMPTON
HAMPTONBAY.COM
GRACIAS
ñados
para mejorar su hogar. Visítenos en línea para ver nuestra línea completa de productos disponibles para hacer que su hogar sea mejor. ¡Gracias
por elegir Hampton Bay!

2
Índice
Índice. ........................................... . 2
Información de Seguridad ........................... . 2
Garantía. . . . . . . . . . . . . . . . . . . . . . . . . . . . . . . . . . . . . . . . . . . 2
Qué Cubre ...................................... . 2
Qué No Cubre .................................... . 2
Pre-Montaje ...................................... . 3
....................... . 3
Elementos de Montaje Incluidos ..................... . 3
Contenido del paquete de mesa ...................... . 4
Montaje .......................................... . 5
Cuidado y Limpieza ................................ . 6
Información de Seguridad
CUIDADO: Lea todas las instrucciones de este manual
antes de empezar el montaje. ¡El no hacerlo podrá
resultaren un montaje con problemas y posibles lesiones!
Garantía
2 AÑOS DE GARANTÍA
QUÉ CUBRE
Garantimos el producto contra defectos de fabricación al comprador original durante dos años.
QUÉ NO CUBRE
. Esta
garantía no cubre el uso comercial, los elementos de montaje, casos de fuerza mayor, congelamiento o uso abusivo. Además, las partes
compradas no están cubiertas por esta garantía.
Reservamos el derecho de hacer reemplazos por mercaderías similares si el modelo en cuestión ya no se produce.
Comuníquese con la Atención al Cliente por el 1-855-HD-HAMPTON o visite www.hamptonbay.com.
GUARDA ESTAS INSTRUCCIONES
ADVERTENCIA: LOS COMBUSTIBLES UTILIZADOS EN ELECTRODOMÉSTICOS DE GAS PROPANO LICUADO, Y LOS PRODUCTOS DE COMBUSTIÓN
DE DICHOS COMBUSTIBLES, PUEDEN EXPONERLE A LOS PRODUCTOS QUÍMICOS, INCLUIDO EL BENCENO, QUE SE SABE QUE EL ESTADO DE
CALIFORNIA CAUSA CÁNCER Y CAUSA DEFECTOS DE NACIMIENTO U OTROS REPRODUCTIVEHARM. Para obtener más información, vaya a:
www.P65Warnings.ca.gov.
ADVERTENCIA: LOS COMBUSTIBLES UTILIZADOS EN EL ARTEFACTO DE MADERA O DE CARBÓN, Y LOS PRODUCTOS DE COMBUSTIÓN DE
DICHOS COMBUSTIBLES PUEDEN EXPONER USTED A PRODUCTOS QUÍMICOS, INCLUYENDO EL NEGRO DE CARBONO, QUE SE SABE QUE EL
ESTADO DE CALIFORNIA CAUSA CÁNCER, Y EL MONÓXIDO DE CARBONO, CONOCIDO POR EL ESTADO DE CALIFORNIA COMO CAUSANTE DE
DEFECTOS DE NACIMIENTO U OTROS DAÑOS EN LA REPRODUCCIÓN.Para obtener más información, vaya a:www.P65Warnings.ca.gov.
LEA TODAS LAS INSTRUCCIONES ANTES DEL USO
Para reducir el riesgo de lesiones a las personas:
1.
2.
3.
Es necesaria una supervisión estricta cuando este mobiliario es
utilizado por ocerca de niños o personas discapacitadas, si
corresponde.
Utilice este mobiliario solo para su uso previsto como se describe en
Esta tabla no está diseñada para soportar un paraguas. Paraguas
debe tener una base o soporte adecuado.
estas instrucciones No use accesorios no recomendados por
el fabricante.

3
HAMPTONBAY.COM
.ecnatsissa rehtruf rof NOTPMAH-DH-558-1 tcatnoc esaelP
Parte Descripción Cantidad
AA Perno M8x20
Arandela
12
BB
21 Arandela de muelleCC
12
12
DD
Tapa para perno
1EE
Llave hexagonal
BB CC
DD
EE
AA
Pre-Montaje
PLANIFICACIÓN DEL MONTAJE
Lea este manual de instrucciones completo antes del montaje..
Identique todas las partes empacadas en la caja contra la lista de partes. Quite todos los materiales de protección y ponga las partes
sobre una supercie no abrasiva para evitar arañazos..
NOTA: Puede que más de una persona sea necesaria para
armar este producto..
ELEMENTOS DE MONTAJE INCLUIDOS
NOTE: Los elementos de montaje no se muestran
en tamaño real.

4
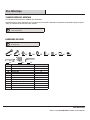
Pre-Montaje
CONTENIDO DEL PAQUETE MESA
Parte Descripción Cantidad
1A
4
Patas de la mesaB
B
B
B
B
A
IMPORTANTE: No apretar los pernos / tornillos hasta que todas las piezas se ensamblan sin
apretar.
Tapa de la mesa

A
5
Montaje
1
NOTA: Asegúrese que todos los pernos están montados
correctamente y utilizan la llave hexagonal (EE) para apretar.
No apriete completamente los pernos/los tornillos hasta que
todas las piezas se montan libremente.Adición correspondi-
.
2
EE
DD
AA
BB
B
B
B
B
CC
Colocar la pata de la mesa para la
mesa
Poner la tabla superior en la tierra suave. Colocar la
pierna de la tabla (B) a la tapa de tabla (A) usando M8
pernos (AA), arandelas (BB) y arandelas (CC).
Volcar la tabla
Voltee la tabla y en la tierra.
HAMPTONBAY.COM
Llame al 1-855-HD-HAMPTON para obtener ayuda adicional.

6
Cuidado y Limpieza
□ No permita la acumulación de agua en el bastidor. Ello provocará corrosión y la posibilidad de daños por congelamiento en climas
fríos.
□ Use un jabón suave y agua para la limpieza normal. No utilice productos de limpieza domésticos ni ningún producto a base de
alcohol. Algunos productos de limpieza pueden indicar que son naturales, pero algunos de sus ingredientes pueden provocar
alteraciones de color o una reacción adversa en su acabado.
□ Enjuáguela con agua limpia y séquela con una toalla de tela suave y absorbente.
□ Trate los bastidores con una cera líquida para la máxima protección contra los rayos UV y/o el aire salado y húmedo.

¿Tiene preguntas, problemas o la faltan partes? Antes de hacer una devolución a la tienda,
llame al Servicio de Atención al Cliente de Hampton Bay
de lunes a viernes de 8:00 a 19:00 (hora de la costa este de EEUU),
de sábado de 9:00 a 18:00 (hora de la costa este de EEUU)
1-855-HD-HAMPTON
HAMPTONBAY.COM
Guarde este manual para utilizarlo en el futuro.

MOVIMIENTO QUE CENA LA SILLA LAUREL OAKS
Ítem # 1003 308 705
1003 262 796
Modelo # 755.0311.000
GUÍA DE USO Y CUIDADO
¿Tiene preguntas, problemas o la faltan partes? Antes de hacer una devolución a la tienda,
llame al Servicio de Atención al Cliente de Hampton Bay
de lunes a viernes de 8:00 a 19:00 (hora de la costa este de EEUU),
de sábado de 9:00 a 18:00 (hora de la costa este de EEUU)
1-855-HD-HAMPTON
HAMPTONBAY.COM
GRACIAS
calidad
diseñados para mejorar su hogar. Visítenos en línea para ver nuestra línea completa de productos disponibles para hacer que su hogar sea
mejor. ¡Gracias por elegir Hampton Bay!

2
Índice
Índice. ........................................... . 2
Información de Seguridad ........................... . 2
Garantía. . . . . . . . . . . . . . . . . . . . . . . . . . . . . . . . . . . . . . . . . . . 2
Qué Cubre ...................................... . 2
Qué No Cubre .................................... . 2
Pre-Montaje ...................................... . 3
....................... . 3
Elementos de Montaje Incluidos ..................... . 3
Contenido del paquete de silla ...................... . 4
Montaje .......................................... . 5,6
Cuidado y Limpieza ................................ . 7
Información de Seguridad
CUIDADO: Lea todas las instrucciones de este manual
antes de empezar el montaje. ¡El no hacerlo podrá
resultaren un montaje con problemas y posibles lesiones!
Garantía
2 AÑOS DE GARANTÍA
QUÉ CUBRE
Garantimos el producto contra defectos de fabricación al comprador original durante dos años.
QUÉ NO CUBRE
. Esta
garantía no cubre el uso comercial, los elementos de montaje, casos de fuerza mayor, congelamiento o uso abusivo. Además, las partes
compradas no están cubiertas por esta garantía.
Reservamos el derecho de hacer reemplazos por mercaderías similares si el modelo en cuestión ya no se produce.
Comuníquese con la Atención al Cliente por el 1-855-HD-HAMPTON o visite www.hamptonbay.com.
GUARDA ESTAS INSTRUCCIONES
ADVERTENCIA: LOS COMBUSTIBLES UTILIZADOS EN ELECTRODOMÉSTICOS DE GAS PROPANO LICUADO, Y LOS PRODUCTOS DE COMBUSTIÓN
DE DICHOS COMBUSTIBLES, PUEDEN EXPONERLE A LOS PRODUCTOS QUÍMICOS, INCLUIDO EL BENCENO, QUE SE SABE QUE EL ESTADO DE
CALIFORNIA CAUSA CÁNCER Y CAUSA DEFECTOS DE NACIMIENTO U OTROS REPRODUCTIVEHARM. Para obtener más información, vaya a:
www.P65Warnings.ca.gov.
ADVERTENCIA: LOS COMBUSTIBLES UTILIZADOS EN EL ARTEFACTO DE MADERA O DE CARBÓN, Y LOS PRODUCTOS DE COMBUSTIÓN DE
DICHOS COMBUSTIBLES PUEDEN EXPONER USTED A PRODUCTOS QUÍMICOS, INCLUYENDO EL NEGRO DE CARBONO, QUE SE SABE QUE EL
ESTADO DE CALIFORNIA CAUSA CÁNCER, Y EL MONÓXIDO DE CARBONO, CONOCIDO POR EL ESTADO DE CALIFORNIA COMO CAUSANTE DE
DEFECTOS DE NACIMIENTO U OTROS DAÑOS EN LA REPRODUCCIÓN.Para obtener más información, vaya a:www.P65Warnings.ca.gov.
LEA TODAS LAS INSTRUCCIONES ANTES DEL USO
Para reducir el riesgo de lesiones a las personas:
1.
2.
Es necesaria una supervisión estricta cuando este mobiliario es
utilizado por ocerca de niños o personas discapacitadas, si
corresponde.
Utilice este mobiliario solo para su uso previsto como se describe en
estas instrucciones No use accesorios no recomendados por
el fabricante.

3
Parte Descripción Cantidad
4 AA
01 02x6
Perno MBB
4CC
10
EE
4
FF
4
GG
8
CC
EE
FF
GG
HH
JJ KK LL
Arandela M8
DD
AA
DD
BB
II
HH
10
JJ
2
II
8
KK
2Placa perforada
LL
1Llave
Pre-Montaje
PLANIFICACIÓN DEL MONTAJE
Lea este manual de instrucciones completo antes del montaje.
Identique todas las partes empacadas en la caja contra la lista de partes. Quite todos los materiales de protección y ponga las partes
sobre una supercie no abrasiva para evitar arañazos.
NOTA:Puede que más de una persona sea necesaria para
armar este producto.
HARDWARE INCLUIDO
NOTA:Los elementos de montaje no se muestran
en tamaño real.
Perno M8x40
Arandela M6
Arandela de muelle
Nuez
Tapa del perno para perno AA
Tornillo de la tuerca
Tapa del perno para perno BB
Llave
HAMPTONBAY.COM
Llame al 1-855-HD-HAMPTON para obtener ayuda adicional.

4
Parte Descripción
1
Brazo derecho
A
1B
1C
H
B
A
C
D
F
E
G
1D
1kcor -TE
1F
1G
1Cojín trasero H
Pre-Montaje
CONTENIDO DEL PAQUETE DE SILLA
IMPORTANTE: No apretar los pernos / tornillos hasta que todas las piezas se ensamblan sin
apretar.
Cantidad
Respaldo
Brazo izquierdo
Asiento de la silla
Base de la silla
Cojín del asiento

D
D
E
F
5
1
Coloque la roca T (E) en el asiento de la silla (D) utilizando
tornillos M8 (AA), chapa (KK), arandelas (CC y EE) y tuerca
(FF).
3
Colocación la espalda en el asiento
Coloque la silla de la (A) en el asiento de la silla (D) usando
pernos M6 (BB) y arandelas (DD).
2
Ctolocación del asiento(D) en la base del asiento(F).
GG
GG
HH
FF
CC
EE
KK
HH
JJ
AA
D
A
DD
BB
LL
II
Montaje
Montaje de la T-rock
NOTA: Asegúrese de que todos los pernos están montados
correctamente y use la llave hexagonal (JJ) para apretar. No
apriete completamente los pernos / tornillos hasta que todas
las piezas estén ensambladas sueltas. Agregar las tapas de
plástico correspondientes después de terminar el montaje.
Colocación del asiento en la base
del asiento
HAMPTONBAY.COM
Llame al 1-855-HD-HAMPTON para obtener ayuda adicional.

6
B
C
A
A
H
G
6
4
Colocar el brazo derecho a la silla de
asiento y respaldo
Coloque el brazo derecho (B) en el asiento de la silla (D) y
el respaldo de chairt (A) usando pernos M6 (BB) y arandelas
(DD).
5
BB
BB
DD
DD
II
II
BB
BB
DD
DD
II
II
Colocar el brazo izquierdo a la silla de
asiento y respaldo
Coloque el brazo derecho (B) en el asiento de la silla (D) y el re-
spaldo de chairt (A) usando pernos M6 (BB) y arandelas (DD)
Montaje (continuación)
NOTA: Asegúrese de que todos los pernos están montados
correctamente y use la llave hexagonal (LL) para apretar. No
apriete completamente los pernos / tornillos hasta que todas
las piezas estén ensambladas sueltas. Agregar las tapas de
plástico correspondientes después de terminar el montaje.
Colocación de los cojines en el asiento
Coloque los cojines (H y G) en el asiento

7
Cuidado y Limpieza
□
No permita la acumulación de agua en el bastidor. Ello provocará corrosión y la posibilidad de daños por congelamiento en climas
fríos.
□
Use un jabón suave y agua para la limpieza normal. No utilice productos de limpieza domésticos ni ningún producto a base de
alcohol. Algunos productos de limpieza pueden indicar que son naturales, pero algunos de sus ingredientes pueden provocar
alteraciones de color o una reacción adversa en su acabado.
.
.
□
Enjuáguela con agua limpia y séquela con una toalla de tela suave y absorbente.
□
Trate los bastidores con una cera líquida para la máxima protección contra los rayos UV y/o el aire salado y húmedo.

Guarde este manual para utilizarlo en el futuro..
¿Tiene preguntas, problemas o la faltan partes? Antes de hacer una devolución a la tienda,
llame al Servicio de Atención al Cliente de Hampton Bay
de lunes a viernes de 8:00 a 19:00 (hora de la costa este de EEUU),
de sábado de 9:00 a 18:00 (hora de la costa este de EEUU)
1-855-HD-HAMPTON
HAMPTONBAY.COM

-
 1
1
-
 2
2
-
 3
3
-
 4
4
-
 5
5
-
 6
6
-
 7
7
-
 8
8
-
 9
9
-
 10
10
-
 11
11
-
 12
12
-
 13
13
-
 14
14
-
 15
15
-
 16
16
-
 17
17
-
 18
18
-
 19
19
-
 20
20
-
 21
21
-
 22
22
-
 23
23
-
 24
24
-
 25
25
-
 26
26
-
 27
27
-
 28
28
-
 29
29
-
 30
30
-
 31
31
-
 32
32
-
 33
33
-
 34
34
-
 35
35
-
 36
36
-
 37
37
-
 38
38
-
 39
39
-
 40
40
-
 41
41
-
 42
42
-
 43
43
-
 44
44
-
 45
45


Hampton Bay 525.0200.000 Guía del usuario
- Tipo
- Guía del usuario
- Este manual también es adecuado para
En otros idiomas
- English: Hampton Bay 525.0200.000 User guide
Documentos relacionados
-
 Hampton Bay 731.0811.000 Instrucciones de operación
-
 Hampton Bay 741.0530.001 Instrucciones de operación
-
 Hampton Bay 721.0733.000 Guía de instalación
-
 Hampton Bay 1003 981 319 Guía del usuario
-
 Hampton Bay 731.0810.000 Instrucciones de operación
-
 Hampton Bay 501.0605.000 Instrucciones de operación
-
 Hampton Bay AS-J-252-3NR/7D Guía del usuario
-
 Hampton Bay FSS60428RST Guía de instalación
-
 Hampton Bay KTOB-1682-HDP Instrucciones de operación
-
 Hampton Bay AS-J-252-3NR/7D Guía de instalación