Kichler Lighting 2643NI Manual de usuario
- Tipo
- Manual de usuario

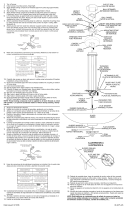
1) Threadonenialontooneendofonethreadedrod.
2) Slipotherendofthreadedroddownthroughholealongedgeofxturebody.
3) Threadlockwasherthenhexnutontothreadedrod.Tightenhexnuttosecurerodin
place.
4) Repeatabovestepsforremainingrods.
5) Carefullyslipglassoverthreadedrodsonxturebody.
6) Slipholesinbottomringoverendsofthreadedrods.Placebottomringupagainst
insideofglass.
7) Threadnialsontoendsofthreadedrods.Tightennialstosecureringinplace.(DO
NOTovertighten.)
8) TURNOFFPOWER.
IMPORTANT:Beforeyoustart,NEVERattemptanyworkwithoutshuttingoffthe
electricityuntiltheworkisdone.
a) Gotothemainfuse,orcircuitbreaker,boxinyourhome.Placethemainpower
switchinthe“OFF”position.
b) Unscrewthefuse(s),orswitch“OFF”thecircuitbreakerswitch(s),thatcontrol
thepowertothextureorroomthatyouareworkingon.
c) Placethewallswitchinthe“OFF”position.Ifthexturetobereplacedhasa
switchorpullchain,placethoseinthe“OFF”position.
9) Determinetheheightfromceilingyouwouldlikeyourxturetohang.Fixtureis
providedwith(2)11-1/2”longtubesthatcanbeusedoromittedtoachievedesired
height.
10) Assemblestemtoxture.
11) Notedirectionofexposedthreadedpipeonillustration.Bottomtwopipeswillhave
exposedthreadattop.Toppipewillnothaveexposedthreadedpipe.
12) Installcanopymountingscrews,ngertight.
13) Slipcanopythenmountingstrapoverstem(s)assembledtoxture.
14) ThreadballontopipeuntilsnugagainststemSecureballswivelinplacebythreading
ahexnutontothreadedpipeinsideball.
NOTE:Onxtureswithnogroundwire,slipgroundjugoverthreadedpipeinside
ballswivelbeforethreadingonhexnut.Onxtureswithagroundwirerunninginto
xturestemorcolumn,attachtosupplygroundasspeciedinstepNo.14.
15) Liftmountingstrapupagainstballswivel,aligningslotinballwithlapinstrap.Snap
ballretainerintoplace.Placingonesideofballretainerinplaceandthensnapping
theotherinissuggested.
16) Attachassembledxture/mountingstraptooutletbox.Assemblemountingstrapto
ceilingwithballslotandtaptowardslowerportionofslopeinceiling.(REF:
IllustrationA)
17) Attachgroundwirefromoutletboxbetweencuppedwasherandgreengroundscrew
andthreadgroundscrewintomountingstrap.Ifxtureisprovidedwithgroundwire,
connectxturegroundwiretooutletboxgroundwirewithwireconnectors(not
provided).Neverconnectgroundwiretoblackorwhitepowersupplywire.
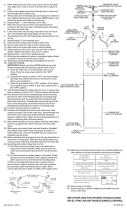
18) Makewireconnections(connectorsnotprovided.)Referencechartbelowforcorrect
connectionsandwireaccordingly.
19) Carefullyslipcanopyupstemandsecuretoceilingusinglockwashers(Canadian
installationsonly)andballknobs.
NOTE: Threadlockingcompoundmustbeappliedtoallstemthreadsasnotedwith
symbol(4)topreventaccidentalrotationofxtureduringcleaning,relamping,etc.
1) Rosqueuncapuchónsobreunextremodeunavarillaroscada.
2) Desliceelotroextremodelavarillaroscadahaciaabajoyatravésdeloricio
ubicadoalolargodelbordedelcuerpodelartefacto.
3) Rosquelaarandeladeseguridadyluegolatuercahexagonalsobrelavarilla
roscada.Ajustelatuercahexagonalparaasegurarlavarillaensulugar.
4) Repitalospasosanterioresparalasvarillasrestantes.
5) Desliceelvidrioconcuidadoporencimadelasvarillasroscadasenelcuerpo
delartefacto.
6) Deslicelosoriciosubicadosenelanilloinferiorsobrelosextremosdelasvarillas
roscadas.Coloqueelanilloinferiorcontralacarainternadelvidrio.
7) Rosqueloscapuchonesenlosextremosdelasvarillasroscadas.Ajustelos
capuchonesparaasegurarelanilloensulugar.(NOaprietedemasiado).
8) APAGUELAALIMENTACIÓNELÉCTRICA.
IMPORTANTE: Antesdecomenzar,NUNCAtratedetrabajarsinantesdesconectar
lacorrientehastaqueeltrabajosetermine.
a) Vayaalacajaprincipaldefusibles,ointerruptorocajadecircuitosdesucasa.
Coloqueelinterruptordelacorrienteprincipalenposicióndeapagado“OFF”.
b) Desatornilleel(los)fusible(s),ocoloqueelinterruptorointerruptoresdel
breakerenposicióndeapagado“OFF”,quecontrola(n)lacorrientehaciael
artefactoohabitacióndondeestátrabajando.
c) Coloqueelinterruptordeparedenposicióndeapagado“OFF”.Sielartefacto
quesevaareemplazartieneuninterruptorocadenaquesejala,colóquelosen
laposicióndeapagado“OFF”.
9) Determinelaalturadecielorrasoalaquelegustariacogarelartefacto.Seproveen
dos(2)tubosde11-1/2”delargoconelartefacto,losquesepuedenusaruomitir
paraalcanzarlaalturadeseada.
10) Monteelvástagoalartefacto.
11) Noteladireccióndeltuboderoscaexpuestaenlailustración.Losdostubos
inferiorestendránroscasexpuestasenlapartesuperior.Eltubosuperiornotendrá
laroscaexpuesta.
12) Instalarlostornillosdemontajedelescudete,apretandoconlosdedos.
13) Deslizerelescudeteyluegolaabrazaderademontajesobreel(los)vástago(s)
montadosalartefacto.
14) Roscarelpivoteeneltubohastaqueestéapretadocontraelvástago.Aseguraren
ellugarelpivotearótularoscandoalatuercahexagonaleneltuboroscado,adentro
delarótula.
NOTA:Enlosartefactossinalambredetierra,deslizarlaterminaldetierrasobreel
tuboroscado,adentrodelpivotearótulaantesderoscarenlatuercahexagonal.En
losartefactosconunalambredetierraquevaenelvástagoolacolumnadel
artefacto,acoplaralaalimentacióndetierracomoseespecicaenelpasoNo.14.
15) Levantarlaabrazaderademontajecontraelpivotearótula,alineandolamuescaen
larótulaconlaorejetaenlaabrazadera.Instalarrápidoelretenedoredondoensu
lugar.Sesugierecolocarunladodelretenedorredondoenellugaryluego
engancharelotro.
16) Acoplarlaabrazaderademontaje/artefactoensambladosalacajadesalida.Montar
laabrazaderademontajealcielorrasoconlamuescayorejetahacialaporciónmás
bajadelainclinacióndelcielorraso.(Ref:IllustracionA)
17) Acoplarelalambredetierradelacajadesalidaentrelaarandelacóncavayel
tornillodetierraverde,yroscarettornillodetierraenlaabrazaderademontaje.Siel
artefactoestáprovistoconunalambredetierra,conectarelalambredetierradel
artefactoalalambredetierradelacajadesalida,conlosconectoresdealambre(no
seproveen).Nuncasedebeconectarelalambredetierraalalambredealimentación
negrooblanco.
18) Hacerlasconexionesdelosalambres(conectoresnoincluidos.)Verelcuadromás
abajoparalasconexionescorrectasyalambrardeacuerdoaesto.
19) Cuidadosamentedeslizarelescudetearribaenelvástagoyaseguraralcielorraso
usandolasarandelasdeseguridad(Sóloeninstalacionescanadienes)ylasperillas
redondas.
NOTA:Debeaplicarseuncompuestoparaelselladoderoscasentodaslasroscasdelas
varillasindicadasconelsímbolo(4)paraevitarlarotaciónaccidentaldelartefacto
durantesulimpieza,cambiodebombillas,etc...
GREEN GROUND
SCREW
WIRE CONNECTOR
(NOT PROVIDED)
OUTLET BOX
GROUND
CUPPED
WASHER
FIXTURE
GROUND
Connect Black or
Red Supply Wire to:
Connect
White Supply Wire to:
Black White
*Parallel cord (round & smooth) *Parallel cord (square & ridged)
Clear, Brown, Gold or Black
without tracer
Clear, Brown, Gold or Black
with tracer
Insulated wire (other than green)
with copper conductor
Insulated wire (other than green)
with silver conductor
*Note: When parallel wires (SPT I & SPT II)
are used. The neutral wire is square shaped
or ridged and the other wire will be round in
shape or smooth (see illus.)
Neutral Wire
TORNILLO DE TIERRA
VERDE
CONECTOR DE ALAMBRE
(NO SE PROVEE)
TIERRA DE LA
CAJA DE SALIDA
ARANDELA
CONCAVA
TIERRA
ARTEFACTO
Conectar el alambre de
suministro negro o rojo al
Conectar el alambre de
suministro blanco al
Negro Blanco
*Cordon paralelo (redondo y liso)
*Cordon paralelo (cuadrado y estriado)
Claro, marrón, amarillio o negro
sin hebra identificadora
Claro, marrón, amarillio o negro
con hebra identificadora
Alambre aislado (diferente del verde)
con conductor de cobre
Alambre aislado (diferente del
verde) con conductor de plata
*Nota: Cuando se utiliza alambre paralelo
(SPT I y SPT II). El alambre neutro es de forma
cuadrada o estriada y el otro alambre será de
forma redonda o lisa. (Vea la ilustracíón).
Hilo Neutral
CANOPY
CAPUCHÓN
3
BALLRETAINER
RETENEDORREDONDO
HEXNUT
TUERCAHEXAGONAL
MOUNTINGSTRAP
ABRAZADERA
DEMONTAJE
THREADEDPIPE
TUBOROSCADO
GREENGROUNDSCREW
TORNILLOVERDEDE
TIERRA
BALLSWIVEL
PIVOTEAROTULA
BALLKNOB
PERILLAREDONDA
SLOTANDTAB
MUESCAYOREJETA
SLOPEDCEILING
CIELORRASO
INCLINADO
ILLUSTRATION A
3
CENTERSTEM
VÁSTAGOCENTRALE
FINIAL
CAPUCHON
THREADEDROD
VARILLAROSCADA
HEXNUT
TUERCAHEXAGONAL
FINIAL
CAPUCHON
LOCKWASHER
ARANDELADE
SEGURIDAD
GLASS
VIDRIO
RING
ANILLO
DateIssued:1/27/12
IS-2643-US
FIXTUREBODY
CUERPODELARTEFACTO
-
 1
1
Kichler Lighting 2643NI Manual de usuario
- Tipo
- Manual de usuario
en otros idiomas
- English: Kichler Lighting 2643NI User manual
Artículos relacionados
-
 Kichler Lighting 3275NI Manual de usuario
-
 Kichler Lighting 3275NI Guía de instalación
-
 Kichler Lighting 2655NI Manual de usuario
-
 Kichler Lighting 2640NI Manual de usuario
-
 Kichler Lighting 3278AP Manual de usuario
-
 Kichler Lighting 1672OZ Manual de usuario
-
Kichler Lighting 49669WZC Manual de usuario
-
 Kichler Lighting 42123CH Manual de usuario
-
 Kichler Lighting 2641NI Manual de usuario
-
 Kichler Lighting 42566BK Manual de usuario


