
PoE Adapter For Google
Nest Cam (battery)
USER MANUAL

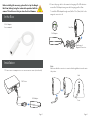
1. Connect the PoE Adapter to the PoE Switch via a RJ45 cable (not included).
2. Connect the pogo cable to the camera for charging it. The LED indicators
around the PoE Adapter turns green while charging your Nest Cam.
Nest Cam
PoE Device
RJ45 PoE Adapter
PoE Adapter
In the Box
Page 1 Page 2
Note:
Make sure that the connector is connected in the right direction as shown in
the picture.
To install the POE adapter through a wall, drill a 1/2 in (13mm) hole for the
magnetic connector to fit.
Front
Back
Weatherproof
Magnetic Connector
Before installing this accessory, please first set up the Google
Nest Cam (battery) using the in-box cable provided with the
camera. This will ensure that you have the latest firmware.
Installation
1 x PoE adapter
1 x user manual

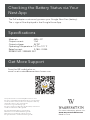
Checking the Battery Status via Your
Nest App
The PoE adapter continuously powers your Google Nest Cam (battery).
The ∞ sign will be displayed in the Google Home App.
Google Nest Cam (battery) is not included.
Wasserstein is not affiliated with Google LLC.
Wasserstein is a trademark of Dropcases Ltd.
Google Nest Cam is a trademark of Google LLC.
Get More Support
Specifications
Materials: ABS + PC
Output current: 1.5A
Output voltage: 5V DC
Operating Temperature: 14 ˚F to 131 ˚F
Rated current: 0.18A - 0.28A
IEEE802.3AF / IEEE802.3AT
This product has been certified by Wasserstein to meet
Google’s compatibility standards. Google is not responsible
for the operation of this product or its compliance with any
applicable safety or other requirements.
Learn more at g.co/madeforgoogle.
Google’s “made for” badge, Google Nest Cam, and related
marks are trademarks of Google LLC.
For more information, please visit:
www.wasserstein-home.com
Made in China
Scan the QR code below or,
email us at [email protected]

Adaptador PoE para Google
Nest Cam (con batería)
MANUAL DEL USUARIO

Página 1 Página 2
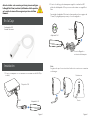
2. Conecte el cable pogo a la cámara para cargarla. Los indicadores LED
alrededor del adaptador PoE se ponen en verde mientras se carga la Nest
Cam.
Nest Cam
Adaptador PoE
Nota:
Asegúrese de que el conector está en la dirección correcta como se muestra
en la imagen.
Para instalar el adaptador PoE a través de una pared, perfore un agujero de
13 mm (1/2 pulgada) para que encaje el conector magnético:
Frente
Parte trasera
Conector Magnético
resistente a la Intemperie
1. Conecte el adaptador PoE al conmutador PoE mediante un cable RJ45 (no
incluido).
Dispositivo PoE
RJ45 Adaptador PoE
En la Caja
Antes de instalar este accesorio, por favor, primero configure
la Google Nest Cam (con batería) utilizando el cable provisto
en la caja de la cámara. Esto asegurará que tiene el último
firmware.
Instalación
1 x adaptador PoE
1 manual de usuario

Comprobación del estado de la
batería a través de su Nest App
El adaptador PoE alimenta continuamente su Google Nest Cam (con batería).
La ∞ señal se mostrará en la Google Home App.
La Google Nest Cam (con batería) no está incluida.
Wasserstein no está afiliado a Google LLC.
Wasserstein es una marca comercial de Dropcases Ltd.
Google Nest Cam es una marca comercial de Google LLC.
Especificaciones del Producto
Materiales: ABS + PC
Corriente de salida: 1.5A
Tensión de salida: 5V DC
Temperatura de funcionamiento: 14 °F a 131 °F
Corriente nominal: 0,18A - 0,28A
IEEE802.3AF / IEEE802.3AT
Este producto ha sido certificado por Wasserstein para cumplir con
los estándares de compatibilidad de Google. Google no se hace
responsable del funcionamiento de este producto ni de su
cumplimiento con los requisitos de seguridad u otros aplicables.
Más información en g.co/madeforgoogle.
El distintivo "made for" de Google, Google Nest Cam y las marcas
relacionadas son marcas comerciales de Google LLC.
Para más información, visite:
www.wasserstein-home.com
Fabricado en China
Obtenga más apoyo
Escanee el código QR que aparece a continuación o envíenos un
correo electrónico a [email protected]

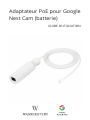
Adaptateur PoE pour Google
Nest Cam (batterie)
GUIDE D’UTILISATION

Page 1 Page 2
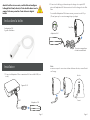
2. Connectez le câble pogo à la caméra pour la charger. Les voyants LED
autour de l’adaptateur PoE deviennent verts lors de la charge de votre Nest
Cam.
Nest Cam
Adaptateur PoE
Note:
assurez-vous que le connecteur soit dans la bonne direction, comme illustré
sur l’image.
Pour installer l’adaptateur PoE à travers un mur, percez un trou de 1/2 po
(13 mm) pour que le connecteur magnétique s’y adapte.
Avant
Arrière
Connecteur magnétique
résistant aux matériaux
1. Connectez l’adaptateur PoE au commutateur PoE via un câble RJ45 (non
inclus).
Appareil PoE
RJ45 Adaptateur PoE
Inclus dans la boîte
Avant d’installer cet accessoire, veuillez d’abord configurer
la Google Nest Cam (batterie) à l’aide du câble fourni avec la
caméra. Cela vous permettra d’avoir le dernier logiciel
installé.
Installation
1 x adaptateur PoE
1 x guide d’utilisation

Vérification de l’état de la batterie via
votre application Nest
L’adaptateur PoE alimente en permanence votre Google Nest Cam (batterie).
Le signe ∞ sera affiché dans l’application Google Home.
Google Nest Cam (batterie) non incluse.
Wasserstein n’est pas affilié à Google LLC.
Wasserstein est une marque commerciale de Dropcases Ltd.
Google Nest Cam est une marque commerciale de Google LLC.
Spécifications du produit
Matériaux : ABS + PC
Courant de sortie : 1.5A
Tension de sortie : 5V DC
Température opérationnelle : -10° C à 55° C
Courant actif : 0.18A - 0.28A
IEEE802.3AF / IEEE802.3AT
Ce produit est certifié par Wasserstein pour répondre aux normes de
compatibilité de Google. Google n’est pas responsable de l’exploitation
de ce produit, de sa conformité avec les exigences de sécurité ou
d’autres exigences applicables.
Pour en savoir plus, consultez g.co/madeforgoogle.
Le badge “Made for” de Google, Google Nest Cam, et les marques
associées sont des marques commerciales de Google LLC.
Pour plus d’informations, visitez :
www.wasserstein-home.com
Fabriqué en Chine
Bénéficiez de notre support
Scannez le code QR ci-dessous ou adressez-nous
un email à [email protected]

PoE Adapter für Google Nest
Cam (mit Akku)
BENUTZERHANDBUCH

Seite 1 Seite 2
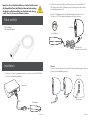
2. Schließen Sie das Pogo-Kabel an die Kamera an, um sie aufzuladen. Die
LED-Anzeigen um den PoE-Adapter herum leuchten grün, während Ihre
Nest Cam aufgeladen wird.
Nest Cam
PoE-Adapter
Hinweis:
Achten Sie darauf, dass der Stecker in der richtigen Richtung angeschlossen
wird, wie in der Abbildung gezeigt.
Um den PoE-Adapter durch eine Wand zu installieren, bohren Sie ein
13-mm-Loch (1/2 Zoll), damit der magnetische Anschluss passt.
Vorderseite
Rückseite
Wetterfester
magnetischer Anschluss
1. Verbinden Sie den PoE-Adapter mit dem PoE-Schalter über ein RJ45-Kabel
(nicht im Lieferumfang enthalten).
PoE-Gerät
RJ45 PoE-Adapter
Paket enthält
Bevor Sie dieses Zubehör installieren, richten Sie bitte zuerst
die Google Nest Cam (mit Akku) mit dem im Lieferumfang
der Kamera enthaltenen Kabel ein. Dadurch wird sicherg-
estellt, dass Sie die neueste Firmware haben.
Installation
1 x PoE-Adapter
1 x Benutzerhandbuch

Überprüfen des Batteriestatus über
Ihre Nest App
Der PoE-Adapter versorgt Ihre Google Nest Cam (mit Akku) kontinuierlich mit
Strom. Das Zeichen wird in der Google Home App angezeigt.
Google Nest Cam (mit Akku) ist nicht im
Lieferumfang enthalten.
Wasserstein gehört nicht zu Google LLC.
Wasserstein ist eine Marke von Dropcases Ltd.
Google Nest Cam ist eine Marke von Google LLC.
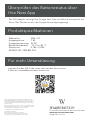
Produktspezifikationen
Materialien: ABS + PC
Ausgangsstrom: 1,5A
Ausgangsspannung: 5V DC
Betriebstemperatur: -10 °C bis 55 °C
Nennstrom: 0,18A - 0,28A
IEEE802.3AF / IEEE802.3AT
Dieses Produkt wurde von Wasserstein zertifiziert, um die
Kompatibilitätsstandards von Google zu erfüllen. Google ist
nicht verantwortlich für die Nutzung dieses Produkts oder
dessen Konformität mit geltenden Sicherheits- oder anderen
Anforderungen.
Weitere Informationen finden Sie unter g.co/madeforgoogle.
Das "Made for"-Zeichen von Google, Google Nest Cam und
verwandte Marken sind Marken von Google LLC.
Für weitere Informationen besuchen Sie bitte:
www.wasserstein-home.com
Hergestellt in China
Für mehr Unterstützung
scannen Sie den QR-Code unten oder senden Sie uns eine
E-Mail an [email protected]
-
 1
1
-
 2
2
-
 3
3
-
 4
4
-
 5
5
-
 6
6
-
 7
7
-
 8
8
-
 9
9
-
 10
10
-
 11
11
-
 12
12


en otros idiomas
- français: WASSERSTEIN B09C1D43CB Manuel utilisateur
- English: WASSERSTEIN B09C1D43CB User manual
- Deutsch: WASSERSTEIN B09C1D43CB Benutzerhandbuch
Artículos relacionados
-
WASSERSTEIN Solar panel Manual de usuario
-
 WASSERSTEIN DRPNEST2PRSOLW Manual de usuario
-
 WASSERSTEIN 4895230304402 Manual de usuario
-
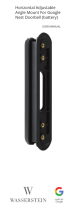 WASSERSTEIN Horizontal Adjustable Angle Mount Manual de usuario
-
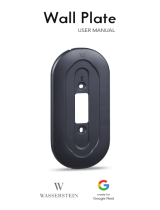 WASSERSTEIN Google Nest Doorbell Wall Plate Manual de usuario
-
WASSERSTEIN NestDB2BattPltBlkUSA Manual de usuario
-
WASSERSTEIN Solar Charger Manual de usuario


Otros documentos
-
 Nanoleaf Essentials Smart A19 Bulb (NL45-0800WT240E27) Manual de usuario
-
 Nanoleaf Essentials Lightstrip Expansion (NL55-0001LS-1M) Manual de usuario
-
Silvercrest S-K 1920 Assembly, Operating And Safety Instructions
-
Swann SWIFI-2KOCAM Guía del usuario
-
Nest NEST CAM OUTDOOR Guía de instalación
-
 Nanoleaf 374NF032LS Essentials Matter Smart Lightstrips Instrucciones de operación
-
PORCELANOSA CAJON MB NEST NEGRO 61 Guía de instalación


