Firman T07571F Manual de usuario
- Categoría
- Generadores de poder
- Tipo
- Manual de usuario

OPERATOR’S MANUAL
Record product information to reference when ordering parts or
obtaining warranty coverage.
TRI-FUEL PORTABLE GENERATOR
MODEL NUMBER
T07571F
P/N:375747009 Rev:00

Table of Contents
Introduction . . . . . . . . . . . .
Features and Controls . . . . . . . . . . . . . . . . . . . . . . . . . . . . . . . . . . . . . . . . . . . . . . . . . . . . . . . . . . . . . . . 5
Operation . . . . . . . . . . . . . . . . . . . . . . . . . . . . . . . . . . . . . . . . . . . . . . . . . . . . . . . . . . . . . . . . . . . . . . . . . . . 10
Maintenance - Storage. . . . . . . . . . . . . . . . . . . . . . . . . . . . . . . . . . . . . . . . . . . . . . . . . . . . . . . . . . . . . . 2 7
Troubleshooting- Specifications . . . . . . . . . . . . . . . . . . . . . . . . . . . . . . . . . . . . . . . . . . . . . . . . . . . . 33
Parts Diagrams - Parts Lists - Wiring Diagram . . . . . . . . . . . . . . . . . . . . . . . . . . . . . . . . . . . . . . . 34
Service - Warranty. . . . . . . . . . . . . . . . . . . . . . . . . . . . . . . . . . . . . . . . . . . . . . . . . . . . . . . . . . . . . . . . . . .41
. . . . . . . . . . . . . . . . . . . . . . . . . . . . . . . . . . . . . . . . . . . . . . . . . . . . . . . . . . . . .1
REGISTER YOUR PRODUCT
Register your Firman generator online at www.firmanpowerequipment.com
INTRODUCTION
Thank you for purchasing a FIRMAN generator. You have selected a high-quality, precision engineered
generator set designed and tested to give you years of satisfactory service. This generator is Tri-Fuel
and capable of running on gasoline, liquid petroleum gas (LPG), and natural gas (NG). This generator is
not intended to be run unattended or to supply power to life safety support.
This manual contains safety information to make you aware of the hazards and risks associated
with generator products and how to avoid them. This generator is designed and intended only
for supplying electrical power for operating compatible electrical lighting, appliances, tools and
motor loads, and is not intended for any other purpose. It is important that you read and
understand these instructions thoroughly before attempting to start or operate this portable
generator. Save these original instructions for future reference.
All information in this publication is based on the latest production information available at the
time of approval for printing. The manufacturer reserves the right to change, alter or otherwise
improve the generator and this documentation at any time without prior notice.
INTRODUCTION
01

02
SIGNAL WORDS
DANGER WARNING CAUTION
Indicates a hazard
which, if not avoided,
will result in death or
serious injury.
Indicates a hazard
which, if not avoided,
could result in death
or serious injury.
Indicates a hazard
which, if not avoided,
could result in minor or
moderate injury.
Toxic Fumes- Engine exhaust contains carbon monoxide, a
poisonous gas that will kill you in minutes. You cannot smell
it or see it.
Fire- Fuel and its vapors are extremely flammable which could
cause burns or fire resulting in death or serious injury.Engine
exhaust could cause fire resulting in death or serious injury.
Hot Surface- Muffler could cause burns resulting in serious injury.
Generator could cause electrical shock resulting in death or serious
injury.
Safety Alert Symbol- Indicates a potential personal injury hazard.
Operator's Manual- Failure to follow warnings, instructions and
operator's manual could result in death or serious injury.
English Customer Service: 1-844-FIRMAN1
NOTICE
Indicates information
considered Important,
but not hazard-related.
INTRODUCTION

English Customer Service: 1-844-FIRMAN1
WARNING! This product can expose you to chemicals including gasoline engine
exhaust, which is known to the State of California to cause cancer, and carbon
monoxide, which is known to the State of California to cause birth defects or other
reproductive harm. For more information go to www.P65Warnings.ca.gov.
This outdoor generator can be used to power outdoor items using extension cords or to restore
home power using a transfer switch. A transfer switch is a separate device installed by a licensed
electrician that allows the portable generator to be cord connected, using either of the 120/240V
receptacles, directly into your home’s electrical system. Install a listed transfer switch as soon as
possible if this generator will be used to restore power to your home.
NOTICE If you have questions about intended use, contact customer service. This portable
generator is designed to be used only with FIRMAN authorized parts.
FIRMAN
The generator has a system ground that connects the generator frame components to the ground
terminals on the AC output receptacles. The system ground is connected to the AC neutral wire.
The neutral is bonded to the generator frame.
System Ground
There may be Federal or State regulations, local codes, or ordinances that apply to the intended
use of the generator. Consult a qualified electrician, electrical inspector, or the local agency
having jurisdiction. This generator is not intended to be used at a construction site or similar
activity as defined by NFPA 70-2020 (NEC) section 590.6.
Compliance Requirements
Connections to your home’s electrical system must use a listed* transfer switch installed by a
licensed electrician. The connection must isolate the generator power from the utility power and
comply with all applicable laws and electrical codes.
To Restore Home Power Using a Listed Transfer Switch
Typical
120/240V
Outlet
Transfer
Switch
Typical Indoor Items
To Restore Power Using Extension Cords
03
INTRODUCTION

English Customer Service: 1-844-FIRMAN1
1. Only use grounded cords marked for outdoor use rated for your loads.
16
14
To provide power using
extension cords
Total
Amperage
Minimum Gauge, Outdoor Rated
Up to 50 FT (15m)
Up to 13A
Up to 15A
Up to 20A
Up to 30A
Up to 50A
2. Follow cord safety instructions.
3. Install carbon monoxide alarm(s).
4. When operating portable generator with extension cords, make sure portable generator is located
in an open, outdoor area, at least 20 ft. (6 m.) from occupied spaces with exhaust pointed away.
5. Extension cords running directly into your home, powering indoor items IS NOT RECOMMENDED.
Extension cords running directly into the home increase your risk of carbon monoxide
poisoning through any openings.
If an extension cord running directly into your home is used to power indoor items, the
operator recognizes that this increases the risk of CO poisoning to people inside the home
and assumes that risk.
•
•
6. Install a listed *transfer switch as soon as possible if this or any generator will be used to restore
power to your home.
*
product safety test standards.
Certified by a Nationally Recognized Testing Laboratory that the product complies to appropriate
DANGER! Engine exhaust contains carbon monoxide, a poisonous gas that will kill
you in minutes. You cannot smell it, see it, or taste it. Even if you do not smell exhaust
fumes, you could still be exposed to carbon monoxide gas.
04
6
INTRODUCTION

1- Fuel Gauge
2- 8.0 Gallon Capacity Fuel Tank
3- Fuel Cap
4- Choke Lever(behind air filter box)
5- Air Filter
6- 439cc FIRMAN OHV Engine
7- Recoil Starter
8- 10.0" Flat Free Wheel
9- Oil Filler Cap
10- Battery
11-
12-
13-
Outlet Cover
Control Panel
Handle
14- LPG/NG Hose Connector(Inlet)
15- LPG/NG Selector Switch
16- Data Decal / Serial Number
English Customer Service: 1-844-FIRMAN1
*We are always working to improve our products. Therefore, the enclosed product may differ
slightly from the image on this page.
①
②
③
⑤
⑥
④
⑦
⑭⑧
⑨
⑩
⑬
⑮
⑪
⑫
⑬
⑭
⑯
05
FEATURES AND CONTROLS

FEATURES AND CONTROLS
English Customer Service: 1-844-FIRMAN1
06
②
③④
①
⑤
⑥
⑦
⑧
⑨
⑩
⑪

FEATURES AND CONTROLS
English Customer Service: 1-844-FIRMAN1
07
①
②③
④
⑤

FEATURES AND CONTROLS
English Customer Service: 1-844-FIRMAN1
08
⑥
⑦
⑧
⑨
⑩
⑪

English Customer Service: 1-844-FIRMAN1
NOTICE Total power drawn from all receptacles must not exceed the data decal rating.
Control Panel
34
2
1
11
5
6
7
8
9
10
12
5
13
1. Main Fuel Selector Switch Engine Switch – Use to select and turn on gasoline (GAS) or LPG/NG
fuel source. The GAS valve is closed when the switch is in the OFF or LPG/NG positions. Engine
switch is on when the switch is in GAS or LPG/NG positions.
/
2. Indicator Light When the main fuel selector switch is turned to the GAS or LPG/NG position,
the indicator light will turn RED for up to 4 minutes (before going off). Starting the engine
successfully anytime during the 4 minutes will turn the indicator light GREEN. See Indicator
light-Battery Power Saving Mode section for more information.
–
5. Circuit Breakers – The receptacles are protected by AC circuit protectors. If the generator is
overloaded or an external short circuit occurs, a circuit protector may trip. If tripping occurs,
disconnect all electrical loads and determine the cause before attempting to continue using the
generator. Reset any tripped circuit protectors.
If multiple receptacles are used at the same time, the total current must be kept with-in the
portable generator data decal rating.
6. 120V, 20A Duplex GFCI (Ground Fault Circuit Interrupter)- NEMA 5-20R
A maximum of 20 Amps current may be drawn from this duplex receptacle.
7. 120V, 30A Twist Lock – NEMA L5-30R(Not GFCI protected)
A maximum of 30 Amps current may be drawn from this receptacle.
8.120/240V, 30A Twist Lock – NEMA L14-30R(Not GFCI protected)
9.Ground Terminal – Consult an electrician or authority having jurisdiction for local grounding
requirements.
10. 120/240V, 50A – (NEMA 14-50R) (Not GFCI protected)
11. Outlet Cover - Protects the receptacles from dust and debris.
12. LPG/NG Hose Connector (Inlet: 3/8" Flare Male) – Used to connect LPG/NG hose to generator.
13. LPG/NG Selector Switch – Select either LPG or NG.
3. Engine Start Switch – To start engine, press and hold the switch in the START (ll) position, the
engine will crank and attempt to start. When the engine starts, release the switch to the RUN (l) position.
4. 3-1 Data-Minder (Multi-Meter) – Push the SELECT button to show the Voltage, Hertz and running hours.
09
FEATURES AND CONTROLS
A maximum of 30 Amps current for 240 Volts or two independent 120 Volt loads at 30 Amps current each.
A maximum of 31.25 Amps current for 240 Volts or two independent 120 Volt loads at 31.25 Amps current each.

English Customer Service: 1-844-FIRMAN1
OPERATION
1.Location
DANGER! Engine exhaust contains carbon monoxide, a poisonous gas that could kill
you in minutes. You CANNOT smell it, see it, or taste it. Even if you do not smell exhaust
fumes, you could still be exposed to carbon monoxide gas.
•
•
•
Operate portable generator only outdoors, at least 20 ft. (6 m) from occupied spaces with exhaust
pointed away to reduce the risk of carbon monoxide accumulating.
Install battery-operated carbon monoxide alarms or plug-in carbon monoxide alarms with
battery back-up according to the manufacturer's instructions. Smoke alarms cannot detect
carbon monoxide gas.
Do not run this portable generator inside homes, garages, basements, crawlspaces, sheds, or
other partially-enclosed spaces even if using fans or opening doors and windows for ventilation.
Carbon monoxide can quickly build up in these spaces and can linger for hours, even after this
product has shut off.
•If you start to feel sick, dizzy, weak or your home’s carbon monoxide alarm sounds, get to fresh air
right away. Call emergency services. You may have carbon monoxide poisoning.
Carbon Monoxide Alarm(s)
Install carbon monoxide alarms
inside your home. Without
wor ki ng car bo n mon o xi de
alarms, you will not realize you
are getting sick and dying from
carbon monoxide poisoning.
Prevent Carbon Monoxide (CO) Poisoning
Use outdoors at least 20 ft. (6.0 m) from any home.
Point exhaust away from all homes and occupied spaces.
Install CO alarms inside your home.
20 ft. (6.0 m) min.
To better educate yourself about all carbon monoxide risks,
go to www.takeyourgeneratoroutside.com.
10

English Customer Service: 1-844-FIRMAN1
Reduce Risk of Fire
WARNING! Exhaust heat/gases could ignite combustibles, structures or damage fuel
tank causing a fire, resulting in death or serious injury.
Keep portable generator at least 5 ft. (1.5m) from any structure, trees or vegetation over 12
in. (30 cm) in height.
•
Select an outdoor site that is dry and protected from the weather. Do not move portable
generator indoors to protect it from the weather.
Do not locate the portable generator under a deck or other similar structure that may
confine heat and airflow.
•
•
5 ft.(1.5m)
min.
5 ft.(1.5m)
min.
20 ft.(6m)min.
11
OPERATION

English Customer Service: 1-844-FIRMAN1
2, Oil and Gasoline / LPG/ NG
Add Engine Oil
We recommend using FIRMAN SAE 10W-30 API SL oil for best performance. Other high-quality
detergent oils (API SL or higher) are acceptable. Do not use special additives. Ambient temperature
determines the proper oil viscosity for the engine. Use the chart to select the proper oil for the
outdoor temperature range expected.
NOTICE Do not attempt to crank or start the engine before it has been properly filled with the
recommended type and amount of oil. Damage due to operation with no oil will void your warranty.
Degrees Celsiusº(Outside)
Full Synthetic 5W-30
Degrees Fahrenheitº(Outside)
5W-30 10W-40
10W-30
1.Place generator on a flat, level surface.
2.Clean area around oil fill and remove yellow oil fill cap/dipstick.
3.Wipe dipstick clean.
(H)
DRAIN PLUG
(L)
H
L
12
OPERATION

English Customer Service: 1-844-FIRMAN1
4. Using oil funnel, slowly pour oil into oil fill opening until oil reaches upper limit "H" mark on the
dipstick. Be careful not to overfill. Overfilling could cause engine starting problems or engine damage.
5.Replace oil fill cap/dipstick and fully tighten.
6.Oil level should be checked prior to each use or at least every 8 hours of operation. Keep oil
level maintained.
The portable generator is equipped with a low oil shutdown. If the oil level drops below the
minimum required level, a sensor will activate an internal switch stopping the engine. If the
engine shuts off and the oil level is within specifications, check to see if generator is sitting at an
angle. Place portable generator on an even surface to correct this. If engine fails to start, the oil
level may not be high enough to deactivate the internal low oil level switch. Make sure the sump is
completely full of oil to the upper limit (H). Do not operate engine until oil level issue is corrected.
Contact Firman customer service.
Low Oil Shutdown
Add Gasoline
WARNING! Fuel and its vapors are extremely flammable which could cause burns or fire
resulting in death or serious injury.
Turn generator engine OFF and let it cool at least 2 minutes before removing fuel cap.
Do Not refuel or move generator when engine is running.
Move generator outdoors prior to adding or draining fuel
Keep fuel away from any ignition sources.
Do not overfill tank, allow space for fuel expansion.
If any fuel spills, wait until it evaporates before starting engine
Check and replace fuel lines, tank, cap, and fittings prior to each use if any damage or leaks
are found.
•
•
•
•
•
•
•
Fuel must meet these requirements:
Clean, fresh, unleaded gasoline with a minimum of 87 octane.
For high altitude use, see Operation at High Altitude.
Gasoline with no more than 10% ethanol is acceptable.
•
•
•E10 E15
13
OPERATION

English Customer Service: 1-844-FIRMAN1
NOTICE Do not mix oil in gasoline or modify engine to run on alternate fuels not described in this
manual. Use of unapproved fuels could damage engine and will not be covered under warranty.
1. Clean area around fuel fill cap, remove cap.
2. Slowly add unleaded fuel to fuel tank. Be careful not to fill above the RED fuel level indicator.
This allows adequate space for fuel expansion.
Red Line Indicator
3. Install fuel cap and let any spilled fuel evaporate before starting engine.
Operation at High Altitude
At altitudes over 5,000 feet(1524 meters), a minimum 85 octane gasoline is acceptable.
Engine power and generator output will be reduced approximately 3.5% for every 1000 feet (305 m)
of elevation above sea level. High altitude may cause hard starting, increased fuel consumption
and sparkplug fouling. To operate at high altitudes FIRMAN can provide a high altitude carburetor
main jet. The alternative main jet and installation instructions can be obtained by contacting
Customer Support.
NOTICE Operation using an alternative main jet at elevations lower than the recommended
minimum altitude can damage the engine. For operation at lower elevations, the standard main
jet supplied must be used. Operating the engine with the wrong main jet may increase exhaust
emissions, fuel consumption and reduce performance.
Altitude main jet 1
Altitude main jet 2
439cc
380717004
380717005
Altitude
3000-6000Feet
6000-8000Feet
Operation at High Ambient conditions
Your Firman Power Equipment product is designed and rated for continuous operation at ambient
temperatures up to 104°F (40°C). The generator may be operated at temperatures ranging from
5°F(-15°C) to 122°F(50°C) for short periods. If the generator is exposed to temperatures outside
this range during storage, the generator should be brought back within this range before
operation. When operated above 77°F(25° C) there may be a decrease in power.
Maximum wattage and current are subject to and limited by such factors as ambient temperature,
altitude, engine conditions etc.
14
OPERATION

English Customer Service: 1-844-FIRMAN1
Connecting LPG/ NG Fuel
WARNING! Liquid Petroleum gas (LPG) and Natural Gas (NG) are extremely
flammable which could cause burns or fire resulting in death or serious injury.
Do not place the LPG/NG sources in the path of muffler outlet or near any ignition source.
Keep a fire extinguisher near the generator all the time.
Do not use or store LPG/NG portable sources not in use near generator or in a building, garage
or enclosed area.
All LPG/NG supply/ piping lines must be installed by a qualified plumber.
If you smell gas, close off all gas sources and contact a qualified plumber to inspect and
repair the LPG or NG system.
Prior to each days first use spray a soapy water solution on LPG/NG fuel connections to check
for leaks.
Never use a gas container, LPG/ NG connector hose, LPG cylinder or NG source that appears
to be damaged.
Do not connect or disconnect the LPG/ NG source in an enclosed area.
LPG is heavier than air and can accumulate in confined / low spaces if there is a leak.
•
•
•
•
•
•
•
•
NOTICE If a fuel supply connection is necessary it must be installed in accordance with all local
codes or regulations, or in the absence of local codes or regulations, in accordance with the
National Fuel Gas Code (NFPA 54/ANSI Z223.1) and CSA B149.1 (Natural Gas and Propane
Installation Code), as applicable. If possible the fuel supply connection should be close to the
outdoor operating location. This will reduce the cost of the flexible fuel run. An approved flexible
fuel line must be installed between the generator LPG/NG Hose Connector (Inlet) and the fuel
supply connection. In no case should this information be interpreted to conflict with any local,
state, or national code. If in doubt, always follow local codes.
LPG
Always keep the LPG cylinder in an upright position.
Use only DOT LPG cylinders in vapor service with type 1, right hand ACME threads. Verify the
re-qualification date on the cylinder has not expired.
All new cylinders must be purged of air and moisture prior to filling. The purging process
should be done by your propane gas supplier.
•
•
•
Attach the LPG regulator hose assembly (included) to the LPG hose connector (inlet) on the control
panel of the generator. Tighten the nut with a 19 mm or adjustable wrench. Remove the safety plug
or cap from the LPG cylinder valve. Attach the LPG regulator to the cylinder valve. Do not use a
wrench to tighten LPG cylinder nut. Tighten the nut by hand clockwise to a positive stop. Using a
wrench may damage LPG cylinder components.
15
•
OPERATION
•The fuel supply line must always be shut off when the engine is not running. Failure to shut
off fuel may allow fuel to leak at the generator.

English Customer Service: 1-844-FIRMAN1
NG Shut Off Valve
Connect the locally approved flexible fuel supply line (not included) to the LPG/NG connector (inlet)
on the control panel and the fuel Source. We recommend you use FIRMAN 25ft (7.62m) Quick Connect
Hose Kit (Model 1815) or 10ft (3m) Quick Connect Hose Kit (Model 1805) for Natural Gas (NG)
connection (This item is not included). Hose requirements may vary in different regions depending
on local codes. Contact your local licensed plumber to ensure complete compliance with all codes.
Make sure the NG source location and hose used allows the portable generator to be located at least
20 ft (6 m) from any occupied spaces.
3.Starting the Generator on Gasoline
1. Before starting the generator, check for loose or missing parts and for any damage which may
have occurred during shipment. Ensure spark plug, muffler, fuel cap, and air cleaner are all in place.
2. Move portable generator outdoors to safe operating location at least 20feet (6m) from any
occupied spaces.
16
Indicator light - Battery Power Saving Mode
This generator is equipped with an electronic module which consumes battery power. When the
main fuel selector switch is turned to the GAS or LPG/NG position, the indicator light will turn
RED for up to 4 minutes (before going off). Starting the engine successfully anytime during the 4
minutes will turn the indicator light GREEN. If portable generator is not started during this
4-minute period the portable generator will switch to Battery Power Saving Mode to conserve
battery life.
NOTICE Your portable generator is equipped with an internal battery charger that will properly
charge the battery only when the engine is running.
The generator cannot be started in Battery Power Saving Mode. Turn main fuel selector switch to
the off position and back to the GAS or LPG/NG position to reset the RED indicator 4-minute
electronic module.
3.If connected make sure the LPG cylinder knob or the NG source valve are fully closed or
disconnected.
CLOSE
OPERATION

English Customer Service: 1-844-FIRMAN1
17
4.Turn the main fuel selector switch to “GAS” position.
NOTICE When the main fuel selector switch is turned to the GAS position, the indicator light will
turn RED for up to 4 minutes (before going off). Starting the engine successfully anytime during
the 4 minutes will turn the indicator light GREEN. See Indicator light-Battery Power Saving
Mode section for more information.
5. Disconnect all electrical loads from the generator. Never start or stop the generator with
electrical devices plugged in.
6. Move choke lever located on engine to “START” position. You do not need to choke a warm engine.
(For electric start move to step (8))
7. For recoil start only - Pull the starter cord slowly until resistance is felt and then pull rapidly to
start engine.
8. For electric start only - Flip the engine switch to the START (ll) position for a few seconds and
then release.
3 sec.
OPERATION

English Customer Service: 1-844-FIRMAN1
9. Do not over-choke. As soon as engine starts and warms up, slowly move the choke lever to the
RUN position.
10. Allow portable generator to run at no load for a few minutes to stabilize before plugging in
any electrical devices.
NOTICE If engine starts but fails to run, or if portable generator shuts down during operation,
check oil level. See Low Oil Shutdown section for more information.
4. Starting the Generator on LPG
1. Before starting the generator, check for loose or missing parts and for any damage which may
have occurred during shipment. Ensure spark plug, muffler, fuel cap, and air cleaner are all in place.
2. Move portable generator outdoors to safe operating location at least 20 feet (6 m) from any
occupied spaces.
3. Connect the LPG hose with regulator to both LPG cylinder and portable generator LPG/NG Hose
Connector (inlet).
LPG
4. Fully open the LPG cylinder knob.
18
OPERATION

English Customer Service: 1-844-FIRMAN1
5. Turn the LPG/NG selector switch to LPG position.
6. Turn the main fuel selector switch to LPG/NG position.
NOTICE When the main fuel selector switch is turned to the LPG/NG position, the indicator light
will turn RED for up to 4 minutes (before going off). Starting the engine successfully anytime
during the 4 minutes will turn the indicator light GREEN.
See Indicator light-Battery Power Saving Mode section for more information.
7. Disconnect all electrical loads from the generator. Never start or stop the generator with
electrical devices plugged in.
8. Move choke lever located on engine to “START” position.
(For electric start move to step (12))
9. For recoil start only - PULL-TO-PRIME Pull the starter cord 1-2 times. Pull slowly until resistance
if felt and then pull rapidly.
1-2 Times
19
OPERATION

10.For recoil start only - Move the choke lever to the “RUN” position.
English Customer Service: 1-844-FIRMAN1
11. For recoil start only - PULL-TO-RUN Pull the starter cord slowly until resistance if felt and pull
rapidly to run the portable generator.
If the engine fails to start in 1-2 pulls with choke in the RUN position, move choke lever to START
position and repeat the PULL-TO-PRIME step (9).
12. For electric start only - Flip the engine switch to the START (ll) position for a few seconds and
then release.
13. For electric start only - Move the choke lever to the RUN position.
3 sec.
14. Allow portable generator to run at no load for a few minutes to stabilize before plugging in
any electrical devices.
NOTICE If engine starts but fails to run, or if portable generator shuts down during operation,
check oil level. See Low Oil Shutdown section for more information.
NOTICE Observing frost on LPG cylinder and regulator is common during operation and normally
is not an indication of a problem. In unusual situations this frost may eventually restrict the flow of
LPG gas to the generator resulting in deteriorating performance. In these rare situations it can be
helpful to:
20
OPERATION

English Customer Service: 1-844-FIRMAN1
•Exchanging fuel cylinders to allow the first cylinder to warm up, repeating as necessary.
Placing the LPG cylinder at the end of the generator near the handle, where engine fan
air flows out from the generator. This air is slightly heated by air flowing over the engine.
Do not place the LPG cylinder in the path of the muffler exhaust outlet.
•
The LPG cylinder and components can be temporarily warmed by pouring warm water over
them.
•
Muffler
5. Starting the Generator on NG
1. Before starting the generator, check for loose or missing parts and for any damage which may
have occurred during shipment. Ensure spark plug, muffler, fuel cap, and air cleaner are all in place.
2. Move portable generator outdoors to safe operating location at least 20 feet (6 m) from any
occupied spaces.
3. Connect the NG hose to both the NG source and portable generator LPG/NG Hose Connector (inlet).
NG Shut Off Valve
4. Fully open the NG source valve.
21
OPERATION

English Customer Service: 1-844-FIRMAN1
5. Turn the LPG/NG selector switch to NG position.
6. Turn the main fuel selector switch to LPG/NG position.
NOTICE When the main fuel selector switch is turned to the LPG/NG position, the indicator light
will turn RED for up to 4 minutes (before going off). Starting the engine successfully anytime
during the 4 minutes will turn the indicator light GREEN. See Indicator light-Battery Power Saving
Mode section for more information.
7. Disconnect all electrical loads from the generator. Never start or stop the generator with
electrical devices plugged in.
8. Move choke lever located on engine to “START” position.
(For electric start move to step (12))
9. For recoil start only - PULL-TO-PRIME Pull the starter cord 1-2 times. Pull slowly until resistance
if felt and then pull rapidly.
1-2 Times
22
OPERATION

10.For recoil start only - Move the choke lever to the “RUN” position.
English Customer Service: 1-844-FIRMAN1
11. For recoil start only - PULL-TO-RUN Pull the starter cord slowly until resistance if felt and pull
rapidly to run the portable generator.
If the engine fails to start in 1-2 pulls with choke in the RUN position, move choke lever to START
position and repeat the PULL-TO-PRIME step (9).
12. For electric start only - Flip the engine switch to the START (ll) position for a few seconds and
then release.
13. For electric start only - Move the choke lever to the RUN position.
3 sec.
14. Allow portable generator to run at no load for a few minutes to stabilize before plugging in
any electrical devices.
NOTICE If engine starts but fails to run, or if portable generator shuts down during operation,
check oil level. See Low Oil Shutdown section for more information.
23
OPERATION

English Customer Service: 1-844-FIRMAN1
This portable generator has been pretested and adjusted to handle its full capacity. The voltage is
regulated using an automatic voltage regulator (AVR) . Readjusting the AVR will void warranty.
6. Connecting Electrical Loads
The duplex receptacle is equipped with GFCI protection. The GFCI protects against electric shock
that may be caused if you become a path which electricity travels to reach earth. Even with a GFCI
you may feel a shock, but the GFCI cuts power quickly so an average person should not suffer any
injury. Manual test GFCI while generator is running to verify internal contacts will function
Push the test button. The reset button will pop out, which should cut power to outlet.
Press the reset button until it locks in the depressed position. If the GFCI does not reset as
described do not use the receptacles. Call Firman customer service.
If GFCI trips while in use, reset and test the outlet. Electric cords laying on the ground with
worn insulation may trip the GFCI, only use cords in good condition.
•
•
•
RESET
TEST
TEST MONTHLY
FOLLOW DIRECTIONS
RESET BUTTON
Receptacle
Outlet
LED Indicator Light
TEST BUTTON
Outlet
In addition to the manual test / reset feature the GFCI receptacle tests itself periodically to
confirm the GFCI electronics are functional. The indicator light will be solid green when the
GFCI is powered from the generator and working correctly.
Self-test indications: If the indicator light is solid orange or flashing red a problem may exist.
Press the TEST button to trip the GFCI. If unable to reset, replace the GFCI.
SELF-TEST OPERATION
Damaged or overloaded extension cords could overheat, arc, and burn resulting death or
serious injury.
Use a ground fault circuit interrupter (GFCI) in any damp or highly conductive area, such as
metal decking.
Do not touch bare wires or receptacles.
WARNING! Generator voltage could cause electrical shock or burn
resulting in death or serious injury.
•
•
•24
OPERATION

English Customer Service: 1-844-FIRMAN1
Do not use generator with electrical cords which are worn, frayed, bare or otherwise damaged.
Do not operate generator in the rain or wet weather.
Do not run indoors to avoid wet conditions.
Do not handle generator or electrical cords while standing in water, while barefoot, or while
hands or feet are wet.
Use listed transfer switch to prevent backfeed by isolating generator from electric utility
workers.
•
•
•
•
•
1.Ensure circuit breaker on control panel is in the closed (on) position.
2. Start the generator with no electrical load attached.
3. Allow the engine to run for several minutes to stabilize.
4. Plug in and turn on the first item. It is best to attach the item with the largest load first.
5. Allow the engine to stabilize.
6. Plug in and turn on the next item.
7. Allow the engine to stabilize.
8. Repeat steps 5-6 for each additional item.
Surge Protection
There is a remote chance that voltage fluctuations may impair the proper functioning of some
sensitive electronic equipment. Electronic devices, including computers and many programmable
appliances may use components that are designed to operate within a narrow voltage range and
may be affected by the portable generator’s momentary voltage fluctuations. While there is no
way to prevent all voltage fluctuations, you can take steps to protect your sensitive electronic
equipment. Install a plug-in surge suppressor on the receptacles feeding your sensitive equipment.
Surge suppressors come in single or multi-outlet styles. They are designed to protect against short
duration voltage fluctuations.
7. Stopping the generator
1. Turn off and remove all electrical loads.
Never stop the generator with electrical devices plugged in and turned on.
Never stop the engine by moving the choke to the start position.
Let the generator run at no-load for one minute to stabilize internal temperatures of the engine
and generator.
25
OPERATION

English Customer Service: 1-844-FIRMAN1
2. Turn the main fuel selector switch to OFF (O) position.
3. Fully close the LPG cylinder knob and NG source valve.
26
CLOSE
OPERATION

English Customer Service: 1-844-FIRMAN1
Maintenance - Storage
General Recommendations
Regular maintenance will improve the performance and extend the life of the generator. See any
authorized dealer for service.
The generator's warranty does not cover items that have been subjected to operator abuse or
negligence. To receive full value from the warranty, the operator must maintain the generator as
instructed in this manual.
Some adjustments will need to be made periodically to properly maintain your generator.
All service and adjustments should be made at least once each season. Follow the requirements
in the maintenanc shedule chart above.
NOTICE Once a year you should clean or replace the spark plug and replace the air filter. New
spark plugs and clean air filter assure proper fuel-air mixture and help your engine run at peak
performance and last longer.
To be performed by knowledgable/experienced owner or by authorized service center.
*
√
Check for damage and leaks.
Replace if necessary.
LPG Regulator
/Hose Assy.
MAINTENANCE SCHEDULE
ITEM NOTES Daily(Before
operation)
Initial
25 hours
Every
50 hours
Every
100 hours
(or annual)
Fittings/
Fasteners
Spark Plug
Engine Oil
Air Filter
Fuel Line
Exhaust
System
Engine
Check condition. Adjust gap
and clean. Replace if necessary.
Check oil level.
Clean, replace if necessary.
Check for leakage. Retighten or
replace gasket if necessary.
Check adjust valve clearance.
Clean combustion chamber.
Check. Replace if necessary.
Check fuel hose for cracks or other
damage. Replace if necessary.
√
√
√
√
√
√
√
√
√
√
Replace.
Check spark arrester screen.
Clean/Replace if necessary.
Every
250 hours
√
*
*
Fuel Clean fuel tank strainer.
Replace if necessary. √
27

English Customer Service: 1-844-FIRMAN1
When Transporting Generator
Transport with fuel tank EMPTY or with main fuel valve in OFF position.
Do not tip generator at an angle which causes fuel to spill.
Disconnect LPG/ NG fuel hose and securely stow away.
ENGINE MAINTENANCE
To prevent accidental starting, remove and ground spark plug wire before performing any service.
Change Engine Oil
Change engine oil every 100 hours. (for a new engine, change oil after 25 hours.)
If you are using your generator under extremely dirty or dusty conditions, or in extremely hot
weather change the oil more often.
CAUTION! Avoid prolonged or repeated skin contact with used motor oil. Used motor oil has been
shown to cause skin cancer in certain laboratory animals. Thoroughly wash exposed areas with
soap and water.
KEEP OUT OF REACH OF CHILDREN. DON’T POLLUTE. CONSERVE RESOURCES. RETURN USED OIL
TO COLLECTION CENTERS.
(a) On a level surface drain oil into a suitable container by removing the drain plug and the oil
filler cap while the engine is warm.
DRAIN PLUG
(b) Reinstall the drain plug and fill the engine with oil until it reaches the HIGH(H) level on the oil
filler dipstick.
(H)
DRAIN PLUG
(L)
NOTICE We recommend using FIRMAN SAE 10W-30 API SL oil for best performance. Other high-
quality detergent oils (API SL or higher) are acceptable. See Oil and Gasoline / LPG/ NG
28
Maintenance - Storage

English Customer Service: 1-844-FIRMAN1
Air Filter Maintenance
(a) Carefully remove foam air filter element and wash it with liquid detergent and water only.
Squeeze dry in a clean cloth.
(b) Saturate foam air filter element with clean engine oil and squeeze in a clean cloth to remove
excess oil.
Spark Plug Maintenance
Changing the spark plug will help your engine start easier and run at peak performance.
(a) Remove the spark plug boot.
(b) Remove spark plug using provided wrench.
A
B
A- Spark plug
B- Spark plug boot
29
( ) Reinstall clean or new air filter element.c
Maintenance - Storage

English Customer Service: 1-844-FIRMAN1
( c) Inspect spark plug for damage and clean with a wire brush before reinstalling. Replace if
damaged.
(d-2) For spark plug CHAMPION N9YC - Adjust the electrode gap to 0.028 - 0.031 in. ( 0.7 - 0.8 mm).
(e) Seat spark plug in position and thread by hand to prevent cross threading.
(f) Tighten plug with provided wrench and put the spark plug boot back on spark plug.
SPARK PLUG: FIRMAN P/N 330723001 or CHAMPION N9YC
Maintenance Valve Clearance
Intake: ( )
Exhaust: 0.007 – 0.009 in. (0.18 – 0.22 mm)
0.005 – 0.007 in. 0.13 – 0.17 mm
Muffler and Spark Arrester
•
•
WARNING! Contact with muffler area could cause burns resulting in serious injury.
Do not tough hot parts.
It is a violation of California Public Resource Code, Section 4442, to use or operate the engine
on any forest-covered, brush-covered, or grass-covered land unless the exhaust system is
equipped with a spark arrester, as defined in Section 4442, maintained in effective working
order. Other states or federal jurisdictions may have similar laws, reference Federal
Regulation 36 CFR Part 261.52.
30
Maintenance - Storage
(d-1) For spark plug FIRMAN P/N 330723001 - Adjust the electrode gap to 0.020 - 0.024 in. ( 0.5 - 0.6 mm).
0.020-0.024 in.
(0.5-0.6mm)
0.028-0.031 in.
(0.7-0.8mm)
SPARK PLUG: FIRMAN P/N 330723001 SPARK PLUG: CHAMPION N9YC

English Customer Service: 1-844-FIRMAN1
Inspect Muffler and Spark Arrester
1.Inspect the muffler for cracks, corrosion, or other damage.
2.Remove the screws securing the spark arrester in place and the remove it from muffler.
Spark arrester
screen
Flange
Screw
3. Carefully remove the carbon deposits from the spark arrester screen with a wire brush.
3. Replace the spark arrester if it is damaged. If replacement parts are required, make sure to use
only FIRMAN original equipment replacement parts.
4. Position the spark arrester in the muffler and attach with the screws.
NOTICE Failure to clean or replace spark arrester may result in decreased engine performance.
GENERATOR MAINTENANCE
Make certain that the portable generator is kept clean and dry.
Do not expose the unit to excessive dust, dirt, moisture or corrosive vapors.
Do not insert any objects through cooling slots.
Before each use inspect underneath the generator for signs of oil or fuel. Clean any accumulated
debris. Keep area around muffler free from any debris. Use a soft bristle brush to remove dirt or
caked on oil. Use a damp cloth to clean all exterior surfaces.
31
Run the generator at least 30 minutes every month.
Maintenance - Storage

English Customer Service: 1-844-FIRMAN1
Battery Replacement
A(M6)
1. Remove the spark plug boot from spark plug.
2. Remove the nut and bolt from the negative(-) post first, then the positive(+) post.
3. Loosen and remove the wing nuts (A) on the battery holding bracket.
4. Remove the battery and recycle.
5. Install the new battery with the following specification:
12V sealed lead acid 15AH
LXWXH: 7.09X2.95X6.5inch(180X75X165mm)
6. Connect the red positive (+) battery cable to the battery first.
7. Connect the black negative (-) battery cable to the battery second.
8. Cover the posts with boots provided.
9. Install the spark plug boot onto spark plug.
The battery powers the starter motor and control module. This portable generator is equipped
with an automatic battery charging circuit. The battery will receive charging voltage only when
the engine is running. The battery will maintain a proper charge if the portable generator is used
on a regular basis (about once every two weeks). If it is used less frequently, the battery should
be connected to a trickle charger (not included) or battery maintainer (not included) to keep the
battery properly charged. If the battery is not able to start the engine, it can be started manually
only in the GAS position by pulling the engine recoil cord. If the battery voltage is extremely low,
the charging circuit may not be able to re-charge the battery. In this case, the battery must be
connected to a standard automotive style battery charger for re-charging before it can be used.
Battery Charging
32
Maintenance - Storage

English Customer Service: 1-844-FIRMAN1
It is important to prevent gum deposits from forming in essential fuel system components such
as the carburetor, fuel hoses or tank during storage. Alcohol-blended fuels (called gasohol, ethanol
or methanol) attract moisture, which leads to separation and formation of acids during storage.
Acidic gas can damage the fuel system of an engine while in storage.
Long Term Storage
When the generator set is being stored for more than one month, follow these instructions to avoid
engine problems:
Do not store fuel near any ignition sources.
When draining fuel move generator outdoors and use a commercially available non-conductive
vacuum siphon. Fuel must be drained into an approved container.
WARNING! Fuel and its vapors are extremely flammable which could cause burns
or fire resulting in death or serious injury.
1-Treat any stored fuel with fuel stabilizer.
2-When storing generator with gasoline in fuel tank, operate the engine for 5-10 minutes to
circulate treated fuel into fuel lines and carburetor before shutdown.
3- There is no need to drain gasoline from the generator fuel tank if fuel stabilizer is added.
4-FUEL STARVATION: If you elect to drain fuel tank move generator outdoors. Once fuel tank is
drained turn main fuel selector switch to GAS position. Start and run the portable generator
outdoors until engine stops from lack of gasoline. This will drain remaining gasoline from tank,
fuel lines, and carburetor.
5-Always turn main fuel selector switch to OFF position prior to storage.
6-Allow the portable generator to cool before cleaning and storage.
7-Change oil .
8-Remove spark plug boot and spark plug. Pour about one teaspoon of engine oil through the
spark plug hole, then slowly pull the recoil starter several times to distribute the oil in the
cylinder. Reinstall the spark plug and attach the spark plug boot. Pull recoil slowly until resistance
is felt. This will close the valves so no moisture enters the engine cylinder.
9-Cover the portable generator and store in a clean, dry place out of direct sunlight and away from
any ignition sources.
Any damage or hazards caused by using improper fuel, improperly stored fuel, and/or improperly
formulated stabilizers, are not covered by manufacturer's warranty.
Do not store gasoline from one season to another season.
33
Maintenance - Storage

Troubleshooting – Specifications
English Customer Service: 1-844-FIRMAN1
Problem Cause Correction
Engine is running, but no
AC output is available.
1. Circuit breaker is open.
2. Fault in generator.
3. Poor connection or defective cord set.
4. Connected device is bad.
1. Reset circuit breaker.
2. Contact authorized service facility.
3. Check and repair.
4. Connect another device that is in
good condition.
Engine runs good at
no-load but “bogs down”
when loads are connected.
1. Short circuit in a connected load.
2. Engine speed is too slow.
3. Shorted generator circuit.
1. Disconnect shorted electrical load.
2. Contact authorized service facility.
3. Contact authorized service facility.
Engine will not start; starts
and runs rough or shuts
down when running.
1. Fuel selector switch set to OFF (O)
position.
3. Low oil level.
4. Dirty air cleaner.
5. Out of gasoline.
6. Stale gasoline.
7. Spark plug wire not connected to
spark plug.
8. Bad spark plug.
9. Water in gasoline.
10. Flooded.
11. Excessively rich fuel mixture.
1. Set fuel selector switch to “GAS”
or “LPG/NG” position.
3. Fill crankcase to proper level or
place generator on level surface.
4. Clean or replace air cleaner.
5. Fill fuel tank with gasoline.
6. Drain fuel tank and carburetor; fill
with fresh gasoline.
7. Connect wire to spark plug.
8. Replace spark plug.
9. Drain gas tank and carburetor; fill
with fresh gasoline.
10. Wait 5 minutes and re-crank engine.
11. Contact authorized service facility.
Engine lacks power.
1. Load is too high.
2. Dirty air filter.
1. Don't Overload Generator
2. Replace air filter.
Engine“hunts”or falters.
1. Carburetor is running too rich or too lean.1. Contact authorized service facility.
12. Clogged or dirty fuel filter.
4. Clean or replace fuel filter.
12. Clean or replace fuel filter.
3. Clogged or dirty fuel filter.
4. Clogged spark arrester.
3. Clean or replace fuel filter.
4. Clean or replace spark arrester.
2. Clogged or dirty fuel filter. 2. Clean or replace fuel filter.
Engine shuts down when
running.
1. Out of gasoline or LPG/NG.
2. Dirty air cleaner.
3. Low oil level.
1. Fill fuel tank with gasoline or replace
LPG cylinder / check NG supply.
2. Clean or replace air cleaner.
3. Fill crankcase to proper level or place.
generator on level surface.
4. Clogged or dirty fuel filter.
13. Starting battery may have
insufficient charge. 13. Check battery output and charge
battery as necessary.
14. Out of LPG/NG. 14. Replace LPG cylinder/ check NG supply.
15. LPG cylinder knob / NG supply
valve is not open.
15. Fully open LPG cylinder knob / NG
supply valve.
2. The indicator light is OFF or
flashing red.
2. Must have solid red indicator light
to be able to start the engine.
16. Out of battery power. 16. Start Engine in “GAS” position.
Charge or replace battery.
For all other issues, contact authorized dealer or Firman customer service.
34

SPECIFICATIONS
Model
Rated AC Voltage
Phase
Power Factor
Voltage Regulator
Alternator Type
Running Watts*
Starting Watts
Engine
Engine Type
Displacement
Low Oil Shutdown
Ignition System
Starting System
Fuel
Capacity Fuel Tank
Lubricating Oil Capacity
Carburetor Type
Air Cleaner
P.T.O. Shaft Rotation
120/240V
T07571F
7500(GAS )/6750(LPG)/5500(NG)OLINE
AVR
Single
1
Single Cylinder, 4-Stroke OHV Air Cooled
439cc
Breakless Ignition Type, Flywheel Magneto
Unleaded Automotive Gasoline/LPG/NG
8.0 U.S. Gallons (30.3L)
37.2 oz (1.1L)
Counter Clockwise (Facing P.T.O.)
Float
Brushed
Polyurethane Type
Yes
9400(GASOLINE)/8450(LPG)/6900(NG)
FIRMAN
Rated Fequency 60Hz
Oil Type
See “Add Engine Oil” Section
Recoil/Electric Start
English Customer Service: 1-844-FIRMAN1
AC Grounding System
7-11 inches water column (0.25-0.40 psi)(13-20mm mercury)(1.7-2.7 kpa)
35
Troubleshooting – Specifications
*Generator certified in accordance with CSA (Canadian Standards Association) standard C22.2 No. 100-14,
Motors and Generators.
Natural gas fuel pressure range
Neutral Bonded To Frame
Natural gas fuel consumption
No Load Half Load Full Load
3
72ft 3
/hr(2m /hr) 3
101ft
101,000 BTU/h (29,593 W)
3
/hr(2.9m /hr)
3
86ft
86,000 BTU/h (25,204 W)
3
/hr(2.4m /hr)
LPG fuel consumption
3
50.8ft
127,000 BTU/h (37,211 W)
/hr(5.3L/hr)
3
31ft
77,500 BTU/h (22,713 W)
/hr(3.2L/hr)
3
15.6ft
39,000 BTU/h (11,429 W)
/hr(1.6L/hr)
72,000 BTU/h (21,101 W)

PARTS DIAGRAM AND PART LIST
T07571F PARTS DIAGRAM
English Customer Service: 1-844-FIRMAN1
36

439cc TRI-FUEL ENGINE PARTS DIAGRAM
English Customer Service: 1-844-FIRMAN1
37

T07571F Portable Generator
NO. Part Number Qty.
English Customer Service: 1-844-FIRMAN1
Description
NO. Part Number Qty.
Description
1
2
3
4
5
6
7
8
9
10
11
12
13
14
15
16
17
18
19
20
21
22
23
24
25
26
27
28
29
30
31
32
33
34
35
36
37
38
39
40
41
42
43
44
45
46
47
48
49
50
51
52
53
54
55
56
57
58
59
60
61
62
63
64
65
66
67
68
69
70
71
72
73
74
75
76
77
78
79
80
81
82
83
84
85
86
87
88
89
90
91
92
93
94
95
96
97
98
99
100
101
102
103
104
105
106
107
108
109
110
111
112
113
114
115
116
117
118
119
120
121
122
123
124
125
126
127
128
129
130
131
132
133
134
135
136
137
138
139
140
141
142
143
144
145
146
147
148
149
150
151
152
380713556
357713501
336713528
357713573
380713544
380713545
380713557
357713506
357713507
336713525
336713524
380713504
336713519
336713523
336713520
336713522
357713509
336713507
380713506
336713512
336713513
336713577
380713507
357713511
380713508
357713513
357713514
336713531
357713515
336713515
357713516
336713538
357713517
336713536
357713518
336713534
336713509
336713533
357713520
375413004
357713523
336713517
357713577
357713524
336713542
336713543
336713544
357713578
336713546
336713547
380713553
336713548
336713549
336713807
336713540
357713580
357713581
336713636
336713639
336713637
336713638
380713532
380713533
357713535
357713592
357713536
380713554
380713546
336713558
357713584
357713550
357713551
357713552
357713553
Rubber Cap B
Flange Bolt M6×8
Generator Wind Shield
Rotor Assy
Stator Assy
Stator Cover
Generator End Cover
Carbon Brush Assembly
Carbon Brush Holder
Bolt &washer Assemblies
AVR
Flange Bolt M5×16
Terminal Block
Bolt M5×16
Ground Wire
Generator End Cover Cap
Flange Bolt M5×12
Flange Bolt M6×200
Lock Washer Ø6
Washer Ø6
Nut M5
Side Cover Bolt M5×229
Lock Washer Ø5
Flange Bolt M10×285
Lock Washer Ø10
Washer Ø10
Flange Bolt M8×20
Holder, Muff
Flange Bolt M6×12
Muffler Fixed Plate A
Screw&washer Assy M5×14
Holder, Spark Arrester
Arrester, Spark
Muffler Fixed Plate B
Nut M8
Lock Washer Ø8
Flat Washer Ø8
Gskt., Ext.
Muff.,Assy.
Muffler Fixed Plate C
Nut M6
Air Filter Bracket
Rubber Cap A
Grommet, Fuel Tank
Washer Tank Buffer
Flange Bolt M6×20
Fuel Gauge Assy.
Screw M5×10
Fuel Gauge Display
Fuel Tank Assy.
Fuel Filter, Wire Mesh
Fuel Cap
Tank Fitting With Filter
Clamp Ø8×6
Hose, Fuel 1
Hose, Fuel 2
Carbon Canister Shield
Carbon Canister Bracket
Carbon Canister
Carbon Canister Holder
Vapor Hose 1
Vapor Hose 2
Axle Pin
Wheel
Cotter Pin
Plastic Front Cover
Frame
Nut M8
Flange Bolt M8×35
Wing Nut M6
Battery Pressing Bracket
Rubber Pad
Battery
1
1
1
1
1
1
1
1
1
1
1
1
2
1
2
1
1
3
4
8
4
2
2
2
1
1
5
4
1
19
1
2
1
1
1
2
2
2
1
1
1
4
1
1
4
4
4
1
2
1
1
1
1
1
7
1
1
1
1
1
1
1
1
2
2
2
1
1
8
2
2
1
1
1
1
2
2
3
2
1
1
1
2
1
1
2
4
1
2
4
1
1
1
1
1
2
1
1
2
1
1
1
1
1
1
1
1
1
2
1
1
2
2
10
6
1
1
8
1
1
1
4
1
1
1
1
1
1
4
2
2
1
2
2
1
1
2
2
2
1
1
1
1
1
1
1
1
1
1
4
4
1
FIRMAN 439cc Tri-fuel Engine
357713554
357713593
357713569
336713578
357713555
357713556
336713842
336713693
357713531
357713532
357713533
357713585
336713559
357713538
336713557
336713561
336713514
336713516
336713601
336713817
375713001
336713819
336713820
336713821
336713822
336713824
375413002
336713826
336713816
336713815
336713827
336713828
357713586
336713574
336713573
357713541
380713512
380713515
380713001
336713569
330713582
380713552
380713518
336713568
357713588
336713526
336713585
336713565
336713818
336713583
380713555
357713545
357713546
357713548
380713547
375723001
380713002
380713550
380713003
357713598
336713643
330713502
336713590
336713844
357713596
357713597
336713841
336713611
375413001
357413509
380413510
357413503
357413506
336713691
380413512
380713542
380713562
357713607
Battery Holder
Flange. Bolt M8×45
Screw&washer Assy M5×10
Nut M5
Bolt,bend Hook
Battery Red Cable +
Black Boot
Battery cable(Female 180mm)
Nut M10
Isolator 2
Isolator 1
Motor Mount
Flange. Bolt M8×16
Support Leg
Rubber, Support
Flange Bolt M6×25
Ground Wire
External Star Washer Ø6
Receptacle L14-30R
Control Module
Tapping Screw St2.9×19
Tapping Screw St2.9×32
Micro Switch 1
Micro Switch 2
Fuel Valve
Main Regulator Assy.
LPG Inlet Cover
Screw M4×12
Main Fuel Selector Switch
Electric Start Switch
Indicator Light
Multi Meter
Outlet Cover TT-30R/14-50R
Outlet Cover L5-30R
Outlet Cover 5-20R GFCI
Bolt M6×22
Nut M6
Screw&Washer Assy M4×20
Screw&washer Assy M4×8
Screw&washer Assy M4×14
Control Panel
Receptacle 14-50R
Nut M4
5-20R Duplex GFCI
Circuit Breaker Amp 20A
Screw M5×14
Charger
Receptacle L5-30R
Control Box
Grommet
Sleeve
Grommet
Metal Clamp
NG Hose
Screw&washer Assy M5×10
LPG/NG Selector Switch
Flange Bolt M6×6
Waterproof Cover
VF Protection Module
Screw M5×20
Cotter Pin, Handle
Washer Ø8
Axle Pin, Handle
Handle
Red Boot
Boot,starter
Control Panel Assy.
Wheel Kit
Rotor And Stator Set
Spark Arrestor Kit
Support Leg Assembly
Hose Holder
LPG-NG Selector switch assembly
Screw&washer Assy M3×6
Screw&washer Assy M5×8
Battery cable(Male 180mm)
Double Pole Circuit Breaker Amp 30A
Double Pole Circuit Breaker Amp 31A
38
Parts Diagrams - Parts Lists - Wiring Diagram

FIRMAN 439cc Tri-fuel Engine
1
2
3
4
5
6
7
8
9
10
11
12
13
14
15
16
17
18
19
20
21
22
23
24
25
26
27
28
29
30
31
32
33
34
35
36
37
38
39
40
41
42
43
44
45
46
47
48
49
50
51
52
53
54
55
56
57
58
NO. Part Number Description Qty.
English Customer Service: 1-844-FIRMAN1
380723518
357723501
357723502
357723503
357723504
357723505
316713518
357723506
357723507
357723508
380723501
357723510
357723511
357723512
357723513
357723514
357723515
357723516
357723517
357723518
357723519
380723502
336723503
357723521
380723503
380723504
380723505
357723525
357723526
357723527
357723528
357723529
357723530
357723531
336723528
336723529
357723532
330723001
357723533
357723534
375717005
336723537
357723536
357723537
357723538
375717007
380723507
380723508
357723542
357723543
357723544
375717006
357723546
357723547
357723548
357723549
357723550
357723551
NO. Part Number Description Qty.
380723520
357723554
375413003
336723555
357723560
357723561
357723562
357723563
357723564
336723567
357723565
357723566
336723564
357723567
357723568
357723569
336723606
357723570
357723571
357723572
336723612
380723511
380723519
357723575
380723512
357723577
357723578
357723579
357723580
357723581
357723582
336723589
336723590
336723591
336723592
336723593
330723528
357723584
336723597
357723585
336723595
357723586
357713520
357423500
357423501
357423508
380423505
380423501
380423502
336723615
375717008
1
2
2
1
2
2
2
2
1
1
1
1
1
1
1
1
2
7
1
2
1
1
8
1
1
1
1
1
1
1
2
1
4
1
2
2
2
1
1
1
2
2
2
2
1
1
1
1
2
2
2
1
1
1
2
1
1
1
1
1
1
3
1
1
1
1
1
1
1
1
1
1
1
2
2
1
1
1
1
1
1
2
1
1
3
1
1
1
1
2
2
1
1
1
1
1
1
1
1
1
1
1
1
1
1
1
1
2
1
Crankcase Comp.
Bolt,drain
Washer,drain Bolt
Oil Level Sensor
Flg. Bolt M6×15
Bearing
Locating Pins
Bearing
Balance Shaft
Camshaft Comp
Crankshaft
Gear,Crank Shaft
Gear,Drive
Gskt.,Crankcase Cover
Oil Dipstick Assy
Cover,Crankcase
Oil Seal
Flange Bolt M8×40
Conn, Rod Comp
Piston Pin Retainer Ring
Wrist Pin
Piston
Flange. Bolt M6×12
Air Guide Lower
Ring, Oil
Ring, Second Piston
Ring, First Piston
Gasket, Valve Cover
Valve Cover Assy
Bolt
Exhaust Valves Stud Bolt
Breather Tube
Flg. Bolt M10×80
Rotator, Exhaust Valve
Locknut
Adjusting Nut, Valve
Valve Rocker
Spark Plug
Retainer, Intake Valve
Retainer, Exhaust Valve
Spring,Valve
Bolt, Rocker Arm
Oil Seal, Valve
Retainer, Valve
Guide Plate, Push Rod
Cylinder Head
Valve,Intake
Valve, Exhaust
Push Rod
Lifter, Valve
Locating Pins
Gasket,cyl.head
Air Cleaner Holder
Nut M6
Air Intake Stud Bolt
Gskt.,Insulator
Insulator, Carburetor
Gskt.,Carburetor
Carburetor
Gskt., Air Cleaner
Air Cleaner Case Assy
Nut M6
Wind Guide, Top
Spring, Governor
Spring, Throttle Return
Rod, Governor
Arm, Governor
Bolt, Governor Arm
Pin, Shaft
Oil Seal
Rocker Shim
Shaft, Governor Arm
Ignition Coil
Flange Bolt M6×29
Wire Clip
Fan Cover Comp
Nut, Shaft
Pulley, Starter
Sheath, Wire
Cooling Fan
Flywheel Comp
Flange Bolt M8×35
Starter Motor Assembly
Grip, Starter
Flange Bolt M6×8
Case Comp.,recoil Starter
Spring,starter Return
Cord
Pulley,recoil Starter
Spring,patchet
Patchet,starter
Pawl Guide
Clip Sprg.,pawl Guide
Screw,pawl Guide
Wire Clip
Bushing, Govorner Gear
Clip, Govorner Gear
Gear, Governor
Inner Washer,gear
Gov., Gear Shaft
Gskt., Ext.
Recoil Starter Set
Governing Gear Set
Air Cleaner Set
Carburetor Set
Piston Rings Set
Gasket Set
Lock Washer
Washer
59
60
61
62
67
68
69
70
71
72
73
74
75
76
77
78
79
80
81
82
83
84
85
86
87
88
89
90
91
92
93
94
95
96
97
98
99
100
101
102
103
104
105
106
107
108
109
110
111
112
113
39
Parts Diagrams - Parts Lists - Wiring Diagram

English Customer Service: 1-844-FIRMAN1
40
Parts Diagrams - Parts Lists - Wiring Diagram

English Customer Service: 1-844-FIRMAN1
FIRMAN 90 DAY Limited Warranty
Do Not Return the Unit to the Place of Purchase
Contact the FIRMAN Service Center and FIRMAN will troubleshoot any issue via phone or e-mail.
If the problem is not corrected by this method, FIRMAN will, at its option, authorize evaluation,
repair or replacement of the defective part or component at a FIRMAN Service Center. FIRMAN
will provide you with a case number for warranty service. Please keep it for future reference.
Repairs or replacements without prior authorization, or at an unauthorized repair facility, will
not be covered by this warranty.
Normal Wear
Your product needs periodic parts and service to perform well. This warranty does not cover
repair when normal use has exhausted the life of a part or the equipment as a whole.
FIRMAN warrants to the original purchaser that the mechanical and electrical components will
be free of defects in material and workmanship for a period of 90 days (parts and labor) from the
original date of purchase. Transportation charges on product submitted for repair or replacement
under this warranty are the sole responsibility of the purchaser. This warranty only applies to
the original purchaser and is not transferable.
Repair/Replacement Warranty
Warranty Exclusions
This warranty does not cover the following repairs and equipment.
Warranty Qualifications
FIRMAN GENERATOR will register the warranty upon receipt of your Warranty Registration Card
and a copy of your sales receipt from one of FIRMAN’s retail locations as proof of purchase. Please
submit your warranty registration and your proof of purchase within ten(10) days of the date of
purchase.
41
SERVICE INFORMATION CONTACT FIRMAN PRODUCT SERVICE DEPARTMENT AT 1-844-347-6261
or at www.firmanpowerequipment.com to obtain warranty service information or to order
replacement parts or accessories.
HOW TO ORDER REPLACEMENT PARTS
Even quality-built equipment such as this electric generator may need occasional
replacement parts to maintain it in good condition over the years. To order replacement parts,
please give the following information:
Model No. Rev. Level and Serial No. found on the Data Decal.
Parts number or numbers as shown in the Parts List section.
A brief description of the trouble with the generator.
•
•
•
Service – Warranty

English Customer Service: 1-844-FIRMAN1
Limits of Implied Warranty and Consequential Damage
FIRMAN disclaims any obligation to cover any loss of time, use of this product, freight, or any
incidental or consequential claim by anyone from using this product. THIS WARRANTY IS IN
LIEU OF ALL OTHER WARRANTIES, EXPRESS OR IMPLIED, INCLUDING WARRANTIES OF MERCHANT
ABLILITY OR FITNESS FOR A PARTICULAR PURPOSE.
A unit provided as an exchange will be subject to the warranty of the original unit. The length of
the warranty governing the exchanged unit will remain calculated by reference to the purchase
date of the original unit.
This warranty gives you certain legal rights which may change from state to state. Your state may
also have other rights you may be entitled to that are not listed within this warranty.
Contact Information
You may contact FIRMAN at:
Address
Firman Power Equipment Inc.
Attn: Customer Service
8716 W. Ludlow Dr. Suite #6
www.firmanpowerequipment.com
Peoria, AZ 85381
We are FIRMAN POWER - And we are here for you.
42
Installation, Use and Maintenance
This warranty will not apply to parts and/or labor if your product is deemed to have been misused,
neglected, involved in an accident, abused, loaded beyond the generator's limits, modified,
installed improperly or connected incorrectly to any electrical component. Normal maintenance is
not covered by this warranty.
Other Exclusions
This warranty excludes:
– cosmetic defects such as paint, decals, etc.
– wear items
– accessory parts
– failures due to acts of God and other force majeure events beyond the manufacturer’s control
– problems caused by parts that are not original FIRMAN parts
– units used for prime power in place of existing utility power where utility is present or in place
of utility power where utility power service does not normally exist.
Service – Warranty

English Customer Service: 1-844-FIRMAN1
CALIFORNIA AND FEDERAL EXHAUST AND EVAPORATIVE EMISSIONS CONTROL WARRANTY STATEMENT
YOUR WARRANTY RIGHTS AND OBLIGATIONS
FIRMAN POWER EQUIPMENT INC.
Emission Control System Warranty
The warranty period begins on the date the engine/equipment is delivered to an ultimate purchaser. FIRMAN warrants to the ultimate
purchaser and each subsequent purchaser that the engine is:
Designed, built, and equipped so as to conform with all applicable regulations adopted by the Air Resources Board and US EPA;
and Free from defects in materials and workmanship that cause the failure of a warranted part to be identical in all material
respects to the part as described in the engine manufacturers application for certification.
The warranty on emissions-related parts is as follows:
(1) Any warranted part that is not scheduled for replacement as required maintenance in the owner's manual supplied, is
warranted for the warranty period stated above. If any such part fails during the period of warranty coverage, the part will be
repaired or replaced by FIRMAN at no charge to the owner. Any such part repaired or replaced under the warranty will be
warranted for the remaining warranty period.
(2) Any warranted part that is scheduled only for regular inspection in the owner's manual supplied, is warranted for the warranty
period stated above. Any such part repaired or replaced under warranty will be warranted for the remaining warranty period.
(3) Any warranted part that is scheduled for replacement as required maintenance in the owner's manual supplied, is warranted
for the period of time prior to the first scheduled replacement point for that part. If the part fails prior to the first scheduled
replacement, the part will be repaired or replaced by FIRMAN at no charge to the owner. Any such part repaired or replaced
under warranty will be warranted for the remainder of the period prior to the first scheduled replacement point for the part.
(4) Repair or replacement of any warranted part under the warranty must be performed at no charge to the owner at a warranty
station.
(5) Notwithstanding the provisions of Subsection (4) above, warranty services or repairs must be provided by FIRMAN that
are franchised to service the subject engines.
(6) The owner must not be charged for diagnostic labor that leads to the determination that a warranted part is in fact defective,
provided that such diagnostic work is performed at a warranty station.
(7) FIRMAN is liable for damages to other engine components proximately caused by a failure under warranty of any
warranted part.
MANUFACTURER'S WARRANTY COVERAGE:
The exhaust and evaporative emissions control system on your is warranted
for two years. If any emissions-related part on your small off-road engine and engine powered equipment is defective, the part will
be repaired or replaced by FIRMAN.
small off-road engine and engine powered equipment
The California Air Resources Board, US Environmental Protection Agency (“US EPA”) and FIRMAN POWER EQUIPMENT
INC.(FIRMAN) are pleased to explain the emissions control systems warranty on your 2020-2021 or later Small Off-Road
Engine (“SORE”) and engine powered equipment. In California, new equipment that use small off-road engines must be
designed, built and equipped to meet the State’s stringent anti-smog standards. FIRMAN must warrant the emissions control
systems on your SORE and engine powered equipment for the periods of time listed below provided there has been no abuse,
neglect or improper maintenance of your small off-road engine or equipment leading to the failure of the emissions control system.
Your emissions control system may include parts such as the carburetor or fuel-injection system, the ignition system, catalytic
converter, fuel tanks, fuel lines (for liquid fuel and fuel vapors), fuel caps, valves, canisters, filters, clamps and other associated
components. Also included may be hoses, belts, connectors, and other emission-related assemblies.
Where a warrantable condition exists, FIRMAN will repair your SORE and engine powered equipment at no cost to you
including diagnosis, parts and labor.
OWNER'S WARRANTY RESPONSIBILITIES:
As the owner, you are responsible for the performance of the required maintenance
listed in your operator's manual. FIRMAN recommends that you retain all receipts covering maintenance on your SORE and
engine powered equipment, but FIRMAN cannot deny warranty coverage solely for the lack of receipts or for your failure to
ensure the performance of all scheduled maintenance.
SORE and engine powered equipment
As the owner, you should however be aware that FIRMAN may deny you warranty
coverage if your small off-road engine or engine powered equipment or a part has failed due to abuse, neglect, or improper
maintenance or unapproved modifications.
SORE and engine powered equipment
You are responsible for presenting your to a FIRMAN distribution center
or service center as soon as the problem exists. The warranty repairs shall be completed in a reasonable amount of time,
not to exceed 30 days.
small off-road engine and engine powered equipment
If you have any questions regarding your warranty rights and responsibilities, you should contact FIRMAN at 1-844-347-6261.
FIRMAN Emission Control Defects Warranty Provisions
43
Service – Warranty

English Customer Service: 1-844-FIRMAN1
PARTS COVERED BY WARRANTY
Limitations
Listed below are the parts (if equipped) covered by the Federal and California Emission Control System Warranty.
This Emission Control System Warranty shall not cover any of the following:
(a) Consequential damages such as loss of time, inconvenience, loss of use of the engine or equipment, etc.
(b) Diagnosis and inspection fees that do not result in eligible warranty service being performed.
1. Ignition system including:
- Spark plug
- Ignition coil
2. Fuel metering system:
- Fuel tank
- Fuel cap
- Fuel lines(for liquid fuel and fuel vapors) and
related fittings/clamps
- Fuel regulator, carburetor and internal parts.
3. Catalytic muffler assembly including:
- Exhaust manifold
- Catalytic converter
- Muffler gasket
-pulse valve
4. Air induction system including:
- Intake pipe/manifold
- Air cleaner
5. Crankcase breather assembly including:
- Breather connection tube
6. Fuel tank evaporative emission control system including:
- Purge valves
- Carbon canister
- Vapor hoses and fitting/clamps
FIRMAN POWER EQUIPMENT INC.
www.firmanpowerequipment.com
(8) Throughout the emissions warranty period defined in Subsection (b)(2), FIRMAN will maintain a supply of warranted
parts sufficient to meet the expected demand for such parts.
(9) Any replacement part may be used in the performance of any warranty maintenance or repairs and must be provided without
charge to the owner. Such use will not reduce the warranty obligations of the manufacturer.
(10) Add-on or modified parts that are not exempted by the Air Resources Board may not be used. The use of any non-exempted
add-on or modified parts by the ultimate purchaser will be grounds for disallowing a warranty claim.
The manufacturer will not be liable to warrant failures of warranted parts caused by the use of a non-exempted add-on or modified
part.
44
Service – Warranty

P/N:375747009 Rev:00
All rights reserved. Any reprinting or unauthorized use
without the written permission is expressly prohibited.
TM
FIRMAN POWER EQUIPMENT INC.
8716 W. LUDLOW DR. SUITE #6
WWW.FIRMANPOWEREQUIPMENT.COM
PEORIA, AZ 85381
1-844-347-6261

MANUAL DEL OPERADOR
Registre la información del producto como referencia cuando solicite
partes u obtenga la cobertura de la garantía.
GENERADOR PORTÁTIL TRI-COMBUSTIBLE
NÚMERO DE MODELO
T07571F
P/N:375747009 Rev:00
NÚMERO DE SERIE:
FECHA DE COMPRA:

Indice De Contenido
Introducción . . . . . . . . . . . .
Características y controles . . . . . . . . . . . . . . . . . . . . . . . . . . . . . . . . . . . . . . . . . . . . . . . . . . . . . . . . . . 5
Operación . . . . . . . . . . . . . . . . . . . . . . . . . . . . . . . . . . . . . . . . . . . . . . . . . . . . . . . . . . . . . . . . . . . . . . . . . . . 7
Mantenimiento - Almacenamiento. . . . . . . . . . . . . . . . . . . . . . . . . . . . . . . . . . . . . . . . . . . . . . . . . . 24
Solución de problemas - Especificaciones . . . . . . . . . . . . . . . . . . . . . . . . . . . . . . . . . . . . . . . . . . 3 0
Diagramas de partes - Listas de partes - Diagrama de cableado. . . . . . . . . . . . . . . . . . . . . 31
Servicio - Garantía . . . . . . . . . . . . . . . . . . . . . . . . . . . . . . . . . . . . . . . . . . . . . . . . . . . . . . . . . . . . . . . . . . .38
. . . . . . . . . . . . . . . . . . . . . . . . . . . . . . . . . . . . . . . . . . . . . . . . . . . . . . . . . . . . .1
REGISTRE SU PRODUCTO
Registre su generador Firman en línea en www.firmanpowerequipment.com
INTRODUCCIÓN
Gracias por comprar un generador FIRMAN. Ha seleccionado un generador de alta calidad y precisión
diseñado y probado para brindarle años de servicio satisfactorio. Este generador es de triple combustible
y puede funcionar con gasolina, gas licuado de petróleo (GLP) y gas natural (GN). Este generador no está
diseñado para funcionar sin supervisión ni para suministrar energía a equipos de salvamento.
Este manual contiene información de seguridad para que sea consciente de los peligros y
riesgos asociados con los productos de los generadores y cómo evitarlos. Este generador está
diseñado y concebido únicamente para suministrar energía eléctrica para el funcionamiento de
iluminación eléctrica, aparatos, herramientas y cargas de motor compatibles, y no está
destinado a ningún otro fin. Es importante que lea y comprenda estas instrucciones
completamente antes de intentar encender u operar este generador portátil. Guarde estas
instrucciones originales para futuras referencias.
Toda la información de esta publicación se basa en la última información de producción
disponible en el momento de la aprobación de la impresión. El fabricante se reserva el derecho
de cambiar, alterar o mejorar el generador y esta documentación en cualquier momento sin
previo aviso.
INTRODUCCIÓN
01
Español Servicio de atención al cliente: 1-844-FIRMAN1

02
PALABRAS DE ADVERTENCIA
PELIGRO ADVERTENCIA PRECAUCIÓN
Indica un peligro que,
si no se evita, resultará
en la muerte o una
lesión grave.
Indica un peligro que,
si no se evita, podría
resultar en la muerte
o una lesión grave.
Indica un peligro que,
si no se evita, podría
resultar en una lesión
menor o moderada.
Humos tóxicos- El escape del motor contiene monóxido de
carbono, un gas venenoso que le matará en minutos. No
puedes olerlo o verlo.
Incendio- El combustible y sus vapores son extremadamente
inflamables, pudiendo causar quemaduras o incendios que
resulten en la muerte o lesiones graves. El escape del motor
podría causar un incendio y provocar la muerte o lesiones
graves.
Superficie caliente- El silenciador podría causar quemaduras que
resulten en lesiones graves.
El generador podría causar una descarga eléctrica que resultaría
en la muerte o lesiones graves.
Símbolo de alerta de seguridad-Indica un posible peligro de
lesiones personales.
Manual del operador- El incumplimiento de las advertencias,
las instrucciones y el manual del operador podría provocar la
muerte o lesiones graves.
Español Servicio de atención al cliente: 1-844-FIRMAN1
AVISO
Indica una información
considerada importante,
pero no relacionada con
el peligro.
INTRODUCCIÓN

¡ADVERTENCIA! Este producto puede exponerle a sustancias químicas,
incluyendo los gases de escape de los motores de gasolina, los cuales son
conocidos por el estado de California como causantes de cáncer, y el monóxido
de carbono, el cual es conocido por el estado de California como causante de
defectos de nacimiento u otros daños reproductivos. Para mayor información,
visite www.P65Warnings.ca.gov.
Este generador para uso externo puede utilizarse para alimentar artículos de exteriores utilizando
cables de extensión o para restaurar la energía doméstica utilizando un interruptor de transferencia.
Un interruptor de transferencia es un dispositivo separado e instalado por un electricista autorizado
que permite conectar el generador portátil con un cable, usando cualquiera de los receptáculos de
120/240V, directamente al sistema eléctrico de su vivienda. Instale un interruptor de transferencia
listado lo antes posible si este generador se va a utilizar para restaurar la energía en su vivienda.
El generador tiene un sistema puesta a tierra que conecta los componentes del bastidor del
generador a los terminales de tierra en los receptáculos de salida de CA. El sistema de tierra está
conectado al cable neutro de CA. El neutro está unido al bastidor del generador.
Sistema Puesta A Tierra
Es posible que haya reglamentos federales o estatales, códigos locales u ordenanzas que se apliquen
al uso previsto del generador. Consulte a un electricista cualificado, a un inspector eléctrico o a la
agencia local con jurisdicción. Este generador no está destinado a ser utilizado en una obra de
construcción o actividad similar, según lo definido por la norma NFPA 70-2020 (NEC), sección 590.6.
Requisitos De Cumplimiento
Las conexiones al sistema eléctrico de su vivienda deben utilizar un interruptor de transferencia
listado* instalado por un electricista autorizado. La conexión debe aislar la energía del generador
de la del servicio público y cumplir con todas las leyes y códigos eléctricos aplicables.
Para Restaurar La Energía Doméstica Usando Un Interruptor De Transferencia Listado
Salida
120 / 240V
Típico
Interruptor de
Transferencia
Artículos típicos de interior
Para Restaurar La Energía Usando Cables De Extensión
03
INTRODUCTION
AVISO Si tiene preguntas sobre el uso previsto, póngase en contacto con el servicio de atención al cliente
de FIRMAN. Este generador portátil está diseñado para ser utilizado solo con partes autorizadas por FIRMAN.
Salida
Español Servicio de atención al cliente: 1-844-FIRMAN1

1. Solo use los cables con conexión a tierra indicados para uso en exteriores y clasificados para
sus cargas.
16
14
Para proporcionar energía
usando cables de extensión
Amperaje
Total
Calibre mínimo, clasificado para exteriores
Hasta 15m (50 pies)
Hasta 13A
Hasta 15A
Hasta 20A
Hasta 30A
Hasta 50A
2. Siga las instrucciones de seguridad del cable.
3. Instale la(s) alarma(s) de monóxido de carbono.
4. Cuando opere el generador portátil con cables de extensión, asegúrese de que el generador
portátil esté ubicado en un área abierta y al aire libre, por lo menos a 20 pies (6 m) de espacios
ocupados, con la salida de gases apuntando hacia afuera.
5. El uso de cables de extensión directamente en la vivienda, para alimentar artículos de interior
NO ES RECOMENDADO.
Los cables de extensión conectados directamente a la casa aumentan el riesgo de intoxicación
por monóxido de carbono a través de cualquier abertura.
Si un cable de extensión que va directamente a su vivienda se utiliza para energizar artículos
de interior, el operador reconoce que esto aumenta el riesgo de envenenamiento por CO para
las personas que están dentro de la vivienda y asume ese riesgo.
•
•
6. Instale un interruptor de transferencia listado* tan pronto como sea posible si este o cualquier
otro generador va a ser usado para restaurar la energía en su vivienda.
*
con los estándares de pruebas de seguridad del producto correspondiente.
Certificado por un laboratorio de pruebas nacionalmente reconocido que el producto cumple
¡PELIGRO! El escape del motor contiene monóxido de carbono, un gas venenoso que
le matará en minutos. No puede olerlo, verlo o probarlo. Incluso si no huele los gases
de escape, podría estar expuesto al gas de monóxido de carbono.
04
6
INTRODUCCIÓN
Español Servicio de atención al cliente: 1-844-FIRMAN1

1-Medidor de combustible
2-Tanque de combustible de 8.0
galones de capacidad
3- Tapa de combustible
4- Palanca del cebador (detrás de
la caja del filtro de aire)
5- Filtro de aire
6- Motor 439cc FIRMAN OHV
7- Arranque retráctil
8- Rueda antipinchazo 10.0"
9- Tapón de llenado de aceite
10- Batería
11- Cubierta de salida
12- Panel de control
13- Mango
14- Conector de manguera GPL/GN
(entrada)
15- Interruptor selector de GLP/GN
*Siempre estamos trabajando para mejorar nuestros productos. Así pues, el producto adjunto
puede diferir ligeramente de la imagen de esta página.
2①
②
③
⑤
⑥
④
⑦
⑭⑧
⑨
⑩
⑬
⑮
⑪
⑫
⑬
⑭
⑯
05
CARACTERÍSTICAS Y CONTROLES
Español Servicio de atención al cliente: 1-844-FIRMAN1
16 - Calcomanía de datos / Número de serie

06
Español Servicio de atención al cliente: 1-844-FIRMAN1
CARACTERÍSTICAS Y CONTROLES
②
③④
①
⑤
⑥
⑦
⑧
⑨
⑩
⑪

07
Español Servicio de atención al cliente: 1-844-FIRMAN1
CARACTERÍSTICAS Y CONTROLES
①
②③
④
⑤

08
Español Servicio de atención al cliente: 1-844-FIRMAN1
CARACTERÍSTICAS Y CONTROLES
⑥
⑦
⑧
⑨
⑩
⑪

AVISO La potencia total extraída de todos los receptáculos no debe exceder la clasificación de
la etiqueta de datos.
Panel de Control
34
2
1
11
5
6
7
8
9
10
12
5
13
1. Interruptor selector de combustible principal/interruptor del motor – Se utiliza para seleccionar
y encender la fuente de combustible de gasolina (GAS) o GLP/GN. La válvula de GAS está cerrada
cuando el interruptor está en las posiciones de OFF o GLP/GN. El interruptor del motor está
activado cuando el interruptor está en las posiciones de GAS o GLP/GN.
09
CARACTERÍSTICAS Y CONTROLES
2. Luz indicadora– Cuando el interruptor principal de combustible se coloca en la posición GAS o GLP/GN,
la luz indicadora se pondrá en ROJO durante un máximo de 4 minutos (antes de apagarse). Si arranca el
motor con éxito en cualquier momento durante los 4 minutos, la luz indicadora se volverá VERDE. Consulte
la sección Luz indicadora-Modo de ahorro de energía de la batería para obtener más información.
3. Interruptor de arranque del motor - Para arrancar el motor, presione y mantenga el interruptor
en la posición START (ll), el motor se pondrá en marcha e intentará arrancar. Cuando el motor
arranque, suelte el interruptor a la posición RUN (l).
4. 3-1 Recordatorio de datos (Multímetro) - Pulse el botón SELECT para mostrar el voltaje, los
hertzios y las horas de funcionamiento.
5. Interruptores - Los receptáculos están protegidos por protectores de circuito de CA. Si se sobrecarga
el generador o se produce un cortocircuito externo, es posible que un protector de circuito se dispare.
Si se produce el disparo, desconecte todas las cargas eléctricas y determine la causa antes de intentar
seguir usando el generador. Reajuste cualquier protector de circuito disparado.
Si se utilizan varios receptáculos al mismo tiempo, la corriente total debe mantenerse dentro de
la clasificación de la placa de identificación del generador portátil.
6. Dúplex GFCI (Interruptor de Circuito de Falla a Tierra) 120V, 20A - NEMA 5-20R
De este receptáculo dúplex puede extraerse una corriente máxima de 20 amperios.
7. Bloqueo giratorio 120V, 30A - NEMA L5-30R (No protegido por GFCI).
De este receptáculo se puede extraer una corriente máxima de 30 amperios.
8. Bloqueo giratorio 120/240V, 30A - NEMA L14-30R (No protegido por GFCI). Una corriente máxima
de 30 amperios para 240 voltios o dos cargas independientes de 120 voltios a 30 amperios de
corriente cada una.
9. Terminal de tierra - Consultar a un electricista o autoridad con jurisdicción para los requisitos
locales de conexión a tierra.
Español Servicio de atención al cliente: 1-844-FIRMAN1

OPERACIÓN
1.Ubicación
PELIGRO! El escape del motor contiene monóxido de carbono, un gas venenoso que le
matará en minutos. NO PUEDE olerlo, verlo o probarlo. Incluso si no huele los gases de
escape, podría estar expuesto al gas de monóxido de carbono.
•
•
•
Opere el generador portátil solo en exteriores, al menos a 20 pies (6m) de espacios ocupados, con el
escape apuntando hacia afuera para reducir el riesgo de la acumulación de monóxido de carbono.
Instale alarmas de monóxido de carbono a batería o conecte las alarmas de monóxido de
carbono con batería de respaldo de acuerdo con las instrucciones del fabricante. Los
detectores de humo no pueden detectar el gas de monóxido de carbono.
No haga funcionar este generador portátil dentro de casas, garajes, sótanos, espacios de acceso,
cobertizos u otros espacios parcialmente cerrados, incluso si utiliza ventiladores o abre puertas y
ventanas para la ventilación. El monóxido de carbono puede acumularse rápidamente en estos
espacios y puede permanecer durante horas, incluso después del apagado de este producto.
•Si comienza a sentirse enfermo, mareado, débil o si suena la alarma de monóxido de carbono de
su vivienda, vaya a tomar aire fresco de inmediato. Llame a los servicios de emergencia. Es posible
que tenga una intoxicación por monóxido de carbono.
Alarma(s) De Monóxido De Carbono
Prevenga el envenenamiento por monóxido de carbono (CO)
Use en el exterior al menos a 20 pies (6.0 m) de cualquier tipo de vivienda.
Apunte el escape lejos de todas las viviendas y espacios ocupados.
20 ft. (6.0 m) min.
Para informarse mejor sobre todos los riesgos del monóxido de
carbono, visite www.takeyourgeneratoroutside.com.
10
Español Servicio de atención al cliente: 1-844-FIRMAN1
10. 120/240V, 50A - (NEMA 14-50R) (No protegido por GFCI).
11. Cubierta de salida - Protege los receptáculos del polvo y los escombros.
12. Conector de manguera de GLP/GN (Entrada: macho de 3/8") - Se usa para conectar la manguera
de GLP/GN al generador.
13. Interruptor selector de GLP/GN - Seleccione GLP o GN.
¡
Instale alarmas de monóxido de carbono dentro de su vivienda. Si las
alarmas de monóxido de carbono no funcionan, no se dará cuenta de
que se está enfermando y muriendo por intoxicación con monóxido
de carbono.

Reducir El Riesgo De Incendio
ADVERTENCIA! El calor/los gases de escape podrían encender combustibles,
estructuras o dañar el tanque de combustible causando un incendio, resultando
en la muerte o lesiones graves.
Mantenga el generador portátil al menos a 1,5 m (5 pies) de cualquier estructura, árboles o
vegetación de más de 30 cm (12 in) de altura.
•
Seleccione un lugar al aire libre que sea seco y esté protegido de las condiciones climáticas.
No mueva el generador portátil al interior para protegerlo de las condiciones climáticas.
No ubique el generador portátil debajo de una plataforma u otra estructura similar que pueda
confinar el calor y el flujo de aire.
•
•
5 ft.(1.5m)
min.
5 ft.(1.5m)
min.
20 ft.(6m)min.
11
OPERACIÓN
Español Servicio de atención al cliente: 1-844-FIRMAN1
¡

2, Aceite y Gasolina/GLP/GN
Añadir Aceite De Motor
Recomendamos usar el aceite SAE 10W-30 API SL de FIRMAN para lograr el mejor rendimiento.
Otros aceites detergentes de alta calidad (API SL o superior) son aceptables. No utilice aditivos
especiales. La temperatura ambiente determina la viscosidad adecuada del aceite para el motor.
Use la tabla para seleccionar el aceite apropiado según el rango de temperatura exterior esperado.
AVISO No intente encender o arrancar el motor antes de que este se haya llenado correctamente
con el tipo y cantidad de aceite recomendados. Los daños debidos a un funcionamiento sin aceite
anularán la garantía.
Degrees Celsiusº(Outside)
Full Synthetic 5W-30
Degrees Fahrenheitº(Outside)
5W-30 10W-40
10W-30
1. Coloque el generador en una superficie plana y nivelada.
3. Limpie la varilla.
(H)
DRAIN PLUG
(L)
H
L
12
OPERACIÓN
2. Limpie el área alrededor del llenado de aceite y remueva la tapa amarilla del llenado de aceite/varilla.
Español Servicio de atención al cliente: 1-844-FIRMAN1

4. Usando un embudo para el aceite, vierta lentamente el aceite en la abertura de llenado de aceite
hasta que el aceite alcance la marca del límite superior "H" de la varilla. Tengan cuidado de no
sobrellenarla. El sobrellenado podría causar problemas de arranque o daños al motor.
5. Vuelva a colocar la tapa de llenado de aceite/varilla y apriétela completamente.
6. El nivel de aceite debe ser revisado antes de cada uso o al menos cada 8 horas de funcionamiento.
Mantenga el nivel de aceite.
El generador portátil está equipado con un apagado por bajo nivel de aceite. Si el nivel de aceite cae
por debajo de nivel mínimo requerido, un sensor activará un interruptor interno que detendrá el
motor. Si el motor se apaga y el nivel de aceite está dentro de las especificaciones, compruebe si el
generador está situado en un ángulo. Coloque el generador portátil en una superficie plana para
corregir esto. Si el motor no arranca, el aceite puede no ser lo suficientemente elevado como para
desactivar el interruptor interno de bajo nivel de aceite. Asegúrese de que el sumidero está
completamente lleno de aceite hasta el límite superior (H). No haga funcionar el motor hasta que se
corrija el problema del nivel de aceite. Contacte con el servicio de atención al cliente de Firman.
Apagado Por Bajo Nivel De Aceite
Añadir Gasolina
ADVERTENCIA! El combustible y sus vapores son extremadamente inflamables, lo que
podría causar quemaduras o incendios que resulten en la muerte o lesiones graves.
Apague el motor del generador y deje que se enfríe al menos 2 minutos antes de quitar la tapa
del combustible.
•
•
•
•
•
•
•
El combustible debe cumplir con estos requisitos:
Gasolina limpia, fresca y sin plomo con un mínimo de 87 octanos.
Para el uso a gran altitud, véase Operación a gran altitud.
Se acepta la gasolina con un máximo de 10% de alcohol.
•
•
•E10 E15
13
OPERACIÓN
¡
No reabastezca de combustible ni mueva el generador cuando el motor esté funcionando.
Mueva el generador al exterior antes de agregar o drenar combustible.
Mantenga el combustible alejado de cualquier fuente de ignición.
No sobrellene el tanque, deje espacio para la expansión del combustible.
En caso de que se derrame combustible, espere a que se evapore antes de arrancar el motor.
Revise y reemplace las tuberías de combustible, el tanque, la tapa y los accesorios antes de
cada uso si se encuentra algún daño o fuga.
Español Servicio de atención al cliente: 1-844-FIRMAN1
Vierta lentamente el aceite en la abertura de llenado de aceite

AVISO No mezcle el aceite con la gasolina ni modifique el motor para que funcione con combustibles
alternativos que no estén descritos en este manual. El uso de combustibles no aprobados podría
dañar el motor y no estará cubierto por la garantía.
1. Limpie el área alrededor de la tapa de llenado de combustible, retire la tapa.
2. Añada lentamente combustible sin plomo al depósito de combustible. Tenga cuidado de no
llenar por encima del indicador de nivel de combustible ROJO. Esto permite un espacio adecuado
para la expansión del combustible.
Red Line Indicator
3. Coloque la tapa del combustible y deje que el combustible derramado se evapore antes de
arrancar el motor.
Operación A Gran Altitud Solo Con Gasolina
En altitudes superiores a los 1524 metros (5.000 pies), se acepta un mínimo de gasolina de 85
octanos. La potencia del motor y la salida del generador se reducirán aproximadamente un 3,5% por
cada 305 m (1000 pies) de elevación sobre el nivel del mar. La elevada altitud puede causar un
arranque difícil, un aumento del consumo de combustible y el ensuciamiento de las bujías. Para el
funcionamiento a elevadas altitudes, FIRMAN puede proporcionar un surtidor principal de carburador
para altitud elevada.El surtidor principal alternativo y las instrucciones de instalación pueden obtenerse
contactando con el servicio de atención al cliente.
AVISO La operación con un surtidor principal alternativo en elevaciones inferiores a la altitud mínima
recomendada puede dañar el motor. Para el funcionamiento en elevaciones más bajas, debe
utilizarse el surtidor principal estándar suministrado. El funcionamiento del motor con un surtidor
principal inadecuado puede aumentar las emisiones de gases de escape, el consumo de combustible
y reducir el rendimiento.
Altitud surtidor principal 1
439cc
380717004
380717005
Altitud
3000-6000 pies
6000-8000 pies
Operación En Condiciones Ambientales Elevadas
Su producto Firman Power Equipment está diseñado y calificado para un funcionamiento continuo a
temperaturas ambientales de hasta 40°C (104°F). El generador puede operar a temperaturas de
entre -15°C (5°F) y 50°C (122°F) por períodos cortos. Si el generador es expuesto a temperaturas
fuera de este rango durante el almacenamiento, el generador debe ser puesto nuevamente dentro
de este rango antes de su operación. Cuando se opera por encima de 25ºC (77ºF) puede haber una
disminución de la potencia. La potencia y la corriente máximas están sujetas y limitadas por factores
tales como el contenido de BTU del combustible, la temperatura ambiente, la altitud, las condiciones
del motor, etc.
14
OPERACIÓN
Español Servicio de atención al cliente: 1-844-FIRMAN1
Altitud surtidor principal 2

Conexión Del Combustible GLP/GN
ADVERTENCIA! El gas licuado de petróleo (GLP) y el gas natural (GN) son
extremadamente inflamables, lo que podría causar quemaduras o incendios que
provocarían la muerte o lesiones graves.
No coloque las fuentes de GLP/GN en la trayectoria de la salida del silenciador o cerca de
cualquier fuente de ignición.
•
•
•
•
•
•
•
•
AVISO Si es necesaria una conexión de suministro de combustible, debe instalarse de acuerdo con
todos los códigos o regulaciones locales, o en ausencia de códigos o regulaciones locales, de acuerdo
con el Código Nacional de Gas Combustible (NFPA 54 / ANSI Z223.1) y CSA B149 .1 (Código de instalación
de gas natural y propano), según corresponda. Si es posible, la conexión de suministro de combustible
debe estar cerca del lugar de funcionamiento al aire libre. Esto reducirá el costo del funcionamiento
flexible del combustible. Debe instalarse una línea de combustible flexible aprobada entre el conector
de la manguera de GLP / GN (entrada) del generador y la conexión de suministro de combustible.
En ningún caso debe interpretarse que esta información entra en conflicto con cualquier código local,
estatal o nacional. En caso de duda, siga siempre los códigos locales.
LPG
Siempre mantenga el cilindro de GLP en posición vertical.
Solo utilice cilindros de GLP de 20 o 30 libras de capacidad con rosca Acme a la derecha, tipo
1. Verifique que la fecha de recalificación del cilindro no haya expirado.
Todos los nuevos cilindros deben ser purgados de aire y humedad antes de ser llenados. El
proceso de purga debe ser realizado por su proveedor de gas propano.
•
•
•
Conecte el conjunto de manguera del regulador de GLP (incluido) al conector de la manguera de
GLP (entrada) en el panel de control del generador. Apriete la tuerca con una llave inglesa de 19
mm o ajustable. Retire el tapón de seguridad o la tapa de la válvula del cilindro de GLP. Acople el
15
•
OPERACIÓN
Español Servicio de atención al cliente: 1-844-FIRMAN1
¡
Mantenga un extintor de incendios cerca del generador todo el tiempo.
No use ni almacene las fuentes portátiles de GLP/GN que no se estén usando cerca del generador
o en un edificio, garaje o área cerrada.
Todas las tuberías de suministro de GLP/GN deben ser instaladas por un plomero calificado.
Si huele gas, cierre todas las fuentes de gas y contacte con un plomero calificado para que
inspeccione y repare el sistema de GLP o GN.
Antes del primer uso de cada día, rocíe una solución de agua jabonosa en las conexiones de
combustible de GLP/GN para comprobar si hay fugas.
Nunca utilice un contenedor de gas, una manguera de conexión de GLP/GN, un cilindro de
GLP o una fuente de gas natural que parezca estar dañado.
No conecte o desconecte la fuente de GLP/GN en un área cerrada.
El GLP es más pesado que el aire y puede acumularse en espacios confinados / reducidos si
hay una fuga.
•La línea de suministro de combustible siempre debe estar cerrada cuando el motor no está
funcionando. No apagar el combustible puede permitir que el combustible se filtre en el generador.

Válvula De Corte De GN
Conecte la línea de suministro de combustible flexible aprobado localmente (no incluido) al conector
LPG / NG (entrada) en el panel de control y el consumo de combustible. Le recomendamos que use
Firman 25FT (7.62M) Kit de mangueras de conexión rápida (MODELO 1815) o kit de mangueras de
conexión rápida de 10 pies (MODELO 1805) para la conexión de gas natural (NG) (este artículo no está
incluido). Los requisitos de manguera pueden variar en diferentes regiones dependiendo de los códigos
locales. Póngase en contacto con su plomero con licencia local para garantizar el cumplimiento completo
de todos los códigos. Asegúrese de que la ubicación de la fuente NG y la manguera utilizadas permitieran
que el generador portátil se ubique al menos 20 pies (6 m) de cualquier espacio ocupado.
3. Arrancar El Generador Con Gasolina
1. Antes de poner en marcha el generador, compruebe si hay piezas sueltas o faltantes y si hay
algún daño que pueda haber ocurrido durante el envío. Asegúrese de que la bujía, el silenciador, la
tapa de la gasolina y el filtro de aire estén en su lugar.
16
Luz Indicadora - Modo De Ahorro De Energía De La Batería
Este generador está equipado con un módulo electrónico que consume energía de la batería.
Cuando el interruptor principal del selector de combustible se coloca en la posición GAS o GLP/GN,
la luz indicadora se pondrá en ROJO durante un máximo de 4 minutos (antes de apagarse). Si el
motor se enciende con éxito en cualquier momento durante los 4 minutos, la luz indicadora se volverá
VERDE. Si el generador portátil no se enciende durante este período de 4 minutos el generador
portátil cambiará al modo de ahorro de energía de la batería para conservar la duración de la batería.
AVISO Su generador portátil está equipado con un cargador de batería interno que cargará
adecuadamente la batería solo cuando el motor esté en funcionamiento.
El generador no puede ponerse en marcha en el modo de ahorro de energía de la batería. Coloque
el interruptor principal de selección de combustible en la posición OFF (apagado) y vuelva a la
posición GAS o GLP/GN para restablecer el módulo electrónico del indicador ROJO de 4 minutos.
3. Si está conectado, asegúrese de que la perilla del cilindro de GLP o la válvula de la fuente de gas
natural estén completamente cerrados o desconectados.
OPERACIÓN
Español Servicio de atención al cliente: 1-844-FIRMAN1
regulador de GLP a la válvula del cilindro. No utilice una llave para apretar la tuerca del cilindro de
GLP. Apriete la tuerca con la mano en el sentido de las agujas del reloj hasta llegar al tope. El uso
de una llave puede dañar los componentes del cilindro de GLP.
GN
2. Mueva el generador portátil al aire libre, a un lugar de operación seguro, al menos a 20 pies (6m)
de cualquier espacio ocupado.

17
4. Gire el interruptor principal de combustible a la posición "GAS".
AVISO Cuando el interruptor selector de combustible principal se coloca en la posición GAS, la luz
indicadora se pondrá en ROJO durante un máximo de 4 minutos (antes de apagarse). Si arranca el
motor con éxito en cualquier momento durante los 4 minutos, la luz indicadora se volverá VERDE.
Consulte la sección Luz indicadora-Modo de ahorro de energía de la batería para obtener más
información.
5. Desconecte todas las cargas eléctricas del generador. Nunca arranque o detenga el generador
con los dispositivos eléctricos enchufados.
6. Mueva la palanca del cebador situada en el motor a la posición "START". No es necesario cebar un
motor caliente. (Para el arranque eléctrico muévase al paso (8)).
7. Solo para el arranque de retroceso - Tire de la cuerda de arranque lentamente hasta que sienta
resistencia y luego tire rápidamente para arrancar el motor.
OPERACIÓN
CLOSE
Español Servicio de atención al cliente: 1-844-FIRMAN1

9. No cebe demasiado. Tan pronto como el motor arranque y se caliente, mueva lentamente la
palanca del cebador a la posición RUN.
10. Deje que el generador portátil opere sin carga durante unos minutos para que se estabilice
antes de enchufar cualquier dispositivo eléctrico.
AVISO Si el motor arranca pero no funciona, o si el generador portátil se apaga durante el
funcionamiento, compruebe el nivel de aceite. Vea la sección Apagado por bajo nivel de aceite
para obtener más información.
4. Arrancar el Generador Con GLP
1. Antes de poner en marcha el generador, compruebe si hay piezas sueltas o faltantes y si hay
algún daño que pueda haber ocurrido durante el envío. Asegúrese de que la bujía, el silenciador, la
tapa de la gasolina y el filtro de aire estén en su lugar.
LPG
4. Abra completamente la perilla del cilindro de GLP.
18
OPERACIÓN
8. Solo para arranque eléctrico - Coloque el interruptor del motor en la posición START (ll) durante
unos segundos y luego suéltelo.
3 sec.
2. Mueva el generador portátil al aire libre a un lugar de operación seguro, al menos a 20 pies(6m) de
cualquier espacio ocupado.
3. Conecte la manguera de GLP con el regulador tanto al cilindro de GLP como al conector de la
manguera de GLP/GN (entrada) del generador portátil.
Español Servicio de atención al cliente: 1-844-FIRMAN1

5. Gire el interruptor selector de GLP/GN a la posición GLP.
6. Gire el interruptor selector de combustible principal a la posición GLP/GN.
AVISO Cuando el interruptor selector de combustible principal se coloca en la posición de GLP/GN,
la luz indicadora se pondrá en ROJO durante un máximo de 4 minutos (antes de apagarse). Si
arranca el motor con éxito en cualquier momento durante los 4 minutos, la luz indicadora se volverá
VERDE. Consulte la sección Luz indicadora-Modo de ahorro de energía de la batería para obtener
más información.
7. Desconecte todas las cargas eléctricas del generador. Nunca arranque o detenga el generador
con dispositivos eléctricos enchufados.
8. Ponga la palanca del cebador situada en el motor en posición "START". (Para el arranque eléctrico
pase al paso (12))
9. Solo para el arranque de retroceso - TIRAR PARA CEBAR Tirar de la cuerda de arranque 1 o 2
veces. Tire lentamente hasta que sienta resistencia y luego tire rápidamente.
1-2 Times
19
OPERACIÓN
Español Servicio de atención al cliente: 1-844-FIRMAN1

10. Solo para el arranque de retroceso - Mueva la palanca del cebador a la posición "RUN".
11. Solo para el arranque de retroceso - TIRAR PARA ARRANCAR Tire lentamente de la cuerda de
arranque hasta que sienta resistencia y tire rápidamente para hacer funcionar el generador portátil.
Si el motor no arranca en 1 o 2 tirones con el cebador en la posición RUN, mueva la palanca del
cebador a la posición START y repita el paso TIRAR PARA CEBAR (9).
12. Solo para arranque eléctrico - Coloque el interruptor del motor a la posición START (ll) durante
unos segundos y luego suéltelo.
13. Solo para arranque eléctrico - Mueva la palanca del cebador a la posición RUN.
3 sec.
14. Deje que el generador portátil opere sin carga durante unos minutos para que se estabilice
antes de enchufar cualquier dispositivo eléctrico.
AVISO Si el motor arranca pero no funciona, o si el generador portátil se apaga durante el
funcionamiento, compruebe el nivel de aceite. Vea la sección Apagado por bajo nivel de aceite
para obtener más información.
AVISO Observar escarcha en el cilindro y regulador de GLP es común durante el funcionamiento y
normalmente no es una indicación de un problema. En situaciones inusuales, esta escarcha puede
llegar a restringir el flujo de gas GLP al generador, lo que provoca un deterioro del rendimiento. En
estas situaciones poco comunes puede ser de utilidad:
20
OPERACIÓN
Español Servicio de atención al cliente: 1-844-FIRMAN1

•Intercambiar los cilindros de combustible para permitir que el primer cilindro se caliente,
y repetirlo si es necesario.
•
El cilindro y los componentes del GLP pueden ser calentados temporalmente vertiendo
agua tibia sobre ellos.
•
Muffler
5. Arrancar El Generador Con GN
1. Antes de poner en marcha el generador, compruebe si hay piezas sueltas o faltantes y si hay
algún daño que pueda haber ocurrido durante el envío. Asegúrese de que la bujía, el silenciador, la
tapa de la gasolina y el filtro de aire estén en su lugar.
Válvula de corte de GN
4. Abra completamente la válvula de la fuente de GN.
21
OPERATION
Español Servicio de atención al cliente: 1-844-FIRMAN1
Colocar el cilindro de GLP en el extremo del generador cerca del mango, donde el aire del
ventilador del motor sale del generador. Este aire es ligeramente calentado por el aire que
fluye sobre el motor.No coloque el cilindro de GLP en la vía de la salida de escape del silenciador.
2. Mueva el generador portátil al aire libre a un lugar de operación seguro, al menos a 20 pies(6m) de
cualquier espacio ocupado.
3. Conecte la manguera de GN natural tanto a la fuente de GN como al conector de la manguera de
GLP/GN (entrada) del generador portátil.
NG

5. Gire el interruptor selector de GLP/GN en la posición de GN.
6. Gire el interruptor selector de combustible principal a la posición GLP/GN.
AVISO Cuando el interruptor selector de combustible principal se coloca en la posición de GLP/GN,
la luz indicadora se pondrá en ROJO durante un máximo de 4 minutos (antes de apagarse). Si
arranca el motor con éxito en cualquier momento durante los 4 minutos, la luz indicadora se volverá
VERDE. Consulte la sección Luz indicadora-Modo de ahorro de energía de la batería para obtener
más información.
7. Desconecte todas las cargas eléctricas del generador. Nunca arranque o detenga el generador
con dispositivos eléctricos enchufados.
8. Ponga la palanca del cebador situada en el motor en posición "START". (Para el arranque eléctrico
pase al paso (12)).
9. Solo para el arranque de retroceso - TIRAR PARA CEBAR Tirar de la cuerda de arranque 1 o 2
veces. Tire lentamente hasta que sienta resistencia y luego tire rápidamente.
1-2 Times
22
OPERATION
Español Servicio de atención al cliente: 1-844-FIRMAN1

10. Solo para el arranque de retroceso - Mueva la palanca del cebador a la posición "RUN”.
11. Solo para el arranque de retroceso - TIRAR PARA ARRANCAR Tire lentamente de la cuerda de
arranque hasta que sienta resistencia y tire rápidamente para hacer funcionar el generador portátil.
Si el motor no arranca en 1 o 2 tirones con el cebador en la posición RUN, mueva la palanca del
cebador a la posición START y repita el paso TIRAR PARA CEBAR (9).
12. Solo para arranque eléctrico - Coloque el interruptor del motor a la posición START (ll) durante
unos segundos y luego suéltelo.
13. Solo para arranque eléctrico - Mueva la palanca del cebador a la posición RUN.
3 sec.
14. Deje que el generador portátil opere sin carga durante unos minutos para que se estabilice
antes de enchufar cualquier dispositivo eléctrico.
AVISO Si el motor arranca pero no funciona, o si el generador portátil se apaga durante el
funcionamiento, compruebe el nivel de aceite. Vea la sección Apagado por bajo nivel de aceite
para obtener más información.
23
OPERATION
Español Servicio de atención al cliente: 1-844-FIRMAN1

Este generador portátil ha sido probado y ajustado previamente para que pueda funcionar a plena
capacidad. El voltaje es regulado por medio de un regulador automático de voltaje (AVR). Al
reajustar el AVR se anulará la garantía. El receptáculo dúplex está equipado con protección GFCI.
El GFCI protege contra las descargas eléctricas que pueden ser causadas si usted se convierte en
una vía por la cual la electricidad puede viajar para llegar a tierra. Incluso con un GFCI puede sentir
un choque, pero el GFCI corta la corriente rápidamente por lo que una persona promedio no debería
sufrir ninguna lesión. Pruebe manualmente el GFCI mientras el generador está funcionando para
verificar que los contactos internos funcionen.
6. Conexión De Las Cargas Eléctricas
Presione el botón de prueba. El botón de reinicio aparecerá, lo que debería cortar la energía
de la toma de corriente.
•
•
•
RESET
TEST
TEST MONTHLY
FOLLOW DIRECTIONS
BOTÓN DE REINICIO
Receptáculo
Salida
Luz indicadora LED
BOTÓN DE PRUEBA
Además de la función de prueba/reinicio manual, el receptáculo GFCI se prueba a sí mismo
periódicamente para confirmar que la parte electrónica del GFCI funciona. La luz indicadora será
verde sólido cuando el GFCI se alimente del generador y funcione correctamente.
OPERACIÓN DE AUTO-PRUEBA
Las extensiones eléctricas dañadas o sobrecargadas podrían sobrecalentarse, arquearse y
quemarse, provocando la muerte o lesiones graves.
Utilice un interruptor de circuito de falla a tierra (GFCI) en cualquier área húmeda o altamente
conductiva, como una cubierta metálica.
No toque los cables desnudos o los receptáculos.
ADVERTENCIA! El voltaje del generador podría causar una descarga
eléctrica o quemaduras que podrían causar la muerte o lesiones graves.
•
•
•24
OPERACIÓN
Si el GFCI se dispara mientras está en uso, reinicie y pruebe la toma de corriente. Los cables
eléctricos tendidos en el suelo con aislamiento desgastado pueden disparar el GFCI, utilice
solo cables en buen estado.
Presione el botón de reinicio hasta que se bloquee en la posición de oprimido. Si el GFCI no se reinicia
como se describe, no utilice los receptáculos. Llame al servicio de atención al cliente de Firman.
Salida
Indicaciones de auto-prueba: Si la luz indicadora es de color naranja sólido o rojo parpadeante,
puede existir un problema. Presione el botón PROBAR para activar el GFCI. Si no puede reiniciarse,
reemplace el GFCI.
¡
Español Servicio de atención al cliente: 1-844-FIRMAN1

No utilice el generador con cables eléctricos que estén gastados, deshilachados, desnudos o
dañados de alguna manera.
No utilice el generador bajo la lluvia o en clima húmedo.
No lo haga funcionar en interiores para evitar condiciones de humedad.
No manipule el generador o los cables eléctricos mientras esté en el agua, mientras esté descalzo
o mientras tenga las manos o pies mojados.
Use el interruptor de transferencia indicado para evitar la retroalimentación aislando el generador
de los trabajadores de la compañía eléctrica.
•
•
•
•
•
1. Asegúrese de que el interruptor del panel de control esté en la posición de cerrado (on).
2. Arranque el generador sin ninguna carga eléctrica conectada.
3. Deje que el motor funcione durante varios minutos para que se estabilice.
4. Enchufe y encienda el primer artículo. Es mejor conectar primero el artículo con la mayor carga.
5. Deje que el motor se estabilice.
6. Enchufe y encienda el siguiente artículo.
7. Deje que el motor se estabilice.
8. Repita los pasos 5-6 para cada artículo adicional.
Protección Contra Sobrecargas
Existe la remota posibilidad de que las fluctuaciones de voltaje puedan perjudicar el buen
funcionamiento de algunos equipos electrónicos sensibles. Los dispositivos electrónicos,
incluyendo las computadoras y muchos aparatos programables, pueden utilizar componentes
diseñados para funcionar dentro de un rango estrecho de voltaje y pueden verse afectados por las
fluctuaciones momentáneas de voltaje del generador portátil. Aunque no hay manera de prevenir
todas las fluctuaciones de voltaje, puede tomar medidas para proteger su equipo electrónico
sensible. Instale un supresor de sobretensiones enchufable en los receptáculos que alimentan su
equipo sensible. Los supresores de sobretensiones vienen en estilos de una o varias salidas. Están
diseñados para proteger contra fluctuaciones de voltaje de corta duración.
7. Detener El Generador
1. Apague y extraiga todas las cargas eléctricas.
Nunca detenga el generador con los dispositivos eléctricos enchufados y encendidos.
Nunca detenga el motor moviendo el cebador a la posición de arranque.
Deje que el generador funcione sin carga durante un minuto para estabilizar las temperaturas
internas del motor del generador.
25
OPERACIÓN
Español Servicio de atención al cliente: 1-844-FIRMAN1

2. Gire el interruptor selector de combustible principal a la posición OFF (O).
3. Cierre completamente la perilla del cilindro de GLP y la válvula de la fuente de gas natural.
26
CLOSE
OPERACIÓN
Español Servicio de atención al cliente: 1-844-FIRMAN1

MANTENIMIENTO - ALMACENAMIENTO
Recomendaciones Generales
El mantenimiento regular mejorará el rendimiento y extenderá la vida útil del generador. Consulte a
cualquier distribuidor autorizado para el servicio.
La garantía del generador no cubre los artículos que han sido objeto de abuso por parte del operador
o negligencia. Para recibir el valor total de la garantía, el operador debe mantener el generador según
lo instruido en este manual.
Habrá que hacer algunos ajustes periódicamente para mantener apropiadamente el generador.
Todo servicio y ajustes deberán hacerse al menos una vez cada temporada. Siga los requisitos de
la tabla del programa de mantenimiento anterior.
AVISO Una vez al año debe limpiar o reemplazar la bujía y sustituir el filtro de aire. Las bujías nuevas
y el filtro de aire limpio aseguran una mezcla adecuada de combustible y aire y ayudan a que su
motor funcione al máximo de su capacidad y dure más tiempo.
Debe ser realizado por el propietario conocedor/experto o por un centro de servicio autorizado.
*
√
Comprobar si hay daños y fugas.
Reemplazar si es necesario.
Ensamble
Manguera/
Regulador
de GLP
PROGRAMA DE MANTENIMIENTO
ÍTEM NOTAS Diario (antes
del funciona
-miento)
Las primeras
25 horas Cada 100
horas
(o anual)
Accesorios /
Sujetadores
Bujía
Aceite de
motor
Filtro de
aire
Línea de
combustible
Sistema de
escape
Motor
Verificar condición. Ajustar la
separación y limpiar. Reemplace si
es necesario.
Comprobar el nivel de aceite.
Limpiar, reemplazar si es necesario.
Comprobar si hay fugas. Reajustar o
cambiar la junta si es necesario.
Comprobar el espacio
de la válvula de ajuste.*
Limpiar la cámara de
combustión. *
Comprobar.
Reemplazar si es
necesario.
Comprobar si la manguera de
combustible tiene grietas u otros
daños. Reemplazarla si es necesario.
√
√
√
√
√
√
√
√
√
√
Reemplazar.
Revisar la pantalla del supresor de
chispas. Limpiar/reemplazar si es
necesario.
Cada
250 horas
√
Combustible Limpiar el filtro del tanque de
combustible.
Reemplazarlo si es necesario. √
27
Las primeras
50 horas
Español Servicio de atención al cliente: 1-844-FIRMAN1

Al transportar El Generador
Realice el transporte con el depósito de combustible VACÍO o con la válvula principal de combustible
en posición OFF. No incline el generador en un ángulo que provoque el derrame de combustible.
Desconecte la manguera de combustible de GLP/GN y almacénela de forma segura.
MANTENIMIENTO DEL MOTOR
Para evitar un arranque accidental, retire y conecte a tierra el cable de la bujía antes de ejecutar
cualquier servicio.
Cambio de aceite del motor
Cambie el aceite del motor cada 100 horas. (Para un motor nuevo, cambie el aceite después de 25
horas.) Si está usando su generador en condiciones de extrema suciedad o polvo, o en condiciones
de calor extremo cambie el aceite más a menudo.
PRECAUCIÓN! Evite el contacto prolongado o repetido de la piel con el aceite de motor usado.
Se ha demostrado en ciertos animales de laboratorio que el aceite de motor usado causa cáncer
de piel. Lave a fondo las áreas expuestas con agua y jabón.
MANTENER FUERA DEL ALCANCE DE LOS NIÑOS. NO CONTAMINAR. CONSERVE LOS RECURSOS.
DEVUELVA EL ACEITE USADO A LOS CENTROS DE RECOLECCIÓN.
(a) En una superficie nivelada, drene el aceite en un recipiente adecuado quitando el tapón de
drenaje y el tapón de llenado de aceite mientras el motor esté caliente.
DRAIN PLUG
(b) Coloque nuevamente el tapón de drenaje y llene el motor con aceite hasta que alcance el nivel
ALTO (H) en la varilla de llenado de aceite.
(H)
DRAIN PLUG
(L)
AVISO Recomendamos usar el aceite SAE 10W-30 API SL de FIRMAN para obtener el mejor
rendimiento. Otros aceites detergentes de alta calidad (API SL o superior) son aceptables.
Ver Aceite y gasolina / GLP / GN.
28
MANTENIMIENTO - ALMACENAMIENTO
Español Servicio de atención al cliente: 1-844-FIRMAN1
¡

Mantenimiento Del Filtro De Aire
(a) Retire cuidadosamente el elemento filtrante de aire de espuma y lávelo solo con detergente
líquido y agua. Exprima en un paño limpio para secarlo.
(b) Sature el elemento filtrante de aire de espuma con aceite de motor limpio y exprima en un paño
limpio para eliminar el exceso de aceite.
Mantenimiento De La Bujía
El cambio de la bujía ayudará a que el motor arranque más fácilmente y funcione a su máximo
rendimiento.
(a) Retire el tapón de la bujía.
(b) Retire la bujía con la llave suministrada.
A
B
A- Bujía
B- T de la bujíaapón
29
(c)Instale de nuevo el elemento filtrante de aire limpio o nuevo.
MANTENIMIENTO - ALMACENAMIENTO
Español Servicio de atención al cliente: 1-844-FIRMAN1

c) Inspeccione la bujía para ver si está dañada y límpiela con un cepillo de alambre antes de volver
a instalarla. Reemplace si está dañada.
(e) Coloque la bujía en posición y enrósquela a mano para evitar que se enrosque en forma torcida.
(f) Apriete la bujía con la llave suministrada y vuelva a colocar el tapón de la bujía en la bujía.
BUJÍA: FIRMAN P/N 330723001 o CHAMPION N9YC
Mantenimiento De La Abertura De La Válvula
Entrada: ( )
Escape: 0,007 - 0,009 in (0,18 - 0,22 mm)
0,005 - 0,007 in 0,13 - 0,17 mm
Silenciador Y Supresor De Chispas
•
•
ADVERTENCIA! El contacto con el área del silenciador podría causar
quemaduras que resulten en lesiones graves.
No toque las partes calientes.
Es una violación del Código de Recursos Públicos de California, Sección 4442, usar u operar el
motor en cualquier terreno que este cubierto por bosques, arbustos o pasto, a menos que el
sistema de escape este equipado con un supresor de chispas, como se define en la Sección 4442,
mantenido en funcionamiento efectivo. Otros estados o jurisdicciones federales pueden tener
leyes similares, véase el Reglamento Federal 36 CFR Parte 261.52.
30
MANTENIMIENTO - ALMACENAMIENTO
(
¡
Español Servicio de atención al cliente: 1-844-FIRMAN1
(d-1) Para bujía FIRMAN P/N 330723001 - Ajuste la separación de los electrodos a 0.020 - 0.024 in. ( 0.5 - 0.6 mm).
(d-2) Para bujía CHAMPION N9YC - Ajuste la separación de los electrodos a 0.028 - 0.031 in. ( 0.7 - 0.8 mm).
0.020-0.024 in.
(0.5-0.6mm)
0.028-0.031 in.
(0.7-0.8mm)

Inspección Del Silenciador Y Del Supresor De Chispas
1. Inspeccione el silenciador para ver si hay grietas, corrosión u otros daños.
2. Retire los tornillos que aseguran el supresor de chispas en su lugar y retírelo del silenciador.
Spark arrester
screen
Flange
Screw
3. Retire cuidadosamente los depósitos de carbono de la pantalla del supresor de chispas con un
cepillo de alambre.
4. Reemplace el supresor de chispas si está dañado. Si se necesitan piezas de repuesto, asegúrese
de usar solo partes de reemplazo del equipo originales FIRMAN.
5. Coloque el supresor de chispas en el silenciador y sujételo con los tornillos.
AVISO El hecho de no limpiar o sustituir el supresor de chispas puede provocar una disminución
del rendimiento del motor.
MANTENIMIENTO DEL GENERADOR
31
Ponga en marcha el generador al menos 30 minutos cada mes.
Asegúrese de mantener el generador portátil limpio y seco.
No exponga la unidad a un exceso de polvo, suciedad, humedad o vapores corrosivos.
No introduzca ningún objeto a través de las ranuras de refrigeración.
Antes de cada uso, inspeccione debajo del generador en busca de señales de aceite o combustible.
Limpie cualquier acumulación de escombros. Mantenga el área alrededor del silenciador libre de
cualquier tipo de desechos. Utilice un cepillo de cerdas suaves para eliminar la suciedad o
incrustación de aceite. Use un paño húmedo para limpiar todas las superficies exteriores.
MANTENIMIENTO - ALMACENAMIENTO
Español Servicio de atención al cliente: 1-844-FIRMAN1

Reemplazo De La Batería
A(M6)
1. Retire el tapón de la bujía de la bujía.
2. Primero retire la tuerca y el perno del poste negativo (-), luego el del poste positivo (+).
3. Afloje y retire las tuercas tipo mariposa (A) del soporte de sujeción de la batería.
4. Retire la batería y recicle.
5. Instale la nueva batería con las siguientes especificaciones:
12V de ácido de plomo sellado 15AH
LXWXH:7,09X2,95X6,5in (180X75X165mm)
6. Conecte primero el cable rojo positivo (+) de la batería a la batería.
7. Conecte el cable negro negativo (-) de la batería a la batería en segundo lugar.
8. Cubra los postes con los bornes provistos.
9. Instale el tapón de la bujía en la bujía.
La batería abastece de energía al motor de arranque y al módulo de control. Este generador portátil
está equipado con un circuito automático de carga de la batería. La batería recibirá tensión de
carga solo cuando el motor esté funcionando. La batería mantendrá una carga adecuada si se
utiliza el generador portátil de forma regular (aproximadamente una vez cada dos semanas). Si se
utiliza con menos frecuencia, la batería debería estar conectada a un cargador de goteo (no
incluido) o a un mantenedor de batería (no incluido) para mantener la batería correctamente
cargada. Si la batería no es capaz de arrancar el motor, este puede ser prendido manualmente solo
en la posición GAS tirando de la cuerda de retroceso del motor. Si el voltaje de la batería es
extremadamente bajo, el circuito de carga puede no ser capaz de recargar la batería. En este caso,
la batería debe ser conectada a un cargador de batería estándar de estilo automotriz para
recargarla antes de que pueda ser usada.
Carga De La Batería
32
MANTENIMIENTO - ALMACENAMIENTO
Español Servicio de atención al cliente: 1-844-FIRMAN1

Es importante prevenir la formación de depósitos de goma en los componentes esenciales del
sistema de combustible, como el carburador, las mangueras de combustible o el tanque, durante
el almacenamiento. Los combustibles mezclados con alcohol (llamados gasohol, etanol o metanol)
atraen la humedad, lo que provoca la separación y formación de ácidos durante el almacenamiento.
El gas ácido puede dañar el sistema de combustible de un motor durante el almacenamiento.
Almacenamiento A Largo Plazo
Cuando el equipo generador vaya a ser almacenado durante más de un mes, siga estas instrucciones
para evitar problemas con el motor:
Cuando drene el combustible, mueva el generador al aire libre y utilice un sifón de vacío no
conductivo disponible en el mercado. El combustible debe ser drenado en un contenedor aprobado.
ADVERTENCIA! El combustible y sus vapores son extremadamente inflamables,
lo que podría causar quemaduras o incendios con resultado de muerte o lesiones
graves.
4-FALTA DE COMBUSTIBLE: Si elige drenar el tanque de combustible, mueva el generador al aire
libre. Una vez que drenado el tanque de combustible, gire el interruptor selector de combustible
principal a la posición GAS. Arranque y haga funcionar el generador portátil en el exterior hasta
que el motor se detenga por falta de gasolina. Esto drenará la gasolina restante del tanque, las
líneas de combustible y el carburador.
5-Gire siempre el interruptor selector de combustible principal a la posición OFF (apagado) antes
del almacenamiento.
6-Deje que el generador portátil se enfríe antes de limpiarlo y almacenarlo.
7-Cambie el aceite.
33
MANTENIMIENTO - ALMACENAMIENTO
¡
No almacene combustible cerca de ninguna fuente de ignición.
1-Trate cualquier combustible almacenado con el
estabilizador de combustible.
8-Remueva el tapón de la bujía y la bujía. Vierta aproximadamente una cucharadita de aceite de
motor a través del agujero de la bujía, luego tire lentamente el arrancador de retroceso varias veces
para distribuir el aceite en el cilindro. Vuelva a instalar la bujía y coloque el tapón de la misma. Tire
del retroceso lentamente hasta que sienta resistencia. Esto cerrará las válvulas para que no entre
humedad en el cilindro del motor.
2-Cuando almacene el generador con gasolina en
el tanque de combustible, haga funcionar el
motor durante 5-10 minutos para hacer circular el
combustible tratado por las líneas de combustible
y el carburador antes de apagarse.
3- No es necesario drenar la gasolina del tanque de
combustible del generador si se añade un
estabilizador de combustible.
9-Cubra el generador portátil y almacénelo en un lugar limpio y seco, fuera de la luz solar directa
y lejos de cualquier fuente de ignición.
Cualquier daño o peligro causado por el uso de combustible inadecuado, almacenamiento
inadecuado del combustible y/o estabilizadores formulados indebidamente, no están cubiertos
por la garantía del fabricante. No almacene gasolina de una estación a otra.
Español Servicio de atención al cliente: 1-844-FIRMAN1

SOLUCIÓN DE PROBLEMAS - ESPECIFICACIONES
Problema Causa Corrección
El motor está funcionando,
pero no hay salida de CA
disponible.
1. El interruptor está abierto.
2. Fallo en el generador.
3. Conexión deficiente o juego de
cables defectuoso.
4. El dispositivo conectado está
defectuoso.
1. Reinicie el interruptor.
2. Contacte con el servicio técnico autorizado.
3. Compruebe y repare.
4. Conecte otro dispositivo que esté en
buenas condiciones.
El motor funciona bien
sin carga pero "se
atasca" cuando las
cargas están
conectadas.
1. Cortocircuito en una carga conectada.
2. La velocidad del motor es demasiado
lenta.
3. Cortocircuito en el generador.
4. Filtro de combustible obstruido o sucio.
1. Desconecte la carga eléctrica en cortocircuito.
2. Contacte con el servicio técnico autorizado.
3. Contacte con el servicio técnico autorizado.
4. Limpie o reemplace el filtro de combustible.
El motor no arranca;
arranca y funciona mal o
se apaga mientras está en
funcionamiento.
El motor carece de
potencia.
1. La carga es demasiado alta.
2. Filtro de aire sucio.
3. Filtro de combustible obstruido o sucio.
4. El supresor de chispas está atascado.
El motor "fluctúa" o falla.
1. El carburador está funcionando
demasiado rico o demasiado pobre.
2. Filtro de combustible obstruido o sucio.
1. Contacte con el servicio técnico autorizado.
2. Limpie o reemplace el filtro de combustible.
El motor se apaga
cuando está
funcionando.
1. Sin gasolina o GLP/GN.
2. Limpiador de aire sucio.
3. Bajo nivel de aceite.
1. Llene el depósito de combustible con gasolina
o reemplace el cilindro de GLP/ compruebe el
suministro de GN.
2. Limpie o reemplace el filtro de aire.
3. Llene el cárter hasta el nivel adecuado o
coloque el generador en una superficie nivelada.
Para cualquier otro asunto, contacte con el distribuidor autorizado o con el servicio de atención al
cliente de Firman.
34
Español Servicio de atención al cliente: 1-844-FIRMAN1
1. Interruptor selector de
combustible en posición OFF (O).
2. La luz indicadora está apagada
o parpadea en rojo.
3. Bajo nivel de aceite.
4. Limpiador de aire sucio.
5. No hay gasolina.
6. Gasolina caducada.
7. El cable de la bujía no está
conectado a la bujía.
8. Bujía defectuosa.
9. Agua en la gasolina.
10. Está ahogado.
11. Mezcla de combustible
excesivamente rica.
12. Filtro de combustible obstruido
o sucio.
13. La batería de arranque puede
tener carga insuficiente.
14. No hay GLP/GN.
15 La perilla del cilindro de GLP/
válvula de suministro de GN no
está abierta.
16. La batería se ha agotado.
2. Debe tener una luz roja sólida
para poder arrancar el motor.
3. Llene el cárter hasta el nivel adecuado
o coloque el generador en una superficie
nivelada.
4. Limpie o reemplace el filtro de aire.
5. Llene el tanque de combustible con
gasolina.
6. Drene el tanque de combustible y el
carburador; llene con gasolina fresca.
7. Conecte el cable a la bujía.
8. Reemplace la bujía.
9. Drene el tanque de gasolina y el
carburador; llene con gasolina fresca.
10. Drene el tanque de gasolina y el
carburador; llene con gasolina fresca.
11. Contacte con el servicio técnico
autorizado.
12. Limpie o reemplace el filtro de
combustible.
13. Compruebe la salida de la batería y
cárguela si es necesario.
14. Reemplace el cilindro de GLP/
compruebe el suministro de gas natural.
15. Abra completamente la perilla del
cilindro de GLP/válvula de suministro de
gas natural.
16. Arranque el motor en posición "GAS".
Cargue o reemplace la batería.
1. Ponga el interruptor selector de
combustible en la posición "GAS" o "GLP/GN".
1. No sobrecargue el generador.
2. Reemplace el filtro de aire.
3. Limpie o reemplace el filtro de combustible.
4. Limpie o reemplace el supresor de chispas.

ESPECIFICACIONES
Modelo
Voltaje Nominal De Ca
Fase
Factor De Potencia
Regulador De Voltaje
Tipo De Alternador
Vatios De Funcionamiento*
Vatios De Arranque
Motor
Tipo De Motor
Desplazamiento
Apagado Por Bajo Nivel De Aceite
Sistema De Ignición
Sistema De Arranque
Combustible
Capacidad Del Tanque De Combustible
Capacidad De Aceite Lubricante
Tipo De Carburador
Limpiador De Aire
Rotación Del Eje De La Toma De Fuerza
120/240V
T07571F
7500(GASOLINA)/6750(GLP)/5500(GN)
AVR
Una Sola
1
Un Solo Cilindro, 4 Tiempos Ohv Refrigerado Por Aire
439cc
Tipo de ignición sin ruptura, Volante Magneto
Gasolina Automotriz Sin Plomo/glp/gn
8,0 Galones Americanos (30,3l)
37,2 oz (1,1l)
En Sentido Contrario A Las Agujas Del Reloj (frente A La Toma De Fuerza)
Flotante
Tipo De Poliuretano
Sí
9400(GASOLINA)/8450(GLP)/6900(GN)
FIRMAN
Frecuencia Nominal 60Hz
Tipo De Aceite
Ver La Sección "añadir Aceite De Motor”
Arranque De Retroceso/eléctrico
Sistema De Puesta A Tierra De Ca
Neutral Adherido Al Marco
35
SOLUCIÓN DE PROBLEMAS - ESPECIFICACIONES
*Generador certificado de acuerdo con la norma CSA (Asociación Canadiense de Normas) C22.2 No. 100-14,
Motores y Generadores.
Español Servicio de atención al cliente: 1-844-FIRMAN1
De Cepillo
Rango de presión del
combustible de gas natural
7-11 Pulgadas De Columna De Agua (0, 25-0, 40 Psi)
(13-20 Mm De Mercurio) (1,7-2,7 Kpa)
Consumo de Combustible de
Gas Natural
Sin Carga Media Carga Carga Completa
Consumo de Combustible GLP
3
72ft 3
/hr(2m /hr) 3
101ft
101,000 BTU/h (29,593 W)
3
/hr(2.9m /hr)
3
86ft
86,000 BTU/h (25,204 W)
3
/hr(2.4m /hr)
3
50.8ft
127,000 BTU/h (37,211 W)
/hr(5.3L/hr)
3
31ft
77,500 BTU/h (22,713 W)
/hr(3.2L/hr)
3
15.6ft
39,000 BTU/h (11,429 W)
/hr(1.6L/hr)
72,000 BTU/h (21,101 W)

DIAGRAMA DE PARTES Y LISTA DE PARTES
T07571F DIAGRAMA DE PARTES
36
Español Servicio de atención al cliente: 1-844-FIRMAN1

DIAGRAMA DE PIEZAS DEL MOTOR TRI-COMBUSTIBLE DE 439cc
37
Español Servicio de atención al cliente: 1-844-FIRMAN1

Generador Portátil T07571F
NO. Número de Parte Ctd
Descripción
1
2
3
4
5
6
7
8
9
10
11
12
13
14
15
16
17
18
19
20
21
22
23
24
25
26
27
28
29
30
31
32
33
34
35
36
37
38
39
40
41
42
43
44
45
46
47
48
49
50
51
52
53
54
55
56
57
58
59
60
61
62
63
64
65
66
67
68
69
70
71
72
73
74
75
76
77
78
79
80
81
82
83
84
85
86
87
88
89
90
91
92
93
94
95
96
97
98
99
100
101
102
103
104
105
106
107
108
109
110
111
112
113
114
115
116
117
118
119
120
121
122
123
124
125
126
127
128
129
130
131
132
133
134
135
136
137
138
139
140
141
142
143
144
145
146
147
148
149
150
151
152
380713556
357713501
336713528
357713573
380713544
380713545
380713557
357713506
357713507
336713525
336713524
380713504
336713519
336713523
336713520
336713522
357713509
336713507
380713506
336713512
336713513
336713577
380713507
357713511
380713508
357713513
357713514
336713531
357713515
336713515
357713516
336713538
357713517
336713536
357713518
336713534
336713509
336713533
357713520
375413004
357713523
336713517
357713577
357713524
336713542
336713543
336713544
357713578
336713546
336713547
380713553
336713548
336713549
336713807
336713540
357713580
357713581
336713636
336713639
336713637
336713638
380713532
380713533
357713535
357713592
357713536
380713554
380713546
336713558
357713584
357713550
357713551
357713552
357713553
1
1
1
1
1
1
1
1
1
1
1
1
2
1
2
1
1
3
4
8
4
2
2
2
1
1
5
4
1
19
1
2
1
1
1
2
2
2
1
1
1
4
1
1
4
4
4
1
2
1
1
1
1
1
7
1
1
1
1
1
1
1
1
2
2
2
1
1
8
2
2
1
1
1
1
2
2
3
2
1
1
1
2
1
1
2
4
1
2
4
1
1
1
1
1
2
1
1
2
1
1
1
1
1
1
1
1
1
2
1
1
2
2
10
6
1
1
8
1
1
1
4
1
1
1
1
1
1
4
2
2
1
2
2
1
1
2
2
2
1
1
1
1
1
1
1
1
1
1
4
4
1
Motor triple Tri-combustible FIRMAN 439cc
357713554
336713593
357713569
336713578
357713555
357713556
336713842
336713693
357713531
357713532
357713533
357713585
336713559
357713538
336713557
336713561
336713514
336713516
336713601
336713817
375713001
336713819
336713820
336713821
336713822
336713824
375413002
336713826
336713816
336713815
336713827
336713828
357713586
336713574
336713573
357713541
380713512
380713515
380713001
336713569
330713582
380713552
380713518
336713568
357713588
336713526
336713585
336713565
336713818
336713583
380713555
357713545
357713546
357713548
380713547
375723001
380713002
380713550
380713003
357713598
336713643
330713502
336713590
336713844
357713596
357713597
336713841
336713611
375413001
357413509
380413510
357413503
357413506
336713691
380413512
380713542
380713562
357713607
38
Diagramas de partes - Listas de partes - Diagrama de cableado
Español Servicio de atención al cliente: 1-844-FIRMAN1
NO. Número de Parte Ctd
Descripción
Ensamblaje Tornillo y arandelaM5×10
Tuerca M5
Perno de brida M6×8
Perno, gancho de flexión
Protector de generador de viento
Tapa de goma B
Cable rojo de la batería +
Ensamblaje Rotor
Tapón negro
Ensamblaje Estator
Cable de la batería (Hembra 180mm)
Cubierta del estator
Tuerca M10
Cubierta del extremo del generador
Aislante
Ensamblaje de escobilla de carbono
Aislante
Soporte de escobilla de carbono
Ensamblajes de pernos y arandelas
AVR
Perno de brida M5×16
Bloque terminal
Perno M5×16
Cable a tierra
Tapa de la cubierta del extremo del generador
Perno de brida M5×12
Perno de brida M6×200
Arandela de seguridad Ø6
Arandela Ø6
Tuerca M5
Perno de la cubierta lateral M5×229
Arandela de seguridad Ø5
Perno de brida M10×285
Arandela de seguridad Ø10
Arandela Ø10
Perno de brida M8×20
Soporte, manguito
Perno de brida M6×12
Placa fija del silenciador A
Ensamblaje Tornillo y arandela M5×14
Soporte, supresor de chispas
Supresor de chispas
Placa fija del silenciador B
Tuerca M8
Arandela de seguridad Ø8
Arandela plana Ø8
Junta, Externa.
Ensamblaje Manguito
Soporte del motor
Brida. Perno M8×16
Pata de apoyo
Goma, Soporte
Perno de brida M6×25
Cable a tierra
Arandela de estrella externa Ø6
Receptáculo L14-30R
Módulo de control
Tornillo autorroscante St2.9×19
Tornillo autorroscante St2.9×32
Micro Interruptor 1
Micro Interruptor 2
Válvula de combustible
Ensamblaje Regulador principal
Cubierta de la entrada de GLP
Tornillo M4×12
Interruptor de arranque eléctrico
Luz indicadora
Multímetro
Cubierta de salida TT-30R/14-50R
Cubierta de salida L5-30R 2
Cubierta de salida 5-20R GFCI
Perno M6×22
Tuerca M6
Interruptor automático de doble polo Amperio 31A
Interruptor selector de combustible principal
Ensamblaje Tornillo y arandela M4×20
Ensamblaje Tornillo y arandela M4×8
Ensamblaje Tornillo y arandela M4×14
Placa fija del silenciador C
Tuerca M6
Soporte del filtro de aire
Tapa de goma A
Ojal, tanque de combustible
Perno de brida M6×20
Tornillo M5×10
Tapa de combustible
Tanque con filtro
Abrazadera Ø8×6
Manguera, combustible 1
Manguera, combustible 2
Escudo de canister de carbono
Perno eje
Rueda
Pasador de chaveta
Cubierta frontal de plástico
Armazón
Tuerca M8
Perno de brida M8×35
Tuerca de mariposa M6
Soporte de presión de la batería
Almohadilla de goma
Batería
Panel de control
Receptáculo 14-50R
Tuerca M4
5-20R Dúplex GFCI
Interruptor de circuito de 20 A.
Tornillo M5×14
Cargador
Receptáculo L5-30R
Caja de control
Ojal
Casquillo
Ojal
Abrazadera de metal
Manguera de GN
Interruptor selector de GLP/GN
Perno de brida M6×6
Cubierta impermeable
Módulo de protección de FV
Tornillo M5×20
Pasador de chaveta, manija
Arandela Ø8
Perno eje, Mango
Mango
Tapón rojo
Tapón, arranque
Ensamble Panel de control
Kit de ruedas
Set de rotor y estator
Kit de supresión de chispas
Ensamblaje de la pata de apoyo
Soporte de manguera
Arandela amortiguadora del tanque
Ensamblaje Indicador de combustible
Pantalla del indicador de combustible
Ensamblaje Tanque de combustible
Filtro de combustible, malla de alambre
Interruptor automático de doble polo Amperio 30A
Ensamblaje Tornillo y arandela M5×10
Montaje del interruptor selector de GLP-NG
Ensamblaje Tornillo y arandela M3×6
Ensamblaje Tornillo y arandela M5×8
Cable de la batería (macho 180mm)
Soporte Canister De Carbono
Cárter De Carbono
Soporte De Cartón De Carbono
Manguera De Vapor 1
Manguera De Vapor 2
Soporte de la batería
Perno de brida M8×45

Motor FIRMAN Tri-combustible de 439cc
1
2
3
4
5
6
7
8
9
10
11
12
13
14
15
16
17
18
19
20
21
22
23
24
25
26
27
28
29
30
31
32
33
34
35
36
37
38
39
40
41
42
43
44
45
46
47
48
49
50
51
52
53
54
55
56
57
58
380723518
357723501
357723502
357723503
357723504
357723505
316713518
357723506
357723507
357723508
380723501
357723510
357723511
357723512
357723513
357723514
357723515
357723516
357723517
357723518
357723519
380723502
336723503
357723521
380723503
380723504
380723505
357723525
357723526
357723527
357723528
357723529
357723530
357723531
336723528
336723529
357723532
330723001
357723533
357723534
375717005
336723537
357723536
357723537
357723538
375717007
380723507
380723508
357723542
357723543
357723544
375717006
357723546
357723547
357723548
357723549
357723550
357723551
380723520
357723554
375413003
336723555
357723560
357723561
357723562
357723563
357723564
336723567
357723565
357723566
336723564
357723567
357723568
357723569
336723606
357723570
357723571
357723572
336723612
380723511
380723519
357723575
380723512
357723577
357723578
357723579
357723580
357723581
357723582
336723589
336723590
336723591
336723592
336723593
330723528
357723584
336723597
357723585
336723595
357723586
357713520
357423500
357423501
357423508
380423505
380423501
380423502
336723615
375717008
1
2
2
1
2
2
2
2
1
1
1
1
1
1
1
1
2
7
1
2
1
1
8
1
1
1
1
1
1
1
2
1
4
1
2
2
2
1
1
1
2
2
2
2
1
1
1
1
2
2
2
1
1
1
2
1
1
1
1
1
1
3
1
1
1
1
1
1
1
1
1
1
1
2
2
1
1
1
1
1
1
2
1
1
3
1
1
1
1
2
2
1
1
1
1
1
1
1
1
1
1
1
1
1
1
1
1
2
1
59
60
61
62
67
68
69
70
71
72
73
74
75
76
77
78
79
80
81
82
83
84
85
86
87
88
89
90
91
92
93
94
95
96
97
98
99
100
101
102
103
104
105
106
107
108
109
110
111
112
113
39
Español Servicio de atención al cliente: 1-844-FIRMAN1
Diagramas de partes - Listas de partes - Diagrama de cableado
NO. Número de Parte Ctd
Descripción
Cárter Comp.
Perno, drenaje
Arandela, perno de drenaje
Sensor de nivel de aceite
Brida. Perno M6×15
Rodamiento
Perno de sujeción
Rodamiento
Eje de compensación
Comp. Cigüeñal
Cigüeñal
Engranaje, cigüeñal
Engranaje, transmisión
Junta, cubierta del cárter
Cubierta, cárter
Retén de aceite
Perno de brida M8×40
Biela conectora, Comp.
Pasador del pistón con anillo
Pasador de pistón
Pistón
Brida. Perno M6×12
Soporte de aire inferior
Anillo, Aceite
Anillo, segundo pistón
Anillo, primer pistón
Junta, cubierta de la válvula
Perno
Perno prisionero válvulas de
Tubo de respiración
Brida. Perno M10×80
Rotador, válvula de escape
Tuerca de seguridad
Tuerca de ajuste, válvula
Balancín de la válvula
Bujía
Retenedor, válvula de escape
Resorte, válvula
Perno, balancín
Retén de aceite, válvula
Retenedor, válvula
Placa guía, barra de empuje
Cabezal de cilindro
Válvula, admisión
Válvula, escape
Varilla de empuje
Elevador, válvula
Perno de sujeción
Junta, cabezal del cilindro
Soporte del filtro de aire
Tuerca M6
Perno de entrada de aire
Junta, Aislante
Aislante, carburador
Junta, carburador
Carburador
Junta, Limpiador de aire
Tuerca M6
Guía de Viento, Superior
Resorte, gobernador
Biela, gobernador
Brazo, gobernador
Perno, brazo gobernador
Pasador, eje
Retén de aceite
Cuña balancín
Eje, brazo gobernador
Bobina de ignición
Perno de brida M6×29
Abrazadera de alambre
Tuerca, eje
Polea, arranque
Cubierta, alambre
Ventilador de refrigeración
Comp. de volante
Perno de brida M8×35
Empuñadura, arranque
Perno de brida M6×8 3
Cordón
Resorte, patchet
Patchet, arranque
Guía de trinquete
Tornillo, guía de trinquete
Abrazadera de alambre
Engranaje, gobernador
Arandela interior, engranaje
Gobernador, eje de engranaje
Junta, externa
Set de arranque del retroceso
Set de limpiador de aire
Set de carburador
Set de anillos de pistón
Set de juntas
Arandela de seguridad
Arandela
Ensamblaje Varilla de medición de aceite
Ensamblaje de la cubierta de la válvula
Retenedor, válvula de admisión
NO. Número de Parte Ctd
Descripción
Ensamble de la caja del limpiador de aire
Resorte, retorno del acelerador
Comp. de la cubierta del ventilador
Ensamblaje del motor de arranque
Comp. de caja, arranque de retroceso
Resorte, arranque de retorno
Polea, retroceso del motor de
Abrazadera de resorte, guía de trinquete
Casquillo, engranaje de gobernador
Arandela, engranaje de gobernador
Set de engranajes de gobernador

40
Español Servicio de atención al cliente: 1-844-FIRMAN1
Diagramas de partes - Listas de partes - Diagrama de cableado

FIRMAN 90 Días Años De Garantía Limitada
No Devuelva La Unidad Al Lugar De Compra
Contacte con el Centro de Servicio de FIRMAN y FIRMAN resolverá cualquier problema vía
telefónica o por correo electrónico. Si el problema no se corrige por este método, FIRMAN
autorizará, a su elección, la evaluación, reparación o reemplazo de la parte o componente
defectuoso en un Centro de Servicio FIRMAN. FIRMAN le proporcionará un número de caso para
el servicio de garantía. Por favor, guárdelo para futuras referencias. Las reparaciones o reemplazos
sin autorización previa, o en un centro de reparación no autorizado, no estarán cubiertos por esta
garantía.
Desgaste Normal
Su producto necesita piezas y servicios periódicos para funcionar adecuadamente. Esta garantía
no cubre la reparación cuando el uso normal ha agotado la vida de una parte o del equipo en su
totalidad.
FIRMAN garantiza al comprador original que los componentes mecánicos y eléctricos estarán libres
de defectos en los materiales y fabricación durante el periodo de un (piezas y mano de obra) desde
la fecha original. Los gastos de transporte de productos presentados para su reparación o repuesto
bajo esta garantía son responsabilidad exclusiva del comprador.Esta garantía sólo se aplica al
comprador original y no es transferible.
Garantía De Reparación/Reemplazo
Exclusiones de la Garantía
Esta garantía no cubre las siguientes reparaciones y equipos.
Condiciones De La Garantía
FIRMAN GENERATOR registrará la garantía al recibir su tarjeta de registro de garantía y una copia
de su recibo de venta de uno de los establecimientos de FIRMAN como prueba de compra. Por
favor, presente su registro de garantía y su prueba de compra dentro de los diez (10) días de la
fecha de compra.
41
INFORMACIÓN DE SERVICIO CONTACTE CON EL DEPARTAMENTO DE SERVICIO DE
PRODUCTOS FIRMA AL 1-844-347-6261 o al www.firmanpowerequipment.com para obtener
información sobre el servicio de garantía o para pedir partes de reemplazo o accesorios.
CÓMO PEDIR PARTES DE REPUESTO
Incluso un equipo construido con calidad como este generador eléctrico puede necesitar partes de
repuesto ocasionalmente para mantenerlo en buenas condiciones a lo largo de los años. Para pedir
partes de reemplazo, por favor dé la siguiente información:
Modelo No. Rev. Nivel y No. de Serie se encuentra en la etiqueta de datos.
Número o números de partes como se muestra en la sección de la Lista de partes.
Una breve descripción del problema con el generador.
•
•
•
SERVICIO - GARANTÍA
Español Servicio de atención al cliente: 1-844-FIRMAN1

Límites De La Garantía Implícita Y Daños Consecuentes
FIRMAN renuncia a cualquier obligación de cubrir cualquier pérdida de tiempo, uso de este
producto, flete, o cualquier reclamación incidental o consecuente de cualquier persona por el uso
de este producto. ESTA GARANTÍA SUSTITUYE A TODAS LAS DEMÁS GARANTÍAS, EXPRESAS
O IMPLÍCITAS, INCLUIDAS LAS GARANTÍAS DE IDONEIDAD COMERCIAL O DE APTITUD
PARA UN FIN DETERMINADO.
Una unidad proporcionada como intercambio estará sujeta a la garantía de la unidad original. La
duración de la garantía que rige la unidad intercambiada seguirá calculándose en función de la
fecha original de compra de la unidad.
Esta garantía le da ciertos derechos legales que pueden cambiar de un estado a otro. Su estado
puede también tener otros derechos a los que puede estar facultado y que no se enumeran en
esta garantía.
Información de Contacto
Puede contactar con FIRMAN en:
Dirección
Firman Power Equipment Inc.
Atención: Servicio al cliente
8716 W. Ludlow Dr. Suite #6
www.firmanpowerequipment.com
Peoria, AZ 85381
Somos FIRMAN POWER - y estamos aquí para usted.
42
Esta garantía no se aplicará a las partes y/o a la mano de obra si se considera que su producto ha
sido mal utilizado, descuidado, involucrado en un accidente, abusado, cargado más allá de los
límites del generador, modificado, instalado incorrectamente o conectado incorrectamente a
cualquier componente eléctrico. El mantenimiento normal no está cubierto por esta garantía.
Otras Exclusiones
Esta garantía excluye:
- Defectos cosméticos como pintura, calcomanías, etc.
- Los artículos de desgaste
- Partes accesorias
- Fallas debido a actos fortuitos y otros eventos de fuerza mayor más allá del control del fabricante
- Problemas causados por partes que no son originales de FIRMAN
- Unidades utilizadas como energía primaria en lugar de la energía de la compañía eléctrica existente
donde el servicio público está presente o en lugar de energía eléctrica donde normalmente no existe
el servicio.
SERVICIO - GARANTÍA
Español Servicio de atención al cliente: 1-844-FIRMAN1
Instalación, Uso Y Mantenimiento

DECLARACIÓN DE GARANTÍA DE CONTROL DE EMISIONES DE ESCAPE Y DE EVAPORACIÓN DE CALIFORNIA
Y DEL GOBIERNO FEDERAL
SUS DERECHOS Y OBLIGACIONES DE GARANTÍA
FIRMAN POWER EQUIPMENT INC.
Garantía Del Sistema De Control De Emisiones
El período de garantía comienza en la fecha en que el motor/equipo se entrega a un comprador final. FIRMAN garantiza
al comprador final y a los compradores subsiguientes que el motor está:
Diseñado, construido y equipado para cumplir con todas las regulaciones aplicables adoptadas por la Junta de Recursos
del Aire y la EPA de los EE.UU.; y libre de defectos de materiales y mano de obra que causen que la falla de una pieza en
garantía sea idéntica en todos los aspectos materiales a las partes descritas en la solicitud de certificación de los
fabricantes de motores.
La garantía de las piezas relacionadas con las emisiones es la siguiente:
COBERTURA DE LA GARANTÍA DEL FABRICANTE:
El sistema de control de emisiones de escape y de evaporación de su pequeño motor para uso fuera de la carretera
y de su equipo motorizado tiene una garantía de dos años. Si alguna pieza de su pequeño motor para uso fuera de
la carretera o de su equipo motorizado está defectuosa, será reparada o sustituida por FIRMAN.
RESPONSABILIDADES DE GARANTÍA DEL PROPIETARIO:
Como propietario de un SORE y de un equipo con motor, usted es responsable de la realización del mantenimiento
requerido que figura en su manual de instrucciones. FIRMAN le recomienda que conserve todos los recibos que
cubran el mantenimiento de su SORE y de sus equipos con motor, pero FIRMAN no puede negar la cobertura de la
garantía únicamente por la falta de recibos o por no haber asegurado la realización de todos los mantenimientos
programados.
Disposiciones De Garantía De Defectos De Control De Emisiones De Firman
43
SERVICIO - GARANTÍA
Español Servicio de atención al cliente: 1-844-FIRMAN1
El Consejo de Recursos Aéreos de California, la Agencia de Protección Ambiental de los Estados Unidos ("US EPA")
y FIRMAN POWER EQUIPMENT INC. (FIRMAN) se complacen en explicar la garantía de los sistemas de control de
emisiones de su pequeño equipo motorizado para uso fuera de carretera ("SORE") 2020-2021 o posterior.
En California, los nuevos equipos que utilizan pequeños motores para uso fuera de la carretera deben ser diseñados,
construidos y equipados para cumplir con los estrictos estándares anti-smog del Estado. FIRMAN debe garantizar
los sistemas de control de emisiones de su SORE y de los equipos accionados por motor durante los períodos de
tiempo que se indican a continuación, siempre que no haya habido abuso, negligencia o mantenimiento inadecuado
de su pequeño motor para uso fuera de la carretera o equipo que provoque el fallo del sistema de control de
emisiones. Su sistema de control de emisiones puede incluir partes como el carburador o el sistema de inyección
de combustible, el sistema de encendido, el sistema catalítico convertidor, tanques de combustible, líneas de
combustible (para combustible líquido y vapores de combustible), tapas de combustible, válvulas, bombonas, filtros,
lámparas y otros componentes asociados. También se incluyen las mangueras, correas, conectores y otros
ensamblajes relacionados con las emisiones. Cuando exista una condición cubierta por la garantía, FIRMAN
reparará su SORE y su equipo de motor sin costo alguno para usted incluyendo el diagnóstico, las partes y el trabajo
de mano de obra.
(1) Cualquier parte garantizada que no esté programada para ser reemplazada según el mantenimiento requerido
en el manual del propietario suministrado, está garantizada por el período de garantía indicado anteriormente. Si
alguna de estas partes falla durante el período de cobertura de la garantía, la pieza será reparada o reemplazada
por FIRMAN sin cargo alguno para el propietario. Cualquier pieza de este tipo que se repare o sustituya en virtud de
la garantía estará garantizada durante el período de garantía restante.
(2) Cualquier parte garantizada que esté programada solo para su inspección regular en el manual del propietario
suministrado, está garantizada por el período de garantía indicado anteriormente. Cualquier parte de este tipo
que se repare o reemplace bajo garantía estará garantizada durante el período de garantía restante.
(3) Cualquier parte garantizada que esté programada para ser reemplazada como mantenimiento requerido en el
manual del propietario suministrado, está garantizada por el período de tiempo anterior al primer punto de
sustitución programado para esa parte. Si la pieza falla antes del primer punto de sustitución programado, la pieza
será reparada o sustituida por FIRMAN sin cargo alguno para el propietario. Cualquier parte reparada o reemplazada
bajo garantía será garantizada por el resto del período anterior al primer punto de sustitución programado para la parte.

PIEZAS CUBIERTAS POR LA GARANTÍA
Limitaciones
A continuación se enumeran las piezas (si están equipadas) cubiertas por la Garantía del Sistema de Control de Emisiones Federal
y de California.
A continuación se enumeran las piezas (si están equipadas) cubiertas por la Garantía del Sistema de Control de
Emisiones Federal y de California. Esta Garantía del Sistema de Control de Emisiones no cubrirá ninguno de los
siguientes aspectos:
1. Sistema de ignición incluido:
- Bujía
- Bobina de ignición
2. Sistema de medición de combustible:
- Tanque de combustible
- Tapa de combustible
- Líneas de combustible (para combustible
líquido y vapores de combustible) y
accesorios/abrazaderas relacionadas
- Regulador de combustible, carburador
y partes internas.
3. Ensamble de silenciador catalítico, incluyendo:
- Sistema de escape
-
- Junta del silenciador
- Válvula de pulso
4. Sistema de inducción de aire incluido:
- Tubo/colector de entrada
- Limpiador de aire
5. Ensamble del respiradero del cárter, incluido:
- Tubo de conexión del respiradero
6. Sistema de control de las emisiones evaporativas
del tanque de combustible, incluido:
- Válvulas de purga
- Depósito de carbono
- Mangueras de vapor y pinzas de montaje.
Convertidor catalítico
FIRMAN POWER EQUIPMENT INC.
Correo electrónico: support@firmanpowerequipment.com
www.firmanpowerequipment.com
44
SERVICIO - GARANTÍA
Español Servicio de atención al cliente: 1-844-FIRMAN1
(4) La reparación o sustitución de cualquier parte garantizada bajo la garantía debe realizarse sin cargo para el
propietario en una estación de garantía.
(5) Sin perjuicio de lo dispuesto en el apartado (4) anterior, los servicios de garantía o las reparaciones deben ser
proporcionados por FIRMAN, que tienen franquicia para dar servicio a los motores en cuestión.
(6) No se debe cobrar al propietario por el trabajo de diagnóstico que conduzca a la determinación de que una
pieza garantizada está realmente defectuosa, siempre que dicho trabajo de diagnóstico se realice en una estación
de garantía.
(7) FIRMAN es responsable de los daños a otros componentes del motor que se produzcan de forma aproximada
por un fallo en la garantía de cualquier pieza garantizada.
(8) Durante todo el período de garantía de emisiones definido en la subsección (b)(2), FIRMAN mantendrá un
suministro departes suficientes para satisfacer la demanda prevista de dichas partes.
(9) Cualquier parte de reemplazo puede ser usada en la realización de cualquier mantenimiento o reparación de
garantía y debe ser proporcionada sin cargo al propietario. Tal uso no reducirá las obligaciones de garantía del
fabricante.
(10) No podrán utilizarse piezas adicionales o modificadas que no estén exentas por la Junta de Recursos del Aire.
El uso de cualquier pieza adicional o modificada no exenta por parte del comprador final será motivo para denegar
una reclamación de garantía. El fabricante no será responsable de garantizar las fallas de las partes garantizadas
causadas por el uso de un agregado no exento o parte modificada.
El fabricante no será responsable de garantizar fallas de partes garantizadas causadas por el uso de un complemento
o parte modificada no exenta.
(a) Daños consecuentes como pérdida de tiempo, inconvenientes, pérdida de uso del motor o del equipo, etc.
(b) Tarifas de diagnóstico e inspección que no resulten en la realización de un servicio de garantía elegible.

P/N:375747009 Rev:00
Todos los derechos reservados. Queda expresamente
prohibida la reimpresión o el uso no autorizado sin una
autorización por escrito.
SÍGUENOS EN LAS REDES SOCIALES
USO
PARA TENER LA OPORTUNIDAD DE GANAR UN SWAG DE FIRMAN
TM
FIRMAN POWER EQUIPMENT INC.
8716 W. LUDLOW DR. SUITE #6
WWW.FIRMANPOWEREQUIPMENT.COM
PEORIA, AZ 85381
1-844-347-6261
-
 1
1
-
 2
2
-
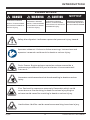 3
3
-
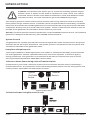 4
4
-
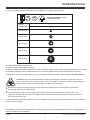 5
5
-
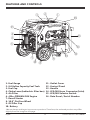 6
6
-
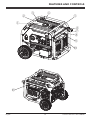 7
7
-
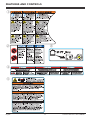 8
8
-
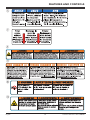 9
9
-
 10
10
-
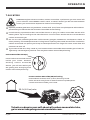 11
11
-
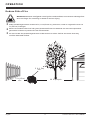 12
12
-
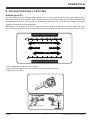 13
13
-
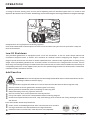 14
14
-
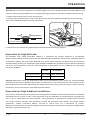 15
15
-
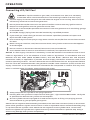 16
16
-
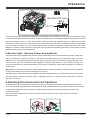 17
17
-
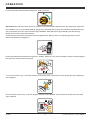 18
18
-
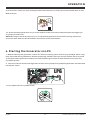 19
19
-
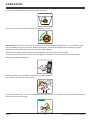 20
20
-
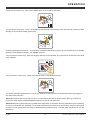 21
21
-
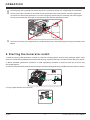 22
22
-
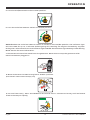 23
23
-
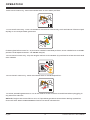 24
24
-
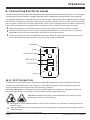 25
25
-
 26
26
-
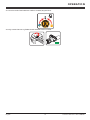 27
27
-
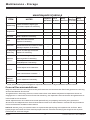 28
28
-
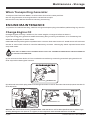 29
29
-
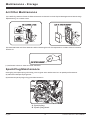 30
30
-
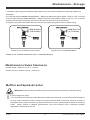 31
31
-
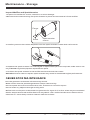 32
32
-
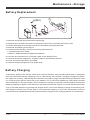 33
33
-
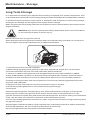 34
34
-
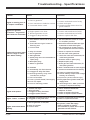 35
35
-
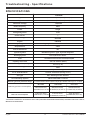 36
36
-
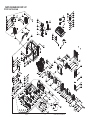 37
37
-
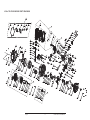 38
38
-
 39
39
-
 40
40
-
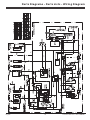 41
41
-
 42
42
-
 43
43
-
 44
44
-
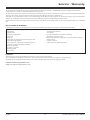 45
45
-
 46
46
-
 47
47
-
 48
48
-
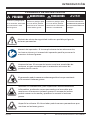 49
49
-
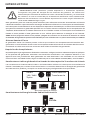 50
50
-
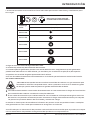 51
51
-
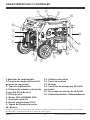 52
52
-
 53
53
-
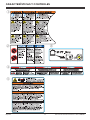 54
54
-
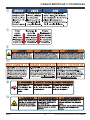 55
55
-
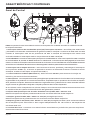 56
56
-
 57
57
-
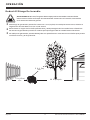 58
58
-
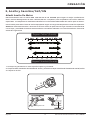 59
59
-
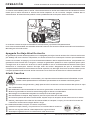 60
60
-
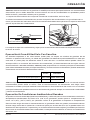 61
61
-
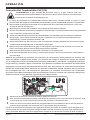 62
62
-
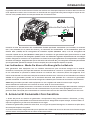 63
63
-
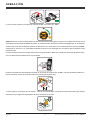 64
64
-
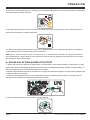 65
65
-
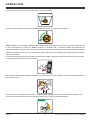 66
66
-
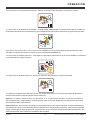 67
67
-
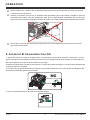 68
68
-
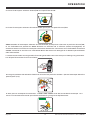 69
69
-
 70
70
-
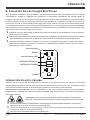 71
71
-
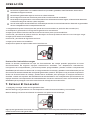 72
72
-
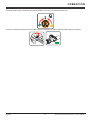 73
73
-
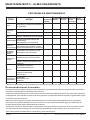 74
74
-
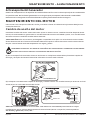 75
75
-
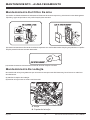 76
76
-
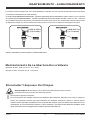 77
77
-
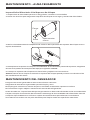 78
78
-
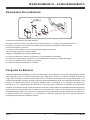 79
79
-
 80
80
-
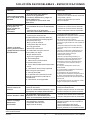 81
81
-
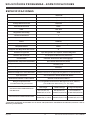 82
82
-
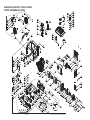 83
83
-
 84
84
-
 85
85
-
 86
86
-
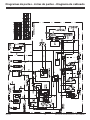 87
87
-
 88
88
-
 89
89
-
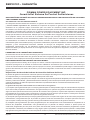 90
90
-
 91
91
-
 92
92


Firman T07571F Manual de usuario
- Categoría
- Generadores de poder
- Tipo
- Manual de usuario
en otros idiomas
- English: Firman T07571F User manual
Artículos relacionados
-
Firman P09301 Manual de usuario
-
Firman T08071 Manual de usuario
-
Firman WH03242 Manual de usuario
-
-
-
-
Firman T08072 Manual de usuario
-
-
-