Canon PIXMA iP110 El manual del propietario
- Categoría
- Relojes de alarma
- Tipo
- El manual del propietario
Este manual también es adecuado para

3
4
5
1
2
XXXXXXXX © CANON INC. 2016
4
1
1
5
3
4
2
2
c
b
b
a
a
8
3
4
6
7
1
2
3
1
1
2
3
a
b
c
a
a
a
a
a
b
b
b
b
b
a
c
a
b
ESPAÑOL
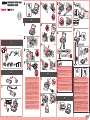
Aunque el interior del paquete y la tapa protectora estén manchados
de tinta, no afecta a la calidad de impresión. Tenga cuidado para no
mancharse de tinta.
Si la luz de Alarma (Alarm) parpadea, compruebe que el cabezal de
impresión y los depósitos de tinta están bien instalados.
Si la luz de Alarma (Alarm) parpadea, pulse el botón REANUDAR/
CANCELAR (RESUME/CANCEL) y continúe con
. La Alineación de los
cabezales de impresión (Print Head Alignment) también puede realizarse
después de la instalación.
PORTUGUÊS
Mesmo se o interior do pacote e se a tampa de proteção estiverem
manchados com a tinta, isso não afetará a qualidade de impressão.
Tenha cuidado para não se sujar com a tinta.
Se o indicador luminoso Alarme (Alarm) piscar, verique se a Cabeça de
Impressão e os cartuchos de tinta estão instalados corretamente.
Se o indicador luminoso Alarme (Alarm) piscar, pressione o botão
RETOMAR/CANCELAR (RESUME/CANCEL), então prossiga para
.
O Alinhamento da Cabeça de Impressão (Print Head Alignment) também
pode ser executado após a instalação.
ITALIANO
Anche se l'interno della confezione e il cappuccio protettivo sono
macchiati di inchiostro, la qualità di stampa non è compromessa.
Fare attenzione a non sporcarsi.
Se la spia di Allarme (Alarm) lampeggia, vericare che la Testina di
stampa e i serbatoi d'inchiostro siano correttamente installati.
Se la spia di Allarme (Alarm) lampeggia, premere il pulsante RIPRENDI/
ANNULLA (RESUME/CANCEL) e passare al punto
. È inoltre possibile
effettuare l'Allineamento testina di stampa (Print Head Alignment) dopo
l'installazione.
NEDERLANDS
Zelfs als de binnenkant van de verpakking en het beschermkapje
inktvlekken bevatten, is dit niet van invloed op de afdrukkwaliteit. Pas
op dat u niet vuil wordt van de inkt.
Als het Alarm-lampje knippert, controleert u of de printkop en de inkttanks
correct zijn geïnstalleerd.
Als het Alarm-lampje knippert, drukt u op de knop HERVATTEN/
ANNULEREN (RESUME/CANCEL) en gaat u verder met
. Uitlijning
printkop (Print Head Alignment) kan ook na de installatie worden uitgevoerd.
DEUTSCH
Auch wenn die Innenseite der Verpackung und die Schutzkappe mit
Tinte verschmutzt sind, hat dies keinen Einuss auf die Druckqualität.
Achten Sie darauf, dass keine Tinte auf Ihre Kleidung oder Haut
gelangt.
Wenn die Alarm-Anzeige blinkt, überprüfen Sie, ob der Druckkopf und die
Tintenpatronen ordnungsgemäß eingesetzt sind.
Wenn die Alarm-Anzeige blinkt, drücken Sie die Taste FORTSETZEN/
ABBRECHEN (RESUME/CANCEL), und fahren Sie mit
fort. Die
Druckkopfausrichtung (Print Head Alignment) kann auch nach der
Installation durchgeführt werden.
FRANÇAIS
Même si l'intérieur de l'emballage et la capsule de protection sont
tachés par de l'encre, cela n'affecte pas la qualité d'impression.
Veillez à ne pas mettre d'encre sur vous.
Si le voyant Alarme (Alarm) clignote, vériez que la tête d'impression et
les cartouches d'encre sont correctement installées.
Si le voyant Alarme (Alarm) clignote, appuyez sur le bouton REPRENDRE/
ANNULER (RESUME/CANCEL), puis passez à
. La fonction Alignement
tête d'impression peut également être effectuée après l'installation.
ENGLISH
Even if the inside of the package and protective cap are stained with
the ink, it does not affect the print quality. Be careful not to get ink on
yourself.
If the Alarm lamp ashes, check that the Print Head and ink tanks are
installed correctly.
If the Alarm lamp ashes, press the RESUME/CANCEL button, then
proceed to
. Print Head Alignment can also be performed after
installation.
QT6-1445-V01
PRINTED IN XXXXXXXX
RMC : K10404

6
1
2
3
4
Windows
3
a
a
b
b
5
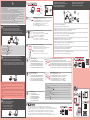
Haga clic en Descargar (Download) para descargar el software para la conexión.
Siga las instrucciones que aparecen en pantalla para seguir con la instalación.
Ejecute el archivo descargado y, a continuación, haga clic en Siguiente (Next).
Conguración
Cambio del método de conexión
Seleccione Conexión de LAN inalámbrica (Wireless LAN Connection).
Seleccione Conexión mediante punto de acceso (recomendada) (Access Point Connection (recommended)) y haga clic en Siguiente (Next).
Seleccione Conexión USB (USB Connection).
Seleccione Conexión directa (Direct Connection) y haga clic en Siguiente (Next).Seleccione Conexión de LAN inalámbrica (Wireless LAN Connection).
Si normalmente utiliza la impresora mediante un enrutador inalámbrico y desea usarla sin el enrutador, cambie el método de conexión a la conexión directa. Para obtener
información sobre el cambio del método de conexión, consulte el Manual en línea a continuación.
"Cambio del método de conexión entre el equipo y un teléfono inteligente/ordenador"
No puede conectar el ordenador a Internet inalámbricamente durante la conexión de la impresora al ordenador
directamente.
Si conecta la impresora a un ordenador y a un teléfono inteligente/una tableta, conéctela primero al ordenador. Para
conectar la impresora solo a un teléfono inteligente/una tableta, consulte el número
.
Conexión de la impresora mediante un enrutador inalámbrico (Conexión mediante punto de acceso)
Conexión de la impresora con un cable USB
Conexión de la impresora mediante la conexión LAN inalámbrica directamente (Conexión directa)
Si no puede seleccionar Conexión directa (Direct Connection), su ordenador ya se ha conectado al enrutador inalámbrico. Conecte la
impresora en el método
.
Puede cambiar el método a
posteriormente.
Si usa un teléfono inteligente/una tableta, descargue Canon PRINT Inkjet/SELPHY para conectar el teléfono inteligente/la tableta a la impresora.
Clique em Download para baixar o software para a conexão.
Siga as instruções da tela para continuar a conguração.
Inicie o arquivo transferido e clique em Avançar (Next).
Conguração
Alteração do método de conexão
Selecione Conexão de LAN sem-o (Wireless LAN Connection).
Selecione Conexão do Ponto de Acesso (recomendado) (Access Point Connection (recommended)) e clique em Avançar (Next).
Selecione Conexão USB (USB Connection).
Selecione Conexão direta (Direct Connection) e clique em Avançar (Next).
Selecione Conexão de LAN sem-o (Wireless LAN Connection).
Se normalmente você usa a impressora através de um roteador sem o e deseja usá-la sem o roteador, altere o método de conexão para conexão direta. Para obter mais
informações sobre a alteração do método de conexão, consulte o Manual On-line abaixo.
"Alterando o Método de Conexão entre a Máquina e o Smartphone/Computador"
Não é possível conectar um computador à Internet sem o durante a conexão direta da impressora ao computador.
Se você conectar a impressora a um computador e a um smartphone/tablet, conecte-a ao computador primeiro. Para
conectar a impressora somente a um smartphone ou tablet, consulte
.
Conectando a impressora através de um roteador sem o (Conexão do Ponto de Acesso)
Conexão da impressora com um cabo USB
Conectando a impressora diretamente a um dispositivo via conexão de LAN sem o (Conexão direta)
Não é possível selecionar a Conexão direta (Direct Connection) pois o computador já está conectado ao roteador sem o. Conectar a
impressora no método
.
Você pode alterar o método para
posteriormente.
Se você usa um smartphone/tablet, baixe o Canon PRINT Inkjet/SELPHY para conectar o smartphone/tablet à impressora.
Fare clic su Scarica (Download) per scaricare il software per la connessione.
Seguire le istruzioni a video per continuare l'impostazione.
Eseguire il le scaricato e fare clic su Avanti (Next).
Impostazione
Modifica del metodo di connessione
Selezionare Connessione rete wireless (Wireless LAN Connection).
Selezionare Connessione a punto di accesso (consigliata) (Access Point Connection (recommended)) e fare clic su Avanti (Next).
Selezionare Connessione USB (USB Connection).
Selezionare Connessione diretta (Direct Connection) e fare clic su Avanti (Next).
Selezionare Connessione rete wireless (Wireless LAN Connection).
Se solitamente si utilizza la stampante tramite un router wireless e ora si desidera utilizzarla senza il router, scegliere la connessione diretta come metodo di connessione. Per
informazioni sulla modica del metodo di connessione, fare riferimento al Manuale online di seguito.
"Modicare il metodo di connessione fra la macchina e lo smartphone/computer"
Non è possibile connettere il computer a Internet in modalità wireless mentre la stampante è connessa direttamente al
computer.
Se si connette la stampante sia a un computer che a uno smartphone o un tablet, innanzitutto connetterla al computer. Per
connettere la stampante solo a uno smartphone o un tablet, fare riferimento a
.
Connessione della stampante tramite un router wireless (Connessione a punto di accesso)
Connessione della stampante tramite cavo USB
Connessione diretta della stampante tramite una connessione LAN wireless (Connessione diretta)
Se non si riesce a selezionare Connessione diretta (Direct Connection), signica che il computer è già connesso al router wireless.
Connettere la stampante con il metodo
.
È possibile passare al metodo
in un secondo momento.
Se si utilizza uno smartphone o un tablet, scaricare Canon PRINT Inkjet/SELPHY per connettere lo smartphone o il tablet alla stampante.
Klik op Downloaden (Download) om de software voor de verbinding te downloaden.
Volg de instructies op het scherm om door te gaan met de instelling.
Start het gedownloade bestand en klik op Volgende (Next).
Installatie
De verbindingsmethode wijzigen
Selecteer Draadloze LAN-verbinding (Wireless LAN Connection).
Selecteer Verbinding met toegangspunt (aanbevolen) (Access Point Connection (recommended)) en klik op Volgende (Next).
Selecteer USB-aansluiting (USB Connection).
Selecteer Directe verbinding (Direct Connection) en klik op Volgende (Next).
Selecteer Draadloze LAN-verbinding (Wireless LAN Connection).
Als u de printer gewoonlijk gebruikt via een draadloze router en hem zonder de router wilt gebruiken, wijzigt u de verbindingsmethode in directe verbinding. Raadpleeg de
Online handleiding hieronder voor informatie over het wijzigen van de verbindingsmethode.
'De verbindingsmethode tussen het apparaat en een computer/smartphone wijzigen'
U kunt de computer niet draadloos met internet verbinden terwijl de printer rechtstreeks met de computer is verbonden.
Als u de printer verbindt met zowel een computer als een smartphone/tablet, dient u de printer eerst met de computer te
verbinden. Als u de printer alleen met een smartphone/tablet wilt verbinden, raadpleegt u
.
De printer verbinden via een draadloze router (Verbinding met toegangspunt)
De printer met een USB-kabel aansluiten
De printer rechtstreeks verbinden via een draadloze LAN-verbinding (Directe verbinding)
Als u Directe verbinding (Direct Connection) niet kunt selecteren, is de computer al verbonden met de draadloze router. Verbind
de printer met de methode
.
U kunt de methode later wijzigen in
.
Als u een smartphone/tablet gebruikt, download u Canon PRINT Inkjet/SELPHY om de smartphone/tablet met de printer te verbinden.
Klicken Sie auf Herunterladen (Download), um die Software für die Verbindung herunterzuladen.
Befolgen Sie die Anweisungen auf dem Bildschirm, um mit der Einstellung fortzufahren.
Starten Sie die heruntergeladene Datei und klicken Sie dann auf Weiter (Next).
Einrichtung
Ändern der Verbindungsmethode
Wählen Sie Drahtlose LAN-Verbindung (Wireless LAN Connection).
Wählen Sie Zugangspunktverbindung (empfohlen) (Access Point Connection (recommended)) und klicken Sie auf Weiter (Next).
Wählen Sie USB-Verbindung (USB Connection).
Wählen Sie Direktee Verbindung (Direct Connection) und klicken Sie auf Weiter (Next).Wählen Sie Drahtlose LAN-Verbindung (Wireless LAN Connection).
Wenn Sie den Drucker normalerweise über einen Wireless Router verwenden und ihn nun ohne Router verwenden möchten, ändern Sie die Verbindungsmethode in direkte
Verbindung. Informationen zum Ändern der Verbindungsmethode nden Sie im Online-Handbuch unten.
"Ändern der Verbindungsmethode zwischen Gerät und Smartphone/Computer"
Sie können Ihren Computer nicht drahtlos mit dem Internet verbinden, während Sie den Drucker direkt mit dem
Computer verbinden.
Wenn Sie den Drucker sowohl mit einem Computer als auch mit einem Smartphone/Tablet verbinden möchten, verbinden
Sie ihn zuerst mit dem Computer. Um den Drucker nur mit einem Smartphone/Tablet zu verbinden, siehe
.
Verbinden des Druckers über einen Wireless Router (Zugangspunktverbindung)
Verbinden des Druckers über ein USB-Kabel
Direkte Verbindung des Druckers über WLAN-Verbindung (Direktee Verbindung)
Wenn Sie Direktee Verbindung (Direct Connection) nicht wählen können, ist Ihr Computer bereits mit dem Wireless Router verbunden.
Schließen Sie den Drucker nach Methode
an.
Sie können die Methode später in
ändern.
Wenn Sie ein Smartphone/Tablet verwenden, laden Sie Canon PRINT Inkjet/SELPHY herunter, um das Smartphone/Tablet mit dem Drucker zu verbinden.
Cliquez sur Télécharger pour télécharger le logiciel pour la connexion.
Suivez les instructions à l'écran pour continuer le paramétrage.
Démarrez le chier téléchargé, puis cliquez sur Suivant.
Conguration
Modification de la méthode de connexion
Sélectionnez Connexion réseau sans l. Sélectionnez Connexion à un point d'accès (recommandé) et cliquez sur Suivant.
Sélectionnez Connexion USB.
Sélectionnez Connexion directe et cliquez sur Suivant.Sélectionnez Connexion réseau sans l.
Si vous utilisez habituellement l'imprimante via un routeur sans l et que vous voulez l'utiliser sans le routeur, changez la méthode de connexion en connexion directe. Pour
plus d'informations sur le changement de méthode de connexion, reportez-vous au Manuel en ligne ci-dessous.
« Modication de la méthode de connexion entre la machine et un smartphone/ordinateur »
Vous ne pouvez pas connecter sans l votre ordinateur à Internet pendant que vous connectez directement l'imprimante
à l'ordinateur.
Si vous connectez l'imprimante à l'ordinateur et à un smartphone/une tablette, connectez-la d'abord à l'ordinateur. Pour
connecter l'imprimante uniquement à un smartphone/une tablette, reportez-vous à l'étape
.
Connexion de l'imprimante via un routeur sans l (Connexion à un point d'accès)
Connexion de l'imprimante à l'aide d'un câble USB
Connexion directe de l'imprimante via une connexion réseau sans l (Connexion directe)
Si vous ne pouvez pas sélectionner Connexion directe, votre ordinateur a déjà été connecté au routeur sans l. Connectez l'imprimante
selon la méthode
.
Vous pouvez changer la méthode en
ultérieurement.
Si vous utilisez un smartphone/une tablette, téléchargez Canon PRINT Inkjet/SELPHY pour connecter le smartphone/la tablette à l'imprimante.
Connecting the printer via a wireless router (Access Point Connection)
Click Download to download the software for connection.
Follow the on-screen instructions to proceed the setting.
Start up the downloaded le, and then click Next.
Connecting the printer with a USB cable
Connecting the printer via wireless LAN connection directly (Direct Connection)
If you usually use the printer via a wireless router and want to use it without the router, change the connection method to the direct connection. For information about changing
the connection method, refer to the Online Manual below.
"Changing Connection Method between Machine and Smartphone/Computer"
Setup
Select Wireless LAN Connection.
Select USB Connection.
Select Access Point Connection (recommended) and click Next.
Select Direct Connection and click Next.
Changing the connection method
If you cannot select Direct Connection, your computer has already connected to the wireless router. Connect the printer in the
method.
Select Wireless LAN Connection.
If you connect the printer to both a computer and a smartphone/tablet, connect it to the computer rst. To connect the printer
only to a smartphone/tablet, refer to
.
You can change the method to
later.
You cannot connect your computer to the Internet wirelessly during connecting the printer to the computer directly.
If you use a smartphone/tablet, download the Canon PRINT Inkjet/SELPHY to connect the smartphone/tablet to the printer.
Transcripción de documentos
ENGLISH FRANÇAIS DEUTSCH ITALIANO PORTUGUÊS ESPAÑOL NEDERLANDS 4 5 a b 3 a b a b 1 3 1 c 6 3 4 RMC : K10404 2 2 1 7 a 3 b 8 4 a b If the Alarm lamp flashes, check that the Print Head and ink tanks are installed correctly. 2 1 a b 2 Zelfs als de binnenkant van de verpakking en het beschermkapje inktvlekken bevatten, is dit niet van invloed op de afdrukkwaliteit. Pas op dat u niet vuil wordt van de inkt. Anche se l'interno della confezione e il cappuccio protettivo sono macchiati di inchiostro, la qualità di stampa non è compromessa. Fare attenzione a non sporcarsi. b Mesmo se o interior do pacote e se a tampa de proteção estiverem manchados com a tinta, isso não afetará a qualidade de impressão. Tenha cuidado para não se sujar com a tinta. a Aunque el interior del paquete y la tapa protectora estén manchados de tinta, no afecta a la calidad de impresión. Tenga cuidado para no mancharse de tinta. c QT6-1445-V01 XXXXXXXX © CANON INC. 2016 1 Als het Alarm-lampje knippert, controleert u of de printkop en de inkttanks correct zijn geïnstalleerd. Se la spia di Allarme (Alarm) lampeggia, verificare che la Testina di stampa e i serbatoi d'inchiostro siano correttamente installati. Se o indicador luminoso Alarme (Alarm) piscar, verifique se a Cabeça de Impressão e os cartuchos de tinta estão instalados corretamente. Auch wenn die Innenseite der Verpackung und die Schutzkappe mit Tinte verschmutzt sind, hat dies keinen Einfluss auf die Druckqualität. Achten Sie darauf, dass keine Tinte auf Ihre Kleidung oder Haut gelangt. b 3 Wenn die Alarm-Anzeige blinkt, überprüfen Sie, ob der Druckkopf und die Tintenpatronen ordnungsgemäß eingesetzt sind. Même si l'intérieur de l'emballage et la capsule de protection sont tachés par de l'encre, cela n'affecte pas la qualité d'impression. Veillez à ne pas mettre d'encre sur vous. c a Si le voyant Alarme (Alarm) clignote, vérifiez que la tête d'impression et les cartouches d'encre sont correctement installées. 4 Even if the inside of the package and protective cap are stained with the ink, it does not affect the print quality. Be careful not to get ink on yourself. PRINTED IN XXXXXXXX Si la luz de Alarma (Alarm) parpadea, compruebe que el cabezal de impresión y los depósitos de tinta están bien instalados. 2 a If the Alarm lamp flashes, press the RESUME/CANCEL button, then proceed to . Print Head Alignment can also be performed after installation. Si le voyant Alarme (Alarm) clignote, appuyez sur le bouton REPRENDRE/ ANNULER (RESUME/CANCEL), puis passez à . La fonction Alignement tête d'impression peut également être effectuée après l'installation. Wenn die Alarm-Anzeige blinkt, drücken Sie die Taste FORTSETZEN/ ABBRECHEN (RESUME/CANCEL), und fahren Sie mit fort. Die Druckkopfausrichtung (Print Head Alignment) kann auch nach der Installation durchgeführt werden. Als het Alarm-lampje knippert, drukt u op de knop HERVATTEN/ ANNULEREN (RESUME/CANCEL) en gaat u verder met . Uitlijning printkop (Print Head Alignment) kan ook na de installatie worden uitgevoerd. a b 5 1 Se la spia di Allarme (Alarm) lampeggia, premere il pulsante RIPRENDI/ ANNULLA (RESUME/CANCEL) e passare al punto . È inoltre possibile effettuare l'Allineamento testina di stampa (Print Head Alignment) dopo l'installazione. Se o indicador luminoso Alarme (Alarm) piscar, pressione o botão RETOMAR/CANCELAR (RESUME/CANCEL), então prossiga para . O Alinhamento da Cabeça de Impressão (Print Head Alignment) também pode ser executado após a instalação. Si la luz de Alarma (Alarm) parpadea, pulse el botón REANUDAR/ CANCELAR (RESUME/CANCEL) y continúe con . La Alineación de los cabezales de impresión (Print Head Alignment) también puede realizarse después de la instalación. 6 1 Setup Configuration If you connect the printer to both a computer and a smartphone/tablet, connect it to the computer first. To connect the printer only to a smartphone/tablet, refer to . Einrichtung Si vous connectez l'imprimante à l'ordinateur et à un smartphone/une tablette, connectez-la d'abord à l'ordinateur. Pour connecter l'imprimante uniquement à un smartphone/une tablette, reportez-vous à l'étape . Impostazione Se si connette la stampante sia a un computer che a uno smartphone o un tablet, innanzitutto connetterla al computer. Per connettere la stampante solo a uno smartphone o un tablet, fare riferimento a . Se você conectar a impressora a um computador e a um smartphone/tablet, conecte-a ao computador primeiro. Para conectar a impressora somente a um smartphone ou tablet, consulte . Configuração Windows Configuración 2 Click Download to download the software for connection. Cliquez sur Télécharger pour télécharger le logiciel pour la connexion. Klicken Sie auf Herunterladen (Download), um die Software für die Verbindung herunterzuladen. Si conecta la impresora a un ordenador y a un teléfono inteligente/una tableta, conéctela primero al ordenador. Para conectar la impresora solo a un teléfono inteligente/una tableta, consulte el número . Klik op Downloaden (Download) om de software voor de verbinding te downloaden. Fare clic su Scarica (Download) per scaricare il software per la connessione. Connecting the printer via a wireless router (Access Point Connection) Connexion de l'imprimante via un routeur sans fil (Connexion à un point d'accès) Clique em Download para baixar o software para a conexão. If you usually use the printer via a wireless router and want to use it without the router, change the connection method to the direct connection. For information about changing the connection method, refer to the Online Manual below. Haga clic en Descargar (Download) para descargar el software para la conexión. "Changing Connection Method between Machine and Smartphone/Computer" Si vous utilisez habituellement l'imprimante via un routeur sans fil et que vous voulez l'utiliser sans le routeur, changez la méthode de connexion en connexion directe. Pour plus d'informations sur le changement de méthode de connexion, reportez-vous au Manuel en ligne ci-dessous. Verbinden des Druckers über einen Wireless Router (Zugangspunktverbindung) De printer verbinden via een draadloze router (Verbinding met toegangspunt) Connessione della stampante tramite un router wireless (Connessione a punto di accesso) Conectando a impressora através de um roteador sem fio (Conexão do Ponto de Acesso) 3 Conexión de la impresora mediante un enrutador inalámbrico (Conexión mediante punto de acceso) Start up the downloaded file, and then click Next. « Modification de la méthode de connexion entre la machine et un smartphone/ordinateur » Démarrez le fichier téléchargé, puis cliquez sur Suivant. Starten Sie die heruntergeladene Datei und klicken Sie dann auf Weiter (Next). Wenn Sie den Drucker normalerweise über einen Wireless Router verwenden und ihn nun ohne Router verwenden möchten, ändern Sie die Verbindungsmethode in direkte Verbindung. Informationen zum Ändern der Verbindungsmethode finden Sie im Online-Handbuch unten. Start het gedownloade bestand en klik op Volgende (Next). "Ändern der Verbindungsmethode zwischen Gerät und Smartphone/Computer" Eseguire il file scaricato e fare clic su Avanti (Next). You can change the method to later. ultérieurement. Vous pouvez changer la méthode en Sie können die Methode später in È possibile passare al metodo Puede cambiar el método a 4 Als u de printer gewoonlijk gebruikt via een draadloze router en hem zonder de router wilt gebruiken, wijzigt u de verbindingsmethode in directe verbinding. Raadpleeg de Online handleiding hieronder voor informatie over het wijzigen van de verbindingsmethode. Ejecute el archivo descargado y, a continuación, haga clic en Siguiente (Next). 'De verbindingsmethode tussen het apparaat en een computer/smartphone wijzigen' "Modificare il metodo di connessione fra la macchina e lo smartphone/computer" Follow the on-screen instructions to proceed the setting. Befolgen Sie die Anweisungen auf dem Bildschirm, um mit der Einstellung fortzufahren. Se normalmente você usa a impressora através de um roteador sem fio e deseja usá-la sem o roteador, altere o método de conexão para conexão direta. Para obter mais informações sobre a alteração do método de conexão, consulte o Manual On-line abaixo. Volg de instructies op het scherm om door te gaan met de instelling. "Alterando o Método de Conexão entre a Máquina e o Smartphone/Computador" Seguire le istruzioni a video per continuare l'impostazione. Siga as instruções da tela para continuar a configuração. Si normalmente utiliza la impresora mediante un enrutador inalámbrico y desea usarla sin el enrutador, cambie el método de conexión a la conexión directa. Para obtener información sobre el cambio del método de conexión, consulte el Manual en línea a continuación. Siga las instrucciones que aparecen en pantalla para seguir con la instalación. "Cambio del método de conexión entre el equipo y un teléfono inteligente/ordenador" Suivez les instructions à l'écran pour continuer le paramétrage. . in un secondo momento. Você pode alterar o método para Inicie o arquivo transferido e clique em Avançar (Next). Se solitamente si utilizza la stampante tramite un router wireless e ora si desidera utilizzarla senza il router, scegliere la connessione diretta come metodo di connessione. Per informazioni sulla modifica del metodo di connessione, fare riferimento al Manuale online di seguito. ändern. U kunt de methode later wijzigen in posteriormente. posteriormente. Connecting the printer via wireless LAN connection directly (Direct Connection) Connexion directe de l'imprimante via une connexion réseau sans fil (Connexion directe) a Direkte Verbindung des Druckers über WLAN-Verbindung (Direktee Verbindung) De printer rechtstreeks verbinden via een draadloze LAN-verbinding (Directe verbinding) Connessione diretta della stampante tramite una connessione LAN wireless (Connessione diretta) Conectando a impressora diretamente a um dispositivo via conexão de LAN sem fio (Conexão direta) Conexión de la impresora mediante la conexión LAN inalámbrica directamente (Conexión directa) a You cannot connect your computer to the Internet wirelessly during connecting the printer to the computer directly. Select Wireless LAN Connection. Sélectionnez Connexion réseau sans fil. Selecteer Verbinding met toegangspunt (aanbevolen) (Access Point Connection (recommended)) en klik op Volgende (Next). Selezionare Connessione rete wireless (Wireless LAN Connection). Selezionare Connessione a punto di accesso (consigliata) (Access Point Connection (recommended)) e fare clic su Avanti (Next). Selecione Conexão de LAN sem-fio (Wireless LAN Connection). Selecione Conexão do Ponto de Acesso (recomendado) (Access Point Connection (recommended)) e clique em Avançar (Next). Seleccione Conexión de LAN inalámbrica (Wireless LAN Connection). Seleccione Conexión mediante punto de acceso (recomendada) (Access Point Connection (recommended)) y haga clic en Siguiente (Next). Select Wireless LAN Connection. Sélectionnez Connexion réseau sans fil. Select Direct Connection and click Next. Sélectionnez Connexion directe et cliquez sur Suivant. Wählen Sie Direktee Verbindung (Direct Connection) und klicken Sie auf Weiter (Next). Selecteer Draadloze LAN-verbinding (Wireless LAN Connection). Selecteer Directe verbinding (Direct Connection) en klik op Volgende (Next). Selezionare Connessione rete wireless (Wireless LAN Connection). Selezionare Connessione diretta (Direct Connection) e fare clic su Avanti (Next). Selecione Conexão de LAN sem-fio (Wireless LAN Connection). Selecione Conexão direta (Direct Connection) e clique em Avançar (Next). Seleccione Conexión de LAN inalámbrica (Wireless LAN Connection). Seleccione Conexión directa (Direct Connection) y haga clic en Siguiente (Next). If you cannot select Direct Connection, your computer has already connected to the wireless router. Connect the printer in the method. Si vous ne pouvez pas sélectionner Connexion directe, votre ordinateur a déjà été connecté au routeur sans fil. Connectez l'imprimante selon la méthode . Wenn Sie Direktee Verbindung (Direct Connection) nicht wählen können, ist Ihr Computer bereits mit dem Wireless Router verbunden. Schließen Sie den Drucker nach Methode an. Select USB Connection. Não é possível conectar um computador à Internet sem fio durante a conexão direta da impressora ao computador. Sélectionnez Connexion USB. Wählen Sie USB-Verbindung (USB Connection). No puede conectar el ordenador a Internet inalámbricamente durante la conexión de la impresora al ordenador directamente. Selecteer USB-aansluiting (USB Connection). Selezionare Connessione USB (USB Connection). Selecione Conexão USB (USB Connection). Connecting the printer with a USB cable Als u Directe verbinding (Direct Connection) niet kunt selecteren, is de computer al verbonden met de draadloze router. Verbind de printer met de methode . Se non si riesce a selezionare Connessione diretta (Direct Connection), significa che il computer è già connesso al router wireless. Connettere la stampante con il metodo . Não é possível selecionar a Conexão direta (Direct Connection) pois o computador já está conectado ao roteador sem fio. Conectar a impressora no método . Si no puede seleccionar Conexión directa (Direct Connection), su ordenador ya se ha conectado al enrutador inalámbrico. Conecte la impresora en el método . Seleccione Conexión USB (USB Connection). Connexion de l'imprimante à l'aide d'un câble USB Conexión de la impresora con un cable USB b Wählen Sie Drahtlose LAN-Verbindung (Wireless LAN Connection). Non è possibile connettere il computer a Internet in modalità wireless mentre la stampante è connessa direttamente al computer. Conexão da impressora com um cabo USB Sélectionnez Connexion à un point d'accès (recommandé) et cliquez sur Suivant. Wählen Sie Zugangspunktverbindung (empfohlen) (Access Point Connection (recommended)) und klicken Sie auf Weiter (Next). U kunt de computer niet draadloos met internet verbinden terwijl de printer rechtstreeks met de computer is verbonden. Connessione della stampante tramite cavo USB Select Access Point Connection (recommended) and click Next. Selecteer Draadloze LAN-verbinding (Wireless LAN Connection). Sie können Ihren Computer nicht drahtlos mit dem Internet verbinden, während Sie den Drucker direkt mit dem Computer verbinden. De printer met een USB-kabel aansluiten b Wählen Sie Drahtlose LAN-Verbindung (Wireless LAN Connection). Vous ne pouvez pas connecter sans fil votre ordinateur à Internet pendant que vous connectez directement l'imprimante à l'ordinateur. Verbinden des Druckers über ein USB-Kabel Modifica del metodo di connessione Alteração do método de conexão Cambio del método de conexión 3 Installatie Wenn Sie den Drucker sowohl mit einem Computer als auch mit einem Smartphone/Tablet verbinden möchten, verbinden Sie ihn zuerst mit dem Computer. Um den Drucker nur mit einem Smartphone/Tablet zu verbinden, siehe . Als u de printer verbindt met zowel een computer als een smartphone/tablet, dient u de printer eerst met de computer te verbinden. Als u de printer alleen met een smartphone/tablet wilt verbinden, raadpleegt u . C h anging the connection method M odification de la méthode de connexion Ä ndern der Verbindungsmethode D e verbindingsmethode wijzigen 5 If you use a smartphone/tablet, download the Canon PRINT Inkjet/SELPHY to connect the smartphone/tablet to the printer. Si vous utilisez un smartphone/une tablette, téléchargez Canon PRINT Inkjet/SELPHY pour connecter le smartphone/la tablette à l'imprimante. Wenn Sie ein Smartphone/Tablet verwenden, laden Sie Canon PRINT Inkjet/SELPHY herunter, um das Smartphone/Tablet mit dem Drucker zu verbinden. Als u een smartphone/tablet gebruikt, download u Canon PRINT Inkjet/SELPHY om de smartphone/tablet met de printer te verbinden. Se si utilizza uno smartphone o un tablet, scaricare Canon PRINT Inkjet/SELPHY per connettere lo smartphone o il tablet alla stampante. Se você usa um smartphone/tablet, baixe o Canon PRINT Inkjet/SELPHY para conectar o smartphone/tablet à impressora. Si usa un teléfono inteligente/una tableta, descargue Canon PRINT Inkjet/SELPHY para conectar el teléfono inteligente/la tableta a la impresora.-
 1
1
-
 2
2


Canon PIXMA iP110 El manual del propietario
- Categoría
- Relojes de alarma
- Tipo
- El manual del propietario
- Este manual también es adecuado para
en otros idiomas
- français: Canon PIXMA iP110 Le manuel du propriétaire
- italiano: Canon PIXMA iP110 Manuale del proprietario
- English: Canon PIXMA iP110 Owner's manual
- Deutsch: Canon PIXMA iP110 Bedienungsanleitung
- Nederlands: Canon PIXMA iP110 de handleiding
- português: Canon PIXMA iP110 Manual do proprietário
Artículos relacionados
-
Canon PIXMA TS8000 serie Manual de usuario
-
Canon PIXMA TS6052 Manual de usuario
-
Canon PIXMA TS5053 Manual de usuario
-
Canon PIXMA TS6150 Manual de usuario
-
Canon PIXMA TR7550 Manual de usuario
-
Canon PIXMA PRO-10S Manual de usuario
-
Canon PIXMA PRO-100S Manual de usuario
-
Canon PIXMA TS8140 El manual del propietario
-
Canon PIXMA TS3151 Manual de usuario
-
Canon Pixma TS8240 - Mac El manual del propietario