Kenmore Elite 71329 El manual del propietario
- Categoría
- Neveras
- Tipo
- El manual del propietario
Este manual también es adecuado para

Models/Modelos: 795.7132*
*
= color number, número de color.
Use & Care Guide
Manual de Uso y Cuidado
P/N MFL67851503-6
Transform SR Brands Management LLC
Hoçman Estates, IL 60179 U.S.A.
Kenmore Elite®
Congelador Inferior Refrigera rod
www.kenmore.com
®
Bottom Freezer Refrigerator

2
TABLE OF CONTENTS
Warranty............................................................................. 3
Product Record
............................................................... 4
Important Safety Instructions
........................... 4-6
Electrical & Grounding Requirements
..............7
Parts and Features
....................................................... 8
Refrigerator Installation ..............................9-17
Unpacking Your Refrigerator ..........................9
Installation
.................................................................... 10
Dimensions and ClearDnces..................................9
Removing/Replacing Refrigerator and
Freezer Handles, Doors and Drawers
....... 11-16
Leveling and Door Alignment ......................17
Using Your Refrigerator ............................18-26
Setting the Controls ..................................18-19
Automatic Icemaker ..................................... 20
Food Storage Guide ..................................... 21
Refrigerator Section
Water Dispenser ........................................... 22
Refrigerator Shelves
................................................23
Humidity Controlled Crisper ........................ 23
Pantry Drawer ..................................................24
Door Bins ..........................................................24
Dairy Bin ......................................................... 24
Freezer Section
Durabase ........................................................ 25
Ice Bin............................................................. 24
Durabase Divider .......................................... 25
Pullout Drawer ............................................... 25
Water Filter ............................................... 26-29
Care and Cleaning .................................... 30-31
General Cleaning Tips ................................ 30
Connecting the Water Line ...................... 32-34
T
Service................................................Back Cover
roubleshooting Guide ............................. 35-41

3
:$55$17<
5()5,*(5$725:$55$17<
.(1025((/,7(/,0,7(':$55$17<
WITH PROOF OF SALE, the following warranty coverage applies when this appliance is correctly installed, operated and maintained according to
all supplied instructions.
2QH<HDURQ$SSOLDQFH
FOR ONE YEAR from the date of sale this appliance is warranted against defects in material or workmanship. A defective appliance will receive free
repair. If the appliance cannot be repaired it will be replaced free of charge. This warranty coverage applies for only 90 days from the sale date if
the appliance is ever used for other than private household purposes.
Five Years on Sealed Refrigerant System
FOR FIVE YEARS from the date of sale, the sealed refrigerant system of this appliance is warranted against defects in material or workmanship.* If
DV\VWHPSDUWLVGHIHFWLYHZLWKLQWKHoUVW\HDUDQHZSDUWZLOOEHVXSSOLHGDQGLQVWDOOHGDWQRFKDUJH,IDV\VWHPSDUWLVGHIHFWLYHDIWHUWKHoUVW\HDU
DQHZSDUWZLOOEHVXSSOLHGEXWQRWLQVWDOOHGDWQRFKDUJH<RXDUHUHVSRQVLEOHIRUWKHODERUFRVWRISDUWLQVWDOODWLRQDIWHUWKHoUVW\HDUIURPWKHGDWH
of sale. This warranty coverage applies for only one year from the sale date if the appliance is ever used for other than private household purposes.
'HIHFWVPXVWEHYHULoHGE\D6HDUVDXWKRUL]HGVHUYLFHUHSUHVHQWDWLYH
Ten Years on Linear Compressor
FOR TEN YEARS from the date of sale, the linear compressor of this appliance is warranted against defects in material or workmanship.* If the
FRPSUHVVRULVGHIHFWLYHZLWKLQWKHoUVW\HDUDQHZRQHZLOOEHVXSSOLHGDQGLQVWDOOHGDWQRFKDUJH,IWKHFRPSUHVVRULVGHIHFWLYHDIWHUWKHoUVW\HDU
DQHZRQHZLOOEHVXSSOLHGEXWQRWLQVWDOOHGDWQRFKDUJH<RXDUHUHVSRQVLEOHIRUWKHODERUFRVWRISDUWLQVWDOODWLRQDIWHUWKHoUVW\HDUIURPWKHGDWH
of sale. This warranty coverage applies for only two years from the sale date if the appliance is ever used for other than private household purposes.
'HIHFWVPXVWEHYHULoHGE\D6HDUVDXWKRUL]HGVHUYLFHUHSUHVHQWDWLYH
Lifetime on Storage Bins
FOR AS LONG AS IT IS USED from the date of sale, a free replacement will be supplied for a defective refrigerator or freezer compartment storage
ELQ,IWKHGHIHFWDSSHDUVZLWKLQWKHoUVW\HDUDQHZELQZLOOEHLQVWDOOHGDWQRFKDUJH,IWKHGHIHFWDSSHDUVDIWHUWKHoUVW\HDUDQHZELQZLOO
be supplied but not installed at no charge. This Lifetime warranty covers only storage bins, and does not apply to any other related component or
PHFKDQLVP<RXDUHUHVSRQVLEOHIRUWKHODERUFRVWRIELQLQVWDOODWLRQDIWHUWKHoUVW\HDUIURPWKHGDWHRIVDOH7KLVZDUUDQW\FRYHUDJHDSSOLHVIRU
only 90 days from the date of sale if the appliance is ever used for other than private household purposes. *Warranty coverage applies to door bins,
GUDZHUELQVDQGEDVNHWELQV'HIHFWVPXVWEHYHULoHGE\D6HDUVDXWKRUL]HGVHUYLFHUHSUHVHQWDWLYH
For warranty coverage details to obtain free repair or replacement, visit the web page: www.kenmore.com/warranty
7KLVZDUUDQW\FRYHUV21/<GHIHFWVLQPDWHULDODQGZRUNPDQVKLSDQGZLOO127SD\IRU
([SHQGDEOHLWHPVWKDWFDQZHDURXWIURPQRUPDOXVHLQFOXGLQJEXWQRWOLPLWHGWRoOWHUVEHOWVEDJVRUVFUHZLQEDVHOLJKWEXOEV
2. A service technician to clean or maintain this appliance, or to instruct the user in correct appliance installation, operation and maintenance.
3. Appliance installation not performed by Sears authorized service agents.
4. Service calls to correct appliance installation not performed by Sears authorized service agents, or to repair problems with house fuses, circuit
breakers, house wiring, and plumbing or gas supply systems resulting from such installation.
5. Damage to or failure of this appliance resulting from installation not performed by Sears authorized service agents, including installation that was
not in accord with electrical, gas or plumbing codes.
6. Damage to or failure of this appliance, including discoloration or surface rust, if it is not correctly operated and maintained according to all
supplied instructions.
7. Damage to or failure of this appliance, including discoloration or surface rust, resulting from accident, alteration, abuse, misuse or use for other
than its intended purpose.
8. Damage to or failure of this appliance, including discoloration or surface rust, caused by the use of detergents, cleaners, chemicals or utensils other
than those recommended in all instructions supplied with the product.
'DPDJHWRRUIDLOXUHRISDUWVRUV\VWHPVUHVXOWLQJIURPXQDXWKRUL]HGPRGLoFDWLRQVPDGHWRWKLVDSSOLDQFH
6HUYLFHWRDQDSSOLDQFHLIWKHPRGHODQGVHULDOSODWHLVPLVVLQJDOWHUHGRUFDQQRWHDVLO\EHGHWHUPLQHGWRKDYHWKHDSSURSULDWHFHUWLoFDWLRQORJR
'LVFODLPHURILPSOLHGZDUUDQWLHVOLPLWDWLRQRIUHPHGLHV
Customer’s sole and exclusive remedy under this limited warranty shall be product repair or replacement as provided herein. Implied warranties,
LQFOXGLQJ ZDUUDQWLHVRI PHUFKDQWDELOLW\ RU oWQHVV IRU D SDUWLFXODU SXUSRVH DUH OLPLWHGWR RQH \HDU RQ WKH DSSOLDQFHoYH \HDUV RQ WKH VHDOHG
refrigerant system, ten years on the linear compressor, and for as long as used on the storage bins, or the shortest period allowed by law. Seller shall
not be liable for incidental or consequential damages. Some states do not allow the exclusion or limitation of incidental or consequential damages,
RUOLPLWDWLRQRQWKHGXUDWLRQRILPSOLHGZDUUDQWLHVRIPHUFKDQWDELOLW\RUoWQHVVVRWKHVHH[FOXVLRQVRUOLPLWDWLRQVPD\QRWDSSO\WR\RX
This warranty applies only while this appliance is used in the United States.
7KLVZDUUDQW\JLYHV\RXVSHFLoFOHJDOULJKWVDQG\RXPD\DOVRKDYHRWKHUULJKWVZKLFKYDU\IURPVWDWHWRVWDWH
7UDQVIRUP65%UDQGV0DQDJHPHQW//&+RçPDQ(VWDWHV,/
®

4
352'8&75(&25'
,03257$176$)(7<,16758&7,216
:$51,1*
,QWKHVSDFHEHORZUHFRUGWKHGDWHRISXUFKDVHPRGHODQGVHULDOQXPEHURI\RXUSURGXFW<RXZLOOoQGWKHPRGHODQG
VHULDOQXPEHUSULQWHGRQDQLGHQWLoFDWLRQODEHOORFDWHGRQWKHLQWHULRUOLQHURIWKHUHIULJHUDWRUFRPSDUWPHQW+DYHWKHVH
items of information available whenever you contact Sears concerning your product.
Model No.___________________ Date of Purchase ___________________
Serial No.___________________
Save these instructions and attach your sales receipt for future reference.
5($'$//,16758&7,216%()25(86(
Safety Messages
Your safety and the safety of others are very important.
We have provided many important safety messages in this manual and on your appliance. Always read and follow all
safety messages.
This is the safety alert symbol.
This symbol alerts you to potential hazards that can kill or injure you and others. All safety messages will
follow the safety alert symbol and either the word WARNING or CAUTION.
These words mean:
:$51,1*
You may be killed or seriously injured if you do not follow instructions.
&$87,21
You may be injured or cause damage to the product if you do not follow instructions.
All safety messages will identify the hazard, tell you how to reduce the chance of injury, and tell you what can happen
if the instructions are not followed.
7RUHGXFHWKHULVNRIH[SORVLRQoUHGHDWKHOHFWULFVKRFNVFDOGLQJRULQMXU\WRSHUVRQVZKHQXVLQJWKLVSURGXFW
follow basic precautions, including the following.
,167$//$7,21
v To reduce the risk of injury to persons, adhere to all
industry recommended safety procedures including the
use of long-sleeved gloves and safety glasses.
v Never attempt to operate this appliance if it is
damaged, malfunctioning, partially disassembled,
or has missing or broken parts, including a damaged
cord or plug.
v Only connect this product to a dedicated grounded
electrical outlet rated for use with this product
(115 V, 60 Hz, AC only). It is the user’s responsibility
to replace a standard 2-prong wall outlet with a
standard 3-prong wall outlet.
v 'RQRWXVHDQRXWOHWWKDWFDQEHWXUQHGRçZLWKD
switch. Do not use an extension cord.
v The appliance must be positioned for easy access to a
power source.
v When moving the refrigerator, be careful not to roll
over or damage the power cord.
v Contact an authorized service center when installing
or relocating the refrigerator.
v Do not, under any circumstances, cut or remove the
third (ground) prong from the power cord.

5
v Keep packing materials out of the reach of children.
Packaging material can be dangerous for children.
7KHUHLVDULVNRIVXçRFDWLRQ
v Do not install the refrigerator in a damp or dusty
place where insulation on electrical parts may
deteriorate.
v Do not place the refrigerator in direct sunlight or
expose it to the heat from heating appliances such as
stoves or heaters.
v Do not bend or pinch the power cord excessively or
place heavy objects on it.
23(5$7,21
v This appliance is intended to be used in household and
similar applications such as:
VWDçNLWFKHQDUHDVLQVKRSVRèFHVDQGRWKHUZRUNLQJ
environments;
- farm houses and by clients in hotels, motels and other
residential type environments;
- bed and breakfast type environments;
- catering and similar non-retail applications.
v This product is not to be used for special purposes
such as the storage of medicine or test materials or for
use on ships, etc.
v DO NOT allow children to climb, stand, or hang
on the refrigerator doors or on the shelves in the
refrigerator. They could damage the refrigerator and
seriously injure themselves.
v Do not allow children to climb into the refrigerator.
7KH\FRXOGEHWUDSSHGDQGVXçRFDWHG
v Children should be supervised to ensure that they do
not play with the refrigerator.
v .HHSoQJHUVRXWRISLQFKSRLQWDUHDVFOHDUDQFHV
between the doors and cabinets are necessarily small.
v Be careful closing doors when children are nearby.
v Do not touch frozen food or the metal parts in the
freezer compartment with wet or damp hands. Doing
so may cause frostbite.
v Do not refreeze frozen food that has thawed
completely. Doing so may result in a serious health
hazard.
v Do not use an adapter plug or plug the power plug
into a multi-outlet extension cord.
v If the supply cord is damaged, it must be replaced
by the manufacturer or its service agent or a similarly
TXDOLoHGSHUVRQLQRUGHUWRDYRLGDKD]DUG
v Do not operate the refrigerator or touch the power
cord with wet hands.
v Do not modify or extend the power cord.
v 'RQRWXVHDQXQFHUWLoHGSRZHURXWOHW'RQRWSOXJ
appliance into a damaged wall outlet.
v Do not put hands, feet or other objects into the air
vents or bottom of the refrigerator. Doing so could
result in personal injury or electric shock.
v In the event of a gas leak (propane/LPG), ensure
the area is adequately ventilated and contact an
authorized service center before resuming use. Do
not touch the refrigerator or power cord of the
refrigerator.
v Disconnect the power cord immediately and contact
an authorized service center if there is a strange noise,
odor, or smoke coming from the appliance.
v Do not use any fuse (such as copper, steel wire, etc.)
other than a standard fuse.
v Do not place or use an electrical appliance inside the
refrigerator, unless it is of a type recommended by the
manufacturer.
v Do not put animals inside the appliance.
v 'RQRWSODFHKHDY\RUIUDJLOHREMHFWVOLTXLGoOOHG
FRQWDLQHUVFRPEXVWLEOHVXEVWDQFHVRUpDPPDEOH
objects (such as candles and lamps) on the appliance.
v Avoid contact with any moving parts of the ejector
mechanism or with the heater that releases the ice
cubes.
v If connected to a circuit protected by fuses, use time
delay fuse.
v Keep ventilation openings, in the appliance enclosure
or in the built-in structure, clear of obstruction.
v Do not use mechanical devices or other means to
accelerate the defrosting process, other than those
recommended by the manufacturer.
v Do not use electrical appliances inside the food
storage compartments of the appliance, unless they
are of a type recommended by the manufacturer.
v Do not store explosive substances such as aerosol cans
ZLWKDpDPPDEOHSURSHOODQWLQWKLVDSSOLDQFH
v '2127SODFHoQJHUVLQWKHDXWRPDWLFLFHPDNHU
when the refrigerator is plugged in.
v When dispensing ice from the dispenser, do not use a
fragile container.
0$,17(1$1&(
v Do not use a hair dryer to dry the inside of the
refrigerator.
v Do not light a candle to remove odors in the
refrigerator.
v ,QWKHHYHQWRIDUHIULJHUDQWOHDNPRYHpDPPDEOH
objects away from the refrigerator. Ensure the area
is adequately ventilated and contact an authorized
service center.

6
CFC/HCFC DISPOSAL
WARNING
WARNING: RISK OF CHILD ENTRAPMENT
Your old refrigerator may have a cooling system
believed to harm stratospheric ozone if released to the
atmosphere. Other refrigerants may also cause harm to
the environment if released to the atmosphere.
v Junked or abandoned refrigerators are dangerous, even if they are sitting for only a few days.
doors but leave the shelves in place so that children may not easily climb inside.
v If disposing of a refrigerator, make sure the refrigerant and insulation foam are removed for
v When discarding the appliance, remove the door gasket while leaving the shelves and baskets in
place, and keep children away from the appliance.
If you are throwing away your old refrigerator, make
sure the refrigerant is removed for proper disposal
under provisions of environmental legislation.
v
gasoline, away from the refrigerator.
v This appliance is not intended for use by persons
(including children) with reduced physical, sensory
or mental capabilities, or lack of experience and
knowledge, unless they have been given supervision
or instruction concerning use of the appliance by a
person responsible for their safety.
v Unplug the power plug before cleaning or repairing
the refrigerator.
v The refrigerator and freezer compartment lights are
interior LED lighting, and service should be performed
v Unplug the power plug immediately in the event of a
blackout or thunderstorm.
v Turn the po
refrigerator. Call a service agent.
v Do not store glass containers or soda in the freezer
compartment. Contents may expand when frozen,
break the container and cause injury.
v Do not store, disassemble or repair the appliance
WARNING: RISK OF FIRE AND FLAMMABLE MATERIALS
v This appliance contains a small amount of isobutane refrigerant (R600a), which is combustible.
When transporting and installing the appliance, care must be taken to ensure that no parts of
the refrigerating circuit are damaged. Refrigerant squirting out of the pipes could ignite or cause
RSHQURRPGRRUVRUZLQGRZVIRUVHYHUDOPLQXWHVWRDOORZIUHVKDLUWRpRZLQWRWKHURRP
v In or
circuit occurs, the size of the room in which the appliance is installed depends on the amount
of refrigerant used. The room must be 10.8 square feet (1 square meter) in size for every 8g of
R600a refrigerant inside the appliance. The amount of refrigerant in your particular appliance is
signs of damage. If in doubt, consult your dealer.

7
(/(&75,&$/*5281',1*5(48,5(0(176
:$51,1*
72&211(&7(/(&75,&,7<
5(&200(1'('*5281',1*0(7+2'
The refrigerator should always be plugged into its own individual properly grounded electrical outlet rated for 115
Volts, 60 Hz, AC only, and fused at 15 to 20 amperes (minimum). This provides the best performance and also prevents
RYHUORDGLQJKRXVHZLULQJFLUFXLWVZKLFKFRXOGFDXVHDoUHKD]DUGIURPRYHUKHDWHGZLUHV,WLVUHFRPPHQGHGWKDWD
separate circuit serving only this appliance be provided.
8VHDUHFHSWDFOHWKDWFDQQRWEHWXUQHGRçZLWKDVZLWFKRUSXOOFKDLQ'RQRWXVHDQH[WHQVLRQFRUG
Where a standard two-prong wall outlet is encountered, it is your personal responsibility and obligation to have it
replaced with a properly grounded three-prong wall outlet.
(OHFWULFDO6KRFN+D]DUG
)253(5621$/6$)(7<this appliance must be
properly grounded. Have the wall outlet and the circuit
FKHFNHGE\DTXDOLoHGHOHFWULFLDQWRPDNHVXUHWKH
outlet is properly grounded.
86(2)(;7(16,21&25'6
:$51,1*'RQRWXVHH[WHQVLRQFRUGVRUXQJURXQGHG
(two-prong) adaptors. Because of potential safety
hazards under certain conditions, the use of an extension
cord is not recommended. However, if you still elect to
use an extension cord, it is absolutely necessary that it
be a UL-listed (USA), 3-wire grounding type appliance
extension cord having a grounding type plug and outlet,
and that the electrical rating of the cord be 15 amperes
(minimum) and 120 volts.
Use of an extension cord will increase the clearance
needed for the back of the refrigerator.
3-prong
grounding
plug
3-prong
grounding type
wall receptacle
Ensure proper
ground exists
before use.
:$51,1*
5HSODFLQJ(OHFWULFDO&RUG
To avoid hazard, damaged power cords must be
replaced by the manufacturer or its service agent or
DVLPLODUO\TXDOLoHGWHFKQLFLDQ'RQRWRSHUDWHWKH
appliance with a damaged power cord.
&$87,21
,167$//$7,21
v Do not install the refrigerator where there may be a
danger of the unit falling.
v The refrigerator must be properly installed in
accordance with the Installation Instructions.
23(5$7,21
v Do not use aerosols near the refrigerator.
v This appliance is intended to be used only in domestic
and similar applications.
v Do not strike or apply excessive force to any glass
surface. Do not touch glass surfaces if they are
cracked or broken.
v 'RQRWRYHUoOORUSDFNLWHPVWRRWLJKWO\LQWRGRRUELQV
Doing so may cause damage to the bin or personal
injury if items are removed with excessive force.
v Do not hang on to or place heavy objects on the
refrigerator’s dispenser.
0$,17(1$1&(
v Do not use strong detergents like wax or thinners for
cleaning. Clean with a soft cloth.
v Remove foreign objects (such as dust and water) from
the prongs of the power plug and contact areas. Do
not use a wet or damp cloth when cleaning the plug.
v Do not spray water directly on the inside or outside of
the refrigerator.
v Do not clean glass shelves or covers with warm water
when they are cold. They may break if exposed to
sudden temperature changes.
7RUHGXFHWKHULVNRIPLQRURUPRGHUDWHLQMXU\WRSHUVRQVPDOIXQFWLRQRUGDPDJHWRWKHSURGXFWRUSURSHUW\ZKHQ
using this product, follow basic precautions, including the following.
6$9(7+(6(,16758&7,216

8
PARTS AND FEATURES
Use this page to become more familiar with the parts and features of your refrigerator.
NOTE: This guide covers several diç erent models. The refrigerator you have purchased may have some or all of the items
listed below. The locations of the features shown below may not match your model.
Water Filter
Refrigerator Light
Refrigerator Shelves
Humidity Controlled Crispers
Pantry Drawer
Articulating Mullion
Icemaker
Ice Bin
Durabase Divider
Durabase
Pullout Drawer
Freezer Light
Door Bins
Dairy Bin
A
I
B
J
KC
LD
ME
NF
G
H
C
F
N
M
L
K
J
D
E
Diagnostics
Water Tank Cover
O
O
B
A
G
H
I

9
REFRIGERATOR INSTALLATION
WARNING WARNING
WARNING
UNPACKING YOUR REFRIGERATOR
To remove any remaining tape or glue, rub the area
briskly with your thumb. Tape or glue residue can also be
easily removed by rubbing a small amount of liquid dish
water and dry.
products can damage the surface of your refrigerator.
Refrigerator shelves are installed in the shipping position.
Please reinstall shelves according to your individual
storage needs.
Excessive Weight Hazard:
Use two or more people to move and install the
refrigerator. Failure to do so can result in back or
other injury.
Excessive Weight Hazard:
Your refrigerator is heavy. When moving the
refrigerator for cleaning or service, be sure to protect
moving it. Do not wiggle or walk the refrigerator when
Explosion Hazard:
gasoline, away from the refrigerator. Failure to do so
Remove tape and any temporary labels from your
UHIULJHUDWRUEHIRUHXVLQJ5HPRYHWKHSURWHFWLYHoOPIURP
doors before connecting the appliance to the electrical
supply (on some models). Do not remove any warning type
labels, the model and serial number label, or the Tech
Sheet that is located under the front of the refrigerator.
DIMENSIONS AND CLEARANCES
v
refrigerator through doors or narrow openings.
v
Replacing Refrigerator Doors in this manual.
v
and space in front to open the doors and drawers.
v Too small of a distance from adjacent items may result in lowered freezing capability and increased electricity
consumption charges. Allow at least 34 inches (864 mm) in front of the refrigerator to open the doors, and at least
2 inches (51 mm) between the back of the refrigerator and the wall.
Dimensions and Clearances
B
A
C
D
F
I
H
E
J
G
A Depth without handle 33.3" (845 mm)
B Width 29.8" (757 mm)
C
Height to top of case 66.9" (1700 mm)
D Height to top of hinge 68.5" (1740 mm)
E Back clearance 2" (51 mm)
F Depth without door 29.1" (740 mm)
G Depth with handle 35.5" (902 mm)
H Total depth with freezer drawer open 54.7" (1390 mm)
I Total depth with door open 90° 44.6" (1185 mm)
J Front clearance 27" (686 mm)

10
INSTALLATION (continued)
1. To avoid noise and vibration, the unit must be leveled
and installed on a solidly constructed
If required,
adjust the leveling legs to compensate for unevenness
of the
The front should be slightly higher than
the rear to aid in door closing. Leveling legs can be
turned easily by tipping the cabinet slightly. Turn the
leveling legs to the left to raise the unit or to the right to
lower it. (See LEVELING AND DOOR ALIGNMENT.)
NOTE: Installing on carpeting, soft tile surfaces,
a platform or weakly supported structure is not
recommended.
2. Install this appliance in an area where the temperature
is between 55°F (13°C) and 110°F (43°C). If the
temperature around the appliance is too low or high,
cooling ability may be adversely
3. Select a place where a water supply can be easily
connected for the automatic icemaker.
NOTE: The water pressure must be between 20 and
120 psi on models without a water
and between
40 and 120 psi on models with a water
4. Too small of a distance from adjacent items may
result in lowered freezing capability and increased
electricity consumption charges. Allow at least 24
inches (61 cm) in front of the refrigerator to open the
doors and at least 2 inches (5.08 cm) between the
back of the refrigerator and the wall.
PRIOR TO USE
1. Clean your refrigerator thoroughly and wipe all
dust that accumulated during shipping.
2. Install accessories such as ice cube bin, drawers,
shelves, etc., in their proper places. They are packed
together to prevent possible damage during shipment.
3. Allow your refrigerator to run for at least two to three
hours before putting food in it. Check the
of
cold air in the freezer compartment to ensure proper
cooling. Your refrigerator is now ready for use.
INSTALLATION
The refrigerator should always be plugged into its own
individual properly grounded electrical outlet rated for
115 Volts, 60 Hz, AC only, and fused at 15 or 20 amperes.
This provides the best performance and also prevents
overloading house wiring circuits which could cause a
hazard from overheated wires. It is recommended that a
separate circuit serving only this appliance be provided.
REFRIGERATOR INSTALLATION
Shock Hazard:
To reduce the risk of electric shock, do not install the
refrigerator in a wet or damp area.
WARNING
2” (5.08 cm)

11
HOW TO REMOVE REFRIGERATOR
DOOR HANDLE
NOTE: Handle appearance may vary from
illustrations on this page.
Loosen the set screws with a 3/32 in. Allen
wrench and remove the handle.
NOTE: If the handle mounting fasteners need
to be tightened or removed, use a ¼ in. Allen
wrench.
NOTE: Removing the doors is always recommended when it is necessary to move the refrigerator through a narrow
opening. If it is necessary to remove the handles, follow the directions below.
REFRIGERATOR INSTALLATION
HOW TO REPLACE REFRIGERATOR
DOOR HANDLE
NOTE: Handle appearance may vary from
illustrations on this page.
Place the handle on the door by
the handle footprints over the mounting
fasteners and tightening the set screws
with a 3/32 in. Allen wrench.
NOTE: If the handle mounting fasteners
need to be tightened or removed, use a
¼ in. Allen wrench.
Mounting
Fasteners
Set Screw
Allen
Wrench
Mounting
Fasteners

7RUHSODFHSODFHWKHKDQGOHRQWKHGRRUE\oWWLQJ
the handle footprints over the mounting fasteners and
tightening the set screw with a 1/8 in. Allen wrench.
NOTE: If the handle mounting fasteners need to be
tightened or removed, use a ¼ in. Allen wrench.
REFRIGERATOR INSTALLATION
HOW TO REMOVE/REPLACE FREEZER
DOOR HANDLE
NOTE: Handle appearance may vary from illustrations on
this page.
To remove, loosen the set screws located on the
lower side of the handle with a 1/8 in. Allen wrench
and remove the handle.
NOTE: Removing the doors is always recommended when it is necessary to move the refrigerator through a narrow
opening. If it is necessary to remove the handles, follow the directions below.
12

13
To remove the left refrigerator door:
On the back of the refrigerator, pull the water tube out of
the collet
on the connector by pressing the
release ring (see picture below).
1. Open the door. Remove the top hinge cover screw (1).
Lift up the cover (2).
2. Remove the cover.
3. Pull out the tube (3).
4. Disconnect all wire harnesses (4).
5. Remove the grounding screw (5).
6. Remove the three bolts (6) using a 10mm socket wrench.
/LIWRçWKHWRSKLQJH
door does not fall forward.
CAUTION: When lifting the hinge, be careful that the
7. Lift the door from the middle hinge pin and remove the
door.
8. Place the door, inside facing up, on a non-scratching
surface.
1. Open the door. Remove the top hinge cover screw (1).
Lift up the cover (2).
2. Remove the cover.
3. Remove the three bolts (3) using a 10mm socket
CAUTION: When lifting the hinge, be careful that the
4. Lift the door from the middle hinge pin and remove
the door.
door does not fall forward.
ZUHQFK/LIWRçWKHWRSKLQJH
5. Place the door, inside facing up, on a non-scratching
surface.
WARNING
Electrical Shock Hazard
v Disconnect the electrical supply to the refrigerator
before installing. Failure to do so could result in
serious injury or death.
v Do not put hands, feet or other objects into the air
vents or bottom of the refrigerator. You may be
injured or receive an electrical shock.
(1)
(2)
(3)
(4)
REFRIGERATOR INSTALLATION
To remove the right refrigerator door:
REMOVING AND REPLACING
REFRIGERATOR DOORS
CAUTION: Before you begin, remove food and bins
from the doors.
WARNING
Excessive Weight Hazard:
Use two or more people to remove and install the
refrigerator doors. Failure to do so can result in back or
other injury.
(1)
(2)
(4)
(3)
(6)
(7)
(5)

14
After inserting, pull the tube to
make sure that it is secure and
reinsert the clip.
Tube
Scale Mark
Collet
Clip
Reinstalling the Refrigerator Door
Left Door
1. Lower the door onto the middle hinge pin (10).
2. Line up the holes in the top hinge with the holes in the
top of the refrigerator. Insert and tighten the three
bolts (6) in the hinge.
3. Install the grounding screw (5) and connect the two
wire harnesses (4).
4. Push the water tube (3) located at the top of the left
door into the hole beside the left hinge on the top of
the cabinet until it exits through the back.
5. Insert the water supply tube (3) into the connector until
you see only one scale mark. Fully insert the tube over
ì
in.
(15
mm).
6. Hook tabs on left side of hinge cover (1) under the
edge of the top hinge (7) and position the cover in
place. Insert and tighten the cover screw (1).
Right Door
1. Lower the door onto middle hinge pin (9).
2. Line up the holes in the top hinge with the holes in the
top of the refrigerator. Insert and tighten the three
bolts (6) in the hinge.
3. Hook the tabs on the right side of the hinge cover (2)
under the edge of the top hinge (4) and position the
cover in place. Insert and tighten the cover screw (1).
REFRIGERATOR INSTALLATION
(9)
(10)
CAUTION
(1)
(2)
(4)
(3)
(6)
(7)
(5)

15
REFRIGERATOR INSTALLATION
1
Remove the screw
2
from the rail on both sides.
Grasp the drawer on each side and pull it up to
separate it from the rails.
Using two hands, slide both bars in simultaneously.
CAUTION: Do not hold the handle when removing or
replacing the drawer. The handle may come oç , causing
personal injury.
2
HOW TO REMOVE THE FREEZER DRAWER
WARNING: Use two or more people to remove and
install the freezer drawer. Failure to do so can result in
back or other injury.
1
To remove, pull the drawer out to full extension.
Remove the ice bin. Lift the drawer up and out, making
sure to clear the rail system.
Pull the drawer open to full extension. Remove the
Durabase basket by lifting the basket from the
rail system.

16
REFRIGERATOR INSTALLATION
Pull out each rail to full extension.
LowHUWKHGRRULQWRLWVoQDOSRVLWLRQDQGWLJKWHQWKH
screws
3
located on both sides.
With the drawHUSXOOed out to full extension, insert the
Durabase basket
4
in the rail assembly.
GrDVSWKHGrawer on each side and hook the door
VXSSRUWV
1
into the rail tabs
2
located on both
sides.
WARNING: If the Durabase divider is removed, there is
HQRXJKRSHQVSDFHIRUFKLOGrHQRUSHWVWRcrawl inside.
TRSrevHQWDFFLGHQWDOFKLOGDQGSHWHQtrDSPHQWRU
suç ocation risk, DO NOT alloZWKHPWRWRXFKRUJR
near the freezer drawer.
WARNING: DO NOTVWHS or sit down on the freezer
drawer.
3
HOW TO INSTALL THE FREEZER DRAWER
2
1
4
7LOWXSWKHIURQWRIWKHXSSHUIUHH]HUGUDZHUWRLQVHUW
the drawer into the rail assembly. Place the ice bin
back in the drawer.

17
LEVELING AND DOOR ALIGNMENT
Leveling
After installing, plug the refrigerator’s power cord into a
3-prong grounded outlet and push the refrigerator into the
Your refrigerator has two front leveling legs—one on the
right and one on the left. Adjust the legs to alter the tilt
from front-to-back or side-to-side. If your refrigerator
seems unsteady, or you want the doors to close more
easily, adjust the refrigerator’s tilt using the instructions
below:
Tools Required:
(18 mm)ZUHQFKRUpDWEODGH/
screwdriver.
Turn the leveling leg to the left to raise that side of
the refrigerator or to the right to lower it. It may take
several turns of the leveling leg to adjust the tilt of the
refrigerator.
NOTE: Having someone push backward against the top of
This makes it easier to adjust the legs.
2. Open both doors again and check to make sure that
they close easily. If the doors do not close easily, tilt
the refrigerator slightly more to the rear by turning
both leveling legs to the left. It may take several more
turns, and you should turn both leveling legs the same
amount.
NOTE: Your refrigerator is uniquely designed with
two fresh food doors. Either door can be opened or
closed independently of the other. You may have to
exert slight pressure on the doors to get them to close
completely.
Door Alignment
If the space between your doors is uneven, follow the
instructions below to align the doors:
1. With one hand, lift up the door that you would like to
raise at the middle hinge.
2. With your other hand, use pliers to insert snap ring as
shown.
3. Insert additional snap rings until the doors are aligned.
(Three snap rings are provided with the refrigerator in
the Use & Care Guide packet.)
REFRIGERATOR INSTALLATION

18
USING YOUR REFRIGERATOR
SETTING THE CONTROLS
NOTE: The dispenser will not work if any door is left
open or if the control lock is engaged.
v The Refrigerator Temp Control ranges from 33°F
to 46°F (0°C to 8°C). Press the Refrigerator Temp button
to cycle through the available temperature settings one
increment at a time.
v The Freezer Temp Control range is from -6°F to
8°F (-21°C to -13°C). Press the Freezer Temp button to
cycle through the available temperature settings one
increment at a time.
Dispenser
Some dripping may occur after dispensing water. Hold
your cup beneath the dispenser for a few seconds after
dispensing to catch all of the drops.
AIRFLOW
The refrigerator control functions as the thermostat for the
entire appliance (refrigerator and freezer sections). The
colder the setting, the longer the compressor will run to
keep the temperature colder. The freezer control adjusts
the cold air
from the freezer to the refrigerator.
Setting the freezer control to a lower temperature keeps
more cold air in the freezer compartment to make it
colder.
Temperature
Accela Ice
v When you press the Accela Ice button, the Accela Ice
graphic will illuminate in the display and will
continue for 24 hours. The function will automatically
VKXWRçDIWHUKRXUV
v You can stop this function manually by touching the
button one more time.
v This function increases both ice making and freezing
capabilities.
Water Filter Reset
When the water
indicator turns on, you have to
change the water
After changing the water
press and hold the Accela Ice (Filter Reset) button for three
seconds to turn the indicator light
You need to change
the water
approximately every six months.
Light
Press the Light button to turn the light on and
When
dispensing water, a light underneath the water switch will
illuminate.
NOTE: When changing control settings, wait 24 hours
before making additional adjustments. The controls are
set correctly when milk or juice is as cold as you would
like and when ice cream is
If the temperature in
either compartment is too cold or too warm, change the
setting one increment at a time. Wait 24 hours for the
change to stabilize before adjusting again.
Diagnostics
Cold air circulates from the freezer to the fresh food
section and back again through air vents in the wall
dividing the two sections. Be sure not to block vents while
placing items in your refrigerator. Doing so will restrict
DLUpRZand may cause the refrigerator temperature to
become too warm or cause interior moisture buildup. (See
DLUpRZdiagram below.)

19
USING YOUR REFRIGERATOR
CAUTION
To reduce the risk of scratching the door or breaking the
door mullion, please make sure that the refrigerator door
mullion is always folded in.
Door Alarm
When power is connected to the refrigerator, the door
alarm is initially set to ON. When you press the Door
Alarm button, the display will change to OFF and the
Door Alarm function will deactivate.
When either the refrigerator or the freezer door is left
open for more than 60 seconds, the alarm tone will
sound to let you know that the door is open.
When you close the door, the door alarm will stop.
Control Lock
When power is initially connected to the refrigerator,
the Lock function is
If you want to activate the Lock function to lock other
buttons, press and hold the Door Alarm button for
three seconds or more. The Lock icon will display and
the Lock function is now enabled.
When the Lock function is activated, no other buttons
will work. The dispenser pad is also deactivated.
To disable the Lock function, press and hold the Door
Alarm button for approximately three seconds.
Articulating Mullion
This feature is a metal strip attached to the left door
that articulates (rotates) 90 degrees as the door is
closed, forming a mullion (base) for the left and right
door gaskets to seal against.
D
Display Power Saving Mode
emo Mode (For Store Use Only)
• The Demo Mode disables all cooling in the refrigerator
and freezer sections to conserve energy while on
display in a retail store. When activated, OFF will
display on the control pad.
• To deactivate / activate:
With either refrigerator door opened, press and hold
the Refrigerator Temp and Accela Ice buttons at the
that Demo Mode is deactivated. Use the same
procedure to activate the Demo Mode.
After 20 seconds of inactivity the display enters Power
Saving Mode. The display turns off until a door is
opened or a button is pressed.

20
USING YOUR REFRIGERATOR
AUTOMATIC ICEMAKER
The icemaker will produce approximately 70-210 cubes
in a 24-hour period, depending on freezer compartment
temperature, room temperature, number of door openings
and other operating conditions.
v It takes about 12 to 24 hours for a newly installed
refrigerator to begin making ice. Wait 72 hours for full
ice production to occur.
v Ice making stops when the in-door ice bin is full. When
full, the in-door ice bin holds approximately 6-8 (12-16
oz) glasses of ice.
v To turn oç the automatic icemaker, set the icemaker
switch to OFF (O). To turn on the automatic icemaker,
set the switch to ON (I).
v The water pressure must be between 20 and
120 psi on models without a water olter and between
40 and 120 psi on models with a water olter to
produce the normal amount and size of
ice cubes.
v Foreign substances or frost on the ice-detecting sensor
can interrupt ice production. Make sure the sensor area
is clean at all times for proper operation.
CAUTION
v The orst ice produced after installation may include
particles or odor from the water supply line or the
water tank. Throw awD\WKHoUVWIew batches of
ice (about 24 cubes). This is also necessary if the
refrigerator has not been used for a long time.
v If discolored ice is produced, check the water supply.
If the problem continues, contact a Sears or other
TXDOLo ed service center. Do not use the ice or water
until the problem is corrected.
v Be sure nothing interferes with the sweep of the
aXWRPDWLFVKXWRçDUP
v When the bin oOOVWRWKHOevel of the aXWRPDWLFVKXWRç
arm, the icemaker will stop producing ice.
v It is normal for some cubes to be stuck together.
v If ice is not used frequently, old ice cubes will become
cloudy, taste stale, and shrink.
v Never store beverage cans or other items in the ice
bin for the purpose of rapid cooling. Doing so may
damage the icemaker or the containers may burst.
v Never use thin crystal glass or crockery to collect ice.
Such containers may chip or break resulting in glass
fragments in the ice.
WARNING
Personal Injury Hazard
DO NOT place ongers or hands on the automatic ice
making mechanism while the refrigerator is plugged in.
WHEN YOU SHOULD SET THE ICEMAKER
POWER SWITCH TO OFF (O)
v When the water supply will be shut oç for several
hours.
v When the ice bin is removed for more than one or two
minutes.
v When the refrigerator will not be used for several days.
NOTE: The ice bin should be emptied when the
icemaker ON/OFF switch is turned to the OFF position.
NORMAL SOUNDS YOU MAY HEAR
v The icemaker water valve will buzz as the icemakHUoOOV
with water. If the power switch is in the ON (I) position,
it will buzz even if it has not yet been hooked up to
water. To stop the buzzing, move the power switch to
OFF (O).
NOTE: Keeping the power switch in the ON (I) position
before the water line is connected can damage the
icemaker.
v You will hear the sound of cubes dropping into the bin
and water running in the pipes as the icemaker rHoOOV
PREPARING FOR VACATION
Set the icemaker power switch to OFF (O) and shut oç
the water supply to the refrigerator.
NOTE: The ice bin should be emptied any time the
icemaker ON/OFF switch is turned to the OFF (O)
position.
If the ambient temperature will drop below freezing, have
DTXDOLo ed technician drain the water supply system to
prevent serious property damage due to pRRGLQJFDXVed
by ruptured water lines or connections.
Automatic
6KXWRç$UP
Power Switch

21
FOOD STORAGE GUIDE
Wrap or store food in the refrigerator in airtight and
moisture-proof material unless otherwise noted. This
prevents food odor and taste transfer throughout the
refrigerator. For dated products, check date code to
ensure freshness.
STORING FROZEN FOOD
NOTE: Check a freezer guide or a reliable cookbook
for further information about preparing food for
freezing or food storage times.
Freezing
Your freezer will not quick-freeze a large quantity of
food. Do not put more unfrozen food into the freezer
than will freeze within 24 hours (no more than 2 to 3
lbs. of food per cubic foot of freezer space). Leave
enough space in the freezer for air to circulate around
packages. Be careful to leave enough room at the
front so the door can close tightly.
Storage times will vary according to the quality and
type of food, the type of packaging or wrap used
(how airtight and moisture-proof) and the storage
temperature. Ice crystals inside a sealed package are
normal. This simply means that moisture in the food
and air inside the package have condensed, creating
ice crystals.
NOTE: Allow hot foods to cool at room temperature
for 30 minutes, then package and freeze. Cooling hot
foods before freezing saves energy.
Packaging
Successful freezing depends on correct packaging.
When you close and seal the package, it must not
allow air or moisture in or out. If it does, you could
have food odor and taste transfer throughout the
refrigerator and could also dry out frozen food.
Packaging recommendations:
Straight-sided canning/freezing jars
Heavy-duty aluminum foil
Plastic-coated paper
Non-permeable plastic wraps
Follow package or container instructions for proper
freezing methods.
Do not use
Bread wrappers
Non-polyethylene plastic containers
Containers without tight lids
Wax paper or wax-coated freezer wrap
Thin, semi-permeable wrap
CAUTION: Do not keep beverage cans or plastic
food containers in the freezer compartment. They may
break or burst if they freeze.
Items How to
Butter or
margarine
Cheese
Milk
Eggs
Fruit
Leafy
vegetables
Vegetables
with skins
(carrots,
peppers)
Fish
Leftovers
Keep opened butter in a covered
dish or closed compartment.
When storing an extra supply,
wrap in freezer packaging and
freeze.
Store in the original wrapping
until you are ready to use it. Once
opened, rewrap tightly in plastic
wrap or aluminum foil.
Wipe milk cartons. For best
storage, place milk on interior
shelf.
Store in original carton on interior
shelf, not on door shelf.
Do not wash or hull the fruit
until it is ready to be used. Sort
and keep fruit in its original
container, in a crisper, or store in a
completely closed paper bag on a
refrigerator shelf.
Remove store wrapping and trim
areas. Wash in cold water and
drain. Place in plastic bag or
plastic container and store in
crisper.
Place in plastic bags or plastic
container and store in crisper.
the freezer section if they are not
6WRUHIUHVKoVKDQGVKHOOoVKLQ
being consumed the same day of
purchase. It is recommended to
same day purchased.
FRQVXPHIUHVKoVKDQGVKHOOoVKWKH
USING YOUR REFRIGERATOR
Cover leftovers with plastic wrap
or aluminum foil, or store in
plastic containers with tight lids.

22
REFRIGERATOR SECTION
WATER DISPENSER
To dispense cold water, push on the dispenser switch
with a glass.
WATER TRAY
To remove the tray, press down on either of the front
corners and pull out.
NOTE: There is no drain beneath the tray. You may
need to empty the tray of any liquid that collects in it.
Some dripping may occur after dispensing. Hold your
cup beneath the dispenser for a few seconds after
dispensing to catch all of the drops.
To replace the tray, slightly tilt up the front of the tray
and snap the tabs into the holes.
USING YOUR REFRIGERATOR
Dispenser Switch
Push
Tabs
Holes

23
USING YOUR REFRIGERATOR
REFRIGERATOR SHELVES
The shelves in your refrigerator are adjustable to meet
your individual storage needs. Your model may have full
or split shelves.
Adjusting the shelves to ot LWHPVRIGLçHUHQWKHLJKWVZLOO
make onding the exact item you Zant easier'RLQJVRZLOO
also reduce the amount of time the refrigerator door is
RSHQZKLFKZLOOVDve energy.
IMPORTANT: Do not clean glass shelvHVZLWKZarm Zater
ZKLOHWKey are cold. Shelves may break if exposed to
sudden temperature changes or impact.
NOTE: Glass shelves are heavy. Use special carHZKHQ
removing them.
Adjusting Shelves (Split Shelf)
Remove shelves from the shipping position and replace
shelves in the position you Zant.
To remove a shelf—Tilt up the front of the shelf
1
DQGOLIWLWIURPEHORZ
2
. Pull the shelf out.
CAUTION:
v Make sure that shelves are level from one side to the
other.
v Make sure that the shelf stopper is completely inserted
betZeen the Zall ribs.
v Make sure that hooks are inserted in the correct
position. (Left shelf to left hole, right shelf to right hole
only.)
Failure to do so may result in the shelf falling or food
3
4
To reinstall a shelf—Tilt the front of the shelf
up and guide the shelf hooks into the slots at a
desired height
3
. Then, lRZer the front of the
shelf so that the hooks drop into the slots
4
.
HUMIDITY CONTROLLED CRISPER
The crispers provide fresher tasting fruit and vegetables by
letting you easily control humidity inside the draZer.
You can control the amount of humidity in the moisture-
sealed crispers by adjusting the control to any setting
betZeen VEGETABLE and FRUIT.
v VEGETABLE keeps moist air in the crisper for best
storage of fresh, leafy vegetables.
v FRUIT lets moist air out of the crisper for best storage
of fruit.
REMOVING THE HUMIDITY CONTROLLED CRISPER
1. To remove, pull the draZer out to full extension.
2. Lift the front of the crisper up, then pull it straight out.
3. To install, slightly tilt up the front, insert the draZer into
the frame and push it back into place.
Fruit Vegetable
FruitVegetable
spilling.

24
USING YOUR REFRIGERATOR
To remove the glass:
1. Lift up the glass under the crisper cover.
2. Pull the glass up and out.
NOTE: Pantry drawer not shown for clarity.
PANTRY DRAWER
This drawer can be used for large party trays, deli items
and beverages. (Do not use this drawer for vegetables or
items that require high humidity.)
Pull forward to open. Lift slightly and pull out to remove.
DOOR BINS
The door bins are removable for easy cleaning and
adjustment.
1. To remove the bin, simply lift the bin up and pull
straight out.
2. To replace the bin, slide it in above the desired support
and push down until it snaps into place.
NOTE: Some bins may vary in appearance and will
only ot in one location.
DAIRY BIN
1. To remove the dairy bin, simply lift it and pull straight out.
2. To replace the dairy bin, slide it in above the desired
location and push down until it stops.
FREEZER SECTION
ICE BIN
1. Pull the freezer drawer and the pullout drawer out as
far as possible to remove the ice bin.
2. Gently lift and pull out the ice bin.
3. To replace, pull both drawers out as far as possible,
and set the bin in its correct position in the pullout
drawer. Close the pullout drawer and then the freezer
drawer.
CAUTION: Pinch hazard! Keep hands and feet clear
of the bottom of the freezer drawer when opening
and closing.
Ice Bin
Pullout Drawer

25
USING YOUR REFRIGERATOR
DURABASE REMOVAL AND REPLACEMENT
1. To remove the Durabase, open the drawer to full
extension
1
. Push the Durabase to the back as much as
possible, tilt the front of the Durabase up, and then lift
it up and out
2
.
2. To replace, tilt the back of the Durabase into the
drawer, then lower it down and into the rail assembly.
DURABASE DIVIDER
The Durabase divider allows you to organize the
Durabase area into sections. It can be adjusted from side
to side to accommodate items of diç erent sizes.
WARNING: If the Durabase divider is removed, there is
enough open space for children or pets to crawl inside.
To prevent accidental child and pet entrapment or
suç ocation risk, DO NOT allow children or pets to
touch or go near the drawer.
1
2
PULLOUT DRAWER
1. To remove, pull the drawer out to full extension. Lift
the drawer up and out, making sure to clear the rail
system.
2. To replace, with the drawer pulled out to full
extension, insert the drawer in the rail assembly.
NOTE: Assemble the Durabase before assembling
the pullout drawer. The pullout drawer needs
clearance in order to properly seat its rollers. If the
items are assembled improperly, the freezer door
may not close.

26
WATER FILTER
WATER FILTER
7KHZDWHUoOWHUVKRXOGEHUHSODFHG
v $SSrR[LPDWHO\ever\PRQWKV
v WKHQWKHwater
LQGLFDWRU
WXUQVRQ
v WKHQWKHwDWHUGLVSHQVHURXWSXW
GeFreDVHV
v WheQ the iFe FXEeV are VmaOOer
thaQ QRrmaO
v
RRWDWHWKHwater
XSLQWR
SRVLWLRQDQGFORVHWKHFRver
TKHFRvHUZLOOFOLFNZKHQFORVeG
FRUreFWO\
3.
After the water
LVrHSODFeGGLVSHQVH
JDOORQVRIwater
IRUDSSrR[LPDWHO\PLQXWHV
WRremRve trDSSeGDLUDQGFRQWDPLQDQWVfrRP
WKHV\VWHP'RQRWGLVSHQVHWKHHQWirHJDOORQ
DPRXQWFRQWLQXRXVO\'HSrHVVDQGrHOeDVHWKH
GLVSHQVHUSDGIRU F\FOHVRIVeFRQGV21DQG
VeFRQGV2FF
4. Water Filter Bypass Plug
KeeS the water
E\SDVVSOXJYRX0867
XVHWKHwater
E\SDVVSOXJZKHQD
rHSODFHPHQWwater
FDUWULGJHLVQRWDvDLODEOH
CAUTION: '2 12T RSerate refrigeratRr withRXt
water Rr water SOXg iQVtaOOeG
NOTE: TRSXrFKDVHDrHSODFHPHQWwater
YLVLWD
1. Remove the old water olter.
v LRwHURUremRvHWKHWRSOHIW
VKHOIWRDOORw the water
WR
rRWDWHDOOWKHwD\GRZQ
v PrHVVWKHSXVKEXWWRQWRRSHQWKH
water
FRver
NOTE: RHSODFLQJWKHwater
FaXVeV a VmaOO amRXQt Rf water
(arRXQG 1 Rz Rr 2 FF tR GraiQ
BefRre SXVhiQg the EXttRQ tR RSeQ the
water
FRver SOaFe a FXS XQGer
the frRQt eQG Rf the FRver tR FROOeFt
aQ\ OeaNiQg water HROG the water
XSright RQFe it iV remRveG tR
SreveQt aQ\ remaiQiQg water frRm
VSiOOiQg RXt Rf the water
v 3XOOWKHwater GRwQwarG
DQGSXOORXt0DNHVXrHWRrRWDWH
the
GRZQ FRPSOHWHO\ EHIRre
SXOOLQJLWRXWRIWKHPDQLIROG
KROH
v
TaNHWKHQew water
RXWRILWVSDFNDJLQJDQG
remRvHWKHSrRWeFWLvHFRver frRPWKHRULQJVWith
water
WDEVLQWKHKRUL]RQWDOSRVLWLRQSXVKWKHQew
water
LQWRWKHPDQLIROGKROHXQWLOLWVWRSV
WDWHU)LOWHU
B\SDVV3OXJ
6HDUVVWRUHRULQWKHU.S.A. call 1-844-553-6667.
<RXPD\DOVRSXUFKDVHRQOLQHDWwww.kenmore.com

27
Performance Data Sheet
The concentration of the indicated substances in water entering the system was reduced to a concentration less than or
HTXDOWRWKHSHUPLVVLEOHOLPLWIRUZDWHUOHDYLQJWKHV\VWHPDVVSHFLoHGLQ16)$16,6WDQGDUGDQG6WDQGDUG
* Based on the use of Cryptosporidium parvum oocysts
6\VWHPWHVWHGDQGFHUWLoHGE\16),QWHUQDWLRQDODJDLQVW16)$16,6WDQGDUGDQG6WDQGDUGIRUWKH
reduction of substances listed below.
Contaminant Reduction
Average
,QpXHQW
16)VSHFLoHG&KDOOHQJH
Concentration
$YJ
Reduction
Average
Product Water
Concentration
Max Permissible
Product Water
Concentration
NSF Reduction
Requirements
NSF Test
Report
Chlorine Taste and Odor 2.1 mg/L 2.0 mg/L ± 10% 97.2% 0.06 mg/L N/A Ă J-00049247
Nominal Particulate Class I, ,
ĂWRòP
5,600,000
pts/mL
At least 10,000 particles/mL 98.7% 73,000 pts/ml N/A Ă J-00049282
Asbestos 190 MFL
WR0)/oEHUVJUHDWHU
WKDQòPLQOHQJWK
>99% 0)/ N/A Ă J-0004928
Atrazine 0.0094 mg/L 0.009 mg/L ± 10% 94.7% 0.00005 mg/L 0.003 mg/L N/A J-00049293
Benzene 0.016 mg/L 0.015 mg/L ± 10% 96.7% 0.005 mg/L 0.005 mg/L N/A J-00049300
Carbofuran 0.08 mg/L 0.08 mg/L ± 10% 98.1% 0.002 mg/L 0.04 mg/L N/A J-00049294
Lindane 0.002 mg/L 0.002 mg/L ± 10% 98.2% 0.00004 mg/L 0.0002 mg/L N/A J-00051975
P-Dichlorobenzene 0.22 mg/L 0.225 mg/L ± 10% 99.8% 0.0005 mg/L 0.075 mg/L N/A J-00049298
Toxaphene 0.014 mg/L 0.015 mg/L ± 10% 93% 0.001 mg/L 0.003 mg/L N/A J-00049302
2,4-D 0.213 mg/L 0.210 mg/L ± 10% 95.2% 0.009 mg/L 0.07 mg/L N/A J-00049284
Lead pH @6.5 0.150 mg/L 0.15 mg/L ± 10% >99.3% 0.001 mg/L 0.010 mg/L N/A J-00051974
Lead pH @8.5 0.150 mg/L 0.15 mg/L ± 10% >99.3% 0.001 mg/L 0.010 mg/L N/A J-00049277
Mercury @ pH 6.5 0.0059 mg/L 0.006 mg/L ± 10% 96.1 0.0002 mg/L 0.002 mg/L N/A J-00053886
Mercury @ pH 8.5 0.0058 mg/L 0.006 mg/L ± 10% 90.1 0.0006 mg/L 0.002 mg/L N/A J-00051972
Cyst* 120,000 cysts/L Minimum 50,000 cysts/L 99.99% F\VW/ N/A Ă J-00049281
WATER FILTER

28
It is essential that the manufacturer’s recommended
installation, maintenance and water
replacement
requirements be carried out for the product to perform as
advertised.
NOTE: While the testing was performed under standard
laboratory conditions, actual performance may vary.
3M is a trademark of 3M Company.
NSF is a trademark of NSF International.
© 2009 3M Company. All rights reserved.
WARNING
CAUTION
To reduce the risk associated with ingestion of
contaminants: Do not use with water that is
microbiologically unsafe or of unknown quality
without adequate disinfection before and after of the
system.
Systems
for cyst reduction may be
used on disinfected water that may contain
cysts. EPA Establishment Number 10350-MN-005
To reduce the risk associated with property damage
due to water leakage:
v Read and follow the Water Filter instructions before
installation and use of this system.
v Installation and use MUST comply with all state and
local plumbing codes.
v Do not install if water pressure exceeds 120 psi (827
kPa). Contact a plumbing professional if you are
uncertain of how to check your water pressure.
v Do not install where water hammer conditions may
occur. If water hammer conditions exist, you must
install a water hammer arrester. Contact a plumbing
professional if you are uncertain of how to check for
this condition.
v Do not install on hot water supply lines.
The maximum operating water temperature of this
water
system is 100°F (38°C).
v
Do not operate
refrigerator in ambient conditions below 55°F
(12.7°C).
Drain water
when storing unit in
temperatures below 40°F (4.4°C).
v The disposable water
must be replaced every
six months, at the rated capacity, or if a noticeable
reduction in
rate occurs.
Application Guidelines/Water Supply Parameters
Service Flow 0.5 gpm (1.9 lpm)
Water Supply Potable Water
Water Pressure 40-120 psi (138 - 827 kPa)
Water Temperature 33°F - 100°F (0.6°C - 38°C)
WATER FILTER
7RSXUFKDVHDUHSODFHPHQWoOWHUYLVLW\RXUORFDO6HDUV
Product distributed in the United States by Transform
65%UDQGV0DQDJHPHQW//&+RçPDQ(VWDWHV,/
U.S.A.
store, or in the U.S.A. call 1-844-553-6667.
You may also purchase online at www.kenmore.com

29
WATER FILTER
State of Ca
li
forn
i
a
Department of Public Health
Water Treatment Device
Certificate Number
Date Issued: December 15, 2009
-909102
Manufacturer:
Cuno Inc.
The water treatment device(s) listed on this certificate have met the testing requirements pursuant to Section
116830 of the Health and Safety Code for the following health related contaminants:
AsbestosCysts
Lead
Mercury
2,4-D Reduction
Atrazine
Benzene
Carbofuran
Lindane
p-Dichlorobenzene
Toxaphene
Microbiological Contaminants and Turbidity
Inorganic/Radiological Contaminants
Organic Contaminants
200 gal
Rated Service Capacity:
0.5 gpm
Rated Service Flow:
Conditions of Certification:

30
CARE AND CLEANING
WARNING
Explosion Hazard
Both the refrigerator and freezer sections defrost
month to prevent odors. Wipe up spills immediately.
GENERAL CLEANING TIPS
Unplug refrigerator or disconnect power.
Remove all removable parts, such as shelves, crispers,
etc. Refer to sections in Using Your Refrigerator for
removal instructions.
Use a clean sponge or soft cloth and a mild detergent
in warm water. Do not use abrasive or harsh cleaners.
Hand wash, rinse and dry all surfaces thoroughly.
Plug in refrigerator or reconnect power.
EXTERIOR
Waxing external painted metal surfaces helps provide
rust protection. Do not wax plastic parts. Wax painted
metal surfaces at least twice a year using appliance wax
(or auto paste wax). Apply wax with a clean, soft cloth.
For products with a stainless steel exterior, use a clean
sponge or soft cloth and a mild detergent in warm water.
Do not use abrasive or harsh cleaners. Dry thoroughly
with a soft cloth.
INSIDE WALLS (allow freezer to warm up so
the cloth will not stick)
To help remove odors, you can wash the inside of the
refrigerator with a mixture of baking soda and warm
water. Mix 2 tablespoons of baking soda to 1 quart of
water (26 g soda to 1 liter water). Be sure the baking soda
is completely dissolved so it does not scratch the surfaces
of the refrigerator.
DOOR LINERS AND GASKETS
Use a clean sponge or soft cloth and a mild detergent
in warm water. Do not use cleaning waxes, concentrated
detergents, bleaches, or cleaners containing petroleum on
plastic refrigerator parts.
PLASTIC PARTS (Covers and Panels)
Use a clean sponge or soft cloth and a mild detergent
in warm water. Do not use glass sprays, abrasive
damage the material.
CONDENSER COILS
Use a vacuum cleaner with
an attachment to clean the
condenser cover and vents.
Do not remove the panel
covering the condenser
coil area.
CAUTION: While cleaning the inside, do not spray
water.

31
CARE AND CLEANING
CARE AND CLEANING
LIGHT REPLACEMENT
NOTE: The refrigerator and freezer compartment lights
are LED interior lighting, and service should be performed
WARNING
Electrical Shock Hazard
POWER INTERRUPTIONS
If the power will be out for 24 hours or less, keep all
refrigerator doors closed to help foods stay cold and
frozen.
2. If the power will be out for more than 24 hours, remove
all frozen food and store it in a frozen food locker.
WHEN YOU GO ON VACATION
If you choose to leave the refrigerator on while you are
away, follow these steps to prepare your refrigerator
before you leave.
Use up any perishables and freeze other items.
2.
follow these steps.
Remove all food from the refrigerator.
2. Depending on your model, set the thermostat control
(refrigerator control) to OFF. See the Setting the
Controls section.
3. Clean the refrigerator, wipe it and dry well.
Tape rubber or wood blocks to the tops of both doors
to prop them open far enough for air to get in. This
stops odor and mold from building up.
WHEN YOU MOVE
When you are moving your refrigerator to a new home,
follow these steps to prepare it for the move.
Remove all food from the refrigerator and pack all
frozen food in dry ice.
2. Unplug the refrigerator.
3. Clean, wipe and dry thoroughly.
Take out all removable parts, wrap them well and
tape them together so they do not shift and rattle
during the move. Refer to the Using your Refrigerator
section for removal instructions.
5.
Tape the doors shut and tape the power cord to the
refrigerator cabinet.
When you get to your new home, put everything back and
refer to the Refrigerator Installation section for preparation
instructions.
CARE AND CLEANING
The refrigerator must be unplugged or the power
WXUQHGRçDWWKHFLUFXLWEUHDNHUEHIRUHFRPSDUWPHQW
lights are replaced.
Depending on the model, raise the front of the
refrigerator so it rolls more easily OR screw in the
leveling legs all the way so they do not scrape the
pRRU6HHthe Leveling and Door Alignment section.

32
CONNECTING THE WATER LINE
BEFORE YOU BEGIN
This water line installation is not covered by the refrigerator
warranty. Follow these instructions carefully to minimize the
risk of expensive water damage.
Water hammer (water banging in the pipes) in house
plumbing can cause damage to refrigerator parts and can
to correct water hammer before installing the water supply
line to the refrigerator.
CAUTION: To prevent burns and product damage, only
connect the refrigerator water line to a cold water supply.
If you use your refrigerator before connecting the water
line, make sure the icemaker power switch is in the OFF (O)
position.
CAUTION: Do not install the icemaker tubing in areas
where temperatures fall below freezing.
WATER PRESSURE
A cold water supply. The water pressure must be between
If a is connected
to your cold water supply, this water line installation is not
covered by the refrigerator warranty. Follow the instructions
carefully to minimize the risk of expensive water damage.
If a
is connected
to your cold water supply, the water pressure to the reverse
osmosis system needs to be a minimum of 40 to 60 psi (2.8
kgf/cm
2
~ 4.2 kgf/cm
2
of 7 oz capacity).
If the water pressure from the reverse osmosis system is less
cup of 7 oz capacity):
Allow the storage tank on the reverse osmosis system to
If the issue concerning water pressure from reverse
All installations must be in accordance with local
plumbing code requirements.
CAUTION: Wear eye protection during installation to
WARNING: Connect to potable water supply only.
prevent injury.
WHAT YOU WILL NEED
Copper Tubing, ¼ in. outer
diameter, to connect the refrigerator
to the water supply. Be sure both
ends of the tubing are cut square.
To determine how much tubing you
need: measure the distance from the water valve on the
back of the refrigerator to the water supply pipe. Then,
(about 8 feet [2.4 m] coiled into 3 turns of about 10 in.
[25 cm] diameter) to allow the refrigerator to move out
from the wall after installation.
Power drill.
½ in. or adjustable wrench.
Flat blade and Phillips head screwdrivers.
Two ¼ in. outer diameter
compression nuts and
2 ferrules (sleeves) to
connect the copper tubing
refrigerator water valve.
If your existing copper water
end, you will need an adapter
(available at plumbing supply
stores) to connect the water line
to the refrigerator OR you can
a tube cutter and then use a
to the cold water line. The
inside diameter of / in. at the point of connection
to the COLD WATER LINE.
are included in many water
supply kits. Before purchasing,
make sure a saddle-type
valve complies with your local
plumbing codes.
NOTE: A self-piercing saddle type water valve should
not be used.
WARNING
Electrical Shock Hazard
When using any electrical device (such as a power
drill) during installation, be sure the device is battery
powered, double insulated or grounded in a manner that
will prevent the hazard of electric shock.

33
INSTALLATION INSTRUCTIONS
drinking water line.
Turn on the nearest faucet to relieve the pressure on the
line.
2. CHOOSE THE VALVE LOCATION
Choose a location for the valve that is
easily accessible. It is best to connect
into the side of a vertical water pipe.
When it is necessary to connect into
a horizontal water pipe, make the
connection to the top or side, rather
than at the bottom, to avoid drawing
3. DRILL THE HOLE FOR THE VALVE
Drill a ¼ in. hole in the water pipe using a sharp bit.
Remove any burrs resulting from
drilling the hole in the pipe. Be
careful not to allow water to
drain into the drill. Failure to
drill a ¼ in. hole may result
in reduced ice production or
smaller cubes.
NOTE: The hookup line cannot be white, plastic
tubing. Licensed plumbers must use only copper
tubing (NDA tubing #49595 or #49599) or Cross Link
Polyethylene (PEX) tubing.
the pipe clamp.
NOTE: Commonwealth of Massachusetts Plumbing
Codes 248CMR shall be adhered to. Saddle valves are
illegal and use is not permitted in Massachusetts.
Consult with a licensed plumber.
5. TIGHTEN THE PIPE CLAMP
Tighten the clamp screws until the sealing washer
begins to swell.
NOTE: Do not overtighten clamp or you may crush the
tubing.
Route the tubing between the cold water line and the
refrigerator.
Route the tubing through a hole drilled in the wall or
as close to the wall as possible.
NOTE:
8 feet coiled into 3 turns of about 10 in. diameter) to
allow the refrigerator to move out from the wall after
installation.
Place the compression nut and ferrule (sleeve) for
copper tubing onto the end of the tubing and connect
inserted into the valve. Tighten the compression nut
securely.
NOTE: Commonwealth of Massachusetts Plumbing
Codes 248CMR shall be adhered to. Saddle valves are
illegal and their use is not permitted in
Massachusetts. Consult with a licensed plumber.
Pipe Clamp
Saddle-Type
Vertical Cold
Water Pipe
Pipe Clamp
Clamp Screw
Washer
Inlet End
Saddle-Type
Packing Nut
Outlet Valve
Compression Nut
Ferrule (sleeve)
CONNECTING THE WATER LINE

34
CONNECTING THE WATER LINE
Turn the main water supply on and
is clear.
valve after about one quart of
tubing.
. CONNECT THE TUBING TO THE
REFRIGERATOR
NOTE: Before making the connection to the
refrigerator, be sure that the refrigerator power cord is
not plugged into the wall outlet.
2.
1.
3.
Tighten any connections that leak.
Arrange the coil of tubing so that it does not vibrate
against the back of the refrigerator or against the wall.
Push the refrigerator back to the wall.
Set the icemaker power switch to the ON position.
The icemaker will not begin to operate until it reaches
its operating temperature of 15°F (–9°C) or below. It
will then begin operation automatically if the icemaker
power switch is in the ON (I) position.
Tubing Clamp
¼ in. Tubing
¼ in.
Compression
Nut
Refrigerator
Connection
Ferrule
(sleeve)
CAUTION: Check to see if leaks occur at the water line
connections.
Remove thHpH[LEOHSODVWLFFDSIUom the water
valve.
Place the compression nut and ferrule (sleeve) onto
the end of the tubing as shown.
Insert the end of the copper tubing into the connec-
tion as far as possible. While holding the tubing,
tighten thHoWWLQJ

3
The default setting for the refrigerator is 37° Fahrenheit (3° Celsius). The default setting for the freezer is 0°
Fahrenheit (-18° Celsius). Adjust these settings as necessary to keep food at desired temperatures. Milk should be
the freezer. To switch the display from Fahrenheit to Celsius, press and hold the Freezer Temp and Refrigerator Temp
buttons until you hear a beep and the settings in the display change.
Continually press the Refrigerator Temp or Freezer Temp button on the control panel until the desired temperature
appears. The numbers will cycle from highest to lowest and then return to the highest again with continuous
pressing.
This may happen if you do not have a water source attached to your refrigerator and the icemaker is turned on. If
This is a normal part of the icemaker cycle. The icemaker tray may appear level or with a slight tilt. The change in
position is to assist in the freezing process.
The refrigerator is in Demo Mode. The Demo Mode disables all cooling in the refrigerator and freezer sections to
conserve energy while on display in a retail store. When activated, OFF is displayed on the control panel and the
display remains on for 20 seconds. With either refrigerator door opened, press and hold the Refrigerator Temp
button and the Accela Ice button at the same time for 5 seconds. The control panel beeps and the temperature
settings display to confirm that Demo Mode is deactivated. Use the same procedure to activate Demo Mode.
Before conducting troubleshooting, make sure that the following basic requirements are met:
)mpl 9.1( mpg 5.0wolF ecivreS
retaW elbatoPylppuS retaW
)aPk 728-831( isp 021-04erusserP retaW
Operating Ambient Temperature Limits 55°F–110°F (12.8°C–43.3°C)
serepma 02 ro 51 ta desuf dna ,ylno CA ,zH 06 ,V 511sgnitaR lacirtcelE

36
COOLING
Problem Possible Cause & Solution
Refrigerator and
freezer section are
not cooling.
The refrigerator control is set to OFF (some models).
v Firmly plug the cord into a live outlet with proper voltage (see Electrical & Grounding
Requirements).
Refrigerator is in the defrost cycle.
v During the defrost cycle, the temperature of each compartment may rise slightly. Wait 30
completed.
Refrigerator was recently installed.
v It may take up to 24 hours for each compartment to reach the desired temperature.
Refrigerator was recently relocated.
v If the refrigerator was stored for a long period of time or moved on its side, it is necessary
for the refrigerator to stand upright for 24 hours before connecting it to power.
The refrigerator is in Demo Mode.
v The Demo Mode allows the lights and control display to work normally while disabling the
Demo Mode, open
one door, then press and hold the Accela Ice and Refrigerator Temp.
e
seconds. Once disabled, OFF will disappear and the previous temperature settings will be
displayed. (Refer to Setting the Controls for recommended temperatures).
Cooling system runs
too much.
Refrigerator is replacing an older model.
v Modern refrigerators r
technology.
Refrigerator was recently plugged in or power restored.
v The refrigerator will take up to 24 hours to cool completely.
The door is opened often or a large amount of food / hot food was added.
v Adding food and opening the door warms the refrigerator, requiring the compressor to
run longer in order to cool the refrigerator back down. In order to conserve energy, try to
get everything you need out of the refrigerator at once, keep food organized so it is easy
Guide.)
Doors are not closed completely.
v Firmly push the doors shut. If they will not shut all the way, the “Doors will not close
correctly or pop open” section in Troubleshooting.
Refrigerator is installed in a hot location.
v The compressor will run longer under warm conditions. At normal room temperatures
(70 °F or 21 °C) expect your compressor to run about 40% to 80% of the time. Under
warmer conditions, expect it to run even more often. The refrigerator should not be
operated above 110 °F (43 °C).
Condenser / back cover is clogged.
v Use a vacuum cleaner with an attachment to clean the condenser cover and vents. Do not
remove the panel covering the condenser coil area.
OTING GUIDE
TROUBLESHOOTING GUIDE

37
Problem Possible Cause & Solution
Interior moisture
buildup
Doors are opened often or for long periods of time.
v When the doors are opened often or for long periods of time, warm, humid air enters the
compartment. This raises the temperature and moisture level within the compartment. To
Doors are not closed correctly.
v See the “Doors will not close correctly or pop open” section.
Weather is humid.
v Humid weather allows additional moisture to enter the compartments when the doors are
opened leading to condensation or frost. Maintaining a reasonable level of humidity in the
home will help to control the amount of moisture that can enter the compartments.
Defrost cycle recently completed.
v During the defrost cycle, the temperature of each compartment may rise slightly and
temperature has been restored once the defrost cycle has completed.
Food is not packaged correctly.
v Food stored uncovered or unwrapped, and damp containers can lead to moisture
accumulation within each compartment. Wipe all containers dry and store food in sealed
packaging to prevent condensation and frost.
Food is freezing
in the refrigerator
compartment
Food with high water content was placed near an air vent.
v Rearrange items with high water content away from air vents.
Refrigerator temperature control is set incorrectly.
v If the temperature is too cold, adjust the control one increment at a time and wait for the
temperature to stabilize. Refer to the Control Panel section for more information.
Refrigerator is installed in a cold location.
v When the refrigerator is operated in temperature below 41 °F (5 °C), food can freeze
in the refrigerator compartment. The refrigerator should not be operated in temperature
below 55 °F (13 °C).
Refrigerator or
freezer section is too
cold.
Incorrect temperature control settings.
v If the temperature is too cold, adjust the control one increment at a time and wait for the
temperature to stabilize. Refer to the Control Panel for more information.
Frost or ice crystals
form on frozen food
(inside of sealed
package).
Condensation from food with a high water content has frozen inside of the food package.
v This is normal for food items with a high water content.
Food has been left in the freezer for a long period of time.
v Do not store food items with high water content in the freezer for a long period of time.
Frost or ice crystals
form on frozen food
(outside of package).
Door is opened frequently or for long periods of time.
v When the doors are opened often or for long periods of time, warm, humid air enters
the compartment. This raises the temperature and moisture level within the compartment.
frequency and duration of door openings.
Door is not closing properly.
v Refer to the “Doors will not close correctly or pop open” section in Troubleshooting.
COOLING
TROUBLESHOOTING GUIDE

38
TROUBLESHOOTING GUIDE
Problem Possible Cause & Solution
Refrigerator or
freezer section is too
warm.
Refrigerator was recently installed.
v It may take up to 24 hours for each compartment to reach the desired temperature.
The air vents are blocked. Cold air circulates from the freezer to the fresh food section and
back again through air vents in the wall dividing the two sections.
v Locate air vents by using y
compartment.
Doors are opened often or for long periods of time.
v When the doors are opened often or for long periods of time, warm, humid air enters the
compartment. This raises the temperature and moisture level within the compartment. To
Unit is installed in a hot location.
v The refrigerator should not be operated in temperatures above 110 °F (43 °C).
A large amount of food or hot food was added to either compartment.
v Adding food warms the compartment requiring the cooling system to run. Allowing hot
food to cool to room temperature before putting it in the refrigerator will reduce this
Doors are not closed correctly.
v See the “Doors will not close correctly or pop open” section in the Troubleshooting.
Temperature control is not set correctly.
v If the temperature is too warm, adjust the control one increment at a time and wait for the
temperature to stabilize.
Defrost cycle has recently completed.
v During the defrost cycle, the temperature of each compartment may rise slightly and
temperature has been restored once the defrost cycle has completed.
COOLING
Problem Possible Cause & Solution
Ice has bad taste or
odor.
Water supply contains minerals such as sulfur.
v d to be installed to eliminate taste and odor problems.
NOTE:
odor/taste in all water supplies.
Icemaker was recently installed.
v Ice that has been stored for too long will shrink, become cloudy, and may develop a stale
taste. Throw away old ice and make a new supply.
The food has not been stored properly in either compartment.
v Rewrap the food. Odors may migrate to the ice if food is not wrapped properly.
The interior of the refrigerator needs to be cleaned.
v See the Care & Cleaning section for more information.
The ice storage bin needs to be cleaned.
v Empty and wash the bin (discard old cubes). Make sure that the bin is completely dry
before reinstalling it.
Icemaker is making
too much ice.
v Empty the ice bin. If your icemaker is e
make sure that there is a clear path between the two sensors. Reinstall the ice bin and wait
ICE

39
Problem Possible Cause & Solution
The icemaker is not
making any ice.
The icemaker is not
making enough ice.
Refrigerator was recently installed or icemaker recently connected.
v It may take up to 24 hours for each compartment to reach the desired temperature and
for the icemaker to begin making ice.
Icemaker is not turned on.
v
The ice detecting sensor is obstructed.
v Foreign substances or frost on the ice-detecting sensor can interrupt ice production. Make
sure that the sensor area is clean at all times for proper operation.
on.
v Connect the r
v If your icemaker is e
a clear path between the two sensors.
v Rev
amount and result in icemaker issues. (Refer to the Connecting the Water Line section.).
Demand exceeds ice storage capacity.
v The icemaker will produce approximately 70-184 cubes in a 24 hour period.
v ecommended:
Approximately every six months.
When the water dispenser output decreases.
When the ice cubes are smaller than normal.
Low house water supply pressure.
v The water pr
necessary to contact a plumber.
Tubing connecting refrigerator to house supply valve is kinked.
v The tubing can kink when the refrigerator is moved during installation or cleaning resulting
future kinks.
Doors are opened often or for long periods of time.
v If the doors of the unit are opened often, ambient air will warm the refrigerator which
will prevent the unit from maintaining the set temperature. Lowering the refrigerator
temperature can help, as well as not opening the doors as frequently.
Doors are not closed completely.
v If the doors are not properly close
not close correctly or pop open” section in Parts & Features Troubleshooting for more
information.
The temperature setting for the freezer is too warm.
v The recommended temperature for the freezer compartment for normal ice production is
ICE
TROUBLESHOOTING GUIDE

40
PARTS & FEATURES
Problem Possible Cause & Solution
Doors will not close
correctly or pop
open.
Food packages are blocking the door open.
v Rearrange food containers to clear the door and door shelves.
Ice bin, crisper cover, pans, shelves, door bins, or baskets are out of position.
v Push bins all the way in and put crisper cover, pans, shelves and baskets into their correct
positions. See the Operation section for more information.
The doors were removed during product installation and not properly replaced.
v Remove and replace the doors according to the Removing and Replacing Refrigerator
Handles and Doors section.
Refrigerator is not leveled properly.
v See Door Alignment in the Refrigeration Installation section to level refrigerator.
open.
The gaskets are dirty or sticky.
v Clean the gaskets and the surfaces that they touch. Rub a thin coat of appliance polish or
kitchen wax on the gaskets after cleaning.
Door was recently closed.
v When you open the door, warmer air enters the refrigerator. As the warm air cools, it can
create a vacuum. If the door is hard to open, wait one minute to allow the air pressure to
equalize, then see if it opens more easily.
Refrigerator wobbles
or seems unstable.
Leveling legs are not adjusted properly.
v Refer to the Leveling and Door Alignment section.
Floor is not level.
v It may be necessary to add shims under the leveling legs or rollers to complete installation.
Lights do not work. LED interior lighting failure.
v The refrigerator compartment lamp is LED interior lighting, and service should be
Refrigerator has an
unusual odor.
The Air Filter may need to be set to the MAX setting or replaced.
v Set the Air Filter to the MAX setting. If the odor does not go away within 24 hours, the
ed to be replaced. See the Replacing the Air Filter section for replacement
instructions.
The interior of
the refrigerator is
covered with dust or
soot
v Make sure that the r
chimney or candle.
TROUBLESHOOTING GUIDE

41
NOISES
Problem Possible Cause & Solution
Clicking The defrost control will click when the automatic defrost cycle begins and ends. The
thermostat control (or refrigerator control on some models) will also click when cycling on and
Rattling
or items stored on top of or around the refrigerator.
v Floor is weak or uneven or leveling legs need to be adjusted. See the Door Alignment
section.
Refrigerator with linear compressor was jarred while running. No action needed.
Whooshing This is normal when the evaporator fan motor is circulating air through the refrigerator and
freezer compartments.
Air is being forced over the condenser by the condenser fan. No action needed.
Gurgling
Popping Contraction and expansion of the inside walls due to changes in temperature is part of normal
operation.
Sizzling It is normal to hear water dripping on the defrost heater during a defrost cycle.
Vibrating If the side or back of the refrigerator is touching a cabinet or wall, some of the normal
vibration may become audible.
v To eliminate the noise, make sure that the sides and back of the refrigerator are not close
enough to contact a wall or cabinet.
Dripping It is normal to hear water running into the drain pan during the defrost cycle.
Pulsating or high-
pitched sound
temperature.
v our new refrigerator to run longer than your
running, it is normal to hear a pulsating or high-pitched sound.
TROUBLESHOOTING GUIDE

42
ÍNDICE
Garantía .............................................................................. 43
Registro del producto
................................................ 44
Instrucciones de seguridad importantes
.....44-46
Requisitos eléctricos y de conexión a tierra
... 47
Componentes y características
............................48
Instalación del refrigerador ..................... 49-57
Desembalaje del refrigerador ..................... 49
Dimensiones y espacios ............................... 49
Filtro de agua ............................................66-69
Cuidado y limpieza ...................................70-71
Sugerencias generales de limpieza ..........71
C
onexión de la tubería de agua ............72-74
Guía pa
Servicio.........................................Contraportada
ra la solución de problemas .... 75-82
Instalación
.......................................................................50
Desmontaje y colocación de las
manijas y puertas del congelador
........... 51-56
Nivelación y alineación de las puertas ..... 57
Uso del refrigerador .................................58-65
Ajuste de los controles ............................58-59
Máquina de hielo automática .................... 60
Guía para el almacenamiento
de alimentos ................................................. 61
Sección refrigerador
Dispensador de agua ...................................62
Estantes del refrigerador
.......................................63
Cajón con control de humedad .................. 63
Cajón con control de Temperatura ............ 64
Bandejas para lácteos .................................64
Bandejas de puerta ........................................64
Sección congelador
Depósito de hielo .........................................64
Durabase ....................................................... 65
Divisor Durabase ........................................... 65
Cajón extraible ..............................................65

*$5$17¸$
*$5$17¸$/,0,7$'$'(/5()5,*(5$'25
*$5$17¸$/,0,7$'$.(1025((/,7(
Con el COMPROBANTE DE COMPRA, la siguiente cobertura de garantía aplica cuando este electrodoméstico se instala, opera y mantiene
correctamente, de acuerdo con todas las instrucciones proporcionadas.
8Q$ÙRGH*DUDQWÕDHQHO(OHFWURGRPÑVWLFR
Este aparato tiene garantía por defectos en el material o mano de obra DURANTE UN AÑO a partir de la fecha de venta. Si el aparato está
defectuoso, recibirá la reparación sin costo o el cambio, a elección del vendedor. La cobertura de garantía completa aplica solamente por 90 días
DSDUWLUGHODIHFKDGHYHQWDVLHOHOHFWURGRPÑVWLFRVHXVDFRQoQHVGLVWLQWRVGHOXVRGRPÑVWLFR
&LQFR$ÙRVGH*DUDQWÕDHQHO6LVWHPD5HIULJHUDQWH6HOODGR
El sistema refrigerante sellado tiene garantía por defectos en el material o mano de obra DURANTE CINCO AÑOS a partir de la fecha de venta.
Si aparecen defectos en alguna pieza del sistema dentro del primer año, se le proporcionará e instalará una nueva sin costo. Si aparece un defecto
en una pieza del sistema después del primer año, se le proporcionará una pieza nueva, pero no se le instalará sin costo. Usted será responsable del
costo de la mano de obra que implica la instalación de la pieza después del primer año a partir de la fecha de venta. La cobertura de esta garantía
DSOLFDVRODPHQWHSRUXQDÙRDSDUWLUGHODIHFKDGHYHQWDVLHOHOHFWURGRPÑVWLFRVHXVDFRQoQHVGLVWLQWRVGHOXVRGRPÑVWLFR
'LH]$ÙRVHQHO&RPSUHVRU/LQHDO
El compresor lineal de este electrodoméstico tiene garantía por defectos en el material o mano de obra DURANTE DIEZ AÑOS a partir de la fecha
de venta. Si aparecen defectos en el compresor dentro del primer año, se le proporcionará e instalará uno nuevo sin costo. Si aparece un defecto en
el compresor después del primer año, se le proporcionará uno nuevo, pero no se le instalará sin costo. Usted será responsable del costo del trabajo
que implica la instalación de la pieza después del primer año a partir de la fecha de venta. Esta cobertura de garantía aplica solamente por dos
DÙRVDSDUWLUGHODIHFKDGHYHQWDVLHOHOHFWURGRPÑVWLFRVHXVDFRQoQHVGLVWLQWRVGHOXVRGRPÑVWLFR
*DUDQWÕDGHSRU9LGDHQ&DMRQHVGH$OPDFHQDPLHQWR
DURANTE EL TIEMPO QUE SE USE desde la fecha de venta, se proporcionará el cambio sin costo por un cajón de almacenamiento o compartimiento
defectuoso del refrigerador o congelador. Si aparece un defecto dentro del primer año, un nuevo cajón se le instalará sin costo. Si aparece un defecto
después del primer año, se le proporcionará un nuevo cajón, pero no se le instalará sin costo. Esta garantía de por vida solo cubre los cajonesy no
aplica a ningún otro componente o mecanismo relacionado. Usted será responsable del costo de la mano de obra que implica la instalación del
contenedor después del primer año a partir de la fecha de venta. La cobertura de garantía aplica solamente por 90 días a partir de la fecha de
YHQWDVLHVWHHOHFWURGRPÑVWLFRVHXVDFRQoQHVGLVWLQWRVGHOXVRGRPÑVWLFR3DUDFRQRFHUORVGHWDOOHVGHFREHUWXUDGHODJDUDQWÕD\REWHQHUUHSDUDFLÚQ
o cambio sin costo, visite el sitio web: www.kenmore.com/warranty
(VWDJDUDQWÕD62/2FXEUHGHIHFWRVHQHOPDWHULDO\ODPDQRGHREUD\12FXEULUÊORVLJXLHQWH
(OHPHQWRVSUHVFLQGLEOHVTXHSXHGHQGHVJDVWDUVHSRUHOXVRQRUPDO\TXHLQFOX\HQHQWUHRWURVoOWURVFRUUHDVEROVDVRIRFRVFRQEDVHGHURVFD
2. Un técnico de servicio que limpie o le de mantenimiento al electrodoméstico, o que le indique al usuario la forma correcta de instalarlo, operarlo
o darle mantenimiento.
3. Llamadas de servicio para corregir la instalación del electrodoméstico no realizada por agentes de servicio autorizados de Sears o para reparar
problemas con fusibles del hogar, interruptores, cableado doméstico y sistemas de suministro de agua o gas provocados por dicha instalación.
4. Daño o falla de este electrodoméstico causado por la instalación no realizada por agentes de servicio autorizado de Sears, que incluye el hecho
de que la instalación no se haya realizado según los códigos eléctricos, de gas o de plomería.
'DÙRRIDOODGHHVWHHOHFWURGRPÑVWLFRLQFOX\HQGRFDPELRGHFRORURFRUURVLÚQGHODVXSHUoFLHVLQRVHRSHUDRVHOHGDPDQWHQLPLHQWRGHDFXHUGR
con todas las instrucciones proporcionadas.
'DÙRRIDOODGHHVWHHOHFWURGRPÑVWLFRLQFOX\HQGRFDPELRGHFRORURFRUURVLÚQGHODVXSHUoFLHSURYRFDGRVSRUXQDFFLGHQWHDOWHUDFLÚQDEXVR
mal uso o el uso contrario al previsto.
'DÙRRIDOODGHHVWHHOHFWURGRPÑVWLFRLQFOX\HQGRFDPELRGHFRORURFRUURVLÚQGHODVXSHUoFLHFDXVDGRSRUHOXVRGHGHWHUJHQWHVOLPSLDGRUHV
productos químicos o utensilios distintos de los recomendados en todas las instrucciones proporcionadas con el producto.
'DÙRRIDOODGHODVSDUWHVRVLVWHPDVSURYRFDGRSRUPRGLoFDFLRQHVQRDXWRUL]DGDVDOHOHFWURGRPÑVWLFR
9. Servicio brindado a un electrodoméstico si faltan el modelo y la placa del número de serie, están alterados o no se puede determinar fácilmente
VLWLHQHQHOORJRWLSRGHFHUWLoFDFLÚQDSURSLDGR
$YLVRGHJDUDQWÕDVLPSOÕFLWDVOLPLWDFLÚQGHUHFXUVRV
El único y exclusivo recurso del cliente según esta garantía limitada será la reparación o el cambio del producto según se establece en el presente. Las
JDUDQWÕDVLPSOÕFLWDVTXHLQFOX\HQODVJDUDQWÕDVGHFRPHUFLDELOLGDGRDSWLWXGSDUDXQoQHQSDUWLFXODUHVWÊQOLPLWDGDVDXQDÙRHQHOHOHFWURGRPÑVWLFR
cinco años en el sistema refrigerante sellado, diez años en el compresor lineal, y el tiempo que se use en los contenedores de almacenamiento,
o el periodo más corto permitido por ley. Los vendedores no pueden ser responsables de daños incidentales o consecuenciales. Algunos estados
no permiten la exclusión o limitación de daños incidentales o consecuenciales, o las limitaciones sobre la duración de una garantía implícita de
comerciabilidad o aptitud, de modo que estas exclusiones o limitaciones pueden no aplicarle a usted.
Esta garantía aplica solamente cuando el electrodoméstico se utilice en los Estados Unidos.
(VWDJDUDQWÕDOHRWRUJDGHUHFKRVOHJDOHVHVSHFÕoFRV\XVWHGWDPELÑQSXHGHWHQHURWURVGHUHFKRVTXHYDUÕDQGHXQHVWDGRDRWUR
7UDQVIRUP65%UDQGV0DQDJHPHQW//&+RçPDQ(VWDWHV,/
®

5(*,6752'(/352'8&72
En el espacio siguiente, anote la fecha de la compra, el modelo y el número de serie del producto. Encontrará el modelo
\HOQàPHURGHVHULHLPSUHVRHQODSODFDGHLGHQWLoFDFLÚQVLWXDGDHQHOUHYHVWLPLHQWRLQWHULRUGHOFRPSDUWLPLHQWRGHO
refrigerador. Tenga esta información a mano siempre que se ponga en contacto con Sears en relación con su producto.
N.º de modelo___________________ Fecha de compra ___________________
N.º de serie.___________________
Guarde estas instrucciones y su ticket de compra para futuras consultas.
,16758&&,21(6'(6(*85,'$'
$'9(57(1&,$
,167$/$&,½1
v Para reducir el riesgo de lesiones personales, respete
todos los procedimientos de seguridad recomendados
por la industria, incluso el uso de guantes de manga
larga y gafas de seguridad.
v Nunca intente operar este artefacto si se encuentra
dañado, si no funciona correctamente, si no está
ensamblado por completo o si tiene piezas faltantes o
rotas, incluido un cable o enchufe dañado.
v Conecte este producto únicamente a un tomacorriente
dedicado, conectado a tierra, apto para usar con este
producto (115 voltios, 60 Hz, solo CA). El usuario tiene
la responsabilidad de reemplazar un tomacorriente de
pared estándar de 2 tomas por un tomacorriente de
pared estándar de 3 tomas.
3DUDGLVPLQXLUHOULHVJRGHH[SORVLRQHVLQFHQGLRVGHVFDUJDVHOÑFWULFDVTXHPDGXUDVOHVLRQHVRPXHUWH
SDUDODVSHUVRQDVTXHXVHQHVWHDUWHIDFWRVLJDODVSUHFDXFLRQHVEÊVLFDVLQFOXLGDVODVVLJXLHQWHV
/($72'$6/$6,16758&&,21(6$17(6'(87,/,=$5
0HQVDMHVGH6HJXULGDG
6XVHJXULGDG\ODGHORVGHPÊVVRQPX\LPSRUWDQWHV
Tanto en este manual como en el equipo, hemos proporcionado muchos mensajes de seguridad importantes. Siempre
debe leer y respetar todos los mensajes de seguridad.
Este es el símbolo de alerta de seguridad.
Este símbolo le advierte de posibles peligros que pueden matarlos o lastimarlos a usted y a otros.
Todos los mensajes de seguridad seguirán el símbolo de alerta de seguridad y la palabra ADVERTENCIA
o PRECAUCIÓN.
(VWRVWÑUPLQRVVLJQLoFDQORVLJXLHQWH
$'9(57(1&,$
Podría sufrir lesiones graves o la muerte si no sigue las instrucciones.
35(&$8&,½1
Puede resultar lesionado o causar daño al producto si no sigue las instrucciones.
Todos los mensajes de seguridad le indicarán cuál es el riesgo potencial, le indicarán cómo reducir la probabilidad de
lesiones y le proporcionarán información sobre qué podría suceder si no se siguen las instrucciones..
v No use un tomacorriente que pueda apagarse con un
interruptor. No use un cable de extensión.
v Posicione el electrodoméstico de un modo que
le permita acceder fácilmente a la alimentación
eléctrica.
v Al mover el electrodoméstico, tenga cuidado de no
torcer ni dañar el cable de alimentación.
v Póngase en contacto con un centro de servicio
autorizado antes de instalar o cambiar de lugar el
electrodoméstico.
v Por ninguna razón debe cortar o quitar la tercera
clavija (tierra) del cable de alimentación.

4
v Mantenga los materiales de empaque fuera del
alcance de los niños. Los materiales de empaque
pueden ser peligrosos para los niños. Corren riesgo de
DVo[LD
v No instale el electrodoméstico en un lugar húmedo
o polvoriento, donde el aislamiento de las piezas
eléctricas podría deteriorarse.
v No coloque el electrodoméstico bajo la luz solar
directa ni lo exponga a electrodomésticos que emitan
calor, como cocinas o calefactores.
v No doble ni pellizque en exceso el cable de
alimentación, ni coloque objetos pesados sobre este.
)81&,21$0,(172
v Este refrigerador está destinado únicamente a usos
domésticos y similares aplicaciones, tales como:
ÊUHDVGHFRFLQDHQWLHQGDVRoFLQDV\OXJDUHVGH
trabajo;
- granjas; por clientes en hoteles, moteles y otros tipos
de ambientes residenciales;
- hospedajes tipo bed and breakfast;
- aplicaciones de abastecimiento y de servicios
similares de no distribución.
v 1RXVHHVWHHOHFWURGRPÑVWLFRSDUDoQHVHVSHFLDOHV
como para conservar medicamentos o materiales de
ensayo, usar en barcos, etc.
v NO permita que los niños entren y se paren o
se cuelguen de las puertas o los estantes del
electrodoméstico. Podrían dañar el refrigerador o
sufrir lesiones graves.
v No permita que los niños entren al electrodoméstico.
Podrían quedar atrapados y sofocarse.
v Debe supervisar a los niños para asegurarse de que
no jueguen con el electrodoméstico.
v Mantenga los dedos lejos de los puntos de riesgo de
pinzamiento; las distancias de separación entre las
puertas y los gabinetes son necesariamente pequeñas.
Tenga cuidado al cerrar las puertas cuando haya
niños cerca.
v No toque los alimentos congelados ni las partes
metálicas del compartimento del congelador si tiene
las manos mojadas o húmedas. Hacerlo podría causar
congelación.
v No vuelva a congelar alimentos congelados que se
hayan descongelado por completo. Esto podría ser
peligroso para su salud.
v No use adaptadores ni enchufe el cable de
alimentación en un alargador de múltiples
tomacorrientes.
v Si el cordón de alimentación es dañado, este debe
ser reemplazado por el fabricante o por su agente de
VHUYLFLRRSRUSHUVRQDOVLPLODUPHQWHFDOLoFDGRFRQHO
oQGHHYLWDUXQSHOLJUR
v No use el refrigerador ni toque el cable de
alimentación con las manos mojadas.
v 1RPRGLoTXHQLH[WLHQGDHOFDEOHGHDOLPHQWDFLÚQ
v 1RXVHXQWRPDFRUULHQWHTXHQRHVWÑFHUWLoFDGR1R
enchufe el electrodoméstico en un tomacorriente de
pared dañado.
v No coloque las manos, los pies u otros objetos
en la ventilación de aire ni en la parte inferior
del refrigerador. Si lo hace, podría sufrir lesiones
personales o descargas eléctricas.
v Si se produce una fuga de gas (propano/GPL),
asegúrese de que el área esté adecuadamente
ventilada y póngase en contacto con un centro
de servicio autorizado antes de volver a usar el
refrigerador. No toque ni desarme el electrodoméstico
ni el cable de alimentación del electrodoméstico.
v Ante la presencia de ruidos u olores extraños, o si sale
humo del electrodoméstico, desconecte el cable de
alimentación de inmediato y póngase en contacto con
un centro de servicio autorizado.
v No use fusibles (como cobre, alambre de acero, etc.)
que no sean los fusibles estándar.
v No coloque ni use un aparato eléctrico dentro
del electrodoméstico, a menos que sea de un tipo
recomendado por el fabricante.
v No introduzca animales con vida dentro del
electrodoméstico.
v No coloque objetos pesados o frágiles, contenedores
llenos de líquido, sustancias combustibles u objetos
LQpDPDEOHVFRPRYHODV\OÊPSDUDVVREUHHO
electrodoméstico.
v Evite el contacto con las partes móviles del
mecanismo eyector o con el elemento de calor que
dispensa los cubos de hielo.
v Si se conecta a un circuito protegido con fusibles,
utilice un fusible de retardo.
v Mantenga las aperturas de ventilación, en la cubierta
del electrodoméstico o en la estructura incorporada,
despejadas de obstrucciones.
v No utilice dispositivos mecánicos u otros medios para
acelerar el proceso de descongelado, con excepción
de aquellos recomendados por el fabricante.
v No utilice aparatos eléctricos dentro de los
compartimientos de almacenaje de alimentos del
electrodoméstico, a menos que sean de un tipo
recomendado por el fabricante.
v No almacene sustancias explosivas como latas
GHDHURVROFRQSURSXOVRUHVLQpDPDEOHVHQHVWH
electrodoméstico.
v NO introduzca los dedos en el mecanismo de
fabricación automática de hielo con el refrigerador
enchufado.
v Al retirar hielo del dispensador, no use un contenedor
frágil.

4
$'9(57(1&,$
$'9(57(1&,$5,(6*2'($75$3$0,(172'(1,¼26
v Los electrodomésticos desechados o abandonados son peligrosos, incluso si se dejan de usar solo
por unos pocos días. Al momento de desechar el refrigerador, retire los materiales de embalaje de
ODSXHUWDRTXLWHODVSXHUWDVSHURGHMHORVHVWDQWHVHQVXOXJDUDoQGHTXHORVQLÙRVQRSXHGDQ
ingresar fácilmente a este.
v Si desecha el refrigerador, asegúrese de que el refrigerante y la espuma de aislamiento sean
UHPRYLGRVSDUDVXDGHFXDGDHOLPLQDFLÚQSRUXQWÑFQLFRFDOLoFDGR6LOLEHUDHOUHIULJHUDQWHR
tira la espuma de aislamiento, puede ser multado o encarcelado de acuerdo con la legislación
DPELHQWDOSHUWLQHQWH/DHVSXPDGHDLVODPLHQWRFRQWLHQHXQJDVH[SDQVRULQpDPDEOH
v Cuando se deshace del electrodoméstico, remueva la junta de la puerta dejando los estantes y
cestas en su lugar, y mantenga a los niños alejados del electrodoméstico.
0$17(1,0,(172
v No use secadoras eléctricas para secar el interior del
producto.
v No prenda velas para remover el olor interno del
producto.
v En el caso de fuga del refrigerante, aleje los objetos
LQpDPDEOHVGHOUHIULJHUDGRU$VHJàUHVHGHTXHHOÊUHD
esté bien ventilada y póngase en contacto con un
centro de servicio autorizado.
v 0DQWHQJDPDWHULDOHVLQpDPDEOHV\YDSRUHVFRPR
gasolina, alejados del refrigerador.
v Este aparato no esta destinado para utilizarse por
SHUVRQDVLQFOX\HQGRQLÙRVFRQFDSDFLGDGHVoVLFDV
sensoriales o mentales reducidas, o con falta de
experiencia o conocimiento, a menos que hayan
recibido una supervisión o capacitación concerniente
a el uso del aparato por una persona responsable de
su seguridad.
v Desenchufe el cable de alimentación antes de limpiar
o reparar el electrodoméstico.
v Las luces del refrigerador y el compartimento del
congelador son luces LED para interiores, y un técnico
FDOLoFDGRGHEHUHDOL]DUHOPDQWHQLPLHQWR
v En caso de apagón o tormenta eléctrica, desenchufe
el cable de alimentación de inmediato.
v Apague la alimentación si ingresa agua o polvo en el
electrodoméstico. Llame a un agente de servicio.
v No almacene contenedores de vidrio ni refrescos en
el compartimento del congelador. Al congelarse, los
contenidos pueden expandirse, romper el contenedor
y provocar lesiones.
v No almacene, desarme ni repare el electrodoméstico
XVWHGPLVPRQLSHUPLWDTXHHOSHUVRQDOQRFDOLoFDGR
lo haga.
$'9(57(1&,$5,(6*2'(,1&(1',2
<0$7(5,$/(6,1)/$0$%/(6
v Este electrodoméstico contiene una pequeña cantidad de refrigerante isobutano (R600a), que es
combustible. Al transportar e instalar el electrodoméstico, debe prestar atención para asegurar
que ninguna parte del circuito refrigerante se dañe. Fuga del refrigerante fuera de las tuberias
podría generar un incendio o causar una lesión ocular. Si se detecta una fuga, evite cualquier
llama descubierta o fuentes potenciales de incendio, y ventile el ambiente en el que se encuentra
el electrodoméstico por varios minutos.
v $PDQHUDGHHYLWDUODFUHDFLÚQGHXQDPH]FODGHJDV\DLUHLQpDPDEOHHQFDVRRFXUUDXQDIXJD
en el circuito refrigerante, el tamaño del ambiente en el que el electrodoméstico se ubica deberá
corresponder a la cantidad de refrigerante usada. El espacio debe ser de 10.8 pies cuadrados (1
metro cuadrado) por cada 8g de refrigerante R600a dentro del electrodoméstico. La cantidad
GHUHIULJHUDQWHHQVXHOHFWURGRPÑVWLFRSDUWLFXODUVHPXHVWUDHQODSODFDGHLGHQWLoFDFLÚQ
ubicada dentro del mismo. Nunca inicie un electrodoméstico mientras este muestre algún signo
defectuoso. En caso de dudas, consulte con su distribuidor.
(/,0,1$&,½1'(&)&+&)&
Es posible que su antiguo refrigerador tenga un sistema
GHUHIULJHUDFLÚQTXHXVH&)&FORURpXRURFDUERQRVR
+&)&KLGURFORURpXRURFDUERQRV/RV&)&\ORV+&)&VRQ
considerados perjudiciales para el ozono estratosférico si se
liberan a la atmósfera. Otros refrigerantes también pueden
causar daño al medio ambiente si se liberan a la atmósfera.
Si va a desechar su antiguo refrigerador, asegúrese de
TXHXQWÑFQLFRFXDOLoFDGRVHHQFDUJXHGHUHWLUDUHO
refrigerante para su adecuada eliminación. Si de forma
intencionada libera este refrigerante, podría estar sujeto a
multas y penas de prisión según lo previsto en la legislación
medioambiental.

4
5(48,6,726(/´&75,&26<'(&21(;,½1$7,(55$
$'9(57(1&,$
3$5$&21(&7$5/$(/(&75,&,'$'
0´72'2'(&21(;,½1$7,(55$5(&20(1'$'2
El refrigerador debe estar siempre enchufado a su toma de corriente individual conectada a tierra adecuadamente con
XQDWHQVLÚQQRPLQDOGHYROWLRV+]VÚOR&$\SURWHJLGDPHGLDQWHIXVLEOHDÚDPSHULRV(VWDFRQoJXUDFLÚQ
proporciona el mejor rendimiento y, al mismo tiempo, evita la sobrecarga de la instalación eléctrica de la casa que podría
provocar un peligro de incendio debido a un sobrecalentamiento de los cables. Se recomienda disponer de un circuito
independiente para la exclusiva alimentación de este electrodoméstico.
Use un receptáculo que no se pueda apagar con un interruptor o una cadena de tracción. No utilice un alargador de corriente.
Si únicamente se dispone de una toma de corriente de 2 clavijas, será responsabilidad y obligación suya sustituirla por otra
de 3 clavijas con una conexión a tierra adecuada.
5LHVJRGHGHVFDUJDVHOÑFWULFDV
325027,926'(6(*85,'$'3(5621$/HVWH
HOHFWURGRPÑVWLFRGHEHHVWDUFRQHFWDGRDWLHUUD
DGHFXDGDPHQWH6ROLFLWHDXQHOHFWULFLVWDFXDOLoFDGRTXH
FRPSUXHEHODWRPDGHFRUULHQWH\HOFLUFXLWRHOÑFWULFR
SDUDDVHJXUDUVHGHTXHODWRPDGHFRUULHQWHHVWÊ
correctamente conectada a tierra.
862'(&$%/(6$/$5*$'25(6
$'9(57(1&,$1RXVHFDEOHVDODUJDGRUHVR
DGDSWDGRUHVVLQFRQH[LÚQDWLHUUDGHGRVFODYLMDV
'HELGRDORVSRVLEOHVSHOLJURVGHVHJXULGDGTXHVHSXHGHQ
SURGXFLUEDMRFLHUWDVFRQGLFLRQHVQRVHUHFRPLHQGDHO
uso de un cable alargador. Sin embargo, si a pesar de ello
elige usar un cable alargador, es absolutamente necesario
que sea un cable alargador para electrodomésticos de 3
FODYLMDVFRQFRQH[LÚQDWLHUUD\FODVLoFDFLÚQ8/((88
que disponga de un enchufe y una toma de corriente con
FRQH[LÚQDWLHUUD\TXHODFODVLoFDFLÚQHOÑFWULFDGHOFDEOH
sea de 15 amperios (mínimo) y 120 voltios.
El uso de un cable alargador aumentará la separación
necesaria para la parte posterior del refrigerador.
Enchufe
de conexión
a tierra de
3 clavijas
Toma de pared
con conexión a
tierra de 3 clavijas
Antes de usar el
electrodoméstico, asegúrese
de disponer de una conexión a
tierra adecuada.
$'9(57(1&,$
5HHPSOD]RGHFDEOHHOÑFWULFR
3DUDHYLWDUSHOLJURVORVFDEOHVGHDOLPHQWDFLÚQGDÙDGRV
deben ser reemplazados por el fabricante, por su
UHSUHVHQWDQWHGHVHUYLFLRWÑFQLFRRSRUXQWÑFQLFR
FDOLoFDGR1RSRQJDHQIXQFLRQDPLHQWRHOUHIULJHUDGRU
VLHOFDEOHHOÑFWULFRHVWÊGDÙDGR
*8$5'((67$6,16758&&,21(6
35(&$8&,½1
,167$/$&,½1
v No coloque el electrodoméstico en un lugar donde
podría caerse.
v El refrigerador debe instalarse correctamente,
teniendo en cuenta las instrucciones de instalación.
)81&,21$0,(172
v No use aerosoles cerca del electrodoméstico.
v Este refrigerador está destinado únicamente a usos
domésticos y similares.
v No golpee ni aplique demasiada fuerza en las
VXSHUoFLHVGHYLGULR1RWRTXHODVVXSHUoFLHVGHYLGULR
si están agrietadas o rotas.
v No cuelgue ni coloque objetos pesados en el
dispensador del electrodoméstico.
v No llene ni envase en exceso los alimentos en los
compartimentos de la puerta. Esto podría dañar el
compartimento o provocar lesiones personales al
retirar los alimentos aplicando una fuerza excesiva.
0$17(1,0,(172
v No use detergentes fuertes como cera o diluyentes
para la limpieza. Limpie con un trapo suave.
v Retire los objetos extraños (como polvo y agua) de las
clavijas del enchufe y las áreas de contacto. No use
un trapo mojado o húmedo para limpiar el enchufe.
v No rocíe agua directamente en el interior o exterior
del electrodoméstico.
v Cuando estén fríos, no limpie los estantes de vidrio ni
las tapas con agua caliente. Si se exponen a cambios
de temperatura repentinos, podrían romperse.

COMPONENTES Y CARACTERÍSTICAS
C
F
N
M
L
K
J
D
E
Diagnostics
O
B
A
G
H
I
Use esta página para familiarizarse con los componentes y funciones del refrigerador.
NOTA: Esta guía cubre varios modelos distintos. El refrigerador que ha adquirido puede tener algunos o todos los
componentes que se enumeran a continuación. Es posible que las ubicaciones de las funciones que se indican no
coincidan con su modelo.
Filtro de agua
Luz del refrigerador
Estantes del refrigerador
Cajón con control de humedad
Cajón con control de temperatura
Parteluz articulado
Máquina de hielo
Depósito de hielo
Divisor Durabase
Durabase
Cajón extraíble
Luz del congelador
Bandejas de puerta
Bandeja para lácteos
A
I
B
J
KC
LD
ME
N
Tapa del depósito de agua
O
F
G
H

49
INSTALACIÓN DEL REFRIGERADOR
ADVERTENCIA
ADVERTENCIA
ADVERTENCIA
DESEMBALAJE DEL REFRIGERADOR
Para retirar los restos de pegamento o cinta adhesiva,
frote enérgicamente el área con el pulgar. Los residuos de
pegamento o cinta adhesiva también se pueden retirar
fácilmente frotando con los dedos una pequeña cantidad
de lavavajillas líquido sobre el adhesivo. Aclare con agua
templada y seque el área.
la cinta adhesiva o el pegamento. Estos productos pueden
Los estantes del refrigerador están instalados en la posición
de transporte. Vuelva a colocar los estantes de acuerdo con
sus necesidades personales de almacenamiento.
Riesgo de peso excesivo:
El desplazamiento e instalación del refrigerador deben
realizarse entre dos o más personas. Si no se respeta esta
advertencia, se podrán producir lesiones en la espalda o
de otro tipo.
Riesgo de peso excesivo:
Su refrigerador es muy pesado. Al desplazarlo para su
limpieza o mantenimiento, asegúrese de proteger el suelo.
Siempre debe tirar del refrigerador en línea recta cuando
los desplace. No menee ni zigzaguee el refrigerador al
tratar de desplazarlo, ya que esto puede dañar el suelo.
Riesgo de explosión:
la gasolina, lejos del refrigerador. Si no se respeta esta
advertencia, existe peligro de explosión, incendio o muerte.
Antes de su uso, retire la cinta adhesiva y todas las
etiquetas temporales del refrigerador. Retirar vinil de las
puertas antes de conectar la unidad a la corriente eléc-
trica (solo en algunos modelos). No retire las etiquetas
que indican advertencias, la etiqueta de modelo y número
de serie ni la Hoja técnica que está ubicada debajo del
frontal del refrigerador, detrás de la rejilla de la base.
DIMENSIONES Y ESPACIOS
mover el refrigerador a través de puertas o aperturas angostas.
v6LXQDDSHUWXra es muy angosta para que pase el refrigerador, remueva las puertas del refrigerador. Vea Removiendo/
ensamblando puertas y estantes en este manual.
v/DXELFDFLÚQGHLQVWDODFLÚQHOegida para el refrigerador debería considerar espacio en la parte trasera de la unidad para
conexiones, circulación de aire y espacio en el frente para abrir las puertas y estantes.
vUna distancia muy pequeña entre los elementos adyacentes puede resultar en capacidad de enfriamiento reducida y en
cargos altos de consumo eléctrico. Deje al menos 27 pulgadas (686 mm) frente al refrigerador para abrir las puertas, y al
menos 2 pulgadas (51 mm) entre la parte trasera del refrigerador y la pared.
Dimensiones y Espacios
B
A
C
D
F
I
H
E
J
G
A Profundidad sin agarrador
B Ancho
C
Altura a la punta de la caja
D Altura a la punta de la bisagra
E Espacio trasero
F Profundidad sin puerta
G Profundidad con agarrador
H
Profundidad total con el cajón del
congelidor abierto
I
Profundidad total con puerta
abierta 90°
J Espacio frontal
33.3" (845 mm)
29.8" (757 mm)
66.9" (1700 mm)
68.5" (1740 mm)
2" (51 mm)
29.1" (740 mm)
35.5" (902 mm)
54.7"
(1390 mm)
44.6"
(1185 mm)
27"
(686 mm)

distancia
INSTALACIÓN (continuación)
1. Para evitar el ruido y la vibración, es necesario
nivelar la unidad e instalarla en un suelo sólidamente
construido. Si es necesario, ajuste los pies de nivelación
para compensar los desniveles del suelo. La parte
delantera debe estar ligeramente más elevada que la
posterior para ayudar al cierre de la puerta. Los pies
de nivelación se pueden girar con facilidad inclinando
ligeramente el aparato. Gire los pies de nivelación
en sentido horario para elevar la unidad y en sentido
antihorario para bajarla. (Consulte NIVELACIÓN Y
ALINEACIÓN DE LAS PUERTAS).
NOTA: No se recomienda realizar la instalación
sobre moqueta,
de baldosas una
plataforma o en una estructura con soporte inestable.
2. Instale este electrodoméstico en una zona donde la
temperatura esté entre 13 °C (55 °F) y 43 °C (110 °F).
Si la temperatura alrededor del electrodoméstico es
demasiado baja o demasiado alta, la capacidad de
refrigeración se verá gravemente afectada.
3. Seleccione un lugar en el que se pueda conectar
fácilmente el suministro de agua para la máquina
GHĄKLHOR automática.
NOTA: La presión del agua debe estar entre los
Ą\ĄORVĄ psi en modelos sin
de agua, y
entrHĄORVĄĄ\ 120 psi en modelos con
de agua.
4. La demasiado pequeña de
adyacentes puede minimizar la capacidad de
congelación y aumentar los cargos de consumo
eléctrico. Deje una distancia de 24 pulgadas (61 cm.)
como mínimo al frente del refrigerador para poder abrir
las puertas, y de al menos 2 pulgadas (5,08 cm.) entre
la parte trasera del refrigerador y la pared.
ANTES DE USAR
1. Limpie el refrigerador a fondo y quite todo el polvo
acumulado durante el transporte.
2. Instale los accesorios como el depósito de cubito de
hielo, los cajones, los estantes, etc., en su sitio. Están
empaquetados juntos para evitar posibles daños durante
el transporte.
3.
Deje que el refrigerador esté en funcionamiento durante
al menos dos o tres horas antes de almacenar comida
dentro de él. Compruebe el
de aire frío en el
compartimiento del congelador para asegurarse de que
la refrigeración sea la adecuada. Su refrigerador ya
está listo para su uso.
INSTALACIÓN
El refrigerador debe estar siempre enchufado a su toma
de corriente individual conectada a tierra adecuadamente
con una tensión nominal de 115 voltios, 60 Hz, sólo CA,
y protegida mediante fusible a 15 ó 20 amperios. Esta
proporciona el mejor rendimiento y, al mismo
tiempo, evita la sobrecarga de la instalación eléctrica de
la casa que podría provocar un peligro de incendio debido
a un sobrecalentamiento de los cables. Se recomienda
disponer de un circuito independiente para la exclusiva
alimentación de este electrodoméstico.
Riesgo de descarga:
Para reducir el riesgo de descarga eléctrica, no instale
el refrigerador en un área húmeda ni mojada.
ADVERTENCIA
INSTALACIÓN DEL REFRIGERADOR
2” (5.08 cm)

5
INSTALACIÓN DEL REFRIGERADOR
CÓMO DESMONTAR LA MANIJA DE
LA PUERTA DEL REFRIGERADOR
NOTA: El aspecto de la manija puede ser distinto
del que aparece en las
ilustraciones de esta página.
los tornillos de presión con una llave
Allen de 2,5 mm (3/32 pulg.) y retire la manija.
NOTA: Si es necesario apretar o retirar los
sujetadores de montaje de la manija, use una
llave Allen de 6,4 mm (¼ pulg.).
NOTA: Siempre se recomienda desmontar las puertas cuando sea necesario desplazar el refrigerador a través de un espacio
estrecho. Si es necesario desmontar las manijas, siga las instrucciones que se indican a continuación.
Sujetadores
de montaje
Tornillo de
presión
Llave Allen
CÓMO SUSTITUIR LA MANIJA DE
LA PUERTA DEL REFRIGERADOR
NOTA: El aspecto de la manija puede ser
distinto del que aparece en las ilustraciones
GHĄHVWD página.
Coloque la manija en la puerta ajustando
las zonas de contacto de la manija
coincidan sobre los sujetadores de montaje
y apretando los tornillos de presión con una
llave Allen de 2,5 cm (3/32 pulg.).
NOTA: Si es necesario apretar o retirar
ORVĄVXMHWDGRres de montaje de la manija,
XVHĄXQD llave Allen de 6,4 mm (¼ pulg.).
Sujetadores
de
montaje

5
NOTA: Si es necesario apretar o retirar los sujetadores
de montaje de la manija, use una llave Allen de 6,4 mm
(¼ pulg.).
CÓMO DESMONTAR/SUSTITUIR LA MANIJA
DE LA PUERTA DEL CONGELADOR
NOTA: El aspecto de la manija puede ser distinto del que
aparece en las ilustraciones de esta página.
3DUDGHVPRQWDUDpRMHORVWRUQLOORVGHSUHVLÚQXELFDGRV
en la parte inferior de la manija con una llave Allen de
3,1 mm (1/8 pulg.) y retire la manija.
Para sustituir, coloque la manija en la puerta ajustando
las zonas de contacto de la manija para que coincidan
sobre los sijetadores de montaje y apretando los tornillos
de presión con una llave Allen de 3,1 mm (1/8 pulg.).
NOTA: Siempre se recomienda desmontar las puertas cuando sea necesario desplazar el refrigerador a través de un espacio
estrecho. Si es necesario desmontar las manijas, siga las instrucciones que se indican a continuación.
INSTALACIÓN DEL REFRIGERADOR

5
INSTALACIÓN DEL REFRIGERADOR
Para desmontar la puerta izquierda del refrigerador:
En la parte posterior del refrigerador, saque el tubo de
agua del adaptador de la virola situada en el conector
presionando el anillo de liberación del adaptador (vea la
imagen inferior).
1. Abra la puerta. Retire el tornillo de la tapa de la bisagra
superior (1).
2. Use un destornillador plano para hacer palanca y
levantar los ganchos (no se ven en la imagen) situados en
la parte inferior delantera de la tapa (2). Levante la tapa.
3. Retire la tapa. Saque el tubo (3).
4. Desconecte todos los mazos de cables (4).
5. Retire el tornillo de conexión a tierra (5).
6. Retire los tres pernos (6) con una llave de tubo de 10
mm. Levante hacia afuera la bisagra superior (7)
PRECAUCIÓN: Cuando levante la bisagra, tenga cuidado
de que la puerta no se caiga hacia delante.
7. Levante la puerta del pasador de la bisagra central y
retire la puerta.
8. Coloque la puerta, con el interior hacia arriba, sobre
una
que no raye.
1. Abra la puerta. Retire el tornillo de la tapa de la bisagra
superior (1). Levante la tapa (2).
2. Retire la tapa.
3. Retire los tres pernos (3) con una llave de tubo de 10
mm. Levante hacia afuera la bisagra superior (4)
PRECAUCIÓN: Cuando levante la bisagra, tenga cuidado
de que la puerta no se caiga hacia delante.
4. Levante la puerta del pasador de la bisagra central y
retire la puerta.
5. Coloque la puerta, con el interior hacia arriba, sobre
una
que no raye.
ADVERTENCIA
Riesgo de descargas eléctricas
v Desenchufe el suministro eléctrico al refrigerador
antes de realizar la instalación. Si no se respeta esta
advertencia, pueden producirse lesiones graves e
incluso la muerte.
v No ponga las manos, pies ni ningún otro objeto en las
rejillas de ventilación de aire, la rejilla de la base o
debajo del refrigerador. Podría sufrir lesiones o recibir
una descarga eléctrica.
Para desmontar la puerta derecha del refrigerador:
DESMONTAJE Y SUSTITUCIÓN
DE LAS PUERTAS DEL REFRIGERADOR
PRECAUCIÓN: Antes de comenzar, saque los alimentos y
quite las bandejas de las puertas.
ADVERTENCIA
Riesgo de peso excesivo:
El desplazamiento e instalación de las puertas del
refrigerador deben realizarse entre dos o más personas.
Si no se respeta esta advertencia, se podrán producir
lesiones en la espalda o de otro tipo.
(1)
(2)
(3)
(4)
(1)
(2)
(4)
(3)
(6)
(7)
(5)

5
Después de insertarlo, tire del
tubo para asegurarse de que está
bien seguro y vuelva a insertar la
abrazadera.
Tubo
Trazo de escala
Virola
Abrazadera
Reinstalación de la puerta del refrigerador
Puerta izquierda
1. Baje la puerta hasta insertarla en el pasador de la
bisagra central (10).
2. Alinee los agujeros de la bisagra superior con los
agujeros de la parte superior del refrigerador. Inserte
y ajuste tres pernos (6) en la bisagra.
3. Instale el tornillo de conexión a tierra (5) y conecte los
dos mazos de cables (4).
4. Empuje el tubo de agua (3) situado en la parte superior
de la puerta izquierda dentro del agujero situado junto
a la bisagra izquierda de la parte superior del aparato
hasta que salga por la parte trasera.
5. Inserte el tubo de suministro de agua (3) dentro del
conector hasta que sólo se vea un trazo de escala.
Inserte completamente el
tubo sobre 15 mm ì pulg.).
6. Enganche las pestañas situadas en el lado izquierdo de
la tapa de la bisagra (1) situada debajo del borde de la
bisagra superior (7) y coloque la tapa en su sitio. Inserte
y apriete el tornillo de la tapa (1).
Puerta derecha
1. Baje la puerta hasta insertarla en el pasador de la
bisagra central (9).
2. Alinee los agujeros de la bisagra superior con los
agujeros de la parte superior del refrigerador. Inserte
y ajuste tres pernos (6) en la bisagra.
3. Enganche las pestañas situadas en el lado derecho de
la tapa de la bisagra (2) situada debajo del borde de la
bisagra superior (4) y coloque la tapa en su sitio. Inserte
y apriete el tornillo de la tapa (1).
PRECAUCIÓN
INSTALACIÓN DEL REFRIGERADOR
(9)
(10)
(1)
(2)
(4)
(3)
(6)
(7)
(5)

5
INSTALACIÓN DEL REFRIGERADOR
REFRIGERATOR INSTALLATION
Abra el cajón todo lo posible. Retire la cesta inferior
1
levantándola del sistema de rieles.
PRECAUCIÓN: No agarre la manija mientras desmon-
ta o vuelve a colocar el cajón. La manija podría salirse
y provocar lesiones personales.
CÓMO DESMONTAR EL CAJÓN DEL
CONGELADOR
ADVERTENCIA: El desplazamiento e instalación del
cajón del congelador deben realizarse entre dos o
más personas. Si no se respeta esta advertencia, se
podrán producir lesiones en la espalda o de otro tipo.
1
Para desmontarlo, saque el cajón todo lo posible.
Levante el cajón y tíre del mismo hacia afuera,
asegurándose de dejar libre el sistema de riel.
Sujete el cajón por cada lado y tire de él hacia arriba
para separarlo de los rieles.
Con las dos manos, deslice ambas barras
simultáneamente.
Retire el tornillo
2
del riel de ambos lados.
2

5
INSTALACIÓN DEL REFRIGERADOR
Saque cada riel hacia afuera todo lo posible.
Baje la puerta hasta su posición onal y apriete los
tornillos
3
ubicados a ambos lados.
Sujete el cajón por cada lado y enganche los soportes
de la puerta
1
para introducirlos en las pestañas de
los rieles
2
que hay a ambos lados.
3
CÓMO INSTALAR EL CAJÓN DEL
CONGELADOR
2
1
Con el cajón completamente sacado, inserte la cesta
inferior
4
en la estructura de rieles.
ADVERTENCIA: Si se retira el divisor Durabase, habrá
VXociente espacio abierto para que un niño o una
mascota puedan gatear hasta el interior.
Para evitar el atrapamiento accidental de un niño o
QDPDVFRWD\HOSRVLEOHULHVJRGHDVo[LD12SHUPLWD
que niños y mascotas toquen ni se acerquen al cajón
del congelador.
ADVERTENCIA: NO pise ni se siente en el cajón
del congelador.
4
Para volver a colocarlo, con el cajón completamente
sacado, inserte el mismo en la estructura de rieles.

5
NIVELACIÓN Y ALINEACIÓN DE LAS PUERTAS
Nivelación
Tras la instalación, enchufe el cable de alimentación del
refrigerador en una toma de corriente de 3 clavijas con conexión
DWLHUUD\HPSXMHHOUHIULJHUDGRUKDVWDVXSRVLFLÚQGHoQLWLYD
Su refrigerador tiene dos pies de nivelación delanteros:
uno a la derecha y otro a la izquierda. Ajuste los pies para
PRGLoFDUODLQFOLQDFLÚQGHGHODQWHKDFLDDWUÊVRGHODGRD
lado. Si el refrigerador parece inestable o si desea que las
puertas se cierren más fácilmente, ajuste la inclinación del
refrigerador mediante las siguientes instrucciones:
NOTA: Herramientas necesarias: Llave de 18 mm (ĒĒ/Ĉč”)
RĄXQGHVWRUQLOODGRUSODQR
Gire los pies de nivelación en sentido antihorario para
levantar esa parte del refrigerador o en sentido horario
para bajarla. Puede que sean necesarios varios giros
del pie de nivelación para ajustar la inclinación del
refrigerador.
NOTA: Si una persona empuja hacia atrás la parte superior
del refrigerador, descargará parte del peso de los pies de
nivelación. Esta operación facilitará el ajuste de los pies.
2. Vuelva a abrir ambas puertas y compruebe que se
cierran con facilidad. Si no es así, incline el refrigerador
ligeramente hacia atrás girando ambos pies de
nivelación en sentido antihorario. Puede que sean
necesarios varios giros y debería girar ambos pies
GHĄQLYHODFLÚQHOPLVPRQàPHURGHJLURV
NOTA: Su refrigerador tiene un diseño exclusivo con dos
puertas para alimentos frescos. Cada una de las puertas
se puede abrir o cerrar de forma independiente de la
otra. Puede que deba ejercer una ligera presión en las
puertas para cerrarlas completamente.
Puerta de la alineación
Si el espacio entre sus puertas no es regular, siga
las instrucciones a continuación para alinear las puertas:
1. De una mano, levante la puerta que desee en la
bisagra del medio.
2. Con la otra mano, use pinzas para insertar el anillo de
retención, como se muestra.
3. Inserte otros anillos de retención hasta que las
puertas sean alineadas. (Tres anillos de seguridad
son provistos con la heladera en el paquete Uso y
Cuidado.
)
INSTALACIÓN DEL REFRIGERADOR

USO DEL REFRIGERADOR
AJUSTE DE LOS CONTROLES
v El rango del control de temperatura del refrigerador de
0 °C a 8 °C (33°F a 46°F). Pulse el botón de Refrigerator
Temp para alternar entre los ajustes de temperatura
disponibles con incrementos de un grado en cada pulsación.
v El rango del control de temperatura del congelador
es de -21 °C a -13 °C (-6 °F a 8 °F). Pulse el botón
de Freezer Temp para alternar entre los ajustes de
temperatura disponibles con incrementos de un grado
HQĄFDGD pulsación.
Dispenser
Es posible que tras la dispensación se produzca un goteo.
Mantenga el vaso bajo el dispensador durante unos
segundos tras la dispensación para recoger todas las
gotas.
NOTA: El dispensador no funcionará si se deja una
puerta abierta o si el cierre de control está activado.
FLUJO DE AIRE
El control del refrigerador funciona como termostato para
todo el electrodoméstico (secciones refrigerador y congelador).
Cuando más frío sea el ajuste, más tiempo funcionará el
compresor para mantener la temperatura más fría. El control
del congelador ajusta el
de aire frío desde el congelador
hacia el refrigerador. Si se ajusta el control del congelador a
una temperatura más reducida, se mantendrá más aire frío en
el compartimiento del congelador para que éste esté más frío.
El aire frío circula desde el congelador hacia la sección de
alimentos frescos y vuelta atrás de nuevo a través de los
conductos de ventilación del aire que hay en la pared que divide
las dos secciones. Asegúrese de no bloquear los conductos de
ventilación al cargar su refrigerador. De lo contrario, restringirá
el
de aire y puede que la temperatura del refrigerador suba
demasiado o que se acumule humedad en su interior. (Consulte el
siguiente diagrama de
de aire).
Temperatura
Accela Ice
v Cuando se toca el botón Accela Ice, el símbolo Accela
Ice se iluminará en la pantalla y continuará encendido
durante 24 horas. De forma automática, se apagará
cuando trDQVFXUUDQĄKRras.
v Para detener esta función manualmente, vuelva a tocar
HOĄERWÚQ otra vez.
v Esta función aumenta tanto las capacidades de
congelación como las de fabricación de hielo.
LUZ
Pulse el botón para encender y apagar la luz. Cuando se
usa el agua, una luz debajo del interruptor del agua se
iluminará.
NOTA: Cada vez que cambie los ajustes de los controles,
debe esperar 24 horas antes de realizar ajustes adicionales.
Los controles están correctamente ajustados cuando la
leche o el zumo están a la temperatura fría de su gusto y
el helado está
Si la temperatura es demasiado fría
o demasiado caliente en alguno de los compartimientos,
cambie el ajuste en incrementos de un grado cada vez.
Espere 24 horas a que se estabilice la temperatura antes de
volver a ajustarla.
&XDQGRVHHQFLHQGHHOLQGLFDGRUGHOoOWURGHDJXD
LQGLFDTXHHVQHFHVDULRFDPELDUHOoOWURGHDJXD8QDĄ
YH]FDPELDGRHOoOWURGHDJXDPDQWHQJDSXOVDGRHO
botón Accela Ice (Water Filter Reset) durante tres
VHJXQGRVSDUDDSDJDUODOX]GHOLQGLFDGRU(OoOWURGH
agua se debe cambiar aproximadamente cada seis
meses.
Diagnostics

59
Bloqueo de los controles
C r r
Lock vada.
v Lock r
Door Alarm r
r o r r Control
Lock
var Lock.
C v Lock
r
van.
Par v Lock r
Door Alarm r ro
r
Modo demostración (sólo para uso en tienda)
Parteluz articulado
r r
r r r
r r
r r
Alarma de la puerta
C r r
v
Door Alarm r
var
r r
r r
r
C r r
r.
PRECAUCIÓN
Par
r ra r
r
r r r o.
USO DEL REFRIGERADOR
El modo demostración desactiva toda la refrigeración en las
secciones refrigerador y congelador para ahorrar energía
mientras está en exposición en una tienda. Cuando se activa,
en el panel de control aparece la palabra OFF.
Para desactivar/activar:
Abra cualquiera de las puertas del refrigerador y mantenga
presionado el botón Refrigerator Temp y el botón Accela
Ice durante 5 segundos. El panel de control emite un pitido
el modo de demostración está desactivado. Use el mismo
p
Después de 20 segundos de inactividad, la pantalla ingresa
al modo de ahorro de energía. La pantalla se apaga hasta
que se abre una puerta o se presiona un botón
rocedimiento para activar el modo de demostración.
Modo de ahorro de energía de pantalla

6
USO DEL REFRIGERADOR
MÁQUINA DE HIELO AUTOMÁTICA
La máquina de hielo puede producir aproximadamente
70 a 210 cubitos en un período de 24 horas, dependiendo
de la temperatura del compartimiento del congelador, de
la temperatura ambiente, de las veces que se abren las
puertas y de otras condiciones de funcionamiento.
v Un refrigerador recién instalado tardará entre 12 y 24
horas en empezar a producir hielo. Espere 72 horas
para que comience la producción de hielo.
v La producción de hielo se detiene cuando se llena el
depósito de hielo. En ese caso, el depósito de hielo
contiene aproximadamente de 6 a 8 vasos (12-16 oz.)
de hielo.
v Para apagar la máquina de hielo automática, ponga
el interruptor de la máquina en posición OFF (O). Para
encender la máquina de hielo automática, ponga el
interruptor en posición ON (I).
v La presión del agua debe estar entre los 20 y los 120
psi en modelos sin oltro de agua, y entre los 40 y 120
psi en modelos con oltro de agua para producir cubitos
de hielo en la cantidad y tamaño normales.
v La presencia de sustancias extrañas o de escarcha en
el sensor de detección de hielo pueden interrumpir
la producción de hielo. Asegúrese de que el área del
sensor esté siempre limpia para que el funcionamiento
sea correcto.
PRECAUCIÓN
v La primera tanda de hielo y agua dispensada podría
incluir partículas y olor procedente de la tubería de
suministro de agua o del depósito de agua. Deseche
las primeras tandas de hielo (aproximadamente 24
cubitos). Esto también es necesario si el refrigerador no
se usa durante un largo período de tiempo.
v Si el hielo producido está descolorado, compruebe el
oltro y el suministro de agua. Si el problema persiste,
póngase en contacto con Sears u otro servicio técnico
FXDOLo cado. No consuma el hielo ni el agua hasta que
se resuelva el problema.
v AsegúrHVHGHTXHQDGDLQWHUo era con el movimiento del
brazo de apagado automático.
v Cuando el depósito se llena hasta el nivel del brazo de
apagado automático, la máquina de hielo dejará de
producir hielo.
v Es normal que algunos cubitos de hielo se atasquen.
v Si el hielo no se usa con frecuencia, los cubitos de
hielo viejos se nublarán, desarrollarán mal olor y se
encogerán.
v Nunca almacene latas de bebidas u otros artículos en
el depósito de hielo con el propósito de que se enfríen
rápidamente. Si lo hace, podría dañar la máquina de
hielo o los contenedores podrían estallar.
v Nunca use vasos de cristal ono o recipientes de loza
para recoger hielo. Ese tipo de contenedores podrían
descascarillarse o romperse, y podrían caer fragmentos
de cristal al hielo.
ADVERTENCIA
Riesgo de lesiones personales
NO introduzca los dedos o las manos en el mecanismo
de producción automática de hielo con el refrigerador
enchufado.
CUÁNDO SE DEBE AJUSTAR LA MÁQUINA DE HIELO
INTERRUPTOR DE ALIMENTACIÓN EN POSICIÓN OFF (O)
v Cuando el suministro de agua vaya a estar interrumpido
durante varias horas.
v Cuando se retire el depósito de hielo durante más de
uno o dos minutos.
v Cuando no se vaya a usar el refrigerador durante varios
días.
NOTA: Se debe vaciar el depósito de hielo cuando el
interruptor de ON/OFF (encendido/apagado) de la
máquina de hielo cambie a la posición OFF.
SONIDOS NORMALES QUE SE PUEDEN ESCUCHAR
v La válvula de agua de la máquina de hielo emite un
zumbido cuando la máquina se llena de agua. Si el
interruptor de alimentación está en posición ON (I),
emitirá un zumbido incluso aunque aún no se haya
conectado al agua. Para detener el zumbido, mueva el
interruptor de alimentación a la posición OFF (O).
NOTA: Mantener el interruptor de alimentación en
posición ON (I) antes de conectar la tubería de agua
podría dañar la máquina de hielo.
v Oirá el sonido de los cubitos de hielo al caer en el
depósito y el agua corriendo por las tuberías cuando se
rellena la máquina de hielo.
PREPARACIÓN PARA LAS VACACIONES
Ponga el interruptor de la máquina de hielo en posición
OFF (O) y corte el suministro de agua al refrigerador.
NOTA: Se debe vaciar el depósito de hielo siempre que el
interruptor de ENCENDIDO/APAGADO de la máquina de
hielo cambie a la posición OFF (O).
Si la temperatura ambiente cae por debajo del punto
de congelación, póngase en contacto con un técnico
FXDOLo cado para que purgue el sistema de suministro de
agua para evitar graves daños materiales debidos a las
inundaciones provocadas por la rotura de las tuberías o
conexiones de agua.
Automatic
Shut O
Arm
Power Switch
Interruptor de alimentaciónSensor de detección de hielo

6
GUÍA PARA EL ALMACENAMIENTO DE ALIMENTOS
Envuelva o almacene los alimentos en el refrigerador dentro
de materiales herméticos y antihumedad, a menos que se
indique lo contrario. Esto evitará que el olor y sabor de
ORVDOLPHQWRVVHWUDQVoHUDSRUWRGRHOUHIULJHUDGRU3DUD
productos con fecha de caducidad, compruebe el código
de fecha para garantizar la frescura.
ALMACENAMIENTO DE ALIMENTOS CONGELADOS
NOTA: Consulte una guía de congelación o un libro de
FRFLQDoDEOHSDUDREWHQHUPÊVLQIRUPDFLÚQVREUHOD
forma de preparar los alimentos para su congelación o
sobre los tiempos de almacenamiento de los alimentos
congelados.
Congelación
El congelador no congelará rápidamente una gran
cantidad de alimentos. No coloque más alimentos sin
congelar en el congelador que los que se congelarán
en 24 horas (no más de 1 o 1,5 kg de alimento por cada
OLWURVGHHVSDFLRHQHOFRQJHODGRU'HMHVXoFLHQWH
espacio en el congelador para que el aire pueda circular
HQWUHORVSDTXHWHV7HQJDFXLGDGRGHGHMDUVXoFLHQWH
espacio en la parte delantera para que se pueda cerrar
la puerta herméticamente.
Los tiempos de almacenamiento variarán en función
de la calidad y el tipo de alimento, el tipo de envase o
envoltorio utilizado (si son herméticos y antihumedad)
y la temperatura de almacenamiento. La aparición
de cristales de hielo dentro de un paquete sellado es
QRUPDO(VWRVÚORVLJQLoFDTXHODKXPHGDGGHODOLPHQWR
y del aire del interior del paquete se ha condensado,
creando cristales de hielo.
NOTA: Deje que los alimentos calientes se enfríen
a temperatura ambiente durante 30 minutos y, a
continuación, empaquételos y congélelos. Enfriar
alimentos calientes antes de congelarlos ahorra energía.
Empaquetamiento
Una congelación correcta depende de un
empaquetamiento adecuado. Cuando se cierra y sella
el paquete, no debe dejar que entre ni salga aire ni
humedad. Si eso sucede, es posible que el olor y el sabor
GHORVDOLPHQWRVVHWUDQVoHUDQSRUWRGRHOUHIULJHUDGRU\
también se podrían resecar los alimentos congelados.
Recomendaciones de empaquetamiento:
v Contenedores de plástico rígido con tapas herméticas
v Tarros de congelación / enlatado con lados rectos
v Papel de aluminio grueso
v Papel con revestimiento plástico
v Envoltorios plásticos no permeables
v Bolsas de plástico con autosellado y calidad
HVSHFÕoFDDSWDSDUDFRQJHODGRU
Siga las instrucciones del contenedor o paquete para
unos métodos de congelación adecuados.
No usar
v Envoltorios de pan
v Contenedores de plástico que no sean de polietileno
v Contenedores sin tapas herméticas
v Papel de cera o envoltorio para congelador revestidos
de cera
v
(QYROWRULRoQR\VHPLSHUPHDEOH
PRECAUCIÓN: No almacene latas de bebidas
o contenedores de comida de plástico en el
compartimiento del congelador. Podrían romperse
RĄHVWDOODUDOFRQJHODUVH
Elementos Cómo
Mantequilla o
margarina
Queso
Leche
Huevos
Fruta
Verdura
con hoja
Vegetales con
piel (zanahorias,
pimientos)
Pescado
Sobras
Conserve la mantequilla abierta
en un plato cubierto o en un
compartimiento cerrado. Cuando
se almacena una cantidad extra,
envuélvala en una bolsa para
congelar y congélela.
Almacene en el envoltorio original
hasta que esté listo para consumirlo.
Una vez abierto, vuelva a envolverlo
herméticamente en un envoltorio
plástico o en papel de aluminio.
Limpie los cartones de leche. Para
un mejor almacenamiento, coloque
la leche en los estantes interiores y
no en los estantes de la puerta.
Almacénelos en el cartón original
en un estante interior, no en un
estante de la puerta.
No lave ni pele la fruta hasta
que ésta vaya a ser utilizada.
Organice la fruta y consérvela en
su contenedor original, en un cajón,
o bien almacénela en una bolsa de
papel completamente cerrada sobre
un estante del refrigerador.
Retire el envoltorio comercial
y corte o arranque las zonas
magulladas o decoloradas. Lave en
agua fría y deje escurrir. Colóquela
en una bolsa o un contenedor de
plástico, y almacénela en el cajón
para verduras.
Colóquelos en una bolsa o
un contenedor de plástico, y
almacénelos en el cajón para
verduras.
Almacene el pescado y los mariscos
frescos en el congelador si no van
a ser consumidos el mismo día en
que se los adquirió. Se recomienda
consumir pescados y mariscos frescos
el mismo día de haberlos adquirido.
Cubra las sobras con un envoltorio
plástico, papel de aluminio o dentro
de contenedores de plástico con
tapas herméticas.
USO DEL REFRIGERADOR

6
SECCIÓN REFRIGERADOR
DISPENSADOR DE AGUA
Para dispensar agua fría, empuje el interruptor del
dispensador con un vaso.
para desmontar la bandeja.
Nota: No hay ningún sistema de drenaje por debajo de
la bandeja. Puede que tenga que vaciar líquidos que
recoge la bandeja.
Es posible que tras la dispensación se produzca un goteo.
Mantenga el vaso bajo el dispensador durante unos
segundos tras la dispensación para recoger todas las gotas.
Para volver a colocar la, incline un poco la parte
delantera de la bandeja hacia lo alto y coloque las
lengüetas en los agujeros.
Presione hacia abajo en una de las esquinas delanteras
USO DEL REFRIGERADOR
BANDEJA DE AGUA
,QWHUUXSWRUGLVSHQVDGRU
(PSXMDU
Tabs
Holes

6
USO DEL REFRIGERADOR
ESTANTES DEL REFRIGERADOR
Los estantes del refrigerador son ajustables para
satisfacer sus necesidades personales de almacenamiento.
Dependiendo del modelo, los estantes pueden ser de
vidrio o de rejilla metálica.
Organizar los estantes para que se ajusten a las
diferentes alturas de los artículos hará que le resulte más
fácil encontrar lo que busca. Con ello también reducirá el
tiempo que permanece la puerta del refrigerador abierta
y ahorrará energía.
IMPORTANTE: No limpie los estantes de vidrio con agua
templada mientras aún están fríos. Los estantes podrían
romperse si se ven expuestos a cambios repentinos de
temperatura o a impactos.
NOTA: Los estantes de vidrio son pesados. Tenga
especial cuidado al momento de retirarlos.
Organización de los estantes (estante de rejilla metálica)
Retire los estantes de la posición de transporte y vuelva a
colocar los estantes en la posición que desee.
Para retirar un estante: incline la parte delantera del
estante
1
y levántelo
2
. Saque el estante.
PRECAUCIÓN:
v Asegúrese de que los estantes tienen ambos lados
nivelados.
v Asegúrese de que el tope del estante esté
completamente insertado entre las vigas de la pared
del refrigerador.
v Asegúrese de colocar los ganchos en la posición
correcta. (el estante izquierdo en el agujero izquierdo,
el estante derecho en el agujero derecho).
De lo contrario, podría caerse el estante o derramarse
los alimentos.
3
4
Para volver a colocar un estante: Incline la parte
delantera del estante hacia arriba y guíe los
ganchos del estante al interior de las ranuras
a la altura deseada
3
. Luego, baje la parte
delantera del estante de manera que los ganchos
caigan en las ranuras
4
.
CAJÓN CON CONTROL DE HUMEDAD
Los cajones para verduras mantienen el sabor y la
frescura de la fruta y la verdura al permitir controlar
fácilmente la humedad dentro del cajón.
Para controlar la cantidad de humedad en los cajones
para verduras con sellado antihumedad, ajuste el control
en cualquier posición entre VEGETABLE (verduras) y
FRUIT (frutas).
v La posición VEGETABLE mantiene un aire húmedo
en el cajón para un mejor almacenamiento de las
verduras frescas y de hoja.
v La posición FRUIT mantiene el aire húmedo fuera del
cajón para un mejor almacenamiento de la fruta.
DESMONTAJE DEL CAJÓN CON CONTROL
DE HUMEDAD
1. Para desmontarlo, saque el cajón todo lo posible.
2. Levante la parte delantera del cajón y tire de él hacia
fuera.
3. Para volver a colocarlo, incline la parte delantera
ligeramente hacia arriba, inserte el cajón en el marco
y empuje hasta que encaje en su sitio.
Fruit Vegetable
FruitVegetable
Para quitar el vidrio
1. Levante el vidrio situado bajo la tapa del cajón para
verduras.
2. Tire del vidrio hacia arriba y hacia fuera.
NOTA: Para mayor claridad, no se muestra el cajón.

6
USO DEL REFRIGERADOR
CAJÓN CON CONTROL DE TEMPERATURA
Este cajón se puede usar para grDQGHVEDQGHMDVGHo
esta, productos de delicatessen y bebidas. (No utilice este
cajón para verduras o productos que requieran un alto
nivel de humedad).
Tire hacia afuera para abrir el cajón. Levántelo suave-
mente y tire hacia afuera para extraerlo.
BANDEJA PARA LÁCTEOS
1. Para desmontar la bandeja para lácteos, simplemente
levántela hacia arriba y tire de ella hacia fuera.
2. Para volver a colocar la bandeja para lácteos,
deslícela en su sitio y empuje hasta que se detenga.
BANDEJAS DE PUERTA
Las bandejas de puerta son extraíbles para facilitar su
limpieza y ajuste.
1. 1. Para desmontar la bandeja, simplemente levántela
hacia arriba y tire de ella hacia fuera.
2. Para volver a colocar la bandeja, deslícela por encima
del soporte deseado y empuje hacia abajo hasta que
encaje en su sitio.
NOTA: Algunas bandejas tienen una apariencia
diferente y sólo encajarán en una ubicación.
SECCIÓN DEL CONGELADOR
DEPÓSITO DE HIELO
1. Tire del cajón del congelador y del cajón extraíble
hacia afuera lo máximo posible para retirar el
depósito de hielo adicional.
2. Con cuidado levante y saque el depósito de hielo.
3. Para volver a colocarlo, tire de los dos cajones hacia
afuera lo máximo posible y ponga el depósito en su
posición correcta en el cajón extraíble. Cierre el cajón
extraíble y, después, el cajón del congelador.
Extra Ice Bin
Pullout Drawer
Depósito
de Hielo
Adicional
Cajón Extraíble
PRECAUCIÓN: Peligro de pinzamiento. Mantenga
las manos y pies lejos de la parte inferior del cajón
del congelador al abrir y al cerrar.

6
USO DEL REFRIGERADOR
EXTRACCIÓN Y COLOCACIÓN DEL DURABASE
1. Para desmontar el Durabase, abra el cajón en su
totalidad
1
. Empuje el Durabase hacia el fondo todo
lo posible, incline la parte delantera del Durabase
hacia arriba, y luego levántelo y sáquelo hacia
afuera
2
.
2. Para volver a colocarlo, incline la parte trasera del
Durabase hacia el cajón, luego bájela e insértela en
el ensamblaje del riel.
DIVISOR DURABASE
El divisor Durabase le permite organizar el área Durabase
en secciones. Se puede ajustar de lado a lado para alojar
artículos de diferentes tamaños.
ADVERTENCIA: Si se retira el divisor Durabase, habrá
VXo ciente espacio abierto para que un niño o una
mascota puedan gatear hasta el interior.
Para evitar el atrapamiento accidental de un niño o una
mascota y el posible riesgo de as xia, NO permita que
niños y mascotas toquen ni se acerquen al cajón.
1
2
CAJÓN EXTRAÍBLE
1. Para desmontarlo, saque el cajón todo lo posible.
Levante el cajón y tíre del mismo hacia afuera,
asegurándose de dejar libre el sistema de riel.
2. Para volver a colocarlo, con el cajón completamente
sacado, inserte el mismo en la estructura de rieles.
NOTA: Coloque el Durabase antes de colocar
el cajón extraíble. El cajón extraíble necesita
separación para que sus rodillos puedan apoyar
correctamente. Si las piezas son ensambladas de
manera incorrecta, el congelador podría no cerrar.

66
FILTRO DE AGUA
FILTRO DE AGUA
Se recomienda reemplazar el
de agua:
v Aproximadamente cada 6 meses.
v Cuando el indicador del
del
agua se encienda.
v Cuando disminuya el caudal del
dispensador de agua.
v Cuando los cubitos de hielo sean
más pequeños de lo normal.
v
Gire el
de agua hacia arriba
hasta colocarlo en su sitio y
cierre la tapa. La tapa hará "clic"
cuando se cierre correctamente.
3. Después de reemplazar el
de agua, dispense
9 litros de agua (deje correr el agua durante unos
5 minutos) para purgar el aire atrapado y los
contaminantes del sistema; no dispense los 9 litros
de agua de manera continua. Pulse y suelte el botón
del dispensador en ciclos de 30 segundos ON y
ĄVegundos OFF.
4. Tapón de derivación del
Conserve el tapón de
derivación del
de
agua. DEBE usar el tapón
de derivación del
cuando no disponga de un
cartucho de
de agua
de repuesto.
PRECAUCIÓN: NO ponga en marcha el sin
tener un
de agua o un tapón de derivación del
de agua instalado.
NOTA: 3DUDFRPSUDUXQoOWURGHDJXDGHUHSXHVWR
visite su establecimiento Sears o llame en EE. UU.
1-844-553-6667.Tambien lo puede ordenar por internet
en www.kenmore.com
1.
v Baje o desmonte el estante
superior izquierdo para permitir
que el
de agua pueda girar
hacia abajo totalmente.
v Pulse el botón de presión para
abrir la tapa del
de agua.
NOTA: Al reemplazar el
de
agua se drena una pequeña cantidad
de agua (unos 25 cc). Coloque un
vaso debajo de la parte delantera
de la tapa del
de agua para
recoger el agua que se escape.
Sostenga el
de agua en posición
vertical, una vez retirado, para evitar
que el agua residual se salga del
de agua.
v Tire del
de agua hacia abajo
y sáquelo.
2.
v Saque el nuevo de agua de su envoltorio y retire la
tapa protectora de las juntas tóricas. Con las pestañas
del
de agua en posición horizontal, empuje el nuevo
de agua en el del colector hasta que haga
tope.
Tapón de
derivación del
de agua

6
Hoja de datos de rendimiento
La concentración de las sustancias indicadas en el agua que entra al sistema se redujo a una concentración inferior o igual
DOOÕPLWHSHUPLVLEOHSDUDHODJXDTXHVDOHGHOVLVWHPDWDOFRPRVHHVSHFLoFDHQODVQRUPDV\GH16)$16,
* Basado en el uso de ooquistes de Cryptosporidium parvum
6LVWHPDSUREDGR\FHUWLoFDGRSRU16),QWHUQDWLRQDOFRQIRUPHDODVQRUPDV\GH16)$16,SDUDOD
reducción de las sustancias que se enumeran a continuación.
Reducción de
contaminantes
Concentración
promedio
Concentración objetivo
en agua
PHGLR
de
reducción
Concentración
permisible
del producto
en agua
Concentración
máxima
permisible del
producto en
agua
Requisitos de
reducción de
NSF
Informe de
pruebas de
NSF
Olor y sabor a cloro 2,1 mg/L 2,0 mg/L ± 10% 97,2% 0,06 mg/L N/D Ă J-00049247
Partículas nominales (Clase I),
ĂWRòP
5,600,000
pts/mL
Como mínimo 10.000
partículas/mL
98,7% 73.000 pts/ml N/D Ă J-00049282
Amianto 190 MFL
D0)/oEUDVPD\RUHV
GHòPGHORQJLWXG
>99% 0)/ N/D Ă J-0004928
Atracina 0,0094 mg/L 0,009 mg/L ± 10% 94,7% 0,00005 mg/L 0,003 mg/L N/D J-00049293
Benceno 0,016 mg/L 0,015 mg/L ± 10% 96,7% 0,005 mg/L 0,005 mg/L N/D J-00049300
Carbofurano 0,08 mg/L 0,08 mg/L ± 10% 98,1% 0,002 mg/L 0,04 mg/L N/D J-00049294
Lindano 0,002 mg/L 0,002 mg/L ± 10% 98,2% 0,00004 mg/L 0,0002 mg/L N/D J-00051975
P-Diclorobenceno 0,22 mg/L 0,225 mg/L ± 10% 99,8% 0,0005 mg/L 0,075 mg/L N/D J-00049298
Toxafeno 0,014 mg/L 0,015 mg/L ± 10% 93% 0,001 mg/L 0,003 mg/L N/D J-00049302
2,4-D 0,213 mg/L 0,210 mg/L ± 10% 95,2% 0,009 mg/L 0,07 mg/L N/D J-00049284
Plomo con pH 6,5 0,150 mg/L 0,15 mg/L ± 10% >99,3% 0,001 mg/L 0,010 mg/L N/D J-00051974
Plomo con pH 8,5 0,150 mg/L 0,15 mg/L ± 10% >99,3% 0,001 mg/L 0,010 mg/L N/D J-00049277
Mercurio con pH 6,5 0,0059 mg/L 0,006 mg/L ± 10% 96,1 0,0002 mg/L 0,002 mg/L N/D J-00053886
Mercurio con pH 8,5 0,0058 mg/L 0,006 mg/L ± 10% 90,1 0,0006 mg/L 0,002 mg/L N/D J-00051972
Quiste* 120.000 quistes/L Mínimo 50.000 quistes/L 99,99% TXLVWH/ N/D Ă J-00049281
FILTRO DE AGUA

68
FILTRO DE AGUA
Es esencial respetar los requisitos recomendados por el
fabricante para la instalación, mantenimiento y reemplazo
del
de agua para que el producto se comporte de la
forma indicada.
NOTA: Las pruebas se realizan en condiciones estándar de
laboratorio, por lo que el rendimiento real puede variar.
Para obtener información sobre los costos estimados de
ORVoOWURVGHDJXDGHUHSXHVWROODPHHQ((88
1-844-553-6667.Tambien lo puede ordenar por internet
en www.kenmore.com
3URGXFWRGLVWULEXLGRHQORV(VWDGRV8QLGRVSRU7UDQVIRUP
65%UDQGV0DQDJHPHQW//&+RçPDQ(VWDWHV,/
86$
3M es una marca comercial de 3M Company.
NSF es una marca comercial de NSF ,nternational.
¬0Company. Reservados todos los derechos.
ADVERTENCIA
PRECAUCIÓN
Para reducir el riesgo asociado a la ingestión de
contaminantes: No utilice agua que no sea segura
microbiológicamente o cuya calidad se desconozca sin
una desinfección adecuada antes o después del sistema.
Los sistemas
para la reducción de quistes
puede utilizarse en aguas desinfectadas que puedan
contener quistes
Número de establecimiento de
EP$01
Para reducir el riesgo asociado con daños materiales
debidos a fugas de agua:
v Lea y cumpla las instrucciones de uso del
de
agua antes de la instalación y uso de este sistema.
v La instalación y uso DEBE cumplir con todas las
normativas de fontanería estatales y locales.
v No instalar si la presión del agua exceGHORVSVL
(827 kPa). Póngase en contacto con un fontanero
profesional si no está seguro de cómo comprobar la
presión del agua.
v No instalar en sistemas donde se pueda producir el
efecto de golpe de ariete. Si existe una situación de
golpe de ariete en la instalación, debe instalar un
amortiguador de golpe de ariete. Póngase en contacto
con un fontanero profesional si no está seguro de
cómo comprobar esta situación.
v No instalar en tuberías de suministro de agua caliente.
La temperatura máxima de funcionamiento del agua de
este sistema de
de agua es de 38 °C (1 °F).
v
No use
el
en condiciones ambientales por debajo
de los 13 ºC (55 °F). Drene el
de agua cuando
almacene la unidad en temperaturas inferiores a los
£&£)
v El
de agua desechable se debe reemplazar cada
seis meses, a la capacidad nominal, o si se produce
una
reducción del
Directrices de aplicación/Parámetros del suministro de
agua
Flujo de servicio OSPJSP
Suministro de agua $gua potable
Presión del agua 138 - 827 kPDSVL
Temperatura del agua £&£&)£)

State of Ca
li
forn
i
a
Department of Public Health
Water Treatment Device
Certificate Number
Date Issued: December 15, 2009
-909102
Manufacturer:
Cuno Inc.
The water treatment device(s) listed on this certificate have met the testing requirements pursuant to Section
116830 of the Health and Safety Code for the following health related contaminants:
AsbestosCysts
Lead
Mercury
2,4-D Reduction
Atrazine
Benzene
Carbofuran
Lindane
p-Dichlorobenzene
Toxaphene
Microbiological Contaminants and Turbidity
Inorganic/Radiological Contaminants
Organic Contaminants
200 gal
Rated Service Capacity:
0.5 gpm
Rated Service Flow:
Conditions of Certification:
FILTRO DE AGUA

7
CUIDADO Y LIMPIEZA
ADVERTENCIA
Riesgo de explosión
8VHXQOLPSLDGRUQRLQpDPDEOH6LQRVHUHVSHWDHVWD
advertencia, existe peligro de explosión, incendio o
muerte.
Tanto las secciones refrigerador como congelador se
GHVFRQJHODQGHIRUPDDXWRPÊWLFDVLQHPEDUJRVH
recomienda limpiar ambas secciones una vez al mes
para evitar la aparición de olores. Seque los derrames
inmediatamente.
SUGERENCIAS GENERALES DE LIMPIEZA
v Desenchufe el refrigerador o desconecte la alimentación.
v Retire todos los componentes extraíbles, como estantes,
cajones, etc. Consulte las secciones en 8VRĄGHOUHIULJHUDGRU
para obtener instrucciones acerca del desmontaje.
v Use una esponja limpia o un trapo suave, junto con
un detergente suave en agua templada. No utilice
limpiadores abrasivos o agresivos.
v
/DYHDPDQRDFODUH\VHTXHWRGDVODVVXSHUoFLHVDIRQGR
v Enchufe el refrigerador o vuelva a conectar la corriente.
EXTERIOR
(OHQFHUDGRGHODVVXSHUoFLHVPHWÊOLFDVSLQWDGDVH[WHUQDV
proporciona una protección contra el óxido. No encere las
SLH]DVGHSOÊVWLFR(QFHUHODVVXSHUoFLHVPHWÊOLFDVSLQWDGDV
al menos dos veces al año con cera para electrodomésticos
(o cera en pasta para coches). Aplique la cera con un trapo
suave y limpio.
Para productos con un exterior en acero inoxidable, use una
esponja limpia o un trapo suave, junto con un detergente
suave en agua templada. No utilice limpiadores abrasivos o
agresivos. Seque a fondo con un trapo suave.
PAREDES INTERIORES (deje que el congelador se caliente
para que el trapo no se quede pegado)
Para ayudarle a eliminar los olores, puede lavar el interior
del refrigerador con una mezcla de bicarbonato sódico
y agua templada. Mezcle 2 cucharadas soperas de
bicarbonato sódico (unos 26 g) en 1 litro de agua. Asegúrese
de que el bicarbonato sódico esté completamente disuelto
SDUDTXHQRUD\HODVVXSHUoFLHVGHOUHIULJHUDGRU
REVESTIMIENTO DE LAS PUERTAS Y JUNTAS
Use una esponja limpia o un trapo suave, junto con un
detergente suave en agua templada. No utilice ceras de
limpieza, detergentes concentrados, lejías ni limpiadores que
contengan petróleo en las piezas del refrigerador que son
de plástico.
PIEZAS DE PLÁSTICO (tapas y paneles)
Use una esponja limpia o un trapo suave, junto con un
detergente suave en agua templada. No utilice sprays para
YHQWDQDVOLPSLDGRUHVDEUDVLYRVQLOÕTXLGRVLQpDPDEOHV\D
que pueden arañar o dañar el material.
BOBINAS DEL CONDENSADOR
Use un aspirador con un
accesorio para limpiar las
bobinas del condensador
y las rejillas de ventilación.
No retire el panel que cubre
el área de las bobinas
del condensador.
PRECAUCIÓN: Cuando esté limpiando el interior, no
pulverice agua.

7
CUIDADO Y LIMPIEZA
SUSTITUCIÓN DE LA BOMBILLA
INTERRUPCIONES DE ALIMENTACIÓN
Si la interrupción de la corriente durará 24 horas o
menos, mantenga todas las puertas del refrigerador
cerradas para que los alimentos permanezcan fríos y
congelados.
2. Si la interrupción de la corriente durará más de
24 horas, saque todos los alimentos congelados y
almacénelos en un arcón congelador.
CUANDO SE VA DE VACACIONES
Si decide dejar encendido el refrigerador mientras está
fuera, siga estos pasos para preparar el refrigerador antes
de irse.
Consuma los alimentos perecederos y congele los
demás.
2. Apague la máquina de hielo y vacíe el depósito de
hielo.
Si decide apagar el refrigerador antes de partir, siga estos
pasos.
Saque todos los alimentos del refrigerador.
2. En función del modelo, ajuste el control del termostato
(control del refrigerador) en OFF. Consulte la sección
Ajuste de los controles.
3. Limpie el refrigerador y séquelo a fondo.
Con cinta adhesiva, coloque bloques de madera o goma
en la parte superior de ambas puertas para mantenerlas
ORVXoFLHQWHPHQWHDELHUWDVSDUDTXHSXHGDSDVDUHO
aire. Esto evitará la aparición de moho y malos olores.
CUANDO SE MUDA
Cuando vaya a trasladar su refrigerador a una nueva casa,
siga estos pasos para prepararlo para la mudanza.
Saque todos los alimentos del refrigerador y empaquete
todos los alimentos congelados en hielo seco.
2. Desenchufe el refrigerador.
3. Lávelo y séquelo a fondo.
Retire todos los componentes extraíbles, envuélvalos bien
y, con cinta adhesiva, embálelos juntos para que no se
muevan ni traqueteen durante la mudanza. Consulte la
sección Uso del refrigerador para obtener instrucciones
sobre componentes extraíbles.
5. En función del modelo, levante la parte delantera del
refrigerador para que ruede con más facilidad O BIEN
atornille los pies de nivelación para que no rayen el
suelo. Consulte la sección Cierre de las puertas.
Use cinta adhesiva para mantener las puertas cerradas
y para pegar el cable de alimentación al cuerpo del
refrigerador.
Cuando llegue a su nueva casa, vuelva a colocar todo en su
sitio y consulte la sección Instalación del refrigerador para
obtener las instrucciones de preparación.
ADVERTENCIA
Riesgo de descargas eléctricas
Antes de sustituir una lámpara de compartimiento,
desenchufe el refrigerador o desconecte la alimentación
en el cortacircuito o caja de fusibles.
NOTA: La lámpara del compartimiento del refrigerador
es una iluminación interior mediante LEDs por lo que
el mantenimiento deberá ser realizado por un técnico
FXDOLoFDGR
CUIDADO Y LIMPIEZA

7
CONEXIÓN DE LA TUBERÍA DE AGUA
ANTES DE EMPEZAR
Esta instalación de la tubería de agua no está cubierta por
la garantía del refrigerador. Siga estas instrucciones con
cuidado para minimizar el riesgo de costosos daños debidos
al agua.
El golpe de ariete (golpeteo del agua en las tuberías) en
la fontanería de la casa podría dañar componentes del
refrigerador y provocar una fuga o una inundación de agua.
/ODPHDXQIRQWDQHURFDOLoFDGRSDUDUHVROYHUHOJROSHGH
ariete antes de instalar la tubería de suministro de agua en
el refrigerador.
PRECAUCIÓN: Para evitar quemaduras y daños en
el producto, conecte sólamente el tubo de agua del
refrigerador a un suministro de agua fría.
Si va a usar el refrigerador antes de conectar la tubería de
agua, asegúrese de que el interruptor de alimentación de la
máquina de hielo está en la posición OFF (O).
PRECAUCIÓN: No instale la tubería de la máquina
de hielo en zonas donde las temperaturas descienden por
GHEDMRGHOSXQWRGHĄFRQJHODFLÚQ
PRESIÓN DEL AGUA
Un suministro de agua fría. La presión del agua debe estar
HQWUHORV\ORVSVLHQPRGHORVVLQoOWURGHDJXD\
HQWUHORV\SVLHQPRGHORVFRQoOWURGHDJXD
Si se conecta un VLVWHPDGHoOWUDFLÚQGHDJXDGHÚVPRVLV
inversa al suministro de agua fría, esta instalación de
la tubería de agua no está cubierta por la garantía del
refrigerador. Siga estas instrucciones con cuidado para
minimizar el riesgo de costosos daños debidos al agua.
Si se conecta un VLVWHPDGHoOWUDFLÚQGHDJXDGHÚVPRVLV
inversa al suministro de agua fría, la presión de agua
al sistema de ósmosis inversa debe ser como mínimo de
entre 40 y 60 psi (2,8 kgf/cm
2
~ 4,2 kgf/cm
2
, menos
GHaĄVHJXQGRVHQOOHQDUXQDWD]DGHFFGH
capacidad).
Si la presión del agua procedente del sistema de ósmosis
inversa es inferior a 21 psi o 1,5 kgf/cm2 (tarda más de
ĄVHJXQGRVHQOOHQDUXQDWD]DGHFFGHFDSDFLGDG
v &RPSUXHEHVLHOoOWURGHVHGLPHQWRVGHOVLVWHPDGHÚVPRVLV
LQYHUVDHVWÊEORTXHDGR5HHPSODFHHOoOWURVLHVQHFHVDULR
v Después de un uso intensivo, déle tiempo al depósito de
almacenamiento del sistema de ósmosis inversa para que
se llene.
v Si el problema relacionado con la presión de agua
procedente de la ósmosis inversa persiste, llame a un
IRQWDQHURFDOLoFDGR
v Todas las instalaciones deben realizarse conforme a los
requisitos de los códigos locales de fontanería.
PRECAUCIÓN: Use gafas protectoras durante la
instalación para evitar lesiones.
QUÉ NECESITARÁ
v Tubería de cobre, de ¼ de pulgada
de diámetro, para conectar el
refrigerador al suministro de agua.
Asegúrese de que ambos extremos de
la tubería están cortados a escuadra.
v Para determinar la cantidad de tubería que necesita: mida
la distancia desde la válvula de agua situada en la parte
posterior del refrigerador a la tubería del suministro de
agua. A continuación, súmele 2,4 metros (8 pies). Asegúrese
GHTXHKD\DVXoFLHQWHWXEHUÕDDGLFLRQDODSUR[LPDGDPHQWH
2,4 metros [8 pies] enrollada en 3 vueltas de unos 25 cm
>ĄSXOJ@GHGLÊPHWURSDUDSHUPLWLUTXHVHSXHGDGHVSHJDU
el refrigerador de la pared después de la instalación.
v Taladro eléctrico.
v Llave de ½ pulg. o una llave inglesa.
v Destornilladores de punta plana y de estrella.
v Dos tuercas de compresión
con un diámetro exterior de
¼ de pulg. y 2 abrazaderas
para unir el tubo de cobre a la
válvula de corte y a la válvula
de agua del refrigerador.
v Si la tubería de agua de cobre
existente tiene una conexión
abocinada en el extremo,
necesitará un adaptador
(disponible en cualquier ferretería)
para conectar la tubería de agua
al refrigerador O puede cortar
la conexión abocinada con un
cortatubos y, a continuación, usar
una tuerca de unión.
v Una válvula de corte para conectar a la tubería de agua
fría. La válvula de corte debería tener una entrada de
agua con un diámetro interior mínimo de Ė/Ċĉ pulg. en el
punto de conexión con la TUBERÍA DE AGUA FRÍA. Las
válvulas de corte de montura se incluyen en muchos kits
de suministros de agua. Antes de
comprarla, asegúrese de que la
válvula de montura cumple con
los códigos locales de fontanería.
NOTA: No se debe usar una
válvula de agua de tipo de montura autoperforante.
ADVERTENCIA
Riesgo de descargas eléctricas
Si usa un dispositivo eléctrico (como un taladro) durante
la instalación, asegúrese de que esté alimentado por
batería y que tenga doble aislamiento o que esté
correctamente conectado a tierra de manera que evite
HOĄULHVJRGHXQDGHVFDUJDHOÑFWULFD

7
INSTRUCCIONES DE INSTALACIÓN
Instale la válvula de corte cerca de la tubería de agua
potable que más se usa.
&257((/680,1,6752'($*8$35,1&,3$/
Abra el grifo más cercano para liberar la presión
de la línea.
2. ELIJA LA UBICACIÓN DE LA VÁLVULA
Elija una ubicación para la válvula a
la que se pueda acceder fácilmente.
Es mejor conectarla en el lateral de
una tubería de agua vertical. Cuando
sea necesario conectarla en una
tubería de agua horizontal, realice la
conexión en la parte superior o lateral,
en lugar de conectarla a la parte inferior, para evitar
la acumulación de sedimentos de la tubería de agua.
3. TALADRE EL ORIFICIO PARA LA VÁLVULA
7DODGUHXQRULoFLRGHSXOJHQ
la tubería de agua mediante una
SXQWDDoODGD4XLWHWRGDVODV
rebabas resultantes de taladrar
HORULoFLRHQODWXEHUÕD7HQJD
cuidado de que no caiga agua
en el taladro. Si no se taladra un
RULoFLRGHGHSXOJSRGUÕD
verse reducida la producción de hielo y el tamaño
de los cubitos.
NOTA: La tubería de conexión no puede ser una tubería
blanca de plástico. Los fontaneros autorizados sólo
deben usar tuberías de cobre NDA #49595 o 49599 o
tuberías PEX (polietileno reticulado).
),-(/$9/98/$'(&257(
Fije la válvula de corte a la tubería de agua fría con la
abrazadera para tubos.
NOTA: Se deben cumplir los códigos de fontanería
248CMR del Estado de Massachusetts. Las válvulas
de montura son ilegales y no se permite su uso en
Massachusetts. Consulte a su fontanero autorizado.
5. APRIETE LA ABRAZADERA PARA TUBOS
Apriete los tornillos de la abrazadera hasta que
la arandela de sellado comience a hincharse.
NOTA: Tenga cuidado de no sobreapretar la
abrazadera, ya que podría romper la tubería.
(1&$0,1(/$78%(5¸$
Encamine la tubería entre la tubería de agua fría y el
refrigerador.
(QFDPLQHODWXEHUÕDDWUDYÑVGHXQRULoFLRWDODGUDGR
en la pared o suelo (detrás del refrigerador o junto a
la base del aparato) lo más cerca de la pared que sea
posible.
NOTA: $VHJàUHVHGHTXHKD\DVXoFLHQWHWXEHUÕD
adicional (aproximadamente 2,4 metros enrollada en
ĄYXHOWDVGHXQRVFPGLÊPHWURSDUDSHUPLWLUTXHVH
pueda despegar el refrigerador de la pared después de
la instalación.
&21(&7(/$78%(5¸$$/$9/98/$
Coloque la tuerca de compresión y la abrazadera
para la tubería de cobre en el extremo de la tubería y
conéctela a la válvula de corte. Asegúrese de que la
tubería está completamente insertada en la válvula.
Apriete la tuerca de compresión con fuerza.
NOTA: Se deben cumplir los códigos de fontanería
248CMR del Estado de Massachusetts. Las válvulas de
montura son ilegales y no se permite su uso en
Massachusetts. Consulte a su fontanero autorizado.
Abrazadera
para tubos
Válvula de
corte de
montura
Tubería de
agua fría
vertical
Abrazadera
para tubos
Tornillo de la
abrazadera
Arandela
Extremo de
entrada
Válvula de
corte de
montura
Tuerca
prensaestopas
Válvula de
salida
Tuerca de
compresión
Guarnición
(manguito)
CONEXIÓN DE LA TUBERÍA DE AGUA

7
CONEXIÓN DE LA TUBERÍA DE AGUA
$&/$5((/,17(5,25'(/$78%(5¸$
Active el suministro de agua
principal y deje correr el agua por la
tubería hasta que salga agua limpia.
Corte la válvula de agua después de
que haya pasado aproximadamente
un litro de agua a través de la
tubería.
. CONECTE LA TUBERÍA AL
REFRIGERADOR
NOTA: Antes de realizar la conexión con el refrigerador,
asegúrese de que el cable de alimentación del
refrigerador no está enchufado a la toma de corriente.
5HWLUHODWDSDGHSOÊVWLFRpH[LEOHGHODYÊOYXODGHDJXD
2. Coloque la tuerca de compresión y la guarnición
(manguito) en el extremo del tubo tal como se muestra
en la imagen.
3. Inserte el extremo de la tubería de cobre en la conexión
todo lo que pueda. Mientras sujeta la tubería, apriete el
adaptador.
$%5$(/3$62'($*8$(1/$9/98/$'(&257(
Apriete las conexiones que goteen.
(1&+8)((/5()5,*(5$'25
Disponga la bobina de tubería de tal manera que no
vibre contra la parte posterior del refrigerador ni contra
la pared. Empuje el refrigerador hacia la pared.
(1&,(1'$/$048,1$'(+,(/2
Ponga el interruptor de alimentación de la máquina
de hielo en la posición ON.
La máquina de hielo no comenzará a funcionar hasta
que no alcance su temperatura de funcionamiento de
–9 °C (15 °F) o menos. En ese momento, comenzará
automáticamente a funcionar si el interruptor de
alimentación de la máquina de hielo está en la posición
ON (I).
Abrazadera de
tubería
Tubería de
¼ de pulg.
Tuerca de
compresión de
¼ de pulg.
Conexión del
refrigerador
Guarnición
(manguito)
PRECAUCIÓN: Compruebe si hay fugas en las
conexiones de las tuberías de agua.

R:
mantener los alimentos a la temperatura deseada. La leche deberá mantenerse fría al almacenarse en el estante
Para cambiar la pantalla de Fahrenheit a Celsios, mantenga presionados los botones Freezer Temp y Refrigerator
Temp hasta que escuche un sonido y vea el cambio de ajustes en la pantalla.
R: Presione continuamente el botón Refrigerator Temp o Freezer Temp en el panel de control hasta que aparezca la
temperatura deseada. Los números se mostrarán de mayor a menor y volverán a comenzar por el mayor a medida
que siga presionando.
R: Esto puede suceder si no tiene una fuente de agua conectada a su refrigerador y la máquina de hielo está
encendida. Si no tiene una fuente de agua conectada a la parte trasera del refrigerador, debe apagar la máquina
de hielo.
R: Esta es una parte normal del ciclo de la máquina de hielo. La bandeja de la máquina de hielo puede parecer
nivelada o con una leve inclinación. El cambio de posición es para asistir el proceso de congelación.
R: El refrigerador está en Modo de Exhibición. El Modo de Exhibición deshabilita toda refrigeración en las secciones
del refrigerador y congelador para conservar energía mientras se exhibe en una tienda minorista. Cuando se
activa, se muestra apagado (OFF) en el panel de control y la pantalla permanece encendida por 20 segundos.
Con cualquier puerta del refrigerador abierta, mantenga presionado el botón Refrigerator Temp y el botón Accela Ice
durante 5 segundos. El panel de control emite un pitido y la configuración de la temperatura muestra la confirmación
de que el Modo de Exhibición está desactivado. Utilice el mismo procedimiento para activar el Modo de Exhibición.
Antes de llevar a cabo los pasos necesarios para detectar y solucionar problemas, asegúrese de que se cumpla con los
siguientes requisitos básicos:
)mpg 5,0( mpl 9,1oicivres ed ojulF
elbatop augAauga ed ortsinimuS
( aPk 728-831auga led nóiserP
0-120 psi)
Límites de temperatura ambiente para el funcionamiento 55°F–110°F (12.8°C–43.3°C)
02 o 51 a odanoisuf y ,etnemacinú CA ,zH 06 ,soitlov 511sgnitaR lacirtcelE
amperios

76
Problema Posible Causa y Solución
Las secciones del
refrigerador y del
congelador no
enfrían.
El control del refrigerador está en la posición OFF (en algunos modelos).
v Encienda el control. Consulte la sección Ajuste de los controles para obtener información
acerca de los ajustes correctos de temperatura..
El refrigerador está en el ciclo de descongelación.
v Durante el ciclo de descongelado, la temperatura de cada compartimento puede
haya sido restaurada una vez que el ciclo de descongelado haya sido completado.
El refrigerador se instaló recientemente.
v Puede tomar hasta 24 horas para que cada compartimento alcance la temperatura
deseada.
El refrigerador se trasladó recientemente.
v Si el refrigerador estaba almacenado por un período largo de tiempo o reclinado, es
necesario que éste se mantenga en posición vertical por 24 horas previo a conectarlo a la
corriente eléctrica.
El refrigerador está en Demo Mode (Modo Demostración).
v Modo Demo permite que la iluminación y la pantalla de control funcionen normalmente
mientras que deshabilita el enfriamiento para ahorrar energía mientras el refrigerador
Controles de este manual para instrucciones sobre cómo deshabilitar el Modo Demo.
El sistema de
enfriado funciona por
demasiado tiempo.
El refrigerador ha reemplazado a un modelo más antiguo.
v Los refrigeradores modernos requieren más tiempo de operación pero usan menos energía
El refrigerador se acaba de enchufar o la electricidad se acaba de restablecer.
v Puede tomar hasta 24 horas para que el refrigerador enfríe completamente.
La puerta se abre a menudo o se acaba de introducir una gran cantidad de alimentos/
alimentos calientes.
v Al añadir alimentos y abrir las puertas el refrigerados se calienta, requiriendo que el
compresor se ejecute más tiempo a manera de enfriarlo de nuevo. A manera de conservar
energía, intente retirar todo lo que necesita del refrigerador al mismo tiempo, mantenga
los alimentos organizados para que sea fácil encontrarlos, y cierre la puerta en cuanto los
alimentos sean retirados. (Consulte la Guía de Almacenamiento de Alimentos.)
Las puertas no están completamente cerradas.
v , vea la sección “Puertas
no cierran o abren completamente” en Solución de Problemas.
El refrigerador está instalado en un lugar caluroso.
v El compresor se ejecutará por más tiempo en condiciones templadas. En temperaturas
normales de habitación (70 °F o 21 °C) espere que su compresor se ejecute de 40% a
80% del tiempo. Bajo condiciones más calientes, espere que este se ejecute más seguido.
El refrigerador no debe ser operado sobre 110 °F (43 °C).
La tapa posterior/ el condensador está obstruida/o.
v Use una aspiradora con un accesorio adjunto para limpiar la cubierta y los respiraderos
del condensador. No remueva el panel que cubre el área de las bobinas del condensador.
ENFRIAMIENTO
GUÍA DE SOLUCIÓN DE PROBLEMAS

77
Problema Posible Causa y Solución
Acumulación de
humedad en el
interior
Las puertas se abren seguido o por largos períodos de tiempo.
v Cuando las puertas están abiertas constantemente o por períodos largos de tiempo, el
aire caliente y húmedo entra al compartimento. Esto eleva la temperatura y el nivel de
humedad dentro del compartimento. Para disminuir el efecto, reduzca la frecuencia y
duración de apertura de la puerta.
Las puertas no cierran correctamente.
v Vea la sección Puertas no cierran o abren completamente en Solución de Problemas de
Partes & Características.
El clima es húmedo.
v El clima húmedo permite que humedad adicional ingrese a los compartimentos cuando
las puertas se abren, provocando condensación o escarcha. Mantener un nivel de
humedad razonable en el hogar ayudará a controlar la cantidad de humedad que pueda
ingresar a los compartimentos.
El ciclo de descongelación se acaba de completar.
v Durante el ciclo de descongelado, la temperatura de cada compartimento puede
incrementar levemente y puede que se forme condensación en la pared trasera. Espere
descongelado ha sido completado.
Los alimentos no están empaquetados correctamente.
v Los alimentos almacenados, descubiertos o desenvueltos, y contenedores húmedos pueden
llegar a generar acumulación de humedad dentro de cada compartimento. Seque
todos los contenedores y almacene los alimentos en empaques sellados para prevenir
condensación y escarcha.
Los alimentos se
congelan en el
compartimiento del
refrigerador.
Alimentos con contenido alto en agua fueron ubicados cerca de una ranura de ventilación.
v Reorganice los artículos con contenido alto en agua alejados de las ranuras de ventilación.
v Si la temperatura es muy baja, ajuste el control mediante un incremento a la vez y espere
a que la temperatura se estabilice. Consulte la sección Ajustando los Controles para más
información.
El refrigerador está instalado en una ubicación fría.
v Cuando el refrigerador es operado en una temperatura inferior a 41 °F (5 °C), los
alimentos pueden congelarse en el compartimento del refrigerador. El refrigerador no
debe ser operado en temperaturas inferiores a 55 °F (13 °C).
La sección del
REFRIGERADOR o
del CONGELADOR
está demasiado fría.
Ajustes de control de temperatura incorrectos.
v Si la temperatura es muy fría, ajuste el control un incremento a la vez y espere a que la
temperatura se estabilice. Consulte el Panel de Control para mayor información.
Se forman cristales
de hielo o escarcha
en los alimentos
congelados (dentro
de paquetes
sellados).
Condensación de alimentos con un alto contenido de agua se ha congelado dentro del
paquete.
v Esto es normal para alimentos con un alto contenido de agua.
Alimentos se han dejado en el congelador por un largo período de tiempo.
v No almacene alimentos con un alto contenido de agua en el congelador por un largo
período de tiempo.
Se forman cristales
de hielo o escarcha
en los alimentos
congelados (fuera de
los paquetes).
La puerta es abierta frecuentemente o por períodos prolongados de tiempo.
v Cuando las puertas son abiertas constantemente o por períodos largos de tiempo, aire
caliente y húmedo entra al compartimento. Esto eleva la temperatura y el nivel de
humedad dentro del compartimento. Para disminuir el efecto, reduzca la frecuencia y
duración de apertura de la puerta.
La puerta no cierra correctamente.
v Vea la sección “Puertas no cierran o abren correctamente” en Solución de Problemas.
ENFRIAMIENTO
GUÍA DE SOLUCIÓN DE PROBLEMAS

78
GUÍA DE SOLUCIÓN DE PROBLEMAS
Problema Posible Causa y Solución
Refrigerator or
freezer section is too
warm.
El refrigerador fue instalado recientemente.
v Puede tomar hasta 24 horas para que cada compartimento alcance la temperatura
deseada.
Los respiraderos están bloqueados. Aire frío circula desde el congelador hasta la sección de
alimentos frescos y luego de regreso a través de los respiraderos en la pared que divide las
dos secciones.
v Reorganice los artículos con contenido alto en agua alejados de las ranuras de
ventilación.
Las puertas están abiertas constantemente o por períodos largos de tiempo.
v Cuando las puertas están abiertas constantemente o por períodos largos de tiempo, el
aire caliente y húmedo entra al compartimento. Esto eleva la temperatura y el nivel de
humedad dentro del compartimento. Para disminuir el efecto, reduzca la frecuencia y
duración de apertura de la puerta.
La unidad está instalada en un lugar caluroso.
v No se debería usar el refrigerador si la temperatura supera los 43°C (110°F).
Se agregó una gran cantidad de alimentos o alimentos calientes al alguno de los
compartimientos.
v Agregar alimentos calienta el compartimiento, con lo cual se necesita que el sistema de
enfriado comience a funcionar. Dejar que la comida caliente se enfríe a temperatura
ambiente antes de ponerla en el refrigerador reducirá dicho efecto.
Las puertas no cierran correctamente.
v Consulte el apartado “Las puertas no se cierran completamente o quedan abiertas” en la
sección Componentes y Características de la Guía de resolución de problemas..
El control de temperatura no es el adecuado.
v
ol de a un punto a la vez y
espere a que la temperatura se estabilice. Consulte la sección Ajuste de los controles para
obtener mayor información.
El ciclo de descongelación se ha completado recientemente.
v Durante el ciclo de descongelación, la temperatura de cada compartimiento puede
aumentar ligeramente y se puede formar condensación en la pared trasera. Espere 30
temperatura correcta se haya restablecido.
ENFRIAMIENTO

79
Problema Posible Causa y Solución
La máquina de hielo
no hace hielo.
La máquina de hielo
hielo.
El refrigerador se instaló recientemente o la máquina de hielo se conectó recientemente.
v Puede tomar hasta 24 horas para que cada compartimiento alcance la temperatura
deseada y para que la máquina de hielo comience a fabricar hielo.
La máquina de hielo no está encendida.
v
que está en la posición ON.
Apagado de la máquina de hielo (brazo palpador) obstruido.
v Las sustancias desconocidas o escarcha en el sensor detector de hielo pueden interrumpir
la producción del mismo. Asegúrese de que el área del sensor está limpia todo el tiempo
para que opere apropiadamente.
El refrigerador no está conectado a un suministro de agua o la válvula de corte del suministro
no está abierta.
v Conecte el refrigerador al suministro de agua y abra completamente la válvula de corte de agua.
Corte de la máquina de hielo (brazo o sensor) obstruido.
v Si su máquina de hielo está equipada con un brazo de corte de hielo, asegúrese de que el
brazo se mueve libremente. Si su máquina de hielo está equipada con un sensor de corte
de hielo, asegúrese de que haya un espacio limpio entre los dos sensores..
v ersa pueden reducir la presión de agua por
debajo de la cantidad mínima y provocar problemas en la máquina de hielo. (Consulte la
sección Conectando la Línea de Agua.)
La demanda excede la capacidad de almacenamiento de hielo.
v La máquina de hielo producirá aproximadamente 70-184 cubos en un período de 24 horas.
v o de agua se recomienda:
Aproximadamente cada seis meses.
Cuando disminuya la potencia del dispensador de agua.
Cuando los cubos de hielo sean más pequeños de lo normal.
Baja presión de suministro de agua principal.
v
o de agua y
sea necesario contactar a un plomero.
La tubería que conecta el refrigerador a la válvula de suministro del hogar está retorcida.
v La tubería se puede retorcer cuando el refrigerador es movido durante la instalación o
de agua y arréglela para prevenir futuras torceduras.
Las puertas están abiertas constantemente o por períodos largos de tiempo.
v Si las puertas de la unidad se abren a menudo, el aire ambiental calentará el refrigerador,
lo que impedirá que la unidad pueda mantener la temperatura establecida. Puede ayudar
el bajar la temperatura del refrigerador, así como no abrir las puertas con tanta frecuencia.
Las puertas no están completamente cerradas.
v Si las puertas no están cerradas correctamente, la producción de hielo se verá afectada.
Para obtener mayor información, vea la sección Las puertas no se cierran completamente
o quedan abiertas en la sección Componentes y Características de la Guía de resolución
de problemas.
El ajuste de temperatura del congelador es demasiado cálido.
v La temperatura recomendada para el compartimento del congelador para una
producción normal de hielo es de 0 °F. Si la temperatura del congelador es superior, la
producción se verá afectada.
HIELO
GUÍA DE SOLUCIÓN DE PROBLEMAS

80
Problema Posible Causa y Solución
El hielo tiene mal
sabor u olor.
El suministro de agua contiene minerales como azufre.
v
NOTA: mineral/
olor/sabor del suministro de agua.
La máquina de hielo fue instalada recientemente.
v El hielo que ha sido almacenado por mucho tiempo se encogerá, tornará turbio y podrá
desarrollar un sabor a viejo. Tire el hielo viejo y haga un nuevo suministro.
Los alimentos no han sido almacenados apropiadamente en los compartimentos.
v Empaque nuevamente los alimentos. Los olores pueden migrar hacia el hielo si los alimentos no
son empacados apropiadamente.
El interior del refrigerador debe ser limpiado.
v Vea la sección de Mantenimiento para mayor información.
El recipiente de almacenamiento de hielo necesita ser limpiado.
v Vacíe y lave el recipiente (deseche cubos viejos). Asegúrese de que el recipiente está
completamente seco previo a reinstalarlo.
La máquina de hielo
está produciendo
demasiado hielo.
Corte de la máquina de hielo (brazo/sensor) está obstruido.
v Vacíe el recipiente de hielo. Si su dmáquina de hielo está equipada con un brazo de corte de
hielo, asegúrese de que el brazo se mueve libremente. Si su máquina de hielo está equipada
con el sensor de corte de hielo electrónico, asegúrese de que haya un espacio limpio entre
apropiadamente.
HIELO
GUÍA DE SOLUCIÓ
N DE PROBLEMAS

81
PARTES Y CARACTERÍSTICAS
Problema Posible Causa y Solución
Las puertas
no se cierran
correctamente o se
quedan abiertas.
Paquetes de alimentos están bloqueando la puerta e impiden que se cierre.
v Reorganice los contenedores de alimentos para liberar la puerta y los estantes de la puerta.
El recipiente de hielo, la tapa del cajón para verduras, las bateas, los estantes, las bandejas
de las puertas o las cestas no están en su sitio.
v Empuje correctamente hacia adentro las bandejas, la tapa del cajón para verduras, las bateas, los estantes
y las cestas en su posición adecuada. Vea la sección Uso del Refrigerador para mayor información.
Las puertas se desmontaron durante la instalación del producto y no se volvieron a colocar
correctamente.
v Desmonte y vuelva a colocar las puertas siguiendo las instrucciones de la sección Desmontaje y
Sustitución de los Agarradores y Puertas del Refrigerador.
El refrigerador no está correctamente nivelado.
v Vea la sección Alineación de las Puertas en la sección Instalación del Refrigerador para nivelar el refrigerador.
Es difícil abrir las
puertas.
Las juntas están sucias o pegajosas.
v a para
electrodomésticos o cera de cocina en las juntas después de limpiarlas.
La puerta se acaba de cerrar.
v Cuando abre la puerta, aire más caliente entra al refrigerador. Al enfriarse, puede crear un vacío.
Si le cuesta abrir la puerta, espere un minuto para permitir que la presión del aire se ecualice y, a
continuación, compruebe si se abre con más facilidad.
El refrigerador se
tambalea o parece
inestable.
Las patas niveladoras no están correctamente ajustadas.
v Consulte la sección Nivelación y Alineación de Puertas.
El piso no está nivelado.
v Puede ser necesario agregar calibradores debajo de las patas o rodillos de nivelación o para
completar la instalación..
Las luces no
funcionan.
Falla de iluminación interior LED.
v La lámpara del compartimento del refrigerador es una iluminación interior LED, por lo que el
El refrigerador tiene
un olor inusual.
El Filtro de Aire puede necesitar ser ajustado a MAX o ser reemplazado.
v Ajuste el Filtro de Aire a MAX. Si no desapar
puede necesitar ser reemplazado. Consulte la sección Sustitución del Filtro de Aire para obtener
instrucciones acerca del reemplazo..
El interior del
refrigerador está
cubierto con polvo u
hollín.
El refrigerador está ubicado cerca de una fuente de fuego, como una chimenea o candela.
v Asegúrese de que el refrigerador no se encuentre ubicado cerca de una fuente de fuego, como
una chimenea o candela.
GUÍA DE SOLUCIÓN DE PROBLEMAS

82
RUIDOS
Problema Posible Causa y Solución
Haciendo clic El control de descongelado hará un “clic” cuando el ciclo de descongelado comience y
termine. El control del termostato (o control del refrigerador en algunos modelos) también
Traqueteo
en la parte posterior de la unidad o de artículos almacenados encima o alrededor del
refrigerador.
El refrigerador no está sólidamente apoyado en el suelo.
v El suelo es poco sólido o irregular, o es necesario ajustar las patas de nivelación. Consulte
la sección Nivelación y Alineación de las Puertas.
El refrigerador con compresor lineal se sacudió mientras estaba funcionando.
Crujido El motor del ventilador del evaporador está circulando el aire a través de los compartimentos
del refrigerador y del congelador.
El ventilador del condensador está forzando el paso de aire a través del condensador.
Gluglú
Estallar Contracción y expansión de las paredes internas debido a cambios en la temperatura.
Chisporroteo El agua cayendo en el calentador de descongelación durante un ciclo de descongelado.
Vibración Si el lateral o la parte posterior del refrigerador están en contacto con un mueble o una
pared, algunas de las vibraciones normales pueden producir un sonido audible.
v Para eliminar el ruido, asegúrese de que los laterales y la parte posterior no puedan vibrar
contra las paredes o los muebles.
Goteo Agua cayendo en la batea de drenaje durante el ciclo de descongelado.
Sonido de pulsación
o agudo
alimentos a la temperatura deseada.
v vo refrigerador funcione durante
que los modelos anteriores. Mientras el refrigerador está en funcionamiento, es normal
escuchar un sonido de pulsación o agudo.
GUÍA DE SOLUCIÓ
N DE PROBLEMAS

127$6

-
 1
1
-
 2
2
-
 3
3
-
 4
4
-
 5
5
-
 6
6
-
 7
7
-
 8
8
-
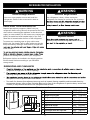 9
9
-
 10
10
-
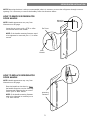 11
11
-
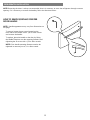 12
12
-
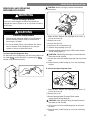 13
13
-
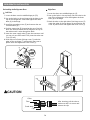 14
14
-
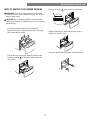 15
15
-
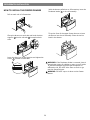 16
16
-
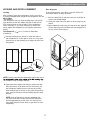 17
17
-
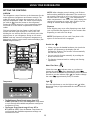 18
18
-
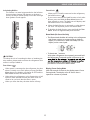 19
19
-
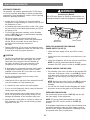 20
20
-
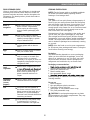 21
21
-
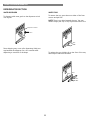 22
22
-
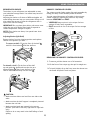 23
23
-
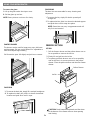 24
24
-
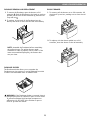 25
25
-
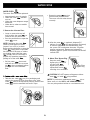 26
26
-
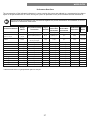 27
27
-
 28
28
-
 29
29
-
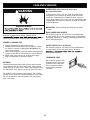 30
30
-
 31
31
-
 32
32
-
 33
33
-
 34
34
-
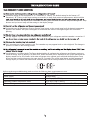 35
35
-
 36
36
-
 37
37
-
 38
38
-
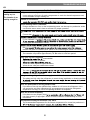 39
39
-
 40
40
-
 41
41
-
 42
42
-
 43
43
-
 44
44
-
 45
45
-
 46
46
-
 47
47
-
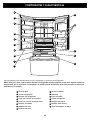 48
48
-
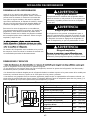 49
49
-
 50
50
-
 51
51
-
 52
52
-
 53
53
-
 54
54
-
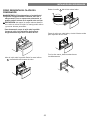 55
55
-
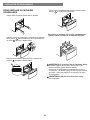 56
56
-
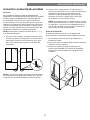 57
57
-
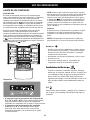 58
58
-
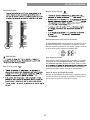 59
59
-
 60
60
-
 61
61
-
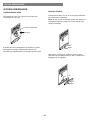 62
62
-
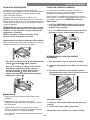 63
63
-
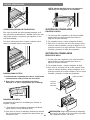 64
64
-
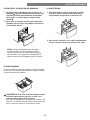 65
65
-
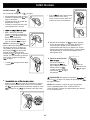 66
66
-
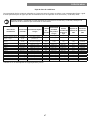 67
67
-
 68
68
-
 69
69
-
 70
70
-
 71
71
-
 72
72
-
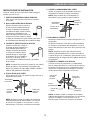 73
73
-
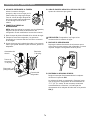 74
74
-
 75
75
-
 76
76
-
 77
77
-
 78
78
-
 79
79
-
 80
80
-
 81
81
-
 82
82
-
 83
83
-
 84
84


Kenmore Elite 71329 El manual del propietario
- Categoría
- Neveras
- Tipo
- El manual del propietario
- Este manual también es adecuado para
en otros idiomas
- English: Kenmore Elite 71329 Owner's manual
Artículos relacionados


Otros documentos
-
LG LRMNC1803 El manual del propietario
-
LG 79029 El manual del propietario
-
Kenmore 73102 El manual del propietario
-
Kenmore 73115 El manual del propietario
-
PREMIUM PRF26607HB Manual de usuario
-
-
-
GE Cafe Series CSB42 El manual del propietario
-
GE GDE03GGHBB El manual del propietario
-
 GE Appliances PYE22KYNFS El manual del propietario
