IMG Stage Line CD-292USB Manual de usuario
- Categoría
- Reproductores de CD
- Tipo
- Manual de usuario

CD-292USB Bestellnummer 21.2790
BEDIENUNGSANLEITUNG • INSTRUCTION MANUAL • MODE D’EMPLOI
ISTRUZIONI PER L’USO • GEBRUIKSAANWIJZING • MANUAL DE INSTRUCCIONES • INSTRUKCJA OBSŁUGI
SIKKERHEDSOPLYSNINGER • SÄKERHETSFÖRESKRIFTER • TURVALLISUUDESTA
PROFESSIONELLER DUAL-CD / MP3-SPIELER
PROFESSIONAL DUAL CD / MP3 PLAYER
LECTEUR CD / MP3 DOUBLE PROFESSIONNEL
LETTORE CD / MP3 DOPPIO PROFESSIONALE

2
wwwwww..iimmggssttaaggeelliinnee..ccoomm
Bevor Sie einschalten …
Wir wünschen Ihnen viel Spaß mit Ihrem neuen Gerät
von „img Stage Line“. Bitte lesen Sie diese Bedienungs-
anleitung vor dem Betrieb gründlich durch. Nur so lernen
Sie alle Funktionsmöglichkeiten kennen, vermeiden
Fehlbedienungen und schützen sich und Ihr Gerät vor
eventuellen Schäden durch unsachgemäßen Gebrauch.
Heben Sie die Anleitung für ein späteres Nachlesen auf.
Der deutsche Text beginnt auf der Seite 4.
Before switching on …
We wish you much pleasure with your new “img Stage
Line” unit. Please read these operating instructions care-
fully prior to operating the unit. Thus, you will get to know
all functions of the unit, operating errors will be pre-
vented, and yourself and the unit will be protected
against any damage caused by improper use. Please
keep the oper ating instructions for later use.
The English text starts on page 10.
Avant toute installation …
Nous vous souhaitons beaucoup de plaisir à utiliser cet
appareil “img Stage Line”. Lisez ce mode dʼemploi entiè-
rement avant toute utilisation. Uniquement ainsi, vous
pourrez apprendre lʼensemble des possibilités de fonc-
tionnement de lʼappareil, éviter toute manipulation erronée
et vous protéger, ainsi que lʼappareil, de dommages éven-
tuels engendrés par une utilisation inadaptée. Conser-
vez la notice pour pouvoir vous y reporter ultérieurement.
La version française se trouve page 16.
Prima di accendere …
Vi auguriamo buon divertimento con il vostro nuovo
apparecchio di “img Stage Line”. Leggete attentamente
le istruzioni prima di mettere in funzione lʼapparecchio.
Solo così potete conoscere tutte le funzionalità, evitare
comandi sbagliati e proteggere voi stessi e lʼapparecchio
da eventuali danni in seguito ad un uso improprio. Con-
servate le istruzioni per poterle consultare anche in
futuro.
Il testo italiano inizia a pagina 22.
D
A
CH
GB
Antes de la utilización …
Le deseamos una buena utilización para su nue vo apa-
rato “img Stage Line”. Por favor, lea estas in s trucciones
de uso atentamente antes de ha cer funcionar el aparato.
De esta manera conocerá todas las funciones de la uni-
dad, se pre vendrán errores de operación, usted y el apa-
rato estarán protegidos en contra de todo daño cau sado
por un uso inadecuado. Por favor, guarde las instruccio-
nes para una futura utilización.
La versión española comienza en la página 34.
Voor u inschakelt …
Wij wensen u veel plezier met uw nieuwe apparaat van
“img Stage Line”. Lees deze gebruikershandleiding gron-
dig door, alvorens het apparaat in gebruik te nemen.
Alleen zo leert u alle functies kennen, vermijdt u foutieve
bediening en behoedt u zichzelf en het apparaat voor
eventuele schade door ondeskundig gebruik. Bewaar de
handleiding voor latere raadpleging.
De Nederlandstalige tekst vindt u op pagina 28.
Przed uruchomieniem …
Życzymy zadowolenia z nowego produktu “img Stage
Line”. Dzięki tej instrukcji obsługi będą państwo w stanie
poznać wszystkie funkcje tego urządzenia. Stosując się
do instrukcji unikną państwo błędów i ewentualnego
uszkodzenia urządzenia na skutek nieprawidłowego
użytkowania. Prosimy zachować instrukcję.
Tekst polski zaczyna się na stronie 40.
Før du tænder …
Tillykke med dit nye “img Stage Line” produkt. Læs sik-
kerhedsanvisningerne nøje før ibrugtagning, for at
beskytte Dem og enheden mod skader, der skyldes for-
kert brug. Gem venligst denne betjeningsvejledning til
senere brug.
Sikkerhedsanvisningerne findes på side 46.
Innan du slår på enheten …
Vi önskar dig mycket glädje med din nya “img Stage
Line” produkt. Läs igenom säkerhetsföre skrifterna innan
en heten tas i bruk för att undvika skador till följd av
felaktig hantering. Behåll instruktionerna för framtida
bruk.
Säkerhetsföreskrifterna återfinns på sidan 46.
Ennen kytkemistä …
Toivomme Sinulle paljon miellyttäviä hetkiä uuden “img
Stage Line” laitteen kanssa. Ennen laitteen käyttöä pyy-
dämme Sinua huolellisesti tutustumaan turvallisuusoh-
jeisiin. Näin vältyt vahingoilta, joita virheellinen laitteen
käyttö saattaa aiheuttaa. Ole hyvä ja säilytä käyttöohjeet
myöhempää tarvetta varten.
Turvallisuusohjeet löytyvät sivulta 47.
F
B
CH
I
ENL
PL DK
SFIN
B

3
CUE 2MEMO / AUTO CUE1 FOLDER
A B / EDIT RELOOP / EXIT TRACK / TRIM/ LIST
PITCH
MT
CUE PLAY/ PAUSE PITCH BEND
PROG.
BPM / TAP
CONT./ LIST
TIME
SCRATCHCD / USBOPEN / CLOSE
SEARCH
RELAY
PRO DUAL
CD / MP3 PLAYER
CD-292USB
MSF
RemainSingleTRACK PITCH
Total
CUE MT
BPM
CD
CUE 2MEMO / AUTO CUE1 FOLDER
A B / EDIT RELOOP / EXIT TRACK / TRIM/ LIST
PITCH
MT
CUE PLAY/ PAUSE PITCH BEND
PROG.
BPM / TAP
CONT./ LIST
TIME
SCRATCHCD / USB
SEARCH
MSF
Single ElapseTRACK PITCH
Total
BPM
USB
OPEN / CLOSE
123
CUE 2MEMO / AUTO CUE1 FOLDER
A B / EDIT RELOOP / EXIT TRACK / TRIM/ LIST
PITCH
MT
CUE PLAY / PAUSE PITCH BEND
PROG.
BPM / TAP
CONT. / LIST
TIME
SCRATCHCD / USBOPEN / CLOSE
SEARCH
MSF
RemainSingleTRACK PITCH
Tot al
CUE MT
BPM
CD
MSF
RemainSingleTRACK PITCH
Tot al
CUE MT
BPM
CD
MSF
RemainSingle Cont. Elapse TotalTRACK PITCH
Total
CUE
FOLDER RELOOP
MT
PG
BPM
CD
USB TITLE
ALBUM
ARTIST
LASER KLASSE 1
CLASS LASER
LASER CLASSE 1
L
R
START/
PAUSE CUE
PLAY
LOCK
TACT
CONNECT TO
REMOTE CONTROL 2
LINE
OUT
START/
PAUSE
L
R
LINE
OUT
CONNECT TO
REMOTE CONTROL 1
230 V~/50Hz
WWW.IMGSTAGELINE.COM
PRO DUAL
CD / MP3 PLAYER
CD-292USB
32 33 34 35 36 37 38 39
4 5 6 7 8 9 10 11 12 13 14 15
ABCDEFGHIJ
16 17 18 19 20 21 22 23 24
KL MNO P Q RS
WWW.IMGSTAGELINE.COM
OPEN /
CLOSE
OPEN /
CLOSE
PRO DUAL
CD / MP3 PLAYER
CD-292USB
USB1 USB 2
25 26 27 28 29 30 31

4
D
A
CH
Auf der ausklappbaren Seite 3 finden Sie
alle beschriebenen Bedienelemente und An -
schlüsse.
Inhalt
1 Übersicht der Bedienelemente
und Anschlüsse . . . . . . . . . . . . . . . . . . 4
1.1 Bedienteil . . . . . . . . . . . . . . . . . . . . . . . . 4
1.2 Laufwerkteil Frontseite . . . . . . . . . . . . . . 5
1.3 Laufwerkteil Rückseite . . . . . . . . . . . . . . 5
2 Hinweise für den sicheren Gebrauch .5
3 Einsatzmöglichkeiten . . . . . . . . . . . . . . 5
4 Gerät aufstellen und anschließen . . . . . 6
5 Bedienung . . . . . . . . . . . . . . . . . . . . . . . 6
5.1 Musikstücke abspielen . . . . . . . . . . . . . . 6
5.2 Play-Liste laden . . . . . . . . . . . . . . . . . . . 6
5.3 Anzeige der Titelinformationen
und des Ruhemodus . . . . . . . . . . . . . . . 6
5.3.1 Grafische Laufzeitanzeige . . . . . . . . . . 7
5.3.2 Anzahl der Taktschläge pro Minute . . . 7
5.3.3 Ruhemodus . . . . . . . . . . . . . . . . . . . . . 7
5.4 Betriebsart wählen . . . . . . . . . . . . . . . . . 7
5.4.1 Fortlaufende Wiedergabe
und Einzeltitelwiedergabe . . . . . . . . . . 7
5.4.2 Relay-Betrieb – automatischer Start
der anderen Abspieleinheit
am Ende eines Titels . . . . . . . . . . . . . . 7
5.5 Anspielen eines Titels . . . . . . . . . . . . . . . 7
5.6 Schneller Vor- und Rücklauf . . . . . . . . . . 7
5.7 Genaues Anfahren
einer bestimmten Stelle . . . . . . . . . . . . . 7
5.8 Rücksprung zu einer bestimmten Stelle . 7
5.8.1 Tasten CUE 1 und CUE 2 . . . . . . . . . . 7
5.8.2 Taste CUE . . . . . . . . . . . . . . . . . . . . . . 7
5.9 Geschwindigkeit mit oder ohne
Tonhöhenverschiebung verändern . . . . . 8
5.10 Pitch Bend – Takt zwischen
zwei Musikstücken angleichen . . . . . . . . 8
5.11 Effekte . . . . . . . . . . . . . . . . . . . . . . . . . . 8
5.11.1 Scratch-Effekte . . . . . . . . . . . . . . . . . . 8
5.11.2 Leiereffekte . . . . . . . . . . . . . . . . . . . . . 8
5.11.3 Stottereffekte . . . . . . . . . . . . . . . . . . . . 8
5.11.4 Endlosschleife abspielen . . . . . . . . . . . 8
5.12 Eigene Titelfolge zusammenstellen . . . . 8
5.12.1 Titelfolge speichern und abspielen . . . 8
5.12.2 Titelfolge überprüfen . . . . . . . . . . . . . . 8
5.12.3 Titelfolge ergänzen oder löschen . . . . 9
6 Faderstart . . . . . . . . . . . . . . . . . . . . . . . 9
7 Firmware aktualisieren . . . . . . . . . . . . . 9
8 Pflege des Gerätes . . . . . . . . . . . . . . . . 9
9 Technische Daten . . . . . . . . . . . . . . . . . 9
1 Übersicht der Bedienelemente
und Anschlüsse
1.1 Bedienteil
1Bedienfeld der Abspieleinheit 1
Details siehe Abb. 2
2Taste RELAY zum automatischen Starten der
anderen Abspieleinheit am Ende eines Titels
(Kapitel 5.4.2)
3Bedienfeld der Abspieleinheit 2
Details siehe Abb. 2
4Taste OPEN / CLOSE zum Öffnen und
Schließen der CD-Schublade [wie die Tasten
(27, 29) am Laufwerkteil]
5Taste CD / USB zum Umschalten zwischen
CD und USB-Speicher: Die Abspieleinheit
muss dazu mit der Taste (20) auf Pause
geschaltet sein.
Sind zwei USB-Speicher angeschlossen,
nach dem Drücken der Taste CD / USB mit
der Taste oder (21) zwischen CD,
USB 1 und USB 2 wählen. Die Textzeile (O)
zeigt die Auswahl an. Zum Bestätigen die
Taste CD / USB abschließend drücken.
6Taste SCRATCH zum Ein- und Ausschalten
der Scratch-Funktion
Bei eingeschalteter Funktion (Taste leuchtet)
lassen sich mit dem Drehrad (16) Scratch-
Effekte erzeugen.
7Taste TIME zum Umschalten der Zeitan-
zeige (H, P)
bei der Anzeige „Remain“ (G)
Restzeit des laufenden Titels
bei der Anzeige „Elapse“ (E)
bereits gespielte Zeit des laufenden Titels
bei der Anzeige „Total Remain“
Restzeit der gesamten CD
(nicht bei MP3-Betrieb möglich)
Bei MP3-Betrieb lässt sich bei gedrückt
gehaltener Taste TIME mit der Taste oder
(21) die Textzeile (O) auf die Anzeige des
Titels, Albums, Interpreten (ID3-Tags) oder
Dateinamens umschalten.
8Taste CONT / LIST
1. zum Umschalten zwischen Einzeltitelwie-
dergabe [Anzeige „Single“ (C)] und fortlau-
fender Wiedergabe [Anzeige „Cont.“ (D)]
2. zum Laden von Play-Listen (Kap. 5.2)
9Taste MEMO / AUTO
1. zum Speichern von Cue-Punkten mit den
Tasten CUE 1 und CUE 2 (11)
2. um einen Titelabschnitt mit der Länge
eines Vielfachen oder eines Bruchteils der
Taktlänge als Schleife abzuspielen
(Kapitel 5.11.4)
10 Display, Details siehe Abb. 3
Awenn über den Ziffern „TRACK“ angezeigt
wird: Nummer des Musiktitels (im ange-
wählten Ordner);
wenn unter den Ziffern „FOLDER“ ange-
zeigt wird: Nummer des angewählten Ord-
ners
BWiedergabesymbol
CAnzeige „Single“: signalisiert die Betriebs-
art Einzeltitelwiedergabe
DAnzeige „Cont.“: signalisiert die Betriebsart
für fortlaufende Wiedergabe der Titel
EAnzeige „Elapse“: signalisiert, dass die be -
reits gespielte Zeit eines Titels angezeigt
wird
FAnzeige „Total“: signalisiert zusammen mit
der Anzeige „Remain“ (G), dass die Rest-
laufzeit der CD angezeigt wird
(nicht bei MP3-Betrieb möglich)
GAnzeige „Remain“: signalisiert, dass die
Restlaufzeit eines Titel angezeigt wird. Bei
der Anzeige „Total Remain“ wird die Rest-
laufzeit der CD angezeigt.
HBalkenanzeige zur Darstellung der relati-
ven Titellaufzeit
IAnzeige der Abweichung von der Normal-
geschwindigkeit in Prozent
JAnzeige „RELOOP“: signalisiert das Ab -
spielen einer Endlosschleife
KAnzeige „CD“ oder „USB“: zeigt an, ob eine
CD, der Anschluss USB 1 (26) oder USB 2
(30) angewählt ist. Bei angewähltem An -
schluss USB 2 blinkt die Anzeige „USB“.
LAnzeige “CUE”: erscheint, wenn die Ab -
spieleinheit am Cue-Punkt auf Pause steht
(Kapitel 5.4.1 und 5.8.2).
MBei MP3-Betrieb ist in diesem Feld ange-
geben, ob in der Textzeile (O) der Titel-,
Album- oder Künstlername des Musiktitels
angezeigt wird. Ist keine dieser Anzeigen
eingeblendet, wird der Dateiname ange-
zeigt (Kapitel 5.3).
NAnzahl der Titel auf der CD;
bei MP3-Betrieb:
Anzahl der Titel im angewählten Ordner
[Anzeige „TRACK“ über den Ziffern (A)]
oder Anzahl der Ordner [Anzeige „FOL-
DER“ unter den Ziffern (A)]
OTextzeile für zusätzliche Informationen
PLaufzeitanzeige, siehe auch Pos. E und G
QAnzeige der Taktschläge pro Minute
RAnzeige „PG“: blinkt, wenn eine eigene
Titelfolge programmiert oder abgespielt
wird
SAnzeige „MT“ (Master-Tempo): signalisiert
die Funktion für konstante Tonhöhe
(Kapitel 5.9)
11 Tasten CUE 1 und CUE 2
1. zum Speichern von zwei Cue-Punkten
[auch während des Abspielens möglich;
zum Speichern zuerst die Taste MEMO /
AUTO (9) drücken]
2. zum Springen auf die gespeicherten Cue-
Punkte
12 Taste FOLDER für den MP3-Betrieb
1. zum Umschalten zwischen der Namens-
anzeige des Titels und des Ordners in der
Textzeile (O)
Entsprechend zu der gewählten Einstel-
lung lässt sich mit den Tasten und
(21) ein Titel oder ein Ordner auswählen.
2. zum Laden von Play-Listen (Kap. 5.2)
3. zum Auswählen einer Partition auf einer
angeschlossenen Festplatte (Kap. 5.1)
13 Taste PROG zum Zusammenstellen und
Abspielen einer eigenen Titelfolge (Kapi-
tel 5.12)
14 Taste PITCH zum Aktivieren / Deaktivieren
des Geschwindigkeitsreglers (15) und zur
Auswahl des Ge schwindigkeitseinstellberei-
ches (8 %, 16 % oder 100 %)
Die Textzeile (O) zeigt kurz die gewählte Ein-
stellung an (Pitch 8 %, 16 %, 100, off).
15 Schieberegler zum Ändern der Abspielge-
schwindigkeit [ohne Änderung der Tonhöhe,
wenn die Taste MT (24) leuchtet]
Die Geschwindigkeit kann nur geändert wer-
den, wenn die Taste PITCH (14) leuchtet.
16 Drehrad REV / FWD
–für den schnellen Vor- und Rücklauf, wenn
die Taste SEARCH (17) gedrückt wurde
–zum Erzeugen von Scratch-Effekten, wenn
die Taste SCRATCH (6) gedrückt wurde

D
A
CH
5
–für die Funktion „Pitch Bend“ während der
Wiedergabe eines Titels (Kapitel 5.10)
–zum exakten Anfahren einer Stelle, wenn
die Abspieleinheit auf Pause geschaltet ist
–bei gedrückter Taste oder (21) zum
schnellen Anwählen von Titeln [Anzeige
„TRACK“ über den Ziffern (A)] oder Ord-
nern [Anzeige „FOLDER“ unter den Ziffern
(A)]
17 Taste SEARCH zum Ein- und Ausschalten
des schnellen Vor- / Rücklaufs mit dem Dreh-
rad (16)
18 Taste CUE zum Anspielen eines Titels
(Kap. 5.5) und für den Rücksprung zu
einer zuvor bestimmten Stelle (Kap. 5.8.2)
19 Tasten zum Speichern und zur Wiedergabe
einer Endlosschleife
Taste A zum Bestimmen des Startpunktes
eines Abschnittes für eine Endlosschleife
Taste B/ EDIT zum Bestimmen des Endpunk-
tes und gleichzeitigem Starten der Schleife;
zum Verschieben des Endpunktes die
Taste erneut drücken und den Endpunkt
mit dem Drehrad (16) einstellen
Taste RELOOP / EXIT zum Verlassen der
Endlosschleife oder zum erneuten Abspie-
len der Schleife
20 Taste zum Starten eines Titels und zum
Umschalten zwischen Wiedergabe und Pause
21 Tasten und
1. zur Titelanwahl, wenn „TRACK“ über den
Ziffern (A) angezeigt wird:
Taste zum Anwählen des nächsten
Titels
Taste zum Sprung an den Anfang des
gerade laufenden Titels. Durch mehrfa-
ches Drücken der Taste wird immer ein
Titel weiter zurückgesprungen.
Wird eine der Tasten gedrückt gehalten,
lassen sich die Titel mit dem Drehrad (16)
schnell anwählen.
2. bei MP3-Betrieb zum Anwählen eines Ord-
ners, wenn „FOLDER“ unter den Ziffern (A)
angezeigt wird [umschaltbar mit der Taste
FOLDER (12)]
Wird eine der Tasten gedrückt gehalten,
lassen sich die Ordner mit dem Drehrad
(16) schnell anwählen.
3. zum Anwählen einer CD oder eines USB-
Speichers, siehe auch Taste CD / USB (5)
4. zum Teilen oder Vervielfachen des Titelab-
schnitts einer Endlosschleife (Kapitel
5.11.4)
5. bei MP3-Betrieb und gedrückt gehaltener
Taste TIME (7) zum Umschalten der Text-
zeile (O) auf die Anzeige des Titels,
Albums, Interpreten (ID3-Tags) oder Datei-
namens
6. zum Auswählen einer Play-Liste (Kapi-
tel 5.2)
7. zum Auswählen einer Partition auf einer
angeschlossenen Festplatte (Kap. 5.1)
22 Tasten PITCH BEND zur Anpassung des
Taktes des gerade laufenden Titels an den
Takt eines auf der anderen Abspieleinheit
laufenden Musikstückes (Kapitel 5.10)
23 Taste TAP für den manuellen Zählmodus des
Beatcounters und zum Zurückschalten auf
den Automatikmodus (Kapitel 5.3.2)
24 Taste MT (Master-Tempo) zum Ein- und Aus-
schalten der Funktion für konstante Tonhöhe
(Kapitel 5.9)
1.2 Laufwerkteil Frontseite
25 CD-Schublade der Abspieleinheit 1
26 USB-Anschluss 1 zum Einstecken eines USB-
Sticks oder zum Anschluss einer Festplatte
27 Taste OPEN / CLOSE zum Öffnen und
Schließen der CD-Schublade 1 [wie Taste
(4) am Bedienteil]
28 Ein- / Ausschalter POWER mit darüberliegen-
der Betriebsanzeige (rote LED)
29 Taste OPEN / CLOSE zum Öffnen und
Schließen der CD-Schublade 2 [wie Taste
(4) am Bedienteil]
30 USB-Anschluss 2 zum Einstecken eines USB-
Sticks oder zum Anschluss einer Festplatte
31 CD-Schublade der Abspieleinheit 2
1.3 Laufwerkteil Rückseite
32 Audio-Ausgang LINE OUT der Abspielein-
heit 2 zum Anschluss an den Line-Eingang
z. B. eines Verstärkers oder Mischpults
33 3,5-mm-Klinkenbuchse START / PAUSE der
Abspieleinheit 2 für die Fernsteuerung der
Funktion Start/ Pause von einem Mischpult
aus
34 Umschalter für die Art der Fernsteuerung
über die Buchsen START / PAUSE (33, 38)
(Kapitel 6)
Position LOCK
für die Steuerung über einen Ein- / Aus-
schalter
Position TACT
für die Steuerung über einen Taster
Position CUE / PLAY
Über einen Steuerimpuls des Mischpults
wird die Abspieleinheit beim Aufziehen des
Mischpult-Faders vom Cue-Punkt [Auto-
Cue-Punkt oder mit der Taste CUE (18)
gesetzt] gestartet und beim Zuziehen des
Faders auf den Cue-Punkt zurückgesetzt.
35 Buchse zum Anschluss des Bedienteils:
mit der Buchse REMOTE CONTROL CON-
NECT TO MAIN UNIT 2 über eines der bei-
liegenden Anschlusskabel verbinden
36 Netzkabel zum Anschluss an eine Steckdose
(230 V~ / 50 Hz)
37 Buchse zum Anschluss des Bedienteils:
mit der Buchse REMOTE CONTROL CON-
NECT TO MAIN UNIT 1 über eines der bei-
liegenden Anschlusskabel verbinden
38 3,5-mm-Klinkenbuchse START / PAUSE der
Abspieleinheit 1 für die Fernsteuerung der
Funktion Start/ Pause von einem Mischpult
aus
39 Audio-Ausgang LINE OUT der Abspielein-
heit 1 zum Anschluss an den Line-Eingang
z. B. eines Verstärkers oder Mischpults
2 Hinweise für den
sicheren Gebrauch
Das Gerät entspricht allen relevanten Richtlinien
der EU und ist deshalb mit gekennzeichnet.
Beachten Sie auch unbedingt folgende Punkte:
GVorsicht! Blicken Sie bei geöffneter CD-
Schublade nicht in den CD-Schacht. Eventuell
austretende Laserstrahlen können zu Augen-
schäden führen.
GVerwenden Sie das Gerät nur im Innenbereich
und schützen Sie es vor Tropf- und Spritzwas-
ser, hoher Luftfeuchtigkeit und Hitze (zulässi-
ger Einsatztemperaturbereich 0 – 40 °C).
GStellen Sie keine mit Flüssigkeit gefüllten Ge -
fäße z. B. Trinkgläser, auf das Gerät.
GNehmen Sie das Gerät nicht in Betrieb und
ziehen Sie sofort den Netzstecker aus der
Steckdose,
1. wenn sichtbare Schäden am Gerät oder am
Netzkabel vorhanden sind,
2. wenn nach einem Sturz oder Ähnlichem der
Verdacht auf einen Defekt besteht,
3. wenn Funktionsstörungen auftreten.
Geben Sie das Gerät in jedem Fall zur Repa-
ratur in eine Fachwerkstatt.
GEin beschädigtes Netzkabel darf nur durch
eine Fachwerkstatt ersetzt werden.
G
Ziehen Sie den Netzstecker nie am Kabel aus
der Steckdose, fassen Sie immer am Stecker an.
GVerwenden Sie für die Reinigung nur ein tro-
ckenes, weiches Tuch, niemals Wasser oder
Chemikalien.
GWird das Gerät zweckentfremdet, nicht richtig
angeschlossen, falsch bedient oder nicht fach-
gerecht repariert, kann keine Haftung für
daraus resultierende Sach- oder Personen-
schäden und keine Garantie für das Gerät
übernommen werden. Ebenso kann keine
Haftung für durch Fehlbedienung oder durch
einen Defekt entstandene Datenverluste und
deren Folgeschäden übernommen werden.
3 Einsatzmöglichkeiten
Der CD / MP3-Spieler CD-292USB mit zwei Ab -
spieleinheiten ist speziell für den professionellen
DJ-Bereich konzipiert. Viele Funktionsmöglich-
keiten sind genau auf diesen Einsatzbereich ab -
gestimmt, z. B. Einzeltitelwiedergabe, automati-
scher Beatcounter, nahtlose Wiedergabe einer
Endlosschleife, Geschwindigkeitsänderung ohne
Tonhöhenänderung, Anti-Shock-Speicher.
Mit dem Gerät können Audio-CDs, selbst
gebrannte Audio-CDs (Audio CD-R) sowie CDs
mit Titeln im MP3-Format abgespielt werden.
Bei wiederbeschreibbaren CDs (CD-RW) kann
es jedoch je nach CD-Typ, verwendetem CD-
Brenner und Brennprogramm beim Abspielen zu
Problemen kommen.
Über die USB-Anschlüsse lassen sich auch
MP3-Dateien von einer Festplatte oder einem
USB-Stick abspielen. Die Abspieleinheiten kön-
nen unabhängig voneinander auf die USB-
Anschlüsse zugreifen, sodass der Betrieb auch
mit nur einem USB-Speicher möglich ist.
WARNUNG Das Gerät wird mit lebensge -
fährlicher Netzspannung versorgt.
Nehmen Sie deshalb niemals
selbst Eingriffe am Gerät vor. Es
besteht die Gefahr eines elektri-
schen Schlages.
Soll das Gerät endgültig aus dem
Betrieb genommen werden, übergeben
Sie es zur umweltgerechten Entsor-
gung einem örtlichen Recyclingbetrieb.

6
D
A
CH
4 Gerät aufstellen
und anschließen
Das Bedienteil und das Laufwerkteil sind für die
Montage in ein Rack für Geräte mit einer Breite
von 482 mm (19″) vorgesehen, können aber
auch als frei stehende Tischgeräte verwendet
werden. Das Laufwerkteil muss immer waage-
recht betrieben werden, während das Bedienteil
beliebig, z. B. auch geneigt, eingebaut werden
kann. Für den Rackeinbau werden für das
Bedien- und das Laufwerkteil jeweils 2 HE benö-
tigt (1 HE = 1 Höheneinheit = 44,45 mm).
Vor dem Anschließen von Geräten oder dem
Ändern bestehender Anschlüsse den CD / MP3-
Spieler und die anzuschließenden Geräte aus-
schalten.
1) Das Bedienteil und das Laufwerkteil mit den
beiden beiliegenden Anschlusskabeln ver-
binden:
Die Buchse CONNECT TO REMOTE CON-
TROL 2 (35) des Laufwerkteils mit der Buchse
REMOTE CONTROL CONNECT TO MAIN
UNIT 2 des Bedienteils verbinden und
die Buchse CONNECT TO REMOTE CON-
TROL 1 (37) des Laufwerkteils mit der Buchse
REMOTE CONTROL CONNECT TO MAIN
UNIT 1 des Bedienteils.
2) Die beiden Signalausgänge LINE OUT (32,
39) an je einen Eingang mit Line-Pegel z. B.
eines Mischpultes oder Verstärkers an schlie-
ßen (mögliche Beschriftung: Line, CD, Aux).
3) Die beiden Abspieleinheiten können über ein
Mischpult mit Faderstart-Funktion gestartet
und auf Pause geschaltet werden. Dazu die
Buchsen START / PAUSE (33, 38) über zwei
Kabel mit 3,5-mm-Klinkensteckern an die
entsprechenden Buchsen des Mischpultes
anschließen. Der CD-292USB muss auf die
Faderstartart des Mischpultes eingestellt
werden; siehe dazu Kapitel 6.
4) Zuletzt den Stecker des Netzkabels (36) in
eine Steckdose (230 V~ / 50 Hz) stecken.
5 Bedienung
Die Bedienung der beiden Abspieleinheiten ist
vollkommen identisch. Das Gerät mit dem Netz-
schalter POWER (28) einschalten. Das Display
(10) zeigt kurz „boot“ (Startvorgang) und WEL-
COME zur Begrüßung. Ist eine CD eingelegt, er -
scheinen nach dem Einlesevorgang im Display
Informationen zur CD. Befindet sich keine CD im
Laufwerk, wird „no dISC“ (keine CD) angezeigt.
Nach dem Betrieb das Gerät ausschalten.
Die folgenden Einstellungen bleiben für den
nächsten Betrieb gespeichert:
1. der gewählte Betriebsmodus (Einzeltitelwie-
dergabe / fortlaufende Wiedergabe, Kapi-
tel 5.4.1)
2. die gewählte Zeitanzeige (Restlaufzeit / be -
reits gespielte Zeit, Kapitel 5.3)
3. der gewählte Geschwindigkeitseinstellbereich
(Kapitel 5.9)
5.1 Musikstücke abspielen
1) Zum Einlegen einer CD die CD-Schublade
(25, 31) mit der Taste (4, 27 oder 29) öff-
nen. Die CD mit der Beschriftung nach oben
einlegen und die CD-Schublade mit der
Taste wieder schließen.
2) Zusätzlich oder alternativ kann jeweils ein
USB-Stick in die USB-Anschlüsse (26, 30)
gesteckt oder jeweils eine Festplatte mit den
USB-Anschlüssen verbunden werden. Zum
Umschalten zwischen CD und USB-Speicher
die Taste CD / USB (5) drücken. Die Abspiel-
einheit muss dazu auf Pause ge schaltet sein;
ggf. die Taste (20) drücken.
Sind zwei USB-Speicher angeschlossen,
nach dem Drücken der Taste CD / USB die
Signalquelle (CD, USB 1, USB 2) mit der
Taste oder (21) wählen. Die Textzeile (O)
zeigt die Auswahl an. Dabei wird die Signal-
quelle übersprungen, die momentan an ge-
wählt ist. Die Auswahl mit der Taste CD / USB
bestätigen.
Hinweise
1. Die angewählte Signalquelle wird auch im Dis-
playfeld (K) angezeigt:
„CD“ = CD-Laufwerk ist angewählt
„USB“ konstant eingeblendet = USB 1
„USB“ blinkt = USB 2
2. Eine Festplatte muss durch ein eigenes Netzge-
rät versorgt werden, wenn deren Stromaufnahme
mehr als 500 mA beträgt.
3. Sind auf einer Festplatte mehrere Partitionen an -
gelegt, können diese wie folgt ausgewählt wer-
den:
a) Die Taste FOLDER (12) so lange gedrückt
halten, bis im Display „PA-SEL“ (Partition
Selection) angezeigt wird.
b) Mit der Taste oder die Partition wählen.
Die Textzeile (O) zeigt jeweils den Namen an.
c) Zum Bestätigen die Taste FOLDER drücken.
3) Zum Starten des ersten Titels die Taste
(20) drücken. Während der Wiedergabe zeigt
das Display das Symbol (B). Das Abspie-
len kann jederzeit mit der Taste unterbro-
chen und wieder fortgesetzt werden.
4) Zum Anwählen eines anderen Titels die Tas-
ten und verwenden.
Taste : Zum nächsten Titel springen
Taste : An den Anfang des gerade laufen-
den Titels springen. Durch mehrfaches Drü-
cken der Taste wird immer ein Titel weiter
zurückgesprungen.
Wird eine der Tasten gedrückt gehalten, las-
sen sich die Titel mit dem Drehrad (16)
schnell anwählen.
5) Sind bei MP3-Betrieb die Musiktitel in ver-
schiedene Ordner einsortiert, zum Anwählen
eines Ordners die Taste FOLDER (12) drü-
cken. Das Display zeigt „FO-SEL“ (Folder
Selection) an und die Textzeile (O) den
Namen des Ordners. Die Ziffern (A) links
oben im Display zeigen jetzt die Nummer des
Ordners an und die Ziffern (N) unter „Total“
die Anzahl der vorhandenen Ordner.
Mit der Taste oder den Ordner auswäh-
len. Wird eine der Tasten gedrückt gehalten,
lassen sich die Ordner mit dem Drehrad (16)
schnell anwählen.
Zum Bestätigen der Auswahl die Taste FOL-
DER drücken; das Display zeigt wieder die
Laufzeitanzeige (P). Mit der Taste oder
den gewünschten Titel im Ordner wählen.
6) Soll eine andere CD eingelegt werden, zuerst
mit der Taste auf Pause schalten, sonst
lässt sich die CD-Schublade mit der Taste
nicht öffnen.
7) Vor dem Ausschalten des Gerätes immer die
CD-Schubladen mit den Tasten schließen,
um die Laser-Abtastsysteme vor Verschmut-
zung zu schützen. Erst dann das Gerät mit
dem Ein- / Ausschalter POWER abschalten.
5.2 Play-Liste laden
Zum Abspielen einer bestimmten Auswahl von
MP3-Dateien lassen sich auf einem Computer
erstellte Play-Listen mit der Dateiendung „wpl“,
„xml“ oder „m3u“ in den CD-292USB laden.
Wichtig: Eine Play-Liste und die dazugehörigen
MP3-Dateien müssen sich auf demselben Spei-
chermedium befinden. Die Play-Listen müssen
immer im Hauptverzeichnis (root directory) ge -
speichert sein.
1) Falls ein Titel abgespielt wird, mit der Taste
(20) auf Pause schalten.
2) Die Taste CONT / LIST (8) gedrückt halten
und mit der Taste oder (21) wählen,
nach welcher Dateiendung gesucht werden
soll. Die Textzeile (O) zeigt die Auswahl an
(M3U Scan, WPL Scan, XML Scan).
3) Die Taste FOLDER (12) drücken. Das Dis-
play zeigt „FO-SEL“ an und die Textzeile (O)
den Namen der ersten Play-Liste. Die Ziffern
(A) links oben im Display zeigen jetzt die
Nummer der Play-Liste an und die Ziffern (N)
unter „Total“ die Anzahl der vorhandenen
Play-Listen.
4) Die gewünschte Play-Liste mit der Taste
oder auswählen.
5) Zum Bestätigen der Auswahl die Taste FOL-
DER drücken. Nach dem Laden der Liste zeigt
das Display wieder die Laufzeitanzeige (P).
6) Zum Starten des ersten Titels der Play-Liste
die Taste drücken. Zum Anwählen ande-
rer Titel aus der Liste die Taste oder drü-
cken oder eine dieser Tasten gedrückt halten
und das Drehrad (16) betätigen.
7) Um die Titel wieder ohne Play-Liste abzu-
spielen, mit der Taste auf Pause schalten.
Die Taste CONT / LIST gedrückt halten und
die Taste oder (21) so oft drücken, bis
die Textzeile „Folder“ anzeigt. Nach dem
Lösen der Tasten zeigt das Display „SCAn“
und danach wieder die Laufzeitanzeige (P).
Es ist dann keine Play-Liste mehr geladen.
5.3 Anzeige der Titelinformationen
und des Ruhemodus
Das Display (10) gibt eine Vielzahl von Informa-
tionen an:
1. Nummer des gewählten Titels (A), wenn über
den Ziffern „TRACK“ angezeigt wird. Wird
unter den Ziffern „FOLDER“ angezeigt, ist die
Nummer des gewählten Ordners angegeben
[umschaltbar mit der Taste FOLDER (12)].
2. Anzahl der Titel (N) auf der CD oder, wenn
die Titel in verschiedene Ordner einsortiert
sind, die Anzahl der Titel im angewählten
Ordner
3. Laufzeit des gewählten Titels relativ (H) und
absolut (P); die Sekunden sind in 75 so ge-
nannte Frames unterteilt
Die Laufzeitanzeige lässt sich mit der Taste
TIME (7) umschalten:
Wird Elapse (E) angezeigt, ist die bereits
gespielte Zeit des Titels angegeben.
Wird Total Remain (F, G) angezeigt, ist die
Restzeit der gesamten CD angegeben
(nicht bei MP3-Betrieb möglich).
Wird Remain (G) angezeigt, ist die Restzeit
des Titels angegeben.
4. In der Textzeile (O) wird angezeigt:
– bei Standard-Audio-CDs mit CD-Text der
Titelname
– bei MP3-Betrieb der Dateiname
Die Textzeile lässt sich auf die Anzeige fol-
gender Informationen (ID3-Tags) um -
schalten. Dazu die Taste TIME gedrückt
halten und mit der Taste oder (21)
wählen:
Anzeige (M)
TITLE = Titelname
ALBUM = Albumname
ARTIST = Interpret
keine = Dateiname

7
5.3.1 Grafische Laufzeitanzeige
Zusätzlich zur numerischen Laufzeitanzeige (P)
stellt die Balkenanzeige (H) die Laufzeit, be -
zogen auf die Titeldauer, durch ihre Länge gra-
fisch dar (relative Zeitdarstellung). Die letzten
30 Sekunden eines Titels signalisiert der Balken
durch Blinken in voller Länge, wobei die letzten
15 Sekunden durch schnelleres Blinken ange-
zeigt werden.
5.3.2 Anzahl der Taktschläge pro Minute
Nach dem Anwählen eines Titels ermittelt der
Beatcounter automatisch die Anzahl der Takt-
schläge pro Minute. Nach kurzer Zeit erscheint
die Anzahl unten rechts im Display (Q). Kann der
Beatcounter keinen richtigen Wert ermitteln
(z. B. bei ruhigen Musiktiteln), lässt sich der Wert
auch manuell feststellen:
1) Die Taste BPM / TAP (23) im Takt der Musik
einige Male antippen (mindestens 4 ×). Die
Anzahl der Taktschläge wird angezeigt und
die Anzeige „BPM“ blinkt zur Kennzeichnung
des manuellen Zählmodus.
2) Zum Zurückschalten auf den automatischen
Zählmodus, die Taste BPM / TAP gedrückt
halten, bis die Anzeige „BPM“ nicht mehr
blinkt.
5.3.3 Ruhemodus
Stehen die beiden Abspieleinheiten länger als
15 Minuten auf Pause, schaltet das Gerät in
den Ruhemodus. Die Laser-Abtastsysteme sind
dann abgeschaltet und werden somit geschont.
Die Displays zeigen SLEEP (Schlaf) an und alle
beleuchteten Tasten erlöschen. Durch Betätigen
einer beliebigen Taste wird in den vorherigen
Betriebsmodus zurückgeschaltet.
5.4 Betriebsart wählen
5.4.1 Fortlaufende Wiedergabe
und Einzeltitelwiedergabe
Zum Umschalten zwischen Einzeltitelwieder-
gabe [Anzeige „Single“ (C)] und fortlaufender
Wiedergabe [Anzeige „Cont.“ (D)] die Taste
CONT / LIST (8) drücken.
A Bei der Einzeltitelwiedergabe schaltet das
Gerät nach jedem Abspielen eines Titels auf
Pause.
Dieser Modus ist speziell für DJ-Anwen -
dungen vorgesehen. Nach dem Anwählen
eines Titels steht die Abspieleinheit exakt an
der Stelle, an der die Musik beginnt (meis-
tens nicht bei dem Zeitindex 0 : 00 : 00, son-
dern einige Frames später, z. B. 0 : 00 : 15).
Diese Stelle wird automatisch als Startpunkt
(Auto-Cue-Punkt) gespeichert und im Dis-
play durch die Anzeige CUE (L) angegeben.
Nach dem Starten des Titels kann mit der
Taste CUE (18) auf diesen Startpunkt zu -
rückgesprungen werden. Nach dem Spielen
eines Titels schaltet das Gerät exakt an der
Stelle auf Pause, an der die Musik des
nächsten Titels beginnt. Diese Stelle ist dann
als neuer Startpunkt gespeichert.
B Bei der fortlaufenden Wiedergabe werden
alle Titel endlos nacheinander abgespielt,
d. h. nach dem letzten Titel startet wieder der
erste. Sind die Titel in verschiedene Ordner
einsortiert, werden jedoch nur die Titel des
angewählten Ordners wiederholt.
5.4.2 Relay-Betrieb – automatischer Start
der anderen Abspieleinheit
am Ende eines Titels
Am Ende eines Titels kann automatisch die
andere Abspieleinheit gestartet werden.
1) Beide Abspieleinheiten mit der Taste CONT /
LIST (8) auf Einzeltitelwiedergabe schalten,
sodass in den Displays „Single“ (C) ange-
zeigt wird.
2) Auf jeder Abspieleinheit einen Titel anwäh-
len.
3) Die Taste RELAY (2) betätigen. Die Taste
leuchtet.
4) Die Wiedergabe auf einer Abspieleinheit mit
der Taste (20) starten. Die andere Ab -
spieleinheit muss auf Pause geschaltet sein.
Sobald ein Titel zu Ende gespielt ist, schaltet
die Abspieleinheit auf Pause und die andere
startet. Der Vorgang wird bis zum Ausschal-
ten des Relay-Betriebs endlos wiederholt.
(Zum Ausschalten die Taste RELAY erneut
drücken.)
5) Während des Relay-Betriebs kann an jeder
Stelle eines Titels mit der Taste zusätzlich
die Wiedergabe von einer zur anderen Ab -
spieleinheit umgeschaltet werden.
Hinweis: Nachdem alle Titel eines Ordners abgespielt
wurden, wird nicht automatisch auf den nächste Ordner
gewechselt. Dies muss immer manuell erfolgen (Kapi-
tel 5.1, Bedienschritt 5).
5.5 Anspielen eines Titels
Mit der Taste CUE (18) lässt sich ein Titel an -
spielen, solange diese Taste gedrückt gehalten
wird. Nach dem Lösen der Taste springt das
Gerät auf den Titelanfang zurück und schaltet
auf Pause.
1) Die Abspieleinheit muss auf Einzeltitelwie-
dergabe geschaltet sein: Anzeige „Single“
(C). Wird „Cont.“ (D) angezeigt, die Taste
CONT / LIST (8) drücken.
2) Den Titel wählen (Kap. 5.1, Bedienschritte 4
und 5).
3) Durch Gedrückthalten der Taste CUE den
Titel anspielen.
4) Soll der Titel abgespielt werden, die Taste
(20) betätigen.
5.6 Schneller Vor- und Rücklauf
Soll ein Titel schnell vor- oder zurücklaufen,
zuerst die Taste SEARCH (17) drücken. In der
Textzeile (O) wird SEARCH angezeigt. Das
Drehrad REV / FWD (16) in die entsprechende
Richtung drehen. Die Vor- bzw. Rücklaufge-
schwindigkeit hängt von der Drehgeschwindig-
keit des Rads ab.
Hinweise: Im Pausenmodus wird nach einem Vor-
oder Rücklauf die momentane Stelle ständig wieder-
holt. Um das Wiederholen zu beenden, entweder die
Taste CUE (18) kurz drücken (neuer Cue-Punkt wird
gesetzt, Kap. 5.8.2) oder die Wiedergabe mit der
Taste (20) starten.
5.7 Genaues Anfahren
einer bestimmten Stelle
Eine Stelle im Titel lässt sich auf 1 Frame
(1⁄75 Sek.) genau anfahren, wenn z. B. die Wie-
dergabe nicht am Titelanfang, sondern ab einer
bestimmten Stelle starten soll.
1) Ist die gewünschte Stelle durch Abspielen
des Titels oder mit dem schnellen Vor-/ Rück-
lauf (Kap. 5.6) ungefähr erreicht, mit der
Taste (20) auf Pause schalten.
2) Durch Links- und Rechtsdrehen des Dreh -
rades (16) die Stelle genau anfahren. Zur
akustischen Kontrolle ist die eingestellte
Stelle ständig wiederholt zu hören.
3) Ist die gewünschte Stelle gefunden, die Taste
CUE (18) drücken. Damit ist die Stelle ge -
speichert und das wiederholte Abspielen
beendet. Mit der Taste kann nun die Wie-
dergabe ab diesem Punkt gestartet werden.
5.8 Rücksprung
zu einer bestimmten Stelle
Um schnell zu einer bestimmten Stelle springen
zu können, lassen sich mit den Tasten CUE 1
und CUE 2 (11) zwei Startpunkte (Cue-Punkte)
speichern, auch während des Abspielens eines
Titels (Fly-Cue).
Zusätzlich kann mit der Taste CUE (18) ein
weiterer Startpunkt bestimmt werden. Dieser
wird jedoch im Einzeltitelmodus beim Erreichen
oder Anwählen des nächsten Titels mit dem
Startpunkt des nächsten Titels überschrieben
[ggf. mit der Taste CONT / LIST (8) auf Gesamt -
titelwiedergabe umschalten].
Hinweis: Die gespeicherten Cue-Punkte werden ge -
löscht beim
– Anwählen eines anderen Ordners
– Umschalten zwischen CD, USB 1, USB 2
– Ausschalten des Gerätes
5.8.1 Tasten CUE 1 und CUE 2
1) Die Taste MEMO / AUTO (9) drücken, um die
Speicherung zu aktivieren. Die Taste leuch-
tet.
2) Entweder während der Wiedergabe die Taste
CUE 1 (11) drücken, wenn die gewünschte
Stelle erreicht ist (Fly-Cue) oder an der
gewünschten Stelle mit der Taste (20) auf
Pause schalten, die Stelle exakt mit dem
Drehrad (16) anfahren und dann die Taste
CUE 1 drücken. Diese blinkt einige Male und
leuchtet dann kontinuierlich. Die Taste
MEMO / AUTO erlischt. Die Wiedergabe ggf.
mit der Taste wieder starten.
3) Die Bedienschritte 1 und 2 für das Bestim-
men eines weiteren Cue-Punktes mit der
Taste CUE 2 wiederholen.
4) Mit den Tasten CUE 1 und CUE 2 kann nun
auf die zugehörigen Cue-Punkte gesprungen
werden: Die Wiedergabe startet sofort ab
dem jeweiligen Cue-Punkt.
5.8.2 Taste CUE
1) Während des Abspielens eines Titels mit der
Taste (20) auf Pause schalten, wenn die
Stelle erreicht ist, zu der später zurückge-
sprungen werden soll. Die Tasten und
CUE (18) blinken.
2) Bei Bedarf kann mit dem Drehrad (16) die
Stelle exakter angefahren werden (Kapi-
tel 5.7). Die angefahrene Stelle ist danach
fortlaufend zu hören.
3) Die Taste CUE drücken. Dadurch wird die
Stelle als Cue-Punkt gespeichert und im Dis-
play erscheint die Anzeige „CUE“ (L). Die
Taste CUE leuchtet jetzt kontinuierlich. Die
Taste blinkt weiter als Aufforderung, die
Wiedergabe zu starten.
4) Das Abspielen mit der Taste wieder star-
ten.
5) Mit der Taste CUE kann nun auf den Cue-
Punkt zurückgesprungen werden. Die Abspiel-
einheit steht dann auf Pause.
6) Mit der Taste die Wiedergabe starten oder
die Taste CUE so lange gedrückt halten, wie
der Titel gespielt werden soll. Nach dem
Lösen der Taste CUE springt die Abspielein-
heit zurück auf den Cue-Punkt und schaltet
auf Pause.
D
A
CH

D
A
CH
8
5.9 Geschwindigkeit mit oder ohne
Tonhöhenverschiebung verändern
Die Geschwindigkeit lässt sich mit dem Schiebe-
regler (15) bis zu ±100 % ändern:
+100 % = doppelte Geschwindigkeit
-
100 % = Stillstand
1) Den Einstellbereich mit der Taste PITCH (14)
wählen. Die Textzeile (O) zeigt kurz die Ein-
stellung an:
„Pitch 8 %“, „Pitch 16 %“, „Pitch 100“ oder
„Pitch off“, wenn der Geschwindigkeitsregler
wieder deaktiviert ist und der Titel mit der
Normalgeschwindigkeit abgespielt wird.
2) Die Geschwindigkeit mit dem Schieberegler
einstellen. Das Display zeigt die prozentuale
Abweichung von der Normalgeschwindigkeit
oben rechts (I) an. Die Anzahl der Takt-
schläge (Q) ändert sich entsprechend.
3) Mit dem Verändern der Geschwindigkeit
ändert sich auch proportional die Tonhöhe.
Soll jedoch die Tonhöhe konstant bleiben, die
Taste MT (24) drücken. Im Display erscheint
die Anzeige „MT“ (S). Zum Ausschalten der
Funktion die Taste MT erneut drücken.
5.10 Pitch Bend – Takt zwischen
zwei Musikstücken angleichen
Die Taktschläge von zwei Musikstücken mit dem-
selben Tempo lassen sich zeitlich genau über -
einander legen. Dadurch wird beim Überblenden
von einer zur anderen Abspieleinheit der Rhyth-
mus beim Tanzen nicht unterbrochen.
1) Zuerst das Tempo des Musikstückes, auf das
übergeblendet werden soll, mit dem Ge -
schwindigkeitsregler (15) an das Tempo des
laufenden Musikstückes angleichen. Dazu mit
dem Schieberegler die gleiche Anzahl von
Taktschlägen pro Minute einstellen, siehe An -
zeige (Q) unten rechts im Display.
2) Die Taktschläge des Musikstückes, auf das
übergeblendet werden soll, mit den Tasten
PITCH BEND (22) genau über die des lau-
fenden Musikstückes legen: Solange die
Taste +oder
-
gedrückt gehalten wird, läuft
der Titel schneller bzw. langsamer. Dadurch
verschieben sich die Taktschläge im Bezug
zu den Taktschlägen des laufenden Musik-
stückes.
3) Die Taktschläge können auch durch Drehen
des Drehrads (16) verschoben werden.
5.11 Effekte erzeugen
5.11.1 Scratch-Effekte
Zur Erzeugung von Scratch-Effekten (entspricht
dem manuellen Drehen eines Plattentellers) die
Taste SCRATCH (6) drücken und das Drehrad
(16) entsprechend vor- und zurückdrehen. Die
LED der Taste leuchtet und die Textzeile (O)
zeigt „SCRATCH“ an. Zum Ausschalten des
Effekts die Taste SCRATCH erneut drücken.
5.11.2 Leiereffekte
Falls die Funktion Master-Tempo (konstante
Tonhöhe) aktiviert ist [Anzeige „MT“ (S) im Dis-
play], diese mit der Taste MT (24) ausschalten.
Durch Hin- und Herdrehen des Drehrades (16)
wird die Abspielgeschwindigkeit abwechselnd
erhöht und verringert. Dadurch entsteht ein
Leiereffekt.
5.11.3 Stottereffekte
Die mit den Tasten CUE (18), CUE 1 und CUE 2
(11) gespeicherten Cue-Punkte (Kap. 5.8)
können auch zum Erzeugen von interessanten
Stottereffekten genutzt werden: Durch mehr -
faches kurzes Drücken einer dieser Tasten ent-
steht ein Stottereffekt. Dieser ist dabei umso ein-
drucksvoller, je geeigneter der Cue-Punkt ist
(z. B. Instrumenteneinsatz oder Anfang eines
Wortes).
5.11.4 Endlosschleife abspielen
Ein bestimmter Abschnitt eines Titels kann als
nahtlose Schleife beliebig oft wiederholt werden.
1) Mit der Taste (20) auf Wiedergabe schal-
ten. Ist der gewünschte Startpunkt der Schleife
erreicht (Punkt a in Abb. 6), die Taste A (19)
antippen.
Abb. 6 Endlosschleife abspielen
Tipp: Um den Startpunkt auf 1 Frame genau fest-
zulegen, zuerst mit der Taste auf Pause schal-
ten, mit dem Drehrad (16) den Punkt exakt einstel-
len und dann die Taste A drücken.
2) Ist beim Weiterspielen das gewünschte Ende
des Abschnitts erreicht (Punkt b in Abb. 6), die
Taste B/ EDIT (19) drücken. Der Abschnitt zwi-
schen den Punkten wird fortlaufend wiederholt.
Solange eine Endlosschleife abgespielt wird,
signalisiert das Display „RELOOP“ (J).
3) Um den Endpunkt zu verschieben oder um
ihn auf 1 Frame genau einzustellen, während
des Abspielens der Schleife die Taste B/ EDIT
drücken. Die Zeitanzeige (P) zeigt jetzt den
Zeitindex des Endpunktes an. Mit dem Dreh-
rad (16) den Endpunkt verschieben und mit
der Taste B/ EDIT den Endpunkt bestätigen.
4) Der Schleifenabschnitt kann aber auch geteilt
oder um ein Vielfaches verlängert werden.
Während die Schleife abgespielt wird, mit der
Taste oder (21) die Längenänderung
wählen. Die Textzeile (O) zeigt die Einstel-
lung an:
TRIM: 1⁄32, 1⁄16, 1⁄8, 1⁄4, 1⁄2, 1⁄1, 2⁄1, 4⁄1, 8⁄1, 16⁄1, 32⁄1
5) Um die Schleife zu verlassen und den Titel
weiterzuspielen, die Taste RELOOP / EXIT
(19) drücken. Zum erneuten Starten der
Schleife die Taste RELOOP / EXIT wieder
drücken.
Abb. 7 Schleife beenden und erneut starten
Hinweis: Eine gespeicherte Schleife wird gelöscht,
sobald beim Abspielen der nächste Titel erreicht ist
oder ein anderer Titel mit der Taste oder (21)
gewählt wird.
Abschnitt mit dem Bruchteil oder
Vielfachen einer Taktlänge
Die Länge eines Abschnitts für die Schleifenwie-
dergabe kann bei Titeln im 4⁄4 -Takt auch exakt
auf einen Bruchteil oder auf ein Vielfaches einer
Taktlänge eingestellt werden:
1⁄32, 1⁄16, 1⁄8, 1⁄4, 1⁄2, 1⁄1, 2⁄1, 4⁄1, 8⁄1, 16⁄1, 32⁄1
1) Die Taste MEMO / AUTO (9) gedrückt halten
und mit dem Drehrad (16) die Länge einstel-
len. Die Länge wird in der Textzeile (O) ange-
zeigt, z. B. „AUTO 2 / 1“ = zwei Taktlängen.
Nach dieser Einstellung leuchtet die Taste
MEMO / AUTO zur Signalisierung, dass auto-
matisch der Endpunkt eines Schleifenab-
schnitts gesetzt wird.
2) Den Startpunkt mit der Taste A (19) bestim-
men. Damit wird gleichzeitig die Endlos-
schleife gestartet und der Endpunkt entspre-
chend der Längeneinstellung gesetzt.
3) Die Länge des Schleifenabschnitts lässt sich
auch nachträglich, wie zuvor beschrieben
(Bedienschritt 3 oder 4), ändern.
5.12 Eigene Titelfolge zusammenstellen
Sollen nur ausgewählte Titel in einer bestimmten
Reihenfolge abgespielt werden, kann eine Folge
mit max. 99 Titeln programmiert werden.
5.12.1 Titelfolge speichern und abspielen
1) Falls ein Titel abgespielt wird, zuerst mit der
Taste (20) auf Pause schalten.
2) Mit der Taste PROG (13) in den Program-
miermodus schalten. Die Zeitanzeige (P)
schaltet auf die Anzeige des ersten Spei-
cherplatzes „P
-
01“ um. Die Anzeige „PG“
(R) blinkt schnell.
Hinweis: Soll dieser Modus sofort verlassen wer-
den, die Taste PROG so lange gedrückt halten, bis
das Display wieder die Laufzeit (P) anzeigt.
3) Den ersten Titel, der gespeichert werden soll,
mit der Taste oder (21) wählen (Kap.
5.1, Bedienschritte 4 und 5).
4) Zur Bestätigung der Titelwahl die Taste
PROG drücken. Der nächste Speicherplatz
„P
-
02“ wird angezeigt.
5) Die Bedienschritte 3 und 4 wiederholen, bis
alle Titel der Titelfolge gespeichert sind. Sind
99 Titel gespeichert und wird versucht, einen
weiteren Titel zu speichern, erscheint die
Meldung „FULL“.
6) Zum Abspielen der Titelfolge die Taste
drücken. Die Anzeige „PG“ (R) blinkt langsa-
mer. Die Titel werden in Abhängigkeit des
gewählten Betriebsmodus (Kapitel 5.4.1)
abgespielt. Zum Anwählen anderer Titel der
Titelfolge die Taste oder (mehrfach) drü-
cken.
7) Zum Zurückschalten auf den normalen Ab -
spielmodus mit der Taste auf Pause
schalten und die Taste PROG so lange ge -
drückt halten, bis die Anzeige „PG“ (R) nicht
mehr blinkt.
Um die Titelfolge erneut abzuspielen, auf
Pause schalten und die Taste PROG drü-
cken, sodass die Anzeige „PG“ wieder blinkt.
Die Titelfolge mit der Taste starten.
Hinweis: Solange die Anzeige „PG“ blinkt oder kon-
stant leuchtet, ist die Titelfolge abrufbar. Sie wird ge -
löscht z. B. beim Ausschalten des Gerätes.
5.12.2 Titelfolge überprüfen
1) Falls ein Titel abgespielt wird, zuerst mit der
Taste auf Pause schalten.
2) Wenn jetzt die Anzeige „PG“ blinkt, die Taste
PROG einmal drücken. Leuchtet die Anzeige
„PG“ konstant, die Taste PROG zweimal drü-
cken.
3) Mit der Taste oder die Speicherplätze
(P
-
01 … P
-
99) nacheinander anwählen.
Der jeweils gespeicherte Titel wird in der
Textzeile (O) angezeigt.
4) Zum Abspielen der Titelfolge die Taste
drücken.
ab
1.
PLAY PLAY
LOOP
2.
AB / EDIT
PLAY c
LOOP
1. 2.
RELOOP / EXITRELOOP / EXIT

5.12.3 Titelfolge ergänzen oder löschen
1) Falls ein Titel abgespielt wird, zuerst mit der
Taste auf Pause schalten.
2) Falls die Anzeige „PG“ blinkt, die Taste PROG
so lange gedrückt halten, bis „PG“ nicht mehr
blinkt.
3) Die Taste PROG kurz drücken, sodass „PG“
schnell blinkt und die Zeitanzeige (P) auf die
Anzeige des nächsten freien Speicherplatzes
„P
-
…“ umschaltet.
4) Entweder zum Löschen die Taste PROG so
lange drücken, bis das Display wieder die
Laufzeit (P) anzeigt oder zum Ergänzen
eines weiteren Titels diesen mit der Taste
oder wählen und mit der Taste PROG
bestätigen. Zum Abspielen der er gänzten
Titelfolge die Taste drücken.
6 Faderstart
Die Funktion Start/ Pause der Taste (20)
lässt sich von einem Mischpult mit Faderstart-
Funktion aus fernbedienen. Der Anschluss an
das Mischpult ist im Kapitel 4, Bedienschritt 3
be schrieben. Den Schiebeschalter (34) auf der
Laufwerkrückseite auf die Faderstartart des
Mischpultes einstellen:
LOCK = Steuerung über einen Ein- / Ausschalter
Für die meisten Mischpulte aus dem Sorti-
ment von „img Stage Line“ muss diese Schal-
terposition gewählt werden. Mit dem Aufzie-
hen des Faders wird ein Schalter im Mischpult
geschlossen, der das Abspielen startet. Beim
Zuziehen des Faders öffnet der Schalter und
schaltet die Abspieleinheit auf Pause.
Abb. 8 Faderstart über Ein- / Ausschalter
TACT = Steuerung über einen Taster
Wird der Taster das erste Mal durch das Auf-
ziehen des Faders betätigt, startet das
Abspielen. Wird der Taster zum zweiten Mal
durch das Zuziehen des Faders betätigt,
schaltet die Abspieleinheit auf Pause.
Abb. 9 Faderstart über Taster
CUE PLAY = Steuerung über einen Impuls
Beim Aufziehen des Faders wird durch einen
kurzen Steuerimpuls des Mischpultes die Wie-
dergabe ab dem Titelanfang (Auto-Cue-Punkt
Kap. 5.4.1) oder ab dem mit der Taste
CUE (18) gesetzten Cue-Punkt (Kap.
5.8.2) gestartet. Beim Schließen des Faders
springt die Abspieleinheit durch einen weite-
ren Steuerimpuls auf diesen Startpunkt zu -
rück und schaltet dort auf Pause.
Abb. 10 Faderstart über Steuerimpuls
7 Firmware aktualisieren
Ist im Internet eine neue Firmware verfügbar,
kann die Ihres Gerätes aktualisiert werden:
1) Auf der Homepage von „img Stage Line“
(www.imgstageline.com) unter der Rubrik
„SUPPORT“ auf „Software-Updates“ klicken.
Dann nach unten bis zur Rubrik „FIRM-
WARE-DOWNLOADS“ scrollen.
Dort zum Herunterladen auf das Symbol vor
„CD-292USB“ klicken.
Die heruntergeladene Software auf einen
USB-Stick kopieren.
2) Den CD-292USB mit dem Netzschalter (28)
ausschalten.
3) Den USB-Stick mit der neuen Firmware in die
linke USB-Buchse USB 1 (26) stecken.
4) An der linken Abspieleinheit die Taste PROG
(13) gedrückt halten und das Gerät wieder
einschalten. Die Taste PROG erst wieder
lösen, wenn im linken Display „UP dAt E“ an -
gezeigt wird.
5) Wenn nach dem Einlesevorgang in der Text-
zeile (O) „Ready“ erscheint, die Taste (20)
drücken, um die Firmware-Aktualisierung zu
starten. Anhand der Balkenanzeige (H) und
der Textzeile kann die Aktualisierung verfolgt
werden. Wird „Finish“ angezeigt, ist die Firm-
ware aktualisiert.
6) Das Gerät aus- und wieder einschalten.
8 Pflege des Gerätes
Das Gerät vor Staub, Vibrationen, Feuchtigkeit
und Hitze schützen (zulässiger Einsatztempera-
turbereich 0 – 40 °C). Für die Reinigung nur ein
weiches, trockenes Tuch verwenden, auf keinen
Fall Wasser oder Chemikalien.
Hinweis zu Tonaussetzern und Lesefehlern
Zigarettenrauch und Staub dringen leicht durch
alle Öffnungen des Gerätes und setzen sich
auch auf der Optik der Laser-Abtastsysteme ab.
Sollte dieser Belag zu Lesefehlern und Ton -
aussetzern führen, muss das Gerät in einer
Fachwerkstatt gereinigt werden. Diese Reini-
gung ist kostenpflichtig, auch während der
Garantiezeit!
9 Technische Daten
Frequenzbereich: . . . . . 20 – 20 000 Hz
Klirrfaktor: . . . . . . . . . . . < 0,1 %
Kanaltrennung: . . . . . . . > 80 dB
Dynamikumfang: . . . . . > 80 dB
Störabstand: . . . . . . . . . > 80 dB
Ausgang: . . . . . . . . . . . 2 V (Line-Pegel),
Cinch-Buchsen
lesbare Dateisysteme: . NTFS, FAT, HFS+
Anti-Shock-Speicher: . . 15 s
Stromversorgung: . . . . . 230 V~ / 50 Hz
Leistungsaufnahme: . . . max. 40 VA
Einsatztemperatur: . . . . 0 – 40 °C
Abmessungen (B×H×T)
Bedienteil: . . . . . . . . . 482 × 90 × 85 mm,
2 HE (Höheneinheiten)
Laufwerkteil: . . . . . . . 482 × 90 × 260 mm,
2 HE (Höheneinheiten)
Gewicht: . . . . . . . . . . . . 6,5 kg
Änderungen vorbehalten.
START /
PAUSE CUE
PLAY
LOCK
TACT
Start
Pause
START /
PAUSE CUE
PLAY
LOCK
TACT
1.×CuePlay
2.×Pause
START /
PAUSE CUE
PLAY
LOCK
TACT
1.×Start
2.×Pause
D
A
CH
9
Diese Bedienungsanleitung ist urheberrechtlich für MONACOR
®
INTERNATIONAL GmbH & Co. KG
geschützt. Eine Reproduktion für eigene kommerzielle Zwecke – auch auszugsweise – ist untersagt.

All operating elements and connections de -
scribed can be found on the fold-out page 3.
Contents
1 Operating Elements
and Connections . . . . . . . . . . . . . . . . 10
1.1 Control unit . . . . . . . . . . . . . . . . . . . . . . 10
1.2 Player mechanism unit, front panel . . . 11
1.3 Player mechanism unit, rear panel . . . . 11
2 Safety Notes . . . . . . . . . . . . . . . . . . . . 11
3 Applications . . . . . . . . . . . . . . . . . . . . 11
4 Setting up and Connecting the Unit .12
5 Operation . . . . . . . . . . . . . . . . . . . . . . . 12
5.1 Replaying music pieces . . . . . . . . . . . . 12
5.2 Loading the play list . . . . . . . . . . . . . . . 12
5.3 Indication of the title information
and the sleep mode . . . . . . . . . . . . . . . 12
5.3.1 Graphic indication of the playing time 12
5.3.2 Number of beats per minute . . . . . . . 13
5.3.3 Sleep mode . . . . . . . . . . . . . . . . . . . . 13
5.4 Selecting the operating mode . . . . . . . . 13
5.4.1 Continuous replay
and single title replay . . . . . . . . . . . . . 13
5.4.2 Relay mode – automatic start of the
other player unit at the end of a title . 13
5.5 Short replay of a title beginning . . . . . . 13
5.6 Fast forward and reverse run . . . . . . . . 13
5.7 Precise selection of a certain spot . . . . 13
5.8 Return to a certain spot . . . . . . . . . . . . 13
5.8.1 Buttons CUE1 and CUE2 . . . . . . . . . 13
5.8.2 Button CUE . . . . . . . . . . . . . . . . . . . . 13
5.9 Changing the speed with or
without displacing the pitch . . . . . . . . . 13
5.10 Pitch Bend – matching the beat
between two music pieces . . . . . . . . . . 13
5.11 Effects . . . . . . . . . . . . . . . . . . . . . . . . . . 14
5.11.1 Scratch effects . . . . . . . . . . . . . . . . . . 14
5.11.2 Droning effects . . . . . . . . . . . . . . . . . 14
5.11.3 Stutter effects . . . . . . . . . . . . . . . . . . 14
5.11.4 Replaying a continuous loop . . . . . . . 14
5.12 Compiling your personal title sequence 14
5.12.1 Storing and
replaying a title sequence . . . . . . . . . 14
5.12.2 Checking a title sequence . . . . . . . . . 14
5.12.3 Completing or
deleting a title sequence . . . . . . . . . . 14
6 Fader Start . . . . . . . . . . . . . . . . . . . . . . 14
7 Updating the Firmware . . . . . . . . . . . . 15
8 Maintenance of the Unit . . . . . . . . . . . 15
9 Specifications . . . . . . . . . . . . . . . . . . . 15
1 Operating Elements
and Connections
1.1 Control unit
1Control panel of player unit 1
For details see fig. 2
2Button RELAY for automatic start of the other
player unit at the end of a title
(chapter 5.4.2)
3Control panel of player unit 2
For details see fig. 2
4Button OPEN / CLOSE to open and close
the CD tray [like buttons (27, 29) at the
player mechanism]
5Button CD / USB to switch between CD and
USB storage medium: For this purpose the
player unit must be set to pause with the but-
ton (20).
If two USB memories are connected, after
pressing the button CD / USB select CD, USB 1
or USB 2 with the button or (21). The text
line (O) shows the selection. To confirm,
press the button CD / USB.
6Button SCRATCH to activate / deactivate the
scratch function
With the function activated (button lights up)
it is possible to create scratch effects with the
jog wheel (16)
7Button TIME to switch the time indication
(H, P)
for the indication “Remain” (G)
remaining playing time of the current title
for the indication “Elapse” (E)
time already played of the current title
for the indication “Total Remain”
remaining time of the entire CD
(not possible for MP3 mode)
For MP3 mode, with the button TIME kept
pressed, switch over the text line (O) to indi-
cate the title, album, artist (ID3 tags) or file
name with the button or (21)
8Button CONT / LIST
1. To switch over between single title replay
[indication “Single” (C)] and continuous
replay [indication “Cont.” (D)]
2. To load play lists (chapter 5.2)
9Button MEMO / AUTO
1. To store Cue points with the buttons CUE 1
and CUE 2 (11)
2. To replay a title section as a loop with the
length of a multiple or a fraction of the beat
length (chapter 5.11.4)
10 Display, for details see fig. 3
Awhen “TRACK” is indicated above the dig-
its: number of the music title (in the
selected folder);
when “FOLDER” is indicated below the
digits: number of the selected folder
Breplay symbol
C“Single”: indicates the single title replay
mode
D“Cont.”: indicates the continuous title
replay mode
Eindication “Elapse”: indicates that the time
already played of a title is shown
F“Total”: indicates together with “Remain”
(G) that the remaining time of the CD is
shown
(not possible for MP3 mode)
G“Remain”: indicates that the remaining time
of a title is shown. With “Total Remain” the
remaining time of the CD is shown
Hbargraph to show the relative playing time
of the title
Ideviation from the standard speed in per-
cent
J“RELOOP”: indicates the replay of a con-
tinuous loop
K“CD” or “USB”: indicates if a CD, the port
USB 1 (26) or USB 2 (30) has been
selected. With the port USB 2 selected, the
indication “USB” flashes.
L“CUE”: appears when the player unit is in
the pause mode at the Cue point
(chapters 5.4.1 and 5.8.2).
Mfor MP3 mode: this field indicates if the
name of the title, album or artist of the
music title is shown in the text line (O). If
none of these indications is inserted, the
file name is shown (chapter 5.3).
Nnumber of titles on the CD;
for MP3 mode:
number of the titles in the selected folder
[“TRACK” above the digits (A)]
or number of the folders [“FOLDER” below
the digits (A)]
Otext line for additional information
Pplaying time indication, also see items E
and G
Qindication of the beats per minute
R“PG”: flashes if a personal title sequence is
programmed or replayed
S“MT” (Master Tempo): indicates the func-
tion for constant pitch (chapter 5.9)
11 Buttons CUE 1 and CUE 2
1. to store two Cue points [also possible dur-
ing replay; to store, press the button
MEMO / AUTO (9) first]
2. to go to the stored Cue points
12 Button FOLDER for MP3 mode
1. to switch over between the name of the title
or folder in the text line (O),
according to the selected adjustment, a
title or a folder can be selected with the but-
tons and (21)
2. to load play lists (chapter 5.2)
3. to select a partition on a hard disk con-
nected (chapter 5.1)
13 Button PROG to compile and to replay a per-
sonal title sequence (chapter 5.12)
14 Button PITCH to activate / deactivate the
speed control (15) and to select the speed
adjusting range (8 %, 16 % or 100 %)
The text line (O) shortly indicates the select -
ed adjustment (pitch 8 %, 16 %, 100, off).
15 Sliding control to change the playing speed
[without changing the pitch when the button
MT (24) lights up]
The speed can only be changed when the
button PITCH (14) lights up.
16 Jog wheel REV / FWD
–for fast forward and reverse run when the
button SEARCH (17) has been pressed
–to create scratch effects when the button
SCRATCH (6) has been pressed
–for the function “Pitch Bend” during replay
of a title (chapter 5.10)
–to precisely select a spot when the player
unit is set to pause
10
GB

–with the button or (21) pressed for fast
selection of titles [“TRACK” above the dig-
its (A)] or folders [“FOLDER” below the dig-
its (A)]
17 Button SEARCH to activate / deactivate the
fast forward / reverse run with the jog wheel
(16)
18 Button CUE for shortly playing the title begin-
ning (chapter 5.5) and for return to a spot
defined before (chapter 5.8.2)
19 Buttons to store and to replay a continuous
loop
button A to define the starting point of a sec-
tion for a continuous loop
button B / EDIT to define the end point and
simultaneous start of the loop;
to displace the end point, press the button
again and adjust the end point with the jog
wheel (16)
button RELOOP / EXIT to exit the continuous
loop or to replay the loop
20 Button to start a title and to switch over
between replay and pause
21 Buttons and
1. for title selection when “TRACK” is indi-
cated above the digits (A):
button to select the next title
button to go to the beginning of the title
currently playing. Each time the button is
pressed, the unit always goes back one
title.
If one of the buttons is kept pressed, the
titles can quickly be selected with the jog
wheel (16).
2. for MP3 mode: to select a folder when
“FOLDER” is indicated below the digits (A)
[to be switched with the button FOLDER
(12)]
If one of the buttons is kept pressed, the
folders can quickly be selected with the jog
wheel (16).
3. to select a CD or a USB storage medium,
also see button CD / USB (5)
4. to divide or to multiply the title section of a
continuous loop (chapter 5.11.4)
5. for MP3 mode and with button TIME (7)
kept pressed: to switch over the text line
(O) to the indication of the title, album,
artist (ID3 tags) or file name
6. to select a play list (chapter 5.2)
7. to select a partition on a hard disk con-
nected (chapter 5.1)
22 Buttons PITCH BEND to adapt the beat of the
title currently playing to the beat of a music
piece playing on the other player unit
(chapter 5.10)
23 Button TAP for the manual counting mode of
the beat counter and to switch back to the
automatic mode (chapter 5.3.2)
24 Button MT (Master Tempo) to activate /
deactivate the function for constant pitch
(chapter 5.9)
1.2 Player mechanism, front side
25 CD tray of player unit 1
26 USB port 1 to insert a USB stick or to connect
a hard disk
27 Button OPEN / CLOSE to open and to close
the CD tray 1 [like button (4) on the control
unit]
28 On / off switch POWER with power LED (red)
above it
29 Button OPEN / CLOSE to open and close
the CD tray 2 [like button (4) on the control
unit]
30 USB port 2 to insert a USB stick or to connect
a hard disk
31 CD tray of player unit 2
1.3 Player mechanism, rear side
32 Audio output LINE OUT of the player unit 2
for connection to the line input e. g. of an
amplifier or mixer
33 3.5 mm jack START / PAUSE of the player
unit 2 for remote control of the function Start /
Pause from a mixer
34 Selector switch for the type of remote control
via the jacks START / PAUSE (33, 38)
[chapter 6]
position LOCK
for control via an on / off switch
position TACT
for control via a momentary pushbutton
position CUE / PLAY
Via a control pulse of the mixer the player
unit will be started from the Cue point [Auto
Cue point or set with the button CUE (18)]
when the fader of the mixer is advanced or
reset to the Cue point when the fader is
closed.
35 Jack for connection of the control part:
Connect it to the jack REMOTE CONTROL
CONNECT TO MAIN UNIT 2 via one of the
supplied connection cables
36 Mains cable for connection to a socket
(230 V~ / 50 Hz)
37 Jack for connection of the control part:
Connect it to the jack REMOTE CONTROL
CONNECT TO MAIN UNIT 1 via one of the
supplied connection cables
38 3.5 mm jack START / PAUSE of player unit 1
for remote control of the function Start / Pause
from a mixer
39 Audio output LINE OUT of the player unit 1
for connection to the line input e. g. of an
amplifier or mixer
2 Safety Notes
This unit corresponds to all relevant directives of
the EU and is therefore marked with .
Please observe the following items in any case:
GCaution! Never look into the CD mechanism
when the CD tray is open; laser beams may be
emitted causing eye damage.
GThe unit is suitable for indoor use only. Protect
it against dripping water and splash water,
high air humidity, and heat (admissible ambi-
ent temperature range 0 – 40 °C).
GDo not place any vessel filled with liquid on the
unit, e. g. a drinking glass.
GDo not operate the unit or immediately discon-
nect the plug from the mains socket
1. if there is visible damage to the unit or to the
mains cable,
2. if a defect might have occurred after the unit
was dropped or suffered a similar accident,
3. if malfunctions occur.
In any case the unit must be repaired by skilled
personnel.
GA damaged mains cable must be replaced by
skilled personnel only.
GNever pull the mains cable to disconnect the
mains plug from the socket; always seize the
plug.
GFor cleaning only use a dry, soft cloth; never
use water or chemicals.
GNo guarantee claims for the unit and no liabil-
ity for any resulting personal damage or mate-
rial damage will be accepted if the unit is used
for other purposes than originally intended, if it
is not correctly connected or operated, or not
repaired in an expert way. Likewise, no liability
will be accepted for operating errors or for data
loss caused by a defect and for any conse-
quential damage of this data loss.
GImportant for U. K. Customers!
The wires in this mains lead are coloured in ac -
cord ance with the following code:
blue = neutral
brown = live
As the colours of the wires in the mains lead of
this appliance may not correspond with the
coloured markings identifying the terminals in
your plug, proceed as follows:
1. The wire which is coloured blue must be
connected to the terminal which is marked
with the letter N or coloured black.
2. The wire which is coloured brown must be
connected to the terminal which is marked
with the letter L or coloured red.
3 Applications
The CD / MP3 player CD-292USB with two player
units has been specially designed for profes-
sional DJ applications. Many functional features
have precisely been matched to this range of
application, e. g. single title replay, automatic
beat counter, seamless replay of a continuous
loop, change of speed without displacing the
pitch, anti-shock memory.
The CD-292USB allows to replay audio
CDs, even CDs you have burnt yourself (audio
CD-R) and CDs with titles in MP3 format. How-
ever, problems in replaying rewritable CDs (CD-
RW) may occur depending on the CD type, the
CD burner, and the burning software used.
Via the USB ports, also MP3 files from a
hard disk or USB stick can be replayed. The
player units will be able to access the USB ports
independently of each other so that operation
with a single USB storage medium will also be
possible.
If the unit is to be put out of operation
definitively, take it to a local recycling
plant for a disposal which is not harmful
to the environment.
WARNING The unit is supplied with haz-
ardous mains voltage. Leave serv-
icing to skilled personnel only!
This may result in an electric
shock.
11
GB

4 Setting up and
Connecting the Unit
The control unit and the player mechanism unit
are designed for installation into a rack for units
with a width of 482 mm / 19″, however, they can
also be used as tabletop units. In any case, the
player mechanism unit must be operated in a
horizontal position while it is possible to install
the control unit as desired, e. g. also in an
inclined position. For rack installation, 2 rack
spaces each are required for the control unit and
for the player mechanism unit (1 rack space =
44.45 mm).
Prior to making or changing any connections,
switch off the CD / MP3 player and the units to be
connected.
1) Connect the control unit and the player mech-
anism unit via the two connection cables sup-
plied:
Jack CONNECT TO REMOTE CONTROL 2
(35) of the player mechanism unit to the jack
REMOTE CONTROL CONNECT TO MAIN
UNIT 2 on the control unit
Jack CONNECT TO REMOTE CONTROL 1
(37) of the player mechanism unit to the jack
REMOTE CONTROL CONNECT TO MAIN
UNIT 1 on the control unit.
2) Connect the two signal outputs LINE OUT
(32, 39) to one input each with line level e. g.
of a mixer or amplifier (possible lettering:
Line, CD, Aux).
3) The two player units can be started and set to
pause via a mixer with fader start function.
For this purpose, connect the jacks START /
PAUSE (33, 38) via two cables with 3.5 mm
plugs to the corresponding jacks of the mixer.
Set the CD-292USB to the type of fader start
of the mixer, see chapter 6.
4) Finally connect the plug of the mains cable
(36) to a mains socket (230 V~ / 50 Hz).
5 Operation
The operation of the two player units is identical.
Switch on the unit with the POWER switch (28).
The display (10) shortly shows “boot” (starting
procedure) and WELCOME. If a CD has been
inserted, after reading-in, the display shows
information about the CD. If there is no CD in the
player mechanism, “no diSC” (no CD) is dis-
played,
Switch off the unit after operation. The fol-
lowing adjustments remain stored for the next
operation:
1. the operating mode selected (single title
replay / continuous replay, chapter 5.4.1)
2. the time indication selected (remaining play-
ing time / time already played, chapter 5.3)
3. the speed adjusting range selected
(chapter 5.9)
5.1 Replaying music pieces
1) To insert a CD, open the CD tray (25, 31) with
the button (4, 27 or 29). Insert the CD with
the lettering facing upwards and close CD
tray with the button .
2) Additionally or alternatively, a USB stick each
can be inserted into the USB ports (26, 30) or
a hard disk each can be connected to the
USB ports. To switch over between CD and
USB storage medium, press the button CD /
USB (5). For this purpose, the player unit
must be set to pause; if required, press the
button (20).
If two USB storage media are connected,
after pressing the button CD / USB, select the
signal source (CD, USB 1, USB 2) with the
button or (21). The text line (O) shows
the selection. The signal source currently
selected is skipped. Confirm the selection
with the button CD / USB.
Notes
1. The selected signal source is also indicated in
the display field (K):
“CD” = CD player mechanism is selected
“USB” constantly inserted = USB 1
“USB” flashes = USB 2
2. A hard disk must be supplied with power by a
power supply unit of its own if its power con-
sumption is higher than 500 mA.
3. If several partitions are provided on a hard disk,
these can be selected as follows:
a) Keep the button FOLDER (12) pressed until
the display shows “PA-SEL” (Partition Selec-
tion).
b) With the button or select the partition.
The text line (O) shows the name in each
case.
c) To confirm, press the button FOLDER.
3) To start the first title, press the button (20).
While replaying, the display shows the sym-
bol (B). The replay can be interrupted and
continued at any time with the button .
4) To select another title, use the buttons and
.
Button : to go to the next title
Button : to go to the beginning of the title
currently playing. Each time the button is
pressed, the unit always goes back one more
title.
If one of the buttons is kept pressed, the titles
can quickly be selected with the jog wheel
(16).
5) For MP3 operation: If the music titles are
sorted in different folders, press the button
FOLDER (12) to select a folder. The display
shows “FO-SEL” (Folder Selection) and the
text line (O) shows the name of the folder.
The digits (A) on the top left of the display
now show the number of the folder and the
digits (N) under “Total” show the quantity of
the folders available.
Select the folder with the button or . If
one of the buttons is kept pressed, the folders
can quickly be selected with the jog wheel
(16).
To confirm the selection, press the button
FOLDER; the display shows the playing time
(P) again. Select the desired title in the folder
with the button or .
6) To insert another CD, first set the unit to
pause with the button , otherwise the CD
tray cannot be opened with the button .
7) Prior to switching off the unit, always close
the CD trays with the buttons to protect the
laser systems against impurities. Afterwards
switch off the unit with the POWER switch.
5.2 Loading the play list
To play a certain selection of MP3 files, it is pos-
sible to load play lists with the file extension
“wpl”, “xml” or “m3u” created on a computer into
the CD-292USB.
Important: The play list and the corresponding
MP3 files must be on the same storage medium.
The play lists must always be stored in the root
directory.
1) If a title is played, set the unit to pause with
the button (20).
2) Keep the button CONT / LIST (8) pressed and
select with the button or (21) which file
extension is searched for. The text line (O)
shows the selection (M3U Scan, WPL Scan,
XML Scan).
3) Press the button FOLDER (12). The display
shows “FO-SEL” and the text line (O) shows
the name of the first play list. The digits (A) on
the top left of the display now show the num-
ber of the play list and the digits (N) under
“Total” show the quantity of the play lists
available.
4) Select the desired play list with the button
or .
5) To confirm the selection, press the button
FOLDER. After loading the list, the display
shows the playing time indication again (P).
6) To start the first title of the play list, press the
button . To select other titles from the list,
press the button or or keep one of these
buttons pressed and actuate the jog wheel
(16).
7) To play the titles again without play list, set
the unit to pause with the button . Keep the
button CONT / LIST pressed and press the
button or (21) repeatedly until “Folder”
appears in the text line. After releasing the
buttons, the display shows “SCAn” and then
again the playing time indication (P). Then no
more play list is loaded.
5.3 Indication of the title information
and the sleep mode
The display (10) indicates a variety of informa-
tion:
1. The number of the selected title (A) if
“TRACK” is shown above the digits. If
“FOLDER” is shown below the digits, the
number of the selected folder is indicated
[switchable with the button FOLDER (12)].
2. Quantity of the titles (N) on the CD or, if the
titles are sorted in different folders, the quan-
tity of the titles in the selected folder
3. Playing time of the selected title: relative (H)
and absolute (P); the seconds can be divided
into 75 so-called frames
The playing time indication can be switched
over with the button TIME (7):
If Elapse (E) is shown, the time already
played of the title is indicated.
If Total Remain (F, G) is shown, the remain-
ing time of the entire CD is indicated
(not possible for MP3 mode).
If Remain (G) is shown, the remaining time of
the title is indicated.
4. The text line (O) shows:
– the title name for standard audio CDs with
CD text
– the file name for MP3 mode
The text line can be switched over to the
indication of the following information (ID3
tags). For this purpose keep the button
TIME pressed and select with the button
or (21):
Indication (M)
TITLE
ALBUM
ARTIST
none = file name
5.3.1 Graphic indication of the playing time
In addition to the numerical time indication (P),
the bargraph (H) will indicate the playing time
graphically by its length, in relation to the dura-
tion of the title (relative time presentation). The
last 30 seconds of a title will be indicated by
the bargraph flashing in its full length, the last
15 sec onds by even faster flashing.
12
GB

5.3.2 Number of beats per minutes
After selecting a title, the beat counter automati-
cally determines the number of beats per minute.
After a short time the number appears on the
right at the bottom of the display (Q). If the beat
counter cannot determine a correct value (e. g.
for quiet music titles), the value can also be
determined manually:
1) Shortly press the button BPM / TAP (23) sev-
eral times to the beat of the music (4 times as
a minimum). The number of beats appears
and the indication “BPM” flashes to show the
manual counting mode.
2) To switch back to the automatic counting
mode, keep the button BPM / TAP pressed
until the indication “BPM” stops flashing.
5.3.3 Sleep mode
If both player units are set to pause for more than
15 minutes, the unit is switched to the sleep
mode. The laser systems are then switched off
and are thus preserved. The displays show
SLEEP and all illuminated buttons will extin-
guish. By actuating any button the unit is
switched back to the previous operating mode.
5.4 Selecting the operating mode
5.4.1 Continuous replay and single title
replay
To switch over between single title replay [indi-
cation “Single” (C)] and continuous replay [indi-
cation “Cont.” (D)], press the button CONT / LIST
(8).
A For single title replay the unit is switched to
pause at the end of a title.
This mode is especially provided for DJ
applications. After selecting a title, the player
unit will be set to pause precisely on the spot
where the music starts (mostly not at the time
index 0:00:00 but some frames later, e. g.
0:00:15). This spot will be automatically
stored as a starting point (Auto Cue point)
and shown on the display by CUE (L). After
starting the title it is possible to return to this
starting point with the button CUE (18). After
replaying a title, the unit will be set to pause
precisely on the spot where the music of the
next title starts. This spot will then be stored
as a new starting point.
B For continuous replay all titles are played
continuously one after the other, i. e. after the
last title the first title restarts. However, if the
titles are sorted in different folders, only the
titles of the folder selected are repeated.
5.4.2 Relay mode – automatic start of the
other player unit at the end of a title
At the end of a title the other player unit can auto-
matically be started.
1) Set both player units to single title replay with
the button CONT / LIST (8), so that the dis-
plays show “Single” (C).
2) Select a title on each player unit.
3) Press the button RELAY (2). The button
lights up.
4) Start the replay on one player unit with the
button (20). The other player unit must be
set to pause. As soon as a title has been
played to the end, the player unit is set to
pause and the other player unit will start. This
procedure will be continuously repeated until
the relay mode is deactivated. (To switch off
this mode, actuate the button RELAY once
again.)
5) During the relay mode, on any spot of a title,
the replay can additionally be switched over
from one player unit to the other with the but-
ton .
Note: After all titles of a folder have been played to the
end, the unit does not change automatically to the next
folder. This must always be done manually (chapter
5.1, step 5).
5.5 Short replay of a title beginning
For short replay of a title beginning keep the but-
ton CUE (18) pressed. After releasing the button,
the unit will return to the title beginning and is set
to pause.
1) The player unit must be set to single title
replay: indication “Single” (C). If “Cont.” (D) is
shown, press the button CONT / LIST (8).
2) Select the title (chapter 5.1, steps 4 and 5).
3) By keeping the button CUE pressed, shortly
replay the title beginning.
4) To replay the title, press the button (20).
5.6 Fast forward and reverse run
For fast forward or reverse run of a title, first
press the button SEARCH (17). SEARCH will be
indicated in the text line (O). Turn the jog wheel
REV / FWD (16) into the corresponding direction.
The forward / reverse speed depends on the
turning speed of the wheel.
Notes: In the pause mode, the current spot is con-
stantly repeated after fast forward or reverse. To stop
the repeat, either press the button CUE (18) shortly
(new Cue point is set, chapter 5.8.2) or start the
replay with the button (20).
5.7 Precise selection of a certain spot
It will be possible to select a spot in a title with the
precision of 1 frame (1⁄75 second), e. g. for start-
ing the replay from a certain spot instead of start-
ing it from the beginning of a title.
1) When the desired spot is roughly reached by
replaying the title or by using fast forward /
reverse (chapter 5.6), set the unit to
pause with the button (20).
2) Precisely select the spot by turning the jog
wheel (16) clockwise and counter-clockwise.
For an acoustic check the adjusted spot will
be constantly repeated.
3) When the desired spot has been found,
shortly press the button CUE (18). Thus, the
spot will be stored and repeating will end. The
replay can now be started from this point with
the button .
5.8 Return to a certain spot
To be able to quickly go to a certain spot, two
starting points (Cue points) can be stored with
the buttons CUE 1 and CUE 2 (11), even during
the replay of a title (Fly Cue).
In addition, another starting point can be
defined with the button CUE (18), however, in
the single title replay mode, this point will be
overwritten with the starting point of the next title
when the next title is reached or selected [switch
over to total title replay with the button CONT /
LIST (8), if required].
Note: The Cue points stored will be deleted
– when selecting another folder
– when switching over between CD, USB 1, USB 2
– when switching off the unit
5.8.1 Buttons CUE 1 and CUE 2
1) Press the button MEMO / AUTO (9) to activate
the storage. The button will light up.
2) During replay, either press the button CUE 1
(11) when the desired spot is reached (Fly
Cue) or set the unit to pause at the desired
spot with the button (20), use the jog
wheel (16) to go to the precise spot, then
press the button CUE 1. It will flash several
times and then light up permanently. The but-
ton MEMO / AUTO will be extinguished. Re -
start the replay with the button , if re quired.
3) Repeat steps 1 and 2 for defining another
Cue point with the button CUE 2.
4) The buttons CUE 1 and CUE 2 can now be
used to return to the corresponding Cue
points: The replay starts immediately from
the respective Cue point.
5.8.2 Button CUE
1) While replaying a title, set the unit to pause
with the button (20) when the spot is
reached to which the unit is to return later.
The buttons and CUE (18) will flash.
2) If required, the spot can be selected more
precisely with the jog wheel (16) [chapter
5.7]. Then the current spot will be continu-
ously replayed.
3) Press the button CUE. Thus, the spot will be
marked as a Cue point and the display shows
“CUE” (L). The button CUE will light up per-
manently. The button will continue to flash
as a request to start the replay.
4) Restart the replay with the button .
5) It is now possible to return to the Cue point
with the button CUE. Then the player unit is
set to pause.
6) Start the replay with the button or keep the
button CUE pressed as long as the title is to
be played. After releasing the button CUE,
the player unit will go back to the Cue point
and will be set to pause.
5.9 Changing the speed with or
without displacing the pitch
The speed can be changed with the sliding con-
trol (15) up to ±100 %:
+100 % = double speed
-
100 % = standstill
1) Select the adjusting range with the button
PITCH (14). The text line (O) shortly shows
the adjustment:
“Pitch 8 %”, “Pitch 16 %”, Pitch 100” or “Pitch
off” when the speed control is deactivated
again and the title is replayed at standard
speed.
2) Adjust the speed with the sliding control. The
display will show the percentage deviation
from the standard speed on the top right (l).
The number of beats (Q) will change accord-
ingly.
3) When the speed is changed, the pitch will
also change proportionally. However, for a
constant pitch, press the button MT (24). The
display will show the indication “MT” (S). To
switch off the function, press the button MT
again.
5.10 Pitch Bend – Matching the beat
between two music pieces
The beats of two music pieces with the same
speed can be synchronized precisely. Thus, the
dancing rhythm will not be interrupted when
crossfading from one player unit to the other.
1) First use the speed control (15) to adapt the
speed of the music piece to which crossfad-
ing is desired to the speed of the current
music piece. For this purpose, set the same
number of beats per minute (BPM) with the
sliding control, see indication (Q) at the bot-
tom on the right of the display.
13
GB

2) Synchronize the beats of the music piece to
which crossfading is desired to the beats of
the current music piece with the buttons
PITCH BEND (22): As long as the button +or
-
is kept pressed, the replay of the title will be
faster or slower. Thus, the beats will be dis-
placed with respect to the beats of the current
music piece.
3) The beats will also be displaced when the jog
wheel (16) is turned.
5.11 Effects
5.11.1 Scratch effects
For creating scratch effects (corresponding to
manual turning of a turntable platter), press the
button SCRATCH (6) and turn the jog wheel (16)
back and forth accordingly. The LED of the but-
ton will light up and the text line (O) will show
“SCRATCH”. To deactivate the effect, press the
button SCRATCH once again.
5.11.2 Droning effects
If the function Master Tempo (constant pitch)
has been activated [indication “MT” (S) on the
display], deactivate it with the button MT (24).
Turn the jog wheel (16) back and forth to
increase or decrease the replay speed alter-
nately. This will create a droning effect.
5.11.3 Stutter effects
The Cue points stored with the buttons CUE
(18), CUE 1 and CUE 2 (11) [chapter 5.8]
can also be used to create interesting stutter
effects: When one of these buttons is shortly
pressed several times, a stutter effect will be cre-
ated. The more suitable the Cue point (e. g. start
of an instrument or beginning of a word), the
more impressive the effect.
5.11.4 Replaying a continuous loop
A certain section of a title can be repeated as a
seamless continuous loop as many times as
desired.
1) Switch to replay with the button (20).
When the desired starting point of the loop is
reached (point a in fig. 6), shortly actuate the
button A (19).
Fig. 6 Replaying a continuous loop
Hint: To define the starting point with the precision
of 1 frame, first set the unit to pause with the button
, precisely select the spot with the jog wheel (16),
then press the button A.
2) When the desired end of the section is
reached (point b in fig. 6) while the replay is
continued, press the button B / EDIT (19). The
section between the points will be continu-
ously repeated. As long as a continuous loop
is replayed, the display indicates “RELOOP”
(J).
3) To displace the end point or to define it with
the precision of 1 frame, press the button B/
EDIT during replay of the loop. The time indi-
cation (P) will now show the time index of the
end point. Displace the end point with the jog
wheel (16) and confirm the end point with the
button B / EDIT.
4) The loop section can also be divided or be
multiplied many times over. While the loop is
replayed, select the change of length with the
button or (21). The text line (O) shows
the adjustment:
TRIM: 1⁄32, 1⁄16, 1⁄8, 1⁄4, 1⁄2, 1⁄1, 2⁄1, 4⁄1, 8⁄1, 16⁄1, 32⁄1
5) To exit the loop and to continue the title
replay, press the button RELOOP / EXIT (19).
To restart the loop, press the button
RELOOP / EXIT again.
Fig. 7 Exit and restart of a continuous loop
Note: A stored loop is deleted as soon as the next title
is reached or another title is selected with the button
or (21) while replaying.
Section with a fraction or multiple of a beat length
For titles in 4⁄4 time, the length of a section for the
loop replay may be adjusted exactly to a fraction
or a multiple of the beat length:
1⁄32, 1⁄16, 1⁄8, 1⁄4, 1⁄2, 1⁄1, 2⁄1, 4⁄1, 8⁄1, 16⁄1, 32⁄1
1) Keep the button MEMO / AUTO (9) pressed
and adjust the length with the jog wheel (16).
The length is indicated in the text line (O),
e. g. “AUTO 2 / 1” = two beat lengths. After
this adjustment the button MEMO / AUTO
lights up to indicate that the end point of a
loop section is automatically set.
2) Define the starting point with button A (19).
Thus, the continuous loop is started at the
same time and the end point is set according
to the length adjustment.
3) The length of the loop section can also be
changed subsequently, as described above
(step 3 or 4).
5.12 Compiling your personal title
sequence
To replay only selected titles in a certain order, a
sequence of 99 titles as a maximum can be pro-
grammed.
5.12.1 Storing and replaying a title
sequence
1) If a title is replayed, first set the unit to pause
with the button (20).
2) Switch to the programming mode with the
button PROG (13). The time indication (P) is
switched to the indication of the first storage
location “P
-
01”. The indication “PG” (R)
flashes quickly.
Note: To exit this mode immediately, keep the but-
ton PROG pressed until the display shows the play-
ing time (P) again.
3) Select the first title to be stored with the but-
ton or (21) [chapter 5.1, steps 4
and 5].
4) To confirm the title selection, press the button
PROG. The next memory location “P
-
02” is
indicated.
5) Repeat the steps 3 and 4 until all titles of the
title sequence will be stored. If you try to store
another title after 99 titles have been stored,
the message “FULL” will appear.
6) To replay the title sequence, press the button
. The indication “PG” (R) flashes more
slowly. The titles are replayed depending on
the operating mode selected (chapter
5.4.1). To select other titles of the title se -
quence, press the button or (several
times).
7) To switch back to the standard replaying
mode, set the unit to pause with the button
and keep the button PROG pressed until the
indication “PG” (R) stops flashing.
To replay the title sequence once again,
set the unit to pause and press the button
PROG so that the indication “PG” flashes
again. Start the title sequence with the button
.
Note: As long as the indication “PG” flashes or con-
stantly lights up, the title sequence can be called. It is
deleted e. g. when switching off the unit.
5.12.2 Checking a title sequence
1) If a title is replayed, first set the unit to pause
with the button .
2) If the indication “PG” flashes now, press the
button PROG once. If the indication “PG”
lights constantly, press the button PROG
twice.
3) Select the storage locations (P
-
01 … P
-
99)
successively with the button or . The title
stored in each case is indicated in the text line
(O).
4) To replay the title sequence, press the button
.
5.12.3 Completing or deleting a title sequence
1) If a title is replayed, first set the unit to pause
with the button .
2) If the indication “PG” flashes, keep the button
PROG pressed until “PG” stops flashing.
3) Shortly press the button PROG so that “PG”
flashes quickly and the time indication (P) is
switched over to the indication of the next
free storage location “P
-
…”.
4) To delete the title sequence, press the button
PROG until the display indicates the playing
time (P) again. To complete the title se -
quence, select another title with the button
or and confirm with the button PROG. To
replay the completed title sequence, press
the button .
6 Fader Start
The function Start / Pause of the button (20)
can be remote-controlled via a mixer with fader
start function. The connection to the mixer is
described in chapter 4, step 3. Adjust the sliding
switch (34) on the rear side of the player mecha-
nism to the type of fader start of the mixer:
LOCK = control via an on / off switch
This switch position must be selected for
most mixers of the “img Stage Line” range.
By advancing the fader, a switch starting the
replay will be closed in the mixer. When the
fader is closed, the switch will open and thus
set the player unit to pause.
Fig. 8 Fader start via on / off switch
START /
PAUSE CUE
PLAY
LOCK
TACT
Start
Pause
PLAY c
LOOP
1. 2.
RELOOP / EXITRELOOP / EXIT
ab
1.
PLAY PLAY
LOOP
2.
AB / EDIT
14
GB

TACT = control via a momentary pushbutton
When the momentary pushbutton is actuated
for the first time by advancing the fader, the
replay will start. When the momentary push-
button is actuated for the second time by
closing the fader, the player unit will be set to
pause.
Fig. 9 Fader start via momentary pushbutton
CUE PLAY = control via a pulse
When the fader is advanced, the replay will
be started from the title beginning (Auto Cue
point chapter 5.4.1) or from the Cue point
set with the button CUE (18) [chapter
5.8.2] by a short control pulse of the mixer.
When the fader is closed, the player unit will
return to this starting point by another control
pulse and will be set to pause there.
Fig. 10 Fader start via control pulse
7 Updating the Firmware
If a new firmware is available on the Internet, the
firmware of your unit may be updated:
1) On the home page of “img Stage Line”
(www.imgstageline.com), click “Software
Updates” under “SUPPORT”. Then scroll
down to “FIRMWARE-DOWNLOADS”.
For downloading, click the icon in front of
“CD-292USB”.
Copy the software download onto a USB
stick.
2) Switch off the CD-292USB with the power
switch (28).
3) Insert the USB stick with the new firmware
into the left USB port USB 1 (26).
4) At the left player unit keep the button PROG
(13) pressed and switch on the player again.
Do not release the button PROG until the left
display shows “UP dAt E”.
5) After reading in, when “Ready” appears in the
text line (O), press the button (20) to start
the firmware update. By means of the bar-
graph indication (H) and the text line the
update can be observed. When “Finish” is
shown, the firmware has been updated.
6) Switch off the player and switch it on again.
8 Maintenance of the Unit
Protect the unit from dust, vibrations, humidity
and heat (admissible ambient temperature
range 0 – 40 °C). For cleaning only use a dry,
soft cloth, never use water or chemicals.
Note concerning sound interruptions and
reading errors
Cigarette smoke and dust will easily penetrate
through all openings of the unit and also settle on
the optics of the laser sampling system. This
deposit may cause reading errors and sound
interruptions, the unit must then be cleaned by
skilled personnel. This cleaning will be charged,
even during the warranty period!
9 Specifications
Frequency range: . . . . . 20 – 20 000 Hz
THD: . . . . . . . . . . . . . . . < 0.1 %
Channel separation: . . . > 80 dB
Dynamic range: . . . . . . > 80 dB
S / N ratio: . . . . . . . . . . . > 80 dB
Output: . . . . . . . . . . . . . 2 V (line level),
RCA jacks
Readable file systems: . NTFS, FAT, HFS+
Anti-shock memory: . . . 15 s
Power supply: . . . . . . . . 230 V~ / 50 Hz
Power consumption: . . . 40 VA max.
Ambient temperature: . . 0 – 40 °C
Dimensions (W × H × D)
Control unit: . . . . . . . 482 × 90 × 85 mm,
2 rack spaces
Player mechanism: . . 482 × 90 × 260 mm,
2 rack spaces
Weight: . . . . . . . . . . . . . 6.5 kg
Subject to technical modification.
START /
PAUSE CUE
PLAY
LOCK
TACT
1.×CuePlay
2.×Pause
START /
PAUSE CUE
PLAY
LOCK
TACT
1.×Start
2.×Pause
15
GB
All rights reserved by MONACOR
®
INTERNATIONAL GmbH & Co. KG. No part of this instruction
manual may be reproduced in any form or by any means for any commercial use.

Ouvrez le présent livret page 3, dépliable, de
manière à visualiser les éléments et branche-
ments.
Table des matières
1 Eléments et branchements . . . . . . . . 16
1.1 Unité de commande . . . . . . . . . . . . . . . 16
1.2 Face avant unité lecture . . . . . . . . . . . . 17
1.3 Face arrière unité lecture . . . . . . . . . . . 17
2 Conseils dʼutilisation et de sécurité .17
3 Possibilités dʼutilisation . . . . . . . . . . 17
4 Positionnement de lʼappareil
et branchements . . . . . . . . . . . . . . . . . 18
5 Utilisation . . . . . . . . . . . . . . . . . . . . . . 18
5.1 Lecture de morceaux de musique . . . . 18
5.2 Charger une liste de lecture . . . . . . . . . 18
5.3 Affichage des informations de titre
et du mode repos . . . . . . . . . . . . . . . . . 18
5.3.1 Affichage graphique de la durée . . . . 19
5.3.2 Nombre de beats par minute . . . . . . . 19
5.3.3 Mode repos . . . . . . . . . . . . . . . . . . . . 19
5.4 Sélection du mode de fonctionnement . 19
5.4.1 Lecture continue et
lecture titre par titre . . . . . . . . . . . . . . 19
5.4.2 Mode relais –
démarrage automatique de lʼautre
unité de lecture à la fin dʼun titre . . . . 19
5.5 Brève lecture du début dʼun titre . . . . . 19
5.6 Avance et retour rapides . . . . . . . . . . . 19
5.7 Positionnement précis à
un endroit donné . . . . . . . . . . . . . . . . . 19
5.8 Retour à un endroit donné . . . . . . . . . . 19
5.8.1 Touches CUE 1 et CUE 2 . . . . . . . . . 19
5.8.2 Touche CUE . . . . . . . . . . . . . . . . . . . 19
5.9 Modification de la vitesse avec ou sans
déplacement de la hauteur tonale . . . . 19
5.10 Pitch Bend – adaptation du rythme
entre deux morceaux de musique . . . . 20
5.11 Création dʼeffets . . . . . . . . . . . . . . . . . . 20
5.11.1 Effets Scratch . . . . . . . . . . . . . . . . . . 20
5.11.2 Effets bourdonnement . . . . . . . . . . . . 20
5.11.3 Effets bégaiement . . . . . . . . . . . . . . . 20
5.11.4 Lecture dʼune boucle continue . . . . . 20
5.12 Création dʼune suite personnelle
de titres . . . . . . . . . . . . . . . . . . . . . . . . . 20
5.12.1 Mémoriser et lire une suite de titres . 20
5.12.2 Vérification de la suite de titres . . . . . 20
5.12.3 Compléter ou effacer
une suite de titres . . . . . . . . . . . . . . . . . 20
6 Démarrage électrique . . . . . . . . . . . . . 21
7 Actualisation du Firmware . . . . . . . . . 21
8 Entretien de lʼappareil . . . . . . . . . . . . 21
9 Caractéristiques techniques . . . . . . . 21
1 Eléments et branchements
1.1 Unité de commande
1Panneau de commande pour lʼunité de lec-
ture 1
voir détails, schéma 2
2Touche RELAY pour un démarrage automa-
tique de lʼautre unité de lecture à la fin dʼun
titre (chapitre 5.4.2)
3Panneau pour lʼunité de lecture 2
voir détails, schéma 2
4Touche OPEN / CLOSE pour ouvrir et fer-
mer le tiroir CD [comme les touches (27,
29) sur la partie Lecteur]
5Touche CD / USB pour commuter entre CD et
support de mémoire USB ; pour ce faire,
lʼunité de lecture doit être commutée avec la
touche (20) sur Pause.
Si deux supports de mémoire USB sont
reliés, après avoir appuyé sur la touche CD /
USB, sélectionnez avec la touche ou
(21), entre CD, USB1 et USB2. La ligne de
texte (O) indique la sélection. Pour confirmer,
appuyez sur la touche CD / USB.
6Touche SCRATCH pour activer et désactiver
la fonction Scratch
Lorsque la fonction est activée (la touche
brille), on peut produire des effets Scratch
avec la molette (16).
7Touche TIME pour commuter lʼaffichage de
durée (H, P)
affichage “Remain” (G)
durée restante du titre
affichage “Elapse” (E)
durée déjà lue du titre
affichage “Total Remain”
durée restante de tout le CD
(pas possible en mode MP3)
En mode MP3, on peut commuter la ligne de
texte (O) sur lʼaffichage du titre, album, inter-
prète (ID3 Tags) ou le nom du fichier, si la
touche TIME est maintenue enfoncée et avec
la touche ou .
8Touche CONT / LIST
1. pour commuter entre la lecture titre par
titre [affichage “Single” (C)] et lecture conti-
nue [affichage “Cont.” (D)]
2. pour charger des listes de lecture (cha-
pitre 5.2)
9Touche MEMO / AUTO
1. pour mémoriser les points Cue avec les
touches CUE 1 et CUE 2 (11)
2. pour lire un segment de titre avec la lon-
gueur dʼun multiple ou dʼune fraction de
longueur de beats, sous forme de boucle
(chapitre 5.11.4).
10 Affichage, détails voir schéma 3
ASi au-dessus des chiffres “TRACK” est
visible : numéro du titre de musique (dans
le dossier sélectionné) ;
Si sous les chiffres, “FOLDER” est affiché :
numéro du dossier sélectionné.
BSymbole du mode lecture
CAffichage “Single” : indique le mode de
fonctionnement titre par titre
DAffichage “Cont.” : indique le mode de
fonctionnement de lecture continue de
tous les titres
EAffichage “Elapse” : indique la durée déjà
lue dʼun titre
FAffichage “Total” : indique avec lʼaffichage
“Remain” (G) la durée restante du CD
(pas possible en mode MP3)
GAffichage “Remain” : indique la durée res-
tante dʼun titre. Si “Total Remain” est affi-
ché, la durée restante du CD est mention-
née.
HBargraphe pour visualiser la durée relative
dʼun titre
IAffichage de la déviation de la vitesse
nominale en pourcentage
JAffichage “RELOOP” : indique la lecture
dʼune boucle continue
KAffichage “CD” ou “USB” : indique si un
CD, le port USB 1 (26) ou USB 2 (30) est
sélectionné. Si USB 2 est sélectionné,
“USB” clignote.
LAffichage “CUE” : sʼaffiche lorsque lʼunité
de lecture est en mode Pause au point Cue
(chapitre 5.4.1 et 5.8.2)
MEn mode MP3 : dans ce champ est indiqué
si le nom du titre, de lʼalbum, de lʼartiste du
morceau de musique est affiché dans la
ligne de texte (O). Si aucune de ces don-
nées ne sʼaffiche, le nom du fichier est indi-
qué (chapitre 5.3).
NNombre de titres sur le CD :
En mode MP3 :
nombre de titre dans le dossier sélectionné
[affichage “TRACK” au-dessus des chiffres
(A)]
ou nombre de dossiers [affichage “FOL-
DER” sous les chiffres (A)]
OLigne de texte pour des informations sup-
plémentaires
PAffichage de la durée, voir position E et G
QAffichage du nombre de beats par minute
RAffichage “PG” : clignote si une suite per-
sonnelle de titres est programmée ou lue
SAffichage “MT” (Master Tempo) : indique la
fonction pour une hauteur tonale constante
(chapitre 5.9)
11 Touches CUE 1 et CUE 2
1. Pour mémoriser deux points Cue [égale-
ment possible pendant la lecture ; pour
mémoriser, appuyez tout dʼabord sur la
touche MEMO / AUTO (9)]
2. pour aller aux points Cue mémorisés
12 Touche FOLDER pour le mode MP3
1. pour commuter entre lʼaffichage du nom du
titre et du dossier dans la ligne de texte (O)
Selon le réglage sélectionné, on peut choi-
sir un titre ou un dossier avec les touches
et (21).
2. pour charger des listes de lecture (cha-
pitre 5.2)
3. pour sélectionner une partition sur un
disque dur relié (chapitre 5.1)
13 Touche PROG pour constituer et lire une
suite de titres personnelle (chapitre 5.12)
14 Touche PITCH pour activer / désactiver le
réglage de vitesse (15) et pour sélectionner
la plage de réglage de la vitesse (8 %, 16 %,
100 %)
La ligne de texte (O) indique brièvement le
réglage sélectionné (Pitch 8 %, 16 %, 100,
off).
15 Potentiomètre à glissière pour modifier la
vitesse de lecture [sans modification de la
hauteur tonale lorsque la touche MT (24) brille]
La vitesse ne peut être modifiée que lorsque
la touche PITCH (14) brille.
16 Molette REV / FWD
–pour une avance et retour rapide lorsque la
touche SEARCH (17) a été enfoncée
–pour produire des effets Scratch lorsque la
touche SCRATCH (6) a été enfoncée
16
F
B
CH

17
F
B
CH
–pour la fonction “Pitch Bend” pendant la
lecture dʼun titre (chapitre 5.10)
–pour aller exactement à un endroit lorsque
lʼunité de lecture est commutée sur Pause
–lorsque la touche ou (21) est enfon-
cée, pour sélectionner rapidement des
titres [affichage “TRACK” au-dessus des
chiffres (A)] ou des dossiers [affichage
“FOLDER” sous les chiffres (A)]
17 Touche SEARCH pour activer et désactiver
lʼavance et retour avec la molette (16)
18 Touche CUE pour lire le début dʼun titre briè-
vement (chapitre 5.5) et pour revenir à un
endroit préalablement déterminé (chapi-
tre 5.8.2)
19 Touches pour mémoriser et lire une boucle
parfaite
touche A pour déterminer le point de départ
dʼun segment pour une boucle parfaite
touche B / EDIT pour déterminer le point de fin
et le démarrage simultané de la boucle ;
pour déplacer le point de fin, appuyez une
nouvelle fois sur la touche et réglez le point
de fin avec la molette (16)
touche RELOOP / EXIT pour quitter la boucle
parfaite ou lancer une nouvelle lecture de
la boucle
20 Touche pour démarrer un titre et commu-
ter entre lecture et Pause
21 Touches et
1. pour la sélection de titre lorsque “TRACK”
est affiché au-dessus des chiffres (A) :
touche pour sélectionner le titre suivant
touche pour revenir au début du titre en
cours de lecture. Par plusieurs pressions
sur la touche , on recule toujours dʼun
titre.
Si une des touches est maintenue enfon-
cée, sélectionnez les titres rapidement
avec la molette (16).
2. en mode MP3, pour sélectionner un dos-
sier lorsque “FOLDER” est affiché sous les
chiffres (A) [commutable avec la touche
FOLDER (12)]
Si une des touches est maintenue enfon-
cée, on peut sélectionner rapidement les
dossiers avec la molette (16).
3. pour sélectionner un CD ou un support de
mémoire USB, voir également touche CD /
USB (5)
4. pour diviser ou multiplier le segment de titre
dʼune boucle parfaite, (chapitre 5.11.4)
5. en mode MP3, et si la touche TIME (7) est
maintenue enfoncée, pour commuter la
ligne de texte (O) sur lʼaffichage du titre, de
lʼalbum, interprète (ID3 tags) ou nom du
dossier
6. pour sélectionner une liste de lecture
(chapitre 5.2)
7. pour sélectionner une partition sur un
disque dur relié (chapitre 5.1)
22 Touches PITCH BEND pour adapter le
rythme du titre en cours au rythme dʼun autre
titre lu sur lʼautre unité de lecture (chapi-
tre 5.10)
23 Touche TAP pour le mode manuel de comp-
tage du compteur de beats et pour revenir au
mode automatique (chapitre 5.3.2)
24 Touche MT (Master Tempo) pour activer et
désactiver la fonction pour la hauteur tonale
constante (chapitre 5.9)
1.2 Face avant unité lecture
25 Tiroir CD pour lʼunité de lecture 1
26 Port USB 1 pour insérer une clé USB ou
brancher un disque dur
27 Touche OPEN / CLOSE pour ouvrir et fer-
mer le tiroir CD 1 [comme touche (4) sur
lʼunité de commande]
28
Interrupteur POWER marche / arrêt avec témoin
de fonctionnement au dessus (LED rouge)
29 Touche OPEN / CLOSE pour ouvrir et fer-
mer le tiroir CD 2 [comme touche (4) sur
lʼunité de commande]
30 Port USB 2 pour insérer une clé USB ou
brancher un disque dur
31 Tiroir CD pour lʼunité de lecture 2
1.3 Face arrière unité lecture
32 Sortie audio LINE OUT de lʼunité de lecture 2
pour brancher à lʼentrée Ligne par exemple
un amplificateur ou une table de mixage
33 Prise jack 3,5 START / PAUSE de lʼunité de
lecture 2 pour la commande à distance de la
fonction Start / Pause depuis une table de
mixage
34 Commutateur pour le type de commande
à distance via les prises START / PAUSE
(33, 38), [chapitre 6]
position LOCK
pour la gestion via un interrupteur marche /
arrêt
position TACT
pour la gestion via un bouton poussoir
momentané
position CUE / PLAY
lʼunité de lecture est démarrée via une
impulsion de commande de la table de
mixage lorsquʼon pousse le fader de la
table de mixage à partir du point Cue [point
Auto Cue ou placé avec la touche CUE
(18)] et elle revient au point Cue lorsquʼon
tire le fader
35 Prise pour brancher lʼunité de commande :
reliez-la à la prise REMOTE CONTROL
CONNECT TO MAIN UNIT 2 via un des cor-
dons de branchement livrés
36 Cordon secteur à relier à une prise secteur
230 V~ / 50 Hz
37 Prise pour brancher lʼunité de commande :
reliez-la à la prise REMOTE CONTROL
CONNECT TO MAIN UNIT 1 via un des cor-
dons de branchement livrés
38 Prise jack 3,5 START / PAUSE de lʼunité de
lecture 1 pour la commande à distance de la
fonction Start / Pause dʼune table de mixage
39 Sortie audio LINE OUT de lʼunité de lecture 1
pour brancher à lʼentrée Ligne par exemple
dʼun amplificateur ou dʼune table de mixage
2 Conseils dʼutilisation
et de sécurité
Cet appareil répond à toutes les directives
nécessaires de lʼUnion européenne et porte
donc le symbole .
Respectez scrupuleusement les points suivants:
GAttention ! Ne regardez pas le compartiment
CD lorsque le tiroir CD est ouvert. Des rayon-
nements laser éventuellement émis pourraient
causer des troubles de la vision.
GLʼappareil nʼest conçu que pour une utilisation
en intérieur. Protégez-le de tout type de projec-
tions dʼeau, des éclaboussures, dʼune humidité
élevée de lʼair et de la chaleur (plage de tempé-
rature de fonctionnement autorisée : 0 – 40 °C).
GEn aucun cas, vous ne devez poser dʼobjet
contenant du liquide, p. ex. un verre, sur lʼap-
pareil.
GNe faites jamais fonctionner lʼappareil et
débranchez-le immédiatement lorsque :
1. des dommages visibles apparaissent sur
lʼappareil et sur le cordon secteur,
2. après une chute ou accident similaire...,
vous avez un doute au sujet de lʼétat de lʼap-
pareil.
3. des dysfonctionnements apparaissent.
Dans tous les cas, les dommages doivent être
réparés par un technicien spécialisé.
GTout cordon secteur endommagé doit être
remplacé impérativement par un technicien
spécialisé.
GNe débranchez jamais lʼappareil en tirant sur
le cordon secteur, tenez-le toujours par la
fiche.
GPour le nettoyage, utilisez un chiffon sec et
doux, en aucun cas de produits chimiques ou
dʼeau.
GNous déclinons toute responsabilité en cas de
dommages matériels ou corporels résultants
si lʼappareil est utilisé dans un but autre que
celui pour lequel il a été conçu, sʼil nʼest pas
correctement branché ou utilisé ou sʼil nʼest
pas réparé par une personne habilitée, en
outre, la garantie deviendrait caduque. De
même, aucune responsabilité ne saurait être
engagée en cas de pertes de données cau-
sées par une mauvaise manipulation ou par un
défaut, ou en cas de dégâts résultants.
3 Possibilités dʼutilisation
Le lecteur CD / MP3 CD-292USB avec deux uni-
tés de lecture est spécialement conçu pour une
utilisation DJ professionnelle. De nombreuses
fonctions sont précisément définies dans ce but,
par exemple lecture titre par titre, compteur auto-
matique de beats, lecture sans interruption
dʼune boucle, modification de la vitesse sans
modification de la hauteur tonale, mémoire anti-
chocs.
Il est possible de lire des CDs audio, des
CDs audio gravés et des CDs avec titres au for-
mat MP3. Pour des CD-RW (CDs réinscripti-
bles), des problèmes lors de la lecture peuvent
Lorsque lʼappareil est définitivement retiré
du service, vous devez le déposer dans
une usine de recyclage adaptée pour
contribuer à son élimination non polluante.
AVERTISSEMENT Cet appareil est alimenté par
une tension dangereuse. Ne
touchez jamais lʼintérieur de
lʼappareil et ne faites rien tom-
ber dans les ouïes de ventila-
tion, vous pourriez subir une
décharge électrique.

18
F
B
CH
survenir selon le type de CD, le graveur et le
logiciel de gravure utilisés.
Via les ports USB, on peut lire des fichiers
MP3 dʼun disque dur ou dʼune clé USB. Les uni-
tés de lecture peuvent accéder aux ports USB
indépendamment lʼune de lʼautre de telle sorte
que le fonctionnement est également possible
uniquement avec un seul support de mémoire
USB.
4 Positionnement de lʼappareil
et branchements
Lʼunité de commande et lʼunité de lecture sont
prévues pour une installation en rack pour des
appareils dʼune largeur de 482 mm (19″). Elles
peuvent également être directement posées sur
une table. Lʼunité de lecture doit toujours fonc-
tionner à lʼhorizontale alors que lʼunité de com-
mande peut, au choix, être intégrée, par exem-
ple de manière inclinée. Pour lʼinstallation en
rack, 2 unités (1 U = 1 unité = 44,45 mm) sont
nécessaires pour lʼunité de commande et lʼunité
de lecture respectivement.
Avant dʼeffectuer ou de modifier les branche-
ments, assurez-vous que le lecteur CD / MP3 et
les appareils à relier sont éteints.
1) Reliez lʼunité de commande et lʼunité de lec-
ture avec les deux cordons livrés :
reliez la prise CONNECT TO REMOTE
CONTROL 2 (35) de lʼunité de lecture à la
prise REMOTE CONTROL CONNECT TO
MAIN UNIT 2 de lʼunité de commande et
reliez la prise CONNECT TO REMOTE
CONTROL 1 (37) de lʼunité de lecture à la
prise REMOTE CONTROL CONNECT TO
MAIN UNIT 1 de lʼunité de commande.
2) Reliez les deux sorties de signal LINE OUT
(32, 39) à respectivement une entrée avec
niveau ligne, par exemple dʼune table de
mixage ou dʼun amplificateur (repérage pos-
sible : Line, CD, Aux).
3) Les deux unités de lecture peuvent être
démarrées via une table de mixage avec la
fonction démarrage électrique et être mises
sur Pause. Pour ce faire, branchez les prises
START / PAUSE (33, 38) via deux cordons
avec fiches jack 3,5 mâles aux prises corres-
pondantes de la table de mixage. Le CD-
292USB doit être réglé sur le démarrage élec-
trique de la table de mixage, voir chapitre 6.
4) Reliez le cordon secteur livré à la prise sec-
teur (36) puis à une prise 230 V~ / 50 Hz.
5 Utilisation
Lʼutilisation des deux unités de lecture est iden-
tique. Allumez lʼappareil avec lʼinterrupteur
POWER (28). Lʼaffichage (10) indique briève-
ment “boot” (processus de démarrage) et WEL-
COME. Si un CD est inséré, les informations sur
le CD sʼaffichent une fois le CD reconnu. Sʼil nʼy
a pas de CD dans le lecteur, “no dISC” (pas de
CD) sʼaffiche.
Après utilisation, éteignez lʼappareil. Les
réglages suivants sont mémorisés pour la pro-
chaine utilisation :
1. le mode de fonctionnement sélectionné (lec-
ture titre par titre / lecture continue, chapi-
tre 5.4.1).
2. lʼaffichage de durée sélectionné (durée res-
tante / durée déjà lue, chapitre 5.3)
3. la plage de réglage de vitesse sélectionnée
(chapitre 5.9)
5.1 Lecture de morceaux de musique
1) Pour insérer un CD, ouvrez le tiroir CD (25,
31) avec la touche (4, 27 ou 29). Insérez le
CD, inscription vers le haut et refermez le
tiroir CD avec la touche .
2) Vous pouvez relier, en plus ou à la place, une
clé USB aux ports USB (26, 30) ou un disque
dur avec ports USB. Pour commuter entre
CD et support de mémoire USB, appuyez sur
la touche CD / USB (5). Lʼunité de lecture doit
être mise sur Pause ; si besoin, appuyez sur
la touche (20).
Si deux supports de mémoire USB sont
branchés, sélectionnez la source de signal
(CD, USB 1, USB 2) avec la touche ou
(21), après avoir appuyé sur la touche CD /
USB. La ligne de texte (O) indique la sélec-
tion. La source de signal alors sélectionnée
est sautée. Confirmez la sélection avec la
touche CD / USB.
Conseils :
1. La source de signal sélectionnée est également
affichée dans le champ (K) :
“CD” = le lecteur CD est sélectionné
“USB” affiché tout le temps = USB 1
“USB” clignote = USB 2
2. Un disque dur doit être alimenté par une bloc
secteur propre dont la consommation doit être
supérieure à 500 mA.
3. Si plusieurs partitions existent sur un disque dur,
on peut les sélectionner comme suit :
a) Maintenez la touche FOLDER (12) enfoncée
jusquʼà ce que sur lʼaffichage “PA-SEL” (Parti-
tion Selection) soit visible.
b) Avec la touche ou , sélectionnez la parti-
tion. La ligne de texte (O) indique le nom.
c) Appuyez sur la touche FOLDER pour confirmer.
3) Pour démarrer le premier titre, appuyez sur la
touche (20). Pendant la lecture, lʼaffi-
chage indique le symbole (B). La lecture
peut être interrompue à tout moment avec la
touche puis être poursuivie.
4) Pour sélectionner un autre titre, utilisez les
touches et .
touche : pour aller au titre suivant
touche : aller au début du titre en cours
de lecture. Par plusieurs pressions sur la
touche, vous reculez toujours dʼun titre.
Si une des touches est maintenue enfoncée,
on peut sélectionner rapidement les titres
avec la molette (16).
5) Si en mode MP3, les titres de musique sont
listés dans différents dossiers, appuyez sur la
touche FOLDER (12) pour sélectionner un
dossier. Lʼaffichage indique “FO-SEL” (Fol-
der Selection) et la ligne de texte (O) indique
le nom du dossier. Les chiffres (A) en haut à
gauche de lʼaffichage indiquent maintenant le
numéro du dossier et les chiffres (N) sous
“Total”, le nombre de dossiers existants.
Avec la touche ou , sélectionnez le dos-
sier. Si une touche est maintenue enfoncée,
vous pouvez sélectionner rapidement les
dossiers avec la molette (16).
Pour confirmer la sélection, appuyez sur la
touche FOLDER ; lʼaffichage indique à nou-
veau lʼindication de durée (P). Avec la touche
ou , sélectionnez le titre voulu dans le
dossier.
6) Si un autre CD doit être inséré, commutez
tout dʼabord sur Pause avec la touche ,
sinon, vous ne pourrez pas ouvrir le tiroir
avec la touche .
7) Avant dʼéteindre lʼappareil, fermez toujours
les tiroirs CD avec les touches pour proté-
ger les systèmes laser des poussières. Etei-
gnez ensuite lʼappareil avec lʼinterrupteur
POWER.
5.2 Charger une liste de lecture
Pour lire une sélection donnée de fichiers MP3,
vous pouvez charger des listes de lecture créées
sur un ordinateur avec lʼextension “wpl”, “xml” ou
“m3u” dans le CD-292USB.
Important : Une liste de lecture et les fichiers
MP3 correspondants doivent être sur le même
support de mémoire. Les listes de lecture doi-
vent toujours être dans le répertoire principal
(root directory).
1) Si un titre est lu, passez sur Pause avec la
touche (20).
2) Maintenez la touche CONT / LIST (8) enfon-
cée et sélectionnez avec la touche ou
(21), quelle extension de fichier il faut recher-
cher. La ligne de texte (O) indique la sélec-
tion (M3U Scan, WPL Scan, XML Scan).
3) Appuyez sur la touche FOLDER (12). Lʼaffi-
chage indique “FO-SEL” et la ligne de texte
(O), le nom de la première liste de lecture.
Les chiffres (A) en haut à gauche sur lʼaffi-
chage indiquent maintenant le numéro de la
liste de lecture et les chiffres (N) sous “Total”
le nombre de listes de lecture existantes.
4) Sélectionnez la liste de lecture voulue avec la
touche ou .
5) Pour confirmer la sélection, appuyez sur la
touche FOLDER. Une fois la liste chargée,
lʼaffichage indique à nouveau lʼindication de
durée (P).
6) Pour démarrer le premier titre de la liste de
lecture, appuyez sur la touche . Pour sélec-
tionner dʼautres titres de la liste, appuyez sur
la touche ou ou maintenez une de ces
touches enfoncées et activez la molette (16).
7) Pour lire les titres sans liste de lecture, pas-
sez sur Pause avec la touche . Maintenez
la touche CONT / LIST enfoncée et appuyez
sur la touche ou (21) jusquʼà ce que la
ligne de texte indique “Folder”. Lorsque vous
relâchez la touche, lʼaffichage indique
“SCAn” puis à nouveau lʼaffichage de durée
(P). Plus aucune liste de lecture nʼest alors
chargée.
5.3 Affichage des informations de titre
et du mode repos
Lʼaffichage (10) indique de nombreuses informa-
tions :
1. numéro du titre sélectionné (A) si “TRACK”
est affiché au-dessus des chiffres. Si “FOL-
DER” est affiché sous les chiffres, le numéro
du dossier sélectionné est indiqué [commuta-
ble avec la touche FOLDER (12)].
2. nombre de titres (N) sur le CD ou si les titres
sont listés dans différents dossiers, le nom-
bre de titres dans le dossier sélectionné.
3. durée relative (H) et absolue (P) du titre
sélectionné : les secondes sont divisées en
75 frames.
On peut commuter lʼaffichage de durée avec
la touche TIME (7) :
Si Elapse (E) est affiché, la durée déjà lue du
titre est indiquée.
Si Total Remain (F, G) est affiché, la durée
restante de tout le CD (pas possible en
mode MP3) est indiquée.
Si Remain (G) est affiché, la durée restante
du titre est indiquée.
4. Dans la ligne de texte (O), sʼaffiche :
– pour des CDs audio standards avec texte
CD, le nom du titre
– en mode MP3, le nom du fichier
La ligne de texte peut être commutée sur
lʼaffichage des informations suivantes (ID3

19
F
B
CH
Tags). Maintenez la touche TIME enfon-
cée et sélectionnez avec la touche ou
(21) :
affichage (M) :
TITLE = nom du titre
ALBUM = nom de lʼalbum
ARTIST = interprète
aucun = nom du dossier
5.3.1 Affichage graphique de la durée
En plus de lʼaffichage numérique de la durée (P),
le bargraphe (H) indique par sa longueur gra-
phique, la durée en fonction de la durée du titre
(affichage relatif de la durée). Les dernières 30
secondes dʼun titre sont indiquées par un cligno-
tement du bargraphe dans toute sa longueur, les
dernières 15 secondes sont indiquées par un cli-
gnotement plus rapide.
5.3.2 Nombre de beats par minute
Une fois le titre sélectionné, le compteur de
beats indique automatiquement le nombre de
beats par minute. Après un bref délai, le nombre
sʼaffiche en bas à droite sur lʼaffichage (Q). Si le
compteur de beats ne peut pas déterminer de
valeur correcte (par exemple pour des titres de
musique calmes), on peut déterminer manuelle-
ment la valeur :
1) Appuyez sur la touche BPM / TAP (23) plu-
sieurs fois au rythme de la musique (4 × au
moins). Le nombre de beats est affiché, lʼin-
dication “BPM” clignote pour signaler le mode
de comptage manuel.
2) Pour revenir au mode de comptage automa-
tique, maintenez la touche BPM / TAP enfon-
cée jusquʼà ce que lʼaffichage “BPM” ne cli-
gnote plus.
5.3.3 Mode repos
Si les deux unités de lecture restent sur Pause
plus de 15 minutes, lʼappareil passe en mode
repos. Les systèmes laser sont désactivés et sont
ainsi économisés. Les affichages indiquent
SLEEP (sommeil) et toutes les touches éclairées
sʼéteignent. En activant une touche au choix, vous
revenez au mode de fonctionnement précédent.
5.4 Sélection du mode
de fonctionnement
5.4.1
Lecture continue et lecture titre par titre
Pour commuter entre lecture titre par titre [affi-
chage “Single” (C)] et lecture continue [affichage
“Cont.” (D)], appuyez sur la liste CONT / LIST (8).
A Pour la lecture titre par titre, lʼappareil com-
mute sur Pause après chaque titre lu.
Ce mode est spécialement prévu pour les
applications DJ. Une fois le titre sélectionné,
lʼunité de lecture est exactement à lʼendroit
où la musique commence (généralement pas
à lʼindex temps 0 : 00 : 00 mais quelques
frames plus loin, par exemple 0 : 00 : 15). Cet
endroit est automatiquement mémorisé
comme point de départ (point Auto Cue) et
signalé sur lʼaffichage par lʼindication CUE
(L). Après le démarrage du titre, on peut
revenir à ce point de démarrage avec la
touche CUE (18). Une fois le titre lu, lʼappa-
reil commute sur Pause exactement à lʼen-
droit où la musique du titre suivant com-
mence. Cet endroit est alors mémorisé
comme nouveau point de départ.
B Pour une lecture en continu, tous les titres
sont lus en continu les uns après les autres,
cʼest-à-dire quʼaprès le dernier titre, le pre-
mier titre redémarre. Si les titres sont listés
dans différents dossiers, seuls les titres du
dossier sélectionné sont répétés.
5.4.2 Mode relais
démarrage automatique de lʼautre
unité de lecture à la fin dʼun titre
A la fin dʼun titre, lʼautre unité de lecture peut
démarrer automatiquement.
1) Commutez les deux unités de lecture sur la
lecture titre par titre avec la touche CONT /
LIST (8) de telle sorte que les affichages
indique “Single” (C).
2) Sélectionnez un titre sur chaque unité de lec-
ture.
3) Activez la touche RELAY (2). La touche brille.
4) Démarrez la lecture sur une unité de lecture
avec la touche (20). Lʼautre unité de lec-
ture doit être sur Pause. Dès quʼun titre est ter-
miné, lʼunité de lecture commute sur Pause,
lʼautre démarre. Le processus est répété en
continu jusquʼà ce que le mode Relais soit
désactivé. (Pour le désactiver, appuyez une
nouvelle fois sur la touche RELAY).
5) Pendant le mode Relais, on peut en plus
commuter la lecture dʼune unité sur lʼautre, à
nʼimporte quel endroit dʼun titre avec la
touche .
Conseil : une fois tous les titres dʼun dossier lus, lʼap-
pareil ne commute pas automatiquement sur le dossier
suivant. Il faut le faire manuellement (chapitre 5.1,
point 5).
5.5 Brève lecture du début dʼun titre
Avec la touche CUE (18), on peut lire le début
dʼun titre brièvement tant que la touche est main-
tenue enfoncée. Une fois la touche relâchée,
lʼappareil revient au début du titre puis commute
sur Pause.
1) Lʼunité de lecture doit être mise sur la lec-
ture titre par titre : affichage “Single” (C). Si
“Cont.” (D) est affiché, appuyez sur la touche
CONT / LIST (8).
2) Sélectionnez le titre (chapitre 5.1, points 4
et 5).
3) En maintenant la touche CUE enfoncée, lisez
le titre.
4) Activez la touche (20) pour lire le titre.
5.6 Avance et retour rapides
Si un titre doit être lu plus vite vers lʼavant ou lʼar-
rière, appuyez tout dʼabord sur la touche
SEARCH (17). Dans la ligne de texte (O),
SEARCH est affiché. Tournez la molette REV /
FWD (16) dans le sens correspondant. La
vitesse dʼavance ou de retour dépend de la
vitesse de rotation de la molette.
Conseils : en mode Pause, lʼendroit en cours est
répété en continu après une avance ou un retour. Pour
arrêter la répétition, soit appuyez brièvement sur la
touche CUE (18) [nouveau point Cue déterminé,
chapitre 5.8.2] soit démarrez la lecture avec la
touche (20).
5.7 Positionnement précis
à un endroit donné
On peut aller à un endroit dans le titre avec une
précision de 1 frame (1⁄75 s), par exemple si la
lecture ne doit pas démarrer au début du titre
mais à un endroit donné.
1) Lorsque lʼendroit voulu est atteint approxima-
tivement pendant la lecture du titre ou avec
lʼavance / retour rapide (chapitre 5.6),
passez en Pause avec la touche (20).
2) En tournant la molette (16) vers la droite ou la
gauche, allez précisément à lʼendroit voulu.
Pour pouvoir effectuer un contrôle acous-
tique, lʼendroit réglé est répété en continu.
3) Lorsque lʼendroit voulu est trouvé, appuyez
sur la touche CUE (18). Lʼendroit est mémo-
risé, la lecture continue arrêtée. Avec la
touche , la lecture peut être maintenant
démarrée à partir de ce point.
5.8 Retour à un endroit donné
Pour pouvoir aller rapidement à un endroit
donné, vous pouvez mémoriser avec la touche
CUE 1 et CUE 2 (11), deux points de départ
(points Cue) même pendant la lecture dʼun titre
(Fly-Cue).
Vous pouvez déterminer en plus avec la
touche CUE (18), un autre point de départ. Il est
écrasé en mode titre par titre, lorsque le titre sui-
vant est atteint ou sélectionné, par le point de
départ du titre suivant [le cas échéant, avec la
touche CONT / LIST (8), commutez sur lecture de
tous les titres].
Conseil : les points Cue mémorisés sont effacés si :
– sélection dʼun autre dossier
– commutation entre CD, USB 1, USB 2
– arrêt de lʼappareil
5.8.1 Touches CUE 1 et CUE 2
1) Appuyez sur la touche MEMO / AUTO (9)
pour activer la mémorisation. La touche brille.
2) Soit pendant la lecture appuyez sur la touche
CUE 1 (11) lorsque le point voulu est atteint
(Fly-Cue) soit commutez sur Pause avec la
touche (20) à lʼendroit voulu, allez à lʼen-
droit exact avec la molette (16) puis appuyez
sur la touche CUE 1. Elle clignote plusieurs
fois puis brille en continu. La touche MEMO /
AUTO sʼéteint. Redémarrez la lecture si
besoin avec la touche .
3) Répétez les points 1 et 2 pour déterminer un
autre point Cue avec la touche CUE 2.
4) Avec les touches CUE 1 et CUE 2, on peut
maintenant sauter aux points Cue correspon-
dants : la lecture démarre immédiatement à
partir de chaque point Cue.
5.8.2 Touche CUE
1) Pendant la lecture dʼun titre, commutez sur
Pause avec la touche (20) lorsque lʼen-
droit où il faut revenir, est atteint. Les touches
et CUE (18) clignotent.
2) Si besoin, allez avec la molette (16) à lʼen-
droit exact (chapitre 5.7). Lʼendroit est
alors répété en continu.
3) Appuyez sur la touche CUE. Ensuite lʼendroit
est mémorisé comme point Cue, sur lʼaffi-
chage lʼindication “CUE” (L) est visible. La
touche CUE brille maintenant en continu. La
touche clignote pour inciter à démarrer la
lecture.
4) Redémarrez la lecture avec la touche .
5) Avec la touche CUE, on peut maintenant
revenir au point Cue. Lʼunité de lecture est
alors sur Pause.
6) Avec la touche , démarrez la lecture ou
maintenez la touche CUE enfoncée pour la
durée de lecture du titre. Lorsque vous relâ-
chez la touche CUE, lʼunité de lecture revient
au point Cue et passe sur Pause.
5.9 Modification de la vitesse avec
ou sans déplacement
de la hauteur tonale
La vitesse peut être modifiée avec le réglage à
glissières (15) jusquʼà ± 100%.
+100 % = vitesse doublée
-
100 % = repos
1) Sélectionnez la plage de réglage avec la
touche PITCH (14). La ligne de texte (O)
indique brièvement le réglage :
“Pitch 8 %”, “Pitch 16 %”, “Pitch 100” ou

“Pitch Off” si le réglage de vitesse est à nou-
veau désactivé et le titre est lu à vitesse nor-
male.
2) Réglez la vitesse avec le réglage. Lʼaffichage
indique la déviation en pourcentage de la
vitesse normale en haut à droite (I). Le nom-
bre de beats (Q) se modifie en conséquence.
3) La hauteur tonale se modifie également pro-
portionnellement avec la vitesse. Si la hau-
teur tonale doit rester constante, appuyez sur
la touche MT (24). Sur lʼaffichage “MT” (S)
est visible. Pour désactiver la fonction, ap -
puyez une nouvelle fois sur la touche MT.
5.10 Pitch Bend – adaptation du rythme
entre deux morceaux de musique
On peut faire coïncider le rythme de deux mor-
ceaux de musique avec le même tempo ; ainsi,
lors du passage dʼune unité de lecture à lʼautre,
le rythme pour la danse nʼest pas interrompu.
1) Tout dʼabord, adaptez le tempo du morceau
de musique sur lequel il faut entrer, au tempo
du morceau de musique en cours avec le
réglage de vitesse (15). Pour ce faire, avec le
réglage à glissières, réglez le même nombre
de beats par minute, voir indication (Q) en
bas à droite sur lʼaffichage.
2) Avec les touches PITCH BEND (22), posi-
tionnez les beats du morceau de musique sur
lequel il faut entrer, avec précision sur les
beats du morceau en cours : tant que la
touche +ou
-
est enfoncée, le titre va plus
vite ou plus lentement. Ainsi les beats se
déplacent selon les beats du morceau en
cours.
3) On peut également déplacer les beats en
tournant la molette (16).
5.11 Création dʼeffets
5.11.1 Effets Scratch
Pour produire des effets Scratch (correspond à
la rotation manuelle dʼun plateau de platine
disque), appuyez sur la touche SCRATCH (6) et
tournez la molette (16) vers lʼavant ou lʼarrière.
La LED de la touche brille, la ligne de texte (O)
indique “SCRATCH”. Pour désactiver lʼeffet,
appuyez une nouvelle fois sur la touche
SCRATCH.
5.11.2 Effets bourdonnement
Si la fonction Master Tempo (hauteur tonale
constante) est activée [affichage “MT” (S)], dés-
activez-la avec la touche MT (24). En tournant la
molette (16) dans un sens ou lʼautre, la vitesse
de lecture est augmentée et diminuée en alter-
nance. On obtient ainsi un effet bourdonnement.
5.11.3 Effets bégaiement
On peut utiliser les points Cue mémorisés avec
les touches CUE (18), CUE 1 et CUE 2 (11)
[chapitre 5.8] pour produire des effets
bégaiements intéressants : par plusieurs brèves
pressions sur une de ces touches, on obtient un
effet bégaiement. Il est dʼautant plus puissant
que le point Cue est adapté (par exemple utilisa-
tion dʼinstrument ou début dʼun mot).
5.11.4 Lecture dʼune boucle continue
On peut répéter un segment donné dʼun titre
sous forme de boucle continue.
1) Avec la touche (20), commutez sur lec-
ture. Lorsque le point de départ voulu de la
boucle est atteint (point a, schéma 6), ap -
puyez sur la touche A (19).
Schéma 6 lecture dʼune boucle continue
Remarque : pour déterminer avec précision le point
de départ sur 1 frame, passez tout dʼabord sur
Pause avec la touche , allez à lʼendroit exact
avec la molette (16) puis appuyez sur la touche A.
2) Lorsque lors de la lecture, la fin souhaitée du
segment est atteinte (point b sur le schéma
6), appuyez sur la touche B / EDIT (19). Le
segment entre les points est répété en
continu. Tant quʼune boucle continue est lue,
lʼaffichage indique “RELOOP” (J).
3) Pour déplacer le point de fin ou le régler avec
précision sur 1 frame, appuyez sur la touche
B / EDIT pendant la lecture. Lʼaffichage (P)
indique maintenant lʼindex temps du point de
fin. Avec la molette (16), déplacez le point de
fin et confirmez-le avec la touche B / EDIT.
4) Le segment de la boucle peut également être
divisé ou prolongé dʼun multiple. Pendant la
lecture de la boucle, avec la touche ou
(21), sélectionnez la modification de la lon-
gueur. La ligne de texte (O) indique le
réglage :
TRIM : 1⁄32, 1⁄16, 1⁄8, 1⁄4, 1⁄2, 1⁄1, 2⁄1, 4⁄1, 8⁄1, 16⁄1, 32⁄1
5) Pour quitter la boucle et reprendre la lecture
du titre, appuyez sur la touche RELOOP /
EXIT (19). Pour un nouveau démarrage de la
boucle, appuyez à nouveau sur la touche
RELOOP / EXIT.
Schéma 7 fin dʼune boucle et redémarrage
Remarque : une boucle mémorisée est effacée dès
que le titre suivant est atteint pendant la lecture ou
quʼun autre titre est sélectionné avec la touche ou
(21).
Segment fraction ou multiple d’une longueur de beats
La longueur dʼun segment pour la lecture dʼune
boucle peut être réglée pour des titres au rythme
4⁄4exactement sur une fraction ou un multiple
dʼune longueur de beats :
1⁄32, 1⁄16, 1⁄8, 1⁄4, 1⁄2, 1⁄1, 2⁄1, 4⁄1, 8⁄1, 16⁄1, 32⁄1
1) Maintenez la touche MEMO / AUTO (9) enfon-
cée et avec la molette (16), réglez la lon-
gueur. Elle est affichée dans la ligne de texte
(O), par exemple “AUTO 2 / 1” : deux lon-
gueurs de beats. Une fois ce réglage effec-
tué, la touche MEMO / AUTO brille pour indi-
quer que le point de fin dʼun segment de
boucle est automatiquement fixé.
2) Déterminez le point de départ avec la touche
A (19). La boucle continue est simultanément
démarrée et le point de fin est déterminé en
fonction du réglage de la longueur.
3) On peut, ultérieurement, modifier la longueur
du segment de la boucle comme décrit pré-
cédemment (point 3 ou 4).
5.12 Création dʼune suite personnelle
de titres
Si seuls des titres sélectionnés doivent être lus
dans un ordre déterminé, on peut programmer
une suite avec 99 titres au plus.
5.12.1 Mémoriser et lire une suite de titres
1) Si un titre est en cours de lecture, passez sur
Pause avec la touche (20).
2) Avec la touche PROG (13), passez en mode
programmation. Lʼaffichage de durée (P)
passe sur lʼindication du premier emplace-
ment de mémoire “P
-
01”. Lʼindication “PG”
(R) clignote rapidement.
Conseil : si vous devez quitter ce mode immédia-
tement, maintenez la touche PROG enfoncée
jusquʼà ce que lʼaffichage indique à nouveau la
durée (P).
3) Sélectionnez le premier titre à mémoriser
avec la touche ou (21) [chapitre 5.1,
points 4 et 5].
4) Pour confirmer la sélection de titre, appuyez
sur la touche PROG. Le prochain emplace-
ment de mémoire “P
-
02” est affiché.
5) Répétez les points 3 et 4 jusquʼà ce que tous
les titres de la suite soient programmés. Si 99
titres sont mémorisés, et si vous essayez
dʼen mémoriser un autre, le message “FULL”
sʼaffiche.
6) Pour lire la suite de titres, appuyez sur la
touche . Lʼaffichage “PG” (R) clignote len-
tement. Les titres sont lus selon le mode
de fonctionnement sélectionné (chapitre
5.4.1). Pour sélectionner dʼautres titres de la
suite, appuyez (plusieurs fois) sur la touche
ou .
7) Pour revenir au mode normal de lecture, pas-
sez en mode Pause avec la touche et
maintenez la touche PROG enfoncée jusquʼà
ce que lʼaffichage “PG” (R) ne clignote plus.
Pour lire une nouvelle fois la suite de titres,
mettez lʼappareil sur Pause, appuyez sur la
touche PROG jusquʼà ce que lʼaffichage “PG”
clignote à nouveau. Démarrez la suite de
titres avec la touche .
Conseil : tant que lʼaffichage “PG” clignote ou brille tout
le temps, la suite de titres est consultable. Elle est effa-
cée par exemple lorsquʼon éteint lʼappareil.
5.12.2 Vérification de la suite de titres
1) Si un titre est lu, passez tout dʼabord en mode
Pause avec la touche .
2) Si lʼindication “PG” clignote maintenant, ap -
puyez une fois sur la touche PROG. Si lʼindi-
cation “PG” brille en continu, appuyez deux
fois sur la touche PROG.
3) Avec la touche ou , sélectionnez les uns
après les autres les emplacements de
mémoire (P
-
01 … P
-
99). Le titre mémorisé
est affiché dans la ligne de texte (O).
4) Appuyez sur la touche pour lire la suite de
titres.
5.12.3
Compléter ou effacer une suite de titres
1) Si un titre est en cours de lecture, passez tout
dʼabord sur Pause avec la touche .
2) Si lʼindication “PG” clignote, maintenez la
touche PROG enfoncée jusquʼà ce que “PG”
ne clignote plus.
3) Appuyez brièvement sur la touche PROG de
telle sorte que “PG” clignote rapidement et
que lʼindication de temps (P) commute sur
lʼaffichage du prochain emplacement de
mémoire libre “P
-
…”.
PLAY c
LOOP
1. 2.
RELOOP / EXITRELOOP / EXIT
ab
1.
PLAY PLAY
LOOP
2.
AB / EDIT
20
F
B
CH

21
F
B
CH
4) Pour effacer, maintenez la touche PROG
enfoncée jusquʼà ce que lʼaffichage indique à
nouveau la durée (P) ou pour compléter,
sélectionnez un autre titre avec la touche
ou et confirmez avec la touche PROG.
Pour lire la suite de titres complétée, appuyez
sur la touche .
6 Démarrage électrique
La fonction démarrage / Pause de la touche
(20) peut être commandée à distance depuis
une table de mixage équipée de la fonction
démarrage électrique. Reportez-vous au chapi-
tre 4, point 3 pour le branchement à la table de
mixage. Réglez le potentiomètre à glissières
(34) sur la face arrière du lecteur sur le démar-
rage électrique de la table de mixage.
LOCK =
commande avec un interrupteur marche /
arrêt
Cette position doit être sélectionnée pour la
majorité des tables de mixage de la gamme
“img Stage Line”. Lorsque le fader est ouvert,
un interrupteur sur la table, démarrant la lec-
ture, se ferme. Lorsque le fader est fermé,
lʼinterrupteur sʼouvre, lʼunité de lecture passe
sur Pause.
Schéma 8 démarrage électrique via un interrup-
teur marche / arrêt
TACT = commande par un bouton poussoir
momentané
Si le bouton poussoir momentané est activé
pour la première fois lorsque le fader est
ouvert, la lecture démarre. Si le bouton pous-
soir momentané est activé pour la deuxième
fois en fermant le fader, lʼunité de lecture
passe sur Pause.
Schéma 9 démarrage électrique via un bouton
poussoir momentané
CUE PLAY = gestion via une impulsion
En ouvrant le fader, la lecture commence, via
une brève impulsion de commande de la
table de mixage, à partir du début du titre
(point Auto Cue, chapitre 5.4.1) ou à par-
tir du point Cue déterminé avec la touche
CUE (18) [chapitre 5.8.2]. En fermant le
fader, lʼunité de lecture revient à ce point de
départ, via une autre impulsion de com-
mande et là passe sur Pause.
Schéma 10 démarrage électrique via
une impulsion de commande
7 Actualisation du Firmware
Si une nouvelle version est disponible sur Inter-
net, vous pouvez actualiser la version de votre
appareil :
1) Sur la page dʼaccueil de www.monacor.com,
dans la rubrique “SUPPORT”, cliquez sur
“Software-updates”. Faites défiler ensuite
vers le bas jusquʼà atteindre “FIRMWARE
DOWNLOADS”.
Cliquez ensuite sur le symbole devant “CD-
292USB” pour télécharger le fichier.
Copiez le fichier téléchargé sur une clé USB.
2) Eteignez le CD-292USB avec lʼinterrupteur
secteur (28).
3) Mettez la clé USB comportant la nouvelle
version dans la prise USB 1 gauche (26).
4) Sur lʼunité gauche de lecture, maintenez la
touche PROG (13) enfoncée et rallumez lʼap-
pareil. Ne relâchez la touche PROG que
lorsque sur lʼaffichage gauche, “UP dA t E”
est visible.
5) Une fois le processus de reconnaissance
effectué, “Ready” sʼaffiche dans la ligne de
texte (O). Appuyez sur la touche (20) pour
démarrer lʼactualisation du firmware. Selon
les indications du bargraphe (H) et de la ligne
de texte, vous pouvez suivre le processus
dʼactualisation. Lorsque “Finish” sʼaffiche, le
firmware est actualisé.
6) Eteignez lʼappareil puis rallumez-le.
8 Entretien de lʼappareil
Protégez lʼappareil de la poussière, des vibra-
tions, de lʼhumidité et de la chaleur (plage de tem-
pérature de fonctionnement autorisée 0 – 40 °C).
Pour le nettoyer, utilisez uniquement un chiffon
sec et doux, en aucun cas, de produits chi-
miques ou dʼeau.
Remarques sur les coupures du son et les
erreurs de lecture
La fumée de cigarettes et la poussière sʼintro-
duisent facilement dans les ouvertures du lec-
teur et se déposent sur lʼoptique du système de
lecture laser. Cela peut générer des erreurs de
lecture et des coupures de son. Dans ce cas,
confiez impérativement le nettoyage du lecteur à
un technicien spécialisé. Cette opération est à la
charge de lʼutilisateur, même lorsque lʼappareil
est sous garantie !
9 Caractéristiques techniques
Bande passante : . . . . . 20 – 20 000 Hz
Taux de distorsion : . . . < 0,1 %
Séparation des canaux : > 80 dB
Plage dynamique : . . . . > 80 dB
Rapport signal / bruit : . . > 80 dB
Sortie : . . . . . . . . . . . . . 2 V (niveau ligne),
prises RCA
Systèmes
de fichiers lisibles : . . . . NTFS, FAT, HFS+
Mémoire anti-chocs : . . 15 s
Alimentation : . . . . . . . . 230 V~ / 50 Hz
Consommation : . . . . . . 40 VA max.
Température fonc. : . . . 0 – 40 °C
Dimensions (L × H × P)
Unité de commande : 482 × 90 × 85 mm,
2 U (unités)
Unité de lecture : . . . 482 × 90 × 260 mm,
2 U (unités)
Poids : . . . . . . . . . . . . . 6,5 kg
Tout droit de modification réservé.
START /
PAUSE CUE
PLAY
LOCK
TACT
1.×CuePlay
2.×Pause
START /
PAUSE CUE
PLAY
LOCK
TACT
1.×Start
2.×Pause
START /
PAUSE CUE
PLAY
LOCK
TACT
Start
Pause
Notice dʼutilisation protégée par le copyright de MONACOR
®
INTERNATIONAL GmbH & Co. KG.
Toute reproduction même partielle à des fins commerciales est interdite.

22
IA pagina 3, se aperta completamente, vedrete
tutti gli elementi di comando e i collegamenti
descritti.
Indice
1 Elementi di comando e collegamenti 22
1.1 Unità di comando . . . . . . . . . . . . . . . . . 22
1.2 Unità lettori lato frontale . . . . . . . . . . . . 23
1.3 Unità lettori lato posteriore . . . . . . . . . . 23
2 Avvertenze di sicurezza . . . . . . . . . . . 23
3 Possibilità dʼimpiego . . . . . . . . . . . . . 23
4 Collocare e collegare lʼapparecchio .24
5 Funzionamento . . . . . . . . . . . . . . . . . . 24
5.1 Riprodurre brani musicali . . . . . . . . . . . 24
5.2 Caricare una playlist . . . . . . . . . . . . . . . 24
5.3 Visualizzazione delle informazioni
sui titoli e modo di riposo . . . . . . . . . . . 24
5.3.1 Visualizzazione grafica della durata . 24
5.3.2 Numero delle battute al minuto . . . . . 25
5.3.3 Modo di riposo . . . . . . . . . . . . . . . . . . 25
5.4 Scegliere il modo di funzionamento . . . 25
5.4.1 Riproduzione continua e
riproduzione di titoli singoli . . . . . . . . 25
5.4.2 Funzionamento relay –
avvio automatico dellʼaltro lettore
alla fine di un titolo . . . . . . . . . . . . . . . 25
5.5 Riproduzione dellʼinizio di un titolo . . . . 25
5.6 Avanzamento e ritorno veloce . . . . . . . 25
5.7 Posizionarsi con esattezza
su un determinato punto . . . . . . . . . . . . 25
5.8 Salto ad un determinato punto . . . . . . . 25
5.8.1 Tasti CUE 1 e CUE 2 . . . . . . . . . . . . . 25
5.8.2 Tasto CUE . . . . . . . . . . . . . . . . . . . . . 25
5.9 Modificare la velocità con o senza
spostamento dellʼaltezza del suono . . . 25
5.10 Pitch Bend – adattare il ritmo
fra due brani musicali . . . . . . . . . . . . . . 26
5.11 Generare degli effetti . . . . . . . . . . . . . . 26
5.11.1 Effetti scratch . . . . . . . . . . . . . . . . . . . 26
5.11.2 Effetti di trascinamento
(dragging effects) . . . . . . . . . . . . . . . 26
5.11.3 Effetti bop (balbuzie) . . . . . . . . . . . . . 26
5.11.4 Riprodurre un loop senza fine . . . . . . 26
5.12 Compilare una sequenza
individuale di titoli . . . . . . . . . . . . . . . . . 26
5.12.1 Programmare e avviare
una sequenza di titoli . . . . . . . . . . . . . 26
5.12.2 Controllare la sequenza . . . . . . . . . . 26
5.12.3 Completare o
cancellare una sequenza . . . . . . . . . 26
6 Avviamento con fader . . . . . . . . . . . . 27
7 Aggiornare il firmware . . . . . . . . . . . . 27
8 Manutenzione . . . . . . . . . . . . . . . . . . . 27
9 Dati tecnici . . . . . . . . . . . . . . . . . . . . . 27
1 Elementi di comando
e collegamenti
1.1 Unità di comando
1Unità di comando del lettore 1
per particolari vedi fig. 2
2Tasto RELAY per lʼavvio automatico dellʼaltro
lettore alla fine del titolo (Capitolo 5.4.2)
3Unità di comando del lettore 2
per particolari vedi fig. 2
4Tasto OPEN / CLOSE per aprire e chiudere
il cassetto CD [come i tasti (27, 29) sul-
lʼunità lettori]
5Tasto CD / USB per cambiare fra CD e memo-
ria USB: il lettore deve essere messo su
pausa per mezzo del tasto (20).
Se sono collegate due memorie USB, dopo
aver premuto il tasto CD / USB, con il tasto
o (21) scegliere fra CD, USB 1 e USB 2. La
riga di testo (O) segnala la scelta. Alla fine,
premere il tasto CD / USB per confermare.
6Tasto SCRATCH per attivare e disattivare la
funzione scratch
Con la funzione attivata (il tasto è illuminato),
con la manopola (16) si possono generare
degli effetti scratch.
7Tasto TIME per modificare lʼindicazione dei
tempi (H, P)
se è visualizzato “Remain” (G)
tempo residuo del titolo attuale
se è visualizzato “Elapse” (E)
tempo già trascorso del titolo attuale
se è visualizzato “Total Remain”
tempo residuo dellʼintero CD
(non con funzionamento MP3)
Con funzionamento MP3, tenendo premuto il
tasto TIME, con il tasto o (21) si può
visualizzare nella riga di testo (O) il titolo,
lʼalbo, lʼinterprete (tag ID3) o il nome del file.
8Tasto CONT / LIST
1. per cambiare fra riproduzione di un titolo
singolo [si vede “Single” (C)] e riprodu-
zione continua [si vede “Cont.” (D)]
2. per caricare delle playlist (Cap. 5.2)
9Tasto MEMO / AUTO
1. per memorizzare dei punti cue per mezzo
dei tasti CUE 1 e CUE 2 (11)
2. per riprodurre come loop una parte del
titolo della lunghezza di un multiplo o di
una frazione della lunghezza di una battuta
(Capitolo 5.11.4)
10 Display, per particolari vedi fig. 3
Ase sopra le cifre è visualizzato “TRACK”:
numero del titolo (nella cartella selezio-
nata);
se sotto le cifre è visualizzato “FOLDER”:
numero della cartella selezionata
BSimbolo di riproduzione
CVisualizzazione “Single”: segnala il modo
di funzionamento di riproduzione di titoli
singoli
DVisualizzazione “Cont.”: segnala il modo di
funzionamento di riproduzione continua
dei titoli
EVisualizzazione “Elapse”: segnala lʼindica-
zione del tempo già trascorso di un titolo
FVisualizzazione “Total”: segnala, insieme
alla visualizzazione “Remain” (G) lʼindica-
zione del tempo residuo del CD
(non con funzionamento MP3)
GVisualizzazione “Remain”: segnala lʼindi-
cazione del tempo residuo di un titolo. Con
la visualizzazione “Total Remain”, è indi-
cato il tempo residuo del CD.
HIndicazione a barre per rappresentare il
tempo relativo del titolo
IVisualizzazione della deviazione dalla
velocità normale come valore percentuale
JVisualizzazione “RELOOP”: segnala la
riproduzione di un loop senza fine
KVisualizzazione “CD” o “USB”: indica se è
selezionato un CD, il contatto USB 1 (26) o
USB 2 (30). Se è selezionato il contatto
USB 2, lʼindicazione “USB” lampeggia.
LVisualizzazione “CUE”: si vede quando il
lettore si trova in pausa sul punto cue
(Capitolo 5.4.1 e 5.8.2).
MCon funzionamento MP3, in questo campo
è indicato se nella riga di testo (O) è visua-
lizzato il nome del titolo, dellʼalbo o dellʼar-
tista del titolo di musica. Se non si vede
nessuna di queste indicazioni, significa
che sarà visualizzato il nome del file
(Capitolo 5.3).
NNumero dei titoli sul CD;
con funzionamento MP3:
numero dei titoli nella cartella selezionata
[indicazione “TRACK” sopra le cifre (A)]
oppure numero delle cartelle [indicazione
“FOLDER” sotto le cifre (A)]
ORiga di testo per informazioni supplemen-
tari
PVisualizzazione della durata, vedi anche
pos. E e G
QVisualizzazione del numero di battute al
minuto
RVisualizzazione “PG”: lampeggia se si pro-
gramma o riproduce una sequenza indivi-
duale di titoli
SVisualizzazione “MT” (Master-Tempo): se -
gnala la funzione per mantenere costante
lʼaltezza del suono (Capitolo 5.9)
11 Tasti CUE 1 e CUE 2
1. per memorizzare due punti cue [possibile
anche durante la riproduzione; per memo-
rizzare premere prima il tasto MEMO /
AUTO (9)]
2. per saltare sui punti cue memorizzati
12 Tasto FOLDER per il funzionamento MP3
1. per cambiare fra lʼindicazione del nome e
della cartella nella riga di testo (O)
A seconda dellʼimpostazione scelta, sce-
gliere un titolo o una cartella con i tasti e
(21).
2. per caricare delle playlist (Cap. 5.2)
3. per selezionare una partizione su un disco
rigido collegato (Cap. 5.1)
13 Tasto PROG per compilare e riprodurre una
sequenza individuale di titoli (Capi-
tolo 5.12)
14 Tasto PITCH per attivare / disattivare il regola-
tore di velocità (15) e per scegliere il campo
di regolazione della velocità (8 %, 16 % o
100 %)
La riga di testo (O) indica brevemente lʼimpo-
stazione scelta (Pitch 8 %, 16 %, 100, off).
15 Cursore per modificare la velocità di riprodu-
zione [senza modificare lʼaltezza del suono
se è acceso il tasto MT (24)]
La velocità può essere modificata solo se il
tasto PITCH (14) è acceso.
16 Manopola REV / FWD
–per lʼavanzamento e ritorno veloce, se è
stato premuto il tasto SEARCH (17)
–per generare degli effetti scratch, se è
stato premuto il tasto SCRATCH (6)

23
I
–per la funzione “Pitch Bend” durante la
riproduzione di un titolo (Capitolo 5.10)
–per posizionarsi con esattezza su un deter-
minato punto se il lettore è messo su
pausa
–con il tasto o (21) premuto, per sce-
gliere velocemente dei titoli [indicazione
“TRACK” sopra le cifre (A)] o delle cartelle
[indicazione “FOLDER” sotto le cifre (A)]
17 Tasto SEARCH per attivare e disattivare
lʼavanzamento / ritorno veloce con la mano-
pola (16)
18 Tasto CUE per riprodurre lʼinizio di un titolo
(Cap. 5.5) e per saltare indietro sul un
punto determinato in precedenza (Cap.
5.8.2)
19 Tasti per memorizzare e riprodurre una loop
senza fine
Tasto A per determinare il punto dʼinizio della
parte per il loop senza fine
Tasto B / EDIT per determinare il punto finale
del loop e nello stesso tempo per avviare il
loop;
per spostare il punto finale, premere nuo-
vamente il tasto e impostare il punto finale
con la manopola (16)
Taste RELOOP / EXIT per uscire dal loop
oppure per riprodurre il loop unʼaltra volta
20 Tasto per avviare un titolo e per cambiare
fra riproduzione e pausa
21 Tasti e
1. per la scelta di un titolo, se sopra le cifre
(A) è indicato “TRACK”:
Tasto per scegliere il titolo successivo
Tasto per saltare allʼinizio del titolo
attuale. Premendo più volte il tasto , si
salta indietro sempre di un titolo.
Se si tiene premuto uno dei tasti, i titoli si
possono scegliere rapidamente con la
manopola (16).
2. con funzionamento MP3 per scegliere una
cartella, se sotto le cifre (A) è indicato
“FOLDER” [commutabile tramite il tasto
FOLDER (12)]
Se si tiene premuto uno dei tasti, le cartelle
si possono scegliere rapidamente con la
manopola (16).
3. per scegliere un CD o una memoria USB,
vedi anche il tasto CD / USB (5)
4. per frazionare o moltiplicare la parte del
titolo di un loop senza fine (Capitolo
5.11.4)
5. con funzionamento MP3 e con il tasto
TIME (7) tenuto premuto, per visualizzare
nella riga di testo (O) il titolo, lʼalbo, lʼinter-
prete (tag ID3) o del nome del file
6. per scegliere una playlist (Capitolo 5.2)
7. per selezionare una partizione su un disco
rigido collegato (Cap. 5.1)
22 Tasti PITCH BEND per adattare il ritmo del
titolo attuale al ritmo del brano riprodotto sul-
lʼaltro lettore (Capitolo 5.10)
23 Tasto TAP per il modo manuale di contare
del beatcounter e per ritornare al modo auto-
matico (Capitolo 5.3.2)
24 Tasto MT (Master-Tempo) per attivare e
disattivare la funzione per lʼaltezza costante
del suono (Capitolo 5.9)
1.2 Unità lettori lato frontale
25 Cassetto CD del lettore 1
26 Contatto USB 1 per inserire una chiavetta
USB o per collegare un disco rigido
27 Tasto OPEN / CLOSE per aprire e chiudere
il cassetto CD 1 [come il tasto (4) sullʼunità
di comando]
28 Interruttore on / off POWER con spia sovra-
stante di funzionamento (LED rosso)
29 Tasto OPEN / CLOSE per aprire e chiudere
il cassetto CD 2 [come il tasto (4) sullʼunità
di comando]
30 Contatto USB 2 per inserire una chiavetta
USB o per collegare un disco rigido
31 Cassetto CD del lettore 2
1.3 Unità lettori lato posteriore
32 Uscita audio LINE OUT del lettore 2 per il col-
legamento con lʼingresso line, p. es. di un
amplificatore o di un mixer
33 Presa jack 3,5 mm START / PAUSE del let-
tore 2 per il telecomando della funzione
Start / Pausa da un mixer
34 Selettore per il tipo di telecomando tramite le
prese START / PAUSE (33, 38)
(Capitolo 6)
Posizione LOCK
per il comando tramite un interruttore on /
off
Posizione TACT
per il comando tramite un pulsante
Posizione CUE / PLAY
Tramite un impulso di comando del mixer,
il lettore si avvia dal punto cue aprendo il
fader del mixer [punto auto-cue oppure
impostato con il tasto CUE (18)], e chiu-
dendo il fader, il lettore ritorna sul punto
cue.
35 Presa per il collegamento dellʼunità di co -
mando:
collegare con la presa REMOTE CONTROL
CONNECT TO MAIN UNIT 2 usando uno dei
cavi di collegamento in dotazione
36 Cavo per il collegamento con una presa di
rete (230 V~ / 50 Hz)
37 Presa per il collegamento dellʼunità di co -
mando:
collegare con la presa REMOTE CONTROL
CONNECT TO MAIN UNIT 1 usando uno dei
cavi di collegamento in dotazione
38 Presa jack 3,5 mm START / PAUSE del let-
tore 1 per il telecomando della funzione
Start / Pausa da un mixer
39 Uscita audio LINE OUT del lettore 1 per il col-
legamento con lʼingresso line, p. es. di un
amplificatore o di un mixer
2 Avvertenze di sicurezza
Lʼapparecchio è conforme a tutte le direttive rile-
vanti dellʼUE e pertanto porta la sigla .
Si devono osservare assolutamente anche i
seguenti punti:
GAttenzione! Con il cassetto CD aperto, non
guardare mai nella fessura per il CD. I raggi
laser eventualmente uscenti possono provo-
care dei danni agli occhi.
G
Usare lʼapparecchio solo allʼinterno di locali e
proteggerlo dallʼacqua gocciolante e dagli
spruzzi
dʼacqua, da alta umidità dellʼaria e dal
calore (temperatura dʼimpiego ammessa fra
0 e 40 °C).
GNon depositare sullʼapparecchio dei conteni-
tori riempiti di liquidi, p. es. bicchieri.
GNon mettere in funzione lʼapparecchio e stac-
care subito la spina rete se:
1. lʼapparecchio o il cavo rete presentano dei
danni visibili;
2. dopo una caduta o dopo eventi simili sussi-
ste il sospetto di un difetto;
3. lʼapparecchio non funziona correttamente.
Per la riparazione rivolgersi sempre ad unʼoffi-
cina competente.
GIl cavo rete, se danneggiato, deve essere
sostituito solo da un laboratorio specializzato
GStaccare il cavo rete afferrando la spina,
senza tirare il cavo.
GPer la pulizia usare solo un panno morbido,
asciutto; non impiegare in nessun caso acqua
o prodotti chimici.
GNel caso dʼuso improprio, di collegamenti sba-
gliati, dʼimpiego scorretto o di riparazione non a
regola dʼarte dellʼapparecchio, non si as sume
nessuna responsabilità per eventuali danni
consequenziali a persone o a cose e non si
assume nessuna garanzia per lʼapparecchio.
Nello stesso modo non si assume nessuna
responsabilità per la perdita di dati e per i rela-
tivi danni consequenziali causati da impiego
sbagliato o da un difetto dellʼapparecchio.
3 Possibilità dʼimpiego
Il lettore CD / MP3 CD-292USB con due lettori è
stato realizzato specialmente per il settore DJ
professionale. Molte funzioni sono previste esat-
tamente per questo campo dʼimpiego, come
p. es. la riproduzione di titoli singoli, il beatcoun-
ter automatico, la riproduzione senza interru-
zione di un loop senza fine, la modifica della
velocità senza cambiamento dellʼaltezza del
suono, la memoria anti-shock.
Con questo apparecchio si possono ripro-
durre CD audio, CD masterizzati in proprio (CD-
R audio) nonché CD con titoli nel formato MP3.
Nel caso di CD riscrivibili (CD-RW) è possibile
che ci siano dei problemi a seconda del tipo di
CD, del masterizzatore usato e del programma
di masterizzazione.
Tramite i contatti USB si possono riprodurre
anche file MP3 da un disco rigido o da una chia-
vetta USB. I lettori possono accedere ai contatti
USB in modo indipendente, e così è possibile il
funzionamento anche con una sola memoria USB.
Se si desidera eliminare lʼapparecchio
definitivamente, consegnarlo per lo
smaltimento ad unʼistituzione locale per
il riciclaggio.
AVVERTIMENTO Lʼapparecchio funziona con
pericolosa tensione di rete.
Non intervenire mai personal-
mente al suo interno. Esiste il
pericolo di una scarica elettrica.

4 Collocare e collegare
lʼapparecchio
Lʼunità di comando e lʼunità lettori sono previste
per il montaggio in un rack per apparecchi della
larghezza di 482 mm (19″), ma si possono collo-
care anche liberamente su un tavolo. Lʼunità let-
tori deve sempre essere collocata su un piano
perfettamente orizzontale, mentre lʼunità di
comando può essere montata a piacere, p. es.
anche inclinata. Per il montaggio in un rack, sia
lʼunità di comando sia lʼunità lettori richiedono
2 U (1 U = 1 unità di altezza = 44,45 mm).
Prima di eseguire il collegamento di apparecchi
o di modificare dei collegamenti esistenti, spe-
gnere il lettore CD / MP3 e gli apparecchi da col-
legare.
1) Collegare lʼunità di comando e lʼunità lettori
per mezzo dei due cavi di collegamento in
dotazione:
Collegare la presa CONNECT TO REMOTE
CONTROL 2 (35) dellʼunità lettori con la
presa REMOTE CONTROL CONNECT TO
MAIN UNIT 2 dellʼunità di comando e
collegare la presa CONNECT TO REMOTE
CONTROL 1 (37) dellʼunità lettori con la
presa REMOTE CONTROL CONNECT TO
MAIN UNIT 1 dellʼunità di comando.
2) Collegare le due uscite dei segnali LINE OUT
(32, 39) ognuna con un ingresso con livello
line, p. es. di un mixer o di un amplificatore
(indicazione possibile: Line, CD, Aux).
3) I due lettori possono essere avviati e messi
su pausa tramite un mixer con avviamento
fader. In questo caso collegare le prese
START / PAUSE (33, 38) con le relative prese
del mixer servendosi di due cavi con jack
3,5 mm. Sul CD-292USB si deve impostare il
tipo dʻavviamento con fader del mixer; vedere
in proposito Capitolo 6.
4) Alla fine inserire la spina del cavo (36) in una
presa di rete (230 V~ / 50 Hz).
5 Funzionamento
Il funzionamento dei due lettori è perfettamente
identico. Accendere lʼapparecchio con lʼinterrut-
tore POWER (28). Il display (10) indica breve-
mente “boot” (avvio) e saluta con WELCOME.
Se è inserito un CD, dopo il caricamento dei dati,
sul display si vedono delle informazioni sul CD.
Se nel lettore con cʼè nessun CD, è indicato “no
dISC” (nessun CD).
Dopo lʼuso spegnere lʼapparecchio. Le
seguenti impostazioni rimangono memorizzate
per lʼuso successivo:
1. il modo di funzionamento scelto (riproduzione
di titoli singoli / riproduzione continua, Capi-
tolo 5.4.1)
2. lʼindicazione scelta per i tempi (tempo resi-
duo / tempo già trascorso, Capitolo 5.3)
3. il campo scelto per la regolazione della velo-
cità (Capitolo 5.9)
5.1 Riprodurre brani musicali
1) Per inserire un CD, aprire il cassetto CD (25,
31) con il tasto (4, 27 o 29). Inserire il CD
con la scritta rivolta verso lʼalto e richiudere il
cassetto con il tasto .
2) In più o in alternativa si può inserire una chia-
vetta USB nei contatti USB (26, 30) oppure si
può collegare un disco rigido con i contatti
USB. Per cambiare fra CD e memoria USB
tener premuto il tasto CD / USB (5). Il lettore
deve trovarsi in pausa; eventualmente pre-
mere il tasto (20).
Se sono collegate due memorie USB,
dopo aver premuto il tasto CD / USB selezio-
nare con il tasto o (21) la sorgente dei
segnali (CD, USB 1, USB 2). La riga di testo
(O) visualizza la scelta. In questo caso si
esclude la sorgente di segnali attualmente
scelta. Confermare la scelta con il tasto CD /
USB.
Note
1. La sorgente scelta dei segnali è indicata anche
nel campo K del display:
“CD” = è scelto lʼunità lettori CD
“USB” visualizzato costantemente = USB 1
“USB” lampeggia = USB 2
2. Un disco rigido deve essere alimentato da un suo
alimentatore se la sua corrente assorbita supera
i 500 mA.
3. Se su un disco rigido sono presenti varie parti-
zioni, possono essere scelte come segue:
a) Tener premuto il tasto FOLDER (12) finché sul
display si vede “PA-SEL” (Partition Selection).
b) Selezionare la partizione con il tasto o .
La riga di testo (O) visualizza il relativo nome.
c) Per confermare, premere il tasto FOLDER.
3) Per avviare il primo titolo, premere il tasto
(20). Durante la riproduzione, il display indica
il simbolo (B). La riproduzione può essere
interrotta e riavviata in qualsiasi momento per
mezzo del tasto .
4) Per scegliere un altro titolo usare i tasti e
.
Tasto : saltare al titolo successivo
Tasto : saltare allʼinizio del titolo attuale.
Premendo il tasto più volte, si torna indietro
sempre di un titolo.
Se si tiene premuto uno dei tasti, i titoli si pos-
sono scegliere rapidamente con lʼaiuto della
manopola (16).
5) Se con funzionamento MP3, i titoli sono inse-
riti in varie cartelle, per scegliere una cartella
premere il tasto FOLDER (12). Il display
indica “FO-SEL” (Folder Selection) e la riga
di testo (O) visualizza il nome della cartella.
Le cifre (A) in alto alla sinistra del display indi-
cano ora il numero della cartella, e le cifre (N)
sotto “Total” il numero delle cartelle presenti.
Con il tasto o scegliere la cartella. Se si
tiene premuto uno dei tasti, le cartelle si pos-
sono scegliere rapidamente con lʼaiuto della
manopola (16).
Per confermare la scelta premere il tasto
FOLDER; il display visualizza nuovamente la
durata (P). Con il tasto o scegliere il
titolo nella cartella.
6) Se si deve inserire un altro CD, attivare prima
la pausa con il tasto , altrimenti non è pos-
sibile aprire il cassetto CD con il tasto .
7) Prima di spegnere lʼapparecchio, chiudere
sempre i cassetti CD con i tasti , per pro-
teggere dallo sporco i sistemi di scansione
laser. Solo allora spegnere lʼapparecchio con
lʼinterruttore on / off POWER.
5.2 Caricare una playlist
Per riprodurre una determinata scelta di file
MP3, si possono caricare nel CD-292USB delle
playlist create su un computer con lʼestensione
“wpl”, “xml” o “m3u”.
Importante: Una playlist e i relativi file MP3
devono trovarsi sulla stessa memoria. Le playlist
devono sempre essere memorizzate nella direc-
tory principale (root).
1) Se è in corso la riproduzione di un titolo, atti-
vare la pausa con il tasto (20).
2) Tener premuto il tasto CONT / LIST (8), e con
il tasto o (21) decidere quale estensione
dei file deve essere cercata. La riga di testo
(O) indica la possibile scelta (M3U Scan,
WPL Scan, XML Scan).
3) Premere il tasto FOLDER (12). Il display
indica “FO-SEL”, e la riga di testo (O) visua-
lizza il nome della prima playlist. Le cifre (A) in
alto a sinistra sul display indicano ora il
numero della playlist e le cifre (N) sotto “Total”
indicano il numero delle playlist presenti.
4) Scegliere la playlist con il tasto o .
5) Per confermare la scelta premere il tasto
FOLDER. Dopo il caricamento della lista, il
display indica nuovamente la durata (P).
6) Per avviare il primo titolo della playlist, pre-
mere il tasto . Per scegliere altri titoli della
lista, premere il tasto o oppure tenere
premuto uno di questi tasti e azionare la
manopola (16).
7) Per riprodurre i titoli senza la playlist, attivare
la pausa con il tasto . Tener premuto il
tasto CONT / LIST e premere il tasto o
(21) tante volte finché la riga di testo indica
“Folder”. Lasciando liberi i tasti, il display
indica “SCAn” e successivamente di nuovo la
durata (P). Non è più caricata nessuna play-
list.
5.3 Visualizzazione delle informazioni
sui titoli e modo di riposo
Il display (10) offre un gran numero di informa-
zioni:
1. Numero del titolo scelto (A), se sopra le cifre
si vede “TRACK”. Se sotto le cifre è indicato
“FOLDER”, viene visualizzato il numero della
cartella scelta [commutabile con il tasto FOL-
DER (12)].
2. Numero dei titoli (N) sul CD oppure, se i titoli
si trovano in varie cartelle, il numero dei titoli
nella cartella scelta.
3. Durata del titolo scelto in modo relativo (H) e
assoluto (P); i secondi sono suddivisi in 75
cosiddetti frame.
Lʼindicazione della durata può essere cam-
biata con il tasto TIME (7):
Se è visualizzato Elapse (E), è indicato il
tempo già trascorso del titolo.
Se è visualizzato Total Remain (F, G), è indi-
cato il tempo residuo dellʼintero CD (non
con funzionamento MP3).
Se è visualizzato Remain (G), è indicato il
tempo residuo del titolo.
4. Nella riga di testo (O) è visualizzato:
– per i CD audio standard con testo CD, il
nome del titolo
– per il funzionamento MP3 il nome del file
La riga di testo può essere cambiata per
visualizzare le seguenti informazioni (tag
ID3). Per fare ciò tener premuto il tasto
TIME e scegliere con il tasto o (21):
Visualizzazione (M)
TITLE = nome del titolo
ALBUM = nome dellʼalbo
ARTIST = interprete
niente = nome del file
5.3.1 Visualizzazione grafica della durata
Oltre alla visualizzazione numerica della durata
(P), il diagramma a barre (H), con la sua lun-
ghezza rappresenta la durata in modo grafico,
riferita alla durata del titolo (rappresentazione
relativa del tempo). Gli ultimi 30 secondi di un
titolo sono segnalati dalla barra con il lampeggio
in tutta la sua lunghezza, mentre gli ultimi
15 secondi sono indicati con il lampeggio più
veloce.
24
I

5.3.2 Numero delle battute al minuto
Dopo la scelta di un titolo, il beatcounter stabili-
sce automaticamente il numero delle battute al
minuto. Dopo breve tempo, il numero appare a
destra, in basso sul display (Q). Se il beatcoun-
ter non riesce a rivelare nessun valore vero
(p. es. con titoli poco dinamici), il valore può
essere stabilito anche manualmente:
1) Azionare il tasto BPM / TAP (23) alcune volte
brevemente nel ritmo della musica (per lo
meno 4 ×). Viene indicato il numero delle bat-
tute e lʼindicazione “BPM” lampeggia per
segnalare il modo manuale del conteggio.
2) Per ritornare nel modo automatico del con-
teggio, tener premuto il tasto BPM / TAP fin-
ché lʼindicazione “BPM” smette di lampeg-
giare.
5.3.3 Modo di riposo
Se i due lettori sono in pausa per più di 15 minuti,
lʼapparecchio si mette nel modo di riposo. I
sistemi di scansione laser sono disattivati e
quindi non si consumano. I display indicano
SLEEP (sonno) e tutti i tasti illuminati si spen-
gono. Azionando un qualsiasi tasto, si ritorna nel
modo precedente di funzionamento.
5.4 Scegliere il modo di funzionamento
5.4.1 Riproduzione continua e riproduzione
di titoli singoli
Per cambiare fra riproduzione di titoli singoli
[indicazione “Single” (C)] e riproduzione conti-
nua [indicazione “Cont.” (D)], premere il tasto
CONT / LIST (8).
A Con la riproduzione di titoli singoli, lʼappa-
recchio va in pausa alla fine di ogni titolo.
Questo modo è previsto in particolar modo
per applicazioni DJ. Dopo la scelta di un
titolo, il lettore si trova esattamente sul punto
dove inizia la musica (generalmente non è
lʼindice del tempo 0 : 00 : 00, ma alcuni frame
oltre, p. es.: 0 : 00 : 15). Questo punto viene
memorizzato automaticamente come punto
dʼavvio (punto auto-cue) e è indicato sul
display con CUE (L). Dopo lʼavvio del titolo,
con il tasto CUE (18) si può ritornare su tale
punto dʼavvio. Al termine della riproduzione
del titolo, lʼapparecchio va in pausa esatta-
mente sul punto dove inizia la musica del
titolo successivo. Tale punto è memorizzato
come nuovo punto dʼavvio.
B Con la riproduzione continua, tutti i titoli
sono riprodotti in successione e senza fine;
dopo lʼultimo titolo parte nuovamente il primo
titolo. Se i titoli si trovano in cartelle differenti,
si ripetono solo i titoli della cartella selezio-
nata.
5.4.2 Funzionamento relay – avvio
automatico dellʼaltro lettore alla fine
di un titolo
Alla fine di un titolo è possibile avviare automati-
camente lʼaltro lettore.
1) Con il tasto CONT / LIST (8), impostare per
entrambi i lettori la riproduzione di titoli singoli
in modo che i display segnalano “Single” (C).
2) Selezionare un titolo su ogni lettore.
3) Azionare il tasto RELAY (2). Il tasto sʼillu-
mina.
4) Con il tasto (20) avviare la riproduzione su
un lettore. Lʼaltro lettore deve esse messo su
pausa. Quando un titolo è finito, il lettore va in
pausa e sʼavvia lʼaltro lettore. Tale procedura
si ripete senza fine sino alla disattivazione del
funzionamento relay. (Per disattivarlo pre-
mere nuovamente il tasto RELAY.)
5) Durante il funzionamento relay, ad ogni punto
di un titolo, con il tasto si può passare alla
riproduzione sullʼaltro lettore.
Nota: Dopo la riproduzione di tutti i titoli di una cartella
non si passa automaticamente alla cartella successiva.
Ciò deve essere fatto sempre manualmente (Capi -
tolo 5.1, punto 5).
5.5 Riproduzione dellʼinizio di un titolo
Con il tasto CUE (18) si può riprodurre lʼinizio di
un titolo finché tale tasto è tenuto premuto. Libe-
rando il tasto, lʼapparecchio ritorna allʼinizio del
titolo e va in pausa.
1) Il lettore deve essere messo su riproduzione
di titoli singoli: indicazione “Single” (C). Se si
vede “Cont.” (D), premere il tasto CONT /
LIST (8).
2) Selezionare il titolo (Cap. 5.1, punti 4 e 5).
3) Tenendo premuto il tasto CUE, riprodurre
lʼinizio del titolo.
4) Per riprodurre il titolo, azionare il tasto (20).
5.6 Avanzamento e ritorno veloce
Se un titolo deve avanzare o ritornare veloce-
mente, premere dapprima il tasto SEARCH (17).
Nella riga di testo (O) si vede SEARCH. Girare la
manopola REV / FWD (16) nella direzione voluta.
La velocità in avanti o indietro dipende dalla
velocità di rotazione della manopola.
Note: Nel modo di pausa, dopo un avanzamento o
ritorno veloce, si ripete continuamente il punto momen-
taneo. Per terminare la ripetizione, premere breve-
mente il tasto CUE (18) [si fissa un nuovo punto cue,
Cap. 5.8.2] oppure avviare la riproduzione con il
tasto (20).
5.7 Posizionarsi con esattezza
su un determinato punto
È possibile posizionarsi su un punto con lʼesat-
tezza di 1 frame (1⁄75 secondo), se, per esempio,
la riproduzione non deve iniziare con lʼinizio del
titolo bensì da un determinato punto.
1) Se tale punto è stato raggiunto allʼincirca
durante la riproduzione o con lʼavanzamento /
ritorno veloce (Cap. 5.6), con il tasto
(20) attivare la pausa.
2) Girando la manopola (16) a destra o a sini-
stra, posizionarsi con esattezza sul punto
desiderato. Per un controllo acustico, tale
punto viene ripetuto continuamente.
3) Raggiunto il punto, premere il tasto CUE (18).
In questo modo è memorizzato questo punto
e la riproduzione ripetuta viene terminata.
Con il tasto si può ora avviare la riprodu-
zione partendo da questo punto.
5.8 Salto ad un determinato punto
Per poter saltare velocemente su un punto
determinato precedentemente, con il tasto CUE 1
e CUE 2 (11) si possono memorizzare due punti
dʼavvio (punti cue), anche durante la riprodu-
zione di un titolo (fly-cue).
In più, con il tasto CUE (18) si può determi-
nare un altro punto dʼavvio. Tuttavia, nel modo di
riproduzione di titoli singoli, quando si raggiunge
o sceglie il titolo successivo, tale punto viene
sovrascritto con il punto dʼavvio del titolo suc-
cessivo [eventualmente passare alla riprodu-
zione di tutti i titoli azionando il tasto CONT / LIST
(8)].
Note: I punti cue memorizzati si cancellano quando
– si sceglie una cartella differente
– si cambia fra CD, USB 1, USB 2
– si spegne lʼapparecchio
5.8.1 Tasti CUE 1 e CUE 2
1) Premere il tasto MEMO / AUTO (9) per atti-
vare la memorizzazione. Il tasto sʼillumina.
2) Durante la riproduzione premere il tasto CUE 1
(11) quando è raggiunto il punto desiderato
(fly-cue) oppure, con il tasto (20) attivare
la pausa sul punto desiderato, posizionarsi
con esattezza su tale punto aiutandosi con la
manopola (16) e premere quindi il tasto CUE 1.
Il tasto lampeggia alcune volte e rimane poi
acceso. Si spegne il tasto MEMO / AUTO.
Eventualmente riavviare la riproduzione con
il tasto .
3) Ripetere i punti 1 e 2 per determinare un ulte-
riore punto cue con il tasto CUE 2.
4) Con i tasti CUE 1 e CUE 2 si può ora saltare
sui relativi punti cue: la riproduzione si avvia
partendo da questo punto cue.
5.8.2 Tasto CUE
1) Durante la riproduzione di un titolo attivare la
pausa con il tasto (20), quando è rag-
giunto il punto sul quale si desidera saltare
successivamente. I tasti e CUE (18) lam-
peggiano.
2) Se necessario, con la manopola (16) ci si può
posizionare con maggiore esattezza su tale
punto (Capitolo 5.7). Tale punto sarà poi
ripetuto continuamente.
3) Premere il tasto CUE. In questo modo, il
punto viene memorizzato come punto cue, e
sul display si vede“CUE” (L). Il tasto CUE ora
è illuminato continuamente. Il tasto conti-
nua a lampeggiare come invito ad avviare la
riproduzione.
4) Riavviare la riproduzione con il tasto .
5) Con il tasto CUE è ora possibile saltare indie-
tro sul punto cue. Il lettore si mette in pausa.
6) Avviare la riproduzione con il tasto oppure
tenere premuto il tasto CUE per tutto il tempo
in cui il titolo deve essere riprodotto. Libe-
rando il tasto CUE, il lettore salta indietro sul
punto cue e si mette in pausa.
5.9 Modificare la velocità con o senza
spostamento dellʼaltezza del suono
Con il cursore (15) è possibile modificare la velo-
cità di rotazione fino a ±100 %:
+100 % = velocità doppia
-
100 % = arresto
1) Scegliere il campo di regolazione con il tasto
PITCH (14). La riga di testo (O) indica breve-
mente lʼimpostazione:
“Pitch 8 %”, “Pitch 16 %”, “Pitch 100” oppure
“Pitch off”, se il regolatore della velocità è
nuovamente disattivato e se il titolo viene
riprodotto con velocità normale.
2) Impostare la velocità con il cursore. Il display
visualizza in alto a destra (I) la deviazione
percentuale dalla velocità normale. Il numero
delle battute (Q) cambia in corrispondenza.
3) Modificando la velocità, cambia anche in pro-
porzione lʼaltezza del suono. Se lʼaltezza del
suono deve rimanere costante, premere il
tasto MT (24). Sul display appare lʼindica-
zione “MT” (S). Per disattivare la funzione,
premere nuovamente il tasto MT.
25
I

26
I5.10 Pitch Bend – adattare il ritmo
fra due brani musicali
È possibile far coincidere esattamente le battute
di due brani musicali con la stessa velocità. In
questo modo, nel caso di una dissolvenza da un
apparecchio allʼaltro, il ritmo per il ballo non
viene interrotto.
1) Per prima cosa adattare la velocità del brano
musicale sul quale effettuare la dissolvenza,
a quella del brano attuale servendosi del
regolatore di velocità (15). Per fare ciò, con il
cursore impostare lo stesso numero di bat-
tute al minuto, vedi lʼindicazione (Q) in basso
a destra sul display.
2) Fare coincidere con esattezza le battute del
brano sul quale effettuare la dissolvenza con
le battute del brano attuale, servendosi dei
tasti PITCH BEND (22): finché si tiene pre-
muto il tasto +oppure
-
, il titolo aumenta o
riduce la velocità. In questo modo, le battute
si spostano rispetto a quelle del brano musi-
cale attuale.
3) Le battute possono essere spostate anche
girando la manopola (16).
5.11 Generare degli effetti
5.11.1 Effetti scratch
Per generare degli effetti scratch (che corri-
spondo alla rotazione manuale del piatto del
disco), premere il tasto SCRATCH (6) e girare la
manopola (16) in un senso o nellʼaltro. Il LED del
tasto si accende e la riga del testo (O) indica
“SCRATCH”. Per disattivare lʼeffetto premere
nuovamente il tasto SCRATCH.
5.11.2 Effetti di trascinamento
(dragging effects)
Se è stata attivata la funzione Master-Tempo
(altezza costante del suono) [indicazione “MT”
(S) sul display], disattivarla con il tasto MT (24).
Girando la manopola (16) nei due sensi, la velo-
cità di riproduzione si riduce e aumenta alterna-
tivamente. In questo modo si ottiene un effetto
tipo trascinamento del piatto di un giradischi.
5.11.3 Effetti bop (balbuzie)
I punti cue memorizzati con i tasti CUE (18),
CUE 1 e CUE 2 (11) [Cap. 5.8] possono
essere utilizzati anche per generare interessanti
effetti di balbuzie (bop): premendo ripetuta-
mente e brevemente uno di questi tasti, si
ottiene un effetto di balbuzie. Tale effetto è più
pronunciato se il punto cue e particolarmente
adatto (p. es. lʼattacco di uno strumento o lʼinizio
di una parola).
5.11.4 Riprodurre un loop senza fine
Una determinata parte di un titolo può essere
ripetuta a volontà e senza interruzioni.
1) Con il tasto (20) impostare la riprodu-
zione. Se è stato raggiunto il punto dʼavvio
del loop (punto a in fig. 6), azionare legger-
mente il tasto A (19).
Fig. 6 Riprodurre un loop senza fine
Un consiglio: Per determinare il punto dʼavvio con
la precisione di 1 frame, impostare prima la pausa
con il tasto , individuare con la manopola (16)
lʼesatto punto e quindi premere il tasto A.
2) Se, continuando la riproduzione, si raggiunge
la fine prevista del brano (punto b in fig. 6),
premere il tasto B / EDIT (19). La parte fra i
punti sarà ripetuta continuamente. Mentre è
riprodotto il loop, il display segnala “RELOOP”
(J).
3) Per spostare il punto di fine oppure per deter-
minarlo con la precisione di un frame, pre-
mere il tasto B / EDIT mentre si riproduce il
loop. Lʼindicazione del tempo (P) segnala ora
lʼindice dei tempo del punto finale. Con la
manopola (16) spostare il punto finale e con-
fermarlo con il tasto B / EDIT.
4) La parte del loop può essere anche divisa o
aumentata tante volte. Mentre si riproduce il
loop, con il tasto o (21) selezionare la
modifica della lunghezza. La riga di testo (O)
visualizza lʼimpostazione:
TRIM: 1⁄32, 1⁄16, 1⁄8, 1⁄4, 1⁄2, 1⁄1, 2⁄1, 4⁄1, 8⁄1, 16⁄1, 32⁄1
5) Per uscire dal loop e per continuare la ripro-
duzione del titolo, premere il tasto RELOOP /
EXIT (19). Per riavviare il loop, premere
unʼaltra volta il tasto RELOOP / EXIT.
Fig. 7 Terminare e riavviare il loop
Note: Un loop memorizzato viene cancellato non
appena durante la riproduzione si raggiunge il titolo
successivo o quando con il tasto o (21) si sceglie
un altro titolo.
Parte con la frazione o con il multiplo della lunghezza
di una battuta
Nei titoli con tempo di quattro quarti, la lun-
ghezza di un brano per la riproduzione come
loop può essere impostata anche con esattezza
a una frazione o a un multiplo della lunghezza
della battuta:
1⁄32, 1⁄16, 1⁄8, 1⁄4, 1⁄2, 1⁄1, 2⁄1, 4⁄1, 8⁄1, 16⁄1, 32⁄1
1) Tener premuto il tasto MEMO / AUTO (9) e
con la manopola (16) impostare la lun-
ghezza. La lunghezza è indicata nella riga di
testo (O), p. es. “AUTO 2 / 1” = due lunghezze
di battuta. Dopo questa impostazione, il tasto
MEMO / AUTO è illuminato per segnalare che
il punto finale del loop sarà determinato auto-
maticamente.
2) Determinare il punto dʼavvio con il tasto A
(19). Contemporaneamente si avvia il loop e
il punto finale viene fissato secondo lʼimpo-
stazione della lunghezza del loop stesso.
3) La lunghezza della parte del loop può essere
modificata anche in un secondo tempo, come
descritto sopra (punto 3 o 4).
5.12 Compilare una sequenza
individuale di titoli
Se si vogliono riprodurre solo particolari titoli in
un ordine determinato, si può programmare una
sequenza di un massimo di 99 titoli.
5.12.1 Programmare e avviare una sequenza
di titoli
1) Se è in corso la riproduzione di un titolo, atti-
vare dapprima la pausa con il tasto (20).
2) Con il tasto PROG (13) attivare il modo di
programmazione. Lʼindicazione della durata
(P) passa allʼindicazione della prima loca-
zione di memoria “P
-
01”. Lʼindicazione “PG”
(R) lampeggia velocemente.
Nota: Se si vuole subito uscire da questo modo,
tener premuto il tasto PROG finché il display visua-
lizza nuovamente la durata (P).
3) Scegliere il primo titolo da memorizzare con il
tasto o (21) [Cap. 5.1, punti 4 e 5].
4) Come conferma della scelta del titolo pre-
mere il tasto PROG. Sarà visualizzata la
locazione successiva di memoria “P
-
02”.
5) Ripetere i passi 3 e 4, finché tutti i titoli della
sequenza sono memorizzati. Se sono stati
memorizzati 99 titoli e si cerca di memoriz-
zare un altro titolo, appare il messaggio
“FULL”.
6) Per riprodurre la sequenza premere il tasto
. Lʼindicazione “PG” (R) lampeggia più
lentamente. I titoli saranno riprodotti secondi
il modo di funzionamento scelto (Capitolo
5.4.1). Per selezionare altri titoli della se -
quenza, premere (più volte) il tasto o .
7) Per ritornare al modo normale di riprodu-
zione, attivare la pausa con il tasto e tener
premuto il tasto PROG finché lʼindicazione
“PG” (R) smette di lampeggiare.
Per riprodurre nuovamente la sequenza,
attivare la pausa e premere il tasto PROG in
modo che lʼindicazione “PG” lampeggi nuo-
vamente. Avviare la sequenza con il tasto .
Note: Finché lʼindicazione “PG” lampeggia o è accesa
costantemente, la sequenza è disponibile. Viene can-
cellata, p. es. spegnendo lʼapparecchio.
5.12.2 Controllare la sequenza
1) Se è in corso la riproduzione di un titolo, atti-
vare dapprima la pausa con il tasto .
2) Se a questo punto, lʼindicazione “PG” sta
lampeggiando, premere una volta il tasto
PROG. Se lʼindicazione “PG” rimane accesa
costantemente, premere due volte il tasto
PROG.
3) Con il tasto o selezionare una dopo lʼal-
tra le locazioni di memoria (P
-
01 … P
-
99).
Nella riga di testo (O) sarà visualizzato il rela-
tivo titolo memorizzato.
4) Per riprodurre la sequenza premere il tasto
.
5.12.3 Completare o cancellare una
sequenza
1) Se è in corso la riproduzione di un titolo, atti-
vare dapprima la pausa con il tasto .
2) Se lʼindicazione “PG” sta lampeggiando, pre-
mere il tasto PROG finché “PG” smette di
lampeggiare.
3) Premere brevemente il tasto PROG, in modo
che “PG” lampeggi velocemente e lʼindica-
zione della durata (P) passi allʼindicazione
della locazione successiva di memoria libera
“P
-
…”.
4) Per cancellare premere il tasto PROG finché
il display indichi nuovamente la durata (P)
oppure, per aggiungere un altro titolo, sce-
glierlo con il tasto o e confermare con
il tasto PROG. Per riprodurre la sequenza
completata premere il tasto .
PLAY c
LOOP
1. 2.
RELOOP / EXITRELOOP / EXIT
ab
1.
PLAY PLAY
LOOP
2.
AB / EDIT

27
I
6 Avviamento con fader
La funzione del tasto Start / Pausa del tasto
(20) può essere telecomandata da un mixer con
funzione di avviamento con fader. Il collegamento
con il mixer è descritto nel capitolo 4, punto 3.
Impostare il cursore (34) sul retro dellʼunità lettori
secondo il tipo di avviamento con fader del mixer:
LOCK = Comando tramite un interruttore on / off
Per la maggior parte dei mixer del pro-
gramma di “img Stage Line” si deve scegliere
questa posizione dellʼinterruttore. Aprendo il
fader si chiude un interruttore sul mixer che
avvia la riproduzione. Chiudendo il fader, lʼin-
terruttore si apre mettendo in pausa il lettore.
Fig. 8 Avviamento con fader tramite un interruttore
on / off
TACT = Comando tramite un pulsante
Se il pulsante viene azionato per la prima volta
aprendo il fader, la riproduzione si avvia. Se il
pulsante viene azionato per la seconda volta
chiudendo il fader, il lettore si mette in pausa.
Fig. 9 Avviamento con fader tramite un pulsante
CUE PLAY = Comando tramite un impulso
Aprendo il fader, per via di un breve impulso
di comando del mixer si avvia la riproduzione
dallʼinizio del titolo (punto auto-cue, Cap.
5.4.1) oppure dal punto cue stabilito con il
tasto CUE (18) [Cap. 5.8.2]. Chiudendo il
fader, il lettore ritorna allo stesso punto dʼav-
vio in seguito ad un altro impulso di comando
e si mette in pausa.
Fig. 10 Avviamento con fader tramite un impulso
7 Aggiornare il firmware
Se in Internet è disponibile un nuovo firmware,
quello dellʼapparecchio può essere aggiornato:
1) Nella homepage di “img Stage Line”
(www.imgstageline.com), nella rubrica “SUP-
PORT” cliccare su “Software-Updates”.
Quindi scrollare la pagina verso il basso fino
alla rubrica “FIRMWARE-DOWNLOADS”.
Per scaricare il firmware cliccare sul simbolo
davanti a “CD-292USB”.
Copiare il software scaricato su una chiavetta
USB.
2) Spegnere il CD-292USB con lʼinterruttore di
rete (28).
3) Inserire la chiavetta USB con il nuovo firm -
ware nella presa USB sinistra USB 1 (26).
4) Sul lettore di sinistra tener premuto il tasto
PROG (13) e accendere lʼapparecchio nuova-
mente. Lasciare il tasto PROG solo quando
sul display di sinistra si vede “UP dA t E”.
5) Se dopo il caricamento dei dati, nella riga di
testo (O) appare “Ready”, premere il tasto
(20), per avviare lʼaggiornamento del firm -
ware. Sul diagramma a barre (H) e con la
riga di testo si può seguire lʼaggiornamento.
Quando è visualizzato “Finish” il firmware è
aggiornato.
6) Spegnere lʼapparecchio e riaccenderlo.
8 Manutenzione
Proteggere lʼapparecchio dalla polvere, da vibra-
zioni, umidità e calore (temperatura dʼesercizio
ammessa 0 – 40 °C). Per la pulizia usare solo un
panno morbida, asciutto; non impiegare in nes-
sun acqua o caso prodotti chimici.
Note su possibili errori di lettura
Il fumo di sigarette e la polvere penetrano facil-
mente fra tutte le aperture dellʼapparecchio e si
depositano sul sistema ottico della scansione ai
raggi laser. Se ciò dovesse provocare errori di
lettura e buchi nella riproduzione, lʼapparecchio
deve essere pulito in un laboratorio specializ-
zato. Una tale pulizia è a pagamento, anche
durante il periodo di garanzia!
9 Dati tecnici
Gamma di frequenze: . . 20 – 20 000 Hz
Fattore di distorsione: . . < 0,1 %
Separazione canali: . . . > 80 dB
Range dinamico: . . . . . > 80 dB
Rapporto S / R: . . . . . . . > 80 dB
Uscita : . . . . . . . . . . . . . 2 V (livello Line),
prese RCA
Sistemi di file leggibili: . NTFS, FAT, HFS+
Memoria anti-shock: . . . 15 s
Alimentazione: . . . . . . . 230 V~ / 50 Hz
Potenza assorbita: . . . . max. 40 VA
Temperatura
dʼesercizio: . . . . . . . . . . 0 – 40 °C
Dimensioni (l × h × p)
Unità di comando: . . . 482 × 90 × 85 mm,
2 U (unità dʼaltezza)
Unità lettori: . . . . . . . 482 × 90 × 260 mm,
2 U (unità dʼaltezza)
Peso: . . . . . . . . . . . . . . 6,5 kg
Con riserva di modifiche tecniche.
START /
PAUSE CUE
PLAY
LOCK
TACT
1.×CuePlay
2.×Pause
START /
PAUSE CUE
PLAY
LOCK
TACT
1.×Start
2.×Pause
START /
PAUSE CUE
PLAY
LOCK
TACT
Start
Pause
La MONACOR
®
INTERNATIONAL GmbH & Co. KG si riserva ogni diritto di elaborazione in qualsiasi forma
delle presenti istruzioni per lʼuso. La riproduzione – anche parziale – per propri scopi commerciali è vietata.

NL
B
28
Op de uitklapbare pagina 3 vindt u een over-
zicht van alle bedieningselementen en de
aansluitingen.
Inhoud
1 Overzicht van de bedienings-
elementen en aansluitingen . . . . . . . 28
1.1 Bedieningsgedeelte . . . . . . . . . . . . . . . 28
1.2 Afspeelgedeelte frontpaneel . . . . . . . . . 29
1.3 Afspeelgedeelte achterzijde . . . . . . . . . 29
2 Veiligheidsvoorschriften . . . . . . . . . . 29
3 Toepassingen . . . . . . . . . . . . . . . . . . . 29
4 Het apparaat opstellen en aansluiten 30
5 Bediening . . . . . . . . . . . . . . . . . . . . . . 30
5.1 Muziekfragmenten afspelen . . . . . . . . . 30
5.2 Afspeellijst laden . . . . . . . . . . . . . . . . . . 30
5.3 Weergave van trackgegevens
en de rustmodus . . . . . . . . . . . . . . . . . . 30
5.3.1 Grafische weergave van de speeltijd 31
5.3.2 Max. aantal beats per minuut . . . . . . 31
5.3.3 Rustmodus . . . . . . . . . . . . . . . . . . . . 31
5.4 De bedrijfsmodus selecteren . . . . . . . . 31
5.4.1 Continu afspelen en afspelen
van een individuele track . . . . . . . . . . 31
5.4.2 Relaiswerking – de andere afspeel -
eenheid automatisch starten
aan het einde van een track . . . . . . . 31
5.5 Een track kort voorbeluisteren . . . . . . . 31
5.6 Versneld vooruit en achteruit zoeken . . 31
5.7 Een bepaalde plaats in een track
precies opzoeken . . . . . . . . . . . . . . . . . 31
5.8 Naar een bepaalde plaats in een track
terugkeren . . . . . . . . . . . . . . . . . . . . . . 31
5.8.1 Toetsen CUE 1 en CUE 2 . . . . . . . . . 31
5.8.2 Toets CUE . . . . . . . . . . . . . . . . . . . . . 31
5.9 De snelheid met of zonder verandering
van toonhoogte wijzigen . . . . . . . . . . . . 32
5.10 Pitch Bend – Het ritme van twee muziek-
fragmenten op elkaar afstemmen . . . . . 32
5.11 Effecten . . . . . . . . . . . . . . . . . . . . . . . . 32
5.11.1 Scratcheffecten . . . . . . . . . . . . . . . . . 32
5.11.2 Liereffecten . . . . . . . . . . . . . . . . . . . . 32
5.11.3 Stottereffecten . . . . . . . . . . . . . . . . . . 32
5.11.4 Naadloze loop afspelen . . . . . . . . . . . 30
5.12 Eigen reeks tracks samenstellen . . . . . 32
5.12.1 Een reeks tracks opslaan
en afspelen . . . . . . . . . . . . . . . . . . . . 32
5.12.2 Een reeks tracks controleren . . . . . . . 32
5.12.3 Een reeks tracks aanvullen of wissen 33
6 Faderstart . . . . . . . . . . . . . . . . . . . . . . 33
7 Firmware updaten . . . . . . . . . . . . . . . . 33
8 Onderhoud van het apparaat . . . . . . . 33
9 Technische gegevens . . . . . . . . . . . . 33
1 Overzicht van de bedienings -
elementen en aansluitingen
1.1 Bedieningsgedeelte
1Bedieningspaneel van de afspeeleenheid 1
Details zie fig. 2
2Toets RELAY voor het automatisch starten
van de andere afspeeleenheid aan het einde
van een track (hoofdstuk 5.4.2)
3Bedieningspaneel van de afspeeleenheid 2
Details zie fig. 2
4Toets OPEN / CLOSE voor het openen en
sluiten van de cd-lade [zoals de toetsen
(27, 29) op het gedeelte met afspeelgedeelte]
5Toets CD / USB om tussen CD en USB-
geheugen te wisselen: De afspeeleenheid
moet daarom met de toets (20) in pauze
geschakeld zijn.
Als er twee USB-geheugens aangesloten
zijn, drukt u eerst op de toets CD / USB en
kiest u vervolgens met de toets of (21)
tussen CD, USB 1 en USB 2. De tekstregel
(O) geeft de selectie aan. Voor bevestiging
drukt u afsluitend op de toets CD / USB.
6Toets SCRATCH voor het in- en uitschakelen
van de scratchfunctie
Bij ingeschakelde functie (toets licht op) kunt
u met behulp van de draaiknop (16) scratch -
effecten genereren.
7Toets TIME om de tijdsaanduiding om te
schakelen (H, P)
bij het displaybericht “Remain” (G)
Resterende speeltijd van de geselecteerde
track
bij het displaybericht “Elapse” (E)
Reeds verstreken speeltijd van de gese-
lecteerde track
bij het displaybericht “Total Remain”
Resterende speeltijd van de volledige cd
(niet mogelijk in de mp3-modus)
Bij mp3-bedrijf kunt u de tekstregel (O) bij
ingedrukt gehouden toets TIME met de toets
of (21) omschakelen naar de weergave
van de track, album, uitvoerder (ID3-tag) of
bestandsnaam.
8Toets CONT / LIST
1. om te wisselen tussen Afspelen van een
individuele track [displaybericht “Single”
(C)] en Continu afspelen [displaybericht
“Cont.” (D)]
2. om afspeellijsten te laden (hoofd-
stuk 5.2)
9Toets MEMO / AUTO
1. om Cue-punten op te slaan met de toetsen
CUE 1 en CUE 2 (11)
2. om een fragment van een track dat een
veelvoud of een fractie is van de beat-
lengte, als loop af te spelen
(hoofdstuk 5.11.4)
10 Display, details zie fig. 3
Aals boven de cijfers het displaybericht
“TRACK” verschijnt: nummer van de track
(in de geselecteerde map);
als onder de cijfers het displaybericht
“FOLDER” verschijnt: nummer van de
geselecteerde map
BWeergavesymbool
CDisplaybericht “Single”: duidt de bedrijfs-
modus Afspelen van een individuele track
aan
DDisplaybericht “Cont.”: duidt de bedrijfs -
modus aan voor continuweergave van de
tracks
EDisplaybericht “Elapse”: duidt aan, dat de
reeds verstreken tijd van een track wordt
weergegeven
FDisplaybericht “Total”: duidt samen met het
displaybericht “Remain” (G) aan, dat de
resterende speeltijd van de cd wordt weer-
gegeven (niet mogelijk in de mp3-modus)
GDisplaybericht “Remain”: duidt aan dat de
resterende speeltijd van een track wordt
weergegeven. Bij het displaybericht “Total
remain” wordt de resterende speeltijd van
de cd weergegeven.
HBalkweergave voor de weergave van de
relatieve speelduur van de track
IAanduiding van de afwijking ten opzichte
van de normale snelheid in procent
JDisplaybericht “RELOOP”: duidt aan dat
een naadloze loop wordt afgespeeld
KDisplaybericht “CD” of “USB”: duidt aan of
er een cd, de aansluiting USB 1 (26) of
USB 2 (30) is geselecteerd. Bij geselec-
teerde aansluiting USB 2 knippert het dis-
playbericht “USB”.
LDisplaybericht “CUE”: verschijnt, als de
afspeeleenheid op het Cue-punt in de pau-
zestand staat (hoofdstuk 5.4.1 en
5.8.2).
MBij mp3-bedrijf wordt in dit veld aange -
geven of in de tekstregel (O) de track-,
album- of artiestennaam bij de muziektrack
wordt weergegeven. Als geen van boven-
staande displayberichten verschijnt, wordt
de bestandsnaam weergegeven
(hoofdstuk 5.3).
NAantal tracks op de cd;
bij mp3-bedrijf:
Aantal tracks in de geselecteerde map
[displaybericht “TRACK” boven de cijfers
(A)]
of aantal mappen [displaybericht “FOL-
DER” onder de cijfers (A)]
OTekstregel voor bijkomende informatie
PWeergave van de speeltijd, zie ook pos. E
en G
QWeergave van het aantal beats per minuut
RDisplaybericht “PG”: knippert als er een
eigen reeks tracks wordt geprogrammeerd
of afgespeeld
SDisplaybericht “MT” (master-tempo): duidt
de functie voor constante toonhoogte aan
(hoofdstuk 5.9)
11 Toetsen CUE 1 en CUE 2
1. om twee Cue-punten op te slaan [ook tij-
dens het afspelen mogelijk; om op te
slaan, drukt u eerst op de toets MEMO /
AUTO (9)]
2. om naar de opgeslagen Cue-punten te
springen
12 Toets FOLDER voor het mp3-bedrijf
1. om tussen de naamweergave van de track
en van de map in de tekstregel (O) te wis-
selen
Overeenkomstig de geselecteerde instel-
ling kunt u met de toetsen en (21) een
track of een map selecteren.
2. om afspeellijsten te laden (hoofd-
stuk 5.2)
3. om een partitie van een aangesloten harde
schijf te selecteren (hoofdstuk 5.1)
13 Toets PROG om een eigen reeks tracks
samen te stellen en af te spelen (hoofd-
stuk 5.12)
14 Toets PITCH voor het in- / uitschakelen van
de snelheidsregelaar (15) en het selecteren
van het snelheidsregelbereik (8 % of 100 %)

NL
B
29
De tekstregel (O) geeft korte tijd de geselec-
teerde instelling weer (Pitch 8 %, 16 %, 100,
off).
15 Schuifregelaar om de afspeelsnelheid te wij-
zigen [zonder wijziging van de toonhoogte,
als de toets MT (24) oplicht]
De snelheid kan alleen worden gewijzigd, als
de toets PITCH (14) oplicht.
16 Draaiknop REV / FWD
–voor het snel vooruit / achteruit zoeken, als
de toets SEARCH (17) werd ingedrukt
–voor het genereren van scratcheffecten,
als de toets SCRATCH (6) werd ingedrukt
–voor de functie “Pitch Bend” tijdens het
afspelen van een track (hoofdstuk 5.10)
–voor het nauwkeurig opzoeken van een
plaats in de track, als de afspeeleenheid in
pauze is geschakeld
–bij ingedrukte toets of (21) om snel
tracks [displaybericht “TRACK” boven de
cijfers (A)] of mappen [displaybericht “FOL-
DER” onder de cijfers (A)] te selecteren
17 Toets SEARCH om het snel vooruit en ach-
teruit zoeken met de draaiknop (16) in en uit
te schakelen
18 Toets CUE om een track kort voor te beluis-
teren (hoofdstuk 5.5) en om naar een
vooraf bepaalde plaats in een track terug te
keren (hoofdstuk 5.8.2)
19 Toetsen om een naadloze loop op te slaan en
af te spelen
Toets A om het beginpunt van een fragment
voor een naadloze loop vast te leggen
Toets B / EDIT om het eindpunt vast te leggen
en de loop tegelijk te starten;
om het eindpunt ervan te verschuiven,
drukt u opnieuw op de toets en stelt u het
eindpunt in met de draaiknop (16)
Toets RELOOP / EXIT om de eindeloze loop
te beëindigen of de loop opnieuw af te spe-
len
20 Toets om het afspelen van een track te
starten en tussen afspelen en pauze om te
schakelen
21 Toetsen en
1. om een track te selecteren, als het display-
bericht “TRACK” boven de cijfers (A) wordt
weergegeven:
Toets om de volgende track te selecteren
Toets om naar het begin van de gese-
lecteerde track te springen. Door verschil-
lende keren op de toets te drukken,
wordt telkens een track teruggesprongen.
Als een van de toetsen ingedrukt wordt
gehouden, kunt u de tracks met de draai-
knop (16) snel selecteren.
2. bij mp3-bedrijf voor het selecteren van een
map, als het displaybericht “FOLDER”
onder de cijfers (A) verschijnt [kan met de
toets FOLDER (12) worden gewisseld]
Als een van de toetsen ingedrukt wordt
gehouden, kunt u de mappen met de draai-
knop (16) snel selecteren.
3. om een cd of een USB-geheugen te selec-
teren, zie ook toets CD / USB (5)
4. om het trackfragment van een naadloze
loop te delen of te vermenigvuldigen
(hoofdstuk 5.11.4)
5. om bij mp3-bedrijf en ingedrukt gehouden
toets TIME (7) de tekstregel (O) om te
schakelen naar de weergave van de track,
album, artiest (ID3-tag) of bestandsnaam
6. om een afspeellijst te selecteren (hoofd-
stuk 5.2)
7. om een partitie van een aangesloten harde
schijf te selecteren (hoofdstuk 5.1)
22 Toetsen PITCH BEND voor het afstemmen
van het ritme van de geselecteerde track op
dat van een muziekfragment dat op de
andere afspeeleenheid wordt afgespeeld
(hoofdstuk 5.10)
23 Toets TAP voor de handmatige telmodus van
de beatteller en voor het terugschakelen naar
de automatische modus (hoofdstuk 5.3.2)
24 Toets MT (master tempo) voor het in- en uit-
schakelen van de functie voor constante
toonhoogte (hoofdstuk 5.9)
1.2 Afspeelgedeelte frontpaneel
25 Cd-lade van de afspeeleenheid 1
26 USB-aansluiting 1 om een USB-stick in te
pluggen of een harde schijf aan te sluiten
27 Toets OPEN / CLOSE voor het openen en
sluiten van de cd-lade [zoals toets (4) op
het bedieningsgedeelte]
28 POWER-schakelaar met rode POWER-LED
erboven
29 Toets OPEN / CLOSE voor het openen en
sluiten van de cd-lade [zoals toets (4) op
het bedieningsgedeelte]
30 USB-aansluiting 2 om een USB-stick in te
pluggen of een harde schijf aan te sluiten
31 Cd-lade van de afspeeleenheid 2
1.3 Afspeelgedeelte achterzijde
32 Audio-uitgang LINE OUT van de afspeeleen-
heid 2 voor het aansluiten op de lijningang
van b.v. een versterker of een mengpaneel
33 3,5 mm-jack START / PAUSE van de afspeel-
eenheid 2 voor de afstandsbesturing van de
functie Start / Pause vanaf een mengpaneel
34 Keuzeschakelaar voor de manier van de
afstandsbediening via de jacks START /
PAUSE (33 en 38) [hoofdstuk 6]
Positie LOCK
voor de bediening via een POWER-scha-
kelaar
Positie TACT
voor de bediening via een drukknop
Positie CUE / PLAY
Via een stuurimpuls van het mengpaneel
wordt de afspeeleenheid bij het openschui-
ven van de mengpaneelregelaar vanaf het
Cue-punt [Auto-Cue-punt of met de toets
CUE (18) ingesteld] gestart, en bij het
dichtschuiven van de regelaar op het Cue-
punt teruggezet.
35 Jack voor aansluiting van het bedieningsge-
deelte:
verbind met de jack REMOTE CONTROL
CONNECT TO MAIN UNIT 2 via een van de
bijgeleverde aansluitkabels
36 Netsnoer voor de aansluiting op een stop-
contact (230 V~ / 50 Hz)
37 Jack voor aansluiting van het bedieningsge-
deelte:
verbind met de jack REMOTE CONTROL
CONNECT TO MAIN UNIT 1 via een van de
bijgeleverde aansluitkabels
38 3,5-mm-jack START / PAUSE van de afspeel-
eenheid 1 voor de afstandsbesturing van de
functie Start / Pause vanaf een mengpaneel
39 Audio-uitgang LINE OUT van de afspeeleen-
heid 1 voor het aansluiten op de lijningang
van b.v. een versterker of een mengpaneel
2 Veiligheidsvoorschriften
Het apparaat is in overeenstemming met alle
relevante EU-Richtlijnen en is daarom geken-
merkt met .
Let eveneens op het volgende:
GOpgelet! Kijk bij geopende cd-lade niet in het
binnenwerk van de cd-speler, want eventueel
actieve laserstralen kunnen oogletsels veroor-
zaken.
GHet apparaat is enkel geschikt voor gebruik
binnenshuis; vermijd druip- en spatwater,
plaatsen met een hoge vochtigheid en uitzon-
derlijk warme plaatsen (toegestaan omge-
vingstemperatuurbereik: 0 – 40 °C).
GPlaats geen bekers met vloeistof zoals drink-
glazen etc. op het apparaat.
GSchakel het apparaat niet in resp. trek onmid-
dellijk de stekker uit het stopcontact,
1. wanneer het apparaat of het netsnoer zicht-
baar beschadigd is,
2. wanneer er een defect zou kunnen optreden
nadat het apparaat bijvoorbeeld is gevallen,
3. wanneer het apparaat slecht functioneert.
Het apparaat moet in elk geval worden her-
steld door een gekwalificeerd vakman.
GEen beschadigd netsnoer mag alleen in een
werkplaats worden vervangen.
GTrek de stekker nooit met het snoer uit het
stopcontact, maar met de stekker zelf.
GVerwijder het stof met een droge, zachte doek.
Gebruik zeker geen water of chemicaliën.
GIn geval van ongeoorloofd of verkeerd gebruik,
verkeerde aansluiting, foutieve bediening of
van herstelling door een niet-gekwalificeerd
persoon vervalt de garantie en de verantwoor-
delijkheid voor hieruit resulterende materiële
of lichamelijke schade. Zo kunnen wij ook niet
aansprakelijkheid worden gesteld voor gege-
vensverliezen als gevolg van foutieve bedie-
ning of een defect, noch voor de schade die
hieruit volgt.
3 Toepassingen
De cd / mp3-speler CD-292USB met twee af -
speeleenheden is speciaal ontworpen voor pro-
fessionele DJ-toepassingen. Diverse functiemo-
gelijkheden zijn precies op dit toepassingsbereik
afgestemd, b.v. afspelen van een individuele
track, automatische beatteller, weergave van
een naadloze loop, wijziging van de snelheid
zonder verandering van de toonhoogte, anti-
schokgeheugen.
Met het apparaat kunt u zowel audio-cdʼs,
zelfgebrande audio-cdʼs (audio-cd-r) als cdʼs
met tracks in mp3-formaat afspelen. Bij herbe-
schrijfbare cdʼs (cd-rw) kan het afspelen naarge-
lang het cd-type en gebruikte cd-brander echter
problematisch verlopen.
Via de USB-aansluitingen kunnen ook mp3-
bestanden van een harde schijf of van een USB-
stick worden afgespeeld. De afspeeleenheden
kunnen de USB-aansluitingen onafhankelijk van
elkaar benaderen, zodat het gebruik ook met
slechts één USB-opslagmedium mogelijk is.
Wanneer het apparaat definitief uit
bedrijf wordt genomen, bezorg het dan
voor milieuvriendelijke verwerking aan
een plaatselijk recyclagebedrijf.
WAARSCHUWING De netspanning van de appa-
raat is levensgevaarlijk. Open
het apparaat niet! U loopt
het risico van een elektrische
schok.

NL
B
30
4 Het apparaat opstellen
en aansluiten
Het bedieningsgedeelte en afspeelgedeelte zijn
voorzien voor montage in een rack voor appara-
tuur met een breedte van 19″ (482 mm); ze kun-
nen echter ook als vrijstaande tafelmodellen
worden gebruikt. Het afspeelgedeelte moet
steeds horizontaal worden geplaatst, terwijl men
het bedieningsgedeelte in een willekeurige posi-
tie kan inbouwen, zelfs gekanteld. Voor de mon-
tage in een rack hebt u voor het bedienings- en
het afspeelgedeelte telkens 2 rackeenheden
nodig (1 rackeenheid = 44,45 mm).
Schakel de cd / mp3-speler en de aan te sluiten
apparatuur uit, alvorens apparaten aan te sluiten
resp. bestaande aansluitingen te wijzigen.
1) Verbind het bedieningsgedeelte en het af -
speelgedeelte via de beide meegeleverde
aansluitingskabels:
De jack CONNECT TO REMOTE CONTROL 2
(35) van het afspeelgedeelte met de jack
REMOTE CONTROL CONNECT TO MAIN
UNIT 2 van het bedieningsgedeelte en
de jack CONNECT TO REMOTE CONTROL 1
(37) van het afspeelgedeelte met de jack
REMOTE CONTROL CONNECT TO MAIN
UNIT 1 van het besturingsgedeelte.
2) Sluit elk van de beide signaaluitgangen LINE
OUT (32, 39) aan op een ingang met lijnni-
veau b.v. van een mengpaneel of een ver-
sterker (mogelijke labeling: Line, CD, Aux).
3) De beide afspeeleenheden kunnen via een
mengpaneel met faderstartfunctie worden
gestart en in pauze geschakeld. Verbind hier-
voor de jacks START / PAUSE (33, 38) via
twee kabels met 3,5 mm-stekkers met de
overeenkomstige jacks van het mengpaneel.
De CD-292USB moet op de faderstart van
het mengpaneel worden ingesteld; zie hier-
voor hoofdstuk 6.
4) Plug ten slotte de stekker van het netsnoer
(36) in een stopcontact (230 V~ / 50 Hz).
5 Bediening
De bediening van de beide afspeelmechanis-
men is volledig identiek. Schakel het toestel in
met de POWER-schakelaar (28). Op het display
(10) verschijnt kort “boot” (opstart) en WEL-
COME als begroeting. Als er een cd in de lade is
geplaatst, verschijnen er na het inlezen gege-
vens van de cd op het display. Als er geen cd in
de lade is geplaatst, verschijnt het displaybericht
“no dISC” (geen cd).
Schakel het apparaat uit na gebruik. De vol-
gende instellingen blijven opgeslagen voor het
verdere gebruik:
1. de geselecteerde bedrijfsmodus (afspelen
van een individuele track / doorlopend afspe-
len, hoofdstuk 5.4.1)
2. de geselecteerde tijdsweergave (resterende
speeltijd / reeds verstreken speeltijd,
hoofdstuk 5.3)
3. het geselecteerde snelheidsregelbereik
(hoofdstuk 5.9)
5.1 Muziekfragmenten afspelen
1) Om een cd te laden, opent u de cd-lade (25,
31) met de toets (4, 27 of 29). Leg een cd
in de lade met het label naar boven en sluit de
cd-lade opnieuw met de toets .
2) Bijkomend of als alternatief kunt u telkens
een USB-stick in de USB-aansluitingen (26,
30) pluggen of telkens een harde schijf met
de USB-aansluitingen verbinden. Voor het
omschakelen tussen cd en USB-geheugen
drukt u op de toets CD / USB (5). De afspeel-
eenheid moet daarom in pauze geschakeld
zijn; druk eventueel op de toets (20).
Als er twee USB-geheugens zijn aange-
sloten, selecteert u na het drukken op de
toets CD / USB de signaalbron (CD, USB 1,
USB 2) met de toets of (21). De tekstre-
gel (O) geeft de selectie aan. Daarbij wordt
over de momenteel geselecteerde signaal-
bron gesprongen. Bevestig de selectie met
toets CD / USB.
Opmerkingen
1. De geselecteerde signaalbron wordt ook weer-
gegeven in het displayveld (K):
“CD” = cd-afspeelmechanisme is geselecteerd
“USB” constant ingevoegd = USB 1
“USB” knippert = USB 2
2. Een harde schijf moet door een eigen netadapter
worden gevoed, als het stroomverbruik ervan
meer dan 500 mA bedraagt.
3. Als er op een harde schijf meerdere partities zijn
aangemaakt, kunnen deze als volgt worden
geselecteerd:
a) Houd de toets FOLDER (12) ingedrukt tot het
displaybericht “PA-SEL” (Partition Selection)
verschijnt.
b) Selecteer de partitie met de toets of . De
tekstregel (O) duidt telkens de naam aan.
c) Druk op de toets FOLDER om te bevestigen.
3) Druk op de toets (20) om de eerste track
te starten. Tijdens het afspelen wordt het
symbool (B) weergegeven. Het afspelen
kan op elk moment met de toets worden
onderbroken en weer voortgezet.
4) Gebruik de toetsen en om een andere
track te selecteren.
Toets : naar de volgende track gaan
Toets : naar het begin van de geselec-
teerde track terugkeren. Door verschillende
keren op de toets te drukken, wordt telkens
een track teruggesprongen.
Als een van de toetsen ingedrukt wordt ge -
houden, kunt u de tracks met de draaiknop
(16) snel selecteren.
5) Als bij mp3-bedrijf de tracks in verschillende
mappen zijn ingedeeld, druk dan op de toets
FOLDER (12) om een map te selecteren. Het
displaybericht “FO-SEL” (Folder Selection)
wordt weergegeven, en in de tekstregel (O)
verschijnt de naam van de map. De cijfers (A)
links bovenaan het display duiden nu het
nummer van de map aan en de cijfers (N)
onder “Total” het aantal beschikbare map-
pen.
Selecteer de map met de toets of . Als
een van de toetsen ingedrukt wordt gehou-
den, kunt u de mappen met de draaiknop (16)
snel selecteren.
Druk op de toets FOLDER om uw selectie te
bevestigen; op het display wordt opnieuw
speeltijd (P) weergegeven. Selecteer met de
toets of de gewenste track in de map.
6) Wenst u een andere cd te laden, schakel dan
eerst met de toets in pauze, anders kunt u
de cd-lade met de toets niet openen.
7) Alvorens het apparaat uit te schakelen, moet
u de cd-lade steeds sluiten met de toetsen ,
om het laseraftastsystemen tegen verontrei-
niging te beschermen. Schakel pas dan de
cd-speler uit met de POWER-schakelaar.
5.2 Afspeellijst laden
Om een bepaalde selectie mp3-bestanden af te
spelen, kunt u op een computer aangemaakte
speellijsten met de extensies “.wpl”, “.xml” of
“.m3u” naar de CD-292USB kopiëren.
Belangrijk: Een afspeellijst en de betreffende
mp3-bestanden moeten op hetzelfde opslagme-
dium staan. De afspeellijsten moeten steeds in
de hoofdindex (root directory) opgeslagen zijn.
1) Als er een track wordt afgespeeld, moet u
deze met de toets (20) in pauze schake-
len.
2) Houd de toets CONT / LIST (8) ingedrukt en
selecteer met de toets of (21), welke
bestandsextensie moet worden gezocht. De
tekstregel (O) geeft de selectie aan (M3U
Scan, WPL Scan, XML Scan).
3) Druk op de toets FOLDER (12). Op het dis-
play wordt “FO-SEL” weergegeven en in de
tekstregel verschijnt de naam van de eerste
speellijst. De cijfers (A) links bovenaan het
display duiden nu het nummer van de
afspeellijst aan en de cijfers (N) onder “Total”
het aantal beschikbare afspeellijsten.
4) Selecteer de gewenste afspeellijst met de
toets of .
5) Druk op de toets FOLDER om de selectie te
bevestigen. Na het laden van de lijst geeft het
display opnieuw de speeltijd (P) weer.
6) Om de eerste track van de afspeellijst te star-
ten, drukt u op de toets . Om een andere
track uit de lijst te selecteren, drukt u op de
toets of of houdt u een van deze toetsen
ingedrukt en draait u met de draaiknop (16).
7) Om de tracks opnieuw zonder afspeellijst af
te spelen, schakelt u met de toets naar
pauze. Houd de toets CONT / LIST ingedrukt
en druk enkele keren op de toets of (21)
tot het displaybericht “Folder” in de tekstregel
verschijnt. Na het loslaten van de toetsen,
verschijnt het displaybericht “SCAn” en ver-
volgens opnieuw de speeltijd (P). Er is dan
geen speellijst meer geladen.
5.3 Weergave van trackgegevens
en de rustmodus
Op het display (10) verschijnen heel wat gege-
vens:
1. Nummer van de geselecteerde track (A), als
boven de cijfers het displaybericht “TRACK”
verschijnt. Als onder de cijfers het displaybe-
richt “FOLDER” verschijnt, wordt het nummer
van de geselecteerde map weergegeven
[kan met de FOLDER (12) worden gewis-
seld].
2. Aantal tracks (N) op de cd of, als de tracks in
verschillende mappen zijn ingedeeld, het
aantal tracks in de geselecteerde map
3. Speeltijd van de geselecteerde track, relatief
(H) en absoluut (P); de seconden zijn in 75
zogenaamde frames ingedeeld
De weergave van de speeltijd kan met de
toets TIME (7) worden omgeschakeld:
Bij het displaybericht Elapse (E) wordt de
reeds verstreken speeltijd van de track
aangeduid.
Bij het displaybericht Total Remain (F, G)
wordt de resterende tijd van de totale cd
aangeduid (niet mogelijk bij mp3-bedrijf).
Bij het displaybericht Remain (G) wordt de
resterende speeltijd van de track aange-
duid.
4. In de tekstregel (O) verschijnt:
– de naam van de track bij gewone audio-
cdʼs met cd-tekst
– de bestandsnaam bij mp3-bestanden
U kunt tussen de tekstregel en de weer-
gave van volgende gegevens (ID3-tagss)
omschakelen. Houd hiervoor de toets

NL
B
31
TIME ingedrukt en selecteer met de toets
of (21):
Weergave (M)
TITLE = naam van de track
ALBUM = naam van het album
ARTIST = naam van de uitvoerder
geen = bestandsnaam
5.3.1 Grafische weergave van de speeltijd
Behalve de numerieke weergave van de speel-
tijd (P) geeft de balkweergave (H) ook de speel-
tijd, mbt de tracktijd, door haar lengte grafisch
weer (relatieve tijdweergave). De balk geeft de
laatste 30 seconden van een track aan door over
de volledige lengte te knipperen. Tijdens de laat-
ste 15 seconden gaat de balk sneller knipperen.
5.3.2 Aantal beats per minuut
Na het selecteren van een track, berekent de
beatteller automatisch het aantal beats per
minuut. Na korte tijd verschijnt het aantal onder-
aan rechts op het display (Q). Als de beatteller
geen precieze waarde kan berekenen (b.v. bij
rustige tracks), kunt u de waarde ook handmatig
bepalen:
1) Druk enkele keren (minstens 4 ×) op de toets
BPM / TAP (23) volgens het ritme van de
muziek. Het aantal beats wordt aangegeven
en het displaybericht “BPM” knippert ter aan-
duiding van de handmatige telmodus.
2) Om naar de automatische telmodus terug te
schakelen, houdt u de toets BPM / TAP inge-
drukt, tot het displaybericht “BPM” niet meer
knippert.
5.3.3 Rustmodus
Wanneer de beide afspeeleenheden langer dan
15 minuten in de pauzestand staan, schakelt het
apparaat naar de rustmodus. De beide laser-
aftastsystemen zijn dan uitgeschakeld en worden
zo gespaard. Op de displays verschijnt SLEEP
(slaap) en alle oplichtende toetsen gaan uit. Door
op een willekeurige toets te drukken, keert het
apparaat terug naar de vorige bedrijfsmodus.
5.4 De bedrijfsmodus selecteren
5.4.1 Continu afspelen en afspelen van een
individuele track
Om te wisselen tussen Afspelen van een indivi-
duele track [displaybericht “Single” (C)] en con-
tinu afspelen [displaybericht “Cont.” (D)] drukt u
op de toets CONT / LIST (8).
A Bij het afspelen van een individuele track
schakelt het apparaat telkens na afspelen
van een track in pauze.
Het afspelen van een individuele track is
speciaal voorzien voor DJ-toepassingen. Na
het selecteren van een track staat de afspeel-
eenheid precies op de plaats waar de muziek
begint (meestal niet bij tijdindex 00 : 00 : 00,
maar enkele frames later b.v. 0 : 00 : 15).
Deze positie wordt automatisch als beginpunt
(Auto Cue-punt) opgeslagen, en aangeduid
door het displaybericht CUE (L). Nadat het
afspelen van de track begonnen is, kunt u
met de toets CUE (18) naar dit beginpunt
terugspringen. Na het afspelen van een track
schakelt de cd-speler in pauze precies op de
plaats, waar de muziek van de volgende
track begint. Deze plaats wordt dan als het
nieuwe beginpunt opgeslagen.
B Bij continu afspelen worden alle tracks
naadloos na elkaar afgespeeld, d.w.z. na de
laatste track start opnieuw de eerste. Als de
tracks in verschillende mappen zijn inge-
deeld, worden echter alleen de tracks van de
geselecteerde map herhaald.
5.4.2 Relaiswerking – automatische start
van de andere afspeeleenheid aan het
einde van een track
Aan het einde van een track, kan automatisch de
andere afspeeleenheid worden gestart.
1) Schakel beide afspeeleenheden met de toets
CONT / LIST (8) naar Afspelen van een indivi-
duele track, zodat het bericht “Single” (C) op
beide displays verschijnt.
2) Selecteer op elke afspeeleenheid een track.
3) Druk op de toets RELAY (2). De toets licht op.
4) Start met de toets (20) het afspelen op
een afspeeleenheid. De andere afspeeleen-
heid moet in de pauzestand staan. Zodra een
track tot het einde is gespeeld, schakelt de
afspeeleenheid in pauze en start de andere.
De procedure blijft zich herhalen tot de relais-
werking wordt uitgeschakeld. (Druk hiervoor
opnieuw op de toets RELAY.)
5) Tijdens het relaisbedrijf kunt u bovendien op
elk moment in een track met de toets de
weergave van de ene naar andere afspeel-
eenheid omschakelen.
Opmerking: Nadat alle tracks van een map zijn afge-
speeld, wordt niet automatisch naar de volgende map
gewisseld. Dit moet steeds handmatig gebeuren (hoofd-
stuk 5.1, bedieningsstap 5).
5.5 Een track kort voorbeluisteren
Met de toets CUE (18) kunt u een track kort voor-
beluisteren, zolang deze toets wordt ingedrukt.
Na loslaten van de toets keert het apparaat terug
naar het begin van de track en schakelt het in
pauze.
1) De afspeeleenheid moet op Afspelen van
een individuele track zijn ingesteld: Display-
weergave “Single” (C). Bij displayweergave
“Cont.” (D) drukt u op de toets CONT / LIST
(8).
2) Selecteer de track (hoofdstuk 5.1, bedie-
ningsstappen 4 en 5).
3) Door de toets CUE ingedrukt te houden, kunt
u de track kort voorbeluisteren.
4) Als u de track wilt starten, druk dan op de
toets (20).
5.6 Versneld vooruit
en achteruit zoeken
Wilt u in een track snel vooruit of achteruit zoe-
ken, druk dan eerst op de toets SEARCH (17). In
de tekstregel (O) wordt SEARCH weergegeven.
Draai de knop REV / FWD (16) in de betreffende
richting. De snelheid van het vooruit resp. ach-
teruit zoeken hangt af van de snelheid waarmee
aan de knop wordt gedraaid.
Opmerkingen: In de pauzemodus wordt de huidige
plaats na het snel vooruit of achteruit zoeken continu
herhaald. Om dit te beëindigen, drukt u ofwel kort op
de toets CUE (18) [u plaatst een nieuw Cue-punt,
hoofdstuk 5.8.2] of start het afspelen met de toets
(20).
5.7 Een bepaalde plaats
in een track precies opzoeken
U kunt een plaats in een track tot op 1 frame
(1⁄75 sec) nauwkeurig opzoeken, b.v. als u het
afspelen niet vanaf het begin van de track, maar
vanaf een bepaalde plaats in de track wenst te
starten.
1) Als u de gewenste plaats door afspelen van
de track of met de functie Snel vooruit / ach-
teruit zoeken (hoofdstuk 5.6) ongeveer
hebt bereikt, schakelt u met de toets (20)
naar de pauzestand.
2) Door de draaiknop (16) naar links en rechts
te draaien, zoekt u de plaats nauwkeurig op.
Voor een akoestische controle kunt u de
ingestelde plaats continu horen.
3) Als u de gewenste plaats hebt gevonden,
druk dan op de toets CUE (18). Daarmee is
de plaats opgeslagen en het herhaald afspe-
len beëindigd. Met de toets kunt u nu het
afspelen vanaf deze plaats starten.
5.8 Naar een bepaalde plaats
in een track terugkeren
Om snel een bepaalde plaats nauwkeurig te
kunnen opzoeken, kunt u met de toetsen CUE 1
en CUE 2 (11) twee startpunten (Cue-punten)
opslaan, ook tijdens het afspelen van een track
(Fly-Cue).
Bovendien kunt u met de toets CUE (18) een
bijkomend startpunt bepalen. In de modus
Afspelen van een individuele track wordt dit
startpunt bij het bereiken of selecteren van een
volgende track echter overschreven met het
startpunt van de volgende track [schakel evt.
met de toets CONT / LIST (8) om naar Afspelen
van alle tracks].
Opmerking: De opgeslagen Cue-punten worden ge -
wist bij
– het selecteren van een andere map
– het omschakelen tussen CD, USB 1, USB 2
– het uitschakelen van het apparaat
5.8.1 Toetsen CUE 1 en CUE 2
1) Druk eerst kort op de toets MEMO / AUTO (9)
om het opslaan te activeren. De toets licht op.
2) Ofwel drukt u tijdens het afspelen op de toets
CUE 1 (11), als de gewenste plaats is bereikt
(Fly-Cue), ofwel schakelt u op de gewenste
plaats met de toets (20) in pauze, zoekt u
de plaats precies op met de draaiknop (16)
en drukt u vervolgens op toets CUE 1. Deze
toets knippert enkele keren en licht dan con-
tinu op. De toets MEMO / AUTO gaat uit. Her-
start het afspelen evt. met de toets .
3) Herhaal de bedieningsstappen 1 en 2 om een
ander Cue-punt vast te leggen met de toets
CUE 2.
4) Met de toetsen CUE 1 en CUE 2 kunt u nu
naar de bijbehorende Cue-punten springen:
het afspelen start onmiddellijk vanaf het res-
pectieve Cue-punt.
5.8.2 Toets CUE
1) Schakel tijdens het afspelen van een track
met de toets (20) in pauze, als de plaats
bereikt is, naar welke later moet worden
teruggesprongen. De toetsen en CUE
(18) lichten op.
2) Indien nodig, kunt u met de draaiknop (16) de
plaats nauwkeuriger opzoeken (hoofd-
stuk 5.7). De huidige plaats is daarna continu
te horen.
3) Druk op de toets CUE. Hierdoor wordt de
plaats als Cue-punt opgeslagen en het dis-
playbericht “CUE” (L) wordt weergegeven.
De toets CUE licht nu continu op. De toets
blijft knipperen als teken om het afspelen te
starten.
4) Herstart het afspelen met de toets .
5) Vervolgens kunt u met de toets CUE naar het
CUE-punt terugspringen. De afspeeleenheid
staat dan in de pauzestand.
6) Start het afspelen met de toets of houd de
toets CUE ingedrukt zolang u de track wenst
af te spelen. Na loslaten van de toets CUE
keert de afspeeleenheid terug naar het Cue-
punt en schakelt hij in pauze.

32
5.9 Snelheid met of zonder verandering
van toonhoogte wijzigen
U kunt de snelheid met de schuifregelaar (15)
met max. ±100 % wijzigen:
+100 % = dubbele snelheid
-
100 % = stilstand
1) Selecteer het regelbereik met de toets PITCH
(14). In de tekstregel (O) wordt kort de instel-
ling weergegeven:
“Pitch 8 %”, “Pitch 16 %”, “Pitch 100” of
“Pitch off”, als de snelheidsregelaar opnieuw
is uitgeschakeld en de track met de normale
snelheid wordt afgespeeld.
2) Wijzig de snelheid met de schuifregelaar. Het
display geeft rechts bovenaan (I) de procen-
tuele afwijking aan ten opzichte van de nor-
male snelheid. Het aantal beats (Q) veran-
dert overeenkomstig.
3) Met het wijzigen van de snelheid wijzigt ook
de toonhoogte in verhouding. Als de toon-
hoogte daarbij echter constant moet blijven,
drukt u op de toets MT (24). Op het display
wordt het bericht “MT” (S) weergegeven. Om
de functie uit te schakelen, drukt u opnieuw
op de toets MT.
5.10 Pitch Bend – Het ritme van
twee muziekfragmenten
op elkaar afstemmen
De beats van twee muziekfragmenten met het-
zelfde tempo kunnen tijdelijk precies op elkaar
worden afgestemd. Op deze manier wordt bij het
mengen tussen twee afspeeleenheden het ritme
tijdens het dansen niet onderbroken.
1) Synchroniseer met de snelheidsregelaar (15)
eerst het tempo van het muziekfragment dat
moet worden ingemengd met het tempo van
het huidige muziekfragment. Stel hiervoor
met de schuifregelaar hetzelfde aantal beats
per minuut in, zie weergave (Q) onderaan
rechts op het display.
2) Stem de beats van het muziekfragment dat
moet worden ingemengd, precies af op deze
van het huidige muziekfragment; gebruik
hiervoor de toetsen PITCH BEND (22):
Zolang de toets +of
-
ingedrukt wordt gehou-
den, wordt de track sneller resp. trager afge-
speeld. Op deze manier verschuiven de
beats zich ten opzichte van de beats van het
huidige muziekfragment.
3) De beats kunnen ook door draaien aan de
knop (16) worden verschoven.
5.11 Scratcheffecten genereren
5.11.1 Scratcheffecten
Om scratcheffecten te genereren (komt overeen
met het handmatig bedienen van een draaitafel),
drukt u op de toets SCRATCH (6) en draait u de
draaiknop (16) overeenkomstig vooruit en ach-
teruit. De LED van de knop licht op en in de teks-
tregel (O) wordt “SCRATCH” weergegeven. Om
het effect uit te schakelen, drukt u opnieuw op de
toets SCRATCH.
5.11.2 Liereffecten
Als de functie Master-Tempo (constante toon-
hoogte) ingeschakeld is [displaybericht “MT”
(S)], schakelt u deze uit met de toets MT (24).
Door de draaiknop (16) heen en weer te draaien,
neemt de afspeelsnelheid afwisselend toe en af.
Zo ontstaat een liereffect.
5.11.3 Stottereffect
De Cue-punten die met de toetsen CUE (18),
CUE 1 en CUE 2 (11) zijn opgeslagen (hoofd-
stuk 5.8), kunnen ook worden gebruikt om inte-
ressante stottereffecten te genereren: Door
meerdere keren kort na elkaar op een van de
toetsen te drukken, ontstaat een stottereffect. Dit
effect wordt nog sterker naarmate het Cue-punt
hiervoor geschikt is (b.v. inzetten van een instru-
ment, begin van een woord)
5.11.4 Naadloze loop afspelen
U kunt een bepaald fragment van een track als
naadloze loop afspelen zo lang u wenst.
1) Start het afspelen met de toets (20). Als
het gewenste beginpunt van de loop is
bereikt (punt a in figuur 6), tip dan op de toets
A (19).
Figuur 6 Naadloze loop afspelen
Tip: Om het beginpunt op 1 frame nauwkeurig vast
te leggen, schakelt u met de toets eerst naar
pauze; met de draaiknop (16) stelt u het punt exact
in en vervolgens drukt u op toets A.
2) Als bij het verder afspelen het gewenste eind-
punt van het fragment is bereikt (punt b in
figuur 6), druk dan op toets B / EDIT (19). Het
fragment tussen de punten wordt continu her-
haald. Zolang een naadloze loop wordt afge-
speeld, wordt het displaybericht “RELOOP”
(J) weergegeven.
3) Om het eindpunt te verschuiven of om dit tot
op één frame nauwkeurig in te stellen, drukt
u tijdens het afspelen van de loop op de toets
B / EDIT. De tijdsweergave (P) duidt nu de
tijdindex van het eindpunt weer. Verschuif
met de draaiknop (16) het eindpunt en beves-
tig het eindpunt met de toets B / EDIT.
4) Het fragment voor de loop kan ook gedeeld of
met een veelvoud verlengd worden. Tijdens
het afspelen van de loop, selecteert u met de
toets of (21) de wijziging van de lengte.
De tekstregel (O) geeft de instelling aan:
TRIM: 1⁄32, 1⁄16, 1⁄8, 1⁄4, 1⁄2, 1⁄1, 2⁄1, 4⁄1, 8⁄1, 16⁄1, 32⁄1
5) Om de loop te verlaten en de track verder af
te spelen, drukt u opnieuw op de toets
RELOOP / EXIT (19). Om de loop te herstar-
ten, drukt u opnieuw op de toets RELOOP /
EXIT.
Figuur 7 De loop beëindigen en opnieuw starten
Opmerking: Een opgeslagen loop wordt gewist, als tij-
dens het afspelen de volgende track is bereikt of een
andere track met de toets of (21) wordt geselec-
teerd.
Fragment met een fractie of veelvoud van een
beatlengte
De lengte van een fragment voor afspelen van
een loop kan ook bij de tracks in 4⁄4 -ritme exact
op een fractie of een veelvoud van een beat-
lengte worden ingesteld:
1⁄32, 1⁄16, 1⁄8, 1⁄4, 1⁄2, 1⁄1, 2⁄1, 4⁄1, 8⁄1, 16⁄1, 32⁄1
1) Houd de toets MEMO / AUTO (9) ingedrukt
houden en stel met de draaiknop (16) de
lengte in. De lengte wordt in de tekstregel (O)
weergegeven, b.v. “AUTO 2 / 1” = twee beat-
lengten. Na deze instelling licht de toets
MEMO / AUTO op, om aan te geven dat het
eindpunt van een loopfragment automatisch
wordt ingesteld.
2) Bepaal het beginpunt met de toets A (19). Zo
wordt tegelijk de naadloze loop gestart en het
eindpunt volgens de ingestelde lengte inge-
steld.
3) U kunt de lengte van het loopfragment ook
achteraf, zoals hierboven beschreven (bedie-
ningsstap 3 of 4), wijzigen.
5.12 Eigen reeks tracks samenstellen
Als er alleen geselecteerde tracks in een
bepaalde volgorde moeten worden afgespeeld,
dan kunt u een reeks van max. 99 tracks pro-
grammeren.
5.12.1 Een reeks tracks opslaan en afspelen
1) Als er een track wordt afgespeeld, moet u
deze met de toets (20) in pauze schakelen.
2) Schakel de programmeermodus in met de
toets PROG (13). De tijdweergave (P) scha-
kelt om naar de weergave van de eerste
geheugenplaats “P
-
01”. Het displaybericht
“PG” (R) knippert snel.
Opmerking: Als u deze modus onmiddellijk wilt ver-
laten, houdt u de toets PROG ingedrukt tot op het
display opnieuw de speeltijd (P) verschijnt.
3) Selecteer de eerste track, die u wilt opslaan,
met de toets oder (21) [hoofd-
stuk 5.1, bedieningsstappen 4 en 5].
4) Om de trackselectie te bevestigen, drukt u op
de toets PROG. De volgende geheugen-
plaats “P
-
02” wordt weergegeven.
5) Herhaal de bedieningsstappen 3 en 4 tot alle
tracks van de reeks opgeslagen zijn. Als er 99
tracks zijn opgeslagen en u probeert nog een
track op te slaan, verschijnt de melding “FULL”.
6) Druk op de toets om de reeks tracks af te
spelen. Het displaybericht “PG” (R) knippert
langzamer. De tracks worden volgens de
geselecteerde bedrijfsmodus (hoofdstuk
5.4.1) afgespeeld. Om een andere track uit
de reeks te selecteren, drukt u (meerdere
keren) op de toets of .
7) Om terug te schakelen naar de normale
afspeelmodus, schakelt u met de toets
naar pauze en houdt u de toets PROG inge-
drukt tot het displaybericht “PG” (R) niet meer
knippert.
Om de reeks tracks opnieuw af te spelen,
schakelt u naar pauze en drukt u op de toets
PROG, zodat het displaybericht “PG” op -
nieuw knippert. Start het afspelen van de
reeks tracks met de toets .
Opmerking: Zolang het displaybericht “PG” knippert of
continu oplicht, kunt u de reeks tracks oproepen. Ze
wordt gewist bijvoorbeeld als u het apparaat uitschakelt.
5.12.2 Een reeks tracks controleren
1) Als er een track wordt afgespeeld, schakelt u
eerst met de toets naar pauze.
2) Als nu het displaybericht “PG” knippert, drukt
u een keer op de toets PROG. Als het dis-
playbericht “PG” continu oplicht, drukt u
tweemaal op de toets PROG.
3) Selecteer met de toets of na elkaar de
geheugenplaatsen (P
-
01 … P
-
99). De track
die wordt opgeslagen verschijnt telkens in de
tekstregel (O).
4) Druk op de toets om de reeks tracks af te
spelen.
PLAY c
LOOP
1. 2.
RELOOP / EXITRELOOP / EXIT
ab
1.
PLAY PLAY
LOOP
2.
AB / EDIT
NL
B

33
5.12.3 Een reeks tracks aanvullen of wissen
1) Als er een track wordt afgespeeld, moet u
deze met de toets in pauze schakelen.
2) Als het displaybericht “PG” knippert, houdt u
de toets PROG ingedrukt tot “PG” niet meer
knippert.
3) Druk kort op de toets PROG, zodat “PG” snel
knippert en de tijdsaanduiding (P) omscha-
kelt naar de weergave van de volgende vrije
geheugenplaats “P
-
…”.
4) Om te wissen houdt u de toets PROG inge-
drukt tot op het display opnieuw de speeltijd
(P) wordt weergegeven, of om met een
andere track aan te vullen selecteert u deze
met de toets of en bevestigt u met de
toets PROG. Druk op de toets om de aan-
gevulde reeks tracks af te spelen.
6 Faderstart
De functie Start / Pause van de toets (20) kunt
u vanaf een mengpaneel met de faderstartfunc-
tie op afstand bedienen. De aansluiting op het
mengpaneel wordt beschreven in hoofdstuk 4,
bedieningsstap 3. Stel de schuifregelaar (34) op
de achterzijde van het afspeelmechanisme in op
de faderstart van het mengpaneel:
LOCK = besturing via een in- / uitschakelaar
Voor de meeste mengpanelen uit het gamma
van “img Stage Line” moet deze schake-
laarstand worden geselecteerd. Met het
openschuiven van de regelaar wordt op het
mengpaneel een schakelaar gesloten die het
afspelen start. Bij het dichtschuiven van de
regelaar, gaat de schakelaar open en scha-
kelt de afspeeleenheid in pauze.
Figuur 8 Faderstart via in- / uitschakelaar
TACT = besturing via een drukknop
Als de drukknop door het openschuiven van
de regelaar de eerste keer wordt bediend,
start het afspelen. Als de drukknop een
tweede keer wordt bediend door het dicht-
schuiven van de regelaar, dan schakelt de
afspeeleenheid in pauze.
Figuur 9 Faderstart via druktoetsen
CUE PLAY = besturing via een impuls
Bij het openschuiven van de regelaar start u
door een korte stuurimpuls van het mengpa-
neel het afspelen vanaf het begin van de
track (Auto-Cue-punt hoofdstuk 5.4.1) of
vanaf het met de toets CUE (18) ingestelde
Cue-punt (hoofdstuk 5.8.2). Bij het sluiten
van de regelaar keert de afspeeleenheid door
een andere stuurimpuls terug naar dit begin-
punt, waar ze in pauze schakelt.
Figuur 10 Faderstart via stuurimpuls
7 Firmware updaten
Als op het internet nieuwe firmware beschikbaar
is, kan uw apparaat geüpdatet worden:
1) Op de website homepage van “img Stage
Line” (www.imgstageline.com) onder de
rubriek “SUPPORT” klikt u op “Software-
Updates”.
Scroll vervolgens naar beneden tot aan de
rubriek “FIRMWARE-DOWNLOADS”.
Om te downloaden klikt u dan op het symbool
voor “CD-292USB”.
Kopieer de gedownloade software naar een
USB-stick.
2) Schakel de CD-292USB met de netschake-
laar (28) uit.
3) Steek de USB-stick met de nieuwe firmware
in de linker USB-jack 1 (26).
4) Houd op de linker afspeeleenheid de toets
PROG (13) ingedrukt en schakel het apparaat
opnieuw in. Laat de toets PROG pas opnieuw
los, als op het linker display “UP dA t E” wordt
aangegeven.
5) Als na het inlezen in de tekstregel (O) het
bericht “Ready” verschijnt, drukt u op de toets
(20) om de firmwareactualisering te star-
ten. Aan de hand van de balkweergave (H)
en de tekstregel kan de actualisering worden
opgevolgd. Als het displaybericht “Finish”
verschijnt, is de firmware geactualiseerd.
6) Schakel het apparaat uit en opnieuw in.
8 Onderhoud van het apparaat
Bescherm het apparaat tegen stof, trillingen,
vocht en warmte (toegelaten omgevingstempe-
ratuur 0 – 40 °C). Verwijder het stof met een
zachte, droge doek. Gebruik zeker geen water of
chemicaliën.
Opmerking in verband met klankstoringen en
leesfouten
Sigarettenrook en stof dringen makkelijk in alle
openingen van de cd-speler en zet zich ook af op
de optische onderdelen van de laseraftastsyste-
men. Mocht deze afzetting tot leesfouten en
klankstoringen leiden, dan moet het apparaat
door een gekwalificeerd vakman worden gerei-
nigd. De kosten voor deze reiniging draagt de
koper, ook tijdens de garantietermijn!
9 Technische gegevens
Frequentiebereik: . . . . . 20 – 20 000 Hz
THD: . . . . . . . . . . . . . . . < 0,1 %
Kanaalscheiding: . . . . . > 80 dB
Dynamisch bereik: . . . . > 80 dB
Signaal /
Ruis-verhouding: . . . . . > 80 dB
Uitgang: . . . . . . . . . . . . 2 V (lijnniveau),
cinch-jacks
leesbare
bestandssystemen: . . . NTFS, FAT, HFS+
Antischokgeheugen: . . . 15 seconden
Voedingsspanning: . . . . 230 V~ / 50 Hz
Vermogensverbruik: . . . max. 40 VA
Omgevings-
temperatuurbereik: . . . . 0 – 40 °C
Afmetingen (B×H×D)
Bedieningsgedeelte: . 482 × 90 × 85 mm,
2 HE (rackeenheden)
Afspeelgedeelte: . . . . 482 × 90 × 260 mm,
2 HE (rackeenheden)
Gewicht: . . . . . . . . . . . . 6,5 kg
Wijzigingen voorbehouden.
START /
PAUSE CUE
PLAY
LOCK
TACT
1.×CuePlay
2.×Pause
START /
PAUSE CUE
PLAY
LOCK
TACT
1.×Start
2.×Pause
START /
PAUSE CUE
PLAY
LOCK
TACT
Start
Pause
Deze gebruiksaanwijzing is door de auteurswet beschermd eigendom van MONACOR
®
INTERNATIONAL
GmbH & Co. KG. Een reproductie – ook gedeeltelijk – voor eigen commerciële doeleinden is verboden.
NL
B

Todos los elementos de funcionamiento y las
conexiones que se describen pueden encon-
trarse en la página 3 desplegable.
Contenidos
1 Elementos de Funcionamiento
y Conexiones . . . . . . . . . . . . . . . . . . . 34
1.1 Aparato de control . . . . . . . . . . . . . . . . 34
1.2 Lector, panel frontal . . . . . . . . . . . . . . . 35
1.3 Lector, panel posterior . . . . . . . . . . . . . 35
2 Notas de Seguridad . . . . . . . . . . . . . . 35
3 Aplicaciones . . . . . . . . . . . . . . . . . . . . 35
4 Colocación y Conexión del Aparato .36
5 Funcionamiento . . . . . . . . . . . . . . . . . 36
5.1 Reproducir piezas musicales . . . . . . . . 36
5.2 Cargar la lista de reproducción . . . . . . 36
5.3 Indicación de la información de pista
y modo sleep . . . . . . . . . . . . . . . . . . . . 36
5.3.1 Indicación gráfica del tiempo
de reproducción . . . . . . . . . . . . . . . . . 37
5.3.2 Número de beats por minuto . . . . . . . 37
5.3.3 Modo sleep . . . . . . . . . . . . . . . . . . . . 37
5.4 Selección del modo de funcionamiento 37
5.4.1 Reproducción continua y
reproducción de una sola pista . . . . . 37
5.4.2 Modo relé – inicio automático del
otro lector al final de una pista . . . . . 37
5.5 Reproducción breve de un inicio
de pista . . . . . . . . . . . . . . . . . . . . . . . . . 37
5.6 Avance rápido y retroceso . . . . . . . . . . 37
5.7 Selección precisa de
un punto concreto . . . . . . . . . . . . . . . . . 37
5.8 Volver a un punto concreto . . . . . . . . . 37
5.8.1 Botones CUE 1 y CUE 2 . . . . . . . . . . 37
5.8.2 Botón CUE . . . . . . . . . . . . . . . . . . . . 37
5.9 Cambiar la velocidad con o
sin desplazar el pitch . . . . . . . . . . . . . . 38
5.10 Pitch Bend – igualar el ritmo (beats)
entre dos piezas musicales . . . . . . . . . 38
5.11 Efectos . . . . . . . . . . . . . . . . . . . . . . . . . 38
5.11.1 Efectos scratch . . . . . . . . . . . . . . . . . 38
5.11.2 Efectos droning . . . . . . . . . . . . . . . . . 38
5.11.3 Efectos stutter . . . . . . . . . . . . . . . . . . 38
5.11.4 Reproducción de un bucle continuo . 38
5.12 Compilación de su secuencia
personal de pistas . . . . . . . . . . . . . . . . 38
5.12.1 Guardar y
reproducir una secuencia de pistas . . 38
5.12.2 Comprobar una secuencia de pistas . 38
5.12.3 Completar o
borrar una secuencia de pistas . . . . . 39
6 Inicio Fader . . . . . . . . . . . . . . . . . . . . . 39
7 Actualizar el Firmware . . . . . . . . . . . . 39
8 Mantenimiento del Aparato . . . . . . . . 39
9 Especificaciones . . . . . . . . . . . . . . . . 39
1 Elementos de Funcionamiento
y Conexiones
1.1 Aparato de control
1Panel de control del lector 1
Para más detalles, ver la fig. 2
2Botón RELAY, para el inicio automático del
otro lector al final de una pista
(apartado 5.4.2)
3Panel de control del lector 2
Para más detalles, ver la fig. 2
4Botón OPEN / CLOSE para abrir y cerrar la
bandeja del CD [como los botones (27, 29)
del mecanismo de lectura]
5Botón CD / USB para conmutar entre CD y
medio de almacenamiento USB: Para ello, el
lector tiene que estar en pausa con el botón
(20).
Si hay dos memorias USB conectadas, des-
pués de pulsar el botón CD / USB seleccione
CD, USB 1 o USB 2 con el botón o (21).
La línea de texto (O) muestra la selección.
Para confirmar, pulse el botón CD / USB.
6Botón SCRATCH para activar / desactivar la
función de scratch
Con la función activada (el botón se ilumina)
se pueden crear efectos scratch con el jog
wheel (16)
7Botón TIME para activar la indicación tempo-
ral (H, P)
Para la indicación “Remain” (G)
Tiempo de reproducción restante de la
pista actual
Para la indicación “Elapse” (E)
Tiempo transcurrido de la pista actual
Para la indicación “Total Remain”
Tiempo restante del CD entero
(no es posible en modo MP3)
Para el modo MP3, con el botón TIME pul-
sado, cambie la línea de texto (O) para indi-
car título, álbum, artista (etiquetas ID3) o
nombre de archivo con el botón o (21)
8Botón CONT / LIST
1. Para cambiar entre reproducción de una
sola pista [indicación “Single” (C)] y repro-
ducción continua [indicación “Cont.” (D)]
2. Para cargar listas de reproducción
(apartado 5.2)
9Botón MEMO / AUTO
1. Para guardar puntos Cue con los botones
CUE 1 y CUE 2 (11)
2. Para reproducir una sección de una pista
como bucle con la longitud de un múltiplo
o fracción de la longitud de un beat
(apartado 5.11.4)
10 Visualización, para más detalles ver la fig. 3
ACuando se indica “TRACK” sobre los dígi-
tos: Número de la pista de música (en la
carpeta seleccionada);
Cuando se indica “FOLDER” bajo los dígi-
tos: Número de la carpeta seleccionada
BSímbolo de reproducción
C“Single”: Indica el modo de reproducción
de una sola pista
D“Cont.”: Indica el modo de reproducción
continua de las pistas
EIndicación “Elapse”: Indica que se muestra
el tiempo transcurrido de una pista
F“Total”: Indica junto con “Remain” (G) que
se muestra el tiempo restante del CD
(no es posible en modo MP3)
G“Remain”: Indica que se muestra el tiempo
restante de una pista. Indica junto con
“Total Remain” que se muestra el tiempo
restante del CD
HBarra gráfica para mostrar el tiempo de
reproducción relativo de la pista
IDesviación de la velocidad estándar en
porcentajes
J“RELOOP”: Indica la reproducción de un
bucle continuo
K“CD” o “USB”: Indica si se ha seleccionado
un CD, el puerto USB 1 (26) o el USB 2
(30). Con el puerto USB 2 seleccionado,
parpadea la indicación “USB”.
L“CUE”: Aparece cuando el lector está en el
modo pausa en el punto Cue
(apartados 5.4.1 y 5.8.2).
MPara el modo MP3: Este campo indica si el
nombre de la pista, álbum o artista de la
pista musical aparece en la línea de texto
(O). Si no se indica ninguna de estas indi-
caciones, aparecerá el nombre del archivo
(apartado 5.3).
NNúmero de pistas del CD;
Para el modo MP3:
Número de las pistas en la carpeta selec-
cionada [“TRACK” sobre los dígitos (A)]
o número de las carpetas [“FOLDER” bajo
los dígitos (A)]
OLínea de texto para información adicional
PIndicación del tiempo de reproducción, ver
también puntos E y G
QIndicación de los beats por minuto (BPM)
R“PG”: Parpadea si se programa o se repro-
duce una secuencia de pistas personal
S“MT” (Master Tempo): Indica la función
para el pitch constante (apartado 5.9)
11 Botones CUE 1 y CUE 2
1. Para guardar dos puntos Cue [también
posible durante la reproducción; para
guardar, pulse primero el botón MEMO /
AUTO (9)]
2. Para ir a los puntos Cue guardados
12 Botón FOLDER para el modo MP3
1. Para cambiar entre nombre de la pista o
carpeta en la línea de texto (O),
teniendo en cuenta el ajuste seleccionado,
se puede seleccionar una pista o una car-
peta con los botones y (21)
2. Para cargar listas de reproducción
(apartado 5.2)
3. Para seleccionar una partición en un disco
duro conectado (apartado 5.1)
13 Botón PROG para compilar y reproducir una
secuencia de pistas personal (apartado
5.12)
14 Botón PITCH para activar / desactivar el con-
trol de velocidad (15) y para seleccionar el
rango de ajuste de la velocidad (8 %, 16 % ó
100 %)
La línea de texto (O) indica brevemente el
ajuste seleccionado [Pitch 8 %, 16 %, 100, off
(apagado)]
E
34

15 Control deslizante para cambiar la velocidad
de reproducción [sin cambiar el pitch cuando
se ilumina el botón MT (24)]
La velocidad sólo puede cambiarse cuando
se ilumina el botón PITCH (14).
16 Jog wheel REV / FWD
–Para el avance rápido y el retroceso
cuando se ha pulsado el botón SEARCH
(17)
–Para crear efectos scratch cuando se ha
pulsado el botón SCRATCH (6)
–Para la función “Pitch Bend” durante la
reproducción de una pista (apartado
5.10)
–Para seleccionar con precisión un punto
cuando el lector está en pausa
–Con el botón o (21) pulsado para la
selección rápida de pistas [“TRACK” sobre
los dígitos (A)] o de carpetas [“FOLDER”
bajo los dígitos (A)]
17 Botón SEARCH para activar / desactivar el
avance / retroceso rápido con el jog wheel (16)
18 Botón CUE para reproducir brevemente el
inicio de pista (apartado 5.5) y para volver
a un punto previamente definido (apar-
tado 5.8.2)
19 Botones para guardar y reproducir un bucle
continuo
Botón A para definir el punto de inicio de una
sección para un bucle continuo
Botón B / EDIT para definir el punto de finali-
zación y el inicio simultáneo del bucle;
para desplazar el punto de finalización,
pulse de nuevo el botón y ajuste el punto
de finalización con el jog wheel (16)
Botón RELOOP / EXIT para salir del bucle
continuo o para reproducir el bucle
20 Botón para iniciar una pista y para con-
mutar entre reproducción y pausa
21 Botones y
1. Para la selección de pista cuando se indica
“TRACK” sobre los dígitos (A):
Botón para seleccionar la siguiente pista
Botón para volver al inicio de pista en
reproducción. Cada vez que se pulsa el
botón , el aparato retrocede una pista.
Si uno de los botones se mantiene pulsa -
do, las pistas pueden seleccionarse rápi-
damente con el jog wheel (16).
2. Para el modo MP3: Para seleccionar una
carpeta cuando se indica “FOLDER” bajo
los dígitos (A) [para activarse con el botón
FOLDER (12)]
Si uno de los botones se mantiene pul-
sado, las carpetas pueden seleccionarse
rápidamente con el jog wheel (16).
3. Para seleccionar un CD o un medio de
almacenamiento USB, ver también el
botón CD / USB (5)
4. Para dividir o multiplicar la sección de pista
para un bucle continuo (apartado 5.11.4)
5. Para el modo MP3 y con el botón TIME (7)
pulsado: Para cambiar la línea de texto (O)
a indicación de título, álbum, artista (eti-
quetas ID3) o nombre de archivo
6. Para seleccionar una lista de reproducción
(
apartado 5.2)
7. Para seleccionar una partición en un disco
duro conectado (apartado 5.1)
22 Botones PITCH BEND para adaptar el ritmo
de la pista en reproducción al ritmo de una
pieza musical que se está reproduciendo en
el otro lector (apartado 5.10)
23 Botón TAP para el modo contador manual
del contador de beats y para volver al modo
automático (apartado 5.3.2)
24 Botón MT (Master Tempo) para activar / des-
activar la función para el pitch constante
(apartado 5.9)
1.2 Lector, parte frontal
25 Bandeja de CD del lector 1
26 Puerto USB 1 para insertar un lápiz USB o
para conectar un disco duro
27 Botón OPEN / CLOSE para abrir y cerrar la
bandeja de CD 1 [como el botón (4) del
aparato de control]
28 Interruptor ON / OFF POWER con LED Power
(rojo) encima
29 Botón OPEN / CLOSE para abrir y cerrar la
bandeja de CD 2 [como el botón (4) del
aparato de control]
30 Puerto USB 2 para insertar un lápiz USB o
para conectar un disco duro
31 Bandeja de CD del lector 2
1.3 Lector, parte posterior
32 Salida de audio LINE OUT del lector 2 para
conectar a la entrada de línea de, por ejem-
plo, un amplificador o un mezclador
33 Jack 3,5 mm START / PAUSE del lector 2
para el control remoto de la función Start /
Pause de un mezclador
34 Interruptor selector para el tipo de control
remoto mediante las tomas START / PAUSE
(33, 38) [apartado 6]
Posición LOCK
Para el control mediante un interruptor
ON / OFF
Posición TACT
Para el control mediante un pulsador
Posición CUE / PLAY
Mediante una pulsación de control del
mezclador, el lector empezará desde el
punto Cue [punto Auto Cue o configurado
con el botón CUE (18)] cuando el Fader
del mezclador aumente o volverá al punto
Cue cuando se cierre el Fader.
35 Toma para la conexión de la parte de control:
Conéctela a la toma REMOTE CONTROL
CONNECT TO MAIN UNIT 2 mediante uno
de los cables de conexión entregados
36 Cable de corriente para conectar a una toma
(230 V~ / 50 Hz)
37 Toma para la conexión de la parte de control:
Conéctela a la toma REMOTE CONTROL
CONNECT TO MAIN UNIT 1 mediante uno
de los cables de conexión entregados
38 Jack 3,5 mm START / PAUSE del lector 1 para
el control remoto de la función Start / Pause
de un mezclador
39 Salida de audio LINE OUT del lector 1 para
conectar a la entrada de línea de, por ejem-
plo, un amplificador o un mezclador
2 Notas de Seguridad
Este aparato cumple con todas las directivas
relevantes de la UE y por lo tanto está marcado
con el símbolo .
Preste atención a los siguientes puntos bajo
cualquier circunstancia:
G¡Precaución! Nunca mire directamente al
mecanismo del CD cuando la bandeja del CD
está abierta, el haz del láser podría emitirse
provocando daños oculares.
GEl aparato está adecuado sólo para utilizarlo
en interiores. Proteja el aparato de goteos y
salpicaduras, elevada humedad del aire y calor
(temperatura ambiente admisible: 0 – 40 ºC).
GNo coloque ningún recipiente con líquido
encima del aparato, p. ej. un vaso.
GNo utilice el aparato y desconecte inmediata-
mente la toma de corriente del enchufe si:
1. Existe algún daño visible en el aparato o en
el cable de corriente.
2. El aparato ha sufrido daños después de una
caída o accidente similar.
3. No funciona correctamente.
Sólo el personal cualificado puede reparar el
aparato bajo cualquier circunstancia.
GUn cable de corriente dañado sólo puede
repararse por el personal cualificado.
GNo tire nunca del cable de corriente para des-
conectarlo de la toma, tire siempre del enchufe.
GUtilice sólo un paño suave y seco para la lim-
pieza; no utilice nunca ni productos químicos
ni agua.
GNo podrá reclamarse garantía o responsabili-
dad alguna por cualquier daño personal o mate-
rial resultante si el aparato se utiliza para otros
fines diferentes a los originalmente concebidos,
si no se conecta o se utiliza adecuadamente o
no se repara por expertos. Del mismo modo, no
se aceptará ninguna responsabilidad por erro-
res del funcionamiento o por la pérdida de datos
provocada por un defecto y los daños consi-
guientes de esta pérdida de datos.
3 Aplicaciones
El lector CD / MP3 CD-292USB con dos lectores
se ha diseñado especialmente para aplicaciones
DJ profesionales. Muchas características funcio-
nales se han adecuado precisamente a este
rango de aplicaciones, p. ej. reproducción de una
sola pista, contador de beats automático, repro-
ducción continua de un bucle, cambio de veloci-
dad sin desplazar el pitch o memoria antichoque.
El CD-292USB permite reproducir CDs de
audio, incluso CDs de audio creados por usted
(CD-R) y CDs con pistas en formato MP3. Sin
embargo, pueden aparecer problemas cuando
se reproduce un CD-RW, dependiendo del tipo
de CD, del grabador de CDs y del programa de
grabación utilizado.
Mediante los puertos USB, se pueden repro-
ducir también archivos MP3 desde un disco duro
o desde un lápiz USB. Los lectores podrán acce-
der a los puertos USB independientemente de
modo que es posible el funcionamiento con un
solo medio de almacenamiento USB.
Si va a poner el aparato fuera de servicio
definitivamente, llévelo a la planta de reci-
claje de la zona para que su eliminación
no sea perjudicial para el medio ambiente.
ADVERTENCIA El aparato está alimentado con
un voltaje peligroso. Deje el
mantenimiento en manos del
personal cualificado. Podría
provocar descargas.
E
35

E
36
4 Colocación y
Conexión del Aparato
La unidad de control y el lector están diseñados
para la instalación en un rack para aparatos con
una amplitud de 482 mm / 19″, sin embargo, se
pueden utilizar como aparatos de sobremesa.
En cualquier caso, el lector tiene que utilizarse
en posición horizontal mientras que la unidad de
control se puede instalar como quiera, incluso
en una posición inclinada. Para la instalación en
rack, se necesitas 2 unidades respectivamente
para la unidad de control y para el lector (1 U =
44,45 mm).
Antes de hacer o modificar cualquier conexión,
desconecte el lector CD / MP3 y todos los apara-
tos que hay que conectar.
1) Conecte la unidad de control y el lector
mediante los dos cables de conexión entre-
gados:
Toma CONNECT TO REMOTE CONTROL 2
(35) del lector a la toma REMOTE CONTROL
CONNECT TO MAIN UNIT 2 de la unidad de
control
Toma CONNECT TO REMOTE CONTROL 1
(37) del lector a la toma REMOTE CONTROL
CONNECT TO MAIN UNIT 1 de la unidad de
control
2) Conecte las dos salidas de señal LINE OUT
(32, 39), cada una a una entrada con nivel de
línea como un mezclador o un amplificador
(inscripciones posibles: Line, CD, Aux).
3) Los dos lectores se pueden iniciar y poner en
pausa mediante un mezclador con función de
inicio Fader. Para ello, conecte las tomas
START / PAUSE (33, 38) mediante dos cables
con conectores jack 3,5 mm a las tomas
correspondientes del mezclador. Ponga el
CD-292USB en el tipo de inicio Fader del
mezclador, ver apartado 6.
4) Finalmente conecte la toma del cable de
corriente (36) a un enchufe (230 V~ / 50 Hz).
5 Funcionamiento
El funcionamiento de los dos lectores es idén-
tico. Conecte el aparato con el interruptor
POWER (28). El visualizador (10) se muestra
brevemente “boot” (procedimiento de inicio) y
WELCOME. Si se ha insertado un CD, después
de leerlo, el visualizador muestra información
sobre el CD. Si no hay ningún CD en el lector, se
visualizará “no diSC” (sin CD).
Desconecte el aparato después del funcio-
namiento. Los siguientes ajustes se mantienen
guardados para la siguiente operación:
1. El modo de funcionamiento seleccionado
(reproducción de una sola pista / reproduc-
ción continua, apartado 5.4.1)
2. La indicación temporal seleccionada (tiempo
restante / tiempo transcurrido, apartado 5.3)
3. El rango de ajuste de velocidad seleccionado
(apartado 5.9)
5.1 Reproducir piezas musicales
1) Para insertar un CD, abra la bandeja del CD
(25, 31) con el botón (4, 27, 29). Inserte el
CD con la cara con inscripciones mirando
hacia arriba y cierre la bandeja del CD con el
botón .
2) Adicionalmente o como alternativa, puede
insertarse un lápiz USB en los puertos USB
(26, 30) o un disco duro en cada uno de los
puertos USB. Para conmutar entre CD y
medio de almacenamiento USB, pulse el
botón CD / USB (5). Para ello, el lector tiene
que estar en pausa; si es necesario, pulse el
botón (20).
Si hay dos medios de almacenamiento
USB conectados, después de pulsar el botón
CD / USB, seleccione la fuente de señal (CD,
USB 1 o USB 2) con el botón o (21). La
línea de texto (O) muestra la selección. Se
salta la fuente de señal seleccionada actual-
mente. Confirme la selección con el botón
CD / USB.
Notas
1. La fuente de señal seleccionada también se
indica en el campo de visualización (K):
“CD” = se ha seleccionado el lector CD
“USB” indicado de modo fijo = USB 1
“USB” parpadeando = USB 2
2. Un disco duro tiene que alimentarse mediante un
alimentador propio si su consumo es superior a
500 mA.
3. Si hay varias particiones en un disco duro, se
pueden seleccionar del siguiente modo:
a) Mantenga pulsado el botón FOLDER (12) hasta
que en el visualizador se muestre “PA-SEL”
(Selección de Partición).
b) Seleccione la partición con el botón o . La
línea de texto (O) muestra el nombre en cada
caso.
c) Para confirmar, pulse el botón FOLDER.
3) Para iniciar la primera pista, pulse el botón
(20). Durante la reproducción, el repro-
ductor muestra el símbolo (B). La repro-
ducción se puede interrumpir y reanudar en
cualquier momento con el botón .
4) Para seleccionar otra pista, utilice los boto-
nes y .
Botón : Para ir a la siguiente pista
Botón : Para volver al inicio de la pista en
reproducción. Cada vez que se pulsa el
botón, el aparato retrocede una pista.
Si uno de los botones se mantiene pulsado,
las pistas pueden seleccionarse rápidamente
con el jog wheel (16).
5) Para el funcionamiento MP3: Si las pistas
musicales están clasificadas en varias carpe-
tas, pulse el botón FOLDER (12) para selec-
cionar una carpeta. En el visualizador apa-
rece “FO-SEL” (Folder Selection / Selección
de Carpeta) y la línea de texto (O) muestra el
nombre de la carpeta. Los dígitos (A) de la
parte superior izquierda del visualizador
ahora muestran el número de la carpeta y los
dígitos (N) bajo “Total” muestran la cantidad
de carpetas disponibles.
Seleccione la carpeta con el botón oder .
Si uno de los botones se mantiene pulsado,
las carpetas pueden seleccionarse rápida-
mente con el jog wheel (16).
Para confirmar la selección, pulse el botón
FOLDER; en el visualizador se muestra de
nuevo el tiempo de reproducción (P). Selec-
cione la pista deseada de la carpeta con el
botón oder .
6) Para insertar otro CD, primero ponga el apa-
rato en pausa con el botón , de lo contra-
rio la bandeja del CD no se puede abrir con
el botón .
7) Antes de desconectar el aparato, cierre siem-
pre las bandejas de los CDs con los botones
para proteger los láseres contra impure-
zas. Después de esto, desconecte el aparato
con el interruptor POWER.
5.2 Cargar la lista de reproducción
Para reproducir una selección de archivos MP3,
se pueden cargar listas de reproducción con la
extensión de archivo “wpl”, “xml” o “m3u” crea-
das en un ordenador en el CD-292USB.
Importante: La lista de reproducción y los archi-
vos MP3 correspondientes tienen que estar en
el mismo medio de almacenamiento. Las listas
de reproducción tienen que guardarse siempre
en el directorio raíz.
1) Si se reproduce una pista, ponga el aparato
en pausa con el botón (20).
2) Mantenga pulsado el botón CONT / LIST (8) y
seleccione con el botón o (21) qué
extensión de archivo hay que buscar. La
línea de texto (O) muestra la selección (M3U
Scan, WPL Scan, XML Scan).
3) Pulse el botón FOLDER (12). En el visualiza-
dor aparece “FO-SEL” y la línea de texto (O)
muestra el nombre de la primera lista de
reproducción. Los dígitos (A) de la parte
superior izquierda del visualizador ahora
muestran el número de la lista de reproduc-
cón y los dígitos (N) bajo “Total” muestran la
cantidad de listas disponibles.
4) Seleccione la lista de reproducción deseada
con el botón o .
5) Pulse el botón FOLDER para confirmar la
selección. Después de cargar la lista, en el
visualizador se muestra de nuevo la indica-
ción del tiempo de reproducción (P).
6) Para iniciar la primera pista de la lista de
reproducción, pulse el botón . Para selec-
cionar otras pistas de la lista, pulse el botón
o o mantenga pulsado uno de estos
botones y utilice el jog wheel (16).
7) Para reproducir las pistas de nuevo sin una
lista de reproducción, ponga el aparato en
pausa con el botón . Mantenga pulsado el
botón CONT / LIST y pulse el botón o
(21) repetidamente hasta que aparezca “Fol-
der” en la línea de texto. Después de liberar
los botones, en el visualizador se muestra
“SCAn” y luego de nuevo la indicación del
tiempo de reproducción (P). Ya no habrá nin-
guna lista disponible.
5.3 Indicación de la información
de pista y modo sleep
El visualizador (10) indica una gran variedad de
información:
1. El número de la pista seleccionada (A) si se
muestra “TRACK” sobre los dígitos. Si “FOL-
DER” aparece bajo los dígitos, se indica el
número de la carpeta seleccionada [conmu-
table con el botón FOLDER (12)].
2. Cantidad de pistas (N) en el CD o, si las pis-
tas están clasificadas en diferentes carpetas,
la cantidad de las pistas en la carpeta selec-
cionada
3. Tiempo de reproducción de la pista seleccio-
nada: Relativo (H) y absoluto (P); los segun-
dos pueden dividirse en 75 frames
La indicación de tiempo de reproducción
puede cambiarse con el botón TIME (7):
Si se muestra Elapse (E), se indica el tiempo
transcurrido de la pista.
Si se muestra Total Remain (F, G), se indica
el tiempo remanente del CD
(no es posible en modo MP3).
Si se muestra Remain (G), se indica el
tiempo remanente de la pista.
4. La línea de texto (O) indica:
– El nombre de pista de CDs de audio
estándar con texto CD
– El nombre de archivo para el modo MP3
La línea de texto puede cambiarse por la
indicación de la siguiente información (eti-
quetas ID3). Para ello, mantenga pulsado

E
37
el botón TIME y seleccione con el botón
o (21):
Indicación (M)
TITLE = pista
ALBUM = álbum
ARTIST = artista
ninguno = nombre de archivo
5.3.1 Indicación gráfica del tiempo
de reproducción
Como añadido a la indicación temporal numé-
rica (P), la barra gráfica (H) indicará el tiempo de
reproducción gráficamente mediante su longi-
tud, en relación con la duración de la pista (pre-
sentación temporal relativa). Los últimos 30
segundos de una pista se indicarán con la barra
gráfica completa parpadeando, los últimos 15
segundos con un parpadeo más rápido.
5.3.2 Número de beats por minuto
Después de seleccionar una pista, el contador
de beats determina automáticamente el número
de bits por minuto. Después de un breve tiempo,
aparece el número en la parte inferior derecha
del visualizador (Q). Si el contador de beats no
puede determinar un valor correcto (p. ej. para
pistas musicales suaves), puede determinarse
el valor manualmente:
1) Pulse brevemente el botón BPM / TAP (23)
varias veces al ritmo de la música (4 veces
como mínimo). El número de beats aparece
y la indicación “BPM” parpadea para mostrar
el modo manual.
2) Para volver al modo automático, mantenga
pulsado el botón BPM / TAP hasta que la indi-
cación “BPM” deje de parpadear.
5.3.3 Modo sleep
Si ambos lectores están en pausa durante más
de 15 minutos, el aparato pasa a modo sleep.
Los láseres se apagan y de este modo se prote-
gen. En el visualizador aparece SLEEP y se
apagan todos los botones iluminados. Si se uti-
liza cualquier botón, el aparato vuelve al modo
de funcionamiento previo.
5.4 Selección del modo
de funcionamiento
5.4.1 Reproducción continua y
reproducción de una sola pista
Para cambiar entre reproducción de una sola
pista [indicación “Single” (C)] y reproducción
continua [indicación “Cont.” (D)], pulse el botón
CONT / LIST (8).
A En la reproducción de una sola pista, el
aparato se pone en pausa cuando acaba la
pista.
Este modo está previsto especialmente
para aplicaciones DJ. Después de seleccio-
nar una pista, el aparato se pone en pausa
justo en el punto en el que empieza la música
(normalmente no el índice temporal 0 : 00 : 00
sino algunos frames después, p. ej. 0 : 00 : 15).
Este punto se guarda automáticamente
como punto de inicio (punto Auto Cue) y apa-
rece en el visualizador como CUE (L). Des-
pués de iniciar la pista se puede volver a este
punto de inicio con el botón CUE (18). Des-
pués de reproducir una pista, el aparato se
pondrá en pausa precisamente en el punto
en el que empieza la música de la siguiente
pista. Este punto luego se guardará como
nuevo punto de inicio.
B En la reproducción continua, todas las pis-
tas se reproducen continuamente una des-
pués de la otra, es decir, después de la última
pista se reinicia la primera pista. Sin
embargo, si las pistas están clasificadas en
varias carpetas, sólo se repetirán las pistas
de la carpeta seleccionada.
5.4.2 Modo relé – inicio automático del otro
lector al final de una pista
Al final de una pista, el otro lector puede iniciarse
automáticamente.
1) Ponga ambos lectores en reproducción de
una sola pista con los botones CONT / LIST
(8), de modo que en los visualizadores se
muestre “Single” (C).
2) Seleccione una pista en cada lector.
3) Pulse el botón RELAY (2). El botón se ilumina.
4) Inicie la reproducción en un lector con el
botón (20). El otro lector tiene que
ponerse en pausa. En cuanto una pista se
haya reproducido hasta el final, el lector se
pondrá en pausa y empezará el otro lector.
Este procedimiento se repetirá continua-
mente hasta que se desactive el modo relé.
(Para desconectar este modo, apriete de
nuevo el botón RELAY.)
5) Durante el modo de relé, en cualquier punto
de una pista, también puede cambiarse la
reproducción de un lector a otro con el botón
.
Nota: Después de que todas las pistas de una carpeta
se hayan reproducido hasta el final, el aparato no cam-
biará automáticamente a la siguiente carpeta. Esto
tiene que hacerse siempre manualmente (apartado 5.1,
paso 5).
5.5 Reproducción breve
de un inicio de pista
Para la reproducción breve del inicio de una
pista, mantenga pulsado el botón CUE (18).
Después de liberar el botón, el aparato volverá
al inicio de la pista y se pondrá en pausa.
1) Tiene que ponerse el lector en reproducción
de una sola pista: Indicación “Single” (C). Si
se muestra “Cont.” (D), pulse el botón CONT /
LIST (8).
2) Seleccione la pista (apartado 5.1, pasos 4
y 5).
3) Si se mantiene pulsado el botón CUE, se
reproduce brevemente el inicio de la pista.
4) Para reproducir la pista, pulse el botón
(20).
5.6 Avance rápido y retroceso
Para el avance rápido y el retroceso de una
pista, pulse primero el botón SEARCH (17). Se
indicará SEARCH en la línea de texto (O). Gire
el jog wheel REV / FWD (16) en la dirección
correspondiente. La velocidad de avance / retro-
ceso depende de la velocidad de giro de la
rueda.
Notas: En el modo pausa, el punto actual se repite
constantemente después del avance rápido o retro-
ceso. Para parar la repetición, pulse brevemente el
botón CUE (18) [se configura el nuevo punto Cue,
apartado 5.8.2] o bien empiece la reproducción con
el botón (20).
5.7 Selección precisa
de un punto concreto
Existe la posibilidad de seleccionar un punto en
una pista con la precisión de 1 frame (1⁄75 se -
gundo), p. ej. para iniciar la reproducción de un
punto concreto en vez de empezarla desde el
inicio de la pista.
1) Cuando esté a punto de alcanzarse el punto
deseado reproduciendo la pista o utilizando
el avance / retroceso rápido (apartado 5.6),
ponga el aparato en pausa con el botón
(20).
2) Seleccione con precisión el punto girando el
jog wheel (16) en el sentido horario o en sen-
tido inverso. Para una comprobación acús-
tica, el punto ajustado se repetirá constante-
mente.
3) Cuando se haya encontrado el punto dese-
ado, pulse brevemente el botón CUE (18).
De este modo, el punto se guardará y se aca-
bará la repetición. Ahora puede empezar la
reproducción desde este punto con el botón
.
5.8 Volver a un punto concreto
Para poder ir rápidamente a un punto concreto,
pueden guardarse dos puntos de inicio (puntos
Cue) con los botones CUE 1 y CUE 2 (11), in -
cluso durante la reproducción de una pista (Fly
Cue).
Además, puede definirse otro punto de inicio
con el botón CUE (18), sin embargo, en el modo
de reproducción de una sola pista, este punto
se sobrescribirá con el punto de inicio de la
siguiente pista cuando se llegue a la siguiente
pista o se seleccione [cambie a reproducción de
todas las pistas con el botón CONT / LIST (8), si
es necesario].
Nota: Se borrarán los puntos Cue guardados
– Cuando se seleccione otra carpeta
– Cuando se cambie entre CD, USB 1 y USB 2
– Cuando se apague el aparato
5.8.1 Botones CUE 1 y CUE 2
1) Pulse el botón MEMO / AUTO (9) para activar
el almacenamiento. Se iluminará el botón.
2) Durante la reproducción, pulse el botón CUE 1
(11) cuando se llegue al punto deseado (Fly
Cue) o bien ponga el aparato en pausa en el
punto deseado con el botón (20), utilice el
jog wheel (16) para ir al punto preciso, luego
pulse el botón CUE 1. Parpadeará varias
veces y luego se iluminará permanente-
mente. Se apagará el botón MEMO / AUTO.
Reinicie la reproducción con el botón , si
es necesario.
3) Repita los pasos 1 y 2 para definir otro punto
Cue con el botón CUE 2.
4) Los botones CUE 1 y CUE 2 ahora se pueden
utilizar para volver a los correspondientes
puntos Cue: La reproducción empieza inme-
diatamente desde el respectivo punto Cue.
5.8.2 Botón CUE
1) Mientras se reproduce una pista, ponga el
aparato en pausa con el botón (20)
cuando se alcance el punto al que el aparato
tiene que volver más tarde. Los botones y
CUE (18) parpadearán.
2) Si es necesario, puede seleccionarse el
punto con más precisión con el jog wheel
(16) [apartado 5.7]. A continuación se
repetirá continuamente el punto actual.
3) Pulse el botón CUE. De este modo, el punto
se marcará como punto Cue y en el visuali-
zador se mostrará “CUE” (L). Se iluminará
permanentemente el botón CUE. El botón
continuará parpadeando como petición para
empezar la reproducción.
4) Reinicie la reproducción con el botón .
5) Ahora se puede volver al punto Cue con el
botón CUE. Luego el lector se pone en
pausa.
6) Inicie la reproducción con el botón o man-
tenga pulsado el botón CUE mientras se
reproduzca la pista. Después de liberar el
botón CUE, el lector volverá al punto Cue y
se pondrá en pausa.

E
38
5.9 Cambiar la velocidad con o
sin desplazar el pitch
La velocidad puede cambiarse con el control
deslizante (15) hasta un ±100%:
+100 % = velocidad duplicada
-
100 % = parado
1) Seleccione el rango de ajuste con el botón
PITCH (14). La línea de texto (O) muestra
brevemente el ajuste:
“Pitch 8 %”, “Pitch 16 %”, Pitch 100” o
“Pitch off” cuando el control de velocidad se
desactiva de nuevo y la pista se reproduce a
velocidad estándar.
2) Ajuste la velocidad con el control deslizante.
El visualizador mostrará el porcentaje de
desviación de la velocidad estándar en la
parte superior derecha (I). El número de
beats (Q) cambiará según corresponda.
3) Cuando se cambia la velocidad, el pitch
vuelve a cambiar proporcionalmente. Sin
embargo, para un pitch constante, pulse el
botón MT (24). El visualizador mostrará la
indicación “MT” (S). Para desactivar la fun-
ción, pulse de nuevo el botón MT.
5.10 Pitch Bend – Igualar el ritmo (beats)
entre dos piezas musicales
Los beats de dos piezas musicales con la misma
velocidad se pueden sincronizar con precisión.
De este modo, no se interrumpe el ritmo de baile
cuando se entrelazan de un lector al otro.
1) Primero utilice el control de velocidad (15)
para adaptar la velocidad de la pieza musical
de la que hay que hacer el crossfading a la
velocidad de la pieza musical actual. Para
ello, ponga el mismo número de beats por
minuto (BPM) con el control deslizante, ver
indicación (Q) en la parte inferior de la dere-
cha del visualizador.
2) Sincronice los beats de la pieza musical de la
que hay que hacer el crossfading con los
beats de la pieza musical actual con los boto-
nes PITCH BEND (22): Mientras esté pul-
sado el botón +oder
-
, la reproducción de la
pista será más rápida o más lenta. De este
modo, se desplazarán los beats respecto a
los beats de la pieza musical actual.
3) Los beats también se desplazarán cuando
gire el jog wheel (16).
5.11 Efectos
5.11.1 Efectos scratch
Para crear efectos scratch (equivalente a girar
manualmente el plato de un giradiscos), pulse el
botón SCRATCH (6) y gire el jog wheel (16)
hacia delante y hacia atrás como quiera. El LED
del botón se iluminará y la línea de texto (O)
mostrará “SCRATCH”. Para desactivar el
efecto, pulse de nuevo el botón SCRATCH.
5.11.2 Efectos droning
Si la función Master Tempo (pitch constante) se
ha activado [indicación “MT” (S) en el visualiza-
dor], desactívela con el botón MT (24). Gire el
jog wheel (16) hacia delante o hacia atrás para
aumentar o disminuir la velocidad de reproduc-
ción alternativamente. Esto creará un efecto
droning.
5.11.3 Efectos stutter
Los puntos Cue guardados con los botones CUE
(18), CUE 1 y CUE 2 (11) [apartado 5.8] tam-
bién se pueden utilizar para crear interesantes
efectos stutter: Cuando uno de estos botones se
pulse brevemente varias veces, se creará un
efecto stutter. Cuanto más apropiado sea el
punto Cue (p. ej. el inicio de un instrumento o el
inicio de una palabra), más impresionante será
el efecto.
5.11.4 Reproducción de un bucle continuo
Se puede repetir una sección concreta de una
pista como bucle continuo las veces que quiera.
1) Cambie a reproducción con el botón (20).
Cuando llegue al punto de inicio deseado del
bucle (punto a en la fig. 6), pulse brevemente
el botón A (19).
Fig. 6 Reproducción de un bucle continuo
Consejo: Para definir el punto de inicio con la pre-
cisión de 1 frame, primero ponga el aparato en
pausa con el botón , seleccione con precisión el
punto con el jog wheel (16), luego pulse el botón A.
2) Cuando llegue al final deseado para la sec-
ción (punto b en la fig. 6) mientras continúa la
reproducción, pulse el botón B / EDIT (19).
Ahora se repetirá continuamente la sección
entre los puntos. Mientras se reproduzca un
bucle continuo, en el visualizador se indica
“RELOOP” (J).
3) Para desplazar el punto de finalización o
para definirlo con la precisión de 1 frame,
pulse el botón B / EDIT durante la reproduc-
ción del bucle. La indicación temporal (P)
mostrará ahora el índice temporal del punto
de finalización. Desplace el punto de finaliza-
ción con el jog wheel (16) y confirme el punto
de finalización con el botón B / EDIT.
4) La sección del bucle también se puede divi-
dir o multiplicar varias veces. Mientras se
reproduce el bucle, seleccione el cambio de
longitud con el botón o (21). La línea de
texto (O) muestra el ajuste:
TRIM: 1⁄32, 1⁄16, 1⁄8, 1⁄4, 1⁄2, 1⁄1, 2⁄1, 4⁄1, 8⁄1, 16⁄1, 32⁄1
5) Para salir del bucle y continuar con la repro-
ducción de la pista, pulse el botón RELOOP /
EXIT (19). Para reiniciar el bucle, pulse de
nuevo el botón RELOOP / EXIT.
Fig. 7 Salir de un bucle y reiniciarlo
Nota: Un bucle guardado se borra en cuanto se llega a
la siguiente pista o se selecciona otra pista con el botón
o (21) durante la reproducción.
Sección con una fracción o múltiplo de la duración de
un beat
Para pistas en tiempo 4⁄4 , la duración de una sec-
ción para la reproducción de un bucle se puede
ajustar exactamente en una fracción o múltiplo
de la duración de un beat:
1⁄32, 1⁄16, 1⁄8, 1⁄4, 1⁄2, 1⁄1, 2⁄1, 4⁄1, 8⁄1, 16⁄1, 32⁄1
1) Mantenga pulsado el botón MEMO / AUTO (9)
y ajuste la duración con el jog wheel (16). La
duración se indica en la línea de texto (O),
p. ej. “AUTO 2 / 1” = duración de 2 beats.
Después de este ajuste el botón MEMO /
AUTO se ilumina para indicar que el punto de
finalización de la sección de un bucle se ha
ajustado automáticamente.
2) Defina el punto de inicio con el botón A (19).
De este modo, el bucle se inicia al mismo
tiempo y el punto de finalización se configura
según la duración del ajuste.
3) La duración la sección del bucle también
puede cambiarse posteriormente, como se
describe anteriormente (paso 3 ó 4).
5.12 Compilación de su secuencia
personal de pistas
Para reproducir una selección de pistas en un
cierto orden, se puede programar una secuencia
de hasta 99 pistas.
5.12.1 Guardar y reproducir una secuencia
de pistas
1) Si se reproduce una pista, primero ponga el
aparato en pausa con el botón (20).
2) Cambie al modo de programación con el
botón PROG (13). La indicación temporal (P)
cambia a la indicación de la primera memoria
“P
-
01”. La indicación “PG” (R) parpadea
rápidamente.
Nota: Para salir inmediatamente de este modo,
mantenga pulsado el botón PROG hasta que en el
visualizador se muestre de nuevo el tiempo de
reproducción (P).
3) Seleccione la primera pista que hay que
guardar con el botón o (21) [apar-
tado 5.1, pasos 4 y 5].
4) Para confirmar la selección de pista, pulse el
botón PROG. Se indica la siguiente memoria
“P
-
02”.
5) Repita los pasos 3 y 4 hasta que todas las
pistas de la secuencia se hayan guardado. Si
intenta guardar otra pista después de haber
guardado 99, aparecerá el mensaje “FULL”.
6) Para reproducir la secuencia de pistas, pulse
el botón . La indicación “PG” (R) parpadea
más lentamente. Las pistas se reproducen
dependiendo del modo de funcionamiento
seleccionado (apartado 5.4.1). Para selec-
cionar otras pistas de la secuencia, pulse el
botón o (varias veces).
7) Para volver al modo de reproducción están-
dar, ponga el aparato en pausa con el botón
y mantenga pulsado el botón PROG
hasta que la indicación “PG” (R) deje de par-
padear.
Para reproducir de nuevo la secuencia de
pistas, ponga el aparato en pausa y pulse el
botón PROG para que la indicación “PG” par-
padee de nuevo. Inicie la secuencia de pistas
con el botón .
Nota: Mientras la indicación “PG” parpadee o se ilu-
mine constantemente, se puede activar la secuencia.
Se borra por ejemplo cuando se desconecta el aparato.
5.12.2 Comprobar una secuencia de pistas
1) Si se reproduce una pista, primero ponga el
aparato en pausa con el botón .
2) Si la indicación “PG” parpadea ahora, pulse
una vez el botón PROG. Si la indicación “PG”
se ilumina constantemente, pulse el botón
PROG dos veces.
3) Seleccione las memorias (P
-
01 … P
-
99)
sucesivamente con el botón o . La pista
guardada se indica siempre en la línea de
texto (O).
4) Para reproducir la secuencia de pistas, pulse
el botón .
PLAY c
LOOP
1. 2.
RELOOP / EXITRELOOP / EXIT
ab
1.
PLAY PLAY
LOOP
2.
AB / EDIT

5.12.3 Completar o
borrar una secuencia de pistas
1) Si se reproduce una pista, primero ponga el
aparato en pausa con el botón .
2) Si parpadea la indicación “PG”, mantenga
pulsado el botón PROG hasta que “PG” deje
de parpadear.
3) Pulse brevemente el botón PROG para que
“PG” parpadee rápidamente y la indicación
temporal (P) cambie a la indicación de la
siguiente memoria libre “P
-
…”.
4) Para borrar la secuencia de pistas, pulse el
botón PROG hasta que en el visualizador se
indique de nuevo el tiempo de reproducción
(P). Para completar la secuencia de pistas,
seleccione otra pista con el botón oder
y confirme con el botón PROG. Para repro-
ducir la secuencia de pistas completa, pulse
el botón .
6 Inicio Fader
La función Start / Pause del botón (20) puede
controlarse remotamente mediante un mezcla-
dor con función de inicio Fader. La conexión al
mezclador se describe en el apartado 4, paso 3.
Ajuste el control deslizante (34) de la parte pos-
terior del lector al tipo de inicio Fader del mez-
clador:
LOCK = control mediante un interruptor ON / OFF
Esta posición del interruptor tiene que selec-
cionarse para la mayoría de mezcladores de
la gama “img Stage Line”. Avanzando el
Fader, se cerrará un interruptor en el mez-
clador que inicia la reproducción. Cuando se
cierre el Fader, el interruptor se abrirá y de
este modo el lector se pondrá en pausa.
Fig. 8 Inicio Fader mediante un interruptor ON / OFF
TACT = control mediante un pulsador
Cuando el pulsador se utiliza por primera vez
avanzado el Fader, empezará la reproduc-
ción. Cuando el pulsador se utilice por
segunda vez cerrando el Fader, el lector se
pondrá en pausa.
Fig. 9 Inicio Fader mediante un pulsador
CUE PLAY = control mediante una pulsación
Cuando se avance el Fader, el reproductor
empezará desde el inicio de la pista (punto
Auto Cue apartado 5.4.1) o desde el
punto Cue ajustado con el botón CUE (18)
[apartado 5.8.2] mediante una breve pul-
sación de control del mezclador. Cuando el
Fader esté cerrado, el lector volverá a este
punto de inicio mediante otra pulsación de
control y se quedará en pausa en ese punto.
Fig. 10 Inicio Fader mediante pulsación de control
7 Actualizar el Firmware
Si hay un nuevo firmware disponible en Internet,
puede actualizar el firmware de su aparato:
1) En la página principal de “img Stage Line”
(www.imgstageline.com), haga clic en “Soft-
ware Updates” dentro de “SUPPORT”. Luego
baje hasta “FIRMWARE-DOWNLOADS”.
Para la descarga, haga clic en el icono frente
a “CD-292USB”.
Copie el software descargado en un lápiz
USB.
2) Desconecte el CD-292USB con el interruptor
Power (28).
3) Inserte el lápiz USB con el nuevo firmware en
el puerto USB de la izquierda, el puerto
USB 1 (26).
4) En el lector izquierdo, mantenga pulsado el
botón PROG (13) y conecte de nuevo el lec-
tor. No libere el botón PROG hasta que en el
visualizador izquierdo aparezca “UP dAt E”.
5) Después de leerlo, cuando aparezca “Ready”
en la línea de texto (O), pulse el botón
(20) para iniciar la actualización del firmware.
Mediante la indicación de la barra gráfica (H)
y la línea de texto se puede observar la
actualización. Cuando aparezca “Finish”, se
habrá actualizado el firmware.
6) Apague el lector y conéctelo de nuevo.
8 Mantenimiento del Aparato
Proteja el lector del polvo, de las vibraciones, de
la humedad y del calor (temperatura ambiente
admisible: 0 – 40 ºC). Utilice sólo un paño suave
y seco para la limpieza; no utilice nunca ni pro-
ductos químicos ni agua.
Nota referente a las interrupciones de sonido
y los errores de lectura
El humo del tabaco y el polvo pueden penetrar
fácilmente a través de todas las aperturas del
aparato y depositarse en las ópticas de los sis-
temas de muestreo láser. Si estos restos causan
errores de lectura o interrupciones del sonido, el
personal cualificado deberá limpiar el aparato.
Esta limpieza se cobrará incluso durante el
periodo de garantía.
9 Especificaciones
Banda pasante: . . . . . . 20 – 20 000 Hz
THD: . . . . . . . . . . . . . . . < 0,1 %
Separación de canal: . . > 80 dB
Dinámica: . . . . . . . . . . . > 80 dB
Relación sonido / ruido: . > 80 dB
Salida: . . . . . . . . . . . . . 2 V (nivel de línea),
tomas RCA
Sistemas de archivos
legibles: . . . . . . . . . . . . NTFS, FAT, HFS+
Memoria antichoque: . . 15 s
Alimentación: . . . . . . . . 230 V~ / 50 Hz
Consumo: . . . . . . . . . . . 40 VA máx.
Temperatura ambiente: 0 – 40 °C
Dimensiones (L×A×P)
Aparato de control . . 482 × 90 × 85 mm,
2U
Lector: . . . . . . . . . . . . 482 × 90 × 260 mm,
2U
Peso: . . . . . . . . . . . . . . 6,5 kg
Sujeto a modificaciones técnicas.
START /
PAUSE CUE
PLAY
LOCK
TACT
1.×CuePlay
2.×Pause
START /
PAUSE CUE
PLAY
LOCK
TACT
1.×Start
2.×Pause
START /
PAUSE CUE
PLAY
LOCK
TACT
Start
Pause
E
39
Manual de instrucciones protegido por el copyright de MONACOR
®
INTERNATIONAL GmbH & Co. KG.
Toda reproducción mismo parcial para fines comerciales está prohibida.

PL
40
Proszę otworzyć instrukcję na stronie 3.
Pokazano tam rozkład elementów operacyj-
nych i złączy.
Spis treści
1 Elementy operacyjne i złącza . . . . . . 40
1.1 Panel sterujący . . . . . . . . . . . . . . . . . . . 40
1.2 Mechanizm odtwarzaczy,
panel przedni . . . . . . . . . . . . . . . . . . . . 41
1.3 Mechanizm odtwarzaczy, panel tylny . . 41
2 Środki bezpieczeństwa . . . . . . . . . . . 41
3 Zastosowanie . . . . . . . . . . . . . . . . . . . 41
4 Przygotowanie do pracy
i podłączanie urządzenia . . . . . . . . . . 42
5 Obsługa . . . . . . . . . . . . . . . . . . . . . . . . 42
5.1 Odtwarzanie muzyki . . . . . . . . . . . . . . . 42
5.2 Wczytywanie list odtwarzania . . . . . . . . 42
5.3 Wyświetlanie informacji o utworze
oraz funkcja sleep . . . . . . . . . . . . . . . . . 42
5.3.1 Graficzny wskaźnik czasu
odtwarzania . . . . . . . . . . . . . . . . . . . . 42
5.3.2 Liczba bitów na minutę . . . . . . . . . . . 43
5.3.3 Tryb Sleep . . . . . . . . . . . . . . . . . . . . . 43
5.4 Wybór trybu pracy . . . . . . . . . . . . . . . . 43
5.4.1 Odtwarzanie pojedynczego utworu
oraz ciągłe odtwarzanie . . . . . . . . . . . 43
5.4.2 Tryb połączeniowy – automatyczny
start drugiego mechanizmu
odtwarzacza po zakończeniu utworu 43
5.5 Krótkie odtwarzanie początku utworów 43
5.6 Szybkie przewijanie w przód / w tył . . . . 43
5.7 Precyzyjny wybór punktu . . . . . . . . . . . 43
5.8 Powrót do poprzednio ustawionego
punktu . . . . . . . . . . . . . . . . . . . . . . . . . . 43
5.8.1 Przyciski CUE 1 i CUE 2 . . . . . . . . . . 43
5.8.2 Przycisk CUE . . . . . . . . . . . . . . . . . . 43
5.9 Zmiana prędkości odtwarzania bez
lub ze zmianą wysokości dźwięku . . . . 43
5.10 Pitch Bend – synchronizacja bitów pomię-
dzy dwoma utworami muzycznymi . . . . 44
5.11 Efekty . . . . . . . . . . . . . . . . . . . . . . . . . . 44
5.11.1 Efekt scratch . . . . . . . . . . . . . . . . . . . 44
5.11.2 Efekt brzęczenia (Droning) . . . . . . . . 44
5.11.3 Efekt stutter . . . . . . . . . . . . . . . . . . . . 44
5.11.4 Odtwarzanie pętli ciągłej . . . . . . . . . . 44
5.12 Układanie własnej sekwencji
odtwarzania . . . . . . . . . . . . . . . . . . . . . 44
5.12.1 Zapisywanie i odtwarzanie sekwencji
utworów . . . . . . . . . . . . . . . . . . . . . . . 44
5.12.2 Sprawdzanie sekwencji utworów . . . . 44
5.12.3 Edytowanie i kasowanie
sekwencji utworów . . . . . . . . . . . . . . 44
6 Funkcja Fader Start . . . . . . . . . . . . . . 45
7 Aktualizowanie oprogramowania . . . 45
8 Konserwacja urządzenia . . . . . . . . . . 45
9 Specyfikacja . . . . . . . . . . . . . . . . . . . . 45
1 Elementy operacyjne i złącza
1.1 Panel sterujący
1Panel sterujący odtwarzacza 1
Szczegóły na rys. 2
2Przycisk RELAY do automatycznego startu
drugiego mechanizmu odtwarzacza po za-
kończeniu utworu (rozdz. 5.4.2)
3Panel sterujący odtwarzacza 2
Szczegóły na rys. 2
4Przycisk OPEN / CLOSE do wysuwania i
wsuwania szuflady na płytę CD [tak jak przy-
ciski (27, 29) na mechanizmie odtwarza-
cza]
5Przycisk CD / USB do przełączania między
nośnikiem CD a USB: przełączanie jest moż-
liwe po ustawieniu odtwarzacza w tryb pauzy
przyciskiem (20).
Jeżeli podłączone są dwa nośniki USB, po
wciśnięciu przycisku CD / USB wybrać CD,
USB 1 lub USB 2 przyciskiem lub (21). W
linii tekstowej (O) pokazany zostanie wybór.
Aby zatwierdzić wcisnąć przycisk CD / USB.
6Przycisk SCRATCH do włączania / wyłącza-
nia funkcji scratch
Po włączeniu funkcji (przycisk podświetlony)
możliwe jest wytwarzanie efektu scratch
pokrętłem jog (16)
7Przycisk TIME do przełączania pomiędzy try-
bami wyświetlania czasu (H, P)
wskazanie “Remain” (G)
czas pozostały do końca bieżącego utworu
wskazanie “Elapse” (E)
miniony czas odtwarzania bieżącego
utworu
wskazanie “Total Remain”
czas pozostały do końca płyty CD
(niedostępne w trybie MP3)
W trybie MP3, przy wciśniętym przycisku
TIME możliwe jest przełączanie linii teksto-
wej (O) na wyświetlanie tytułu, albumu, wyko-
nawcy (ID3 tag) lub nazwy pliku, za pomocą
przycisków oraz (21)
8Przycisk CONT / LIST
1. Do przełączania między dwoma trybami
pracy: odtwarzania pojedynczych utworów
[wskazanie “Single” (C)] a ciągłym odtwa-
rzaniem wszystkich utworów [wskazanie
“Cont.” (D)]
2. Do wczytywania list odtwarzania
(rozdz. 5.2)
9Przycisk MEMO / AUTO
1. Do zapamiętywania punktów Cue, za po -
mocą przycisków CUE 1 oraz CUE 2 (11)
2. Do odtwarzania sekcji utworu w pętli o dłu-
gości równej wielokrotności bitu
(rozdz. 5.11.4)
10 Wyświetlacz, szczegóły na rys. 3
AZe wskazaniem “TRACK”: numer utworu
(w wybranym folderze);
Ze wskazaniem “FOLDER”: numer wybra-
nego folderu
Bsymbol odtwarzania
C“Single”: wskazanie trybu odtwarzania po -
jedynczego utworu
D“Cont.”: wskazanie trybu ciągłego odtwa-
rzania
E“Elapse”: oznacza, że pokazywany jest
miniony czas odtwarzania utworu
F“Total”: wraz ze wskazaniem “Remain” (G)
oznacza, że pokazywany jest czas do
końca płyty CD
(niedostępne w trybie MP3)
G“Remain”: oznacza, że pokazywany jest
czas do końca utworu. Wskazanie “Total
Remain” oznacza, że pokazywany jest
czas do końca płyty CD
Hwskaźnik paskowy do pokazywania rela-
tywnego czasu odtwarzania utworu
Iwskazanie procentowego odchylenia od
standardowej prędkości odtwarzania
J“RELOOP”: wyświetlane podczas odtwa-
rzania pętli
K“CD” lub “USB”: wskazuje wybrany nośnik
CD, port USB 1 (26) lub USB 2 (30). Po
wybraniu portu USB 2, miga wskazanie
“USB”.
L“CUE”: pojawia się gdy odtwarzacz usta-
wia się w tryb pauzy w punkcie Cue
(rozdz. 5.4.1 i 5.8.2).
Mw trybie MP3: wskazuje rodzaj informacji
pokazywanej w linii tekstowej (O): nazwa
utworu, album lub wykonawca. Przy braku
wskazania, pokazywana jest nazwa pliku
(rozdz. 5.3).
Nliczba utworów na płycie CD;
w trybie MP3:
liczba utworów w wybranym folderze [ze
wskazaniem “TRACK” (A)]
lub liczba folderów [ze wskazaniem “FOL-
DER” (A)]
Olinia tekstowa dla dodatkowych informacji
Pwskaźnik czasu, patrz także punkty E i G
Qwskaźnik liczby bitów na minutę
R“PG”: miga podczas programowania oraz
odtwarzania własnej sekwencji utworów
S“MT” (Master Tempo): sygnalizuje funkcję
stałej wysokości (rozdz. 5.9)
11 Przyciski CUE 1 oraz CUE 2
1. do zapamiętywania dwóch punktów Cue
[także podczas odtwarzania; aby zapisać
punkt, najpierw wcisnąć przycisk MEMO /
AUTO (9)]
2. do przechodzenia do zapamiętanych punk-
tów Cue
12 Przycisk FOLDER dla trybu MP3
1. do przełączania między nazwą utworu lub
folderu w linii tekstowej (O),
zgodnie z wybranym ustawieniem, utwór
lub folder mogą być wybierane przyciskami
oraz (21)
2. do wczytywania list odtwarzania
(rozdz. 5.2)
3. do wyboru partycji na podłączonym twar-
dym dysku (rozdz. 5.1)
13 Przycisk PROG do tworzenia i odtwarzania
własnej sekwencji utworów (rozdz. 5.12)
14 Przycisk PITCH do włączania / wyłączania
regulacji prędkości (15) oraz do wyboru
zakresu regulacji (8 %, 16 % lub 100 %)
W linii tekstowej (O) pokazany zostanie na
krótko wybrany zakres (Pitch 8 %, 16 %, 100,
off).
15 Regulator do zmiany prędkości odtwarzania
[bez zmiany wysokości dźwięku jeżeli świeci
przycisk MT (24)]
Zmiana nie będzie następować tylko jeśli
przycisk PITCH (14) świeci.
16 Pokrętło jog REV / FWD
–do szybkiego przewijania równocześnie z
wciśniętym przyciskiem SEARCH (17)
–do wytwarzania efektu scratch, po wciśnię-
ciu przycisku SCRATCH (6)
–podczas odtwarzania: dla funkcji “Pitch
Bend” (rozdz. 5.10)
–w trybie pauzy: do precyzyjnego ustawia-
nia punktu

PL
41
–do szybkiego przechodzenia między utwo-
rami [ze wskazaniem “TRACK” (A)] lub fol-
derami [ze wskazaniem “FOLDER” (A)]
równocześnie z wciśniętym przyciskiem
lub (21)
17 Przycisk SEARCH do przełączania pokrętła
jog (16) na funkcję szybkiego przewijania
18 Przycisk CUE do krótkiego odtwarzania po -
czątku utworu (rozdz. 5.5) oraz do powra-
cania do zapamiętanego wcześniej punktu
(rozdz. 5.8.2)
19 Przyciski do zapisywania oraz odtwarzania
pętli
przycisk A do definiowania punktu starto-
wego pętli
przycisk B / EDIT do definiowania punktu koń-
cowego pętli oraz równocześnie do startu
pętli; aby zmienić punkt końcowy, wcisnąć
ponownie przycisk i ustawić punkt koń-
cowy pokrętłem jog (16)
przycisk RELOOP / EXIT do kończenia i res-
tartowania pętli
20 Przycisk do rozpoczynania odtwarzania
utworu oraz do przełączania pomiędzy try-
bem odtwarzania i pauzy
21 Przyciski oraz
1. do wyboru utworów jeżeli wyświetlone jest
wskazanie “TRACK” (A):
przycisk do przechodzenia do kolejnego
utworu
przycisk do przechodzenia do początku
odtwarzanego już utworu, każde kolejne
wciśnięcie przycisku powoduje przejście
do poprzedniego utworu
Przytrzymanie wciśniętego jednego z przy-
cisków umożliwia wybór utworu pokrętłem
jog (16).
2. w trybie MP3: do wyboru folderów jeżeli
wyświetlone jest wskazanie “FOLDER” (A)
[do przełączania służy przycisk FOLDER
(12)]
Przytrzymanie wciśniętego jednego z przy-
cisków umożliwia wybór folderów pokręt-
łem jog (16).
3. do wyboru nośnika CD lub USB, patrz
także przycisk CD / USB (5)
4. do dzielenia oraz zwielokrotniania sekcji
utworu przy odtwarzaniu pętli (rozdz.
5.11.4)
5. w trybie MP3 wraz z wciśniętym przyci-
skiem przycisk TIME (7): do przełączania
linii tekstowej (O) na wskazanie tytułu,
albumu, wykonawcy (ID3 tag) lub nazwy
pliku
6. do wyboru listy odtwarzania (rozdz. 5.2)
7. do wyboru partycji na podłączonym twar-
dym dysku (rozdz. 5.1)
22 Przyciski PITCH BEND do synchronizacji
bitów bieżącego i kolejnego utworu, odtwa-
rzanego w drugim mechanizmie odtwarzacza
(rozdz. 5.10)
23 Przycisk TAP dla ręcznego licznika bitów
oraz do przełączania na automatyczny licznik
bitów (rozdz. 5.3.2)
24 Przycisk MT (Master Tempo) do włączania /
wyłączania funkcji stałej wysokości dźwięku
(rozdz. 5.9)
1.2 Mechanizm odtwarzaczy,
panel przedni
25 Szuflada na płytę CD odtwarzacza 1
26 Port USB 1 do podłączania nośnika USB lub
twardego dysku
27 Przycisk OPEN / CLOSE do wysuwania i
wsuwania szuflady na płytę CD 1 [tak jak
przycisk (4) na panelu sterującym]
28 Włącznik zasilania POWER z (czerwonym)
wskaźnikiem diodowym
29 Przycisk OPEN / CLOSE do wysuwania i
wsuwania szuflady na płytę CD 2 [tak jak
przycisk (4) na panelu sterującym]
30 Port USB 2 do podłączania nośnika USB lub
twardego dysku
31 Szuflada na płytę CD odtwarzacza 2
1.3 Mechanizm odtwarzaczy, panel tylny
32 Wyjście liniowe audio LINE OUT dla mecha-
nizmu odtwarzacza 2, do łączenia z wejściem
liniowym wzmacniacza lub miksera
33 Gniazdo 3,5 mm START / PAUSE mechanizmu
odtwarzacza 2, dla funkcji zdalnego sterowa-
nia funkcją Start / Pauza z miksera
34 Przełącznik do wyboru typu zdalnego sterow-
nia poprzez gniazdo START / PAUSE (33, 38)
[rozdz. 6]
pozycja LOCK
do sterowania przełącznikiem on / off
pozycja TACT
do sterowania przełącznikiem chwilowym
pozycja CUE / PLAY
Po wysunięciu fadera na mikserze, wysy-
łany jest impuls sterujący i odtwarzacz roz-
poczyna odtwarzanie od punktu Cue [pun-
ktu Auto Cue lub punktu ustawionego
przyciskiem CUE (18)]; zamknięcie fadera
powoduje powrót do punktu Cue.
35 Gniazdo do podłączania panelu sterującego:
Należy połączyć je z gniazdem REMOTE
CONTROL CONNECT TO MAIN UNIT 2 za
pomocą dołączonego kabla
36 Kabel zasilający do łączenia z gniazdkiem
sieciowym (230 V~ / 50 Hz)
37 Gniazdo do podłączania panelu sterującego:
Należy połączyć je z gniazdem REMOTE
CONTROL CONNECT TO MAIN UNIT 1 za
pomocą dołączonego kabla
38 Gniazdo 3,5 mm START / PAUSE mechanizmu
odtwarzacza 1, dla funkcji zdalnego sterowa-
nia funkcją Start / Pauza z miksera
39 Wyjście liniowe audio LINE OUT dla mecha-
nizmu odtwarzacza 1, do łączenia z wejściem
liniowym wzmacniacza lub miksera
2 Środki bezpieczeństwa
Urządzenie spełnia wszystkie wymagania norm
UE dlatego zostało oznaczone symbolem .
Należy przestrzegać następujących zasad:
GUwaga! Nie wolno zaglądać do środka
mechanizmu odtwarzacza CD przy otwartej
szufladzie na płytę CD; wiązka lasera może
uszkodzić wzrok.
GUrządzenie przeznaczone jest wyłącznie do
użytku wewnątrz pomieszczeń. Należy chro-
nić je przez wodą, dużą wilgotnością oraz
wysoką temperaturą (dopuszczalny zakres
wynosi 0 – 40 °C).
GNa urządzeniu nie należy stawiać żadnych
pojemników z cieczą np. szklanek.
GNie wolno używać urządzenia lub natychmiast
odłączyć wtyczkę zasilającą z gniazdka:
1. jeżeli stwierdzono istnienie widocznego
uszkodzenia odtwarzacza lub kabla zasila-
jącego,
2. jeżeli uszkodzenie urządzenia mogło nastą-
pić w wyniku upadku lub innego podobnego
zdarzenia,
3. jeżeli urządzenie działa nieprawidłowo.
W każdym przypadku, naprawę należy zlecić
specjaliście.
GWymianę uszkodzonego kabla zasilającego
należy zlecić specjaliście.
GNie wolno odłączać urządzenia z gniazdka
sieciowego ciągnąc za kabel zasilania, należy
zawsze chwytać za wtyczkę.
GDo czyszczenia używać suchej miękkiej ście-
reczki; nie stosować wody ani środków che-
micznych.
GProducent ani dostawca nie ponoszą odpo-
wiedzialności za wynikłe szkody: uszkodzenie
sprzętu lub obrażenia użytkownika, jeśli urzą-
dzenie było używane niezgodnie z ich prze-
znaczeniem, nieprawidłowo zamontowane,
podłączone lub obsługiwane bądź poddane
nieautoryzowanej naprawie. Ponadto, nie
ponosi się odpowiedzialności za utratę danych
lub uszkodzenie nośnika.
3 Zastosowanie
Podwójny odtwarzacz CD / MP3 CD-292USB
został specjalnie zaprojektowany do profesjonal-
nych aplikacji DJ. Posiada wiele przydatnych
funkcji, takich jak np. odtwarzanie pojedynczych
utworów, automatyczny licznik bitów, regulacja
prędkości bez zmiany wysokości dźwięku,
odtwarzanie pętli czy pamięć antywstrząsowa.
Odtwarzacz CD-292USB pozwala na odtwa-
rzanie płyt audio CD, także wypalonych we włas-
nym zakresie (audio CD-R) oraz płyt CD z pli-
kami MP3. Mogą się jednak pojawić problemy
przy odtwarzaniu płyt CD-RW.
Dzięki wyposażeniu w porty USB, możliwe
jest odtwarzanie plików MP3 z nośników USB
lub twardych dysków. Poszczególne mecha-
nizmy odtwarzaczy mają niezależny dostęp do
obu portów USB, co pozawala na pracę z jed-
nym nośnikiem USB.
Po całkowitym zakończeniu eksploata-
cji, urządzenie należy oddać do punktu
recyklingu, aby nie zaśmiecać środo-
wiska.
UWAGA Urządzenie pracuje na niebezpie -
cznym napięciu. Wszelkie naprawy
należy zlecić osobie przeszkolo-
nej; nieprawidłowa obsługa może
spowodować porażenie prądem
elektrycznym.

PL
42
4 Przygotowanie do pracy
i podłączanie urządzenia
Obie części urządzenia: panel sterujący oraz
mechanizm odtwarzaczy przystosowane do
montażu w racku 482 mm (19″), ale mogą pra-
cować również jako wolnostojące. Mechanizm
odtwarzacza musi zawsze znajdować się w
pozycji poziomej, natomiast panel sterujący
można zamontować w pochylonej ramie
uchwytu montażowego. Obie części urządzenia
mają wysokość 2 U (1 U = 44,45 mm).
Przed przystąpieniem do podłączania lub
zmiany połączeń należy bezwzględnie wyłączyć
odtwarzacz CD / MP3 oraz pozostałe urządzenia.
1) Za pomocą dwóch dołączonych kabli sterują-
cych połączyć panel sterujący z mechaniz-
mem odtwarzaczy:
Gniazdo CONNECT TO REMOTE CON-
TROL 2 (35) mechanizmu odtwarzacza z
gniazdem REMOTE CONTROL CONNECT
TO MAIN UNIT 2 panelu sterującego
Gniazdo CONNECT TO REMOTE CON-
TROL 1 (37) mechanizmu odtwarzacza z
gniazdem REMOTE CONTROL CONNECT
TO MAIN UNIT 1 panelu sterującego
2) Podłączyć dwa wyjścia sygnałowe LINE OUT
(32, 39) do wejść liniowych miksera lub
wzmacniacza (możliwe oznaczenie: Line,
CD, Aux).
3) Oba mechanizmy odtwarzacza mogą być
wyzwalane oraz ustawiane w tryb pauzy z
poziomu miksera, dzięki funkcji fader start. W
tym celu, podłączyć gniazda START / PAUSE
(33, 38) do odpowiednich gniazd w mikserze,
za pomocą dwóch kabli z wtykami 3,5 mm.
Należy również ustawić na odtwarzaczu CD-
292USB typ wyzwalania funkcji fader start,
patrz rozdz. 6.
4) Na końcu podłączyć kabel zasilający (36) do
gniazdka sieciowego (230 V~ / 50 Hz).
5 Obsługa
Obsługa obu mechanizmów odtwarzaczy jest
identyczna. Włączyć urządzenie przełącznikiem
POWER (28). Na wyświetlaczu (10) pojawi się
na krótko “boot” (procedura startowa) oraz WEL-
COME. Jeżeli w napędzie znajduje się płyta CD,
po jej wczytaniu, wyświetlacz pokaże informacje
o płycie CD. Jeżeli w napędzie nie ma płyty CD,
pojawi się komunikat “no diSC”.
Po zakończeniu pracy wyłączyć urządzenie.
Następujące ustawienia zostaną zapamiętane:
1) wybrany tryb pracy
(odtwarzanie pojedynczych utworów / ciągłe
odtwarzanie, rozdz. 5.4.1)
2) tryb wyświetlania czasu (czas do końca /
miniony czas odtwarzania, rozdz. 5.3)
3) wybrany zakres regulacji prędkości
(rozdz. 5.9)
5.1 Odtwarzanie muzyki
1) Aby wysunąć szufladę na płytę CD (25, 31)
wcisnąć przycisk (4, 27 lub 29). Włożyć
płytę CD nadrukiem do góry, a następnie
zasunąć szufladę wciskając przycisk .
2) Dodatkowo lub alternatywnie, podłączyć noś-
niki USB lub twarde dyski do portów USB (26,
30). Do przełączania między nośnikami CD a
USB służy przycisk CD / USB (5). Odtwarzacz
musi być ustawiony w tryb pauzy; jeśli trzeba,
wcisnąć przycisk (20).
W przypadku podłączenia dwóch nośni-
ków USB, po wciśnięciu przycisku CD / USB,
należy wybrać źródło sygnału (CD, USB 1,
USB 2) przyciskiem lub (21). Wybrany
nośnik zostanie pokazany w linii tekstowej
(O). Wybrany aktualnie nośnik jest pomijany.
Zatwierdzić wybór przyciskiem CD / USB.
Uwagi
1. Wybrany nośnik pokazany jest także na wyświet-
laczu (K):
“CD” = mechanizm odtwarzacza CD
“USB” wyświetlane ciągle = USB 1
“USB” miga = USB 2
2. Twardy dysk musi posiadać osobne zasilanie z
zewnętrznego zasilacza, jeżeli jego pobór prądu
jest wyższy niż 500 mA.
3. Jeżeli dysk posiada kilka partycji, trzeba wybrać
jedną nich:
a) Przytrzymać wciśnięty przycisk FOLDER (12)
aż na wyświetlaczu pojawi się “PA-SEL” (Par-
tition Selection).
b) Za pomocą przycisku oder wybrać party-
cję. W linii tekstowej (O) pokazana zostanie jej
nazwa.
c) Zatwierdzić wybór przyciskiem FOLDER.
3) Aby rozpocząć odtwarzanie pierwszego
utworu, wcisnąć przycisk (20). Podczas
odtwarzania, na wyświetlaczu widoczny jest
symbol (B). Do wstrzymania i kontynuowa-
nia odtwarzania służy przycisk .
4) Do wyboru innego utworu służą przyciski
oraz .
Przycisk do przechodzenia do kolejnego
utworu
Przycisk do przechodzenia do początku
odtwarzanego już utworu, każde kolejne
wciśnięcie przycisku powoduje przejście
do poprzedniego utworu.
Przytrzymanie wciśniętego jednego z przyci-
sków umożliwia wybór utworu pokrętłem jog
(16).
5) W przypadku plików MP3: Jeżeli pliki znaj-
dują się różnych folderach, wcisnąć przycisk
FOLDER (12), aby wybrać folder. Wyświet-
lacz pokaże “FO-SEL” (Folder Selection) a w
linii tekstowej (O) pojawi się nazwa folderu.
W polu (A) w lewym górnym rogu wyświetla-
cza pokazany zostanie numer folderu a w
polu (N) pod “Total” – całkowita liczba do -
stępnych folderów.
Wybrać folder przyciskiem lub . Przy-
trzymanie wciśniętego jednego z przycisków
umożliwia wybór folderu pokrętłem jog (16).
Aby zatwierdzić wybór wcisnąć przycisk
FOLDER; wyświetlacz pokaże ponownie
czas odtwarzania (P). Wybrać żądany plik z
folderu przyciskami oraz .
6) Aby zmienić płytę CD, należy najpierw
zatrzymać odtwarzanie ustawiając tryb
pauzy przyciskiem ; w przeciwnym razie
szuflada na płytę CD nie da się wysunąć
przyciskiem .
7) Przed wyłączeniem urządzenia należy
zawsze zasunąć szufladę na płytę CD przyci-
skiem , aby chronić układ laserowy przed
zabrudzeniem. Następnie wyłączyć urządze-
nie przełącznikiem POWER.
5.2 Wczytywanie list odtwarzania
Odtwarzacz CD-292USB może odczytywać listy
plików MP3 w formatach “wpl”, “xml” oraz “m3u”,
stworzonych w komputerze.
Uwaga: Lista odtwarzania oraz odpowiednie
pliki MP3 z niej muszą znajdować się na tym
samym nośniku. Listy odtwarzania muszą być
zapisane na nośniku poza folderami (root).
1) Jeżeli trwa odtwarzanie, włączyć tryb pauzy
przyciskiem (20).
2) Przytrzymać wciśnięty przycisk CONT / LIST
(8) i wybrać szukane rozszerzenie pliku, za
pomocą przycisków oraz (21). W linii
tekstowej (O) pokazany zostanie bieżący
wybór (M3U Scan, WPL Scan, XML Scan).
3) Wcisnąć przycisk FOLDER (12). Wyświet-
lacz pokaże “FO-SEL” a w linii tekstowej (O)
pojawi się nazwa pierwszej listy odtwarzania.
W polu (A) w lewym górnym rogu wyświetla-
cza pokazany zostanie numer listy odtwarza-
nia a w polu (N) pod “Total” – całkowita liczba
dostępnych list.
4) Wybrać żądaną listę przyciskami oraz .
5) Zatwierdzić wybór przyciskiem FOLDER. Po
wczytaniu listy, wyświetlacz pokaże ponow-
nie czas odtwarzania (P).
6) Aby rozpocząć odtwarzanie pierwszego
utworu z listy, wcisnąć przycisk . W celu
wybrania innego utworu wcisnąć przycisk
lub , albo przytrzymać wciśnięty jeden z
przycisków i wybrać utwór pokrętłem jog (16).
7) Aby powrócić do odtwarzania bez listy, usta-
wić tryb pauzy przyciskiem . Przytrzymać
wciśnięty przycisk CONT / LIST i wcisnąć
przycisk lub (21) klika razy, aż na
wyświetlaczu w linii tekstowej pojawi się “Fol-
der”. Po zwolnieniu przycisków, wyświetlacz
pokaże “SCAn” a następnie ponownie czas
odtwarzania (P). Żadna lista odtwarzania nie
jest wówczas wczytana.
5.3 Wyświetlanie informacji o
utworze oraz funkcja sleep
Na wyświetlaczu (10) widoczne są różne infor-
macje:
1. Numer wybranego utworu (A) wraz ze wska-
zaniem “TRACK”. Ze wskazaniem “FOL-
DER”, numer dotyczy folderu [przełączanie
przyciskiem FOLDER (12)].
2. Liczba utworów (N) na płycie CD lub, pliki są
w różnych folderach, liczba plików w wybra-
nym folderze
3. Czas wybranego utworu: relatywny (H) i cał-
kowity (P); każda sekunda dzieli się na 75
tzw. ramek
Wskaźnik czasu może być przełączany przy-
ciskiem TIME (7):
Wskazane Elapse (E) oznacza wyświetlanie
minionego czasu odtwarzania utworu.
Wskazane Total Remain (F, G) oznacza
wyświetlanie czasu do końca płyty CD
(niedostępne w trybie MP3).
Wskazane Remain (G) oznacza wyświetla-
nie czasu do końca utworu.
4. W linii tekstowej (O) znajdują się informacje:
– nazwa utworu dla standardowych płyt
audio CD z funkcją CD text
– nazwa utworu dla trybu MP3
Możliwe jest przełączanie kolejnych infor-
macji (ID3 tag). W tym celu przytrzymać
wciśnięty przycisk TIME i wciskać kolejno
przycisk lub (21):
Wskazanie (M)
TITLE = tytut
ALBUM = album
ARTIST = artysta
brak = nazwa pliku
5.3.1 Graficzny wskaźnik czasu odtwarzania
Dodatkowym sposobem sygnalizacji czasu,
oprócz numerycznej (P), jest wskaźnik paskowy
(H) o zmiennej długości (relatywna prezentacja
czasu). Ostatnie 30 sekund utworu jest sygnali-
zowane miganiem paska o pełnej długości,
przez ostatnie 15 sekund miganie jest szybsze.

PL
43
5.3.2 Liczba bitów na minutę
Po wybraniu utworu, automatyczny licznik okre-
śla liczbę bitewna minutę. Po krótkiej chwili poja-
wia się wskazanie w lewym dolnym rogu
wyświetlacza (Q). Jeżeli niemożliwe jest okre-
ślenie tej wartości (np. dla zbyt cichej muzyki),
można to zrobić manualnie:
1) Wcisnąć kilka razy (minimum 4) przycisk
BPM / TAP (23) w rytm muzyki, aż wyświet-
lona zostanie wartość oraz migający wskaź-
nik “BPM”.
2) Aby powrócić do automatycznego licznika
bitów, przytrzymać wciśnięty przycisk BPM /
TAP aż wskaźnik “BPM” przestanie migać.
5.3.3 Tryb Sleep
Jeżeli odtwarzacz zostanie ustawiony w tryb
pauzy na ponad 15 minut, przejdzie w tryb uśpie-
nia, aby chronić laser. Na wyświetlaczu pojawi
się SLEEP oraz zgaśnie podświetlenie przyci-
sków. Aby powrócić do poprzedniego trybu
pracy, należy wcisnąć dowolny przycisk.
5.4 Wybór trybu pracy
5.4.1 Odtwarzanie pojedynczego utworu
oraz ciągłe odtwarzanie
Do przełączania między trybem odtwarzania
pojedynczego utworu [wskazanie “Single” (C)] a
trybem ciągłego odtwarzania [wskazanie “Cont.”
(D)], służy przycisk CONT / LIST (8).
A W trybie odtwarzania pojedynczego utwo -
ru, odtwarzacz ustawia się w tryb pauzy po
zakończeniu każdego utworu.
Tryb ten jest przydatny zwłaszcza w apli-
kacjach DJ. Po wybraniu utworu odtwarzacz
ustawia się w tryb pauzy precyzyjnie na
początku muzyki kolejnego utworu (zazwy-
czaj na 0 : 00 : 00, ale czasem o kilka ramek
dalej, np. 0 : 00 : 15). Punkt ten jest automa-
tycznie zapamiętywany jako punkt startowy
(Auto Cue), oznaczany wskazaniem CUE (L)
na wyświetlaczu. Po rozpoczęciu odtwarza-
nia możliwy jest powrót do tego punktu, za
pomocą przycisku CUE (18). Po zakończeniu
odtwarzania utworu, odtwarzacz ustawia się
w tryb pauzy na początku muzyki kolejnego.
Punkt ten jest zapamiętywany jako nowy
punkt startowy.
B W trybie ciągłego odtwarzania odtwarzane
są kolejno wszystkie utwory, a po odtworze-
niu ostatniego urządzenie powraca do pierw-
szego utworu. Jeżeli utwory znajdują się w
różnych folderach, powtarzane będą utwory
tylko z wybranego folderu.
5.4.2 Tryb połączeniowy – automatyczny
start drugiego mechanizmu
odtwarzacza po zakończeniu utworu
Funkcja ta pozwala na automatyczny start dru-
giego mechanizmu odtwarzacza po zakończe-
niu utworu.
1) Ustawić oba odtwarzacze na tryb odtwarza-
nia pojedynczego utworu przyciskiem CONT /
LIST (8), aby oba wyświetlacze pokazywały
“Single” (C).
2) Wybrać utwór na każdym odtwarzaczu.
3) Wcisnąć przycisk RELAY (2). Włączy się
podświetlenie przycisku.
4) Uruchomić odtwarzanie na jednym z urzą-
dzeń przyciskiem (20). Drugi odtwarzacz
musi być w trybie pauzy. Po zakończeniu
utworu, bieżące urządzenie ustawi się w tryb
pauzy, natomiast odtwarzanie będzie konty-
nuowane z drugiego odtwarzacza. Odtwa-
rzanie naprzemienne będzie kontynuowane
do momentu wyłączenia trybu połączenio-
wego (po ponownym wciśnięciu przycisku
RELAY).
5) Podczas odtwarzania, możliwe jest przełą-
czenie się na drugi odtwarzacz w dowolnej
chwili, za pomocą przycisku .
Uwaga: Po odtworzeniu wszystkich utworów z folderu,
nie nastąpi automatyczne przejście do kolejnego fol-
deru. Należy zrobić to ręcznie (rozdz. 5.1, krok 5).
5.5 Krótkie odtwarzanie początku
utworów
W celu odtworzenia początku utworu przytrzy-
mać wciśnięty przycisk CUE (18). Po zwolnieniu
przycisku, odtwarzacz ustawi się w tryb pauzy w
punkcie startowym utworu.
1) Odtwarzacz musi być ustawiony na tryb
odtwarzania pojedynczego utworu: wskaza-
nie “Single” (C). Przy wskazaniu “Cont.” (D)
należy wcisnąć przycisk CONT / LIST (8).
2) Wybrać żądany utwór (rozdz. 5.1, kroki 4 i 5).
3) Wcisnąć i przytrzymać przycisk CUE. Utwór
będzie odtwarzany tak długo, jak długo przy-
cisk będzie wciśnięty.
4) Aby odtworzyć utwór normalnie, wcisnąć
przycisk (20).
5.6 Szybkie przewijanie w przód / w tył
Do włączenia funkcji szybkiego przewijania w
przód / w tył służy przycisk SEARCH (17). Po
pojawieniu się wskazania SEARCH w linii teks-
towej (O), przekręcić pokrętło jog REV / FWD
(16) w odpowiednią stronę. Szybkość przewija-
nia zależy od szybkości obracania pokrętła.
Uwaga: W trybie pauzy, po przewinięciu bieżący punkt
będzie ciągle odtwarzany. Aby to zatrzymać, wcisnąć
na krótko przycisk CUE (18) [ustawianie punktu Cue
rozdz. 5.8.2] lub uruchomić odtwarzanie przyci-
skiem (20).
5.7 Precyzyjny wybór punktu
Każdy punkt ten może zostać ustawiony z
dokładnością do 1 ramki (1⁄75 sekundy), np. w
celu odtwarzania od danego punktu zamiast od
początku utworu.
1) Jeżeli wybrany punkt jest zbyt szybko osią-
gany przy odtwarzaniu utworu lub szybkim
przewijaniu, należy ustawić urządzenie w
tryb pauzy przyciskiem (20).
2) Precyzyjnie wybrać punkt przy użyciu
pokrętła jog (16). Wybrany punkt będzie
odtwarzany ciągle.
3) Po wybraniu punktu, wcisnąć na krótko przy-
cisk CUE (18). Dzięki temu, punkt zostanie
zapamiętany i powtarzanie zostanie zakoń-
czone. Odtwarzanie od tego punktu odbywać
się będzie po wciśnięciu przycisku .
5.8 Powrót do poprzednio
ustawionego punktu
W celu szybkiego odszukania ustawionego pun-
ktu, możliwe jest zapamiętanie dwóch punktów
startowych (punkty Cue) za pomocą przycisków
CUE 1 oraz CUE 2 (11), także podczas odtwa-
rzania (Fly Cue).
Dodatkowo, można zdefiniować kolejny
punkt startowy przyciskiem CUE (18), należy
jednak pamiętać, że w trybie odtwarzania poje-
dynczego utworu punkt ten nadpisywany jest
przez punkt startowy każdego kolejnego utworu
[jeżeli trzeba, przełączyć się na tryb ciągłego
odtwarzania przyciskiem CONT / LIST (8)].
Uwaga: Zapamiętane punkty Cue zostają skasowane:
– gdy zostanie wybrany inny folder
– po przełączeniu nośnika CD, USB 1, USB 2
– po wyłączeniu urządzenia
5.8.1 Przyciski CUE 1 i CUE 2
1) Wcisnąć przycisk MEMO / AUTO (9) aby akty-
wować pamięć. Przycisk zostanie podświet-
lony.
2) Wcisnąć przycisk CUE 1 (11) gdy punkt
zostanie osiągnięty podczas odtwarzania
(Fly Cue) lub przełączyć urządzenie w tryb
pauzy w wybranym punkcie, przyciskiem
(20). Wykorzystać pokrętło jog (16) do precy-
zyjnego ustawienia punktu, a następnie wcis-
nąć przycisk CUE 1. Mignie on kilka razy,
po czym zacznie świecić ciągle. Przycisk
MEMO / AUTO zgaśnie. Uruchomić ponownie
odtwarzanie przyciskiem .
3) Powtórzyć kroki 1 i 2 dla ustawienia kolej-
nego punktu Cue przyciskiem CUE 2.
4) Przyciski CUE 1 oraz CUE 2 mogą być teraz
wykorzystywane do przechodzenia do odpo-
wiednich punktów Cue; odtwarzanie roz-
pocznie się natychmiast od wybranego pun-
ktu CUE.
5.8.2 Przycisk CUE
1) Podczas odtwarzania, przełączyć urządzenie
w tryb pauzy przyciskiem (20) w punkcie,
do którego zamierza się później wrócić. Przy-
ciski oraz CUE (18) zaczną migać.
2) Jeżeli trzeba, ustawić precyzyjnie punkt za
pomocą pokrętła jog (16) [rozdz. 5.7].
Wybrany punkt będzie ciągle odtwarzany.
3) Wcisnąć przycisk CUE. Wybrany punkt
zostanie zapisany w pamięcijako punkt Cue,
a na wyświetlaczu pojawi się wskazanie
“CUE” (L). Przycisk CUE świeci ciągle. Przy-
cisk będzie migał oznaczając żądanie
wznowienia odtwarzania.
4) Uruchomić ponownie odtwarzanie przyci-
skiem .
5) Powrót do wybranego punktu jest możliwy za
pomocą przycisku CUE. Odtwarzacz ustawi
się w tryb pauzy w zapisanym punkcie.
6) Aby powrócić do odtwarzania wcisnąć przy-
cisk lub przytrzymać wciśnięty przycisk
CUE dla krótkiego odtwarzania. Po zwolnie-
niu przycisku CUE, odtwarzacz ponownie
ustawi się w zapisanym punkcie.
5.9 Zmiana prędkości odtwarzania bez
lub ze zmianą wysokości dźwięku
Za pomocą regulatora suwakowego (15) moż-
liwa jest zmiana prędkości odtwarzania w zakre-
sie do ±100 %:
+100 % = podwójna szybkość
-
100 % = zatrzymanie
1) Wybrać zakres regulacji przyciskiem PITCH
(14). Wybór sygnalizowany jest w linii teksto-
wej (O):
“Pitch 8 %”, “Pitch 16 %”, Pitch 100” lub
“Pitch off” po wyłączeniu regulatora prędko-
ści i powrocie do standardowej prędkości.
2) Zmiana prędkości odtwarzania następuje
poprzez przesuwanie suwaka. Na wyświetla-
czu pokazywane jest procentowe odchylanie
od prędkości standardowej (l). Zmienia się
również liczba bitów na minutę (Q).
3) Podczas zmiany prędkości, zmienia się rów-
nież wysokość dźwięku. Aby utrzymać stałą
wysokość dźwięku, wcisnąć przycisk MT
(24). Na wyświetlaczu pojawi się wskazanie
“MT” (S). Wyłączenie stałej wysokości
dźwięku następuje po ponownym wciśnięciu
przycisku MT.

5.10 Pitch Bend – synchronizacja bitów
pomiędzy dwoma utworami
muzycznymi
Istnieje możliwość zsynchronizowania bitów z
dwóch utworów muzycznych o tej samej prędko-
ści. Dzięki temu, możliwe jest przechodzenie
pomiędzy utworami bez utraty rytmu np. pod-
czas tańca.
1) W pierwszej kolejności należy zsynchronizo-
wać prędkość odtwarzanego utworu z pręd-
kością drugiego utworu, za pomocą regula-
tora suwakowego (15). Ustawić regulatory na
obu urządzeniach tak, aby uzyskać taką
samą liczbę bitów na minutę (BPM). Zwrócić
uwagę na wskazanie (Q) na wyświetlaczu.
2) Zsynchronizować bity obu utworów, za
pomocą przycisków PITCH BEND (22): tak
długo jak przycisk +lub
-
jest wciśnięty,
utwór jest odtwarzany szybciej lub wolniej.
Pozwala to na dokładne dostrojenie rytmu
utworu następnego i bieżącego.
3) Można również wykorzystać do tego pokrętło
jog (16).
5.11 Efekty
5.11.1 Efekt scratch
Włączanie efektu scratch (symulacja płyty gra-
mofonowej obracanej w przód i w tył), odbywa się
po wciśnięciu przycisku SCRATCH (6) i uzys-
kuje się go obracając pokrętło jog (16) w tył i w
przód. Zapali się dioda przycisku, a w linii teks-
towej (O) pojawi się wskazanie “SCRATCH”.
Aby wyłączyć efekt, wcisnąć ponownie przycisk
SCRATCH.
5.11.2 Efekt brzęczenia (Droning)
Jeżeli funkcja Master Tempo (stałej wysokości)
jest aktywna [wskazanie “MT” (S) na wyświetla-
czu], wyłączyć ją przyciskiem MT (24). Obraca-
jąc pokrętło jog (16) w tył i w przód zmniejsza się
i zwiększa prędkość odtwarzania. Powoduje to
powstanie efektu brzęczenia.
5.11.3 Efekt stutter
Do wytwarzania efektów dźwiękowych można
również wykorzystać punkty Cue, zapamiętane
przyciskami CUE (18), CUE 1 oraz CUE 2 (11)
[rozdz. 5.8]: Przyciśnięcie kilka razy na
krótko jednego z przycisków powoduje powsta-
nie efektu wycinania. Im precyzyjniej wybrany
został punkt Cue (np. przy starcie instrumentu
lub wokalu), tym ciekawsze efekty można uzys-
kać.
5.11.4 Odtwarzanie pętli ciągłej
Wybrany fragment muzyki może być odtwarzany
wielokrotnie w formie pętli.
1) Włączyć tryb odtwarzania przyciskiem
(20). Po osiągnięciu żądanego punktu starto-
wego pętli (punkt a na rys. 6), wcisnąć na
krótko przycisk A (19).
Rys. 6 Odtwarzanie pętli ciągłej
Wskazówka: Aby zdefiniować punkt startowy bar-
dziej precyzyjnie, z dokładnością do jednej ramki,
włączyć tryb pauzy przyciskiem , wybrać precy-
zyjnie punkt pokrętłem jog (16), a następnie wcis-
nąć przycisk A.
2) Po osiągnięciu żądanego punktu końcowego
pętli (punkt b na rys. 6) wcisnąć przycisk
B / EDIT (19). Fragment pomiędzy zaznaczo-
nymi punktami będzie odtwarzany w formie
pętli. Na wyświetlaczu pojawi się wskazanie
“RELOOP” (J).
3) Aby przesunąć punkt końcowy lub zdefinio-
wać go z dokładnością do jednej ramki, wcis-
nąć przycisk B / EDIT podczas odtwarzania
pętli. Wskaźnik czasu (P) pokaże indeks cza-
sowy punktu końcowego. Przesunąć położe-
nie punktu za pomocą pokrętła jog (16) i
zapamiętać przyciskiem B / EDIT.
4) Wybrany fragment może być podzielony lub
zwielokrotniony wiele razy. Podczas odtwa-
rzania pętli, wybrać zmianę długości przyci-
skiem lub (21). W linii tekstowej (O)
pokazane zostanie ustawienie:
TRIM: 1⁄32, 1⁄16, 1⁄8, 1⁄4, 1⁄2, 1⁄1, 2⁄1, 4⁄1, 8⁄1, 16⁄1, 32⁄1
5) Aby wyjść z pętli i kontynuować odtwarzanie
kolejnych fragmentów muzyki, należy wcis-
nąć przycisk RELOOP / EXIT (19). Aby po -
nownie uruchomić odtwarzanie pętli, wcisnąć
przycisk RELOOP / EXIT.
Rys. 7 Wychodzenie i restart pętli ciągłej
Uwaga: Pętla zostanie skasowana po osiągnięciu lub
przełączeniu do kolejnego utworu przyciskiem oraz
(21) podczas odtwarzania.
Sekcja o długości równej wielokrotności
długości bitu
W przypadku utworów w rytmie 4⁄4 , możliwe jest
takie ustawienie sekcji do odtwarzania w pętli,
aby jej długość była równa wielokrotności długo-
ści bitu:
1⁄32, 1⁄16, 1⁄8, 1⁄4, 1⁄2, 1⁄1, 2⁄1, 4⁄1, 8⁄1, 16⁄1, 32⁄1
1) Przytrzymać wciśnięty przycisk MEMO /
AUTO (9) i przekręcić pokrętło jog (16). aby
ustawić długość pętli. W linii tekstowej (O)
pokazana zostanie długość np. “AUTO 2 / 1”
= długość pętli równa długości dwóch bitów.
Po ustawieniu, zapali się podświetlenie przy-
cisku MEMO / AUTO oznaczając automa-
tyczne ustawienie punktu końcowego pętli.
2) Zdefiniować punkt startowy przyciskiem A
(19). Rozpocznie się odtwarzanie pętli.
3) Długość pętli można teraz zmieniać także
w sposób podany w poprzednim rozdziale
(kroki 3 oraz 4).
5.12 Układanie własnej sekwencji
odtwarzania
Możliwe jest stworzenie własnej sekwencji
odtwarzania. Długość tej listy może wynosić do
99 utworów.
5.12.1 Zapisywanie i
odtwarzanie sekwencji utworów
1) Ustawić odtwarzacz w tryb pauzy przyci-
skiem (20).
2) Aktywować tryb programowania przyciskiem
PROG (13). Zamiast wskaźnika czasu (P)
pokazany zostanie również numer pierwszej
komórki pamięci “P
-
01”. Wskazanie “PG”
(R) miga szybko.
Uwaga: Aby szybko wyjść z trybu programowania,
przytrzymać wciśnięty przycisk PROG, aż na wy -
świetlaczu pojawi się ponownie wskaźnik czasu (P).
3) Wybrać pierwszy utwór do sekwencji, za po -
mocą przycisków oraz (21) [rozdz.
5.1, kroki 4 i 5].
4) Aby zapisać wybrany utwór na liście, wcisnąć
przycisk PROG. Wyświetlacz pokaże numer
kolejnej komórki pamięci “P
-
02”.
5) Kolejne utwory zapisywać na liście w sposób
analogiczny (kroki 3 i 4). Po zapamiętaniu 99
utworów, przy próbie zapisania kolejnego
pojawi się komunikat “FULL”.
6) Aby rozpocząć odtwarzanie zapisanej sek-
wencji, wcisnąć przycisk . Wskazanie “PG”
(R) miga wolniej. Odtwarzanie utworów z zapi-
sanej sekwencji będzie następowało zgodnie
z ustawionym trybem pracy (rozdz. 5.4.1).
Do przechodzenia do innego utworu w sek-
wencji służą przyciski oraz .
7) Aby powrócić do normalnego trybu odtwarza-
nia, ustawić odtwarzacz w tryb pauzy przyci-
skiem i przytrzymać wciśnięty przycisk
PROG, aż wskazanie “PG” (R) przestanie
migać.
Aby ponownie odtworzyć sekwencję, usta-
wić odtwarzacz w tryb pauzy i wcisnąć przy-
cisk PROG, aż wskazanie “PG” zacznie
migać. Uruchomić odtwarzanie sekwencji
przyciskiem .
Uwaga: Tak długo jak wyświetlane jest lub miga wska-
zanie “PG”, możliwe jest wywołanie sekwencji. Zapi-
sana sekwencja utworów zostaje skasowana np. po
wyłączeniu urządzenia.
5.12.2 Sprawdzanie sekwencji utworów
1) Ustawić odtwarzacz w tryb pauzy przyci-
skiem .
2) Jeżeli wskazanie “PG” miga, wcisnąć przy-
cisk PROG jeden raz. Jeżeli wskazanie “PG”
świeci ciągle, wcisnąć przycisk PROG dwa
razy.
3) Wybrać komórkę pamięci (P
-
01 … P
-
99)
przyciskami oraz . Zapisane utwory
pokazywane są w linii tekstowej (O).
4) Aby odtworzyć sekwencję, wcisnąć przycisk
.
5.12.3 Edytowanie i
kasowanie sekwencji utworów
1) Ustawić odtwarzacz w tryb pauzy przyci-
skiem .
2) Jeżeli wskazanie “PG” miga, przytrzymać
wciśnięty przycisk PROG aż “PG” przestanie
migać.
3) Wcisnąć na krótko przycisk PROG aż “PG”
zacznie migać szybciej a wskaźnik czasu (P)
przełączy się na pierwszą wolną komórkę
pamięci “P
-
…”.
4) Aby skasować sekwencję utworów, wcisnąć
przycisk PROG aż wyświetlacz powróci do
wskaźnika czasu (P). Aby uzupełnić sekwen-
cję, wybrać kolejny utwór przyciskami oraz
i zatwierdzić przyciskiem PROG. Aby
odtworzyć sekwencję, wcisnąć przycisk .
PLAY c
LOOP
1. 2.
RELOOP / EXITRELOOP / EXIT
ab
1.
PLAY PLAY
LOOP
2.
AB / EDIT
PL
44

6 Funkcja Fader Start
Funkcja Start / Pauza przycisku (20) może być
również aktywowana zdalnie z poziomu miksera
z funkcją fader start. Sposób podłączania takiego
miksera do odtwarzacza opisano w rozdz. 4, krok
3. Konieczne jest również wybranie typu funkcji
fader start, za pomocą przełącznika (34) na tylnej
stronie mechanizmu odtwarzaczy:
LOCK = sterowanie przełącznikiem on / off
To ustawienie musi zostać wybrane dla więk-
szości mikserów marki “img Stage Line”.
Otwarcie fadera powoduje zamknięcie prze-
łącznika w mikserze. Zamknięcie fadera po -
woduje otwarcie przełącznika i przełączenie
odtwarzacza w tryb pauzy.
Rys. 8 Funkcja fader start sterowana
przełącznikiem on / off
TACT = sterowanie przez przełącznik chwilowy
Pierwsze zwarcie przełącznika wywołane
otwarciem fadera powoduje start odtwarza-
nia, kolejne zwarcie wywołane zamknięciem
fadera – odtwarzacz ustawia się w tryb pauzy.
Rys. 9 Funkcja fader start sterowana
przełącznikiem chwilowym
CUE PLAY = sterowanie impulsowe
Po otwarciu fadera miksera, impuls urucha-
mia odtwarzanie od początku utworu (punkt
Auto Cue rozdz. 5.4.1) lub od punktu
Cue, ustawionego przyciskiem CUE (18)
[rozdz. 5.8.2]. Po zamknięciu fadera
miksera, impuls ustawia urządzenie w tryb
pauzy w punkcie startowym.
Rys. 10 Funkcja fader start sterowana impulsem
7 Aktualizowanie
oprogramowania
Istnieje możliwość aktualizacji oprogramowania,
poprzez stronę internetową:
1) Na stronie producenta “img Stage Line”
(www.imgstageline.com), kliknąć na zakładkę
“Software Updates” w dziale “SUPPORT”.
Wyszukać na stronie “FIRMWARE-DOWN-
LOADS”.
Aby ściągnąć plik, kliknąć na ikonę obok
“CD-292USB”.
Ściągnięty plik przegrać na pamięć prze-
nośną USB.
2) Wyłączyć CD-292USB przełącznikiem power
(28).
3) Podłączyć pamięć przenośną USB do lewe -
go portu USB 1 (26).
4) Włączyć urządzenie trzymając wciśnięty
przycisk PROG (13). Nie zwalniać przycisku
PROG aż na lewym wyświetlaczu pojawi się
“UP dA t E”.
5) Po wgraniu, w linii tekstowej (O) pojawi się
“Ready”, wcisnąć wówczas przycisk (20)
aby rozpocząć aktualizację. Postęp aktuali-
zacji można obserwować na pasku graficz-
nym (H) oraz w linii tekstowej. Zakończenie
aktualizacji sygnalizowane jest komunikatem
“Finish”.
6) Wyłączyć i włączyć ponownie urządzenie.
8 Konserwacja urządzenia
Urządzenie należy chronić przed kurzem, wstrzą-
sami, dużą wilgotnością oraz wysoką tempera-
turą (dopuszczalny zakres wynosi 0 – 40° C). Do
czyszczenia używać suchej miękkiej ściereczki;
nie stosować wody ani środków chemicznych.
Uwagi dotyczące zakłóceń dźwięku i błędów
odczytu
Wpływ dymu papierosowego oraz kurzu może
spowodować błędy przy odczycie płyt. Niestety
uniknięcie szkodliwych warunków nie zawsze
jest możliwe np. w dyskotekach. W takim przy-
padku należy zlecić okresowe czyszczenie urzą-
dzenia przez autoryzowany serwis.
9 Specyfikacja
Pasmo przenoszenia: . . 20 – 20 000 Hz
THD: . . . . . . . . . . . . . . . < 0,1 %
Separacja kanałów: . . . > 80 dB
Zakres dynamiki: . . . . . > 80 dB
Stosunek S / N: . . . . . . . > 80 dB
Wyjścia: . . . . . . . . . . . . 2 V (poziom liniowy),
gniazda RCA
Formaty dysku: . . . . . . . NTFS, FAT, HFS+
Pamięć
antywstrząsowa: . . . . . . 15 s
Zasilanie: . . . . . . . . . . . 230 V~ / 50 Hz
Pobór mocy: . . . . . . . . . 40 VA max
Zakres temperatur: . . . . 0 – 40 °C
Wymiary (S×W×D)
Panel sterujący: . . . . 482 × 90 × 85 mm,
2U
Mechanizm
odtwarzaczy: . . . . . . . 482 × 90 × 260 mm,
2U
Waga: . . . . . . . . . . . . . . 6,5 kg
Z zastrzeżeniem możliwości zmian.
START /
PAUSE CUE
PLAY
LOCK
TACT
1.×CuePlay
2.×Pause
START /
PAUSE CUE
PLAY
LOCK
TACT
1.×Start
2.×Pause
START /
PAUSE CUE
PLAY
LOCK
TACT
Start
Pause
PL
45
Instrukcje obsługi są chronione prawem copyright for MONACOR
®
INTERNATIONAL GmbH & Co. KG.
Przetwarzanie całości lub części instrukcji dla osobistych korzyści finansowych jest zabronione.

46
Læs nedenstående sikkerhedsoplysninger op-
mærksomt igennem før ibrugtagning af enhe-
den. Bortset fra sikkerhedsoplysningerne henvi-
ses til den engelske tekst.
Sikkerhedsoplysninger
Denne enhed overholder alle nødvendige EU-
direktiver og er som følge deraf mærket .
Vær altid opmærksom på følgende:
GAdvarsel! Undlad at kigge ind i CD-mekanis-
men, når CD-skuffen er åben. Der kan udsen-
des laserstråler, som kan forårsage øjenska-
der.
GEnheden er kun beregnet til indendørs brug.
Be skyt den mod vanddråber og -stænk, høj
luftfugtighed og varme (tilladt omgivelsestem-
peratur 0 – 40 °C).
GUndgå at placere væskefyldte genstande, som
f. eks. glas, ovenpå enheden.
GTag ikke enheden i brug og tag straks stikket
ud af stikkontakten i følgende tilfælde:
1. hvis der er synlig skade på enheden eller
netkablet,
2. hvis der kan være opstået skade, efter at
enheden er tabt eller lignende,
3. hvis der forekommer fejlfunktion.
Enheden skal altid repareres af autoriseret
personel.
GEt beskadiget netkabel må kun repareres af
producenten eller af autoriseret personel
GTag aldrig netstikket ud af stikkontakten ved at
trække i kablet, tag fat i selve stikket.
GHvis enheden benyttes til andre formål, end
den oprindeligt er beregnet til, hvis den ikke er
tilsluttet korrekt, hvis den betjenes forkert, eller
hvis den ikke repareres af autoriseret personel,
omfattes eventuelle skader ikke af ga rantien.
Der ydes ingen garanti ved betjeningsfejl eller
tab af data som følge af en defekt i pladespille-
ren og for den skade dette datatab vil udgøre.
Vedligeholdelse af enheden
Beskyt enheden mod støv, vibrationer og fugt.
Til rengøring må kun benyttes en blød, tør klud;
der må under ingen omstændigheder benyttes
vand eller kemikalier.
Note vedrørende læse fejl og afbrydelse af
afspilning
Cigaretrøg og støv kan nemt trænge ind gennem
alle åbninger på CD-afspilleren, og kan sætte sig
på laseren. Hvis dette skulle medfører læse fejl,
skal denne renses af en uddannet reparatør.
Rensning af laseren er ikke omfattet af garantien
på CD-afspilleren.
Hvis enhederne skal tages ud af drift for
bestandigt, skal de bringes til en lokal
genbrugsstation for bortskaffelse.
ADVERSAL Enheden benytter livsfarlig net-
spænding. For at undgå fare for
elektrisk stød må kabinettet ikke
åbnes. Overlad servicering til
autoriseret personel.
Ge akt på säkerhetsinformationen innan enhe-
ten tas i bruk. Skulle ytterliggare information
behövas kan den återfinnas i Manualen för
andra språk.
Säkerhetsföreskrifter
Enheten uppfyller samtliga Eu-direktiv och har
därför försetts med symbolen .
Ge ovillkorligen även akt på följande:
GVarning! Titta aldrig in i spelmekanismen
då luckan är öppen. Laserstrålen kan skada
ögonen.
GEnheten är endast avsedd för inomhusbruk.
Skydda enheten mot vätskor, hög luftfuktighet
och hög värme (tillåten omgivningstemperatur
0 – 40 °C).
GPlacera inte föremål innehållande vätskor,
t. ex. dricksglas, på enheten.
GAnvänd inte enheten och ta omedelbart kontak-
ten ur eluttaget om något av följande fel uppstår:
1. Enheten eller elsladden har synliga skador.
2. Enheten är skadad av fall e. d.
3. Enheten har andra felfunktioner.
Enheten skall alltid lagas på verkstad av utbil-
dad personal.
GEn skadad elsladd skall endast bytas på verk-
stad eller hos tillverkaren.
GDrag aldrig ut kontakten genom att dra i el slad-
den utan ta tag i kontaktkroppen.
GOm enheten används för andra ändamål än
avsett, om den kopplas in felaktigt, om den an -
vänds på fel sätt eller inte repareras av aukto-
riserad personal upphör alla garantier att gälla
och inget ansvar tas heller för uppkommen
skada på person eller materiel. Likaså accep-
teras inget ansvar för driftsfel eller för dataför-
lust orsakad av en defekt och för följdskador
av denna dataförlust.
Skötsel av enheten
Skydda enheten mot damm, vibrationer och fukt.
Rengör endast med en ren och torr trasa.
Använd aldrig vätskor i någon form då dessa kan
rinna in och orsaka kortslutning.
Notering ang ljud avbrott och läs problem
Cigarett rök och damm kommer lätt in genom
enhetens intag och kan då givetvis sätta sig på
det optiska läshuvudet. Om detta sker och föror-
sakar ljudstörningar och avbrott så måste enhe-
ten rengöras av kvalificerad personal. Var vänlig
att notera att detta kommer att fakturears även
om artikeln befinner sig inom garantiperioden.
Om enheten skall kasseras bör de läm-
nas in till återvinning.
VARNING Enheten använder högspänning
in ternt. For att undvika en elektrisk
stöt, öppna aldrig chas sit på egen
hand utan överlåt all ser vice till
auktoriserad verkstad.
DK
S

47
Ole hyvä ja huomioi joka tapauksessa seuraavat
turvallisuuteen liittyvät seikat ennen laitteen käyt-
töä. Laitteen toiminnasta saa lisätietoa tarvitta-
essa tämän laitteen muunkielisistä käyttöohjeista.
Turvallisuudesta
Tämä laite täyttää kaikki siihen kohdistuvat EU-
direktiivit ja sille on myönnetty hyväksyntä.
Huomioi seuraavat seikat:
GHuomio! Älä katso CD mekanismiin, kun CD
kelkka on ulkona. Lasersäteiden säteily voi
vahingoittaa silmiä.
GTämä laite soveltuu vain sisätilakäyttöön. Suo-
jele laitetta kosteudelta, vedeltä ja kuumuu-
delta (sallittu ympäröivä lämpötila 0 – 40 °C).
GÄlä sijoita laitteen päälle mitään nestettä sisäl-
tävää, kuten vesilasia tms.
GIrrota virtajohto pistorasiasta, äläkä käynnistä
laitetta jos:
1. virtajohdossa on havaittava vaurio
2. putoaminen tai muu vastaava vahinko on
saattanut aiheuttaa vaurion
3. laitteessa esiintyy toimintahäiriöitä
Kaikissa näissä tapauksissa laite tulee toimit-
taa valtuutettuun huoltoliikkeeseen.
GVirtajohdon saa vaihtaa vain valtuutettu huol-
tohenkilö.
GÄlä koskaan irrota virtajohtoa pistorasias ta
johdosta vetämällä.
GLaitteen takuu raukeaa, eikä valmistaja, maa-
hantuoja tai myyjä ota vastuuta mahdollisista
välittö mis tä tai välillisistä vahingoista, jos lai-
tetta on käytetty muuhun kuin alkuperäiseen
käyttötarkoitukseen, laitet ta on taitamattomasti
käytetty tai kytketty tai jos laitetta on huollettu
muussa kuin valtuutetussa huollossa. Myös-
kään mitään vastuuta mahdollisista käyttövir-
heiden, tai muun vian aiheuttamista tietohävi-
keistä tai välillisistä vahingoista ei oteta.
Laitteen huolto ja ylläpito
Suojele laitetta pölyltä, värähtelyiltä ja kosteu-
delta. Käytä puhdistamiseen vain kuivaa, peh-
meää kangasta. Älä käytä vettä tai kemikaaleja.
Tiedote koskien levyn lukuhäiriöitä sekä kat-
koksia äänessä
Laitteeseen kertyvä pöly, tupakansavu yms aihe-
uttaa laitteeseen lukuvirheitä. Laitteen saa avata
ja huoltaa vain av-huoltoliike tai sähköalan am-
mattilainen. Huomioi että kyseessä on normaa-
listi veloitettava huoltotyö myös takuuaikana.
Kun laite poistetaan lopullisesti käy-
tösta, vie se paikalliseen kierrätyskes-
kukseen jälkikäsittelyä varten.
VAROITUS Tämä laite toimii hengenvaaralli-
sella 230 V~ jännitteellä. Välttääk-
sesi sähköiskun, älä avaa laitteen
koteloa. Jätä huoltotoimet valtuu-
tetulle, ammattitaitoiselle huolto-
liikkeelle.
FIN

-
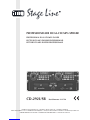 1
1
-
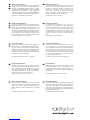 2
2
-
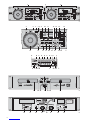 3
3
-
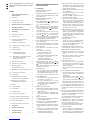 4
4
-
 5
5
-
 6
6
-
 7
7
-
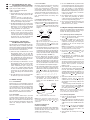 8
8
-
 9
9
-
 10
10
-
 11
11
-
 12
12
-
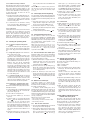 13
13
-
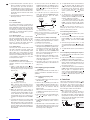 14
14
-
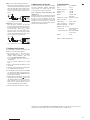 15
15
-
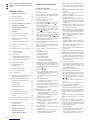 16
16
-
 17
17
-
 18
18
-
 19
19
-
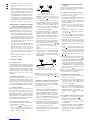 20
20
-
 21
21
-
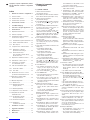 22
22
-
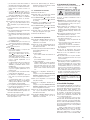 23
23
-
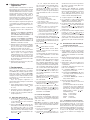 24
24
-
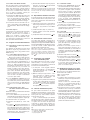 25
25
-
 26
26
-
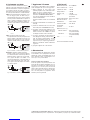 27
27
-
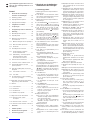 28
28
-
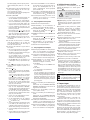 29
29
-
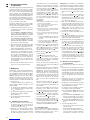 30
30
-
 31
31
-
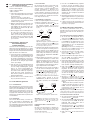 32
32
-
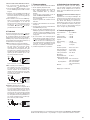 33
33
-
 34
34
-
 35
35
-
 36
36
-
 37
37
-
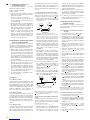 38
38
-
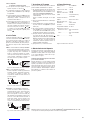 39
39
-
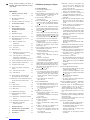 40
40
-
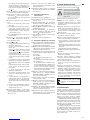 41
41
-
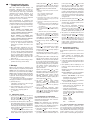 42
42
-
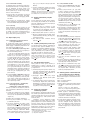 43
43
-
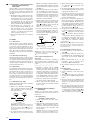 44
44
-
 45
45
-
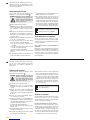 46
46
-
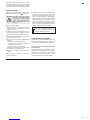 47
47
-
 48
48


IMG Stage Line CD-292USB Manual de usuario
- Categoría
- Reproductores de CD
- Tipo
- Manual de usuario
En otros idiomas
- français: IMG Stage Line CD-292USB Manuel utilisateur
- Deutsch: IMG Stage Line CD-292USB Benutzerhandbuch
- Nederlands: IMG Stage Line CD-292USB Handleiding
- polski: IMG Stage Line CD-292USB Instrukcja obsługi