
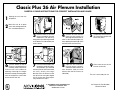
Unplug the unit from the
receptacle.
Remove both of the filter
frame assemblies from the
condenser side panel by
lifting them up and tilting outward
at the bottom as indicated by the
arrows above.
Remove the filter elements
from the filter frames by
pressing outward on the re-
tainer at the indicated points (A),
then, opening the retainer (B). (Save
the filter frames for future use)
Temporairly remove the five
(5) screws from the left side
of the rear panel.
Turn the latches of the Air
Plenum counterclockwise
until they stop. Place the Air
Plenum over the condenser
openings and align the hinge/
bracket assembly mounting holes
with the respective screw holes
on the back of the unit.
For ease of installation, turn
the latches to the full clock-
wise position. (This will hold
the front part of the Plenum onto
the unit). Attach the hinge/
bracket of the Air Plenum to the
rear of the unit using the original
five (5) screws that were tempo-
rarily removed in step 5.
Move the unit to an open
area with enough room for
the installation process.
Open the Air Plenum by
turning latches counter-
clockwise and install the air
filter elements (from the filter
frames) onto the Air Plenum (as
indicated).
9
Close and secure the Air
Plenum to the unit.
The unit is now ready for use.
Classic Plus 26 Air Plenum Installation
CAREFULLY READ INSTRUCTIONS FOR CORRECT INSTALLATION AND USAGE.
© 2000 DENSO SALES CALIFORNIA, INC.
DENSO P/N: LA990009-1263
www.movincool.com
Air Plenum Kit Part Number:
LAY84270-0030
1
2
345
67 8
A
B

Numero de Parte para ‘Air Plenum Kit’:
LAY84270-0030
9
© 2000 DENSO SALES CALIFORNIA, INC.
DENSO P/N: LA990009-1263
www.movincool.com
1
2
345
67 8
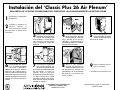
Desenchufe la unidad del
receptáculo.
Traslade la unidad a un
espacio abierto lo
suficientemente amplio
para permitir el proceso de
instalación.
Retire los dos conjuntos de
bastidores del filtro del panel
lateral del condensador
levantándolos e inclinándolos
hacia fuera en la parte inferior
como lo indican las flechas del
diagrama.
Retire los elementos del filtro
de los bastidores del filtro
presionando el retenedor
hacia adentro en los puntos
indicados y luego abriendo el
retenedor (guarde los bastidores
del filtro para uso futuro).
Retire temporalmente los
cinco (5) tornillos de la parte
inferior izquierda del panel
trasero de la unidad.
Gire los pestillos del “Air Ple-
num” en sentido antihorario
hasta que se detengan.
Coloque el “Air Plenum” sobre las
aberturas del condensador y
alinee los orificios de montaje del
conjunto bisagra/ménsula con los
orificios correspondientes para los
tornillos en la parte trasera de la
unidad.
Para facilitar la instalación,
gire completamente los
pestillos en sentido horario
(de manera que la parte delantera
del “Air Plenum” se sujete a la
unidad). Sujete el conjunto
bisagra/ménsula del “Air Plenum”
a la parte trasera de la unidad
haciendo uso de los cinco (5) tor-
nillos que previamente se habían
retirado en el paso 5.
Abra el “Air Plenum”
girando los pestillos en
sentido antihorario e instale
los elementos del filtro de aire
(procedentes de los bastidores
del filtro) en el “Air Plenum” (tal
como se indica).
Cierre y afiance el ‘Air Ple-
num’ a la unidad.
La unidad ya está lista para usar.
Instalación del ‘Classic Plus 26 Air Plenum’
PARA INSTALAR Y UTILIZAR CORRECTAMENTE EL DISPOSITIVO, LEA CUIDADOSAMENTE LAS INSTRUCCIONES
A
B
-
 1
1
-
 2
2


Movincool CPK24 Guía de instalación
- Tipo
- Guía de instalación
- Este manual también es adecuado para
en otros idiomas
- English: Movincool CPK24 Installation guide
Artículos relacionados

Otros documentos
-
Miller MH065000D El manual del propietario
-
-
-
Friedrich 920-075-13 (1-11) Manual de usuario
-
-
Infiniton SSDC-4630 El manual del propietario
-
GE AZ91H18E5C El manual del propietario
-
GE AZ91H12D2C Guía del usuario
-