
Rice Cooker
INSTRUCTION AND
RECIPE BOOKLET
For your safety and continued enjoyment of this product, always read the instruction book carefully before using.
CRC-800

2
IMPORTANT
SAFEGUARDS
When using an electrical appliance, basic safety
precautions should always be followed, including
the following:
1. READ ALL INSTRUCTIONS.
2. Do not touch hot surfaces; use handles
or knobs.
3. To protect against risk of electrical shock, do
not immerse the Rice Cooker/Steamer housing
in water or any other liquid. If housing falls into
liquid, unplug the cord from outlet immediately.
DO NOT reach into the liquid.
4. To avoid possible accidental injury, close
supervision is necessary when any
appliance is used by or near children.
5. Unplug from outlet when not in use and before
cleaning. Allow to cool before putting on or
taking off parts.
6. Do not operate any appliance with a
damaged cord or plug, or after the
appliance has malfunctioned or has been
dropped or damaged in any way or is not
operating properly. Return the appliance to
the nearest Cuisinart Repair Center for
examination, repair or mechanical or
electrical adjustment.
7. The use of attachments not recommended by
Cuisinart may cause fire, electrical shock, or
risk of injury.
8. Do not use outdoors or anywhere the cord or
motor housing might come into contact with
water while in use.
9. Do not use the Rice Cooker/Steamer for any-
thing other than its intended use.
10. To avoid the possibility of the Rice Cooker/
Steamer being accidentally pulled off work
area, which could result in damage to it or in
personal injury, do not let cord hang over edge
of table or counter.
11. To avoid damage to cord and possible fire or
electrocution hazard, do not let cord contact
hot surfaces, including a stove.
12. Extreme caution must be used when moving
any appliance containing hot oil or other hot
liquids.
13. Do not place on or near a hot gas or
electric burner, or in a heated oven.
14. Do not operate Rice Cooker/Steamer in water
or under running water.
15. To reduce the risk of electric shock, cook only
in removable container. Do not immerse the
container in water.
SAVE THESE
INSTRUCTIONS
FOR HOUSEHOLD USE
ONLY
SPECIAL CORD SET
INSTRUCTIONS
A short power-supply cord is provided to reduce
the risks of becoming entangled in or tripping over
a longer cord.
Longer extension cords are available and may be
used if care is exercised.
If a long extension cord is used, the marked
electrical rating of the extension cord should be
at least as great as the electrical rating of the
appliance. The longer cord should be arranged
so that it will not drape over the countertop or
tabletop where it can be pulled on by children or
tripped over.
NOTICE
This appliance has a polarized plug (one blade
is wider than the other). To reduce the risk of
electric shock, this plug will fit in a polarized
outlet only one way. If the plug does not fit fully
in the outlet, reverse the plug. If it still does not fit,
contact a qualified electrician. Do not modify the
plug in any way.
CONTENTS
Important Safeguards. . . . . . . . . . . . . . . . . . . . . 2
Parts and Features. . . . . . . . . . . . . . . . . . . . . . . 3
Important Guidelines . . . . . . . . . . . . . . . . . . . . . 3
Tips and Hints . . . . . . . . . . . . . . . . . . . . . . . . . . 3
Assembly Instructions . . . . . . . . . . . . . . . . . . . . 4
Operation
Cooking Rice . . . . . . . . . . . . . . . . . . . . . . . . 4
Cooking Rice and Steaming . . . . . . . . . . . . 5
Steaming Only . . . . . . . . . . . . . . . . . . . . . . . 5
Reheating Rice. . . . . . . . . . . . . . . . . . . . . . . 5
Cleaning, Care and Maintenance. . . . . . . . . . . . 5
Guide for Cooking Rice . . . . . . . . . . . . . . . . . . . 6
Guide for Steaming Vegetables, Poultry,
Seafood and Hard-Cooked Eggs . . . . . . . . 7
Recipes. . . . . . . . . . . . . . . . . . . . . . . . . . . . . . . . 8

3
INTRODUCTION
Cooking rice and steaming food has never been
easier. All you have to do is fill the cooking bowl or
steaming tray, and press the switch! When
cooking cycle is complete, the temperature is
automatically reduced to keep food warm until
you’re ready to eat. As always, cleanup is quick,
because all removable parts are dishwasher-safe.
PARTS AND FEATURES
1. Glass Lid with Steam Vent: See-through
glass lid allows you to view the rice while
the steam vent helps to prevent splattering.
Stainless steel rim accents complement any
kitchen decor.
2. Steaming Tray: Allows you to steam a
variety of foods while the rice is cooking.
3. Cooking Bowl: Nonstick coating prevents
the rice from sticking to the bowl.
4. Stainless Steel Housing: Durable stainless
steel construction makes cleanup easy.
5. Chrome-plated Handles: Cool touch han-
dles.
6. “Cook” and “Warm” Indicator Switch:
LED lights on top of the switch indicate that
the unit is in Cook or Warm mode.
7. Measuring Cup: Calibrated specifically
for your Cuisinart
®
Rice Cooker/Steamer;
allows you to measure the proper rice to
water proportions with ease.
8. Rice Paddle: Allows you to fluff and scoop
the rice out of the cooking bowl.
9. Retractable Cord Storage (not shown):
Convenient retractable cord storage.
10. BPA-Free (not shown):
All parts that come in contact
with food are BPA-Free.
IMPORTANT GUIDELINES
• This appliance generates steam. Do not operate
it without the lid in place.
• Do not use your Rice Cooker/Steamer under
hanging wall cabinets; the escaping steam could
cause damage.
• Do not use metal utensils. Metal utensils will
damage the nonstick finish on inner cooking
bowl.
• Add rice and water before plugging in the cooker.
Because the Rice Cooker/Steamer does not have
an Off setting, the unit will automatically be in
Warm mode immediately after the unit is plugged
in.
TIPS AND HINTS
• The Cuisinart
®
Rice Cooker/Steamer is a perfect
appliance for a busy lifestyle and limited space.
It will cook rice and grains perfectly with minimal
fuss, taking up little counter space and leaving
all your burners free for other tasks. Cleaning up
the nonstick bowl is quick and easy and there is
virtually no maintenance.
• Your rice cooker can be used for more than just
rice. It is a simple way to cook pilafs. Simply turn
unit on and walk away — it will automatically
switch to Warm when ready to serve.
• You can use your rice cooker to cook a combi-
nation of rice, grains and legumes at the same
time. Follow our recipes for ideas and suggested
amounts to use — let your imagination be
your guide.
• Rinsing/washing rice: Generally the rule is to
wash or rinse imported rice and not to wash
or rinse domestic (grown in U.S.) rice, as it has
been enriched with vitamins. To wash rice: place
in a medium bowl and cover with water, swirl
until the water appears chalky/cloudy, and drain
in a fine mesh strainer. Repeat until water is clear
(or nearly clear) when rice is covered and swirled.
Rice aficionados will even wash domestic rice,
as it removes the starches and reduces sticki-
ness. If you follow a well-balanced diet, then the
loss of these vitamins will not be detrimental. Do
not wash your rice in the rice cooker bowl – if the
outside of the bowl is wet when cooking, it may
cause damage to your rice cooker.
• Some varieties of rice may call for a soaking
period. This can be done in the rice cooker bowl
prior to cooking.
• When cooking rice, boil it until it has absorbed
all the liquid. At this time it is not quite done.
Rice benefits from a “boil-steam” method of
cooking. Allow your rice to rest on the Warm
setting for 5 to 10 minutes before serving for
best results. Do not remove the cover and peek.
2
1
3
4
5
6
9
7
8

4
• After rice rests for 5 to 10 minutes, open rice
cooker cover and stir rice gently with rice paddle
or a wooden spoon. If rice is not ready to serve,
re-cover and let stand on Warm until ready.
• The rice cooker will switch to the Warm cycle
when it has finished cooking. At this time, you
may stir in chopped raw vegetables such as
green onions, slivered snow peas, shredded car-
rots, or even grape tomatoes to add texture to
the dish – they will warm while the rice is resting,
and if served in 5 to 10 minutes will retain their
unique texture.
• The rice cooker can be used to prepare com-
mercially packaged pilafs, rice and grain mixes.
Some packages will come with generic rice
cooker instructions, or they may be found on the
websites of the manufacturers. If the package
has a sautéing step, do it right in the rice cooker
bowl. Turn on, add specified amount of butter or
oil, add rice/vegetables/meat and sauté accord-
ing to package instructions, with the lid on. Add
liquid and continue to cook. If the rice is too wet,
allow it to remain on Warm for 15 to 20 minutes
before serving. If it is too chewy, add up to ¼
cup more liquid and let stay on Warm until liquid
is absorbed (about 15 to 20 minutes).
• When measuring rice with your rice cooker cup,
level it off with a table knife or spatula as you
would flour for baking.
• If desired, you may spray your rice cooking bowl
with nonstick cooking spray, but this step is not
necessary, as it has a nonstick coating.
• When rice is placed in the cooking bowl, level it
off to a flat layer that covers the entire bottom of
the bowl, to ensure that it cooks evenly.
• The water you use for cooking rice should be
the same water that you drink. If you do not like
the taste of your tap water, use bottled or filtered
water. The taste of the water will affect the taste
of the rice.
• For best results, use cold water. Cooking times
will vary depending on the temperature of the
water being used.
• Liquids other than water may be used to cook
rice. Use low-fat, low-sodium meat or vegetable
stocks/broths. Fish stock or clam broth may be
used for seafood-flavored rice.
• One to two teaspoons of unsalted butter, olive,
vegetable or nut oil will help keep grains of rice
separate and prevent boiling over.
• If your recipe calls for salt, add and swirl in with
the rice paddle or a wooden spoon after adding
liquid — then level the rice as evenly as possible.
• The rice cooker can be used to steam vegeta-
bles, seafood and some meats while cooking the
rice. Use our recipes as a guide, then create your
own combinations.
• When steaming vegetables, clean them and
trim to similar size. Follow Steaming Guide (page
7) for steaming vegetables alone. To steam veg-
etables while preparing rice, use steaming guide
to time when to add vegetables to steaming tray.
Most vegetables can be added about 10 minutes
before rice has finished cooking.
• When steaming meats such as poultry or sau-
sage, cut all into small, similar sized pieces (such
as “finger strips” or 1-inch slices). Arrange in a
single layer in the steaming tray, which has been
sprayed with cooking spray.
• When steaming shrimp, scallops and other sea-
food, arrange in a single layer in the steaming
tray, which has been sprayed with cooking spray.
• When using your rice cooker, plug it in and
arrange it on the counter away from the wall
and not under hanging cabinets, to prevent
steam damage.
• The steam vent in the cover should always be
placed facing the back of the rice cooker. Lift
the lid from the back to the front to prevent
steam burns.
• One cup of uncooked rice makes approximately
three cups of cooked rice.
• 1 rice cooker cup (filled to the top) = ¾ cup =
12 tablespoons
ASSEMBLY INSTRUCTIONS
To use your Cuisinart
®
Rice Cooker/Steamer:
1. Carefully unpack the cooker.
2. Rinse the nonstick cooking bowl, steaming tray
and lid in warm, soapy water. Rinse well and
dry thoroughly.
3. Wipe all interior and exterior surfaces of the rice
cooker base with a soft, damp cloth.
4. Place cooking bowl in base of unit.
5. Place steaming tray in cooking bowl with open
part facing down.
6. Place the lid on top of the cooking bowl.
7. Do not plug in unit. Your rice cooker is now
ready for use.
OPERATION
Cooking Rice
1. Make sure your Cuisinart
®
Rice Cooker/Steamer
is unplugged.
2. Place cooking pot in the stainless steel housing.
3. Measure desired amount of raw rice with the
measuring cup provided. Rinse rice if needed.
See Guide for Cooking Rice (page 6) for
rice-to-water ratios.
4. Choose one of the following ways to add water
or stock for cooking:

5
a. Measure the appropriate amount of water
using standard liquid measuring cup.
See Guide for Cooking Rice.
b. Using the water line inside the cooking pot,
add water to the rice inside the bowl up to
the proper water line. For example, if you
added 2 cups of raw rice, add water to line
2 (white rice only).
5. Cover the cooking bowl with lid. Make sure the
steam vent is facing toward the back of the unit.
6. Plug in unit.
7. Set to the cook position by pressing the switch
down. The Cook LED light will be illuminated.
8. Rice cooker will heat and cook the rice.
Cooking time will vary, depending on the
amount and type of rice or grain being cooked.
9. Once the rice is cooked, the unit will automati-
cally switch to the Warm setting and the Warm
LED will be illuminated. The unit will stay in
Warm mode until the unit is unplugged from
the outlet.
10. For best texture, allow cooked rice to rest in
Warm mode for 5 to 10 minutes.
11. Once you are ready to serve the rice, lift the lid
away from you.
12. Fluff rice with paddle or utensil suitable for
nonstick cookware.
13. Lift and remove cooking bowl from rice cooker
using potholders.
Cooking Rice and Steaming
1. Clean and prepare your vegetables, seafood,
fish or poultry.
2. Follow steps 1 to 8 under the Cooking Rice
section (page 4).
3. Fill the steaming tray with open end facing up.
4. Place the filled steaming tray on top of the
cooking bowl at the appropriate time for food
being steamed. See Steaming Guide (page 7),
for approximate cooking times.
5. Place lid on top of the steaming tray.
6. When the appropriate cooking time has elapsed,
unplug the unit.
Steaming Only
1. Make sure unit is unplugged.
2. Fill cooking bowl with the suggested amount of
water based on the Steaming Guide.
3. Fill the steaming tray with open end facing up.
4. Place the filled steaming tray on top of the
cooking bowl.
5. Place lid on top of the steaming tray.
6. When water is completely evaporated, the unit
will automatically switch to the Warm setting and
the Warm LED will be illuminated. The unit will
stay in Warm mode until the unit is unplugged
from the outlet. Do not allow bowl to boil dry.
7. For best results, unplug unit immediately
after the unit switches to Warm, to prevent
over-cooking.
Reheating Rice
1. Make sure unit is unplugged.
2. To reheat rice, add ¼ cup (4 tablespoons) of
cold water per cup of cooked rice.
3. Stir to mix.
4. Place lid on top of the cooking bowl.
5. Plug in unit and set to the cook position by
pressing the switch down. The Cook LED light
will be illuminated.
6. Once the rice is cooked, the unit will automati-
cally switch to the Warm setting and the Warm
LED will be illuminated. The unit will stay in
Warm mode until the unit is unplugged from the
outlet.
CLEANING, CARE AND
MAINTENANCE
1. Unplug your Cuisinart
®
Rice Cooker/Steamer
and allow it to cool before cleaning.
2. Place cooking bowl, steaming tray and lid in the
dishwasher or wash with warm, soapy water. If
food sticks to the surface, fill with warm, soapy
water and allow to soak before cleaning.
3. If scouring is necessary, use a nonabrasive
cleanser or liquid detergent with a nylon pad
or brush.
4. Wipe base of unit with a soft, damp cloth or
microfiber towel. NEVER IMMERSE BASE OF
UNIT IN WATER.
5. Make sure all parts are cool before storing. Store
unit in a clean, dry place.
6. Any other servicing should be performed by
an authorized service representative.

6
COOKING CHARTS
Guide for Cooking Rice
Cooking times will vary according to amount and temperature of cooking liquid.
The simplest way to cook long grain (converted) white rice is to place rice in cooking bowl and add liquid to
appropriate line marking. For example, using the rice measuring cup provided, fill cooking bowl with 2 cups
rice. Then, add water to the 2 cup water marking inside the bowl. If using 3 cups of rice, add water to the 3
cup water marking inside the pot. Do the same when using 4 to 8 cups of rice. Please note that preparing
less than 2 cups of rice is not recommended.
For grains or brown and specialty rice, use the chart provided below. Note that you should not prepare
these in amounts smaller or larger than stated in the chart.
All rice/grain is measured in the rice cooker cup. All water/liquid is measured in a standard liquid measuring cup.
Rice/Grain Serves Amount Rice
(in Rice Cooker Cups) Amount Water/Liquid
(in standard liquid measure cups)
Long Grain White 4 2 2⁄8
Long Grain White 6 3 3⁄8
Long Grain White 8 4 3¾
Long Grain White 10 5 4½
Long Grain White 12 6 5½
Long Grain White 16 8 7½
Medium Grain White 4 2 2
Medium Grain White 6 3 2¾
Medium Grain White 8 4 3½
Medium Grain White 10 5 4¼
Medium Grain White 12 6 5¼
Medium Grain White 16 8 7
Arborio 4 1 3¼
Brown Rice (med/long) 2-4 1 1¾
Brown Rice (med/long) 3-5 1½ 2½
Wehani Rice 4 1 17⁄8
Red Rice
(Carmargue riz rouge;
Bhutanese) 41 1¾
Red Rice
(Carmargue riz rouge;
Bhutanese) 61½ 2
2/3
Wild Pecan 4 7-oz. package 1¾
Wild Pecan 8 Two 7-oz. packages 3½
Black Rice (Forbidden) 4 1 1¾
Black Rice (Forbidden) 8 2 3½
Sushi
(soak rice for 30 minutes
before cooking)
makes
about 5½
cups 3 2¼ cups water + 2 tablespoons Sake
Pearl Couscous (Israeli) 6 1½ 3
Pearl Couscous (Israeli) 12 3 6
Polenta (Cornmeal) 4 1 3
Polenta (Cornmeal) 8 2 6
Oatmeal (Rolled Oats) 4 2 3
Oatmeal (Rolled Oats) 8 4 6
Oatmeal
(Irish – soak overnight
in water – cooking amount) 2 to 3 1 3
Oatmeal
(Irish – soak overnight in the
amount of cooking water) 4 to 6 2 6
* One rice cooker cup equals ¾ cup standard dry measure.

7
Guide for Steaming Vegetables, Poultry, Seafood and Hard-Cooked Eggs
Place indicated amount of water into the Cooking Bowl. The amount needed will vary according to the type
of food being cooked. Arrange foods in a single layer in the steaming tray. Vegetables should be cut in
similar sizes as indicated. Begin timing when unit is turned on. Cooking times are approximate and will yield
cooked but crisp/tender vegetables. Add more time for more tender/softer vegetables or cut back on time
for crispier vegetables to taste.
The rice cooker must be unplugged immediately after vegetables have finished cooking to prevent over-
cooking. If cooking vegetables over rice, use chart to determine approximately when to add steaming tray to
rice cooker. Serve steamed vegetables immediately or plunge into ice water to stop cooking to use in salads
and other cold preparations.
Food Amount Preparation Water Cooking Time
(approximate)
Asparagus 8 ounces 3-inch cut 2 cups 9-10 minutes
Broccoli 8 ounces 1½-2" flowerets 2 cups 11 minutes
Carrots – baby 8 ounces Whole 2 cups 15 minutes
Carrots – sliced 8 ounces ¼-inch slices 2 cups 15 minutes
Green beans 4 ounces 1 to 1½" slices 2 cups 8-9 minutes
Peas, snow 4 ounces Whole, tipped and
topped, strings
removed 2 cups 11 minutes
Potatoes, new
(1½" diameter) 8 ounces Quartered 2 cups 23-24 minutes
Potatoes
Yellow/Gold 12 ounces ¾-inch dice 2 cups 23-24 minutes
Sweet potatoes 8 ounces Peeled, ½-inch dice 2 cups 18-19 minutes
Zucchini/
yellow squash 6 ounces Halve lengthwise,
¾-inch slices 2 cups 11 minutes
Sweet potatoes 16 ounces Peeled, ¾" cubes 2 cups 25 minutes
Poultry –
chicken or turkey 8-16 ounces Cut into similiar size
pieces, ½ x ½ x
3-inches 2 cups 15-20 minutes
Shrimp Up to one
pound
Peeled/unpeeled; may
be seasoned with
herbs or prepared
seafood seasoning
such as Old Bay®
(spray steaming tray
with cooking spray)
2 cups 12-15 minutes
(will depend on size
of shrimp)
Scallops Up to one
pound
Season as desired
(spray steaming tray
with cooking spray or
line with leaf lettuce)
2 cups 10-15 minutes
Fin fish (salmon,
haddock, cod, sea
bass, etc.)
up to one
pound
Cut into 1½-inch
squares; arrange
on lettuce leaves or
parchment rounds in
steaming tray
2 cups 10-15 minutes
Eggs, large 8 In shells To one cup
mark
21 minutes (place
in ice water
immediately to
stop cooking)

8
RECIPES
For all recipes in this Instruction & Recipe Booklet
use the included Rice Cooker Measure Cup to
measure the rice or grain. Use a standard liquid
measure cup (1 cup = 8 ounces = 16 tablespoons)
to measure all liquids. (This keeps your Rice
Cooker Measure Cup dry for measuring dry rice/
grain.)
The Rice Cooker Measure Cup = ¾ cup standard
dry measure or 12 tablespoons. Only white rice
can be cooked to the maximum amount possible
in the Rice Cooker (4 Rice Cooker cups/8 Rice
Cooker cups). Do not cook more than the sug-
gested amounts of other rice on the cooking chart,
as the amount of liquid needed to cook larger
amounts will boil over.
SALADS
Red Onion Vinaigrette
Makes
7⁄8
cup
½ small red onion, peeled, cut into
½-inch pieces (about 1 ounce)
1½ teaspoons Dijon-style mustard
1 teaspoon sugar
½ teaspoon kosher salt
¼ teaspoon freshly ground black pepper
¼ cup white balsamic vinegar (or use a
fruit flavored vinegar)
½ cup extra virgin olive oil
Place the red onion, mustard, sugar, salt, pepper,
and vinegar in a food processor or blender; pro-
cess until smooth. Add the oil and process until
emulsified. Keep vinaigrette in a covered con-
tainer in the refrigerator until ready to use. If vin-
aigrette separates, stir with a whisk to emulsify.
Nutritional information per tablespoon:
Calories 71 (96% from fat) • carb. 1g • pro. 0g
• fat 7g • sat. fat 1g • chol. 0mg • sod. 61mg
• calc. 0mg • fiber 0g
Konriko
Wild Pecan® Rice
Waldorf Salad
Konriko Wild Pecan
®
Aromatic Rice is a type of
long grain rice. The nutty aroma and flavor are
natural to the rice. We use the Wild Pecan
®
Rice
here to make a Waldorf type salad with apples
and dried cranberries. This naturally flavored rice
makes a great side dish.
3 cups (Rice Cooker) Konriko Wild
Pecan® Aromatic Rice*
4½ cups (standard liquid) water
2 shallots, peeled, finely chopped
4 teaspoons Dijon-style mustard
½ teaspoon kosher salt
½ teaspoon freshly ground black pepper
6 tablespoons sherry vinegar
6 tablespoons extra virgin olive oil
4 tablespoons vegetable oil
1 apple, such as Gala, Braeburn, Pink
Lady, cored, cut into ¼-inch dice
1 cup dried cranberries or dried
tart cherries
2
⁄
3
cup chopped toasted pecans
½ cup chopped red onion
½ cup chopped celery
Place rice and water in cooking bowl and insert
in Cuisinart® Rice Cooker/Steamer. Turn on
and cook until water is absorbed; about 35
minutes. When unit switches to Warm, let stand
5 minutes. Spread on a baking sheet to cool.
While rice is cooking and cooling, prepare the
vinaigrette. Place the shallots, mustard, salt,
pepper and vinegar in a small bowl; stir with
a whisk to blend. Add the oils and whisk until
emulsified; reserve. When rice is cooled to room
temperature, place in a large bowl. Add the diced
apple, dried cranberries, chopped pecans, red
onion, and celery; stir gently to combine. Pour
the dressing over the salad and toss gently to
coat and blend. Serve at room temperature. If
not serving immediately, cover and refrigerate.
Remove from refrigerator 30 minutes before
serving.
*Konriko Wild Pecan
®
Aromatic Rice can be
found in most well-stocked grocery stores. Use
four 7-ounce packages for the right amount for
this recipe.
Nutritional information per serving (½ cup):
Calories 124 (57% from fat) • carb. 13g • pro. 1g
• fat 8g • sat. fat 1g • chol. 0mg • sod. 81mg
• calc. 6mg • fiber 1g

9
Yellow Rice and Black
Bean Salad
This colorful salad is delicious with grilled
seafood. Garnish with sliced avocado.
Makes 16 cups
2 cucumbers, peeled and seeded,
cut into ¼-inch dice
2 teaspoons kosher salt, divided
2 teaspoons vegetable oil
2 teaspoons turmeric
1½ teaspoons ground cumin, divided
3 cups (Rice Cooker) long grain white
rice
3 cups (standard liquid measure) water
2 cloves garlic, peeled, finely minced
¼ cup fresh lime juice
2 tablespoons rice vinegar
½ teaspoon ground coriander
½ teaspoon oregano
¾ cup extra virgin olive oil
2 cans (15 ounces each) black beans,
rinsed and drained
2 cups diced (¼-inch) jicama
2 cups grape tomatoes, halved
1 cup chopped red bell pepper
½ cup chopped red onion
2-3 jalapeño peppers, stemmed, seeded,
and finely chopped
½ cup chopped fresh cilantro
Place the diced cucumber in a strainer. Sprinkle
with 1 teaspoon of the salt; toss to coat. Place
strainer over a bowl to drain for 30 minutes.
Insert the cooking bowl in the Cuisinart
®
Rice Cooker/Steamer. Add oil, turmeric and
cumin; cover and cook and 2 minutes. Add rice;
stir to coat with oil and spices. Cover; cook 2
minutes. Stir in water and ½ teaspoon of the salt.
Cover and turn on. Cook until liquid is absorbed,
about 20 to 25 minutes. Spread the rice onto a
baking sheet to cool.
Place minced garlic, lime juice, vinegar,
coriander, oregano, the remaining salt and cumin
in a small bowl; stir with a whisk to blend. Add
olive oil and whisk until emulsified.
Place the cooled rice in a large bowl. Add the
black beans, jicama, tomatoes, chopped red
pepper, chopped onion, and chopped jalapeño.
Stir gently to mix. Add the vinaigrette and
chopped cilantro.
Stir gently to combine.Transfer to a decorative
bowl to serve. If not serving immediately, cover
and refrigerate. Remove from refrigerator 30 min-
utes before serving.
Nutritional information per serving (½ cup):
Calories 128 (39% from fat) • carb. 17g • pro. 3g
• fat 6g • sat. fat 1g • chol. 0mg • sod. 88mg
• calc. 18mg • fiber 2g
Greek Rice Salad
Serve this salad as a side dish with grilled tuna,
swordfish or lamb.
Makes about 16 cups
2 teaspoons extra virgin olive oil
2
cups (Rice Cooker) long grain white rice
1 cup (Rice Cooker) orzo
1 teaspoon salt
4½ cups (standard liquid measure) water
2 cloves garlic, minced
2 large tomatoes, seeded and chopped
1 large cucumber, seeded and chopped
1
medium red onion, peeled and chopped
1¼ cups crumbled feta cheese
1 cup pitted kalamata olives, halved
2 cans (15 ounces each) artichoke
hearts, drained well and quartered
½ cup chopped fresh parsley
2 tablespoons fresh lemon juice
1 teaspoon oregano
1 teaspoon basil
1 teaspoon kosher salt
2 teaspoons freshly ground black pepper
6 tablespoons extra virgin olive oil
Place cooking bowl in Cuisinart
®
Rice Cooker/
Steamer. Add olive oil. Cover and turn Rice
Cooker on; wait 1 minute. Stir in rice and orzo.
Cook for 2 minutes, stirring constantly. Add 1
teaspoon salt and water; sprinkle with minced
garlic. Cover and cook until liquid is absorbed
and cooker switches to Warm. Let stand on
Warm for 5 minutes. Spread the rice/orzo onto a
baking sheet to cool.
While the rice cooks, place the tomato, cucum-
ber, feta, olives, artichokes, parsley, lemon juice,
oregano, basil, 1 teaspoon kosher salt, pepper
and olive oil in a large bowl; stir. When rice/orzo
mixture is cooled, stir into the vegetable mixture.
Chill one hour or longer before serving.
Nutritional information per serving (¾ cup):
Calories 153 (50% from fat) • carb. 17g • pro. 3g
• fat 8g • sat. fat 2g • chol. 6mg • sod. 555mg
• calc. 54mg • fiber 1g

10
Forbidden Rice Salad
This black rice was once reserved only for the
Emperor, forbidden to all others.
Makes about 3 cups (6 servings)
¾ cup (Rice Cooker) Forbidden Rice
¾ cup (standard liquid measure) and
3 tablespoons water
1 sweet potato (6 ounces), peeled and
cut into ½-inch cubes
Miso Dressing (recipe follows)
3 green onions (include 2-3 inches of
green), trimmed and chopped
¼ cup dried cranberries
2 tablespoons toasted chopped pecans
Rinse and drain rice. Place in cooking bowl. Add
water; turn Rice Cooker/Steamer on. Place sweet
potato cubes in steaming tray. After 10 minutes
of cooking, lift lid and place steaming tray on top
of Rice Cooker Bowl, then cover immediately.
Continue to cook until Rice Cooker switches
to Warm cycle. Let stand 5 minutes. Remove
steamer tray. Transfer rice to large bowl. Add 2
tablespoons Miso Dressing and toss gently. Let
cool 10 minutes.
Add cooled sweet potato, green onions, dried
cranberries, chopped pecans, and 1 to 2 more
tablespoons Miso Dressing. Toss gently to
combine and coat evenly with dressing. Add
more dressing to taste if desired.
Nutritional information per serving (½ cup),
made with 4 tablespoons dressing:
Calories 138 (33% from fat) • carb. 23g • pro. 2g
• fat 5g • sat. fat 1g • chol. 0mg • sod. 97mg
• calc. 15mg • fiber 2g
Miso Dressing
Makes ½ cup
1 clove garlic, peeled and finely minced
½ teaspoon dry mustard
½ teaspoon ginger
¼ cup fresh lemon juice
1 tablespoon sherry vinegar
3 tablespoons vegetable oil
2 tablespoons yellow miso*
1 teaspoon toasted sesame oil
Place garlic, mustard, ginger, lemon juice and
vinegar in a small bowl; stir with a whisk until
emulsified. Add Miso and oil.
Nutritional information per tablespoon:
Calories 64 (81% from fat) • carb. 3g • pro. 1g
• fat 6g • sat. fat 1g • chol. 0mg • sod. 184mg
• calc. 5mg • fiber 0g
* Miso is available at Asian grocery stores and
health food markets.
Wheat Berry &
Vegetable Salad
Makes 12 cups salad (24 servings)
2 cups (Rice Cooker) wheat berries*
3 cups (standard liquid measure) water
½ teaspoon kosher salt
11⁄3 cups cut corn (use frozen, thawed)
1 cup (4 oz.) shredded zucchini
1 cup chopped red bell pepper
½ cup chopped green onion
½ cup chopped sun-dried tomatoes
½ cup Red Onion Vinaigrette
(recipe, page 8)
¼ cup chopped fresh parsley
Soak the wheat berries in 2 inches of water
for 1 hour. Drain and place in cooking bowl of
Cuisinart
®
Rice Cooker/Steamer. Add water and
½ teaspoon salt. Turn on and cook until all water
is absorbed and unit switches to Warm, about 40
minutes. Let stand 5 minutes. Spread out on a
baking sheet to cool.
When wheat berries are cooled, place in a
medium bowl with the corn, zucchini, red pepper,
green onion, and sun-dried tomatoes. Toss gently
to combine. Add 4 tablespoons of the dressing
(cover and refrigerate remaining dressing for
another use) and the parsley; toss to combine.
If not serving immediately, cover and refrigerate.
Remove from refrigerator 30 minutes before
serving.
*Wheat berries can be found in many well-
stocked grocery stores, specialty food stores
or health food stores. Wheat berries are whole
unprocessed kernels of wheat. They can be
cooked in cereals, pilafs and breads and add
a nutty flavor. Wheat berries should be soaked
prior to using to soften.
Nutritional information per serving:
Calories 110 (46% from fat) • carb. 15g • pro. 2g
• fat 7g • sat. fat 1g • chol. 0mg • sod. 148mg
• calc. 14mg • fiber 3g

11
SIDE DISHES
Curried Rice Pilaf with
Apricots & Pine Nuts
Makes 8 cups (12 to 16 servings)
2 tablespoons unsalted butter
1 cup chopped onion
1 tablespoon curry powder
1 teaspoon turmeric
4 cups (Rice Cooker) long grain white rice
4 cups (standard liquid measure) water
2 teaspoons kosher salt
1 cup slivered dried apricots
¼ cup toasted pine nuts
Place the cooking bowl in the Cuisinart
®
Rice
Cooker/Steamer. Add the butter, cover and turn
on; wait 2 minutes. Add the chopped onion, curry
powder and turmeric to the melted butter; stir
with rice paddle to coat. Cover and cook 5 min-
utes. Stir in the rice, water and salt. Top with the
slivered apricots. Cover and reset Rice Cooker to
On. Cooking time will be approximately 25 min-
utes, then the Rice Cooker will switch to Warm.
Let stand 5 to 10 minutes on Warm (or longer)
before serving. Fluff with rice paddle and transfer
to a warm serving bowl. Sprinkle with toasted
pine nuts just before serving.
Nutritional information per serving (based on 16 servings):
Calories 161 (15% from fat) • carb. 33g • pro. 3g
• fat 3g • sat. fat 1g • chol. 4mg • sod. 170mg
• calc. 10mg • fiber 2g
Brown, Wehani
& Wild Rice Pilaf
Makes 4 cups (8 servings)
2 tablespoons unsalted butter
¼ cup minced celery
¼ cup minced shallot
1½ cups (Rice Cooker) long grain brown rice
1 cup (Rice Cooker) wehani rice
½ cup (Rice Cooker) wild rice
1 teaspoon herbs de Provence
1⁄3 cup (standard liquid measure) dry
white vermouth or dry white wine
2¼ cups (standard liquid measure) chicken
stock (low-sodium)
2¼ cups (standard liquid measure) water
1 cup dried cranberries
4 green onions, trimmed and chopped
(include several inches of green)
2⁄3 cup chopped toasted pistachios
Place cooking bowl in Cuisinart
®
Rice Cooker/
Steamer. Place butter in bowl. Cover and turn on;
cook 2 minutes. Add celery and shallot to melted
butter; stir with rice paddle. Cover; cook 2 min-
utes. Add three rices and herbs de Provence; stir
to coat with butter, using rice paddle. Add wine;
stir. Cover and cook 3 minutes. Add chicken
stock and water; stir. Cover; turn on and cook
until liquid is absorbed, about 45 to 50 minutes –
unit will then switch to Warm. Sprinkle the dried
cranberries and chopped green onions on top of
the rice. Cover and let stand 5 minutes. Stir in
half the chopped toasted pistachios. Transfer to
a warmed serving bowl and top with remaining
pistachios. Serve immediately.
Nutritional information per serving:
Calories 134 (18% from fat) • carb. 23g • pro. 4g
• fat 3g • sat. fat 1g • chol. 5mg • sod. 264mg
• calc. 16mg • fiber 2g
Brown Rice and Lentil
Pilaf
Makes 4 cups (8 servings)
1 tablespoon extra virgin olive oil
¼ cup chopped carrots
¼ cup chopped mushrooms
¼ cup chopped shallots
2 cups (Rice Cooker) long grain brown rice
2⁄3 cup (Rice Cooker) brown lentils
1 teaspoon thyme
2¼ cups (standard liquid measure)
chicken stock
1½ cups (standard liquid measure) water
Place cooking bowl in Cuisinart
®
Rice Cooker/
Steamer. Add olive oil. Cover and turn on; let
heat for 1 minute. Add carrots, mushrooms and
shallots to bowl; stir, using rice paddle to coat
with oil. Cover and cook for 3 minutes (Rice
Cooker will shut off). Stir in rice, lentils and
thyme. Add stock and water; stir, using rice
paddle. Cover and turn on. Cooking time will be
approximately
30 minutes. The Rice Cooker will
then switch to Warm. Let stand 5 to 10 minutes
(or longer) on Warm before serving. Fluff with rice
paddle and transfer to a warm serving bowl.
Nutritional information per serving:
Calories 185 (14% from fat) • carb. 34g • pro. 6g
• fat 3g • sat. fat 0g • chol. 0mg • sod. 332mg
• calc. 20mg • fiber 3g

12
Confetti Pilaf
This mixture of wheat berries and brown and wild
rices is finished off with green peas and chopped
red bell pepper – the look is wonderfully full of
color, and the pilaf is perfect with grilled chicken
or fish.
Makes 8 cups (16 servings)
1 cup (Rice Cooker) wheat berries* (not
cracked wheat or bulgur) boiling water
2 teaspoons unsalted butter
2 teaspoons extra virgin olive oil
6 tablespoons finely chopped onion
or shallot
¼ cup finely chopped carrot
1½ cups (Rice Cooker) long grain
brown rice
½ cup (Rice Cooker) wild rice
1 teaspoon marjoram
3 cups (standard liquid measure)
low-sodium chicken stock
2¼ cups (standard liquid measure) water
1 teaspoon kosher salt
1½ cups frozen baby peas, thawed
1 cup chopped red bell pepper
4 green onions, trimmed
(include 2-3 inches of green), chopped
1 teaspoon freshly ground pepper
Place the wheat berries in a heatproof bowl and
cover with 2 inches of boiling water. Let stand 1
hour to soften. Drain.
Insert the cooking bowl in the Cuisinart
®
Rice
Cooker/Steamer. Place the butter and olive oil
in the bowl; cover and turn on. Heat for 1 min-
ute. Add chopped onion and carrot; stir, cover,
and cook 2 minutes. Add drained wheat ber-
ries, brown rice, wild rice, and marjoram; stir to
coat. Cover; cook 2 minutes. Add chicken stock,
water and salt; stir. Cover and cook until liquid
is absorbed and Rice Cooker switches to Warm,
about 50 minutes. When Rice Cooker switches
to Warm, add the thawed peas, chopped red
pepper and green onions. Cover and let stand 5
minutes. Add ground pepper; toss gently to com-
bine. Transfer to a warm bowl to serve.
Serve hot.
*See note about wheat berries on page 10.
Nutritional information per serving:
Calories 108 (16% from fat) • carb. 19g • pro. 3g
• fat 2g • sat. fat 0g • chol. 1mg • sod. 197mg
• calc. 13mg • fiber 3g
Creamy Parmesan Risotto
with Asparagus
Use vegetable stock to make this a vegetarian
dish.
Makes 6 cups (serves 12 as a side dish, 8 as a
first course, 4 as an entrée)
cooking spray
8 ounces asparagus, peeled,
cut into 1-inch pieces
2 teaspoons unsalted butter
2 teaspoons extra virgin olive oil
2⁄3 cup finely chopped onion or shallot
2⁄3 cup finely chopped carrot
2 cups (Rice Cooker) Arborio rice
2⁄3 cup dry white wine or vermouth
6 cups (standard liquid measure) water,
chicken or vegetable stock (may mix)
½ cup heavy cream
½ cup freshly grated Parmesan cheese
¼ teaspoon ground white pepper
Lightly coat the steaming tray of the Cuisinart
®
Rice Cooker/Steamer with cooking spray. Place
asparagus in steaming tray; reserve.
Place the butter and olive oil in the cooking bowl
of the Cuisinart
®
Rice Cooker/Steamer. Cover,
turn on and wait one minute. Stir in the chopped
onion and carrot and cover; cook 1 minute. Add
the rice; stir to coat completely. Cover and cook
2 minutes. Stir in the wine; cover. Cook 2 to 3
minutes, until the wine is completely absorbed.
Add the water or stock; stir. Cover and cook for
25 minutes, stirring 2 or 3 times during cook-
ing. Place the asparagus filled steaming tray on
the cooking bowl and cover. Cook until the Rice
Cooker switches to Warm, about 5 minutes lon-
ger. When Rice Cooker switches to Warm, stir in
the heavy cream, Parmesan, and white pepper.
Replace the steaming tray over the cooking bowl
and let stand on Warm for 5 to 10 minutes. Stir
the steamed asparagus into the risotto. Serve
hot.
Nutritional information per serving (based on 12 servings):
Calories 110 (37% from fat) • carb. 11g • pro. 4g
• fat 4g • sat. fat 2g • chol. 11mg • sod. 334mg
• calc. 66mg • fiber 1g

13
ENTRÉES
Sun-Dried Tomato
Pearl Couscous
Makes 4 cups (8 servings)
2 teaspoons extra virgin olive oil
6 tablespoons finely chopped onion
or shallot
2 cups (Rice Cooker) pearl couscous
(also known as Israeli couscous)*
1½ cups (standard liquid measure)
low-sodium chicken stock
1½ cups (standard liquid measure) water
½ teaspoon kosher salt
½ cup chopped sun-dried tomatoes
(not oil-packed)
1 teaspoon basil
2 tablespoons chopped toasted pine nuts
Insert cooking bowl in Cuisinart
®
Rice Cooker/
Steamer. Add oil, cover and turn on; heat 1½
minutes. Stir in chopped onion. Cover and cook
1 minute. Add couscous to bowl. Stir, using rice
paddle, for 1 to 2 minutes. Add chicken stock,
water and salt; stir. Add sun-dried tomatoes and
basil. Cover and cook until liquid is absorbed,
about 20-25 minutes. Rice Cooker will switch to
Warm.
Let stand 5 minutes or hold on Warm until ready
to serve. Transfer to a warm bowl and sprinkle
with chopped toasted pine nuts to serve.
*Pearl or Israeli couscous can be found in
well-stocked grocery stores or in specialty
food stores.
Nutritional information per serving:
Calories 83 (26% from fat) • carb. 13g • pro. 3g
• fat 3g • sat. fat 0g • chol. 0mg • sod. 228mg
• calc. 12mg • fiber 1g
Saffron Risotto
with Snow Peas
Makes 4 cups (8 entrée servings or 12 side dish
servings)
4½ cups (standard liquid measure) water
½ teaspoon saffron threads
1 tablespoon extra virgin olive oil
1 tablespoon unsalted butter
¼ cup minced carrot
¼ cup minced celery
¼ cup minced shallot
1½ cups (Rice Cooker) Arborio rice
6 tablespoons dry white vermouth or
other dry white wine (not Chardonnay)
1 teaspoon kosher salt
1½ cups shredded snow peas
Heat the water until simmering (may be done on
stovetop or in microwave). Stir in saffron threads;
reserve.
Insert the cooking bowl in the Cuisinart
®
Rice
Cooker/Steamer. Place the olive oil and butter in
the bowl, cover and turn Rice Cooker on.
Heat olive oil and butter for 1 minute. Add the
minced carrot, celery and shallot. Cover and
cook 2 minutes. Stir in Arborio rice; cover and
cook 2 minutes. Stir in wine; cover and cook 3
minutes.
Stir in saffron infused water and salt. Cover and
cook until the Rice Cooker switches to Warm,
about 28 to 29 minutes. Lift lid, stir with rice
paddle and cover again, two or three times while
cooking. Add snow peas to the Rice Cooker on
top of the risotto; cover and let stand 5 minutes.
Stir snow peas into risotto and transfer to a warm
serving bowl. Serve immediately.
Nutritional information per serving (based on 12 servings):
Calories 89 (32% from fat) • carb. 12g • pro. 2g
• fat 3g • sat. fat 1g • chol. 4mg • sod. 190mg
• calc. 21mg • fiber 1g

14
Creamy Fontina Risotto
with Mushrooms
This creamy risotto makes a marvelous side dish
or can be served as a first course.
Makes 6 cups (serves 12 as a side dish, 8 as a
first course)
5 teaspoons unsalted butter, divided
5 teaspoons extra virgin olive oil, divided
2⁄3 cup finely chopped onion or shallot
2 cups (Rice Cooker) Arborio rice
¾ cup dry white vermouth or other
dry white wine (not Chardonnay)
6 cups (standard liquid measure)
low-sodium chicken broth
12 ounces shiitake mushrooms, tough
stems removed, thinly sliced
½ teaspoon thyme
6 ounces shredded fontina cheese
1 teaspoon freshly ground pepper
chopped fresh thyme and Italian parsley
as garnish, optional
Place 3 teaspoons each of the butter and
olive oil in the cooking bowl of the Cuisinart
®
Rice Cooker/Steamer. Cover, turn on, and wait
one minute. Stir in the chopped onion and
cover; cook 1 minute. Add the rice; stir to coat
completely. Cover and cook 2 minutes. Stir in the
wine; cover. Cook 2 to 3 minutes until the wine is
completely absorbed. Add the chicken stock; stir.
Cover and cook until Rice Cooker switches to
Warm, about 35 to 40 minutes, stirring 2 or 3
times during cooking.
While the risotto is cooking, heat the remaining
butter with the remaining oil in a 10-inch nonstick
skillet over medium high heat. When bubbling,
add the mushrooms, stir to coat, and cook,
stirring now and then until the mushrooms are
golden and slightly crispy.
When Rice Cooker switches to Warm, stir in the
shredded fontina, cooked shiitakes and ground
pepper. Serve risotto hot. May be garnished with
chopped fresh thyme and parsley, if desired.
Nutritional information per serving (½ cup):
Calories 207 (34% from fat) • carb. 26g • pro. 6g • fat 8g
• sat. fat 4g • chol. 21mg • sod. 117mg
• calc. 86mg • fiber 1g
Red Beans & Rice
This version of the traditional long-cooking New
Orleans dish can be made in less than 30 min-
utes in the Cuisinart
®
Rice Cooker/Steamer.
Makes 8 cups
8 ounces smoked chicken or turkey
andouille sausage*
cooking spray
2 cans (15 ounces each) red beans,
rinsed and drained
2 teaspoons good quality olive oil
6 tablespoons finely chopped onion
4 tablespoons finely chopped celery
6 tablespoons finely chopped green
bell pepper
2 cloves garlic, finely chopped
2 cups (Rice Cooker) long grain rice
1 teaspoon thyme
1 bay leaf
3 cups (standard liquid measure)
chicken stock
6 tablespoons chopped Italian parsley
Tabasco® or other hot sauce
Divide the sausage in half. Finely chop half the
sausage; cut the remaining sausage into ½-inch
pieces. Lightly coat the interior of the steaming
tray with cooking spray. Place the red beans and
sliced sausage into the steaming tray; reserve.
Insert the cooking bowl into the Cuisinart
®
Rice
Cooker/Steamer. Place the olive oil in the bowl,
cover, and turn on for 1 minute. Add the onion,
celery, bell pepper, and garlic; stir to coat with
oil. Cover and cook 3 to 4 minutes. Stir in the
rice and thyme. Stir until rice is opaque, 3 to 4
minutes. Tuck in the bay leaf and add the chicken
stock. Place the filled steaming tray on the bowl;
cover. Turn the Rice Cooker on and cook until it
switches to Warm, about 20 to 25 minutes. Let
stand at Warm for 5 minutes. Transfer beans and
sausage to a medium bowl; add cooked rice
mixture to the same bowl. Remove and discard
bay leaf. Gently toss rice mixture with beans
and sausage. Add parsley and toss to combine.
Transfer to a warmed bowl to serve. Serve with
hot sauce if desired.
*Smoked chicken or turkey andouille sausage
has much less fat than traditional pork andouille.
It can be found in many well-stocked grocery
stores. Smoked turkey kielbasa can be substi-
tuted.
Nutritional information per serving (½ cup):
Calories 265 (14% from fat) • carb. 43g • pro.13g
• fat 4g • sat. fat 1g • chol. 18mg • sod. 453mg
• calc. 43mg • fiber 5g

15
“Not” Fried Rice
A quick and healthy version of that carry-out
favorite.
Makes 8 cups
cooking spray
6 ounces chicken tender,
cut into ¼-inch pieces
1 teaspoon sesame oil
16 medium shrimp, peeled, deveined,
cut in half lengthwise
2 tablespoons soy sauce
(can use low-sodium)
2 teaspoons rice vinegar
½ teaspoon sugar
½ teaspoon freshly ground black pepper
2 teaspoons vegetable oil
½ ounce Canadian bacon or ham,
cut into ¼-inch pieces
¼ cup finely chopped onions
¼ cup finely chopped carrots
2 tablespoons chopped mushrooms
1 clove garlic, finely chopped
2½ cups (Rice Cooker) basmati rice
3½ cups (standard liquid measure)
low-sodium chicken stock
2⁄3 cup frozen peas, thawed
½ cup julienned red bell pepper
(1 x
1⁄8” pieces)
4 green onions, trimmed and chopped
(include 2-3 inches of green)
1 cup mung bean sprouts
Lightly coat the steaming tray with cooking spray.
Place the chicken in a small dish and drizzle
with half the sesame oil; stir to coat. Place in the
steamer tray to one side in a single layer. Repeat
with the shrimp. Reserve.
In a small bowl, combine the soy sauce, rice
vinegar, sugar, and pepper. Stir until sugar
dissolves; reserve.
Insert the cooking bowl into the Cuisinart
®
Rice
Cooker/Steamer. Add the oil; cover and turn on
for 1 minute. Add the Canadian bacon, chopped
onions, carrots, mushrooms, and garlic. Stir to
coat with oil. Cover and cook 4 to 5 minutes.
Add the rice; stir to coat. Add the stock, cover
and cook. After rice has cooked for 15 minutes,
place the steaming tray over the cooking bowl
and cover. Continue to cook until Rice Cooker
switches to Warm. Using protective potholders,
lift off steaming tray. Add the peas, red pepper
and green onions to the bowl on top of the rice –
do not stir. Replace the steaming tray on top of
the cooking bowl and cover. Let stand 5 minutes.
Transfer the rice and vegetables to a medium
bowl, along with the steamed chicken and
shrimp and mung bean sprouts. Drizzle the soy
mixture over the rice and stir to combine. Serve
immediately.
Nutritional information per serving (based on 8 servings):
Calories 286 (12% from fat) • carb. 42 g • pro. 20g
• fat 4g • sat. fat 1g • chol. 75mg • sod. 566mg
• calc. 41mg • fiber 2g
Mexican Rice & Shrimp
Makes 6 entrée servings
2 teaspoons extra virgin olive oil
¼ cup red onion
2 cloves garlic, chopped
1½ teaspoons oregano
½ teaspoon ground coriander
½ teaspoon ground cumin
½ teaspoons kosher salt
½ teaspoons turmeric
2 cups (Rice Cooker) long grain white rice
3 cups (standard liquid measure) water
2 cans (15 ounces each) diced tomatoes,
drained – discard liquid
24 ounces shrimp, peeled, deveined,
halved lengthwise
11⁄3 cups frozen thawed peas
4 green onions, chopped
2 jalapeño peppers, stemmed, seeded,
and chopped
Place cooking bowl in Cuisinart
®
Rice Cooker/
Steamer. Add olive oil. Cover and turn on; let
heat for 1 minute. Add red onion, garlic, oregano,
coriander, cumin, salt, and turmeric to bowl; stir,
using wooden spoon, to coat with oil. Cover and
cook for 1 minute. Add rice, stir and cook for
2 minutes. Add water; stir. Add drained diced
tomatoes on top of rice – do not stir in. Cover
and turn on.
Lightly coat the interior of the steaming tray with
cooking spray. Place shrimp in steaming tray.
After 10 minutes, place steaming tray on cooking
bowl; cover. Cook until Rice Cooker switches to
Warm. Place the peas, green onions and jalapeño
pepper on top of the rice. Cover and let stand on
Warm for 5 minutes.
To serve, fluff with rice paddle and stir in
vegetables. Transfer to top with steamed shrimp.
Garnish with sliced avocado and serve with a
wedge of lemon or lime.
Nutritional information per serving:
Calories 350 (9% from fat) • carb. 49g • pro. 29g
• fat 3g • sat. fat 1g • chol. 221mg • sod. 485mg
• calc. 108mg • fiber 4g

16
Couscous with Shrimp
& Scallops
Easy enough to be a weeknight entrée.
Makes 4 entrée servings
12 ounces shrimp, peeled, deveined,
cut in half lengthwise
12 ounces bay scallops
1 tablespoon extra virgin olive oil, divided
cooking spray
2 shallots, peeled, minced
2 cloves garlic, minced
2 teaspoons thyme
2 cups (Rice Cooker) pearl couscous
(also known as Israeli couscous)*
1½ cups (standard liquid measure) chicken
or vegetable stock
1½ cups (standard liquid measure) water
½ teaspoon kosher salt
½ cup chopped green pepper
½ cup chopped red bell pepper
¼ cup chopped fresh parsley
2 teaspoons finely chopped lemon zest
lemon wedges
Place shrimp and scallops in a small bowl. Add
2 teaspoons of the olive oil and toss to coat.
Lightly coat the interior of the steaming tray with
cooking spray. Place the shrimp and scallops in
the
steaming tray; reserve.
Insert cooking bowl in Cuisinart
®
Rice Cooker/
Steamer. Add remaining oil, cover, and turn on;
heat 1½ minutes. Stir in shallots, garlic and
thyme. Cover and cook 1 minute. Add couscous
to bowl. Stir for 1 to 2 minutes. Add stock, water
and salt; stir. Cover and cook for 7 minutes.
Place steaming tray over bowl and continue to
cook until Rice Cooker switches to Warm. Stir
green and red peppers, parsley and lemon zest
into couscous. Cover and let stand on Warm for
5 minutes. To serve, stir steamed shrimp and bay
scallops into hot couscous. Garnish with lemon
wedges.
*Pearl or Israeli couscous can be found in well-
stocked grocery stores, or in specialty food
stores.
Nutritional information per serving:
Calories 318 (19% from fat) • carb. 26g • pro. 37g
• fat 7g • sat. fat 1g • chol. 194mg • sod. 691mg
• calc. 85mg • fiber 2g
Risi e Bisi with Shrimp
The traditional Venetian comfort food, Rice and
Peas, is taken a step further and garnished with
steamed shrimp to make it a complete meal.
Makes 4 entrée servings
1 pound shrimp, peeled, deveined,
halved lengthwise
4 teaspoons extra virgin olive oil, divided
cooking spray
2 teaspoons unsalted butter
2⁄3 cup finely chopped onion
2⁄3 cup finely chopped celery
2 cups (Rice Cooker) Arborio rice
6 tablespoons dry white wine or vermouth
6 cups (standard liquid measure) chicken
or vegetable stock (may use half water)
2½ cups fresh or frozen thawed peas
½ cup freshly grated Parmesan cheese
Place shrimp in a small bowl and drizzle with 1
teaspoon of the olive oil. Toss to coat. Lightly
coat the steaming tray with cooking spray.
Arrange shrimp in steaming tray; reserve.
Place remaining olive oil and butter in the
cooking bowl of the Cuisinart
®
Rice Cooker/
Steamer. Cover, turn on, and wait one minute.
Stir in the chopped onion and celery and
cover; cook 1 minute. Add the rice; stir to coat
completely. Cover and cook 2 minutes. Stir in the
wine; cover. Cook 2 to 3 minutes until the wine is
completely absorbed. Add the stock; stir. Cover
and cook for 22 minutes, stirring 2 or 3 times
during cooking. After 22 minutes, place steaming
tray over cooking bowl and cover. Continue to
cook until Rice Cooker switches to Warm, about
8 to 10 minutes longer. Add peas to cooking
bowl. Cover and let stand on Warm for 5 to 10
minutes.
Just before serving, stir peas and steamed
shrimp along with half the Parmesan into the
cooked rice. Serve in warm bowls and top with
remaining Parmesan.
Nutritional information per serving:
Calories 440 (23% from fat) • carb. 40g • pro. 20g
• fat 11g • sat. fat 4g • chol. 237mg • sod. 1175mg
• calc. 198mg • fiber 5g

17
Lemon-Thyme Brown Rice
& Salmon
Turn this into a vegetarian entrée by substituting
canned chickpeas (rinsed and drained) for the salmon.
Makes 4 entrée servings
cooking spray
3-4 lettuce leaves (use leaf lettuce,
not iceberg)
1¼
pounds boneless, skinless salmon fillet*,
cut into 4 equal fillets
2 sprigs fresh thyme
1 tablespoon unsalted butter
4 tablespoons finely chopped onion
2 cloves garlic, minced
1½ cups (Rice Cooker) brown rice, rinsed
and drained
4 teaspoons finely chopped lemon zest,
divided
1 teaspoon dill
1 teaspoon kosher salt
3½ cups (standard liquid measure) water
(or half water, half chicken stock)
½ cup halved grape tomatoes
½ cup chopped green pepper
(½-inch dice)
½ cup chopped red bell pepper
(½-inch dice)
lemon wedges/lemon slices
Lightly coat the steamer insert with cooking spray.
Line with lettuce leaves. Arrange the salmon fillets
in the lettuce-lined steamer insert in a single layer
and top with fresh thyme sprigs; reserve.
Place cooking bowl in Cuisinart
®
Rice Cooker/
Steamer. Add butter. Cover and turn on, let heat
for 30 to 40 seconds. Stir in onion and garlic;
cover and cook 30 seconds. Add rinsed and
drained rice, 2 teaspoons lemon zest, salt and
dill. Stir to coat. Add water. Cover and cook for
40 minutes. Place filled steamer insert above rice
and cover. Continue to cook until Rice Cooker
switches to Warm setting, about 10 to 12 minutes
longer. Place tomatoes and peppers on top of rice
and let stand on Warm for 10 minutes. To serve,
stir tomatoes and peppers into rice. Place rice
mixture on warmed plates and top with a steamed
salmon fillet. Sprinkle with remaining lemon zest
and serve with a wedge of lemon.
*You may use sea scallops in place of the salmon.
Remove the tough muscle from the side of each
scallop and toss scallops in 2 teaspoons of olive oil.
Nutritional information per serving:
Calories 435 (31% from fat) • carb. 45g • pro. 30g
• fat 15g • sat. fat 4g • chol. 76mg • sod. 406mg
• calc. 53mg • fiber 3g
Teriyaki Steamed Chicken
with Cranberry Wild Rice
You may substitute turkey cutlet or tenderloin for
the chicken.
Makes 4 entrée servings
2 tablespoons light soy sauce
2 tablespoons honey
4 teaspoons dry sherry
1 clove garlic, peeled, finely minced
1 teaspoon powdered ginger
1 tablespoon vegetable oil
2 tablespoons finely minced green onion
1 pound boneless, skinless chicken
breast
cooking spray
1½ cups (Rice Cooker) wild rice
3 cups (standard liquid measure)
chicken stock
¾ cup water
1 teaspoon kosher salt
1 cup dried cranberries
6 green onions, very thinly sliced
2 tablespoons minced jalapeño pepper
Place the soy, honey, sherry, garlic, ginger, oil,
and green onion in a small bowl. Whisk to blend.
Cut the chicken into “finger” sized pieces, about
½-inch thick and 3 inches long. Stir the chicken
into the teriyaki marinade and let stand for
15 minutes.
Lightly coat both the steaming tray and cooking
bowl with cooking spray. Place the bowl in the
Cuisinart
®
Rice Cooker/Steamer. Place the rice
in the bowl. Add the stock, water and salt; stir.
Cover and turn on. Cook for 50 minutes. Drain
the chicken and place in prepared steamer tray;
discard marinade. After rice has cooked for
50 minutes, place the steaming tray over the
cooking bowl and cover. Cook for an additional
12 to 15 minutes, until the Rice Cooker switches
to Warm. When Rice Cooker switches to Warm,
place the dried cranberries, green onions and
minced jalapeño peppers on top of the rice.
Cover and let stand on Warm for 10 minutes.
To serve, stir rice to blend in cranberries, green
onions and jalapeño. Transfer to warmed plates
and top with steamed teriyaki chicken fingers.
Nutritional information per serving:
Calories 546 (13% from fat) • carb. 74g • pro. 44g
• fat 8g • sat. fat 2g • chol. 87mg • sod. 786mg
• calc. 36mg • fiber 6g

18
Jambalaya with Sausage
& Shrimp
Makes 4 cups
4 ounces smoked chicken or turkey
andouille sausage*
cooking spray
8 ounces shrimp, peeled, deveined, cut
in half lengthwise
1 teaspoon good quality olive oil
½ cup finely chopped onions
¼ cup finely chopped celery
3 tablespoons chopped green bell
pepper (¼-inch chop)
3 tablespoons chopped red bell
pepper (¼-inch chop)
1 clove garlic, finely chopped
1½ cups (Rice Cooker) long grain rice
1 teaspoon thyme
½ teaspoon chili powder
1¾ cups (standard liquid measure)
chicken stock
¾ cup tomato sauce
1 bay leaf
3 tablespoons chopped Italian parsley
Tabasco® or other hot sauce
Cut sausage into ½-inch slices. Lightly coat the
interior of the steamer tray with cooking spray.
Place the sausage and shrimp into the steaming
tray; reserve.
Insert the cooking bowl into the Cuisinart
®
Rice Cooker/Steamer. Place the olive oil in the
bowl, cover, and turn on. After 1 minute, add
the onions, celery, green and red peppers, and
garlic; stir to coat with oil. Cover and cook 3 to 4
minutes. Stir in the rice, thyme, and chili powder.
Stir until rice is opaque, 2 to 3 minutes. Add the
chicken stock and tomato sauce; tuck in the bay
leaf. Cover and cook for 10 minutes. Place the
filled steaming tray on the cooking bowl; cover.
Continue to cook until Rice Cooker switches to
Warm, 8 to 10 minutes longer. Let stand at Warm
for 5 minutes. Remove and discard bay leaf.
Gently toss rice mixture with steamed shrimp
and sausage. Add half the parsley and toss to
combine. Transfer to a warmed bowl to serve.
Sprinkle with remaining chopped parsley. Serve
with hot sauce if desired.
*Smoked chicken or turkey andouille sausage
has much less fat than traditional pork andouille.
It can be found in many well-stocked grocery
stores. Smoked turkey kielbasa can be
substituted.
Nutritional information per serving (based on 4 servings):
Calories 299 (8% from fat) • carb. 50g • pro. 19g
• fat 3g • sat. fat 0g • chol. 113mg • sod. 644mg
• calc. 59g • fiber 2g
Cinnamon Raisin Oatmeal
No fuss, no stirring, no boiling over, no burned
pan! Hot oatmeal has never been so easy to
serve as it is when cooked in your Cuisinart
®
Rice
Cooker/Steamer.
Makes 8 servings (about ¾ cup each)
4 cups (Rice Cooker) rolled oats
(not quick cooking)
6 cups (standard liquid measure) water
2 teaspoons ground cinnamon
½ teaspoon salt
6 tablespoons raisins
Insert bowl In Cuisinart
®
Rice Cooker/Steamer.
Place oatmeal, water, cinnamon and salt in bowl;
stir. Sprinkle raisins over top. Cover and turn
on; cooking time will be about 15 to 18 minutes.
When unit switches to Warm, Cinnamon Raisin
Oatmeal is ready to serve, or it may be kept on
Warm. Stir before serving. Serve hot as is, or
sprinkle with a sweetener such as brown sugar,
honey or maple syrup. A dollop of yogurt (plain or
vanilla) or milk to taste may be added.
Note: Other dried fruits may be substituted for
the raisins. Try dried cherries, cranberries or
blueberries, slivered dried apricots or plums or
chopped dried apples.
You may make this oatmeal using Irish Oats.
Combine 1 Rice Cooker cup of Irish Oats with 3
(standard liquid measure) cups water in a bowl;
cover, refrigerate and soak overnight. Transfer the
soaked oatmeal and liquid to the cooking bowl.
Stir in cinnamon, salt and raisins. Turn on. When
unit switches to Warm, the Irish Oatmeal is done.
Stir before serving.
Nutritional information per serving:
Calories 154 (12% from fat) • carb. 32 mg • pro. 5g
• fat 2g • sat. fat 0g • chol. 0mg • sod. 154 mg
• calc. 32 mg • fiber 4g

19
Limited Three-Year Warranty
This warranty supersedes all previous warranties
on Cuisinart® Rice Cooker/Steamer. This warranty
is available to consumers only. You are a consum-
er if you own a Cuisinart® Rice Cooker/Steamer
that was purchased at retail for personal, family,
or household use. Except as otherwise required
under applicable state law, this warranty is not
available to retailers or other commercial purchas-
ers or owners. We warrant that your Cuisinart®
Rice Cooker/Steamer will be free of defects in
material or workmanship under normal home use
for three years from the date of original purchase.
We recommend that you visit our website,
www.cuisinart.com for a fast, efficient way to
complete your product registration. However,
product registration does not eliminate the need
for the consumer to maintain the original proof of
purchase in order to obtain the warranty benefits.
In the event that you do not have proof of pur-
chase date, the purchase date for purposes of this
warranty will be the date of manufacture.
If your Cuisinart® Rice Cooker/Steamer should
prove to be defective within the warranty period,
we will repair it (or, if we think it necessary, replace
it) without charge to you. To obtain warranty ser-
vice, please call our Consumer Service Center
toll-free at 1-800-726-0190, or write to: Cuisinart,
7475 North Glen Harbor Blvd.
Glendale, AZ 85307To facilitate the speed and
accuracy of your return, please enclose $10.00 for
shipping and handling of the product. Please also
be sure to include a return address, daytime phone
number, description of the product defect, prod-
uct serial number (stamped on bottom of product
base), and any other information pertinent to the
product’s return.
Please pay by check or money order (California resi-
dents need only supply proof of purchase and should
call 1-800-720-0190 for shipping instructions).
NOTE: For added protection and secure handling
of any Cuisinart® product that is being returned,
we recommend you use a traceable, insured deliv-
ery service. Cuisinart cannot be held responsible
for in-transit damage or for packages that are not
delivered to us. Lost and/or damaged products are
not covered under warranty.
Please be sure to include your return address,
daytime phone number, description of the product
defect, product model number (located on bot-
tom of product), original date of purchase and any
other information pertinent to the product’s return.
Your Cuisinart® Rice Cooker/Steamer has been
manufactured to the strictest specifications and
has been designed for use only in 120 volt outlets
and only with authorized accessories and replace-
ment parts. This warranty expressly excludes any
defects or damages caused by attempted use
of this unit with a converter, as well as use with
accessories, replacement parts or repair service
other than those authorized by Cuisinart. This
warranty does not cover any damage caused by
accident, misuse, shipment or other than ordinary
household use. This warranty excludes all inciden-
tal or consequential damages. Some states do not
allow the exclusion or limitation of these damages,
so these exclusions may not apply to you. You
may also have other rights, which vary from state
to state.
California Residents Only
California law provides that for In-Warranty
Service, California residents have the option of
returning a nonconforming product (A) to the
store where it was purchased or (B) to another
retail store which sells Cuisinart products of the
same type. The retail store shall then, according
to its preferences, either repair the product, refer
the consumer to an independent repair facility,
replace the product, or refund the purchase price
less the amount directly attributable to the con-
sumer’s prior usage of the product. If the above
two options do not result in the appropriate relief
to the consumer, the consumer may then take the
product to an independent repair facility if service
or repair can be economically accomplished.*
Cuisinart and not the consumer will be responsible
for the reasonable cost of such service, repair,
replacement, or refund of nonconforming products
under warranty.
California residents may also, according to their
preference, return nonconforming products directly
to Cuisinart for repair or, if necessary, replacement
by calling our Consumer Service Center toll-free at
1-800-726-0190. Cuisinart will be responsible for
the cost of the repair, replacement, and shipping
and handling of such nonconforming products
under warranty.
Before Returning Your Cuisinart Product
If you are experiencing problems with your
Cuisinart product, we suggest that you call our
Consumer Service Center at 1-800-726-0190
before returning the product for servicing. Often,
our Consumer Service Representatives can help
solve the problem without having the product ser-
viced. If servicing is needed, a Representative can
confirm whether the product is under warranty and
direct you to the nearest service location.
*Important: If the nonconforming product is to
be serviced by someone other than Cuisinart’s
Authorized Service Center, please remind the
servicer to call our Consumer Service Center at
1-800-726-0190 to ensure that the problem is
properly diagnosed, the product is serviced with
the correct parts, and to ensure that the product is
still under warranty.
© 2019 Cuisinart
East Windsor, NJ 08520
Printed in China
19CE062342
F IB-5026-ESP-A
Any other trademarks or service marks referred to herein are the trademarks or
service marks of their respective owners.

Arrocera/Vaporera
MANUAL DE
INSTRUCCIONES Y
LIBRO DE RECETAS
Para su seguridad y para disfrutar plenamente de este producto,
siempre lea cuidadosamente las instrucciones antes de usarlo.
CRC-800

MEDIDAS DE
SEGURIDAD
IMPORTANTES
Al usar aparatos eléctricos, siempre debe tomar
precauciones básicas de seguridad, incluso las
siguientes:
1. LEA TODAS LAS INSTRUCCIONES.
2. No toque las partes calientes de este aparato.
Utilice el mango/las asas y los botones o
perillas.
3. Para reducir el riesgo de electrocución, no
coloque el cuerpo del aparato en agua u
otro líquido. Si el aparato cayera al agua,
desconecte el cable de la toma de corriente
inmediatamente;
NO toque el agua.
4. Supervise el uso de este aparato
cuidadosamente cuando sea usado por o
cerca de niños.
5. Desconecte el aparato cuando no está en uso
y antes de limpiarlo. Permita que se enfríe
antes de instalar/sacar piezas.
6. No utilice este aparato si el cable o la clavija
estuviesen dañados, después de que hubiese
funcionado mal o que se hubiese caído o si
estuviese dañado; regréselo a un centro de
servicio autorizado para su revisión, reparación
o ajuste.
7. El uso de accesorios no recomendados por
Cuisinart presenta un riesgo de incendio,
electrocución o heridas.
8. No lo use en exteriores ni en lugares donde el
aparato o el cable podrían mojarse.
9. No lo use para ningún otro fin que no sea el
indicado.
10. No permita que el cable cuelgue del borde de
la encimera o de la mesa, donde se pueda jalar
o tropezar.
11. No permita que el cable haga contacto con
superficies calientes, incluso hornillas; esto
podría dañar el cable y provocar un incendio o
un choque eléctrico.
12. Tenga sumo cuidado al mover un aparato que
contenga aceite u otros líquidos calientes.
13. No coloque el aparato sobre o cerca de
un quemador a gas o una hornilla eléctrica
caliente, ni en un horno caliente.
14. No haga funcionar el aparato en agua o bajo
agua corriente.
15. Para reducir el riesgo de electrocución, solo
cocine alimentos en la vasija provista. No
sumerja el aparato en agua.
GUARDE ESTAS
INSTRUCCIONES
PARA USO
DOMÉSTICO
SOLAMENTE
USO DE EXTENSIONES
El cable provisto con este aparato es corto para
reducir el peligro de que alguien se enganche o
tropiece con un cable más largo.
Se podrá usar una extensión eléctrica, siempre
que respete las precauciones siguientes.
La clasificación nominal de la extensión debe ser
por lo menos igual a la del aparato. Coloque el
cable sobre la encimera o la mesa de tal forma que
niños no puedan jalar o tropezar con este.
AVISO
El cable de este aparato está dotado de una clavija
polarizada (una pata es más ancha que la otra).
Como medida de seguridad, se podrá enchufar
de una sola manera en la toma de corriente
polarizada. Si no entrara en la toma de corriente,
inviértala. Si aún no entrara completamente,
comuníquese con un electricista. No intente
modificarla.
ÍNDICE
Medidas de seguridad importantes . . . . . . . . . . 2
Introducción . . . . . . . . . . . . . . . . . . . . . . . . . . . . 3
Piezas y características . . . . . . . . . . . . . . . . . . . 3
Recomendaciones importantes . . . . . . . . . . . . . 3
Consejos útiles. . . . . . . . . . . . . . . . . . . . . . . . . . 3
Instrucciones de ensamblaje . . . . . . . . . . . . . . . 4
Operación
Cómo cocer arroz . . . . . . . . . . . . . . . . . . . . 4
Cómo cocer arroz y cocer al vapor
al mismo tiempo . . . . . . . . . . . . . . . . . . . . . 5
Cómo cocer al vapor solamente . . . . . . . . . 5
Cómo recalentar arroz . . . . . . . . . . . . . . . . . 5
Limpieza y mantenimiento . . . . . . . . . . . . . . . . . 6
Guía de cocción del arroz, granos y cereales . . 7
Guía de cocción al vapor . . . . . . . . . . . . . . . . . . 8
Recetas . . . . . . . . . . . . . . . . . . . . . . . . . . . . . . . 9
2

INTRODUCCIÓN
Cocer arroz y cocer al vapor nunca ha sido tan
fácil. ¡Lo único que tiene que hacer es llenar la
vasija y/o la cesta de cocción al vapor y presionar
el botón de encendido! A final de la cocción, la
temperatura bajará automáticamente para mantener
los alimentos calientes hasta el momento de servir.
La limpieza es fácil y rápida, porque todas las
piezas removibles son aptas para lavavajillas.
PIEZAS Y CARACTERÍSTICAS
1. Tapa de vidrio con orilla y respiradero de
acero inoxidable: la tapa transparente permite
vigilar la cocción; el respiradero deja escapar
el vapor para evitar las salpicaduras. Detalles
de acero inoxidable combinan con cualquier
estilo de cocina.
2. Cesta de cocción al vapor: permite cocer al
vapor una variedad de alimentos mientras se
cocina el arroz.
3. Vasija: el revestimiento antiadherente evita que
el arroz pegue a la vasija.
4. Carcasa de acero inoxidable: duradera
construcción de acero inoxidable, para una
limpieza fácil.
5. Asas cromadas: asas aislantes que
permanecen frías.
6. Botón para cocer/mantener caliente: los
indicadores luminosos arriba de “COOK”
(cocer) y “WARM” (mantener caliente) indican
si la unidad está cociendo o manteniendo
caliente.
7. Vaso medidor: especialmente diseñado para
la arrocera/vaporera Cuisinart
®
; permite medir
con facilidad la cantidad exacta de arroz.
8. Cuchara de plástico para servir: permite
esponjar y servir el arroz fácilmente, sin que
este pegue a la cuchara.
9. Cable retráctil (no ilustrado): práctico cable
retráctil, para facilitar el almacenaje
RECOMENDACIONES
IMPORTANTES
• Este aparato produce vapor; no lo haga funcionar
sin la tapa puesta.
• No haga funcionar el aparato bajo un armario/
gabinete; el vapor puede dañarlo.
• No utilice utensilios metálicos; pueden dañar el
revestimiento antiadherente.
• Siempre agregue el arroz y el agua antes de
conectar el cable a la toma de corriente. La
unidad ingresará automáticamente el modo
“mantener caliente”.
CONSEJOS ÚTILES
• La arrocera/vaporera Cuisinart
®
es un aparato
perfecto para las personas ocupadas que tienen
un espacio limitado.
Cocinará arroz y granos/cereales a la perfección y
sin esfuerzo, ocupando muy poco espacio sobre
la encimera y dejando su estufa libre para otro
uso. Además, la vasija antiadherente es muy fácil
de limpiar y el aparato no requiere prácticamente
ningún mantenimiento.
• Su arrocera es un aparato muy versátil, que
permite preparar muchos alimentos. Es un
método muy sencillo para preparar arroz
pilaf sin esfuerzo. Simplemente encienda el
aparato. La unidad mantendrá el arroz caliente
automáticamente después de cocerlo.
• Puede usar su arrocera para cocer una
combinación de arroz, granos/cereales y
vegetales al mismo tiempo. Utilice nuestras
recetas como pauta y deje que su imaginación
sea su guía.
• Para lavar el arroz: por lo general, se aconseja
enjuagar/lavar el arroz importado y no lavar el
arroz producido en los Estados Unidos, porque
está enriquecido con vitaminas. Para lavar el
arroz: coloque el arroz en un tazón mediano y
cúbralo con agua. Revuelva hasta que el agua
se ponga turbia, y luego cuele el arroz con un
colador de malla fina. Repita hasta que el agua
esté casi clara al revolver el arroz. Los aficionados
del arroz lavan incluso el arroz producido en los
Estados Unidos para eliminar el almidón y hacer
que esté menos pegajoso. Si usted tiene una
dieta equilibrada, la pérdida de vitaminas que se
produce al lavar el arroz no le perjudicará. No
lave el arroz en la vasija; mojar por accidente el
exterior de la vasija puede dañar el aparato.
3
2
1
3
4
5
6
9
7
8

• Algunos tipos de arroz deben remojarse antes de
la cocción. Esto puede hacerse en la vasija, antes
de la cocción.
• Deje hervir el arroz hasta que haya absorbido
todo el líquido. En este punto, aún no está
completamente cocido. El arroz es mejor cuando
termina de cocerse al vapor. Para mejores
resultados, permita que el arroz termine de cocer
en “WARM” (mantener caliente) durante 5–10
minutos. No abra/retire la tapa durante este
tiempo.
• Después de 5–10 minutos, revuelva el arroz con
la cuchara provista o un cucharón de madera. Si
el arroz no está listo, cierre rápidamente la tapa y
deje la arrocera en “WARM” hasta que lo esté.
• La arrocera mantendrá el arroz caliente
automáticamente al final de la cocción. Si desea
añadir vegetales crudos al arroz, como cebolletas,
arvejas en láminas, zanahorias ralladas o tomates
de pera, haga esto después de que la arrocera se
ponga en “WARM”. Los vegetales se calentarán,
pero conservarán su textura.
• Puede usar la arrocera para cocinar arroz y
granos/cereales preparados. Por lo general, las
instrucciones de cocción se encuentran sobre
el envase, o en el sitio Internet del fabricante. Si
las instrucciones especifican que hay que saltear
algunos ingredientes, haga esto directamente en
la vasija. Encienda la arrocera, ponga la cantidad
deseada de aceite o mantequilla en la vasija,
agregue los ingredientes y saltéelos. Después,
agregue el líquido y cueza el arroz. Si el arroz está
demasiado aguado, permita que permanezca en
“WARM” durante 15–20 minutos antes de servirlo.
Si está demasiado duro, agregue ¼ taza (60 ml)
de líquido y déjelo en “WARM” hasta que haya
absorbido el líquido (aproximadamente 15–20
minutos).
• Mida el arroz precisamente, utilizando el vaso
medidor provisto solamente.
• Si desea, puede aceitar la vasija con spray
vegetal, pero no es necesario puesto que es
antiadherente.
• Para lograr una cocción uniforme, nivele el arroz
crudo en la vasija antes de encender el aparato.
• Utilice el agua que bebe para cocer arroz. Si no
le gusta el agua de la llave, utilice agua mineral
o agua filtrada para preparar arroz. El gusto del
agua afectará el gusto del arroz.
• Para mejores resultados, utilice agua fría. El
tiempo de cocción variará según la temperatura
inicial del agua.
• El arroz no solo se cocina en agua. También
puede usar caldo de pollo, carne o vegetales bajo
en sodio, o bien caldo de pescado o de almejas
para dar un sabor especial al arroz
• Para separar los granos de arroz y evitar que el
agua hierva demasiado, agregue 1–2 cucharaditas
de aceite (vegetal, de oliva o de nuez) o de
mantequilla sin sal al agua.
• Si desea utilizar sal, agregue la sal al agua,
mezcle el arroz con la cuchara provista y nivele el
arroz antes de cocerlo.
• La arrocera puede usarse para cocer al vapor
vegetales, mariscos y algunas carnes. Utilice
nuestras recetas como pauta para preparar sus
propias combinaciones.
• Para cocer vegetales al vapor, límpielos y
córtelos en pedazos uniformes. Consulte la guía
de cocción al vapor (página 7) para cocer los
vegetales solos. Para cocer vegetales al vapor
al mismo tiempo que se cuece el arroz, utilice
la guía de cocción al vapor para determinar en
qué momento de la cocción debe colocar la
cesta de cocción al vapor encima de la vasija. La
mayoría de los vegetales podrán ponerse a cocer
aproximadamente 10 minutos antes de que el
arroz esté listo.
• Para cocer pollo o salchicha al vapor, corte la
carne en trocitos uniformes o en rodajas de 1
pulgada (2.5 cm). Rocíe spray vegetal en la cesta
y disponga los pedazos en una capa en el fondo
de esta.
• Para cocer camarones y mariscos al vapor, rocíe
spray vegetal en la cesta y disponga los mariscos
en una capa en el fondo de esta.
• Mantenga la arrocera lejos de las paredes y de los
armarios para evitar los daños.
• Coloque la tapa de tal manera que el respiradero
apunte hacia atrás. Alce la tapa desde la parte
posterior para evitar las quemaduras.
• Un vaso medidor de arroz crudo rinde
aproximadamente tres tazas de arroz cocido.
• 1 vaso medidor lleno = ¾ taza = 12 cucharadas
= 200 g
INSTRUCCIONES DE
ENSAMBLAJE
Siga estas instrucciones para ensamblar su
arrocera/vaporera Cuisinart
®
.
1. Retire cuidadosamente el aparato de la caja.
2. Limpie la vasija, la cesta de cocción al vapor y
la tapa en agua jabonosa tibia. Enjuáguelas y
permita que se sequen completamente.
3. Limpie el interior y el exterior del aparato con un
paño suave, ligeramente humedecido.
4. Coloque la vasija en la base.
5. Coloque la cesta de cocción al vapor sobre la
vasija, el lado abierto apuntando hacia abajo.
6. Cierre la tapa.
7. No conecte el cable a la toma de corriente
todavía. Su arrocera está lista.
4

OPERACIÓN
Cómo cocer arroz
1. Asegúrese de que el aparato esté desconectado.
2. Coloque la vasija en la base de acero inoxidable.
3. Mida la cantidad deseada de arroz crudo con
el vaso medidor provisto. Lave el arroz si es
necesario. Véase la guía de cocción del arroz
(página 6) para las proporciones arroz-agua.
4. Mida el agua o el caldo, usando uno de los
métodos siguientes:
a. Mida el líquido con una taza de medir regular,
respetando las proporciones indicadas en la
guía de cocción del arroz.
b. Mida el agua fijándose en las marcas adentro
la vasija. Por ejemplo, para cocinar 2 vasos
medidores de arroz blanco, llene la vasija con
líquido hasta la línea 2.
5. Cierre la tapa. Asegúrese que el respiradero
apunte hacia atrás.
6. Conecte el cable a una toma de corriente.
7. Presione el botón de encendido hacia abajo
para empezar la cocción. La luz arriba de
“COOK” se encenderá.
8. La arrocera calentará el agua y cocerá el arroz.
El tiempo de cocción variará según la cantidad
y el tipo de arroz o grano.
9. Cuando el arroz esté listo, la unidad se pondrá
automáticamente en “WARM” (mantener
caliente) y la luz arriba de “WARM” se
encenderá. La unidad permanecerá en “WARM”
hasta que desconecte el cable de la toma de
corriente.
10. Para obtener resultados óptimos, permita que la
unidad permanezca en “WARM” durante 5–10
minutos antes de servir el arroz.
11. Cuando esté listo para servir, levante la tapa
con cuidado.
12. Ahueque el arroz con la cuchara provista o un
cucharón de madera o de plástico.
13. Retire la vasija de la base, usando agarraderas,
manoplas o guantes para el horno.
Cómo cocer arroz y cocer al vapor al
mismo tiempo
1. Limpie y prepare los vegetales, mariscos,
pescado o pollo.
2. Siga los pasos 1–8 de la sección “Cómo cocer
arroz” en la página anterior.
3. Ponga los alimentos que desea cocinar al vapor
en la cesta.
4. Coloque la cesta encima de la vasija, en el
momento apropiado (véase la guía de cocción al
vapor a continuación).
5. Coloque la tapa sobre la cesta de cocción al
vapor.
6. Desconecte el aparato al final de la cocción.
Cómo cocer al vapor solamente
1. Asegúrese de que el aparato esté desconectado.
2. Llene la vasija con agua hasta el nivel
deseado (véase la guía de cocción al vapor a
continuación).
3. Ponga los alimentos que desea cocinar al vapor
en la cesta.
4. Coloque la cesta de cocción al vapor sobre la
vasija.
5. Coloque la tapa sobre la cesta de cocción al
vapor.
6. Después de que el agua se haya evaporado, la
unidad se pondrá automáticamente en “WARM”
(mantener caliente) y la luz arriba de “WARM” se
encenderá. La unidad permanecerá en “WARM”
hasta que desconecte el cable de la toma de
corriente. No permita que hierva en seco.
7. Para mejores resultados, desconecte el aparato
inmediatamente después de que se ponga
en “WARM”, para evitar que los alimentos se
recuezan.
Cómo recalentar arroz
1. Asegúrese de que el aparato esté desconectado.
2. Combine el arroz cocido con agua fría, utilizando
¼ taza (60 ml) de agua por taza de arroz.
3. Revuelva para mezclar.
4. Cierre la tapa.
5. Presione el botón de encendido hacia abajo. La
luz arriba de “COOK” se encenderá.
6. Cuando el arroz esté listo, la unidad se pondrá
automáticamente en “WARM” (mantener caliente)
y la luz arriba de “WARM” se encenderá. La
unidad permanecerá en “WARM” hasta que
desconecte el cable de la toma de corriente.
5

6
LIMPIEZA Y MANTENIMIENTO
1. Apague y desconecte el aparato después del uso. Permita que se enfríe antes de limpiarlo.
2. Lave la vasija, la cesta de cocción al vapor y la tapa en agua jabonosa tibia o en el lavavajillas. Si es
necesario, remoje la vasija en agua jabonosa antes de lavarla.
3. Si es necesario restregarla, utilice un cepillo o un estropajo de nailon y detergente no abrasivo.
4. Limpie la base con un paño suave ligeramente húmedo, o una toalla de microfibra. NUNCA SUMERJA
LA BASE EN AGUA.
5. Asegúrese de que todas las piezas estén limpias y secas antes de guardar el aparato. Guarde el aparato
en un lugar limpio y seco.
6. Cualquier otro servicio debe ser realizado por un técnico autorizado.

7
Guía de cocción del arroz, granos y cereales
Arroz/Cereales Porciones
Cantidad de arroz
(medido con el
vaso medidor
provisto)
Cantidad de agua/líquido
(medido con taza de
medir regular)
Arroz blanco de grano largo 4 2 vasos 2⁄8 tazas (500 mL)
Arroz blanco de grano largo 6 3 vasos 3⁄8 tazas (740 mL)
Arroz blanco de grano largo 8 4 vasos 3¾ tazas (885 mL)
Arroz blanco de grano largo 10 5 vasos 4½ tazas (1 L)
Arroz blanco de grano largo 12 6 vasos 5½ tazas (1.3 L)
Arroz blanco de grano largo 16 8 vasos 7½ tazas (1.75 L)
Arroz blanco de grano medio 4 2 vasos 2 tazas (475 mL)
Arroz blanco de grano medio 6 3 vasos 2¾ tazas (650 mL)
Arroz blanco de grano medio 8 4 vasos 3½ tazas (830 mL)
Arroz blanco de grano medio 10 5 vasos 4¼ tazas (1 L)
Arroz blanco de grano medio 12 6 vasos 5¼ tazas (1.25 L)
Arroz blanco de grano medio 16 8 vasos 7 tazas (1.65 L)
Arroz Arborio (para risotto) 4 1 vaso 3¼ tazas (770 mL)
Arroz integral de grano medio-largo 2-4 1 vaso 1¾ taza (415 mL)
Arroz integral de grano medio-largo 3-5 1½ vaso 2½ tazas (590 mL)
Arroz Wehani®4 1 vaso 17⁄8 taza (445 mL)
Arroz rojo (Riz Rouge de Camargue;
arroz de Bután) 4 1 vaso 1¾ taza (415 mL)
Arroz rojo (Riz Rouge de Camargue;
arroz de Bután) 6 1½ vaso 22/3 tazas (630 mL)
Arroz salvaje (Wild Pecan®)4
Un paquete de 7
onzas (200 g) 1¾ taza (415 mL)
Arroz salvaje (Wild Pecan®)8
Dos paquetes de 7
onzas (200 g) 3½ tazas (830 mL)
Arroz negro (arroz prohibido) 4 1 vaso 1¾ taza (415 mL)
Arroz negro (arroz prohibido) 8 2 vasos 3½ tazas (830 mL)
Arroz para sushi
(remojar en agua durante
30 minutos antes de cocer)
Rinde
proximadamente
5½ tazas
3 vasos
2¼ tazas (530 ml) de agua
+ 2 cucharadas (30 ml)
de Sake
Cuscús israelí (perlas de cuscús) 6 1½ vaso 3 tazas (710 mL)
Cuscús israelí (perlas de cuscús) 12 3 vasos 6 tazas (1.4 L)
Polenta (harina de maíz) 4 1 vasos 3 tazas (710 mL)
Polenta (harina de maíz) 8 2 vasos 6 tazas (1.4 L)
Avena (tradicional, no precocida) 4 2 vasos 3 tazas (710 mL)
Avena (tradicional, no precocida) 8 4 vasos 6 tazas (1.4 L)
Avena escocesa/irlandesa
(remojar en agua durante 8–12 horas
antes de cocer)
2–3 1 vaso 3 tazas (710 mL)
Avena escocesa/irlandesa (remojar
en agua durante 12 horas antes de
cocer)
4–6 2 vasos 6 tazas (1.4 L)

8
Guía de cocción al vapor
Coloque la cantidad indicada de agua en la vasija. La cantidad de agua necesaria para cocinar al vapor
dependerá del tipo de alimentos. Disponga los alimentos en una sola capa en el fondo de la cesta. Corte
los vegetales en pedazos uniformes. Empiece a medir el tiempo al encender el aparato. Los tiempos de
cocción son aproximados y producirán resultados tiernos/crujientes. Alargue el tiempo para conseguir
vegetales más tiernos o reduzca el tiempo para vegetales más crujientes.
Desconecte el aparato inmediatamente después del tiempo de cocción para evitar que los alimentos
se recuezan. Si cocina arroz al mismo tiempo, fíjese en el tiempo de cocción indicado en la tabla para
determinar en qué momento colocar la cesta encima de la vasija. Sirva los vegetales cocidos al vapor
inmediatamente o enfríelos en agua helada para usarlos en ensaladas y otras recetas frías.
Alimento Cantidad Preparación Agua Tiempo de cocción
(aproximado)
Espárragos 8 onzas (225 g) Trozos grandes 2 tazas (500 mL) 9–10 minutos
Brécol 8 onzas (225 g) Cogollos pequeños 2 tazas (500 mL) 11 minutos
Zanahorias “baby” 8 onzas (225 g) Enteras 2 tazas (500 mL) 15 minutos
Zanahorias 8 onzas (225 g) Rodajas medianas 2 tazas (500 mL) 15 minutos
Habichuelas 4 onzas (115 g) Trozos grandes 2 tazas (500 mL) 8–9 minutos
Tirabeques 4 onzas (115 g) Enteros, sin puntas/
hebras 2 tazas (500 mL) 11 minutos
Papas nuevas
(pequeñas) 8 onzas (225 g) En cuartos 2 tazas (500 mL) 23–24 minutos
Papas amarillas 12 onzas (340 g) En cubos 2 tazas (500 mL) 23–24 minutos
Batata/Camote/Ñame 8 onzas (225 g) Peladas, en cubitos 2 tazas (500 mL) 18–19 minutos
Calabacines,
zapallos 6 onzas (170 g)
Cortar
longitudinalmente a la
mitad,
y luego en rodajas
gruesas
2 tazas (500 mL) 11 minutos
Batata/Camote/Ñame: 16 onzas (455 g) Peladas y cortadas en
cubos 2 tazas (500 mL) 25 minutos
Pollo/Pavo 8–16 onzas
(230–465 g)
Cortar en pedazos
uniformes 2 tazas (500 mL) 15–20 minutos
Camarones Hasta 1 libra
(455 g)
Con/sin piel; sazonar
con hierbas o sazón
para mariscos como
Old Bay
®
. Engrasar
la cesta con spray
vegetal.
2 tazas (500 mL)
12–15 minutos,
según el tamaño de
los camarones
Vieiras Hasta 1 libra
(455 g)
Sazonar al gusto.
Engrasar la cesta con
spray vegetal o forrar
con lechuga.
2 tazas (500 mL) 10–15 minutos
Pescado (salmón,
eglefino, bacalao,
corvina, etc.)
Hasta 1 libra
(455 g)
Cortar en cubos. Forrar
la cesta con hojas
de lechuga o papel
sulfurizado.
2 tazas (500 mL) 10–15 minutos
Huevos grandes 8 En su cáscara Hasta la marca
n.° 1.
21 minutos (colocar
en agua helada
inmediatamente
después de cocer)

9
GUÍAS DE COCCIÓN
Guía de cocción del arroz
(tabla en la página siguiente)
El tiempo de cocción variará según la cantidad y la
temperatura del líquido de cocción.
La manera más simple para cocer arroz blanco
de grano corto es midiendo el arroz con el vaso
medidor provisto y midiendo el agua fijándose en
las marcas adentro de la vasija. Por ejemplo, para
cocer 2 vasos medidores llenos de arroz, llene
la vasija con agua hasta la línea 2. Para cocer 3
vasos medidores llenos de arroz, llene la vasija con
agua hasta la línea 3, etc. La capacidad máxima
de la arrocera es de 8 vasos medidores de arroz
blanco. No se aconseja preparar menos de 2 vasos
medidores de arroz.
Para cocer granos/cereales y otras variedades de
arroz, véase la tabla a continuación. Tenga presente
que no debería preparar cantidades más pequeñas
o grandes que las indicadas en la tabla.
Mida el arroz o los granos/cereales con el vaso
medidor provisto. Mida el agua/líquido con una taza
de medir regular.
RECETAS
Utilice el vaso medidor provisto para medir el arroz
y los granos. Utilice una taza de medir regular
(1 taza = 8 onzas = 235 ml) para medir el líquido.
Esto mantiene el vaso medidor seco para medir
arroz/granos.
Un vaso medidor = ¾ taza de medir regular = 200 g
de arroz. Puede cocer hasta 8 vasos medidores
(1.6 kg) de arroz blanco en la arrocera. Para las
otras variedades de arroz, respete las proporciones
al pie de la letra para evitar los derrames.
ENSALADAS
Vinagreta de cebolla roja
Rinde
78
taza (205 ml)
½ cebolla roja pequeña, en cubos
1½ cucharadita de mostaza de Dijon
1 cucharadita de azúcar
½ cucharadita de sal kosher
¼ cucharadita de pimienta negra recién
molida
¼ taza (60 ml) de vinagre balsámico
blanco u otro vinagre con sabor a fruta
½ taza (120 ml) de aceite de oliva virgen
extra
Colocar la cebolla roja, la mostaza, el azúcar, la
sal, la pimienta y el vinagre en una procesadora de
alimentos o una licuadora. Procesar hasta obtener
una mezcla suave. Agregar el aceite y procesar
hasta emulsionar. La vinagreta podrá conservarse
en el refrigerador, en un recipiente hermético. Batir
antes de usar si es necesario.
Información nutricional por cucharada:
Calorías 71 (96% de grasa) • Carbohidratos 1g • Proteínas
0g • Grasa 7g • Grasa saturada 1g • Colesterol 0mg
Sodio 61mg • Calcio 0mg • Fibra 0g
Ensalada Waldorf de
arroz salvaje Konriko Wild
Pecan®
El arroz Konriko Wild Pecan
®
es un arroz aromático
de grano largo, con sabor y aroma a nuez natural.
Es perfecto para preparar esta sabrosa ensalada
Waldorf con manzanas y arándanos agrios secos.
Este arroz aromático natural también puede servirse
como plato de acompañamiento.
3 vasos medidores de arroz salvaje
Konriko Wild Pecan®*
4½ tazas (1 L) de agua
2 chalotes, finamente picados
4 cucharaditas de mostaza de Dijon
½ cucharadita de sal kosher
½ cucharadita de pimienta negra recién
molida
6 cucharadas (90 ml) de vinagre de jerez
6 cucharadas (90 ml) de aceite de oliva
virgen extra
4 cucharadas (60 ml) de aceite vegetal
1 manzana (Gala, Braeburn, Pink Lady),
en cubitos
1 taza (120 g) de arándanos agrios secos
o cerezas agrias secas
2
⁄
3
taza (50 g) de pacanas tostadas,
picadas
½ taza (80 g) de cebolla roja picada
½ taza (80 g) de apio picado
Colocar el arroz y el agua en la vasija y colocar
ésta en la base. Dejar cocer por aproximadamente
35 minutos, hasta que el agua se haya evaporado.
Dejar reposar durante 5 minutos después de que
la arrocera se ponga en “WARM”. Esparcir sobre
una placa para horno para enfriar.
Durante este tiempo, preparar la vinagreta. Colocar
el chalote, la mostaza, la sal, la pimienta y el vinagre
en un tazón pequeño; revolver con un batidor para
mezclar. Agregar el aceite y batir hasta emulsionar;
reservar. Cuando el arroz esté tibio, colocarlo en

10
un tazón grande. Agregar la manzana picada, los
arándanos agrios secos, las pacanas picadas, la
cebolla roja y el apio; revolver suavemente para
mezclar. Sazonar con vinagreta y revolver. Servir
a temperatura ambiente. Cubrir y refrigerar hasta
el momento de servir. Sacar del refrigerador 30
minutos antes de servir.
El arroz salvaje aromático Konriko Wild Pecan
®
está
disponible en la mayoría de los supermercados
grandes. Utilice 4 paquetes de 7 onzas (200 g) para
esta receta.
Información nutricional por porción de ½ taza (120 ml):
Calorías 124 (57% de grasa) • Carbohidratos 13g
Proteínas 1g • Grasa 8g • Grasa saturada 1g • Colesterol
0mg • Sodio 81mg • Calcio 6mg • Fibra 1g
Ensalada de arroz amarillo
y frijoles negros
Esta ensalada llena de color acompaña
deliciosamente pescado y mariscos asados. Servir
con aguacate.
Rinde 16 tazas
2 pepinos, pelados y cortados en cubitos
2 cucharaditas de sal kosher
2 cucharaditas de aceite vegetal
2 cucharaditas de cúrcuma en polvo
1½ cucharadita de comino en polvo
3 vasos medidores de arroz blanco de
grano largo
3 tazas (710 ml) de agua
2 dientes de ajo, finamente picados
¼ taza (60 ml) de jugo de lima/limón verde
fresco
2 cucharadas (30 ml) de vinagre de arroz
½ cucharadita de semillas de cilantro en
polvo
½ cucharadita de orégano
¾ taza (175 ml) de aceite de oliva virgen
extra
2 latas de 15 onzas (450 g) de frijoles
negros, lavados y escurridos
2 tazas (400 g) de cubitos de jícama
2 tazas (300 g) de tomates de pera
1 taza (150 g) de pimiento dulce rojo
picado
½ taza (80 g) de cebolla roja picada
2–3 jalapeños, sin semillas, finamente
picados
½ taza (30 g) de perejil fresco picado
Colocar el pepino en un colador de malla fina.
Esparcir 1 cucharadita de sal encima y revolver.
Colocar el colador encima de un tazón y dejar
escurrir durante 30 minutos.
Colocar la vasija en la arrocera. Agregar el aceite, la
cúrcuma y el comino. Cubrir y cocer por 2 minutos.
Agregar el arroz y revolver. Tapar y dejar cocer por
2 minutos. Agregar el agua y ½ cucharadita de sal.
Cerrar la tapa y encender el aparato. Dejar cocer
por 20–25 minutos, hasta que el líquido se haya
evaporado. Esparcir el arroz sobre una placa para
horno para enfriar.
Colocar el ajo, el jugo de lima, el vinagre, las
semillas de cilantro, el orégano y la sal restante en
un tazón pequeño; revolver con un batidor. Agregar
el aceite de oliva y batir hasta emulsionar.
una vez enfriado, colocar el arroz en un tazón
grande. Agregar los frijoles negros, la jícama, los
tomates, el pimiento rojo, la cebolla y los jalapeños.
Revolver suavemente. Agregar la vinagreta y el
cilantro picado.
Revolver suavemente para mezclar. Poner en un
cuenco decorado para servir. Cubrir y refrigerar
hasta el momento de servir. Sacar del refrigerador
30 minutos antes de servir.
Información nutricional por porción de ½ taza (120 ml):
Calorías 128 (39% de grasa) • Carbohidratos 17g
Proteínas 3g • Grasa 6g • Grasa saturada 1g • Colesterol
0mg • Sodio 88mg • Calcio 18mg • Fibra 2g
Ensalada de arroz griega
Sirva esta ensalada con atún, pez espada o cordero
asado.
Rinde aproximadamente 16 tazas
2 cucharaditas de aceite de oliva virgen
extra
2 vasos medidores de arroz blanco de
grano largo
1 vaso medidor de orzo
1 cucharadita de sal
4½ tazas (1 L) de agua
2 dientes de ajo, finamente picados
2 tomates grandes, sin semillas, picadas
1 pepino pequeño, sin semillas, picado
1 cebolla roja mediana, picada
1¼ taza (175 g) de queso Feta
desmenuzado
1 taza (120 g) de aceitunas negras
deshuesadas, partidas
2 latas de 15 onzas (425 g) de corazones
de alcachofa, escurridos y cortados en
cuartos
½ taza (30 g) de perejil fresco picado

11
2 cucharadas (30 ml) de jugo de limón
fresco
1 cucharadita de orégano
1 cucharadita de albahaca seca
1 cucharadita de sal kosher
2 cucharaditas de pimienta negra recién
molida
6 cucharadas (90 ml) de aceite de oliva
virgen extra
Colocar la vasija en la arrocera. Agregar el aceite
de oliva. Tapar, encender el aparato y calentar
durante 1 minuto. Agregar el arroz y el orzo. Dejar
cocer por 2 minutos, revolviendo de vez en cuando.
Agregar 1 cucharadita de sal y el agua. Salpicar
con el ajo picado. Tapar y dejar cocer hasta que
el agua se haya evaporado. Dejar reposar durante
5 minutos. Esparcir el arroz/orzo sobre una placa
para horno para enfriar.
Mientras tanto, colocar el tomate, el pepino,
el queso Feta, las aceitunas, las alcachofas, el
perejil, el jugo de limón, el orégano, la albahaca, 1
cucharadita de la sal kosher, la pimienta y el aceite
de oliva en un tazón grande. Una vez enfriado el
arroz/orzo, revolverlo con la mezcla de vegetales.
Refrigerar por una hora o más antes de servir.
Información nutricional por porción (¾ taza):
Calorías 153 (50% de grasa) • Carbohidratos 17g
Proteínas 3g • Grasa saturada 8g • Colesterol 6mg
Sodio 555mg • Calcio 54mg • Fibra 1g
Ensalada de “arroz
prohibido”
En la antigüedad, este arroz negro era reservado
para el Emperador y prohibido para los demás.
Rinde aproximadamente 6 porciones (3 tazas)
¾ vasos medidores de “arroz prohibido”
(arroz negro)
¾ taza (175 ml) de agua
3 cucharadas de agua
1 batata/camote, pelada y cortada en
cubos
Aderezo de miso (receta a
continuación)
3 cebolletas (“green onions”), con medio
dedo de verde, picadas
¼ taza (30 g) de arándanos agrios secos
2 cucharadas de pacanas picadas
Lavar y escurrir el arroz. Colocar en la vasija.
Agregar el agua y encender el aparato. Colocar las
batatas en la cesta de cocción al vapor. Después
de 10 minutos de cocción, colocar la cesta
sobre la vasija y tapar inmediatamente. Seguir
cociendo hasta que el agua se haya evaporado.
Dejar reposar por 5 minutos. Retirar la cesta de
cocción al vapor. Colocar el arroz en un tazón
grande. Agregar 2 cucharadas de aderezo de miso
y revolver suavemente. Dejar enfriar durante 10
minutos.
Agregar las batatas enfriadas, las cebolletas, los
arándanos agrios secos, las pacanas picadas y
1–2 cucharadas adicionales de aderezo. Revolver
suavemente para mezclar. Agregar más aderezo si
desea.
Información nutricional por porción (½ taza):
Calorías 138 (33% de grasa) • Carbohidratos 23g
Proteínas 2g • Grasa 5g • Grasa saturada 1g • Colesterol
0mg • Sodio 97mg • Calcio 15mg • Fibra 2g
Aderezo de miso
Rinde ½ taza (120 ml)
1 diente de ajo, finamente picado
½ cucharadita de mostaza seca
½ cucharadita de jengibre
¼ taza (60 ml) de jugo de limón fresco
1 cucharadas de vinagre de jerez
3 cucharadas (60 ml) de aceite vegetal
2 cucharadas de miso amarillo*
1 cucharadita de aceite de sésamo
Colocar el chalote, la mostaza, el jengibre, el jugo
de limón y el vinagre en un tazón pequeño; revolver
con un batidor para emulsionar. Agregar el miso y
el aceite.
Información nutricional por cucharada:
Calorías 64 (81% de grasa) • Carbohidratos 3g • Proteínas
1g • Grasa 6g • Grasa saturada 1g • Colesterol 0mg
Sodio 184 mg • Calcio 5mg • Fibra 0g
* El mismo está disponible en las tiendas de comida
asiática y en las tiendas de alimentos naturales.
Ensalada de granos
de trigo integral
y vegetales
Rinde 24 porciones (12 tazas)
2 vasos medidores de granos de trigo
integral (“wheat berries”)*
3 tazas (1.4 L) de agua
½ cucharadita de sal kosher
11⁄3 taza (335 g) de maíz en grano, fresco o
descongelado
1 taza (120 g) de calabacín (“zucchini”)
rallado

12
1 taza (150 g) de pimiento dulce rojo
picado
½ taza (30 g) de cebolleta (“green onion”)
picada
½ taza (60 g) de tomates secados al sol
picados
½ taza (120 ml) de vinagreta de cebolla
roja (receta en la página 8)
¼ taza (15 g) de perejil fresco picado
Dejar remojar el trigo en agua en agua durante 1
hora. Escurrir y colocar la vasija en la arrocera.
Agregar agua y ½ cucharadita de sal. Dejar cocer
por aproximadamente 40 minutos, hasta que el
agua se haya evaporado. Dejar reposar por 5
minutos. Esparcir sobre una placa para horno para
enfriar.
Una vez enfriado, revolver el trigo con el maíz,
el calabacín, el pimiento rojo, la cebolleta y los
tomates secados al sol. Revolver suavemente para
mezclar. Agregar 4 cucharadas del aderezo (cubrir
y refrigerar el resto del aderezo para otro uso) y el
perejil. Revolver suavemente para mezclar. Cubrir
y refrigerar hasta el momento de servir. Sacar del
refrigerador 30 minutos antes de servir.
*Los granos de trigo integral (“wheat berries”
en inglés) están disponibles en muchos
supermercados grandes y en las tiendas de
alimentos naturales. Los granos de trigo integral
son granos enteros de trigo no procesados. Pueden
usarse para preparar cereales, pilafs y panes y dan
un sabor a nueces a los alimentos. Se debe remojar
los granos de trigo integral antes de cocerlos para
suavizarlos.
Información nutricional por porción:
Calorías 110 (46% de grasa) • Carbohidratos 15g
Proteínas 2g • Grasa 7g • Grasa saturada 1g • Colesterol
0mg • Sodio 148mg • Calcio 14mg • Fibra 3g
ACOMPAÑAMIENTOS
Arroz pilaf al curry con
albaricoques y piñones
Rinde 12–16 porciones (8 tazas)
2 cucharadas (30 g) de mantequilla sin sal
1 taza (150 g) de cebolla picada
1 cucharadita de curry en polvo
1 cucharadita de cúrcuma en polvo
4 vasos medidores de arroz blanco de
grano largo
4 tazas (1.4 L) de agua
2 cucharaditas de sal kosher
1 taza (200 g) de albaricoques/
chabacanos/damascos secos, en
tajadas finas
¼ taza (35 g) de piñones tostados
Colocar la vasija en la arrocera. Agregar la
mantequilla, tapar y encender el aparato; calentar
por 2 minutos. Agregar la cebolla picada, el curry y
la cúrcuma en polvo; revolver. Tapar y dejar cocer
por 5 minutos. Agregar el arroz, el agua y la sal.
Añadir los albaricoques. Tapar y volver a encender
el aparato. Dejar cocer por aproximadamente 25
minutos, hasta que el agua se haya evaporado.
Dejar reposar durante 5–10 minutos antes de servir.
Esponjar el arroz con la cuchara de plástico y
ponerlo en un cuenco caliente. Esparcir los piñones
encima justo antes de servir.
Información nutricional por porción
(basada en 16 porciones):
Calorías 161 (15% de grasa) • Carbohidratos 33g
Proteínas 3g • Grasa 3g • Grasa saturada 1g • Colesterol
4mg • Sodio 170mg • Calcio 10mg • Fibra 2g
Pilaf de arroz integral,
arroz Wehani y arroz
salvaje
Rinde 8 porciones
2 cucharadas (30 g) de mantequilla sin sal
¼ taza (25 g) de apio finamente picado
¼ taza (25 g) de chalote finamente picado
1½ vaso medidor de arroz blanco de grano
largo
1 vaso medidor de arroz Arborio
½ vaso medidor de arroz salvaje
1 cucharadita de hierbas provenzales
(Herbes de Provence)
1⁄3 taza (80 ml) de vermú u otro vino blanco
seco
2¼ tazas (500 ml) de caldo de pollo bajo en
sodio
2¼ tazas (500 ml) de agua
1 taza (120 g) de arándanos agrios secos
4 cebolletas (“green onions”), con medio
dedo de verde, picadas
2⁄3 taza (50 g) de pistachos tostados,
picados
Colocar la vasija en la arrocera. Agregar la
mantequilla. Tapar y calentar por 2 minutos.
Agregar el apio y el chalote y revolver. Tapar y dejar
cocer por 2 minutos. Agregar los tres tipos de arroz
y las hierbas provenzales; revolver con la cuchara
de plástico. Agregar el vino y revolver Tapar y dejar

13
cocer por 3 minutos. Agregar el caldo de pollo y
revolver. Tapar, volver a encender el aparato, y
dejar cocer por 45–50 minutos, hasta que el líquido
se haya evaporado. Esparcir los arándanos secos y
la cebolleta picada encima del arroz. Tapar y dejar
reposar durante 5 minutos. Agregar la mitad de los
pistachos y revolver. Colocar en un tazón caliente
y decorar con el resto de los pistachos. Servir
inmediatamente.
Información nutricional por porción:
Calorías 134 (18% de grasa) • Carbohidratos 23g
Proteínas 4g • Grasa 3g • Grasa saturada 1g • Colesterol
5mg • Sodio 264mg • Calcio 16mg • Fibra 2g
Pilaf de arroz integral y
lentejas
Rinde 8 porciones
1 cucharada (15 ml) de aceite de oliva
virgen extra
¼ taza (25 g) de zanahoria picada
¼ taza (25 g) de champiñones picados
¼ taza (40 g) de chalote picado
2 vasos medidores de arroz integral de
grano largo
2⁄3 vaso medidor de lentejas marrones
1 cucharadita de tomillo seco
2¼ tazas (500 ml) de caldo de pollo
1½ taza (355 ml) de agua
Colocar la vasija en la arrocera. Agregar el aceite
de oliva. Tapar, encender el aparato y calentar
durante 1 minuto. Agregar la zanahoria, los
champiñones y el chalote, y revolver con la cuchara
de plástico. Tapar y dejar cocer por 3 minutos (la
arrocera se apagará). Agregar el arroz, las lentejas y
el tomillo. Agregar el caldo y el agua, y revolver con
la cuchara de plástico. Cerrar la tapa y encender
el aparato. Dejar cocer por aproximadamente
30
minutos
.
La arrocera se pondrá automáticamente
en “WARM” al final de la cocción. Dejar reposar
por 5–10 minutos antes de servir. Esponjar el arroz
con la cuchara de plástico y ponerlo en un cuenco
caliente.
Información nutricional por porción:
Calorías 185 (14% de grasa) • Carbohidratos 34g
Proteínas 6g • Grasa 3g • Grasa saturada 0g • Colesterol
0mg • Sodio 332mg • Calcio 20mg • Fibra 3g
Pilaf “confeti”
Pilaf de trigo integral, arroz integral y arroz salvaje
con arvejas y pimiento rojo picado – este pilaf
lleno de color es perfecto para servir con pollo o
pescado asado.
Rinde 16 porciones
1 vaso medidor de granos de trigo
integral (“wheat berries”)*
2 cucharaditas de mantequilla sin sal
2 cucharaditas (10 ml) de aceite de oliva
virgen extra
6 cucharadas de cebolla o chalote
finamente picado
¼ taza (50 g) de zanahorias finamente
picadas
1½ vaso medidor de arroz integral de grano
largo
½ vaso medidor de arroz salvaje
1 cucharadita de mejorana
3 tazas (710 ml) de caldo de pollo bajo en
sodio
2¼ tazas (500 ml) de agua
1 cucharadita de sal kosher
1½ taza (300 g) de arvejas pequeñas,
descongeladas
1 taza (150 g) de pimiento dulce rojo
picado
4 cebolletas (“green onions”), con medio
dedo de verde, picadas
1 cucharadita de pimienta negra recién
molida
Colocar los granos de trigo integral en un tazón a
prueba de calor y cubrir con agua hirviente. Dejar
remojar durante 1 hora para suavizar. Escurrir.
Colocar la vasija en la arrocera. Agregar la
mantequilla y el aceite de oliva, tapar y encender
el aparato. Dejar cocer por 1 minuto. Agregar la
cebolla y la zanahoria, revolver, tapar y dejar cocer
por 2 minutos. Agregar los granos de trigo integral
(escurridos), el arroz integral, el arroz salvaje y
la mejorana; revolver. Tapar y dejar cocer por 2
minutos. Agregar el caldo de pollo, el agua y la sal;
revolver. Tapar y dejar cocer por aproximadamente
50 minutos, hasta que el agua se haya evaporado.
Al final de la cocción, agregar las arvejas, el
pimiento rojo y las cebolletas. Tapar y dejar reposar
durante 5 minutos. Agregar la pimienta y revolver
suavemente para mezclar. Poner en un cuenco
caliente para servir. Servir caliente.
*Véase la nota acerca de los granos de trigo
integral en la página 10.
Información nutricional por porción:
Calorías 108 (16% de grasa) • Carbohidratos 19g
Proteínas 3g • Grasa 2g • Grasa saturada 0g • Colesterol
1mg • Sodio 197mg • Calcio 13mg • Fibra 3g

14
Risotto cremoso con
queso Parmesano y
espárragos
Utilice caldo de vegetales para preparar una versión
vegetariana de este plato.
Rinde 6 tazas (12 porciones como plato de
acompañamiento, 8 porciones como entrada, 4
porciones como plato principal).
Spray vegetal
8 onzas (115 g) de espárragos, en trozos
de medio dedo
2 cucharaditas de mantequilla sin sal
2 cucharaditas (10 ml) de aceite de oliva
virgen extra
2⁄3 taza (30 g) de cebolla o chalote
finamente picado
2⁄3 taza (30 g) de zanahoria finamente
picada
2 vasos medidores de arroz Arborio
2⁄3 taza (160 ml) de vino blanco seco o
vermú
6 tazas (1.4 L) de agua, caldo de pollo o
caldo de vegetales (o una combinación)
½ taza (120 ml) de crema líquida para
batir (“heavy cream”)
½ taza (50 g) de queso Parmesano rallado
¼ cucharadita de pimienta blanca recién
molida
Engrasar levemente la cesta de cocción al vapor
con spray vegetal. Colocar los espárragos en la
cesta y reservar.
Colocar la mantequilla y el aceite de oliva en
la vasija. Tapar, encender el aparato y calentar
durante 1 minuto. Agregar la cebolla y la zanahoria,
tapar, y dejar cocer por 1 minuto. Agregar el arroz
y revolver para cubrir. Tapar y dejar cocer por 2
minutos. Agregar el vino y tapar. Dejar cocer por
2–3 minutos, hasta que el vino se haya evaporado.
Agregar el agua/caldo y revolver. Tapar y dejar
cocer por 25 minutos, revolviendo 2 ó 3 veces
durante la cocción. Colocar la cesta de cocción al
vapor encima de la vasija y tapar. Dejar cocer por
aproximadamente 5 minutos adicionales, hasta
que la arrocera se ponga en “WARM”. Cuando la
arrocera se ponga en “WARM”, agregar la crema
líquida, el queso Parmesano y la pimienta blanca.
Regresar la cesta encima de la vasija, tapar y dejar
reposar por 5–10 minutos. Después de este tiempo,
agregar los espárragos al arroz. Servir caliente.
Información nutricional por porción
(basada en 12 porciones):
Calorías 110 (37% de grasa) • Carbohidratos 11g
Proteínas 4g • Grasa saturada 4g • Colesterol 11mg
Sodio 334mg • Calcio 66mg • Fibra 1g
PLATOS PRINCIPALES
Cuscús israelí con
tomates secados al sol
Rinde 8 porciones
2 cucharaditas (10 ml) de aceite de oliva
virgen extra
6 cucharadas de cebolla o chalote
finamente picado
2 vasos medidores de cuscús israelí
(perlas de cuscús)
1½ taza (355 ml) de caldo de pollo bajo en
sodio
1½ taza (355 ml) de agua
½ cucharadita de sal kosher
¼ taza (50 g) de tomates secados al sol
picados (no en aceite)
1 cucharadita de albahaca seca
2 cucharadas de piñones tostados
Colocar la vasija en la arrocera. Agregar el aceite,
tapar y encender el aparato, calentar por 1½
minuto. Agregar la cebolla picada. Dejar cocer por
1 minuto. Agregar el cuscús. Revolver durante 1–2
minutos, usando la cuchara de plástico. Agregar el
caldo de pollo, el agua y la sal; revolver. Agregar
los tomates secados al sol y la albahaca. Tapar
y dejar cocer por 20–25 minutos, hasta que el
líquido se haya evaporado. La arrocera se pondrá
automáticamente en “WARM” al final de la cocción.
Dejar reposar durante 5 minutos, o mantener
caliente hasta el momento de servir. Colocar en un
cuenco caliente y decorar con piñones tostados.
*El cuscús israelí, también llamado “perlas de
cuscús” está disponible en la mayoría de los
supermercados grandes y en las tiendas de
alimentos naturales.
Información nutricional por porción:
Calorías 83 (26% de grasa) • Carbohidratos 13g • Proteínas
3g • Grasa 3g • Grasa saturada 0g • Colesterol 0mg •
Sodio 228mg • Calcio 12mg • Fibra 1g

15
Risotto con azafrán
y tirabeques
Rinde 4 tazas (8 porciones como plato principal;
12 porciones como plato de acompañamiento)
4½ tazas (1 L) de agua
½ cucharadita de hebras de azafrán
1 cucharada (15 ml) de aceite de oliva
virgen extra
1 cucharada (15 g) de mantequilla sin sal
¼ taza (25 g) de chalote finamente picado
¼ taza (25 g) de apio finamente picado
¼ taza (25 g) de chalote finamente picado
1½ vaso medidor de arroz Arborio
6 cucharadas de vermú seco o vino
blanco seco (no utilizar Chardonnay)
1 cucharadita de sal kosher
1½ taza (300 g) de tirabeques/arvejas
chinas (“snow peas”) trituradas
Calentar el agua en el microondas o en una
cacerola hasta que empiece a hervir. Agregar las
hebras de azafrán y reservar.
Colocar la vasija en la arrocera. Agregar el aceite
de oliva y la mantequilla, tapar y encender el
aparato.
Calentar el aceite y la mantequilla por 1 minuto.
Agregar la zanahoria, el apio y el chalote. Tapar y
dejar cocer por 2 minutos. Agregar el arroz Arborio,
revolver, tapar y dejar cocer por 2 minutos. Agregar
vino, tapar y dejar cocer por 3 minutos.
Agregar el agua con azafrán y la sal. Tapar y dejar
cocer por 28–29 minutos, hasta que la arrocera
se ponga en “WARM”. Revolver con la cuchara
de plástico 2 ó 3 veces durante la cocción. Al final
de la cocción, esparcir los tirabeques encima del
risotto, tapar y dejar reposar durante 5 minutos.
Revolver y ponerlo el risotto un cuenco caliente.
Servir inmediatamente.
Información nutricional por porción
(basada en 12 porciones):
Calorías 89 (32% de grasa) • Carbohidratos 12g • Proteínas
2g • Grasa 3g • Grasa saturada 1g • Colesterol 4mg
Sodio 190mg • Calcio 21mg • Fibra 1g
Risotto cremoso con
queso Fontina y setas
Este risotto cremoso puede servirse como plato de
acompañamiento o plato principal.
Rinde 6 tazas (12 porciones como plato de
acompañamiento, 8 porciones como plato
principal).
5 cucharaditas (20g) de mantequilla sin
sal
5 cucharaditas de aceite de oliva virgen
extra
2⁄3 taza (30 g) de cebolla o chalote
finamente picado
2 vasos medidores de arroz Arborio
¾ taza (175 ml) de vermú seco o vino
blanco seco (no utilizar Chardonnay)
6 tazas (1.4 L) de caldo de pollo bajo en
sodio
12 onzas (340 g) de setas Shiitake, sin
tallos y cortadas en rodajas finas
½ cucharadita de tomillo seco
6 onzas (170 g) de queso Fontina rallado
1 cucharadita de pimienta negra recién
molida
Tomillo fresco y perejil italiano fresco,
picados (opcional)
Colocar 3 cucharaditas (15 g) de la mantequilla y
el aceite de oliva en la vasija. Tapar, encender el
aparato y calentar por 1 minuto. Agregar la cebolla,
tapar y dejar cocer por 1 minuto. Agregar el arroz
y revolver para cubrir. Tapar y dejar cocer por 2
minutos. Agregar el vino y tapar. Dejar cocer por
2–3 minutos, hasta que el vino se haya evaporado.
Agregar el caldo de pollo y revolver.
Tapar y dejar cocer por 35–40 minutos, revolviendo
2 ó 3 veces durante la cocción, hasta que la
arrocera se ponga en “WARM”.
Mientras el risotto está cociendo, calentar la
mantequilla y el aceite restantes a fuego medio,
en un sartén antiadherente. Cuando esté caliente,
agregar las setas y cocer hasta que estén dorados
y ligeramente crujientes, revolviendo de vez en
cuando.
Al final de la cocción, agregar el queso Fontina, las
setas y la pimienta. Servir caliente. Decorar con
tomillo y perejil si desea.
Información nutricional por porción de ½ taza (120 ml):
Calorías 207 (34% de grasa) • Carbohidratos 26g
Proteínas 6g • Grasa 8g • Grasa saturada 4g • Colesterol
21mg • Sodio 117mg • Calcio 86mg • Fibra 1g

16
Arroz con frijoles rojos
Esta versión del famoso plato tradicional de la
Nueva Orleans – que demora horas en cocinar –
estará lista en menos de 30 minutos gracias a su
arrocera/vaporera Cuisinart
®
.
Rinde 8 tazas
8 onzas (225 g) de salchicha “andouille”
de pollo o de pavo ahumado*
Spray vegetal
2 latas de 15 onzas (425 g) de frijoles
rojos, lavados y escurridos
2 cucharadas de aceite de oliva de buena
calidad
6 cucharadas de cebolla finamente
picada
4 cucharadas de apio finamente picado
6 cucharadas de pimiento dulce verde
finamente picado
2 dientes de ajo, finamente picados
2 vasos medidores de arroz de grano
largo
1 cucharadita de tomillo seco
1 hoja de laurel
3 tazas (710 ml) de caldo de pollo bajo en
sodio
6 gotas de Tabasco® u otra salsa picante
Dividir la salchicha en dos partes iguales. Picar
finamente la primera parte; cortar la segunda
parte en rodajas de ½ pulgada (1.5 cm). Engrasar
levemente la cesta de cocción al vapor con spray
vegetal. Colocar los frijoles rojos y la salchicha en
rodajas en la cesta de cocción al vapor; reservar.
Colocar la vasija en la arrocera. Agregar el aceite
de oliva, tapar, encender el aparato y calentar por
1 minuto. Agregar la cebolla, el apio, el pimiento
y el ajo; revolver para cubrir con aceite. Tapar y
dejar cocer por 3–4 minutos. Agregar el arroz y el
tomillo. Revolver durante 3–4 minutos, hasta que
el arroz se ponga opaco. Agregar la hoja de laurel
y el caldo de pollo. Colocar la cesta de cocción
al vapor encima de la vasija y tapar. Encender el
aparato y dejar cocer por 20–25 minutos, hasta que
la arrocera se ponga en “WARM”. Dejar reposar por
5 minutos. Colocar los frijoles y la salchicha en un
cuenco mediano; agregar el arroz con vegetales.
Sacar y tirar la hoja de laurel. Revolver suavemente
para mezclar. Agregar el perejil y revolver. Poner
en un cuenco caliente para servir. Servir con salsa
caliente si desea.
*La salchicha “andouille” de pollo o pavo ahumado
tiene mucho menos grasa que la salchicha
“andouille” de cerdo tradicional. Está disponible
en muchos supermercados grandes. Si no la
encuentra, puede sustituirle salchicha Kielbasa.
Información nutricional por porción de ½ taza (120 ml):
Calorías 265 (14% de grasa) • Carbohidratos 43g
Proteínas 13 g • Grasa 4g • Grasa saturada 1g • Colesterol
18mg • Sodio 453mg • Calcio 43mg • Fibra 5g
Arroz “no” frito
Una versión rápida y saludable del arroz frito.
Rinde 8 tazas
Spray vegetal
6 onzas (170 g) de tiras de pollo, en
pedacitos
1 cucharadita (5 ml) de aceite de sésamo
16 camarones medianos, pelados, limpios
y cortados longitudinalmente por la
mitad
2 cucharadas (30 ml) de salsa de soya
regular o baja en sodio
2 cucharadas (30 ml) de vinagre de arroz
½ cucharadita de azúcar granulada
½ cucharadita de pimienta negra recién
molida
2 cucharaditas (20 ml) de aceite vegetal
½ onza (15 g) de tocino canadiense o de
jamón, en pedacitos
¼ taza (25 g) de cebolla finamente picada
¼ taza (50 g) de zanahoria finamente
picada
2 cucharadas de champiñones picados
1 diente de ajo, finamente picado
2½ vasos medidores de arroz Basmati
3½ tazas (830 ml) de caldo de pollo bajo en
sodio
2⁄3 taza (50 g) de arvejas descongeladas
½ taza (100 g) de pimiento dulce rojo
cortado en juliana (tiritas finas)
4 cebolletas (“green onions”), con medio
dedo de verde, picadas
1 taza (150 g) de brotes de porote chino
(también conocido como judía mongo o
soya verde)
Engrasar levemente la cesta de cocción al vapor
con spray vegetal. Colocar el pollo en un tazón
pequeño y rociar con la mitad del aceite de
sésamo; revolver. Colocar en la cesta de cocción al
vapor, sin superponerlos. Hacer lo mismo con los
camarones. Reservar.
Colocar la salsa de soya, el vinagre de arroz, el
azúcar y la pimienta en un tazón pequeño; revolver.
Revolver hasta que el azúcar esté disuelto; reservar.
Colocar la vasija en la arrocera. Agregar el aceite,
tapar y encender el aparato; dejar calentar por 1

17
minuto. Agregar el tocino canadiense, la cebolla,
la zanahoria, los champiñones y el ajo. Revolver
para cubrir con aceite. Tapar y cocer durante 4–5
minutos. Agregar el arroz y revolver. Agregar el
caldo, tapar y dejar cocer. Después de 15 minutos,
colocar la cesta encima de la vasija y tapar.
Seguir cociendo hasta que la arrocera se ponga
en “WARM”. Retirar la cesta de cocción al vapor,
usando agarraderas, manoplas o guantes para el
horno. Esparcir las arvejas, el pimiento rojo y las
cebolletas encima del arroz – no revolver. Regresar
la cesta de cocción al vapor encima de
la vasija y tapar. Dejar reposar por 5 minutos.
Colocar el arroz y los vegetales en un cuenco
mediano, junto con el pollo y los camarones
cocidos al vapor, y los brotes de porote chino.
Rociar con la mezcla de salsa de soya y revolver
para mezclar. Servir inmediatamente.
Información nutricional por porción (basada en 8 porciones):
Calorías 286 (12% de grasa) • Carbohidratos 42g
Proteínas 20g • Grasa 4g • Grasa saturada 1g • Colesterol
75mg • Sodio 566mg • Calcio 41mg • Fibra 2g
Arroz con camarones
Rinde 6 porciones
2 cucharaditas (10 ml) de aceite de oliva
virgen extra
¼ taza (40 g) de cebolla roja picada
2 dientes de ajo, finamente picados
1½ cucharadita de orégano
½ cucharadita de semillas de cilantro en
polvo
½ cucharadita de comino en polvo
½ cucharadita de sal kosher
½ cucharadita de cúrcuma en polvo
2 vasos medidores de arroz blanco de
grano largo
3 tazas (710 ml) de agua
2 latas de 15 onzas (425 g) de tomates
cocidos picados, escurridos
24 onzas (695 g) de camarones, pelados,
limpios y cortados longitudinalmente
por la mitad
11⁄3 taza (150 g) de arvejas congeladas
4 cebolletas (“green onions”), picadas
2 jalapeños, sin semillas, picados
Colocar la vasija en la arrocera. Agregar el aceite
de oliva. Tapar, encender el aparato y dejar
calentar por 1 minuto. Agregar la cebolla roja, el
ajo, el orégano, las semillas de cilantro en polvo,
el comino, la sal y la cúrcuma. Revolver con un
cucharón de madera para cubrir con aceite. Tapar y
dejar cocer por 1 minuto. Agregar el arroz, revolver
y dejar cocer por 2 minutos. Agregar el agua;
revolver Esparcir los tomates picados encima del
arroz, sin mezclar. Tapar y encender el aparato.
Engrasar levemente la cesta de cocción al vapor
con spray vegetal. Colocar los camarones en la
cesta y reservar. Después de 10 minutos, colocar
la cesta de cocción al vapor encima de la vasija y
tapar. Dejar cocer hasta que la arrocera se ponga
en “WARM”. Esparcir las arvejas, las cebolletas y el
jalapeño encima del arroz. Tapar y dejar reposar por
5 minutos.
Esponjar el arroz con la cuchara de plástico y
revolver con los vegetales. Colocar en un cuenco
y colocar los camarones cocidos al vapor encima.
Decorar con rebanadas de aguacate y servir con
limón o lima.
Información nutricional por porción:
Calorías 350 (9% de grasa) • Carbohidratos 49g • Proteínas
29g • Grasa 3g • Grasa saturada 1g • Colesterol 221mg
Sodio 485mg • Calcio 108mg • Fibra 4g
Cuscús con camarones y
vieiras
Este sabroso plato puede prepararse fácil y
rápidamente entre semana.
Rinde 4 porciones
12 onzas (340 g) de camarones, pelados,
limpios y cortados longitudinalmente
por la mitad
12 onzas (340 g) de vieiras
1 cucharada (15 ml) de aceite de oliva
virgen extra
Spray vegetal
2 chalotes, finamente picados
2 dientes de ajo, finamente picados
2 cucharaditas de tomillo
2 vasos medidores de cuscús israelí
(perlas de cuscús)
1½ taza (355 ml) de caldo de pollo
1½ taza (355 ml) de agua
½ cucharadita de sal kosher
½ taza (75 g) de pimiento dulce verde
picado
½ taza (75 g) de pimiento dulce rojo
picado
¼ taza (15 g) de perejil fresco picado
2 cucharaditas de ralladura fina de limón
Pedazos de limón
Colocar los camarones y las vieras en un tazón
pequeño. Agregar 2 cucharaditas de aceite de oliva
y revolver. Engrasar levemente la cesta de cocción
al vapor con spray vegetal. Colocar los camarones y
las vieiras en el cesta de cocción al vapor; reservar.

18
Colocar la vasija en la arrocera. Agregar el aceite
restante, tapar y encender el aparato. Dejar calentar
por 1½ minuto. Agregar los chalotes, el ajo y
el tomillo. Dejar cocer por 1 minuto. Agregar el
cuscús. Cocer, revolviendo, durante 1–2 minutos.
Agregar el caldo, el agua y la sal; revolver. Tapar
y dejar cocer por 7 minutos. Colocar la cesta de
cocción al vapor encima de la vasija, tapar, y dejar
cocer hasta que la arrocera se ponga en “WARM”.
Agregar los pimientos, el perejil y la ralladura
de limón al cuscús. Tapar y dejar reposar por 5
minutos. Para servir: revolver los camarones y las
vieiras cocidas al vapor con el cuscús caliente.
Decorar con pedazos de limón.
*El cuscús israelí, también llamado “perlas de
cuscús” está disponible en la mayoría de los
supermercados grandes y en las tiendas de
alimentos naturales.
Información nutricional por porción:
Calorías 318 (19% de grasa) • Carbohidratos 26g
Proteínas 37g • Grasa 7g • Grasa saturada 1g • Colesterol
194mg • Sodio 691mg • Calcio 85mg • Fibra 2g
“Risi e Bisi” con
camarones
Nuestra versión de este sustancioso plato
veneciano tradicional incluye camarones cocidos al
vapor, para una comida completa.
Rinde 4 porciones
1 libra (455 g) de camarones, pelados,
limpios y cortados longitudinalmente
por la mitad
4 cucharaditas de aceite de oliva virgen
extra
Spray vegetal
2 cucharaditas de mantequilla sin sal
2⁄3 taza (35 g) de cebolla finamente picada
2⁄3 taza (35 g) de apio finamente picado
2 vasos medidores de arroz Arborio
6 cucharadas (90 ml) de vino blanco seco
o vermú
6 tazas (1.4 L) de caldo de pollo o caldo
de vegetales (diluido con agua si desea)
2½ tazas (300 g) de arvejas frescas o
congeladas
½ taza (50 g) de queso Parmesano rallado
Colocar los camarones en un tazón pequeño
y rociar con 1 cucharadita del aceite de oliva.
Revolver. Engrasar levemente la cesta de cocción al
vapor con spray vegetal. Colocar los camarones en
la cesta y reservar.
Colocar la mantequilla y el aceite de oliva restante
en la vasija. Tapar, encender el aparato y dejar
calentar por 1 minuto. Agregar la cebolla y el apio,
tapar, y dejar cocer por 1 minuto. Agregar el arroz
y revolver para cubrir. Tapar y dejar cocer por 2
minutos. Agregar el vino y tapar. Dejar cocer por
2–3 minutos, hasta que el vino se haya evaporado.
Agregar el caldo y revolver. Tapar y dejar cocer
por 22 minutos, revolviendo 2 ó 3 veces durante la
cocción. Después de 22 minutos, colocar la cesta
de cocción al vapor encima de la vasija y tapar.
Dejar cocer por 8–10 minutos, hasta que la arrocera
se ponga en “WARM”. Agregar las arvejas. Tapar y
dejar reposar por 5–10 minutos.
Justo antes de servir, revolver el arroz con los
camarones y la mitad del queso Parmesano. Servir
en cuencos calientes, con el resto del queso
Parmesano esparcido encima.
Información nutricional por porción:
Calorías 440 (23% de grasa) • Carbohidratos 40g
Proteínas 20g • Grasa 11g • Grasa saturada 4g
Colesterol 237mg • Sodio 1175mg • Calcio 198mg
Fibra 5g
Arroz integral y salmón
con limón y tomillo
Para preparar una versión vegetariana de este plato,
simplemente sustituya el salmón por garbanzos en
lata (lavados y escurridos).
Rinde 4 porciones
Spray vegetal
3–4 hojas de lechuga
1¼
libra (570 g) de salmón deshuesado y sin
piel, cortado en 4 filetes
2 ramitas de tomillo fresco
1 cucharada (15 g) de mantequilla sin sal
4 cucharadas de cebolla finamente
picada
2 dientes de ajo, finamente picados
1½ vaso medidor de arroz integral,
enjuagado en agua y escurrido
4 cucharaditas de ralladura fina de limón
1 cucharadita de eneldo fresco
1 cucharadita de sal kosher
3½ tazas (830 ml) de agua (o mitad agua/
mitad caldo de pollo)
½ taza (75 g) de tomates de pera, cortadas
a la mitad
½ taza (75 g) de pimiento dulce verde
picado
½ taza (75 g) de pimiento dulce rojo
picado
Pedazos de limón/lima
Engrasar levemente la cesta de cocción al vapor
con spray vegetal. Forrar con hojas de lechuga.
Disponer los filetes de salmón en una sola capa en

19
el fondo de la cesta y colocar las ramitas de tomillo
encima.
Colocar la vasija en la arrocera. Agregar la
mantequilla. Tapar, encender el aparato y dejar
calentar por 30–40 segundos. Agregar la cebolla y
el ajo; tapar y dejar cocer por 30 segundos. Agregar
el arroz, 2 cucharaditas de la ralladura de limón,
la sal y el eneldo. Revolver para cubrir. Agregar el
agua. Tapar y dejar cocer por 40 minutos. Colocar
la cesta de cocción al vapor encima de la vasija
y tapar. Seguir cociendo durante 10–12 minutos,
hasta que la arrocera se ponga en “WARM”.
Esparcir los tomates y los pimientos encima del
arroz y dejar reposar por 10 minutos. Para servir:
revolver el arroz con los tomates y los pimientos.
Colocar el arroz sobre platos calientes, con filetes
de salmón al vapor. Decorar con la ralladura de
limón restante y un pedazo de limón.
*Sustituir el salmón por vieiras si desea. Quitar
los músculos laterales primero y revolver con 2
cucharaditas de aceite de oliva.
Información nutricional por porción:
Calorías 435 (31% de grasa) • Carbohidratos 45g
Proteínas 30g • Grasa 15g • Grasa saturada 4g
Colesterol 76mg • Sodio 406mg • Calcio 53mg • Fibra 3g
Pollo Teriyaki al vapor con
arroz salvaje y arándanos
agrios
Sustituir el pollo por chuletas o lomo de pavo si
desea.
Rinde 4 porciones
2 cucharadas (30 ml) de salsa de soya
baja en sodio
2 cucharadas (30 g) de miel
4 cucharaditas (40 ml) de jerez seco
1 diente de ajo, finamente picado
1 cucharadita de jengibre en polvo
1 cucharada de aceite vegetal
2 cucharadas de cebolleta (“green onion”)
finamente picada
1 libra (455 g) de pechuga de pollo,
deshuesada y sin piel
Spray vegetal
1½ vasos medidores de arroz salvaje
3 tazas (710 ml) de caldo de pollo bajo en
sodio
¾ taza (175 ml) de agua
1 cucharadita de sal kosher
1 taza (120 g) de arándanos agrios secos
6 cebolletas (“green onions”), finamente
picadas
2 cucharadas de jalapeño finamente
picado
Colocar la salsa de soya, la miel, el jerez, el ajo,
el jengibre, el aceite y la cebolleta en un tazón
pequeño. Batir para mezclar. Cortar el pollo en
tiritas de aproximadamente ½ x 3 pulgadas (1.5 cm
x 7.5 cm). Agregar el pollo a la marinada Teriyaki y
dejar reposar por 15 minutos.
Engrasar levemente la cesta de cocción al vapor
y la vasija con spray vegetal. Colocar la vasija en
la arrocera. Colocar el arroz en la vasija. Agregar
el caldo, el agua y la sal; revolver. Cerrar la tapa y
encender el aparato. Dejar cocer por 50 minutos.
Escurrir el pollo y colocarlo en la cesta de cocción
al vapor; tirar la marinada. Después de 50 minutos,
colocar la cesta encima de la vasija y tapar. Dejar
cocer por 12–15 minutos, hasta que la arrocera se
ponga en “WARM”. Cuando la arrocera se ponga
en “WARM”, esparcir los arándanos agrios secos,
las cebolletas picadas y el jalapeño picado encima
del arroz. Tapar y dejar reposar por 10 minutos.
Para servir: revolver el arroz con los arándanos
agrios, las cebolletas y el jalapeño. Servir en platos
calientes, después de colocar los deditos de pollo
Teriyaki encima del arroz.
Información nutricional por porción:
Calorías 546 (13% de grasa) • Carbohidratos 74g
Proteínas 44g • Grasa saturada 8g • Colesterol 87mg
Sodio 786mg • Calcio 36mg • Fibra 6g
“Jambalaya” con salchicha
y camarones
Rinde 4 tazas
4 onzas (115 g) de salchicha “andouille”
de pollo o de pavo ahumado*
Spray vegetal
8 onzas (225 g) de camarones, pelados,
limpios y cortados longitudinalmente
por la mitad
1 cucharada (10 ml) de aceite de oliva de
buena calidad
½ taza (80 g) de cebolla finamente picada
¼ taza (25 g) de apio finamente picado
3 cucharadas de pimiento dulce verde
picado
3 cucharadas de pimiento dulce rojo
picado
1 diente de ajo, finamente picado
1½ vaso medidor de arroz de grano largo
1 cucharadita de tomillo seco
½ cucharadita de chile en polvo
1¾ taza (415 ml) de caldo de pollo
¾ taza (175 ml) de salsa de tomate

20
1 hoja de laurel
3 cucharadas de perejil italiano fresco
picado
Tabasco® u otra salsa picante
Cortar la salchicha en rodajas gruesas. Engrasar
levemente la cesta de cocción al vapor con spray
vegetal. Colocar la salchicha y los camarones en el
cesta de cocción al vapor; reservar.
Colocar la vasija en la arrocera. Agregar el aceite
de oliva, tapar y encender el aparato. Después de 1
minuto, agregar la cebolla, el apio, el pimiento dulce
verde y rojo y el ajo; revolver para cubrir con aceite.
Tapar y dejar cocer por 3–4 minutos. Agregar el
arroz, el tomillo y el chile en polvo. Revolver por
2–3 minutos, hasta que el arroz se ponga opaco.
Agregar el caldo de pollo, la salsa de tomate y la
hoja de laurel. Tapar y dejar cocer por 10 minutos.
Colocar la cesta de cocción al vapor encima de
la vasija y tapar. Dejar cocer por 8–10 minutos,
hasta que la arrocera se ponga en “WARM”. Dejar
reposar por 5 minutos. Sacar y tirar la hoja de
laurel. Revolver suavemente para mezclar. Agregar
el perejil y revolver. Poner en un cuenco caliente
para servir. Decorar con el resto del perejil picado.
Servir con salsa caliente si desea.
*La salchicha “andouille” de pollo o pavo ahumado
tiene mucho menos grasa que la salchicha
“andouille” de cerdo tradicional. Está disponible
en muchos supermercados grandes. Si no la
encuentra, puede sustituirle salchicha Kielbasa.
Información nutricional por porción (basada en 4 porciones):
Calorías 299 (8% de grasa) • Carbohidratos 50g • Proteínas
19g • Grasa 3g • Grasa saturada 0g • Colesterol 113mg
• Sodio 644mg • Calcio 59g • Fibra 2g
Avena con canela y pasas
¡Fácil de preparar, sin revolver, sin derrame, y sin
quemar! ¡Nunca ha sido tan fácil preparar avena
caliente!
Rinde 8 porciones
4 vasos medidores de copos de avena (no
utilice avena instantánea)
6 tazas (1.4 L) de agua
2 cucharaditas de canela en polvo
½ cucharadita de sal
6 cucharadas de pasas
Colocar la vasija en la arrocera. Colocar la avena,
el agua, la canela y la sal en la vasija; revolver.
Esparcir las pasas encima. Tapar, encender y dejar
cocer por 15–18 minutos. Cuando la arrocera se
ponga en “WARM”, servir la avena o mantenerla
caliente hasta el momento de servir. Revolver antes
de servir. Servir así o endulzar con azúcar moreno,
miel o jarabe de arce. También puede añadirle
una cucharada de yogur (regular o de vainilla) o de
leche.
Nota: puede sustituir las pasas por otras frutas
secas, como por ejemplo: cerezas, arándanos
agrios, arándanos azules, albaricoques o ciruelas
cortadas en tajadas finas, o manzanas picadas.
También puede preparar la receta con avena
irlandesa. Colocar 1 vaso medidor de avena
irlandesa con 3 tazas (710 ml) de agua en un tazón;
revolver, cubrir y refrigerar por 8–12 horas. Colocar
la mezcla en la vasija. Agregar la canela, la sal y
las pasas; revolver. Encender el aparato. Cuando la
arrocera se ponga en “WARM”, la avena está lista.
Revolver antes de servir.
Información nutricional por porción:
Calorías 154 (12% de grasa) • Carbohidratos 32mg •
Proteínas 5g • Grasa 2g • Grasa saturada 0g • Colesterol
0mg • Sodio 154mg • Calcio 32mg • Fibra 4g

21
©2019 Cuisinart
East Windsor, NJ 08520
Impreso en China
19CE062342
F IB-5026-ESP-A
Todas las marcas registradas, comerciales o de servicio mencionadas en este
documento pertenecen a sus titulares respectivos.
Garantía limitada de tres años
Esta garantía reemplaza todas las demás
declaraciones expresas de garantía. Esta garantía
es para los consumidores solamente. Usted es un
consumidor si ha comprado su aparato Cuisinart
®
en una tienda, para uso personal o casero. A
excepción de los estados donde la ley lo permita,
esta garantía no es para los detallistas u otros
comerciantes. Cuisinart garantiza este aparato
contra todo defecto de materiales o fabricación
durante 3 años después de la fecha de compra
original, siempre que el aparato haya sido utilizado
para uso doméstico y según las instrucciones.
Le aconsejamos que llene el formulario de registro
disponible en www.cuisinart.com a fin de facilitar
la verificación de la fecha de compra original. Sin
embargo, registrar el producto no es necesario
para recibir servicio bajo esta garantía. En ausencia
del recibo de compra, el período de garantía será
calculado a partir de la fecha de fabricación.
Si este aparato presentara algún defecto de
materiales o fabricación durante el período de
garantía, la reparemos o reemplazaremos (a nuestra
opción). Para obtener servicio bajo esta garantía,
llame a nuestra línea directa gratuita al 1-800-726-
0190 o regrese el aparato defectuoso a:
Cuisinart
7475 North Glen Harbor Blvd.
Glendale, AZ 85307
Regrese el aparato defectuoso, junto con su recibo
de compra y un cheque o giro postal de US$10.00
por gastos de manejo y envío. Recuerde incluir
su nombre, dirección y teléfono, la descripción
del problema, así como cualquier información
pertinente.
Los residentes de California sólo necesitan dar una
prueba de compra y deben llamar al 1-800-720-
0190 para recibir instrucciones de envío.
NOTA: Para mayor seguridad, le aconsejamos
que mande su paquete por un método de entrega
con seguro y seguimiento. Cuisinart no será
responsable por los daños ocurridos durante el
transporte o por los paquetes mandados a una
dirección equivocada. Los productos perdidos y/o
lastimados durante el envío no serán cubiertos bajo
esta garantía.
Este aparato satisface las más altas exigencias
de fabricación y ha sido diseñado para uso sobre
corriente de 120V, usando accesorios y piezas
de repuesto autorizados solamente. Esta garantía
excluye expresamente los daños causados por
accesorios, piezas o reparaciones no autorizados
por Cuisinart, así como los daños causados por el
uso de un convertidor de voltaje. Esta garantía no
cubre el uso institucional o comercial del producto,
y no es válida en caso de daños causados por
mal uso, negligencia o accidente. Esta garantía
excluye expresamente todos los daños incidentales
o consecuentes. Algunos Estados no permiten
la exclusión o limitación de daños incidentales
o consecuentes, de modo que las limitaciones
mencionadas pueden no regir para usted. Usted
puede tener otros derechos que varían de un
Estado a otro.
Residentes de California solamente
La ley del estado de California ofrece dos opciones
bajo el período de garantía. Los residentes del
estado de California pueden (A) regresar el producto
defectuoso a la tienda donde lo compraron o
(B) a otra tienda que venda productos Cuisinart
®
de este tipo. La tienda, a su opción, reparará el
producto, referirá el consumidor a un centro de
servicio independiente, cambiará el producto o
reembolsará el consumidor por el precio original
del producto, menos la cantidad imputable al uso
del producto por el consumidor hasta que éste
se dañe. Si estas dos opciones no satisfacen al
consumidor, podrá llevar el producto a un centro
de servicio independiente, siempre que se pueda
ajustar o reparar el producto de manera económica.
Cuisinart será responsable por los gastos de
servicio, reparación, reemplazo o reembolso de
los productos defectuosos durante el período de
garantía.
Los residentes de California también pueden, si lo
desean, mandar el aparato defectuoso directamente
a Cuisinart para que lo reparen o lo cambien. Para
esto, se debe llamar a nuestro servicio posventa al
1-800-726-0190. Cuisinart será responsable por los
gastos de reparación, reemplazo, manejo y envío
de los productos defectuosos durante el período de
garantía.
Antes de hacer reparar su aparato
Si su aparato tiene algún problema, le
recomendamos que llame a nuestro servicio
posventa al 1-800-726-0190 antes de regresar el
aparato a Cuisinart. Muy a menudo, nuestro servicio
de asistencia al cliente podrá ayudarle a resolver
el problema sin tener que regresar el aparato. Un
representante le confirmará si su aparato sigue
bajo garantía y le indicará la dirección del centro de
servicio más cercano.
* Importante: si debe llevar el aparato defectuoso
a un centro de servicio no autorizado, por favor
informe al personal del centro de servicio que
deberían llamar al servicio posventa de Cuisinart al
1-800-726-0190 a fin de diagnosticar el problema
correctamente, usar las piezas correctas para
repararlo y asegurarse de que el producto esté bajo
garantía.
-
 1
1
-
 2
2
-
 3
3
-
 4
4
-
 5
5
-
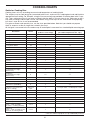 6
6
-
 7
7
-
 8
8
-
 9
9
-
 10
10
-
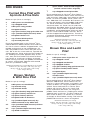 11
11
-
 12
12
-
 13
13
-
 14
14
-
 15
15
-
 16
16
-
 17
17
-
 18
18
-
 19
19
-
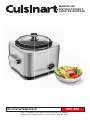 20
20
-
 21
21
-
 22
22
-
 23
23
-
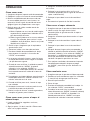 24
24
-
 25
25
-
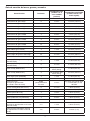 26
26
-
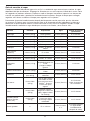 27
27
-
 28
28
-
 29
29
-
 30
30
-
 31
31
-
 32
32
-
 33
33
-
 34
34
-
 35
35
-
 36
36
-
 37
37
-
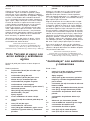 38
38
-
 39
39
-
 40
40


Cuisinart CRC-800P1 Manual de usuario
- Categoría
- Ollas arroceras
- Tipo
- Manual de usuario
en otros idiomas
- English: Cuisinart CRC-800P1 User manual