Sony CCD-TRV30 Manual de usuario
- Categoría
- Videocámaras
- Tipo
- Manual de usuario
Este manual también es adecuado para

CCD-TRV30/TRV3OPK/TRV40/TRVTO
" RMT-708
SERVICEMANUAL
US Model
Canadian Model
Hong Kong Model
CCD-TRV30/'I'R V40/-I'R V70
E Model
CCD- Tit V30/TR V3OPK/TR V40/'FRV70
Tourist Model
CCD- TRV30
• CCD-TRV30PK is model that carring case are
added in CCD-TRV30.
• CCD-TRV30PK are different from CCD-TRV30
only in the accessories and packing materials.
For MECHANISM ADJUSTMENTS, refer to the
"8 mm Video MECHANICAL ADJUSTMENT
MANUAL IV" (9-973-199-11),
Video Camera Recorder
System
Video recording system
Two rotary heads,Helical
scanningFM system
Audio recording system
Rotary heads,FM system
Video signal
NTSC color,EIA standards"
Usable cassette
See the table.
Tape speed
SP mode:Approx. 1.43 cm
(] 9/32 in)/second
LP mode:Approx. 0.72 cm
(5/l 6 in)/second
LP mode is for playback only.
Recording/Playback time
SP mode: 2 hours (P6-120)
LP mode: 4 hours (P6-120)
LP mode is for playback only.
Fasfforward/rewind time
Approx. 6 rain. 30 sec.
(P6-120)
SPECIFICATIONS
Image device
CCD (Charge Coupled Device)
Vlewfinder
Electronic viewfinder
(monochrome)
Lena
See the table.
Focal distance
Seethetable.
Color temperature
AUtO
Minimum Illumination
See the table.
Illumination range
See the table.
Recommended illumination
More than !00 Ix
LCD screen
Picture
See the table.
On-screen display
See the table.
Input and Output connectors
S video input/output
See the table.
Video Input/output
Phonojack, lVp-p, 75Q
unbalanced, syncnegative
Audio input/output
See the table.
RFU DC OUT
Special minijack, DC 5V
Iteadphonee/earphone jack
See the table.
LANC Jack
Stereo mini-mini jack
(€ 2.5 ram)
MIC jack
See the table.
Speaker
Dynamic-speaker
General
Power requirements
On battery mounting surface
6.0V (battery pack),
7.5V (AC power adaptor)
Average power consumption
See the table.
Installation
Vertically, Horizontally
Operating temperature
0'_ to 40"C (32"F to 104*F)
Storage temperature
-20"C to +60 *C
(--4*F to +140 oF)
Dimensions
See the table.
Mass
See the table.
Microphone
See the table.
Continued on next page --
EElVIDEOCAMERARECORDER
CCD-TRV30/TRV30PK/TRV40
Hi VIDEOCAMERARECORDER
CCD-TRV70
SONY

Check that the fullowing accessories are supplied C:umpruebe que se ban surninistradu los
with yuur camcorder, siguientes accesurius c_n la vide,oc;t mara.
[]
[]
[]
[]
[]
[]
[] Wireless Remote Commander (1) (p.80)
[] NP-66 Battery pack (1) (p.6)
[] AC-V26 AC power adaptor (1) (p.6, 29)
[] Shoulder strap (1) (p.80)
[] A/V connecting cable (1) (p.47)
I_ Svideo connecting cable (1) (p.47)
[] R6 (size AA) Battery for Remote
Commander (2) (p.81)
[] CR2025 Uthlum battery (1) (p.S3)
Already ins=lied in the camcorder.
[] LCD screen cleaner cloth (1) (p.6S)
[] Tripod adaptor (1) (p.20)
[]
[]
[]
[]
t I
[] Mando a distancia inal_mbrico (1) (p.80)
[] 8ateria NP-66 (1) (p.6)
[] Adaptador de alimentaci6n de CA AC-V26
(1) (p.6, zg)
[] Asa de hombro (1) (p.$0)
[] Cable de conexibn de A/V (1) (p.47)
[] Cable de conexlbn S video (1)(p.47)
[] Pilas R6 (tama_o AA) para el mando a
distanda (2) (p.81)
[] Pila de litio CR2025 (1) (p.53)
Ya instalada en la vide_c_imara.
[] PaSo de limpieza para pantalla LCD (1)
(p.6S)
[] Adaptador de trtpode (1) (p.20)
3'
5

Before using your camcorder, you first need tu
charge and install ti_e battery pack. To charge the
battery pack, use the supplied AC power
adaptor.
Antes de emplear [a videoc_imara, es ne_'esariu en
primer lugar cargar e instalarla baterfa: Pnra ellu,
utiliceel adaptadur de alimentaci,3n de CA
suministrado.
Charge the battery pack on a fiatplace without
vibration.
(1) ConneCt the AC power adaptor to the mains.
(2) Allgll the right side of the battery pack with
the line on the AC power adaptor, then slide
the battery pack in the direction of the arrow.
(3) Set the selector to CHARGE. The CHARGE
lam'p (orange) lights up. Charging begins.
When charging iscompleted, the CHARGE lamp
goes out. Set the selector tu the center position
and unplug the unit from the main_. Then
remove the battery pack and installitun the
camcorder. To stop charging, _et the selector to
the center position.
C,_rguela sobre una superficie plana sin
vibracione_.
(1) Conecte el adaptador de alimentaci6n de CA
a la toma de alimentaci6n de red.
(2) Aiinee la parte derecha de la baterfa con la
ffneadel adaptador de alimentaci6n de CA y,
a conUnuaci6n, deslice ]a batevla en la
dlrecci6n de la flecha.
(3) Ajuste el selector en la po_ici6n CHARGE. El
indicador CHARGE (naranja) se ilumina,
cumenzando as="la carga.
Cuando la carga finaliza,e! indicador CHARGE
se apaga. Ajuste el selector en la pusici6n central
y desenchufe ]a unidad de la toma de
afimentad_n de red. A continuach3n, extraiga la
bater_a • in_.t_iiela en [a vide,_Jrnara. Para
de_ner la carga, ajuste el selector en la posid0n
ten tra 1.
I
%!_iiii_ii_i:?
Charging Time
• Batte_.pack::_:::
N P-(-,6(supplied)
NP-77H/77HD
NP-C65
NP-SSH
! Charging, time*.:
95
170
I05
85
• Approximate minuk.*stt_charge an empty battery
pack using the supplied AC pewer adaptor
(Lower t*:mperatu_=srequire a longer charging
time.)
Battery Life
While recording') While
Battery pack LeD playing
open=_ LCD close back on
LCD _)
NP-66 30 (60) 40 (80) 60
(supplied)
NP-77H/77HD 50 (95) 75 (145) 100
NP-C_5 30 (55) 40 (8o) 60
N P-5511 20 (40) 35 (65) "40
1) App'_ximate minute_ when recording while
you repeat reoarding start/stop, zooming and
turning the power on/off. The acnaal battery life
may be shorter.
Approximate continuous recording time indoors
is indica_-d in parcnthes_._.
2) Approximate minutes when usin_ both the
viewfinder and the LCD screen. When using the
LCD screen only, the battery life is Ionb,ntr.
3) Approximate Continuous playback time indoors.
Tiempo de carga
• : : Bateria • ITiempo,.decarga,
NP-66 (suminbtr-ada) 95
NP-77H/77H D 170
/
N P-C65 J 105
NP-55H ..1 85 ..
• Minutus apn_ximados para carg'ar una batcrfa
vacfa con el adaptador de alimentaci6n de CA
suministrado (A bajas tempera_ras es n,..'ce_rio
un mayor _._paciode tiem_x_de carga.)
Duraci6n de la baterfa
: ;:_ i!::!..: :1Dura : Durantel a
€_rabacl:6:hi_:!_:_:ili:i_!!!_!_!:::?::I_ep_,
ab[ertai_1_/al _CD__! :
NP-66 30 (60) 40 (80) 60
(suministrada)
NP-77H/77HD i 50(95) 75(145) 100
NP-C65 30 (55) 40 (80_ 60
NP-55H 20 (40) 35 (6.=;) 40
1) Minutes aproximados de grabaci6n cuando
iniciey detcnga lagrabaci6n de una furma
repetida,utilice€l zoom y active/desactive la
alimentaci6n. Es pusibluque laduraci6n realde
la bater/asea m_s curia.El tiempo aproximado
de grabaci6n continua cn intcrlorL_s se indicn
entre par_ntesis.
2) Minutes apruximados al utilizarel visor
eh.'c_'6nico y la pan_lla LCD. Si _')1o se emplea
la pantalla LCD, la duraciOn de la bat_:ria seni
superior.
3) Tiemp_) aproximado de repr,aducci6n continua
cn interiores.
=
..
us
6 7

7
8
Important!
Use the battery completely before
recharging1
Before you recharge the battery, make sure
the battery has been used up (discharged)
completely.
Repeated charging wMle some capacity
remains causes a lowering of'battery capacity.
However, the originalbattery capacity can be
recovered ifyou use the battery completely
and charge itfullyagain.
To use up the battery,remove the cassetteand
turn the POWER switcl_to CAMERA with the
battery attached, and leave the camcorder
uniiJ the G:2 indicator and the Ted lamp t3a_h
rapidly in the viewfinder.
Removing the Battery Pack
Slide the battery pack in the direction of the
arrow.
ilmportante!
iAgote pot completo la bateria antes de
volver a cargarla!.
Antes de volver a cargar la bateria, aseg_rese
de que _ta _e enc'uentra compietamente
agotada (descargada).
Si carga la baterfa varias veces sin estar
comp{etamente agotada, se produce una
reducci6n de su capacidad. Nu obstante, es
poslble recuperar ]a capacidad original _i ]a
agora por completo y la vueive a cargar.
Para descargar la bateHa, extrai,_;ael cassette
y gire el conmutador POWER a la Posici6n
CAMERA con labateffafijada,y dejela
videoc,imara basra que el Jnd_ador CO y el
indicador ru_oparpadeen r_ipidamente en el
visor electr,_nic:u.
Extracci6n de la baterfa
Oeslfcela en ladirecci6n de [a flecha.
Install,ng the.Battery: Pack ;i-_i:
(1) Lift up the vlewfinder.
(2) Align the right side of the battery pack with
white line on the camcorder, and slide the
battery pa_k to the right.
1
::'i_stalac!6n de|a b_teri.a _::!!_:
(1) Levante el vi_,or electrGnico.
(2) AJinee Ja parte derecha de }a bateHa ('un la
linea blanca de [a videoc_mara y, a
cuntinuaci_n, de, lice la baterl"a hacia la
derecha.
2
Notes on charging the battery pack
• The POWER lamp will remain lit fora while
even if the battery pack b removed and the
mains lead is unplugged after charging the
battery pack. This is normal,
• [f the POWER lamp doe_ not light, set the
selector to the center position and disconnect
the mains lead. After abuut one minute,
reconnect the mains lead and set the Selector to
CHARGE again.
• You cannot operate the camcorder using the
AC power adaptor while charging the battery
pack.
Notas sobre la (arga de la baterfa
• E1indicador POWER !_n'nanece_ iluminadu
durante unos instantes, inclu_o si ha extraldo
la baterla y ha desenchu fado el cable de
aHmenmci6n de_pu_s de cargaria. Esto e.-,
normal
• Si el indicadur POWER no se ilumina, ajuste el
selector en la posici6n central y de:_'onecte el
cable de alimentaciOn. [_pu_ de un rninuto
aproximadamente, vue]va a coneCtar el cable
de alimentaci6n y a a}ustar el selector en ]a
posici6n CHARGE.
• Nu es Posible emplear la videoc_i mara con el
adaptador de alimentaci6n de CA mientras
carga la baten'a.
Removing the Battery Pack
(1) Lift up the vlewfinder.
(2) While pressing BAll', slide the battery pack
Extracci6n de la baterla
(1) Levante el visor electr_nico.
(2) Mientras pul,_a BATT, deslice ta baten'a hacia
to the left. ]a izqulerda.
1 2
o
0
_i::::::_:'_
- _!
o
. _a.
9

I
o
10
Make sure that a power source is installed.
(1) While sliding the lid release knob, lift up the
lid. Then open it.
(2) Press EJECT. The cassette compartment
automatically lifts up and opens.
(3) Insert a cassette (not supplied) with the
window facing out.
(4) Press the PUSH mark on the cassette
compartment to close it.The cassette
compartment automatically goes down.
(5) Close the lid unti] it locks.
Aseg6rese de que ha instalado una fuente de
alimentaci6n.
(1) Levante la tapa mientras desliza el mandu de
apertura y, a continuaci6n, .'ibrala.
(2) Pulse EJECT El compartimientu del cassette
se levanta ),se abre autom,_ticamente.
(3) Jnserteun cassette (no suministradu) con [a
parte transparente hacla fuera.
(4) Presione la marca PUSH de] compartimiento
del cassette para cerrarlo. Dicho
compartimiento baia automziticamente.
(5) Cierre la tapa complet._mente.
ECT
To Eject the Cassette
While sliding the lid release knob in the direction
of the arrow, lift up the lid of the cassette holder
and press EJECT.
Para expulsar el cassette
Mientras desliza el mando de apertura de la tapa
en la direcci6n de la flecha, levante la tapa del
portacassette y pulse EJECT.
To Prevent Accidental Erasure
To prevent accidental erasure, slide the tab on the
cassette to expose the red mark. If you try to
record with the red mark exposed, the _ and ,a,
indicators flash i_ the viewfinder, and you
cannot record.
To re-record on this tape, slide the tab back out
covering the red mark.
Para prevenir que el cassette se
borre accidentalmente
Deslice la lengiJeta del cassette para que
aparezca la marca ruin. No es posible grabar
mientras e_ta marca sea visible y los indicadores
y --_ parpadeen en el visor electr6nico.
Para volver a grabar en esta cinta, vuelva a
deslizar la leng_ieta a su Posici6n anterior de
forma qua c'ubra la marca roja.
Make sure that the power source is installed and
a cassette is inserted. The date is automatically
recorded for 10 seconds after you start recording
(AUTO DATE feature). This feature works only
oncea day. You can hear the beep sound to
confirm your operation,
Before you record one-time events, you may
want to make a trial recording to make sure that
the camcorder is working correctly.
(1) While pressing the small green button on the
POWER switch, turn it to CAMERA.
(2) Turn STANDBY up.
(3) Press START/STOP. The camcorder starts
recording and the "REC" indicator appears
and the red lamp lights up in the viewfinder.
The red- lamp on the front also lights up.
Aseg6rese de que ha instalado la fuente de
alimentaci6n y de que ha insertado una cinta. La
fecha se graba autom:iticamente durante 10
segundos de_pu_s del inicio de la grabaci6n
(funci6n AUTO DATE). Esta funci6n se activa
s61o una vez al dia. Es Posible escuchar el pitido
para confirmar la operaci6n.
Antes de grahar acontecimientos 6nicos, es
posible que desee realizar una grabaci6n de
prueba para asegurarse de que la videoc_mara
funciona correctarnente.
(1) Mientras pulsa el bot6n verde peque_o del
conmutador POWER, girelo hacia CAMERA.
(2) Give STANDBY hacia arriba.
(3) Pulse START/STOP. La videoc_mara inicia
la grabaci6n, aparece el Lndicador "R_C" y el
indicador rojo se ilumina en el visor
electr6nico. El indicador rojo situado en la
parte frontal tambi_n se ilumina.
JUL41StlS
.:÷:.
To Stop Recording Momentarily
Press START/STOP again. The "STBY" indicator
appears in the viewfinder (Standby mode).
Para detener la grabaci6n
moment=tneamente
Vueiva a pulsar START/STOP. El indicador
'_STBY"aparece en el visor electr6nico (Modo el_
espera),
°stl
See the next page for further information.
==
Consulte la p,4gina siguiente para obtener m,4s
informaci6n. 11

7
To Finish Recording [b]
Press START/STOP to stop. Turn STANDBY
down, and set the POWER switch to OFF. The
lens cover closes. Then, eject the cassette (p. 10)
and remove the battery pack (p.9).
Para finalizar la grabaci6n [b]
Pulse START/STOP para detener la graba_'k'Jn.
Gire STANDBY hacia abaju y ajuste el .
cunmutador POWER en k'_pusici6n OFF. La
cubierta del objetivu se cierra. A continuaci6n,
expulse el cassette(p.10) y extraiga la bater_a
(p.9).
p_t _ at_J
_,O _ 2..._
To Focus the Viewfinder Lens
If the viewlVmder is not in focus at all or when
you use the camcorder after someone else has
used it, focus the viewfinder lens. Turn the
viewfinder lens adjustment Hng so that the
indicators in the viewfinder come into sharp
focu3.
Para enfocar el objetivo del visor
electr6nico
Si el visor electrOnico no es_ en absoluto
enfocado o si utiliza ]a videoc_imara despuds de
que otra persona la haya utilizado, enfoque el
objetivo del visor electr6nico. Gire la rueda de
ajuste de objetivo del visor electn3nicu de forma
que los ind icadores del visor se enf'cquen con
nitidez.
=y
STRY
0:00:00
Note on 5tandby mode
If'you leave thecamcorder f'or S minutes or more
with a cassetteinserted in Standby mode, the
Carecorder goes off au toma tically. Thi_ preven
wearing down the battery and wearing ou t the
tape. Tu resume Standby mode, torn STANDBY
down once and torn it up again. To start
recording, pressSTART/STOP.
Note on recording
When you record from the beginning of the tape,
run the tape for about 15 seconds before starting
the actual recording. This will ensure that you
won't miss any start-up scenes when you play
back the tape.
Nora sobre el modo en espera
Si deja la vide,_'_maca durante 5 minutos u m.'is
con un cassette in_ertado en el modu en espera,
_sta se desactiva automdticamente. E.stu previene
el desgaste de la bater_ y de la cinta. Para
reanudar el modo en espera, gire STANDBY
hacia abajo una vez y vuelva a girarlo hacia
arriba, Para iniciar la
grabaci6n, pulse STA RT/STOP.
Nota sobre la grabaci6n
Si _'aba de_te el comienzo de la cinta, av_incela
durante 1,5segundos apr_ximadamente ante_ de
iniciar la grabaci6n real. Esto evita_ la omisi.3n
de las primeras escenas cuando repru,Juzca la
cinta.
Note on the tape counter
The tape counter indicates the recording or
playback time. Use it as a guide. There will be a
time lag of _everal _econds from the actual time.
To _et the counter to zero. press COUNTER
RESET located behind tile LCD panel. You can
know the approximate remaining tape by tbe
remaining tape indicator (p.85).
Note on beep sound
As indicated by the h mark in the illustrations, a
beep sounds when you torn the power on or
when you start recording and two beeps sound
when you stoprecording, confirming the
operation. Several beeps al_o sound as a warning
of any unusual condition of the camcorder (p.86).
Note that ti_e beep sound is not recorded on the
tape. If you do not want to hear the beep sound,
select "OFF" in the menu system (p.43).
Note on the AUTO DATE feature
The clock is set at the factory; to New York or
Panama time for Amaerica models, to Tokyo
time _or Japan models, and to Hung Kong time
for other models. You can reset the clock (p.54).
You can change the AUTO DATE setting by
selecting ON or OFF in the menu system (p.43).
The AUTO DATE feature works once a day.
However, the date may automatically appear
more than once a day when:
• you reset the date and time.
• you eject and insert the cassette again.
• you stop recording within lOseconds.
• you set AUTO DATE to OFF once and set to
ON in the menu system.
When moving from indoors to outdoors (or
vice versa)
Turn STANDBY up and point the camcorder at a
white paper for about 1B seconds so that the
white balance i_ properly adjusted.
Nora sobre el €ontador de cinta
El cuntador de cinta indica el tiempu de
grabaci6n o de reproducci6n. Utilfcelocon1,_)
gula. Habr,'lun intervalo de varios segundos con
respecto al tiempu real.Para aiustar el cuntador a
cero, pulse el bot6n COUNTER RESET sltoadu
debajo del panel LCD. Es posible conocer la
longitud de cinta restante aproximada mediante
el indicador de dnta restante.(p.85).
Nota sobre los pitidos
Comu indica la marca _ en las ilustraciones, se
oye un pitido al activar la alimentaci0n u al
iniciar la grabaci6n, y dos pitidos al detener ha
grabaci6n, confirmando la operaci_n. Asimismo,
se oyen ratios pitidos comu aviso de cualquier
condici6n anormal de la videocdmara. (p.86).
Tenga en cuenta que Io,Jpiddos no se graban en
la cinta. Si no desea ufrlos, seleccione "OFF" en el
sistema de mends. (p.43).
Nota sobre la funci6n AUTO DATE
El reloj est_iajustado de f,_brica a la hora de
Sidney para Australia y Nueva Zelanda, a ]a de
Tokio para los modelos comercia]izados en
Jap6n, y a ]a hora de Hung Kong para otros
modelos. Si 1o desea, puede volver a ajustarlo,
(p.54).
Es posible cambiar el ajuste AUTO DATE
mediante la selecci6n de ON u OFF en el sistema
de ment'm (p.43).
La funci6n AUTO DATE se activa una vez al dia.
Sin embargo, es posib]e que la fecha aparezca
autom_ticamente m_s de una vez al dta, st:
• vuelve a ajustar la fecha y la hora.
• expulsa y vuelve a insertar el cassette.
• detiene ]a grabaci6n en un espacio de tiempo
de 10 segundos.
• ajusta AUTO DATE en la posici6n OFF una
vez y Io aiusta en ON en el sistema de men6s.
AI desplazarse del interior al exterior (o
viceversa)
Gire STANDBY hacia arriba y oriente la
videocamara hacia un ubjeto blancu durante 15
segundos aproximadamente para que el balance
de blanco se ajuste correctamente.
o
i,
12 13

Zooming is a recording technique that lets you
cl_ange the size of the subject in the scene.
For more professiunal-[_king recordings, use
the zoom sparingly.
"T" side: fortelephoto(subjectappearscloser)
"W" side:forwide-angle(subjectappea_ farther
away)
El uso del zoom es una t_nica de grabaci6n que
permite cambiar el tamaz_o del objetu de la
e_ena.
Pararealizargrabackmes m,_sprofesiunales,
utiliceelzoom con moderaci6n.
Lado "T": para telefoto(elobjetoaparecem.Ss
cerca)
Lado "W': paragran angular(elobjetoaparece
m_s lejos)
Zooming Speed (Dual speed
zooming)
Press the power zoom button firmly for a high-
speed zoom; press it softly for a relatively slow
zoom.
Velocidad de zoom (Zoom de doble
velocldad)
Si desea un zoom de alta velocidad, pulse e!
bot6n de zoom con Ermeza; p61selo ligeramente
side_ea un zoom relafivamente lento.
Notes on digital zoom
• More than12x zoom isperformed digitally,
and thepicturequalitydeteriurate_asyou go
toward theT side.ifyou du notwant touse
the digital zoom, set ti_e D ZOOM function to
OFF in the menu system (p. 43).
- The horizontal bar in the power zoom
indicator separates the digital zooming zone
(above the bar [al) and the optical zooming
zone (underthebar [b]).Ifyou settheD
ZOOM function to OFF, the part above the bar
disappear.
Notas sobre el zoom digital
• El nivel de zoom _uperior a 12 x se realiza
digitalmente y la calidad de la imagen se
deteriora a medida que _e avanza hacia el lado
T. Si no desea utilizar el zoom digital,
seleccione la opci6n OFF para la hJnci6n D
ZOOM en elsi_tema de men0s (p:43).
• La barrahorizontaldelindicadorde zoom
separalazona dezoom digital(porencima de
la barra [a]) de la zona de zoom 6ptico (por
debajode labarra[bl).Siselecciona OFF para
la funciOn D ZOOM, la parte superior
desaparece.
T
W
When you shoot a subject using a telephoto
zoom
If you cannot get a sharp focus while in extreme
telephotozoom, pressthe"W" side of thepower
zoom buttonuntilthefocusissharp.You can
shoot a subject that isat least I m (about 3.3 feet)
away from tlae lens surface in the telephoto
position, orabout I cm (about 1/2 inches) in the
wide-angle position.
Cuando filme un objeto con zoom telefoto
Si no obtiene un enfoque nitido en la position de _o
zoom telefoto de m_ximo alcance,pulse ellado _.
"W" del bot6n de alimentaciOn de zoom hasta _"
obtener un enfoque nitido. Es posible Fdmar on _"
objeto que se encuentre a una distancia de al
menus 1 m. de la superficie del objetivo en la
posici6n de telefoto, o de I cm. aproximadamente =.
en la poslci6n de gran angular. 8
14 15

,.a.
_a
You can aLsorecord the picture while looking at
the LCD screen.
You cannot monitor the sound from the speaker
during recording.
(1) While pressing PUSH OPEN, open the LCD
panel.
(2) Adjust the angle of the LCD panel.
The LCD panel moves about 90 degrees to
this side and about 210 degrees to the other
side.
To adjust the brightness of the LCD _creen,
turn the BRIGHTdial.
There is the recording lamp on the left of' the
LCD pa.nel.
Tambi_n es posible grabar la imagen mientras
mira a la pantalla LCD.
No es posible controlar el sonldu del altavuz
durante la grabaciOn.
(1) Mientras pulsa PUSH OPEN; abra el panel
LCD,
(2) Ajuste el inhTulo del panel LCD. El panel
LCD se desplaza aproximadamente 90
gradus hacia este lado y apruximadamente
210 grados al lado Contrario.
Para ajustar el brillo de la pant'alia LCO, gire
el dial BRIGHT.
El indicador de grabaci6n se enCuentra en la
parte izquierda del panel LCD.
Letting the Subject Monitor the Shot
You can turn the LCD panel over so that it faces
the utl_er way.
When the LCD is turned over in CAMERA mode,
you can see yourself just as you see yourself in
the mirror (mirror mode).
Tu'rn the LCD panel vertically until it clicks first.
then turn it over. [a]
The _) indlcator appaars on the LCDscreen and
the date, remaining battery and remaining tape
indicator disappear. [b]
Deje que el objeto controle la
filmaci6n
Es p_sible glrar completamente el panel LCD de
forn_a que se oriente hacia el otro lado.
Si gira cumpletamente el panel LCDen el modo
CAMERA. pod r'J verse Como :siestuviera delante
de on e_pejo (modo de espejo).
Gire el panel LCD verticalmente hasta que se
oiga un clic y, a conUnuaci6n, girelo
compietamente. [a]
El indicador _ aparece en ia pantal)a LCD y la
fecha y el indicador de bateria y cinta restante
desaoareceb. [b]
[a]
I
I go'
\..........................................................!...................................................................,/
The battery life is longer when the LCD panel is
closed. Use the viewfinder instead of the LCD
screen to save the battery power.
La duraci6n de la pila es mayor si se cierra el
panel LCD. Utilice e! visor elecm3nicu en lugar
de la pantalla LCD para ahorrar pilas.
While recording in a low position using the LCD
panel, it is convenient to use the power zoom
buttOn located on the front panel (only for slow
zoom) and the START/STOP button located on
the right top.
Si realiza la filmad6n en una posici6n baja y
utiliza el panel LCD, se recomienda emplear e!
bot6n de zoom situado en el panel frontal (s61o
para zoom lento) y el bot6n START/STOP
situado en la parte superior derecha.
Using the mirror mode, you can record yourself
while watching yourself on the LCD. [€)
While recording in the mirror mode, you can also
use the viewfinder so that you can record a
person while letting him/her monitor the shut.
[d)
Cuando emplee el modo de espejo, pod_
grabarse a sf mismo mientras mira en la pantaHa
LCD. [el
Asimismo, en _te modu podrd utilizar el visor
electr6nico para filmar a sos amigos y dejar que
ellos controlen la filmaci6n. [d]
[c]
[d)
o
j-
!
16 17

a,
Notes on the LCD panel
• When the LCD panel is turned over,
- only the POWER switch, the START/STOP
button, the power z_m button, the
STANDBY switch, the EDITSEARCH button
and EJECT button work.
- the date appears reversely when the AUTO
DATE feature i_ turned on, When recorded it
will be normal.
- the STBY indicator appea_ as III and REC
as@.
• When closing the LCD panel, turn it vertically
until it clicks. [a]
• When turning the LCD panel, turn it always
vertically; otherwise, the camcorder body may
be damaged or the LCD panel may not close
properly. [b]
• Close the LCD panel completely when not in
use.
Notas sobre el panel LCD
• Cuandu le haya dado la vuelta al panel LCD,
-s_3lo fun¢ionar_n el cunmutador PQWER, el
bot6n START/STOP, el bot6n de z_xam, y el
conmutador STANDBY, el bot6n
EDITSEARCH y e! bot6n EJECT.
-la fecha aparece invertida al activar la
funci6n AUTO DATE. Una vez grabada,
aparecer_i normal.
-el indicador STBY aparece como OII, y REC
como 0,
• AI cerrar el panel LCD, girelo verticalmente
hasta que se oiga un clic. [a]
• Cuandu gire el panel LCD, h_igalo siempre en
sentido vertical; de otto modo, pueden da_arse
el cuerpo de lavideoc_imara, o es po,_ible que'
el panel LCD no cierre correctamente. [b]
• Cierre el panel LCD completamente cuando no
Io u rilice.
[a] 0
[b]
For hand-held shots, you'll get better results by
hold ing the ca recorder accord ing to the following
suggestions.
• Hold the camcorder firmly and secure it with
the grip strap so that you can easily
manipulate the controls with your thumb.
Cuando filme _ujetando la videoc_mara con la
mano, cunseguir,'i mejores resultados si sigue las
siguientes sugerencias.
• Sujete la videoc_imara con firmeza y asegdrela
con la correa de la empu_adura de forma que
sea posible manipular f._cilmente los contrules
con el dedu pulgar.
• Place your right elbow against your side.
• Place your left hand under the camcorder to
support it.
• Place your eye firmly against the viewfinder
eyecup.
• Use the viewfinder frame as a guide to
determine the horizontal plane.
• You can record in a low position toget an
interesting recording angle. Lift the viewfinder
up Earrecording from a low position. (You can
turn it up to about 80 degrees.) [a]
• You can also record in a low position or even
in a high position using the LCD panel [b]
[a) [b]
• Sit_e e! codo derechu contra el costado.
• SivSe la mano izquierda debaju de la
videoc_mara para sujetarla.
•Sitde el ojo firmemente contra el ocular del
visor electn3nicu.
• Utilice el cuadna del visor electrdnic,a como
guia para determinar el piano horizontal.
• Es posiblegrabar en una posici6n baja para
obtener un ,_ngulo de grabaci6n intere_ante. 3
Levante el visor electrdnico para _rabar desde _"
una posici6n baja. (Es posible levantarlo ha_ta
aproximadamente 80 grados.) [a] _..
• Tambi_n es posible grabar en una posici6n
baja, u incluso en una alta0utilizando el panel 8.
LCD. (b]
18 19

7
Place the camcorder on a flat surface or use a
tripod
Try placing the camcurder on a table top or any
other flat surface of suitable I_eight. if you have a
triprod fura still came_, you can also use it with
the camcurder.
[f tl_e camcorder is difficult to balance on a
tripod, use the supplied adaptor. You can attach.
a tripod to the adaptor. [c]
Do not leave the tripod adaptor on the camcorder
if the camcorder is not mounted on a tripod.
When attaching a non-Sony tripod, make sure
that the length of the tripod screw is ]e_s than 6.5
mm (9/32 in). Otherwise, the screw may damage
the inner part_ of the camcorder.
You can use the stand on the bottom to place the
camcorder on a table when recording in a low
position. [d]
Coloque la videoc='imara sobre una superficie
plana o utilice un tripode
CoJoque la yideoc:imara sobre una mesa o subre
cualquier otra superficie plana de alhJra
adecuada.
Si dispone de una tripode para una c,'imara fija,
puede iguaimente utilizarlo con ]a
videoc_imara.
Si resulta difkil equilibrar la vide_c:imara sobre
un tr1"pode, utilice el adaptador sumini_tradu. [c]
No deje el adaptadur de tripode fijadv a la
videoc_imara si _sta no est_ muntada sobre un
trfpode.
Cuando fijeun tr(pude que no _ea Son)',
compruebe que la longitud de] tornillode trfp,.x.-le
sea inferior a 6,5 ram. De Io cuntrario, es posible
que el tornillo dafie los componentes infernos de
la videoc_tma ra.
Es posible utilizar el soporte de la parte inferior
para colucar la video¢_tmara sobre una mesa aI
grabvar en una p_sicidn baja. [d]
Cautions on the viewfinder and the LCD
• Do not pick up the camcorder by the
viewfinder or by the LCD panel. [e]
• Do not place the camcorder _o a_ to point the
viewfinder or the LCD screen tuward the sun.
The inside of the viewfinder or the LCD panel
may be deformed. Be careful when placing the
camcorder under sunlight or by the window.
[f]
Precauciones sobre el visor electrbnico y el
panel LCD
• No coja [a videoc.'imara por el visor ni pqr el
panel LCD. [el
• No coloque la videoc_mam de forma que el
visor o la pantalla LCD queden orientadu_
hacia el sol, ya que es posible que el interior
del visor o el panel LCD se deformen. Tenga
cuidado al colocar [a videoc_mara bajo Ia luz
solar o en una ventana. [f]
[el {fl
[c] (d]
o
20 21

....L
I
TheEDITSEARCHfunction is used to view the
recordedpicture for a moment during recording.
Using EDITSEARCH,you can review the last
recorded scene or check the recorded picture on
the LCDscreen. You can also review the picture
in theviewfinder.
(1) While pressing the small green button on the
POWER switch, turn it to CAMERA.
(2) Turn STANDBYup.
(3) Press the - (_) side ofEDITSEARCH
momentarily;the last few seconds of the
recorded portion plays back. Youcan also
monitor the sound. (RecReview)
Hold down the - side ofEDITSEARCHuntil
the camcordergoes back tothe scene you
want. The last recorded portion is played
back. Togo forward,hold down the + side.
(Editsearch)
Lafunci6n EDITSEARCHseutiliza para
visualizar mumentS.neamente im,'igenesgrabadas
durante la grabacidn.
Mediante la funcidnEDITSEARCH,es posible
visualizar la dltima escena grabada o compn._bar
la imagengrabadaen el visorelectr6nico.
Asimismo, es posible visoalizar la imagen en la
pantalla LCD.
(1) MientTaspulsael bot6n verde pequer_odel
conmutador POWER,desliceloa la posici6n
CAMERA.
(2) Cite STANDBYhacia arriba.
(3) Pul_ el lado - (_) de EDITSEARCH durante
un instante;sereproducenlosdltimos
segundosde lapartegrebada.(Revisibnde
grabacibn)
Mantenga pulsadu el lado- de
ED[TSEARCHhasta que la videoc_imara
vuelva a laescena que desee. Se reproduce la
61tima parte grabada.Para avanzar hacia
delante, mantenga pulsado el lado +.
(SOsquedadeedid6n)
To Stop Playback
Release EDITSEARCH.
To Begin Re-recording
PressSTART/STOP. Re-recordingbeginsfrom
the point you released EDITSEARCH. Pnavided
you do not eject the cassette, the transition
between the last scene you recorded and the next
scene you record will be smooth.
Para detener la reproducci6n
LibereEDITSEARCH.
Para volver a iniciar la grabaci6n
Pulse START/STOP. La grabaci6n comienza
desde el punto en el que fiber6 EDITSEARCH.
Siempre que no expulse el cassette, la transici6n
entre la filtima escena grabada y la siguiente que
grabe se_ uni_onne.
3
.=
F,-
O
,=,
.-..
=.
*o
o
S
22 23

.--L
I
You can monitor the playback picture on the
LCD screen.
(1) While pressingthesmallgreenbuttonon the
POWER switch,turnittoV'I'R.
The operation keys light on.
(2) Insert the recorded tape with the window
facing out.
(3) While pressing PUSH OPEN. open Ule LCD
panel.Adjusttheangleof theLCD panelor
thebrightnessoftheLCD screenifnecessary.
(p.16).
(4) PressE_ tostart playback.
(5) Adjustthevolume usingVOLUME.
You can alsomonitorthepictureon a TV _'reen,
afterconnecUng thecamcorder toa "IVor VCR
(p.47).
Es posible controlar la imagen de _pr_x:lucck'm
en la pantalla LCD.
(1) Mientras pulsa el bot_'mverde peque_'_udel
conmutadur POWER, deslicelo a la p_ici_3n
VTR.
Los botones de c_mtrol seiluminan.
(2) Inserte laclntagrabadacon la parte
transperente hacia fuera.
(3) Presione PUSH OPEN para abrir el panel
LCD. Ajuste el ,ingulo del panel LCD o el
brillo de la pantalla LCD, sies necesario.
(p.16).
(4) Pulse {_ para iniciar la repn_lucci6n.
(5) Ajusteelvolumen con VOLUME.
Asimismo, esposiblecontrularlaimagen en una
pantallade "IV,despu_s de coneetarla
vide_c_maraa un televisoro a una
videograbadora(p.47).
To Stop Playback
Press C] during playback.
To Rewind the Tape
Press-<'<.
Para detener la reproducci6n
Pulse 1-1durante lareprud ucci_3n.
Para rebobinar la cinta
Pulse"<'_.
To Fast-forward the Tape
PressI_._.
Para avanzar la cinta rdpidamente
Pulse I=-I,-.
When watching on the LCD screen
Turn the LCD panel vertically until it clicks, turn
it over and move back to the b_:ly. (al
The stand on the bottom is useful. [b]
AI visualizar la pantalla LCD
(3ire el panel LCD verticalmente hasta que se
oiga un clic, dele la vuel/a y despl,4celo de nuevo
hacia la unidad. [al
El soporte de la parte inferior resuita 6til. [b]
Note on DISPLAY button
Press DISPLAY _ erase the screen indicators on
the LCD screen. To display the indicator_, press
itagain.
Using headphones
Connect headphones (not supplied) to the .Q
jack. You can adjust the volume of the
head phones using VOLUME.
To view the playback picture in the
vievvfinder
Close the LCD panel.The viewfinder turns on
automatically. When using the viewfinder, you
can monitor the sound only by using
headphones.
To view on the LCD screen again, open the L(3D
panel. The vlewfinder turns off automatically.
Nota sobre el botdn DISPLAY
Pulse DISPLAY para visualizar Its indicadores
de pantaHa en Ia pantalla LCD. Para borrarlos,
vueivaa pulsarlo.
Uso de auriculares
Conectelos auricu]are_(no suministrados) a ia
toma Q. Es posible ajustar el voiumen de lu_
auriculares con VOLUME.
Para visualizar la imagen de reproducci6n en
el visor electrdnlco
Cierre el panel LCD. El visor se activa
autom:_ticamente. Cuando utilice elvisor,es
posible controlar el sonido s61o mediante el uso
de auriculare_.
Para vo[ver a visualizar im_igenes en la pantaHa
LCD, abra el panel LCD. El visor se desactiva
au tom-_ticamente.
i
24 25

=L
d
26
You can enjoy pictures with little noise on the
LCD screen during still, slow and picture search.
(CRYSTAL-CLEAR still/slow/picture search)
To View a Still Picture (Playback
pause)
Press II during playback. To resume playback,
pressII orD_.
To Locate a Scene (Picture search)
Keep pressing 4,,I or _ during playback. To
resume normal playback, release the button.
To Monitor the High-speed Picture
while Advancing the Tape or
Rewinding (Skip scan)
Keep pressing 4,11 while rewinding or _ while
advancing the tape. To resume normal playback,
press E>..
To View the Picture in a Sequence of
Stop-motion Images
Press EDITSEARCH in Playback pause mode. If
you keep pressing EDITSEARCH, you can view
the picture play back in the forward (+) or
reverse (-) direction.
To View the Picture at 115 Speed
(Slow playback) (only with the
Remote Commander)
Press ID- on the Remote Commander during
playback. To resume normal playback, press D>-.
If slow playback lasts for about ] minute, it shifts
to normal speed automatically.
Notes on playback
• Streaks appear and thesound is muted in tile
various playback modes.
• When Playback pause mode lasts for 5
minutes, the camcorder automatically enters
stop mode.
To select the monitor sound
Change the "HiFi SND'"mode setting in the
menu system (p.44).
i _biVers0s :mod_s de il i:ii;'!iii::iii:i! :i:!
i_reprOducci_n :"
Esposlble obtener im_igenescon muy poco nivel
de ruido en la pantalla LCD durante el modo de
imagen fija, a c.'imara lenta y de bLisquedade
im=igenes.(B0squeda de imagen/mode de
imagen fija/a c_mara lenta CRYSTAL-CLEAR)
Para visualizar una imagen fija
(Pausa de reproducci6n)
Pulse II durante la reproducci6n, Para reanudar
la reproducci6n, pulse II o [:>'.
Para Iocalizar una eScena (B_lsqueda
de imagen)
Manten_a pul_adu -_1 o _ durante la
reproducci6n. Para reanudar la reprtx:lucci6n
normal, suelte el botdn.
Para €ontrolar la imagen de alta
velocidad mientras avanza o
rebobina la cinta (Exploraci6n de
omisi6n)
Mantenga pul_ado _ mientras reb_bina o
mientras avanza la cinta. Para reanudar la
reproduccidn normal, pulse 1_-.
Para visualizar la imagen en una
secuencia de imfigenes detenidas
Pulse EDITSEARCH en el modo de pausa de
reproducci6n. Si Io mantiene pulsado, es posible
visualizar la reproducci6n de la imagen en
sentido proglx, sivo (+) o inverso (-).
Para visualizar la imagen a la mitad
de la velocidad normal
(Reproducci6n a c6mara lenta) (s61o
con el mando a distancia)
PulseI =_enel mando a distancia durante la
reproducci6n. Para reanudar la repr_uccidn
normal, pulse C:_. Si la duraci6n de la
reproducci6n a o'imara lenta es de ] minuto
aproximadamente, la unidad vuelve a la
velocidad normal autom:iticamente.
Notas sobre la reproducci6n
• En los diver_s mudos de repru_Jucci6n,
aparecen rayas y se omite el sonido.
• Si laduracidn del modo de pausa de
reproduccidn es de 5 minutus, la videuc;imara
Para seleccionar el sonido del monitor
Cambie el ajuste del m_lo "HiFi SND" en el
sistema de men0s (p. 44).
You can go to the end of the recorded portion.
It is convenient when you restart recording after
you played back the recorded portion.
This function works when the POWER switch is
set to either CAMERA or VT'R.
(1) While pressing PUSH OPEN, open the LCD
panel. Adjust the angle of the LCD panel or
the brightness of the LCD screen if necessary.
(p.16).
(2) Press END SEARCH after you record and
play back the tape. The tape starts rewinding
or fa:_t-forwarding and the last 3 seconds of
the recorded position plays back. Then the
tape stops at the end of the recorded picture.
(End Search)
End Search-function does not work once you
eject the cassette after you recorded.
Es posible ir al final de lapartegrabada.
Es conveniente vulver ainiciar lagmbacidn
despuds de reproducir la parte grabada.
Esta funci6n esoperativa cuando el cvnmutador
POWER estfisituadu en la posicidn CAMERA o
VTR.
(1) Mientras pulsa PUSH OPEN. abm el panel
LCD. Ajuste e! _ngulo del panel LCDo el
brillo de la pantalla LCDsl es necesario.
(p.16)
(2) Pulse ENDSEARCH despuds de la grabacidn
y reproduzca lacinta. _sta se rebobina o
avanza nipidamente y se reproducen los 3
tiltimos segundosde la posici6n de
grabaci6n.Acontinuaci6n, la cintase detiene
al final de haimagen grabada. (B0squeda del
final)
La funci6n de b_squeda final no se activar_ una
vez que extraiga el cassette despuds de grabarlo.
END
SEARCH
0
27

7
SD
28
You can chooseany ofthefollowingpower
sourcesforyour camcorder:batterypack(p.6),
tl_ehousecurrent,and 12/24V carbattery.
Choose theappropriatepower sourcedepending
on where you want to use your camcorder.
House AC power adaptor
Indoors current AC-V26 (_upptied)
Battery pack
NP-_ (supplied),
Outdoor Battery pack NP-77H/77HD,
NP-C65, NP-SSH
In the car 12 V or 24 V DC pack DCP-?7
car battery
Note on power sources
Disconnecting the power sourceor removing the
battery pack during recording or playback may
damage the inserted tape. If this happens, restore
thepower supply againimmediately.
Puede elegir cualquiera de las sii:;uientes fllentes
de alimentaci6n para la videLx:zlmara: bateffa
(p.6), cable de alimentaci0n de red y baten'a para
autom6vil de 12/24 V. Elija la fuente de
allmentaci6n apropiada en funciOn del lugar en
el que desee utilizar la videoc_mara.
i::;;ii:iiiiiii!:i_il;ii;iiiii:i:i;!i_;iiiiimen_6r ::ii_iat!iiia_:::;i!!!:!:::::
Interferes Cable de Adaptador de
alJmentaci6n allmentaci6n de
de red CA AC-V26
(suministrado),
Baterfa
NP-66
Exterior Bateria (suministrada),
NP-77H/77HD,
NP-C65, NP-SSH
Autombvil 8ateria para Paquetede CC
au tomdvil de EX_p-77
12Vo24V
Nota sobre fuentes de allmentaci6n
E_ posible que la cinta in_rtada _edafie si
durante la grabaci6n o la reproducci6n
desconecta la _uente de alimentaci,3n o extrae la
bate_a. Si esto ocurre, vuelva a conectar el
suministrode alimentaci6ninmediatamente.
To use the supplied AC power adaptor:
(1) Lift up the viewfinder.
(2) Connect the AC power adaptor cord to a wall
outlet. Connect the bottom of the AC power
adaptor to the battery mounting surface of
the camcorder,
(3) Set the selector to VTR (EX_ OUT).
:Use de/cable de alimentaCi6n
:de red."ill ii: :i:ii:i_ i_:__.._:
Para utilizar el adaptador de alimentaciOn de CA
suministrado:
(1) Levante el visor electr_nico.
(2) Conecte el cable de alimentaci6n a una toma
mural. Conecte la parte inferior del
adaptador de alimentaci6n de CA a la
superficie de montaje de bateria de ]a
rid e_c,Jma ra.
(3) Ajuste el selector en la posici6n VTR (DC
OUT).
1 !2
i o
................................................................................................................................. o.
WARNING
AC power adaptor cord must only be changed at
qualified service shop.
PRECAUTION
The unit is not disconnected Promthe AC power
source as long as it is connected to the wall
outlet, even it"the set itself has been turned of/.
ADVERTENCIA
Reemplace el cable de alimentaciOn s61o en un
establecimiento especializadu.
PR EC,AUCI6N
La unidad no se desconectarfi de la f'uente de
alimentaci6n de CA mientras est_ conectada a ]a
toma mural, incluso si la ha apagado.
O
Notes on the POWER lamp
• The POWER lamp will remain lit for a while
even if the unit is unplugged after use. This is
normal.
• If the POWER lamp does not light, set the
selector to the center position and disconnect
the AC power adaptor cord.After about one
minute, reconnect the AC power adaptor cur
and set the selector to V'TR(EX_OUT) again.
To Remove the Adaptor
The adaptor is removed in the same way as the
battery pack (p.9).
Notas :obre el indicador POWER
• El indicador POWER permanecer.'i iluminadu
durante unos instantes, incluso si ha
desenchufado la unidad despuds de utilizarla.
Estu es normal. _.
" Si el indicador POWER no se ilumina, ajuste el
selector en la posici6n central y desconecte el
cable de alimentaciOn. Despuds de un minutu =_
aproximadamente, vuelva a cunectar el cable =
de alimentaci6n y a ajustar el selector en la _-
posici6n VTR (DC OUT).
Para extr_ier el adaptador
Extr.'iigalode lamisma furrnaque labateria(p.9). 29

_Us..ing_::a_!_ca:r_Ba_e!_:_!!!_i_.!_!_:.:._:_:.!:_i_.:!::.!::i_!_:::!i!_!.:_!._.:::Uso de_n:a bat_rfapa_r_ i:_!ii:I i
........ _auto m6vii _ii _!i_i:::
Use theEK_P-77_ pack (notsupplied).Connect ............ ".............._........................•......
the cord of the DC pack to the cigarette lighter
socket of a car (12 V or 24 V). Connect the DC
pack to the battery mounting surface uf the
camcorder.
To Remove the DC Pack
The DC pack is removed in the same way as the
battery pack. (p.9)
Utilice el paquete DCP-77 DC (no suministrado).
Conecte el cable del paquete de CC a la clavija
del encendedor de ciga rrillus de un autom6vil
(12 V o 24 V), Conecte el paquete de CC a la
superficie de montaje de bateria de la
videoc;imara.
Para extraer el paquete de CC
Ext_igalo de la misma forma que la baterla. (p.9)
This mark indicates that this
product is a genuine product
related toour 8ram video
equipment.
When purchasing our 8ram
video equipment, we
recommend that you purchase
related 8ram video products
provided with the same mark
or products provided with our
logotype mark.
Esta marca indica que _te
pr,aducto e,agenuino y est_
relacionado con nuestro equipo
de video de 8ram.
A la hora de adquirir nuestru
equipo de vMeo de 8ram.,
recomendamos que adquiera
pr_ductus de video de 8 ram.
relacionados que dispongan de
esta marca u otros con nuestro
lugotipo.
You can record the date or time d_played on the
LCD screen or in the viewfinder with the picture.
You cannot record the date and time at the same
time. Except for the date or time indicator, no
indicator on the LCD screen or in the viewfinder
is recorded.
The clock is already set at the factory; to New
York or Panama time for America models, to
Tokyo time for Japan models, and to Hong Kong
time for other models. You can reset the clock in
the menu system (p.54).
(1) While pressing PUSH OPEN, open the LCD
pe ne1.
(2) Press DATE or TIME before you start
recording.
Es posible grabar la fecha o la hora que aparecen
en la pantalla LCD o en el visor electr6nico con la
imagen. No es posible grabar dichos elementos a
la vez. No se graba ningfin otro indicador de la
pantalla LCD ni del visor electr6nico, excepto los
indicadores de la fecha y la hora.
El reloj esl_l ajustado de fiibrica a la hora de
Sidney para los modelos de Australia y Nueva
Zelanda, a la de Tokio para los modelos
comerclalizados en jap6n y a la de Hong Kong
para otros modelos. Es posible volver a ajustar el
rcloj en el sistema dc mends (p.54.)
(1) MientraspulsaPUSH OPEN, abraelpanel
LCD.
(2)PulseDATE o TIME antesde iniciarla
grabaci6n
2
DATE
TIME
_EC]
0._7:12L
,__41 sssl
REC]
o.'o7:1s/
S_O:OOPM [
To Stop Recording with the Date or
Time
Press DATE or TIME again. The date or time
indicator disappears. The recording continues
without the date or time.
Para detener la grabaci6n de la fecha
o de la hora
Vuelva a pulsarDATE o TIME. Elindicadorde la
fechao de lahoradesaparece.La grabaci6n
continuasinfechanihora.
>
O
3
o
30 31

L
3
You can select from four PROGRAM AE (Auto
Exposure) modes to suit your shooting situation.
When you use PROGRAM AE, you can get a
portrait effect (the subject is in focus and the
background is out of focus), capture high-sp_-_'l
action or record night views.
Selectone offourmodes, referringtothe
following.
Es pusible seleccionar cuatru modus diferentes de
PROGRAM AE (Exposicidn automStica) que se
adapten a su situaci6n de filmaci6n. C_n e! uso
de la funci6n PROGRAM AE, es posible obtener
un efectu de retrato (seenfoca el objeto y el rondo
no se incluye en dicho enfuque)0 filmar acciones
de gran velocidad o g'rabar vistas nodumas.
i;SeleCclO n :i_le I !modoi Id 6 ne o:::iii_i:_:;!:_.!,:_i_:_!_::!
Seiecclone uno de los cuatro modus que aparecen
a cuntinuaci6n.
de telefoto
I_ Portraitmode _ Modo de retrato
• A sellsubjectsuchasa personorflower * Objetosfijoscomo una personao una flor
• Zooming inon a subjectinthetelephotomode • Uso delzoom para filmarun objetoen elmodo
• A subjectbehindan obstaclesuchasa net
_. Sports mode
• Outdoor sports scenessuch as football, tennis,
golf or skiing
• A landscapeina moving car
_ High-speed shutter mode
• A golf swing or tennis match in fine weather
with the ball captured clearly
• Playing back certain scenes with high-speed
movement_ in clear, sharp picture
J Twilight mode
Recording night views,neon signsor fireworks
• Objetosdetnisde un obst_,culo,como una red
Modo deportivo
• Escenasde dep_rtes al aire llbre comu el
hitbol,eltenis,elg_Ifoelesqui
• Panor_micasdesde un autom_3vilen marcha
_ Modo de obturaci6n de alta veloddad
• Un swing de golf o un partido de tenis con
buen _empo visualizando la pelota con nitidez
* Repr_:lucci6n de ciertasescenascon
movimientos de g_an ve]o_idadcon una
imagen claray nitida
.._ Modo de crepOsculo
Grabac_n de vistas n_ctumas, letreros de neon o
_uegos artificiales
.Usingith_PROGRAM:AE i :.
Each pressofPROGRAM AE changes themode.
RepeatpressingPROGRAM AE untilthedesired
mode appears.The indicatoroftl_eselected
PROGRAM AE mode appearsintheviewfinder
or on the LCD screen.
Uso de [a: f_nci6n_:PROGRAM AE
:.: .,:......... .... .
Cada vez que pulse PROGRAM AE, el modo
cambia. Siga puls_indulu hasta que aparezca el
modo que desee. El indicador de] m_xto
PROGRAM AE seleccionado aparece en el visor
electr6nico o en la pantatla LCD.
L _j
i
i
Note on shutter speed
The shutter speed in each PROGRAM AE mode
is as follows:
Portrait mode -- between 1/60 to 1/2000
Sports mode -- between 1/60 to 1/500
High-speed shutter mode _ I/4000
Twilight mode-- 1/60
Nota sobre la velocidad de 0bturaci6n
La ve!ocidad deobturaciOn de cada modo
PROGRAM AE es como se indlca a continuaci0n.
Modo de retrato _ entre 1/60 y t/2000
Modo deportivo -- entre 1/60 y ]/500
Modo de obturaci6n de alta veloddad -- 1/4000
Modo de creptlsculo -- 1/60
O
o
32 33

,L
a,
You can make interesting picture_, like those of
television with Picture Effect function.
Es posible realizar atractivas pelfculas, como las
de televisi6n, con la funci6n de efecto de imagen.
Select one of seven modes, referring to the Seleccione uno de los cinco modqs que aparecen
following, a continuaci6n.
[d] D [el
MOSAIC [a]
The picture becomes mosaic.
SOLARIZE [b]
The light intensity ksmore clear, and the picture
look5 like a painting.
B&W
The picture is monochrome (blackand white).
SEPIA
The picture ks _epia.
NEG. ART [c]
The color of the picture is reversed.
SLIM [d]
The picture becomes slim.
STRETCH [el
The picture is stretched.
MOSAIC [a]
La imagen aparece como un mosaico.
SOLARIZE [b]
La inten_idad luminosa es mayor y la imagen
parece una pintura.
B&W
La imagen es monocroma (blanco y negro).
SEPIA
La imagenes de c61or sepia.
NEG. ART [€]
E1color de la imagen se invierte.
SLIM [d]
La imagen se estrecha.
STRETCH [el
La imagen se amplia.
Each press of PICTURE EFFECT changes the
mode. Repeat pressing PICTURE EFFECT until
the desired mode appears. The indicator of the
selected PICTURE EFFECT mode appears in the
viewfinder or on tl_e LCD screen.
Cada vez que pulse PICTURE EFFECT. el modo
cambia. Siga pul_ndulu hasta que aparezca el
rn_:lo que desee. El indicador del modo
PICTURE EFFECT seleccionado aparece en el
vksor electr6nico o en la pantalla LCD.
!...::_,_,
PICTUREEFFECT
--_ S_JM
_L--_ I STRETC_t
I
I
You can check the changed picture in the
viewfinder or on the LCD screen.
Note on Picture Effect
When you turn the power off, thecarncorder
returns automatically to normal mode.
Es posible comprobar la imagen cambiada en el
visor electrdnico o en la pantaila LCD.
Nota sobre el efecto de imagen
AI desconectar la alirnentaci6n, la videoGimara
vueive autom_iticamente al modo normal.
34 35

!
M
36
In the following cases you should obtain better En lossiguientes casus, obtendr_ me,ms
resultsby adju=ting the focus manually, re_ultad_,'ssi realizael enfoque manualmente.
[a]
[b] I'€] [d]
Wl_en focusing manually, First fucus in telephoto
before recording, amid then reset the shot length.
(I) Set FOCUS to MANUAL. The _ indicator
appears in the viewfinder or on the LCD
screen.
(2) Keep pressing the "T" (telephoto) side of the
power zoom button until the zooming stops.
(3) Turn the focus dial to achieve a sharp focus.
(4) Set the desired '=hotlength using the power
zoom button.
ilEnf0quemanua,li !Zi:iiiiiiii:!!ili!i Ti)!i:iTi}!:!ii ili}i!ii!iii!!i,i
AI realizar el en_oque manual, utilice en primer
lugar el modo de telefoto antes de filmar y, a
continuaci6n, restaure la Iongitud de filmaciOn.
(1) Sitfie FOCUS en la posici6n MANUAL. El
indicador €_ aparecer_ en el visor
e]ectr_nicu u en la pantalla LCD.
{2) Mantenga puLsado ei ]ado "T" (telefoto) del
boron de zoom basra que se detenga el
proceso de zoom.
(3) Gire el dial de enfoque para obtener una
imagen nltida.
(4) Ajuste la longitud de filmaci_n que desee
mediante el bot_n de zoom.
• Insufficientlight [a]
• Subjects withlittlecontrast-- walls,sky,
etc.(b]
• TOO much brightnessbehind thesubject [c]
• Horizontalstripes[d]
• Bright subjector subject ret']ecting light
• Shooting a stationary subject wl_en using a
tripod
• llumlnaci6ninsuEciente(ai
• Objetoscon poco contraste_ paredes,cielo,
etc.[hi
• Demasiado brillodetr_sdel objeto[c]
• Rayashorizontales(d]
• Objetobrillanteo que reflejaluz
• Filmaci6nde un objetoinm_vilutilizanduun
tHpode
FOCUS I
I1::::1p'_sl_I. t o.
L__^u_o, "_..-: .
........ _%).'o? .-:_;.
r.._:.'_.,_.?
To Reactivate Auto Focusing
Set FOCUS to AUTO. The _. indicator in the
viewfinder di_ppears.
Shooting in relatively dark places
Shoot at wide angles after focusing in telephoto.
Note on the focus dial
The focus dial does not have a stop position.
To Shoot with Auto Focusing
Momentarily
While shooting with manual focusing, press
FOCUS down (PUSH AUTO).
When you release, manual focusing will resume.
Use this switch when focusing on one subject to
the other _or natural focusing.
Para reactivar el enfoque autom_tico
Ajuste FOCUS en la posid6n AUTO. E1indicador
(_ del visor electr_nico desaparece.
Filmacibn en lugares relativamente oscuros
Utilice el modo de gran angular despu_s del
_hodo de telefoto.
Nota sobre el dial de enfoque
El dial de enfoque no dispone de una posici6n de
parada.
Filmacibn moment_tnea con el modo
de enfoque autom_tico
Mientra`= videofilma con el modo de en/oque
manual, pulse FOCUS (PUSH AUTO).
AI soharlo, se resraurard el mudo de enfu_ue
manual. Utilice e_te selector Cuando en fc,'que
distintos obletos consecutivamente para
proporcionar naturalidad.
]>
(
o
-=.
(
.=
<-
37

You can fadeinorout togiveyourrecordinga
professionalappearance.
When fadingin,thepicturegraduallyfadesin
from blackormosaicwhilethesound increases.
When fadingout,thepicturegraduallyfadesto
blackor mosaicwhilethesound decreases.
When Fading in [a]
(1) While the camcorder is in Standby mode,
press FADER. The fade indicator start_
flashing.
(2) Press START/STOP to start recording. The
fade indicator stops flashing and the picture
appears gradually.
When Fading out [b]
(1) During recording, press FADER. The fade
indicator start_ flashing.
(2) Press START/STOP to stop recording. The
fade indicator stops flashing. The picture
fades out and then recording stops.
Es posible fundir im:tgenes gradualmente para
darle a sus grabaciones una apariencla m,_s
profesional.
AI utiHzar la funci,3n de apariei6n gradual, [a
imagen aparece gradualmente a partir del negro
o mosaicu, mientras que el :_onido aumenta. Al
utillzar la funci6n de desaparici6n gradual, la
imagen desaparece gradualmente hasta que se
oscurece o tama el aspecto de mosaico, mientras
que el sonido di_minuye.
AI utilizar la funci6n de aparicidn
gradual [a]
(1) Mientras lavideoc_mara seencuentra en el
modo de espera,pulse FADER. Elindlcador
de aparici6ny desaparici6ngradual
comienza a parpadear.
(2)PulseSTART]STOP parainiciarlagrabaci6n.
Elindicadorde aparici6ny desaparici6n
gradualdejade parpadean.
AI utilizar la funci6n de desaparici6n
gradual [b]
(1) Durante la g'rabaci,3n, pulse FADER. El
indlcador de aparici6n y desaparici6n
gradual comienza a parpadear.
(2) Pulse START/STOP para detener la
grabaci6n. El indicadur de aparici6n y
desaparici6n gradual deja de parpadear. La
imagen desaparece y se detiene la grabaci6n.
To Cancel the Fade-in/Fade-out
Function
Before pressing START/STOP, press FADER
until the fade indicator disappears.
When the date/time indicator is displayed
The date/time indicator does not fade in nor fade
out.
Para cancelar la funci6n de aparici6n/
desaparici6n gradual
Antes de pulsar START/STOP, pulse FADER
hasta que el indicador de aparici6n y
desaparici6n gradual desaparezca.
Si visualiza el indicador de fecha/hora
El indicador de fecha/hora no aparece ni
desaparece gradualmente.
[a] ;1::[! lb.
mmmj
||:l" ;1=[I
FADER
[b] _I'_'
1
FADER
,._ FADER -
";l:(-_" " (
!
0
"v
o
3
38 39

I
When you shoot a subject with the ligl_t source
behind the subject or a subject with a light
background, use the BACK LIGHT function.
Press BACK LIGHT. The _ indicator appears in
the vlewfinder or on the LCD screen.
Si filma un objeto cun la fuente de iluminaci6n
situada det_s de dicho ubjeto o si _ste presenta
un fundo luminuso, utilice la funci6n BACK
LIGHT.
Pulse BACK LIGHT. El indicador _ aparece en el
interior del visor electr6nico o en la pantalla
LCD,
[a]
[b]
BACK LIGHT
[a] Subject is too dark because of backlight.
[b] Subject becomes bright with backiight
cumpensation.
After Shooting
Be Sure to release this adjustment condition by
pressing BACK LIGHT again. The _ indicator
disappears. Otherwise, the picture will be too
bright under normal lighting condition.
This function is also effective under following
conditions:
• On snow e.g. at a ski resort
• At the beach under strong sunshine
• A subject with a light source nearby or a
mirror reflecting light
• A white subject against a white background.
Especially when you shoot a person wearing
shiny clothes made of silk or synthetic fiber,
his or her face tends to become dark if you do
not use this function.
[a] El objeto aparece demasiado oscuro debido al
contraluz.
[b] El objetoaparececon claridadpor la
compensaci6ndeicontraluz.
Despu_s de la filmaci6n
Aseg.Jrese de anular este ajuste volviendo a
pu "LsarBACK LIGHT. El indicador [] desaparece.
De lo contraHo, la imagen serif demasiado
lumino_a en condiciones de iluminaci6n
normales.
Asimismo, es posible aplicar esta funci6n en
las siguientes condlciones:
• En la nieve, por ejemplo, en una estaciOn de
e_u(
* En la playa bajo una luz solar intensa
• Objetos con una fuente de iluminaci6n cercana
o un espe,jo que refleje la luz
• Objetos blancos contra un rondo blanco. Utilice
esta funci6n especlalmente si filma a una
persona con ropa luminosa de seda o fibras
sint_ticas. De 1oContrario, la cara apa recer',i
OSCUra,
When you shoot, the ,((_}bindicator appears in the
viewfinder or on the LCD screen. This indicates
that the Steady Shut function is working and the
camcurder compensates for camera-shake.
You can release the Steady Shot function. Do not
use the Steady Shot function such as when
shooting stationary object with a tripod.
(1) While pressing PUSH OPEN, open the LCD
panel.
(2) Set STEADY SHOT to OFF.
AI filmar, el b_dicador ._ a parece en el visor
elecrr6nico o en la pantalla LCD. Estu indica que
la funci6n de estabilizaciOn de imagen (Steady
Shot) estzi tuncionando y que )a vide_,:=imara
compensa ]a vibraciGn de la c-4mara.
Es posible desactivar In funci6n de estabilizaci6n
de imagen (Steady Sieur). No emplee e_ta funci6n
cuando est_ filmando un objeto inm6vil con un
trlpode.
(1) MientraspulsaPUSH OPEN, abraelpanel
LCD.
(2) AjusteSTEADY SHOT en lap_sici6nOFF.
2
STEADY SHOT _,
ON • •OFF
To Activate the Steady Shot Function
Again
Set STEADY SHOT toON.
Notes on the Steady Shot function
• TheSteady Shot function will not correct
excessive camera-shake.
• When you switch the STEADY SHOT, the
exposure may fluctuate.
Para volver a activar la funci6n de
estabilizaci6n de imagen (Steady
Shot)
Ajuste STEADYSHOT en la posici6n ON.
Notas sobre la funcibn de estabilizaci6n de
imagen
• Estafunci0n no ¢orregir_ la vibraci6n excesiva
de la c_,mara.
• AI activar STEADY SHOT, es posible que
flut6e ]a exposici_n.
40 41

A
)
3
You can change the mode settings in the menu
system to further enjoy the features and
function_ of the camcorder.
The menu contents of CAMERA mode are
different from those of V'TRmode.
(1) While pressing PUSH OPEN, open tl_e LCD
panel.
(2) Press MENU to display the menu on the LCD
screen.
(3) Press I"or 4, to select the desired item, then
press EXECUTE.
(4) Press I' or 4, to set the desired mode, then
press EXECUTE. If you want to change the
oflaer modes, repeat steps 3 and 4.
(5) Press MENU to erase the menu display.
Es posible cambiar los ajustes de modo en el
sistema de mends para di,_frutar en mayor
medida de las caracterfsticas y funciones de la
rid eoc_ima ra.
El contenido de los metals del modo CAMERA
es distinto del contenido del modo VTR.
(1) Presione PUSH OPEN para abrir el panel
LCD.
(2) Pulse MENU para vlsualizar el ment_ en la
pantalla LCD.
(3) Pulse €' o 4, para seleccionar el elernento que
desee y, a continuaci6n, pulse EXECUTE.
(4) Pulse I' o 4, para ajustar el modo que desee y,
a continuaci6n, pulse EXECUTE. Si desea
cambiar los otros modus, replta los pasos 3 y
4.
(5) Pulse MENU para borrar ]a pantalla de
men6.
2
MENU
I MENU
OfF
COMM_Oen
e_EP
le_WJO_
0 ZOOU
aECMO0_
AUTO_TE
3o
@
EXECUTE
ut_
_cv'
4o o
EXECUTE
5
i S:electing tiie
i Ea €hl !re m !_ii:ii i! :
Items in CAMERA and VTR Modes
COMMANDER <ON/OFF>
• SeMct ON when using the supplied wireless
Remote Commander for the camcorder.
• Select OFF when not using the Remote
Commander for the camcorder.
BEEP<ON/OFF>
• Select ON to turn the beep sound on.
• Select OFF to turn the beep sound off,
COLOR*
Select this item and cl_ange the level of the
indicator by pre.s_ '1-or 4, to adjust the color
intensity of the picture when using the LCD.
Items in CAMERA Mode only
WIND <ON/OFF>
• Select ON to reduce wind noise when
recording in strong wind.
• Normally select OFF.
16:gWIDE <OFFICINEMAIFULL> _'
Select this item to record in wide mode (p.4S).
D ZOOM <ON/OFF>"
• Select ON to activate digital zooming,
• Select OFFotherwise. The zooming ability
becomes 12 x.
AUTO DATE <ON/OFF>*
• Select ON to record the date for I0 seconds
after recording has started. (AUTO DATE
feature p.13).
• Select OFF rot to record the date.
i! Selecci6n dei aj_st_: d_:moao_ae
; ca d a e! e m e nt°i !_.:i!z:ii. ::_I:ISIIi!:ii!!!.:;;:i,_:
Elementos de los modos CAMERA y
VTR
COMMANDER <ON/OFF>
• Seleccione ON cuando utilice el mando a
distancia inal_mbrico suministrado pare la
videoc:_imara.
• Seleccione OFF cuando no utilice el mando a
distancia para la videoc_mara.
BEEP <ONIOFF>
• Seleccione ON para activar el pitido.
• Seleccione OFF para desactivar el pitido.
COLOR*
Seleccione este etemento y cambie el nivel del
indicador puh_ando 1, o 4, para ajustar la
intensidad de color de la imagen cuando utilice
la pantalla LCD.
Elementos solo del modo CAMERA
WIND <ON/OFF>
• Seleccione ON para reducir el ruido deI viento
al grabar con viento fuerte.
• Normalmente, seleccione OFF.
16:9WIDE <OFF/CINEMA/FULL>*
Seleccione esta opci6n para grabar en el modo de
gran angular (p.45).
D ZOOM <ON/OFF>*
• Seleccione ON para activar el modo de zoom
digital.
• De otto modo, seleccione OFF. La capacidad
de zoom cambia a 12 x.
AUTO DATE <ONIOFF>*
• Seleccione ON para grabar la fecha durante 10
segundos despu(_s del inicio de la graback'm.
(Funci,Sn AUTO DATE p.13).
• Seleccione OFF para no grabar la fecha.
_u
o
42 Continued to the next page. Continda en la p_gina siguiente. 43

REC LAMP <ON/OFF>"
• Select ON to let the camera recording/battery
lamp on thefrontpanellightduringrecording.
- Select OFF not to let it light.
CLOCK SET*
Select this item to re_et the date or time. (p.54).
Item for VTR Mode only
EDIT <ON/OFF>
• Select ON to rnini.m_e picture deterioration
when editing.
• NorrnaliyselectOFF,
HIFI SND <STEREOIll2>
• Normally select STEREO.
• Select 1 or 2 to play back a dual soundttack
tape.
• The_e settings are retained even when battery i=
removed, as long as the lithium battery is in place.
REC LAMP <ONIOFF>*
•Seleccione ON para que el indicador de
grabaci6n/bater_a del panel ffun=al de la
c_,mara se ilumlne durante la grabaci_n.
•Seleccione OFF para qua no se ilumine.
CLOCK SET*
Seleccione este elemento para volver a ajustar la
[echa o la hora. (p,54).
Elemento s61o del modo VTR
EDIT <ONIOFF>
• Selection° ON para minimizar el deteriorO de
imagen al editar.
• Normalmente, seleccione OFF.
HiFi SND <STEREOIll2>
• Non'naImenre,._eleccioneSTEREO.
•SeleccioneI u 2 para reproduciruna cintacon
pistade sonldodual.
• Es|os ajustes se m_ntierlen incluso si extra° la baturfa,
siempre qua la pila de litlo estl itutalada.
You can reqord a wide picture to watch on the
wide-sc_.en "IV. This camcorder has two wide
modes shown below.
[a]
®
CINEMA [a]
Black band appears at the top and the bottom O[
the screen, and the viewfinder and a normal TV
screen look wide.
FULL [b]
The picture in the vlewflnder or on a normal "IV
horizon=allycompzessed.When you playback
the pictureon a wide-screen"IV,theimage fits
thescreen.
Notes on wide mode
• If 16:9 WIDE issettoFULL, theSteadyShot
functiondoes not work and the*_ indicator
flashes.
• When you recordinFULL mode, thedateor
timewillbe widened on thewide 'I"V.
• If,youdub a =ape,thetapeiscopiedinthe
same mode as theoriginalrecording.
Es posiblegrabaruna imagen amplia para
repruducirlaenun TV de pantallapanonlmica.
Estavideograbadoraoffecedos m,.,'dusde g'ran
angular:
CINEMA [a]
Una banda negra aparece en ]aparte superior e
inferior de la pantalia de modo que la imagen se
ensancha en el visor electnSnico yen una pantaHa
de TV normal
FULL [b]
La imagen que aparece enel visor o en una
pantalla de "IV normal se c_amprime
horizon=alto°ate.A] repruducirlaimagen en un
TV de pantaiiapanor.4mica,_ta ocupa todala
pantalla.
Not.as sobre el modo de gran angular
• Si ajusta 16:9 WIDE en la pusiciOn FULL, la
funci_n de estabilizaci_n de imagen (,Steady
Shot) no funciunar:_ y et indicadur _)
parpadeanl.
• AI _'abar en el modu FULL, la fecha o la hora
se ensanchar_n enun "IV de pantai]a
panonimica.
• Si copla una cinta, se mantienen ias
caracter_sticas de la grabaci6n original
o
-o
o
o
Consulte la p_gina siguiente para obtener m_ts
44 See the next page [or further in[urination, in/ormaci6n. 45

46
............ 11/ ._w- II
...... r_
(1) While pressing PUSH OPEN, open the LCD
panel.
(2) PressMENU to display the menu on the LCD
screen.
(3).Select 16:9 WIDE, then press EXECUTE.
(4) Press 'I' or 4, to select the desired mode, then
press EXECUTE.
(5) PressMENU toerasethemenu display.
(1) Mientras pulsa PUSH OPEN, abra el panel
LCD.
(2) Pulse MENU para visualizar el men6 en la
pantalla LCD.
(3) Seleccione 16:9 WIDE y, a continuaci,3n,
pulseEXECUTE.
(4) Pulse#'o 4-paraseleccionarelmodo que
desee y, a continuacibn, pulse EXECUTE.
(5) Pulse MENU para borrar la pantalla de
menU.
u_J
wlno
COUJ.U,NV_
"ECUOOE
^UTOO*TE
_eWl _NO
_m
To Cancel Wide Mode
Set 16:9W[DE to OFF in the menu system.
To watch the tape recorded with FULL mode
Set the screen mode of d_e wide "IV to full (16:9)
mode. For details, refer to the instruction manual
of the "IV.
Note that the picture looks compressed on a
normal TV.
Para cancelar el modo de gran
angular
Ajuste 16:9 WIDE en la posici6n OFF en el
sistema de men_s.
Para visualizar la cinta grabada en el modo
FULL
Seleccione el m__to de pantalla cumpleta (16:9)
del "IVpanor_,mico. Para obtener informaci6n
detallada, consulte el manual de instrucciones
del TV. Observe que la imagen aparece
comprimida en un TV normal.
You can use the camcorder as a VCR. Connect
the camcorder to the TV by using the supplied
A/V connecting cable. There are two ways to
connect the camcorder to your TV. When
monitoring the playback picture by connecting
the camcorder to your TV, we recommend you
use the house current for the power source (p.29).
While playing back Ona "IV screen, close the
LCD panel to reduce noise during various
playback.
Connecting Directly to a TV
Connect the camcorder to the inputs on the TV
by using the supplied A/V connecting cable. Set
the TV/VCR selector on the I"V to VCR.
Es posible utilizar la videoc'iimara como una
videograbadora. Conecte la videuc_imara al
televisur mediante el cable de conexiOn de A/V
suministvado. Exi_ten dos furmas para conectar
la videoc.'imara al televisor. Cuando cuntrole la
imagen de repruducci6n mediante la coneM.3n de
]a videoc_mara at televisor, _e recumienda el u_o
del cable de alimentaci6n de red como fuente de
alimentaci6n (p.29).
Mientras reproduce en una pantalla de TV, cierre
el panel LCD para reducir el ruido en diferentes
reprod ucciones.
Conexi6n directa a un TV
Conecte la videoc_mara alas tumas de entrada
de] televisor mediante e] cable de conexi6n de A/
V suministrado. Ajuste el selector TV/VCR deI
televisor en la posici6n VCR.
S-VIDEO IN
: Signal flow/Flujo de sefiales
0 IN
If you are going to Connect the camcorder using
the S video cable [a], you do not need to connect
the yellow (video) plug of the A/V connecting
cable [b].
Siva a conectar la videoc_,mara utilizando el
cable S video [a], no es necesario conectar el
enchufe amarillo (video) de[ cable de conexi6n de
A/V [b].
See the next page for further information.
Consulte ]a p,lgina siguiente para ubtener m_,_
in/ormaci6n.
O
o
47

-a.
I
_o
If your VCR is already connected to a "IV
ConneCt the camcorder to the LINE IN inpu_ on
the VCR by using the A/V connecting cable. Set
fl_e TV/VCR selector on the "IV to VCR.
Si la videograbadora ya est_ conectada a un
televisor
Conecte la videL_.:.';maraalas tomas de entrada
LINE IN de la videograbadora medianie el cable
de conexibn de A/V. Ajuste el selector TV/VCR
del televisor en la posici6n VCR.
S-VIDEO IN
C:_ :Signal t'low/Flujo de seflales
If your TV or VCR is a monaural type, connect
only the white plug for audio on both the
camcorder and the "IVor the VCR. With this
connection, the sound is monaural.
To connect a TV or a VCR without audio/video
input jacks
Use an RFU adaptor (not supplied).
AUDIO IN
Si el TV o la videogvabadora son de tipo
monof6nico, conecte s61o el enchu fe blanco para
audio tanto en la videoc'_mara como en el TV o
en la videograbadora. Con esta conexi6n, el
sonido e_ monof'Onico.
Parti conectar un televisor o una
videograbadora sin tomas de entrada de
"audio/video
Utilice un adaptador RFU (no suministrado).
Connect the camcorder to the VCR using the
supplied A/V connecting cable (p.47).
Set the input selector on the VCR to LINE, if
available,
(1) Set the POWER switch to VTR.
(2) Set EDIT to ON in the menu system (p. 44),
You can create your own video program by Puede crear su prupio prugrama de vMeo si
editing with any other _ 8 ram, blll_l HiS, _1!_ realiza la edici6n con cualquier otra ulfidad de
VHS, S_S_ S-VHS, _]S[_ VHSC, SVI_'I_ S- O 8 mm, I-I1_] HiS, iwl_ VHS, S_aI$;S-VHS, Yus[_
VHSC, or [] Betamax VCR that has video/audio VHSC, S_'I_$B S-VHSC, o videugrabadora
inputs. [] Betamax que di_punga de entradas de audiu/
video.
Conecte la vid_.,_:_mara a la videograbadura
mediante el cable de conexidn de A/V
sumlnist_du (p.47).
Aiu_te el _lect_r de en_ada de la
videograbadora en la p_sicidn LINE, _i est_
disponible.
(1) Ajuste el conmutador POWER en la pusicidn
V'I'R.
(2) Aju_te EDIT en la posicJdn ON en el slstema
de men_s (p. 44).
2
O
O
e
ultaea
lue,___
:Signal flow/Flujo de seflales
o
iu
Consuite la p_gina siguiente para obtener m_is
48 See the next page for further information, informaciOn. 49

)
|
5O
, i ..........................
iii!i i6 i E ! i iiiii iiiii ii i!ii? i i !! i!i!!ilililill
Turn down the volume of the camcurder while
editing. Otherwise, picture distortion may occur.
(1) Insert a blank tape (or a tape you want to
record over) into the VCR and insert your
recorded tape into the camcorder.
(2) Playback tl_e recorded tape on the
camcorder until you locate the point where
you want to start editing, then press II to put
the camcorder in playback pause mode.
(3) On the VCR, locate the recording start point
and put the VCR in recording pause mode.
(4) Press l! on the camcorder and VCR
simultaneously to start editing.
To Edit More Scenes
Repeat steps 2 to 4.
To Stop Editing
Press 1"3STOP on both the camcorder and VCR.
Baje el volumen de la videoczimara durante la
edici6n. En caso contrariu, puede distorsiona_e
la imagen.
(1) Inserte una cinta en blanco (u una
previamente grabada que desee volver a
grabar) en la videograbadora y la cinta
grabada en la videoc_imara.
(2) Reproduzca la cinta grabada en la
videooJmara basra que Iocalice el punto
desde el que desee iniciar la edici6n y, a
continuaci6n, pulse II para intn..Mucir el
modo de pausa de reproducci6n en la
videoc_imara.
(3) En la vldeograbadora, Iocalice el punto de
inicio de grabaci6n e introduzca el modo de
pausa de grabaci6n.
(4) Pulse II en ]a vldeoc_imara yen la
videograbadora simult.'tneamenta para
iniciar la edici6n.
Use of the EDITSEARCH button
You can play back the tape in the normal/reverse
direction by holding down EDITSEARCH during
playback pause mode.
You can also play back still pictures successively
at spec!fic intervals by pressing ED[TSEARCH
intermittently.
Para editar m_is escenas
Repita los pasosde 2 a 4.
Para detener la edici6n
Pulse r-ISTOP en la videoc_mara yen la
videograbadora.
Utilice el boron EDITSEARCH
Es posible reproducir la cinta en _entido nom_al e
inverso; para e]lo, mantenga pulsado
EDITSEARCH durante el modo de pausa de
reproducci6n.
Tambi(in puede reproducir im-Jgenes
sucesivamente a intervalos espec_ficos mientras
pulsa _DITSEARCH intermitentemente.
You can record a tape _rum another VCR or a TV
program from a TV that has video/audio
outputS.
Connect the camcurder to the VCR or TV.
Turn down the volume o_ the camcorder while
editing. Otherwise, the picture distortion may
Occur.
(1) Turn the POWER switch to VTR.
(2) Press REC • and the button on the right
together at the point where you want to start
recording.
Es posible grabar una cinta desde otra
videograbadora, u un progrsma de TV desde un
"IVque disponga de salidas de audio/vMeo.
Conecte la videoc:imara a la videograbadora o al
TV.
Baje el volumen de la videoc_,mara dorante la
edici6n. En casu contrario, puede distorsionarse
la imagen.
(1) Aiuste el conmutadur POWER en la posici6n
VTR.
(2) Pulse REC • y el botOn de la derecha
simult_ineamenta en el puntu de inicio de
grabaci6n.
1 2
S-VIDEO OUT
AUDIO OUT
¢..:._._:... :Signal flow/Flujo de la sefiales
If'you are going to connect the camcorder using
the S video cable [a], you do not need to connect
the yellow (video) plug of the A/V connecting
cable [b].
If your TV or VCR is a monaural type, connect
only the white plug for audio on both the
camcorder and the TV or the VCR. With this
connection, the sound is monaural.
To Stop Recording
Press [3.
Monitoring the Picture from a TV or
VCR
You can monitor the picture on the LCD screen
or in the viewfinder. Connect tl_e camcorder to
theoutputs on the "IV or VCR.
Siva a conectar la videoc_imara mediante el cable
S v_deo [a], no es preciso conectar el enchufe
amarillo (vfdeo) del cable de conexi6n de A/V
[b].
Si el TV o la videograbadora son de tipo
monof0nico, conec m s61o el encl_ufe blanco para
audio tanto en la vldeoc_imara como en el TV o
en la videograbadora. Con esta conexi6n, el
sonido es monof6nico.
Para detener la grabaci6n
Pulse r'l.
Control de la imagen de un TV o de
una videograbadora
Es posiblecontrolar la imagen en la pantalla LCD
o en el visor electr6nicu. Conecte la videoc_imara
a las tomas de salida del televisor o de la
videograbadora.
O
I "o
3
o
51

I
• °---° • • .
Your camcorder is supplied with the lithium
battery installed. When the battery becomes
week or dead, _. indicator flashes in the
vlewfinder or on the LCD screen for about 5
secondswhen you setthePOWER switchto
CAMERA. Inthiscase,replacethe batterywith
the Sony CR2025 o DuracellO1.-2025lithium
battery.Use of any other batterymay present
a riskoffireorexplosion.
The lithiumbatteryforthecarncorderlastsfor
about I year under normal operation. However,
the lithium battery installed at the factory may
not last 1 year.
La videoc_imara se suministra con la pila de litio
instalada. Cuandu se debilite ose agote la pila, el
indicador _ parpadear_ en el visor electrOnico o
en la pantalla LCD durante 5 segundos si ajusta
el conmutador POWER en la Posici6n CAMERA.
En este caso,sustitOyala por la pila de litio
CR2025 Sony o Duracell DL-2025. El uso de
cualquier otro tipo de pila puede representar
un riesgo de incendio o explosl6n.
Esta pile dura l afio aproximadamente en
condiciones normales de uso. No obstante, es
posible que la pila de litio instalada de fiibrica no
dure I a6o.
Note on Lithium Battery
The lithium battery hasa positive (+) and a
negative (-) sideas illustrated.
Be sure to insert the lithium battery with the
positive side facing out.
Nora sobre la pila de litio
La piJade liflo tiene un polo positivo (+) y unu
negativo (-) como se muestra en la ilusb'aci6n.
Compruebe que al insertar la pila de litio, el
polo positivo quede hacia fuera.
When replacing the lithium battery, keep the
battery pack or other power source attached.
Otherwi:ie, you will need to reset tile date, time
and the other items marked with * on pages 43
and 44.
(1) Open the lid of the lithium battery
compartment under the grip strap of the
camcorder.
(2) Push the battery down once and pull it out
from the holder.
(3) Install the lithium battery with the positive
(+) side facing out. Close the Lidof the battery
Compartment.
Cambio de la pffa de litio i/
AI sustituir la pile de litiu, rnantenga ctmectada la
bater(a u otra fuente de alimentaci6u. En caso
contrario, ser_i precisu volver a aju>tar la fecha, la
hura y otros elementus rnarcados col{ "en las
p_ginas 43 y 44.
(1} Abra la tape del compartimiento de la pila de
litio situada debajo de la correa de la
ernpufiadura de la videoc_.mara.
(2) Empuie ]a pile hacia abajo una vez y tire de
_sta pare sacarla del soporte.
(3) [nstale la pila de litio con el polo positivo {÷)
hacia fuera. Cierre la tapa del
compartimiento de la pila.
o
o
i:
WARNING
The battery may explode if mistreated. Do not
recharge, disassemble, or dispose o[ in fire.
Caution
Keep the lithium battery out of the reach of
children. Should the battery be swallowed,
consult a doctor immediately.
ADVERTENCIA
La piJapuede explotar si la expone a condiciones
inadecuadas.No larecargue,niladesecheen el
fuego.
Precauci6n
Mantenga alejada la pila de lit]o del alcance
de los nifios. En caso de ingesti6n de la pila,
consulte al m_dico inmediatamente.
52 53

,...a
I
I
You can reset the date and time in the menu
system in CAMERA mode.
(1) While pressing PUSH OPEN, open the LCD
panel.
(2) Press MENU to display the menu on the LCD
screel'_.
(3) Press ,I, or 4, to select CLOCK SET, then press
EXECUTE.
(4) Press I, or 4, to adjust the year, and then
press EXECUTE..
(5) In the same way as for the year, adjust the
month, day, hour and minutes using "f', 4,
and EXECUTE.
Note that when you hold down "t"or 4,,the
indications in the menu display advance
faster.
(6) Pre_s MENU to erase the menu display.
Es posible reajustarlafechay lahora en el
sistemade men6s delmodo CAMERA.
(I) MientraspulsaPUSH OPEN, abraelpanel
LCD.
(2) Pulse MENU para visualizar el mend en la
pantalla LCD.
(3) Pulse ,I"o 4. para selecciunar CLOCK SET y,
a continuaci6n,pulseEXECUTE.
(4) Pulse"t-o 4,paraajustarelafloy,a
continuaci6n, pulse EXECUTE..
(S) AI igual que para ajustar elafio, ajuste el
mas, dla, hora y minutos mediante _"o 4. y
EXECUTE.
Observe que mientras mantiene pulsado ,T"o
4", las indicaciones de ]a pantalla de men6
avanzan con mayor rapidez.
(6) Pulse MENU para borrar la pantalla de
mend.
To Check the Date and Time
Press DATE to display the date indicator.
Press TIME to display the time indicator. When
you pressthe same button again, the indicator
g_es out.
Note on the setting of the year
When you set the year, each time you press"T,or
4., the digits change as follows:
1995 _ 1996 ....... 2025
t
Note on the time indicator
The internalclockof thecamcurderoperateson a
12-hourcycle.
12:00:00 AM stands for midnight.
12:00:00 PM stands for noon.
Para comprobar la fecha y la hora
Pulse DATE para mustrar el indicador de fecha.
Pulse TIME para mostrar el indicador de hora. Si
pulsa de nuevo el mismo bot6n, el indicador se
apaga.
Nota sobre el ajuste del afio
Cuando ajuste al afio, cada vez que pulse 4"o 4,,
los digitos cambiar:_ncomo se indica a
cuntinuaci6n:
1995 _ 1996 ....... 2025
t t
Nota sobre el indicador de hora
E} reJojintemo de lavideoGimara utiHza el
sistema de 12 hums.
54
3 0 0
4
i
To Correct the Date and Time Setting
Repeat steps 4 to S.
Para corregir el ajuste de fecha y
hora
Repita los pasos de 4 a 5.
:_:_'.'_.'.::_"::.'_::::::"_'_':_.4:_'_::>_::_::_ ===========================================================::::::::;.
ThisHi8 system isan extensionof thestandard8
mm system,and was developed forhigher-
qualitypictures.
You can use Hi8 videoand standard8 mm
Cassettes. When you want to record in the Hi8
system, use only Hi8 video cassettes. You cannot
record on standard 8 mm cassettes in the Hi8
system.
if you are going to play back the tape using a
standard 8 mm video recorder/player, you
should record in the standard 8 mm tape.
E-."
!
Hi8 HII_I
Standard 8 []
o
Este sistema Hi8 es una exten_i6n del sistema
est_ndar de 8 mm y se desarroll6 para im_genes
de mayor calidad. _-
Es posible utilizar clntas de vfdeo Hi8 y estdndar
de 8 ram. Cuandu desee graba r en el sistema HiS, =
s61ocintas de video Hi8. No es posible iutilice
videofilmar con cintas est_ndar de 8 mm en el
sistemaHi8.
Siva a reproducir la cinta con una
videograbadura/videoreproductor est_ndar de 8
ram, es preciso filmar con una cinta est_ndar de
mm.
Para reproduci, Grabe uti zand_ elti_:ae:!ii:
_ienel sistema I :¢in_ : : :::::_i,;:!':.:i:ii:iii_::'i:i::: :::
Hi8 bli_
Standard 8 []
55

I
:: a;u. :. !
The playback mode (SPor LP) isselected
automatically according to the format in which
the tape hasbeen recorded. The quality of the
recorded picture in LP mode. however, will not
be asgood as that inSP mode.
E1 modu de repruducci6n (SP o LP) se selecciona
autom_dcamente de acuerdo con el forrnato de
grabacidn de ]a cinta. No obstante, la calidad de
la irnagen grabada en el rnodo LP n_._ser_ tan alta
como la del rnodo SP.
Notes on AFM Hi-Fi stereo
When you play back the tape, the :sound is in
monaural if'.
• You record the tape using this camcorder, then
play it back on an AFM Hi-Fi monaural video
recorder/player.
• You record the tapeon an AFM Hi-Fi
monaural video recorder, tl_en play it back on
this camcorder.
IF'(long play) mode
When you play back a tape recorded in LP mode,
the LP indicator lights up in the viewfinder or on
theLCD screen,
Foreign $ mm video
You cannot play software recorded on a different
'IV color System. Becausethe TV color systems
differ from country to country, you may not be
able to play back foreign prerecorded software.
Refer to page 67 to check the TV color system of
foreigncountries.
Notas sobre el sistema estdreo AFM Hi-Fi
A! reproducir lacinta, ei sonido recibido _er6
monofdnico si:
• Graba la cinta utilizando esta videoczirnara y, a
continuacidn, la reproduce en una
videograbadora/videoreproductor AFM Hi-Fi
rnonof6nico.
• Graba la cinta en una videograbadora AFM
Hi-Fi rnonofOnica y, a cuntlnuaci6n, la
reproduce en esta vide_o_mara.
Modo LP(larga durad6n)
AI reproducir una cinta grabada en el rnodo LP,
el indicador se ilumina en el visor electr6nico o
en hi pantalla LCD.
Vfdeo de 8 mm extranjero
No es posible reproducir software grabado en un
sistema de color de TV diferente. Corno los
siStemas de color de T'V va ffan en _ncldn de ]us
paises,no seniposible reproducirsoftware
previarnentegrabado en elextranjero.Cunsulte
lap-_gina67 paracornprobarlossisternasde
colorde "IVde paisesextranjeros.
This section shows you how you can get the rno_t En esta seccidn se explica cdmu renmbilizar al
out of your battery pack. m,_ximo ]a bateria.
Always Carry Additional Batteries
Have sufficient battery pack power to do 2 to 3
times as much recording as you have planned.
Battery Life is Shorter in Cold
Environment
Battery efficiency is decreased and the battery
will be used up more quickly if you are recording
in cold environment.
To Save Battery Power
Turn theSTANDBY switch on the camcorder
down when not recording to save battery power.
A smooth transition between scenes can be made
even if recording isstopped and startedagain.
While you are positioning the subject, selecting
an angle, or looking through the viewfinder lens
oron the LCD screen, the lensmoves
automatically and the battery is used. The battery
is also used when a tape is inserted or removed.
Lleve siempre conslgo pilas
adiclonales
Disponga siempre de suticiente bateria para
grabar el doble o el triple del tiernpo planeado.
La duraci6n de la bater|a es menor a
bajas temperaturas
La eficacia de la baten'a disminuye y se agutar_
con mayor rapidez sl realiza la _Tabaci_n a baias
ternperaturas.
Para ahorrar bateria
Cite el selector STANDBY de la videooimara
hacia abajo cuando no e_td grabando para
ahurrar bateHa.
Es posible realizaruna transici6n unlforme entre
_cenas $idetlene y vuelve a iniciarla grabaci6n.
Mientras coloca el objeto, selecciona un _ngulu o
mira a trav_s del objetivo de! visor electr6nicu u
la pantalla LCD, el objetivo se rnueve
autorn_iticarnente y se utiliza bateffa. "i'arnbi_n se
ernplea bater_a al insertar o extraer una cinta.
}=
a
o
ra
3
56 57

I
€..,o
While you are using your camcorder, the
remaining battery indicator in the viewfinder or
on the LCD screen decreases gradually as battery
power is used up.
Mientrasutiliza lavide_c_mara,elindicadorde
bater_a restante delvisorelectrdnicoo de la
pantallaLCD seapaga gradualmentecuando se
est_agotando labateria.
When the remaining battery indicator reaches the
lowest point, the c_ indicator appears and starts
flashing in the viewfinder or on the LCD screen.
[a] on the next page
When the (30 indicator in the viewfinder changes
from slow flashing to rapid flashing while you
are recording, turn the POWER switch to OFF on
the camcorder and replace the battery pack.
Leave the tape in the camcorder to obtain smooth
transition between scenes after the battery pack is
replaced.
Note on the remaining battery indicator
The remaining battery indicator of the camcorder
may indicate a different remaining capacity from
that of the battery pack with its own indicator
(not supplied). The indicator on the battery pack
is more accurate.
Cuando el indicador de baterla r_tante alcanza
el punto m_s bajo, e{ indicador c_ aparece y
comienza a parpedear en el visor electrdnico o en
la pantalla LCD. [a] en la p::gina siguiente
Cuando el indicador COdel visor electrdnico
cambia de on parpadeo lento a uno r,_pido
mientras e_t_ grabando, deslice el conmutador
POWER a la posicidn OFF de la videoc_mara y
sustituya la bateria. De_e [a cinta en la
videoc_mara para obtener una transici6n
uniforme entre escenas despu_s de sustituir la
baterla.
Nora sobre el indicador de bateria restante
El indicador de bateffa restante de la
videocimara puede indicar una ¢apacidad
restante di_tinta de [ade la bateffa con su propio
indicador (no suministrado). El indicador de la
bateHa es m:_s preciso.
The Battery Pack Heats Up
During charging or recording, the battery pack
heats up. This iscaused by energy that has been
generated and a chemical change that has
occurred inside the battery pack. This is not
cause for concern.
La bateria se callenta
Durantelacargao lagrabacidn,labateriase
calienta.Estosedebe a laenerglageneraclay al
cambio quimicoque seha producidoen el
interiorde labater_a.No escau_ade
preocupacidn.
Battery Pack Care
• Remove the battery pack from the
camcorder after using the battery pack, and
keep it in a cool place. When the battery pack
is attached to the camcorder, a small amount
of current flows to the camcorder even if the
POWER switch is set to OFF, which shortens
battery life
• The battery pack is always discharging even
when it is not in use after charging. Therefore,
you should charge the battery right before
using the camcorder.
How to Use the Switch on the
Battery Pack
This switch is provided so that you can mark the
charged battery pac_. Set the switch to the "no
mark" position when cl_arglng iscompleted. Set
the switch to the "red mark" position when the
battery is used up (or in whichever direction you
want to remind yourself). [b]
The Life of the Battery Pack
If the _ indicator flashes rapidly just after
turning on the eamcorder with a fully charged
battery pack, the battery pack should be replaced
with a new fully charged one.
Charging Temperature
You should charge batteries at temperatures
from 10°C to 30°C (from 50°F to 86°F). Lower
temperatures require a longer charging time.
Cuidado de la baterfa
• Retire la bateria de la videoc-_mara despues
de utilizar la bateria y cons_rvela en un lugar
fresco. AI instalar la bater_a en la videoc_mara,
una peque_a cantidad de corriente fluye pur ta
videoc_imara aunque el conmutador POWER
seencuentreen laposici6nOFF, y elloreduce
laduraci6nde labateria.
• La bateriasiempreest_en prvce_ude
descarga, aunque no se utilice despu_s de
cargarla. De este modo, se recomienda cargar
la baterla inmediatamente antes de utilizar la
videoc_mara,
C6mo utilizar el selector con la
baterfa
Esteselectorseproporciona para marcar la
bateria cargada. Aju_te el selector en la posicidn w
"no mark" cuando haya terminado la carga y =
aj_steio en la posicidn "red mark" cuando la 2
bateria estd agotada (o en el sentido que sea m_is
f_cil de recordar). [b] o_"
Duracibn de la baterfa
Si elindicador cO parpadea con rapidez
inmediatamente despu_ de activarla
videoc_mara,serzlprecisosustituirlabateHa ])or
una nueva completamente cargada.
Temperatura de carga
Se recomienda cargar la bateffa a una
temperatura entre 10°C y 30°C (entre 50°F y
86°F). A temperaturas inferiores, la duracidn de
Cargaes mayor.
[a] [b)
e_
S
58 59

I
.Ib
A Brand-new Battery Pack
A brand-new batter,/pack is not charged. Before
using the battery pack, charge it completely.
Before Recharging a Used Battery
Pack
• Make sure to use up the battery before
recharging.
• if recording is completed before the c_
indicator appea_ in the viewfinder or on the
LCD screen,you should remove the tape, turn
the POWER switch to CAMERA, turn
STANDBY up, and leave the camcorder until
the battery indicator flashes rapidly,
• Charging the usable battery causes a
lowering of battery capacity. Eattery
capacity can be recovered if you fully
discharge and charge the battery pack
again.
After Long Storage
Recharge the battery pack after a long period of
storage. If the battery pack is charged fully but
not used for a long time (about I year), it
becomeS discharged. Charge it again, but in this
cast the batter), life will be shorter than normal.
After several charging and discharging cycles,
the battery life will recover its original capacity.
If the terminals (metal parts on the back) are
not clean, the battery duration will be
shortened.
When the terminals are not clean or when the
batterypack has notbeen used fora longtime,
repeatedly install and remove the battery pack.
This improves the contact condition. Also, wipe
the + and - terminals with a soft cloth or paper.
Baterfa completamente nueva
Una baten'a nueva no est,_cargada, de forma que
antes de utillz_rla, es preciso cargarla
completamente.
Antes de recargar un bateria usada
• Aseg_irese de que la bater(a estli
completamente agotada antes de cargarla de
nuevo.
• Si ha terminado de grabar ante_ de que el
indicador _:J aparezca en el visor e]ectr0nico o
en la pantalla LCD, deber_iretirar la cinta,
desllzar el Conmutador POWER a la posicidn!
CAMERA, gira rSTANDBY hacla arriba y no
utilizar la videoc_mara hasta que el indicaddr
de batefia parpadee rlpidamente.
• AI cargar la baterl'a usada, dismlnuye la
capacidad de ista, y puede recuperarse si
descarga la bater|a completamente y vuelve
a cargaria.
Si ha almacenado la baterfa durante
mucho tiempo
Recargue la bateHa despu_s de un largo periodo
de almactrutmientu. Si no se utiliza una bater_a
€ompletamente cargada durante un larg_
periodo de tlempo (1 aflo apruximadamente), se
descargaM.Vuelva a cargarla,pero en estecaso,
laduracidnde labateriaser_imenor de Io
habitual Oespu_ de varios ciclos de carga y
descarga,labateria
recuperarlsucapacidadoriginal.
Silos terminales (piezas de metal situadas en
la parle posterior) no est_n limpias, la
duracibn de la bateffa ser_ menor.
Si los terminales no _.t_n lim_ios o _i no se ha
utillzadu Ia baterla durante un largo periodu de
tiempo, instale y retire la bateria varias veces. De
esta forma mejoraP'i la toma de contactu.
Asimismo, limpie los terminales + y- con un
pa_o o trozo de papel suaves.
Be Sure to Observe the Following
• To prevent an accident caused by a short
circuit, do not allow metal objects such as
necklace to touch the battery terminals. When
carrying tlae battery pack, attach the terminal
cover. [c]
• Keep the battery pack away from fire.
• Keep the battery pack dry.
• Do not open nor convert the battery pack.
• Do not expose the battery pack to an).'
mechanical shock.
Observe las siguientes indicaciones
• Paraevitarquese pruduzcan accidentes
derivados de cortuclrcuitus, no permite que
entren en contactoubjetos de metal, como un
collar,con losterminalesde labateria.Cuando
transp_rte la bateria, ajuste lacubierta de
termhmles. [c]
• Mantenga la bateHa alejada de[ fuego.
• Mantenga Ia bater/a seca.
• No abra nl modifique la baterla.
• No exponga la bateria a golpes mec:'_nicu_.
o
If the camcorder is brought directly from a cold
place to a warm place, moisture may condense
inside the camcorder, on the surface of the tape,
or on the lens,inthis condition, the tape may
stick to the head drum and be damaged or the
camcorder may not operate correctly. To prevent
possible damage under these circumstances, the
cam€order is furnished with moisture sensors.
However, take the following precautions.
:'2:::...:::.,.:-:.;,::.:-:.._.:::.::.:.:.:.;_.:: :;::. ;.:.:::::.,:.:,:-.•_,_:_:.:_::;::.:.,.:._::. _._.:_;._:_::;:._: : ::.::";. : ;
Si traslada la video_dmara directamente de un
iugar fifo a uno c_illdo, puede condensar_
humedad en el interior de la misma, en la
superficie de la cinta o en el objetivo. De este
modo, la cinta puede pegarseal tambor del
cabezal y dafiarse, o la videuc_imara puede no
funcionar correctamente. Paraevitar que se
produzcan posiblesdat"tosbaioestas
circunstancias0lavideoc_maradisponede
sensoresde humedad. No obstante,tome las
siguientes precauciones.
60 61

I
62
Inside the Camcorder
When [] and -- indicators flash in the viewfinder
or on the LCD screen, moisture has condensed
inside the camoorder.
If this happens, no other foncUuns except for tape
ejection will work.
Eject the tape, turn off the camcorder, and
leave it with the cassette holder open for at
least one hour.
The camcorder can be used again if the []
indicator does not appear when the power is
turned on again.
Interior de la videocdmara
Cuando los indicadores [] y _ parpadean en el
visor eiectr_nicu o en ha pantalla LCD, si_ifica
que se ha condensado humedad en el interior de
la vide_mam.
Si esto ocurre, no se acfivar_ nin_una funci,_n,
excepto la de expulsi6n de cinta..
Extralga la cinta, desactive la videoc;_mara y
deje el portacassettes abierto durante ai
menos una hora.
La videoc_mara puede volver a utiliza_e sl el
indicador I_ no se ilumina al volver a activar ha
allmentaci6n.
How to Prevent Moisture
Condensation
When bringing the camcorder from a cold place
to a warm place, put the camcorder in a plastic
bag and allow it tu adapt to room conditions over
a period oi: time.
(1) Be sure to tigl_tly seal the plastic bag
containing the camcorder.
(2) Remove the bag when the air temperature
inside it has reached the temperature
surrounding it (after about 1 hour).
Cdmo prevenir la condensacidn de
humedad
Si transporta la videt_fimara de un lugar frfo a
uno c;ilidu, culdquela en una b_Jlsade pl_sticu y
deje que se adapte a ]ascondiciunes de la
habitaci_n.
(1) Compruebe que la buisa de pl._stlcoque
contiene la videoolmara est_bien sellada.
(2) Retire ]a bolsa cuando la temperatura del aire
de[ interior haya alcanzado hatemperatura
ambiente (despu_s de una hora
aproximadamente).
On the Surface of the Tape
If there is moisture on the surface of the tape,
when you insert cassette and press a tape
transport button (E:>-PLAY, etc.), the _" indicator
in the viewlrmder or on the LCD screen flashes.
In this case, no other functions except for tape
ejection will work.
Eject the tape, turn off the carncorder and
leave it with the cassette holder open for at
least one hour,
The camcorder can be used again ifthe A
indicator does not appear when you insertthe
cassette and press one of the tape transport
button.
On the Lens
If moisture condenses on the lens, no indicator
appears, but the picture becomes dim. Turn off
the power and do not use the camco'rder for
about one hour.
Superficie de la clnta
Slsecondensa humedad en hasuperficiede la
cinta,alinsertarelcassettey pulsarun bot6n de
transportede cinta(E:>-PLAY,etc.),parpadear_el
indicador_-en elvisor
electr6nicoo en lapantallaLCD.
En estecaso,no seactivar_ninguna funci6n,
exceptolade expulsi6nde cinta.
Extraiga la cinta, desactive la videoc_mara y
deje el portacassettes abierto durante al
menos una hora.
La videocimara puede volvera utilizarse siel
indicador -----no se ilumina a[ insertar el cassette y
pulsar uno de los botones de transporte de cinta.
Objetlvo
Sise condensa humedad en el objetivo, no
aparece ning'fin indicador, pero ha imagen se
atenBa. Desactive la a|imentaci6n y no utilice ha
videoc/.mara durante al menos una hora.
To ensure normal recording and clear pictures,
clean the video heads. When the _ indicator and
"EIu CLEANING CASSETTE" message appear
one after another in the viewfmder or on the LCD
screen or playback pictures are "noisy" or hardly
visible, the video heads may be dirty.
Para garantizar que la grabaci6n se realice
normalmente y se obtenga im:;genes claras,
limpie los cabezales de video. Cuando el
indicador0 y elmensaje",,_CLEAN ING
CASSETTE" aparecenono despu(_sdelotroen el
visorelectr6nicoo en hapantallaLCD, o has
im:igene_de reproducci6nproducen "ruido"o
no seven con claridad,esPosibleque los
cabezalesde videoest(_nsucios.
(a] , ,,
III
lu [b]
[a] Slightly dirty
[b] Very dirty
If this happens, clean the video heads with the
Sony VS-25CLH cleaning cassette (not supplied).
After checking the picture, if it is still "noisy",
repeat the cleaning. (Do not repeat cleaning more
than 5 times.)
Caution
Do not use a commercially available wet-type
cleaning cassette. It may damage the video
heads.
Note
If the VS-?.SCLH cleaning cassetteis not available
in your area, consult your nearest Sony dealer.
[a] Ligeramente sucios
[b] Muy sucio_
Si estu ocurre, limpie los cabezales de video con
el cassette limpiador VB-25CLH Sony (no
suministvado). Despuds de c_mprobar la imagen,
si todavia contiene ruido, repita la limpieza. (No
repita la limpieza mils de 5 veces.)
Precaution
No utilice un cassette iimpiadur de tipo hdmedo
que puede adquirirse en tiendas dei ramo, ya que
puede daflar los cabezales de video.
Nora
Si el cassette limpiador VS-.?.SCLH Sony no estfi
dbponible en su zuna, consulte al proveedor
Sony m::.s cercano.
&-,
8
o
g
G"
63

a.
,a
(1) While holding down RELEASE on tile
view finder barrel, turn the eyecup ill tile
direction of the arrow and pull it out.
(2) Clean the surface with a commercially
available blower•
(_omo retirar ei pOiVo clel i i:iii i_:
_interiOir de[visOr.electr6nic6::i: :::
(1) Mientras mantiene pulsado RELEASE ell el
barrilete del vi_r electr6nico, gire el ocular
en elsentido de la flecha y tire del mismo.
(2) Limpie la superficie con un _upladur
disponible ell tiendas del ramo.
r I
To Reattach the Eyecup
(1) Align the groove on the eyecup with the
• mark on the barrel.
(2) Turn the eyecup clockwise.
2
i
Para volver a ajustar el ocular
(1) Alinee la hendidura del ocular cun la marca
• del barrilete.
(2)Citeelocularen elsentidode lasagujasdel
reloj.
2rI
........................................................................................................................................................................................ J
Camcorder Operation
• Operate the camcorder using 6.0 V (battery
pack) ur 7.5 V (AC power adaptor).
• For DC or AC operation, use only the
accessoriesrecommended in this manual.
• Should any solid objector liquid get inside the
casing, unplug the camcorder and have it
checked by your nearest Sony dealer before
operating it any further.
• Avoid rough handling or mechanical shock. Be
particularly careful of the lens.
• Keep the POWER switch set to OFF when not
using the camcorder.
• Do not wrap up thecamcorder and operate it
since heat may build up internally.
• Keep the camcorder away from strong
magnetic fields or mechanical vibration.
• Do not push tile LCD screen.
• If tile camcorder is used in a cold place, a
residual image may appear on the LCD screen.
This is not a malfunction.
• While using the camcorder, the back of the
LCD screen may heat up. This is not a
malfunction.
• Constant bright points of light (red, blue, or
green) may appear on the LCD screen. This is
not a malfunction.
On Handling Tapes
Do not insert anything in the small holes on the
Fearof the cassette. These holes are used to sense
the type and thickness of tape, or if the tab is out
or in.
Camcorder Care
• When tile camcorder isnot to be used fora
long time, disconnect the power source and
remove the tape. Periodically turn on the
power, operate the camera and player sections
and play back a tape for about 3 minutes.
• Clean the lens with a soft brush to remove
dust. If there are fingerprints on the lens,
remove them with a soft cloth.
• Clean the camcorder body with a soft dry
cloth, or a soft cloth lightly moistened with a
mild detergent solution. Do not use any type
of solvent which may damage the finish.
• Clean the LCD screen with the supplied LCD
screen cleaner cloth to remove fingerprints.
:Precauciones ::;i _::.
Funcionamiento de la videoc_mara
• Alimente la videoo'imara tun 6,0 V (bateria) u
con 7,5 V (adaptador de alimentaci6n de CA).
• Para alimentar la videoc_imara con CC u CA,
utilice s6lo los accesorius recumendados en
este manual.
• Si cae alg_n objeto s61ido ose vierte [iquido en
el interior de ia unidad, desench_ feia y haga
ue sea revisada por su proveedur Sony ante_
e utilizarla de nuevo.
• Evite exponer la videoc_mara a un trato
inadecuado, asl como a golpe:i mec:_nicos. Sea
especiaimente cuidadoso con el ubjetivo.
• Mantenga el conmutador POWER en la
posici0n OFF cuando no utillce ta
videoo'imara.
• No envuelva la videocimara para utiHzarla, ya
que puede calentar_e internamente.
• Mantenga la videoc_mara alejada decampos
magn&ticos intensos u de vibraciones
mec_nicas.
• No ejerza presi6n ::vobrela pantalla LCD.
• Si emplea la videoc:_mara en un lugar frlo,
puede aparecer una imagen residual en ]a
pantalla LCD. Esto no significa un
f_ncionamientu incorrecto.
• Mientras utiliza la vide_'imara, es ]xnible que
la pa_e trasera de la pantalla LCD se caliente;
esto no supone un funcionamiento defectuoso.
• La pantallaLCD puede presentarpuntusde
brillopermanentes (rojos,azulesu verdes).
E_tono significaun funcionamientoincorrecto.
utillzaci6n de las cintas
No inserte nin_Jn objeto en los pequetios
orificiosde laparteposteriordelcassette.E:_tos
orificiosseemplean paradetectareltipoy el
gT0SOrde lacinta,o laposici6nde laleng6eta.
Cuidados de la videocdmara
• Cuando no vaya a utilizar la videoc_mara
durante un largo periodo de tiempo,
desconecte la fuente de alimentaciOn y retire la
cinta. Active la alimentaci6n periOd icamente,
utilice las secciunes de la c_mara y del
reproductur y reproduzca una cinta durante 3
mlnutos aproximadamente.
• Limpie el objetivo con una e_cobilla suave para
retirar el polvo. Si el objetivo tiene impresas
hueilas dactilares, limpielas con un patio
suave.
• Limpie el cuerpo de la videoc_mara cun un
a_o Seco y suave, o con un patio suave
geramente humedecidu en una suluci6n
detergente poco concentrada. No emplee
ningOn tipo de disolvente, ya que podHa dafiar
el acabadu.
• Limpie la pantalla LCD con el pafiu limpiador
64
o
o
n
e_pecificu suministrado, con el fin deborrar la_ 65
huellas dactila res.

I
f.a.)
.,-d
r'rl
66
AC Power Adaptor
Charging
• Repeated charging while some capacity
remains causes a lowering of battery
capacity. However, the original battery
capacity can be recovered if you use the
battery completely and charge it fully again.
• Charge the battery pack on a flat surface
without vibration.
• The battery pack will be hot dunng charging.
This is normal
Others
• Unplug the unit from the wall outlet (mains)
when not in use for a long time. To disconnect
the cord (mains lead), pu[! it out by the plug.
Never pull the cord itself.
• Do not operate the unit with a damaged cord
or if the unit has been dropped or damaged.
• Do not bend the AC power curd (mains lead)
forcibly, or put a heavy object on it_This will
damage the cord and may cause a fire or an
electrical shock.
• Be sure that nothing metallic comes into
contact with the metal parts. If this happens, a
short may occur and the unit may be damaged.
* Always keep the metal contacts clean.
• Do not disassemble the unit.
• Do not apply mechanical shock or drop the
unit.
• While the unit is in use, particularly during
charging, keep it away from AM receivers and
video equipment because it will disturb AM
reception and video operation.
• The unit becomes warm while in u_e. This is
normal.
• Do not pface the unit in locations that are:
- Extremely hot or cold
- Dusty or dirty
- Very humid
- Vibrating
If any difficulty should arise, unplug t'he unit and
contact your nearest Sony dealer.
Adaptador de alimentacidn de CA
Carga
• Si se realiza el proceso de carga d e la
bateria repetidarnente sin que su capacidad
se haya agotado completarnente, se
producira una reducci6n de _sta. No
obstante, la capacidad original de la bateria
puede recuperarse si la agora primero y, a
continuaci6n, vuelve a cargarla
completamente.
• Cargue ]a baterla sobre una superficie p[ana
sin vibracione_.
• La baterfa se calentar_, durante la carga. Esto es
normal.
Otros
• Desenchufe ]a unldad de ]atoma mural (tuma
de alimentaci6n) _:uando no vaya a utilizarla
durante varios dias. Pars descunectar e] cable
(conductor de alimentaci6n), tire del enchu re,
nunca de[ propio cable.
• No utilice la unidad con un cable dafiado, ni si
_sta ha su frido una caida o _e ha dafiado.
• No doble el cable de alimentaci6n de CA
(conductor de alimentacidn) a fa fuerza, ni
coloque objetos pesados sobre el mismo, ya
que puede dafiar_e el cable y pr_ducirse un
incendio o un cortucircuito.
• Aseg-6 rese de que ning_n objeto metC,Eco entra
en contacto con la_ partes de metal. Si estu
ocurre, puede pruducirse un curtLx:ircuito que
da_aria la unidad.
• Mantenga siempre limpios los contactos de
metal.
• No de, monte fa unidad.
• No exponga la unidad a golpes mec_tnicos y
evite que sufra caldas.
• Cuando estd utilizando la unidad y,
especialmente, durante el proceso de carga,
mant_ngala alejada de receptores de AM y de
equip_ de video, ya que puede distor_ionar {a
recepci6n de AM y causar interferencias en el
funcionamiento de video.
• La unidad se calienta durante su uso. Esto es
normal
• No sit6e la unidad en lugares:
- Extremadamente c_,lidos o fffos
- Polvorientos o sue(us
- Muy h_medos
- Que emitan vibraciones
Si se produce alg6n problema, desenchufe la
u nidad y p6ngase en contacto con el proveedor
Sony re;is cercano.
Each country has its own electricity and TV color
systems. Before using your camcorder abroad,
check the following points:
Cads pals dispone de sus propio sistema de
electric(dad y de color de TV. Antes de utilizar la
videoc_,mara en el extranjero, compruebe los
siguientes puntos:
i_i_9_i_: S_I_ :.!i!iii::_::_!:!.!::ii:._:!!_._i_i!_.i.!)::.{ _ ! :_:i i.i_ _S_!:cl:eali men(_ii_:_i _::_iii!iiii...:
You can use your camcorder in any country with Es posible utilizar fa videoc6mara en cuaiquier
the supplied AC power adaptor within 110 V to paLScon e[ adaptador de alimentaci6n de CA
240 V AC, 50/60 Hz. suministrado (de 110 V a 240 V CA, 50/60 Hz).
...................................................................................!_iic6 i_:ii'_!i_i_I
This camcorder is an N'I'SC system based
camcorder. [f you want to view the playback Esta videoc_,mara e_t6 basada en el sistema PAL. -_.
picture on _ TV, it must be an NTSC system Si desea visualizar la imagen de repn.,'ducci6n en _"
based "IV.When you want to use a PAL-M un TV, debe utilizar un TV basado en el sistema
system based "IV, you will need an NTSC/PAL- PAL o uno basado en el sistema SECAM con un 5"
M transcoder, transcodificador PAL-SECAM. °'9'
Check the following alphabetical list. Compruebe la siguiente Esta alfab_tica.
NTSC System countries
Bahama Islands, Bolivia, Canada, Central
America, Chile, Colombia, Ecuador, Jamaica,
Japan, Korea, Mexico, Peru, Surinam, Taiwan, the
Philippines, the U.S.A., Venezuela, etc.
Parses que utilizan el sistema NTSC
Amfirica central, Bolivia, Canadzl, Chile,
Colombia, Ecuador, EE.UU.,Filipinas, lsias
Bahamas, Jamaica, Japdn, Corea, M_jicu, Per_,
Surinam, Taiw_n, Venezuela, etc.
PAL system countries
Australia, Austria, Belgium, China, Denmark,
Finland, Germany, Great Britain, Holland, Hung
Kong, italy, Kuwait, Malaysia, New Zealand,
Norway, Portugal, Singapore, Spain, Sweden,
Switzerland, Thailand, etc.
Paises que utilizan el sisterna PAL
Alemania, Australia, Austria, B_lgica, China,
Dinamarca, Finlandia, Gran Bretafia, Hofanda,
Hong Kong, Italia, Kuwait, Malasia, Nueva
Zelanda, Noruega, Portugal, Singapur, EspaEa,
Suecia, Suiza, Tails ndia, etc.
PAL-M system country
Brazil
Pais que utiliza el sistema PAL-M
Brasil
PAL-N system countries
Argentina, Paraguay, Uruguay
SECAM system countries
Bulgaria, Czech Republic, France, Guyana,
Hungary, lran, Iraq, Monaco, Poland, Russia,
Stovak Republic, Ukraine, etc.
Sistemas que utilizan el sistema PAL-N
Argentina, Paraguay, Uruguay
Paises que utilizan el sisterna SECAM
Bulgaria, Francia, Guayana, Hun_fa, [r6n, Irak, It
M6naco, Polonia, Rep6blica checa, Repfiblica
eslovaca, Rusia, Ucranla, etc.
s
67

T
76
[]
[]
[]
[]
[]
[]
.................................... ]
[]
[]
[] Tape transport buttons (p.24, 25)
[] STOP
REW (rewind)
E:>-PLAY (playback)
FF (fast-forward)
II PAUSE
• REC
These buttons will function in VTR mode.
[] Power zoom button (p.14)
[] EDITSEARCH button (p.22)
i_]POWER switch (p.11, 24)
[] Camera recording/battery lamp (p.44)
[] Power zoom button (p.15)
It is u_seful when recording in low position.
[] Built-in microphone
[] Viewfinder adjustment ring (p.12)
[] Viewfinder (p.12, 64, 84)
[] FADER button (p.38)
[] LCD panel (p.lG)
[] Lens cover
11_Remote sensor (p.82)
Aim the Remote Commander here for remote
control.
[] Botones de transporte de cinta (p.24, 25)
[] STOP
REW (reb_binado)
E:>- PLAY (reproducci6n)
I_ FF (avance r_ipido)
II PAUSE
• REC
Esto'_ botones funcionar;in en el memo VTR.
[] Botbn de zoom (p.14)
[] Botbn EDITSEARCH (p.22)
[] Conmutador POWER (p.11, 24)
[] Indicador de grabaci6n de cdmara/bateria
(p.44)
[] Botbn de zoom (p.15)
Resulta 6til para filmar en una posici6n baja.
[] Micr6fono incorporado
[] Rueda de ajuste del visor electrbnico (p.12)
[] Visor electrbnico (p.12, 64, 84)
[] Botbn FADER (p.38)
[] Panel LCD (p.16)
[] Cubierta del objetivo
[] Sensor remoto (p.B2)
Oriente el mando a distancia hacia e_te punto
para control remoto.
[] LCD screen (p.24, 84) [] Pantalla LCD (p.24, 84)
_]TIME button (p.31) [] Bot6n TIME (p.31)
[] Recording lamp (p.16) [] lndlcador de grabaci6n (p.16)
77
[] DISPLAY button (p.2S)
END SEARCH button (p.27)
[] STEADY SHOT switch (p.41)
[] COUNTER RESET button (p.13)
[] DATE button (p.31)
[] MENU operation buttons (p.42, 54)
[] VOLUME control (p.24)
[] PICTURE EFFECT button (p.35)
[] PROGRAM AE button (p.33)
[] BACK LIGHT button (p.40)
[] Bot6n DISPLAY (p.25)
[] Bot6n END SEARCH (p.27)
[] Selector STEADY SHOT (p.41)
[] Botdn COUNTER RESET (p.13)
[] Boton DATE (p.31)
[] Botones de control de men_l MENU (p.42,
54)
[] Botdn VOLUME (p.24)
[] Bot6n PICTURE EFFECT (p.3S)
[] Bot6n PROGRAM AE (p.33)
[] Bot6n BACK UGHT (p.40)
O.1
O
"13
=0
=0
O

I
78
[]
[]
[]
[]
[]
[]
[]
[]
.)
[]
[]
[]
@
[]
[] START/STOP button (p.16)
[t is useful when recording in low position.
[] FOCUS switch (p.37)
[] Focus dial (p.37)
_-_LCD BRIGHT dial (p.16)
[]Tripod receptacle (p.20)
Attach the supplied tripod adaptor so that a
tripod (not supplied) can be attached in good
balance.
[] Stand (for recording) (p.20)
[] Stand (for playback) (p.25)
[] PUSH OPEN button (p.16, 24)
[] Eyecup
[] RELEASE (viewfinder release) knob (p.64)
[] STANDBY switch (p.11)
[] START/STOP button (p. 11)
[] Battery mounting surface (p.9)
[] Hooks for shoulder strap (p.B0)
[] BArI" (battery release) knob (p.9)
[] Bot6n START/STOP (p.16)
Resulta dtil para filmar en una p_ici6n baja.
[] Selector FOCUS (p.37)
[] Dial de enfoque (p.37)
[] Dial LCD BRIGHT (p.16)
[] Recept_tculo para tdpode (p.20)
Ajuste el adaptador de trfp_le suministrado,
de forma que el tr_pode (no suministrado)
mantenga un buen nivel de equitibrio.
[] Soporte (para grabaci6n) (p.20)
[] Soporte (para reproducd6n) (p.25)
_J Bot6n PUSH OPEN (p.16, 24)
[] Ocular
[] Mando RELEASE (liberacibn del visor
electrbntco) (p.64)
[] Selector STANDBY (p.11)
[] Botbn START/STOP (p.11)
[] Superficie de montaje de la bateria (p.9)
[] Ganchos para asa de hombro (p.$0)
[] Mando BAR" (liberacibn de la bateria) (p.9)
[] []
[]
[] "
m[]
[] j
[] Cassette Compartment lid (p.10)
[] EJECTbutton (under the lid ) (p.10)
[] LANC_ control jack
Connect the LANe I_ connecting cable to a
wired remote control unit suchas anediting
con'a'oller,inthiscase,settheCOMMANDER
mode toOFF inthemenu system (p.43).
stands(orLocalAppllcadon ControlBus
system.The _ €ontro[jackisused for
Controllingthetapetransportofvideo
equipment and peripheralsconnectedtoit.
Thisjackhasthesame funcdonasthe
connectorsindicatedasCONTROL L or
REMOTE.
[] Q (headphones) jack (p.2.5)
[] Uthium battery compartment (p.S3)
[] Grip strap (p.19)
[] Ud release knob (p.10)
[] MIC (microphone) jack
Connect an optional external microphone.Thls
jack alsoaccepts a "plug-in-power"
microphone.
[] S VIDEO jack (p,47. 51)
[] VIDEO jack- (p.47, Sl)
RFU DC OUT (RFU adaptor DC out) jack
AUDIO jacks (p.47, 51)
[] Jack cover
[] Tapa del compartimiento de cassettes(p.10)
[] Sot6n EJECT (debajo de la tapa) (p.10)
_Toma de control LANC @
Conecte e] cable de conexi_n LANe _ a una
unidad de control remoto con cable, cOreD un
controlador de edici_n. En este caso, asigne al
modo COMMANDER la opci_n OFF en el
sistema de mends (p. 43).
significaLocal Application Control Bus
system (sistema de bus de control de
aplicaciones local).La toma de control t_ se
emplea para controlar e[ t_nsporte de cinta
del .ec[uipode video y de los dlspositivos
perif_ricos conectados a _ta. Esta toma
realiza la misma funcidn que los conectores
CONTROL L o REMOTE.
IA'_Toma ._. (auriculares) (p.25)
[] Compar'Umlento de la pila de litio (p,53)
[] Correa de la empu_adura (p.lg)
[] Mando de apertura de la tapa (p.10)
[] Toma MIC (microfono)
Conecte un mic'_fono opciona| externo. Esta
toma tambi_n admire unmicr61_ono con
enchulre de alimentaci0n.
[] Toma S VIDEO (p.47, 51)
[] Toma VIDEO (p.47, 51)
[] Toma RFU DC OUT (adaptador RFU con
sallda CC)
[] Tomas de AUDIO (p.47, 51)
i'_ Cubierta de tomas
_o
g
3
79

T
80
Attaching the shoulder strap
Attach the supplied shoulder strap to tile hooks
for the shoulder strap (_] on page 78).
Ajuste del asa de hombro
Ajuste el asa de hombro suminlstrada a los
ganchos del mismo (_-_ en p-'_gir, a 715)..
1 ..... 2
\
Preparing the Remote Commander
To use the Remote Commander, you must insert
two R6 (size AA) batteries. Use the supplied R6
(size AA) batteries.
(1) Remove the battery cover trrum the Remote
(2) Insert both of the R6 (size AA) batteries with
The buttons that have the same name on fl_e
Remote Commander and on the camcorder
function identically.
[]
[]
[] Transmitter
Point toward the remote sensor to control the
camcorder after turning on the POWER
:_witch on the camcorder.
_"] Tape transport buttons (p.24, 25)
[] DISPLAY button (p.25)
1_ R6 (size AA) battery holder
[] START/STOP button
[] Power zoom button
The zooming speed is unchangeable on the
Remote Commander.
Preparaci6n del mando a distancia
Para utilizar el mandu a distancia, es preciso
insertar dos pilas R6 (tamal_u AA). Utilice las
pilas R6 (tamafio AA) suministradas.
(1) Retire la cubierta de[ cumpartimientu de pila._
.ii:::!!_i'!iL_. Insert both Of
connect polarity,
Put the battery CC
Commander.
LOSbotones cun el mismo hombre en el mando a
distancia y en la videoc_mara funcionan de
forma id_ntica.
_'_,
[]
................................................ []
[] Transmisor
Apunte al sensor remoto para controlar la
videoczlmara despu_s de activar el
conmutador POWER en la misma.
[] Botones de transporte de cinta (p.24, 25)
[] Boron DISPLAY (p.2S)
[] Soporte de bateria R6 (tama_o AA)
[] Boron START/STOP
[] Botbn de zoom
La velocidad de zoom no puede camhiarse en
el mando a distancia.
(3) Put the battery cover back onto the Remote
del mando a distancia.
(2) Insertedos pilas R6 (tamaf_u AA) con la
polaridad correcta.
(3) Cierre la cubierta del compartimiento de
pilasdeI mandu a distancia.
¢,_....................................................................................................................................•
w
B"
_5.
! ..9
Note on battery life
The battery for the Remote Commander last
about 6 months under normal operation. When
the batteries become weak or dead, the Remote
Commander do_ not work.
To avoid damage from possible battery
leakage
Remove the batteries when you will nut use the
Remote Commander for a long time.
Nora sobre la duracibn de las pilas
l,as pilas del mando a d istancia duran 6 meses
apruximadamente en c_ndiciones nurmales de
uso. Cuando ]as pilas se debiiitan ose agotan, el
mandu a distancia no funciona.
Para evitar da_os derivados de posibles fugas
de las pilas
Retire las pilas cuando no vaya a utilizar ei
mando a distancia durante onus dfas.
Q.
Using the Remote Commander
Make sure that the COMMANDER mode is set to
ON in the menu system (p.43).
Uso del mando a distancia
Compruebe que el modu COMMANDER est',
ajustado en la posici6n ON en el sistema de
men6s (p.43).
O Mr=_
,0,
O _XECu'I"_
CZZD
€_F
................................................... =4
81

7
4_
Remote Control Direction
Aim the Remote Commander to the n_mote
sensor within the range as shown below.
Direcci6n del control remoto
Dirijael mando a dlstancia ai sensor remoto
dentro del margen que se mue_tra a
continuaci6n.
15
Notes on the Remote Commander
• Keep the remote sensor away from strong light
sources, such as direct sunlight or
illumination. Otherwise, the remote control
may not be effective.
• Be sure that there is no obstacle between the
remote sensor and the Remote Commander.
• This camcorder works at commander mode
VTR 2. The commander mode (1, 2, and 3) are
used to disting_aish this camcorder from other
Sony VCRs to avoid remote control
misoperation. If you use another Sony VCR at
commander mode VTR 2, we reCommend you
change the commander mode or cover the
remote sensor of the VCR with black paper.
Notas sobre el mando a distancia
° Mantenga alejado el sensor remotu de fuentes
Be i|uminaci6nintensas,como lucesdirectas o
laluzdirectadel sol.De otromodo, esp_sible
que no funcioneelcontrolmmoto.
• Aseg_resede que no se interponganinga)n
obst_culoentreelsensorremoto y elmando a
distancia.
° Estavideoc_imarafiandonaen elmodode
mando a distanciaVTR 2.Elmodo de mando a
distancia(I,2 y 3)seutilizapara distinguirla
videoGimara de otvas videograbadoras Sony,
con el fin de evitarfallosde funcionamiento
delcontrolremote.Siemplea otra
videograbadoraSony enelmodo de mando a
distanciaVTR 2,serecomienda cambiar el
modo de mando a distanciao cubrirelsensor
remoto de lavideograbadoracon papelnegro.
To Watch the Demonstration
You can watch a brief demonstration of pictures
with special effects.
If the demonstration appears when you turn on
the camcorder for the first time, exit the Demo
mode to use your camcorder.
To enter Demo mode
(1) Remove the cassette and turn the POWER
switch to OFF.
(2) Turn STANDBY up.
(3) While holding down t::_ turn the POWER
switch to CAMERA. Demonstration starts.
If a cassette is inserted, the demo mode will be
cancelled. Note that once you enter demo mode,
this mode is retained as long as lithium battery is
in place. Therefore demonstration starts
automatically 10 minutes later every time you
turn the POWER switch to CAMERA or 10
minutes after the cassette has been removed.
To exit Demo mode
(1) Turn the POWER switch to OFF.
(2) Turn STANDBY up.
(3) While holding down I-I, turn the POWER
switch to CAMERA.
Para visualizar la demostraci6n
Es posihle visualizar una peque:_a demostraci6n
de imfigenes con efectos t'speciales.
Sila demostraci6n aparece al activar la
videoc,imara por primera vez, salga del modo de
demu.,,traci6n para utilizar ia videocamara.
Para introducir el modo de demostracibn
(1) Extraiga el cassette y ajuste el conmutador
POWER en la posici6n OFF.
(2) Gire STANBY hacia arriba.
(3) Mientras mantiene pulsado Ca- gire el
conmutador POWER hasta CAMERA. Se
inicia la demostraci6n.
Si hay un cassette insertado, el modo de
demostraci6n se cancelar,_. Tenga en cuenta que
una vez qoe introduzca el modo de
demostraci6n, t4ste permanecer,i mientras la pila
de litio est_ instalada. De esta forma, la
demostraci6n se inicia autom_iticamente 10
segundos despu_s cada vez que ajuste el
conmutador POWER en la posici6n CAMERA, o
10 minutos despu_s de haber extraido el cassette.
Para salir del modo de demostraci6n
(1) Ajuste el conmutador POWER en la posici6n
OFF.
(2) Gire STANDBY hacia arriba.
(3) Mientras mantiene pulsado I"},glre el
conmutador POWER hasta CAMERA.
o.
E
g
=_
o
3
=_"
=
o
!
.q.
=o.
g
!
l=
82 83

t
¢J1
[]
[]
[] []
[] Remaining tape indicator (p.13)
5rain ._ lmin -_- --'0min -.
[] Remaining battery indicator (p.S8)
_tAUTO DATE indicator (p.13)
[] Date or Time (p.31)
[] Recording lamp (in the viewfinder) (p.11)
[] Indicador de cinta restante (p.13)
5min
[] Indicador de bateria restante (p.58)
[] Indicador AUTO DATE (p.13)
[] Fecha u hora (p.31)
[1_ Indicador de grabaci6n/indicador de
bateria (en el visor electr6nico) (p.11)
[] Wind indicator (p.43)
[] Manual focusing indicator (p.37)
_IPROGRAM AE mode indicator (p.32, 33)
[] Steady Shot indicator (p.41)
[] Back light indicator (p.40)
[] Wide mode indicator (p.45)
[] Power zoom indicator (p.14)
[] FADER indicator (p.38)
[] Picture effect indicator (p.34, 35)
[] Warning indicators (p.B6)
[] Playing back or recording in Hi8 format
[] Playing back a tape recorded in,LP mode
(p.56)
[] Tape transport mode (p. 11)
II-_Tape counter (p.13)
[] Indicador de nivel de viento (p.43)
[] Indicador de enfoque manual (p.37)
[] Indicador de modo PROGRAM AE (p.32.33)
[] Indicador de estabilizaci6n de imagen
(Steady Shot) (p.41)
[] Indicador de contraluz (p.40)
[] Indicador de modo de gran angular (p.45)
FT] Indicador de zoom (p.14)
[] Indicador FADER (p.38)
[] Indicador de efecto de imagen (p.34, 35)
_'_ Indicadores de aviso (p.86)
[] Reproduccidn o grabaci6n en formato Hi8
[] Reproduccidn de una cinta grabada en el
mode LP (p.56)
[] Modo de transporte de cinta (p.11)
[] Contador de dnta (p.13)
o
8
3
84 85

r
if indicatoea/lash in the viewfinder or a caution
lamp on the camcorder flashes, check the
fol]owing:
,b : You can hear the beep sound when the BEEP
is set to ON. (p.43)
[]
[]
[]
I
[]
i
: I .,.\ _ /i
Si los indicadoresdel visor elect_nico y e{
indicador de precauci6n de la videoc_imara
parpadean, compruebe 1osiguiente:
h :Es Posible escuchar el pitido cuando BEEP
est:_ajustado en la posici6n ON. (p.43)
[]
Smm
.,/_'o.
_..,,'-
om,_
.;A:
[]
_ooo
_eom
_eoo
[]
I
i
86
[] Battery Remaining
Slow flashing: The battery isweak.
Fast flashing: The battery isdead.
1-_The tape is near the end.
[_The tape has run out.
[] No tape has been inserted.
{-5]The tab on the tape is out (red). (p.10)
[] Moisture condensation has occurred. (p.62)
E_The video heads may be contaminated.
(p.63)
[] Some other trouble has occurred.
Disconnect the power source and contact your
Sony dealer or local authorized _¢acility.
[]The lithium battery is weak or the lithium
battery is not installed. (p.52)
[] Bateria restante
Parpadeo lento: labateria estd d_bil.
Parpadeo _pido: la bateria e_t_iagutada.
[] La cinta estl llegando al final.
r_ se ha terminado la cinta.
[] No se ha insertado ninguna dnta.
[] Se ha retirado la lengr,eta de la cinta (rojo)
(p.10).
[] Se ha condensado humedad (p.62).
[] Es posible que se hayan contaminado los
cabezales de video (p.63).
[] Se ha producido otro problema.
Desconecte la fuente de alimentaci6n y
pbngase en cuntacto con su proveedor Sony
n_is cercanoo con el estab]ecimiento
autorizado Sony local.
[] Lapilade litiose ha debilltadoo no se ha
inst_ladoninguna pilade lltio(p.52)
-
 1
1
-
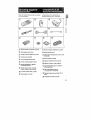 2
2
-
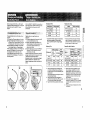 3
3
-
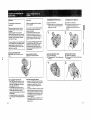 4
4
-
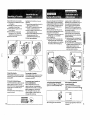 5
5
-
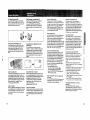 6
6
-
 7
7
-
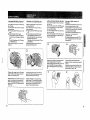 8
8
-
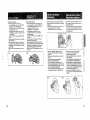 9
9
-
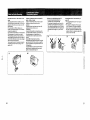 10
10
-
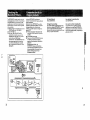 11
11
-
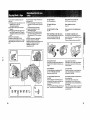 12
12
-
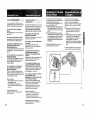 13
13
-
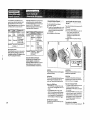 14
14
-
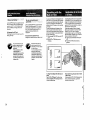 15
15
-
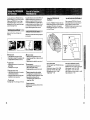 16
16
-
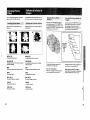 17
17
-
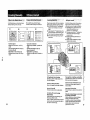 18
18
-
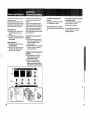 19
19
-
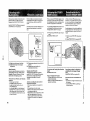 20
20
-
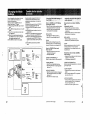 21
21
-
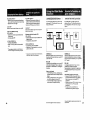 22
22
-
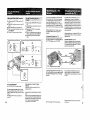 23
23
-
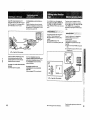 24
24
-
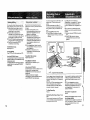 25
25
-
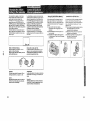 26
26
-
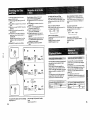 27
27
-
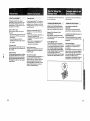 28
28
-
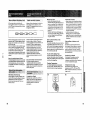 29
29
-
 30
30
-
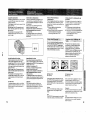 31
31
-
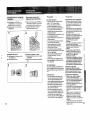 32
32
-
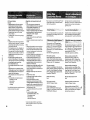 33
33
-
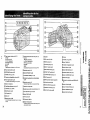 34
34
-
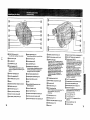 35
35
-
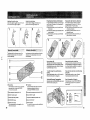 36
36
-
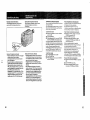 37
37
-
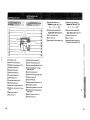 38
38
-
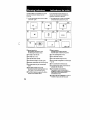 39
39


Sony CCD-TRV30 Manual de usuario
- Categoría
- Videocámaras
- Tipo
- Manual de usuario
- Este manual también es adecuado para
en otros idiomas
- English: Sony CCD-TRV30 User manual
Artículos relacionados
-
Sony HDR-XR550V El manual del propietario
-
Sony DCR-SR87 El manual del propietario
-
Sony DCR-SX40 El manual del propietario
-
-
-
-
-
-
Sony DSC-S950 El manual del propietario
-