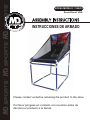
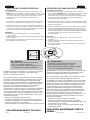
MD Sports 1358412 El manual del propietario
- Tipo
- El manual del propietario

Please contact us before returning the product to the store.
Por favor póngase en contacto con nosotros antes de
devolver el producto a la tienda.
INSTRUCCIONES DE ARMADO
MODEL/MODELO: 1358412
Sears/Kmart USA

Español
English
GARANTÍA LIMITA DE 90 DIAS
LIMITED 90 DAYS WARRANTY
(Continúe en la siguiente página.) www.themdsports.com
1358412
1
(Continued on the next page.)
This product is covered by a limited warranty that is effective for
90 days from the date of purchase. If, during the limited
warranty period, a part is found to be defective or breaks, we
will offer replacement part at no cost to you, the customer. The
only exceptions to the warranty include main frames, table tops,
playing surfaces, batteries or tools.
The above warranty will not apply in cases of damages due to
improper usage, alteration, misuse, abuse, accidental damage
or neglect.
This Limited Warranty gives you specific legal rights and you
may also have other rights which vary from one State
(province) to another.
“PLEASE SAVE THESE INSTRUCTIONS
AND PURCHASE RECEIPT!”
A PURCHASE RECEIPT (or other proof of purchase date) will
be required before any warranty service is initiated. All requests
for warranty service, please feel free to contact our Consumer
Service Department at :
WEBSITE: www.themdsports.com
*Please be aware of your product’s Limited Warranty for the
return/refund policy from the store, We, at Medal Sports, can
not handle the product which is out of product’s limited warranty
since we only provide available parts.
PLEASE CONTACT US BEFORE RETURNING
THE PRODUCT TO THE STORE.
THANK YOU VERY MUCH!
Este producto está cubierto por una garantía efectiva de 90 días a
partir de la fecha de su compra. Durante el periódo límite de la
garantía, si una parte defectuosa o quebrada es encontrada, nosotros
ofreceremos una reparación o un reemplazo de la parte sin ningún
costo para ud, nuestro cliente. Las únicas excepciones de la garantía
incluyen marcos principales, tableros de mesa, superficies, pilas o
herramientas.
La susodicha garantía no se aplicará en los casos de daños y
perjuicios debido al uso impropio, la alteración, el mal uso, el abuso,
el daño accidental o la negligencia.
Esta garantía limitada le da a usted derechos legales específicos,
usted también puede tener otros derechos que varían de un estado
(provincia) a otro.
"POR FAVOR GUARDE ESTAS INSTRUCCIONES
Y RECIBO DE LA COMPRA! "
EL RECIBO DE LA COMPRA (o cualquier otra prueba de la fecha de
su compra) sería requerida antes que cualquier servicio de garantía
fuera iniciada. Toda solicitud para el servicio de garantía, por favor
siéntase libre de ponerse en contacto con nuestro Departamento de
Servicio de Consumidor en:
WEBSITE: www.themdsports.com
*Por favor tenga atención sobre el Límite de Garantía de su producto
de la política de vuelta/reembolsa desde la tienda, Nosotros, Medal
Sports, no podemos manejar el producto que está fuera del límite de
garantía ya que proporcionamos solamente partes disponibles.
POR FAVOR PÓNGASE EN CONTACTO CON NOSOTROS ANTES
DE DEVOLVER EL PRODUCTO A LA TIENDA.
MUCHAS GRACIAS!
1 - Please leave your name, address, phone number, model number,
parts needed on the answering machine if there is no attendant.
Failure to do so will result in a delay in shipping parts to you.
2 - Please review the replacement parts list and make sure that
you have all your parts before beginning assembly. For
questions that may arise or for missing/damaged parts,
please contact us.
1 - Por favor deje su nombre, dirección, número telefónico, número
de modelo, partes necesarios a la máquina contestadora si no
fuera atendido. El fracaso de hacer así le causará un retraso del
envío de partes.
2 - Por favor consultar la lista de piezas de recambio y asegurarse
que usted tiene todas sus piezasantes de comenzar la asamblea.
Para preguntas o para piezas que no se hayan incluidos/dañadas,
por favor pongase en contacto con nosotros.
AVISO!NOTICE!
STAPLE YOUR RECEIPT HERE /
GRAPA SU RECIBO AQU

Español
English
(Continúe en la siguiente página.) www.themdsports.com
1358412
2
(Continued on the next page.)
CAUTION !
CAUTION !
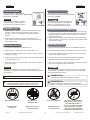
ASSEMBLY TIPS
TOOLS REQUIRED
Phillips Screwdriver - Not Included
Standard (Flat Head Screwdriver) - Not Included
Allen Wrench - Included
Electric Screwdrivers may be helpful
during assembly; however, please set
a low torque and use extreme caution.
Destornillador Phillips - No incluido
Destornillador de Cabeza Plana - No incluido
Llave Allen - Incluido
Los destornilladores eléctricos pueden ser
de gran ayuda durante el ensamblado; sin
embargo, por favor ajuste el par de giro
bajo y sea extremadamente precavido.
1 - This product is intended for INDOOR use only.
2 - Please Do Not sit, climb or lean on the game table / court.
3 - Please Do Not drag the table when moving it in order to avoid the
damaged on the legs.
4 - Please only use spray furniture polish to clean the exterior surfaces
on the game table / court.
5 - This is not a child's toy, adult supervision is required for children
playing this game.
Changes or modifications not expressly approved by the party
responsible for compliance could void the user’s authority to operate
the equipment.
WARNING:
PELIGRO DE ASFIXIO - - Este artículo contiene piezas
pequeñas y / o pequeñas bolas. No apto para menores de 3 años.
WARNING: Adult Assembly Required.
IMPORTANT NOTICE!
ADVERTENCIA:
Las tareas de montaje debe realizarlas un adulto.
Herramientas Necesarias
CONSEJOS PARA EL ENSAMBLADO
ADVERTENCIA:
Adultos fuertes
necesarios
Ningunos niños en el
área de asamblea
Mantenga lejos de
animal doméstico
X 2
No use y no guarde el produco
al aire libre. Para el empleo
de interior sólo. Ningunas
condiciones mojadas/húmedas.
Strong Adults Needed No Children in
Assembly Area
Keep away from pets Do not use or keep product
outdoors. For indoor use only.
No wet/humid conditions.
Power Tools
- Set Low Torque
High Torque
over tightened
1 - Please read the instructions carefully, and follow all assembly,
operation or safety instructions properly in order to avoid
damage or injury. For the assembly, at least two adults are
required.
2 - Some figures or drawings may not look exactly like your
product. Please read and understand the text before beginning
each assembly step.
1. Este producto está destinado para el uso INTERIOR solamente.
2. Por favor No sientes, subas o inclínes la mesa de juego / cancha.
3. Por favor No arrastres la mesa cuando está en movimiento para
evitar el daño sobre las piernas.
4. Por favor use sólo la cera espray de muebles para limpiar las
superficies exteriores sobre la mesa de juego / cancha.
5. Esto no es un juguete de niños, se requieren la supervisión adulta
para niños cuando está jugando este juego.
Los destornilladores eléctricos pueden ser de gran ayuda durante
el ensamblado; sin embargo, por favor ajuste el par de giro bajo y
sea extremadamente precavido.
AVISO IMPORTANTE!
1. Por favor lea las instrucciones con cuidado y siga todo durante el
montaje, la operación o instrucciones de seguridad correctamente
para evitar el daño o la herida. Para el montaje, por lo menos se
requieren dos adultos.
2. Algunas figuras o dibujos podrían parecer no estén exactamente
como su producto. Por favor lea y entienda el texto antes de iniciar
cada paso del montaje.

Español
English
www.themdsports.com
1358412
3
(Continúe en la siguiente página.)
(Continued on the next page.)
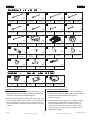
1358412 PARTS LIST / LISTA DE PARTES
1. Find a clean, level place to begin the assembly of your
Basketball Game. We recommend that two adults work
together to assemble this basketball game.
2. Remove all the parts from the box and verify that you
have all of the listed parts as shown on the Parts list
below. Carefully cut or tear the four corners of the box
so that the bottom of the box can be used as your work
surface.
1. Encuentre un lugar limpio, plano para comenzar el
montaje de su Juego de Baloncesto. Recomendamos
montado este juego de baloncesto por dos
adultos conjuntos.
2. Quite todas las partes de la caja y verifique si estén
todas las partes catalogadas como mostrado a la
Lista de Partes debajo. Con cuidado el corte o el
rasgón de los cuatro rincones de la caja de modo
que el inferior de la caja pueda ser usado como su
superficie de trabajo.
INSTRUCCION DE MONTAJE
ASSEMBLY INSTRUCTIONS:
9
10 11
12
13 14 15
16
2 3 41
x6 x4 x2 x4
6 7 85
x4 x2 x2
x2
18 19
x4
Backboard
Straight
Connector
Conector Directo
3 Way Connector
Conector de
3 Vías
L Connector Conector L
Velcro Velcro
T Connector Conector T
Tablero De
Canasta
x1
Ball Return Net
Redes de Vuelta
de Pelota
x1
Basketball
5” Dia.
Baloncesto
5" Dia.
17
x4
Tube - 1
Φ25.4x698mm
Tube - 2
Φ25.4x514mm
Tube - 3
Φ25.4x584mm
Tube - 4
Φ25.4x546mm
Tubo - 3
Φ25.4x584mm
Tube - 7
Φ25.4x206mm
Tubo - 7
Φ25.4x206mm
Tube - 8
Φ25.4x89mm
Tubo - 8
Φ25.4x89mm
Tubo - 4
Φ25.4x546mm
Tubo - 2
Φ25.4x514mm
Tubo - 1
Φ25.4x698mm
Tube - 5
Φ25.4x464mm
Tubo - 5
Φ25.4x464mm
Tube - 6
Φ25.4x349mm
Tubo - 6
Φ25.4x349mm
Tube - 9
Φ25.4x698mm
Tubo - 9
Φ25.4x698mm
Inflation Pump
with Needle
Angle Connector
Conector de
Angulo
Bomba de Inflación
con Aguja
x1
x6
x6
x4 x4
x1
x4
Net
Red
A1 A2
x2
A3
1358412 PRE-INSTALLED PARTS / PIEZAS PREINSTALADAS
Electronic
Scorer
Marcador
Electrónico
x1
Rim with Paddle Borde con Paleta
x2

FIG. 2
1
2
14
18
3
5
FIG.1
3. Attach tube 1, 2, 14, 18 as shown in FIG 1.
FIG.1
3. Adjunte los tubos 1, 2, 14, 18 como mostrado en
la FIG. 1
www.themdsports.com
1358412
4
(Continúe en la siguiente página.)
(Continued on the next page.)
Español
English
FIG.2
4. Attach tube 3, 5, 14 as shown in FIG 2.
FIG.2
4. Adjunte los tubos 3, 5, 14 como mostrado en la FIG. 2
X 2
X 4
X 2
X 4
X 2
X 4
FIG. 1
1
1
2
2
2
2
18
18
14
14
X 2
3
3
5
5
5
5
14

1
8
16
17
FIG.3
5. Attach tube 1, 8 with T connector 16, 17 as shown
in FIG 3.
FIG.3
5. Adjunte los tubos 1, 8 con conectores T 16, 17 como
mostrado en la FIG 3.
www.themdsports.com
1358412
5
(Continúe en la siguiente página.)
(Continued on the next page.)
Español
English
FIG.4
6. Attach tube 4, 9 with connector 14, 15 as shown
in FIG 4.
FIG.4
6. Adjunte los tubos 4, 9 con conectores 14, 15 como
mostrado en la FIG 4.
X 1
X 2
X 2
X 4
4
9
14
15
X 4
X 1
X 2
X 2
FIG. 4
9
4
4
4
4
14
15
FIG. 3
1
16
17
17
8
T Connector
/ Conector T
Angle Connector
/ Conector de
Angulo
Angle Connector
/ Conector de
Angulo

1
6
7
15
16
FIG.5
7. Attach tube 1, 6, 7 with connector 15, 16 as shown
in FIG 5.
FIG.5
7. Adjunte los tubos 1, 6, 7 con conectores 15, 16 como
mostrado en la FIG 5.
www.themdsports.com
1358412
6
(Continúe en la siguiente página.)
(Continued on the next page.)
Español
English
X 3
X 2
X 2
X 2
X 4
FIG. 5
1
1
1
6
6
7
7
16
15

10
FIG.6
8. Attach the Backboard (#10) to the Tubes using four
Velcros (#19) as shown in FIG. 6A.
FIG.6
8. Adjunte el Tablero(#10) a los Tubos usando 4 Velcros
(#19) como mostrado en la FIG. 6A.
www.themdsports.com
1358412
7
(Continúe en la siguiente página.)
(Continued on the next page.)
Español
English
X 1
19
19
19
19
19
X 4
FIG. 6
10
19
FIG. 6A

FIG. 7
FIG.7
9. Slide velcro strap of Ball Return Net (#11) to the main
frame (pre-installed). See FIG. 7A.
FIG.7
9. Deslice la correa de velcro a la Red de Retorno de Pelota
(#11) al cuadro principal (pre-instalado). Vea la FIG. 7A.
www.themdsports.com
1358412
8
(Continúe en la siguiente página.)
(Continued on the next page.)
Español
English
11
X 1
FIG. 7A
11
11
A1
A3

ELECTRONIC SCORER OPERATION OPERACIÓN DEL MARCADOR ELECTRÓNICO
www.themdsports.com
1358412
9
(La ultima página)
(The last page)
Español
English
Install Batteries
1. Unscrew bolt using a screwdriver and open the battery box. Insert
3 AAA batteries ( not included) in the order of polarity as shown on the
inside cover. Then close the cover using a screwdriver. Turn the power
on using the on/off switch. (if the game will not be used for a long
period of the time, we recommend that the batteries should
be removed)
2. While game is in Sleep Mode, if a basketball is scored, the game will
turn back on and the score board will begin the 5 sec. countdown.
3. After finishing the game, Turn OFF the scorer by using the ON/OFF
switch. NOTE: The scoreboard will turn off after 5 minutes, if not in use,
however, we recommend turning the ON/OFF switch to OFF when the
game will not be used for an extended period of time.
Reminding:
a. Batteries must be installed according to the correct polarization
(+ and -) requires.
b. Please clean the battery contacts and also those of the devices prior to
battery installation.
c. If the game will not be used for a long period of time, we recommend
that the batteries should be removed.
Instalación de las pilas
1. Desatornille el perno usando un destornillador y abra la caja de la
batería. Inserte 3 pilas AAA (que no va incluido) en orden de la polaridad
como se muestra en la tapa interior. Luego, tápelo usando un
destornillador. Prenda la carga usando el interruptor de prender/apagar
(on/off). (Si el juego no será usado por un peródo prolongado, le
recomendamos quitar las baterías).
2. Cuando el juego está en Modo de Dormir, si un baloncesto ha marcado
el puntaje, se vuelve al juego y el marcador de puntos iniciará ua cuenta
regresiva de 5 segundos.
3. Después de finalizar el juego, Apague el marcador de puntos usando el
interruptor de PRENDER/APAGAR (ON/OFF). Nota: el marcador de
puntos se apagará después de 5 minutos al no ser usado, sin embargo,
le recomendamos apagar el interruptor PRENDER/APAGAR (ON/OFF)
en APAGAR (OFF) cuando el juego no sería continuado por un
periódo prolongado.
Atención:
a. Las pilas deben ser instaladas según la polarización correcta
requerido (+ y -).
b. Limpie los contactos de baterias y también los aparatos antes de la
instalación de batería.
c. Si no jugará el juego por un largo período de tiempo, recomendamos
que quite las baterias.
WARNING:
!
1) Requires 3 “AAA” batteries (not included).
2) Do not mix old and new batteries.
3) Do not mix alkaline, standard (carbon zinc), or
rechangeable (nickel-cadmium) batteries.
ADVERTENCIA:
!
1) Requiere 3 “AAA” baterias (no incluido).
2) No mezcles baterias viejas y nuevas.
3) No mezcles baterias alkalina, estándar (carbón,
cinc), o recargable (níquel-cadmio).
ADVERTENCIA:Los cambios o modificaciones no expresamente
aprobado por la parte responsable del cumplimiento podrían
anular la autoridad del usuario para operar el equipo.
NOTA: Este equipo ha sido probado y encontrado para cumplir
con los límites para el dispositivo digital de Clase B, de
conformidad con la Parte 15 de las Reglas de FCC. Estos límites
son diseñados para proporcionar protección razonable contra la
interferencia dañosa en una instalación residencial. Este equipo
genera, usa y podría irradiar la energía de radiofrecuencia y, si
no fuera instalado y usado conforme con las instrucciones,
podría causar interferencia dañosa para la comunicación de
radio. Sin embargo, no está garantizado que la interferencia no
ocurrirá en una instalación particular. Si este equipo realmente
causado interferencia dañosa a la radio o la recepción de
televisión, podría ser determinada por girando el equipo off y on,
el usuario está animado de corregir la interferencia por una o
más siguientes medidas:
-- Reoriente o recoloque la antena de recepción.
-- Incremente la separación entre el equipo y el receptor.
-- Conecte el equipo a una salida del circuito diferente que el que
está conectado con el receptor.
-- Consulte el proveedor o un técnico experienciado de radio/
televisión por ayudas
WARNING: Changes or modifications not expressly approved by
the party responsible for compliance could void the user’s
authority to operate the equipment.
NOTE: This equipment has been tested and found to comply with
the limits for a Class B digital device, pursuant to Part 15 of the
FCC Rules. These limits are designed to provide reasonable
protection against harmful interference in a residential installation.
This equipment generates, uses and can radiate radio frequency
energy and, if not installed and used in accordance with the
instructions, may cause harmful interference to radio
communications. However, there is no guarantee that interference
will not occur in a particular installation. If this equipment does
cause harmful interference to radio or television reception, which
can be determined by turning the equipment off and on, the user
is encouraged to try to correct the interference by one or more of
the following measures:
-- Reorient or relocate the receiving antenna.
-- Increase the separation between the equipment and receiver.
-- Connect the equipment into an outlet on a circuit different from
that to which the receiver is connected.
-- Consult the dealer or an experienced radio/TV technician for help.
YOU ARE NOW READY TO PLAY!
VOUS ETES MAINTENANT PRET A
JOUER !
A2
A2
OFF/ON
RIGHT
LEFT
Transcripción de documentos
MODEL/MODELO: 1358412 Sears/Kmart USA INSTRUCCIONES DE ARMADO Please contact us before returning the product to the store. Por favor póngase en contacto con nosotros antes de devolver el producto a la tienda. English Español LIMITED 90 DAYS WARRANTY GARANTÍA LIMITA DE 90 DIAS This product is covered by a limited warranty that is effective for 90 days from the date of purchase. If, during the limited warranty period, a part is found to be defective or breaks, we will offer replacement part at no cost to you, the customer. The only exceptions to the warranty include main frames, table tops, playing surfaces, batteries or tools. Este producto está cubierto por una garantía efectiva de 90 días a partir de la fecha de su compra. Durante el periódo límite de la garantía, si una parte defectuosa o quebrada es encontrada, nosotros ofreceremos una reparación o un reemplazo de la parte sin ningún costo para ud, nuestro cliente. Las únicas excepciones de la garantía incluyen marcos principales, tableros de mesa, superficies, pilas o herramientas. The above warranty will not apply in cases of damages due to improper usage, alteration, misuse, abuse, accidental damage or neglect. La susodicha garantía no se aplicará en los casos de daños y perjuicios debido al uso impropio, la alteración, el mal uso, el abuso, el daño accidental o la negligencia. This Limited Warranty gives you specific legal rights and you may also have other rights which vary from one State (province) to another. Esta garantía limitada le da a usted derechos legales específicos, usted también puede tener otros derechos que varían de un estado (provincia) a otro. “PLEASE SAVE THESE INSTRUCTIONS AND PURCHASE RECEIPT!” "POR FAVOR GUARDE ESTAS INSTRUCCIONES Y RECIBO DE LA COMPRA! " EL RECIBO DE LA COMPRA (o cualquier otra prueba de la fecha de su compra) sería requerida antes que cualquier servicio de garantía fuera iniciada. Toda solicitud para el servicio de garantía, por favor siéntase libre de ponerse en contacto con nuestro Departamento de Servicio de Consumidor en: A PURCHASE RECEIPT (or other proof of purchase date) will be required before any warranty service is initiated. All requests for warranty service, please feel free to contact our Consumer Service Department at : WEBSITE: www.themdsports.com WEBSITE: www.themdsports.com *Please be aware of your product’s Limited Warranty for the return/refund policy from the store, We, at Medal Sports, can not handle the product which is out of product’s limited warranty since we only provide available parts. *Por favor tenga atención sobre el Límite de Garantía de su producto de la política de vuelta/reembolsa desde la tienda, Nosotros, Medal Sports, no podemos manejar el producto que está fuera del límite de garantía ya que proporcionamos solamente partes disponibles. PLEASE CONTACT US BEFORE RETURNING THE PRODUCT TO THE STORE. POR FAVOR PÓNGASE EN CONTACTO CON NOSOTROS ANTES DE DEVOLVER EL PRODUCTO A LA TIENDA. THANK YOU VERY MUCH! MUCHAS GRACIAS! STAPLE YOUR RECEIPT HERE / GRAPA SU RECIBO AQU NOTICE! AVISO! 1 - Please leave your name, address, phone number, model number, parts needed on the answering machine if there is no attendant. Failure to do so will result in a delay in shipping parts to you. 1 - Por favor deje su nombre, dirección, número telefónico, número de modelo, partes necesarios a la máquina contestadora si no fuera atendido. El fracaso de hacer así le causará un retraso del envío de partes. 2 - Please review the replacement parts list and make sure that you have all your parts before beginning assembly. For questions that may arise or for missing/damaged parts, please contact us. 1358412 (Continued on the next page.) 2 - Por favor consultar la lista de piezas de recambio y asegurarse que usted tiene todas sus piezasantes de comenzar la asamblea. Para preguntas o para piezas que no se hayan incluidos/dañadas, por favor pongase en contacto con nosotros. 1 (Continúe en la siguiente página.) www.themdsports.com English Español Herramientas Necesarias TOOLS REQUIRED Phillips Screwdriver - Not Included Standard (Flat Head Screwdriver) - Not Included Allen Wrench - Included CAUTION ! Destornillador Phillips - No incluido Destornillador de Cabeza Plana - No incluido Llave Allen - Incluido Power Tools - Set Low Torque High Torque over tightened Electric Screwdrivers may be helpful during assembly; however, please set a low torque and use extreme caution. Los destornilladores eléctricos pueden ser de gran ayuda durante el ensamblado; sin embargo, por favor ajuste el par de giro bajo y sea extremadamente precavido. ASSEMBLY TIPS CONSEJOS PARA EL ENSAMBLADO 1 - Please read the instructions carefully, and follow all assembly, operation or safety instructions properly in order to avoid damage or injury. For the assembly, at least two adults are required. 1. Por favor lea las instrucciones con cuidado y siga todo durante el montaje, la operación o instrucciones de seguridad correctamente para evitar el daño o la herida. Para el montaje, por lo menos se requieren dos adultos. 2. Algunas figuras o dibujos podrían parecer no estén exactamente como su producto. Por favor lea y entienda el texto antes de iniciar cada paso del montaje. 2 - Some figures or drawings may not look exactly like your product. Please read and understand the text before beginning each assembly step. AVISO IMPORTANTE! IMPORTANT NOTICE! 1 - This product is intended for INDOOR use only. 1. Este producto está destinado para el uso INTERIOR solamente. 2 - Please Do Not sit, climb or lean on the game table / court. 2. Por favor No sientes, subas o inclínes la mesa de juego / cancha. 3 - Please Do Not drag the table when moving it in order to avoid the damaged on the legs. 3. Por favor No arrastres la mesa cuando está en movimiento para evitar el daño sobre las piernas. 4 - Please only use spray furniture polish to clean the exterior surfaces on the game table / court. 4. Por favor use sólo la cera espray de muebles para limpiar las superficies exteriores sobre la mesa de juego / cancha. 5 - This is not a child's toy, adult supervision is required for children playing this game. 5. Esto no es un juguete de niños, se requieren la supervisión adulta para niños cuando está jugando este juego. CAUTION ! Los destornilladores eléctricos pueden ser de gran ayuda durante el ensamblado; sin embargo, por favor ajuste el par de giro bajo y sea extremadamente precavido. Changes or modifications not expressly approved by the party responsible for compliance could void the user’s authority to operate the equipment. ADVERTENCIA: WARNING: Adult Assembly Required. Las tareas de montaje debe realizarlas un adulto. WARNING: ADVERTENCIA: PELIGRO DE ASFIXIO - - Este artículo contiene piezas pequeñas y / o pequeñas bolas. No apto para menores de 3 años. X2 Strong Adults Needed No Children in Assembly Area Keep away from pets Adultos fuertes necesarios Ningunos niños en el área de asamblea Mantenga lejos de animal doméstico 1358412 (Continued on the next page.) 2 Do not use or keep product outdoors. For indoor use only. No wet/humid conditions. No use y no guarde el produco al aire libre. Para el empleo de interior sólo. Ningunas condiciones mojadas/húmedas. (Continúe en la siguiente página.) www.themdsports.com English Español 1358412 PARTS LIST / LISTA DE PARTES 1 2 3 x6 Tube - 1 Φ25.4x698mm Tubo - 1 Φ25.4x698mm 5 x4 Tube - 2 Φ25.4x514mm x2 Tubo - 2 Tube - 3 Φ25.4x514mm Φ25.4x584mm 6 Tubo - 5 Φ25.4x464mm Tube - 6 Φ25.4x349mm Tube - 9 Φ25.4x698mm Tube - 7 Φ25.4x206mm 13 11 Backboard Straight Connector Ball Return Net 18 17 Conector de Angulo 16 L Connector Conector L x4 3 Way Connector Baloncesto 5" Dia. x6 T Connector Conector T 19 x4 Angle Connector Basketball 5” Dia. x4 Conector Directo Tubo - 8 Φ25.4x89mm x4 Redes de Vuelta de Pelota x6 Bomba de Inflación con Aguja Tube - 8 Φ25.4x89mm 12 15 x1 Tubo - 4 Φ25.4x546mm x2 x1 Tablero De Canasta 14 Inflation Pump with Needle Tubo - 7 Φ25.4x206mm x1 Tubo - 9 Φ25.4x698mm Tube - 4 Φ25.4x546mm x2 Tubo - 6 Φ25.4x349mm x1 x4 8 x2 10 9 Tubo - 3 Φ25.4x584mm 7 x4 Tube - 5 Φ25.4x464mm 4 x4 Conector de 3 Vías Velcro Velcro 1358412 PRE-INSTALLED PARTS / PIEZAS PREINSTALADAS A1 A3 A2 x2 Net x1 Electronic Scorer Red Marcador Electrónico x2 Rim with Paddle Borde con Paleta ASSEMBLY INSTRUCTIONS: INSTRUCCION DE MONTAJE 1. Find a clean, level place to begin the assembly of your Basketball Game. We recommend that two adults work together to assemble this basketball game. 1. Encuentre un lugar limpio, plano para comenzar el montaje de su Juego de Baloncesto. Recomendamos montado este juego de baloncesto por dos adultos conjuntos. 2. Remove all the parts from the box and verify that you have all of the listed parts as shown on the Parts list below. Carefully cut or tear the four corners of the box so that the bottom of the box can be used as your work surface. 1358412 (Continued on the next page.) 2. Quite todas las partes de la caja y verifique si estén todas las partes catalogadas como mostrado a la Lista de Partes debajo. Con cuidado el corte o el rasgón de los cuatro rincones de la caja de modo que el inferior de la caja pueda ser usado como su superficie de trabajo. 3 (Continúe en la siguiente página.) www.themdsports.com Español English 1 X2 2 X4 14 X2 18 X4 18 FIG. 1 2 1 14 2 2 2 1 18 FIG.1 FIG.1 3. Attach tube 1, 2, 14, 18 as shown in FIG 1. 3. Adjunte los tubos 1, 2, 14, 18 como mostrado en la FIG. 1 5 5 14 3 X2 5 X4 14 X2 FIG. 2 5 5 3 3 FIG.2 FIG.2 4. Attach tube 3, 5, 14 as shown in FIG 2. 1358412 (Continued on the next page.) 4. Adjunte los tubos 3, 5, 14 como mostrado en la FIG. 2 4 (Continúe en la siguiente página.) www.themdsports.com 17 English Angle Connector / Conector de Angulo 1 X1 8 X2 16 X2 17 X4 Angle Connector / Conector de Angulo Español 17 FIG. 3 8 1 16 T Connector / Conector T FIG.3 FIG.3 5. Attach tube 1, 8 with T connector 16, 17 as shown in FIG 3. 4 X4 9 X1 14 X2 15 X2 5. Adjunte los tubos 1, 8 con conectores T 16, 17 como mostrado en la FIG 3. 4 FIG. 4 14 4 9 4 15 FIG.4 FIG.4 6. Attach tube 4, 9 with connector 14, 15 as shown in FIG 4. 1358412 4 (Continued on the next page.) 6. Adjunte los tubos 4, 9 con conectores 14, 15 como mostrado en la FIG 4. 5 (Continúe en la siguiente página.) www.themdsports.com Español English 1 X3 6 X2 7 X2 15 X2 16 X4 1 FIG. 5 15 6 6 1 7 16 7 1 FIG.5 FIG.5 7. Attach tube 1, 6, 7 with connector 15, 16 as shown in FIG 5. 1358412 (Continued on the next page.) 7. Adjunte los tubos 1, 6, 7 con conectores 15, 16 como mostrado en la FIG 5. 6 (Continúe en la siguiente página.) www.themdsports.com Español English 10 X1 19 X4 FIG. 6 19 10 19 19 FIG. 6A 19 19 FIG.6 FIG.6 8. Attach the Backboard (#10) to the Tubes using four Velcros (#19) as shown in FIG. 6A. 1358412 (Continued on the next page.) 8. Adjunte el Tablero(#10) a los Tubos usando 4 Velcros (#19) como mostrado en la FIG. 6A. 7 (Continúe en la siguiente página.) www.themdsports.com Español English 11 X1 FIG. 7 11 FIG. 7A A3 A1 11 FIG.7 FIG.7 9. Slide velcro strap of Ball Return Net (#11) to the main frame (pre-installed). See FIG. 7A. 1358412 (Continued on the next page.) 9. Deslice la correa de velcro a la Red de Retorno de Pelota (#11) al cuadro principal (pre-instalado). Vea la FIG. 7A. 8 (Continúe en la siguiente página.) www.themdsports.com Español English ELECTRONIC SCORER OPERATION OPERACIÓN DEL MARCADOR ELECTRÓNICO Install Batteries 1. Unscrew bolt using a screwdriver and open the battery box. Insert 3 AAA batteries ( not included) in the order of polarity as shown on the inside cover. Then close the cover using a screwdriver. Turn the power on using the on/off switch. (if the game will not be used for a long period of the time, we recommend that the batteries should be removed) Instalación de las pilas 1. Desatornille el perno usando un destornillador y abra la caja de la batería. Inserte 3 pilas AAA (que no va incluido) en orden de la polaridad como se muestra en la tapa interior. Luego, tápelo usando un destornillador. Prenda la carga usando el interruptor de prender/apagar (on/off). (Si el juego no será usado por un peródo prolongado, le recomendamos quitar las baterías). 2. While game is in Sleep Mode, if a basketball is scored, the game will turn back on and the score board will begin the 5 sec. countdown. 2. Cuando el juego está en Modo de Dormir, si un baloncesto ha marcado el puntaje, se vuelve al juego y el marcador de puntos iniciará ua cuenta regresiva de 5 segundos. 3. After finishing the game, Turn OFF the scorer by using the ON/OFF switch. NOTE: The scoreboard will turn off after 5 minutes, if not in use, however, we recommend turning the ON/OFF switch to OFF when the game will not be used for an extended period of time. Reminding: a. Batteries must be installed according to the correct polarization (+ and -) requires. b. Please clean the battery contacts and also those of the devices prior to battery installation. c. If the game will not be used for a long period of time, we recommend that the batteries should be removed. 3. Después de finalizar el juego, Apague el marcador de puntos usando el interruptor de PRENDER/APAGAR (ON/OFF). Nota: el marcador de puntos se apagará después de 5 minutos al no ser usado, sin embargo, le recomendamos apagar el interruptor PRENDER/APAGAR (ON/OFF) en APAGAR (OFF) cuando el juego no sería continuado por un periódo prolongado. Atención: a. Las pilas deben ser instaladas según la polarización correcta requerido (+ y -). b. Limpie los contactos de baterias y también los aparatos antes de la instalación de batería. c. Si no jugará el juego por un largo período de tiempo, recomendamos que quite las baterias. A2 A2 RIG HT OF F/O N LEF T ! WARNING: 1) Requires 3 “AAA” batteries (not included). 2) Do not mix old and new batteries. 3) Do not mix alkaline, standard (carbon zinc), or rechangeable (nickel-cadmium) batteries. ADVERTENCIA: 1) Requiere 3 “AAA” baterias (no incluido). 2) No mezcles baterias viejas y nuevas. 3) No mezcles baterias alkalina, estándar (carbón, cinc), o recargable (níquel-cadmio). ! WARNING: Changes or modifications not expressly approved by the party responsible for compliance could void the user’s authority to operate the equipment. ADVERTENCIA:Los cambios o modificaciones no expresamente aprobado por la parte responsable del cumplimiento podrían anular la autoridad del usuario para operar el equipo. NOTE: This equipment has been tested and found to comply with the limits for a Class B digital device, pursuant to Part 15 of the FCC Rules. These limits are designed to provide reasonable protection against harmful interference in a residential installation. This equipment generates, uses and can radiate radio frequency energy and, if not installed and used in accordance with the instructions, may cause harmful interference to radio communications. However, there is no guarantee that interference will not occur in a particular installation. If this equipment does cause harmful interference to radio or television reception, which can be determined by turning the equipment off and on, the user is encouraged to try to correct the interference by one or more of the following measures: -- Reorient or relocate the receiving antenna. -- Increase the separation between the equipment and receiver. -- Connect the equipment into an outlet on a circuit different from that to which the receiver is connected. -- Consult the dealer or an experienced radio/TV technician for help. NOTA: Este equipo ha sido probado y encontrado para cumplir con los límites para el dispositivo digital de Clase B, de conformidad con la Parte 15 de las Reglas de FCC. Estos límites son diseñados para proporcionar protección razonable contra la interferencia dañosa en una instalación residencial. Este equipo genera, usa y podría irradiar la energía de radiofrecuencia y, si no fuera instalado y usado conforme con las instrucciones, podría causar interferencia dañosa para la comunicación de radio. Sin embargo, no está garantizado que la interferencia no ocurrirá en una instalación particular. Si este equipo realmente causado interferencia dañosa a la radio o la recepción de televisión, podría ser determinada por girando el equipo off y on, el usuario está animado de corregir la interferencia por una o más siguientes medidas: -- Reoriente o recoloque la antena de recepción. -- Incremente la separación entre el equipo y el receptor. -- Conecte el equipo a una salida del circuito diferente que el que está conectado con el receptor. -- Consulte el proveedor o un técnico experienciado de radio/ televisión por ayudas YOU ARE NOW READY TO PLAY! 1358412 (The last page) 9 VOUS ETES MAINTENANT PRET A JOUER ! (La ultima página) www.themdsports.com-
 1
1
-
 2
2
-
 3
3
-
 4
4
-
 5
5
-
 6
6
-
 7
7
-
 8
8
-
 9
9
-
 10
10


MD Sports 1358412 El manual del propietario
- Tipo
- El manual del propietario
en otros idiomas
- English: MD Sports 1358412 Owner's manual
Artículos relacionados
-
MD Sports BBG022_087M Manual de usuario
-
-
-
-
-
-
-
-
