
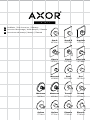
Terrano
37711xx1
Steel
35715801
Citterio
39716xx1
Citterio
39711xx1
Uno
38715xx1
Terrano
37716xx1
Citterio M
34714001
Carlton
17716xx1
Massaud
18741001
Starck
10715xx1
Carlton
17712xx1
Starck X
10717001
Montreux
16816xx1
Montreux
16824xx1
Phoenix
17382xx1
Phoenix
17383xx1
Urquiola
11731xx1
EN Installation/UserInstructions/Warranty
FR Instructionsdemontage/Moded'emploi/Garantie
ES Instruccionesdemontaje/Manejo/Garantía

2
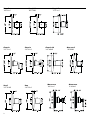
Starck
10715xx1
Starck X
10717001
Montreux
16816xx1
Massaud
18741001
Steel
35715801
Citterio M
34714001
Uno
38715xx1
Citterio
39711xx1
Citterio
39716xx1
Montreux
16824xx1
Urquiola
11731xx1

3
Carlton
17712xx1
Carlton
17716xx1
Terrano
37711xx1
Terrano
37716xx1
Phoenix
17382xx1
Phoenix
17383xx1
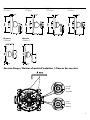
Service Stops / Butées d’arrêt d’isolation / Cierres de servicio
closed
ferme
cerrado
open
ouvert
abierto

4
Technical Information
Recommendedwaterpressure 15-75PSI
Max.waterpressure 145PSI
Recommendedhotwatertemp. 120°-140°F*
Max.hotwatertemp 176°F*
Flowrate@44PSI 15.3GPM
Connections ¾"NPT
*Pleaseknowandfollowallapplicablelocalplumbing
codeswhensettingthetemperatureonthewaterheater.
Données techniques
Pressiond’eaurecommandée 15-75PSI
Pressiond’eaumaximum 145PSI
Températurerecommandée 120°-140°F*
d'eauchaude
Températuremaximumd'eauchaude 176°F*
Capaciténominale@44PSI 15.3GPM
Raccordements ¾"NPT
English
Français
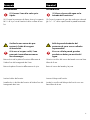
Installation Considerations
Forbestresults,Hansgroherecommendsthat
thisunitbeinstalledbyalicensed,professional
plumber.
Pleasereadovertheseinstructionsthoroughlybe
-
forebeginninginstallation.Makesurethatyou
havealltoolsandsuppliesneededtocomplete
theinstallation.
ThistrimisforusewithiBoxUniversalPlusmodel
01850181(notincluded).
Topreventscaldinjury,themaximumoutputtem
-
peratureoftheshowervalvemustbenohigher
than120°F.InMassachusetts,themaximumout-
puttemperaturecanbenohigherthan112°F.
Thisunitdoesnothavean"o"position.Itmust
beusedincombinationwithavolumecontrol
valve/valves.
Keepthisbookletandthereceipt(orotherproof
ofdateandplaceofpurchase)forthisproductin
asafeplace.Thereceiptisrequiredshoulditbe
necessarytorequestwarrantyparts.
•
•
•
•
•
•
*Vousdevezconnaîtreetrespectertouslescodesdeplom-
berielocauxapplicablespourleréglagedelatempérature
duchaue-eau.
À prendre en considération pour
l’installation
Pourdemeilleursrésultats,Hansgroherecom-
mandequeceproduitsoitinstalléparunplom-
bierprofessionnellicencié.
Veuillezlireattentivementcesinstructionsavant
deprocéderàl’installation.Assurez-vousdedis
-
poserdetouslesoutilsetdumatérielnécessaires
pourl’installation.
Cedispositifrequiertunepièceintérieure
01850181.
Pourempêcherdesblessuresparébouillante
-
ment,latempératuredesortiemaximaledu
robinetdedouchenedoitpasexcéder120°F.
AuMassachusetts,latempératuredesortiemaxi-
maledurobinetdedouchenedoitpasexcéder
112°F.
Conservezcelivretetlereçu(ouuneautre
preuvesurlaquellegurentladateetl’endroit
del’achat)pourceproduitdansunendroitsûr.
Lereçuestrequissivouscommandezdespièces
sousgarantie.
•
•
•
•
•

5
Datos tecnicos
Presiónrecomendadaenservicio 15-75PSI
Presiónenserviciomax. 145PSI
Temperaturarecomendadadel 120�-140�F*
aguacaliente
Temperaturadelaguacalientemax. 176�F*
Caudalmáximo@44PSI 15.3GPM
Conexiones ¾"NPT
Consideraciones para la
instalación
Paraobtenermejoresresultados,lainstalación
debeestaracargodeunplomeroprofesional
matriculado.
Antesdecomenzarlainstalación,leaestas
instruccionesdetenidamente.Asegúresedetener
lasherramientasylosinsumosnecesariospara
completarlainstalación.
Launidadrequiereunapiezainteriordeválvula
01850181.
Paraevitarescaldaduras,lamáximatemperatura
desalidadelaválvuladeladuchanodebeex
-
cederlos120°F.EnMassachusetts,lamáxima
temperaturadesalidadelaválvuladeladucha
nodebeexcederlos112°F.
Mantengaestefolletoyelrecibo(uotrocom
-
probantedellugaryfechadecompra)deeste
productoenlugarseguro.Elreciboserequiere
encasodesernecesariosolicitarpiezasbajo
garantía.
•
•
•
•
•
Español
*Debeconocerycumplirtodosloscódigoslocalesapli-
cablesparaajustarlatemperaturadelcalentadordeagua.

6
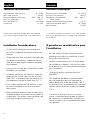
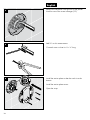
English
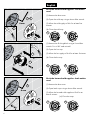
Flush the hot and cold supplies - one outlet
used
(1)Removethedustcover.
(2)Openthecoldstopusinga4mmAllenwrench.
(3)Allowthecoldsupplytoushforatleastve
minutes.
(4)Closethecoldstop.
(1)Removetheushingblockusinga5mmAllen
wrench.Turnit90°andreinstall.
(2)Openthehotstop.
(3)Allowthehotsupplytoushforatleast5minutes.
(4)Closethehotstop.
Flush the hot and cold supplies - both outlets
used
(1)Removethedustcover.
(2)Openbothstopsusinga4mmAllenwrench.
(3)Allowthehotandcoldsuppliestoushforat
least5minutes.
(4)Closethestops.
4 mm
4 mm
1
2
3
4
2 4
1
2
3
4
1
2
3
2 4

7
Français Español
Rincez les conduites d’alimentation de l’eau
chaude et de l’eau froide - seulement une
sortie est utilisée
(1)Retirezl’étiquette.
(2)Ouvrezl’eaufroideàlabutéed'arrêtd'isolation
àl’aided’unecléhexagonalede4mm..
(3)Rincezleconduitedel’eaufroidepouraumoins
5minutes.
(4)Fermezl'eaufroideàlabutéed'arrêtd'isolation.
Lave los suministros frío y caliente - sólo
una salida es utilizada
(1)Retirelaetiqueta.
(2)Abraelpasodelaguafríaenelcierredeservicio
conunallaveAllende4mm.
(3)Laveelsuministrodeaguafríaparaporlomenos
cincominutos.
(4)Cierreelpasodelaguafríaenelcierrede
servicio.
(1)Retirezlavisdelapièced’insertionaeuranteà
l’aided’unecléhexagonalede5mm.Tournez-leà
90°,etréinstallez-le.
(2)Ouvrezl’eauchaudeàlabutéed'arrêt
d'isolation.
(3)Rincezleconduitedel’eauchaudepourau
moins5minutes.
(4)Fermezl'eauchaudeàlabutéed'arrêt
d'isolation.
(1)RetireelinsertodelavadoconunallaveAllende
5mm.Gírelo90°yreinstálelo.
(2)Abraelpasodelaguacalienteenelcierrede
servicio.
(3)Laveelsuministrodeaguacalienteparaporlo
menoscincominutos.
(4)Cierreelpasodelaguacalienteenelcierrede
servicio.
Rincez les conduites d’alimentation de l’eau
chaude et de l’eau froide - les deux sorties
sont utilisées
(1)Retirezl’étiquette.
(2)Ouvrezl’eauàlesbutéesd'arrêtd'isolationà
l’aided’unecléhexagonalede4mm.
Rincezlesconduitesdel’eaupouraumoins5
minutes.
Lave los suministros frío y caliente - ambas
salidas son utilizadas
(1)Retirelaetiqueta.
(2)Abralospasosdelaguaenloscierresdeservi
-
ciosconunallaveAllende4mm.
Lavelossuministrosdeaguaparaporlomenoscinco
minutos.

8
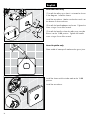
English
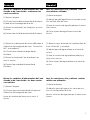
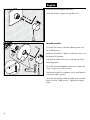
Installation
(1) Turn the water o at the main.
(2)Cuttheplastershieldsothatitextends¹⁄₁₆"-⅛"
fromthenishedwallsurface.
Seal the wall around the plaster
shield with waterproof sealant.
Failure to seal the wall can lead
to possible water damage.
Removetheushinsertscrewusinga5mmAllen
wrench.
Removetheushinsertandseal.
Installthefunctionblock.
Tightenthefunctionblockscrewsusinga4mmAllen
wrench.
1
2
3
1
2

9
Français Español
Instalación
(1) Cierre el paso del agua en la
entrada del suministro.
(2)Corteelprotectordeyesodemodoquesobresal
-
ga¹⁄₁₆"-⅛"delasuperciedelaparedterminada.
Installation
(1) Fermez l’eau à la valve prin-
cipale.
(2)Coupezleprotecteurdefaçonàcequ’unepartie
de¹⁄₁₆à⅛posoitàl’extérieurdelasurfacedumur
ni.
Scellez le mur autour du pro-
tecteur à l’aide d’un agent
d’étanchéité.
Si le mur n’est pas scellé, l’eau
pourrait éventuellement causer
des dommages.
Retirezlavisdelapièced’insertionaeuranteà
l’aided’unecléhexagonalede5mm.
Retirezlapièced’insertionaeuranteetlejoint.
Insérezleblocdefonction.
Installezlesvisdublocdefonctionàl’aided’uneclé
hexagonalede4mm.
Selle la pared alrededor del
protector de yeso con un sellador
impermeable.
Si no se sella la pared, pueden
producirse daños por acción del
agua.
Quitelostornillosdelinsertodelavadoconunallave
Allende5mm.
Retireelinsertodelavadoylajunta.
Inserteelbloquedefunción.
Instalelostornillosdelbloquedefunciónconuna
llaveAllende4mm.

10
English
Measurethedistancefromthefrontoftheplaster
shieldtooneofthescrew-inanges("X").
Add½"tothismeasurement.
CuteachscrewsothatitisX+½"long.
Installthecarrierplatesothatthenotchisatthe
bottom.
Installthecarrierplatescrews.
Openthestops.
4
5
6

11
Français Español
Mesurezladistanceentrelasurfacedumuretla
brideduvis.Notezlalongueurmesurée(«X»).
Ajoutez½poàcettelongueur«X».Notezcette
longueur.
Coupezlesvisdefaçonàcequecelui-cidépassede
½po+lalongueurX.
Installezlaplaque-supportdefaçonàceque
l’encochesoitverslebas.
Installezlesvisdelaplaque-support.
Ouvrezl’eauàlesbutéesd'arrêtd'isolation.
Midaladistanciaentrelasuperciedelaparedyla
bridadetornillo.Anoteestamedida(“x”).
Agregue½"aX.Anoteestamedida.
Corteeltornillodemodoquesobresalga½"+X.
Instalelaplacadelportadordemaneraquela
ranuraquedeenlaparteinferior.
Coloquelostornillosdelaplacadelportador.
Abraelpasodelaguaenloscierresdeservicio.

12
English
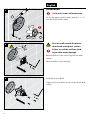
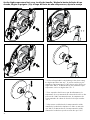
Axor Massaud only
(1)Installthesafetysetsothatitisorientedasshown
inthediagram.Installthesleeve.
Installtheescutcheon.Makesurethatthenotchisat
thebottomoftheescutcheon.
(2)Installthehandleadapterandscrew.Tightenthe
screwusinga3mmAllenwrench.
(3)Installthehandlesothatthesafetystopoverride
buttonisatthe12:00position.Tightenthehandle
screwusinga2mmAllenwrench.
Axor Urquiola only
Placeadabofwaterproofsealantatthegroutjoints.
Installthesleevewiththeindexmarkatthe12:00
position.
Installtheescutcheon.
!
1
2
3

13
Français Español
Axor Urqiola seulement
Appliquerunepetitequantitédel’agentd’étanchéité
auxjointsdecoulis.
Axor Urquiola sólo
Coloqueunpocodeselladorapruebadeaguaen
lasunionesdelalechadadecemento.
Installezladouillethermostatiquedefaçonàceque
lamarquederepèresoitàlaposition12:00.
Installezlerosace.
Instaleelcasquillodemaneraquelamarcaindica
-
doraquedeenposiciónde12:00.
Instaleelorón.
Axor Massaud seulement
(1)Installezl’ensembledesécuritédefaçonàce
qu’ilsoitorientécommesurleschéma.Installezle
manchon.
Installezl’écussondefaçonàcequel’encochesoit
verslebas.
(2)Installezl’adaptateurdepoignéeetvissez-le.
Serrezlavisàl’aided’unecléhexagonalede3mm.
(3)Installezlapoignéedefaçonàcequelebouton
desurpassementdelabutéedesécuritésoitàla
position12:00.Serrezlavisdelapoignéeàl’aide
d’unecléhexagonalede2mm.
Axor Massaud sólo
(1)Instaleelequipodeseguridaddemaneraque
quedeorientadocomosemuestraeneldibujo.
Instaleelmando.
Instaleelescudodemaneraquelaranuraquedeen
laparteinferior.
(2)Instaleeladaptadordeelmandoyatornille.
AprieteeltornilloconunallaveAllende3mm.
(3)Instaleelmandodemaneraqueelbotónde
vencimientodetopedeseguridadseencuentreen
unaposiciónde90grados.Aprieteeltornillodeel
mandoconunallaveAllende2mm.

14
English
All other models
(1)Installthesleevesothattheindexingmarkisat
the12:00position.
Installtheescutcheon.Makesurethatthenotchisat
thebottomoftheplate.
Lubricatethevalvestemwithasmallamountofthe
enclosedgrease.
(2)Installthehandleadapterandscrew.Tightenthe
screwusinga3mmAllenwrench.
Lubricatetheendoftheadapterwithasmallamount
ofwhiteplumber'sgrease.
(3)Installthehandlesothatthesafetystopoverride
buttonisatthe12:00position.Tightenthehandle
screw.
Installthehandleadapterandscrew.
Installthehandle.Tightenthehandlescrew.
!
1
2
3

15
Français Español
Installezl’adaptateurdepoignée.Serrezlesvisà
l’aided’unecléhexagonalede3mm.
Installezlapoignéethermostatique.
Serrezlavisdelapoignée.
Instaleeladaptadordelmando.Aprieteeltornillo
conunallaveAllende3mm.
Instaleelmandotermostatico.
Aprieteeltornillodelmando.
Tous les autres modèles
(1)Installezlemanchondefaçonàcequela
marquederepèresoitàlaposition12:00.
Installezl’écusson.Veillezàcequel’encochesoitau
basdelaplaque.
Lubriezlatigedemanoeuvreavecunepetitequan
-
titédegraissedeplomberieblanche.
(2)Installezl’adaptateurdepoignéeetvissez-le.
Serrezlavisàl’aided’unecléhexagonalede3mm.
Lubriezl’extrémitédel’adaptateuravecunepetite
quantitédegraissedeplomberieblanche.
(3)Installezlapoignéedefaçonàcequelebouton
desurpassementdelabutéedesécuritésoitàla
position12:00.
Serrezlavisdelapoignéeàl’aided’unpetittourn
-
evisàtêteplate.
Todos los demás modelos:
(1)Instaleelmandodemaneraquelamarcaindica
-
doraquedeenposiciónde90grados.
Instaleelescudo.Asegúresedequelaranurase
encuentreenlaparteinferiordelaplaca.
Lubriqueelvástagodelaválvulaconunapequeña
cantidaddegrasablancaparaplomería.
(2)Instaleeladaptadordeelmandoyatornille.
AprieteeltornilloconunallaveAllende3mm.
Lubriqueelextremodeladaptadorconunapequeña
cantidaddegrasablancaparaplomería.
(3)Instaleelmandodemaneraqueelbotónde
vencimientodetopedeseguridadseencuentreen
unaposiciónde90grados.Ajusteeltornillode
elmandoconundestornilladorpequeñodehoja
plana.

16
**Followallapplicablelocalplumbingcodeswhensetting
thehightemperaturelimitstop.Topreventscaldinjury,the
maximumoutputtemperatureoftheshowervalvemustbeno
higherthan120°F.InMassachusetts,themaximumoutput
temperaturecanbenohigherthan112°F.
**Pourempêcherdesblessuresparébouillantement,la
températuredesortiemaximaledurobinetdedouchenedoit
pasexcéder120°F.AuMassachusetts,latempératurede
sortiemaximaledurobinetdedouchenedoitpasexcéder
112°F.
**Alprevnentescaldaherida,latemperaturadesalida
máximadelaválvuladechaparrónnodebesermásalto
que120°F.EnMassachusetts:latemperaturadesalida
máximadelaválvulanopuedesermásaltoque112°F.
Set the high temperature limit stop, Justify the handle / Réglez la butée de limite d’eau
chaude, Réglez la poignée / Fije el tope de límite de alta temperatura, Ajuste la manija
**

17
User Instructions / Instructions à l’intention de l’utilisateur /
Instrucciones para el usuario
100°
a
b

18
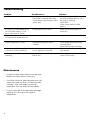
Problem Possible Cause Solution
Insucientwater -Supplypressureinadequate
-Thermostaticcartridgelterdirty
-Showerheadscreenwasherorlter
gasketdirty
-Checkwaterpressure(Ifapump
hasbeeninstalledchecktoseeif
thepumpisworking).
-Cleanlters
-Cleanscreenwasherorlter
gasket
Crossow:hotwaterbeingforced
intocoldwatersupply,orvice
versa,whenmixerisclosed
-Checkvalvesdirtyorworn -Cleancheckvalves,replaceif
necessary
Outputtemperaturedoesnot
correspondwithtemperatureset
-Handlenotjustied -Justifythehandle
Outputtemperatureiserratic -Temperatureregulatordirtyor
calcied
-Cleantemperaturethermostatic
cartridgelters
-Replacethermostaticcartridge
Outputwaterisallhotorallcold
--doesn'tmix(newinstallation)
-Roughvalveiscrossconnected--
hotonrightandcoldonleft
-Removefunctionblock,turnit180
andreinstall.
Safetystopoverridebuttonnot
operating
-Springdefective
-Buttondirty
-Cleanspringand/orbutton,
replaceifnecessary
Troubleshooting
Maintenance
Inspectthecheckvalvesatleastonceperyear.
Replacethecheckvalvesifnecessary.
Shouldthevolumeofwaterdecreaseovertime,
inspectandcleantheltersonthethermostatic
cartridge.Afterreassembly,setthehigh
temperaturelimitstopandjustifythehandle.
Toprolongthelifeofthethemostaticcartridge,
regularlyrunitthroughitsfullrangeof
temperatures.
•
•
•

19
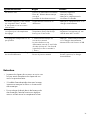
Dysfonctionnement Origine Solution
Pasassezd´eau -Pressiond´alimentationinsusante
-Filtredel´élémentthermostatique
encrassé
-Joint-ltrededouchetteencrassé
-Contrôlerlapression
-Nettoyerlesltres
-Nettoyerlejoint-ltreentrela
douchetteetleexible
Circulationopposée,l´eauchaude
estcompriméedansl´arrivée
d´eaufroideetviceversaavec
robinetfermé
-Clapetanti-retourencrasséou
défectueux
-Nettoyerleclapetanti-retouroule
changeréventuellement
Latempératureàlasortiene
correspondpasàlatempérature
deréglage
-Lethermostatn´apasétéréglé
-Températured'eauchaudetrop
basse,pasd´eaufroide
-Réglerlethermostat
-Augmenterlatempératured´eau
chaudeentre42Cet65C
Leréglagedelatempératuren´est
paspossible
-L´élémentthermostatiqueest
encrasséouentartré
-Lapiècedebaseaune
alimentationinversée(l´eaufroide
doitêtreàdroiteetl´eauchaude
àgauche)ouelleestmontéeà
l´envers
-Nettoyerl´élémentthermostatique
oulechangezéventuellement
-Montezleblocdefonctionà180
Boutonàpressionduverrouillage
desécuritédéfectueux
-Ressortdéfectueux
-Boutonàpressionentartré
-Nettoyerleressortoubienle
boutonàpression,lechanger
éventuellement
Inspectezlesclapetsdenon-retouraumoinsune
foisparannée.Remplacezlesclapetsdenon-
retourlorsquenécessaire.
Siledébitd’eaudevaitdécroîtreavecletemps,
inspectezetnettoyezlesltressurlacartouche
thermostatique.
Pourprolongerladuréedeviedelacartouche
thermostatique,faites-lafonctionnerrégulière
-
mentenutilisanttouteslestempératuresd’eau.
•
•
•
Entretien

20
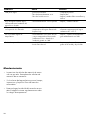
Problema Causa Solución
Salepocaagua -presióninsuciente
-ltrodeltermoelementosucio
-ltrodeladuchasucio
-comprobarpresión
-limpiarltro
-limpiar/cambiarltrosentreexoy
ducha
Flujodeaguacruzadaagua
calienteentraenlatuberíadel
aguafríaoalrevés
-válvulaantirretornosuciaopierde -limpiar/cambiarválvula
Temperaturadelaguano
correspondealomarcado
-termostatonohasidoajustado
-temperaturadelaguademasiado
bajanohay
-ajustartermostato
-aumentartemperaturadelagua
calientea42º-65ºC.
Noesposibleregularla
temperatura
-termoelementosucio/llenodecal
-cuerpoempotradomalmontado
(debeestar:frío=derecha)o
instaladogiradoen180º
-limpiar/cambiartermoelemento
-girarembellecedoren180º
Botóndetopenofunciona -muelledefecto
-botónllenodecal
-Limpiaryaplicarunanacapade
grasaenelmuelleyelpulsador
Inspeccionelasválvulasderetenciónalmenos
unavezporaño.Reemplacelasválvulasde
retencióndesernecesario.
Sielvolumendelaguadisminuyeconeltiempo,
inspeccioneylimpielosltrosdelcartucho
termostático.
Paraprolongarlavidaútildelcartuchotermos
-
tático,hágalofuncionarregularmenteentodos
losrangosdetemperatura.
•
•
•
Mantenimiento

21
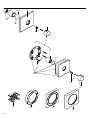
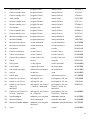
Replacement Parts / Pièces détachées / Repuestos
48x5
17
1
23
16x2
18
14
21
22
48x5
10
8
31
28
48x5
9
15
13
28
19
20
16
32
2
3
4
5
6
7
34
33

22
35
36
48x3
19
37
28
38
27
26
25
11
29
12
30
48x5
15
24

23
1 Starckhandle poignéeStarck manijaStarck 10391xx1
2 Carltonhandle,lever poignéeCarlton manijaCarlton 17391xx1
3 Carltonhandle,cross poignéeCarlton manijaCarlton 17994xx1
4 Steelhandle poignéeSteel manijaSteel 35391801
5 Terranohandle,lever poignéeTerrano manijaTerrano 37391xx1
6 Terranohandle,cross poignéeTerrano manijaTerrano 37994xx1
7 Unohandle poignéeUno manijaUno 38391xx1
8 Citteriohandle,lever poignéeCitterio manijaCitterio 39994xx1
9 Citteriohandle,cross poignéeCitterio manijaCitterio 39391xx1
10 Montreuxhandle,cross poignéeMontreux manijaMontreux 16594xx1
11 Massaudhandle poignéeMassaud manijaMassaud 18097001
12 Massaudescutcheon rosaceMassaud escudoMassaud 98678000
13 Montreuxescutcheon rosaceMontreux escudoMontreux 98648xx0
14 escutcheon rosace escudo 96452xx0
15 Citterioescutcheon rosaceCitterio escudoCitterio 96749xx0
16 StarckXescutcheon rosaceStarckX escudoStarckX 97449000
17 CitterioMescutcheon rosaceCitterioM escudoCitterioM 98917000
18 sleeve douille casquillo 97439xx0
19 xingscrew visdusupport tornilloportador 96454000
20 carrierplate supportderosace orónportador 96447000
21 thermostatcartridge elémentthermostatique termoelemento 96633000
22 sealset setdejoint junta 96636000
23 checkvalve clapetanti-retour válvulaantirretorno 97350000
24 extensionset25mm rallonge25mm prolongación25mm 13595000
25 extensionset22mm rallonge22mm prolongación22mm 13596xx0
26 extensionsetCitterio/
StarckX/
Massaud
rallonge22mmCitterio
/StarckX/Massaud
prolongación22mm
Citterio/StarckX/
Massaud
97407xx0
27 extensionset22mmCit-
terioM/Urquiola
rallonge22mmCitterio
M/Urquiola
prolongación22mm
CitterioM/Urquiola
98860000
28 handleadapter adapteurpourpoignée adaptadormanija 96435000
29 Massaudsleeve douilleMassaud casquilloMassaud 98679000
30 Massaudhandleadapter adapteurpourpoignée
Massaud
adaptadormanijaMassaud 98701000
31 screw vis tornillo 96525000

24
32 Montreuxhandle,lever poignéeMontreux manijaMontreux 16694xx1
33 Phoenixhandle,cross poignéePhoenix manijaPhoenix 96631xx1
34 Phoenixhandle,lever poignéePhoenix manijaPhoenix 96791xx1
35 carrierplate supportderosace orónportador 98793000
36 Urquiolasleeve douilleUrquiola casquilloUrquiola 97439xx0
37 Urquiolaescutcheon rosaceUrquiola escudoUrquiola 95173xx0
38 Urquiolahandle poignéeUrquiola manijaUrquiola 11791xx1
xx = Colors / Couleurs / Acabados
00 chrome
62 oilrubbedbronze
80 steel/steeloptik
82 brushednickel
83 polishednickel

25
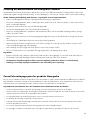
Conseil de nettoyage pour les produits Hansgrohe
Denosjourslesanitairemoderne,larobinetterieetlesdouchettessecomposentdematériauxtrèsdiérentspoursatisfaire
àlademandeconcernantledesignetlafonctionnalité.Pouréviterlesdétériorationsetlesréclamations,aussibienpour
l’utilisationquepourlenettoyageprochain,certainscritèresserontàprendreenconsidération.
A prendre en considération lors de l’entretien de la robinetterie et de douchettes:
• Ondoitseulementutiliserlesproduitsdenettoyagequisontformellementprévuspourcedomaine.
• Aucuncontactavecl’applicationdenettoyantscontenantdel’acidechlorhydrique,del’acideformiqueoudel’acide
acétiquequipeuventcauserdeconsidérablesdétériorations.
• Lesnettoyantsàbased’acidephosphorique,aussi,nesontpasàutilisersansréserves.
• Lemélangedenettoyantsengénéraln’estpasautorisé.
• L’utilisationdeproduitsdenettoyagerécurantsetdesustensilescommedesfrottoirs,desépongesàrécureretdes
torchonsmicrobresestexclue.
• Lesconseilsd’entretiendesproducteursdenettoyantssontàsuivreobligatoirement.
• Lenettoyageestàfairecorrespondreavecledosage,letempsd’action,spéciqueàl’objetetàlanécessité.
Cleaning Recommendation for Hansgrohe Products
Modernbathroomfaucets,kitchenmixersandshowersconsistofverydierentmaterialstocomplywiththeneedsofthe
marketwithregardtodesignandfunctionality.Toavoiddamage,itisnecessarytoconsidercertaincriteriawhencleaning.
At the cleaning of the ttings and showers, in principle, it must be pointed out:
• Onlyusecleaningmaterialwhichisexplicitlyintendedforthistypeofapplication.
• Neverusecleaningmaterials,whichcontainhydrochloricacid,formicacid,chlorinepalelyeoraceticacid,asthey
causeconsiderabledamage.
• Phosphorusacidiccleanersareonlyconditionallyapplicable.
• Donotmixcleaningagents,unlessdirectedbythemanufacturer.
• Neverusecleaningmaterialsorapplianceswithanabrasiveeect,suchasunsuitablecleaningpowders,sponge
padsormicrobercloths.
• Alwaysfollowtheinstructionsonthecleaningagentpackagewithrespecttospeciedcleanerdosageandcontact
time.
• Thebuildingupofcalcicationshastoberemovedbycleaningregularly.
• Whenusingspraycleaners,sprayrstontoasoftclothorspongeneverdirectlyontotheproduct,asdropscould
enteropeningsandgapsandcausedamage.
• Aftercleaning,rinsethoroughlywithcleanwatertoremoveanycleanerresidue.
• Theuseofsteamcleanersisnotpermitted.Thehightemperaturescandamagetheproducts.
Important
• Residuesofliquidsoaps,shampoosandshowerfoamscanalsocausedamage,sorinsewithcleanwaterafteruse.
• Thedamageofalreadydamagedsurfaceswilldeteriorateundertheeectofthecleansers.
• Components with damaged surfaces must be replaced, otherwise there is a risk of injury.
• Damage caused by improper treatment is not covered by our warranty.

26
Recomendación de limpieza para los productos de Hansgrohe
Hoyendía,lasgriferíasdebañoydecocinaasícomoduchasmodernassecomponendematerialesmuydistintospara
satisfacerlasexigenciasdelmercadorespectoaldiseñoylafuncionalidad.Paraevitardañosyreclamacioneshayque
tenerencuentaciertosaspectostantoenelusocomoensulimpieza.
Para el cuidado de las griferías y las duchas en principio hay que seguir lo siguiente:
• Usarsólodetergentesprevistosespecícamenteparaestecampodeaplicación.
• Noaplicardetergentesquecontenganácidoclorhídrico,fórmicooacéticoporquepuedencausardañosimportantes.
• Detergentesquecontienenácidofosfóricotampocopuedenseraplicadosilimitadamente.Porreglageneralnose
debenmezclardetergentes.
• Tampocosedebenutilizarutensiliosabrasivos,comosonpolvosabrasivos,esponjasopañosdemicrobra.
• Setienenqueseguirsiemprelassugerenciasdeempleodelosfabricantesdelosdetergentes.
• Lalimpiezatienequeserrealizadasegúnladosicaciónyeltiempodeactuación,enfuncióndelobjetoyajustadaa
lasnecesidadesespecícasdelmismo.
• Graciasaunalimpiezaperiódicasepuedenevitarlosdepósitosdecal.
• Noconvienerociareldetergenteenningúncasosobrelagriferíasinosobrelostextilesyejecutarlalimpiezaasí,
porqueellíquidopuedeentrarenaperturasohendidurasdelagriferíaycausardaños.
• Despuésdelalimpiezahayqueaclararconsucienteaguaparaeliminarcompletamenteelrestodedetergente.
• Lautilizacióndelimpiadoresavapornoestápermitida,lasaltastemperaturaspuedendañarlosproductos.
Indicaciones importantes
• Losresiduosdeproductosdeaseocomojabónlíquido,champúsygeldeduchapuedendañartambiénlosmateriales.
• Porloquetambiénsedeberáprestaratenciónalosiguiente:aclararconabundanteaguadespuésdeluso.
• Conmaterialesyadañadoslaaccióndedetergentsincrementaráeldesgastedeestos.
• Los componentes con supercies dañadas deberán cambiarse, en otro caso se corre el peligro de
lesionarse.
• Losdañosqueresultendeunusoinadecuadonoestánincluidosennuestragarantía.
• Ledépôtdecalcaireestévitéparunnettoyagerégulier.
• Pourlenettoyageavecproduitvaporiséliquide,enaucuncassurlarobinetterie,maisaucontraireaspergésurle
chion(torchon,éponge)eteectuercommecelalenettoyage,carlesaérosolspeuventpénétrerdanslesouvertureset
fentesdelarobinetterieetpeuventprovoquerdesdétériorations.
• Aprèslenettoyagerincezavecsusammentd’eauclairepouréliminerlesrestesdeproduitsattachés.
• L’utilisationd’appareildenettoyageàvapeurn’estpasautorisée,carlestempératuresimportantespeuventdétériorer
lesproduits.
Indications importantes
• Lesproduitspourlecorpscommelessavonsliquides,lesshampooingsoulesgelsdedouchepeuventcauserdes
détériorations.
• Iciaussiondoit:Aprèsl’utilisationrincersoigneusementlesrestesavecdel’eau.
Conseil de nettoyage
• Les deteriorations imputables à un mauvais entretien ne peuvent être pris en considération par
notre garantie.
• Parl’actiond’unnettoyantsurlesrevêtementsdéjàendommagéilseproduituneaggravationdesdégâts.

27
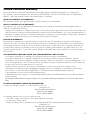
Limited Consumer Warranty
ThisproducthasbeenmanufacturedandtestedtothehighestqualitystandardsbyHansgrohe,Inc.(“Hansgrohe”).
ThiswarrantyislimitedtoHansgroheproductsthatarepurchasedbyaconsumerintheUnitedStatesorCanadaafter
March1,1996,andinstalledineitherintheUnitedStatesorinCanada.
WHO IS COVERED BY THE WARRANTY
Thiswarrantyextendstotheoriginalpurchaseronly.Thiswarrantyisnon-transferable.
WHAT IS COVERED BY THE WARRANTY
ThewarrantycoversonlyyourHansgrohemanufacturedproduct.Hansgrohewarrantsthisproductagainstdefectsin
materialorworkmanshipasfollows:
Hansgrohewillreplaceatnochargeforpartsonlyor,atitsoption,replaceanyproductorpartoftheproductthatproves
defectivebecauseofimproperworkmanshipand/ormaterial,undernormalinstallation,use,serviceandmaintenance.If
Hansgroheisunabletoprovideareplacementandrepairisnotpracticalorcannotbemadeintimelyfashion,Hansgrohe
mayelecttorefundthepurchasepriceinexchangeforthereturnoftheproduct.
LENGTH OF WARRANTY
Replacementorrepairedpartsofproductswillbecoveredforthetermofthiswarranty,asstatedinthefollowingtwo
sentences.Ifyouareaconsumerwhopurchasedtheproductforuseprimarilyforpersonal,familyorhouseholdpurposes,
thiswarrantyextendsforaslongasyouowntheproductandthehomeinwhichtheproductisoriginallyinstalled.Ifyou
purchasedtheproductforuseprimarilyforanyotherpurpose,including,withoutlimitation,acommercialpurpose,this
warrantyextendsonly(i)for1year,withrespecttoHansgrohe&Commercialproducts,and(ii)for5years,withrespectto
Axorproducts.
THIS WARRANTY DOES NOT COVER, AND HANSGROHE WILL NOT PAY FOR:
A.Conditions,malfunctionsordamagenotresultingfromdefectsinmaterialorworkmanship.
B.Conditions,malfunctionsordamageresultingfrom(1)normalwearandtear,improperinstallation,improper
maintenance,misuse,abuse,negligence,accidentoralteration;(2)theuseofabrasiveorcausticcleaningagentsor“no-
rinse”cleaningproducts,ortheuseoftheproductinanymannercontrarytotheproductinstructions;or(3)conditionsin
thehomesuchasexcessivewaterpressureorcorrosion.
C.Laborandotherexpensesfordisconnection,deinstallation,orreturnoftheproductforwarrantyservice
(includingbutnotlimitedtoproperpackagingandshippingcosts),orforinstallationorreinstallationoftheproduct.
D.Accessories,connectedmaterialsandproducts,orrelatedproductsnotmanufacturedbyHansgrohe.
E.AnyHansgroheorAxorproductsoldfordisplaypurposes.
F.RubbedBronzenishissubjecttoa3-yearlimitedwarranty.ChromeandallPVDnishesarecoveredbythelimited
lifetimewarranty.
G.HansgroheWaterFiltrationSystemissubjecttoa1-yearlimitedwarranty.Warrantydoesnotincludereplacement
lters.
TO OBTAIN WARRANTY PARTS OR INFORMATION
ContactyourHansgroheretailer,orcontactTechnicalServiceat:
Hansgrohe,Inc.
1492BluegrassLakesParkway
Alpharetta,GA30004
Toll-free800-334-0455
Inrequestingwarrantyservice,youwillneedtoprovide:
1.Thesalesreceiptorotherevidenceofthedateandplaceofpurchase.
2.Adescriptionoftheproblem.
3.Deliveryoftheproductorthedefectivepart,postageprepaidandcarefullypackedandinsured,to:
Hansgrohe,Inc.
1492BluegrassLakesParkway
Alpharetta,GA30004
Toll-free800-334-0455

Hansgrohe,Inc.•1490BluegrassLakesParkway•Alpharetta,GA30004
Tel.800-334-0455
•Fax770-360-9887
www.hansgrohe-usa.com
US - Installation Instructions • Part No. 90912222 • Revised 6/2010
Whenwarrantyserviceiscompleted,anyrepairedorreplacementproductorpartwillbereturnedtoyoupostageprepaid.
EXCLUSIONS AND LIMITATIONS
REPAIR OR REPLACEMENT (OR, IN LIMITED CIRCUMSTANCES, REFUND OF THE PURCHASE PRICE) AS
PROVIDED UNDER THIS WARRANTY IS THE EXCLUSIVE REMEDY OF THE PURCHASER. HANSGROHE
NEITHER ASSUMES NOR AUTHORIZES ANY PERSON TO CREATE FOR IT ANY OTHER OBLIGATION OR
LIABILITY IN CONNECTION WITH THIS PRODUCT. HANSGROHE SHALL NOT BE LIABLE TO PURCHASER
OR ANY OTHER PERSON FOR ANY INCIDENTAL, SPECIAL OR CONSEQUENTIAL DAMAGES, ARISING OUT
OF BREACH OF THIS WARRANTY OR ANY IMPLIED WARRANTY (INCLUDING BUT NOT LIMITED TO ANY
IMPLIED WARRANTY OF MERCHANTABILITY).
SomeStatesdonotallowtheexclusionorlimitationofincidentalorconsequentialdamages,sotheabovelimitationor
exclusionmaynotapplytoyou.Thiswarrantygivesyouspeciclegalrights,andyoumayalsohaveotherrightsthatvary
fromstatetostate.
TO THE EXTENT PERMITTED BY LAW, ANY IMPLIED WARRANTIES OF MERCHANTABILITY AND FITNESS
FOR A PARTICULAR PURPOSE, ARE LIMITED TO THE DURATION OF THE EXPRESS WARRANTY.
Somestatesdonotallowlimitationsonhowlonganimpliedwarrantymaylast,sotheabovelimitationsmaynotapplyto
you.Youmayberequiredbylawtogiveusareasonableopportunitytocorrectorcureanyfailuretocomplybeforeyou
canbringanyactionincourtagainstusundertheMagnuson-MossWarrantyAct.
PRODUCT INSTRUCTIONS AND QUESTIONS
Uponpurchaseorpriortoinstallation,pleasecarefullyinspectyourHansgroheproductforanydamageorvisibledefect.
Priortoinstalling,alwayscarefullystudytheenclosedinstructionsontheproperinstallationandthecareandmaintenanceof
thisproduct.Ifyouhavequestionsatanytimeabouttheuse,installationorperformanceofyourHansgroheproduct,orthis
warranty,pleasewriteusorcallustoll-freeat800-334-0455.
-
 1
1
-
 2
2
-
 3
3
-
 4
4
-
 5
5
-
 6
6
-
 7
7
-
 8
8
-
 9
9
-
 10
10
-
 11
11
-
 12
12
-
 13
13
-
 14
14
-
 15
15
-
 16
16
-
 17
17
-
 18
18
-
 19
19
-
 20
20
-
 21
21
-
 22
22
-
 23
23
-
 24
24
-
 25
25
-
 26
26
-
 27
27
-
 28
28


Axor 18741001 Guía de instalación
- Categoría
- Artículos sanitarios
- Tipo
- Guía de instalación
en otros idiomas
- français: Axor 18741001 Guide d'installation
- English: Axor 18741001 Installation guide
Artículos relacionados
-
Axor 18020001 Massaud Assembly Instruction
-
-
Axor AXOR Carlton 177121 Serie Guía de instalación
-
-
-
-
Axor 18112001 Guía de instalación
-
Axor 16801001 Thermostatic Trim with Volume Control Assembly Instruction
-
-
Otros documentos
-
Hansgrohe 18020001 Guía de instalación
-
-
-
-
-
-
-
-
-
Hans Grohe E 04226 0 Series Installation Instructions / Warranty