
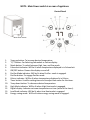
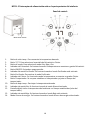
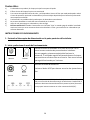
NOTE: Main Power switch is on rear of applaince.
1. Temp up button: To increase desired temperature.
2. °C/°F Button: For Selecting Fahrenheit or Celsius display.
3. Mode button: To select between High, Low, and Eco mode.
4. Fahrenheit indicator: Will be lit when temperature displayed is in Fahrenheit.
5. ON/OFF button: Powers the display on and off.
6. Purifier Mode indicator: Will be lit when Purifier mode is engaged.
7. Purifier button: To engage Purifier mode.
8. Celsius indicator: Will be lit when temperature displayed is in Celsius.
9. Timer button: Used for setting timer and to adjust time value for the timer.
10. Temp down button: To decrease desired temperature.
11. High Mode indicator: Will be lit when High Heat mode is engaged.
12. Digital display: Indicates set room temperature or time (value of the timer).
13. Low Mode indicator: Will be lit when Low Heat mode is engaged.
14. Energy-saving mode: Will be lit when energy-saving mode is engaged.
Control Panel
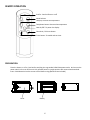
Main Power Switch
5

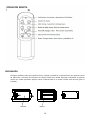
REMOTE OPERATION
PREPARATION
Place the heater on a firm, level surface and plug into a grounded 120V 60Hz power outlet. And turn on the
power switch in the rear of the unit. Only operate heater in upright position with caster wheels attached.
Insert 2 AAA batteries into the remote control before using (Batteries Not Included)
PUSH
Cover
Battery
Pruifier: Sets Purifiere on or off
Mode Selector
Temp up: Increase Set temperature
Temp down button: Decrease Set temperature
Heat On/Off: To power the display
Fahrenheit / Celsisus selector
Timer button: To enable and set timer
6

Helpful Tips:
1) If heater will not turn on, check main power switch. Rear of Appliance.
2) Check air filter, clean as needed.
3) If your room has minimal heat loss, and is closed off to cooler areas you may be able to reduce the cost of
operation by setting the heater to low after the room has reached a comfortable temperature.
4) If remote is lost you can still operate the heater manually.
5) Do not drag your heater across the room by pulling it by the cord. Store cord on cord wrap when not in use.
6) Use the timer to turn off your heater and save energy
7) Cool Down feature: When the thermostat cycles “off” or when you turn the unit off the fan will continue to run
for a few moments to finish distributing the heat and to cool down the heaters heating elements.
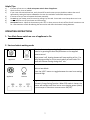
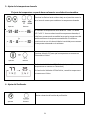
OPERATING INSTRUCTIONS
1. Turn Main Power switch on rear of appliance to On.
2. Start and select working mode
Turn the heater on by pressing the Power button on the control
panel or by pressing the Heat On/Off button on the supplied
remote control.
Once power is off, heating element will stop working at first. Fan
will prolong working for 3 min to emit plenty of heat inside. This
mark will indicate running during the 3 min.
Select a heat Mode
Press the HEAT button to toggle between the two heat settings
Auto and High.
High Mode uses 1500W; Low Mode uses 750W. ECO mode is an
Economic Energy Saving Function. When ECO mode is chosen, the
heater will manage itself from less to more heating power (watts)
in an attempt to maintain a constant warm 68°(20°).
Appliance Remote
Appliance Remote
7

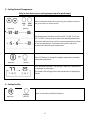
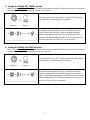
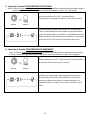
3. Setting Desired Temperature
Only in Auto heat-up can setting temperature be performed.
Adjust the desired temperature by pressing the Up/Down arrows on
the control panel or remote control.
Set temperature indication varies from 59° F to 86° F, or from
15° C to 30°C. Once you have chosen the desired temperature,
the heater will remain on until the room temperature increases
to the ser temperature. The heater will cycle on and off to
maintain the desired room temperature.
Press C/F button to change the display temperature between
Fahrenheit and Celsius.
The Fahrenheit indicator LED will light , when the temperature
is displayed in Fahrenheit.)
The Celsius LED will light, when the temperature is displayed in
Celsius.
4. Setting Purifier
Open or close the purification function.
Appliance Remote
Appliance Remote
Appliance Remote
8

5. Setting the POWER OFF TIMER Function
Note: The Power-Off-Timer Function will allow for the heater to power OFF after a certain set time, and can
only be set while the heater’s display is in the “On” position.
Turn the heater to the “On” position .Press the Timer button
on the heater’s control panel or the remote.
The digital display changes from the “temperature” to the
“hours” option for the timer. Continue to press the timer
button to change the number of hours you would like the
heater to run before powering itself off .The hour options for
the timer are from 0 to 12 hrs. (in 1 hr increments).
6. Setting the POWER ON TIMER Function
Note: The Power-On-Timer Function will allow for the heater to power ON after a certain set time, and can
only be set while the heater’s display is in the “Off” position.
Turn the heater to the “OFF” position .Press the Timer button
on the heater’s control panel or the remote.
The digital display shows the “hours” option for the timer.
Continue to press the timer button to change the number of
hours you would like the heater’s internal clock to count down
before powering itself on .The hour options for the timer are
from 0 to 12 hrs. (in 1 hr increments).
Appliance Remote
Appliance Remote
9

7. Setting Electro lock
The Electro Lock can help avoid the heater from being accidentally engaged by children. The locking
mechanism can be set in both the ON and OFF modes.
And
Press Temp Up and Temp Down buttons at the same time for 3
seconds. Locking is complete when you hear a beep. When locked, the
functions of the control panel and remote will be locked for use.
And
When you need to unlock it, press Temp Up and Temp Down buttons
at the same time for 3 seconds. You will hear a beep .The control panel
and remote control will become functional again.
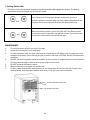
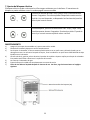
MAINTENANCE
1. Turn off the power switch in the rear of the unit.
2. Unplug the unit and let it cool completely.
3. To keep the heater clean, the outer shell may be cleaned with a soft, damp cloth. You may use a mild
detergent if necessary. After cleaning, dry the unit with a soft cloth. CAUTION: DO NOT let liquid enter
the heater.
4. DO NOT use alcohol, gasoline, abrasive powders, furniture polish, or rough brushes to clean the heater.
This may cause damage or deterioration to the surface of the heater.
5. DO NOT immerse the heater in water.
6. Wait until the unit is completely dry before use.
7. Air filter needs cleaning after used 3 months of use. Please take off the filter with the 2 steps in the
drawing below. Flush and clean the filter with water, Then, dry it out and re-assemble.
Remove Bracket screws (2X)
Remove Air Filter
10

NOTA: El interruptor de alimentación está en la parte posterior del artefacto.
1. Botón de subir temp.: Para aumentar la temperatura deseada.
2. Botón °C/°F: Para seleccionar la pantalla de Fahrenheit o Celsius.
3. Botón de modo: Para seleccionar modo Alto, Bajo y Eco.
4. Indicador de Fahrenheit: Se iluminará cuando la temperatura se muestre en grados Fahrenheit.
5. Botón ON/OFF: Enciende o apaga pantalla.
6. Indicador de modo Purificador: Se iluminará cuando el modo Purificador esté activado.
7. Botón Purificador: Para activar el modo Purificador.
8. Indicador de Celsius: Se iluminará cuando la temperatura se muestre en grados Celsius.
9. Botón Temporizador: Se usa para establecer el temporizador y ajustar el tiempo del
temporizador.
10. Botón de bajar temp.: Para bajar la temperatura deseada.
11. Indicador de modo Alto: Se iluminará cuando el modo Alto esté activado.
12. Pantalla digital: Indica la temperatura del ambiente o el tiempo establecidos (valor del
temporizador).
13. Indicador de modo Bajo: Se iluminará cuando el modo Bajo esté activado.
14. Modo Ahorro de energía: Se iluminará cuando el modo Ahorro de energía esté activado.
Panel de control:
Main Power Switch
18

PREPARACIÓN
Coloque el calefactor sobre una superficie firme y nivelada y enchufe en un tomacorriente con conexión a tierra
de 120V 60Hz. Y encienda el interruptor en la parte trasera de la unidad. Sólo operar calentador en posición
vertical con ruedas pivotantes adjunta. Inserte 2 baterías AAA en el control remoto antes de usar (pilas no
incluidas)
PUSH
Cubierta
Batería
19

Puntas útiles:
1) Si calentadora no prenderá, el cheque principal interruptor del poder
2) El filtro de aire del cheque, limpia como necesitado
3) Si su cuarto tiene pérdida mínima de calor, y es bloqueado a áreas más frías que usted puede poder reducir
el costo de operación poniendo la calentadora al punto más bajo después de que el cuarto haya alcanzado
una temperatura cómoda.
4) Si telemando le es perdido todavía puede operar la calentadora manualmente.
5) No arrastre calentadora a través del cuarto tirandolo por la cuerda
6) Utilice el reloj para apagar su calentadora y salvo energía
7) Enfríese característica: Cuando el termostato va en bicicleta "lejos" o cuando apaga la unidad el ventilador
continuará correr por unos momentos de terminar distribuir el calor y para enfriarse las calentadoras que
calientan elementos.
INSTRUCCIONES DE FUNCIONAMIENTO
1. Encienda el interruptor de alimentación en la parte posterior del artefacto.
2. Inicie y seleccione el modo de funcionamiento.
Presione el botón de encendido en el panel de control o en el
control remoto suministrado para encender el calefactor.
Una vez apagado, primeramente dejará de funcionar la
resistencia. El ventilador seguirá funcionando durante 3 minutos
para suministrar suficiente calor en el interior. Esta marca indicará
que seguirá funcionando por 3 minutos.
Selección de modo de calefacción
Presione el botón HEAT para alternar entre los dos ajustes Auto y
Alto.
El modo Alto consume 1500 W; el modo Bajo consume 750 W. El modo
ECO es una función de ahorro de energía. Al seleccionar el modo ECO, el
calefactor administrará automáticamente la potencia (vatios) de menor
a mayor para intentar mantener un calor constante de 68°(20°).
Aparato Remoto
Aparato Remoto
20

3. Ajuste de la temperatura deseada
El ajuste de temperatura se puede hacer solamente en calefacción automática.
Presione las flechas hacia arriba o abajo en el panel de control o
en el control remoto para establecer la temperatura deseada.
El indicador de temperatura varía desde 59° F a 86° F o desde
15° C a 30° C. Una vez seleccionada la temperatura deseada, el
calefactor permanecerá encendido hasta que la temperatura del
ambiente alcance la temperatura establecida. El calefactor
continuará con un ciclo de actividad e inactividad para mantener
la temperatura deseada en el ambiente.
Presione el botón C/F para que la temperatura se muestre en
Fahrenheit o Celsius.
Se iluminará el indicador LED de Fahrenheit, cuando la
temperatura se muestre en Fahrenheit.)
Se iluminará el indicador LED de Celsius, cuando la temperatura
se muestre en Celsius.
4. Ajuste del Purificador
Activa o desactiva la función de purificación.
Aparato Remoto
Aparato Remoto
Aparato Remoto
21

5. Ajuste de la función TEMPORIZADOR DE APAGADO
Nota: La función Temporizador de apagado permite apagar el calefactor después de determinado tiempo y
solamente se puede establecer cuando la pantalla del calefactor está en "On" (encendida).
Encienda el calefactor en "On". Presione el botón
Temporizador en el panel de control o en el control remoto.
La pantalla digital cambiará de la opción de "temperatura" a
"horas" para establecer el temporizador. Siga presionando el
botón del temporizador para cambiar la cantidad de horas que
desea mantener en funcionamiento el calefactor. Las opciones
de horas van de 0 a 12 horas (en incrementos de 1 hora).
6. Ajuste de la función TEMPORIZADOR DE ENCENDIDO
Nota: La función Temporizador de encendido permite encender el calefactor después de determinado
tiempo y solamente se puede establecer cuando la pantalla del calefactor está en "Off" (apagada).
Deje el calefactor en "OFF". Presione el botón Temporizador en
el panel de control o en el control remoto.
La pantalla digital mostrará la opción de "horas" para
establecer el temporizador. Siga presionando el botón del
temporizador para cambiar la cantidad de horas del reloj
interno que faltarán para que se encienda calefactor. Las
opciones de horas van de 0 a 12 horas (en incrementos de 1
hora).
Aparato Remoto
Aparato Remoto
22

7. Ajustes del bloqueo eléctrico
El bloqueo eléctrico ayuda a evitar que los niños tengan accidentes con el calefactor. El mecanismo de
bloqueo se puede establecer tanto en modo apagado como encendido.
y
Presione los botones de Subir Temp. y Bajar Temp. simultáneamente
durante 3 segundos. El artefacto quedará bloqueado cuando escuche
el pitido. Una vez bloqueado, se bloquearán las funciones del panel de
control y del control remoto.
y
Para desbloquear, presione los botones de Subir Temp. y Bajar Temp.
simultáneamente durante 3 segundos. Escuchará un pitido. El panel de
control y el control remoto se podrán volver a utilizar.
MANTENIMIENTO
1) Apague el interruptor de encendido en la parte trasera de la unidad.
2) Desenchufe la unidad y deje que se enfríe completamente.
3) Para limpiar el calentador, la cáscara externa puede limpiarse con un paño suave y húmedo. Puede usar un
detergente suave si es necesario. Después de limpiar, secar la unidad con un paño suave. PRECAUCIÓN: No deje
líquido entra al calentador.
4) No utilice alcohol, gasolina, polvos abrasivos, lustrador de muebles o ásperos cepillos para limpiar el calentador.
Esto puede causar daño o deterioro a la superficie de la estufa.
5) No sumerja el calentador de agua.
6) Espere hasta que la unidad esté completamente seca antes de usarlo.
7) Filtro de aire debe ser limpiada después de 3 meses de uso. Por favor, siga las instrucciones en la página
siguiente.
23
-
 1
1
-
 2
2
-
 3
3
-
 4
4
-
 5
5
-
 6
6
-
 7
7
-
 8
8
-
 9
9
-
 10
10
-
 11
11
-
 12
12


en otros idiomas
- English: Comfort Glow CDE4800 User guide
Artículos relacionados
Otros documentos
-
 Life Smart LS1002THD13 El manual del propietario
-
World Marketing of America QDE1425 El manual del propietario
-
-
-
Lifesmart MCHT1141US Manual de usuario
-
Lifesmart HT1125 Guía del usuario
-
LG ATNQ30GPLA4 El manual del propietario
-
 Profusion Heat HFU15-E Guía del usuario

