
Model KSTAW08A
1
12A

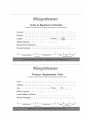
Tarjetade Registrationde Producto
Es sencillo! Cumple y envia su Tarjeta de Registracion de Producto hoy!
Nombrel ] I ] ] I
Direcci6nl] I ] ] I
Ciudad I I I 1 I I
Tel6fono(Opcional)l] ] I ]
Directionde E-mail(Opcional)[
DondeComprado I I I
11111 11 II II
Estado L_J C6dig0
postal
I
Numero de Modelo
I I I I I I
Numero de Serie Mes Dia Ano
REV 11/04 Fecha de la compra
I
Product Registration Card
it's simple! Complete and mail your Product Registration Card today!
Name I
Address I
City
Phone (Optional)
E-mail Address (Optional)[
Where Purchased
I I I I I
IIL II I I LL
State L_ Zip
I
Model Number
I I I I I I
Serial Number Month Day Year
REV 11/04 Date of Purchase
I

9Z6Z-SZ _SI; 7-17V_lO(]
_g 319 IS IS HzMN g0£0
N3_LNqO NOIIVN_LSI£)qN lOnC]ONd
dNOO VOINBIAIV vqClllAI
I"11'11"'1'"1"11'1'"1"1'11'1"'1"11'"111'"'11"'11"1
3_13H
dlAIV±S
::lOVqd
e6e_,sod
JedoJd_noqi!M
JeA!tep_OU
II!Meo!bO;sod
"paJ!nbeN
e6msod
IIIII
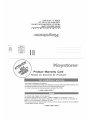
Product Warranty Card
Tarjeta de Garantia de Producto
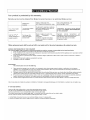
Your product is protected bythis warranty:
Your appliance iswarranted by Midea. Any obligations for services and parts under this warranty must
be performed by Midea Consumer Services or an authorized Midea servicer
To contact a Customer Service Representative,Call Midea TOLL FREE
1-866 -646-4332 ®
Su producto est_ protegido por esta garantia:
Su producto est_ garantizado por Midea. Cualquier obligaci6n de proporcionar servido o
repuestos establecida en esta garantia deber# ser cumplida por los Servicios al consumidor de
Midea o por un representante autorizado de Midea.
Para comunicarse con un Representante de Servicio al Cliente, tenga la bondad de Ilamar por tel_fono
sin cargo alguno a Midea, al ndmero:
1-866 -646-4332 ®

1. SAFETY PRECAUTIONS .................................................................... 2
2. IMPORTANT SAFETY INSTRUCTIONS ............................................ 4
3. NORMALSOUNDS ............................................................................. 5
4. AIR CONDITIONER FEATURES ......................................................... 5
5. INSTALLATION INSTRUCTIONS ....................................................... 10
6. CARE AND CLEANING ..................................................................... 14
7. TROUBLESHOOTING TIPS ............................................................... 15
8. WARRANTY INFORMATION .............................................................. 17
9. CUSTOMER SERVICE INFORMATION ............................................. 17
Read This Manual
Inside you will find many helpful hints on how to use and maintain your air conditioner
properly. Just a little preventive care on your part can save you a great deal of time
and money over the life of your air conditioner. You'll find many answers to common
problems in the chart of troubleshooting tips. If you review our chart of Troubleshooting
Tips first, you may not need to call for service at all.
CAUTION
• Contact the authorized service technician for repair or maintenance of this unit.
• Contact the installer for installation of this unit.
• The air conditioner is not intended for use by young children or infirm persons
without supervision.
• Young children should be supervised to ensure that they do not play with the air
conditioner.
• If the power cord is to be replaced, replacement work shall be performed by
authorized personnel only.
• Installation work must be performed in accordance with the national wiring
standards by authorized personnel only.

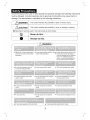
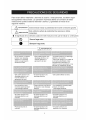
To prevent injury to the user or other people and property damage, the following instructions
must be followed. Incorrect operation due to ignoring of instructions may cause harm or
damage. The seriousness is classified by the following indications.
I /_WARNING
//_CAUTION
This symbol indicates the possibility of death or serious injury.
This symbol indicates the possibility of injury or damage to property.
• Meanings of symbols used in this manual are as shown below.
f (_ Never do this.
\ O Always do this.
I/_ WARNING1 w
• Otherwise, it may cause electric
shock or fire due to excess heat
generation.
• It may cause electric shock or
fire due to heat generation.
• Incorrect earthing may cause
electric shock.
• It may cause fire and electric
shock.
• It may cause fire.
• It may cause electric shock or fire • It may cause electric shock or fire.
due to heat generation. • If the power cord is damaged, it
must be replaced by the manufac-
turer or an authorised service
centre or a similarly qualified per-
son in order to avoid a hazard.
• It may cause electric shock.
• It may cause failure of machine
or electric shock.
• It may cause fire and electric
shock.
• It may cause fire and electric
shock.
• It may cause explosion, fire and, burns.
• This could damage your health.
• Incorrect installation may cause
fire and electric shock.
• It may cause electric shock.
• It may cause an explosion or fire.
• It may cause failure and electric shock.
2

• It may cause an injury.
I/_ CAUTION I
• Water may enter the unit and
degrade the insulation. It may
cause an electric shock.
• Do not clean unit when
power is on as it may cause
fire and electric shock, it may
cause an injury.
• This could injure the pet or
plant.
• An oxygen shortage may occur.
• Do not use this air conditioner to
preserve precision devices, food,
pets, plants, and art objects.
It may cause deterioration of
quality, etc.
• Operation with windows
opened may cause wetting
of indoor and soaking of
household furniture.
• It may cause failure of
appliance or accident.
• It may cause electric shock
and damage.
• It may cause failure of product
or fire.
• If bracket is damaged, there
is concern of damage due to
falling of unit.
• Appearance may be
deteriorated due to change
of product color or
scratching of its surface.
• There is danger of fire or
electric shock.
• Operation without filters may
cause failure.
• It contains contaminants and
could make you sick.
J
3

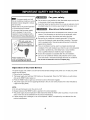
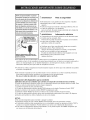
The power supply cord with
this air conditioner contains a current
detection device designed to reduce
the risk of fire.
Please refer to the section'Operation
of Current Device'for details.
In the event that the power supply
cord is damaged, it can not be
repaired.It must be replaced with a
cord from the Product Manufacturer.
_Do not, under any _'_
iJ circumstances, cut, I
/_'_ _ remove, or bypass |
Power supply cord
with 3-prong grounding plug
and current detection device
For your safety
• Do not store or use gasoline or other flammable vapors and liquids
in the vicinity of this or any other appliance.
• Avoid fire hazard or electric shock. Do not use an extension cord or
an adaptor plug. Do not remove any prong from the power cord.
Electrical Information
• Be sure the electrical service is adequate for the model you have
chosen. This information can be found on the serial plate, which
is located on the side of the cabinet and behind the grille.
• Be sure the air conditioner is properly grounded. To minimize
shock and fire hazards, proper grounding is important. The power
cord is equipped with a three-prong grounding plug for protection
against shock hazards.
• Your air conditioner must be used in a properly grounded wall
receptacle. If the wall receptacle you intend to use is not adequately
grounded or protected by atime delay fuse or circuit breaker,
have a qualified electrician install the proper receptacle.
• Ensure the receptacle is accessible after the unit installation.
• Do not run air conditioner without side protective cover in place.
This could result in mechanical damage within the air conditioner.
Do not use an extension cord or an adapter plug.
Operation of Current Device
The power supply cord contains a current device that senses damage to the power cord. To test your power
supply cord as follows:
1. Plug in the Air Conditioner.
2. The power supply cord will have TWO buttons on the plug head. Press the TEST button, you will notice a
click as the RESET button pops out.
3. Press the RESET button, again you will notice a click as the button engages.
4. The power supply cord is now supplying electricity to the unit. (On some products this it also indicated by
a light on the plug head.)
NOTE:
• Do not use this device to turn the unit on or off.
• Always make sure the RESET button is pushed in for correct operation.
• The power supply must be replaced if it fails reset when either the TEST button is pushed, or it can not be
reset. A new one can be obtained from the product manufacturer.
• Ifpower supply cord is damaged, it can not be repaired. It MUST be replaced by one obtained from the
product manufacturer.
4

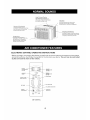
Sound of Rushing Air
At the front of the unit, you may
hear the sound of rushing air _
being moved by the fan
Gurgle/Hiss
"Gurgling or hissing"noise may
be heard due to refrigerant
passing through evaporator
during normal operation.
High Pitched Chatter
High efficiency compressors
may have a high pitched chatter
during the cooling cycle.
Vibration
Unit may vibrate and make noise
because of poor wall or window
construction or incorrect installation.
Pinging or Switching
Droplets of water hitting condenser
during normal operation may cause
"pinging or switching"sounds.
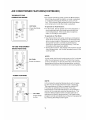
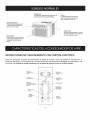
ELECTRONIC CONTROL OPERATING INSTRUCTIONS
Before you begin, thoroughly familiarize yourself with the control panel and remote as shown below
and all its functions, then follow the symbol for the functions you desire. The unit can be controlled
by the unit control alone or the remote.
ADJUST
TEMPERATURE
OR TtME
ACTIVATE
TIMER
RESET BUTTON
SET MODE
ENERGY
SAVER MODE
ADJUST
TEMPERATURE
OR TtME
DISPLAY
TEMPERATURE
OR TIME
FOLLOW ME INDICATOR
TURN UNIT
ON OR OFF
UNIT CONTROL

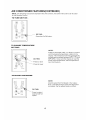
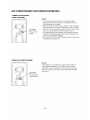
AIR CONDITIONER FEATURES(CONTINUED)
NOTE: The following instructions represent the Unit Controls, the same instructions can be used
for the Remote Control.
TO TURN UNIT ON:
Auto Auto
c:o: :::
@
E_aer _rY On/Off
DO THIS:
Press the On/Off button.
TO CHANGE TEMPERATURE
SETTING:
....9 9 ....
DO THIS:
Press to raise
Press to lower
NOTE:
Press or hold either Left(<) or Right (>) button
until the desired temperature is seen on the
display. This temperature will be automatically
maintained anywhere between 62°F(17°C) and
86°F(30%). If you want the display to read the
actual room temperature, see"To Operate on
Fan Only'section.
TO ADJUST FAN SPEEDS:
Auto Auto
c:o; :::
Fo_w
E_'er egrY On/Off
DO THIS:
_ Press to select
appropriate fan
speed
NOTE:
Used to select the Fan Speed in four steps:
Auto, Low, Med or High. Each time the button
is pressed, the fan speed mode is shifted.
6

AIR CONDITIONER FEATURES(CONTINUED)
TO SELECT THE
OPERATING MODE:
Auto Auto
Cool Low
F_Dry Med
E_aer_rY On/Off
TO USE THE ENERGY
SAVER FEATURE:
cool Low
Dry Med
Fan igh
E_'aer_rY On/Off
DO THIS:
i Press the Mode
button.
DO THIS:
/Press the button
NOTE:
• To choose operating mode, press the Mode button.
Each time you press the button, a mode is selected
in a sequence that goes from Auto, Cool, Dry to
Fan. The indicator light besides will be illuminated
and remained on once the mode is selected.
To operate on Auto feature:
• In this mode, the fan speed can not be adjusted, it
starts automatically at a speed according to the
room temperature. If the room does not get too
warm, it will stay at Low speed.
To operate on Fan Only:
• Use this function only when cooling is not desired,
such as for room air circulation or to exhaust stale
air(on some models). (Remember to open the vent
during this function, but keep it closed during
cooling for maximum cooling efficiency.) You can
choose any fan speed you prefer.
• During this function, the display will show the actual
room temperature, not the set temperature as in the
cooling mode.
NOTE:
In this mode, the fan will continue to run for 3 minutes
after the compressor shuts off. The fan then cycles
on for 2 minutes at 10 minute intervals until the room
temperature is above the set temperature, at which
time the compressor turns back on and cooling starts.
SLEEP FEATURE:
/
em0 Tem
.... 0_
Off
c,?e_k s,eep
....l l....
Cool LOW
Dry Med
Fan High
-- DO THIS:
Press Sleep
button
NOTE:
In this mode the selected temperature will increase
by 2°F(1°C) 30 minutes after the mode is selected.
The temperature will then increase by another 2°F
(1°C) after an additional 30 minutes. This new
temperature will be maintained for 7 hours before it
returns to the originally selected temperature. This
ends the Sleep mode and the unit will continue to
operate as originally programmed. The Sleep mode
program can be cancelled at any time during operation
by pressing the Sleep button again.
7

AIR CONDITIONER FEATURES(CONTINUED)
TIMER: AUTO START/
STOP FEATURE:
__Temp Temp
_ ....... On .......
....l l....
CooJ Low
Dry Med
Fan High
DO THIS:
Press Timer
button
NOTE:
• First press the Timer button, the indicator light
besides word On illuminates. It indicates theAuto
Start program is initiated.
• Press or hold the Left arrow or Right arrow to change
the Auto time by 0.5 hour increments, up to 10 hours,
then at 1 hour increments up to 24 hours. The control
will count down the time remaining until start.
• The selected time will register in 5 seconds and the
system will automatically revert back to display the
previous temperature setting.
• Turning the unit ON or OFF at any time will cancel the
Auto Start/Stop function.
CHECK FILTER FEATURE:
/
Temp Temp
....l l....
Cool LOW
Dry Med
Fan High
DO THIS:
J
Press Check
Filter button
NOTE:
This feature is a reminder to clean the Air Filter for
more efficient operation. The light will illuminate
after 250 hours of operation. To reset after cleaning
the filter, press the Check Filter button and the light
will go off.
8

AIR CONDITIONER FEATURES(CONTINUED)
FOLLOW ME FEATURE:
Auto Auto
Cool Low
Dry Med
Fan High
_'aevr_ry Oa/Off
j Light flashing
/
NOTE:
This feature can be activated from the remote
control ONLY. The remote control serves as a
remote thermostat allowing for the precise
temperature control at its location.
To activate the Follow Me feature, point the remote
control towards the unit and press the Follow Me
button. The remote display is actual temperature
at its location. The remote control will send this
signal to the air conditioner every 3 minutes interval.
If the unit does not receive the Follow Me signal
during any 7 minutes interval, the unit will beep to
indicate the Follow Me mode has ended.
The actual temperature can be displayed at the unit
by pressing the Fan Only mode. When in the Cool
mode, the unit display indicates the set temperature.
ADDITIONAL THINGS YOU SHOULD KNOW
Now that you have mastered the operating procedure, here are more features in your control that
you should become familiar with.
• The Cool circuit has an automatic 3 minutes time delayed start if the unit is turned offand on
quickly. This prevents overheating of the compressor and possible circuit breaker tripping.
The fan will continue to run during this time.
• The control will maintain any set temperature within I°F, between 62°F(17°C) and 86°F(30°C) degrees.
• The control is capable of displaying temperature in degrees Fahrenheit or degrees Celsius.
To convert from one to the other, press and hold the Left and Right Temp/Timer buttons at the
same time for 3 seconds.
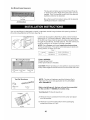
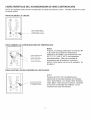
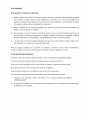
Fresh Air Vent Control(10,000Btu/12,000Btu Models):
Figure 1 (VENT CLOSED)
Figure 2 (VENT OPEN)
The Fresh Air Vent allows the air conditioner to:
1. Recirculate inside air- Vent Closed (See Fig.l)
2. Draw fresh air into the room- Vent Open (see Fig.2)
3. Exchange air from the room and draws fresh air into
the room- Vent and Exhaust Open (see Fig.3)
Figure 3 (VENT & EXHAUST OPEN)
9

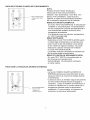
Air Directional Louvers
Levers
Air Direction
The louvers will allow you to direct the air flow Up
or Down and Left or Right throughout the room as
needed. Pivot horizontal louvers until the desired
Up/Down direction is obtained.
Move the Levers from side to side until the desired
Left/Right direction is obtained.
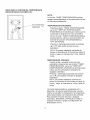
Your air conditioner is designed to install in standard double hung windows with opening widths of
23 to 36 inches(584mm to 914mm) (See Fig.l).
EXTERIOR
WALL .
Lower sash must open sufficiently to allow a clear vertical
opening of 15-1/2 inches (394mm). Side louvers and the rear
of theAC must have clear air space to allow enough airflow
through the condenser, for heat removal. The rear of the unit
must be outdoors, not inside a building or garage.
NOTE: Save Carton and these Installation Instructions
for future reference. The carton is the best way to store unit
during winter, orwhen not in use.
Table 1
el 8000Btu/h 10000-12000Btu/h
14"(356mm) 15-1/2"(394mm)
Mounting Hardware
3/4"Screws Lock Frame Sash Lock
(7) (2) (1)
TOOLS NEEDED:
Phillips Screw Driver
Drill(If pilot holes are needed)
CAUTION: When handling unit, be careful to avoid cuts from
sharp metal edges and aluminum fins on front and rear coils.
Top Rail Hardware
3/8"Screws Top Rail
(4) (1)
.... _. •s,_ ¸_;_,!_;_;_ _
fii! iilF _, i¸
IJ
NOTE: The top rail hardware and the following Fig.A,
Fig.Band Fig.C are not applicable to the units more
than 10000Btu/h.
Before installing unit, the top rail must be assembled
on the unit (For <10000Btu/h models only).
Tool Needed: Phillips Screwdriver
A: Remove the air conditioner from the carton and place
on a flat surface.
B: Remove top rail from the bottom of the packaging
material as shown in Fig.A
10

Fig.C
C: Align the hole in the top rail with those in the
top of the unit as shown in Fig.B
D: Secure the top rail to the unit with the 3/8"
Screws as shown in Fig.C.
NOTE: For safety reasons, all four(4) screws
MUST be securely fastened.
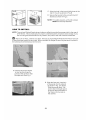
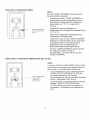
HOW TO INSTALL
NOTE: Top rail and Sliding Panels at each side are offset to provide the proper pitch to the rear of
5/16"(8mm). This is necessary for proper condensed water utilization and drainage. If you
are not using the Side Panels for any reason, this pitch to the rear must be maintained.
_11 Place unit on floor, a bench or a table. There is a Left and Right Window Filler Panel- be sure
to use the proper panel for each side. When installed the flange for securing the panel in place to
the window sill will be facing into the room.
A. Hold the Accordion Panel
in one hand and gently
pull back the center to free
the open end. See Fig.1.
B. Slide the free and (I section)
of the panel into the cabinet
as shown in Fig. 2A, 2B & 3.
Slide the panel down., Be
sure to leave enough space
to slip the top and bottom of
the frame into the rails on
the cabinet.
11

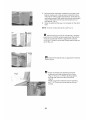
C. Once the panel has been installed on the side of the
cabinet, make sure it sits securely inside the frame
channel by making slight adjustments. Slide the top
and bottom ends of the frame into the top and bottom
ends of the frame into the top and bottom rails of
the cabinet. Fig.4.
D. Slide the panel all the way in and repeat on the other
side.
NOTE: If storm window blocksAC, see Fig. 13.
Keep a firm grip on the air conditioner, carefully
place the unit into the window opening so the bottom
of the air conditioner frame is against the window
sill (Fig.5). Carefully close the window behind the top
rail of the unit.
Extend the side panels out against the window
frame (Fig.6).
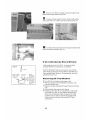
Fig.7
Place the frame lock between the frame
extensions and the window sill as shown
(Fig.7). Drive 3 / 4"(1 9mm) locking screws
through the frame lock and into the sill
(Fig .8).
NOTE: To prevent window sill from splitting,
drill 1 / 8"(3mm) pilot holes before driving
screws.
12

Drive 3 / 4"(19mm) locking screws through frame
holes into window sash (Fig.9/10).
To secure lower sash in place, attach right angle
sash lock with 3 / 4"(19mm) screw as shown(Fig.11).
I_ Cut foam seal and insert in the space between the
upper and lower sashes (Fig.12).
Fig.13
Storm window 11/2"MIN
frame or other (38 mm)
Board
thickness
If AC is Blocked by Storm Window
Add wood as shown in Fig.13, or remove storm
window before air conditioner is installed.
If Storm Window Frame must remain, be sure the
drain holes or slots are not caulked or painted shut.
Accumulated Rain Water or Condensation must be
allowed to drain out.
Removing AC From Window
• Turn AC off, and disconnect power cord.
• Remove sash seal from between windows, and
unscrew safety lock.
• Remove screws installed through frame and frame
lock.
• Close (slide) side panels into frame.
• Keeping a firm grip on air conditioner, raise sash
and carefully 'rock' air conditioner backward to
drain any condensate water in base of unit. Be
carefully not to spill any remaining water while
lifting unit form window. Store parts WITH air
conditioner.
13

OIRIJTIOI
Clean your air conditioner occasionaly to keep it looking new. Be sure to unplug the unit
before cmeaning to prevent chock or fire hazards.
Air F/ter Cleaning
The air filter should be checked at least once a
month to see if cleaning is necessary. Trapped
particles in the filter can build up and cause an
accumulation of frost on the cooling coils.
® Push the vent handle to the Vent Closed position
(where applicable).
• Open the front panel.
® Grasp the filter by the center and pull up and
out.
• Wash the filer using liquid dishwashing deter-
gent and warm water. Rinse filter thoroughly.
o Gently shake excess water from the filter. Be
sure the filter is thoroughly dry before replacing.
o You may also vacuum the filer clean instead of
washing.
Note: Never use hot water over 40 °C(104°F) to
clean the air filter. Never attempt to operate the
unit without the air filter.
Cabinet Cleaning
Be sure to unplug the air conditioner to prevent
shock or fire hazard. The cabinet and front may
be dusted with an oil-free cloth or washed with
a cloth dampened in a solution of warm water
and mild liquid dishwashing detergent. Rinse
thoroughly and wipe dry.
Never use harsh cleaners, wax or polish on the
cabinet front.
o Be sure to wring excess water from the cloth before
wiping around the controls. Excess water inor around
the controls may cause damage to the air conditioner.
Plug in air conditioner.
Winter Storage
If you plan to store the air conditioner during the winter,
remove it carefully from the window according to the
installation instructions. Cover it with plastic or return it
to the original carton.
14

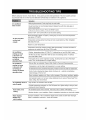
Before calling for service, review this list. It may save you time and expenditure. This list includes common
occurrences that are not the result of defective workmanship or materials in this appliance.
Air conditioner
does notstart
Solution
Wallplug disconnected. Pushplug firmly into wall outlet.
House fuse blown or circu# breaker tripped. Replace fuse with time delay type or
reset drcu# breaker.
Plug Current Device Tripped.Press the RESET button.
Control is OFF.TurnControl ONand set to desired setting.
Room temperature below 17°C(62°F).Coolingmay not occur until room temperature
rises above 17°C(62°F).
Air from unit does
not feel cold Temperaturesensing element touching cold coil, located behind air filter. Straighten
enough tube away from coil.
Reset to a Lowertemperature.
Compressor shut-off by changing modes. Wait approximately 3 minutes and listen for
compressor torestart whenset in the COOLmode.
Air conditioner
cooling,but room
is too warm-ice
formingon cooling
coil behind
decorative fronL
Air conditioner
cooling, but room
is too warm-NO
ice formingon
cooling coil behind
decorative fronL
Outdoor temperature below 18%(64 °F). Todefrost the coil, set FAN ONLYmode.
Air filter may be dirty. Clean filter.Refer to Care and Cleaningsection. Todefrost,
set to FAN ONLYmode.
Thermostatset too cold for night-time cooling. Todefrost the coil, set to FAN ONLY
mode. Then, set temperature to a Higher setting.
Dirty air filter- air restricted. Clean air filter.Refer to Care and Cleaningsection.
Temperatureis set too High, set temperature toa Lower setting.
Air directional louvers positioned improperly.Positionlouvers for better air distribution.
Front of units is blocked by drapes, blinds, fumfure, etc. - restricts air distribution.
Clear blockage in front of unit.
Doors, windows, registers, etc. Open-cold air escapes. Close doors, windows, registers.
Unit recently turned on in hot room. Allow additional time to remove" Stored heat" from
wafts,ceiling, floorand furniture.
Air conditioner turnson
and offrapidly
Noisewhen unit is
cooling
Dirty air filter- air restricted. Cleanair filter.
Outside temperatureextremely hot. Set FANspeed toa Higher setting to bring air past
cooling coils more frequently.
Air movement sound. Thisis normal. If too loud, set to a slower FAN setting.
Window vibration - poor installation. Refer to installation instructions or check with installer.
Water dripping
INSIDE when
unitis cooling.
Improper installation. Tilt air conditioner slightly to the outside toallow water drainage.
Refer to installation instructions - check with installer.
15

Solution
Unit removing large quantity of moisture from humid room. This is normal during
Water dripping excessively humid days.
OUTSIDE when
unit is cooling.
Remote control not located within range. Place remote control within 20 feet & 180_,
Remote Sensing radius of the front of the unit.
Deactivating
Prematurely Remote control signalobstructed. Remove obstruction.
(some models)
Room too cold Set temperature too low.Increase set temperature.
16

Your product is protected by this warranty:
Warranty service must be obtained from Midea Consumer Services or an authorized Midea servicer.
FULL TWO-YEAR
WARRANTY
LIMITED 3RD=5 TM
YEAR WARRANTY
(sealed system)
WARRANTY
PERIOD
Two year from original
purchase date
Third through fifth
years from original
purchase date
MIDEA, THROUGH ITS
AUTHORIZED SERVICERS, WILL:
Pay all costs for repairing or replacing
parts of this appliance which prove to
be defective in materials or
workmanship.
Repair or replace any parts in the
Sealed Refrigeration System
(compressor,
condenser, evaporator and tubing)
proves to be defective in materials
workmanship.
THE CONSUMER WILL BE
RESPONSIBLE FOR:
Transportation and costs of service calls that
are lasted under NORMAL RESPONSIBILITIES
OF THE CONSUMER*
Diagnostic, removal, transportation and
reinstallation costs required because of service.
Costs for labor, parts and transportation
other than with respect to the Sealed
Refrigeration System.
Midea replacement parts shall be used and will be warranted only for the period remaining on the original warranty.
NORMAL RESPONSIBILITIES OF THE CONSUMER*
This warranty applies only to products in ordinary household use, and the consumer is responsible for the items listed below:
1. Proper use of the appliance in accordance with instructions provided with the product.
2. Proper installation by an authorized service professional in accordance with instructions provided with the appliance and in accordance with all
local plumbing, electrical and / or gas codes.
3. Proper connection to a grounded power supply of sufficient voltage, replacement of blown fuses, repair of loosen connections or defects in
house wiring.
4. Expenses for making the appliance accessible for servicing.
5. Damages to finish after installation.
EXCLUSIONS
This warranty does not cover the following:
1) Failure caused by damage to the unit while in your possession (other than damage caused by defect or malfunction), by its improper
installation, or by unreasonable use of the unit, including without limitation, failure to provide reasonable and necessary maintenance or to
follow the written Installation and Operating Instructions.
2) Damages caused by services performed by persons other than authorized Midea servicers; use of parts other than Midea replacement parts;
obtained from persons other than such Midea customer service; or external causes such as abuse, misuse, inadequate power supply.
3) If the unit is put to commercial, business, rental, or other use or application other than for consumer use, we make no warranties, express or
implied, including but not limited to, any implied warranty of merchantability or fitness for particular use or purpose.
4) Products without original serial numbers or products that have serial numbers which have been altered or cannot be readily determined.
Note: Some states do not allow the exclusion or limitation of incidental or consequential damages. So this limitation or exclusion may not apply to you.
IF YOU NEED SERVICE
Keep your bill of sale, delivery slip, or some other appropriate payment record.
The date on the bill established the warranty period should service be required.
If service is performed, Atis your best interest to obtain and keep all receipts.
This written warranty gives you specific legal rights. You may also have other rights that vary from state to state.
Service under this warranty must be obtained by following these steps, in order:
t. Contact Midea Consumer Services or an authorized Midea servicer at 1-866-646-4332
2. If there is a question as to where to obtain service, contact our consumer relations Department.

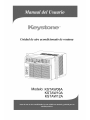
Unidad de aire acondicionado de ventana
Modelo: KSTAW08A
KSTAW10A
2A

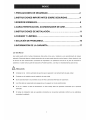
1.PRECAUCIONES DE SEGURIDAD .......................................................... 2
2.1NSTRUCCIONES IMPORTANTES SOBRE SEGURIDAD ...................... 4
3.SONIDOS NORMALES .............................................................................. 5
4.CARACTERISTICAS DEL ACONDIONADOR DE AIRE ............................ 5
5.1NSTRUCCIONES DE INSTALACION ............................................... 11
6.CUIDADO Y LIMPIEZA ............................................................................ 15
7.SOLUCION DE PROBLEMAS .................................................................. 16
8.1NFORMAClON DE LA GARANTiA .......................................................... 17
Leer Este Manual
Aqui usted puede contrar muchas indicaciones Qtites sobre como usar y mantener su aire acondicionado de manera
adecuada. Solamente algunos cuidados preventivos de su parte puede ahorrarle mucho tiempo y dinero durante la vida
de servicio del aire acondicionado. Encontrara las respuestas a los problemas comunes en la pare de soluciones a
problemas. Si usted revisa la parte de Soluciones a Problema primero, a 1omejor no necesitara llamar para servicio.
PRECAUCION
• Contactar con el tecnico autorizado de servicio para la reparaci6n o el mantenimiento de esta unidad.
• Contactar con el instalador para la instalaci6n de esta unidad.
• El aire acondicionado no es prometido al uso de niSos o personas enfermizas sin supervici6n.
• Los niSos debe ser supervisado para asegurar que no jueguen con el aire acondicionado.
• Si se va a sustituir el cable de alimentaci6n, el dicho trabajo debe ser ejecutado Qnicamente por el personal
autorizado.
• El trabajo de instalaci6n debe ser ejecutado Qnicamente por el personal autorizado conforme a los estandares
nacionales de cableado.

Para evitar dafios materiales y lesiones al usuario u otras personas, se deben seguir
las siguientes instrucciones. La operacidn incorrecta debido a la omisi6n de estas
instrucciones puede ocasionar lesiones o dafios. La gravedad se indica de la
siguiente manera.
//_ADVERTENClA Este simbolo indica la posibilidad de muerte o lesiones graves.'_
//_ Este simbolo sefiala la posibilidad de lesiones o dafios
PRECAUClON materiales.
• El significado de los simbolos usados en este manual son los que se indican a continuaci6n.
(_ Nunca haga esto.
Siempre haga esto.
I/ AovE.TE.c, -
• De Io contrario, se puede
producir una descarga
electrica o un incendio
debido a la generaci6n
excesiva de calor.
• Esto puede producir una
descarga electrica o un
incendio debido a la
generaci6n de calor.
• Se puede producir una descarga
electrica o un incendio.
• Para evitar peligros, si el cable de
la corriente esta dafiado, debe
reemplazarlo el fabricante, un
centro de servicio autorizado o una
3ersona con calificaci6n similar.
• Esto puede producir una
descarga electrica o un
incendio debido a la
generaci6n de calor.
• Se puede producir una
descarga electrica.
• Esto puede afectar su salud.
• Una conexi6n a tierra
incorrecta puede producir
una descarga electrica.
• Una instalaci6n correcta puede• Puede provocar una falla de
la maquina o una descarga producir un incendio
electrica, y descargas electricas.
• Se puede producir una
descarga electrica y un
incendio.
• Puede producirse un
incendio.
• Se puede producir una
descarga electrica y un
incendio.
• Se puede producir una
descarga electrica y un
incendio.
• Se puede producir una
descarga electrica y un
incendio.
• Se puede producir una
explosi6n o un incendio.

f
• Puede producirse una
explosi6n, un incendio y
quemaduras.
Se puede producir una falla y una descarga
el6ctrica.
• Pueden producirse lesiones. • El agua puede entrar en la
unidad y degradar el
aislante. Se puede producir
una descarga el6ctrica.
• Puede disminuir el suministro de
oxigeno.
• No limpie la unidad cuando
la corriente est6 encendida
pues se puede producir un
incendio y una descarga
el6ctrica, Io que provocaria
lesiones.
• Esto puede lesionar a la
mascota o dafiar la planta.
• No use este aparato de aire
acondicionado para
conservar dispositivos de
precisi6n, alimentos,
mascotas plantas, ni objetos
de arte. Puede producir
deterioro en la calidad etc.
• Si se usa con las ventanas
abiertas se pueden mojar
los muebles y el interior de
la habitaci6n.
• Puede producirse una falla
del aparato o un accidente.
• Se puede producir una
descarga el6ctrica y dafios.
• Puede producirse una falla
del aparato o un incendio.
• Si la abrazadera est_
dafiada, hay peligro de
dafios debido a la caida de
la unidad.
• Se puede notar el deterioro
del aparato por el cambio
del color en el producto o si
la superficie est_
desportillada.
• Existe el riesgo de incendio
o descarga el6ctrica.
• Si la unidad funciona sin
filtros se puede dafiar.
• Contiene contaminantes y
puede provocar
enfermedades.
J
3

! ADVERTENCIA Para su seguridad
• NO almacene o use gasolina ni otros vapores o I_quidos
inflamables junto a este o cualquier otto
aparato.
• Evite los riesgos de incendio o descarga el6ctrica. No use
un cable de extensi6n o un adaptador
para el enchufe. No quite ninguna terminal de la clavija del
cable de alimentaci6n el6ctrica.
! ADVERTENCIA Informaci6n electrica
• Compruebe que el servicio el6ctrico sea el adecuado para
el modelo que ha escogido. Esta
informaci6n la puede encontrar en la placa con el nQmero
de serie que se Iocaliza al lado del
gabinete y detr_s de la parrilla.
• Verifique que el aire acondicionado tenga una conexi6n
adecuada a tierra. Para minimizar los
riesgos de descarga el6ctrica e incendio, es importante
contar con una conexi6n a tierra apropiada.
El cable de alimentaci6n el6ctrica est_ equipado con una
clavija trif_sica como protecci6n contra
_ _, :__:_ d_ _ riesgos el6ctricos.
• Su aparato de aire acondicionado se debe usar en un recept_culo para pared correctamente
conectado a tierra. Si el recept_culo de pared que pretende usar no tiene una conexi6n adecuada a
tierra o no est_ protegido con un fusible retardador oun interruptor de circuito, contrate un
electricista calificado para que instale el recept_culo correcto.
AI instalar la unidad, asegQrese de hacerlo dejando espacio de forma que m_s adelante sea posible
el acceso al recept_culo.
No encienda el aparato de aire acondicionado si no ha colocado en su sitio la cubierta protectora.
Esto podda producir da_os mec_nicos en el aparato de aire acondicionado.
No use un cable de extensi_rt o urt aclaptacior para el enchufe.
Operaci6n del disposidvo para corriente
(Aplicable s61o para las unidades que cuen_an con dispositivo de detecci_n de corriente).
El cable de alimentaci6n el_ctrica cuenta con un dispositivo el_ctrico que detecta da_os al cable. Para
probar su cable de alimentaci6n el_ctrica haga Io siguiente:
1. Enchufe el aparato de aire acondicionado.
2. El cable de alimentaci6n el_ctrica tendr_ DOS botones en la clavija. Presione el bot6n TEST
(prueba) y notar_ un clic cuando el bot6n RESET (restablecer) salte.
3. Presione el bot6n RESET de nuevo y notar_ un clic cuando el bot6n encaje de nuevo.
4. El cable de alimentaci6n el_ctrica ahora est_ suministrando electricidad a la unidad. (En algunos
productos esto tambi_n se indica mediante una luz en la clavija).
NOTAS:
No use este dispositivo para encender o apagar la unidad.
AsegQrese siempre de que el bot6n RESET est_ oprimido para una operaci6n correcta.
El suministro el_ctrico debe reemplazarse si no se restablece cuando se presiona el bot6n TEST o
cuando no se puede restablecer. Puede obtener uno nuevo con el fabricante del producto.
Si el cable de alimentaci6n el_ctrica est_ da_ado, no se puede reparar. Se DEBE reemplazar pot
uno nuevo con el fabricante del producto.
4

INSTRUCCIONES DE FUNCIONAMIENTO CON CONTROL ELECTRICO
Antes de comenzar, conozca en profundidad el panel de control, como se muestra a continuaci6n, y
todas sus funciones. En las paginas 6 a 8 puede encontrar una descripci6n detallada de cada bot6n y sus
funciones. La unidad se puede controlar con el panel de control o con el control remoto.
off
C,';teck Sleep
t fli_i
5

CARACTERiSTICAS DEL ACONDIONADOR DE AIRE (CONTINUACION)
NOTA: las siguientes instrucciones corresponden al manejo del panel de control. Tambien pueden servir para
el control remoto:
PARA ENCENDER LA UNIDAD:
On/Off
PARA CAMBIAR LAS CONFIGURACIONES DE TEMPERATURA:
NOTA:
Presione o mantenga presionado los botones (T)
6 (A) hasta que aparezca la temperatura
deseada en la pantalla. Las temperaturas entre
62 °F (17 °C) y 86 °F (30 °C) se mantendran
automaticamente. Para vet en pantalla la
temperatura real del ambiente, consulte la
secci6n "Para operar solo en modo ventilador" en
la pagina 7.
PARA AJUSTAR LAS VELOCIDADES DEL VENTILADOR:
Auto Auto
°;:; 2:
E_'ev_gY On/Off
NOTA:
Presione el bot6n "Fan" [Ventilador] para
seleccionar la velocidad deseada del ventilador:
"Auto" [automatica], "Low" [baja], "Med" [media] o
"High" [alta]. Cada vez que Io presione, cambiara
el modo de la velocidad del ventilador y asi Io
mostraran las luces del indicador.
6

PARA SELECCIONAR EL MODO DE FUNCIONAMIENTO:
@
to
Med
NOTA:
Presione el bot6n "Mode" [modo] para
seleccionar el modo de funcionamiento
deseado: "Auto" [automatico], "Cool" [fdo], "Dry"
[seco] y "Fan" [ventilador]. Cada vez que Io
presione, el modo de funcionamiento cambiara y
asi Io mostrara la respectiva luz del indicador.
MODO DE FUNClON AUTOMATICA:
En modo "AUTO" [AUTOMATiCO], la velocidad del
ventilador no se puede ajustar. El acondicionador
de aire comenzara a funcionar automaticamente a
una velocidad del ventilador en funci6n de la
temperatura del ambiente.
Si el ambiente no es muy caiuroso, permanecera
en "LOW" [velocidad baja].
MODO VENTILADOR:
- Seleccione el modo "FAN" [VENTILADOR] cuando
no desee bajar la temperatura, pot ejemplo para
hacer circular el aire del ambiente o para extraer
el aire viciado (en algunos modelos). Se puede
seleccionar cualquier velocidad del ventilador
en modo "FAN" [VENTiLADOR].
• La pantalla mostrara la temperatura ambiente real.
• No se puede ajustar la temperatura.
MODO DE FUNCION DE DESHUMIDIFICADOR:
• En modo "DRY" [SECO], el acondicionador de
aire funciona por Io general como
deshumidificador. El enfdamiento continuara
en cierta medida.
PARA USAR LA FUNCION DE AHORRO DE ENERG{A:
Auto Auto
Cool Low
Dry Med
Fan High
NOTA:
• La funci6n "ENERGY SAVER" [AHORRO DE
ENERGiA] permite que el acondicionador de aire
reduzca al minimo el consumo de energia durante
el enfdamiento.
• Cuando se activa, el ventilador seguira funcionando
pot tres minutos despues de que se apague el
compresor. Luego, el ventilador se enciende pot 2
minutos en intervalos de 10 minutos hasta que la
temperatura ambiente supere la temperatura
establecida. En ese momento, el compresor se
enciende y se reanuda el enfdamiento.
7

PARA USAR LA FUNCION DEL TEMPORIZADOR
(INICIO/APAGADO AUTOMATICO):
Temp Temp
Timer" _ Timer
..... On..... t
Off
.....:2
l
Cool Low
Dry Med
Fan High
i
NOTA:
La funci6n "TIMER" [TEMPORIZADOR] iniciara y
apagar& automaticamente el acondicionador de aire
en intervalos establecidos.
TEMPORIZADOR ENCENDIDO:
Presione el bot6n "TIMER" [TEMPORIZADOR].
La luz de "TIMER ON" [TEMPORIZADOR
ENCENDIDO] se encendera para indicar que ha
comenzado el programa de inicio automatico
NOTA: El bot6n "TIMER" [TEMPORIZADOR] se
puede presionar cuando el acondicionador del
aire este en posici6n "ON" [ENCENDIDO] o
"OFF" [APAGADO].
Presione o mantenga presionados los botones
(A) o (T) para ajustar la hora de inicio
autom&tico.
NOTA: Se pueden establecer aumentos de
tiempo en intervalos de 30 minutos por hasta 10
horas y, luego, en intervalos de 1 hora, hasta 24
horas.
TEMPORiZADOR APAGADO:
Cuando se fija y visualiza la hora de inicio
automatico, presione otra vez el bot6n "TIMER"
[TEMPORIZADOR]. La luz de "TIMER OFF"
[TEMPORIZADOR APAGADO] se iluminara para
indicar que ha comenzado el programa de
apagado automatico.
Presione o mantenga presionados los botones
(A) o (_') para ajustar el tiempo de apagado
autom&tico.
NOTA: Se pueden establecer aumentos de
tiempo en intervalos de 30 minutos por hasta 10
horas y, luego, en intervalos de 1 hora, hasta 24
horas.
Las horas seleccionadas se visualizaran por 5
segundos y el sistema automaticamente volvera a
mostrar en pantalla la configuraci6n de temperatura
antes seleccionada o la temperatura del ambiente.
Para cancelar la funci6n de inicio o apagado
automatico, ENClENDA o APAGUE la unidad en
cualquier momento o ajuste la configuraci6n del
temporizador en 0.0.
8

PARA U8AR LA FUNCION DE DORMIR:
Timer" _ Timer
-- oo;J
__:_F,%k s_eep
Oool Low
Dry Med
Fan High
NOTA:
En modo "SLEEP" [DORMIR], el acondicionador
de aire realizara Io siguiente:
AI presionar el bot6n "SLEEP" [DORMIR], el
acondicionador de aire aumentara de forma
automatica la configuraci6n de temperatura
seleccionada en 2 °F (1-2 o) luego de 30
minutos.
Luego de 30 minutos adicionaies, la
configuraci6n de la temperatura aumentara otros
2 OF(1-2 ° C).
Esta nueva configuraci6n de temperatura se
mantendr& 6 horas adicionales.
Luego de 6 horas, el modo "SLEEP" [DORMIR]
finalizara y el acondicionador de aire continuara
funcionando seg0n Io que antes se habia
programado y con la configuraci6n de
temperatura seleccionada originalmente.
El modo "SLEEP"[DORMIR] se puede cancelar
en cualquier momento durante el
funcionamiento, con s61o presionar el bot6n
"SLEEP" [DORMIR].
PARA USAR LA FUNCION DE VERIFICACION DEL FILTRO:
AutoI iAuto
0ool Low
Dry Med
Fan High
NOTA:
La funci6n "CHECK FILTER" [VERIFICAR FILTRO]
proporciona un recordatorio para limpiar el filtro de
aire y Iograr un funcionamiento mas eficiente.
La luz indicadora de LED por encima del bot6n
"CHECK FILTER" [VERIFICAR FILTRO] se
encendera despues de 250 horas de
funcionamiento con el fin de recordarle que debe
limpiar o reemplazar el filtro de aire.
Luego de limpiar o reemplazar el filtro, presione
el bot6n "CHECK FILTER" [VERIFICAR
FILTRO] otra vez para volver a configurar el
recordatofio. Se apagara la luz indicadora de
LED.
9

CARACTERiS_CAS DEL Ai_RE T_NUA#O]
D FOLLOW ME
@
Auto
Cool
Dry
Fan
{
Ener
Sav_ / On/Off
f/
NOTA:
ALGO _.AS QUE DEBE SABER
Ahora que domina el procedimiento de funcionamiento, detaHamos a continuaci6n mas funciones de su control
con las que debe fam_liadzarse.
El circuito de Frio se inicia con una demora automatica de 3 minutos si la unidad se apaga y enciende
rapidamente. Esto evita el recalentamiento del compresor y que actQe el interruptor de c_rcuitos. El
ventilador seguir_ funcionando durante este tiempo.
" El control puede mostrar la temperatura en grados Fahrenheit o Celsius. Para convertidos mantenga
presionados los botones de Temp/Timer (temperatura y temporizador) izquierdo y derecho al mismo
tiempo, por 3 segundos.
RejH_as de ventHaci6n direcciona_es
Manijas centrabs
Las rejiHas de ventilaci6n le permitiran dirigir e_flujo de aire
hacia ARRIBA O ABAJO (en algunos modebs) e
IZQUIERDA o DERECHA en el ambbnte
segQn sea necesario. Haga girar las rejiHas de ventilaci6n
horizontales hasta obtener la direcci6n hacia ARRIBA/ABAJO
que desea.
Mueva las MANUAS CENTRALES hacia los lados
hasta obtener la direcci6n IZQUIERDA/DERECHA
deseada.
Contro_ de venti_aci6n con aire fresco
10

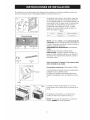
Suaparatodeaireacondicionadoestfidisefiadoparainstalarseenventanasdeslizableverticalcon
anchodeaberturasde23a36pulgadas(584mma914mm)(VetFig.1).
Elsujetadorinferiorparaelmarcodebesepararse
Iosuficienteparapermitirunaaperturaverticalde
15-1/2pulgadas(394mm).Lasrejillaslateralesyla
parteposteriordelAAdebentenetunespaciolibre
parapermitirelsuficienteflujodeairehaciael
condensadorparadispersarelcalor.Laparte
posteriordelaunidaddebequedardefuera,no
dentrodeledificioogaraje.
Table 1
eJ 8000Btu/h 10000-12000Btu/h
_. 14"(356m m) 15-1/2"(394mm)
NOTA: Guarde el cart6n y estas Instrucciones de
instalaci6n para su consulta posterior. El cart6n es
el mejor medio para almacenar la unidad durante el
invierno, o cuando no se use.
HERRAMIENTAS NECESARIAS: Destornillador
Phillips
Taladro (Si son necesarios orificios guia)
PRECAUClON: Cuando manipule la unidad, no
toque las orillas metfilicas agudas ni las placas de
aluminio de los evaporadores delantero y trasero
para evitar cortes.
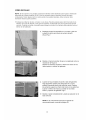
Antes de instalar la unidad, el riel superior debe
ester mont_cio en la unidacL
Herramientas necesarias: Destornillador Phillips
A: Desempaque el aparato de aire acondicionado y
col6quelo en una superficie plana.
B: Quite el riel superior de la parte posterior del
material de empacado como se muestra en la Fig.
A.
C: Alinee el orificio del riel superior con el de la
parte superior de la unidad como se muestra en la
Fig. B.
D: Asegure el riel superior a la unidad con los
tornillos de 3/8 como se ilustra en la Fig. C.
NOTA: Por razones de seguridad, los cuatro (4)
tornillos DEBEN estar bien apretados.
11

COMO INSTALAR
NOTA: El riel superior y los paneles corredizos laterales est_n dise_ados para Iograr la inclinaci6n
adecuada de la parte posterior (5/16"). Esto es necesario para el drenado correcto del agua
condensada. Si pot alguna raz6n no est_ usando los paneles laterales, debe conservar esta
inclinaci6n hacia la parte posterior.
1 Coloque la unidad en el piso, un banco o una mesa. Hay dos paneles para cubrir los lados de la
ventana: uno para el derecho y otto para el izquierdo. Compruebe que usa el panel para el lado
correc.to Cuando se instale, la pesta_a para asegurar el panel a la ventana debe apuntar hacia el
interior de la habitaci6n.
A. Sostenga el panel de acorde6n en una mano y jale con
cuidado el centro para liberar el extremo abierto.
Vea la Fig. 2
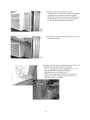
B, Deslice el marco Accordian Grupo en el gabinete como se
muestra en la Figura 3.
Deslice los extremos superior e inferior del marco en los
rieles superior e inferior del gabinete.
C,
D,
Cuando se haya instalado el panel al lado del gabinete,
haga peque_os ajustes para asegurarse de que se
asienta firmemente dentro del canal del marco. Deslice
los extremos superior e inferior del marco en los extremos
superior e inferior del marco que estan en los rieles
inferior y superior del gabinete. Fig.4
Deslice el panel completamente y repita la operaci6n en el
lado contrario.
NOTA: Si la contraventana bloquea el aparato de
aire acondicionado, consulte la pagina 34.
]2

2 Sujete con firmeza el aparato de aire
acondicionado, coloque con cuidado la unidad en
la abertura de la ventana hasta que la parte
inferior de la unidad se apoye en el alf6izar de la
ventana (Fig. 5). Cierre con cuidado la ventana
pot detr_s del riel superior de la unidad.
3 Extienda los paneles laterales hacia el marco de
la ventana (Fig. 6).
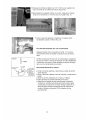
4 Coloque el fijador entre las extensiones del marco y el
alf6izar de la ventana tal como se muestra
(Fig. 7). Coloque los tornillos de fijaci6n de s" (19
mm) atornill_ndolos a trav6s del fijador y
afianz_ndolos en el alf6izar (Fig. 8).
NOTA: Para evitar que el alf6izar de la ventana se
despedace, taladre orificios guJa de 1/8" (3 mm)
antes de colocar los tornillos.
13

5 Coloque los tornillos de fijaci6n de 1/2" (13 mm) en el sujetador del
marco a trav6s de los orificios del marco (Figs. 9/10).
6 Para asegurar el sujetador inferior en su sitio, col6quelo en angulo
recto con un tornillo de ¾" (19 mm) como se muestra (Fig. 11).
7 Corte la espuma selladora e ins6rtela en el espacio entre
los fljadores superior e inferior (Fig. 12).
Si el AA est_ bloqueado por una contraventana
Agregue madera como se muestra en la Fig. 13, o quite la
contraventana antes de instalar el aparato de aire acondicio-
nado.
Si debe conservarse el marco de la contraventana, asegQrese
de que los orificios o ranuras de drenado no est6n calafateados
ni obstruidos con pintura. Debe facilitarse el drenado del agua
de Iluvia o de condensaci6n acumulada.
Desmontaje del AA de la ventana
Corte la corriente electrica y desconecte el cable de aliment
aci6n electrica.
Quite el sello del sujetador entre las ventanas y desatornille el
fijador.
Quite los tornillos instalados en el marco y el fijador.
Cierre (deslice) los paneles laterales en el marco.
Sujete bien el aparato de aire acondicionado, levantelo e
inclinelo con cuidado hacia atras para drenar toda el agua
condensada en la base de la unidad. Tenga cuidado de no
derramar agua sobrante mientras levanta la unidad de la
ventana. Almacene las partes CON el aparato de aire
acondicionado.
]4

Limpie _d_icamente e__parato desire a_dicicnado para manlenersu apadencia
aueva.Aseg_rese de desconec_r la unidad antes de Iimpi,ada _,r_
evi_r ei peiigro de des_rga o
Limpieza del filtro de aire
El filtro de aire deber_ revisarse por Io menos una vez al rues
para vet si necesita limpieza. Las particulas atrapadas en el
filtro pueden acumularse y ocasionar una acumulaci6n de
escarcha en los evaporadores de enfdamiento.
• Quite el filtro deslizAndolo del lado derecho.
• Lave el filtro con detergente lavavajillas liquido y agua tibia.
Enjuague completamente el filtro. Sacuda con cuidado el
exceso de agua del filtro. Compruebe que el filtro est6
completamente seco antes de reemplazarlo.
• Tambi6n puede aspirar el filtro en _gar de lavarlo.
Nota: Nunca use agua caliente a m_s de 40° C (104° F) para
limpiar el filtro de aire. Nunca intente usar la unidad sin
el filtro de aire.
Limpieza del gabinete
• Aseg_rese de desconectar el aire acondicionado para evitar
el peligro de incendio o descarga
el6ctrica. El gabinete y el frente de la unidad se pueden
desempolvar con un paso sin aceite o lavar
con un paso humedecido con una soluciSn de agua tibia y
detergente lavavajillas liquido suave.
Enjuague completamente y seque.
• Nunca use limpiadores abrasivos, ceras ni pulidores en el
frente del gabinete.
• Expdma el exceso de agua del paso antes de limpiar
alrededor de los controles. El exceso de agua dentro o
alrededor de los controles puede daSar la unidad.
• Enchufe el aparato de aire acondicionado.
Almacenamiento durante el invierno
, si planea almacenar el aparato de aire acondicionado
durante el invierno, qultelo con cuidado de la ventana de
acuerdo alas instrucciones de instalaciSn. CQbralo con
pl_stico o regr6selo a su empaque original.
15

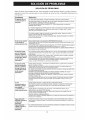
SOLUCION DE PROBLEMAS
Antes de Ilamar para solicitar servicio, revise esta lista. Puede ahorrarle tiempo y gastos. Esta lista
incluye los casos m_s comunes que no son resultado de mano de obra o materiales defectuosos en
este aparato.
Problema
El aparato de aire
acondicionado no
enciende
El aire de la unidad
no se siente Io
suficientemente frio
El aparato enfria,
pero la habitaci6n
esta muy caliente.
Se forma hielo en el
evaporador, detras
de la cubierta
decorativa.
El aparato enfria,
pero la habitaci6n
esta muy caliente.
No hay hielo en el
evaporador detras
de la cubierta
decorativa.
Soluci6n
La clavija est_ desconectada. Coloque firmemente la clavija en el tomacorriente.
El fusible esta fundido o el interruptor de circuito cortado. Reemplace el fusible con uno de
tipo de retardo o restablezca el interruptor de circuito.
El control de selecci6n esta en la posici6n OFF. Gire el seleccionador a la posici6n
deseada (FAN o COOL).
La unidad se apag5 porque el termostato se movi6 a un nDmero que indicaba menos fr[o y
se regres6 inmediatamente a un nDmero que indica m_s frio. Espere unos 3 minutos.
Escuche que el compresor arranque.
La unidad se apag5 y luego se encendi5 con demasiada rapidez. Apague la unidad y
espere 3 minutos antes de volverla a encender.
El termostato se coloc5 en un nQmero demasiado bajo. Ajuste el termostato a un nQmero
mayor para enfriamiento.
Gire el seleccionador a una posici6n de ENFRIAMIENTO m_s alta.
El termostato se coloc5 en una posiciSn demasiado cafiente. Coloque el termostato a una
temperatura m_s fria.
La temperatura de la habitaci6n est_ por debajo de 17° C (62 ° F). El enfriamiento puede no
activarse hasta que la temperatura ambiente este arriba de 17° C (62° F).
El tubo sensor de temperatura est_ tocando el evaporador fr[o, ubicado detr_s del filtro de
aire. Aleje el tubo del condensador.
La temperatura exterior est_ por debajo de 18° C (64° F). Para descongelar el evaporador,
coloque el seleccionador en la posiciSn FAN. Luego, coloque el termostato en la posiciSn
m_s caliente.
El filtro de aire puede estar sucio. Limpie el filtro. Consulte la secci6n Cuidado y limpieza.
Para descongelar, coloque el seleccionador en FAN.
El termostato se coloc5 en una posiciSn demasiado fria para funcionar durante la noche.
Para descongelar el evaporador, coloque el seleccionador en la posici6n FAN.
Luego, coloque el termostato en una posici6n m_s caliente.
El filtro de aire est_ sucio - se bloquea la circulaci6n del aire. Limpie el flltro. Consulte la
secciSn Cuidado y limpieza.
El termostato se coloc5 en una posiciSn demasiado caliente. Gire el termostato en el
sentido de las manecillas del reloj a una posici6n mas fria.
Las rej_71asdireccionales de aire se colocaron de forma incorrecta. Coloque las rejillas para
una mejor distribuci6n del aire.
El frente de la unidad est_ bloqueado por cortinas, persianas, muebles, etc., Io que
restringe la distribuci6n de aire. Elimine la causa del bloqueo.
Hay puertas, ventanas, registros, etc. abiertos. El aire fr[o se escapa. Cierre las puertas,
ventanas, registros, etc.
La unidad se encendi5 hace poco en un cuarto caliente. Permita que funcione un tiempo
adicional para que elimine el "calor acumulado" en las paredes, el techo, el piso y los
muebles.
El aire El filtro de aire esta sucio - bloqueo del aire. Limpie el filtro de aire.
acondicionado $e La temperatura exterior es demasiado caliente. Coloque en la posici6n de enfriamiento
enciende y apaga m_s alta para permitir que el aire pase por el evaporador de enfriamiento con m_s
con rapidez, frecuencia.
La unidad hate Sonido de aire en movimiento. Esto es normal. Si es demasiado ruidoso, gire el
ruido cuando enfria seleccionador a la posici6n FAN mas baja.
Sonido de agua que golpea el abanico, sistema de eliminaci6n de humedad. Esto es
normal cuando la humedad es alta.
Cierre las puertas, ventanas y registros.
Vibraci6n en la ventana, lnstalaci6n defectuosa. Consulte las instrucciones de instalaciSn o
revisela con el instalador.
Agua goteando lnstalaci6n incorrecta. Incline un poco el aparato de aire acondicionado hacia el exterior
DENTRO cuando la para permitir el drenado del agua. Consulte las instrucciones de instalaciSn o rev/sela con
unidad esta el instalador.
enfriando.
Agua goteando La unidad est_ eliminando una gran cantidad de humedad de la habitaciSn. Esto es normal
FUERA cuando la cuando el dia es excesivamente h_medo.
unidad est#
enfriando.
16

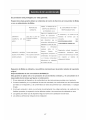
Su producto est_ protegido pot esta garant_a:
Reparaciones bajo garantia deben set obtenidos de Centro de Servicios al Consumidor de Midea
o con un administrador de Midea.
GARANTIA
COMPLETA
A_OS
DE 2DC
GARANTIA LIMFADA
DE 3DO A 5TO ANOS
(sistema sellado)
PERIODO DE
GARANTIA
2DO aSos a partir de
la fecha de compra
odginal
Tercer hasta quinto
ASo a partir de la fecha
de compra original
MIDEA,A TRAVES DE SU
CENTRO DE SERVlCIO
AUTORIZADO, VAA
Pago delatotalidad delos
ELCONSUMIDORVAASER
RESPONSABLE PARA
El transporte y los costos de las
Ilamadas de servicio que se
encuentra bajo
RESPONSABILIDADES DEL
CONSUMIDOR NORMALES
costos de reparaci6n o
reemplazo de las partes de
este dispositivo que se
comprueba defectuosos en
matedales o mano de obra.
Reparar o reemplazar
cualquier parte en la
Sistema Sellado de
refdgeraci6n (compresor, el
condensador, el evaporador
y el tubo)se comprueban
defectuosos en matedales
de la mano de obra.
Diagn6stico, retirada, transporte y
reinstalaci6n necesadoS delos
costos de los servicios que no sean
con respecto al sistema de
refrigeraci6n Sellado
Repuestos de Midea se utilizaran y se justifican unicamente pot el periodo restante de magarantia
original
Responsabilidades de mosconsumidores NORMALES
Esta garantia se aplica s61o amos productos de uso dom_stico ordinario, y el consumidor es el
responsable de mostema$ que figuran a continuaci6n;
1. El uso adecuado del dispositivo, de conformidad con las instrucciones provistas con el producto.
2. Correcta instalaci6n pot un profesional de servicio autorizado, de conformidad con las instrucciones
provistas con el dispositivo, y de conformidad con todos los plomeda local, electricidad y / o c6digos
de gas.
3. Una buena conexi6n a tierra a una fuente de alimentaci6n de vokaje suficiente, de sustituci6n de
fusibles quemados, la reparaci6n de los defectos sueltos o las conexiones de cableado en casa.
4. Los gastos para hacer que el dispositivo Ilegue al centro de la prestaci6n de servicios.
5. Los daSos a perfeccionar despues de la instalaci6n.
17

EXCLUSIONES
Esta garantia no incluye los siguientes:
2)
3)
4)
Fallos causados por el daSo a la m_.quina cuando estA de su propiedad (salvo los daSos causados
por el defecto o mala funci6n), pot la instalaci6n no correctas, o por el uso irrazonable de la
m_.quina, incluyendo sin limitaci6n, fracaso de proveer responsabilidad y mantenimiento necesario
o de seguir las Instrucciones de Instalaci6n y Operaci6n.
DaSos causados pot los servicios realizados pot personas salvo los servidores autorizados de
Midea, uso de las partes no de Midea
Si la mAquina se usa en el campo comercial, de negocio, renta, o de otros prop6sitos salvo para el
uso del cliente, no ofrecemos la garanfia ni expresa ni implfcita, incluido pero no limitado, cualquier
garantfa implicita de comercializable o adaptabilidad para el uso o prop6sito particular.
Los productos sin n0meros seriales originaHes o los que no tiene los n0meros seriales cuales no han
sido alterados o no pueden ser reconocido f_.cilmente.
Nota: En algunos estados no se permite la exclusi6n o limitaci6n de los daSos incidentales o
consecuenciales. Por Io tanto, esta limitaci6n o exclusi6n podria no aplicar para usted.
Sl USTED NECESITA SERVIClO
Guarde su recibo de compra, tiquete de reparto, o otros comprobantes apropiados de pago.
La fecha en el recibo estable el periodo de garantia que se requiere el servicio.
Si el servicio se ha realizado, ser& su mejor interns de obtener y guardar todos los recibos.
Esta garanfia escrita le ofrece los derechos especificos legales.
Usted tambi6n puede tenet otros derechos que varian entre cada estado.
El servicio bajo esta garantia debe set obtenido pot los pasos siguientes en orden.
1. Contactar a los Servicios a Cliente de Midea o a un servidor autorizado de Midea a
1-866-646-4332.
2. Si se tiene una cuesti6n como de donde se puede obtener servicio, contacte nuestro Departamento
de Relaciones con Clientes.
18

EXCLUSIONES
Esta garantia no incluye los siguientes:
2)
3)
4)
Fallos causados por el daSo a la m_.quina cuando estA de su propiedad (salvo los daSos causados
por el defecto o mala funci6n), pot la instalaci6n no correctas, o por el uso irrazonable de la
m_.quina, incluyendo sin limitaci6n, fracaso de proveer responsabilidad y mantenimiento necesario
o de seguir las Instrucciones de Instalaci6n y Operaci6n.
DaSos causados pot los servicios realizados pot personas salvo los servidores autorizados de
Midea, uso de las partes no de Midea
Si la mAquina se usa en el campo comercial, de negocio, renta, o de otros prop6sitos salvo para el
uso del cliente, no ofrecemos la garanfia ni expresa ni implfcita, incluido pero no limitado, cualquier
garantfa implicita de comercializable o adaptabilidad para el uso o prop6sito particular.
Los productos sin n0meros seriales originaHes o los que no tiene los n0meros seriales cuales no han
sido alterados o no pueden ser reconocido f_.cilmente.
Nota: En algunos estados no se permite la exclusi6n o limitaci6n de los daSos incidentales o
consecuenciales. Por Io tanto, esta limitaci6n o exclusi6n podria no aplicar para usted.
Sl USTED NECESITA SERVIClO
Guarde su recibo de compra, tiquete de reparto, o otros comprobantes apropiados de pago.
La fecha en el recibo estable el periodo de garantia que se requiere el servicio.
Si el servicio se ha realizado, ser& su mejor interns de obtener y guardar todos los recibos.
Esta garanfia escrita le ofrece los derechos especificos legales.
Usted tambi6n puede tenet otros derechos que varian entre cada estado.
El servicio bajo esta garantia debe set obtenido pot los pasos siguientes en orden.
1. Contactar a los Servicios a Cliente de Midea o a un servidor autorizado de Midea a
1-866-646-4332.
2. Si se tiene una cuesti6n como de donde se puede obtener servicio, contacte nuestro Departamento
de Relaciones con Clientes.
-
 1
1
-
 2
2
-
 3
3
-
 4
4
-
 5
5
-
 6
6
-
 7
7
-
 8
8
-
 9
9
-
 10
10
-
 11
11
-
 12
12
-
 13
13
-
 14
14
-
 15
15
-
 16
16
-
 17
17
-
 18
18
-
 19
19
-
 20
20
-
 21
21
-
 22
22
-
 23
23
-
 24
24
-
 25
25
-
 26
26
-
 27
27
-
 28
28
-
 29
29
-
 30
30
-
 31
31
-
 32
32
-
 33
33
-
 34
34
-
 35
35
-
 36
36
-
 37
37
-
 38
38
-
 39
39
-
 40
40


Keystone KSTAW08A Manual de usuario
- Tipo
- Manual de usuario
en otros idiomas
- English: Keystone KSTAW08A User manual