Kichler Lighting 15194AZ Manual de usuario
- Tipo
- Manual de usuario
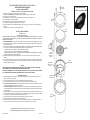
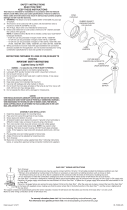
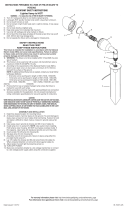
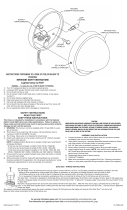
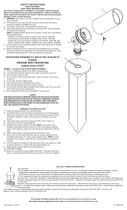
El Kichler Lighting 15194AZ es un artefacto de iluminación para exteriores diseñado para brindar una iluminación segura y eficiente a jardines, parques y otras áreas al aire libre. Está hecho de aluminio fundido resistente a la intemperie y tiene un acabado de bronce envejecido que le da un aspecto clásico y elegante. Puede usarse con lámparas incandescentes o LED. También cuenta con una lente de vidrio transparente que proporciona una distribución uniforme de la luz.
El Kichler Lighting 15194AZ es un artefacto de iluminación para exteriores diseñado para brindar una iluminación segura y eficiente a jardines, parques y otras áreas al aire libre. Está hecho de aluminio fundido resistente a la intemperie y tiene un acabado de bronce envejecido que le da un aspecto clásico y elegante. Puede usarse con lámparas incandescentes o LED. También cuenta con una lente de vidrio transparente que proporciona una distribución uniforme de la luz.


-
 1
1
-
 2
2


Kichler Lighting 15194AZ Manual de usuario
- Tipo
- Manual de usuario
El Kichler Lighting 15194AZ es un artefacto de iluminación para exteriores diseñado para brindar una iluminación segura y eficiente a jardines, parques y otras áreas al aire libre. Está hecho de aluminio fundido resistente a la intemperie y tiene un acabado de bronce envejecido que le da un aspecto clásico y elegante. Puede usarse con lámparas incandescentes o LED. También cuenta con una lente de vidrio transparente que proporciona una distribución uniforme de la luz.
en otros idiomas
- English: Kichler Lighting 15194AZ User manual
Artículos relacionados
-
 Kichler Lighting 15780AZT30R Manual de usuario
-
 Kichler Lighting 15088BK Manual de usuario
-
 Kichler Lighting 15309AZT Manual de usuario
-
 Kichler Lighting 15478CBR Manual de usuario
-
 Kichler Lighting 15390AZT Manual de usuario
-
 Kichler Lighting 15190BK Manual de usuario
-
 Kichler Lighting 15374BKT Manual de usuario
-
Kichler Lighting 16070AZT27R Manual de usuario
-
 Kichler Lighting 15064BBR Manual de usuario
-
 Kichler Lighting 15384AZT Manual de usuario


