Euro-Pro 8135H El manual del propietario
- Categoría
- Máquinas de coser
- Tipo
- El manual del propietario

Model 5 Instruction Manual
Modelo 5 Manual de Instrucciones
Model 5 Manuel d'Instructions
813 H
813 H
813 H
La página se está cargando...
La página se está cargando...

IMPORTANTES MESURES DE SÉCURITÉ
Lorsqu'on utilise une machine à coudre, il
faut toujours respecter certaines règles
fondamentales de sécurité, notamment
les suivantes:
1. Ne pas laisser sans surveillance
lorsque branchée. Toujours débrancher
la machine immédiatement après
usage et avant de la nettoyer.
2. Toujours débrancher avant de changer
l'ampoule. Remplacer l'ampoule par
une ampoule de même calibre 10
watts (110-120V area) ou 15 watts
(220-240 area).
1. Ne pas permettre l'utilisation comme
jouet. Exercer une étroite surveillance
lorsque la machine est utilisée à
proximité d'un enfant ou lorsqu'elle
est utilisée par ce dernier.
2. N'utilisez cette machine à coudre que
pour l'utilisation décrite dans ce
manuel. N'utiliser que les accessoires
recommandés par le manufacturier
décrits dans ce manuel.
3. Ne pas utiliser cette machine à
coudre si le cordon ou la prise sont en
mauvais état, si elle ne fonctionne
pas normalement, si elle est tombée
et endommagée, ou plongée dans
l'eau. Retourner la machine à coudre
chez le dépositaire autorisé le plus
près pour examen, réparations,
réglages électriques ou mécanique.
4. Ne jamais utiliser la machine à coudre
lorsque les trous d'aération sont
bloqués. Garder les trous d'aération
de la machine à coudre et de la
commande de vitesse libres de toute
accumulation de charpie, poussières et
tissus.
5. Ne jamais échapper ou insérer tout
objet dans les ouvertures.
6. Ne pas utiliser à l'extérieur.
7. Ne pas utiliser dans un endroit où des
produits aérosol sont utilisés on dans
un endroit où on administre de
l'oxygène.
8. Mettre la machine hors tension avant
de la brancher ou de la débrancher.
9. Ne pas tirer sur le cordon pour
débrancher la machine à coudre. Pour
débrancher, saisir la fiche et tirer.
10. Tenir les doigts éloignés des pièces
mobiles. Tout spécialement de l'aiguille.
11. Toujours utiliser la plaque à aiguille
appropriée.
12. Ne pas utiliser d'aiguille croche.
13. Ne pas tirer ou pousser sur le tissu en
cousant, afin d'éviter de briser l'aiguille.
14. Mettre la machine hors tension pour
effectuer tout réglage, tel enfiler
l'aiguille, changer l'aiguille ou plaque
aiguille.
15. Toujours débrancher la machine à
coudre pour effectuer l'entretien ou
tout autre réglage mentionnés dans ce
manuel.
16. Le niveau du son est dans des
conditions normales de 75dB (A).
Lire toutes les directives avant usage.
- Pour éviter les risques
de secousses électriques:
- Afin de réduire les risques
de brûlures, feu, risques de secousses
électriques, ou blessures:
DANGER
AVIS
CONSERVER CES
INSTRUCTIONS
F
La página se está cargando...

List of contents
GB
Principal parts .................................................................................................................2/4
Accessories........................................................................................................................6
Fitting the snap-in sewing table..........................................................................................8
Connecting machine to power source..............................................................................10
Changing the bulb............................................................................................................12
Two-step presser foot lever/ Adjusting the presser foot pressure....................................14
Attaching the presser foot holder .....................................................................................16
Winding the bobbin ..........................................................................................................18
Inserting bobbin................................................................................................................20
Changing the needle (system 130/ 705H)........................................................................22
Threading the upper thread..............................................................................................24
Automatic needle threader...............................................................................................26
Thread tension .................................................................................................................28
Bringing up the lower thread ............................................................................................30
Reverse sewing/ Changing sewing directions/
Removing the work/ Cutting the thread.......................................................................32
How to drop feed dog.......................................................................................................34
Matching needle / fabric / thread......................................................................................35
How to choose your pattern .............................................................................................38
Straight stitching and needle position ..............................................................................40
Zig zag sewing .................................................................................................................42
Blind hem/ lingerie stitch ..................................................................................................44
Overlock stitches..............................................................................................................46
Sewing on buttons............................................................................................................48
How to sew buttonholes (one-step buttonhole)................................................................50
Left and right side balance for buttonhole........................................................................52
Zippers and piping............................................................................................................54
Sewing with the hemmer foot...........................................................................................56
3-step zig-zag...................................................................................................................58
Stitch selection.................................................................................................................60
Smocking stitch................................................................................................................62
Sewing with the cording foot ............................................................................................64
Free motion darning.........................................................................................................66
Practical stitches ..............................................................................................................68
Darning.............................................................................................................................70
Attaching lace...................................................................................................................72
Applique ...........................................................................................................................74
Twin needle......................................................................................................................76
Monogramming and embroidering with embroidery hoop* ..............................................78
Quilting.............................................................................................................................80
Gathering .........................................................................................................................82
Scallop stitching ...............................................................................................................84
Patch work .......................................................................................................................86
The walking foot accessory (optional)..............................................................................88
Side Cutter .......................................................................................................................90
Maintenance.....................................................................................................................92
Trouble shooting guide.....................................................................................................94
La página se está cargando...

F
Sommaire
Pièces principales de la machine....................................................................................3/5
Accessoires........................................................................................................................7
Mise en place de la table-rallonge .....................................................................................9
Branchement de la machine à coudre .............................................................................11
Changement de l'ampoule ...............................................................................................13
Levier du pied-de-biche à deux positions/ Ajustement de la pression du pied-de-biche .15
Montage du support du pied-de-biche .............................................................................17
Remplir la canette ............................................................................................................19
Mise en place de la canette .............................................................................................21
Mise en place de l'aiguille (Système 130/705H) ..............................................................23
Enfilage fil supérieur.........................................................................................................25
Enfileur automatique ........................................................................................................27
Tension du fil....................................................................................................................29
Remonter le fil inférieur....................................................................................................31
Marche arrière/ Pour modifier le sens de la couture/
Retrait de l'ouvrage/ Couper les fils ............................................................................33
Escamotage de la griffe d'entraînement ..........................................................................34
Tableau des aiguilles et fils..............................................................................................37
Sélection des points.........................................................................................................39
Couture au point droit et position d'aiguille ......................................................................41
Couture au point zig-zag..................................................................................................43
Ourlet au point invisible....................................................................................................45
Point overlock...................................................................................................................47
Pose des boutons ............................................................................................................49
Coudre les boutonnières/ boutonnières à une étape .......................................................51
Equilibrage droit et gauche de la boutonnière..................................................................53
Pose d'une fermeture à glissière......................................................................................55
Coudre avec le pied ourleur.............................................................................................57
Point zig-zag cousu..........................................................................................................59
Sélection des points.........................................................................................................61
Point nid d'abeille .............................................................................................................63
Coudre avec le pied pour cordonnet................................................................................65
Reprise.............................................................................................................................67
Points utilitaires................................................................................................................69
Reprisage.........................................................................................................................71
Pose de la dentelle...........................................................................................................73
Appliqué ...........................................................................................................................75
Couture à deux aiguilles...................................................................................................77
Monogramme et broderie à main libre*............................................................................79
Coudre avec le guide .......................................................................................................81
Le fronçage ......................................................................................................................83
Point feston ......................................................................................................................85
Patchwork ........................................................................................................................87
Pied de transport supérieur (optionnels)..........................................................................89
Coupeur latéral.................................................................................................................91
Entretien de la machine ...................................................................................................93
Comment remédier soi-même aux petits problèmes ......................................................96
La página se está cargando...

F
E
3
Pièces principales de la machine
Descripción de la máquina
1. Tensión del hilo
2. Presiion de pie
3. Palanca tensora del hilo
4. Corta-hilos
5. Pié prensa tela
6. Chapa aguja
7. Mesa plana deslizable y caja de accesorios
8. Dial para puntada zigzag
9. Dial de longitud de puntada
10. Eje para el bobinado
11. Disco visor
12. Iman
13. Palanca reversora de costura
14. Palanca para bajar los dientes de alimentación
15. Palanca de un paso coser ojales
16. Enhebrador automático
1. Régulateur de tension du fil
2. Régulateur de pression du pied-de-biche
3. Releveur de fil
4. Coupe-fil
5. Pied-de-biche
6. Plaque à aiguille
7. Table-rallonge et boîtier pour les accessoires
8. Bouton pour la largeur du point
9. Bouton pour la longueur du point
10. Butée du bobineur
11. Affichage du point
12.
13. Levier de marche arrière
14. Abaissement du transporteur
15. Levier de boutonnière à une étape
16. Enfileur automatique
Aimant

GB
4
Principal parts
18
19
20
21
22
17
25
24
23
27
26
17. Handle
18. Bobbin winder
19. Spool pin
20. Handwheel
21. Pattern selector dial
22. Power switch
23. Main plug socket
24. Bobbin thread guide
25. Upper thread guide
26. Presser foot lever
27. Buttonhole stitch balance adjustment slot
La página se está cargando...

6
GB
a.
b.
c.
d.
e.
f.
g.
h.
i.
j.
k. Spool pin felt (2x)
l. Satin stitch foot
m.Overcasting foot
n. Hemmer foot
o. Blind hem foot
p. Cording foot
q. Quilting foot
r. Darning/ Embroidery foot
s. Gathering foot
t. Walking foot
u. Side cutter
v. Twin needle
Standard accessories (1) Bonus feet (2) Optional accessories (3)
All purpose foot
Zipper foot
Button sewing foot
Buttonhole foot
L-screwdriver
Seam ripper/ brush
Oil bottle
Pack of needles (3x)
Bobbin (3x)
Seam guide
(These 1 accessories are
not supplied with this
machine; they are however
available as special
accessories from your local
dealer.)
Accessories
t
u
l
s
r
nom
1
2
p
3
ab dc
e
f
g
jhi
k
v
q
La página se está cargando...

GB
Fitting the snap-in sewing table
Hold the snap-in sewing table horizontal, and push it
in the direction of the arrow. (1)
The inside of the snap-in sewing table can be utilized
as an accessory box.
To open, lift up at the point of the arrow. (2)
8
2
1
La página se está cargando...

GB
Connecting machine to power source
10
a
b
3
4
1
2
A
B
Caution:
Attention:
Always make sure that the machine is unplugged from power source
and the main switch is on "O". when the machine is not in use and
before inserting or removing parts.
Consult a qualified electrician if in doubt as to connect machine to
power source. Unplug power cord when machine is not in use.
The appliance must be used with the foot controller 4C-316B (110-
120V area)/ 4C-326G (230V area)/ 4C-316C or 4C-326C (220-240V
area) manufactured by MATSUSHITA ELECTRIC (TAIWAN) CO.,
LTD.
- This machine is equipped with a polarized plug which must be used
with an appropriate electrical outlet.
- Connect the machine to a power source as illustrated (1/2).
- The power switch is located above the terminal box. Your machine
will not operate unless this switch is on " I ". (1)
- Sewing light turns on automatically when the main switch is on " I ".
- To start the machine, press on the foot control (4). The speed of
the machine is regulated by the amount of pressure exerted on the
foot control.
a. Polarized attachment plug
b. Conductor intended to be grounded
IMPORTANT NOTICE
For appliance with a polarized plug (one blade is wider than the other).
To reduce the risk of electric shock, this plug is intended to fit in a
polarized outlet only one way. If it does not fit fully in the outlet,
reverse the plug. If it still does not fit, contact a qualified electrician to
install the proper outlet. Do not modify the plug in any way. (3)
La página se está cargando...

GB
Changing the bulb
Caution:
Make sure to disconnect the electrical supply plug
from wall outlet before changing light bulb.
- Loosen screw (A) as illustrated. (1)
- Remove the cover (B).
- Unscrew the bulb and fit new one (C). (2)
- Replace the cover and tighten screw.
Replace bulb with same type rated 10 watts (110-
120V area) or 15 watts (220-240V area).
12
1
A
B
2
C
La página se está cargando...

GB
A
Adjusting the presser foot pressure
Two-step presser foot lever
When sewing several layers or thick fabrics, the
presser foot can be raised a second stage for easy
positioning of the work. (A)
The presser foot pressure of the machine has been
pre-set and requires no particular readjustment
according to the type of fabric (light-or-heavy weight).
However, if you need to adjust the presser foot
pressure, turn the presser adjusting screw with a coin.
For sewing very thin fabric, loosen the pressure by
turning the screw counter clockwise, and for heavy
fabric, tighten by turning it clockwise.
14

F
E
15
La presiõn del pie prensatela de la máquina ha sido preseleccionada y no requiere
especiales ajustes de acuerdo con el tipo de tejido (liviano o pesado).
Sin embargo, si se necesita ajustar la presión del pie presatela gire el tornillo de ajuste
de presión con una moneda. Para coser tela muy fina afloje la presión girando el tornillo
en sentido antihorario y para telas pesadas aumente la presión girán dolo en sentido
horario.
Ajuste de la presión del pié prensatela
Para coser ropas extremamente gruesas se puede ensanchar el pasaje de la ropa
debajo del pie subiendo la palanca del alza-prensatelas de un escalón. (A)
Palanca para levantar el pié prénsatela con dos posiciones
Pour faciliter l'insertion de tissus très épais sous le pied-de-biche, on peut augmenter
l'espace entre le pied-de-biche et la plaque à aiguille, en relevant le levier du pied-de-
biche d'un cran.
Lever du pied-de-biche à deux positions
Le régulateur de pression du pied-de-biche a été ajusté et devrait convenir à tous les
types de tissus (du plus fin au tissu épais).
Cependant, si un ajustement s'avère nécessaire, tournez la vis d'ajustement en vous
servant d'une pièce de monnaie.
Pour les tissus très fins, desserrer le régulateur de pression en tournant dans le sens
contraire des aiguilles d'une montre, et pour les tissus épais, augmenter la pression en
tournant la vis dans le sens des aiguilles d'une montre.
Ajustement de la pression du pied-de-biche

GB
Attaching the presser foot holder
Attention:
Turn power switch to "O" before carrying out any of the
operations below.
Raise the needle to its highest position and raise the
presser foot lever. Attach the presser foot holder (b) to
the presser foot bar (a). (1)
Lower the presser foot holder (b) until the cut-out (c) is
directly above the pin (d). (2)
Lower the presser foot holder (b) and the presser foot (f)
will engage automatically.
Raise the presser foot.
Release the pressure foot by raising lever (e) located at
the back of the foot holder. (3)
Attach the seam guide (g) in the slot as illustrated. Adjust
the distance as required for hems, pleats, etc.... (4)
Attaching the presser foot:
Removing the presser foot:
Attaching the seam guide:
16
4
1
2
3
e
b
a
a
c
d
e
f
b
g
La página se está cargando...

GB
Winding the bobbin
a
18
1
Please Note:
When the bobbin winder spindle is in
"bobbin winding" position, the machine
will not sew and the hand wheel will
not turn. To start sewing, push the
bobbin winder spindle to the left
(sewing position).
a. Spool pin felt
Press the foot control gently. The bobbin will stop winding when it is full. Push the bobbin to
the left to "sewing position" and remove it.
Place an empty bobbin on the
bobbin winder spindle.
Take the thread from the spool
through the bobbin winder
tension disc. (1)
Wind the thread a few times by
hand around the empty bobbin in
a clockwise direction. Push the
bobbin to the right towards the
bobbin winding position. (2)
2
La página se está cargando...

GB
Inserting bobbin
Attention:
Turn power switch to "O" before inserting or removing the
bobbin.
When inserting or removing the bobbin, the needle must be
fully raised.
- Open the hinged cover. (1)
- Hold the bobbin case with one hand. Insert the bobbin so
that the thread runs in a clockwise direction (arrow). (2)
- Pull the thread through the slot, down and to the left until it
enters the delivery eyelet (rectangular opening) under the
tension spring. (3)
- Hold the bobbin case by the hinged latch. (4)
- Insert the bobbin case fully into the shuttle race and release
the latch. Make sure that the metal finger fits into the notch
at the top of the race cover. (5)
20
3
4
1
2
5
La página se está cargando...

Caution:
Turn power switch to "O" before
inserting or removing the needle.
Replace the needle at the first sign of
thread breakage or skipped stitches.
Select the correct type and size of
needle for the fabric to be sewn. Turn
the balance wheel towards you until
the needle is at highest position.
Loosen the needle clamp screw (A)
and tighten again after inserting the
new needle. (1)
The flat side of the needle shaft
should be facing away from you (B).
Push the needle up (C) into the
needle clamp as far as it will go (D).
Tighten the needle clamp screw firmly.
The sewing needle must always be
straight and sharp for smooth sewing.
Replace the needle (2) if it is bent (A),
blunt (B) or the point is damaged (C).
GB
Changing the needle (System 130/705H)
A
B
C
D
22
1
2
AB
C
La página se está cargando...

24
Threading the upper thread
GB
Caution:
Before threading, turn power
switch to "O".
Raise the needle bar to its highest
position. Follow exactly the
numbered threading sequence
illustrated below. If you skip a step
or fail to properly engage the
thread in any of the thread guides,
the machine will not sew properly.
(1-5)
Continue to draw the thread down
and into the needle bar thread
guide. Insert the thread through
the eye of the needle from front to
back. Leave about 10 cm (4") of
thread loose behind the needle. (6)
a. Spool pin felt
1
2
6
3
4 5
a
La página se está cargando...

- Raise the needle to its highest
position.
- Press lever (A) right down.
- The threader automatically
swings to the threading position
(B).
- Take the thread around the
hook (C).
- Take the thread in front of the
needle round the hook (D)
from bottom to top.
- Release lever (A).
- Pull the thread through the
needle eye.
Attention:
Turn power switch to off ("O")!
26
2
1
A
B
D
C
A
C
A
C
B
D
Automatic needle threader
GB
La página se está cargando...

GB
Thread tension
28
1
B
C
A
Note:
The bobbin thread tension has
been adjusted at the factory and
readjustment is usually not
required.
Lower thread tension
To test the bobbin thread
tension, remove the bobbin case
and bobbin from the machine
and hold the bobbin case
suspended by the thread. Shake
it once or twice. If the tension is
correct, the thread will unwind
by about an inch or two. If the
tension is too tight, it will not
unwind. If the tension is too
loose, the thread will unwind for
more than two inches.
To adjust, turn the small screw
on the side of the bobbin case.
(1)
Upper thread tension
Basic thread tension setting: "4". (2)
To increase the tension, turn the dial up to a higher number. To reduce the tension, turn
the dial to a lower number.
A. Normal thread tension.
B. Thread tension too loose.
C. Thread tension too tight.
2
La página se está cargando...

30
Bringing up the lower thread
GB
Hold the upper thread with the left
hand. Turn the handwheel towards
you with your right hand until the
needle goes down and comes up
again to its highest position. (1)
- Lightly draw the needle thread
forming a loop with the bobbin
thread. The upper thread should
have caught the lower thread in a
loop.
- Pull the needle thread toward you
and the lower thread will come up
from the bobbin in a large loop. (2)
Pull about 15 cm. (6") of both thread
away from you under the presser
foot.
1
2
La página se está cargando...

B
32
Reverse sewing
GB
Reverse sewing is used for locking the end of seams and
where reinforcement is needed. At the end of seam, press
down the reverse sewing lever and touch the foot control
lightly. Sew a few reverse stitches. Release the lever and
the machine will sew forwards again (A).
A
1. Stop the machine at the point where you wish to change
directions with the needle still in the fabric.
2. Raise the presser foot and turn the fabric to line up its
new direction using the needle as a turning point.
3. Lower the presser foot and start sewing in the new
direction.
Turn the handwheel towards you to bring the thread take
up lever to its highest position. Raise the presser foot and
draw the fabric away from you.
Cutting the thread
Hold the threads behind the presser foot. Using both hands,
guide them to the slit (B) at the rear of the presser bar and
press down to cut the thread. You can also use the thread
cutter on the side of the machine.
Removing the work
Changing sewing directions
La página se está cargando...

34
For ordinary sewing, keep the feed dog up, for
freehand embroidery, sewing on buttons and darning,
drop the feed dog.
To raise (a) and lower (b) feed dog.
How to drop feed dog
GB
Los dientes de arrastre están en posición arriba para
los trabajos de costura habituales.
Colocar la palanca (a) hacia la izquierda.
El transportador se coloca automa-ticamente arriba
desde la primera puntada.
Es necesario bajar los dientes de arrastre para
ciertos trabajos en los cuales la tela no debe ser
transportadas como, por ejemplo, zurcidos o
bordados con bastidor.
Poner la palanca (b) hacia la derecha.
Bajar los dientes del alimentador
E
Pour les travaux de couture usuels, la griffe
d'entraînement reste en position haute. Pousser le
levier (a) vers la gauche.
Le transporteur est automatiquement repoussé vers
le haut dès le premier point. Pour certains travaux tels
que le reprisage ou la broderie à mains libres,
l'ouvrage ne doit pas être entraîné. Il faut donc
abaisser la griffe d'entraînement. Pousser le levier (b)
vers la droite.
Escamotage de la griffe d'entraînement
F
a
b
a
b
2
1

Matching needle / fabric / thread
GB
NEEDLE, FABRIC, THREAD SELECTION GUIDE
NEEDLE SIZE FABRICS THREAD
9-11(65-75)
12(80)
Lightweight fabrics-thin cottons, voile,
serge, silk , muslin, Qiana, interlocks,
cotton knits, tricots, jerseys, crepes,
woven polyester, shirt & blouse fabrics.
Medium weight fabrics-cotton, satin,
kettleclote, sailcloth, double knits,
lightweight woollens.
Medium weight fabrics-cotton duck,
woolen, heavier knits, terrycloth,
denims.
Heavyweight fabrics-canvas, woolens,
outdoor tent and quilted fabrics,
denims, upholstery material (light to
medium).
Heavy woollens, overcoat fabrics,
upholstery fabrics, some leathers and
vinyls.
IMPORTANT: Match needle size to thread size and weight of fabric
NEEDLE, FABRIC SELECTION
14(90)
16(100)
18(110)
Light-duty thread in cotton,
nylon or polyester.
Most threads sold are medium
size and suitable for these
fabrics and needle sizes. Use
polyester threads on synthetic
materials and cotton on natural
woven fabrics for best results.
Always use the same thread on
top and bottom.
Heavy duty thread, carpet
thread. (Use heavy foot
pressure-large numbers.)
Standard sharp needles. Sizes
range thin to large. 9 (65) to 18
(110)
Semi-ball point needle, scarfed.
9 (65) to 18 (110)
Full ball point needle 9 (65) to
18 (110)
Leather needles. 12 (80) to 18
(110)
Note:
1. Twin needles, can be purchased for utility and decorative work.
2. When sewing with twin needles, the stitch width dial should be set at less than "2.5".
3. European needles show sizes 65, 70, 80 etc. American and Japanese needles show size 9, 11,
12 etc.
4. Replace needle often (approximately every other garment ) and / or at first thread breakage or
skipped stitches.
Natural woven fabrics-wool, cotton, silk,
etc. Qiana. Not recommended for
double knits.
Natural and synthetic woven fabrics,
polyester blends. Knits-polyesters,
interlocks, tricot, single and double
knits. Can be used instead of 15 1 for
sewing all fabrics.
NEEDLES EXPLANATION TYPE OF FABRIC
Sweater knits, Lycra, swimsuit fabric,
elastic.
Leather, vinyl, upholstery. (Leaves
smaller hole than standard large
needle.)
HA 1
15 1
15 1/705H
(SIN)
15 1/705HS
(SUK)
130 PCL
35
La página se está cargando...

F
Tableau des aiguilles et fils
37
SÉLECTION DE L'AIGUILLE PAR RAPPORT AU TISSU
Aiguilles régulières et universelles.
Grosseurs disponibles de 9 (65)
à 18 (110).
Aiguilles à demi-bille. Grosseurs
disponibles 9 (65) à 18 (110).
Aiguilles à bille entière.
Grosseurs disponibles 9 (65) à
18 (110).
Aiguilles robustes à pointe
universelle, 14 (90) à 18 (110).
Remarque:
1. Les aiguilles jumelles peuvent être achetées dans un but utilitaire ou décoratif.
2. Quand vous cousez avec les aiguilles jumelles, le bouton de largeur de point doit être au moins
sur le chiffre "2.5" et moins.
3. Les aiguilles européennes sont numérotées 65, 70, 80 etc. Les aiguilles américaines et
japonaises sont numérotées 9, 11, 12 etc.
4. Changer souvent les aiguilles (après le couture d'un vêtement) et / ou à la première rupture du fil
ou des points.
Tissu en fibre naturelle: coton, lainage,
soie. Non recommand é pour tricot-
double.
Pour fibre naturelle et synthétique ou
un mélange des deux fibres: étoffe
tissé, tricot, interlock etc.
AIGUILLES DESCRIPTIONS GENRE DE TISSUS
Trico à chandail, lycra, tissu pour
costume de bain, élastique.
Denim, canevas, tissu à recouvrement,
toile.
HA 1
15 1
15 1/705H
(SIN)
15 1/705HS
(SUK)
15 x 1/ 705 HJ
GROSSEUR DE
LAIGUILLE
TISSUS
FILS
9-11(65-75)
12(80)
Tissus Légers: Coton léger, voile,
serge, mousseline, tricot de coton,
jersey, crêpes, polyester, tissu pour
blouse ou chemise.
Tissus moyens: Coton moyen, satin,
toile, tricot double , lainage léger.
Fil de coton, fil de soie, fil de
nylon ou fil synthétique.
Tissus moyens à épais: Coton épais,
lainages, tricot épais, ratine, denim,
velours côtelé.
Tissus épais: canevas, lainage épais,
toile de tente, tissu piqué, denim, tissu
à recouvrement (léger à moyen).
Tissus épais: Lainages à manteau,
tissu pour vêtements d'extéieur,
certains cuir et vinyle.
IMPORTANT: Assurez-vous que la grosseur de l'aiguille convienne à l'épaisseur du tissu à coudre
14(90)
16(100)
18(110)
Les fils vendus en magasin
conviennent à tous ces tissus et
grosseurs d'aiguilles. Utiliser le
fil synthétique pour les tissus
synthétique et le fil de coton
pour les tissus en fibre naturelle.
Assurez-vous d' avoir le même
fil sur le dessus et dans la
canette.
Fil fort, fil à denim. (Augmenter
la pression sur le pied presseur).
Aiguilles avec pointe en forme
d'angle acéré, 12 (80) à 18
(110).
Cuir, vinyle, plastique souple.130 PCL
La página se está cargando...
La página se está cargando...

40
Straight stitching and needle position
GB
1
2
3
4
5
A
Turn the pattern selector dial so
that the stitch display shows the
straight stitch position.
Generally speaking, the thicker
the fabric, thread and needle,
the longer the stitch should be.
Choose your needle position,
from center position to left
needle position by changing the
stitch width dial (1) from "0" to
"5".
1. Stitch width dial
2. Stitch length dial
3. Stitch display
4. Pattern selector dial
5. Reverse sewing lever
La página se está cargando...

42
Zig zag sewing
GB
1
2
5
0
1
2
3
4
5
4
3
21
0
0
1
2
3
4
4
3
21
0.5
S
Turn the pattern selector dial to "B".
The maximum zigzag stitch width for zigzag stitching
is "5"; however, the width can be reduced on any
pattern. The width increases as you move zigzag dial
from "0" - "5". For twin needle sewing, never set the
width wider than "2.5". (1)
The density of zigzag stitches increase as the setting
of stitch length dial approaches "0". Neat zigzag
stitches are usually achieved at "2.5" or below. (2)
When the stitch length is set between "0" - "1", the
stitches are very close together producing the "satin
stitch" which is used for making buttonholes and
decorative stitches.
When sewing very thin fabrics, it is suggested that
you use interfacing on the backside of the fabric.
Function of stitch width dial
Function of stitch length dial while zigzaging
Satin stitch
Sewing thin fabrics:
La página se está cargando...

GB
Blind hem/ lingerie stitch
44
c
d
3
4
2
1
C
D
For hems, curtains, trousers, skirts, etc.
Blind hem/ lingerie for firm fabrics. Position "C" on selection
dial.
Blind hem for stretch fabrics. Position "D" on selection dial.
Set the machine as illustrated.
Fold the fabric as illustrated with the wrong side uppermost. (1)
Place the fabric under the foot. Turn the handwheel forwards by
hand until the needle swings fully to the left. It should just pierce
the fold of the fabric. If it does not, adjust the stitch width
accordingly. (2) Adjust the guide (3) by turning the knob (4) so
that the guide just rests against the fold. Sew slowly, by pressing
the foot control lightly guiding the fabric along the edge of the
guide.
Stitch width
Stitch length
Note:
It takes practice to sew blind hems. Always make a sewing test
first.
a.
b.
c. Presser foot
d. Stitch pattern
a
b
0
1
2
3
4
S
1~2
3~5
5
0
1
2
3
4
La página se está cargando...

GB
Overlock stitches
46
1
2
3
QPI
a
b
0
1
2
3
4
S
3, S
3~5
5
0
1
2
3
4
Seams, neatening, visible hems.
Turn the stitch length dial to "3' or "S".
The stitch width can be adjusted to suit the fabric.
For fine knits, handknits, seams. (1)
For fine knits, jerseys, neck edges, ribbing. (2)
For fine knits, jerseys, neck edges, ribbing. (3)
All overlock stitches are suitable for sewing and neatening edges
and visible seams in one operation.
When neatening, the needle should just go over the edge of the
fabric.
Double overlock stitch:
Standard overlock:
Stretch overlock:
Attention:
Use new needles or ball point needles or stretch needle!
La página se está cargando...

GB
Sewing on buttons
48
2
3
1
a
b
B
a
b
a
b
0
1
2
3
4
S
0
3~5
5
0
1
2
3
4
Move the drop feed control to right side to lower the feed dogs. (1)
Change presser foot to button sewing foot.
Position the work under the foot. Place the button in the desired
position, lower the foot. Set the pattern selector knob on zig zag
stitch " ". Adjust the stitch width to "3" - "5" according to the
distance between the two holes of the button. Turn the handwheel
to check that the needle goes cleanly into the left and right holes
of the button. Set the pattern selector knob on straight stitch " ",
and sew a few securing stitches. Set the pattern selector knob on
zig zag stitch " ", and slowly sew on the button with about 10
stitches. Set the pattern selector knob on straight stitch " ", and
sew a few securing stitches. (2)
If a shank is required, place a darning needle on top of the button
and sew. (3) For buttons with 4 holes, sew through the front two
holes first (2), push work forward and then sew through the back
two holes. (3)
La página se está cargando...

50
0
1
2
3
4
S
0.5~1
3~5
5
0
1
2
3
4
How to sew buttonholes (one-step buttonhole)
GB
Buttonhole sewing is a simple process that provides reliable results.
However, it is strongly suggested to always make a practice buttonhole on
a sample of your fabric and interfacing.
1. Using tailor's chalk, mark the position of the buttonhole on the fabric.
2. Attach the buttonhole foot and set the pattern selector dial to " ". Set
stitch length dial to " ". Adjust stitch width to desired width.
3. Lower the presser foot aligning the marks on foot with the marks on the
fabric (A). (The front bar tack will be sewn first.)
4. Open the button plate and insert the button (B).
5. Lower the buttonhole lever and gently push it back (C).
6. While lightly holding the upper thread, start the machine.
7. Buttonhole stitching is done in the order (D).
8. Stop the machine when the buttonhole is sewn.
When sewing buttonholes on stretch fabric, hook heavy thread or cord
under the buttonhole foot. When the buttonhole is sewn the legs will
overcast the cord.
1. Mark the position of the buttonhole on the fabric with the tailor's chalk,
attach the buttonhole foot, and set the pattern selector dial to " ". Set
stitch length dial to " ".
2. Hook the heavy thread onto the back end of the buttonhole foot, then
bring the two heavy thread ends to the front of the foot, insert them into
the grooves and temporarily tie them there.
3. Lower the presser foot and start sewing.
* Set the stitch width to match the diameter of the gimp thread.
4. Once sewing is completed, gently pull the heavy thread to remove any
slack, then trim off the excess.
Making a Buttonhole
Making a Buttonhole on Stretch Fabrics (E)
D
E
2
1
4
3
A
B
C
PUSH
PUSH
La página se está cargando...

52
Left and right side balance for buttonhole
GB
Stitch density on right and left
sides of buttonhole can be
adjusted by buttonhole balance
control dial.
This dial should usually be in a
neutral position. (between "+"
and "")
If the stitches on the left side of
the buttonhole are too close
together, turn the dial to the left
(+).
* Turning dial to the left opens
left side.
If the stitches on the left side of
the buttonhole are too open,
turn the dial to the right ().
* Turning dial to the right closes
left side.
The stitch on the right side of
the buttonhole is set using the
stitch length dial.
La página se está cargando...

GB
Zippers and piping
54
1
2
Set the machine as illustrated. Dial selector on "A".
Set stitch length control between "1" - "4" (according to thickness of
fabric).
The zipper foot can be inserted right or left, depending on which
side of the foot you are going to sew. (1)
To sew past the zipper pull, lower the needle into the fabric, raise
the presser foot and push the zipper pull behind the presser foot.
Lower the foot and continue to sew.
It is also possible to sew in a length of cord, into a bias strip to form
a 'welt'. (2)
0
1
2
3
4
S
1~4
0
5
0
1
2
3
4
A
La página se está cargando...

GB
Sewing with the hemmer foot
56
For hems in fine or sheer fabrics.
Set the machine as illustrated. Pattern selector on "A".
Neaten the edge of the fabric. At the beginning of the hem, turn
under the edge twice by about 3 mm (1/8") and sew 4-5 stitches to
secure. Pull the thread slightly towards the back. Insert the needle
into the fabric, raise the presser foot and guide the fold into the
scroll on the foot. (1)
Gently pull the fabric edge towards you and lower the presser foot.
Begin sewing, guiding the fabric into the scroll by holding it upright
and slightly to the left. (2)
0
1
2
3
4
S
1~4
0
5
0
1
2
3
4
A
1
2
La página se está cargando...

GB
3-step zig-zag
58
Sewing on lace and elastic, darning, mending, reinforcing edges.
Set the machine as illustrated. Pattern selector on "E".
Place patch in position. The stitch length can be shortened to
produce very close stitches. (1)
When mending tears, it is advisable to use a piece of backing
fabric to reinforce. The stitch density can be varied by adjusting the
stitch length. First sew over the center and then overlap on both
sides. Depending on the type of fabric and damage, sew between
3 and 5 rows. (2)
1. Place the elastic on the fabric.
2. As you sew, stretch the elastic both in the front and behind the
presser foot as shown in fig. (3)
The elastic stitch can be used to join two pieces of fabric together
and is very effective when sewing knitted fabrics. If nylon thread is
used, the stitch will not be visible.
1. Place the edges of the two pieces of fabric together and center
them under the presser foot.
2. Sew them together using the elastic stitch taking care to keep
the two fabric edges close together as shown in fig. (4)
Sewing elastic
Joining fabric
0
1
2
3
4
S
1~2
3~5
5
0
1
2
3
4
E
3
4
21
La página se está cargando...

GB
Stitch selection
60
3
4
Triple straight stitch: (1/3)
Triple zig-zag: (2/4)
Pattern selector on "A".
For hardwearing seams.
Turn the stitch length dial to "S".
The machine sews two stitches forwards and
one stitch backwards. This gives triple
reinforcement.
Pattern selector on "B".
For hardwearing seams, hems and decorative
seams.
Turn the stitch length dial to "S".
Adjust the stitch width dial to between "3" and "5".
Triple zig-zag is suitable for firm fabrics like
denim, corduroy, etc.
1
2
0
1
2
3
4
S
S
0
1
2
3
4
S
S
0
5
0
1
2
3
4
3~5
5
0
1
2
3
4
A B
La página se está cargando...

GB
62
Smocking stitch
Seams, hems, T-shirts, underwear, etc.
Set the machine as illustrated.
This stitch can be used for all types of jersey as well as for woven
fabrics. (1)
Sew at 1 cm (1/4") from the fabric edge and trim the surplus fabric.
(2)
Pattern selector on "E".
Turn the stitch length dial to "S".
1
2
0
1
2
3
4
S
S
4~5
5
0
1
2
3
4
E
La página se está cargando...

GB
64
Sewing with the cording foot
Decorative effects, cushions, tablecloths, etc.
Set the machine as illustrated. Various stitches are suitable for
sewing on cord, e.g. Zig-zag, Triple zig-zag, decorative stitches.
Insert the cord between the spring covering the cord groove and
the foot. The cord should run in the groove. One, two or three
cords can be sewn on. The stitch width is adjusted according to
the number of cords and the stitch selected. (1/2)
0
1
2
3
4
S
1~4
3~5
5
0
1
2
3
4
B
1
2
La página se está cargando...

GB
66
Free motion darning
Set the machine as illustrated. Move the drop feed control to right
side to lower the feed dogs. (1)
Remove the presser foot clamp. (2)
Attach the darning foot to the presser foot bar. The lever (A)
should be behind the needle clamp screw (B). Press the darning
foot on firmly from behind with your index finger and tighten the
screw (C). (3)
First sew round the edge of the hole (to secure the threads). (4)
First row: Always work from left to right. Turn work by 1/4 and
oversew.
A darning ring is recommended for easier sewing and better
results.
0
1
2
3
4
S
0
0
5
0
1
2
3
4
A
1
a
b
A
B
C
2
3
4
a
b
La página se está cargando...

GB
68
Practical stitches
1
2 3
F PI
0
1
2
3
4
S
1~2
3~5
5
0
1
2
3
4
Set the machine as illustrated.
Turn the stitch width dial and stitch length dial to suit the fabric.
Feather stitch (1)
Rampart (2)
Shell hem (3)
Pattern selector on "F".
Pattern selector on "I".
For flat joining seams, sewing on elastic, visible hems.
This stitch can be used for firm, thicker fabrics.
Pattern selector on "P".
For decorative edges.
Suitable for edges on sheer, fine and stretch fabrics. The larger
stitch should go just over the edge of the fabric to create the shell
effect.
For decorative joining seam for a fagoted effect.
La página se está cargando...

GB
70
Darning
- Turn stitch length dial to the desired length.
- Turn stitch selector to straight stitch, center needle position.
- Position the fabric to be darned under the presser foot together
with the under laying fabric to be used.
- Lower the presser foot and alternately sew forward or reverse
using the lever.
- Repeat this motion until the area to be darned is filled with rows
of stitching.
For reverse sewing instructions, see page 32.
Darning
0
1
2
3
4
S
2~4
0
5
0
1
2
3
4
A

F
E
- Gire el disco regulador del largo de puntada al largo deseado.
- Gire el selector a costura recta, posición central de la aguja.
- Coloque la tela a zurcir bajo el prensatelas, junto con la tela subyacente que se va a
utilizar.
- Baje el pié prénsatela y de manera alternativa, cosa hacia delante y atrás accionando
la palanca reversora.
- Repita este movimiento hasta que la parte a zurcir se rellene con hileras de cosido.
Para las instrucciones sobre cómo coser hacia atrás, vea página 33.
Zurcido
- Régler la longueur du point selon la longueur désirée.
- Placer le sélecteur de points à la couture droite, position d'aiguille au centre.
- Faufiler une pièce de renfort sous la section à repriser et placer le tissu sous le pied-
de-biche.
- Abaisser le pied-de-biche et coudre alternativement en marche avant et en marche
arrière en vous servant du levier de marche arrière.
- Répéter ce mouvement jusqu'à ce que toute la surface à repriser soit couverte.
Pour les instructions de marche arrière. Voir P. 33.
71
Reprisage

GB
72
Attaching lace
- Turn stitch length dial to the desired length.
- Turn the stitch selector to straight stitch, center needle position.
- Fold in the edge of the fabric (approximately 6 mm 1/4").
- Place the lace under the folded edge of the fabric allowing it to
under lap the fabric slightly as required by the pattern of the lace.
- Sew on the edge of the fabric fold.
- You can add a decorative touch by using the satin stitch to sew
the lace.
Attaching lace
0
1
2
3
4
S
2~4
0
5
0
1
2
3
4
A
La página se está cargando...

GB
74
Applique
- Turn stitch length dial to the desired length.
- Turn pattern selector dial to zig zag.
- Select a narrow zig zag width.
- Cut out the applique design and baste it to the fabric.
- Sew slowly around the edge of the design.
- Trim excess material outside the stitching. Make sure not to cut
any stitches.
- Remove the basting thread.
- Tie top and bottom thread under the applique to avoid
unraveling.
0
1
2
3
4
S
0.5~1
3~5
5
0
1
2
3
4
B

F
E
- Regular la máquina segúina segun la ilústración.
- Reducir el ancho de la puntada de zigzag.
1. Hilvane el diseño sobre la superficie de la tela.
2. Empieze a coser con cuidado según el diseño.
3. Recorte la tela que rebase la costura.
4. Saque la puntadas de hilvanar.
Nota:
Vuelva a coser las puntadas finales e inciales con puntada recta para reforzar.
Aplicación
- Régler le bouton de longueur de point selon la longueur désirée.
- Placer le sélecteur de point à un point de zigzag étroit.
- Découper l'appliqué et le faufiler au vêtement.
- Coudre lentement près du bord extérieur de l'appliqué.
- Recouper tout excédent de tissu en prenant soin de ne couper aucun des points
cousus.
- Retirer le faufil.
- Tirer le fil à l'envers du tissu et attacher ensemble.
75
Appliqué

GB
76
Twin needle
* The twin needle is an optional accessory not supplied with your
machine.
- Turn stitch length dial to the desired stitch length.
- Turn stitch selector to straight stitch, center needle position,
width setting "0".
- Make sure that the two threads used to thread the twin needle
are of the same weight. You can use one or two colors.
- Insert the twin needle in the same way as single needle. Flat
side of needle should face away from you.
- Follow instructions for single needle threading. Thread each
needle separately.
Please note:
When sewing with twin needle, always proceed slowly, and make
sure to maintain a low speed to insure quality stitching.
When using twin needle on zig-zag make sure the stitch width dial
is set between "0" and "2.5". Do not use twin needle at setting
above "2.5".
0
1
2
3
4
S
1~4
0~2.5
5
0
1
2
3
4
A
La página se está cargando...

GB
78
0
1
2
3
4
S
0
1~5
5
0
1
2
3
4
- Set the machine as illustrated.
- Remove the presser foot and the presser foot holder.
- Move the drop feed control to right side to lower the feed dogs.
(1)
- Lower presser foot lever before starting to sew.
- Adjust the stitch width according to the size of lettering or design.
- Draw the desired lettering or design on the right side of the
fabric.
- Stretch the fabric between embroidery hoop as firmly as
possible.
- Place the fabric under the needle. Make sure the presser foot
bar is down in its lowest position.
- Turn the balance wheel towards you to bring up the lower thread
through the fabric. Sew a few securing stitches at the starting
point.
- Hold the hoop with thumb and forefingers of both hands while
pressing the material with the middle and third fingers and
supporting the outside of hoop with smaller finger.
* Embroidery hoop not included with machine.
Preparation for Monogramming and Embroidering*
Monogramming and embroidering with embroidery hoop*
B
2
1
a
b
a
b
La página se está cargando...

GB
80
Quilting
Set pattern selector as illustrated.
Insert the quilting guide in presser foot holder and set the space
as you desired.
Move the fabric over and sew successive rows with the guide
riding along on the previous row of stitching.
Note:
Presser foot shown is the optional quilting foot which does not
come with your machine. If you have not purchased this foot
substitute the all purpose foot.
0
1
2
3
4
S
1~4
0
5
0
1
2
3
4
A
La página se está cargando...

GB
82
Gathering
Set the pattern selector as illustrated.
1. Attach the gathering foot.
2. Sew a single row or multiple rows of straight stitches.
3. If more gathering is required, loosen the upper thread tension
to below 2 so that the lower thread lies on the under side of the
material.
4. Pull the lower thread to gather more of the material.
Note:
Presser foot shown is the optional gathering foot which does not
come with your machine. If you have not purchased this foot
substitute the all purpose foot and gather fabric by hand by
lowering the tension setting to below 2 and pulling the lower
thread to gather the material.
0
1
2
3
4
S
1~4
0
5
0
1
2
3
4
A
La página se está cargando...

GB
84
0
1
2
3
4
S
1~2
5
0
1
2
3
4
N
This machine automatically produces a scallop stitch which may
be used as decorative edging.
- Set the pattern selector at "N".
- Sew the scallop stitch along the edge of the material. (1)
- If desired, trim around the scallop with scissors to create a
scalloped edge. Be careful not to cut the thread. (2)
3~5
Scallop stitching
1
2
La página se está cargando...

GB
86
Patch work
These stitches are used to join two pieces of fabric while leaving a
space between their edges.
1. Fold over the edges of the two pieces of fabric for the hem and
baste the edges to a thin piece of paper leaving a small space
between them.
2. Set the Pattern selector on "I".
Turn the stitch length dial to "S".
3. Stitch along the edge, pulling both threads slightly when begin-
ning to sew.
* Use thicker than normal threads for sewing.
4. After sewing, remove the basting and the paper. Finish by tying
knots on the reverse side at the beginning and the end of the
seams.
0
1
2
3
4
S
S
3~5
5
0
1
2
3
4
I
La página se está cargando...

88
GB
The walking foot accessory
c
a
d
a
b
1
2
3
e
f
Always try to sew first without the walking foot accessory
which should be used only when necessary.
It is easier to guide the fabric and you have a better view of
the seam when using the standard, regular foot on your
machine. Your EURO-PRO sewing machine offers excellent
stitch quality on a wide range of fabrics from delicate
chiffons to multiple layers of denim.
The "Walking foot" accessory equalizes the feeding of the
upper and lower layers of fabric and improves the matching
of plaids, stripes and patterns. This foot helps to prevent
uneven feeding of very difficult fabrics.
1. Lift the presser foot bar.
2. Remove the "foot holder" by opening counter clockwise
the presser bar attaching screw. (3)
3. Attach the "walking foot" to the machine in the following
way.
i) The fork arm should fit into the needle screw and
clamp. (2)
ii) Slide the plastic "attaching head" from your left to right
so that it is fitted into the "presser foot bar".
iii) Lower the "presser foot bar".
iv) Replace and tighten clockwise the "presser bar
attaching screw".
4. Make sure both the "needle screw" and the "presser bar
attaching screw" are tightly secured.
5. Draw the bobbin thread up and place both the bobbin
thread and the needle thread behind the walking foot
attachment.
a. Fork arm
b. Attaching head
c. Needle bar
d. Needle screw & clamp
e. Presser foot bar
f. Presser bar attaching screw
La página se está cargando...

Adjust the stitch length according to the stitch selected.
However, the stitch width must be set at maximum.
Note: The side cutter can only be used with
the regular zigzag stitch (at maximum width
)
or the overlock stitches.
La página se está cargando...

GB
2
Caution:
Always make sure that the machine is unplugged
from power source and the main switch is on "O"
before inserting or removing any parts and before
cleaning.
Remove the stitch plate:
Cleaning the feed dog:
Cleaning and lubricating the hook:
Important:
Turn the handwheel until the needle is fully raised.
Open the hinged front cover and unscrew the needle
plate screw with the screw driver. (1)
Remove the bobbin case and use the brush supplied
to clean the whole area. (2)
Remove the bobbin case. Snap the two hook
retaining arms (a) outwards. Remove the hook race
cover (b) and the hook (c) and clean with a soft cloth.
Lubricate at the points (d) (1-2 drops) with sewing
machine oil. Turn the handwheel until the hook race
(e) is in the left position. Replace the hook (c).
Replace the hook race cover and snap back the two
hook retaining arms. Insert he bobbin case and
bobbin and replace the stitch plate.
Fabric fluff and threads must be removed
regularly. Your machine should be serviced at regular
intervals at one of our service agencies.
Maintenance
a
b
c
d
e
1
92
La página se está cargando...

Problem Cause Correction
Upper thread
breaks
Lower thread
breaks
Skipped stitches
Needle breaks
Loose stitches
Seams gather
or pucker
Uneven stitches,
uneven feed
The machine is
noisy
The machine
jams
1.The machine is not threaded
correctly
2.The thread tension is too tight
3.The thread is too thick for the needle
4.The needle is not inserted correctly
5.The thread is round wound the
spool holder pin
6.The needle is damaged
1.The bobbin case is not inserted
correctly
2.The bobbin case is threaded wrongly
3.The lower thread tension is too tight
1.The needle is not inserted correctly
2.The needle is damaged
3.The wrong size needle has been
used
4.The foot is not attached correctly
1.The needle is damaged
2.The needle is not correctly inserted
3.Wrong needle size for the fabric
4.The wrong foot is attached
1.The machine is not correctly
threaded
2.The bobbin case is not correctly
threaded
3.Needle/ fabric/ thread combination is
wrong
4.Thread tension wrong
1.The needle is too thick for the fabric
2.The stitch length is wrongly adjusted
3.The thread tension is too tight
1.Poor quality thread
2.The bobbin case is wrongly
threaded
3.Fabric has been pulled
1.The machine must be lubricated
2.Fluff or oil have collected on the hook
or needle bar
3.Poor quality oil has been used
4.The needle is damaged
Thread is caught in the hook
1.Rethread the machine
2.Reduce the thread tension (lower number)
3.Select a larger needle
4.Remove and reinsert the needle (flat side
towards the back)
5.Remove the reel and wind thread onto reel
6.Replace the needle
1.Remove and reinsert the bobbin case and
pull on the thread. The thread should pull
easily
2.Check both bobbin and bobbin case
3.Loosen lower thread tension as described
1.Remove and reinsert needle (flat side
towards the back)
2.Insert a new needle
3.Choose a needle to suit the thread and
fabric
4.Check and attach correctly
1.Insert a new needle
2.Insert the needle correctly (flat side towards
the back)
3.Choose a needle to suit the thread and
fabric
4.Select the correct foot
1.Check the threading
2.Thread the bobbin case as illustrated
3.The needle size must suit the fabric and
thread
4.Correct the thread tension
1.Select a finer needle
2.Readjust the stitch length
3.Loosen the thread tension
1.Select a better quality thread
2.Remove bobbin case and retread and
insert correctly
3.Do not pull on the fabric while sewing, let it
be taken up by the machine
1.Lubricate as described
2.Clean the hook and feed dog as described
3.Only use good quality sewing machine oil
4.Replace the needle
Remove the upper thread and bobbin case,
turn the handwheel backwards and forwards
by hand and remove the thread remands.
Lubricate as described
Trouble shooting guide
GB
94
La página se está cargando...

F
Comment remédier soi-même aux petits problèmes
F
Problème Cause Remède
Le fil supérieur
casse
Le fil inférieur
casse
Les points ne
se forment pas
toujours
L'aiguille casse
Des noeuds se
forment au cours
du travail
Les coutures se
rétractent ou se
froncent
Les points et
l'entraînement
sont irréguliers
La machine est
bruyante
La machine est
bloquée
1. L'enfilage du fil est incorrect.
2. La tension du fil est trop forte.
3. Le fil est trop épais pour l'aiguille.
4.
5. Le fil s'est entortillé sur la broche de
la bobine.
6. L'aiguille est endommagée.
1. La boîte à canette n'est pas placée
correctement.
2. La boîte à canette n'est pas enfilée
correctement.
3. La tension du fil est trop forte.
2. L'aiguille est tordue ou épointée.
3. L'aiguille n'a pas la classe ou la
grosseur correcte.
4. Le pied-de-biche ne convient pas.
1. L'aiguille est tordue ou épointée.
2. La boîte à canette n'est pas enfilée
correctement.
3. Tissu trop épais/ grosseur incorrecte
de l'aiguille.
4. Le pied-de-biche ne convient pas.
1. Le fil n'est pas enfilé correctement.
2. La boîte à canette n'est pas enfilée
correctement.
3. Le rapport aiguille/ tissu/ fil est incorrect.
4. Le fil n'est pas tendu correctement.
1. L'aiguille est trop grosse pour le tissu.
2. La tension du fil est trop forte.
1. Le fil n'est pas assez solide.
2. La boîte à canette n'est pas enfilée
correctement.
3. Le tissu est tiré lors du piquage.
1. La machine doit être lubrifiée.
2. Présence de bourre ou de trace
d'huile sur le cro-chet ou sur la barre
d'aiguille.
3. L'huilage a été effectué avec une
huile de mauvaise qualité.
4. L'aiguille est tordue ou épointée.
Le fil est coincé dans le crochet.
1. Enfiler à nouveau le fil à travers la machine
et l'aiguille
2. Réduire la tension du fil supérieur (chiffre
inférieur)
3. Utiliser une aiguille plus grosse
4. Enlever l'aiguille , puis la remettre en place
(talon dirigé vers l'arrière)
5. Retirer la bobine et bobiner le fil
6. Remplacer l'aiguille
1. Enlever la navette, puis la remettre en place
et tirer sur le fil. Si le fil se déroule facilement,
la navette est bien en place.
2. Contrôler la canette et la navette
3. Rectifier la tension du fil inférieur de la
manière prescrite
1. Enlever l'aiguille puis la remettre en place
(talon dirigé vers l'arrière).
2. Remplacer l'aiguille.
3. Choisir une aiguille dont la grosseur est
adaptée au fil et à l'étoffe.
4. Vérifier si le pied-de-biche utilisé convient
pour l'ouvrage.
1. Remplacer l'aiguille .
2. Enlever l'aiguille, puis la remettre en place
(talon dirigé vers l'arrière).
3. Choisir une aiguille dont la grosseur est
adaptée au fil et au tissu.
4. Changer le pied-de-biche.
1. Enfiler correctement le fil dans la machine.
2. Enfiler la navette de la manière prescrite.
3. Choisir une aiguille dont la grosseur est
adaptée au fil et à l'étoffe.
4. Rectifier la tension du fil.
1. Utiliser une aiguille plus fine.
2. Rectifier la tension du fil.
1. Utiliser un fil de meilleur qualité.
2. Enfiler à nouveau la boîte à canette, puis la
remettre en place.
3. Ne pas tirer le tissu lors de la couture. Celui-
ci doit être entraîné automatiquement.
1. Huiler la machine en suivant les instructions
2. Nettoyer le crochet et la griffe d'entraînement
en suivant les instructions.
3. Pour le huilage, utiliser exclusivement une
huile spéciale pour machine à coudre.
4. Remplacer l'aiguille.
Enlever le fil supérieur et la navette, tourner le
volant par secousses à la main en avant et en
arrière. Enlever les restes de fil. Huiler selon
les instructions.
L'aiguille n'est pas insérée correctement.
1. L'aiguille n'est pas insérée correctement.
96
La página se está cargando...


Transcripción de documentos
Model 8135H Instruction Manual Modelo 8135H Manual de Instrucciones Model 8135H Manuel d'Instructions F IMPORTANTES MESURES DE SÉCURITÉ Lorsqu'on utilise une machine à coudre, il faut toujours respecter certaines règles fondamentales de sécurité, notamment les suivantes: Lire toutes les directives avant usage. DANGER - Pour éviter les risques de secousses électriques: 1. Ne pas laisser sans surveillance lorsque branchée. Toujours débrancher la machine immédiatement après usage et avant de la nettoyer. 2. Toujours débrancher avant de changer l'ampoule. Remplacer l'ampoule par une ampoule de même calibre 10 watts (110-120V area) ou 15 watts (220-240 area). AVIS - Afin de réduire les risques de la machine à coudre et de la commande de vitesse libres de toute accumulation de charpie, poussières et tissus. 5. Ne jamais échapper ou insérer tout objet dans les ouvertures. 6. Ne pas utiliser à l'extérieur. 7. Ne pas utiliser dans un endroit où des produits aérosol sont utilisés on dans un endroit où on administre de l'oxygène. 8. Mettre la machine hors tension avant de la brancher ou de la débrancher. 9. Ne pas tirer sur le cordon pour débrancher la machine à coudre. Pour débrancher, saisir la fiche et tirer. 10. Tenir les doigts éloignés des pièces mobiles. Tout spécialement de l'aiguille. de brûlures, feu, risques de secousses électriques, ou blessures: 11. Toujours utiliser la plaque à aiguille appropriée. 1. Ne pas permettre l'utilisation comme jouet. Exercer une étroite surveillance lorsque la machine est utilisée à proximité d'un enfant ou lorsqu'elle est utilisée par ce dernier. 12. Ne pas utiliser d'aiguille croche. 2. N'utilisez cette machine à coudre que pour l'utilisation décrite dans ce manuel. N'utiliser que les accessoires recommandés par le manufacturier décrits dans ce manuel. 3. Ne pas utiliser cette machine à coudre si le cordon ou la prise sont en mauvais état, si elle ne fonctionne pas normalement, si elle est tombée et endommagée, ou plongée dans l'eau. Retourner la machine à coudre chez le dépositaire autorisé le plus près pour examen, réparations, réglages électriques ou mécanique. 4. Ne jamais utiliser la machine à coudre lorsque les trous d'aération sont bloqués. Garder les trous d'aération 13. Ne pas tirer ou pousser sur le tissu en cousant, afin d'éviter de briser l'aiguille. 14. Mettre la machine hors tension pour effectuer tout réglage, tel enfiler l'aiguille, changer l'aiguille ou plaque aiguille. 15. Toujours débrancher la machine à coudre pour effectuer l'entretien ou tout autre réglage mentionnés dans ce manuel. 16. Le niveau du son est dans des conditions normales de 75dB (A). CONSERVER CES INSTRUCTIONS GB List of contents Principal parts .................................................................................................................2/4 Accessories........................................................................................................................6 Fitting the snap-in sewing table..........................................................................................8 Connecting machine to power source..............................................................................10 Changing the bulb ............................................................................................................12 Two-step presser foot lever/ Adjusting the presser foot pressure....................................14 Attaching the presser foot holder .....................................................................................16 Winding the bobbin ..........................................................................................................18 Inserting bobbin................................................................................................................20 Changing the needle (system 130/ 705H)........................................................................22 Threading the upper thread..............................................................................................24 Automatic needle threader ...............................................................................................26 Thread tension .................................................................................................................28 Bringing up the lower thread ............................................................................................30 Reverse sewing/ Changing sewing directions/ Removing the work/ Cutting the thread.......................................................................32 How to drop feed dog.......................................................................................................34 Matching needle / fabric / thread......................................................................................35 How to choose your pattern .............................................................................................38 Straight stitching and needle position ..............................................................................40 Zig zag sewing .................................................................................................................42 Blind hem/ lingerie stitch ..................................................................................................44 Overlock stitches..............................................................................................................46 Sewing on buttons............................................................................................................48 How to sew buttonholes (one-step buttonhole)................................................................50 Left and right side balance for buttonhole ........................................................................52 Zippers and piping............................................................................................................54 Sewing with the hemmer foot...........................................................................................56 3-step zig-zag...................................................................................................................58 Stitch selection .................................................................................................................60 Smocking stitch ................................................................................................................62 Sewing with the cording foot ............................................................................................64 Free motion darning .........................................................................................................66 Practical stitches ..............................................................................................................68 Darning.............................................................................................................................70 Attaching lace...................................................................................................................72 Applique ...........................................................................................................................74 Twin needle......................................................................................................................76 Monogramming and embroidering with embroidery hoop* ..............................................78 Quilting .............................................................................................................................80 Gathering .........................................................................................................................82 Scallop stitching ...............................................................................................................84 Patch work .......................................................................................................................86 The walking foot accessory (optional)..............................................................................88 Side Cutter .......................................................................................................................90 Maintenance.....................................................................................................................92 Trouble shooting guide.....................................................................................................94 F Sommaire Pièces principales de la machine....................................................................................3/5 Accessoires........................................................................................................................7 Mise en place de la table-rallonge .....................................................................................9 Branchement de la machine à coudre .............................................................................11 Changement de l'ampoule ...............................................................................................13 Levier du pied-de-biche à deux positions/ Ajustement de la pression du pied-de-biche .15 Montage du support du pied-de-biche .............................................................................17 Remplir la canette ............................................................................................................19 Mise en place de la canette .............................................................................................21 Mise en place de l'aiguille (Système 130/705H) ..............................................................23 Enfilage fil supérieur.........................................................................................................25 Enfileur automatique ........................................................................................................27 Tension du fil....................................................................................................................29 Remonter le fil inférieur ....................................................................................................31 Marche arrière/ Pour modifier le sens de la couture/ Retrait de l'ouvrage/ Couper les fils ............................................................................33 Escamotage de la griffe d'entraînement ..........................................................................34 Tableau des aiguilles et fils ..............................................................................................37 Sélection des points .........................................................................................................39 Couture au point droit et position d'aiguille ......................................................................41 Couture au point zig-zag ..................................................................................................43 Ourlet au point invisible....................................................................................................45 Point overlock...................................................................................................................47 Pose des boutons ............................................................................................................49 Coudre les boutonnières/ boutonnières à une étape .......................................................51 Equilibrage droit et gauche de la boutonnière..................................................................53 Pose d'une fermeture à glissière......................................................................................55 Coudre avec le pied ourleur .............................................................................................57 Point zig-zag cousu..........................................................................................................59 Sélection des points .........................................................................................................61 Point nid d'abeille .............................................................................................................63 Coudre avec le pied pour cordonnet ................................................................................65 Reprise.............................................................................................................................67 Points utilitaires ................................................................................................................69 Reprisage.........................................................................................................................71 Pose de la dentelle...........................................................................................................73 Appliqué ...........................................................................................................................75 Couture à deux aiguilles...................................................................................................77 Monogramme et broderie à main libre*............................................................................79 Coudre avec le guide .......................................................................................................81 Le fronçage ......................................................................................................................83 Point feston ......................................................................................................................85 Patchwork ........................................................................................................................87 Pied de transport supérieur (optionnels) ..........................................................................89 Coupeur latéral.................................................................................................................91 Entretien de la machine ...................................................................................................93 Comment remédier soi-même aux petits problèmes ......................................................96 E Descripción de la máquina 1. Tensión del hilo 2. Presiion de pie 3. Palanca tensora del hilo 4. Corta-hilos 5. Pié prensa tela 6. Chapa aguja 7. Mesa plana deslizable y caja de accesorios 8. Dial para puntada zigzag 9. Dial de longitud de puntada 10. Eje para el bobinado 11. Disco visor 12. Iman 13. Palanca reversora de costura 14. Palanca para bajar los dientes de alimentación 15. Palanca de un paso coser ojales 16. Enhebrador automático F Pièces principales de la machine 1. Régulateur de tension du fil 2. Régulateur de pression du pied-de-biche 3. Releveur de fil 4. Coupe-fil 5. Pied-de-biche 6. Plaque à aiguille 7. Table-rallonge et boîtier pour les accessoires 8. Bouton pour la largeur du point 9. Bouton pour la longueur du point 10. Butée du bobineur 11. Affichage du point 12. Aimant 13. Levier de marche arrière 14. Abaissement du transporteur 15. Levier de boutonnière à une étape 16. Enfileur automatique 3 GB Principal parts 17. Handle 18. Bobbin winder 19. Spool pin 20. Handwheel 21. Pattern selector dial 22. Power switch 23. Main plug socket 24. Bobbin thread guide 25. Upper thread guide 26. Presser foot lever 27. Buttonhole stitch balance adjustment slot 17 24 18 25 19 20 26 21 22 23 27 4 GB Accessories Standard accessories (1) a. All purpose foot b. Zipper foot c. Button sewing foot d. Buttonhole foot e. L-screwdriver f. Seam ripper/ brush g. Oil bottle h. Pack of needles (3x) i. Bobbin (3x) j. Seam guide k. Spool pin felt (2x) 1 a Bonus feet (2) l. Satin stitch foot m.Overcasting foot n. Hemmer foot o. Blind hem foot p. Cording foot q. Quilting foot r. Darning/ Embroidery foot s. Gathering foot t. Walking foot u. Side cutter b e c v. Twin needle d g f h Optional accessories (3) (These 1 accessories are not supplied with this machine; they are however available as special accessories from your local dealer.) i j k 2 l m n r s t p o u 3 v 6 q GB Fitting the snap-in sewing table 1 Hold the snap-in sewing table horizontal, and push it in the direction of the arrow. (1) 2 The inside of the snap-in sewing table can be utilized as an accessory box. To open, lift up at the point of the arrow. (2) 8 GB Connecting machine to power source Caution: Always make sure that the machine is unplugged from power source and the main switch is on "O". when the machine is not in use and before inserting or removing parts. 1 A 2 B 3 b a - This machine is equipped with a polarized plug which must be used with an appropriate electrical outlet. - Connect the machine to a power source as illustrated (1/2). - The power switch is located above the terminal box. Your machine will not operate unless this switch is on " I ". (1) - Sewing light turns on automatically when the main switch is on " I ". - To start the machine, press on the foot control (4). The speed of the machine is regulated by the amount of pressure exerted on the foot control. Attention: Consult a qualified electrician if in doubt as to connect machine to power source. Unplug power cord when machine is not in use. The appliance must be used with the foot controller 4C-316B (110120V area)/ 4C-326G (230V area)/ 4C-316C or 4C-326C (220-240V area) manufactured by MATSUSHITA ELECTRIC (TAIWAN) CO., LTD. IMPORTANT NOTICE For appliance with a polarized plug (one blade is wider than the other). To reduce the risk of electric shock, this plug is intended to fit in a polarized outlet only one way. If it does not fit fully in the outlet, reverse the plug. If it still does not fit, contact a qualified electrician to install the proper outlet. Do not modify the plug in any way. (3) a. Polarized attachment plug b. Conductor intended to be grounded 4 10 Changing the bulb GB Caution: Make sure to disconnect the electrical supply plug from wall outlet before changing light bulb. 1 B A Replace bulb with same type rated 10 watts (110120V area) or 15 watts (220-240V area). - Loosen screw (A) as illustrated. (1) - Remove the cover (B). - Unscrew the bulb and fit new one (C). (2) - Replace the cover and tighten screw. 2 C 12 GB Two-step presser foot lever When sewing several layers or thick fabrics, the presser foot can be raised a second stage for easy positioning of the work. (A) A Adjusting the presser foot pressure The presser foot pressure of the machine has been pre-set and requires no particular readjustment according to the type of fabric (light-or-heavy weight). However, if you need to adjust the presser foot pressure, turn the presser adjusting screw with a coin. For sewing very thin fabric, loosen the pressure by turning the screw counter clockwise, and for heavy fabric, tighten by turning it clockwise. 14 E Palanca para levantar el pié prénsatela con dos posiciones Para coser ropas extremamente gruesas se puede ensanchar el pasaje de la ropa debajo del pie subiendo la palanca del alza-prensatelas de un escalón. (A) Ajuste de la presión del pié prensatela La presiõn del pie prensatela de la máquina ha sido preseleccionada y no requiere especiales ajustes de acuerdo con el tipo de tejido (liviano o pesado). Sin embargo, si se necesita ajustar la presión del pie presatela gire el tornillo de ajuste de presión con una moneda. Para coser tela muy fina afloje la presión girando el tornillo en sentido antihorario y para telas pesadas aumente la presión girán dolo en sentido horario. F Lever du pied-de-biche à deux positions Pour faciliter l'insertion de tissus très épais sous le pied-de-biche, on peut augmenter l'espace entre le pied-de-biche et la plaque à aiguille, en relevant le levier du pied-debiche d'un cran. Ajustement de la pression du pied-de-biche Le régulateur de pression du pied-de-biche a été ajusté et devrait convenir à tous les types de tissus (du plus fin au tissu épais). Cependant, si un ajustement s'avère nécessaire, tournez la vis d'ajustement en vous servant d'une pièce de monnaie. Pour les tissus très fins, desserrer le régulateur de pression en tournant dans le sens contraire des aiguilles d'une montre, et pour les tissus épais, augmenter la pression en tournant la vis dans le sens des aiguilles d'une montre. 15 Attaching the presser foot holder GB 1 Attention: Turn power switch to "O" before carrying out any of the operations below. a Raise the needle to its highest position and raise the presser foot lever. Attach the presser foot holder (b) to the presser foot bar (a). (1) b 2 Attaching the presser foot: Lower the presser foot holder (b) until the cut-out (c) is directly above the pin (d). (2) Lower the presser foot holder (b) and the presser foot (f) will engage automatically. a e b d c Removing the presser foot: Raise the presser foot. Release the pressure foot by raising lever (e) located at the back of the foot holder. (3) f Attaching the seam guide: Attach the seam guide (g) in the slot as illustrated. Adjust the distance as required for hems, pleats, etc.... (4) 3 e 4 g 16 GB Winding the bobbin 1 a Place an empty bobbin on the bobbin winder spindle. 2 Take the thread from the spool through the bobbin winder tension disc. (1) Wind the thread a few times by hand around the empty bobbin in a clockwise direction. Push the bobbin to the right towards the bobbin winding position. (2) Press the foot control gently. The bobbin will stop winding when it is full. Push the bobbin to the left to "sewing position" and remove it. Please Note: When the bobbin winder spindle is in "bobbin winding" position, the machine will not sew and the hand wheel will not turn. To start sewing, push the bobbin winder spindle to the left (sewing position). a. Spool pin felt 18 GB Inserting bobbin Attention: Turn power switch to "O" before inserting or removing the bobbin. 1 When inserting or removing the bobbin, the needle must be fully raised. - Open the hinged cover. (1) - Hold the bobbin case with one hand. Insert the bobbin so that the thread runs in a clockwise direction (arrow). (2) - Pull the thread through the slot, down and to the left until it enters the delivery eyelet (rectangular opening) under the tension spring. (3) - Hold the bobbin case by the hinged latch. (4) - Insert the bobbin case fully into the shuttle race and release the latch. Make sure that the metal finger fits into the notch at the top of the race cover. (5) 2 3 4 5 20 GB Changing the needle (System 130/705H) 1 Caution: Turn power switch to "O" before inserting or removing the needle. D A Replace the needle at the first sign of thread breakage or skipped stitches. Select the correct type and size of needle for the fabric to be sewn. Turn the balance wheel towards you until the needle is at highest position. Loosen the needle clamp screw (A) and tighten again after inserting the new needle. (1) B C The flat side of the needle shaft should be facing away from you (B). Push the needle up (C) into the needle clamp as far as it will go (D). Tighten the needle clamp screw firmly. The sewing needle must always be straight and sharp for smooth sewing. Replace the needle (2) if it is bent (A), blunt (B) or the point is damaged (C). 2 B A C 22 GB 2 4 Threading the upper thread Caution: Before threading, turn power switch to "O". 3 Raise the needle bar to its highest position. Follow exactly the numbered threading sequence illustrated below. If you skip a step or fail to properly engage the thread in any of the thread guides, the machine will not sew properly. (1-5) 5 Continue to draw the thread down and into the needle bar thread guide. Insert the thread through the eye of the needle from front to back. Leave about 10 cm (4") of thread loose behind the needle. (6) a. Spool pin felt 6 a 1 24 GB Automatic needle threader - Raise the needle to its highest position. 1 A B A C B C - Press lever (A) right down. - The threader automatically swings to the threading position (B). D D - Take the thread around the hook (C). - Take the thread in front of the needle round the hook (D) from bottom to top. 2 - Release lever (A). - Pull the thread through the needle eye. A Attention: Turn power switch to off ("O")! C 26 GB 1 Thread tension Note: The bobbin thread tension has been adjusted at the factory and readjustment is usually not required. 2 Lower thread tension To test the bobbin thread tension, remove the bobbin case and bobbin from the machine and hold the bobbin case suspended by the thread. Shake it once or twice. If the tension is correct, the thread will unwind by about an inch or two. If the tension is too tight, it will not unwind. If the tension is too loose, the thread will unwind for more than two inches. To adjust, turn the small screw on the side of the bobbin case. (1) A B C Upper thread tension Basic thread tension setting: "4". (2) To increase the tension, turn the dial up to a higher number. To reduce the tension, turn the dial to a lower number. A. Normal thread tension. B. Thread tension too loose. C. Thread tension too tight. 28 GB Bringing up the lower thread Hold the upper thread with the left hand. Turn the handwheel towards you with your right hand until the needle goes down and comes up again to its highest position. (1) 1 - Lightly draw the needle thread forming a loop with the bobbin thread. The upper thread should have caught the lower thread in a loop. - Pull the needle thread toward you and the lower thread will come up from the bobbin in a large loop. (2) Pull about 15 cm. (6") of both thread away from you under the presser foot. 2 30 GB Reverse sewing A Reverse sewing is used for locking the end of seams and where reinforcement is needed. At the end of seam, press down the reverse sewing lever and touch the foot control lightly. Sew a few reverse stitches. Release the lever and the machine will sew forwards again (A). Changing sewing directions 1. Stop the machine at the point where you wish to change directions with the needle still in the fabric. 2. Raise the presser foot and turn the fabric to line up its new direction using the needle as a turning point. 3. Lower the presser foot and start sewing in the new direction. Removing the work Turn the handwheel towards you to bring the thread take up lever to its highest position. Raise the presser foot and draw the fabric away from you. Cutting the thread B Hold the threads behind the presser foot. Using both hands, guide them to the slit (B) at the rear of the presser bar and press down to cut the thread. You can also use the thread cutter on the side of the machine. 32 GB How to drop feed dog For ordinary sewing, keep the feed dog up, for freehand embroidery, sewing on buttons and darning, drop the feed dog. To raise (a) and lower (b) feed dog. 1 E Bajar los dientes del alimentador Los dientes de arrastre están en posición arriba para los trabajos de costura habituales. Colocar la palanca (a) hacia la izquierda. El transportador se coloca automa-ticamente arriba desde la primera puntada. 2 a b Es necesario bajar los dientes de arrastre para ciertos trabajos en los cuales la tela no debe ser transportadas como, por ejemplo, zurcidos o bordados con bastidor. Poner la palanca (b) hacia la derecha. F a b Escamotage de la griffe d'entraînement Pour les travaux de couture usuels, la griffe d'entraînement reste en position haute. Pousser le levier (a) vers la gauche. Le transporteur est automatiquement repoussé vers le haut dès le premier point. Pour certains travaux tels que le reprisage ou la broderie à mains libres, l'ouvrage ne doit pas être entraîné. Il faut donc abaisser la griffe d'entraînement. Pousser le levier (b) vers la droite. 34 Matching needle / fabric / thread GB NEEDLE, FABRIC, THREAD SELECTION GUIDE NEEDLE SIZE FABRICS THREAD 9-11(65-75) Lightweight fabrics-thin cottons, voile, serge, silk , muslin, Qiana, interlocks, cotton knits, tricots, jerseys, crepes, woven polyester, shirt & blouse fabrics. Light-duty thread in cotton, nylon or polyester. 12(80) Medium weight fabrics-cotton, satin, kettleclote, sailcloth, double knits, lightweight woollens. 14(90) Medium weight fabrics-cotton duck, woolen, heavier knits, terrycloth, denims. 16(100) Heavyweight fabrics-canvas, woolens, outdoor tent and quilted fabrics, denims, upholstery material (light to medium). 18(110) Heavy woollens, overcoat fabrics, upholstery fabrics, some leathers and vinyls. Most threads sold are medium size and suitable for these fabrics and needle sizes. Use polyester threads on synthetic materials and cotton on natural woven fabrics for best results. Always use the same thread on top and bottom. Heavy duty thread, carpet thread. (Use heavy foot pressure-large numbers.) IMPORTANT: Match needle size to thread size and weight of fabric NEEDLE, FABRIC SELECTION NEEDLES EXPLANATION TYPE OF FABRIC HA 1 15 1 Standard sharp needles. Sizes range thin to large. 9 (65) to 18 (110) Natural woven fabrics-wool, cotton, silk, etc. Qiana. Not recommended for double knits. 1/705H (SIN) Semi-ball point needle, scarfed. 9 (65) to 18 (110) Natural and synthetic woven fabrics, polyester blends. Knits-polyesters, interlocks, tricot, single and double knits. Can be used instead of 15 1 for sewing all fabrics. 1/705HS (SUK) Full ball point needle 9 (65) to 18 (110) Sweater knits, Lycra, swimsuit fabric, elastic. Leather needles. 12 (80) to 18 (110) Leather, vinyl, upholstery. (Leaves smaller hole than standard large needle.) 15 15 130 PCL Note: 1. Twin needles, can be purchased for utility and decorative work. 2. When sewing with twin needles, the stitch width dial should be set at less than "2.5". 3. European needles show sizes 65, 70, 80 etc. American and Japanese needles show size 9, 11, 12 etc. 4. Replace needle often (approximately every other garment ) and / or at first thread breakage or skipped stitches. 35 Tableau des aiguilles et fils F GROSSEUR DE LAIGUILLE TISSUS FILS 9-11(65-75) Tissus Légers: Coton léger, voile, serge, mousseline, tricot de coton, jersey, crêpes, polyester, tissu pour blouse ou chemise. Fil de coton, fil de soie, fil de nylon ou fil synthétique. 12(80) Tissus moyens: Coton moyen, satin, toile, tricot double , lainage léger. 14(90) Tissus moyens à épais: Coton épais, lainages, tricot épais, ratine, denim, velours côtelé. 16(100) Tissus épais: canevas, lainage épais, toile de tente, tissu piqué, denim, tissu à recouvrement (léger à moyen). 18(110) Tissus épais: Lainages à manteau, tissu pour vêtements d'extéieur, certains cuir et vinyle. Les fils vendus en magasin conviennent à tous ces tissus et grosseurs d'aiguilles. Utiliser le fil synthétique pour les tissus synthétique et le fil de coton pour les tissus en fibre naturelle. Assurez-vous d' avoir le même fil sur le dessus et dans la canette. Fil fort, fil à denim. (Augmenter la pression sur le pied presseur). IMPORTANT: Assurez-vous que la grosseur de l'aiguille convienne à l'épaisseur du tissu à coudre SÉLECTION DE L'AIGUILLE PAR RAPPORT AU TISSU AIGUILLES DESCRIPTIONS GENRE DE TISSUS HA 1 15 1 Aiguilles régulières et universelles. Grosseurs disponibles de 9 (65) à 18 (110). Tissu en fibre naturelle: coton, lainage, soie. Non recommand é pour tricotdouble. 1/705H (SIN) Aiguilles à demi-bille. Grosseurs disponibles 9 (65) à 18 (110). Pour fibre naturelle et synthétique ou un mélange des deux fibres: étoffe tissé, tricot, interlock etc. 1/705HS (SUK) Aiguilles à bille entière. Grosseurs disponibles 9 (65) à 18 (110). Trico à chandail, lycra, tissu pour costume de bain, élastique. 15 x 1/ 705 HJ Aiguilles robustes à pointe universelle, 14 (90) à 18 (110). Denim, canevas, tissu à recouvrement, toile. 130 PCL Aiguilles avec pointe en forme d'angle acéré, 12 (80) à 18 (110). Cuir, vinyle, plastique souple. 15 15 Remarque: 1. Les aiguilles jumelles peuvent être achetées dans un but utilitaire ou décoratif. 2. Quand vous cousez avec les aiguilles jumelles, le bouton de largeur de point doit être au moins sur le chiffre "2.5" et moins. 3. Les aiguilles européennes sont numérotées 65, 70, 80 etc. Les aiguilles américaines et japonaises sont numérotées 9, 11, 12 etc. 4. Changer souvent les aiguilles (après le couture d'un vêtement) et / ou à la première rupture du fil ou des points. 37 GB Straight stitching and needle position 1 Turn the pattern selector dial so that the stitch display shows the straight stitch position. 2 3 4 5 Generally speaking, the thicker the fabric, thread and needle, the longer the stitch should be. Choose your needle position, from center position to left needle position by changing the stitch width dial (1) from "0" to "5". A 1. Stitch width dial 2. Stitch length dial 3. Stitch display 4. Pattern selector dial 5. Reverse sewing lever 40 GB Zig zag sewing Turn the pattern selector dial to "B". 1 5 4 3 5 1 0 2 4 3 2 1 0 Function of stitch width dial The maximum zigzag stitch width for zigzag stitching is "5"; however, the width can be reduced on any pattern. The width increases as you move zigzag dial from "0" - "5". For twin needle sewing, never set the width wider than "2.5". (1) Function of stitch length dial while zigzaging The density of zigzag stitches increase as the setting of stitch length dial approaches "0". Neat zigzag stitches are usually achieved at "2.5" or below. (2) Satin stitch When the stitch length is set between "0" - "1", the stitches are very close together producing the "satin stitch" which is used for making buttonholes and decorative stitches. 2 3 4 2 2 Sewing thin fabrics: When sewing very thin fabrics, it is suggested that you use interfacing on the backside of the fabric. 1 0 4 3 0.5 1 S 42 GB a Blind hem/ lingerie stitch For hems, curtains, trousers, skirts, etc. Blind hem/ lingerie for firm fabrics. Position "C" on selection dial. 4 3 2 1 0 5 Blind hem for stretch fabrics. Position "D" on selection dial. 3~5 Set the machine as illustrated. 3 2 1 0 4 b 1~2 S c d C D Note: It takes practice to sew blind hems. Always make a sewing test first. Fold the fabric as illustrated with the wrong side uppermost. (1) Place the fabric under the foot. Turn the handwheel forwards by hand until the needle swings fully to the left. It should just pierce the fold of the fabric. If it does not, adjust the stitch width accordingly. (2) Adjust the guide (3) by turning the knob (4) so that the guide just rests against the fold. Sew slowly, by pressing the foot control lightly guiding the fabric along the edge of the guide. a. Stitch width b. Stitch length c. Presser foot d. Stitch pattern 4 1 2 3 44 Overlock stitches GB a Seams, neatening, visible hems. 4 3 2 1 0 5 Turn the stitch length dial to "3' or "S". The stitch width can be adjusted to suit the fabric. 3~5 b 2 Standard overlock: For fine knits, jerseys, neck edges, ribbing. (2) 1 0 4 3 Double overlock stitch: For fine knits, handknits, seams. (1) Stretch overlock: For fine knits, jerseys, neck edges, ribbing. (3) 3, S S All overlock stitches are suitable for sewing and neatening edges and visible seams in one operation. When neatening, the needle should just go over the edge of the fabric. Attention: Use new needles or ball point needles or stretch needle! I P Q 1 2 3 46 GB a Sewing on buttons Move the drop feed control to right side to lower the feed dogs. (1) 4 3 2 1 0 5 3~5 3 2 1 0 4 b 0 Change presser foot to button sewing foot. Position the work under the foot. Place the button in the desired position, lower the foot. Set the pattern selector knob on zig zag stitch " ". Adjust the stitch width to "3" - "5" according to the distance between the two holes of the button. Turn the handwheel to check that the needle goes cleanly into the left and right holes of the button. Set the pattern selector knob on straight stitch " ", and sew a few securing stitches. Set the pattern selector knob on zig zag stitch " ", and slowly sew on the button with about 10 stitches. Set the pattern selector knob on straight stitch " ", and sew a few securing stitches. (2) S If a shank is required, place a darning needle on top of the button and sew. (3) For buttons with 4 holes, sew through the front two holes first (2), push work forward and then sew through the back two holes. (3) a B a 1 2 b b 3 48 GB How to sew buttonholes (one-step buttonhole) Buttonhole sewing is a simple process that provides reliable results. However, it is strongly suggested to always make a practice buttonhole on a sample of your fabric and interfacing. 4 3 2 1 0 5 Making a Buttonhole 1. Using tailor's chalk, mark the position of the buttonhole on the fabric. 2. Attach the buttonhole foot and set the pattern selector dial to " ". Set stitch length dial to " ". Adjust stitch width to desired width. 3. Lower the presser foot aligning the marks on foot with the marks on the fabric (A). (The front bar tack will be sewn first.) 4. Open the button plate and insert the button (B). 5. Lower the buttonhole lever and gently push it back (C). 6. While lightly holding the upper thread, start the machine. 7. Buttonhole stitching is done in the order (D). 8. Stop the machine when the buttonhole is sewn. 3~5 2 1 0 4 3 0.5~1 S Making a Buttonhole on Stretch Fabrics (E) When sewing buttonholes on stretch fabric, hook heavy thread or cord under the buttonhole foot. When the buttonhole is sewn the legs will overcast the cord. 1. Mark the position of the buttonhole on the fabric with the tailor's chalk, attach the buttonhole foot, and set the pattern selector dial to " ". Set stitch length dial to " ". 2. Hook the heavy thread onto the back end of the buttonhole foot, then bring the two heavy thread ends to the front of the foot, insert them into the grooves and temporarily tie them there. 3. Lower the presser foot and start sewing. * Set the stitch width to match the diameter of the gimp thread. 4. Once sewing is completed, gently pull the heavy thread to remove any slack, then trim off the excess. H PUS A B 3 4 2 H PUS 1 D E 50 C GB Left and right side balance for buttonhole Stitch density on right and left sides of buttonhole can be adjusted by buttonhole balance control dial. This dial should usually be in a neutral position. (between "+" and "") If the stitches on the left side of the buttonhole are too close together, turn the dial to the left (+). * Turning dial to the left opens left side. If the stitches on the left side of the buttonhole are too open, turn the dial to the right (). * Turning dial to the right closes left side. The stitch on the right side of the buttonhole is set using the stitch length dial. 52 GB Zippers and piping Set the machine as illustrated. Dial selector on "A". Set stitch length control between "1" - "4" (according to thickness of fabric). 4 3 2 1 0 5 0 2 1 0 4 3 The zipper foot can be inserted right or left, depending on which side of the foot you are going to sew. (1) 1~4 To sew past the zipper pull, lower the needle into the fabric, raise the presser foot and push the zipper pull behind the presser foot. Lower the foot and continue to sew. It is also possible to sew in a length of cord, into a bias strip to form a 'welt'. (2) S A 2 1 54 GB Sewing with the hemmer foot For hems in fine or sheer fabrics. 4 3 2 1 0 5 Set the machine as illustrated. Pattern selector on "A". 0 2 1 0 4 3 Neaten the edge of the fabric. At the beginning of the hem, turn under the edge twice by about 3 mm (1/8") and sew 4-5 stitches to secure. Pull the thread slightly towards the back. Insert the needle into the fabric, raise the presser foot and guide the fold into the scroll on the foot. (1) 1~4 Gently pull the fabric edge towards you and lower the presser foot. Begin sewing, guiding the fabric into the scroll by holding it upright and slightly to the left. (2) S A 2 1 56 GB 3-step zig-zag Sewing on lace and elastic, darning, mending, reinforcing edges. 4 3 2 1 0 5 Set the machine as illustrated. Pattern selector on "E". 3~5 2 1 0 4 3 Place patch in position. The stitch length can be shortened to produce very close stitches. (1) 1~2 When mending tears, it is advisable to use a piece of backing fabric to reinforce. The stitch density can be varied by adjusting the stitch length. First sew over the center and then overlap on both sides. Depending on the type of fabric and damage, sew between 3 and 5 rows. (2) S Sewing elastic 1. Place the elastic on the fabric. 2. As you sew, stretch the elastic both in the front and behind the presser foot as shown in fig. (3) Joining fabric The elastic stitch can be used to join two pieces of fabric together and is very effective when sewing knitted fabrics. If nylon thread is used, the stitch will not be visible. 1. Place the edges of the two pieces of fabric together and center them under the presser foot. 2. Sew them together using the elastic stitch taking care to keep the two fabric edges close together as shown in fig. (4) E 1 2 3 58 4 Stitch selection 5 4 3 2 1 0 0 3~5 1 3 2 1 0 0 4 2 4 3 Triple straight stitch: (1/3) Pattern selector on "A". For hardwearing seams. Turn the stitch length dial to "S". The machine sews two stitches forwards and one stitch backwards. This gives triple reinforcement. 4 3 2 1 0 5 S S A B 1 2 S GB Triple zig-zag: (2/4) Pattern selector on "B". For hardwearing seams, hems and decorative seams. Turn the stitch length dial to "S". Adjust the stitch width dial to between "3" and "5". Triple zig-zag is suitable for firm fabrics like denim, corduroy, etc. 3 60 4 S Smocking stitch GB Seams, hems, T-shirts, underwear, etc. 4 3 2 1 0 5 Set the machine as illustrated. 4~5 2 Sew at 1 cm (1/4") from the fabric edge and trim the surplus fabric. (2) 1 0 4 3 This stitch can be used for all types of jersey as well as for woven fabrics. (1) S Pattern selector on "E". Turn the stitch length dial to "S". S E 1 62 2 GB Sewing with the cording foot Decorative effects, cushions, tablecloths, etc. 4 3 2 1 0 5 Set the machine as illustrated. Various stitches are suitable for sewing on cord, e.g. Zig-zag, Triple zig-zag, decorative stitches. 3~5 2 1 0 4 3 Insert the cord between the spring covering the cord groove and the foot. The cord should run in the groove. One, two or three cords can be sewn on. The stitch width is adjusted according to the number of cords and the stitch selected. (1/2) 1~4 S B 2 1 64 GB Free motion darning 5 Set the machine as illustrated. Move the drop feed control to right side to lower the feed dogs. (1) 4 3 2 1 0 Remove the presser foot clamp. (2) 0 2 1 0 4 3 Attach the darning foot to the presser foot bar. The lever (A) should be behind the needle clamp screw (B). Press the darning foot on firmly from behind with your index finger and tighten the screw (C). (3) 0 First sew round the edge of the hole (to secure the threads). (4) First row: Always work from left to right. Turn work by 1/4 and oversew. A darning ring is recommended for easier sewing and better results. a S A a b b 1 A B C 2 4 3 66 GB Practical stitches Set the machine as illustrated. Turn the stitch width dial and stitch length dial to suit the fabric. 4 3 2 1 0 5 Feather stitch (1) Pattern selector on "F". For decorative joining seam for a fagoted effect. 3~5 2 1 0 4 3 Shell hem (3) Pattern selector on "P". For decorative edges. Suitable for edges on sheer, fine and stretch fabrics. The larger stitch should go just over the edge of the fabric to create the shell effect. 1~2 S F I Rampart (2) Pattern selector on "I". For flat joining seams, sewing on elastic, visible hems. This stitch can be used for firm, thicker fabrics. P 1 2 68 3 GB Darning - Turn stitch length dial to the desired length. 4 3 2 1 0 5 - Turn stitch selector to straight stitch, center needle position. - Position the fabric to be darned under the presser foot together with the under laying fabric to be used. 0 2 1 0 4 3 - Lower the presser foot and alternately sew forward or reverse using the lever. 2~4 - Repeat this motion until the area to be darned is filled with rows of stitching. For reverse sewing instructions, see page 32. S A 70 E Zurcido - Gire el disco regulador del largo de puntada al largo deseado. - Gire el selector a costura recta, posición central de la aguja. - Coloque la tela a zurcir bajo el prensatelas, junto con la tela subyacente que se va a utilizar. - Baje el pié prénsatela y de manera alternativa, cosa hacia delante y atrás accionando la palanca reversora. - Repita este movimiento hasta que la parte a zurcir se rellene con hileras de cosido. Para las instrucciones sobre cómo coser hacia atrás, vea página 33. F Reprisage - Régler la longueur du point selon la longueur désirée. - Placer le sélecteur de points à la couture droite, position d'aiguille au centre. - Faufiler une pièce de renfort sous la section à repriser et placer le tissu sous le piedde-biche. - Abaisser le pied-de-biche et coudre alternativement en marche avant et en marche arrière en vous servant du levier de marche arrière. - Répéter ce mouvement jusqu'à ce que toute la surface à repriser soit couverte. Pour les instructions de marche arrière. Voir P. 33. 71 GB Attaching lace - Turn stitch length dial to the desired length. 4 3 2 1 0 5 - Turn the stitch selector to straight stitch, center needle position. - Fold in the edge of the fabric (approximately 6 mm 1/4"). 0 2 - Sew on the edge of the fabric fold. 1 0 4 3 - Place the lace under the folded edge of the fabric allowing it to under lap the fabric slightly as required by the pattern of the lace. - You can add a decorative touch by using the satin stitch to sew the lace. 2~4 S A 72 GB Applique - Turn stitch length dial to the desired length. 4 3 2 1 0 5 - Turn pattern selector dial to zig zag. - Select a narrow zig zag width. 3~5 - Cut out the applique design and baste it to the fabric. - Sew slowly around the edge of the design. 2 1 0 4 3 - Trim excess material outside the stitching. Make sure not to cut any stitches. - Remove the basting thread. 0.5~1 - Tie top and bottom thread under the applique to avoid unraveling. S B 74 E Aplicación - Regular la máquina segúina segun la ilústración. - Reducir el ancho de la puntada de zigzag. 1. Hilvane el diseño sobre la superficie de la tela. 2. Empieze a coser con cuidado según el diseño. 3. Recorte la tela que rebase la costura. 4. Saque la puntadas de hilvanar. Nota: Vuelva a coser las puntadas finales e inciales con puntada recta para reforzar. F Appliqué - Régler le bouton de longueur de point selon la longueur désirée. - Placer le sélecteur de point à un point de zigzag étroit. - Découper l'appliqué et le faufiler au vêtement. - Coudre lentement près du bord extérieur de l'appliqué. - Recouper tout excédent de tissu en prenant soin de ne couper aucun des points cousus. - Retirer le faufil. - Tirer le fil à l'envers du tissu et attacher ensemble. 75 GB Twin needle * The twin needle is an optional accessory not supplied with your machine. 4 3 2 1 0 5 - Turn stitch length dial to the desired stitch length. 0~2.5 2 - Make sure that the two threads used to thread the twin needle are of the same weight. You can use one or two colors. 1 0 4 3 1~4 - Turn stitch selector to straight stitch, center needle position, width setting "0". - Insert the twin needle in the same way as single needle. Flat side of needle should face away from you. - Follow instructions for single needle threading. Thread each needle separately. S Please note: When sewing with twin needle, always proceed slowly, and make sure to maintain a low speed to insure quality stitching. When using twin needle on zig-zag make sure the stitch width dial is set between "0" and "2.5". Do not use twin needle at setting above "2.5". A 76 GB Monogramming and embroidering with embroidery hoop* - Set the machine as illustrated. - Remove the presser foot and the presser foot holder. - Move the drop feed control to right side to lower the feed dogs. (1) - Lower presser foot lever before starting to sew. - Adjust the stitch width according to the size of lettering or design. 4 3 2 1 0 5 1~5 2 1 0 4 3 0 S B Preparation for Monogramming and Embroidering* - Draw the desired lettering or design on the right side of the fabric. - Stretch the fabric between embroidery hoop as firmly as possible. - Place the fabric under the needle. Make sure the presser foot bar is down in its lowest position. - Turn the balance wheel towards you to bring up the lower thread through the fabric. Sew a few securing stitches at the starting point. - Hold the hoop with thumb and forefingers of both hands while pressing the material with the middle and third fingers and supporting the outside of hoop with smaller finger. * Embroidery hoop not included with machine. a a 1 2 78 b b GB Quilting Set pattern selector as illustrated. Insert the quilting guide in presser foot holder and set the space as you desired. 4 3 2 1 0 5 0 2 1 0 4 3 Move the fabric over and sew successive rows with the guide riding along on the previous row of stitching. Note: Presser foot shown is the optional quilting foot which does not come with your machine. If you have not purchased this foot substitute the all purpose foot. 1~4 S A 80 GB Gathering Set the pattern selector as illustrated. 1. Attach the gathering foot. 2. Sew a single row or multiple rows of straight stitches. 3. If more gathering is required, loosen the upper thread tension to below 2 so that the lower thread lies on the under side of the material. 4. Pull the lower thread to gather more of the material. 4 3 2 1 0 5 0 2 1 0 4 3 1~4 Note: Presser foot shown is the optional gathering foot which does not come with your machine. If you have not purchased this foot substitute the all purpose foot and gather fabric by hand by lowering the tension setting to below 2 and pulling the lower thread to gather the material. S A 82 GB Scallop stitching This machine automatically produces a scallop stitch which may be used as decorative edging. 4 3 2 1 0 5 - Set the pattern selector at "N". 3~5 2 - If desired, trim around the scallop with scissors to create a scalloped edge. Be careful not to cut the thread. (2) 1 0 4 3 - Sew the scallop stitch along the edge of the material. (1) 1~2 S N 2 1 84 GB Patch work These stitches are used to join two pieces of fabric while leaving a space between their edges. 4 3 2 1 0 5 1. Fold over the edges of the two pieces of fabric for the hem and baste the edges to a thin piece of paper leaving a small space between them. 3~5 2 1 0 4 3 2. Set the Pattern selector on "I". Turn the stitch length dial to "S". S 3. Stitch along the edge, pulling both threads slightly when beginning to sew. * Use thicker than normal threads for sewing. 4. After sewing, remove the basting and the paper. Finish by tying knots on the reverse side at the beginning and the end of the seams. S I 86 GB The walking foot accessory Always try to sew first without the walking foot accessory which should be used only when necessary. 1 a b c 2 a d 3 e It is easier to guide the fabric and you have a better view of the seam when using the standard, regular foot on your machine. Your EURO-PRO sewing machine offers excellent stitch quality on a wide range of fabrics from delicate chiffons to multiple layers of denim. The "Walking foot" accessory equalizes the feeding of the upper and lower layers of fabric and improves the matching of plaids, stripes and patterns. This foot helps to prevent uneven feeding of very difficult fabrics. 1. Lift the presser foot bar. 2. Remove the "foot holder" by opening counter clockwise the presser bar attaching screw. (3) 3. Attach the "walking foot" to the machine in the following way. i) The fork arm should fit into the needle screw and clamp. (2) ii) Slide the plastic "attaching head" from your left to right so that it is fitted into the "presser foot bar". iii) Lower the "presser foot bar". iv) Replace and tighten clockwise the "presser bar attaching screw". 4. Make sure both the "needle screw" and the "presser bar attaching screw" are tightly secured. 5. Draw the bobbin thread up and place both the bobbin thread and the needle thread behind the walking foot attachment. f a. b. c. d. e. f. Fork arm Attaching head Needle bar Needle screw & clamp Presser foot bar Presser bar attaching screw 88 Adjust the stitch length according to the stitch selected. However, the stitch width must be set at maximum. Note: The side cutter can only be used with the regular zigzag stitch (at maximum width) or the overlock stitches. GB Maintenance Caution: Always make sure that the machine is unplugged from power source and the main switch is on "O" before inserting or removing any parts and before cleaning. 1 Remove the stitch plate: Turn the handwheel until the needle is fully raised. Open the hinged front cover and unscrew the needle plate screw with the screw driver. (1) Cleaning the feed dog: Remove the bobbin case and use the brush supplied to clean the whole area. (2) 2 Cleaning and lubricating the hook: Remove the bobbin case. Snap the two hook retaining arms (a) outwards. Remove the hook race cover (b) and the hook (c) and clean with a soft cloth. Lubricate at the points (d) (1-2 drops) with sewing machine oil. Turn the handwheel until the hook race (e) is in the left position. Replace the hook (c). Replace the hook race cover and snap back the two hook retaining arms. Insert he bobbin case and bobbin and replace the stitch plate. Important: Fabric fluff and threads must be removed regularly. Your machine should be serviced at regular intervals at one of our service agencies. d e c b a 92 GB Trouble shooting guide Problem Upper thread breaks Cause 1.The machine is not threaded correctly 2. The thread tension is too tight 3. The thread is too thick for the needle 4. The needle is not inserted correctly 5. The thread is round wound the spool holder pin 6. The needle is damaged Correction 1. Rethread the machine 2. Reduce the thread tension (lower number) 3. Select a larger needle 4. Remove and reinsert the needle (flat side towards the back) 5. Remove the reel and wind thread onto reel 6. Replace the needle Lower thread breaks 1. The bobbin case is not inserted correctly 2. The bobbin case is threaded wrongly 3. The lower thread tension is too tight 1. Remove and reinsert the bobbin case and pull on the thread. The thread should pull easily 2. Check both bobbin and bobbin case 3. Loosen lower thread tension as described Skipped stitches 1. The needle is not inserted correctly 2. The needle is damaged 3. The wrong size needle has been used 4. The foot is not attached correctly 1. Remove and reinsert needle (flat side towards the back) 2. Insert a new needle 3. Choose a needle to suit the thread and fabric 4. Check and attach correctly Needle breaks 1. The needle is damaged 2. The needle is not correctly inserted 3. Wrong needle size for the fabric 4. The wrong foot is attached 1. Insert a new needle 2. Insert the needle correctly (flat side towards the back) 3. Choose a needle to suit the thread and fabric 4. Select the correct foot Loose stitches 1. The machine is not correctly threaded 2. The bobbin case is not correctly threaded 3. Needle/ fabric/ thread combination is wrong 4. Thread tension wrong 1. Check the threading 2. Thread the bobbin case as illustrated 3. The needle size must suit the fabric and thread 4. Correct the thread tension Seams gather or pucker 1. The needle is too thick for the fabric 2. The stitch length is wrongly adjusted 3. The thread tension is too tight 1. Select a finer needle 2. Readjust the stitch length 3. Loosen the thread tension Uneven stitches, uneven feed 1. Poor quality thread 2. The bobbin case is wrongly threaded 3. Fabric has been pulled 1. Select a better quality thread 2. Remove bobbin case and retread and insert correctly 3. Do not pull on the fabric while sewing, let it be taken up by the machine The machine is noisy 1. The machine must be lubricated 2. Fluff or oil have collected on the hook or needle bar 3. Poor quality oil has been used 4. The needle is damaged 1. Lubricate as described 2. Clean the hook and feed dog as described 3. Only use good quality sewing machine oil 4. Replace the needle The machine jams Thread is caught in the hook Remove the upper thread and bobbin case, turn the handwheel backwards and forwards by hand and remove the thread remands. Lubricate as described 94 F Comment remédier soi-même aux petits problèmes Problème Le fil supérieur casse Cause 1. L'enfilage du fil est incorrect. 2. La tension du fil est trop forte. 3. Le fil est trop épais pour l'aiguille. 4. L'aiguille n'est pas insérée correctement. 5. Le fil s'est entortillé sur la broche de la bobine. 6. L'aiguille est endommagée. Remède 1. Enfiler à nouveau le fil à travers la machine et l'aiguille 2. Réduire la tension du fil supérieur (chiffre inférieur) 3. Utiliser une aiguille plus grosse 4. Enlever l'aiguille , puis la remettre en place (talon dirigé vers l'arrière) 5. Retirer la bobine et bobiner le fil 6. Remplacer l'aiguille Le fil inférieur casse 1. La boîte à canette n'est pas placée correctement. 2. La boîte à canette n'est pas enfilée correctement. 3. La tension du fil est trop forte. 1. Enlever la navette, puis la remettre en place et tirer sur le fil. Si le fil se déroule facilement, la navette est bien en place. 2. Contrôler la canette et la navette 3. Rectifier la tension du fil inférieur de la manière prescrite Les points ne se forment pas toujours 1. L'aiguille n'est pas insérée correctement. 2. L'aiguille est tordue ou épointée. 3. L'aiguille n'a pas la classe ou la grosseur correcte. 4. Le pied-de-biche ne convient pas. 1. Enlever l'aiguille puis la remettre en place (talon dirigé vers l'arrière). 2. Remplacer l'aiguille. 3. Choisir une aiguille dont la grosseur est adaptée au fil et à l'étoffe. 4. Vérifier si le pied-de-biche utilisé convient pour l'ouvrage. L'aiguille casse 1. L'aiguille est tordue ou épointée. 2. La boîte à canette n'est pas enfilée correctement. 3. Tissu trop épais/ grosseur incorrecte de l'aiguille. 4. Le pied-de-biche ne convient pas. 1. Remplacer l'aiguille . 2. Enlever l'aiguille, puis la remettre en place (talon dirigé vers l'arrière). 3. Choisir une aiguille dont la grosseur est adaptée au fil et au tissu. 4. Changer le pied-de-biche. Des noeuds se forment au cours du travail 1. Le fil n'est pas enfilé correctement. 2. La boîte à canette n'est pas enfilée correctement. 3. Le rapport aiguille/ tissu/ fil est incorrect. 4. Le fil n'est pas tendu correctement. 1. Enfiler correctement le fil dans la machine. 2. Enfiler la navette de la manière prescrite. 3. Choisir une aiguille dont la grosseur est adaptée au fil et à l'étoffe. 4. Rectifier la tension du fil. Les coutures se rétractent ou se froncent 1. L'aiguille est trop grosse pour le tissu. 2. La tension du fil est trop forte. 1. Utiliser une aiguille plus fine. 2. Rectifier la tension du fil. Les points et l'entraînement sont irréguliers 1. Le fil n'est pas assez solide. 2. La boîte à canette n'est pas enfilée correctement. 3. Le tissu est tiré lors du piquage. 1. Utiliser un fil de meilleur qualité. 2. Enfiler à nouveau la boîte à canette, puis la remettre en place. 3. Ne pas tirer le tissu lors de la couture. Celuici doit être entraîné automatiquement. La machine est bruyante 1. La machine doit être lubrifiée. 2. Présence de bourre ou de trace d'huile sur le cro-chet ou sur la barre d'aiguille. 3. L'huilage a été effectué avec une huile de mauvaise qualité. 4. L'aiguille est tordue ou épointée. 1. Huiler la machine en suivant les instructions 2. Nettoyer le crochet et la griffe d'entraînement en suivant les instructions. 3. Pour le huilage, utiliser exclusivement une huile spéciale pour machine à coudre. 4. Remplacer l'aiguille. La machine est bloquée Le fil est coincé dans le crochet. Enlever le fil supérieur et la navette, tourner le volant par secousses à la main en avant et en arrière. Enlever les restes de fil. Huiler selon les instructions. 96-
 1
1
-
 2
2
-
 3
3
-
 4
4
-
 5
5
-
 6
6
-
 7
7
-
 8
8
-
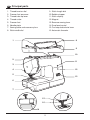 9
9
-
 10
10
-
 11
11
-
 12
12
-
 13
13
-
 14
14
-
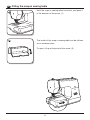 15
15
-
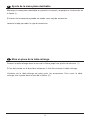 16
16
-
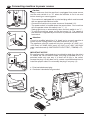 17
17
-
 18
18
-
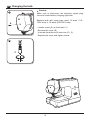 19
19
-
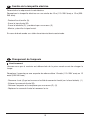 20
20
-
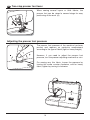 21
21
-
 22
22
-
 23
23
-
 24
24
-
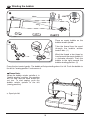 25
25
-
 26
26
-
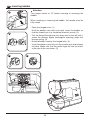 27
27
-
 28
28
-
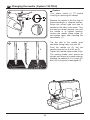 29
29
-
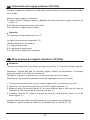 30
30
-
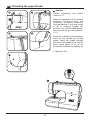 31
31
-
 32
32
-
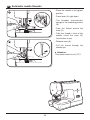 33
33
-
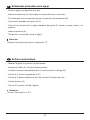 34
34
-
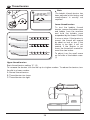 35
35
-
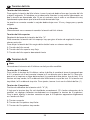 36
36
-
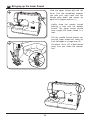 37
37
-
 38
38
-
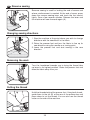 39
39
-
 40
40
-
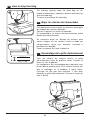 41
41
-
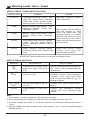 42
42
-
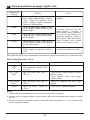 43
43
-
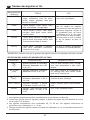 44
44
-
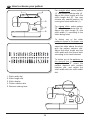 45
45
-
 46
46
-
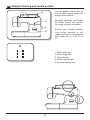 47
47
-
 48
48
-
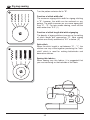 49
49
-
 50
50
-
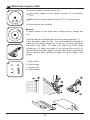 51
51
-
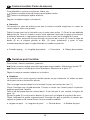 52
52
-
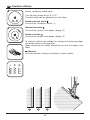 53
53
-
 54
54
-
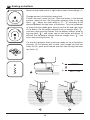 55
55
-
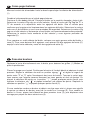 56
56
-
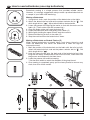 57
57
-
 58
58
-
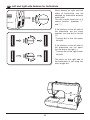 59
59
-
 60
60
-
 61
61
-
 62
62
-
 63
63
-
 64
64
-
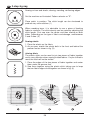 65
65
-
 66
66
-
 67
67
-
 68
68
-
 69
69
-
 70
70
-
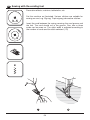 71
71
-
 72
72
-
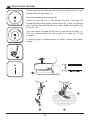 73
73
-
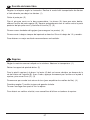 74
74
-
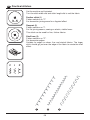 75
75
-
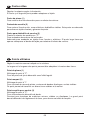 76
76
-
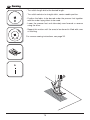 77
77
-
 78
78
-
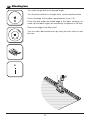 79
79
-
 80
80
-
 81
81
-
 82
82
-
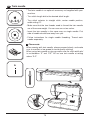 83
83
-
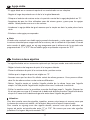 84
84
-
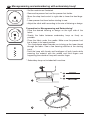 85
85
-
 86
86
-
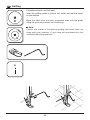 87
87
-
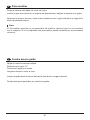 88
88
-
 89
89
-
 90
90
-
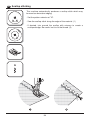 91
91
-
 92
92
-
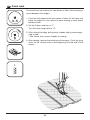 93
93
-
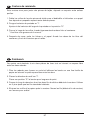 94
94
-
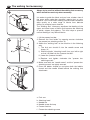 95
95
-
 96
96
-
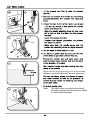 97
97
-
 98
98
-
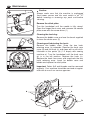 99
99
-
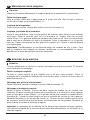 100
100
-
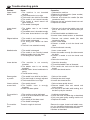 101
101
-
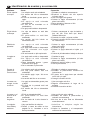 102
102
-
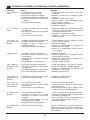 103
103
-
 104
104
-
 105
105
-
 106
106
-
 107
107


Euro-Pro 8135H El manual del propietario
- Categoría
- Máquinas de coser
- Tipo
- El manual del propietario
en otros idiomas
- français: Euro-Pro 8135H Le manuel du propriétaire
- English: Euro-Pro 8135H Owner's manual
Artículos relacionados
-
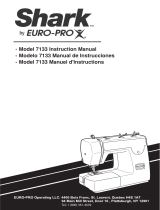 Euro-Pro Euro-Pro 7133 Manual de usuario
-
 Euro-Pro 7130 Q Manual de usuario
-
 Euro-Pro 7500 Manual de usuario
-
 Euro-Pro 420 Manual de usuario
-
 Euro-Pro 6130A2 Manual de usuario
-
 Euro-Pro 420 Manual de usuario
-
 Euro-Pro 6130A Manual de usuario
-
 Euro-Pro 380A Manual de usuario
-
 Euro-Pro Sewing Machine 385X Manual de usuario
-
 Euro-Pro 8260L El manual del propietario


