Troy-Bilt 15A3000766 Manual de usuario
- Categoría
- Mini cultivadores
- Tipo
- Manual de usuario

TROY-BILT LLC, P.O. BOX 361131 CLEVELAND, OHIO 44136-0019
Op e r a t O r ’s Ma n u a l
Safe Operation Practices • Set-Up • Operation • Maintenance • Service • Troubleshooting • Warranty
WARNING
READ AND FOLLOW ALL SAFETY RULES AND INSTRUCTIONS IN THIS MANUAL
BEFORE ATTEMPTING TO OPERATE THIS MACHINE.
FAILURE TO COMPLY WITH THESE INSTRUCTIONS MAY RESULT IN PERSONAL INJURY.
Reel Mower — TBR16 & TBR18
Form No. 769-06425A
(October 21, 2010)

Customer Support
Please do NOT return the machine to the retailer or dealer without first contacting the Customer Support Department.
If you have difficulty assembling this product or have any questions regarding the controls, operation, or maintenance of
this machine, you can seek help from the experts. Choose from the options below:
Visit us on the web at www.troybilt.com◊
Call a Customer Support Representative at (800) 828-5500 or (330) 558-7220◊
Write to Troy-Bilt LLC • P.O. Box 361131 • Cleveland, OH • 44136-0019◊
Thank you for purchasing a Troy-Bilt Reel Mower. It was carefully
engineered to provide excellent performance when properly
operated and maintained.
Please read this entire manual prior to operating the equipment.
It instructs you how to safely and easily set up, operate and
maintain your machine. Please be sure that you, and any other
persons who will operate the machine, carefully follow the
recommended safety practices at all times. Failure to do so could
result in personal injury or property damage.
All information in this manual is relative to the most recent
product information available at the time of printing. Review
this manual frequently to familiarize yourself with the machine,
its features and operation. Please be aware that this Operator’s
Manual may cover a range of product specifications for various
models. Characteristics and features discussed and/or illustrated
in this manual may not be applicable to all models. We reserve
the right to change product specifications, designs and
equipment without notice and without incurring obligation.
If you have any problems or questions concerning the machine,
phone a authorized Troy-Bilt service dealer or contact us directly.
Troy-Bilt’s Customer Support telephone numbers, website
address and mailing address can be found on this page. We want
to ensure your complete satisfaction at all times.
Throughout this manual, all references to right and le ft side of the
machine are observed from the operating position
Thank You
Record Product Information
Before setting up and operating your new equipment, please
locate the model plate on the equipment and record the
information in the provided area to the right. You can locate
the model plate by looking near the machine’s right wheel. This
information will be necessary, should you seek technical support
via our web site, Customer Support Department, or with a local
authorized service dealer.
MO d e l nu M b e r
se r i a l nu M b e r
To The Owner
1
2
Safe Operation Practices ........................................ 3
Assembly & Set-Up .................................................. 5
Operation ................................................................. 7
Maintenance & Adjustment................................... 8
Illustrated Parts List ...............................................10
Warranty .................................................................13
Table of Contents

Important Safe Operation Practices
2
3
General Operation
Read this operator’s manual carefully in its entirety before 1.
attempting to assemble this machine. Read, understand,
and follow all instructions on the machine and in the
manual(s) before operation. Keep this manual in a safe
place for future and regular reference and for ordering
replacement parts.
Be completely familiar with the proper use of this machine 2.
before operating it.
This machine is a precision piece of power equipment, 3.
not a plaything. Therefore, exercise extreme caution at all
times. This machine has been designed to perform one job:
to mow grass. Do not use it for any other purpose.
Never allow children under 10 years of age to operate this 4.
machine. Children 10 and over should read and understand
the instructions and safe operation practices in this manual
and on the machine and should be trained and supervised
by an adult.
Only responsible individuals who are familiar with these 5.
rules of safe operation should be allowed to use this
machine.
Thoroughly inspect the area where the equipment is to be 6.
used. Remove all stones, sticks, wire, bones, toys and other
foreign objects.
To help avoid blade contact, stay in operator zone behind 7.
handles and keep children, bystanders, helpers and pets
away from mower while it is in operation. Stop machine if
anyone enters area.
Wear sturdy, rough-soled work shoes and close-fitting 8.
slacks and shirts. Shirts and pants that cover the arms
and legs and steel-toed shoes are recommended. Never
operate this machine in bare feet, sandals, slippery or light-
weight (e.g. canvas) shoes.
Do not put hands or feet near rotating blades. Contact with 9.
blades can amputate fingers and toes.
Many injuries occur as a result of the mower being pulled 10.
over the foot during a fall caused by slipping or tripping.
Do not hold on to the mower if you are falling; release the
handle immediately.
Be careful when pulling the machine backward. Look down 11.
and behind to avoid tripping. Be sure you are well balanced
with sure footing.
Do not operate the mower while under the influence of 12.
alcohol or drugs.
Never operate the mower in wet grass. Always be sure of 13.
your footing. A slip and fall can cause serious personal
injury.
Mow only in daylight or good artificial light. Walk, never 14.
run.
The cutting blade may continue to rotate for a few seconds 15.
after the mower has stopped moving. Never place any part
of the body in the blade area until you are sure the blade
has stopped rotating.
Use safe lifting practices when moving mower.16.
Only use parts and accessories made for this machine by 17.
the manufacturer. Failure to do so can result in personal
injury.
If situations occur which are not covered in this manual, use 18.
care and good judgement. Contact Customer Support for
assistance or the name of the nearest service dealer.
Slope Operation
Slopes are a major factor related to slip and fall accidents, which
can result in severe injury. Operation on slopes requires extra
caution. If you feel uneasy on a slope, do not mow it. If the slope
is greater than 15 degrees, do not mow it.
Do:
Mow across the face of slopes; never up and down. Exercise 1.
caution when changing direction on slopes.
Watch for holes, ruts, rocks, hidden objects, or bumps 2.
which can cause you to slip or trip. Tall grass can hide
obstacles.
Always be sure of your footing. A slip and fall can cause 3.
serious personal injury.
WARNING: This symbol points out important safety instructions which, if not followed,
could endanger the personal safety and/or property of yourself and others. Read and follow
all instructions in this manual before attempting to operate this machine. Failure to comply
with these instructions may result in personal injury.
When you see this symbol. HEED ITS WARNING!
DANGER: This machine was built to be operated according to the safe operation practices in
this manual. Carelessness or error on the part of the operator can result in serious injury. This
machine is capable of amputating fingers and toes and throwing objects. Failure to observe
the following safety instructions could result in serious injury.

4 se c t i O n 2 — iM p O r t a n t sa f e Op e r a t i O n pr a c t i c e s
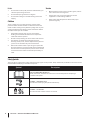
Safety Symbols
This page depicts and describes safety symbols that may appear on this product. Read, understand, and follow all instructions on the
machine before attempting to assemble and operate.
Symbol Description
READ THE OPERATOR’S MANUAL(S)
Read, understand, and follow all instructions in the manual(s) before attempting to
assemble and operate
DANGER — ROTATING BLADES
To reduce the risk of injury, keep hands and feet away.
DANGER — BYSTANDERS
Do not mow when children or others are around.
Do Not:
Do not mow near drop-offs, ditches or embankments, you 1.
could lose your footing or balance.
Do not mow slopes greater than 15 degrees.2.
Do not mow on wet grass. Unstable footing could cause 3.
slipping.
Children
Tragic accidents can occur if the operator is not alert to the
presence of small children. Children are often attracted to the
mower and the mowing activity. Children younger than 10 years-
old do not understand the dangers. Never assume that children
will remain where you last saw them.
Keep children 1. younger than 10 years-old out of the
mowing area and under watchful care of a responsible
adult other than the operator.
Be alert and stop mowing if a child or others enter the area.2.
Use extreme care when approaching blind corners, 3.
doorways, shrubs, trees, or other objects that may obscure
your vision of a child who may run into the mower.
Never allow children under 10 years of age to operate this 4.
machine. Children 10 and over should read and understand
the instructions and safe operation practices in this manual
and on the machine and be trained and supervised by an
adult.
Service
Mower blades are sharp and can cut. Wear gloves, and use 1.
extra caution when servicing them.
Keep all nuts, bolts, and screws tight to be sure the 2.
equipment is in safe working condition.
Never tamper with safety devices. Check their proper 3.
operation regularly.

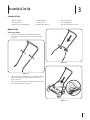
Mower Set-Up
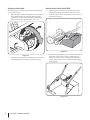
Attaching the Handle
Secure the upper handle to the mid handles with two 1.
carriage bolts, two saddle washers and two wing knobs.
See Fig. 3-1.
Secure the handle assembled in step 1 to the lower handle with 2.
four carriage bolts, four saddle washers and four wing
knobs. See Fig. 3-2.
Position the complete handle assembly over the studs on the 3.
rear of the mower frame. See Fig. 3-3.
Figure 3-2
Figure 3-3
Figure 3-1
Contents of Crate
One Upper Handle• Two Mid Handles• One Lower Handle•
Six Carriage Bolts• Six Wing Knobs• Six Saddle Washers•
One Grass Catcher (TB R18 Only)• One Operator’s Manual• One Product Registration Card•
Assembly & Set-Up
3
5

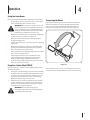
Adjusting the Cutting Height
The cutting height can be adjusted to between approximately
/-inch and 2/-inches.
Move the right-hand height adjustment lever outward and 1.
then position it forward (to lower the cutting height) or
rearward (to raise the cutting height) before releasing it
into the notch for your desired height. See Fig. 3-4.
Repeat Step 1 on the left-hand side making sure to release the 2.
height adjustment lever into the corresponding notch.
Attaching the Grass Catcher (Model TBR18)
Expand the grass catcher from its collapsed position by 1.
opening up the hinges found on the inside of its frame.
Position the grass catcher hooks over the rod on the rear of 2.
the mower. See Fig. 3-5.
Position the strap through the grass catcher’s handle and over 3.
the mower’s lower handle crossbar to support the rear
of the grass catcher. See Fig. 3-6. Adjust the length of the
strap so that the bag is low to the ground but not dragging
on the ground.
Figure 3-5
Figure 3-4
Figure 3-6
6 se c t i O n 3 — as s e M b l y & se t -up

Operation
4
7
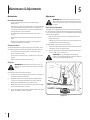
Transporting the Mower
During normal operation, the blade reel will turn anytime the
mower’s front wheels are turning. To safely move the mower
from one location to another without the blade reel turning,
simply pivot the handle over the reel and push the mower
from the opposite side. See Fig. 4-1. Pushing the mower in this
manner (transport mode) prohibits the blade reel from turning.
Figure 4-1
Using Your Lawn Mower
Please observe the following when operating your reel mower.
Be sure lawn is clear of stones, sticks, wire, or other objects •
which could damage lawn mower or engine.
WARNING: The operation of any lawn mower can
result in foreign objects being thrown into the eyes,
which can damage your eyes severely. Always wear
safety glasses while operating the mower, or while
performing any adjustments or repairs on it.
Mow the lawn when the grass is relatively dry. Attempting •
to mow wet grass can result in an uneven cut.
Maintain a consistent walking pace while pushing the •
mower in straight passes.
Slightly overlap each pass to even the cut and avoid leaving •
uncut strips.
Mow the lawn regularly, at • least once a week during the
growing season. Mow more frequently than you would
with a conventional rotary lawn mower.
Always mow with the blade height adjusted to cut no more •
than / the total height of grass.
If the height of your lawn’s grass exceeds four inches, •
adjust the blade height to its highest position before
mowing. After mowing, readjust the blade to your
preferred cutting height and mow the lawn a second time
within the next one or two days.
Using Grass Catcher (Model TB R18)
You can use the grass catcher to collect clippings while you are
operating the mower.
Attach grass catcher following instructions in the Assembly 1.
& Set-Up section. Grass clippings will automatically collect
in catcher as you operate the mower. The faster you push
the mower, the more effectively it will collect clippings.
Operate the mower till grass catcher is full.
Remove the grass catcher’s strap from the lower handle’s 2.
crossbar and lift the grass catcher up and away from the
mower to remove the bag. Dispose of the grass clippings
and reinstall the bag when complete.
WARNING: If you strike a foreign object,
thoroughly inspect mower for any damage. Repair
any damage before operating.

Maintenance & Adjustments
5
8
Maintenance
General Recommendations
Always observe safety rules when performing any •
maintenance.
The warranty on this lawn mower does not cover items that •
have been subjected to operator abuse or negligence. To
receive full value from warranty, operator must maintain
the lawn mower as instructed here.
All adjustments should be checked at least once each •
season.
Periodically check all fasteners and make sure these are •
tight.
Regularly apply lubricant to mower’s cutting surfaces, •
cutting reel axle shaft and wheels.
Cleaning the Mower
To prevent the build-up of grass clippings or other debris, clean
the mower by wiping it down with a damp cloth after each use.
Scrape and clean the mower with a suitable tool (e.g. a •
plastic scraper or brush).
Do not use a pressure washer or garden hose to clean the •
mower.
Remove deposits from the wheel tread.•
Blade Care
WARNING: Mower blades are sharp and can cut.
Wear gloves, and use extra caution when servicing
them.
Periodically sharpen the blades as follows:
Spread a thin layer of lapping compound (100 - 240 grit) on 1.
the front edge of the reel blades.
Adjust the cutter bar so that the blade has light but firm 2.
contact across the full width of the cutter bar. Refer to
Blade Clearance Adjustment later in this section.
Operate the mower on a paved surface until the front edge 3.
of the cutter bar blade is polished.
Clean any grinding compound or debris from the cutter bar 4.
blade, reel blade, pinions, and pawls.
Adjustments
WARNING: Mower blades are sharp and can cut.
Wear gloves, and use extra caution when servicing
them. Any wheel rotation can cause the blade reel
to rotate.
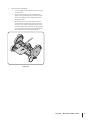
Blade Clearance Adjustment
The blade reel is adjusted for proper clearance from the cutting
bar at the factory. However, after extended periods of mowing or
as part of annual maintenance, it is recommended that the blade
clearance be readjusted.
If blade clearance is too wide, the cutting pattern will be •
rough and uneven.
If blade clearance is too narrow, the machine will be noisy •
and difficult to push while operating.
To adjust blade clearance, proceed as follows:
Locate the adjustment bolts found on the underside of the 1.
cutting bar on the rear of the mower.
Using a 13mm wrench, tighten the adjustment bolts (one 2.
on each end) /-turn. See Fig. 5-1.
CAUTION: Do not overtighten the adjusting
screws, as this could damage the cutter bar. Tighten
both screws during final adjustment.
Figure 5-1

9se c t i O n 5 — Ma i n t e n a n c e & ad j u s t M e n t s
To test for proper adjustment:3.
Lean the mower all the way back so that it’s resting a.
on the handle.
Use one hand to slowly rotate the wheel of the b.
mower, causing the blade reel to slowly turn. If the
wheel is too difficult to turn, slightly loosen each
adjustment screw.
While the blade reel is turning, insert a sheet of c.
paper between the blade reel and the cutting bar.
See Fig. 5-2. The paper should shear evenly along
the entire length of the cutter bar, as if being cut by
scissors. If the paper doesn’t shear, slightly tighten
each adjustment screw and repeat the test.
Figure 5-2

10
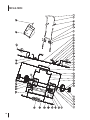
TB R16 & TB R18

11
TB R16 & TB R18
Ref.
Part Number Description
1 720 -04167 Grip, Handle, 26 x 16 x 630
2 74 9 - 0 4 811 Handle, Upper
3 749-04812 Handle, Middle
4 720 -04168 Knob, Red
5 749- 04813 Handle, Lower, TB R16
5 749-04814 Handle, Lower, TB R18
6 710-05321 Bolt, M6x35gb/T12
7 711-05530 Shaft, Rear, TB R16, Red
7 711-05532 Shaft, Rear, TB R18, Red
8 712-04292 Nut, M8, Gb/T6172.2
9 736-04563 Washer, 17 x 8.2 x 1.2
10 711-05534 Pin, TB R16
10 711-05535 Pin, TB R18
11 710-05322 Screw, M8-16gbt70.2
12 787-01959 Bracket, Rear, LH, Red
13 787-01960 Handle, Adjustment, Red
14 734-04605 Wheel, Rear
15 736-04564 Washer, 17 x 8.2 x 1.2
16 736-04565 Washer, Gb/T955
17 736-04566 Washer, 20 x 13 x 1
18 710-05323 Bolt, M8 x 24
19 787-01964 Bracket, Lower Blade, TB R16, Red
19 787-01966 Bracket, Lower Blade, TB R18, Red
20 712- 04293 Nut, M8 x 1
21 732-04854 Spacer, 65mm, 17 x 4 x 48
22 710-05324 Bolt, M8 x 1 x 65
23 736-04567 Washer, 25 x 6.5 x 1.5
Ref.
Part Number Description
24 710-05325 Bolt, M6x20, Gb/T5780
25 731-08253 Hub Cap
26 734-04606 Wheel, Complete
27 787- 01968 Bracket, Red
28 736-04568 Washer, Spacer, Gb/T7244
29 787- 01972 Bracket, Support, LH, Red
30 736-04569 Washer, 20x10.2x1.4
31 712-04294 Nut, M10, Gb/T6172.2
32 717- 04917 Gear, 41mm, Pa66
33 787-01976 Support, 19 x 10 x 5
34 736-04570 Washer, 34 x 15.5 x 1
35 741- 04514 Bearing, 6002z
36 742-04362 Blade, Roller, TB R16
36 742-04363 Blade, Roller, TB R18
37 787-01977 Shield, Deector, TB R16
37 787-01979 Shield, Deector, TB R18
38 787-01981 Bracket, Support, RH, Red
39 711-05536 Axle, Wheel, 19x65.5
40 712-04295 Nut, M8, Gb/T6170
41 710-05326 Bolt, M8x16gb/T5781
42 787-01985 Bracket, Adjustment, 9 Tooth RH
787-01994 Bracket, Adjustment, 9 Tooth LH
43 787-01987 Bracket, Rear, RH, Red
44 710-05327 Bolt, M6x10 Gb/T5780
45 764- 04132 Grass Bag, TB R18
46 727- 04374 Strap, Grass Bag Hanger, TB R18
47 736-04573 Saddle Washer

MANUFACTURER’S LIMITED WARRANTY FOR
GDOC-100020 REV. A
The limited warranty set forth below is given by Troy-Bilt LLC with
respect to new merchandise purchased and used in the United States
and/or its territories and possessions, and by MTD Products Limited
with respect to new merchandise purchased and used in Canada and/
or its territories and possessions (either entity respectively, “Troy-
Bilt”).
“Troy-Bilt” warrants this product (excluding its Normal Wear Parts
and Attachments as described below) against defects in material and
workmanship for a period of two (2) years commencing on the date
of original purchase and will, at its option, repair or replace, free of
charge, any part found to be defective in materials or workmanship.
This limited warranty shall only apply if this product has been
operated and maintained in accordance with the Operator’s Manual
furnished with the product, and has not been subject to misuse,
abuse, commercial use, neglect, accident, improper maintenance,
alteration, vandalism, theft, fire, water, or damage because of other
peril or natural disaster. Damage resulting from the installation or use
of any part, accessory or attachment not approved by Troy-Bilt for use
with the product(s) covered by this manual will void your warranty as
to any resulting damage.
Normal Wear Parts are warranted to be free from defects in material
and workmanship for a period of thirty (30) days from the date of
purchase. Normal wear parts include, but are not limited to items
such as: batteries, belts, blades, blade adapters, tines, grass bags,
wheels, rider deck wheels, seats, snow thrower skid shoes, friction
wheels, shave plates, auger spiral rubber and tires.
Attachments — Troy-Bilt warrants attachments for this product
against defects in material and workmanship for a period of one (1)
year, commencing on the date of the attachment’s original purchase
or lease. Attachments include, but are not limited to items such as:
grass collectors and mulch kits.
HOW TO OBTAIN SERVICE: Warranty service is available, WITH
PROOF OF PURCHASE, through your local authorized service dealer.
To locate the dealer in your area:
In the U.S.A.
Check your Yellow Pages, or contact Troy-Bilt LLC at P.O. Box 361131,
Cleveland, Ohio 44136-0019, or call 1-866-840-6483,
1-330-558-7220 or log on to our Web site at www.troybilt.com.
In Canada
Contact MTD Products Limited, Kitchener, ON N2G 4J1, or call 1-800-
668-1238 or log on to our Web site at www.mtdcanada.com.
This limited warranty does not provide coverage in the following
cases:
a. The engine or component parts thereof. These items may carry a
separate manufacturer’s warranty. Refer to applicable manufac-
turer’s warranty for terms and conditions.
b. Log splitter pumps, valves, and cylinders have a separate one-
year warranty.
c. Routine maintenance items such as lubricants, filters, blade
sharpening, tune-ups, brake adjustments, clutch adjustments,
deck adjustments, and normal deterioration of the exterior finish
due to use or exposure.
d. Service completed by someone other than an authorized service
dealer.
e. Troy-Bilt does not extend any warranty for products sold or
exported outside of the United States and/or Canada, and their
respective possessions and territories, except those sold through
Troy-Bilt’s authorized channels of export distribution.
f. Replacement parts that are not genuine Troy-Bilt parts.
g. Transportation charges and service calls.
h. Troy-Bilt does not warrant this product for commercial use.
No implied warranty, including any implied warranty of
merchantability or fitness for a particular purpose, applies after
the applicable period of express written warranty above as to the
parts as identified. No other express warranty, whether written or
oral, except as mentioned above, given by any person or entity,
including a dealer or retailer, with respect to any product, shall
bind Troy-Bilt. During the period of the warranty, the exclusive
remedy is repair or replacement of the product as set forth above.
The provisions as set forth in this warranty provide the sole and
exclusive remedy arising from the sale. Troy-Bilt shall not be liable
for incidental or consequential loss or damage including, without
limitation, expenses incurred for substitute or replacement lawn
care services or for rental expenses to temporarily replace a
warranted product.
Some states do not allow the exclusion or limitation of incidental
or consequential damages, or limitations on how long an implied
warranty lasts, so the above exclusions or limitations may not apply
to you.
In no event shall recovery of any kind be greater than the amount of
the purchase price of the product sold. Alteration of safety features of
the product shall void this warranty. You assume the risk and liability
for loss, damage, or injury to you and your property and/or to others
and their property arising out of the misuse or inability to use the
product.
This limited warranty shall not extend to anyone other than the
original purchaser or to the person for whom it was purchased as a
gift.
HOW STATE LAW RELATES TO THIS WARRANTY: This limited
warranty gives you specific legal rights, and you may also have other
rights which vary from state to state.
IMPORTANT: Owner must present Original Proof of Purchase to
obtain warranty coverage.
Troy-Bilt LLC, P.O. BOX 361131 CLEVELAND, OHIO 44136-0019; Phone: 1-866-840-6483, 1-330-558-7220
MTD Canada Limited - KITCHENER, ON N2G 4J1; Phone 1-800-668-1238

TROY-BILT LLC, P.O. BOX 361131 CLEVELAND, OHIO 44136-0019
Ma n u a l d e l O p e r a d O r
Medidas importantes de seguridad • Conguración • Funcionamiento • Mantenimiento • Servicio •
Solución de problemas • Garantía
ADVERTENCIA
LEA Y SIGA TODAS LAS INSTRUCCIONES DE ESTE MANUAL ANTES DE PONER EN
FUNCIONAMIENTO ESTA MÁQUINA.
SI NO RESPETA ESTAS INSTRUCCIONES PUEDE PROVOCAR LESIONES PERSONALES.
Cortadora de Césped de Cilindro — TBR16 & TBR18
Formulario No. 769-06425A
(Octubre 21, 2010)

Al propietario
1
2
Asistencia al Cliente
Por favor, NO devuelva la unidad al minorista o distribuidor sin ponerse en contacto primero con el Departamento de
Asistencia al Cliente.
En caso de tener problemas para montar este producto o de tener dudas con respecto a los controles, funcionamiento o
mantenimiento del mismo, puede solicitar la ayuda de expertos. Elija entre las opciones que se presentan a continuación:
Visite nuestro sitio web en www.troybilt.com◊
Llame a un representante de Asistencia al Cliente al (800) 828-5500 ó (330) 558-7220◊
Escríbanos a Troy-Bilt LLC • P.O. Box 361131 • Cleveland, OH • 44136-0019◊
Gracias por comprar una Troy-Bilt máquina quitanieve. La
misma ha sido diseñada cuidadosamente para brindar excelente
rendimiento si se la opera y mantiene correctamente.
Por favor lea todo este manual antes de operar el equipo.
Le indica cómo configurar, operar y mantener la máquina
con seguridad y fácilmente. Por favor asegúrese de seguir
cuidadosamente y en todo momento las prácticas de seguridad
recomendadas, y hacérselas seguir a cualquier otra persona que
opere la máquina. En caso de no hacerlo podrían producirse
lesiones personales o daños materiales.
Toda la información contenida en este manual hace referencia
a la más reciente información de producto disponible en el
momento de la impresión. Revise el manual frecuentemente
para familiarizarse con la unidad, sus características y
funcionamiento. Por favor tenga en cuenta que este Manual
del Operador puede cubrir una gama de especificaciones de
productos de diferentes modelos. Las características y funciones
incluidas y/o ilustradas en este manual pueden no ser aplicables
a todos los modelos. Reservamos el derecho de modificar
las especificaciones de los productos, los diseños y el equipo
estándar sin previo aviso y sin generar responsabilidad por
obligaciones de ningún tipo.
Si tiene algún problema o duda respecto a la unidad, llame a
un distribuidor de servicio Troy-Bilt autorizado o póngase en
contacto directamente con nosotros. Los números de teléfono,
dirección del sitio web y dirección postal de la Asistencia al
Cliente de Troy-Bilt se encuentran en esta página. Queremos
garantizar su entera satisfacción en todo momento.
En este manual, las referencias al lado derecho o izquierdo de la
máquina se observan desde la posición del operador.
El fabricante del motor es el responsable de todas las
cuestiones relacionadas con el rendimiento, potencia de salida,
especificaciones, garantía y mantenimiento del motor. Para
obtener mayor información consulte el Manual del Propietario /
Operador entregado por el fabricante del motor, que se envía, en
un paquete por separado, junto con su unidad.
Gracias
Importante Medidas importantes de seguridad .. 3
Ensamblado y Conguración ................................. 5
Funcionamiento ...................................................... 7
Mantenimiento y Ajustes ........................................ 8
Garantía ...................................... Cubierta Posterior
Índice
nú M e r O d e M O d e l O
nú M e r O d e s e r i e
Registro de información de producto
Antes de configurar y operar su equipo nuevo, por favor localice
la placa del modelo en el equipo y registre la información en
el área situada a la derecha. Para encontrar la placa de modelo,
colóquese detrás de la unidad en la posición del operador y mire
hacia la parte inferior de la sección trasera del chasis. Si tiene
que solicitar soporte técnico a través de nuestro sitio web, el
Departamento de Asistencia al Cliente, o de un distribuidor de
servicio autorizado local, necesitará esta información.

Medidas importantes de seguridad
2
3
Funcionamiento general
Lea y siga todas las instrucciones contenidas en este manual 1.
antes de intentar ensamblar esta máquina. Lea, comprenda
y respete todas las instrucciones que figuran en la máquina
y en el o los manuales antes de hacerla funcionar. Guarde
este manual en un lugar seguro para consultas futuras y
periódicas, así como para solicitar repuestos.
Antes de hacer funcionar este equipo, familiarícese 2.
totalmente con el uso correcto del mismo.
TEsta máquina es un equipo motorizado de precisión, 3.
no un juguete. Por lo tanto, tenga mucho cuidado en todo
momento. Esta máquina fue diseñada para realizar una
tarea: cortar el césped. No la utilice para ningún otro fin.
No permita nunca que los niños menores de 10 años 4.
utilicen esta máquina. Los niños de 10 años en adelante
deben leer y entender las instrucciones de operación y
normas de seguridad contenidas en este manual y en la
máquina y deben ser entrenados y supervisados por un
adulto.
Sólo se debe permitir usar esta máquina a individuos 5.
responsables y familiarizados con sus reglas de seguridad.
Inspeccione minuciosamente el área donde utilizará el 6.
equipo. Retire todas las piedras, palos, alambre, huesos,
juguetes y otros objetos extraños.
Para ayudar a evitar el contacto con las cuchillas, 7.
manténgase en la zona del operador detrás de la barra de
control y mantenga a los niños, observadores, ayudantes
y mascotas apartados de la podadora mientras está
funcionando. Detenga la máquina si alguien entra en el área.
Utilice zapatos de trabajo resistentes, de suela fuerte, así 8.
como pantalones y camisas ajustados. Se recomienda
vestir camisa y pantalón para cubrir brazos y piernas y usar
zapatos con puntera de acero. Nunca opere esta máquina
con los pies desnudos, con sandalias o calzado con el que
pueda resbalar o con zapatos ligeros (por ejemplo, calzado
de lona).
No coloque las manos ni los pies cerca de las cuchillas 9.
giratorias. El contacto con las cuchillas puede amputarle los
dedos de las manos o los pies.
Muchas lesiones ocurren como resultado de pasar la 10.
cortadora sobre los pies durante una caída luego de
resbalar o tropezar. No se sostenga de la cortadora si se
está cayendo, suelte la barra de control inmediatamente.
Sea precavido al tirar de la máquina hacia atrás. Mire hacia 11.
abajo y atrás para evitar tropezarse. Asegúrese que está
bien equilibrado y bien parado.
No opere esta cortadora bajo los efectos del alcohol o 12.
las drogas.
Nunca opere la podadora en césped húmedo. Siempre 13.
esté seguro de estar bien parado. Si resbala y cae puede
lesionarse seriamente.
Corte el césped solamente con luz de día o con una buena 14.
luz artificial. Camine, nunca corra.
La cuchilla puede continuar rotando unos cuantos 15.
segundos más después de que la máquina deja de
moverse. Nunca coloque ninguna parte del cuerpo en el
área de la cuchilla hasta que esté seguro de que la misma
ha detenido su movimiento giratorio.
Use medidas de elevación seguras para mover la podadora.16.
Utilice solamente piezas y accesorios manufacturados para 17.
esta máquina por el fabricante. De lo contrario podrían
producirse lesiones personales.
Si se presentan situaciones que no están previstas en este 18.
manual, tenga cuidado y use el sentido común. Póngase en
contacto con Asistencia al Cliente para solicitar ayuda o el
nombre del distribuidor de servicio más cercano.
Funcionamiento en pendientes
Las pendientes son un factor importante que se relaciona con los
accidentes producidos por derrapes y caídas y pueden producir
lesiones graves. La operación en pendiente requiere mucha
precaución. Si no se siente seguro en una pendiente, no corte el
césped. Si la pendiente supera los 15 grados, no corte el césped.
Haga lo siguiente:
Corte en sentido transversal a la cara de la pendiente, nunca 1.
hacia arriba y abajo. Tenga mucho cuidado al cambiar de
dirección en una pendiente.
ADVERTENCIA: La presencia de este símbolo indica que se trata de instrucciones de
seguridad importantes que debe respetar para evitar poner en riesgo su seguridad personal y/o
material y la de los demás. Lea y cumpla todas las instrucciones de este manual antes de
intentar operar esta máquina. Si no respeta estas instrucciones puede provocar lesiones
personales. Cuando vea este símbolo.
¡TENGA EN CUENTA LAS ADVERTENCIAS!
PELIGRO: Esta máquina está diseñada para ser utilizada respetando las normas de seguridad
contenidas en este manual. Un descuido o error por parte del operador puede ocasionar
lesiones graves. Esta máquina es capaz de amputar dedos de las manos y los pies y de arrojar
objetos con gran fuerza. De no respetar las instrucciones de seguridad siguientes se pueden
producir lesiones graves o la muerte.

4 se c c i ó n 2 — Me d i d a s i M p O r t a n t e s d e s e g u r i d a d
Símbolos de seguridad
En esta página se presentan y describen los símbolos de seguridad que pueden aparecer en este producto. Lea, entienda y cumpla
todas las instrucciones incluidas en la máquina antes de intentar realizar el montaje de la unidad y utilizarla.
Símbolo Descripción
LEA LOS MANUALES DEL OPERADOR
Lea, entienda y cumpla todas las instrucciones incluidas en los manuales antes de realizar el
montaje de la unidad y utilizarla.
PELIGRO — CUCHILLAS GIRATORIAS
reducir el riesgo de lesiones, mantenga las manos y los pies alejados.
PELIGRO — OBSERVADORES
podar el césped cuando hay niños u otras personas alrededor.
Esté atento a los agujeros, raíces, rocas, objetos ocultos 2.
o abultamientos que puedan hacerlo resbalar o tropezar.
El césped alto puede ocultar obstáculos.
Siempre esté seguro de estar bien parado. Si resbala y cae 3.
puede lesionarse seriamente.
No haga lo siguiente:
No corte el césped cerca de caídas, zanjas o terraplenes, 1.
puede perder el equilibrio.
No pode las pendientes que superen los 15 grados.2.
No corte el césped mojado. Si no está firmemente parado, 3.
puede resbalarse.
Niños
Pueden ocurrir accidentes trágicos si el operador no está atento
a la presencia de niños. Por lo general a los niños les atraen las
podadoras y la actividad de podar el césped. Los niños menores
de 10 años no comprenden los peligros. Nunca suponga que los
niños permanecerán en el lugar donde los vio por última vez.
Mantenga a los niños menores de 10 años fuera del área de 1.
trabajo y bajo estricta vigilancia de un adulto responsable
además del operador.
Esté alerta y pare la podadora si un niño u otras personas 2.
ingresan al área.
Tenga mucho cuidado cuando se aproxime a las esquinas 3.
ciegas, puertas, arbustos, árboles u otros objetos que
puedan obstaculizarle la vista de un niño que pudiese
correr hacia la cortadora.
No permita nunca que los niños menores de 10 años utilicen 4.
esta máquina. Los niños de 10 años en adelante deben leer
y entender las instrucciones de operación y normas
de seguridad contenidas en este manual y en la máquina
y deben ser entrenados y supervisados por un adulto.
Servicio
Las cuchillas de las cortadoras son muy filosas y podría 1.
cortarse. Utilice guantes y extreme las precauciones
cuando efectúe el mantenimiento.
Mantenga todos los pernos, tuercas y tornillos bien 2.
ajustados para asegurarse de que la máquina se encuentra
en condiciones seguras de funcionamiento.
Nunca altere los dispositivos de seguridad. Controle 3.
periódicamente que funcionen correctamente.

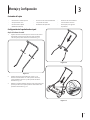
Configuración de la podadora de césped
Acople de la barra de control
Sujete la barra de control superior a las barras de control 1.
intermedias con dos pernos del carro, dos arandelas
cóncavas y dos perillas de aletas. Consulte la Fig. 3-1.
Sujete la barra que se ensambló en el paso 1, a la 2.
barra de control inferior con cuatro pernos del carro,
cuatro arandelas cóncavas y cuatro perillas de aletas.
Consulte la Fig. 3-2.
Ubique la unidad completa de la barra de control sobre los 3.
pernos que están en la parte posterior del bastidor de la
podadora. Consulte la Fig. 3-3.
Figura 3-2
Figura 3-3
Figura 3-1
Contenido del cajón
Una barra de control superior• Dos barras de control intermedias• Una barra de control inferior•
Seis pernos del carro• Seis perillas de aletas• Seis arandelas cóncavas•
Un colector de césped •
(TB R18 únicamente)
Un Manual del operador• Una tarjeta para registrar •
el producto
Montaje y Configuración
3
5

Ajuste de la altura de corte
La altura de corte puede ajustarse para que sea
aproximadamente de entre ¾ de pulgada y 2 pulgadas y media.
Mueva la palanca de ajuste de altura derecha hacia afuera 1.
y luego póngala hacia adelante (para reducir la altura de
corte) o hacia atrás (para aumentarla) antes de soltarla
dentro de la muesca para que quede en la altura que desea.
Consulte la Fig. 3-4.
Repita el Paso 1 con la palanca izquierda asegurándose de 2.
soltarla cuando esté en la muesca correspondiente.
Acople del colector de césped (Modelo TB R18)
Para abrir el colector de césped que está plegado, deberá 1.
abrir las bisagras que están en el interior de su bastidor.
Ubique los ganchos del colector de césped sobre la 2.
varilla que está en la parte posterior de la podadora.
Consulte la Fig. 3-5.
Ubique la tira a través de la manija del colector de césped 3.
y sobre la barra transversal de la barra de control inferior de
la podadora para sostener la parte posterior del colector
de césped. Consulte la Fig. 3-6. Ajuste la longitud de la
tira de manera que la bolsa quede abajo, cerca del suelo,
pero que no se arrastre.
Figura 3-5
Figura 3-4
Figura 3-6
6 se c c i ó n 2 — MO n t a j e y cO n f i g u r a c i ó n

Funcionamiento
4
7
ADVERTENCIA: Si golpea un objeto extraño,
inspecciones detalladamente la podadora para
detectar si se dañó. Debe reparar los daños antes
de usarla.
Transporte de la podadora
Durante el funcionamiento normal, el cilindro de corte de la
cuchilla girará cada vez que giren las ruedas delanteras de la
podadora. Para mover la podadora de forma segura desde una
ubicación a otra sin girar el cilindro de corte de la cuchilla, sólo
debe hacer que pivote la barra de control sobre el cilindro y
empujar la podadora desde el lado contrario. Consulte la Fig. 4-1.
Si se empuja la podadora de esta manera (modo de transporte)
se impide que gire el cilindro de corte de la cuchilla.
Figura 4-1
Uso de la podadora de césped
Tenga en cuenta lo siguiente cuando opere la cortadora de
césped de cuchillas helicoidales.
Asegúrese que el césped está libre de piedras, palos, cables •
u otros objetos que pudiesen dañar la cortadora o el motor.
ADVERTENCIA: Al hacer funcionar la cortadora
de césped puede ser que arroja objetos extraños
a los ojos, lo cual puede dañarlos gravemente.
Utilice siempre gafas de seguridad durante el
funcionamiento de la cortadora o mientras
hace ajustes o la repara.
Corte el césped cuando el pasto está relativamente seco. •
Si se intenta cortar el césped cuando está húmedo el corte
puede quedar desparejo.
Mantenga un paso uniforme mientras empuja la podadora •
con pasadas en línea recta.
Superponga ligeramente cada pasada para emparejar •
el corte y evitar que queden franjas sin cortar.
Corte el césped periódicamente, al menos una vez a la •
semana durante la estación de crecimiento. La frecuencia
debe ser superior a la habitual con una podadora
rotatoria convencional.
Pode siempre con la altura de la cuchilla ajustada para •
cortar no más de 1/3 de la altura total del césped.
Si la altura del césped supera las 4 pulgadas, debe ajustar la •
altura de la cuchilla en su posición más alta antes de podar.
Después de podar, reajuste la cuchilla en su altura de corte
preferida y pode el césped una segunda vez al
día siguiente o dentro de los dos días.
Uso del colector de césped (Modelo TB R18)
Puede utilizar el colector de césped para recoger recortes
mientras opera la podadora.
Acople el colector de césped siguiendo las instrucciones 1.
de la sección Montaje y configuración. Los recortes
de césped son recolectados en el colector de forma
automática a medida que usa la podadora. Cuanto más
rápido se empuje la podadora, mayor será la eficacia con
que recogerá los recortes. Opere la podadora hasta que
el recolector de césped esté lleno.
Quite la tira del recolector de césped de la barra transversal 2.
de la barra de control inferior y eleve el colector de césped
alejándolo de la podadora para sacar la bolsa. Deseche los
recortes de césped y vuelva a colocar la bolsa cuando
haya terminado.

Mantenimiento y Ajustes
5
8
Mantenimiento
Recomendaciones generales
Respete siempre las reglas de seguridad cuando realice •
tareas de mantenimiento.
La garantía de esta podadora no cubre elementos que han •
estado sujetos al mal uso o la negligencia del operador. Para
recibir el reembolso total de la garantía, el operador deberá
mantener la podadora como se indica en este manual.
Todos los ajustes deben ser verificados por lo menos una •
vez por temporada.
Revise periódicamente todos los sujetadores y compruebe •
que estén bien ajustados.
Aplique periódicamente un lubricante a las superficies •
de corte, al eje del cilindro de corte y a las ruedas.
Limpieza de la cortadora
Para evitar la acumulación de recortes de césped o de otros
residuos, limpie la podadora pasándole un trapo húmedo
después de cada uso.
Raspe y limpie la podadora con una herramienta adecuada •
(por ejemplo, un raspador plástico o un cepillo).
No utilice una lavadora a presión o manguera de jardín •
para limpiar la podadora.
Elimine los depósitos que haya en las huellas de las ruedas.•
Cuidado de la cuchilla
ADVERTENCIA: Las cuchillas de las cortadoras son
muy filosas y podría cortarse. Utilice guantes y
extreme las precauciones cuando efectúe el
mantenimiento.
Ale periódicamente las cuchillas de la siguiente manera:
Aplique una capa delgada de compuesto abrasivo 1.
(granulosidad de 100 a 240) en el borde delantero de las
cuchillas del cilindro de corte.
Ajuste la barra de corte de manera que la cuchilla tenga 2.
un contacto ligero pero firme todo a lo ancho de dicha
barra. Consulte “Ajuste de la separación de la cuchilla”
posteriormente en esta sección.
Opere la podadora en una superficie pavimentada hasta 3.
que se haya pulido el borde delantero de la cuchilla de la
barra de corte.
Elimine el compuesto abrasivo o los residuos de la cuchilla 4.
de la barra de corte, la cuchilla del cilindro de corte,
los piñones y los retenes.
Ajustes
ADVERTENCIA: Las cuchillas de las cortadoras son
muy filosas y podría cortarse. Utilice guantes
y extreme las precauciones cuando efectúe el
mantenimiento. Cualquier rotación de la rueda puede
hacer que rote el cilindro de corte de la cuchilla.
Ajuste de la separación de la cuchilla
El cilindro de corte de la cuchilla se ajusta en la fábrica para que
tenga la separación adecuada de la barra de corte. Sin embargo,
después de usar la podadora durante períodos prolongados o
como parte del mantenimiento anual, se recomienda reajustar la
separación de las cuchillas.
Si la separación de la cuchilla es demasiado amplia, •
el patrón de corte es irregular y desparejo.
Si es demasiado estrecha, la máquina hace ruido y resulta •
difícil empujarla cuando está en funcionamiento.
Para ajustar la separación de la cuchilla, proceda de la
siguiente manera:
Ubique los pernos de ajuste que están en la parte de abajo 1.
de la barra de corte, en la parte posterior de la podadora.
Apriete los pernos de ajuste (uno en cada extremo) ¼ de 2.
giro con una llave de 13mm. Consulte la Fig. 5-1.
PRECAUCIÓN: No apriete excesivamente los
tornillos de ajuste ya que podría dañar la barra de
corte. Apriete ambos tornillos durante el ajuste final.
Figura 5-1

9se c c i ó n 5— Ma n t e n i M i e n t O y aj u s t e s
Para probar si el ajuste es correcto:3.
Incline la podadora totalmente hacia atrás de manera a.
que quede apoyada sobre la barra de control.
Rote despacio la rueda de la podadora con una mano, b.
haciendo que el cilindro de corte de la cuchilla gire
lentamente. Si resulta muy difícil girar la rueda, afloje
ligeramente cada tornillo de ajuste.
Mientras gira el cilindro de corte de la cuchilla, inserte c.
una hoja de papel entre dicho cilindro y la barra de
corte. Consulte la Fig. 5-2. El papel debe cortarse
de forma pareja todo a lo largo de la barra de corte,
como si se cortara con tijeras. Si no se corta, ajuste
ligeramente cada tornillo de ajuste y repita la prueba.
Figura 5-2

Notas
6
10

11se c c i ó n 6 — nO t a s

GARANTÍA LIMITADA DEL FABRICANTE PARA
GDOC-100020 REV. A
La siguiente garantía limitada es otorgada por Troy-Bilt LLC con
respecto a nuevos productos adquiridos y utilizados en Estados
Unidos y/o sus territorios y posesiones, y por MTD Products Limited
con respecto a nuevos productos adquiridos y utilizados en Canadá
y/o sus territorios y posesiones (cualquiera de las dos entidades,
respectivamente, “Troy-Bilt”).
“Troy-Bilt” garantiza este producto (excluidas las Piezas y Accesorios
con Desgaste Normal según se describe más abajo) contra defectos
en los materiales y mano de obra por un período de dos (2) años
a partir de la fecha de compra original y, a su opción, reparará o
reemplazará, sin costo alguno, cualquier pieza que presente defectos
en los materiales o de mano de obra. Esta garantía limitada sólo se
aplicará si el producto ha sido operado y mantenido de acuerdo con
las instrucciones del Manual del Operador que se proporciona con el
producto y no ha sido sujeto a uso inapropiado, abuso, uso comercial,
abandono, accidente, mantenimiento incorrecto, alteración,
vandalismo, robo, incendio, inundación o algún daño debido a otro
peligro o desastre natural. El daño resultante por la instalación o el
uso de piezas, accesorios o aditamentos no aprobados por Troy-Bilt
para su uso con el(los) producto(s) incluido(s) en este manual
anulará la garantía en lo que respecta a esos daños.
Se garantiza que las Piezas con Desgaste Normal están libres
de defectos en los materiales y mano de obra por un período de
treinta (30) días a partir de la fecha de compra. Las piezas sujetas
a desgaste normal incluyen pero no se limitan a: baterías, correas,
cuchillas, adaptadores para cuchillas, dientes, bolsas para pasto,
ruedas, ruedas para la plataforma de la podadora tractor, asientos,
zapatas antideslizantes, ruedas de fricción, placas de raspado, gomas
helicoidales y neumáticos.
Accesorios — Troy-Bilt garantiza que los accesorios de este producto
están libres de defectos de material y mano de obra durante un
período de un (1) año a partir de la fecha de compra o arrendamiento
original del accesorio. Los accesorios incluyen, pero no se limitan a
elementos tales como: colectores de césped y kits para abono.
CÓMO SOLICITAR Y OBTENER SERVICIO TÉCNICO: El servicio de
la garantía está disponible, CON COMPROBANTE DE COMPRA, a
través de su distribuidor local autorizado para el mantenimiento. Para
localizar al distribuidor de su zona:
En Estados Unidos de América
Consulte las páginas amarillas, o póngase en contacto con Troy-Bilt
LLC en P.O. Box 361131, Cleveland, Ohio 44136-0019, llame al 1-866-
840- -6483, o visite nuestro sitio web en www.troybilt.com.
En Canadá
Póngase en contacto con MTD Products Limited, Kitchener, ON N2G
4J1, llame al 1-800-668-1238 ó visite nuestro sitio web en www.
mtdcanada.com.
Esta garantía limitada no suministra cobertura en los siguientes
casos:
a. El motor o las piezas que lo componen. Estos productos pueden
tener garantía del fabricante por separado. Consulte los términos y
condiciones de la garantía aplicable del fabricante.
b. Las bombas, válvulas y cilindros del rompetroncos tienen una
garantía separada de un año.
c. Los artículos necesarios para el mantenimiento de rutina como
por ejemplo lubricantes, filtros, afiladores de cuchillas, sincroni-
zación del motor, los ajustes de los frenos, del embrague o de la
plataforma y el deterioro normal del acabado exterior debido al
uso o exposición.
d. Mantenimiento no realizado por el distribuidor de servicio
autorizado.
e. Troy-Bilt no extiende ninguna garantía para los productos
vendidos o exportados fuera de los Estados Unidos de América
y/o Canadá, y sus respectivas posesiones y territorios, excepto
para aquellos vendidos a través de los canales autorizados de
distribución de exportaciones de Troy-Bilt.
f. Piezas de reemplazo que no son piezas originales de Troy-Bilt.
g. Gastos de transporte y visitas técnicas.
h. Troy-Bilt no garantiza este producto para uso comercial.
No existe ninguna garantía implícita, incluyendo cualquier
garantía implícita de comerciabilidad o adaptabilidad para un
propósito en particular, una vez transcurrido el período aplicable
de garantía escrita según lo antedicho en relación con las piezas
identificadas. Ninguna otra garantía expresa, ni oral ni escrita,
excepto la mencionada anteriormente, extendida por personas
reales o jurídicas, incluidos los distribuidores o los minoristas
con respecto a cualquier producto, obligará a Troy-Bilt. Durante el
plazo de la garantía el único recurso es la reparación o reemplazo
del producto como se indicó anteriormente.
Las disposiciones de esta garantía cubren el recurso de reparación
única y exclusiva que surge de la venta. Troy-Bilt no se hará
responsable de ninguna pérdida o daño incidental o resultante,
incluyendo sin limitación, los gastos incurridos para los servicios
de mantenimiento del césped, o los gastos de arrendamiento para
reemplazar de manera transitoria un producto bajo garantía.
Algunos estados no permiten la exclusión o limitación de los daños y
perjuicios incidentales o directos, o las limitaciones sobre la duración
de las garantías implícitas, por lo que las exclusiones o limitaciones
mencionadas anteriormente pueden no serle de aplicación.
En ningún caso se obtendrá una compensación de ningún tipo por un
monto mayor al precio de compra del producto vendido. La alteración
de las características de seguridad del producto anulará esta garantía.
Usted asume el riesgo y la responsabilidad de las pérdidas, daños
o lesiones que sufran usted y sus bienes y/u otras personas y sus
bienes como resultado del uso incorrecto o de la falta de capacidad
para usar este producto.
Esta garantía limitada cubre solamente al comprador original, o a la
persona que recibió el producto de regalo.
CÓMO SE RELACIONA LA LEGISLACIÓN ESTATAL
CON ESTA GARANTÍA: Esta garantía limitada le otorga
derechos legales específicos y usted también puede tener otros
derechos que varían de un estado a otro.
IMPORTANTE: El propietario debe presentar comprobante de
compra original para obtener la cobertura de la garantía.
Troy-Bilt LLC, P.O. BOX 361131 CLEVELAND, OHIO 44136-0019, Teléfono: 1-866-840-6483, 1-330-558-7220
MTD Canada Limited - KITCHENER, ON N2G 4J1; teléfono 1-800-668-1238
-
 1
1
-
 2
2
-
 3
3
-
 4
4
-
 5
5
-
 6
6
-
 7
7
-
 8
8
-
 9
9
-
 10
10
-
 11
11
-
 12
12
-
 13
13
-
 14
14
-
 15
15
-
 16
16
-
 17
17
-
 18
18
-
 19
19
-
 20
20
-
 21
21
-
 22
22
-
 23
23
-
 24
24


Troy-Bilt 15A3000766 Manual de usuario
- Categoría
- Mini cultivadores
- Tipo
- Manual de usuario
en otros idiomas
- English: Troy-Bilt 15A3000766 User manual
Artículos relacionados
-
Troy-Bilt 15A3100711 Manual de usuario
-
-
-
-
-
-
Yard Machines Series 440 Manual de usuario
-
