
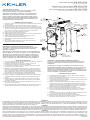
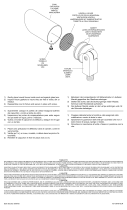
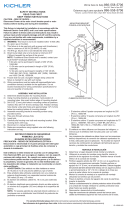
GROUND WIRE
AND WIRE NUT
ALAMBRE DE TIERRA
Y TUERCA DE CABLE
FIL DE TERRE
ET ÉCROU DE FIL
CONDUIT
CONNECTOR
CONECTOR DE CONDUCTO
CONNECTEUR DE CONDUIT
BOLT
TORNILLO
BOULON
#10-24 SCREW
HEXNUT
TUERCA HEXAGONAL
ÉCROU HEXAGONAL
GASKET
EMPAQUETADURA
JOINT D'ÉTANCHÉITÉ
COVER
CUBIERTA
COUVERCLE
#8-32 SCREW
EMPULGUERAS
DES VIS
STARWASHER
ARANDELA
RONDELLE
EMPULGUERAS
DES VIS
CAUTION – RISK OF SHOCK –
Disconnect Power at the main circuit breaker panel or main
fuse box before starting and during the installation.
This xture is intended for installation in accordance with the
National Electric Code (NEC) and Local code specications.
Failure to adhere to these codes and instructions may result in
serious injury and/or property damage and will void the warranty.
If you are not familiar with code requirements, installation by a
certied electrician is recommended.
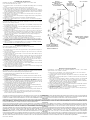
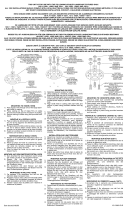
ASSEMBLY AND INSTALLATION
1) At desired location, use tree bracket as a template and mark position of
mounting holes.
2) Screw hexnut onto bolt until hexnut meets wood screw thread.
3) At position marked in step 1 screw bolts into tree until bolts are secure.
4) Slip tree bracket over bolts and secure in place with remaining hexnuts.
To allow for tree growth tree bracket should not be directly against tree.
This can be accomplished by either backing bolt out from tree or
backing hexnut from step one back from tree.
5) Attach conduit to bottom of tree bracket.
6) Attach xture to tree bracket. Once xture is in desired location secure
in place with #10-24 screw provided.
7) Attach ground from xture and ground from supply under
round screw provided inside tree bracket.
8) Make wire connections (reference instructions provided
with xture).
9) Align holes in gasket with holes in cover and secure to tree
bracket using #8-32 screws provided.
PRECAUCIÓN – RIESGO DE DESCARGA ELÉCTRICA –
Desconecte la electricidad en el panel principal del interruptor
automático o caja principal de fusibles antes de comenzar y
durante la instalación.
Este artefacto se debe instalar de acuerdo con el Código Eléctrico
Nacional (NEC, por sus siglas en inglés) y con las especicaciones
del código local. No cumplir con estos códigos e instrucciones
puede resultar en lesiones graves y/ o en daños a la propiedad y
anulará la garantía. Si no está familiarizado con los requisitos del
código, la instalación se recomienda un electricista certicado.
MONTAJE E INSTALACIÓN
1) En el lugar deseado, use el soporte del árbol como plantilla y marque la
posición de los agujeros de montaje.
2) Atornille la tuerca hexagonal en el perno hasta que la tuerca
hexagonal alcance la rosca del tornillo de madera.
3) En la posición marcada en el paso 1, atornille los pernos en el árbol
hasta que los pernos estén seguros.
4) Resbale el soporte del árbol sobre los pernos y sujete en el lugar con
las tuercas hexagonales restantes. Para permitir el crecimiento del
árbol, el soporte del árbol no debe estar directamente contra el árbol.
Esto se puede lograr quitando algo el perno fuera del árbol o destornil
lando la tuerca hexagonal del paso 1 retirándola del árbol.
5) Acople el conducto a la parte inferior del soporte del árbol.
6) Acople el artefacto al soporte del árbol. Una vez que el artefacto esté
en el lugar deseado, sujete en el lugar con el tornillo #10-24 que se
provee.
7) Acople la conexión a tierra del artefacto y la conexión a tierra de la
corriente eléctrica, debajo del tornillo redondo que se provee dentro
del soporte del árbol.
8) Haga las conexiones de los alambres (consulte las instrucciones que
se proveen con el artefacto).
9) Alinee los agujeros en la empaquetadura con los agujeros en la tapa y
sujete al soporte del árbol con los tornillos #8-32 que se proveen.
WARRANTY
WE WARRANT THE LANDSCAPE PRODUCTS FEATURED IN OUR LANDSCAPE LIGHTING CATALOG (WITH THE EXCEPTION OF LIGHT BULBS) FOR FIVE
YEARS AGAINST DEFECTS IN MATERIALS AND WORKMANSHIP IF IT WAS PROPERLY INSTALLED AND FAILED UNDER NORMAL OPERATING CONDI-
TIONS, PROVIDED IT IS RETURNED TO THE POINT OF PURCHASE, WHERE IT WILL BE REPAIRED OR, AS IT MAY BE DETERMINED, TO REPLACE THE
LANDSCAPE PRODUCT OR PARTS USED ON THAT PRODUCT.
GARANTIA
NOSOTROS GARANTIZAMOS POR CINCO ANOS LOS PRODUCTOS PANORAMICOS QUE OFRECEMOS EN NUESTRO CATALOGO DE ILUMINACION PAN-
ORAMICA (CON EXCEPCION DE LAS BOMBILLAS), QUE ESTAN EXENTOS DE DEFECTOS DE MATERIALES Y MANO DE OBRA, SI SE INSTALARON COR-
RECTAMIENTE Y FALLARON EN CONDICIONES DE OPERACION NORMAL, SIEMPRE QUE SE DEVUELVAN AL LUGAR DE COMPRA, DONDE SERAN REPA-
RADOS O, SEGUN PUEDA DETERMINARSE, SERAN CAMBIADOS LOS PRODUCTOS PANORAMICOS O LAS PIEZAS UTILIZADAS EN ESE PRODUCTO.
GARANTIE
NOUS GARANTISSONS LES PRODUITS DE PAYSAGES FIGURANT DANS NOTRE CATALOGUE DES LUMIERES PAYSAGISTES (A L’EXCEPTION DES
AMPOULES) PENDANT UNE PERIODE DE CINQ ANS CONTRE TOUS DEFAUTS DE MATERIAUX ET DE MAIN D’OEUVRE SOUS CONDITION QUE
L’INSTALLATION AIT ETE EFFECTUEE CORRECTEMENT ET QUE LES PROBLEMES SE SOIENT PRODUITS AU COURS D’UN EMPLOI NORMAL. LE
PRODUIT DOIT ETRE RETOURNE AU LIEU DE VENTE OU IL SERA REPARE OU, SUITE A UNE EVALUATION, LE PRODUIT DE PAYAGE OU LES PIECES QUI
LE COMPOSENT SERONT REMPLACEES.
IS-15609-BL
We’re here to help 866-558-5706
Hrs: M-F 9am to 5pm EST
Nous sommes là pour vous aider 866-558-5706
Heures : du lundi au vendredi, de 9h à 17h (heure de l’Est)
Estamos aquí para ayudarle 866-558-5706
Horario: Lunes-Viernes 9am a 5pm EST (hora ocial del este)
ATTENTION – RISQUE DE DÉCHARGES ÉLECTRIQUES –
Couper le courant au niveau du panneau du disjoncteur du circuit
principal ou de la boîte à fusibles principale avant de procéder à
l’installation.
Cet appareil est prévu pour l’installation conformément au Code
électrique National (NEC) et les spécications du code Local. Ne pas
respecter ces codes et instructions peut entraîner des blessures
graves et/ou des dommages matériels et annulera la garantie. Si vous
ne connaissez pas les exigences de ces codes, il est recommandé de
coner l’installation à un électricien certié.
MONTAGE ET INSTALLATION
1) À l’emplacement choisi, utilser un support d’arbre comme gabarit et
marquer les trous de montage.
2) Visser l’écrou hexagonal sur le boulon jusqu’à ce que l’écrou entre en
contact avec le let de la vis en bois.
3) Au repère marqué au cours de l’étape 1, visser les boulons dans l’arbre
jusqu’à ce qu’ils soient bien serrés.
4) Passer le support d’arbre sur les boulons et xer à l’aide des écrous
hexagonaux restants. Pour ne pas aecter la croissance de l’arbre, le
support ne doit pas se trouver directement contre l’arbre. Cette espace
peut être crée soit en devisant partiellement le boulon de blocage de
l’arbre soit l’écrou hexagonal de l’étape 1 de l’arbre.
5) Fixer le conduit sur la partie inférieure du support de l’arbre.
6) Fixer le luminaire au support de l’arbre. Une fois que le luminaire se
trouve dans la position souhaitée, xer à l’aide d’une vis nº 10-24
(fournie).
7) Connecter la mise à la terre du luminaire et celle de l’alimentation sous
la vis ronde fournie à l’intérieur du support de’arbre.
8) Raccorder les ls (instructions fournies avec le luminaire).
9) Aligner les trous situés dans la rondelle à ceux du couvercle et xer au
support de l’arbre à l’aide des vis nº 8-32 fournies.

Date Issued: 10/24/04
IS-15609-EUR
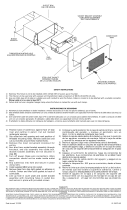
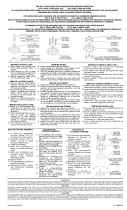
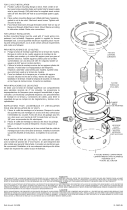
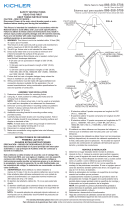
HEXNUT
TUERCA HEXAGONAL
ECROU HEXAGONAL
SECHSKANTMUTTER
DADO ESAGONALE
BOLT
PERON
BOULON
BOLZEN
BULLONE
#10-24 SCREW
#8-32 SCREWGASKET
EMPAQUETADURA
RONDELLE
DICHTUNGSRING
GUARNIZIONE
COVER
TAPA
COUVERCLE
ABDECKUNG
COPERTURA
WOOD SCREW THREAD
TORNILLO DE MADERA
VIS EN BOIS
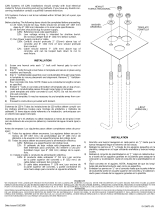
ASSEMBLY AND INSTALLATION
Installation should be done by a qualified electrician in accordance with
local, state and national electric codes.
1) At desired location, use tree bracket as a template and mark position of mounting
holes.
2) Screw hexnut onto bolt until hexnut meets wood screw thread.
3) At position marked in step 1 screw bolts into tree until bolts are secure.
4) Slip tree bracket over bolts and secure in place with remaining hexnuts. To allow
for tree growth tree bracket should not be directly against tree. This can be accomplished
by either backing bolt out from tree or backing hexnut from step one back from tree.
5) Attach conduit to bottom of tree bracket.
6) Attach fixture to tree bracket. Once fixture is in desired location secure in place
with #10-24 screw provided.
7) Attach ground from fixture and ground from supply under round screw provided
inside tree bracket.
8) Make wire connections (reference instructions provided with fixture.
9) Align holes in gasket with holes in cover and secure to tree bracket using #8-32
screws provided
MONTAJE E INSTALACIÓN
La instalación debe hacerla un electricista calificado de acuerdo con los códigos
eléctricos local, estatal y nacional.
1) En el lugar deseado, use el soporte del árbol como plantilla y marque la posición
de los agujeros de montaje.
2) Atornille la tuerca hexagonal en el perno hasta que la tuerca hexagonal alcance la
rosca del tornillo de madera.
3) En la posición marcada en el paso 1, atornille los pernos en el árbol hasta que los
pernos estén seguros.
4) Resbale el soporte del árbol sobre los pernos y sujete en el lugar con las tuercas
hexagonales restantes. Para permitir el crecimiento del árbol, el soporte del
árbol no debe estar directamente contra el árbol. Esto se puede lograr quitando
algo el perno fuera del árbol o destornillando la tuerca hexagonal del paso 1
retirándola del árbol.
5) Acople el conducto a la parte inferior del soporte del árbol.
6) Acople el artefacto al soporte del árbol. Una vez que el artefacto esté en el lugar
deseado, sujete en el lugar con el tornillo #10-24 que se provee.
7) Acople la conexión a tierra del artefacto y la conexión a tierra de la corriente
eléctrica, debajo del tornillo redondo que se provee dentro del soporte del árbol.
8) Haga las conexiones de los alambres (consulte las instrucciones que se proveen con
el artefacto).
9) Alinee los agujeros en la empaquetadura con los agujeros en la tapa y sujete al
soporte del árbol con los tornillos #8-32 que se proveen.
MONTAGE ET INSTALLATION
Un électricien qualifié doit se charger des opérations conformément
aux codes nationaux et locaux.
1) À l’emplacement choisi, utilser un support d’arbre comme gabarit et marquer les
trous de montage.
2) Visser l’écrou hexagonal sur le boulon jusqu’à ce que l’écrou entre en contact avec
le filet de la vis en bois.
3) Au repère marqué au cours de l’étape 1, visser les boulons dans l’arbre jusqu’à ce
qu’ils soient bien serrés.
4) Passer le support d’arbre sur les boulons et fixer à l’aide des écrous hexagonaux
restants. Pour ne pas affecter la croissance de l’arbre, le support ne doit pas se
trouver directement contre l’arbre. Cette espace peut être crée soit en devisant
partiellement le boulon de blocage de l’arbre soit l’écrou hexagonal de l’étape 1
de l’arbre.
5) Fixer le conduit sur la partie inférieure du support de l’arbre.
6) Fixer le luminaire au support de l’arbre. Une fois que le luminaire se trouve dans la
position souhaitée, fixer à l’aide d’une vis nº 10-24 (fournie).
7) Connecter la mise à la terre du luminaire et celle de l’alimentation sous la vis ronde
fournie à l’intérieur du support de’arbre.
8) Raccorder les fils (instructions fournies avec le luminaire).
9) Aligner les trous situés dans la rondelle à ceux du couvercle et fixer au support de
l’arbre à l’aide des vis nº 8-32 fournies.
MONTAGE UND EINBAU
Die Installation sollte von einem qualifizierten Elektriker im Einklang mit den örtlichen,
staatlichen und nationalen Bestimmungen durchgeführt werden.
1) Die Baumhalterung am gewählten Platz als Schablone benutzen und die
Montagelöcher markieren.
2) Drehen Sie die Sechskantmutter bis zum Gewinde für die Holzschraube auf den
Bolzen.
3) In den markierten Positionen (Schritt 1) die Schraubbolzen in den Baum drehen bis
die Bolzen festsitzen.
4) Die Baumhalterung über die Bolzen gleiten und mit den verbleibenden
Sechskantmuttern befestigen. Ziehen die das Wachstum des Baumes in Betracht
und befestigen Sie die Halterung nicht unmittelbar am Baum. Das können Sie
erreichen, indem Sie entweder den Bolzen aus dem Baum herausdrehen oder die
Sechskantmutter (Schritt 1) weiter vom Stamm entfernt anbringen.
5) Die Leitungsführung unten an der Baumhalterung anbringen.
6) Befestigen Sie die Lampe in der Ausrichtung Ihrer Wahl an der Baumhalterung.
Verwenden Sie dazu die einbegriffene #10-24 Schraube.
7) Den Erdleiter der Lampe und den Erdleiter von der Netzstromversorgung unter der
runden Schraube im Innern der Baumhalterung befestigen.
8) Stellen Sie die elektrischen Verbindungen her. Die Anweisungen dazu erhalten Sie
zusammen mit der Lampe.
9) Bringen Sie die Löcher im Dichtungsring und die Löcher im Deckel in
Übereinstimmung und befestigen Sie den Dichtungsring mit den beiliegenden
#8-32 Schrauben über der Baumhalterung.
MONTAGGIO ED INSTALLAZIONE
L'installazione va effettuata da un elettricista qualificato secondo i codici elettrici
vigenti a livello locale, statale e nazionale.
1) Alla posizione desiderata, usare la piastra per alberi come mascherina e
contrassegnare la posizione dei fori di montaggio.
2) Avvitare il dado esagonale sul bullone fin quando non arriva a toccare il filetto della
vite in legno.
3) Alla posizione contrassegnata al punto 1, avvitare i bulloni nel ramo fin quando non
risultano ben fissati.
4) Far scorrere la piastra per alberi sui bulloni e fissarla in posizione con restanti dadi
esagonali. Per consentire all'albero di crescere la piastra non deve esservi
poggiata direttamente contro. Per fare questo, tirare indietro il bullone dall'albero
oppure tirare indietro il dado esagonale (punto 1) dall'albero.
5) Attaccare il tubo protettivo al fondo della piastra per alberi.
6) Fissare l'unità alla piastra per alberi. Con l'unità nella posizione desiderata, fissarla in
posizione con le viti n. 10-24 in dotazione.
7) Collegare la massa dall'unità e dall'alimentatore sotto la vite rotonda all'interno
della piastra per alberi.
8) Collegare i fili (consultare le istruzioni in dotazione all'unità).
9) Allineare i fori nella guarnizione con i fori nella copertura e fissare alla piastra per
alberi utilizzando le viti n. 8-32 in dotazione.
WARRANTY
WE WARRANT THE LANDSCAPE PRODUCTS FEATURED IN OUR LANDSCAPE LIGHTING CATALOG (WITH THE EXCEPTION OF LIGHT BULBS) FOR FIVE YEARS AGAINST DEFECTS
IN MATERIALS AND WORKMANSHIP IF IT WAS PROPERLY INSTALLED AND FAILED UNDER NORMAL OPERATING CONDITIONS, PROVIDED IT IS RETURNED TO THE POINT OF
PURCHASE, WHERE IT WILL BE REPAIRED OR, AS IT MAY BE DETERMINED, TO REPLACE THE LANDSCAPE PRODUCT OR PARTS USED ON THAT PRODUCT.
GARANTIA
NOSOTROS GARANTIZAMOS POR CINCO ANOS LOS PRODUCTOS PANORAMICOS QUE OFRECEMOS EN NUESTRO CATALOGO DE ILUMINACION PANORAMICA (CON EXCEPCION
DE LAS BOMBILLAS), QUE ESTAN EXENTOS DE DEFECTOS DE MATERIALES Y MANO DE OBRA, SI SE INSTALARON CORRECTAMIENTE Y FALLARON EN CONDICIONES DE
OPERACION NORMAL, SIEMPRE QUE SE DEVUELVAN AL LUGAR DE COMPRA, DONDE SERAN REPARADOS O, SEGUN PUEDA DETERMINARSE, SERAN CAMBIADOS LOS PRO-
DUCTOS PANORAMICOS O LAS PIEZAS UTILIZADAS EN ESE PRODUCTO
GARANTIE
NOUS GARANTISSONS LES PRODUITS DE PAYSAGES FIGURANT DANS NOTRE CATALOGUE DES LUMIERES PAYSAGISTES (A L’EXCEPTION DES AMPOULES) PENDANT UNE PERI-
ODE DE CINQ ANS CONTRE TOUS DEFAUTS DE MATERIAUX ET DE MAIN D’OEUVRE SOUS CONDITION QUE L’INSTALLATION AIT ETE EFFECTUEE CORRECTEMENT ET QUE LES
PROBLEMES SE SOIENT PRODUITS AU COURS D’UN EMPLOI NORMAL. LE PRODUIT DOIT ETRE RETOURNE AU LIEU DE VENTE OU IL SERA REPARE OU, SUITE A UNE EVALUA-
TION, LE PRODUIT DE PAYAGE OU LES PIECES QUI LE COMPOSENT SERONT REMPLACEES.
GARANTIE
WIR GARANTIEREN DIE LANDSCHAFTSPRODUKTE, DIE IN UNSEREM KATALOG MIT LANDSCHAFTSBELEUCHUNGSSYSTEMEN ANGEBOTEN WERDEN (MIT AUSNAHME DER
GLÜHBIRNEN), FÜR FÜNF JAHRE. DIE GARANTIE DECKT MATERIALFEHLER UND DIE HANDWERKLICHE AUSFÜHRUNG, SOLANGE DIE TEILE FACHGERECHT EINGEBAUT WER-
DEN UND DIE MÄNGEL UNTER NORMALEN BEDINGUNGEN DER VERWENDUNG AUFTRETEN, VORAUSGESETZT, DASS DAS TEIL/ PRODUKT AM EINKAUFSORT
ZURÜCKGEGEBEN WIRD. DAS PRODUKT WIRD DORT REPARIERT ODER, JE NACH BEURTEILUNG, KANN DAS TEIL / LANDSCHAFTSBELEUCHTUNGSSYSTEM AUCH ERSETZT
WERDEN.
GARANZIA
GARANTIAMO I PRODOTTI DA ESTERNO CONTENUTI IN QUESTO CATALOGO (AD ECCEZIONE DELLE LAMPADINE) PER UN PERIODO DI CINQUE ANNI DA DIFETTI DI MATERI-
ALE E MANODOPERA, SE DEBITAMENTE INSTALLATI, CHE SI GUASTANO IN CONDIZIONI OPERATIVE REGOLARI, AMMESSO CHE VENGANO RESTITUITI AL CENTRO DI ACQUIS-
TO, DOVE VERRANNO RIPARATI, OPPURE, A SECONDA DEL CASO, SOSTITUITI CON PRODOTTI O PARTI DA ESTERNO USATI SUL PRODOTTO IN QUESTIONE.
Transcripción de documentos
We’re here to help 866-558-5706 Hrs: M-F 9am to 5pm EST Estamos aquí para ayudarle 866-558-5706 Nous sommes là pour vous aider 866-558-5706 Horario: Lunes-Viernes 9am a 5pm EST (hora oficial del este) CAUTION – RISK OF SHOCK – Disconnect Power at the main circuit breaker panel or main fuse box before starting and during the installation. This fixture is intended for installation in accordance with the National Electric Code (NEC) and Local code specifications. Failure to adhere to these codes and instructions may result in serious injury and/or property damage and will void the warranty. If you are not familiar with code requirements, installation by a certified electrician is recommended. Heures : du lundi au vendredi, de 9h à 17h (heure de l’Est) HEXNUT TUERCA HEXAGONAL ÉCROU HEXAGONAL ASSEMBLY AND INSTALLATION 1) At desired location, use tree bracket as a template and mark position of mounting holes. 2) Screw hexnut onto bolt until hexnut meets wood screw thread. 3) At position marked in step 1 screw bolts into tree until bolts are secure. 4) Slip tree bracket over bolts and secure in place with remaining hexnuts. To allow for tree growth tree bracket should not be directly against tree. This can be accomplished by either backing bolt out from tree or backing hexnut from step one back from tree. 5) Attach conduit to bottom of tree bracket. 6) Attach fixture to tree bracket. Once fixture is in desired location secure in place with #10-24 screw provided. 7) Attach ground from fixture and ground from supply under round screw provided inside tree bracket. 8) Make wire connections (reference instructions provided with fixture). #10-24 SCREW 9) Align holes in gasket with holes in cover and secure to tree EMPULGUERAS bracket using #8-32 screws provided. DES VIS BOLT TORNILLO BOULON GROUND WIRE AND WIRE NUT ALAMBRE DE TIERRA Y TUERCA DE CABLE FIL DE TERRE ET ÉCROU DE FIL GASKET EMPAQUETADURA JOINT D'ÉTANCHÉITÉ STARWASHER ARANDELA RONDELLE #8-32 SCREW EMPULGUERAS DES VIS COVER CUBIERTA COUVERCLE PRECAUCIÓN – RIESGO DE DESCARGA ELÉCTRICA – Desconecte la electricidad en el panel principal del interruptor automático o caja principal de fusibles antes de comenzar y durante la instalación. Este artefacto se debe instalar de acuerdo con el Código Eléctrico Nacional (NEC, por sus siglas en inglés) y con las especificaciones del código local. No cumplir con estos códigos e instrucciones puede resultar en lesiones graves y/ o en daños a la propiedad y anulará la garantía. Si no está familiarizado con los requisitos del código, la instalación se recomienda un electricista certificado. MONTAJE E INSTALACIÓN 1) En el lugar deseado, use el soporte del árbol como plantilla y marque la posición de los agujeros de montaje. 2) Atornille la tuerca hexagonal en el perno hasta que la tuerca hexagonal alcance la rosca del tornillo de madera. 3) En la posición marcada en el paso 1, atornille los pernos en el árbol hasta que los pernos estén seguros. 4) Resbale el soporte del árbol sobre los pernos y sujete en el lugar con las tuercas hexagonales restantes. Para permitir el crecimiento del árbol, el soporte del árbol no debe estar directamente contra el árbol. Esto se puede lograr quitando algo el perno fuera del árbol o destornil lando la tuerca hexagonal del paso 1 retirándola del árbol. 5) Acople el conducto a la parte inferior del soporte del árbol. 6) Acople el artefacto al soporte del árbol. Una vez que el artefacto esté en el lugar deseado, sujete en el lugar con el tornillo #10-24 que se provee. 7) Acople la conexión a tierra del artefacto y la conexión a tierra de la corriente eléctrica, debajo del tornillo redondo que se provee dentro del soporte del árbol. 8) Haga las conexiones de los alambres (consulte las instrucciones que se proveen con el artefacto). 9) Alinee los agujeros en la empaquetadura con los agujeros en la tapa y sujete al soporte del árbol con los tornillos #8-32 que se proveen. CONDUIT CONNECTOR CONECTOR DE CONDUCTO CONNECTEUR DE CONDUIT ATTENTION – RISQUE DE DÉCHARGES ÉLECTRIQUES – Couper le courant au niveau du panneau du disjoncteur du circuit principal ou de la boîte à fusibles principale avant de procéder à l’installation. Cet appareil est prévu pour l’installation conformément au Code électrique National (NEC) et les spécifications du code Local. Ne pas respecter ces codes et instructions peut entraîner des blessures graves et/ou des dommages matériels et annulera la garantie. Si vous ne connaissez pas les exigences de ces codes, il est recommandé de confier l’installation à un électricien certifié. MONTAGE ET INSTALLATION 1) À l’emplacement choisi, utilser un support d’arbre comme gabarit et marquer les trous de montage. 2) Visser l’écrou hexagonal sur le boulon jusqu’à ce que l’écrou entre en contact avec le filet de la vis en bois. 3) Au repère marqué au cours de l’étape 1, visser les boulons dans l’arbre jusqu’à ce qu’ils soient bien serrés. 4) Passer le support d’arbre sur les boulons et fixer à l’aide des écrous hexagonaux restants. Pour ne pas affecter la croissance de l’arbre, le support ne doit pas se trouver directement contre l’arbre. Cette espace peut être crée soit en devisant partiellement le boulon de blocage de l’arbre soit l’écrou hexagonal de l’étape 1 de l’arbre. 5) Fixer le conduit sur la partie inférieure du support de l’arbre. 6) Fixer le luminaire au support de l’arbre. Une fois que le luminaire se trouve dans la position souhaitée, fixer à l’aide d’une vis nº 10-24 (fournie). 7) Connecter la mise à la terre du luminaire et celle de l’alimentation sous la vis ronde fournie à l’intérieur du support de’arbre. 8) Raccorder les fils (instructions fournies avec le luminaire). 9) Aligner les trous situés dans la rondelle à ceux du couvercle et fixer au support de l’arbre à l’aide des vis nº 8-32 fournies. WARRANTY WE WARRANT THE LANDSCAPE PRODUCTS FEATURED IN OUR LANDSCAPE LIGHTING CATALOG (WITH THE EXCEPTION OF LIGHT BULBS) FOR FIVE YEARS AGAINST DEFECTS IN MATERIALS AND WORKMANSHIP IF IT WAS PROPERLY INSTALLED AND FAILED UNDER NORMAL OPERATING CONDITIONS, PROVIDED IT IS RETURNED TO THE POINT OF PURCHASE, WHERE IT WILL BE REPAIRED OR, AS IT MAY BE DETERMINED, TO REPLACE THE LANDSCAPE PRODUCT OR PARTS USED ON THAT PRODUCT. GARANTIA NOSOTROS GARANTIZAMOS POR CINCO ANOS LOS PRODUCTOS PANORAMICOS QUE OFRECEMOS EN NUESTRO CATALOGO DE ILUMINACION PANORAMICA (CON EXCEPCION DE LAS BOMBILLAS), QUE ESTAN EXENTOS DE DEFECTOS DE MATERIALES Y MANO DE OBRA, SI SE INSTALARON CORRECTAMIENTE Y FALLARON EN CONDICIONES DE OPERACION NORMAL, SIEMPRE QUE SE DEVUELVAN AL LUGAR DE COMPRA, DONDE SERAN REPARADOS O, SEGUN PUEDA DETERMINARSE, SERAN CAMBIADOS LOS PRODUCTOS PANORAMICOS O LAS PIEZAS UTILIZADAS EN ESE PRODUCTO. GARANTIE NOUS GARANTISSONS LES PRODUITS DE PAYSAGES FIGURANT DANS NOTRE CATALOGUE DES LUMIERES PAYSAGISTES (A L’EXCEPTION DES AMPOULES) PENDANT UNE PERIODE DE CINQ ANS CONTRE TOUS DEFAUTS DE MATERIAUX ET DE MAIN D’OEUVRE SOUS CONDITION QUE L’INSTALLATION AIT ETE EFFECTUEE CORRECTEMENT ET QUE LES PROBLEMES SE SOIENT PRODUITS AU COURS D’UN EMPLOI NORMAL. LE PRODUIT DOIT ETRE RETOURNE AU LIEU DE VENTE OU IL SERA REPARE OU, SUITE A UNE EVALUATION, LE PRODUIT DE PAYAGE OU LES PIECES QUI LE COMPOSENT SERONT REMPLACEES. IS-15609-BL ASSEMBLY AND INSTALLATION Installation should be done by a qualified electrician in accordance with local, state and national electric codes. 1) At desired location, use tree bracket as a template and mark position of mounting holes. 2) Screw hexnut onto bolt until hexnut meets wood screw thread. 3) At position marked in step 1 screw bolts into tree until bolts are secure. 4) Slip tree bracket over bolts and secure in place with remaining hexnuts. To allow for tree growth tree bracket should not be directly against tree. This can be accomplished by either backing bolt out from tree or backing hexnut from step one back from tree. 5) Attach conduit to bottom of tree bracket. 6) Attach fixture to tree bracket. Once fixture is in desired location secure in place with #10-24 screw provided. 7) Attach ground from fixture and ground from supply under round screw provided inside tree bracket. 8) Make wire connections (reference instructions provided with fixture. 9) Align holes in gasket with holes in cover and secure to tree bracket using #8-32 screws provided GASKET EMPAQUETADURA RONDELLE DICHTUNGSRING GUARNIZIONE COVER TAPA COUVERCLE ABDECKUNG COPERTURA #8-32 SCREW #10-24 SCREW MONTAJE E INSTALACIÓN La instalación debe hacerla un electricista calificado de acuerdo con los códigos eléctricos local, estatal y nacional. 1) En el lugar deseado, use el soporte del árbol como plantilla y marque la posición de los agujeros de montaje. 2) Atornille la tuerca hexagonal en el perno hasta que la tuerca hexagonal alcance la rosca del tornillo de madera. 3) En la posición marcada en el paso 1, atornille los pernos en el árbol hasta que los pernos estén seguros. 4) Resbale el soporte del árbol sobre los pernos y sujete en el lugar con las tuercas hexagonales restantes. Para permitir el crecimiento del árbol, el soporte del árbol no debe estar directamente contra el árbol. Esto se puede lograr quitando algo el perno fuera del árbol o destornillando la tuerca hexagonal del paso 1 retirándola del árbol. 5) Acople el conducto a la parte inferior del soporte del árbol. 6) Acople el artefacto al soporte del árbol. Una vez que el artefacto esté en el lugar deseado, sujete en el lugar con el tornillo #10-24 que se provee. 7) Acople la conexión a tierra del artefacto y la conexión a tierra de la corriente eléctrica, debajo del tornillo redondo que se provee dentro del soporte del árbol. 8) Haga las conexiones de los alambres (consulte las instrucciones que se proveen con el artefacto). 9) Alinee los agujeros en la empaquetadura con los agujeros en la tapa y sujete al soporte del árbol con los tornillos #8-32 que se proveen. MONTAGE ET INSTALLATION Un électricien qualifié doit se charger des opérations conformément aux codes nationaux et locaux. BOLT PERON BOULON BOLZEN BULLONE WOOD SCREW THREAD TORNILLO DE MADERA VIS EN BOIS HEXNUT TUERCA HEXAGONAL ECROU HEXAGONAL SECHSKANTMUTTER DADO ESAGONALE 1) À l’emplacement choisi, utilser un support d’arbre comme gabarit et marquer les trous de montage. 2) Visser l’écrou hexagonal sur le boulon jusqu’à ce que l’écrou entre en contact avec le filet de la vis en bois. 3) Au repère marqué au cours de l’étape 1, visser les boulons dans l’arbre jusqu’à ce qu’ils soient bien serrés. 4) Passer le support d’arbre sur les boulons et fixer à l’aide des écrous hexagonaux restants. Pour ne pas affecter la croissance de l’arbre, le support ne doit pas se trouver directement contre l’arbre. Cette espace peut être crée soit en devisant partiellement le boulon de blocage de l’arbre soit l’écrou hexagonal de l’étape 1 de l’arbre. 5) Fixer le conduit sur la partie inférieure du support de l’arbre. 6) Fixer le luminaire au support de l’arbre. Une fois que le luminaire se trouve dans la position souhaitée, fixer à l’aide d’une vis nº 10-24 (fournie). 7) Connecter la mise à la terre du luminaire et celle de l’alimentation sous la vis ronde fournie à l’intérieur du support de’arbre. 8) Raccorder les fils (instructions fournies avec le luminaire). 9) Aligner les trous situés dans la rondelle à ceux du couvercle et fixer au support de l’arbre à l’aide des vis nº 8-32 fournies. MONTAGE UND EINBAU Die Installation sollte von einem qualifizierten Elektriker im Einklang mit den örtlichen, staatlichen und nationalen Bestimmungen durchgeführt werden. 1) Die Baumhalterung am gewählten Platz als Schablone benutzen und die Montagelöcher markieren. 2) Drehen Sie die Sechskantmutter bis zum Gewinde für die Holzschraube auf den Bolzen. 3) In den markierten Positionen (Schritt 1) die Schraubbolzen in den Baum drehen bis die Bolzen festsitzen. 4) Die Baumhalterung über die Bolzen gleiten und mit den verbleibenden Sechskantmuttern befestigen. Ziehen die das Wachstum des Baumes in Betracht und befestigen Sie die Halterung nicht unmittelbar am Baum. Das können Sie erreichen, indem Sie entweder den Bolzen aus dem Baum herausdrehen oder die Sechskantmutter (Schritt 1) weiter vom Stamm entfernt anbringen. 5) Die Leitungsführung unten an der Baumhalterung anbringen. 6) Befestigen Sie die Lampe in der Ausrichtung Ihrer Wahl an der Baumhalterung. Verwenden Sie dazu die einbegriffene #10-24 Schraube. 7) Den Erdleiter der Lampe und den Erdleiter von der Netzstromversorgung unter der runden Schraube im Innern der Baumhalterung befestigen. 8) Stellen Sie die elektrischen Verbindungen her. Die Anweisungen dazu erhalten Sie zusammen mit der Lampe. 9) Bringen Sie die Löcher im Dichtungsring und die Löcher im Deckel in Übereinstimmung und befestigen Sie den Dichtungsring mit den beiliegenden #8-32 Schrauben über der Baumhalterung. MONTAGGIO ED INSTALLAZIONE L'installazione va effettuata da un elettricista qualificato secondo i codici elettrici vigenti a livello locale, statale e nazionale. 1) Alla posizione desiderata, usare la piastra per alberi come mascherina e contrassegnare la posizione dei fori di montaggio. 2) Avvitare il dado esagonale sul bullone fin quando non arriva a toccare il filetto della vite in legno. 3) Alla posizione contrassegnata al punto 1, avvitare i bulloni nel ramo fin quando non risultano ben fissati. 4) Far scorrere la piastra per alberi sui bulloni e fissarla in posizione con restanti dadi esagonali. Per consentire all'albero di crescere la piastra non deve esservi poggiata direttamente contro. Per fare questo, tirare indietro il bullone dall'albero oppure tirare indietro il dado esagonale (punto 1) dall'albero. 5) Attaccare il tubo protettivo al fondo della piastra per alberi. 6) Fissare l'unità alla piastra per alberi. Con l'unità nella posizione desiderata, fissarla in posizione con le viti n. 10-24 in dotazione. 7) Collegare la massa dall'unità e dall'alimentatore sotto la vite rotonda all'interno della piastra per alberi. 8) Collegare i fili (consultare le istruzioni in dotazione all'unità). 9) Allineare i fori nella guarnizione con i fori nella copertura e fissare alla piastra per alberi utilizzando le viti n. 8-32 in dotazione. WARRANTY WE WARRANT THE LANDSCAPE PRODUCTS FEATURED IN OUR LANDSCAPE LIGHTING CATALOG (WITH THE EXCEPTION OF LIGHT BULBS) FOR FIVE YEARS AGAINST DEFECTS IN MATERIALS AND WORKMANSHIP IF IT WAS PROPERLY INSTALLED AND FAILED UNDER NORMAL OPERATING CONDITIONS, PROVIDED IT IS RETURNED TO THE POINT OF PURCHASE, WHERE IT WILL BE REPAIRED OR, AS IT MAY BE DETERMINED, TO REPLACE THE LANDSCAPE PRODUCT OR PARTS USED ON THAT PRODUCT. GARANTIA NOSOTROS GARANTIZAMOS POR CINCO ANOS LOS PRODUCTOS PANORAMICOS QUE OFRECEMOS EN NUESTRO CATALOGO DE ILUMINACION PANORAMICA (CON EXCEPCION DE LAS BOMBILLAS), QUE ESTAN EXENTOS DE DEFECTOS DE MATERIALES Y MANO DE OBRA, SI SE INSTALARON CORRECTAMIENTE Y FALLARON EN CONDICIONES DE OPERACION NORMAL, SIEMPRE QUE SE DEVUELVAN AL LUGAR DE COMPRA, DONDE SERAN REPARADOS O, SEGUN PUEDA DETERMINARSE, SERAN CAMBIADOS LOS PRODUCTOS PANORAMICOS O LAS PIEZAS UTILIZADAS EN ESE PRODUCTO GARANTIE NOUS GARANTISSONS LES PRODUITS DE PAYSAGES FIGURANT DANS NOTRE CATALOGUE DES LUMIERES PAYSAGISTES (A L’EXCEPTION DES AMPOULES) PENDANT UNE PERIODE DE CINQ ANS CONTRE TOUS DEFAUTS DE MATERIAUX ET DE MAIN D’OEUVRE SOUS CONDITION QUE L’INSTALLATION AIT ETE EFFECTUEE CORRECTEMENT ET QUE LES PROBLEMES SE SOIENT PRODUITS AU COURS D’UN EMPLOI NORMAL. LE PRODUIT DOIT ETRE RETOURNE AU LIEU DE VENTE OU IL SERA REPARE OU, SUITE A UNE EVALUATION, LE PRODUIT DE PAYAGE OU LES PIECES QUI LE COMPOSENT SERONT REMPLACEES. GARANTIE WIR GARANTIEREN DIE LANDSCHAFTSPRODUKTE, DIE IN UNSEREM KATALOG MIT LANDSCHAFTSBELEUCHUNGSSYSTEMEN ANGEBOTEN WERDEN (MIT AUSNAHME DER GLÜHBIRNEN), FÜR FÜNF JAHRE. DIE GARANTIE DECKT MATERIALFEHLER UND DIE HANDWERKLICHE AUSFÜHRUNG, SOLANGE DIE TEILE FACHGERECHT EINGEBAUT WERDEN UND DIE MÄNGEL UNTER NORMALEN BEDINGUNGEN DER VERWENDUNG AUFTRETEN, VORAUSGESETZT, DASS DAS TEIL/ PRODUKT AM EINKAUFSORT ZURÜCKGEGEBEN WIRD. DAS PRODUKT WIRD DORT REPARIERT ODER, JE NACH BEURTEILUNG, KANN DAS TEIL / LANDSCHAFTSBELEUCHTUNGSSYSTEM AUCH ERSETZT WERDEN. GARANZIA GARANTIAMO I PRODOTTI DA ESTERNO CONTENUTI IN QUESTO CATALOGO (AD ECCEZIONE DELLE LAMPADINE) PER UN PERIODO DI CINQUE ANNI DA DIFETTI DI MATERIALE E MANODOPERA, SE DEBITAMENTE INSTALLATI, CHE SI GUASTANO IN CONDIZIONI OPERATIVE REGOLARI, AMMESSO CHE VENGANO RESTITUITI AL CENTRO DI ACQUISTO, DOVE VERRANNO RIPARATI, OPPURE, A SECONDA DEL CASO, SOSTITUITI CON PRODOTTI O PARTI DA ESTERNO USATI SUL PRODOTTO IN QUESTIONE. Date Issued: 10/24/04 IS-15609-EUR-
 1
1
-
 2
2


Kichler Lighting 15609 Manual de usuario
- Tipo
- Manual de usuario
- Este manual también es adecuado para
en otros idiomas
- français: Kichler Lighting 15609 Manuel utilisateur
- English: Kichler Lighting 15609 User manual
- Deutsch: Kichler Lighting 15609 Benutzerhandbuch
Artículos relacionados
-
 Kichler Lighting 15070AZT Manual de usuario
-
 Kichler Lighting 15671ST Manual de usuario
-
 Kichler Lighting 15679BK Manual de usuario
-
 Kichler Lighting 15665AZT Manual de usuario
-
 Kichler Lighting 15665AZT Manual de usuario
-
 Kichler Lighting 15601BKT Manual de usuario
-
 Kichler Lighting 15066AZT Manual de usuario
-
 Kichler Lighting 15065AZT Manual de usuario


