Signia sDemo Information For Hearing Care Professionals
- Tipo
- Information For Hearing Care Professionals


3
2
Content
General information 3
What are sDemo inruments? 3
Programming sDemo inruments 3
Inform your client 5
What's next? 5
For in-the-ear sDemo inruments 6
General safety information 6
Inructions for disinfection 7
Exchanging Click Sleeves 8
Exchanging Click Domes 9
Exchanging the receiver wax guard 9
Exchanging the microphone cover 10
General information
What are sDemo inruments?
sDemo inruments are hearing inruments that oer the
exibility to demonrate dierent performance levels and
features on a trial basis, easily congurable via our tting
software.
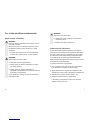
Programming sDemo inruments
XConnect the sDemo inruments to the PC running our
tting software.
XClick the sDemo icon. The icon is only
displayed when the sDemo inruments
are connected.
XFollow the inructions on the screen. For example,
you can choose if you want to transfer data from the
exiing session to the sDemo inruments or if you
want to art a new tting.

45
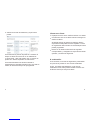
XSelect the performance level and the trial period.
We recommend a trial period of 1 week. The wearing
time is calculated based on an eimated usage of
10 hours per day, 7 days a week. Thus a 1 week trial
period equates to 70 hours of usage.
We recommend adding a one‑week buer for the expiry
timer. In case the appointment is delayed the client has
sucient time to reschedule.
Inform your client
● Explain the purpose of the sDemo inruments to your
client.
● Arrange an appointment with the client when you hand
over the sDemo inruments.
At the end of the trial period the sDemo inruments
will art beeping repeatedly. The follow up
appointment should coincide with the end of the
programmed trial period.
● Review the relevant safety information with your client
and provide them with a copy of the user guide and
the safety manual.
What's next?
If needed, at the follow up appointment you can set up
another trial period, with a dierent performance level.
Or, if your client is satised with the current performance
level, you can transfer the session to the new hearing
inruments the client purchases.

6 7
For in-the-ear sDemo inruments
General safety information
WARNING
In‑the‑ear sDemo inruments may only be used in
ears with intact skin.
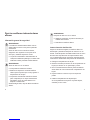
Before every use of an sDemo inrument, ensure
the following using an otoscope and by a visual
inspection:
XThe ear canal mu be free from pathologically
modied skin, inamed skin, or open wounds.
WARNING
Before every use with a client:
XVerify the acouical performance.
XVisibly check the sDemo inrument for cracks
and other damage.
XVisibly check the sDemo inrument for
persient contamination that cannot be removed
by cleaning or disinfection.
If you identify any damage, do not use the sDemo
inrument further.
WARNING
After every use with a client:
XReplace ear piece, receiver wax guard and
microphone cover.
XDisinfect the sDemo inrument.
Inructions for disinfection
In accordance with hygiene regulations, the sDemo
inrument mu be cleaned and disinfected after every
use with a client. All parts accessible from the outside
as well as the inside of the battery compartment have
to be treated with an active, sporicidal disinfectant.
Always observe and follow the inructions given by the
manufacturer of the disinfectant.
XRemove the battery compartment.
XUse a soft and clean cloth to remove visual debris
from the battery compartment and housing.
XSpray disinfectant on all parts accessible from the
outside and on the inside of the battery compartment.
XWait at lea 5 minutes to allow parts to dry.
XInall the cleaned battery compartment.
If the battery compartment could not be cleaned,
replace it with a new one.

8 9
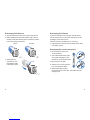
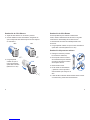
Exchanging Click Sleeves
XGrip the Click Sleeve with your ngers and pull it o.
XWhen inalling the new Click Sleeve, take care that
the ap of the Click Sleeve points towards the printed
text on the hearing inrument.
correct incorrect
XTake particular
care that the new
Click Sleeve clicks
noticeably in place.
click
Exchanging Click Domes
If you have problems removing the old Click Dome,
use the removal tool or follow the inructions on the
packaging of the Click Domes.
The removal tool is available as an accessory.
XTake particular care that the new Click Dome clicks
noticeably in place.
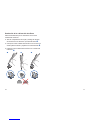
Exchanging the receiver wax guard
XRemove the ear piece (see
sections before).
XScrew the threaded end of the
wax guard changing tool into
the lter of the external receiver.
XRemove the used lter.
XFlip the tool over and push the
new wax guard into place.
XRelease the lter by tilting
the changing tool to the side. Then dispose of the
changing tool.
➊
➋

10
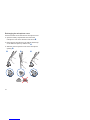
Exchanging the microphone cover
Use the tool that comes with the new microphone cover.
XOpen the battery compartment and remove the
microphone cover in the direction of the arrow ➊.
XPlace the new microphone cover with the at side up
on the table and pick it up with the tool ➋.
XSlide the new microphone cover on the microphone
opening ➌.
CIC
CIC
➊ ➋ ➌


3
2
Información general
¿Qué son los audífonos sDemo?
Los audífonos sDemo son audífonos para pruebas que
permiten realizar demoraciones de diintos niveles de
rendimiento y diintas funciones con nes de prueba.
Además, pueden congurarse muy fácilmente con
nuero software de adaptación.
Programación de los audífonos sDemo
XConecte los audífonos sDemo al PC en el que se
ejecuta nuero software de adaptación.
XHaga clic en el icono sDemo. El
icono solo se muera cuando se han
conectado los audífonos sDemo.
XSiga las inrucciones de la pantalla. Por ejemplo,
seleccione si desea transferir datos de la sesión
exiente a los audífonos sDemo o si desea iniciar un
ajue nuevo.
Contenidos
Información general 3
¿Qué son los audífonos sDemo? 3
Programación de los audífonos sDemo 3
Informe a su cliente 5
A continuación 5
Para los audífonos intraauriculares sDemo 6
Información general de seguridad 6
Inrucciones de desinfección 7
Suitución de Click Sleeves 8
Suitución de Click Domes 9
Suitución del protector anticera 9
Suitución de la cubierta del micrófono 10

45
Informe a su cliente
● Explique la función de los audífonos sDemo a su cliente.
● Concierte una cita con el cliente cuando le entregue los
audífonos sDemo.
Al nal del período de prueba, los audífonos sDemo
empezarán a emitir pitidos de forma repetida. La visita
de seguimiento debe coincidir con el nal del período de
prueba programado.
● Revise con el cliente la información de seguridad
correspondiente, y entréguele una copia del manual del
operador y el manual de seguridad.
A continuación
Si es necesario, en la visita de seguimiento puede denir
otro período de prueba con otro nivel de rendimiento.
O bien, si el cliente eá satisfecho con el nivel de
rendimiento actual, ued puede transferir la sesión a los
audífonos nuevos que compre el cliente.
XSeleccione el nivel de rendimiento y el período de
prueba.
Se recomienda un período de prueba de 1 semana. El
tiempo se calcula en función de un uso eimado de
10 horas al día, 7 días a la semana. Así, un período de
prueba de 1 semana equivale a 70 horas de uso.
Se recomienda añadir una semana adicional al
temporizador de caducidad. De ee modo, si la visita se
retrasa, el cliente tiene tiempo de reprogramarla.

6 7
ADVERTENCIA
Después de cada uso con un cliente:
XSuituya el auricular, el protector anticera y la
cubierta del micrófono.
XDesinfecte el audífono sDemo.
Inrucciones de desinfección
Según la normativa de higiene, el audífono sDemo se
debe limpiar y desinfectar después de cada uso con un
cliente. Todas las piezas accesibles desde fuera así como
el interior del compartimento de la pila se deben tratar
con un desinfectante activo esporicida. Siga siempre las
inrucciones del fabricante del producto de desinfección.
XExtraiga el compartimento de la pila.
XRetire la suciedad que observe en el compartimento de
la pila y la carcasa con un paño limpio y suave.
XRocíe con desinfectante todas las piezas accesibles
desde fuera así como el interior del compartimento de
la pila.
XEspere al menos 5 minutos a que se sequen las
piezas.
XInale el compartimento de la pila limpio.
Si el compartimento de la pila no se puede limpiar,
cámbielo por uno nuevo.
Para los audífonos intraauriculares
sDemo
Información general de seguridad
ADVERTENCIA
Los audífonos intraauriculares sDemo solo se
deben utilizar en oídos con la piel en perfectas
condiciones.
Antes de cada uso de un audífono sDemo,
asegúrese de lo siguiente con la ayuda de un
otoscopio y mediante inspección visual:
XLa piel del canal auditivo debe ear libre de
cualquier modicación patológica, no debe ear
inamada ni debe presentar heridas abiertas.
ADVERTENCIA
Antes de cada uso con un cliente:
XCompruebe el rendimiento acúico.
XRealice una inspección visual del audífono
sDemo para comprobar que no haya grietas ni
desperfectos de otro tipo.
XInspeccione visualmente el audífono sDemo
para comprobar que no haya contaminación
persiente que no se pueda eliminar con
limpieza o desinfección.
Si detecta algún daño, deje de utilizar el audífono
sDemo.

8 9
Suitución de Click Domes
Si tiene problemas para extraer el Click Dome
usado, utilice la herramienta de extracción o siga las
inrucciones del embalaje de los Click Domes:
La herramienta de extracción eá disponible como
accesorio.
XPonga especial cuidado en que el nuevo Click Dome
quede bien colocado (deberá oír un clic).
Suitución del protector anticera
XExtraiga el auricular (consulte
las secciones anteriores).
XEnrosque el extremo roscado
de la herramienta para cambiar
el protector anticera en el ltro
del receptor externo.
XRetire el ltro usado.
XDé la vuelta a la herramienta
y presione el nuevo protector
anticera haa que encaje en su
sitio.
XLibere el ltro inclinando la herramienta hacia un lado.
A continuación, puede tirar la herramienta.
➊
➋
Suitución de Click Sleeves
XSujete el Click Sleeve con los dedos y retírelo.
XCuando inale el nuevo Click Sleeve, asegúrese de
que la solapa del Click Sleeve apunte al texto impreso
en el audífono.
Bien Mal
XPonga especial
cuidado en que el
nuevo Click Sleeve
quede bien colocado
(deberá oír un clic).
click

10 11
Suitución de la cubierta del micrófono
Utilice la herramienta que se suminira con la nueva
cubierta del micrófono.
XAbra el compartimento de la pila y extraiga la cubierta
del micrófono en la dirección que indica la echa ➊.
XColoque la nueva cubierta del micrófono en la mesa con
el lado plano bocarriba y sujétela con la herramienta ➋.
XInserte la nueva cubierta del micrófono en el oricio del
micrófono ➌.
CIC
CIC
➊ ➋ ➌

Manufactured by
Sivantos, Inc.
10 Conitution Avenue
Piscataway, NJ 08854
Phone: (800) 766‑4500
Fax: (732) 562‑6696
Information in this brochure is subject to change without notice.
La información que contiene ee folleto eá sujeta a cambios
sin aviso.
Hearing Inrument Made in Singapore.
Inrumento auditivo Hecho en Singapur.
Document No. 02819‑99T03‑6000 EN, ES‑USA / D10537791
Order/Item No. 10537791 3.0 22B771 1K SI/18623‑18
Maer Rev04, 01.2018
© 08.2018, Sivantos Inc. All rights reserved.
signiausa.com
-
 1
1
-
 2
2
-
 3
3
-
 4
4
-
 5
5
-
 6
6
-
 7
7
-
 8
8
-
 9
9
-
 10
10
-
 11
11
-
 12
12
-
 13
13


Signia sDemo Information For Hearing Care Professionals
- Tipo
- Information For Hearing Care Professionals
en otros idiomas
- English: Signia sDemo
Artículos relacionados


Otros documentos
-
 REXTON MOSAIC M 80 8C Guía del usuario
-
Panasonic SCTMAX9EG Instrucciones de operación
-
-
Panasonic SC-HTB8EG-K El manual del propietario
-
-
-
-
-
Beurer HA 60 Pair El manual del propietario
-
 Microson mc-8 ITC P Manual de usuario

