Kobalt KJR 1040-03 Manual de usuario
- Categoría
- Radios
- Tipo
- Manual de usuario

SS22007
Questions, problems, missing parts? Before returning to your retailer, call our customer
service department at 888-3KOBALT (888-356-2258), 8 a.m.-8 p.m., EST,
Monday-Sunday. You could also contact us at [email protected].
ATTACH YOUR RECEIPT HERE
KOBALT and logo design are trademarks or
registered trademarks of LF, LLC. All rights
reserved.
Serial Number Purchase Date
Español p. 17
ITEM # 5149482
40V PORTABLE HYBRID
RADIO & BLUETOOTH® SPEAKER
MODEL #KJR 1040-03

2
TABLE OF CONTENTS
Product Specications ......................................................................................2
Package Contents ............................................................................................3
Safety Information ............................................................................................ 4
Preparation .......................................................................................................7
Operating Instructions ...................................................................................... 8
Care and Maintenance ...................................................................................10
Troubleshooting.............................................................................................. 10
Warranty ......................................................................................................... 10
PRODUCT SPECIFICATIONS
COMPONENT SPECIFICATION
AC Power Adaptor 120V~ 60Hz
Voltage for DC Operation 40 V
Speaker Power (2) Woofer: 40W; (2) Tweeter: 20W
IP (Ingress Protection) Grade IP64*
AUX Connector 3.5 mm
Bluetooth® Version V5.0
Bluetooth® Range Up to 150 ft.
USB Output 5 V , 2.1 A
Recommended Operating and Storage
Temperature
41°F (5°C) - 104°F (40°C)
* NOTE: IP64 is true when the USB/AUX ports and the DC Socket are covered.
The Bluetooth® word mark and logos are registered trademarks owned by Bluetooth SIG, Inc.
and any use of such marks by KOBALT is under license.

3
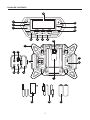
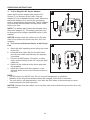
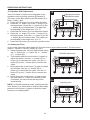
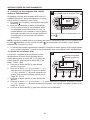
PACKAGE CONTENTS
V W X
S R Q
I
J
K
D
C
B
H G F E M
N
O
P
UT
L
A

4
PACKAGE CONTENTS
PART DESCRIPTION PART DESCRIPTION
A Display M Battery-release Button
B Volume + Button N Storage Pocket
C Volume – Button O Clock Battery Door
D Mode Button P Battery Pack Port
E Tune/Seek Up Q Rubber Cover
F Play/Pause/Preset Button R USB Power Port (Type C)
G Tune/Seek Down S AUX (auxiliary) Input Port
H Bluetooth-pairing Button T DC Socket
I EQ Button U USB Power Port (Type A)
J Clock Button V AC Power Adaptor
K On/Off Button W AUX Cable
L Handle X AAA Batteries (2)
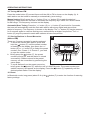
WARNING
• Remove the tool from the package and examine it carefully. Do not discard the carton or any
packaging material until all parts have been examined.
• If any part of the tool is missing or damaged, do not attach the battery pack or use the tool
until the part has been repaired or replaced. Failure to heed this warning could result in
serious injury.

5
SAFETY INFORMATION
Please read and understand this entire manual before attempting to assemble or operate
this product. If you have any questions regarding the product, please call customer service at
888-3KOBALT (888-356-2258), 8 a.m. - 8 p.m., EST, Monday - Sunday. You could also contact
us at [email protected].
Know the Tool
To operate this tool, carefully read this manual and all labels afxed to the tool before using it.
Keep this manual available for future reference.
Important
This tool should be serviced only by a qualied service technician.
Read All Instructions Thoroughly
Some of the following symbols may be used on this tool. Please study them and their meaning.
Proper interpretation of these symbols will allow you to operate the tool better and more safely.
SYMBOL DEFINITION SYMBOL DEFINITION
V Volts A Amps
Hz Hertz W Watts
or d.c. Direct Current or a.c. Alternating current
A danger, warning or caution.
It means ‘Attention! Your
safety is involved.
To reduce the risk of
injury, user must read
instruction manual.
General Power Tool Safety Warnings
WARNING
• Read all safety warnings, instructions, illustrations and specications provided with
this apparatus. Failure to follow all instructions listed below may result in electric shock, re
and/or serious injury.
• To reduce the risk of re or electric shock, do not expose this apparatus to rain or
moisture. Do not use this apparatus near water. Dry location use only.
• Only operate this apparatus in a well-ventilated area.
• Read these instructions.
• Keep these instructions.
• Heed all warnings.
• Follow all instructions.
• Clean only with dry cloth.
• Do not block any ventilation openings. Install in accordance with the manufacturer’s
instructions.
• Do not install near any heat sources such as radiators, heat registers, stoves, or
other apparatus (including ampliers) that produce heat.

6
SAFETY INFORMATION
• Only use attachments/accessories specied by the manufacturer.
• Detach the battery pack from the apparatus during lightning storms or when unused
for long periods of time.
• Refer all servicing to qualied service personnel. Servicing is required when the
apparatus has been damaged in any way, such as power-supply cord or plug is damaged,
liquid has been spilled or objects have fallen into the apparatus, the apparatus has been
exposed to rain or moisture, does not operate normally, or has been dropped. Service or
maintenance performed by unqualied personnel could result in a risk of injury.
• A battery-operated apparatus with integral batteries or a separate battery pack must
be recharged only with the specied charger for the battery. A charger that may be
suitable for one type of battery may create a risk of re when used with another battery.
• Never disassemble the apparatus or try to do any rewiring on the apparatus’s
electrical system.
• Maintain the apparatus. Check for misalignment, breakage of parts and any other
condition that may affect the apparatus operation. If damaged, have the apparatus
repaired before use. Use the apparatus in accordance with these instructions,
taking into account the working conditions and the work to be performed. Use of the
apparatus for operations different from those intended could result in a hazardous situation.
• Keep the apparatus away from other metal objects, such as paper clips, coins, keys,
nails, screws, or other small metal objects that can make a connection from one
terminal to another. Shorting the terminals together may cause burns or a re.
• Do not use the apparatus if it has been dropped or received a sharp blow. A damaged
apparatus will increase the risk of re.
• Dispose of a used battery promptly. Keep away from children. Do not disassemble and
do not dispose of in re.
• Recharge only with the charger specied by the manufacturer. A charger that is suitable
for one type of battery pack may create a risk of re when used with another battery pack.
• For use with KOBALT 40V battery packs. Use of any other battery packs may create a
risk of injury and re.
BATTERY PACK CHARGER
KB 240-03; KB 440-03; KB 640-03; KB 3640-03 KRC 840-03; KRC 1540-03
• For best results, your battery and tool should be stored, charged and used in a
location where the temperature is more than 41°F (5°C) but less than 104°F (40°C). Do
not store outside or in vehicles.
WARNING
• People with electronic devices, such as pacemakers, should consult their
physician(s) before using this product. Operation of electrical equipment in close
proximity to a heart pacemaker could cause interference or failure of the pacemaker.
• Save these instructions. Refer to them frequently and use them to instruct others who may
use this product. If you loan someone this product, loan them these instructions also.
FCC CAUTION
• Changes or modications to this unit not expressly approved by the party responsible for
compliance could void the user’s authority to operate the equipment.
• This device complies with Part 15 of the FCC Rules. Operation is subject to the following
two conditions: (1) this device may not cause harmful interference, and (2) this device
must accept any interference received, including interference that may cause undesired
operation.

7
SAFETY INFORMATION
•
NOTICE: This equipment has been tested and found to comply with the limits for a Class B
digital device, pursuant to Part 15 of the FCC Rules. These limits are designed to provide
reasonable protection against harmful interference in a residential installation. This equipment
generates, uses and can radiate radio frequency energy and, if not installed and used in accor-
dance with the instructions, may cause harmful interference to radio communications.
However, there is no guarantee that interference will not occur in a particular installation. If
this equipment does cause harmful interference to radio or television reception, which can be
determined by turning the equipment off and on, the user is encouraged to try to correct the
interference by one or more of the following measures:
Reorient or relocate the receiving antenna.
• Increase the separation between the equipment and receiver.
• Connect the equipment into an outlet on a circuit different from that to which the receiver is
connected.
• Consult the dealer or an experienced radio/TV technician for help.
The device has been evaluated to meet general RF exposure requirement. The device
can be used in portable exposure condition without restriction.

8
PREPARATION
Know Your Radio
Before attempting to use the radio, familiarize yourself with all of its operating features and
safety requirements.
WARNING
• Do not allow familiarity with the radio to cause carelessness. Remember that one careless
moment is enough to cause severe injury. Before attempting to use any apparatus, be sure
to become familiar with all of the operating features and safety instructions.
• Do not attempt to modify this apparatus or create accessories not recommended for use
with this apparatus. Any such alteration or modication is misuse and could result in a
hazardous condition leading to possible serious personal injury.

9
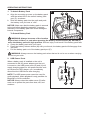
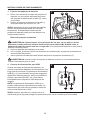
OPERATING INSTRUCTIONS
1. To Attach Battery Pack
a. Align the mounting grooves on the battery pack
with the raised ribs in the radio’s battery pack
port (P), as shown.
b. Slide the battery pack into the radio and push
the battery until you hear a “click”.
NOTICE: Make sure that the battery pack is secured
to the tool before beginning operation. Improper
assembly of the battery pack can cause damage to
internal components.
To Detach Battery Pack
WARNING: Always be aware of the location
of your feet, children, or pets when pressing the battery-release button (M). NEVER re-
move the battery pack at a high position. Serious injury could result if the battery pack falls.
a. Grasp the battery pack with your hand.
b. Press the battery-release button (M) with your thumb; the battery pack will disengage from
the latch.
c. Pull the battery pack out of the battery pack port (P).
WARNING: Always remove the battery pack when the tool is not in use or when carrying
the tool at your side.
2. USB Power Ports
When a battery pack is installed or the unit is
connected to the AC power adaptor and the unit
is turned on, the USB power ports (R) and (U) will
supply charging power for low power devices such
as cell phones, MP3 players, etc. Immediately
disconnect the USB device after charging.
NOTE: The USB power ports cannot be used for
audio playback. Audio playback is only possible via
Bluetooth or AUX connection.
NOTICE: Always close the rubber cover (Q) after
each use to protect the ports from dust, dirt, and
moisture.
1M P
2
R Q
U

10
OPERATING INSTRUCTIONS
3. To Use Supplied AC Power Adaptor
Insert the AC power adaptor plug into the DC
Socket (T) on the back of the radio. Plug the
adaptor (V) into a standard power outlet. Whenever
the power adaptor (V) is connected, the battery
pack is automatically disconnected. The AC adaptor
(V) should be disconnected from the power outlet
when not in use.
NOTE: The battery pack cannot be charged using
the power adaptor (V). The battery pack can only
be charged using chargers specied earlier in this
manual.
NOTICE: Always close the rubber cover (Q) after
each use to protect the ports from dust, dirt, and
moisture.
4. To Connect an External Player to AUX Input
Port
a. Select the AUX operating mode using the mode
button (D).
b. Insert the AUX cable (W) into the AUX input
port (S) and make sure that they are properly
connected.
c. Connect an MP3 player, CD player, or other
audio device directly to the unit, using the AUX
cable (W).
d. Switch on the external audio device and start
the playback.
e. Adjust the volume with the regulator on the
external audio device or the volume buttons of
the unit.
NOTE:
• The AUX port is for INPUT only. Do not connect headphones or speakers.
• Batteries of the connected devices cannot be charged via the AUX connection.
• The unit will turn off automatically 1 hour after the AUX cable is disconnected (or never
connected) from the AUX input port.
NOTICE: Always close the rubber cover (Q) after each use to protect the ports from dust, dirt,
and moisture.
3T
QV
4
QSW

11
OPERATING INSTRUCTIONS
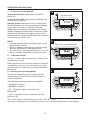
5. To Install Clock Batteries
Your unit is equipped with memory function to store
the time and your preset radio stations. When the
unit is in the OFF position, this memory function is
powered by two clock batteries which need to be
installed in the unit.
a. Use a No.1 Phillips screwdriver (not included)
to loosen and remove (turn counterclockwise)
the screw and the clock battery door (O).
b. Install the clock batteries (X) observing the
correct polarity (+ and –).
c. Replace the battery door, insert the screw, and
tighten it clockwise.
NOTE: When changing the clock batteries, all
settings will be erased. To avoid this, attach the battery pack or plug in the power adaptor, and
turn the unit ON before replacing the clock batteries.
NOTE: When the unit “wakes up” from standby mode, it will remember the last active operating
mode.
WARNING: When replacing clock batteries, replace them with the same or equivalent
type AAA. Observe correct polarity (+ and –) when replacing batteries. Do not store or carry
batteries in such a way that metal objects can contact exposed battery terminals.
6. Storage Pocket
The unit features left and right side storage pockets
(N) for small items.
NOTICE: To prevent accidental loss or damage,
always remove all items (if any) from the pockets
before transporting this unit.
-+
+-
5
XScrew
O
6
N

12
OPERATING INSTRUCTIONS
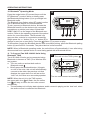
7. To turn the unit On and Off
To turn the unit ON: briey press the On/Off
button (K).
To turn the unit OFF: press the On/Off button (K)
and hold for 2 seconds.
Standby mode: when the unit is on, briey press
the On/Off button (K), the unit switches to standby
mode. When the unit is in standby mode the
display (A) will continue showing the time, but the
display brightness will dim after 30 seconds. Briey
press the On/Off button (K) again to return to full
operating mode or press On/Off button (K) for about
2 seconds to turn off the unit.
NOTE:
• Entering standby mode is a simple way to mute
radio/speaker sounds.
• When in standby mode, the unit can still charge
device(s) connected to USB power ports.
• The unit will turn off automatically after 1 hour of
being in standby mode and no button pressed.
8. To Set the Volume
Use the ‘+’ button (B) to increase or ‘–’ button (C) to
decrease the volume.
Briey press one of the volume buttons to increase/
decrease by one level. Press and hold one of the
volume buttons to continuously increase/decrease
the volume.
9. Selecting the Operating Mode
To select the operating mode, briey press the
mode button (D) several times until the desired
mode is displayed.
The following operating modes are available:
– FM Radio reception.
– AM Radio reception.
– BT – Playback of audio connected via
Bluetooth®.
– AUX – Playback of audio connected via AUX
input port (S).
The modes switch in the following order FM→AM→BT→AUX.
The active operating mode is shown by means of the corresponding symbol on the display.
87.50
FM
MHz
7a
The unit is ON
A
K
AM
7b
The unit is in standby mode
A
K
87.50
FM
MHz
9
DC
B

13
OPERATING INSTRUCTIONS
10. Bluetooth® Operating Mode
Press the mode button (D) several times until the
BT (Bluetooth®) mode is active or briey press
the Bluetooth-pairing button (H) to go straight into
Bluetooth mode.
The Bluetooth icon ashes when BT mode is active
but no Bluetooth device is connected/paired.
To pair (connect) a Bluetooth device, activate the
Bluetooth function on the device to be connected
(smartphone or similar) and select “Kobalt 40V
HRBS 1040-03” as the target of the Bluetooth con-
nection. Refer to the operating manual of the paired
device for more information. The Bluetooth icon
stays on after a device is connected successfully.
Single press the ‘<<’ button (G) or ‘>>’ button (E) to
change to previous or next song. Press the button (F) to pause or play.
To disconnect (forget) the Bluetooth device after successful pairing, press the Bluetooth-pairing
button (H) and hold for 3 seconds. The paired device is disconnected.
NOTE: When in Bluetooth operating mode, the unit will turn off automatically 1 hour after being
disconnected from a paired device or never being paired with a Bluetooth device.
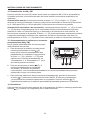
11. To Connect Two KJR 1040-03 Units Using
Bluetooth® TWS
Two KJR 1040-03 units can be connected using
Bluetooth® to become a TWS (True Wireless Ste-
reo) system.
a. Turn two units on and set both units to
Bluetooth mode .
b. Briey press the Bluetooth button (H) again
on one of the units, this unit will automatically
connect to the other, the previous unit that
displays the upper radio icon will act as the
‘host’ unit, the other as a secondary speaker.
NOTE: When the unit is in the TWS system,
the upper radio icon will ash, the two radios
icon will stay on when the two units connect
successfully.
c. The secondary unit will play back whatever audio content is playing on the ‘host’ unit, when
the audio source is connected via Bluetooth.
AM
11 The unit is in the TWS system
The two units connect successfully
AM
10
G F E D

14
OPERATING INSTRUCTIONS
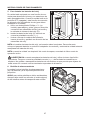
12. Equalizer (EQ) Adjustment
Your unit’s bass or treble can be adjusted in the
equalizer menu by briey pressing EQ button (I).
The menu order after pressing the EQ button (I) is:
Bass→Treble→Exit.
a. Press the EQ button (I) to rst adjust the bass.
b. Press the ‘<<’ button (G) or the ‘–’ button (C) to
decrease bass. Press the ‘>>’ button (E) or the
‘+’ button (B) to increase bass. The bass can
be adjusted in the range from -5 to +5.
c. Press the EQ button (I) to now adjust the treble.
d. Press the ‘<<’ button (G) or the ‘–’ button (C) to
decrease treble. Press the ‘>>’ button (E) or the
‘+’ button (B) to increase treble. The treble can
be adjusted in the range from -5 to +5.
e. Press the EQ button (I) to exit the equalizer menu.
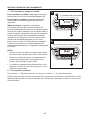
13. Setting the Time
In any mode, press the clock button (J) for 2 seconds to enter the time menu. The time menu
order is: 12H/24H→HOUR→MINUTE→EXIT.
a. Switch between the 12H and 24H formats using
the ‘<<’ button (G), ‘>>’ button (E) or ‘–’ button
(C), ‘+’ button (B).
b. Then briey press the clock button (J) again to
adjust the hours. Use the ‘<<’ button (G) or ‘–’
button (C) to decrease the value. Use the ‘>>’
button (E) or the ‘+’ button (B) to increase the
value.
c. Briey press the clock button (J) again to adjust
the minutes. Use the ‘<<’ button (G) or ‘–’
button (C) to decrease the value. Use the ‘>>’
button (E) or the ‘+’ button (B) to increase the
value.
d. Briey press the clock button (J) again to exit
the time menu or, if there is no activity within
5 seconds, the unit will exit the time menu
automatically.
NOTE: In FM/AM operating mode, briey press the
clock button (J) to show time on display, then briey
press the clock button (J) again to show the radio
frequency on display again.
0
Bass
Treble
12
I
Adjusting the bass
Adjusting the treble
G E C B
AM
13b
C B
J G E
Adjusting time
13a
J
12H/24H adjustment
G E CB

15
OPERATING INSTRUCTIONS
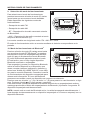
14. Tuning AM and FM
Press the mode button (D) several times until the AM or FM is shown on the display (A). A
radio station can be tuned to manually or automatically (scan-tuning).
Manual tuning: Briey press the ‘<<’ button (G) or ‘>>’ button (E) to reach the desired
frequency. Each press will increase or decrease the frequency by 0.1MHz for FM and 10kHz
for AM range. The frequency is shown on the display.
Automatic/Scan Tuning: Press the ‘<<’ button (G) or ‘>>’ button (E) and hold for 2 seconds,
the tuner will automatically seek the rst radio station with strong signal and stop at that
station’s frequency. The frequency is shown on the display. The ‘>>’ button (E) may be pressed
for 2 seconds again to continue seeking more radio stations at higher frequencies. The ‘<<’
button (G) may be pressed to seek radio stations at lower frequencies.
15. Storing Stations in Preset Memories
(AM and FM)
There are 5 memory presets for each waveband.
a. To store the current radio station, press and
hold the button (F) until the preset number
is ashing on the display, then press the ‘<<’
button (G) or ‘>>’ button (E) to select the preset
number, from ‘Preset 1’ to ‘Preset 5’, you wish
to save the station under.
b. Briey press the button (F), the preset
number will stay on, and the station is stored
successfully. Stations stored in the preset
memory can be overwritten by performing the
same steps.
c. To recall stations from the preset memories,
briey press the button (F) while the unit is in AM/FM mode. The preset number and
station frequency will appear on the display. Press the button (F) repeatedly until the
desired preset station is on the display.
16. Reset
In Bluetooth® mode, long press (about 5–6 s) the button (F) to enter the function of restoring
factory settings.
87.50
FM
MHz
1
15
FG E

16
CARE AND MAINTENANCE
WARNING
• All maintenance should only be carried out by a qualied service technician.
• To reduce the risk of personal injury and damage, never immerse your radio, battery pack,
power adaptor, or charger in liquid or allow a liquid to ow inside them.
Cleaning
• Before cleaning or performing any maintenance, remove the battery/unplug the power
adaptor. For safe and proper operation, always keep the unit clean.
• Always use only a soft, dry cloth to clean the unit. Never use detergent or alcohol. Clean
dust and debris from vents. Keep the unit handle clean, dry and free of oil or grease.
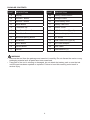
TROUBLESHOOTING
WARNING: Disconnect battery pack or AC power adaptor from the unit before performing
troubleshooting procedures.
PROBLEM POSSIBLE CAUSE CORRECTIVE ACTION
The unit does not work.
Battery pack charge is
depleted. Charge the battery pack.
The power adaptor is not
properly connected.
Check and plug the power
adaptor again.
Unit is not charging USB
device.
The USB device draws more
than the rated output of the
ports.
Remove the USB device
and turn the unit on again.
The unit cannot properly
pair with a Bluetooth device.
Out of Bluetooth pairing range. Move your device closer to
the unit.
Wrong steps performed during
pairing process.
Refer to “Bluetooth
Operating Mode” chapter
and correctly pair the audio
device with the unit.
WARRANTY
For 5 years from the date of purchase, the tool is warranted for the original purchaser to be
free from defects in material and workmanship. This guarantee does not cover damage due
to abuse, normal wear, improper maintenance, neglect, unauthorized repair/alteration, or
expendable parts and accessories expected to become unusable after a reasonable period of
use.
If you think your product meets the above guarantee criteria, please return it to the place of
purchase with valid proof of purchase and the defective product will be repaired or replaced at
no charge. This guarantee gives you specic legal rights, and you may also have other rights
that vary from state to state.
Printed in China
Lowe’s Home Centers LLC.
MOORESVILLE, NC 28117

¿Preguntas, problemas, piezas faltantes? Antes de regresar a su distribuidor, llame a
nuestro Departamento de Servicio al Cliente al 888-3KOBALT (888-356-2258), de lunes a
domingo, de 8 a.m. a 8 p.m., hora estándar del Este. También puede ponerse en contacto
con nosotros en [email protected].
ADJUNTE SU RECIBO AQUÍ
KOBALT y el diseño del logotipo son marcas
comerciales o marcas registradas de LF, LLC.
Todos los derechos reservados.
Número de serie Fecha de compra
ARTÍCULO N.º 5149482
RADIO PORTÁTIL HÍBRIDA DE 40 V
Y ALTAVOZ BLUETOOTH®
MODELO N.º KJR 1040-03

18
ÍNDICE
Especicaciones del producto ........................................................................18
Contenido del paquete ................................................................................... 19
Información de seguridad ...............................................................................21
Preparación ....................................................................................................24
Instrucciones de funcionamiento ....................................................................25
Cuidado y mantenimiento ..............................................................................33
Solución de problemas ...................................................................................33
Garantía .........................................................................................................34
ESPECIFICACIONES DEL PRODUCTO
COMPONENTE ESPECIFICACIONES
Adaptador de alimentación CA 120V~ 60Hz
Voltaje para la operación CC 40 V
Alimentación del altavoz (2) Woofer: 40 W; (2) Tweeter: 20 W
Grado de IP (protección de ingreso) IP64*
Conector AUX 3,5 mm
Versión de Bluetooth® V 5.0
Alcance de Bluetooth® Hasta 150 pies
Salida en USB 5 V , 2.1 A
Temperatura recomendada de
funcionamiento y almacenamiento
De 5° C (41 °F) a 40 °C (104 °F)
* NOTA: IP64 es cierto cuando los puertos USB/AUX y la toma CC están cubiertos.
La marca y los logos Bluetooth® son marcas registradas propiedad de Bluetooth SIG, Inc. y
todo uso por parte de KOBALT se hace bajo licencia.

19
CONTENIDO DEL PAQUETE
V W X
S R Q
I
J
K
D
C
B
H G F E M
N
O
P
UT
L
A

20
CONTENIDO DEL PAQUETE
PIEZA DESCRIPCIÓN PIEZA DESCRIPCIÓN
A Pantalla M Botón de liberación de las
baterías
B Botón de Volumen + N Bolsillo de almacenamiento
C Botón de Volumen – O Cubierta de la batería del reloj
D Botón de modo P Puerto del paquete de baterías
E Sintonizar/buscar Q Cubierta de goma
FBotón de reproducir/pausar/
precongurar RPuerto de alimentación USB
(Tipo C)
G Sintonizar/buscar hacia abajo S Puerto de entrada AUX (auxiliar)
HBotón para vincular dispositivos
con Bluetooth T Toma CC
I Botón EQ U Puerto de alimentación USB
(Tipo A)
J Botón de reloj V Adaptador de alimentación CA
K Botón de encendido/apagado W Cable AUX
L Manija X (2) baterías AAA
ADVERTENCIA
• Retire la herramienta del paquete y examínela cuidadosamente. No deseche la caja ni
ningún material de embalaje hasta después de examinar todas las piezas.
• Si falta alguna pieza de la herramienta o si alguna pieza está dañada, no coloque
el paquete de baterías ni use la herramienta hasta reparar o reemplazar la pieza. El
incumplimiento de esta advertencia podría provocar lesiones graves.

21
INFORMACIÓN DE SEGURIDAD
Lea y comprenda completamente este manual antes de intentar ensamblar u operar con este
producto. Si tiene preguntas relacionadas con el producto, llame al Departamento de Servicio
al Cliente al 888-3KOBALT (888-356-2258), de lunes a domingo de 8 a.m. a 8 p.m., hora
estándar del Este. También puede ponerse en contacto con nosotros mediante partsplus@
lowes.com.
Conozca la herramienta
Para operar esta herramienta, lea cuidadosamente este manual y todas las etiquetas
adheridas a la herramienta antes de usarla. Guarde este manual para referencia futura.
Importante
Solo un técnico calicado puede reparar esta herramienta.
Lea detenidamente todas las instrucciones.
Algunos de los siguientes símbolos pueden aparecer en esta herramienta. Obsérvelos y
aprenda su signicado. La interpretación correcta de estos símbolos le permitirá utilizar la
herramienta de manera más ecaz y segura.
SÍMBOLO DEFINICIÓN SÍMBOLO DEFINICIÓN
V Voltios A Amp
Hz Hertz W Vatios
o d.c. Corriente continua o a.c. Corriente alterna
Peligro, advertencia o
precaución. Signica
¡Atención! Su seguridad se
encuentra comprometida.
Para reducir el riesgo
de lesiones, el usuario
debe leer el manual de
instrucciones.
Advertencias de seguridad generales en el manejo de herramientas eléctricas
ADVERTENCIA
• Lea todas las instrucciones, ilustraciones, especicaciones y advertencias seguridad
que se incluyen con este aparato. No cumplir con todas las instrucciones que se detallan
a continuación podría provocar descargas eléctricas, incendios o lesiones graves.
• Para reducir el riesgo de incendios o descargas eléctricas, no exponga este aparato a
la lluvia o a la humedad. No utilice este equipo cerca del agua. Úselo solo en lugares
secos.
• Use este aparato solo en un área bien ventilada.
• Lea estas instrucciones.
• Guarde estas instrucciones.
• Preste atención a todas las advertencias.
• Siga todas las instrucciones.
• Limpie solo con un paño seco.

22
INFORMACIÓN DE SEGURIDAD
• No bloquee ninguna abertura de ventilación. Instale de acuerdo con las instrucciones del
fabricante.
• No instale cerca de ninguna fuente de calor tal como radiadores, salidas de
calefacción, estufas u otros aparatos (incluidos amplicadores) que produzcan calor.
• Use solo jaciones o accesorios especicados por el fabricante.
• Desenchufe el paquete de baterías del aparato durante tormentas eléctricas o cuando
no lo use por períodos prolongados.
• Solicite todos los trabajos de reparación y mantenimiento a personal de servicio
calicado. Deberá solicitar trabajos de reparación cuando el aparato se haya averiado
de algún modo, por ejemplo, si el cable de alimentación o el enchufe resulta dañado, si
se derrama líquido o caen objetos sobre él, si el aparato ha estado expuesto a lluvia o
humedad, si no funciona con normalidad o si ha caído al suelo. Si personal no calicado
realiza la reparación o el mantenimiento, puede provocar riesgo de lesiones.
• Un aparato con baterías integrales o un paquete de baterías independiente debe
recargarse solo con el cargador especicado para la batería. Un cargador posiblemente
adecuado para un tipo de batería puede generar un riesgo de incendio cuando se usa con
otra batería.
• Nunca desensamble el aparato ni intente volver a instalar el cableado en el sistema
eléctrico del aparato.
• Realícele mantenimiento al aparato. Revise si las piezas están desalineadas o rotas,
o si existe otra condición que pueda afectar el funcionamiento del aparato. Si se
daña, haga reparar el aparato antes de usarlo. Use el aparato de acuerdo con estas
instrucciones, según las condiciones de trabajo y el trabajo que desea realizar. El uso
del aparato en operaciones distintas para las que se diseñó podría crear una situación de
peligro.
• Mantenga el aparato alejado de otros objetos metálicos, como sujetapapeles,
monedas, llaves, clavos, tornillos u otros objetos metálicos pequeños que pudieran
crear una conexión entre los terminales. Es posible que una conexión entre los
terminales produzca quemaduras o un incendio.
• No utilice el aparato si lo dejó caer o recibió un golpe. Un aparato dañado aumentará
el riesgo de incendio.
• Deseche las baterías usadas inmediatamente. Mantenga lejos del alcance de los niños.
No desensamble ni incinere la batería.
• Recargue solo con el cargador especicado por el fabricante. Un cargador adecuado
para un tipo de paquete de baterías puede causar un riesgo de incendio si se usa con otro
paquete de baterías.
• Para usarse con paquetes de baterías KOBALT de 40 voltios. El uso de cualquier otro
paquete de baterías puede crear un riesgo de lesión e incendio.
PAQUETE DE BATERÍAS CARGADOR
KB 240-03; KB 440-03; KB 640-03; KB 3640-03 KRC 840-03; KRC 1540-03
• Para obtener los mejores resultados, la batería y la herramienta se deben almacenar,
cargar y usar en una ubicación donde la temperatura sea superior a 5 °C (41 °F) e
inferior a 40 °C (104 °F). No la almacene en el exterior ni en vehículos.

23
INFORMACIÓN DE SEGURIDAD
ADVERTENCIA
• Las personas con dispositivos electrónicos, como marcapasos, deben consultar
a su médico antes de usar este producto. El funcionamiento del equipo eléctrico
en proximidad de un marcapasos cardíaco puede causar interferencias o hacer que el
marcapasos falle.
• Guarde estas instrucciones. Consúltelas periódicamente y utilícelas para instruir a otras
personas para que puedan utilizar este producto. Si le facilita este producto a alguien,
facilítele también estas instrucciones.
PRECAUCIÓN DE FCC
• Los cambios o modicaciones a esta unidad que no estén expresamente aprobados por la
parte responsable del cumplimiento podrían anular la autorización del usuario para utilizar
el equipo.
• Este dispositivo cumple con la Sección 15 de las Normas de la FCC. Su funcionamiento
está sujeto a las siguientes condiciones: (1) este dispositivo no debe causar interferencia
perjudicial, y (2) debe aceptar cualquier interferencia recibida, incluida la interferencia que
pudiese causar un funcionamiento no deseado.
AVISO: este equipo se probó y se vericó su cumplimiento con los límites para un disposi-
tivo digital de clase B, conforme a la Sección 15 de las Normas de la Comisión Federal de
Comunicaciones (FCC). Estos límites están diseñados para proporcionar protección razonable
contra interferencias perjudiciales en una instalación residencial. Este equipo genera, utiliza
y puede irradiar energía de radiofrecuencia y, si no se instala y se usa de acuerdo con las
instrucciones, puede causar interferencia perjudicial para las comunicaciones de radio.
Sin embargo, no se garantiza que no se producirán interferencias en una instalación en
particular. Si este equipo genera una interferencia perjudicial para la recepción de radio o
televisión, que se puede determinar al encender y apagar el equipo, se recomienda al usuario
que intente corregir la interferencia con una o más de las siguientes medidas:
• Reorientar o reubicar la antena de recepción.
• Aumentar la separación entre el equipo y el receptor.
• Conectar el equipo a un tomacorriente de un circuito distinto al que usa el receptor.
• Solicitar ayuda al distribuidor o a un técnico con experiencia en radio/TV.
Declaración de advertencia de radiofrecuencia:
Se ha evaluado este equipo y se ha vericado que cumple con los requisitos de ex-
posición a radiofrecuencias. El dispositivo puede usarse en condiciones de exposición
portátiles sin restricciones.

24
PREPARACIÓN
Conozca la radio
Antes de usar la radio, familiarícese con todas las características de funcionamiento y los
requisitos de seguridad.
ADVERTENCIA
• No permita que la familiaridad con la radio lo vuelva descuidado. Recuerde que un
momento de descuido es suciente para causar lesiones graves. Antes de intentar
utilizar cualquier aparato, asegúrese de familiarizarse con todas las características de
funcionamiento e instrucciones de seguridad.
• No intente modicar este aparato ni crear accesorios que no sean los recomendados para
este. Cualquier alteración o modicación se considera un uso inadecuado y podría causar
una condición peligrosa que produzca lesiones personales graves.

25
INSTRUCCIONES DE FUNCIONAMIENTO
1. Fijación del paquete de baterías
a. Alinee las ranuras de montaje del paquete de
baterías con las varillas elevadas del puerto
del paquete de baterías de la radio (P), como
se muestra.
b. Deslice el paquete de baterías en la radio y
empújelo hasta que escuche un “clic”.
AVISO: asegúrese de que el paquete de baterías
esté jo en la herramienta antes de comenzar
la operación. El ensamblaje inadecuado del
paquete de baterías puede provocar daños a los
componentes internos.
Retiro del paquete de baterías
ADVERTENCIA: fíjese siempre en la ubicación de los pies, de los niños o de las
mascotas cuando presione el botón de liberación de la batería (M). NUNCA retire el
paquete de baterías cuando esté en un lugar alto. Si el paquete de baterías se cae, podría
provocar lesiones graves.
a. Sujete el paquete de baterías con la mano.
b. Con el pulgar, presione el botón de liberación de la batería (M); el paquete de baterías se
desconectará del pestillo.
c. Jale el paquete de baterías hasta retirarlo del puerto de paquete de baterías (P).
ADVERTENCIA: siempre retire el paquete de baterías cuando no use la herramienta o
cuando la transporte junto a usted.
2. Puertos de alimentación para USB
Cuando se instala un paquete de baterías o se
conecta la unidad al adaptador de alimentación CA y
luego esta se enciende, los puertos de alimentación
USB (R) y (U) suministrarán energía de carga para
dispositivos de baja potencia, tales como teléfonos
móviles, reproductores MP3, etc. Desconecte
inmediatamente el dispositivo USB después de
cargarlo.
NOTA: los puertos de alimentación USB no se
pueden utilizar para la reproducción de audio. La
reproducción de audio solo es posible a través de
una conexión Bluetooth o AUX.
AVISO: después de cada uso, siempre cierre la
cubierta de goma (Q) para proteger los puertos del polvo, de la suciedad y de la humedad.
1M P
2
R Q
U

26
INSTRUCCIONES DE FUNCIONAMIENTO
3. Para utilizar el adaptador de alimentación
CA suministrado
Inserte el enchufe del adaptador de alimentación
CA en el toma CC (T) en la parte posterior
de la radio. Enchufe el adaptador (V) en un
tomacorriente de alimentación estándar. Siempre
que se conecta el adaptador de alimentación
(V), el paquete de baterías se desconecta
automáticamente. El adaptador CA (V) debe
desconectarse del tomacorriente cuando no esté
en uso.
NOTA: el paquete de baterías no se puede
cargar con el adaptador de alimentación (V). El
paquete de baterías solo se puede cargar con los
cargadores especicados anteriormente en este manual.
AVISO: después de cada uso, siempre cierre la
cubierta de goma (Q) para proteger los puertos del
polvo, de la suciedad y de la humedad.
4. Para conectar un reproductor externo al
puerto de entrada AUX
a. Seleccione el modo de funcionamiento AUX
con el botón de modo (D).
b. Inserte el cable AUX (W) en el puerto de
entrada AUX (S) y asegúrese de que estén
conectados correctamente.
c. Conecte un reproductor MP3, un reproductor
de CD u otro dispositivo de audio directamente
a la unidad usando el cable AUX (W).
d. Encienda el dispositivo de audio externo e
inicie la reproducción.
e. Ajuste el volumen con el regulador del dispositivo de audio externo o los botones de
volumen de la unidad.
NOTA:
• El puerto AUX es solo para ENTRADA. No conecte auriculares ni altavoces.
• Las baterías de los dispositivos conectados no se pueden cargar a través de la conexión
AUX.
• La unidad se apagará automáticamente 1 hora después de que se desconecte el cable AUX
(o de que nunca se conecte) del puerto de entrada AUX.
AVISO: después de cada uso, siempre cierre la cubierta de goma (Q) para proteger los puer-
tos del polvo, de la suciedad y de la humedad.
3T
QV
4
QSW

27
INSTRUCCIONES DE FUNCIONAMIENTO
5. Para instalar las baterías del reloj
Su unidad está equipada con una función de me-
moria para almacenar la hora y sus estaciones de
radio preestablecidas. Cuando la unidad está en la
posición OFF (apagada), esta función de memoria
se alimenta con dos baterías de reloj que deben
instalarse en la unidad.
a. Utilice un destornillador Phillips n.º 1 (no
incluido) para aojar y quitar (girar en dirección
contraria a las manecillas del reloj) el tornillo y
la cubierta de la batería del reloj (O).
b. Instale las baterías del reloj (X) teniendo en
cuenta la polaridad correcta (+ y -).
c. Vuelva a colocar la cubierta de la batería,
inserte el tornillo y apriételo en dirección de las
manecillas del reloj.
NOTA: al cambiar las baterías del reloj, se borrarán todos los ajustes. Para evitar esto,
coloque el paquete baterías o enchufe el adaptador de corriente y encienda la unidad antes de
reemplazar las baterías del reloj.
NOTA: cuando la unidad “se despierta” del modo de espera, recordará el último modo de
operación activo.
ADVERTENCIA: cuando reemplace las baterías del reloj, utilice el mismo tipo AAA o
equivalente. Tenga en cuenta la polaridad correcta (+ y –) de las baterías cuando las re-
emplace. No guarde o transporte las baterías de una manera en que permita que objetos de
metal entren en contacto con las terminales expuestas de la batería.
6. Bolsillo de almacenamiento
La unidad incluye bolsillos de almacenamiento
(N) a la derecha y a la izquierda para artículos
pequeños.
AVISO: para evitar pérdidas o daños accidentales,
siempre retire todos los artículos (si existe alguno)
de los bolsillos antes de transportar esta unidad.
-+
+-
5
XTornillo
O
6
N

28
INSTRUCCIONES DE FUNCIONAMIENTO
7. Para encender y apagar la unidad
Para encender la unidad: mantenga presionado
brevemente el botón de encendido/apagado (K).
Para apagar la unidad: mantenga presionado
el botón de encendido/apagado (K) durante 2
segundos.
Modo de espera: cuando la unidad está
encendida, presione brevemente el botón de
encendido/apagado (K) para que la unidad cambie
al modo de espera. Mientras que la unidad está en
modo de espera, la pantalla (A) seguirá mostrando
la hora, pero el brillo de la pantalla se atenuará
después de 30 segundos. Presione brevemente
el botón de encendido/apagado (K) de nuevo
para volver al modo de funcionamiento completo
o presione el botón de encendido/apagado (K)
durante aproximadamente 2 segundos para apagar
la unidad.
NOTA:
• Activar el modo de espera es una forma simple
de silenciar los sonidos de la radio o del altavoz.
• Durante el modo de espera, la unidad todavía
puede cargar dispositivos conectados a los
puertos de alimentación para USB.
• La unidad se apagará automáticamente 1 hora
después de estar en modo de espera y si no se
presiona ningún botón.
8. Para ajustar el volumen
Use el botón “+” (B) para aumentar el volumen o el botón “–” (C) para disminuirlo.
Presione brevemente uno de los botones del volumen para aumentarlo o disminuirlo un nivel.
Mantenga presionado uno de los botones del volumen para aumentar o disminuir el volumen
continuamente.
87.50
FM
MHz
7a
La unidad está encendida
A
K
AM
7b
La unidad está en modo de espera
A
K

29
INSTRUCCIONES DE FUNCIONAMIENTO
9. Selección del modo de funcionamiento
Para seleccionar el modo de funcionamiento,
presione brevemente el botón de modo (D) varias
veces hasta que se muestre el modo deseado.
Están disponibles los siguientes modos de
funcionamiento:
– Recepción de radio FM.
– Recepción de radio AM.
– BT – Reproducción de audio conectado a través
de Bluetooth®.
– AUX – Reproducción de audio conectado a través
del puerto de entrada AUX (S).
Los modos cambian en el siguiente orden: FM→AM→BT→AUX.
El modo de funcionamiento activo se muestra mediante el símbolo correspondiente en la
pantalla.
10. Modo de funcionamiento de Bluetooth®
Presione el botón de modo (D) varias veces hasta
que se active el modo BT (Bluetooth®) o presione
brevemente el botón de emparejamiento de Blue-
tooth (H) para ir directamente al modo Bluetooth.
El ícono de Bluetooth parpadea cuando el modo
BT está activo, pero no hay ningún dispositivo
Bluetooth conectado o emparejado.
Para emparejar (conectar) un dispositivo Bluetooth,
active la función Bluetooth en el dispositivo que
desee conectar (teléfono inteligente o similares) y
seleccione “Kobalt 40V HRBS 1040-03” como obje-
tivo para la conexión Bluetooth. Consulte el manual
de funcionamiento del dispositivo emparejado para
obtener más información. El ícono de Bluetooth
permanece encendido cuando un dispositivo se conecta correctamente.
Presione una vez el botón “<<” (G) o el botón “>>” (E) para pasar a la canción anterior o sigui-
ente. Presione el botón (F) para pausar o reproducir.
Para desconectar (olvidar) el dispositivo Bluetooth después de un emparejamiento exitoso,
mantenga presionado el botón de emparejamiento de Bluetooth (H) durante 3 segundos. El
dispositivo emparejado está desconectado.
NOTA: cuando está en modo de Bluetooth activo, la unidad se apagará automáticamente 1
hora después de desconectarse de un dispositivo emparejado o si nunca se emparejó con un
dispositivo Bluetooth.
AM
10
G F E D
87.50
FM
MHz
9
DC
B

30
INSTRUCCIONES DE FUNCIONAMIENTO
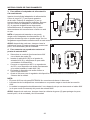
11. Conexión de dos unidades KJR 1040-03
mediante TWS Bluetooth®
Se pueden conectar dos unidades KJR 1040-03
mediante Bluetooth® para convertirse en un siste-
ma de estéreo inalámbrico real (TWS).
a. Encienda dos unidades y congúrelas en modo
Bluetooth .
b. Presione brevemente el botón de Bluetooth
(H) de nuevo en una de las unidades, esta
se conectará automáticamente a la otra. La
unidad anterior que muestra el ícono superior
de la radio actuará como la unidad “antriona”,
mientras que la otra actuará como altavoz
secundario.
NOTA: cuando la unidad esté en un sistema de estéreo inalámbrico real, el ícono superior de
la radio destellará, los dos íconos de radio se mantendrán encendido cuando ambas
unidades se conecten con éxito.
c. La unidad secundaria reproducirá cualquier contenido de audio que se esté reproduciendo
en la unidad “antriona”, cuando la fuente de audio esté conectada a través de Bluetooth.
12. Ajuste del ecualizador (EQ)
Los graves o agudos de su unidad se pueden
ajustar desde el menú del ecualizador presio-
nando brevemente el botón EQ (I). El orden del
menú después de presionar el botón EQ (I) es
Bass→Treble→Exit.
a. Presione el botón de EQ (I) para ajustar
primero los graves.
b. Presione el botón “<<” (G) o el botón “–” (C)
para disminuir los graves. Presione el botón
“>>” (E) o el botón “+” (B) para aumentar los
graves. Los graves se pueden ajustar en el
rango de -5 a +5.
c. Presione el botón de EQ (I) para ajustar los
agudos.
d. Presione el botón “<<” (G) o el botón “–” (C) para disminuir los agudos. Presione el botón
“>>” (E) o el botón “+” (B) para aumentar los agudos. Los agudos se pueden ajustar en el
rango de -5 a +5.
e. Presione el botón de EQ (I) para salir del menú del ecualizador.
0
Bass
Treble
12
I
Ajustar los graves
Ajustar los agudos
G E C B
AM
11 La unidad está en sistema TWS
Las dos unidades se conectaron con
éxito

31
INSTRUCCIONES DE FUNCIONAMIENTO
13. Cómo establecer la hora
En cualquier modo, presione el botón del reloj
(J) durante 2 segundos para ingresar al menú
de la hora. El orden del menú de la hora es
12H/24H→HOUR→MINUTE→EXIT.
a. Cambie entre los formatos de 12H y de 24H
usando el botón “<<” (G), el botón “>>” (E), el
botón “–” (C) o el botón “+” (B).
b. Luego, presione brevemente el botón del reloj
(J) de nuevo para ajustar la hora. Use el botón
“<<” (G) o el botón “–” (C) para disminuir el
valor. Use el botón “>>” (E) o el botón “+” (B)
para aumentar el valor.
c. Presione brevemente el botón del reloj (J) de
nuevo para ajustar los minutos. Use el botón
“<<” (G) o el botón “–” (C) para disminuir el
valor. Use el botón “>>” (E) o el botón “+” (B)
para aumentar el valor.
d. Presione brevemente el botón del reloj (J) de
nuevo para salir del menú de la hora; si no hay
actividad en 5 segundos, la unidad saldrá del
menú de la hora automáticamente.
NOTA: en el modo de funcionamiento FM/AM,
presione brevemente el botón del reloj (J) para
mostrar la hora en la pantalla, luego presione
brevemente el botón del reloj (J) otra vez para
volver a mostrar la frecuencia de la radio en la
pantalla.
AM
13b
C B
J G E
Ajustar la hora
13a
J
Ajuste de 12H/24H
G E CB

32
INSTRUCCIONES DE FUNCIONAMIENTO
14. Sintonización de AM y FM
Presione el botón de modo (D) varias veces hasta que aparezca AM o FM en la pantalla (A).
Se puede sintonizar una emisora de radio de forma manual o automática (exploración de
emisoras).
Sintonización manual: presione brevemente el botón “<<” (G) o el botón “>>” (E) para
alcanzar la frecuencia deseada. Cada vez que presione aumentará o disminuirá la frecuencia
en 0.1 MHz para FM y en 10 kHz para AM. La frecuencia se muestra en la pantalla.
Sintonización automática o de exploración: mantenga presione el botón “<<” (G) o el botón
“>>” (E) durante 2 segundos para que el sintonizador busque automáticamente la primera
estación de radio con una señal fuerte y se detendrá en la frecuencia de esa estación. La
frecuencia se muestra en la pantalla. El botón “>>” (E) puede presionarse nuevamente durante
2 segundos para seguir buscando más estaciones de radio en frecuencias más altas. Se
puede presionar el botón “<<” (G) para buscar estaciones de radio en frecuencias más bajas.
15. Almacenamiento de emisoras en memorias
preestablecidas (AM y FM)
Hay 5 ajustes preestablecidos de memoria para
cada banda de frecuencias.
a. Para almacenar la estación de radio actual,
mantenga presionado el botón (F)
hasta que el número preestablecido esté
parpadeando en la pantalla, luego presione
el botón “<<” (G) o el botón “>>” (E) para
seleccionar el número preestablecido, de
“Preestablecer 1” a “Preestablecer 5”, en el
que desea guardar la emisora.
b. Presione brevemente el botón (F), el
número preestablecido se mantendrá
encendido y la estación se guardará
correctamente. Las emisoras almacenadas en la memoria preestablecida se pueden
sobrescribir si sigue los mismos pasos.
c. Para sintonizar estaciones de las memorias preestablecidas, presione brevemente
el botón (F) mientras la unidad está en modo AM/FM. El número preestablecido
y la frecuencia de la estación aparecerán en la pantalla. Presione el botón (F)
repetidamente hasta que la estación preestablecida deseada aparezca en la pantalla.
16. Restablecer
Para ingresar a la función para restaurar las conguraciones de fábrica, mantenga presionado
el botón (F) (durante 5 a 6 segundos) en el modo Bluetooth®.
87.50
FM
MHz
1
15
FG E

33
CUIDADO Y MANTENIMIENTO
ADVERTENCIA
• Todo el mantenimiento debe estar exclusivamente a cargo de un técnico calicado.
• Para reducir el riesgo de provocar lesiones personales y daños, nunca sumerja la radio, el
paquete de baterías, el adaptador de alimentación o el cargador en líquidos ni permita que
ingresen líquidos en ellos.
Limpieza
• Antes de limpiar o realizar cualquier mantenimiento, retire la batería o desenchufe el
adaptador de alimentación. Para un uso seguro y adecuado, siempre mantenga la unidad
limpia.
• Siempre use solo un paño suave y seco para limpiar la unidad. Nunca use ningún tipo
de detergente o alcohol. Limpie el polvo y los desechos de los conductos de ventilación.
Mantenga la manija de la unidad limpia, seca y sin aceite ni grasa.
SOLUCIÓN DE PROBLEMAS
ADVERTENCIA: desconecte el paquete de baterías o el adaptador de alimentación CA
de la unidad antes de realizar procedimientos de solución de problemas.
PROBLEMA CAUSA POSIBLE ACCIÓN CORRECTIVA
La unidad no funciona.
La carga de la batería está
agotada.
Cargue el paquete de
baterías.
El adaptador de alimentación
no está conectado
correctamente.
Verique y enchufe el
adaptador de alimentación
de nuevo.
La unidad no está cargando
un dispositivo USB.
El dispositivo USB es de
mayor amperaje que el rango
de salida especicado para los
puertos.
Retire el dispositivo USB
y vuelva a encender la
unidad.
La unidad no se puede
emparejar correctamente
con un dispositivo
Bluetooth.
Fuera del rango de vinculación
con Bluetooth.
Acerque su dispositivo a la
unidad.
Se siguieron pasos incorrectos
durante el proceso de
emparejamiento.
Consulte el capítulo "Modo
de funcionamiento con
Bluetooth" y empareje
correctamente el
dispositivo de audio con la
unidad.

34
GARANTÍA
La herramienta está garantizada contra defectos de fabricación en los materiales y la mano de
obra durante 5 años desde la fecha de compra para el comprador original. Esta garantía no
cubre daños debidos al maltrato, desgaste normal, mantenimiento inadecuado, negligencia,
reparaciones o alteraciones no autorizadas o piezas y accesorios prescindibles que se espera
que resulten inutilizables después de un período de uso razonable.
Si cree que este producto cumple con la garantía mencionada anteriormente, devuelva
el producto al lugar donde lo compró con un comprobante de compra válido y el producto
defectuoso se reparará o reemplazará sin cargo. Esta garantía le otorga derechos legales
especícos, pero también podría tener otros derechos que varían según el estado.

35

36
Impreso en China
Lowe’s Home Centers LLC.
MOORESVILLE, NC 28117
-
 1
1
-
 2
2
-
 3
3
-
 4
4
-
 5
5
-
 6
6
-
 7
7
-
 8
8
-
 9
9
-
 10
10
-
 11
11
-
 12
12
-
 13
13
-
 14
14
-
 15
15
-
 16
16
-
 17
17
-
 18
18
-
 19
19
-
 20
20
-
 21
21
-
 22
22
-
 23
23
-
 24
24
-
 25
25
-
 26
26
-
 27
27
-
 28
28
-
 29
29
-
 30
30
-
 31
31
-
 32
32
-
 33
33
-
 34
34
-
 35
35
-
 36
36


Kobalt KJR 1040-03 Manual de usuario
- Categoría
- Radios
- Tipo
- Manual de usuario
en otros idiomas
- English: Kobalt KJR 1040-03 User manual