
1
Modelo BEM-501
Estación Meteorológica
Manual de Instrucciones
Características:
z Frecuencia de recepción RF 433 MHz
z Selección de un máximo de tres canales de radiofrecuencia (RF) con sensor
térmico sin cable
z Distancia de transmisión: 30 metros (en zona abierta).
z Intervalos de medición:
Temperatura interior: 0° C ~ +50° C
Temperatura exterior: -50° C ~ +70° C
z Función de aviso de temperatura exterior.
z Memoria de máximas / mínimas de temperatura interior y exterior.
z Indicador de bajo nivel de carga de las pilas para el sensor exterior.
z Calendario perpetuo hasta 2069.
z Formato de visualización de la hora: 12 / 24 h (a seleccionar).
z Día de la semana en 7 idiomas (a seleccionar).
z Soporte para mesa o montaje en pared (a seleccionar).
z Pilas:
Aparato: 2 pilas de tamaño AA y 1,5 V DC.
Sensor térmico: 2 pilas de tamaño AAA y 1,5 V DC

2
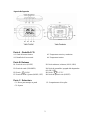
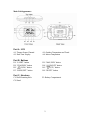
Aspecto del aparato
Parte A - Pantalla LCD
A1: Canal del sensor térmico A2: Temperatura exterior y tendencias
A3: Pantalla de la hora actual A4: Temperatura interior
Parte B- Botones
B1: Botón de aviso (ALERT)
B2: Botón máximas / mínimas (MAX / MIN)
B3: Botón de canal (CHANNEL) B4: Botón de encendido / apagado del despertador
(AL ON / OFF)
B5: Botón “
(12/24)”
B6: Botón “
(° C/° F)”
B7: Botón de modo / ajustes (MODE / SET) B8: Botón de puesta a cero (RESET)
Parte C- Estructura
C1: Hueco para montaje en pared C2: Compartimento de las pilas
C3: Soporte

3
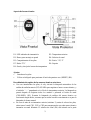
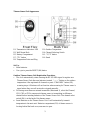
Aspecto del sensor térmico:
D1: LED indicador de transmisión D2: Temperatura exterior
D3: Hueco para montaje en pared D4: Selector de canal
D5: Compartimento de las pilas D6: Botón “º C/° F”
D7: Botón “TX” D8: Soporte
D9: Sonda y clavija del sensor de temperatura
Ajustes:
y Introduzca las pilas.
y Utilice un bolígrafo para presionar el botón de puesta a cero (RESET) (B8).
Procedimiento de registro de los sensores térmicos exteriores:
z Una vez introducidas las pilas, el reloj iniciará la búsqueda automática de las
señales de radiofrecuencia (RF) 433 MHz para registrar el nuevo sensor térmico, y
el símbolo “--.-” parpadeará en la fila de la temperatura exterior. La búsqueda se
parará después de registrar todos los canales o pulsando el botón de canal
(CHANNEL) (B3). Durante la búsqueda de señales del sensor térmico no
funcionará ningún botón, a menos que se reciba la señal correctamente o se pare la
búsqueda de forma manual
z En caso de más de un transmisor exterior (máximo 3), antes de colocar las pilas,
seleccione el canal CH1, CH2 o CH3 para asegurarse de que cada sensor térmico
transmite un canal diferente. El selector de canal (D4) está situado en la parte

4
posterior del sensor térmico.
z Inserte las pilas en el sensor térmico y automáticamente comenzará a transmitir la
temperatura al aparato. El compartimento de las pilas (D5) del sensor térmico está
situado detrás de la cubierta posterior. Desatorníllela para abrirla.
z Para asegurarse de que el aparato recibe el canal, pulse el botón “TX” (D7) del
sensor térmico para transmitir la temperatura al aparato. El aparato emitirá un
sonido (“beep”) cuando reciba la temperatura.
Visualización de la temperatura exterior:
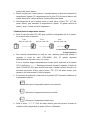
z Pulse el botón de canal (CH) (B3) para visualizar la temperatura de los 3 canales.
La secuencia será la siguiente:
Pulse Pulse Pulse
Botón de canal (CH) Botón de canal (CH) Botón de canal (CH)
Los tres canales se visualizarán
de forma alternativa
z Para cancelar manualmente un canal sin usar, mantenga presionado durante 3
segundos el botón de canal (CHANNEL) (B3). El aparato registrará
automáticamente un canal nuevo si lo recibe.
Si no se visualiza ninguna temperatura en el canal actual, aparecerá en la pantalla
LCD la indicación “- - . –”. Mantenga presionado, durante 3 segundos, el botón de
canal (CHANNEL) (B3) para cancelar este canal e intentar recibirlo de nuevo (se
escuchará un sonido). Ahora, pulse el botón “TX” (D7) del sensor térmico para
transmitir, de forma manual, la señal al aparato.
z El indicador de tendencias visualizado en la pantalla LCD muestra la tendencia de
la temperatura exterior.
indica que la temperatura exterior va en aumento.
indica que la temperatura exterior es estable.
indica que la temperatura exterior baja.
z Pulse el botón “° C /° F” (D6) del sensor térmico para seleccionar el formato de
visualización de temperatura en grados Celsius o Fahrenheit.

5
Uso del cable de 1,5 m de la sonda de temperatura.
z Inserte la clavija de la sonda (D9) en la toma situada en el lado derecho del sensor
térmico.
z Para evitar la congelación de las pilas, coloque el revestimiento metálico fuera y
deje el sensor térmico en una zona interna cuando la temperatura exterior sea
inferior a -20° C.
z Utilice siempre la sonda de temperatura si la temperatura está comprendida dentro
del siguiente intervalo:
-50° C ~ 0° C y +50° C ~ + 70° C
Ajuste de la hora:
z Para acceder al modo de ajuste del reloj / calendario, mantenga presionado el
botón de modo / ajustes (MODE/SET) (B7) durante 3 segundos.
z Pulse el botón “ ” (B5) o el botón “ ” (B6) para efectuar los ajustes, y
después pulse el botón de modo / ajustes (MODE/SET) (B7) para confirmar cada
ajuste.
z La secuencia de ajustes es la siguiente: horas, minutos, segundos, año, secuencia
de meses/días, mes, día, zona horaria, idioma del día de la semana.
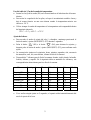
z Dispondrá de 7 idiomas para el día de la semana: alemán, inglés, danés, holandés,
francés, italiano y español. En la siguiente tabla se muestran los idiomas y sus
correspondientes abreviaturas para los días de la semana.
Idioma
Domingo
Lunes Martes Miércoles Jueves Viernes Sábado
Alemán, GE SO MO DI MI DO FR SA
Inglés, EN SU MO TU WE TH FR SA
Danés, DA SO MA TI ON TO FR LO
Holandés, NE ZO MA DI WO DO VR ZA
Francés, FR DI LU MA ME JE VE SA
Italiano, IT DO LU MA ME GI VE SA
Español, ES DO LU MA MI JU VI SA
z Si no realiza ningún ajuste en 5 segundos, el aparato saldrá automáticamente del
modo de ajuste de la hora.

6
Despertador con función de cabezada:
z Pulse el botón de modo / ajustes (MODE/SET) (B7) para seleccionar la
visualización en la pantalla LCD de:
Hora Fecha/Mes /Semana Hora del despertador (La indicación “ ” se
visualizará en pantalla)
• Cuando se visualice la hora del despertador, mantenga presionado el botón de
modo / ajustes (MODE/SET) (B7) durante 3 segundos para acceder a los ajustes
de la hora del despertador. Pulse el botón “ ” (B5) o el botón “ ” (B6) para
ajustar la hora del despertador.
z Para encender o apagar el despertador, pulse el botón de encendido / apagado del
despertador (AL ON / OFF) (B4). Si está encendido, el símbolo“ ” se
visualizará en la pantalla LCD.
z Para parar el despertador, pulse cualquier botón.
Termómetro:
z Pulse el botón “(° C / ° F)” (B6) para seleccionar el modo de visualización de la
temperatura en grados Celsius o Fahrenheit.
Función de registro de máximas / mínimas de temperatura:
• Pulse el botón de máximas / mínimas (MAX/MIN) (B2) para visualizar la
temperatura máxima interior / exterior.
La indicación “ ” se visualizará en la pantalla LCD cuando se visualice la
temperatura máxima.
La indicación “
” se visualizará en la pantalla LCD cuando se visualice la
temperatura mínima.
z Mantenga presionado, durante 3 segundos, el botón de máximas / mínimas
(MAX/MIN) (B2) para borrar el último registro de máximas y mínimas.
Función de aviso de temperatura:
z Mantenga presionado, durante 3 segundos, el botón de aviso (ALERT) (B1) para
acceder al ajuste del aviso de temperatura. Los dígitos correspondientes a la
temperatura parpadearán.
z Pulse el botón “ ” (B5) o el botón “ ” (B6) para seleccionar aviso de
temperatura interior o exterior del canal CH1, CH2 y CH3. Para confirmar el
ajuste efectuado, pulse el botón de aviso (ALERT) (B1).
z Pulse el botón“ ” (B5) o el botón “ ” (B6) para ajustar el límite máximo
“ ” y mínimo “ ” de temperatura. Para confirmar el ajuste efectuado, pulse el
botón de aviso (ALERT) (B1).

7
z Pulse el botón de aviso (ALERT) (B1) para activar o desactivar la función de
aviso de temperatura. (Si la función está activada, el símbolo“ ” se visualizará en
la pantalla LCD).
Indicador de bajo nivel de carga de las pilas:
y El símbolo de bajo nivel de carga de las pilas “ ” aparecerá en un canal
concreto, indicando que el nivel de carga de las pilas del sensor térmico exterior
del canal es bajo y, por lo tanto, deberá cambiarlas.
Notas:
z Lea atentamente el manual de instrucciones antes de utilizar este aparato.
z Si el aparato funciona incorrectamente, utilice un bolígrafo para presionar el
botón de puesta a cero (RESET) (B8)
z No coloque el reloj cerca de aparatos o marcos de metal que puedan producir
interferencias como un ordenador, televisor, etc.
z La información memorizada en el reloj se perderá cuando retire las pilas.
z Los botones no estarán operativos durante la búsqueda de la señal de
temperatura exterior, a menos que la señal se reciba correctamente o la búsqueda
se cancele de forma manual.

1
Model BEM-501
Weather Station
Instruction Manual
Features:
z 433 MHz RF receiving frequency.
z Maximum three selectable RF channels with wireless Thermo Sensor.
z Transmission range: 30 meters (open area).
z Measuring range:
Indoor temperature: 0°C ~ +50°C
Outdoor temperature: -50°C ~ +70°C
z Outdoor temperature alert function.
z Max/Min Memory for Indoor and Outdoor Temperature.
z Low-battery indicator for Outdoor Remote Sensor.
z Perpetual Calendar Up to Year 2069.
z 12/24 Hour time display selectable.
z Day of week in 7 Languages Selectable.
z Table Stand or Wall Mount Selectable.
z Battery:
Main Unit: DC 1.5 V AA size x 2 pcs
Thermo Sensor Unit: DC 1.5 V AAA size x 2 pcs

2
Main Unit Appearance
Part A- LCD
A1: Thermo Sensor Channel A2: Outdoor Temperature and Trend
A3: Real Time Display A4: Indoor Temperature
Part B- Buttons
B1: “ALERT” button B2: “MAX/MIN” button
B3: “CHANNEL” button B4: “AL ON/OFF” button.
B5: “ (12/24)” button B6: “ (C/F)” button
B7: “MODE/SET” button B8: “RESET” button
Part C- Structure
C1: Wall Mounting Hole. C2: Battery Compartment.
C3: Stand

3
Thermo Sensor Unit Appearance
D1: Transmission Indication LED D2: Outdoor Temperature
D3: Wall Mount Hole D4: Channel Selecting Switch
D5: Battery Compartment D6: “°C/°F” button
D7: “TX” button D8: Stand
D9: Temperature Probe and Plug
Set Up:
y Insert batteries.
y Use a pin to press the RESET (B8) button
Outdoor Thermo Sensor Unit Registration Procedure:
y The clock automatically starts scanning the RF 433 MHz signal to register new
Thermo Sensor Unit after new batteries inserted, “- - . -” flashes on the outdoor
temperature. After registered all channels or press “CHANNEL” button (B3),
scanning stops. All buttons will not function when scanning for Thermo sensor’s
signal unless they are well received or stopped manually.
z For having more than one external transmitter (Maximum 3), select the Channel,
CH1, CH2 or CH3 to ensure each thermo sensor is transmitting in difference
channel before inserting batteries of the Thermo Sensor Unit. The channel select
switch (D4) is at the back of the thermo sensor.
z Insert Batteries on the Thermo Sensor Unit. It will automatically transmit
temperature to the main unit. Batteries compartment (D5) of thermo sensor is
locating behind the back cover, unscrews to open.

4
z Press “TX” button (D7) on the thermo sensor unit to transmit temperature to the
main unit to ensure the main unit can receive the channel. The main unit gives a
“beep” sound if it received the temperature.
Display outdoor temperature:
z Press “CHANNEL” button (B3) to view the 3 Channels’ temperature. The
sequence is shown as follow:
Press Press Press
“CHANNEL” button “CHANNEL” button “CHANNEL” button
Display the three
channels alternatively
z Hold “CHANNEL” button (B3) for 3 seconds to cancel unused channel manually.
It will automatically register a new channel again if a new channel is received.
If there is no temperature displayed in existing channel (“- - . –”) is displayed on
the LCD), hold “CHANNEL” button (B3) for 3 seconds to cancel that channel and
receive the channel again (“Beep” sound can be heard.) Then, press “TX” button
(D7) on the thermo sensor unit to transmit signal to the main unit manually
z The trend pointer displayed on the LCD indicates the trend of the outdoor
temperature.
“
” indicates the outdoor temperature is increasing.
“ ” indicates the outdoor temperature is steady.
“
” indicates the outdoor temperature is decreasing.
z Press “°C /°F” button (D6), on the Thermo Sensor unit, to select Thermo Sensor
displayed in Celsius mode or Fahrenheit mode.
The use of 1.5m cord Temperature Probe:
z Insert the probe plug (D9) on the right hand side of the Thermo Sensor Unit.
z Put the metal casing outside and leave the Thermo Sensor Unit in an indoor area
to avoid freezing up the battery when the outdoor temperature is below -20 °C.
z Always use the temperature probe to sense the temperature when the temperature

5
is between the following range:
-50°C ~ 0°C and +50°C ~ + 70°C
Time Setting:
z Hold “MODE/SET” button (B7) for 3 seconds to enter Clock/Calendar setting
Mode.
z Press “ ” (B5) or “ ” (B6) buttons to adjust the setting and press
“MODE/SET” button (B7) to confirm each setting.
z The setting sequence is shown as follow: Hour, Minutes, Second, Year,
Month/Day sequence, Month, Day, Time Zone, Day-of-week language.
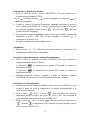
z 7 languages can be selected in Day-of-week, they are: German, English, Denmark,
Dutch, French, Italian and Spanish. The languages and their selected abbreviations
for each day of the week are shown in the following table.
Language
Sunday
Monday Tuesday Wednesday Thursday Friday Saturday
German, GE SO MO DI MI DO FR SA
English, EN SU MO TU WE TH FR SA
Denmark, DA SO MA TI ON TO FR LO
Dutch, NE ZO MA DI WO DO VR ZA
French, FR DI LU MA ME JE VE SA
Italian, IT DO LU MA ME GI VE SA
Spanish, ES DO LU MA MI JU VI SA
z The Time Setting Mode will automatically exit in 5 seconds without any
adjustment.
Snooze Alarm Clock Function:
z Press “ MODE/SET” button (B7) to select to view :
Time Date/Month /Weekday Alarm Time (“ ” Shown on the LCD)
z When viewing the Alarm Time, hold “MODE/SET” button (B7) for 3 seconds to
enter Alarm Time setting. Press “
” (B5) or “ ” (B6) buttons to adjust the
alarm time.
z Press “AL ON/OFF” button (B4) to switch alarm on or off. If it is on, “ ”
shown on the LCD.
z Press any button to stop the alarm.

6
Thermometer:
z Press “°C / °F” button (B6) to select Temperature in Celsius mode/ Fahrenheit
mode.
Maximum/Minimum temperature recording function:
z Press “MAX/MIN” button (B2) to show the maximum or minimum of indoor and
outdoor temperature.
“ ” is shown on the LCD if maximum temperature is shown.
“ ” is shown on the LCD if minimum temperature is shown.
y Hold “MAX/MIN” button (B2) for 3 seconds to clear the recorded maximum and
minimum reading.
Temperature Alert function:
z Hold “ALERT” button (B1) for 3 seconds to enter Temperature Alert setting,
Temperature’s digits flash.
z Press “ ” (B5) or “ ” (B6) button to select Indoor or Outdoor CH1, CH2
and CH3 temperature alert. Press “ALERT “button (B1) to confirm the setting.
z Press “ ” (B5) or “ ” (B6) button to set the upper “ ” and lower “ ”
limit of the temperature. Press “ALERT “button (B1) to confirm the setting.
z Press “ALERT” button (B1) to set the Temperature Alert function on or off (“ ”
appears on the LCD if this function is on).
Low batteries indicator:
z Low battery icon “ ” appear at particular channel indicating that Thermal
Sensor Unit of the channel is in low battery status. The batteries should be
replaced.
Note:
z Always read the users manual carefully before operating the Unit.
z Use a pin to press the reset button (B8) if the Unit does not work properly.
z Avoid placing the clock near interference sources/metal frames such as computer
or TV sets.
z The clock loses its time information when the battery is removed.
z Buttons will not function while scanning for outdoor temperature signal unless
they are well received or stopped manually.
-
 1
1
-
 2
2
-
 3
3
-
 4
4
-
 5
5
-
 6
6
-
 7
7
-
 8
8
-
 9
9
-
 10
10
-
 11
11
-
 12
12
-
 13
13


Brigmton BEM-501-N El manual del propietario
- Tipo
- El manual del propietario
- Este manual también es adecuado para
En otros idiomas
- English: Brigmton BEM-501-N Owner's manual