Kenmore 100.30428310 Manual de usuario
- Categoría
- Hervidores eléctricos
- Tipo
- Manual de usuario
Este manual también es adecuado para

Kenmore ®
English / Español
Use & Care Guide
Manual de Uso y Cuidado
P/N 134779000B(0807)
Customer Assistance/Asistencia al Cliente
1-855-438-7899
Sears Brands Management Corporation
Homan Estates, IL 60179 U.S.A.
www.kenmore.com
www.sears.com
www.kmart.com
Tea Kettle
1.7 Liter Capacity
Hervidor de té
Capacidad 1.7 litros
Model/Modelo: 100.30428310
KENMORE TWO YEAR LIMITED WARRANTY
When installed, operated and maintained according to all supplied instructions, if this appliance
fails due to a defect in material and workmanship within two year
s from the date of purchase,
return it with proof of purchase to any Sears store, Parts & Repair Service Center or other
Kenmore outlet in the United States for free repair or replacement if repair is unavailable.
This warranty covers ONLY defects in material and workmanship, and will NOT pay for:
1. Expendable items that can wear out from normal use, including but not limited to lters, belts,
light bulbs, and bags.
2. A service technician to instruct the user in correct product installation, operation or maintenance.
3. A service technician to clean or maintain this product.
4. Damage to or failure of this product if it is not installed, operated or maintained according
to the all instructions supplied with the product.
5. Damage to or failure of this product resulting from accident, abuse, misuse or use for other
than its intended purpose.
6. Damage to or failure of this product caused by the use of detergents, cleaners, chemicals or
utensils other than those recommended in all instructions supplied with the product.
7. Damage to or failure of parts or systems resulting from unauthorized modications
made to this product.
This warranty is void if this appliance is ever used for other than private household purposes.
This warranty gives you specic legal rights, and you may also have other rights
which vary from state to state.
Sears Brands Management Corporation, Homan Estates, IL 60179
GARANTÍA DE KENMORE LIMITADA POR DOS AÑOS
Cuando se instale, opere y se mantenga según todas las instrucciones incluidas, si este aparato
falla dado a un defecto en materiales o mano de obra dentro de dos años desde la fecha de compra,
devuélvalo con su comprobante de compra a cualquier tienda Sears, Centro de Piezas y Reparación
de Sears u otra tienda de Kenmore en los Estados Unidos para que sea reparado o reemplazado
gratuitamente si no se puede reparar.
Esta garantía cubre los defectos en materiales y mano de obra ÚNICAMENTE y NO pagará por:
1. Piezas fungibles que se pueden desgastar con el uso normal, incluyendo pero sin limitarse a
ltros, correas, bombillos, y bolsas.
2. Un técnico de servicio que le indique al usuario la instalación correcta del producto,
operación o mantenimiento.
3. Un técnico de servicio que limpie o dé mantenimiento a este producto.
4. Daño o fallo de este producto si no se instala, opera o mantiene de acuerdo a todas las
instrucciones incluidas con este producto.
5. Daño o fallo de este producto como resultado de un accidente, abuso, mal uso o uso diferente
a los nes previstos.
6. Daño o fallo de este producto causado por detergentes, limpiadores, químicos u otros
utensilios que no sean los recomendados en las instrucciones incluidas con este producto.
7. Daño o fallo de las piezas o sistemas como resultado de modicaciones no autorizadas que
se hagan a este producto.
Esta garantía no será válida si este producto se usa para otro propósito que no sea de uso doméstico.
Esta garantía le da derechos legales especícos y es posible que tenga otros derechos los cuales
pueden variar de un estado a otro.
Sears Brands Management Corporation, Homan Estates, IL 60179

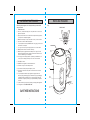
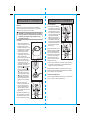
Power Cord
2
3
Latch
Button
Lid
Handle
Control
Panel
PowerFunction
UPDOWN
Water
Window
Body
Power
Base
Fig. 1
CONTROL PANEL
IMPORTANT SAFEGUARDS
When using electrical appliance the following basic safety precautions should
always be followed
1. READ all instructions.
2. Before use, check that the voltage power corresponds to the one shown on the
appliance rating label.
3. Unplug from outlet when not in use and before cleaning. Allow the appliance to
cool down before cleaning the appliance.
4. DO NOT let cord hang over edge of the table or counter, or touch hot surface.
5. Put kettle on a warm-resistant and flat surface.
6. To protect against electric shock, DO NOT immerse cord, plug, power base and
kettle in water or other liquid.
7. Close supervision is necessary when any appliance is used or near children.
8. DO NOT touch hot surface. Use handle or knobs only.
9. DO NOT operate any appliance with a damaged cord or plug or after the
appliance malfunctions. Return the appliance to the nearest authorized service
center for examination, repair or adjustment.
10. If the supply cord is damaged, it must be replaced by the manufacturer or its
service agent or a similarly qualified person in order to avoid a hazard.
11. DO NOT use outdoors.
12. DO NOT use the appliance for other than intended use.
13. The kettle can only use with the stand provided.
14. If the kettle is overfilled, boiling water may be ejected.
15. Fill with proper amount of water, neither over the max-level nor lower than
the min-level.
16. To protect against electrical shock, this appliance is equipped with a cord
having a 3-prong grounding-type plug for insertion into a proper grounding-type
receptacle. DO NOT alter the plug for use in a 2-prong receptacle. If the plug
will not fit into a receptacle, have the proper receptacle installed by a qualified
electrician.
17. Children should be supervised to ensure that they do not play with the appliance.
18. This appliance is for HOUSEHOLD USE ONLY.
PARTS AND FEATURES
2
SAVE THESE INSTRUCTIONS!
1.7L
MAX
1.5L
1.0L
0.5L
MIN

1.7L
MAX
1.5L
1.0L
0.5L
MIN
4
5
OPERATING YOUR TEA KETTLE OPERATING YOUR TEA KETTLE
INITIAL USE
Before first use, run the kettle through several cleaning cycles following the
instructions below to remove factory material or dust from the interior. Discard the
water from these cleaning cycles.
Fig. 2
Fig. 3
Fig. 4
CAUTION: The lled water level must be between the Max and Min level
as indicated on the housing. Too little water will do damage to the heat
element. Water overll may cause boiling water to overow out of the kettle.
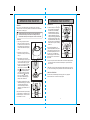
OPERATION
1. Raise Lid by pressing down on Latch
Button in top of Lid (Fig. 2). Pour water
into kettle to desired level and close Lid.
Ensure that Lid Latch on kettle interior is
not obstructed and that Lid completely
closes.
2. Place kettle on Power Base (Fig. 3).
Position kettle so that spout faces away
from you.
3.
Plug kettle into a power outlet. The
Control Panel Display will light up green
for a few seconds to indicate electrical
connection and then dim to gray until
the next press of a button. The Display
defaults to the Heat Water icon [ ]
and 212°F (Fig. 4). Pressing the Function
Button [ ] will display the Keep Warm
icon [ ] and default temperature of
190°F (Fig. 5). Another press displays
the Boil Extend icon [ ] and default
time of 3 seconds (Fig. 6). Press the
Power button to immediately begin
heating to those default levels.
4.
To adjust the Heat Water, Keep Warm
and Boil Extend settings, press the Down
or Up buttons when the function is
selected in the display. Boil Extend
adjustment is only available for 212°F
Heat Water.
Note: Heat Water and Keep Warm adjust
in 10ºF increments to a minimum of 110ºF.
Boil Extend adjusts in 1 second increments
to a maximum of 6 seconds.
PowerFunction
Down Up
Fig. 4Fig. 4
PowerFunction
Down Up
Fig. 5Fig. 5
PowerFunction
Down Up
Fig. 6Fig. 6
OPERATION cont.
5.
When the settings are as desired, press
the Power button to start heating. The
Heat Water icon will start blinking,
indicating that heating is underway.
Once water reaches the temperature
setting, the blinking Keep Warm icon
will appear in the display, indicating the
temperature at which the water will be
kept. If the Heat Water setting is 212°F,
the display will pass to the blinking Boil
Extend icon before it passes to the Keep
Warm icon.
Note: The Boil Extend function is for
operation at high altitude locations, where
water can begin to boil before it reaches
the normal boiling temperature of 212°F.
The extra 3 to 6 seconds that can be
added to heating are so that water may
heat to 212°F before the unit switches to
Keep Warm.
6. When it is raised from the Power Base the kettle shuts off and all setting adjustments
are canceled. The kettle reverts to the default settings once it is placed back onto
the Power Base.
CAUTION: Be very careful when pouring water from kettle as boiling water can scald
you. Also to avoid scalding, do not open the kettle lid while the water in the kettle is hot.
EMPTY-STOP-OFF FUNCTION
The kettle will turn off automatically if it boils empty. If this occurs, unplug the
kettle and wait for it to cool down before using it again.

6
7
NOTES CARE AND CLEANING
In order to maintain the polish of the outer surface, do not use abrasive cleaner to
wipe the housing.
Do not attempt to dismantle the kettle or power base. There are no user serviceable
parts inside.
DE-SCALING
Periodical descaling is needed. The interval of descaling depends on the hardness
of water in your living area and the frequency your using the kettle.
When scale becomes visible in the kettle, you have to de-scale it. To remove scale
from the kettle interior, use liquid de-scaling product, or you can use vinegar.
1. Fill kettle to MAX line with water first, and add the de-scaling agent afterwards.
2. Add de-scaling agent according to the instructions that come with the product.
When using vinegar, add 2 to 3 ml to the kettle.
3. Turn the ON/OFF switch to ON, and bring kettle to boil.
NOTE: The de-scaling mixture might froth during heating.
4. After de-scaling, rinse the kettle interior out twice with fresh water.
WARNING:
• DO NOT immerse the tea kettle in water or any other liquid.
• ALWAYS UNPLUG the tea kettle from the electric outlet before cleaning.
STORAGE
The kettle may be stored on the power base when not in use. But make sure the
power cord is unplugged.
Note: Always disconnect the power supply when not use.
All other servicing to this appliance must be performed by a qualified service agent.

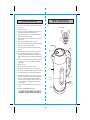
Cable eléctrico
2
9
Botón
de cierre
Tapa
Manija
Panel
de control
PoderFunción
Arriba
Abajo
Ventana
de agua
Cuerpo
Base
de energía
Fig. 1
Panel de control
PUNTOS IMPORTANTES
PARTES Y CARACTERÍSTICAS
8
GUARDE ESTAS INSTRUCCIONES!
1.7L
MAX
1.5L
1.0L
0.5L
MIN
Al usar el aparato eléctrico, las medidas de seguridad básicas siguientes deben
ser siempre seguidas:
1. LEA todas las instrucciones.
2. Antes de usar, compruebe que la energía del voltaje corresponda a la que
está demostrada en la etiqueta de clasificación del aparato.
3. Desenchufe de la toma cuando no se usa y antes de limpiar. Permita que el
aparato se enfrie antes de limpiar el aparato.
4. NO deje la cuerda colgar sobre el borde de la mesa o contador, o toque la
superficie caliente.
5. Ponga el hervidor en una superficie resistente al calor y plano.
6. Para proteger contra descarga eléctrica, NO sumerja la cuerda, el enchufe, la
base de energía y el hervidor en agua u otro líquido.
7. La supervisión cercana es necesaria cuando se utiliza cualquier aparato o
cerca a niños.
8. NO toque la superficie caliente. Solamente utilice la manija o las perillas.
9. NO funcione ningún aparato con una cuerda o un enchufe dañado o
después de los malfuncionamientos del aparato. Vuelva el aparato al centro
de servicio autorizado más cercano para la examinación, la reparación o el
ajuste.
10. Si se daña la cuerda de alimentación, debe ser substituida por el fabricante
o su agente de servicio o una persona semejantemente calificada para
evitar un peligro.
11. NO utilice al aire libre.
12. NO utilice el aparato para con excepción del uso previsto.
13. El hervidor solamente se puede utilizar con el soporte proporcionado.
14. Si el hervidor es excesivamente llenada, agua hervido puede ser expulsado.
15. Llene el agua conveniente, ni sobre el máximo nivel ni bajo del minimo nivel.
16. Para proteger contra descarga eléctrica, este aparato se equipa de una
cuerda que tiene un enchufe tipo de poner a tierra de tres dientes para la
inserción en un receptáculo tipo poner a tierra apropiado. NO altere el
enchufe para el uso en un receptáculo de 2 dientes. Si el enchufe no cabe
en a el receptáculo, tenga el receptáculo apropiado instalado por un
electricista calificado.
17. Los niños deben ser supervisados para asegurarse de que no jueguen con el
aparato.
18. Este aparato es SOLAMENTE PARA EL USO EN CASA.

1.7L
MAX
1.5L
1.0L
0.5L
MIN
10
11
FUNCIONAMIENTO DE SU HERVIDOR DE TÉ
FUNCIONAMIENTO DE SU HERVIDOR DE TÉ
USO INICIAL
Antes del primer uso, funcione el hervidor durante varios ciclos de limpieza
siguiendo las instrucciones abajo para quitar el material o el polvo de fábrica
del interior. Deseche el agua de estos ciclos de limpieza.
Fig. 2
Fig. 3
Fig. 4
PRECAUCIÓN: el nivel del agua llenado debe estar entre el nivel máximo y
mínimo según lo indicado en la cubierta. Demasiado poca agua hará daño
al elemento de calor. El sobrelleno de agua puede hacer que el agua
hervida desbordar del hervidor.
Funcionamiento
PowerFunction
Down Up
Fig. 4Fig. 4
PowerFunction
TEMP
Down
TEMP
Up
Fig. 5Fig. 5
PowerFunction
TEMP
Down
TEMP
Up
Fig. 6Fig. 6
Cont FUNCIONAMIENTO
1. Levante la tapa presionando hacia el
botón de cierre en la parte superior de la
tapa (Figura.2 ) .Vierta el agua en el
hervidor hasta el nivel deseado y cierre la
tapa. Asegúrese de que el cierre de tapa
del hervidor interior no esté obstruido y
que la tapa se cierra por completo.
2. Coloque el hervidor en la Base de
energía (Figura.3).Lo ponga para que el
surtidor de la espalda a usted.
3. Conecte el enchufe a la toma electríca. El
Panal de control se ilumina en verde
durante unos segundos para indicar que
la conexión eléctrica y luego a gris
oscuro hasta la siguiente pulsación de un
botón. El Panal se vuelve al signo de
Calentar el Agua [ ] y 212°F (Figura.4)
.Al pulsar el botón de función [ ] se
mostrará el signo de Mantener el calor
[ ] y la temperatura predeterminada
de 190°F (Figura.5) . Otra pulsación
muestra el signo Extender la ebullición
[ ] y el tiempo predeterminado de 3
segundos (Figura.6) Pulse el Botón de
Poder para iniciar inmediatamente la
caletacción a los niveles predetermina-
dos.
4. Para ajustar el calentar el agua,
mantener el calor y Extender la ebul-
lición, pulse el botón Abajo o Arriba
cuando se selecciona la función en el
Panal Control. Extender la ebullición
ajuste solo está disponible para 212°F al
Calendar el Agua
Nota: Caldear el Agua y Mantener el calor
ajustar en incrementos de 10ºF a un mínimo
de 110ºF.Extender la ebullición ajusta en 1
segundo hasta un máximo de 6 segundos.
FUNCIÓN DE VACIO DETENER APAGAR
El hervidor se apagará automáticamente cuando esté vacío. Si esto pasa, desenchufe
el hervidor y espere que se enfríe antes de utilizarlo otra vez.
5. Cuando los ajustes son los deseados,
pulse el botón de poder para comenzar
a calendar.El signo de Calentar el Agua
empezará a parpadear, lo que indica
que la calefacción está en marcha. Una
vez que el auga alcanza la temperature
programada, el signo parpadea
Mantenga el calor aparecerá en la
Panal, lo que indica la temperature a la
cual se mantendrá el agua. Si el ajuste
del agua es de 212°F,el Panal pasará al
signo de Extender la ebullición intermi-
tente antes de que pase al signo de
Mantener el calor.
Nota: El Extender la ebullición es para el
funcionamiento en lugares de gran altitude,
donde el agua puede comenzar a hervir
antes de que alcance la temperatura de
ebullición normal de 212°F. El extra de 3 a
6 segundos que se pueden agregar a la
calefacción son para que el agua se
caliente a 212 °F antes de que el equipo
cambia para mantener el calor.
6. Cuando el hervidor se levantó de la base de energía se apaga y todos los ajustes
de configuración se cancelará. El hervidor vuelva a la configuración predeteimi-
nada, una vez que se coloca en la Base de energía.
PRECAUCIÓN: Tenga mucho cuidado al verter el agua del hervidor como el agua
hirviendo puede quemar usted. También para evitar quemaduras, no abra la tapa del
hervidor , mientras que el agua de él está caliente.

12
13
NOTASCUIDADO Y LIMPIEZA
ADVERTENCIA:
• No sumerja el hervidor de té en agua o cualquier otro líquido.
• DESENCHUFE SIEMPRE el hervidor de té del enchufe eléctrico antes de limpiar.
Para mantener el pulimento de la superficie externa, no utilice el limpiador
abrasivo para limpiar la cubierta.
No intente de desmontar el hervidor ni la base de energía. No hay piezas
usables en el interior.
DESINCRUSTACIÓN
La desincrustación periodica es necesaria. El lapso de la desincrustación
depende de la dureza del agua en su área y la frecuencia su usar el hervidor.
Cuando la incrustación llega a ser visible en el hervidor, usted tiene que
desincrustarlo. Para quitar la incrustación del interior del hervidor, utilice el
producto líquido de desincrustación, o usted puede utilizar el vinagre.
1. Llene el hervidor a la línea MÁXIMA de agua primero, y agregue el agente
de desincrustación luego.
2. Agregue el agente de desincrustación según las instrucciones que vienen con
el producto. Al usar el vinagre, agregue 2 a 3 ml al hervidor.
3. Gire el interruptor Encendido/Apagado, y haga el hervidor hervir.
NOTA: La mezcla de desincrustación pudo espumejear durante la calefacción.
4. Después de la desincrustación, enjuague el interior del hervidor hacia fuera
dos veces con agua fresca.
Almacenamiento
El hervidor tiene que ser puesto sobre la base de energía cuando no esté en uso.
Pero asegúrese de que el cable eléctrico está desenchufado.
Nota: siempre desconecte el suministro de electricidad cuando no esté en uso.
Todos los demás servicios de este aparato debe ser realizada por un técnico
cualificado.
-
 1
1
-
 2
2
-
 3
3
-
 4
4
-
 5
5
-
 6
6
-
 7
7


Kenmore 100.30428310 Manual de usuario
- Categoría
- Hervidores eléctricos
- Tipo
- Manual de usuario
- Este manual también es adecuado para
en otros idiomas
- English: Kenmore 100.30428310 User manual
Artículos relacionados
Otros documentos
-
Svan SVHV1117 El manual del propietario
-
Bella KitchenSmith 1.7L/7 Cup Electric Kettle El manual del propietario
-
Tefal BJ750D El manual del propietario
-
Mellerware 22350D Manual de usuario
-
Magic Chef MCSK17SS Manual de usuario
-
-
T-Fal KI410D50 El manual del propietario
-
-
Krups BW314050 Manual de usuario
-
Whirlpool 5KEK1522EOB Guía del usuario