Electrolux EHD90230P Manual de usuario
- Categoría
- Encimeras
- Tipo
- Manual de usuario

user manual
notice d'utilisation
bruksanvisning
manual de instrucciones
bruksanvisning
Induction Hob
Table de cuisson à induction
Induksjonskoketopp
Placa de inducción
Induktionshäll
EHD90230P

Electrolux. Thinking of you.
Share more of our thinking at www.electrolux.com
CONTENTS
Safety information 2
Installation instructions 3
Product description 5
Operating instructions 6
Helpful hints and tips 9
Care and cleaning 10
What to do if… 11
Environment concerns 12
Warranty 12
Subject to change without notice.
SAFETY INFORMATION
For your safety and correct operation
of the appliance, read this manual
carefully before installation and use. Al-
ways keep these instructions with the
appliance even if you move or sell it.
Users must fully know the operation
and safety features of the appliance.
GENERAL SAFETY
Warning! Persons (including children)
with reduced physical sensory, mental
capabilities or lack of experience and
knowledge must not use the appliance.
They must have supervision or
instruction for the operation of the
appliance by a person responsible for
their safety.
CHILD SAFETY
• Only adults can use this appliance. Chil-
dren must get supervision to make sure
that they do not play with the appliance.
• Keep all packaging away from children.
There is a risk of suffocation.
• Keep children away from the appliance
when it is on.
Warning! Start the child safety device
to prevent small children and pets from
an accidental activation of the
appliance.
SAFETY DURING OPERATION
• Remove all packaging, stickers and lay-
ers from the appliance before the first
use.
• Set the cooking zones to "off" after each
use.
• Risk of burns! Do not put metallic ob-
jects, for example cutlery or saucepan
lids, on the cooking surface, as they can
become hot.
• Users with an implanted pacemaker must
keep their upper body minimum 30 cm
from induction cooking zones that are
switched on.
Warning! Fire danger! Overheated
fats and oils can catch fire very quickly.
CORRECT OPERATION
• Always monitor the appliance during op-
eration.
• Only use the appliance for domestic
cooking tasks!
• Do not use the appliance as a work or a
storage surface.
• Do not put or keep very flammable liquids
and materials, or fusible objects (made of
plastic or aluminium) on or near the appli-
ance.
• Be careful when you connect the appli-
ance to the near sockets. Do not let elec-
tricity bonds touch the appliance or hot
cookware. Do not let electricity bonds
tangle.
HOW TO PREVENT A DAMAGE TO THE
APPLIANCE
• If the objects or cookware fall on the
glass ceramic, the surface can be dam-
aged.
• Cookware made of cast iron, cast alumi-
nium or with damaged bottoms can
scratch the glass ceramic if you move
them on the surface.
2 electrolux

• Do not let cookware boil dry to prevent
the damage to cookware and glass ce-
ramics.
• Do not use the cooking zones with empty
cookware or without cookware.
• Do not cover the parts of the appliance
with aluminium foil.
• Do not cover the ventilation space of 5
mm between the worktop and front of
the unit below it.
Caution!
5 mm ventilation space is essential, failure
to include this during installation can cause
appliance malfunctions which are not cov-
ered under warranty.
Warning! If there is a crack on the
surface, disconnect power supply
to prevent the electric shock.
INSTALLATION INSTRUCTIONS
Before the installation, note down
the serial number (Ser. Nr.) from the
rating plate.The rating plate of the
appliance is on its lower casing.
EHD90230P
949 594 167 01
58 GCD E2 AU
ELECTROLUX
220-240 V 50-60 Hz
6,9 kW
Induction 6,9 kW
SAFETY INSTRUCTIONS
Warning! You must read these!
Make sure that the appliance is not
damaged because of transportation.
Do not connect a damaged appliance.
If it is necessary, speak to the supplier.
Only an authorised service technician
can install, connect or repair this appli-
ance. Use only original spare parts.
Only use built-in appliances after you
assemble the appliance into correct
built-in units and work surfaces that
align to the standards.
Do not change the specifications or
modify this product. Risk of injury and
damage to the appliance.
Fully obey the laws, ordinances, direc-
tives and standards in force in the
country where you use the appliance
(safety regulations, recycling regula-
tions, electrical safety rules etc.)!
Keep the minimum distances to other
appliances and units!
Install anti-shock protection, for exam-
ple install the drawers only with a pro-
tective floor directly below the appli-
ance!
Protect the cut surfaces of the worktop
against moisture with a correct sealant!
Seal the appliance to the work top with
no space left with a correct sealant!
Protect the bottom of the appliance
from steam and moisture, e.g. from a
dishwasher or oven!
Do not install the appliance adjacent to
doors and below windows! If not, hot
cookware can be hit off the hob when
you open doors or windows.
Warning! Risk of injury from electrical
current. Carefully obey the instructions
for electrical connections.
• The electrical mains terminal is live.
• Make electrical mains terminal free of
voltage.
• Install correctly to give anti-shock protec-
tion.
• Loose and incorrect plug and socket
connections can make the terminal be-
come too hot.
• A qualified electrician must install the
clamping connections correctly.
• Use a strain relief clamp on cable.
• Use the correct mains cable of type
H05BB-F Tmax 90°C (or higher) for a sin-
gle-phase or two-phase connection.
• Replace the damaged mains cable with a
special cable (type H05BB-F Tmax 90°C;
or higher). Speak your local Service Force
Centre.
The appliance must have the electrical in-
stallation which lets you disconnect the ap-
pliance from the mains at all poles with a
contact opening width of minimum 3 mm.
You must have correct isolation devices:
line protecting cut-outs, fuses (screw type
fuses removed from the holder), earth leak-
age trips and contactors.
electrolux 3

STICKING ON THE SEAL
• Clean the worktop in the area of the cut-
out section.
• Bond the sealing tape to the lower edge
of the cooking surface along the outer
edge of the glass ceramic. Do not extend
it. Let stay the cut ends in the middle of
one side. When you have cut it to length
(add some mm), push the two ends to-
gether.
ASSEMBLY
min.
50mm
min.
50mm
min.
500mm
min.
5mm
600mm
380
+1
mm
880
+1
mm
=
=
R 5mm
min.
25 mm
min.
5 mm
min.
20 mm
4 electrolux

min.
38 mm
min.
5 mm
If you use a protection box (the addi-
tional accessory
1)
), the front airflow
space of 5 mm and protective floor di-
rectly below the appliance are not nec-
essary.
You can not use the protection box if
you install the appliance above an
oven.
PRODUCT DESCRIPTION
COOKING SURFACE LAYOUT
1 2
4
3
1
Induction cooking zone 2300W, with
Power function 3200W
2
Induction cooking zone 2300W, with
Power function 3200W
3
Induction cooking zone 2300W, with
Power function 3200W
4
Control panel
CONTROL PANEL LAYOUT
1 2 3 4 5
89
12 11
6 7
10
1) The protection box accessory may not be available in some countries. Please contact your local supplier.
electrolux 5

Use the sensor fields to operate the appliance.
sensor field function
1
starts and stops the hob
2
starts and stops the key lock or child lock
3
activates Power function
4
cooking zones' indicators of timer shows for which zone you set the time
5
the timer display shows the time in minutes
6
a heat setting indicators show the heat setting
7
shows that:
• there is no cookware on the cooking zone
• the cookware is not correct
• automatic switch off is active
8
shows that cooking zone stays hot
9
a control bar to set the heat setting
10
/
increases or decreases the time
11
selects the cooking zone
12
starts and stops STOP+GO
+number in the timer display shows
that there is a malfunction.
RESIDUAL HEAT INDICATOR
Warning! Risk of burns from
residual heat!
The induction cooking zones make the heat
necessary for cooking directly in the bottom
of the cookware. The glass ceramic is heat-
ed by the residual heat of the cookware.
OPERATING INSTRUCTIONS
ON AND OFF
Touch
for 1 second to start or stop the
appliance.
AUTOMATIC SWITCH OFF
The function stops the hob
automatically if:
• all cooking zones are off.
• you do not set the heat setting after you
start the hob.
• you cover a sensor field with an object (a
pan, a cloth, etc.) for longer than 10 sec-
onds. The sound operates until you re-
move the object.
• the hob gets too hot (e.g. when a sauce-
pan boils dry). Before you use the hob
again, the cooking zone must be cool.
•
you use incorrect cookware.
comes
on and after 2 minutes the cooking zone
stops automatically.
• you do not stop a cooking zone or
change the heat setting. After some time
comes on and the hob stops. See the
table.
Automatic Switch Off times
Heat setting
1-2 3-4 5 6-9
Stops after 6 hours 5 hours 4 hours 1.5 hours
6 electrolux

THE HEAT SETTING
Touch the control bar at the heat setting.
The heat setting indicators come on.
THE AUTOMATIC HEAT UP
The Automatic heat up function sets the
highest heat setting for some time, and
then decreases to the necessary level.
Touch
. The indicator flashes. Set the
heat setting (1-8). The indicator of the heat
setting comes on. The indicator above
comes on and after some time goes out.
The time of the automatic heat up changes
for different heat settings.
1
2
3
4
5
6
7
8
9
10
11
0
123456789
SWITCHING THE POWER FUNCTION
ON AND OFF
The Power function makes more power
available to the induction cooking zones.
The Power function is activated for 10 mi-
nutes at most. After that the induction
cooking zone automatically switches back
to the highest heat setting (9). To switch on,
touch
, the indicator above comes on.
To switch off, touch a heat setting (1-9).
POWER MANAGEMENT
The power management divides the power
between two cooking zones in a pair (see
the figure). The power function increases
the power to the maximum level for one
cooking zone in the pair and automatically
decreases in the second cooking zone to a
lower power level. The display for the re-
duced zone alternates.
USING THE TIMER
Count Down Timer
Use the Count Down Timer to set how long
the cooking zone operates for one cooking
session.
Set the Count Down Timer after the se-
lection of the cooking zone.
You can set the heat setting before or after
you set the timer.
• Selection of the cooking zone:touch
again and again until the indicator of a
necessary cooking zone comes on.
• Starting the Count Down Timer: touch
of the timer to set the time (
00
-
99
minutes). When the indicator of the cook-
ing zone flashes slower, the time counts
down.
• Checking the remaining time: select
the cooking zone with
. The indicator
of the cooking zone flashes faster. Dis-
play shows the remaining time.
• Changing the Count Down Timer:se-
lect the cooking zone with
touch or
.
electrolux 7

• Stopping the timer: select the cooking
zone with
. Touch . The remaining
time counts backwards to
00
. The indi-
cator of the cooking zone goes out. To
switch off You can also touch
and
at the same time.
When the time elapses, the sound oper-
ates and
00
flashes. The cooking zone
switches off.
•
Stopping the sound: touch
CountUp Timer (Count up timer)
Use the CountUp Timer to monitor how
long the cooking zone operates.
• Selection of the cooking zone (if
more than 1 cooking zone oper-
ate):touch
again and again until the
indicator of a necessary cooking zone
comes on.
•
Starting the CountUp Timer:touch
of the timer comes on. When the indi-
cator of the cooking zone flashes slower,
the time counts up, display switches be-
tween
and time elapsed (minutes)
• Checking the elapsed time: select the
cooking zone with
. The indicator of
the cooking zone flashes faster. Display
shows the elapsed time.
• Stopping the CountUp Timer: select
the cooking zone with
and touch
or to switch off the timer. The indicator
of the cooking zone goes out.
Minute Minder
You can use the timer as a Minute Minder
while cooking zones do not operate. Touch
. Touch or of the timer to select
the time. When the time elapses, the sound
operates and
00
flashes.
•
Stopping the sound: touch
STOP+GO
The
function sets all cooking zones that
operate to the lowest heat setting.
When
operates, you cannot change the
heat setting.
The
function does not stop the timer
function.
•
To activate this function touch
. The
indicator comes on.
•
To deactivate this function touch
.
The heat setting that you set before
comes on.
LOCK
You can lock the control panel, but not
.
It prevents an accidental change of the heat
setting.
To start this function touch
. The indica-
tor comes on.
The Timer stays on.
To stop this function touch
. The indica-
tor goes out.
When you stop the appliance, you also stop
this function.
THE CHILD SAFETY DEVICE
This function prevents an accidental opera-
tion of the hob.
Starting the child safety device
•
Start the hob with
. Do not set the
heat settings.
•
Touch
for 4 seconds. The indicator
comes on.
•
Stop the hob with
.
Switching off the child safety device
•
Start the hob with
. Do not set the
heat settings. Touch
for 4 seconds.
The indicator goes out.
•
Stop the hob with
.
Overriding the child safety device for
one cooking session
•
Start the hob with
. The indicator
comes on.
•
Touch
for 4 seconds. Set the heat
setting in less than 10 seconds. You
can operate the hob.
•
When you stop the hob with
, the
child safety device operates again.
OFFSOUND CONTROL (DEACTIVATION
AND ACTIVATION OF THE SOUNDS)
Deactivation of the sounds
Deactivate the appliance.
Touch
for 3 seconds. The displays come
on and go out. Touch
for 3 seconds.
comes on, the sound is on. Touch ,
comes on, the sound is off.
When this function operates, you can hear
the sounds only when:
8 electrolux

•
you touch
• the Minute Minder comes down
• the Count Down Timer comes down
• you put something on the control panel.
Activation of the sounds
Deactivate the appliance.
Touch
for 3 seconds. The displays come
on and go out. Touch
for 3 seconds.
comes on, because the sound is off. Touch
, comes on. The sound is on.
HELPFUL HINTS AND TIPS
Use the induction cooking zones with
suitable cookware.
COOKWARE FOR INDUCTION
COOKING ZONES
Important! In induction cooking a powerful
electromagnetic field generates an almost
instant heat inside the cookware.
Cookware material
• correct: cast iron, steel, enamelled steel,
stainless steel, a multi-layer bottom
(marked as correct by a manufacturer).
• not correct: aluminium, copper, brass,
glass, ceramic, porcelain.
Cookware is correct for an induction
hob if …
• ... some water boils very quickly on a
zone set to the highest heat setting..
• ... a magnet pulls on to the bottom of the
cookware.
The bottom of the cookware must
be as thick and flat as possible.
Cookware dimensions: induction
cooking zones adapt to the dimension
of the bottom of the cookware auto-
matically to some limit. But, the mag-
netic part of the bottom of the cook-
ware must have a minimum diameter of
approximately 3/4 of the cooking
zones.
OPERATING NOISES
If you can hear
• cracking noise: cookware is made of dif-
ferent materials (Sandwich construction).
• whistling: you use one or more cooking
zones with high power levels and the
cookware is made of different materials
(Sandwich construction).
• humming: you use high power levels.
• clicking: electric switching occurs.
• hissing, buzzing: the fan operates.
The noises are normal and do not refer
to any defects.
ENERGY SAVING
• If possible, always put the lids on the
cookware.
•Put cookware on a cooking zone be-
fore you start it.
• Stop the cooking zones before the
end of the cooking time to use resid-
ual heat.
• The bottom of pans and cooking
zones must have the same dimen-
sion.
ÖKO TIMER (ECO TIMER)
To save the energy, the heater of the
cooking zone switches itself off earlier
than count down timer signal. The
heating time reduction depends on
cooking level and cooking time.
EXAMPLES OF COOKING
APPLICATIONS
The data in the table is for guidance only.
Heat
set-
ting
Use to: Time Hints
-1
Keep cooked foods warm as re-
quired
Cover the food
electrolux 9

Heat
set-
ting
Use to: Time Hints
1-2 Hollandaise sauce, melt: butter, choco-
late, gelatine
5-25
min
Mix occasionally
1-2 Solidify: fluffy omelettes, baked eggs 10-40
min
Cook with a lid on
2-3 Simmer rice and milkbased dishes,
heating up ready-cooked meals
25-50
min
Add at least twice as much liquid as
rice, stir milk dishes part way
through
3-4 Steam vegetables, fish, meat 20-45
min
Add a few tablespoons of liquid
4-5 Steam potatoes 20-60
min
Use max. ¼ l water for 750 g of po-
tatoes
4-5 Cook larger quantities of food, stews
and soups
60-150
min
Up to 3 l liquid plus ingredients
6-7 Gentle fry: escalope, veal cordon bleu,
cutlets, rissoles, sausages, liver, roux,
eggs, pancakes, doughnuts
as re-
quired
Turn halfway through
7-8 Heavy fry, hash browns, loin steaks,
steaks
5-15
min
Turn halfway through
9 Boil large quantities of water, cook pasta, sear meat (goulash, pot roast), deep fry chips
The Power function is suitable for heating
large quantities of water.
Information on acrylamides
Important! According to the newest
scientific knowledge, if you brown food
(specially the one which contains starch),
acrylamides can pose a health risk. Thus,
we recommend that you cook at the lowest
temperatures and do not brown food too
much.
CARE AND CLEANING
Clean the appliance after each use.
Always use cookware with clean bottom.
Warning! Sharp objects and abrasive
cleaning agents will damage the
appliance.
For your safety, do not clean the appli-
ance with steam blasters or high-pres-
sure cleaners.
Scratches or dark stains on the glass
ceramic have no effect on how the ap-
pliance operates.
To remove the dirt:
1. – Remove immediately:melted plas-
tic, plastic foil, and food with sugar. If
not, the dirt can cause damage to
the appliance. Use a special scraper
for the glass . Put the scraper on the
glass surface at an acute angle and
move the blade on the surface .
–
Remove after the appliance is
sufficiently cool:limescale rings ,
water rings, fat stains, shiny metallic
discolorations. Use a special cleaning
agent for glass ceramic or stainless
steel.
2. Clean the appliance with a moist cloth
and some detergent.
3. At the end rub the appliance dry
with a clean cloth.
10 electrolux

WHAT TO DO IF…
Problem Possible cause and remedy
You cannot start the appliance
or operate it.
• You touched 2 or more sensor fields at the same time. Only
touch one sensor field.
• There is water or fat stains on the control panel. Clean the con-
trol panel
•
The child safety device or key lock or
operates . See the
chapter Operating the appliance.
• Start the appliance again and set the heat setting within 10
seconds.
A sound operates (6x) and the
appliance stops or a sound op-
erates when the appliance is
off.
You covered one or more sensor fields. Uncover the sensor
fields.
The residual heat indicator
does not come on.
The cooking zone is not hot because it operated only for a short
time. If the cooking zone is supposed to be hot, speak to the Af-
ter Sales Service.
A sound operates and appli-
ance starts and stops again.
After 5 seconds one more
sound operates.
You covered . Uncover the sensor field.
Heat setting alternates The Power management is active. See the section Power man-
agement.
comes on
• No cookware on the cooking zone. Put cookware on the cook-
ing zone.
• Not correct cookware. Use the correct cookware.
• The diameter of the bottom of the cookware is too small for the
cooking zone. Move cookware to a smaller cooking zone.
• The automatic switch-off operates. Stop the appliance and
start it again.
• Overheating protection for the cooking zone operates. Switch
off the cooking zone. Switch on the cooking zone again.
and number come on.
There is an error in the appliance.
Disconnect the appliance from the electrical supply for some
time. Disconnect the fuse from the electrical system of the house.
Connect again. If
comes on again, speak to the after sales
service.
comes on
There is an error in the appliance, because a cookware boils dry
or you use not correct cookware. Overheating protection for the
cooking zone operates. The automatic switch-off operates.
Switch off the appliance. Remove the hot cookware. After ap-
proximately 30 seconds switch on the cooking zone again.
should disappear, residual heat indicator can stay. Cool down the
cookware and check it with the section "Cookware for the induc-
tion cooking zone".
If you tried the above solutions and cannot
repair the problem, speak to your dealer or
the Customer Care Department. Give the
data from the rating plate, three-digit-letter
code for the glass ceramic (it is in the cor-
ner of the cooking surface) and an error
message that comes on.
If you operated the appliance incorrectly,
the servicing by a customer service techni-
cian or dealer will not be free of charge,
even during the warranty period. The in-
structions about the customer service and
conditions of guarantee are in the guaran-
tee booklet.
electrolux 11

ENVIRONMENT CONCERNS
The symbol on the product or on its
packaging indicates that this product may
not be treated as household waste. Instead
it should be taken to the appropriate
collection point for the recycling of electrical
and electronic equipment. By ensuring this
product is disposed of correctly, you will
help prevent potential negative
consequences for the environment and
human health, which could otherwise be
caused by inappropriate waste handling of
this product. For more detailed information
about recycling of this product, please
contact your local council, your household
waste disposal service or the shop where
you purchased the product.
PACKAGING MATERIAL
The packaging materials are friendly to
the environment and can be recycled.
The plastic components are identified
by marking: >PE<,>PS<, etc. Discard
the packaging materials as household
waste at the waste disposal facilities in
your municipality.
WARRANTY
FOR SALES IN AUSTRALIA AND NEW
ZEALAND
APPLIANCE: BUILT-IN OVEN, COOKTOP
AND FREESTANDING COOKER
This document sets out the terms and
conditions of the product warranties
for Electrolux Appliances. It is an im-
portant document. Please keep it with
your proof of purchase documents in a
safe place for future reference should
you require service for your Appliance.
1. In this warranty
a) ‘acceptable quality’ as referred to in
clause 10 of this warranty has the
same meaning referred to in the
ACL;
b) ‘ACL’ means Trade Practices
Amendment (Australian Consumer
Law) Act (No.2) 2010;
c) ‘Appliance’ means any Electrolux
product purchased by you accom-
panied by this document;
d) ‘ASC’ means Electrolux’ authorised
serviced centres;
e) ‘Electrolux’ means Electrolux Home
Products Pty Ltd of 163 O’Riordan
Street, Mascot, NSW 2020, ABN 51
004 762 341 in respect of Applian-
ces purchased in Australia and
Electrolux (NZ) Limited of 3-5 Niall
Burgess Road, Mount Wellington, in
respect of Appliances purchased in
New Zealand;
f) ‘major failure’ as referred to in
clause 10 of this warranty has the
same meaning referred to in the
ACL and includes a situation when
an Appliance cannot be repaired or
it is uneconomic for Electrolux, at its
discretion, to repair an Appliance
during the Warranty Period;
g) ‘Warranty Period’ means:
– where the Appliance is used for
personal, domestic or household
use (i.e. normal single family use)
as set out in the instruction man-
ual, the Appliance is warranted
against manufacturing defects in
Australia for 24 months and in
New Zealand for 24 months, fol-
lowing the date of original pur-
chase of the Appliance;
– where the Appliance is used for
commercial purposes (including
being used to directly assist a
business or where the Appliance
is used in a multi-family commu-
nal or share type environment),
the Appliance will then be warran-
ted against manufacturing de-
fects in Australia for 3 months
and in New Zealand for 3
months, following the date of
original purchase of the Appli-
ance.
h) ‘you’ means the purchaser of the
Appliance not having purchased the
Appliance for re-sale, and ‘your’ has
a corresponding meaning.
12 electrolux

2. This warranty only applies to Applian-
ces purchased and used in Australia or
New Zealand and is in addition to (and
does not exclude, restrict, or modify in
any way) any non-excludable statutory
warranties in Australia or New Zealand.
3. During the Warranty Period Electrolux
or its ASC will, at no extra charge if
your Appliance is readily accessible for
service, without special equipment and
subject to these terms and conditions,
repair or replace any parts which it con-
siders to be defective. Electrolux or its
ASC may use remanufactured parts to
repair your Appliance. You agree that
any replaced Appliances or parts be-
come the property of Electrolux. This
warranty does not apply to light globes,
batteries, filters or similar perishable
parts.
4. Parts and Appliances not supplied by
Electrolux are not covered by this war-
ranty.
5. You will bear the cost of transportation,
travel and delivery of the Appliance to
and from Electrolux or its ASC. If you
reside outside of the service area, you
will bear the cost of:
a) travel of an authorised representa-
tive;
b) transportation and delivery of the
Appliance to and from Electrolux or
its ASC,
In all instances, unless the Appliance is
transported by Electrolux or an Electro-
lux authorised representative, the Appli-
ance is transported at the owner’s cost
and risk while in transit to and from
Electrolux or its ASC.
6. Proof of purchase is required before
you can make a claim under this war-
ranty.
7. You may not make a claim under this
warranty unless the defect claimed is
due to faulty or defective parts or work-
manship. Electrolux is not liable in the
following situations (which are not ex-
haustive):
a) the Appliance is damaged by:
– accident
– misuse or abuse, including failure
to properly maintain or service
– normal wear and tear
– power surges, electrical storm
damage or incorrect power sup-
ply
– incomplete or improper installa-
tion
– incorrect, improper or inappropri-
ate operation
– insect or vermin infestation
– failure to comply with any addi-
tional instructions supplied with
the Appliance;
b) the Appliance is modified without
authority from Electrolux in writing;
c) the Appliance’s serial number or
warranty seal has been removed or
defaced;
d) the Appliance was serviced or re-
paired by anyone other than Elec-
trolux, an authorised repairer or
ASC.
8. This warranty, the contract to which it
relates and the relationship between
you and Electrolux are governed by the
law applicable where the Appliance
was purchased. Where the Appliance
was purchased in New Zealand for
business purposes the Consumer
Guarantee Act does not apply.
9. To the extent permitted by law, Electro-
lux excludes all warranties and liabilities
(other than as contained in this docu-
ment) including liability for any loss or
damage whether direct or indirect aris-
ing from your purchase, use or non use
of the Appliance.
10. For Appliances and services provided
by Electrolux in Australia, the Applian-
ces come with a guarantee by Electro-
lux that cannot be excluded under the
Australian Consumer Law. You are en-
titled to a replacement or refund for a
major failure and for compensation for
any other reasonably foreseeable loss
or damage. You are also entitled to
have the Appliance repaired or re-
placed if the Appliance fails to be of ac-
ceptable quality and the failure does
not amount to a major failure. The ben-
efits to you given by this warranty are in
addition to your other rights and rem-
edies under a law in relation to the Ap-
pliances or services to which the war-
ranty relates.
electrolux 13

11. At all times during the Warranty Period,
Electrolux shall, at its discretion, deter-
mine whether repair, replacement or re-
fund will apply if an Appliance has a val-
id warranty claim applicable to it.
12. For Appliances and services provided
by Electrolux in New Zealand, the Ap-
pliances come with a guarantee by
Electrolux pursuant to the provisions of
the Consumer Guarantees Act, the
Sale of Goods Act and the Fair Trading
Act.
13. To enquire about claiming under this
warranty, please follow these steps:
a) carefully check the operating in-
structions, user manual and the
terms of this warranty;
b) have the model and serial number
of the Appliance available;
c) have the proof of purchase (eg an
invoice) available;
d) telephone the numbers shown be-
low.
14. You accept that if you make a warranty
claim, Electrolux and its ASC may ex-
change information in relation to you to
enable Electrolux to meet its obligations
under this warranty.
Important Notice
Before calling for service, please ensure that the steps listed in point 13 above have been
followed.
FOR SERVICE
or to find the address of your
nearest state service centre in
Australia
Please call 13 13 4 9
For the cost of a local call (Australia on-
ly)
SERVICE AUSTRALIA
ELECTROLUX HOME
PRODUCTS
www.electrolux.com.au
FOR SPARE PARTS
or to find the address of your
nearest state spare parts cen-
tre in Australia
Please call 13 13 50
For the cost of a local call (Australia on-
ly)
FOR SERVICE
or to find the address of your
nearest authorised service cen-
tre in New Zealand
Free call 0800 10 66 10
(New Zealand only)
SERVICE NEW ZEALAND
ELECTROLUX HOME
PRODUCTS
www.electrolux.co.nz
FOR SPARE PARTS
or to find the address of your
nearest state spare parts cen-
tre in New Zealand
Free call 0800 10 66 20
(New Zealand only)
14 electrolux

Electrolux. Thinking of you.
Partagez notre imagination sur www.electrolux.com
SOMMAIRE
Consignes de sécurité 15
Instructions d'installation 16
Description de l'appareil 18
Notice d'utilisation 20
Conseils utiles 23
Entretien et nettoyage 24
En cas d'anomalie de fonctionnement 25
En matière de protection de
l'environnement 26
Sous réserve de modifications.
CONSIGNES DE SÉCURITÉ
Pour votre sécurité et le bon fonction-
nement de l'appareil, lisez attentive-
ment ce manuel avant l'installation et
l'utilisation. Conservez ces instructions
à proximité de l'appareil. Les utilisa-
teurs doivent connaître parfaitement le
fonctionnement et les fonctions de sé-
curité de l'appareil.
AVERTISSEMENTS IMPORTANTS
Avertissement Cet appareil n'est pas
conçu pour être utilisé par des
personnes (y compris des enfants) dont
les facultés physiques, sensorielles ou
mentales sont réduites, ou qui
manquent d'expérience et de
connaissances, à moins qu'une
personne responsable de leur sécurité
ne les supervise ou leur donne des
instructions sur la manière de l'utiliser.
SÉCURITÉ DES ENFANTS
• Cet appareil a été conçu pour être utilisé
par des adultes. Veillez à ce que les en-
fants n'y touchent pas et ne l'utilisent pas
comme un jouet.
• Ne laissez pas les emballages à portée
de main des enfants. Ils pourraient s'as-
phyxier !
• Tenez les enfants éloignés de l'appareil
pendant son fonctionnement.
Avertissement La sécurité enfants
empêche l'utilisation accidentelle ou
involontaire de l'appareil.
UTILISATION
• Retirez tous les emballages, les étiquet-
tes et les films protecteurs de l'appareil
(sauf la plaque signalétique) avant de
l'utiliser pour la première fois.
• Mettez les zones de cuisson à l'arrêt
après chaque utilisation.
• Risque de brûlures ! Ne posez aucun ob-
jet contenant du métal, comme les cou-
verts et couvercles de récipients sur la ta-
ble de cuisson. Ils risqueraient de
s'échauffer.
• Les utilisateurs porteurs d'un pacemaker
doivent se tenir à une distance d'au
moins 30 cm (au niveau du buste) des
zones de cuisson à induction mises en
fonctionnement.
Avertissement Danger d'incendie !
Surveillez attentivement la cuisson lors
de friture dans l'huile ou la graisse : les
graisses surchauffées s'enflamment
facilement.
UTILISATION
• Surveillez toujours l'appareil pendant son
fonctionnement.
• Votre appareil est destiné à un usage do-
mestique normal.
• N'utilisez pas l'appareil comme plan de
travail ou support.
• Ne posez pas ou ne stockez pas de liqui-
des ou des matériaux inflammables, des
objets susceptibles de fondre (plastique,
aluminium) sur ou à proximité de l'appa-
reil.
• Faites attention si vous branchez d'autres
appareils électriques à des prises situées
electrolux 15

à proximité de la table de cuisson. Con-
trôlez que les câbles d'alimentation n'en-
trent pas en contact avec les surfaces
brûlantes de l'appareil ou les récipients
brûlants. Contrôlez que les câbles ne
soient pas enchevêtrés.
COMMENT ÉVITER D'ENDOMMAGER
L'APPAREIL
•Des objets ou des récipients de cuisson
peuvent, en tombant, endommager la
surface vitrocéramique.
• N'utilisez pas de récipients en fonte, ni de
récipients dont le fond est endommagé
et rugueux. Ils risqueraient de rayer la ta-
ble de cuisson.
• Ne faites pas "brûler" les récipients et ne
laissez pas le contenu s'évaporer en to-
talité. Cela peut entraîner des dégats per-
manents des récipients et de la table de
cuisson.
• Ne placez pas de plats de cuisson vides
sur les zones de cuisson et ne mettez
pas ces dernières en fonctionnement
sans récipient.
• Ne recouvrez aucune partie de l'appareil
à l'aide de feuilles d'aluminium.
• Laissez un espace ouvert de 5 mm sous
le plan de travail et à l'avant de l'appareil
pour la ventilation.
Avertissement Si votre table de
cuisson est endommagée (éclat,
fêlure,...), débranchez votre
appareil pour éviter tout risque
d'électrocution.
INSTRUCTIONS D'INSTALLATION
Avant d'installer l'appareil, notez le
numéro de série qui figure sur la plaque
signalétique.La plaque signalétique
se trouve sur la partie inférieure de
l'appareil.
EHD90230P
949 594 167 01
58 GCD E2 AU
ELECTROLUX
220-240 V 50-60 Hz
6,9 kW
Induction 6,9 kW
AVERTISSEMENT IMPORTANTS
Avertissement Veuillez lire
attentivement cette notice d'utilisation
ainsi que les recommandations et les
avertissements qu'elle contient avant
de procéder à l'installation et à la
première utilisation de l'appareil.
Vérifiez que l'appareil n'a pas été en-
dommagé pendant le transport. Ne
branchez jamais un appareil endom-
magé. Si nécessaire, contactez le ma-
gasin vendeur.
Les opérations d'installation, de bran-
chement et de réparation sont du res-
sort exclusif d'un technicien qualifié. En
cas d'intervention sur l'appareil, exigez
du Service Après-vente des pièces de
rechange certifiées constructeur.
Les appareils encastrables ne peuvent
être mis en fonctionnement qu'après
avoir été installés dans des meubles et
des plans de travail homologués et
adaptés.
Ne modifiez pas ou n'essayez pas de
modifier les caractéristiques de cet ap-
pareil. Cela représenterait un danger
pour vous.
L'installation doit être conforme à la lé-
gislation, la réglementation, les lignes
directrices et les normes en vigueur
dans le pays de résidence (consignes
de sécurité électro-techniques et régle-
mentation, recylage conforme et régle-
mentaire, etc.).
Respectez l'espacement minimal re-
quis par rapport aux autres appareils !
La protection contre les contacts acci-
dentels doit être assurée par le monta-
ge, par exemple les tiroirs doivent être
installés uniquement avec un plancher
de protection directement sous l'appa-
reil.
Protégez l'appareil de l'humidité en
plaçant un joint d'étanchéité dans les
rainures du plan de travail.
Le joint comble les fentes entre le plan
de travail et l'appareil.
Protégez la partie inférieure de l'appa-
reil de la vapeur et de l'humidité éma-
nant, par exemple, d'un lave-vaisselle
ou d'un four.
N'installez pas l'appareil à proximité
d'une porte ou sous une fenêtre ! Les
récipients chauds sur la table de cuis-
16 electrolux

son risquent de tomber lors de l'ouver-
ture de la porte ou de la fenêtre.
Avertissement Le courant électrique
peut provoquer des blessures. Les
opérations d'installation et de
branchement doivent être réalisées par
un technicien qualifié.
• La borne d'alimentation est sous tension.
• Mettez la borne d'alimentation hors ten-
sion.
• Assurez-vous que l'appareil est correcte-
ment installé de manière à éviter tout
contact.
• Des connexions desserrées ou incorrec-
tes peuvent être à l'origine d'une sur-
chauffe des bornes.
• Le raccordement électrique ne doit être
effectué que par un électricien qualifié.
• Le câble ne doit pas être tendu.
• En cas de raccordement monophasé ou
biphasé, utilisez impérativement le câble
d'alimentation approprié de type H05BB-
F Tmax 90°C (ou plus).
• Si le câble d'alimentation est endomma-
gé, il doit être remplacé par un câble
spécial (type H05BB-F Tmax 90°C ; ou
plus). Veuillez vous adresser au Service
Après-vente.
Dans le cas d'une installation fixe, le raccor-
dement au réseau doit être effectué par l'in-
termédiaire d'un interrupteur à coupure om-
nipolaire, ayant une distance d'ouverture
des contacts d'au moins 3 mm.
Les dispositifs d'isolement comprennent :
des coupe-circuits, des fusibles (les fusibles
à visser doivent être retirés du support), des
disjoncteurs de mise à la terre et des con-
tacteurs.
MISE EN PLACE DU JOINT
• Nettoyez la zone de la découpe du plan
de travail.
• Collez le joint d'étanchéité sur le bord in-
férieur de la surface de cuisson, le long
du bord extérieur de la vitrocéramique.
Ne l'étirez pas. Le point de jonction doit
se trouver au milieu d'un côté. Après
avoir mesuré la longueur (prévoyez quel-
ques mm en plus), appuyez fermement
sur les deux extrémités en même temps.
MONTAGE
min.
50mm
min.
50mm
min.
500mm
min.
5mm
600mm
380
+1
mm
880
+1
mm
=
=
R 5mm
electrolux 17

min.
25 mm
min.
5 mm
min.
20 mm
min.
38 mm
min.
5 mm
Si vous utilisez une enceinte de protec-
tion (accessoire en option
2)
), l'espace
de circulation d'air de 5 mm et le fond
de protection installé directement sous
l'appareil ne sont plus nécessaires.
Vous ne pouvez pas utiliser le boîtier de
protection si vous installez l'appareil
au-dessus d'un four.
DESCRIPTION DE L'APPAREIL
AGENCEMENT DE LA TABLE DE CUISSON
1 2
4
3
1
Zone de cuisson à induction 2300 W,
avec fonction Booster 3200 W
2
Zone de cuisson à induction 2300 W,
avec fonction Booster 3200 W
3
Zone de cuisson à induction 2300 W,
avec fonction Booster 3200 W
4
Bandeau de commande
2) L'enceinte de protection n'est pas disponible dans tous les pays. Veuillez contacter votre revendeur local.
18 electrolux

DESCRIPTION DU BANDEAU DE COMMANDE
1 2 3 4 5
89
12 11
6 7
10
Les touches sensitives permettent de commander l'appareil.
Touche sensitive Fonction
1
Mise en fonctionnement et à l'arrêt de la table de
cuisson
2
Activation et désactivation de la fonction de ver-
rouillage des touches ou de la Sécurité enfants
3
Activation de la fonction Booster
4
Voyants du minuteur des zones de
cuisson
Affichage de la zone à laquelle se réfère la durée
sélectionnée
5
Affichage du minuteur Affichage de la durée en minutes
6
Voyants du niveau de cuisson Affichage du niveau de cuisson
7
indique ce qui suit :
• absence d'ustensile sur la zone de cuisson
• le récipient de cuisson n'est pas adapté
• l'arrêt de sécurité est activé
8
Affichage indiquant que la zone de cuisson est en-
core chaude
9
bandeau de commande Pour régler le niveau de cuisson
10
/
Augmentation ou diminution de la durée
11
Sélection d'une zone de cuisson
12
Activation et désactivation de la fonction STOP
+GO
+ un chiffre dans l'affichage du mi-
nuteur, indique une anomalie de fonc-
tionnement.
VOYANT DE CHALEUR RÉSIDUELLE
Avertissement La chaleur
résiduelle peut être source de brûlures !
Les zones de cuisson à induction génèrent
la chaleur nécessaire directement sur le
fond des plats de cuisson. La chaleur rési-
duelle des plats de cuisson suffit pour
chauffer légèrement la table vitrocéramique.
electrolux 19

NOTICE D'UTILISATION
MISE EN FONCTIONNEMENT ET MISE
À L'ARRÊT
Appuyez sur
pendant 1 seconde pour
mettre l'appareil en fonctionnement ou à
l'arrêt.
DISPOSITIF D'ARRÊT DE SÉCURITÉ
La table de cuisson est
automatiquement mise à l'arrêt si :
• toutes les zones de cuisson sont mises à
l'arrêt.
• vous ne réglez pas le niveau de cuisson
après la mise en fonctionnement de la ta-
ble de cuisson.
• vous avez posé un objet (casserole, chif-
fon, etc.) sur une touche sensitive pen-
dant plus de 10 secondes. Un signal so-
nore retentira tant que vous n'aurez pas
enlevé l'objet.
• en cas de surchauffe (par ex. une casse-
role brûle sur le feu). Avant de réutiliser la
table de cuisson, laissez refroidir la zone
de cuisson.
• vous utilisez des récipients qui ne sont
pas adaptés.
s'allume et, 2 minutes
après, la zone de cuisson est automati-
quement mise à l'arrêt.
• vous n'avez pas mis à l'arrêt une zone de
cuisson ou modifié le niveau de cuisson.
Après un certain temps
s'allume et la
table de cuisson se met à l'arrêt. Voir ta-
bleau.
Durée du dispositif d'arrêt de sécurité
Niveau de cuis-
son
1-2 3-4 5 6-9
Se met à l'arrêt
après
6 heures 5 heures 4 heures 1,5 heure
NIVEAU DE CUISSON
Appuyez sur le bandeau de commande sur
le niveau de cuisson souhaité. Les voyants
du niveau de cuisson s'allument.
FONCTION DE DÉMARRAGE
AUTOMATIQUE DE LA CUISSON
Avec la fonction de démarrage automati-
que, la zone de cuisson est chauffée à la
puissance maximale pendant un certain
temps puis passe automatiquement au ni-
veau de cuisson souhaité.
Appuyez sur
. Le voyant clignote. Réglez
le niveau de cuisson (de 1 à 8). Le voyant
du niveau de cuisson s'allume. Le voyant
situé au dessus de s'allume et s'éteint
au bout d'un certain temps.
La durée de fonctionnement de la cuisson
automatique dépend du niveau de cuisson
sélectionné.
1
2
3
4
5
6
7
8
9
10
11
0
123456789
ACTIVATION/DÉSACTIVATION DE LA
FONCTION BOOSTER
La fonction Booster vous permet d'aug-
menter la puissance des zones de cuisson
à induction. La fonction Booster est activée
pendant une durée maximum de 10 minu-
20 electrolux

tes. La zone de cuisson revient ensuite au-
tomatiquement au niveau de cuisson maxi-
mum (9). Pour l'activer, appuyez sur
, le
voyant situé au dessus s'allume. Pour la
désactiver, appuyez sur un niveau de cuis-
son (1-9).
GESTION DU NIVEAU DE PUISSANCE
Le dispositif de gestion de la puissance ré-
partit la puissance disponible entre deux
zones de cuisson qui sont couplées pour
former une paire (voir la figure). La fonction
Booster attribue la puissance maximale à
l'une des zones de cuisson de la paire et
réduit automatiquement la puissance de
l'autre zone au minimum. L'écran de la zo-
ne correspondante affiche plusieurs valeurs
en alternance.
UTILISATION DU MINUTEUR
Minuteur progressif
Utilisez le minuteur progressif pour régler la
durée de fonctionnement de la zone de
cuisson pendant une cuisson.
Réglez le minuteur après avoir sélec-
tionné la zone de cuisson.
Vous pouvez régler le niveau de cuisson
avant ou après le réglage du minuteur.
• Sélection d'une zone de cuisson :ap-
puyez plusieurs fois sur
jusqu'à ce
que le voyant de la zone de cuisson sou-
haitée s'allume.
•
Utilisation du minuteur progressif :
appuyez sur
du minuteur pour régler
la durée (
00
-
99
minutes). Lorsque le
voyant de la zone de cuisson clignote
plus lentement, le décompte de la durée
est activé.
• Contrôle du temps restant : sélection-
nez la zone de cuisson avec
. Le voy-
ant de la zone de cuisson clignote plus
rapidement. L'affichage indique le temps
restant.
•
Modification de la durée du minuteur
progressif : sélectionnez la zone de
cuisson avec
et appuyez sur ou
.
• Arrêt du minuteur : sélectionnez la zone
de cuisson avec
. Appuyez sur . Le
décompte du temps restant s'effectue
jusqu'à
00
. Le voyant de la zone de
cuisson s'éteint. Pour mettre à l'arrêt,
vous pouvez aussi appuyer sur
et
en même temps.
Dès que la durée sélectionnée est écou-
lée, un signal sonore retentit et
00
cligno-
te. La zone de cuisson s’éteint.
• Désactivation du signal sonore : ap-
puyez sur
CountUp Timer (Minuteur progressif)
Utilisez la fonction CountUp Timer pour
contrôler le temps de fonctionnement de la
zone de cuisson.
•
Sélection de la zone de cuisson (si
plus d'une zone en cours d'utilisa-
tion) :appuyez plusieurs fois sur
jus-
qu'à ce que le voyant de la zone de cuis-
son souhaitée s'allume.
• Activation de la fonction CountUp Ti-
mer :appuyez sur
du minuteur,
s'allume. Lorsque le voyant de la zone de
cuisson clignote plus lentement, le dé-
compte est progressif, l'affichage alterne
entre
et la durée écoulée (minutes)
• Contrôle du temps écoulé : sélection-
nez la zone de cuisson avec
. Le voy-
ant de la zone de cuisson clignote plus
rapidement. L'affichage indique le temps
écoulé.
• Désactivation du CountUp Timer: sé-
lectionnez la zone de cuisson avec
et
appuyez sur
ou pour désactiver le
minuteur. Le voyant de la zone de cuis-
son s'éteint.
Compte-minutes
Vous pouvez vous servir du minuteur com-
me sablier lorsque vous n'utilisez pas les
electrolux 21

zones de cuisson. Appuyez sur . Ap-
puyez sur
ou du minuteur pour régler
la durée. Dès que la durée sélectionnée est
écoulée, un signal sonore retentit et
00
cli-
gnote.
• Désactivation du signal sonore : ap-
puyez sur
STOP+GO
La fonction
permet de basculer simulta-
nément toutes les zones de cuisson actives
en position de maintien au chaud.
Il n'est désormais plus possible de modifier
le niveau de cuisson en cours
.
n’interrompt pas le minuteur.
• Pour démarrer cette fonction, appuyez
sur
. Le voyant s'allume.
• Pour désactiver cette fonction, appuyez
sur
. Le niveau de cuisson précédent
s'allume.
VERROUILLAGE
Vous pouvez verrouiller le bandeau de com-
mande à l'exception de la touche
. Ce
qui permet d'éviter une modification invo-
lontaire du niveau de cuisson par exemple.
Pour démarrer cette fonction, appuyez sur
. Le voyant s'allume.
Le minuteur reste allumé.
Pour mettre à l'arrêt cette fonction, ap-
puyez sur
. Le voyant de contrôle
s’éteint.
Lorsque vous mettez l'appareil à l'arrêt,
vous désactivez également cette fonction.
LE DISPOSITIF DE SÉCURITÉ
ENFANTS
Ce dispositif empêche l'utilisation acciden-
telle ou involontaire de l'appareil.
Activation de la Sécurité enfants
• Mettez la table de cuisson en fonctionne-
ment avec
. Ne sélectionnez aucun
niveau de cuisson.
•
Appuyez sur
pendant 4 secondes. Le
voyant s'allume.
• Mettez à l'arrêt la table de cuisson avec
.
Désactivation de la Sécurité enfants
• Mettez la table de cuisson en fonctionne-
ment avec
. Ne sélectionnez aucun
niveau de cuisson. Appuyez sur
pendant 4 secondes. Le voyant de con-
trôle s'éteint.
• Mettez à l'arrêt la table de cuisson avec
.
Bridage de la sécurité enfants le temps
d'une cuisson
• Mettez la table de cuisson en fonctionne-
ment avec
. Le voyant s'allume.
•
Appuyez sur
pendant 4 secondes.
Réglez le niveau de cuisson dans les
10 secondes qui suivent.Vous pouvez
utiliser la table de cuisson.
• Lorsque vous mettez la table de cuisson
à l'arrêt avec
, la Sécurité enfants est
de nouveau activée.
OFFSOUND CONTROL
(DÉSACTIVATION ET ACTIVATION DES
SIGNAUX SONORES)
Désactivation des signaux sonores
Mettez l'appareil à l'arrêt.
Appuyez sur
pendant 3 secondes. Tous
les indicateurs s'allument et s'éteignent.
Appuyez sur
pendant 3 secondes.
s'allume, le signal sonore est activé. Ap-
puyez sur
, s'allume, le signal sonore
est désactivé.
Lorsque cette fonction est activée, l'appa-
reil émet des signaux sonores uniquement
dans les circonstances suivantes :
•
quand vous appuyez sur
• quand le minuteur arrive en fin de course
• quand le décompte se termine
• quand vous posez un objet sur le ban-
deau de commande.
Activation des signaux sonores
Mettez l'appareil à l'arrêt.
Appuyez sur
pendant 3 secondes. Tous
les indicateurs s'allument et s'éteignent.
Appuyez sur
pendant 3 secondes.
s'allume, le signal sonore est désactivé. Ap-
puyez sur
, s'allume. Les signaux so-
nores sont activés.
22 electrolux

CONSEILS UTILES
Utilisez des récipients adaptés aux zo-
nes de cuisson à induction.
RÉCIPIENTS DE CUISSON
COMPATIBLES AVEC LES ZONES DE
CUISSON À INDUCTION
Important Les zones de cuisson à
induction génèrent un champ
électromagnétique qui génère à son tour
une chaleur presque instantanée à
l'intérieur des récipients de cuisson.
Matériaux des ustensiles de cuisson
• adapté :un fond en fonte, acier, acier
émaillé, acier inoxydable ou avec plu-
sieurs couches de métaux différents
(conseillé par les fabricants).
• non adapté : aluminium, cuivre, laiton,
verre, céramique, porcelaine.
Les ustensiles de cuisine conviennent
pour l'induction si
• ... une petite quantité d'eau entre rapide-
ment en ébullition sur la zone réglée à la
puissance maximum..
• ... un aimant adhère au fond du récipient
de cuisson.
Le fond du récipient de cuisson doit
être lisse, propre et sec, aussi plat et
épais que possible avant chaque utili-
sation.
Dimensions de l'ustensile : Les zo-
nes de cuisson à induction s'adaptent
automatiquement au diamètre du fond
du récipient utilisé. Cependant, la zone
magnétique au fond du récipient doit
avoir un diamètre minimum égal à envi-
ron les 3/4 de la taille de la zone de
cuisson.
BRUITS DE FONCTIONNEMENT
Si vous entendez
• un craquement : l'ustensile est composé
de différents matériaux (conception
"sandwich").
• un sifflement : vous utilisez une ou plu-
sieurs zones de cuisson avec la fonction
Booster et l'ustensile est composé de dif-
férents matériaux (conception "sand-
wich").
• un bourdonnement : vous utilisez la fonc-
tion Booster.
• un cliquètement : en cas de commuta-
tions électriques.
• un sifflement, bourdonnement : le ventila-
teur fonctionne.
Ces bruits ne sont pas signe de dys-
fonctionnement de l'appareil et n'ont
aucune incidence sur son bon fonc-
tionnement.
ÉCONOMIE D'ÉNERGIE
• Si possible, couvrez toujours les réci-
pients de cuisson avec un couvercle
pendant la cuisson.
• Déposez toujours le récipient sur la
zone de cuisson avant de mettre
celle-ci en fonctionnement.
• Mettez à l'arrêt les zones de cuisson
avant la fin du temps de cuisson
pour utiliser la chaleur résiduelle.
• Sur la table de cuisson, utilisez des
récipients de cuisson dont le diamè-
tre correspond au diamètre de la zo-
ne de cuisson utilisée.
ÖKO TIMER (MINUTEUR ECO)
Pour réaliser des économies d'énergie,
le foyer s'éteint automatiquement avant
le signal du minuteur. La réduction du
temps de cuisson dépend de la puis-
sance et de la durée de la cuisson.
EXEMPLES DE CUISSON
Les valeurs figurant dans le tableau suivant
sont fournies à titre indicatif.
electrolux 23

Ni-
veau
de
cuis-
son
adapté à : Durée Conseils
-1
Conserver les aliments cuits au chaud Selon
besoin
Couvrir les aliments
1-2 sauce hollandaise, faire fondre : beurre,
chocolat, gélatine
5-25
min
Remuer de temps en temps
1-2 Solidifier : omelettes, œufs au plat 10-40
min
Couvrir pendant la cuisson
2-3 riz et plats à base de riz. Cuisson de pe-
tites quantités de pomme de terre ou de
légumes à la vapeur. Réchauffage des
plats cuisinés
25-50
min
Ajouter au moins deux fois plus
d'eau que de riz. Remuer car les ali-
ments à base de lait se séparent
durant la cuisson
3-4 Faire cuire à la vapeur les légumes, le
poisson à l'étuvée, la viande
20-45
min
Ajouter quelques cuillères à soupe
de liquide
4-5 Faire bouillir des pommes de terre 20-60
min
Utiliser max. ¼ l d'eau pour 750 g
de pommes de terre
4-5 Cuisson de grandes quantités d'ali-
ments, ragoûts et soupes
60-150
min
Ajouter jusqu'à 3 l de liquide, plus
les ingrédients
6-7 Cuisson à feu doux : des escalopes,
des cordons bleus de veau, des côtelet-
tes, des rissolettes, des saucisses, du
foie, des œufs, des crêpes, des bei-
gnets
Selon
besoin
Retourner à mi-cuisson
7-8 Cuisson à température élevée des pom-
mes de terre rissolées, côtelettes de fi-
let, steaks
5-15
min
Retourner à mi-cuisson
9 Faire bouillir de grandes quantités d'eau, cuire des pâtes, griller la viande (goulache, bœuf
en daube), cuisson des frites
La fonction Booster convient pour faire
chauffer de grands volumes d'eau.
ENTRETIEN ET NETTOYAGE
Nettoyez l'appareil après chaque utilisation.
Utilisez toujours des récipients de cuisson
dont le fond est propre et sec, lisse et plat.
Avertissement Les objets tranchants
et les produits de nettoyage agressifs
ou abrasifs endommagent l'appareil.
Par mesure de sécurité, il est interdit
de nettoyer la table de cuisson avec un
appareil à jet de vapeur ou à haute
pression.
Les égratignures ou les taches som-
bres sur la vitrocéramique n'ont aucu-
ne influence sur le fonctionnement de
l'appareil.
Retrait des salissures :
1. – Retirez immédiatement : plastique
fondu, feuilles plastiques et aliments
sucrés. En cas de non-respect de
cette consigne, la salissure risque
d'endommager l'appareil. Utilisez un
racloir spécial pour la vitre. Tenez le
racloir incliné sur la surface vitrée et
faites glisser la lame du racloir pour
enlever les salissures.
–
Une fois que l'appareil s'est suffi-
samment refroidi, enlevez :les cer-
nes de calcaire, traces d'eau, projec-
tions de graisse, décolorations mé-
talliques luisantes. Utilisez un agent
de nettoyage spécial pour vitrocéra-
mique ou acier inoxydable.
24 electrolux

2. Nettoyez l'appareil à l'aide d'un chiffon
humide et un peu de détergent.
3. Et enfin, essuyez l'appareil à l'aide
d'un chiffon propre.
EN CAS D'ANOMALIE DE FONCTIONNEMENT
Anomalie Cause possible et solution
Vous ne réussissez pas à met-
tre l'appareil en fonctionne-
ment.
• Vous avez appuyé sur 2 ou plusieurs touches sensitives en mê-
me temps. N'appuyez que sur une seule touche sensitive à la
fois.
• Il y a de l'eau ou des projections de graisse sur le bandeau de
commande. Nettoyez le bandeau de commande
•
La Sécurité enfants ou la fonction
est activée. Voir le chapi-
tre Utilisation de l'appareil.
• Remettez l'appareil en fonctionnement et réglez le niveau de
cuisson dans les 10 secondes qui suivent.
Un signal sonore retentit (6x) et
l'appareil se met automatique-
ment à l'arrêt ou un signal so-
nore retentit lorsque l'appareil
est à l'arrêt.
Vous avez recouvert une ou plusieurs touches sensitives. Enlevez
ce qui recouvre la ou les touches sensitives.
Le voyant indicateur de chaleur
résiduelle ne s'allume pas.
La zone de cuisson n'a été activée que pendant un court laps de
temps et, par conséquent, n'a pas eu le temps de chauffer. Si la
zone de cuisson est censée être chaude, faites appel au Service
Après-vente.
Un signal sonore retentit et
l'appareil se remet en fonction-
nement et à l'arrêt. Au bout de
5 secondes, un signal sonore
retentit de nouveau.
Vous avez recouvert . Enlevez ce qui recouvre la touche sen-
sitive.
Alternance des niveaux de cuis-
son
Le dispositif de gestion de la puissance est activé. Voir le chapitre
Dispositif de gestion de la puissance.
s'allume
• Aucun ustensile de cuisine sur la zone de cuisson. Déposez
toujours le récipient sur la zone de cuisson.
• Le récipient de cuisson n'est pas adapté. Utilisez des récipients
de cuisson appropriés.
• Le diamètre du fond du récipient est trop étroit pour la zone de
cuisson. Choisissez une zone de cuisson plus petite.
• Le dispositif d'arrêt de sécurité est activé. Mettez l'appareil à
l'arrêt et remettez-le en fonctionnement.
• La protection anti-surchauffe de la zone de cuisson est activée.
Mettez la zone de cuisson à l'arrêt. Remettez la zone de cuis-
son en fonctionnement.
et un chiffre s'allument.
Erreur du système électronique.
Débranchez électriquement l'appareil pendant quelques minutes.
Déconnectez le fusible de l'installation électrique de l'habitation.
Mettez de nouveau sous tension. Si
s'affiche de nouveau, fai-
tes appel au Service Après-vente.
electrolux 25

Anomalie Cause possible et solution
s'allume
Une erreur du système électronique s'est produite parce que
vous avez utilisé un récipient vide ou pas adapté à la zone de
cuisson. La protection anti-surchauffe de la zone de cuisson est
activée. Le dispositif d'arrêt de sécurité est activé.
Mettez l'appareil à l'arrêt. Enlevez le récipient chaud. Au bout
d'environ 30 secondes, remettez la zone de cuisson en fonction-
nement.
doit disparaître, le voyant de chaleur résiduelle reste
allumé. Laissez refroidir le récipient et consultez le chapitre "Réci-
pients de cuisson compatibles avec les zones de cuisson à in-
duction".
Si les indications ci-dessus ne vous per-
mettent pas de remédier au problème,
veuillez vous adresser à votre magasin ven-
deur ou au Service Après-vente. Veuillez lui
fournir les informations figurant sur la pla-
que signalétique, la combinaison à 3 lettres
et chiffres pour la vitrocéramique (située
dans un des coins de la table de cuisson) et
le type de message d'erreur qui s'affiche.
En cas d'erreur de manipulation de la part
de l'utilisateur, le déplacement du techni-
cien du Service Après-vente ou du magasin
vendeur peut être facturé même en cours
de garantie. Les instructions relatives au
Service Après-vente et aux conditions de
garantie figurent dans le livret de garantie.
EN MATIÈRE DE PROTECTION DE L'ENVIRONNEMENT
Le symbole sur le produit ou son
emballage indique que ce produit ne peut
être traité comme déchet ménager. Il doit
être remis au point de collecte dédié à cet
effet (collecte et recyclage du matériel
électrique et électronique).
En procédant à la mise au rebut de
l'appareil dans les règles de l’art, nous
préservons l'environnement et notre
sécurité, s’assurant ainsi que les déchets
seront traités dans des conditions
optimum.
Pour obtenir plus de détails sur le recyclage
de ce produit, veuillez prendre contact avec
les services de votre commune ou le
magasin où vous avez effectué l'achat.
EMBALLAGE
Tous les matériaux d'emballage sont
écologiques et recyclables. Les com-
posants en plastique sont identifiables
grâce aux sigles : >PE<,>PS<, etc.
Veuillez jeter les matériaux d'emballage
dans le conteneur approprié du centre
de collecte des déchets de votre com-
mune.
26 electrolux

Electrolux. Thinking of you.
Les mer om hvordan vi tenker på www.electrolux.com
INNHOLD
Sikkerhetsinformasjon 27
Installasjonsanvisninger 28
Produktbeskrivelse 30
Brukerveiledning 31
Nyttige tips og råd 34
Stell og rengjøring 35
Hva må gjøres, hvis... 36
Miljøvern 36
Med forbehold om endringer.
SIKKERHETSINFORMASJON
For at du skal bruke apparatet korrekt
og sikkert, må du lese denne bruksan-
visningen nøye før apparatet installeres.
Oppbevar denne bruksanvisningen
sammen med apparatet, også hvis du
selger det eller flytter. Den som bruker
apparatet må være godt kjent med sik-
kerhetsfunksjonene og hvordan appa-
ratet betjenes.
GENERELT OM SIKKERHET
Advarsel Personer (også barn) med
redusert fysisk eller psykisk helse, eller
som mangler erfaring og kunnskaper
om bruken, må ikke bruke apparatet.
De må ha tilsyn og gis instruksjon om
bruken av apparatet av en person som
er ansvarlig for deres sikkerhet.
BARNS SIKKERHET
• Dette apparatet skal kun brukes av voks-
ne. Hold tilsyn med barn, slik at de ikke
leker med apparatet.
• Hold all emballasje utenfor barns rekke-
vidde. Det er fare for kvelning.
• Hold barn borte fra apparatet når det er
koplet inn.
Advarsel Aktiver barnesikringen for å
hindre at små barn og husdyr kan
komme til å aktivere apparatet.
SIKKERHET UNDER BRUK
• Fjern all emballasje, klistremerker og be-
legg fra apparatet før første gangs bruk.
• Still kokesonene på "av" etter hver bruk.
• Forbrenningsfare! Ikke legg metallgjen-
stander, som f.eks. bestikk eller grytelokk
på kokefeltet, fordi de kan bli varme.
• Brukere med pacemaker må holde over-
kroppen minst 30 cm fra induksjonskoke-
sonene når de er slått på.
Advarsel Brannfare! Overopphetet
fett og olje kan ta fyr veldig raskt.
RIKTIG BRUK
• Ha alltid tilsyn med apparatet under bruk.
• Apparatet skal kun brukes for matlaging i
private husholdninger!
• Ikke bruk apparatet som arbeidplate, og
ikke oppbevar ting på den.
• Ikke plasser eller oppbevar svært brenn-
bar væske eller materiale, eller smeltbare
gjenstander (laget av plast eller alumini-
um) på eller i nærheten av apparatet.
• Vær forsiktig når du kopler apparatet til
stikkontakter som befinner seg nær ap-
paratet. Ikke la ledninger komme borti
apparatet eller varme kokeredskaper. På-
se at ledningene ikke floker seg.
SLIK UNNGÅR DU SKADE PÅ
APPARATET
• Hvis gjenstander eller kokeredskaper fal-
ler ned på den glasskeramiske overflaten,
kan den bli skadet.
• Kokeredskap av støpt jern, støpt alumini-
um eller med skadde bunner kan skrape
den glasskeramiske overflaten hvis de
skyves over den.
• Ikke la kokeredskaper tørrkoke, for å
unngå skade på kokeredskapet og den
glasskeramiske overflaten.
• Bruk aldri kokesonene med tomt koke-
redskap eller uten kokeredskap.
• Ikke dekk til deler av apparatet med alu-
miniumsfolie.
electrolux 27

• Ikke dekk til ventilasjonsåpningen, som
må være 5 mm mellom arbeidsbenken
og oversiden av enheten under den.
Advarsel Hvis det er sprekk i
overflaten, må strømforsyningen
kobles fra for å unngå elektrisk
støt.
INSTALLASJONSANVISNINGER
Før du monterer koketoppen bør du
notere serienummeret (Ser. Nr.) som
står på typeskiltet.Typeskiltet finner
du på den nedre delen av koketop-
pen.
EHD90230P
949 594 167 01
58 GCD E2 AU
ELECTROLUX
220-240 V 50-60 Hz
6,9 kW
Induction 6,9 kW
SIKKERHETSANVISNINGER
Advarsel Dette må du lese!
Kontroller at apparatet ikke er skadet
under transport. Ikke kople til et skadet
apparat. Hvis nødvendig, snakk med
leverandøren.
Kun en autorisert servicetekniker kan
installere, kople til eller reparere dette
apparatet. Bruk kun originale reserve-
deler.
Innbygningsprodukter skal bare brukes
når de er bygd inn i egnede skrog og
arbeidsbenker som oppfyller standar-
dene.
Ikke modifiser eller endre spesifikasjo-
nene på dette produktet. Fare for per-
sonskade eller skade på apparatet.
Følg lovene, forskriftene, direktivene og
standardene som gjelder i brukslandet
(sikkerhetsbestemmelser, forskrifter for
resirkulering, sikkerhetsregler for elek-
trik osv.)!
Overhold minimumsavstanden til andre
apparater og enheter!
Monter berøringsbeskyttelse. Ved
montering av skuff direkte under koket-
pooen skal det for eksempel monteres
beskyttelsesplate!
Beskytt kantene på arbeidsbenken mot
fuktighet med en tetningslist som pas-
ser!
Apparatet må forsegles til arbeidsben-
ken uten mellomrom, med en tetnings-
list som passer!
Beskytt bunnen av apparatet mot
damp og fuktighet, f.eks. fra en opp-
vaskmaskin eller ovn!
Ikke installer apparatet ved siden av en
dør eller under et vindu! Ellers kan var-
me kokeredskaper skyves av platetop-
pen når dører og vinduer åpnes.
Advarsel Fare for personskade pga.
elektrisk strøm. Følg anvisningene om
elektrisk tilkopling nøye.
• Nettilkoplingsklemmen er strømførende.
• Skill nettilkoplingsklemmen fra strømnet-
tet.
• Montér forskriftsmessig for å sikre berø-
ringsbeskyttelse.
• Løse og uforsvarlige kontaktforbindelser
kan overopphete klemmen.
• Klemmeforbindelsene skal utføres av en
kvalifisert elektriker.
• Monter strekkavlaster for kabelen.
• Bruk riktig strømledning av type H05BB-
F Tmaks 90°C (eller høyere) for enkelfa-
se- eller tofaseforbindelser.
• En skadet strømledning skal erstattes
med spesiell ledning (type H05BB-F
Tmaks 90°C; eller høyere. Snakk med
serviceavdelingen.
Apparatet må ha en enhet i den elektriske
installasjonen som gjør det mulig å kople
apparatet fra hovedstrømmen ved alle poler
med en kontaktåpningsbredde på minst 3
mm.
Du må ha korrekte isoleringsenheter: led-
ningsbeskyttende strømbrytere, sikringer
(sikringer av skrutypen skal fjernes fra hol-
deren), jordfeilbrytere og kontaktorer.
ANBRINGE TETNINGSLIMBÅNDET.
• Rengjør arbeidsplaten i utskjæringsområ-
det.
• Lim tetningslimbåndet på undre kant av
platetoppen langs den ytre kanten av
glasskeramikken. Tetningslimbåndet skal
ikke stikke ut over kanten. De skjøtene
skal være midt på siden. Når de er skåret
28 electrolux

til ønsket lengde (legg til noen mm), tryk-
ker du de to endene sammen.
MONTERING
min.
50mm
min.
50mm
min.
500mm
min.
5mm
600mm
380
+1
mm
880
+1
mm
=
=
R 5mm
min.
25 mm
min.
5 mm
min.
20 mm
electrolux 29

min.
38 mm
min.
5 mm
Hvis du bruker et beskyttelsessett (til-
leggsutstyr
3)
), er 5 mm luftstrøm og an-
nen deleplate mellom skuff og koke-
topp unødvendig.
Du kan ikke bruke beskyttelsessettet
hvis du monterer produktet over en
ovn.
PRODUKTBESKRIVELSE
OVERSIKT OVER KOKETOPPEN
1 2
4
3
1
Induksjonskokesone 2300 W med Po-
wer-funksjon på 3200 W
2
Induksjonskokesone 2300 W med Po-
wer-funksjon på 3200 W
3
Induksjonskokesone 2300 W med Po-
wer-funksjon på 3200 W
4
Betjeningspanel
OVERSIKT OVER BETJENINGSPANELET
1 2 3 4 5
89
12 11
6 7
10
3) Beskyttelsessettet er kanskje ikke tilgjengelig i alle land. Ta kontakt med din lokale leverandør.
30 electrolux

Bruk sensorfeltene for å betjene koketoppen.
sensorfelt funksjon
1
slår koketoppen på og av
2
aktiverer og deaktiverer tastelåsen eller barnesik-
ringen
3
aktiverer effektfunksjonen
4
tidsurindikatorer for kokesonene viser hvilken sone tiden er innstilt for
5
tidsurdisplay viser tiden i minutter
6
en effektrinnindikator viser effekttrinn
7
viser at:
• det ikke er noen kokekar på varmesonen
• kokekaret ikke er av riktig type
• den automatiske utkoblingsfunksjonen er aktiv
8
viser at kokesonen fremdeles er varm
9
betjeningslinje innstilling av effekttrinn
10
/
øker eller reduserer tiden
11
velger kokesone
12
aktiverer og deaktiverer STOP+GO
+nummer i displayet for tidsur viser
at det foreligger en feilfunksjon.
RESTVARMEINDIKATOR
Advarsel Forbrenningsfare pga.
restvarme!
Induksjonskokesonene gir den nødvendige
varmen for tilberedning direkte i bunnen av
kokekaret. Glasskeramikken blir varmet opp
av restvarmen fra kokekaret.
BRUKERVEILEDNING
PÅ OG AV
Berør
i 1 sekund for å aktivere eller de-
aktivere apparatet.
AUTOMATISK UTKOPLING
Funksjonen slår komfyrtoppen av
automatisk hvis:
• alle kokesonene er av.
• du ikke stiller inn et effekttrinn etter at du
har slått komfyrtoppen på.
• du dekker et sensorfelt med en gjenstand
(en gryte, en klut, osv.) i mer enn 10 se-
kunder. Lydsignalet høres til du fjerner
gjenstanden.
• komfyrtoppen blir for varm (f.eks. hvis en
kasserolle koker tørr). Før komfyrtoppen
brukes igjen, må kokesonene være kalde.
•
du bruker feil kokeredskap.
vises og
etter 2 minutter deaktiveres kokesonen
automatisk.
• du ikke deaktiverer en kokesone eller en-
drer effekttrinn. Etter en stund vises
og komfyrtoppen deaktiveres. Se tabel-
len.
Tider for automatisk utkopling
Effekttrinn 1-2 3-4 5 6-9
Slår seg av etter 6 timer 5 timer 4 timer 1,5 timer
electrolux 31

EFFEKTTRINN
Berør betjeningslinjen ved effekttrinnet. Ef-
fekttrinnindikatorene tennes.
AUTOMATISK OPPVARMING
Den automatiske oppvarmingsfunksjonen
innstiller høyeste effekttrinn en stund, og
går så tilbake til nødvendig trinn.
Pek på
. Indikatoren blinker. Still inn ef-
fekttrinn (1-8). Indikatoren for effekttrinnet
tennes. Indikatoren over
tennes, og slår
seg av igjen etter en stund.
Den automatiske oppvarmingstiden varierer
i forhold til forskjellige effekttrinn.
1
2
3
4
5
6
7
8
9
10
11
0
123456789
SLÅ POWERFUNKSJONEN PÅ OG AV
Powerfunsjonen gir ekstra effekt til induk-
sjonskokesonene. Powerfunksjonen er akti-
vert i maks 10 minutter. Deretter kopler in-
duksjonskokesonen automatisk tilbake til
høyeste effekttrinn (9). Pek på
for å akti-
vere, indikatoren over tennes. For å deakti-
vere, pek på et effekttrinn (1-9).
EFFEKTSTYRING
Effektstyringen deler effekten parvis mellom
to kokesoner (se bilde). Powerfunksjonen
øker effekten opp til maksimumsnivået for
et kokesonepar, og reduserer automatisk
effektnivået for den andre kokesonen. Di-
splayet for den reduserte sonen skifter.
BRUKE TIDSURET
Tidsur med nedtelling
Bruk tidsuret til å stille inn hvor lenge en ko-
kesone skal være aktiv under tilberednin-
gen.
Still tidsuret når kokesonen er valgt.
Du kan velge effekttrinn før eller etter at du
stiller inn tidsuret.
•
Velge kokesone: berør
gjentatte
ganger, til indikatoren for ønsket kokeso-
ne lyser.
•
Starte tidsur med nedtelling: berør
på tidsuret for å stille inn tiden (
00
-
99
minutter). Når indikatoren for kokesonen
blinker langsommere, har nedtellingen
startet.
• Vise resterende tid: velg kokesone med
. Indikatoren for kokesonen blinker ra-
skere. Displayet viser gjenværende tid.
• Endre tidsuret med nedtelling:velg ko-
kesone med
berør eller .
• Deaktivere tidsuret: velg kokesone
med
. Berør . Den gjenværende ti-
den teller ned til
00
. Indikatoren for ko-
kesonen slukkes. For å deaktivere kan du
også berøre
og samtidig.
Når tiden er omme, høres lydsignalet og
00
blinker. Kokesonen slås av.
•
Deaktivere lydsignalet: berør
32 electrolux

CountUp Timer (Tidsur med opptelling)
Bruk CountUp Timer til å følge med på hvor
lenge kokesonen er på.
• Valg av kokesone (hvis mer enn 1 ko-
kesone er på):berør
gjentatte gan-
ger, til indikatoren for ønsket kokesone
lyser.
•
Starte CountUp Timer:berør
på tids-
uret
tennes. Når indikatoren for koke-
sonen blinker langsommere, telles tiden
opp, displayet skifter mellom
og hvor
lang tid som har gått (minutter)
• Vise hvor lang tid som har gått: velg
kokesone med
. Indikatoren for koke-
sonen blinker raskere. Displayet viser
hvor lang tid som har gått.
• Deaktivere CountUp Timer: velg koke-
sone med
og berør eller for å slå
av tidsuret. Indikatoren for kokesonen
slokker.
Varselur
Du kan bruke tidsuret som et varselur uten
at kokesonene er aktive. Berør
. Berør
eller på tidsuret for å stille inn tiden.
Når tiden er omme, høres lydsignalet og
00
blinker.
•
Deaktivere lydsignalet: berør
STOP+GO
Med
-funksjonen stilles alle de aktive ko-
kesonene på laveste effekttrinn.
Når
er aktivert kan du ikke endre effekt-
trinnet.
-funksjonen deaktiverer ikke tidsurfunk-
sjonen.
•
Berør
for å aktivere denne funksjonen.
Indikatoren tennes.
•
Berør
for å deaktivere denne funksjo-
nen. Effekttrinnet som ble innstilt tidligere
aktiveres.
LÅSE
Du kan låse betjeningspanelet, men ikke
. Dette hindrer utilsiktet endring av effekt-
trinnet.
Berør
for å aktivere denne funksjonen.
Indikatoren tennes.
Tidsuret er fortsatt på.
Berør
for å deaktivere denne funksjonen.
Indikatoren slokker.
Når du slår av koketoppen, deaktiverer du
også denne funksjonen.
BARNESIKRING
Denne funksjonen hindrer at komfyrtoppen
blir aktivert ved et uhell.
Aktivere barnesikringen
•
Aktiver komfyrtoppen med
. Ikke still
inn effekttrinn.
•
Pek på
i 4 sekunder. Indikatoren ten-
nes.
•
Deaktiver komfyrtoppen med
.
Deaktivere barnesikringen
•
Aktiver komfyrtoppen med
. Ikke still
inn effekttrinn. Pek på
i 4 sekunder.
Indikatoren slukker.
•
Deaktiver komfyrtoppen med
.
Deaktivere barnesikringen når du skal
bruke komfyrtoppen
•
Aktiver komfyrtoppen med
. Indikato-
ren tennes.
•
Pek på
i 4 sekunder. Still inn effekt-
trinn innen 10 sekunder. Du kan betje-
ne komfyrtoppen.
• Hvis du deaktiverer komfyrtoppen med
, blir barnesikringen aktiv igjen.
OFFSOUND CONTROL
(DEAKTIVERING OG AKTIVERING AV
LYDENE)
Deaktivering av lydene
Deaktiver maskinen.
Berør
i 3 sekunder Displayene lyser og
slukker. Berør
i 3 sekunder. lyser, ly-
den er på. Berør
, lyser, lyden er av.
Når denne funksjonen er på, hører du lyder
bare når:
•
du berører
• Tidsuret kommer ned
• Tidsuret med nedtelling kommer ned
• du legger noe på betjeningspanelet.
Aktivering av lydene
Deaktiver maskinen.
Berør
i 3 sekunder Displayene lyser og
slukker. Berør
i 3 sekunder. lyser, for-
di lyden er av. Berør
, lyser. Lyden er
på.
electrolux 33

NYTTIGE TIPS OG RÅD
Bruk egnede kokeredskaper til induk-
sjonskokesonene.
KOKEREDSKAPER FOR
INDUKSJONSKOKESONER
Viktig Ved induksjonskoking generer et
kraftig elektromagnetisk felt varme i
kokeredskapet nesten momentant.
Kokekarets materiale
• riktig: støpejern, stål, emaljert stål, rust-
fritt stål, en bunn med flere lag (merket
med dette av fabrikanten).
• feil: aluminium, kobber, messing, glass,
keramikk, porselen.
Kokeredskapet er riktig for
induksjonskoketopp hvis …
• ... litt vann koker veldig raskt på en sone
med høyeste effekttrinn.
• ... en magnet fester seg til bunnen av ko-
keredskapet.
Kokeredskapets bunn må være så
tykk og jevn som mulig.
Kokekarets dimensjoner: induk-
sjonskokesonene tilpasser seg til di-
mensjonen på kokekarets bunn auto-
matisk. Men den magnetiske delen av
bunnen til kokekaret må ha en mini-
munsdiameter på ca. 3/4 av kokesone-
ne.
LYDER UNDER DRIFT
Hvis du kan høre
• knekkelyder: kokeredskapet er laget av
forskjellige materialer (Sandwichkonstruk-
sjon).
• plystrelyder: to eller flere kokesoner er
innstilt på høye effekttrinn og kokereska-
pet er laget av forskjellige materialer
(Sandwichkonstruksjon).
• summelyder: du bruker høye effekttrinn.
• klikkelyder: det skjer elektriske koplinger.
• brumming, during: viften er aktiv.
Lydene er normale og henviser ikke til
feil.
ENERGISPARING
• Legg om mulig alltid et lokk på koke-
redskapet.
• Sett kokeredskapet på kokesonen
før du slår kokesonen på.
• Slå av kokesonene før steketiden er
ferdig for å utnytte restvarmen.
• Grytenes bunn må ha samme stør-
relse som kokesonen.
ÖKO TIMER(ØKO-TIDSUR)
For energisparing, koples varmeele-
mentet for kokesonen av før tiden er
ute. Hvor mye tiden reduseres avhen-
ger av effektnivå og tilberedningstid.
EKSEMPLER PÅ
TILBEREDNINGSMÅTER
Opplysningene i tabellen er kun veiledende.
Ef-
fekt-
trinn
Brukes for: Tid Tips
-1
Holde ferdig tilberedt mat varm etter be-
hov
Dekk til maten
1-2 Hollandaise-sause, smelte: smør, sjoko-
lade, gelatin
5-25
min
Rør av og til
1-2 Stivning: Eggeomelett, eggestand 10-40
min
Tilberedes med lokk
2-3 Svelling av ris og melkeretter, varming
av ferdigretter
25-50
min
Tilsett minst dobbelt mengde væ-
ske til risen, melkeretter omrøres av
og til
3-4 Dampkoke grønnsaker, fisk, kjøtt 20-45
min
Tilsett noen få spiseskjeer væske
34 electrolux

Ef-
fekt-
trinn
Brukes for: Tid Tips
4-5 Dampkoke poteter 20-60
min
Bruk maks. ¼ l vann for 750 g po-
teter
4-5 Tilberede større matvaremengder, gryte-
retter og supper
60-150
min
Opptil 3 l væske pluss ingredienser
6-7 Varsom steking: schnitzel, cordon bleu
av kalv, koteletter, kjøttkaker, pølser, le-
ver, sausejevning, egg, pannekaker,
smultringer
etter be-
hov
Snu etter halve tiden
7-8 Steking, potetlapper, hoftestykker, ste-
ker
5-15
min
Snu etter halve tiden
9 Koke opp mye vann, koke pasta, brune kjøtt (gulasj, grytestek), frityrkoke pommes frites
Powerfunksjonen egner seg for oppvarming
av mye vann.
Informasjon om akrylamider
Viktig Ifølge ny vitenskapelig viten kan
akrylamider utgjøre en helsefare når det
stekes ved høy temperatur (særlig mat som
inneholder stivelse). Vi anbefaler derfor at
du tilbereder maten ved så lav temperatur
som mulig og ikke steker den for hardt.
STELL OG RENGJØRING
Rengjør apparatet etter hver bruk.
Bruk alltid kokeredskaper med ren bunn.
Advarsel Skarpe og skurende
rengjøringsmidler skader apparatet.
For din sikkerhet, ikke rengjør appara-
tet med damp eller høytrykkspyler.
Striper eller mørke flekker i glasskera-
mikken påvirker ikke koketoppens
funksjon.
Fjerne smusset:
1. – Fjern straks: smeltet plast, plastfolie
og mat som inneholder sukker. Hvis
ikke, kan smuss føre til at koketop-
pen skades. Bruk spesialskrape til
glasset. Plasser skrapen på glassfla-
ten i skarp vinkel, og skyv bladet
bortover flaten.
– Etter at toppen er avkjølt fjer-
nes:kalkringer, vannringer, fettflek-
ker, blanke metalliske misfarginger.
Bruk et spesialrengjøringsmiddel som
er egnet for glasskeramikk eller rust-
fritt stål.
2. Rengjør koketoppen med en fuktig klut
og litt rengjøringsmiddel.
3. Til slutt gnir du koketoppen helt tørr
med en ren klut.
electrolux 35

HVA MÅ GJØRES, HVIS...
Feil Mulig årsak og løsning
Du kan ikke slå på eller betjene
koketoppen.
• Du har berørt to eller flere sensorfelt samtidig. Berør bare ett
sensorfelt.
• Det er vann eller fettsprut på betjeningspanelet. Tørk av betje-
ningspanelet
•
Barnesikringen, tastelåsen eller
er aktivert. Se kapittelet
"Betjene koketoppen".
• Slå på koketoppen igjen og still inn effekttrinn innen 10 sekun-
der.
Et lydsignal høres (6 ganger) og
koketoppen slås av, eller et sig-
nal høres mens koketoppen er
avslått.
Du har dekket til ett eller flere sensorfelt. Fjern tildekkingen av
sensorfeltene.
Restvarmeindikatoren ble ikke
aktivert.
Kokesonen er ikke varm fordi den bare har vært i bruk en kort
stund. Kontakt kundeservice hvis kokesonen burde vært varm.
Det høres et lydsignal og koke-
toppen slås på og av igjen. Et-
ter 5 sekunder høres enda et
lydsignal.
Du har dekket til . Fjern tildekkingen fra sensorfeltet.
Alternative effekttrinn Strømstyringen er aktiv. Se avsnittet "Strømstyring".
tennes
• Ingen kokekar på kokesonen. Sett kokekar på kokesonen.
• Feil kokekar. Bruk riktig kokekar.
• Diameteren på kokekarets bunn er for liten for kokesonen. Flytt
kokekaret til en mindre kokesone.
• Den automatiske utkoblingsfunksjonen er aktivert. Slå av koke-
toppen og slå den på igjen.
• Overopphetingsvernet for kokesonen er aktivert. Slå av kokeso-
nen. Slå på kokesonen igjen.
og tall tennes.
Det er en feil på koketoppen.
Koble koketoppen fra strømforsyningen en stund. Koble fra sikrin-
gen i husets sikringsskap. Koble til igjen. Hvis
tennes igjen,
snakk med kundeservice.
tennes
Det er en feil på koketoppen fordi et kokekar har kokt tørt eller du
ikke bruker riktig type kokekar. Overopphetingsvernet for kokeso-
nen er aktivert. Den automatiske utkoblingsfunksjonen er aktivert.
Slå av koketoppen. Fjern det varme kokekaret. Slå på koketop-
pen igjen etter ca. 30 sekunder.
skal nå forsvinne, men res-
tvarmeindikatoren kan fortsatt lyse. Kjøl ned kokekaret og sjekk
avsnittet "Kokekar for induksjonskokesoner".
Hvis du har prøvd løsningsforslagene over
og ikke kan løse problemet, snakk med for-
handleren eller serviceavdelingen. Oppgi
opplysningene på typeskiltet, tresiffret bok-
stavkode for den glasskeramiske overflaten
(den er på hjørnet av kokeflaten) og en feil-
melding som vises.
Ved feil bruk, er hjelp av serviceverksted el-
ler forhandler ikke gratis, selv innenfor ga-
rantiperioden. Anvisninger om kundeservice
og garantibetingelser finner du i garanti-hef-
tet.
MILJØVERN
Symbolet på produktet eller på
emballasjen viser at dette produktet ikke
må behandles som husholdningsavfall. Det
skal derimot bringes til et mottak for
resirkulering av elektrisk og elektronisk
utstyr. Ved å sørge for korrekt avhending av
36 electrolux

apparatet, vil du bidra til å forebygge de
negative konsekvenser for miljø og helse
som gal håndtering kan medføre. For
nærmere informasjon om resirkulering av
dette produktet, vennligst kontakt
kommunen, renovasjonsselskapet eller
forretningen der du anskaffet det.
EMBALLASJEMATERIALE
Embalasjen er miljøvennlig og resirku-
lerbar. Deler av plast er merket med:
>PE<,>PS<, osv. Kast emballasjema-
terialene som husholdningsavfall i riktig
avfallsbeholder ved kommunens av-
fallsinnsamlingsstasjon.
electrolux 37

Electrolux. Thinking of you.
Conozca mejor nuestros conceptos en www.electrolux.com
ÍNDICE DE MATERIAS
Información sobre seguridad 38
Instrucciones de instalación 39
Descripción del producto 41
Instrucciones de uso 42
Consejos útiles 45
Mantenimiento y limpieza 47
Qué hacer si… 48
Aspectos medioambientales 49
Salvo modificaciones.
INFORMACIÓN SOBRE SEGURIDAD
Por su seguridad y para garantizar el
funcionamiento correcto del aparato,
antes de instalarlo y utilizarlo por pri-
mera vez lea atentamente este manual.
Conserve siempre estas instrucciones
con el aparato, aunque lo cambie de
lugar o lo venda. Los usuarios deben
conocer a la perfección el funciona-
miento y las características de seguri-
dad del aparato.
SEGURIDAD GENERAL
Advertencia Las personas (incluidos
niños) con discapacidad física,
sensorial o mental, o con experiencia y
conocimiento insuficientes, no deben
usar el aparato. Sólo podrán usarlo
bajo la supervisión o instrucción de la
persona responsable de su seguridad.
SEGURIDAD PARA LOS NIÑOS
• Este aparato sólo lo pueden usar adul-
tos. Es necesario supervisar a los niños
para evitar que jueguen con el aparato.
• Mantenga todo el embalaje alejado de los
niños. Existe riesgo de asfixia.
• Mantenga los niños alejados del aparato
cuando esté encendido.
Advertencia Inicie el bloqueo contra la
manipulación por niños para evitar que
niños pequeños y animales activen
accidentalmente el aparato.
SEGURIDAD DURANTE EL
FUNCIONAMIENTO
• Retire todo el material de embalaje, ad-
hesivos y láminas de protección del apa-
rato antes de ponerlo en marcha por pri-
mera vez.
• Apague las zonas de cocción después
de cada uso.
• ¡Peligro de quemaduras! No deposite ob-
jetos metálicos, como cubiertos o tapa-
deras, sobre la superficie de cocción, ya
que podrían calentarse en exceso.
• Los usuarios que tengan marcapasos im-
plantados deberán mantener una distan-
cia mínima de 30 cm entre la parte supe-
rior del cuerpo y las zonas de cocción
encendidas.
Advertencia ¡Peligro de incendio!
Las grasas y aceites calentados en
exceso pueden arder con facilidad.
FUNCIONAMIENTO CORRECTO
• Controle siempre el aparato durante el
funcionamiento.
• Use sólo el aparato para tareas de coc-
ción domésticas.
• No use el aparato como superficie de tra-
bajo ni para depositar objetos.
• No ponga ni mantenga líquidos y mate-
riales muy inflamables, ni objetos que
puedan fundirse (de plástico o aluminio)
encima o cerca del aparato.
• Tenga cuidado al conectar el aparato a
cajas de enchufe cercanas. No deje que
las conexiones eléctricas toquen el apa-
rato o recipientes calientes. No deje que
las conexiones eléctricas se enreden.
CÓMO EVITAR DAÑOS AL APARATO
• Evite la caída de objetos o utensilios de
cocina sobre la superficie vitrocerámica.
• No arrastre sobre la placa recipientes
metálicos de hierro o aluminio fundido o
que tengan la base dañada.
38 electrolux

• No permita que el contenido de los reci-
pientes hierva hasta que se agote el líqui-
do.
• No encienda las zonas de cocción en va-
cío ni con recipientes vacíos.
• No cubra ninguna parte del aparato con
papel aluminio.
• Deje libre un espacio de ventilación de 5
mm entre la encimera y la parte frontal de
la unidad situada bajo ella.
Advertencia Si la superficie llegara
a agrietarse, desenchufe el aparato
de la corriente para evitar posibles
descargas eléctricas.
INSTRUCCIONES DE INSTALACIÓN
Antes del montaje, anote el número
de serie (Ser. Nr.) de la placa de datos
técnicos.La placa de datos técnicos
está en la carcasa inferior del apa-
rato.
EHD90230P
949 594 167 01
58 GCD E2 AU
ELECTROLUX
220-240 V 50-60 Hz
6,9 kW
Induction 6,9 kW
INSTRUCCIONES DE SEGURIDAD
Advertencia ¡Debe leerlas!
Compruebe que el aparato no haya su-
frido daños durante el transporte. No
conecte el aparato si está dañado. Si
es necesario, hable con el proveedor.
Sólo un técnico de servicio autorizado
puede instalar, conectar o reparar este
aparato. Use sólo repuestos originales.
Use sólo los aparatos empotrables
después de montar el aparato en uni-
dades empotrables adecuadas y su-
perficies de trabajo que cumplan las
normas.
No cambie las especificaciones ni mo-
difique este producto. Podría sufrir le-
siones personales o dañar el aparato.
Siga estrictamente las leyes, ordenan-
zas, directivas y normas en vigor en el
país en que use el aparato (regulacio-
nes de seguridad, regulaciones de reci-
claje, normas de seguridad electrotéc-
nicas, etc.).
Mantenga las distancias mínimas a
otros aparatos y unidades.
Instale protecciones contra el contacto;
por ejemplo, instale los cajones única-
mente con una base protectora justo
debajo del aparato.
Proteja las superficies cortadas de la
encimera contra la humedad con un
sellante adecuado.
Selle el aparato en la encimera con un
sellante adecuado sin dejar espacio.
Proteja la parte inferior del aparato del
vapor y la humedad, como los que ge-
nera, por ejemplo, un lavavajillas o un
horno.
No instale el aparato junto a una puerta
o debajo de una ventana. De lo contra-
rio, la apertura brusca de puertas y
ventanas puede desplazar recipientes
calientes de la zona de cocción.
Advertencia Peligro de daños por la
corriente eléctrica. Siga atentamente
las instrucciones para las conexiones
eléctricas.
• La clema de conexión a la red está bajo
tensión.
• Desconecte la clema de conexión de la
red eléctrica.
• Asegure la protección contra el contacto
mediante una instalación correcta.
• Unas conexiones de enchufe flojas e ina-
decuadas pueden sobrecalentar la cle-
ma.
• Un electricista homologado debe instalar
correctamente las conexiones de los bor-
nes.
• Establezca la descarga de tracción del
cable.
• En el caso de que se produzca una co-
nexión de una fase o de dos fases, use el
cable de alimentación que corresponda
del tipo H05BB-F Tmáx 90 °C (o supe-
rior).
• Sustituya el cable de alimentación daña-
do por un cable especial (tipo H05BB-F
electrolux 39

Tmáx 90°C; o superior). Hable con su
centro de servicio postventa local.
El aparato debe tener una instalación eléc-
trica que le deje desconectar el aparato de
la red en todos los polos con una anchura
de apertura de contacto de como mínimo 3
mm.
Usted debe tener dispositivos de aislamien-
to adecuados: dispositivos de desconexión
automática, fusibles (fusibles tipo tornillo re-
tirados del soporte), disyuntores de fugas y
contactores.
COLOCACIÓN DE LA CINTA SELLANTE
ADHESIVA
• Limpie la encimera en la zona del recorte.
• Pegue la cinta adhesiva sellante alrede-
dor del borde inferior de la superficie de
cocción, en el borde exterior de la vitro-
cerámica. No la estire. Procure que el
corte quede en el centro de uno de los
lados. Cuando haya terminado de cortar-
la (añada algunos mm), presione ambos
extremos entre sí para pegarlos.
MONTAJE
min.
50mm
min.
50mm
min.
500mm
min.
5mm
600mm
380
+1
mm
880
+1
mm
=
=
R 5mm
min.
25 mm
min.
5 mm
min.
20 mm
40 electrolux

min.
38 mm
min.
5 mm
Si utiliza una caja de protección (acce-
sorio adicional
4)
), no son necesarios el
espacio de ventilación frontal de 5 mm
y el suelo protector directamente por
debajo del aparato.
No se puede utilizar la caja de protec-
ción si se instala el aparato encima de
un horno.
DESCRIPCIÓN DEL PRODUCTO
DISPOSICIÓN DE LA SUPERFICIE DE COCCIÓN
1 2
4
3
1
Zona de cocción por inducción a
2.300 W, con función Power a 3.200
W
2
Zona de cocción por inducción a
2.300 W, con función Power a 3.200
W
3
Zona de cocción por inducción a
2.300 W, con función Power a 3.200
W
4
Panel de mandos
DISPOSICIÓN DEL PANEL DE MANDOS
1 2 3 4 5
89
12 11
6 7
10
4) El accesorio de la caja de protección puede no estar disponible en algunos países. Póngase en contacto con el
proveedor local.
electrolux 41

Utilice el aparato con los sensores.
sensor función
1
enciende y apaga la placa
2
activa y desactiva el seguro para niños
3
activa la función Power
4
indicadores del temporizador de las
zonas de cocción
muestran la zona para la que se ha ajustado el
tiempo
5
indicador del temporizador muestra el tiempo en minutos
6
indicadores de ajuste de calor muestran los distintos ajustes de calor
7
indica lo siguiente:
• no hay ningún recipiente sobre la zona de coc-
ción
• el recipiente no es adecuado
• la desconexión automática está activada
8
indica que la zona de cocción está caliente
9
barra de control para el control del quemador
10
/
aumenta o reduce el tiempo
11
selecciona la zona de cocción
12
enciende y apaga el aparato STOP+GO
El símbolo + número en el visor di-
gital del temporizador indica un fallo de
funcionamiento.
INDICADOR DE CALOR RESIDUAL
Advertencia ¡Peligro de
quemaduras producidas por el calor
residual!
Las zonas de cocción por inducción gene-
ran el calor necesario para cocinar directa-
mente en la base del recipiente, lo que ha-
ce que la superficie vitrocerámica se calien-
te por el calor residual del mismo.
INSTRUCCIONES DE USO
ENCENDIDO Y APAGADO
Toque
durante 1 segundo para conectar
y desconectar el aparato.
APAGADO AUTOMÁTICO
La función desconecta
automáticamente la placa siempre que:
• todas las zonas de cocción están apaga-
das.
• no se ha elegido un ajuste de calor des-
pués de haber encendido la placa.
• el sensor ha estado cubierto por un obje-
to (recipiente, paño, etc.) durante más de
10 segundos. El aparato emitirá una se-
ñal acústica hasta que se retire el objeto.
• la placa está demasiado caliente (por
ejemplo, el contenido de un recipiente ha
hervido hasta agotarse). Antes de poder
utilizarla de nuevo es necesario dejar en-
friar la placa.
• no se utilizan los recipientes adecuados.
Se enciende el símbolo
y la zona de
cocción se apaga automáticamente des-
pués de 2 minutos.
• no ha apagado una zona de cocción o
no ha cambiado el ajuste de calor. Des-
pués de un cierto tiempo, se enciende el
símbolo
y se apaga la placa. Consulte
la tabla.
42 electrolux

Tiempos de desconexión automática
Nivel de calor 1-2 3-4 5 6-9
Se desconecta
después de
6 horas 5 horas 4 horas 1,5 horas
PARA AJUSTAR EL CALOR
Toque el ajuste de calor en la barra de con-
trol. Se encienden los indicadores de ajuste
de calor.
CALENTAMIENTO AUTOMÁTICO
La función de calentamiento automático es-
tablece el ajuste de temperatura máximo
durante un tiempo y después desciende al
nivel necesario.
Toque el sensor
. El indicador parpadea.
Ajuste el nivel de calor (1-8). Se enciende el
indicador del ajuste de calor. El indicador
situado por encima de
se enciende y se
apaga al cabo de unos minutos.
El tiempo del indicador de calentamiento
automático cambia según los distintos ajus-
tes de calor.
1
2
3
4
5
6
7
8
9
10
11
0
123456789
ACTIVACIÓN Y DESACTIVACIÓN DE LA
FUNCIÓN POWER
La función Power suministra potencia adi-
cional a las zonas de cocción por induc-
ción. Se activa durante 10 minutos como
máximo. Transcurrido ese tiempo, la zona
de cocción recupera automáticamente su
ajuste de calor máximo (9). Para activar la
función, toque
y se encenderá el indica-
dor situado por encima. Para apagar la fun-
ción, toque cualquier ajuste de calor (1-9).
GESTIÓN DE LA ENERGÍA
La función de gestión de la energía divide la
potencia entre las dos zonas de cocción
que forman un par (consulte la figura). La
electrolux 43

función incrementa al máximo la potencia
de una de las zonas del par y reduce al mí-
nimo el de la otra automáticamente. El visor
digital cambia para la zona con la potencia
reducida.
USO DEL TEMPORIZADOR
Temporizador de cuenta atrás
Utilice el temporizador de cuenta atrás para
regular el tiempo que desee mantener en-
cendida una zona de cocción.
Ajuste el temporizador después de se-
leccionar la zona de cocción.
Elija el nivel de calor antes o después de
ajustar el temporizador.
• Selecciona la zona de cocción:toque
el sensor
varias veces hasta que se
encienda el indicador de la zona de coc-
ción que desea.
• Para activar el temporizador: toque la
tecla
del temporizador para progra-
mar el tiempo (
00
-
99
minutos). La
cuenta atrás comenzará en cuanto el in-
dicador de la zona de cocción parpadee
más lentamente.
• Para comprobar el tiempo restante:
seleccione la zona de cocción con el
sensor
. El indicador de la zona de
cocción parpadea más rápidamente. El
visor digital muestra el tiempo restante.
•
Para cambiar el temporizador de
cuenta atrás:seleccione la zona de coc-
ción con el sensor
y toque o .
• Para parar el temporizador: seleccio-
ne la zona de cocción con el sensor
.
Toque el sensor
. El tiempo restante se
sigue descontando hasta llegar a
00
. El
indicador de la zona de cocción se apa-
ga. También puede apagar el temporiza-
dor tocando
y a la vez.
Cuando haya transcurrido, se activa la
señal acústica y
00
parpadea. La zona
de cocción se apaga.
• Para parar la señal acústica: toque el
sensor
CountUp Timer (temporizador de
avance de contador)
Utilice el CountUp Timer para regular el
tiempo que funcionamiento de una zona de
cocción.
• Para seleccionar la zona de cocción
(si hay más de una):toque el sensor
varias veces hasta que se encienda el in-
dicador de la zona de cocción que de-
sea.
•
Puesta en marcha de la función
CountUp Timer:toque la tecla
del
temporizador hasta que se encienda el
símbolo
. Cuando el indicador de la
zona de cocción parpadea más lenta-
mente, comienza la cuenta adelante y en
el indicador se alternan
y el tiempo
transcurrido (minutos)
• Para comprobar el tiempo transcurri-
do: seleccione la zona de cocción con el
sensor
. El indicador de la zona de
cocción parpadea más rápidamente. En
el indicador se muestra el tiempo trans-
currido.
• Interrupción de CountUp Timer: se-
leccione la zona de cocción con el sen-
sor
y toque o para apagar el
temporizador. El indicador de la zona de
cocción se apaga.
Minutero
Puede utilizar el temporizador como minu-
tero mientras no funcionen las zonas de
cocción. Toque el sensor
. Para selec-
cionar el tiempo, toque la tecla
o del
temporizador. Al finalizar el tiempo se activa
la señal acústica y el símbolo
00
parpadea.
• Para parar la señal acústica: toque el
sensor
STOP+GO
La función
ajusta todas las zonas de
cocción en funcionamiento al nivel de calor
más bajo.
Cuando
funciona, no se puede cambiar
el ajuste de calor.
La función
no detiene la función del
temporizador.
•
Para activar esta función, toque
. Se
enciende el indicador.
•
Para desactivar esta función, toque
. Se activará la temperatura que se haya
seleccionado anteriormente.
BLOQUEAR
Siempre que lo desee podrá bloquear el
panel de mandos, salvo la tecla
. Este
44 electrolux

sensor impide el cambio accidental del
ajuste de calor.
Para activar esta función, toque
. Se en-
ciende el indicador.
El temporizador se mantiene activo.
Para detener esta función, toque
. El in-
dicador se apaga
La función también se desactiva cuando se
apaga el aparato.
DISPOSITIVO DE SEGURIDAD PARA
NIÑOS
Es una función que impide el funcionamien-
to accidental de la placa.
Para activar el dispositivo de seguridad
para niños
•
Ponga la placa en marcha con la tecla
. No seleccione un ajuste de calor.
•
Toque
durante 4 segundos. Se en-
ciende el indicador.
•
Apague la placa con la tecla
.
Para desactivar el dispositivo de
seguridad para niños
•
Ponga la placa en marcha con la tecla
. No seleccione un ajuste de calor.
Toque
durante 4 segundos. Se apaga
el indicador.
•
Apague la placa con la tecla
.
Para anular el dispositivo de seguridad
para niños para una sesión
•
Ponga la placa en marcha con la tecla
. Se enciende el indicador.
•
Toque
durante 4 segundos. Selec-
cione el ajuste de calor en menos de
10 segundos.Utilice el aparato con nor-
malidad.
•
Cuando apague la placa con la tecla
,
el dispositivo de seguridad para niños se
activará de nuevo.
OFFSOUND CONTROL (ACTIVACIÓN Y
DESACTIVACIÓN DE LOS SONIDOS)
Desactivación de los sonidos
Desactive el aparato.
Pulse
durante 3 segundos. Los indica-
dores se encienden y se apagan. Pulse
durante 3 segundos. se enciende; el so-
nido está activado. Pulse
; se encien-
de y la señal acústica se desactiva.
Cuando está activa esta función, sólo se
oye el sonido cuando:
•
se pulsa
• el avisador se apaga
• el temporizador se apaga
• se coloca algo en el panel de control.
Activación de los sonidos
Desactive el aparato.
Pulse
durante 3 segundos. Los indica-
dores se encienden y se apagan. Pulse
durante 3 segundos. se enciende por-
que el sonido está desactivado. Pulse
,
se enciende. El sonido está activado.
CONSEJOS ÚTILES
Utilice las zonas de cocción con los re-
cipientes apropiados.
RECIPIENTES PARA LAS ZONAS DE
COCCIÓN POR INDUCCIÓN
Importante El calor de la cocción por
inducción lo genera un potente electroimán
que lo transmite de inmediato al interior del
recipiente.
Material del recipiente
• correcto: hierro y acero fundido, acero
esmaltado, acero inoxidable con bases
formadas por varias capas (indicados por
el fabricante como aptos para inducción).
• incorrecto: aluminio, cobre, latón, cris-
tal, cerámica, porcelana.
El recipiente es indicado para cocinar
por inducción si...
• ... puede calentar en poco tiempo una
cantidad pequeña de agua con el ajuste
de calor máximo.
• ... el imán se adhiere a la base del reci-
piente.
electrolux 45

Utilice recipientes con la base más
gruesa y plana posible.
Medidas de los recipientes: las zo-
nas de cocción por inducción se adap-
tan automáticamente al tamaño de la
base de los recipientes, pero hasta un
cierto límite. No obstante, la parte
magnética de la base del recipiente de-
be tener un diámetro mínimo de unos
3/4 del tamaño de la zona de cocción.
RUIDOS DURANTE EL
FUNCIONAMIENTO
Es posible que escuche los ruidos
siguientes:
• crujidos: el recipiente está fabricado con
distintos tipos de materiales (construc-
ción por capas).
• silbidos: utiliza una o varias zonas de
cocción a temperaturas muy altas y con
recipientes cuya base está hecha de dis-
tintos materiales (construcción por ca-
pas).
• murmullos: el nivel de calor utilizado es
alto.
• golpeteos: cambios en la potencia eléc-
trica.
• siseos, zumbidos: el ventilador está en
funcionamiento.
Los ruidos descritos son normales y no
indican fallo alguno.
AHORRO DE ENERGÍA
• Si es posible, cocine siempre con los
recipientes tapados.
• Coloque el recipiente antes de iniciar
la zona de cocción.
• Desconecte las zonas de cocción
antes de finalizar el tiempo de coc-
ción para usar el calor residual.
• La base de las cacerolas y las zonas
de cocción deben tener el mismo ta-
maño.
ÖKO TIMER (TEMPORIZADOR
ECOLÓGICO)
Para ahorrar energía, la resistencia de
la zona de cocción se apaga automáti-
camente antes de que suene la señal
del temporizador de cuenta atrás. La
reducción del tiempo de calentamiento
depende del nivel de calor y del tiempo
de cocción.
EJEMPLOS DE APLICACIONES DE
COCCIÓN
Los datos de la tabla se indican sólo a título
orientativo.
Nivel
de
coc-
ción
Utilícelo para: Tiempo Sugerencias
1
Mantener calientes los alimentos según
sea ne-
cesario
Cubrir los alimentos
1-2 Salsa holandesa, derretir: mantequilla,
chocolate, gelatina
5 - 25
min
Mezclar de vez en cuando
1-2 Cuajar: tortillas, huevos al plato 10 - 40
min
Cocinar con tapa
2-3 Arroces y platos a base de leche, calen-
tar comidas preparadas
25 - 50
min
Añadir al menos el doble de agua
que de arroz, remover los platos a
base de leche durante la cocción
3-4 Cocinar al vapor verduras, pescados o
carnes
20 - 45
min
Añadir unas cucharadas de líquido
4-5 Patatas al vapor 20 - 60
min
Utilizar como máximo ¼ l de agua
para 750 g de patatas
4-5 Grandes cantidades de alimentos, esto-
fados y sopas
60 - 150
min
Hasta 3 L de líquido más los ingre-
dientes
46 electrolux

Nivel
de
coc-
ción
Utilícelo para: Tiempo Sugerencias
6-7 Asado suave: escalopes, ternera "cor-
don bleu", chuletas, hamburguesas, sal-
chichas, hígado, filetes rusos, huevos,
tortitas, rosquillas
según
sea ne-
cesario
Dar la vuelta a media cocción
7-8 Asado fuerte, bolas de patata, filetes de
lomo, filetes
5 - 15
min
Dar la vuelta a media cocción
9 Hervir grandes cantidades de agua, cocer pasta, dorar carne (gulash, asado), freír patatas
La función Power es adecuada para calen-
tar grandes cantidades de líquido.
Información sobre acrilamidas
Importante Según los nuevos
descubrimientos científicos, el tostado
intensivo de los alimentos, especialmente
de los productos que contienen almidón,
puede ser un riesgo para la salud. Por esta
razón, se recomienda cocinar a bajas
temperaturas y no tostar excesivamente los
alimentos.
MANTENIMIENTO Y LIMPIEZA
Limpie el aparato después de cada uso.
Use siempre recipientes con la base limpia.
Advertencia Los productos de
limpieza corrosivos y abrasivos dañan
al aparato.
Por razones de seguridad, no limpie el
aparato con limpiadores de chorro de
vapor o de alta presión.
Los arañazos o las marcas oscuras de
la superficie vitrocerámica no afectan al
funcionamiento normal del aparato.
Para eliminar la suciedad:
1. – Quite inmediatamente: restos fun-
didos de plástico, papel aluminio y
alimentos que contengan azúcar. De
lo contrario la suciedad dañará el
aparato. Utilice un rascador especial
para el cristal. Coloque el rascador
sobre la superficie formando un án-
gulo agudo y arrastre la hoja para eli-
minar la suciedad.
– Elimine cuando el aparato se ha-
ya enfriado: restos de cal, marcas
de agua, manchas de grasa y deco-
loraciones metálicas. Utilice un lim-
piador especial para vitrocerámicas o
acero inoxidable.
2. Limpie el aparato con un paño suave
humedecido con agua y detergente.
3. Termine la limpieza secando a fondo
el aparato con un paño limpio.
electrolux 47

QUÉ HACER SI…
Problema Causa y soluciones posibles
El aparato no se pone en mar-
cha o no funciona.
• Se han tocado 2 o más sensores a la vez. Toque sólo un sen-
sor.
• Hay agua o manchas de grasa sobre el panel de mandos. Lim-
pie el panel de mandos
•
Están activados el seguro para niños o el bloqueo
. Consul-
te el capítulo Funcionamiento del aparato.
• Reinicie el aparato y ajuste el nivel de calor en 10 segundos.
El aparato emite una señal
acústica (6 veces) y se para o
emite una señal acústica cuan-
do está apagado.
Hay uno o varios sensores cubiertos. Descubra los sensores.
El indicador de calor residual
no se enciende.
La zona de cocción no está caliente porque ha funcionado poco
tiempo. Si la zona de cocción debería estar caliente, llame al
Centro de servicio técnico.
El aparato emite una señal
acústica tras la cual se conecta
y desconecta. El aparato vuelve
a emitir otra señal acústica 5
segundos más tarde.
Se ha cubierto el sensor . Descubra el sensor.
El nivel de calor cambia Está activada la gestión de la energía. Consulte la sección Ges-
tión de la energía.
Se enciende el símbolo
• No hay ningún recipiente en la zona de cocción. Coloque un
recipiente sobre la zona de cocción.
• El recipiente no es correcto. Use un recipiente que sea ade-
cuado.
• El diámetro del recipiente es demasiado pequeño para la zona
de cocción elegida. Póngalo sobre una zona de cocción más
pequeña.
• La desconexión automática está en marcha. Desconecte el
aparato y vuelva a conectarlo.
• La protección contra sobrecalentamiento de la zona de coc-
ción está activada. Apague la zona de cocción. Vuelva a en-
cender la zona de cocción.
Se enciende el símbolo se-
guido de un número.
Hay un fallo de funcionamiento.
Desconecte el aparato de la toma de corriente durante un tiem-
po. Desconecte el interruptor del sistema eléctrico doméstico.
Vuelva a conectarlo de nuevo. Si el símbolo
se vuelve a en-
cender, llame al Centro de servicio técnico.
Se enciende el símbolo
El contenido del recipiente ha hervido hasta agotarse o no se ha
usado el recipiente correcto. La protección contra sobrecalenta-
miento de la zona de cocción está activada. La desconexión au-
tomática está en marcha.
Apague el aparato. Retire el recipiente. Espere unos 30 segundos
y vuelva a encender la zona de cocción.
debería desapare-
cer; el indicador de calor residual puede permanecer encendido.
Deje enfriar el recipiente y consulte la sección "Recipientes para
las zonas de cocción por inducción".
Si ha intentando las soluciones anteriores y
no puede solucionar el problema, hable con
su distribuidor , el departamento de aten-
ción al cliente o servicio técnico Dé los da-
tos de la placa de características, el código
de tres dígitos y letras de la vitrocerámica
(está en la esquina de la encimera) y el
mensaje de error que se enciende.
Si usted ha hecho funcionar el aparato in-
correctamente, se facturará el trabajo de
48 electrolux

mantenimiento de un técnico del servicio
postventa o distribuidor incluso durante el
periodo de garantía. Las instrucciones so-
bre el servicio postventa y las condiciones
de la garantía están en el folleto de garan-
tía.
ASPECTOS MEDIOAMBIENTALES
El símbolo que aparece en el aparato o
en su embalaje, indica que este producto
no se puede tratar como un residuo normal
del hogar. Se deberá entregar, sin coste
para el poseedor, bien al distribuidor, en el
acto de la compra de un nuevo producto
similar al que se deshecha, bien a un punto
municipal de recolección selectiva de
equipos eléctricos y electrónicos para su
reciclaje. Al asegurarse de que este
producto se desecha correctamente, usted
ayudará a evitar posibles consecuencias
negativas para el medio ambiente y la salud
pública, lo cual podría ocurrir si este
producto no se gestionara de forma
adecuada. Para obtener información más
detallada sobre el reciclaje de este
producto, póngase en contacto con el
Ayuntamiento de su Municipio, ó con la
tienda donde lo compró.
MATERIAL DE EMBALAJE
Los materiales de embalaje son ecoló-
gicos y totalmente reciclables. Los
componentes de plástico se identifican
con marcados: >PE<,>PS<, etc. Dese-
che los materiales de embalaje como
residuos domésticos en el contenedor
correspondiente de su municipio.
electrolux 49

Electrolux. Thinking of you.
Ta del av våra tankegångar på www.electrolux.com
INNEHÅLL
Säkerhetsinformation 50
Installationsanvisningar 51
Produktbeskrivning 53
Instruktioner för användning 54
Råd och tips 57
Underhåll och rengöring 58
Om maskinen inte fungerar 59
Miljöskydd 60
Med reservation för ändringar.
SÄKERHETSINFORMATION
För din egen säkerhet och för att du
skall kunna använda diskmaskinen på
korrekt sätt är det viktigt att du nog-
grant läser igenom denna bruksanvis-
ning innan du installerar och använder
diskmaskinen. Förvara bruksanvisning-
en nära till hands och se till att den
också medföljer diskmaskinen om du
flyttar eller säljer den. Alla användare
måste ha fullgod kännedom om an-
vändningen av diskmaskinen och dess
säkerhetsfunktioner.
ALLMÄN SÄKERHET
Varning Personer (inklusive barn) med
nedsatt fysisk, sensorisk eller mental
förmåga, eller om de har bristande
erfarenhet och kunskap, får inte
använda denna produkt. De skall
övervakas eller instrueras vid
användning av produkten av en person
som ansvarar för deras säkerhet.
BARNSÄKERHET
• Endast vuxna personer får använda den-
na produkt. Barn skall övervakas så att
de inte leker med produkten.
• Håll allt förpackningsmaterial utom räck-
håll för barn. Risk för kvävning föreligger.
• Håll barn borta från produkten när den är
påslagen.
Varning Aktivera barnlåset för att
förhindra att småbarn eller husdjur
oavsiktligt sätter på produkten.
SÄKERHET UNDER ANVÄNDNING
• Ta bort allt förpackningsmaterial, dekaler
och folier från produkten före använd-
ning.
• Stäng av kokzonerna efter varje använd-
ningstillfälle.
• Risk för brännskador! Lägg inte metallfö-
remål, till exempel bestick eller kokkärls-
lock på kokzonerna eftersom de kan bli
heta.
• Användare som har en pacemaker im-
planterad måste hålla överkroppen på
minst 30 cm avstånd från kokzoner som
är påslagna.
Varning Brandrisk! Överhettade fetter
och oljor kan snabbt fatta eld.
KORREKT ANVÄNDNING
• Övervaka alltid produkten under använd-
ning.
• Använd bara produkten för matlagning i
ett hushåll!
• Använd inte produkten som arbets- eller
avlastningsyta.
• Placera inte lättantändliga vätskor och
material, eller smältbara föremål (plast el-
ler aluminium), på eller i närheten av pro-
dukten.
•Var försiktig när du ansluter produkten till
eluttag i närheten. Låt inte elektriska led-
ningar vidröra produkten eller heta kok-
kärl. Låt inte elektriska ledningar trassla in
sig.
SÅ HÄR UNDVIKER DU SKADOR PÅ
PRODUKTEN
• Ytan kan skadas om föremål eller kokkärl
faller på glaskeramiken.
• Kokkärl tillverkade av gjutjärn, gjuten alu-
minium eller med skadad botten kan repa
glaskeramiken om de dras över ytan.
• Låt inte kokkärl torrkoka för att undvika
skador på kokkärlen och glaskeramiken.
50 electrolux

•Använd inte kokzonerna utan kokkärl eller
med tomma kärl.
• Täck aldrig någon del av produkten med
aluminiumfolie.
• Blockera inte ventilationsutrymmet på 5
mm mellan arbetsytan och produktens
front under arbetsytan.
Varning Om ytan är spräckt, koppla
loss produkten från eluttaget för att
undvika elektriska stötar.
INSTALLATIONSANVISNINGAR
Före installationen bör du anteckna
serienumret (Ser. Nr.) från typskyl-
ten.Typskylten finner du på produk-
tens nedre ram.
EHD90230P
949 594 167 01
58 GCD E2 AU
ELECTROLUX
220-240 V 50-60 Hz
6,9 kW
Induction 6,9 kW
SÄKERHETSFÖRESKRIFTER
Varning Dessa måste du läsa!
Kontrollera att produkten inte har ska-
dats under transporten. Nätanslut inte
produkten om den är skadad. Kontakta
vid behov återförsäljaren.
Endast en auktoriserad servicetekniker
får installera, ansluta eller reparera den-
na produkt. Använd endast originalde-
lar vid reparationer och utbyten.
Inbyggnadsprodukter får endast använ-
das efter installation i lämpliga inbygg-
nadsenheter och arbetsbänkar enligt
gällande standarder.
Modifiera inte denna produkt och ändra
inte dess specifikationer. Det finns risk
för personskador och skador på pro-
dukten.
Gällande lagar, förordningar, direktiv
och standarder i landet där produkten
används måste följas (t.ex. säkerhets-
bestämmelser, regler för kassering och
återvinning och elektriska säkerhetsbe-
stämmelser)!
Minsta avstånd till andra apparater och
enheter skall observeras!
Installera skydd mot elektriska stötar.
Installera exempelvis alltid lådorna med
en skyddsskiva direkt under produkten!
Skydda kanterna i arbetsskivans urtag
mot fukt med ett lämpligt tätningsme-
del!
Täta produkten mot arbetsskivan, så
att det inte blir några springor, med ett
riktigt tätningsmedel!
Skydda produktens undersida mot
ånga och fukt, till exempel från en disk-
maskin eller ugn!
Installera inte produkten intill dörrar eller
under fönster! Annars kan heta kokkärl
slås ned från hällen när dörrar eller
fönster öppnas.
Varning Risk för skador på grund av
elektrisk ström. Följ noga
instruktionerna om elektriska
anslutningar.
• Nätanslutningsplinten är strömförande.
• Gör nätanslutningsplinten strömlös.
• Installera korrekt för att skydda mot elekt-
riska stötar.
• Lösa eller felaktigt anslutna stickkontakter
eller eluttag kan orsaka överhettning i
kopplingsplinten.
• En behörig elektriker skall installera klä-
manslutningarna korrekt.
• Dragavlasta nätkabeln.
• Använd en nätkabel av typ H05BB-F
Tmax 90 °C (eller högre) för anslutning till
en eller två faser.
• Byt ut en skadad nätkabel mot en spe-
cialkabel (typ H05BB-F Tmax 90 °C eller
högre). Kontakta vår lokala serviceavdel-
ning.
Den elektriska installationen måste förses
med en frånskiljare som kan göra produk-
ten strömlös i alla poler med en kontaktse-
paration på minst 3 mm.
Installationen måste ha korrekta isoleringsa-
nordningar: strömbrytare, säkringar (säk-
ringar av skruvtyp skall tas ur hållaren), jord-
felsbrytare och kontaktorer.
electrolux 51

SÄTTA FAST TÄTNINGEN
• Rengör arbetsskivan i området kring urta-
get.
• Sätt fast tätningstapen på hällens nedre
kant längs glaskeramikens yttre kant.
Sträck den inte. Låt de avklippta ändarna
hamna på ena sidans mitt. När du har
klippt av till rätt längd (lägg till några mm),
tryck ihop de två ändarna.
MONTERING
min.
50mm
min.
50mm
min.
500mm
min.
5mm
600mm
380
+1
mm
880
+1
mm
=
=
R 5mm
min.
25 mm
min.
5 mm
min.
20 mm
52 electrolux

min.
38 mm
min.
5 mm
Om du använder en skyddslåda,Pro-
box,(extra tillbehör
5)
) behövs inte det
främre luftflödesområdet på 5 mm eller
skyddsplåten som annars skulle fästs i
kökssnickerierna.
Du kan inte använda skyddslådan om
du installerar produkten ovanför en in-
byggnadsugn.
PRODUKTBESKRIVNING
BESKRIVNING AV HÄLLEN
1 2
4
3
1
Induktionskokzon 2300 W, med effekt-
funktion 3200 W
2
Induktionskokzon 2300 W, med effekt-
funktion 3200 W
3
Induktionskokzon 2300 W, med effekt-
funktion 3200 W
4
Kontrollpanel
BESKRIVNING AV KONTROLLPANELEN
1 2 3 4 5
89
12 11
6 7
10
5) Skyddslådan (tillbehör) finns inte i alla länder. Kontakta din lokala återförsäljare.
electrolux 53

Använd touchkontrollerna för att betjäna produkten.
Touchkontroll Funktion
1
Sätter på och stänger av hällen
2
Aktiverar och inaktiverar funktionslåset eller barnlå-
set
3
Aktiverar effektfunktionen
4
Timerindikatorer för kokzoner Visar för vilken kokzon tiden är inställd
5
Timerdisplay Visar tiden i minuter
6
Värmelägesdisplay Visar det inställda värmeläget
7
Visar att:
• det inte står något kokkärl på kokzonen
• kokkärlet är olämpligt att använda
• säkerhetsavstängningen är aktiverad
8
Visar att en kokzon fortfarande är varm
9
Inställningslist För att ställa in värmelägen
10
/
Ökar eller minskar tiden
11
För att välja kokzon
12
Sätter på och stänger av funktionen STOP+GO
+ en siffra på timerdisplayen visar
att ett feltillstånd har inträffat.
RESTVÄRMEINDIKATOR
Varning Risk för brännskador på
grund av restvärme!
Induktionskokzonerna skapar den värme
som behövs för tillagningen direkt i kokkär-
lets botten. Glaskeramiken värms upp av
restvärmen hos kokkärlet.
INSTRUKTIONER FÖR ANVÄNDNING
PÅ OCH AV
Tryck på
i 1 sekund för att sätta på eller
stänga av produkten.
SÄKERHETSAVSTÄNGNING
Funktionen stänger av hällen
automatiskt och om:
• Alla kokzoner är avstängda.
• Du inte ställer in ett värmeläge när du har
satt på hällen.
• En touchkontroll är täckt av ett föremål
(t.ex. ett kokkärl eller en trasa) längre än
10 sekunder. Ljudsignalen avges tills du
avlägsnar föremålet.
• Hällen blir för het (.ex. om ett kokkärl ko-
kar torrt). Innan du använder hällen igen
måste kokzonen kallna.
• Du använder ett olämpligt kokkärl. Sym-
bolen
tänds och efter 2 minuter
stängs kokzonen av automatiskt.
• Du inte stänger av en kokzon eller ändrar
värmeläget. Efter en stund tänds symbo-
len
och hällen stängs av. Se tabellen.
Tider för säkerhetsavstängning
Värmeläge 1-2 3-4 5 6-9
Stängs av efter 6 timmar 5 timmar 4 timmar 1,5 timma
54 electrolux

VÄRMELÄGE
Tryck på inställningslisten vid önskat värme-
läge. Värmelägesindikatorerna tänds.
SNABBUPPVÄRMNING
Snabbuppvärmningen ställer in det högsta
värmeläget under en viss tid och minskar
sedan till den inställda nivån.
Tryck på
. Indikatorn blinkar. Ställ in ett
värmeläge (1-8). Indikatorn för det valda
värmeläget tänds. Indikatorn ovanför
tänds och slocknar sedan efter en stund.
Tiden för snabbuppvärmningen varierar för
olika värmelägen.
1
2
3
4
5
6
7
8
9
10
11
0
123456789
SÄTTA PÅ / STÄNGA AV
EFFEKTFUNKTIONEN
Effektfunktionen gör mer effekt tillgänglig för
induktionskokzonerna. Effektfunktionen är
aktiverad i högst 10 minuter. Därefter ställs
kokzonen automatiskt in på det högsta vär-
meläget (9). För att aktivera funktionen,
tryck på . Indikatorn ovanför tänds. För
att stänga av funktionen, tryck på ett vär-
meläge (1-9).
EFFEKTREGLERING
Effektregleringen delar upp effekten mellan
två kokzoner parvis (se figur). Effektfunktio-
nen ökar effekten till den högsta nivån för
en kokzon i paret och minskar automatiskt
effektnivån för den andra kokzonen. Dis-
playen för den reducerade kokzonen växlar.
ANVÄNDA TIMERN
Nedräkningstimer
Använd nedräkningstimern för att ställa in
hur länge kokzonen ska vara i drift vid ett
tillagningstillfälle.
Ställ in nedräkningstimern efter valet
av kokzon.
Du kan ställa in värmeläget innan eller efter
att du har ställt in timern.
•
Välj kokzon:tryck på
upprepade
gånger tills indikeringen för den önskade
kokzonen tänds.
•
Starta nedräkningstimern: tryck på
på timern för att ställa in tiden (
00
-
99
minuter). När indikeringen för kokzonen
blinkar långsammare räknas tiden ned.
• Kontroll av återstående tid: välj kokzo-
nen med
. Kokzonens indikering blin-
kar fortare. På displayen visas den åter-
stående tiden.
• Ändra nedräkningstimern:välj kokzo-
nen med
tryck på eller .
•
Stoppa timern: välj kokzonen med
.
Tryck på
. Den återstående tiden räk-
nas ned till
00
. Kokzonens indikering
slocknar. För att stänga av kan du även
trycka på
och samtidigt.
electrolux 55

När tiden har förflutit hörs ljudet och
00
blinkar. Kokzonen stängs av.
•
Stänga av ljudet: tryck på
CountUp Timer (Tidtagningstimer)
Använd CountUp Timer för att kontrollera
hur länge kokzonen är igång.
•
Val av kokzon (om mer än en kokzon
är i drift): tryck på
upprepade gånger
tills indikeringen för den önskade kokzo-
nen tänds.
•
Aktivera CountUp Timer:tryck på
på
timern
tänds. När indikeringen för kok-
zonen blinkar långsammare räknas tiden
ned, och displayen växlar mellan
och
tiden som gått (minuter)
• Kontroll av tiden som gått: välj kokzo-
nen med
. Kokzonens indikering blin-
kar fortare. Displayen visar tiden som
gått.
• Stoppa CountUp Timer: välj kokzonen
med
och tryck på eller för att
stänga av timern. Kokzonens indikering
slocknar.
Signalur
Du kan använda timern som en Signalur
när kokzonerna inte används. Tryck på
.
Tryck på
eller på timern för att ställa in
tiden. När tiden har förflutit hörs ljudet och
00
blinkar.
•
Stänga av ljudet: tryck på
STOP+GO
Funktionen
ställer in alla påslagna kok-
zoner på det lägsta värmeläget.
När
är igång kan du inte ändra värmelä-
get.
Funktionen
stoppar inte timerfunktionen.
• För att aktivera denna funktion, tryck
. Kontrollampan tänds.
• För att avaktivera denna funktion, tryck
på
. Det tidigare inställda värmeläget
tänds.
LÅS
Du kan låsa kontrollpanelen, men inte
.
Funktionen förhindrar oavsiktliga ändringar
av vämeläget.
För att starta denna funktion, tryck på
.
Kontrollampan tänds.
Timern förblir på.
För att stoppa denna funktion, tryck på
.
Indikeringen slocknar
När du stänger av produkten stängs även
denna funktion av.
BARNLÅS
Denna funktion förhindrar oavsiktlig använd-
ning av hällen.
För att aktivera barnlåset:
•
Sätt på hällen med strömbrytaren
.
Ställ inte in något värmeläge.
•
Tryck på
i 4 sekunder. Indikatorn
tänds.
•
Stäng av hällen med
.
För att inaktivera barnlåset:
•
Sätt på hällen med strömbrytaren
.
Ställ inte in något värmeläge. Tryck på
i 4 sekunder. Indikatorn slocknar.
•
Stäng av hällen med
.
För att inaktivera barnlåset för ett
enstaka tillagningstillfälle:
•
Sätt på hällen med strömbrytaren
. In-
dikatorn tänds.
•
Tryck på
i 4 sekunder. Ställ in ett
värmeläge inom 10 sekunder. Hällen
kan nu användas.
•
När du stänger av hällen med
aktive-
ras barnlåset igen.
OFFSOUND CONTROL (AVAKTIVERING
OCH AKTIVERING AV LJUD)
Avaktivering av ljuden
Stäng av produkten.
Tryck på
i 3 sekunder. Displayerna tänds
och släcks. Tryck på
i 3 sekunder.
tänds, och ljudet är nu på. Tryck på .
tänds, och ljudet är nu avstängt.
När denna funktion är aktiv kan du höra ljud
när:
•
du trycker på
• signaluret ringer
• nedräkningstimern ringer
• du lägger något på kontrollpanelen.
Aktivering av ljuden
Stäng av produkten.
Tryck på
i 3 sekunder. Displayerna tänds
och släcks. Tryck på
i 3 sekunder.
56 electrolux

tänds, eftersom ljudet är avstängt. Tryck på
. tänds. Ljudet är nu på.
RÅD OCH TIPS
Använd induktionskokzonerna med
lämpliga kokkärl.
KOKKÄRL FÖR
INDUKTIONSKOKZONER
Viktigt Vid matlagning med induktion
genereras värme nästan omedelbart i
kokkärlet av ett kraftigt elektromagnetiskt
fält.
Kokkärlets material
• Lämpliga: gjutjärn, stål, emaljerat stål,
rostfritt stål, botten med flera lager (märkt
som lämpligt av tillverkaren).
• Olämpliga: aluminium, koppar, mässing,
glas, keramik, porslin.
Kokkärl är lämpliga för en
induktionshäll om:
• Lite vatten mycket snabbt kokar upp på
en kokzon som är inställd på det högsta
värmeläget.
• En magnet fastnar på botten är kärlet.
Kokkärlets botten skall vara så tjock
och plan som möjligt.
Kokkärlets mått: Induktionskokzoner-
na anpassar sig automatiskt till storle-
ken på kokkärlets botten upp till en viss
gräns. Den magnetiska delen av kok-
kärlets botten måste dock ha en mins-
ta diameter på cirka 3/4 av kokzonens
storlek.
LJUD UNDER ANVÄNDNING
Om du hör
• knackande ljud: Är kokkärlet tillverkat av
olika material ("sandwichkonstruktion").
• vinande ljud: Använder du en eller flera
kokzoner med höga effektnivåer och kok-
kärlet är tillverkat av olika material ("sand-
wichkonstruktion").
• surrande ljud: Använder du höga effektni-
våer.
• klickande ljud: Beror detta på elektriska
omkopplingar.
• Visslande, surrande ljud: Beror detta på
att fläkten är i drift.
Dessa ljud är normala och innebär inte
att något är fel.
SPARA ENERGI
• Sätt om möjligt alltid ett lock på kok-
kärlet.
• Ställ kokkärlet på kokzonen innan du
sätter på zonen.
• Stäng av kokzonen innan tillagningen
är klar för att utnyttja restvärmen.
• Botten på pannor och kokkärl måste
vara lika stor som kokzonen.
ÖKO TIMER (ECO TIMER)
För att spara energi stängs kokzonen
av tidigare än med en nedräkningsti-
mer. Hur mycket uppvärmningstiden
reduceras beror på tillagningsnivå och
tillagningstid.
EXEMPEL PÅ OLIKA TYPER AV
TILLAGNING
Uppgifterna i tabellen är endast avsedda
som vägledning.
Vär-
melä-
ge
Använd för: Tid Anvisning
-1
Varmhållning av tillagad mat efter be-
hov
Täck över maten
1-2 Hollandaisesås, smältning: smör, chok-
lad, gelatin
5-25 mi-
nuter
Rör om då och då
1-2 Stanning: omeletter, äggstanning 10-40
minuter
Tillaga med lock
electrolux 57

Vär-
melä-
ge
Använd för: Tid Anvisning
2-3 Sjudning av ris och mjölkbaserade rät-
ter, värmning av färdiglagade rätter
25-50
minuter
Tillsätt minst dubbla mängden väts-
ka som ris, rör om mjölkrätter under
tillagningen
3-4 Ångkoka grönsaker, fisk, kött 20-45
minuter
Tillsätt några matskedar vätska
4-5 Koka potatis 20-60
minuter
Använd max. 1/4 liter vatten för 750
gram potatis
4-5 Tillagning av stora mängder mat, stuv-
ningar och soppor
60-150
minuter
Upp till 3 liter vätska plus ingredien-
ser
6-7 Lätt stekning: schnitzel, cordon bleu,
kotletter, kroketter, korv, lever, ägg,
pannkakor, munkar
efter be-
hov
Vänd efter halva tiden
7-8 Hård stekning, potatiskroketter, fransys-
ka, biff
5-15 mi-
nuter
Vänd efter halva tiden
9 Koka stora mängder vatten, koka pasta, bryna kött (gulash, grytstek), fritera pommes fri-
tes
Effektfunktionen är lämplig för att värma
upp stora mängder vatten.
Information om akrylamid
Viktigt Enligt de senaste vetenskapliga
rönen kan akrylamid bildas om livsmedel
bryns hårt (speciellt om de innehåller
stärkelse), vilket kan utgöra en hälsorisk. Vi
rekommenderar därför tillagning vid låga
temperaturer och att inte bryna mat för hårt.
UNDERHÅLL OCH RENGÖRING
Rengör produkten efter varje användnings-
tillfälle.
Använd alltid kokkärl med ren botten.
Varning Vassa föremål och repande
rengöringsmedel skadar produkten.
Av säkerhetsskäl får produkten inte
rengöras med ång- eller högtryckstvätt.
Repor eller mörka fläckar på glaskera-
miken påverkar inte produktens funk-
tion.
För att ta bort smuts:
1. – Ta omedelbart bort:smält plast,
plastfolie och mat med socker.
Smutsen kan skada produkten om
du inte gör detta. Använd en speciell
skrapa för glaset. Sätt skrapan snett
mot glasytan och för bladet över
ytan.
– Avlägsna när produkten är till-
räckligt sval:kalkavlagringsringar,
vattenringar, fettstänk, glänsande
metalliska missfärgningar. Använd ett
speciellt rengöringsmedel för glaske-
ramik eller rostfritt stål.
2. Rengör produkten med en fuktig duk
och lite rengöringsmedel.
3. Torka sedan produkten torr med en
ren duk.
58 electrolux

OM MASKINEN INTE FUNGERAR
Problem Möjlig orsak och åtgärd
Produkten kan inte sättas på
och användas.
• Du har tryckt på två eller fler touchkontroller samtidigt. Tryck
bara på en touchkontroll.
• Det är vatten eller fettstänk på kontrollpanelen. Rengör kontroll-
panelen.
•
Funktionslåset eller barnlåset är aktiverat eller funktionen
är
aktiverad. Se avsnittet "Användning av produkten".
• Slå på produkten igen och ställ in värmeläget inom 10 sekun-
der.
En ljudsignal avges (6x) och
produkten stängs av eller en
ljudsignal avges när produkten
är avstängd.
En eller flera touchkontroller är övertäckta. Ta bort det som täcker
touchkontrollerna.
Restvärmeindikatorn tänds inte. Kokzonen är inte varm eftersom den bara har varit påslagen en
kort stund. Kontakta Kundtjänst om kokzonen borde vara varm.
En ljudsignal avges och pro-
dukten sätts på och stängs se-
dan av igen. Efter 5 sekunder
avges en ny ljudsignal.
Du har täckt över . Ta bort det som täcker touchkontrollen.
Det inställda värmeläget växlar. Effektregleringen är aktiverad. Se avsnittet "Effektreglering".
Symbolen tänds.
• Det står inget kokkärl på kokzonen. Ställ ett kokkärl på kokzo-
nen.
• Kokkärlet är olämpligt att använda. Använd rätt typ av kokkärl.
• Diametern på kokkärlets botten är för liten för kokzonen. Flytta
kokkärlet till en mindre kokzon.
• Säkerhetsavstängningen är aktiverad. Stäng av produkten och
sätt på den igen.
• Överhettningsskyddet för kokzonen har aktiverats. Stäng av
kokzonen. Sätt på kokzonen igen.
och en siffra tänds.
Det har uppstått ett fel på produkten.
Koppla loss produkten från eluttaget en stund. Slå ifrån säkringen
i fastighetens elsystem. Anslut produkten till eluttaget igen. Kon-
takta Kundtjänst om
tänds igen.
tänds.
Det har uppstått ett fel på produkten på grund av att ett kokkärl
har kokat torrt eller att du har använt ett olämpligt kokkärl. Över-
hettningsskyddet för kokzonen har aktiverats. Säkerhetsavstäng-
ningen är aktiverad.
Stäng av produkten. Ta bort det heta kokkärlet. Sätt på kokzonen
igen efter cirka 30 sekunder.
bör slockna och restvärmeindi-
katorn bör var tänd. Låt kokkärlet kallna och kontrollera i avsnittet
"Kokkärlets material" att det är lämplig att använda.
Kontakta återförsäljaren eller Kundtjänst om
du inte kan avhjälpa problemet med ovan-
stående förslag. Uppge data från typskyl-
ten, koden med tre siffror/bokstäver för
glaskeramiken (den sitter i hörnet på hällen)
och det felmeddelande som visas.
Om du har hanterat hällen på fel sätt och
måste tillkalla en servicetekniker från vår
kundtjänst eller din återförsäljare är detta
besök inte kostnadsfritt, inte heller under
garantitiden. Anvisningar för kundservice
och garantivillkor finns i garantihäftet.
electrolux 59

MILJÖSKYDD
Symbolen på produkten eller emballaget
anger att produkten inte får hanteras som
hushållsavfall. Den skall i stället lämnas in
på uppsamlingsplats för återvinning av el-
och elektronikkomponenter. Genom att
säkerställa att produkten hanteras på rätt
sätt bidrar du till att förebygga eventuellt
negativa miljö- och hälsoeffekter som kan
uppstå om produkten kasseras som vanligt
avfall. För ytterligare upplysningar om
återvinning bör du kontakta lokala
myndigheter eller sophämtningstjänst eller
affären där du köpte varan.
FÖRPACKNINGSMATERIAL
Förpackningsmaterialen är miljövänliga
och kan återvinnas. Plastdelarna är
märkta med t.ex. >PE<,>PS<, etc.
Kassera förpackningsmaterialen i av-
sedda behållare på kommunens sop-
stationer.
60 electrolux

electrolux 61

62 electrolux

electrolux 63

892933184-F-382011
www.electrolux.com/shop
-
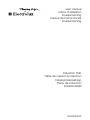 1
1
-
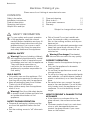 2
2
-
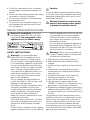 3
3
-
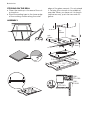 4
4
-
 5
5
-
 6
6
-
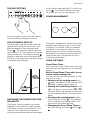 7
7
-
 8
8
-
 9
9
-
 10
10
-
 11
11
-
 12
12
-
 13
13
-
 14
14
-
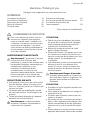 15
15
-
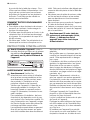 16
16
-
 17
17
-
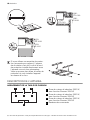 18
18
-
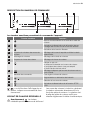 19
19
-
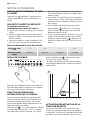 20
20
-
 21
21
-
 22
22
-
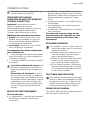 23
23
-
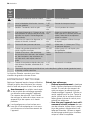 24
24
-
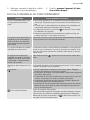 25
25
-
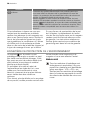 26
26
-
 27
27
-
 28
28
-
 29
29
-
 30
30
-
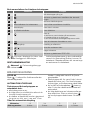 31
31
-
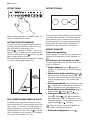 32
32
-
 33
33
-
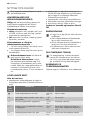 34
34
-
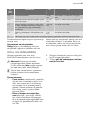 35
35
-
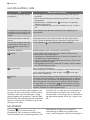 36
36
-
 37
37
-
 38
38
-
 39
39
-
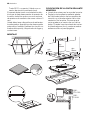 40
40
-
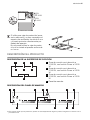 41
41
-
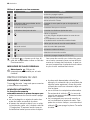 42
42
-
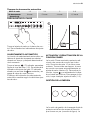 43
43
-
 44
44
-
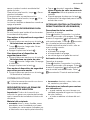 45
45
-
 46
46
-
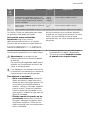 47
47
-
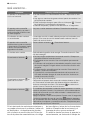 48
48
-
 49
49
-
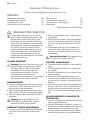 50
50
-
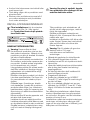 51
51
-
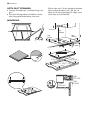 52
52
-
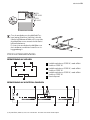 53
53
-
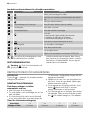 54
54
-
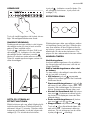 55
55
-
 56
56
-
 57
57
-
 58
58
-
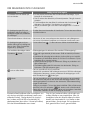 59
59
-
 60
60
-
 61
61
-
 62
62
-
 63
63
-
 64
64


Electrolux EHD90230P Manual de usuario
- Categoría
- Encimeras
- Tipo
- Manual de usuario
en otros idiomas
- français: Electrolux EHD90230P Manuel utilisateur
- English: Electrolux EHD90230P User manual
- dansk: Electrolux EHD90230P Brugermanual
- svenska: Electrolux EHD90230P Användarmanual
Artículos relacionados
-
Electrolux EHD90230P Manual de usuario
-
Electrolux EHD60020X Manual de usuario
-
-
-
-
-
-
-
-
Electrolux LIT81443 Manual de usuario