
8
1
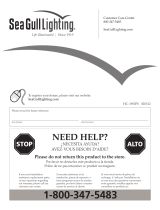
Please record for future reference:
Item Number Date Purchased
NEED HELP?
¿NECESITA AYUDA?
AVEZ-VOUS BESOIN D’AIDE?
Please do not return this product to the store.
Por favor no devuelva este producto a la tienda.
Prière de ne pas retourner ce produit au magasin.
1-800-347-5483
If you need installation
assistance, replacement parts,
or have questions regarding
our warranty, please call our
customer care center:
Si necesita asistencia en la
instalación, piezas de repuesto, o
tiene preguntas acerca de nuestra
garantía, por favor llame a nuestro
centro de servicio al cliente:
Si vous avez besoin de pièces de
rechange, d ’aide pur l’installation ou
si vous avez des questions concernant
notre garantie, veuillez appeler nos
conseillers en produits au :
STOP
ALTO
Care and Cleaning
To clean, wipe fixture with a soft cloth. Clean glass with a mild soap. Do
not use abrasive materials such as scouring pads or powders,steel wool or
abrasive paper.
Warranty
Sea Gull Lighting fixtures and components, when properly installed and under normal conditions of use, are warranted to be free from defects in materials and
workmanship for one year from date of sale. ENERGY STAR
®
labeled products are warranted for three years. Sea Gull Lighting at its sole option will repair or
replace, F.O.B. Factory, freight prepaid, any Sea Gull Lighting product defective in materials or workmanship. Such replacement is the exclusive remedy against
Sea Gull Lighting should any of the products delivered prove defective. Invoices for labor charges and/or charge backs for labor will be denied unless prior written
approval is given.
Any modification to a Sea Gull Lighting product not made at the factory will void the UL or ETL listing as well as the Sea Gull Lighting warranty policy.
To register your fixture, please visit our website: SeaGullLighting.com
Entretien et Nettoyage
Nettoyer le luminaire en l’essuyant avec un chiffon doux. Utiliser un savon
doux pour le verre. Ne pas utiliser de matières ou substances abrasives
telles que tampons ou poudres à récurer, paille de fer ou papier de verre.
Cuidado y Limpieza
Para limpiar, limpie el accesorio con un trapo suave. Lave el vidrio con
jabón suave. No use materiales abrasivos tales como almohadillas o
polvos abrasivos, lana de acero o papel abrasivo.
Garantie
A la condition d’un montage et d’une utilisation dans les normes, les Luminaires et pièces Sea Gull Lighting sont garantis sans défauts des matériaux et dans
leur fabrication pour une durée d’un an à compter de la date d’achat. Les produits labellisés ENERGY STAR® sont garantis pour trois ans. A sa seule discrétion,
Sea Gull Lighting réparera ou remplacera tout produit Sea Gull Lighting défectueux dans ses matériaux ou dans sa fabrication, F.O.B. Usine fret payé d’avant. Un
remplacement selon ces conditions est l’unique recours à l’encontre de Sea Gull Lighting dans le cas où les produits livrés se révèlent défectueux. Toute facture
concernant des frais de main d’oeuvre et/ou toute demande de remboursement de main d’oeuvre sera rejetée à moins qu’un accord écrit ait été consenti au
préalable.
Toute modification non effectuée par l’usine d’un produit Sea Gull Lighting conduira à l’annulation des enregistrements UL ou ETL ainsi que du contrat de
garantie Sea Gull Lighting.
Pour enregistrer votre luminaire, veuillez consulter notre site web : SeaGullLighting.com
Garantía
Los accesorios y componentes Sea Gull Lighting, cuando son correctamente instalados bajo condiciones de uso normal, se garantizan a estar libres de defectos
en materiales y trabajo manual por un año de la fecha de compra. Los productos etiquetados ENERGY STAR® se garantizan por tres años. Sea Gull Lighting a
su propia opción reparará o reemplazará, F.O.B. Factory, flete pre pagado, cualquier producto de Sea Gull Lighting defectuoso en materiales o trabajo manual. Tal
reemplazo es el remedio exclusivo en contra de Sea Gull Lighting en caso de que cualquiera de sus productos entregados esté defectuoso. Facturas por cargos de
labor y/o cargos al usuario por labor serán negados a menos de que se haya recibido permiso previo por escrito.
Cualquier modificación hecha a un producto de Sea Gull Lighting no llevado a cabo en la fábrica
anulara el listado de UL o ETL al igual que la póliza de garantía de Sea Gull Lighting.
Para registrar su accesorio, por favor visite nuestra página web: SeaGullLighting.com
Customer Care Center
800-347-5483
SeaGullLighting.com
HC-1912FS 022412
To register your fixture, please visit our website:
SeaGullLighting.com
Helpful Tools / Outils Utiles / Herramientas Útiles

2
7
1
2
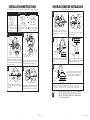
Align posts on top of one louver and insert into holes on
bottom of other louver. Align posts on top louver with bosses
on roof and secure with 3-inch long self-tapping screw
Feed wires from roof thru large round hole in canopy.
Align two bosses on canopy with bosses in roof and insert
canopy into roof. Be sure canopy fits flush with roof.
Insert carriage bolt into square opening in back of canopy,
and secure with acorn nut.
screws
(provided)
INSTALLATION INSTRUCTIONS
READ IMPORTANT SAFETY TIPS BEFORE PROCEEDING WITH INSTALLATION
Turn fixture off! (Place wall switch
in off position, if fixture has built-in
switch or chain pull, switch or pull
chain so fixture is off.)
Next - go to the main fuse box. If
your fuse box has an ON/OFF switch,
simply place main power switch in
OFF position.
SAFETY TIPS
Screw-in type fuses - unscrew the fuse
or fuses that control the power to the
fixture or room you are working in.
OR
Thread one inch long screws into mounting plate and
feed fixture wires through the hole in the center of the
mounting plate.
CONNECT THE WIRES. NOTE: Attach black fixture wire to
black supply wire, white fixture wires to white supply wire.
Do not mix them up. Use wire connectors (not provided).
3
4
Omit this step if unit you purchased has canopy attached to
roof.
photo sensor
(optional)
carriage bolt
nut
lampholder
mounting
plate
roof
louver
louver
3-inch long
self -tapping screws
screws
mounting
plate
fixture
wires
fixture wires
outlet box
wire connectors
HC-1912FS 022412
INSTRUCCIONES DE INSTALACION
CONTINUED FROM OTHER SIDE
5
6
Coloque cierre sobre tornillos montadores y seguros con
nueces de pulgar proveídas.
dispositivo
tuerca ciega
7 8
9
Colocar el dispositivo sobre los tornillos de de montaje del
dispositivo y saegurar en posición con las tuercas ciegas
incluidas.
NOTA: El dispositivo tiene que calafateavse con calafateo
(caulk) acrílico donde la base del dispositivo toca la
superficie (el techo ó la pared) en que se montó. Elcalafateo
crea un sello impermeable en ellugar de instalación.
PARA DISPOSITIVOS FLUORESCENTES ÚNICAMENTE: EN CASO DE TEMPERATURAS BAJAS: Para temperaturas bajo 25’ deje la lámpara PL9
prendida constantemente - empezando con lámparas ya calentadas. Nota: Si tiene problemas al intentar prender la lámpara en
temperaturas bajas, quite la lámpara del dispositivo y tráigala adentro para que se caliente. Luego reinstale la lámpara, préndala y déjela
prendida constantemente. No intente calentar las lámparas en un horno de gas o de microondas o en ningún aparato calentador.
calafateo
casquete
del
dispositivo
LIMPIAR SOLAMENTE CON JABON SUAVE Y AGUA. EVITE ROCIAR CON
PRODUCTOS DE LIMPIEZA, INSECTICIDAS Y PESTICIDAS QUE SON
PRODUCTOS DERIVADOS DEL PETRÓLEO DE LOS HIDROCARBUROS.
ESTAS DEGRADARÁ LUMINARIA.
Incluya girar sobre un eje - prohiba a caja-de-enchuf e con
dos 8-32” tornillos (no proveída). Inserten tornillos a trav
és de apertura rectangular y en girar sobre un eje barra.
Aprieten tornillos.
Gire sobre un eje Barra
caja
eléctrica
tornillo
tuerca
ciega
travesaño
externo
tornillos de
montaje del
dispositivo
instalar el foco en el casquillo. Asegurarse de usar un foco de
una potencia de vatios no más alta que lo especificado para
esta artefacto. Enroscar el difusor a la cubierta.
foco
difusor
HC-1912FS 022412

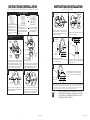
6
3
1
2
Alinee los postes encima de un lumbrera y relleno en los
agujeros en fondo de la otra lumbrera. Alinee los postes en la
lumbrera superior con los jefes en la azotea y asegúrelos con
el tornillo self-tapping largo 3-inch
Alimente los alambres de la azotea por el agujero redondo
grande en pabellón. Alinee dos jefes en el pabellón con los
jefes en pabellón de la azotea y del relleno en la azotea. Sea
ajustes seguros del pabellón a ras de la azotea. Inserte el
perno de carro en la abertura cuadrada adentro detrás del
pabellón, y asegure con la tuerca de la bellota.
screws
(provided)
INSTRUCCIONES DE INSTALACIÓN
LEA LAS EXTREMIDADES IMPORTANTES DE SEGURIDAD ANTES DE PROCEDER CON LA INSTALACIÓN
COLOQUE EL INTERRUPTOR EN
APAGADO. (SI LA INSTALACION TIENE
UN INTERRUPTOR INTEGRADO O DE
CADENA, ASEGURARSE QUE ESTE
APAGADO).
VAYA A LA CAJA PRINCIPAL DE
FUSIBLES DE SU CASA. SI TIENE
INTERRUPTOR DE APAGADO/
ENCENDIDO, COLOCAR EN APAGADO.
EXTREMIDADES DE SEGURIDAD
FUSIBLES DESATORNILLABLES.
DESATORNILLE LOS FUSIBLES QUE
CONTROLAN LA ELECTRICIDAD EN
EL CUARTO QUE VA A TRABAJAR.
OR
Rosque los tornillos de una pulgada de largo en los
alambres del accesorio de la placa y de la alimentación
de montaje a través del agujero en el centro de la placa
de montaje.
CONECTE LOS ALAMBRES. NOTA: Una el alambre negro
del accesorio al alambre negro de la fuente, alambres
blancos del accesorio al alambre blanco de la fuente.
No los mezcle para arriba. Utilice los conectadores del
alambre (no proporcionados).
Omita este paso si la unidad que usted compró tiene pabellón
unido a la azotea.
fotosensor
(opcional)
perno de carro
tuerca
placa de
montaje de la
portalámpara
azotea
lumbrera
lumbrera
3-inch desean
los tornillos que
golpean ligeramente del uno mismo
tornillos
placa de
montaje
alambres del
accesorio
alambres del accesorio
caja del enchufe
conectadores del alambre
3
4
HC-1912FS 022412
HC-1912FS 022412
INSTALLATION INSTRUCTIONS
CONTINUED FROM OTHER SIDE
5
6
Position fixture over fixture mounting screws and secure
with provided thumb nuts.
fixture
thumb nuts
7 8
9
Position the fixture over the fixture mounting screws and
secure in place with the thumb nuts provided.
NOTE: Fixture MUST be caulked with an acrylic caulk
where fixture meets mounting surface. This provides a
water tight seal when fixture is installed.
FOR FLUORESCENT FIXTURES ONLY! COLD WEATHER STARTING INFORMATION: For temperatures below 250 leave the lamp(s) on continuously
- starting with warm lamps. NOTE: If lamp starting becomes a problem in any cold weather applications; remove the lamp(s) form the fixture -
bring the lamp(s) indoors so that they become warm - then re-install the lamp(s) into the fixture and leave the fixture on continuously. Do not place
lamp(s) in an oven, microwave or similar heat producing device.
caulk
fixture
canopy
CLEAN ONLY WITH MILD SOAP AND WATER. AVOID SPRAYING WITH
CLEANSERS, INSECTICIDES, AND PESTICIDES THAT ARE PETROLEUM
BASED HYDROCARBON PRODUCTS. THESE WILL DEGRADE LUMINAIRE.
Attach swivel bar to outlet box with two 8-32 screws (not
provided). These screws should be inserted through
appropriate rectangular opening in plate and into swivel bar.
Tighten screws.
swivel bar
outlet box screws
thumb
nuts
outer
cross bar
fixture
mounting
screws
install bulb into socket. Be sure to use bulb with wattage no
greater than specified for this fixture. Screw diffuser into roof.
bulb
diffuser
La página se está cargando ...
Transcripción de documentos
Care and Cleaning Entretien et Nettoyage To clean, wipe fixture with a soft cloth. Clean glass with a mild soap. Do not use abrasive materials such as scouring pads or powders,steel wool or abrasive paper. Nettoyer le luminaire en l’essuyant avec un chiffon doux. Utiliser un savon doux pour le verre. Ne pas utiliser de matières ou substances abrasives telles que tampons ou poudres à récurer, paille de fer ou papier de verre. Customer Care Center 800-347-5483 SeaGullLighting.com Cuidado y Limpieza Para limpiar, limpie el accesorio con un trapo suave. Lave el vidrio con jabón suave. No use materiales abrasivos tales como almohadillas o polvos abrasivos, lana de acero o papel abrasivo. Warranty Sea Gull Lighting fixtures and components, when properly installed and under normal conditions of use, are warranted to be free from defects in materials and workmanship for one year from date of sale. ENERGY STAR® labeled products are warranted for three years. Sea Gull Lighting at its sole option will repair or replace, F.O.B. Factory, freight prepaid, any Sea Gull Lighting product defective in materials or workmanship. Such replacement is the exclusive remedy against Sea Gull Lighting should any of the products delivered prove defective. Invoices for labor charges and/or charge backs for labor will be denied unless prior written approval is given. HC-1912FS 022412 Any modification to a Sea Gull Lighting product not made at the factory will void the UL or ETL listing as well as the Sea Gull Lighting warranty policy. To register your fixture, please visit our website: SeaGullLighting.com Helpful Tools / Outils Utiles / Herramientas Útiles To register your fixture, please visit our website: SeaGullLighting.com Garantie A la condition d’un montage et d’une utilisation dans les normes, les Luminaires et pièces Sea Gull Lighting sont garantis sans défauts des matériaux et dans leur fabrication pour une durée d’un an à compter de la date d’achat. Les produits labellisés ENERGY STAR® sont garantis pour trois ans. A sa seule discrétion, Sea Gull Lighting réparera ou remplacera tout produit Sea Gull Lighting défectueux dans ses matériaux ou dans sa fabrication, F.O.B. Usine fret payé d’avant. Un remplacement selon ces conditions est l’unique recours à l’encontre de Sea Gull Lighting dans le cas où les produits livrés se révèlent défectueux. Toute facture concernant des frais de main d’oeuvre et/ou toute demande de remboursement de main d’oeuvre sera rejetée à moins qu’un accord écrit ait été consenti au préalable. Toute modification non effectuée par l’usine d’un produit Sea Gull Lighting conduira à l’annulation des enregistrements UL ou ETL ainsi que du contrat de garantie Sea Gull Lighting. Please record for future reference: Item Number Date Purchased Pour enregistrer votre luminaire, veuillez consulter notre site web : SeaGullLighting.com NEED HELP? Garantía Los accesorios y componentes Sea Gull Lighting, cuando son correctamente instalados bajo condiciones de uso normal, se garantizan a estar libres de defectos en materiales y trabajo manual por un año de la fecha de compra. Los productos etiquetados ENERGY STAR® se garantizan por tres años. Sea Gull Lighting a su propia opción reparará o reemplazará, F.O.B. Factory, flete pre pagado, cualquier producto de Sea Gull Lighting defectuoso en materiales o trabajo manual. Tal reemplazo es el remedio exclusivo en contra de Sea Gull Lighting en caso de que cualquiera de sus productos entregados esté defectuoso. Facturas por cargos de labor y/o cargos al usuario por labor serán negados a menos de que se haya recibido permiso previo por escrito. Cualquier modificación hecha a un producto de Sea Gull Lighting no llevado a cabo en la fábrica anulara el listado de UL o ETL al igual que la póliza de garantía de Sea Gull Lighting. Para registrar su accesorio, por favor visite nuestra página web: SeaGullLighting.com STOP ¿NECESITA AYUDA? AVEZ-VOUS BESOIN D’AIDE? Please do not return this product to the store. Por favor no devuelva este producto a la tienda. Prière de ne pas retourner ce produit au magasin. If you need installation assistance, replacement parts, or have questions regarding our warranty, please call our customer care center: Si necesita asistencia en la instalación, piezas de repuesto, o tiene preguntas acerca de nuestra garantía, por favor llame a nuestro centro de servicio al cliente: Si vous avez besoin de pièces de rechange, d ’aide pur l’installation ou si vous avez des questions concernant notre garantie, veuillez appeler nos conseillers en produits au : 1-800-347-5483 8 ALTO 1 INSTRUCCIONES DE INSTALACION INSTALLATION INSTRUCTIONS CONTINUED FROM OTHER SIDE R E A D I M P O R TA N T S A F E T Y T I P S B E F O R E P R O C E E D I N G W I T H I N S TA L L AT I O N 5 SAFETY TIPS caja eléctrica 6 tornillo dispositivo OR Turn fixture off! (Place wall switch in off position, if fixture has built-in switch or chain pull, switch or pull chain so fixture is off.) 1 Next - go to the main fuse box. If your fuse box has an ON/OFF switch, simply place main power switch in OFF position. Gire sobre un eje Barra tuerca ciega Incluya girar sobre un eje - prohiba a caja-de-enchuf e con dos 8-32” tornillos (no proveída). Inserten tornillos a trav és de apertura rectangular y en girar sobre un eje barra. Aprieten tornillos. 2 Omit this step if unit you purchased has canopy attached to roof. photo sensor (optional) Screw-in type fuses - unscrew the fuse or fuses that control the power to the fixture or room you are working in. 7 nut roof travesaño externo Coloque cierre sobre tornillos montadores y seguros con nueces de pulgar proveídas. 8 tuerca ciega foco louver 4 fixture wires outlet box instalar el foco en el casquillo. Asegurarse de usar un foco de una potencia de vatios no más alta que lo especificado para esta artefacto. Enroscar el difusor a la cubierta. 9 wire connectors calafateo NOTA: El dispositivo tiene que calafateavse con calafateo (caulk) acrílico donde la base del dispositivo toca la superficie (el techo ó la pared) en que se montó. Elcalafateo crea un sello impermeable en ellugar de instalación. casquete del dispositivo fixture wires Thread one inch long screws into mounting plate and feed fixture wires through the hole in the center of the mounting plate. difusor Colocar el dispositivo sobre los tornillos de de montaje del dispositivo y saegurar en posición con las tuercas ciegas incluidas. Align posts on top of one louver and insert into holes on bottom of other louver. Align posts on top louver with bosses on roof and secure with 3-inch long self-tapping screw screws mounting plate tornillos de montaje del dispositivo 3-inch long self -tapping screws Feed wires from roof thru large round hole in canopy. Align two bosses on canopy with bosses in roof and insert canopy into roof. Be sure canopy fits flush with roof. Insert carriage bolt into square opening in back of canopy, and secure with acorn nut. 3 lampholder mounting plate louver carriage bolt screws (provided) PARA DISPOSITIVOS FLUORESCENTES ÚNICAMENTE: EN CASO DE TEMPERATURAS BAJAS: Para temperaturas bajo 25’ deje la lámpara PL9 prendida constantemente - empezando con lámparas ya calentadas. Nota: Si tiene problemas al intentar prender la lámpara en temperaturas bajas, quite la lámpara del dispositivo y tráigala adentro para que se caliente. Luego reinstale la lámpara, préndala y déjela prendida constantemente. No intente calentar las lámparas en un horno de gas o de microondas o en ningún aparato calentador. CONNECT THE WIRES. NOTE: Attach black fixture wire to black supply wire, white fixture wires to white supply wire. Do not mix them up. Use wire connectors (not provided). LIMPIAR SOLAMENTE CON JABON SUAVE Y AGUA. EVITE ROCIAR CON PRODUCTOS DE LIMPIEZA, INSECTICIDAS Y PESTICIDAS QUE SON PRODUCTOS DERIVADOS DEL PETRÓLEO DE LOS HIDROCARBUROS. ESTAS DEGRADARÁ LUMINARIA. 2 HC-1912FS 022412 7 HC-1912FS 022412 INSTRUCCIONES DE INSTALACIÓN INSTALLATION INSTRUCTIONS CONTINUED FROM OTHER SIDE LEA LAS EXTREMIDADES IMPORTANTES DE SEGURIDAD ANTES DE PROCEDER CON LA INSTALACIÓN EXTREMIDADES DE SEGURIDAD 5 outlet box 6 screws fixture OR COLOQUE EL INTERRUPTOR EN APAGADO. (SI LA INSTALACION TIENE UN INTERRUPTOR INTEGRADO O DE CADENA, ASEGURARSE QUE ESTE APAGADO). 1 VAYA A LA CAJA PRINCIPAL DE FUSIBLES DE SU CASA. SI TIENE INTERRUPTOR DE APAGADO/ ENCENDIDO, COLOCAR EN APAGADO. Omita este paso si la unidad que usted compró tiene pabellón unido a la azotea. fotosensor (opcional) swivel bar FUSIBLES DESATORNILLABLES. DESATORNILLE LOS FUSIBLES QUE CONTROLAN LA ELECTRICIDAD EN EL CUARTO QUE VA A TRABAJAR. thumb nuts Attach swivel bar to outlet box with two 8-32 screws (not provided). These screws should be inserted through appropriate rectangular opening in plate and into swivel bar. Tighten screws. 2 7 outer cross bar tuerca Position fixture over fixture mounting screws and secure with provided thumb nuts. 8 thumb nuts bulb azotea lumbrera lumbrera pernoscrews de carro (provided) 3-inch desean los tornillos que golpean ligeramente del uno mismo Alimente los alambres de la azotea por el agujero redondo grande en pabellón. Alinee dos jefes en el pabellón con los jefes en pabellón de la azotea y del relleno en la azotea. Sea ajustes seguros del pabellón a ras de la azotea. Inserte el perno de carro en la abertura cuadrada adentro detrás del pabellón, y asegure con la tuerca de la bellota. 3 caja del enchufe diffuser Position the fixture over the fixture mounting screws and secure in place with the thumb nuts provided. Alinee los postes encima de un lumbrera y relleno en los agujeros en fondo de la otra lumbrera. Alinee los postes en la lumbrera superior con los jefes en la azotea y asegúrelos con el tornillo self-tapping largo 3-inch 4 tornillos fixture mounting screws placa de montaje de la portalámpara install bulb into socket. Be sure to use bulb with wattage no greater than specified for this fixture. Screw diffuser into roof. 9 conectadores del alambre caulk NOTE: Fixture MUST be caulked with an acrylic caulk where fixture meets mounting surface. This provides a water tight seal when fixture is installed. fixture canopy placa de montaje alambres del accesorio FOR FLUORESCENT FIXTURES ONLY! COLD WEATHER STARTING INFORMATION: For temperatures below 250 leave the lamp(s) on continuously - starting with warm lamps. NOTE: If lamp starting becomes a problem in any cold weather applications; remove the lamp(s) form the fixture bring the lamp(s) indoors so that they become warm - then re-install the lamp(s) into the fixture and leave the fixture on continuously. Do not place lamp(s) in an oven, microwave or similar heat producing device. alambres del accesorio CONECTE LOS ALAMBRES. NOTA: Una el alambre negro del accesorio al alambre negro de la fuente, alambres blancos del accesorio al alambre blanco de la fuente. No los mezcle para arriba. Utilice los conectadores del alambre (no proporcionados). Rosque los tornillos de una pulgada de largo en los alambres del accesorio de la placa y de la alimentación de montaje a través del agujero en el centro de la placa de montaje. 6 CLEAN ONLY WITH MILD SOAP AND WATER. AVOID SPRAYING WITH CLEANSERS, INSECTICIDES, AND PESTICIDES THAT ARE PETROLEUM BASED HYDROCARBON PRODUCTS. THESE WILL DEGRADE LUMINAIRE. HC-1912FS 022412 3 HC-1912FS 022412-
 1
1
-
 2
2
-
 3
3
-
 4
4


Generation Lighting 83055-12 Guía de instalación
- Tipo
- Guía de instalación
- Este manual también es adecuado para
En otros idiomas
Documentos relacionados
-
 Generation Lighting 83057 Guía de instalación
-
Generation Lighting 83057 Manual de usuario
-
 Generation Lighting 83057BLE-15 Guía de instalación
-
Seagull Lighting 8335-15 Guía de instalación
-
Generation Lighting 8335-15 Manual de usuario
-
Generation Lighting 8335BLE-12 Guía de instalación
-
Generation Lighting 77952 Guía de instalación
-
 Generation Lighting 75952-962 Guía de instalación
-
 Generation Lighting 61952 Guía de instalación
-
 Generation Lighting 61180-710 Guía de instalación


Otros documentos
-
Sea gull lighting 83055BLE-15 Guía de instalación
-
solus SPC75TC-LE26W-W Guía de instalación
-
Progress Lighting P5493-31 Guía de instalación
-
-
-
-
DeckoRail 117659 Guía de instalación