
Bedienungsanleitung/Garantie 04
Instrucciones de servicio 13
Manual de instruções 21
Istruzioni per l’uso 29
Instruction Manual 37
Instrukcja obsługi/Gwarancja 45
D Autoradio mit USB & Card Reader
E Radio de coche con USB y CARD Reader
P Rádio automóvel com usb e card reader
I Radio per auto con USB e CARD Reader
GB Car radio with USB & CARD Reader
PL Radio samochodowe z USB & Card Reader
AUTORADIO MIT USB &
CARD READER
AR 4027 USB/CR

Inhalt
2
Deutsch
Inhalt
Übersicht der Bedienelemente ......................................Seite 3
Bedienungsanleitung ....................................................... Seite 4
Technische Daten ..............................................................Seite 8
Garantie ...............................................................................Seite 9
Stichwortverzeichnis – Index ...........................................Seite 12
Español
Indice
Indicación de los elementos de manejo ...................Página 3
Instrucciones de servicio ...............................................Página 13
Datos técnicos ................................................................Página 17
Índice ................................................................................Página 20
Português
Índice
Descrição dos elementos .............................................Página 3
Manual de instruções ....................................................Página 21
Características técnicas .................................................Página 25
Registo de palavras-chave – Índice ............................Página 28
Italiano
Indice
Elementi di comando ....................................................Pagina 3
Istruzioni per l’uso...........................................................Pagina 29
Dati tecnici .......................................................................Pagina 33
Elenco tematico - Indice ...............................................Pagina 36
English
Contents
Overview of the Components ........................................Page 3
Instruction Manual.............................................................Page 37
Technical Data ....................................................................Page 41
Index ....................................................................................Page 44
Język polski
Spis treści
Przegląd elementów obłsugi ....................................... Strona 3
Instrukcja obsługi ............................................................ Strona 45
Dane techniczne ............................................................. Strona 49
Ogólne warunki gwarancji ............................................ Strona 50
Indeks rzeczowy .............................................................. Strona 52

Indicación de los elementos de manejo
Descrição dos elementos de serviço
Elementi di comando
Übersicht der Bedienelemente
3
Overview of the Components
Przegląd elementów obłsugi

Deutsch
4
Bedienungsanleitung
Vielen Dank, dass Sie sich für unser Produkt entschieden
haben. Wir wünschen Ihnen viel Freude mit dem Gerät.
Sicherheitshinweise
Lesen Sie vor Inbetriebnahme dieses Gerätes die Bedie-
nungsanleitung sehr sorgfältig durch und bewahren Sie diese
inkl. Garantieschein, Kassenbon und nach Möglichkeit den
Karton mit Innenverpackung gut auf.
• VerwendenSiedasGerätnurfürdenvorgesehenen
Zweck.
• DasGerätsoeinbauen,dassvorhandeneLüftungsöff-
nungen nicht verdeckt werden.
• NiemalsdasGehäusedesGerätesöffnen.Durchunsach-
gemäße Reparaturen können erhebliche Gefahren für
den Benutzer entstehen. Bei Beschädigung des Gerätes,
das Gerät nicht mehr in Betrieb nehmen, sondern von
einem Fachmann reparieren lassen.
Diese Symbole können sich ggf. auf dem Gerät befinden
und sollen Sie auf folgendes hinweisen:
Das Symbol mit Ausrufezeichen soll den Benutzer
auf wichtige Bedienungs- oder Wartungs-Hin-
weise in den Begleitpapieren hinweisen.
Geräte mit diesem Symbol arbeiten mit einem
„Klasse 1-Laser“ zur Abtastung der CD. Die ein-
gebauten Sicherheitsschalter sollen verhindern,
dass der Benutzer gefährlichem, für das mensch-
liche Auge nicht sichtbarem Laserlicht ausgesetzt
wird, wenn das CD-Fach geöffnet ist.
Diese Sicherheitsschalter sollten auf keinen Fall überbrückt
oder manipuliert werden, sonst besteht die Gefahr, dass Sie
sich dem Laser-Licht aussetzen.
Symbole in dieser Bedienungsanleitung
Wichtige Hinweise für Ihre Sicherheit sind besonders gekenn-
zeichnet. Beachten Sie diese Hinweise unbedingt, um Unfälle
und Schäden am Gerät zu vermeiden:
WARNUNG:
Warnt vor Gefahren für Ihre Gesundheit und zeigt mögliche
Verletzungsrisiken auf.
ACHTUNG:
Weist auf mögliche Gefährdungen für das Gerät oder
andere Gegenstände hin.
HINWEIS:
Hebt Tipps und Informationen für Sie hervor.
Kinder und gebrechliche Personen
• ZurSicherheitIhrerKinderlassenSiekeineVerpackungs-
teile (Plastikbeutel, Karton, Styropor, etc.) erreichbar
liegen.
WARNUNG!
Lassen Sie kleine Kinder nicht mit Folie spielen. Es
besteht Erstickungsgefahr!
Verkehrssicherheit
WARNUNG:
• DieVerkehrssicherheitistoberstesGebot.BenutzenSie
daher Ihre Autoradioanlage immer so, dass Sie stets
der aktuellen Verkehrssituation gewachsen sind.
• BedenkenSie,dassSiebeieinerGeschwindigkeitvon
50 km/h in der Sekunde 14 m fahren.
• InkritischenSituationenratenwirvoneinerBedienung
ab.
• DieWarnhinweisez.B.vonPolizeiundFeuerwehrmüs-
sen im Fahrzeug rechtzeitig und sicher wahrgenommen
werden können.
• HörenSiedeshalbwährendderFahrtIhrProgramm
nur in angemessenerer Lautstärke.
• UmernsteVerkehrsunfällezuvermeiden,installieren
Sie das Gerät so, dass es Sie bei der Bedienung des
Lenkrades, Ganghebels usw. nicht behindert.
• EbenfallsdürfenSicherheitseinrichtungen,wiez.B.
Airbag und die freie Sicht nicht behindert werden.
Sicherheitshinweise für die Dauer
der Montage/Anschluss
• ZuerstdenMinuspol,danndenPluspolderBatterie
abklemmen. (Anklemmen in umgekehrter Reihenfolge.)
Bitte beachten:IstdieBatterievomNetz,verlierenalle
flüchtigen Speicher ihre Informationen. Beachten Sie die
Sicherheitshinweise des KFZ- Herstellers.
• DieHauptsicherungmussmöglichstnahe(maximalnach
30 cm) am Pluspol der Batterie installiert werden, damit
das Auto vor einem eventuellen Kabelbrand z.B. durch
Unfall geschützt ist. Sollte die Installation dieser Vorgabe
nicht entsprechen, erlischt der Versicherungsschutz.
• DerQuerschnittdesPlus-undMinuskabelsdarf1,5mm²
nicht unterschreiten.
Installationstipps:
• KabelschutztüllenschützenKabelvorDurchscheuernan
scharfen Karosserieteilen.
• DieIsolierungderKabeldarfbeiderInstallationnicht
beschädigt werden.

Deutsch
5
• DasrichtigeWerkzeugistbeieinerCar-HiFi-Installation
selbstverständlich.
Je nach Bauart kann Ihr Fahrzeug von dieser Beschreibung
abweichen. Für Schäden durch Einbau- oder Anschlussfehler
und für Folgeschäden übernehmen wir keine Haftung.
Wichtige Zusatzinformation zum Einbau
Ihres Autoradios!
1. Das Gerät ist für den Minuspol der Batterie ausgelegt,
der an die Fahrzeugkarosserie angeschlossen sein muss.
Dies bitte vor Installation überprüfen.
2. Bitte beachten Sie beim Einbau/Anschluss Ihres Gerätes,
dass nicht jedes Fahrzeug mit einem “ISO Anschluss“
versehen ist. In diesem Fall empfehlen wir Ihnen den
Einsatz eines KFZ spezifischen ISO Adapter.
Adapter erhalten Sie im Autozubehörhandel und/oder
bei Ihrer KFZ Werkstatt.
3. Bei der Belegung des “Dauer +“ (Dauerstromanschluss)
kann es je nach Fahrzeugtyp zu Abweichungen kommen.
(Dies ist jedoch für die Speicherung der Senderstationen
notwendig.)
Um alle Funktionen zu gewährleisten ist der Einbau
entsprechend dieser Anleitung zwingend erforderlich.
Im Zweifel wenden Sie sich an eine autorisierte KFZ Werk-
statt.
Bedingt durch die verschiedenen Fahrzeugtypen bzw.
Fahrzeughersteller, ist eine korrekte Belegung des ISO
Steckers nicht gewährleistet; selbst wenn die ISO Stecker-
anschlüsse mechanisch aufeinander passen. Daher ist es
eventuell erforderlich den Stromanschluss zu ändern bzw.
Kfz-spezifische Adapter zu verwenden.
HINWEIS:
Bei korrektem Anschluss lässt sich das Radio über die
Zündung ein- bzw. ausschalten. Bei eventuellem Verlust
der gespeicherten Sender erhält das Radio keinen, für
die Senderspeicherung erforderlichen, „Dauer +“.
ACHTUNG:
Bei einem Anschluss an „Dauer +“ ohne Zündung,
kann es trotz ausgeschaltetem Radio zu einer unnöti-
gen Belastung der Autobatterie kommen. Im schlimms-
ten Fall zu einer Entladung der Autobatterie.
4. Je nach Fahrzeugtyp können in Ausnahmefällen Störge-
räusche im Betrieb auftreten. Diese lassen sich mit einem
zusätzlichen Entstörfilter entsprechend beseitigen. Ihr
Gerät ist bereits serienmäßig mit einem Entstörfilter
ausgerüstet. Trotzdem kann es fahrzeugbedingt zu
Beeinträchtigungen kommen.
Entstörfilter erhalten Sie im Autozubehörhandel und/
oder bei Ihrer KFZ Werkstatt.
5. Bitte achten Sie beim Einbau Ihres Radios darauf, dass
die Rückseite des Radios genügend Freiraum hat, damit
eine ausreichende Kühlung gewährleistet ist.
6. Beim Antennenanschluss gibt es zwei verschiedene
Normen.Erstensdenalten(50Ohm)mitlangem,
herausstehendem Rundkontakt fahrzeugseitig und einer
Rundbuchse auf der Radioseite. Zweitens ISO-genormte
Antennenstecker (150 Ohm). Adapter für beide Formate
bieten Zubehörhersteller und/oder Ihrer KFZ Werkstatt
an.
HINWEIS:
Bei VW/Audi unbedingt beachten: Bei der Antenne
in Ihrem Fahrzeug kann es sich um eine aktive Antenne
handeln. Diese benötigt eine Spannungsversorgung
die nur von den originalen Autoradios ausgegeben
wird. Sollte dies der Fall sein, verwenden Sie einen
Antennen-Adapter für Phantomspeisung.
Antennen-Adapter erhalten Sie im Autozubehörhandel
und/oder bei Ihrer KFZ Werkstatt.
Installation
Montieren Sie das Radiogerät gemäß folgender Darstellun-
gen.
a Mutter
b Federscheibe
c Unterlegscheibe
d Schraube
e Montagewinkel
f Gewindebolzen
g Einschubgehäuse
h Ausziehwerkzeug (Schlüssel für die Demontage)

Deutsch
6
Anschluss
Stellen Sie die Anschlüsse gemäß des Schaubildes her.
Anschluss eines externen Verstärkers
Für den Anschluss eines externen Verstärkers benutzen Sie
denAudio-Cinch-AusgangLINEOUTaufderRückseitedes
Gerätes. Beachten Sie hierzu die Bedienungsanleitung des
externen Verstärkers.
Bedienhinweise
1. Wenn das Fahrzeuginnere extrem heiß ist, z.B. nach einer
längeren Parkdauer in praller Sonne, das Gerät nicht
einschalten, bis das Fahrzeug nach einer kurzen Fahrzeit
im Inneren etwas abgekühlt ist.
2. Etwaige Fehlfunktionen während des Betriebs können
durch Drücken der RESET Taste behoben werden. Drü-
cken Sie mit Hilfe eines Drahtes o.ä. die Taste RESET (10),
umdieElektronikwiederzurückzustellen(RESETEN).
3. Die Uhrzeit, die im Standby angezeigt wird, stellt sich
automatisch ein sobald Sie einen Radiosender hören.
Eine manuelle Eingabe ist nicht möglich.
Bedienung
NachfolgendwerdendieFunktionendereinzelnen
Gerätetasten, entsprechend der Abbildung, beschrieben
„Übersicht der Bedienelemente“.
1 MODE-Taste
Drücken Sie diese Taste zur Auswahl der verschiedenen
Modi. (Radio, USB, CARD und AUX)
HINWEIS:
Der USB- und CARD-Modus kann nur angewählt
werden, wenn Sie ein entsprechendes Medium ange-
schlossen haben.
2 Stationstasten (1-6)
a) Im Radio-Betrieb:
• HaltenSiediegewünschteStationstastege-
drückt, um einen Radiosender abzuspeichern.
• UmeinenRadiosenderanzuwählen,drückenSie
die entsprechende Stationstaste kurz.
• ZurAuswahleinesProgrammtyps. Seite 8
„BAND/PTY-Taste“
b) Im USB/CARD-Betrieb:
Direktanwahl einer Musikdatei.
Seite 8
„AS/PS-Taste“
3 Lautstärkeregler / Ein-/Aus / SEL-Taste (Auswahl)
a) Drücken Sie auf den Regler, um das Gerät einzuschal-
ten. Zum Ausschalten des Gerätes halten Sie den
Regler gedrückt. Die Uhrzeitanzeige erscheint im
Display.
b) Im normalen Spielbetrieb dient der Regler zur Einstel-
lung der Lautstärke.
In Verbindung mit dem zuvor gedrückten Regler
(SEL-Taste) können Änderungen im Menü z.B. dem
Klangmodus vorgenommen werden.
c) Drücken Sie die SEL-Taste kurz, um in das Auswahl-
menü zu gelangen. Durch wiederholtes Drücken der
SEL-Taste können Sie nun die einzelnen Menüpunkte
anwählen. Sie ändern die Einstellungen der einzelnen
Menüpunkte durch Drehen des Lautstärkereglers.
ACHTUNG:
• VerwendenSieLautsprechermiteinerImpedanzvon
4 Ohm.
• DieLautsprecherverkabelungmussMassefreisein.

Deutsch
7
BAS (Bässe)
TRE (Höhen)
BAL (Balance)
FAD (Überblendregelung)
AF ON/AF OFF
AF (Alternativ Frequenzen) ist eine Funktion die mit
Hilfe des RDS (Radio Data System) arbeitet und nur
bei FM Sendern genutzt werden kann. Das Gerät
sucht im Hintergrund die am besten zu empfangene
Frequenz des eingestellten Senders.
• ON: Bei schlechtem Empfang eines bestimmten
Radiosenders wird automatisch zu einem Sender
umgeschaltet, der dasselbe Programm über
dieselbe RDS-Senderkette sendet.
• OFF: Die Funktion ist deaktiviert.
REG ON/REG OFF
Einige Sender teilen zu bestimmten Zeiten ihr
Programm in Regionalprogramme mit unterschiedli-
chem Inhalt auf.
• ON: Es werden nur die Regionalprogramme des
Senders wiedergegeben.
• OFF: Es werden auch die überregionale Pro-
gramm wiedergeben.
VOL (Lautstärke)
4
/DIR Taste
a) Im Radio-Betrieb zum Einstellen eines Radiosenders.
b) Im USB/CARD-Betrieb:
• DrückenSiedieTaste,umdasvorherigeMusik-
stück anzuwählen.
• HaltenSiedieTastegedrückt,umdenvorheri-
gen Ordner anzuwählen (sofern Ordner auf dem
Speichermedium vorhanden sind).
5
/MUT-Taste
a) Drücken Sie die Taste, um das Abspielen eines Mu-
sikstücks zu unterbrechen (Pausenfunktion). Drücken
Sie diese Taste erneut, um diese Funktion wieder
aufzuheben.
b) Halten Sie diese Taste gedrückt, wird die Tonausgabe
stumm geschaltet. Um die Funktion wieder auszu-
schalten, halten Sie die Taste erneut gedrückt.
6 LCD-Display (Flüssigkristallanzeige)
7 SD/MMC-Card Schlitz
Stecken Sie die Speicherkarte mit dem Label nach vorne
in die dafür vorgesehene Öffnung, bis diese mit einem
„Klick“ einrastet. Im Display erscheint die Anzeige CARD.
Die Daten werden automatisch abgespielt.
HINWEIS:
Um bestimmte Tracks zu suchen/auszuwählen, verfah-
ren Sie wie unter Punkt 13 (AS/PS-Taste als Suchfunkti-
on im MP3 Modus) beschrieben.
Um die Speicherkarte zu entnehmen, drücken Sie erneut
auf das Ende der Speicherkarte. Diese rastet mit einem
„Klick“ aus und kann entnommen werden.
ACHTUNG:
Einfaches Herausziehen kann den Schacht und/oder
die Speicherkarte beschädigen.
8 AUX-Buchse
Zum Anschluss von analogen Wiedergabegeräten. Über
diese Buchse können Sie auch den Ton anderer Wie-
dergabegeräte wie MP3-Player, CD-Player usw. über die
Lautsprecher hören.
1. Schließen Sie bitte das externe Gerät, mit einem
3,5 mm Stereo-Klinkenstecker, an die AUX Buchse (8)
an.
2. Drücken Sie die MODE Taste (1) so oft, bis im Display
„AUX“ erscheint.
3. Über die Lautsprecher hören Sie die Tonwiedergabe
aus dem externen Gerät, mit dem Lautstärkeregler (3)
können Sie die Lautstärke verändern.
4. Die weitere Vorgehensweise entnehmen Sie bitte der
Bedienungsanleitung der externen Tonquelle.
HINWEIS:
Stellen Sie die Lautstärke des externen Gerätes auf
eine hörgerechte Lautstärke.
9 USB-Anschluss
Wollen Sie Daten von einem USB-Stick abspielen,
stecken Sie diesen in die dafür vorgesehene Öffnung. Im
Display erscheint die Anzeige USB. Die Daten werden
automatisch abgespielt.
HINWEIS:
• UmbestimmteTrackszusuchen/auszuwählen,
verfahren Sie wie unter Punkt 13 (AS/PS-Taste als
Suchfunktion im MP3 Modus) beschrieben.
• Bitte beachten: Der USB Anschluss dient aus-
schließlich zur Wiedergabe von Speichermedien
und nicht zum Aufladen von anderen externen
Geräten. Es kann nur eine Low Power (100 mA)
Stromversorgung zugesichert werden. Für eine
Verwendung von z.B. externen 2,5“ Festplatten, die
Anlaufströme von bis zu 1100 mA aufweisen kön-
nen, ist dieser USB Anschluss nicht ausgelegt. Zur
Wiedergabe mit Ihrem Smartphone oder iPod bzw.
iPhonenutzenSiediedafürvorgeseheneAUX-IN
Buchse.

Deutsch
8
10 Reset-Taste (Zurücksetzen)
Siehe Abschnitt „Bedienhinweise“ auf Seite 6.
11
/DIR Taste
a) Im Radio-Betrieb zum Einstellen eines Radiosenders.
b) Im USB/CARD-Betrieb:
• DrückenSiedieTaste,umdasnächsteMusik-
stück anzuwählen.
• HaltenSiedieTastegedrückt,umdennächsten
Ordner anzuwählen (sofern Ordner auf dem
Speichermedium vorhanden sind).
12 BAND/PTY-Taste
a) Radio-Betrieb
DrückenSiekurzdieBAND/PTY-Taste,umzwischen
den drei FM- (UKW) Ebenen umzuschalten. Die
Bezeichnung der entsprechenden Ebene wird in der
LCD-Anzeige angezeigt.
b) PTY-Taste
Radio-Betrieb:
PTY Wahl des Programmtyps
NebendemSendernameübermittelneinigeFM-
Sender auch Informationen über den Programmtyp
ihres Programms. Diese Informationen können von
Ihrem Autoradio angezeigt werden.
Solche Programmtypen können z.B. sein:
SPORT NEWS POP CLASSICS
MitderPTY-FunktionkönnenSiegezieltSendereines
bestimmten Programmtyps auswählen. Die einzelnen
Programmtypen sind in zwei Sparten unterteilt: Musik
und Sprache. Eine Auflistung der Programmtypen
finden Sie auf Seite 11.
• HaltenSiedieBAND/PTY-Taste1xgedrückt,
um die Funktion einzuschalten und die Sparte
„Sprache“ auszuwählen.
• HaltenSiedieBAND/PTY-Taste2xgedrücktwird
die Sparte „Musik“ ausgewählt.
HINWEIS: Funktion ausschalten
WennSiedieBAND/PTY-TasteeindrittesMal
gedrückt halten, wird die Funktion ausgeschaltet.
Drücken Sie anschließend die Stationstasten 1-6, um
diePTYAuswahlzutreffen.ImDisplayerscheintdie
Einblendung des gewählten Programmtyps.
WennPTYangewähltwird,startetdasRadiogerätdie
SuchenachentsprechendenPTY-Informationenund
stoppt,wenndiegesuchtePTY-Informationgefunden
wurde.
Wird der gesuchte Programmtyp nicht gefunden,
erscheintimDisplaydieMeldung„NOPTY“.
WenndiegesuchtePTY-Informationnichtmehr
besteht,schaltetsichdiePTY-Funktionautomatisch
auf normalen Modus um.
13 AS/PS-Taste
Radio-Betrieb:
a) Drücken Sie die Taste kurz, werden die abgespeicher-
ten Radiosender der Reihe nach für ca. 5 Sekunden
angespielt. Drücken Sie die gewünschte Stations-
taste, um diesen Vorgang abzubrechen und den
Radiosender wiederzugeben.
b) Halten Sie diese Taste gedrückt, um den automati-
schen Sendersuchlauf zu starten. SEARCH erscheint
im Display. Der Suchvorgang kann einige Minuten
dauern. Die Sender werden Frequenzaufsteigend
abgespeichert. Anschließend werden die abge-
speicherten Radiosender kurz angespielt. Drücken
Sie eine der Stationstasten, um diesen Vorgang
abzubrechen.
USB/CARD-Betrieb:
Zur Direktanwahl einer Musikdatei.
DrückenSiedieAS/PSTaste,„NUM---“wirdimDisplay
angezeigt. Drehen Sie den Lautstärkeregler bis zur ge-
wünschtenDatei,odergebenSiedieNummermitden
Stationstasten ein (Taste 1-6, MODE = 7,
/DIR = 8,
/DIR =9,BAND=0).DrückenSieanschließenddie
SEL Taste (3), um die Datei abzuspielen.
Technische Daten
Allgemeines
Netzspannung ................................... DC 12 V (negative Erdung)
Stromverbrauch ..................................................................5 A Max.
Leistung .................................................................4 x 80 W (PMPO)
Abspielbare Dateiformate ...........................................MP3, WMA
Gehäuseabmessungen (Einbau) ................ 182 B x 52 H x 108 T
FM-Bereich
Frequenzbereich .......................................87,5 MHz ~ 108,0 MHz
NutzbareEmpndlichkeit .........................................................4 µV
I.F. Frequenz .......................................................................10,7 MHz
Technische Änderungen vorbehalten!
Konformitätserklärung
Hiermit erklärt die Firma ETV – Elektro-technische Vertriebs-
gesellschaft mbH, dass sich das Gerät AR 4027 USB/CR in
Übereinstimmung mit den grundlegenden Anforderungen,
der europäischen Richtlinie für Funkentstörung von Kraftfahr-
zeugmotoren mit Fremdzündung (2004/104/EC) befindet.
Bitte führen Sie das ausgediente Gerät einer umweltgerech-
ten Entsorgung zu.

Deutsch
9
Störungsbehebung
Bevor Sie die Checkliste durchgehen, bitte zunächst den
Anschluss fertig stellen. Wenn nach erfolgtem Durchprüfen
der Checkliste immer noch Fragen offen sind, wenden Sie
sich bitte an Ihre nächstgelegene Kundendienststelle.
Fehlersymptom Grund Lösung
Keine Funktion. Die Zündung ist
ausgeschaltet.
Den Zündschlüssel
auf„ON“oder
„ACC“ drehen.
Eine oder mehrere
Sicherungen sind
durchgebrannt.
Die Sicherung
durch eine andere
5A /1A-Sicherung
ersetzen.
Gerät lässt sich
nicht über die Zün-
dung „Ein“ bzw.
„Aus“ Schalten.
Fehlanschluss.
(jeder KFZ Her-
steller belegt den
ISO Anschluss im
Fahrzeug anders)
Bitte setzen Sie
sich mit Ihrer KFZ
Werkstatt oder
einem Autospezi-
alisten in Verbin-
dung, wegen
KFZ spezifische
Anschlussadapter.
Das Gerät funktio-
niert nicht richtig.
Der Mikrocom-
puter wurde
durch elektroma-
gnetische Felder
gestört.
Das Gerät aus-
und dann wieder
einschalten.
Kein Radioemp-
fang.
Das Antennen-
kabel ist nicht
angeschlossen.
Das Antennenka-
bel fest in die An-
tennenbuchse des
Gerätes stecken.
Schlechter Radio-
empfang
Ggf. hat Ihr Fahr-
zeug eine spezielle
Antenne (Phantom
gespeiste Anten-
ne.)
Bitte setzten Sie
sich mit Ihrer
KFZ Werkstatt
oder einem
Autospezialisten in
Verbindung. (Für
„Fremdfabrikate“
gibt es spezifische
Einspeisweichen
bzw. Spannungs-
adapter.)
Garantie
Garantiebedingungen
1. Gegenüber Verbrauchern gewähren wir bei privater
NutzungdesGerätseineGarantievon24Monatenab
Kaufdatum.
IstdasGerätzurgewerblichenNutzunggeeignet,ge-
währen wir beim Kauf durch Unternehmer für das Gerät
eine Garantie von 12 Monaten.
Die Garantiezeit für Verbraucher reduziert sich auf 12 Mo-
nate,sofernsieeinzurgewerblichenNutzunggeeignetes
Gerät – auch teilweise – gewerblich nutzen.
2. Voraussetzung für unsere Garantieleistungen sind der
Kauf des Geräts in Deutschland bei einem unserer
Vertragshändler sowie die Übersendung einer Kopie des
Kaufbelegs und dieses Garantiescheins an uns.
Befindet sich das Gerät zum Zeitpunkt des Garantiefalls
im Ausland, muss es auf Kosten des Käufers uns zur
Erbringung der Garantieleistungen zur Verfügung gestellt
werden.
3. Mängel müssen innerhalb von 14 Tagen nach Erkenn-
barkeit uns gegenüber schriftlich angezeigt werden.
Besteht der Garantieanspruch zu Recht, entscheiden wir,
auf welche Art der Schaden/Mangel behoben werden
soll, ob durch Reparatur oder durch Austausch eines
gleichwertigen Geräts.
4. Garantieleistungen werden nicht für Mängel erbracht, die
aufderNichtbeachtungderGebrauchsanweisung,un-
sachgemäßer Behandlung oder normaler Abnutzung des
Geräts beruhen. Garantieansprüche sind ferner ausge-
schlossen für leicht zerbrechliche Teile, wie zum Beispiel
Glas oder Kunststoff. Schließlich sind Garantieansprüche
ausgeschlossen, wenn nicht von uns autorisierte Stellen
Arbeiten an dem Gerät vornehmen.
5. Durch Garantieleistungen wird die Garantiezeit nicht
verlängert. Es besteht auch kein Anspruch auf neue
Garantieleistungen. Diese Garantieerklärung ist eine
freiwillige Leistung von uns als Hersteller des Geräts.
DiegesetzlichenGewährleistungsrechte(Nacherfüllung,
Rücktritt, Schadensersatz und Minderung) werden durch
diese Garantie nicht berührt.
Stand 03 2008
Garantieabwicklung
Sollte Ihr Gerät innerhalb der Garantiezeit einen Mangel
aufweisen, bitten wir Sie, uns Ihren Garantieanspruch mitzu-
teilen.
Die schnellste und komfortabelste Möglichkeit ist die Anmel-
dung über unser SLI (Service Logistik International) Internet-
Serviceportal.
www.sli24.de
Sie können sich dort direkt anmelden und erhalten alle Infor-
mationen zur weiteren Vorgehensweise Ihrer Reklamation.
Über einen persönlichen Zugangscode, der Ihnen direkt nach
Ihrer Anmeldung per E-Mail übermittelt wird, können Sie den
Bearbeitungsablauf Ihrer Reklamation auf unserem Service-
portal online verfolgen.
Alternativ können Sie uns den Servicefall per E-Mail
hotline@etv.de
mitteilen.

Deutsch
10
Bitte teilen Sie uns Ihren Namen, Vornamen, Straße,
Hausnummer, PLZ und Wohnort, Telefon-Nummer, soweit
vorhanden, Fax-Nummer und E-Mail-Adresse mit. Im Wei-
teren benötigen wir die Typenbezeichnung des reklamierten
Gerätes, eine kurze Fehlerbeschreibung, das Kaufdatum
und den Händler,beidemSiedasNeugeräterworben
haben.
NachPrüfungIhresGarantieansprucheserhaltenSievon
uns einen fertig ausgefüllten Versandaufkleber. Sie brauchen
diesen Aufkleber nur noch auf die Verpackung Ihres gut ver-
packten Gerätes zu kleben und das Paket bei der nächsten
Annahmestelle der Deutschen Post / DHL abzugeben. Der
Versand erfolgt für Sie kostenlos an unser Servicecenter bzw.
Servicepartner.
Bitte fügen Sie dem Paket eine Kopie Ihres Kaufbeleges
(Kassenbon, Rechnung, Lieferschein) sowie eine kurze Fehler-
beschreibung bei.
Ohne den Garantienachweis (Kaufbeleg) kann Ihre Rekla-
mation nicht kostenfrei bearbeitet werden.
Bitte nehmen Sie in keinem Fall eine unfreie Einsendung Ih-
res Gerätes vor. Bei unfreien Lieferungen entfällt Ihr Anspruch
auf Garantieleistungen.
ETV
Elektro-technische Vertriebsgesellschaft mbH
Industriering Ost 40
D-47906 Kempen

Deutsch
11
PTY – Programmtypen
Stationstasten PTY der Sparte „Sprache“ Stationstasten PTY der Sparte „Musik“
1
NEWS
1
POP M
AFFAIRS
ROCK
INFO
2
SPORT
2
LIGHT
EDUCATION
EASY
DRAMA
3
CULTURE
3
CLASSIC
SCIENCE
OTHER
VARIED
4
WEATHER
4
COUNTRY
FINANCE
JAZZ
CHILDREN
5
SOCIAL
5
NATIONAL
RELIGION
OLDIES
PHONEIN
6
TRAVEL
6 FOLKLEISURE
DOCUMENT

Deutsch
12
Stichwortverzeichnis – Index
A
Anschluss ...........................................................................................6
AS/PS Taste .......................................................................................8
Ausschalten .......................................................................................6
AUX Buchse .......................................................................................7
B
Bedienhinweise ................................................................................6
Bedienung .........................................................................................6
BAND/PTYTaste ..............................................................................8
E
Einschalten .........................................................................................6
G
Garantie ..............................................................................................9
I
Installation ..........................................................................................5
Installationstipps ...............................................................................4
L
Lautstärke einstellen ........................................................................6
M
Montage (Sicherheitshinweise) .....................................................4
MODE Taste ......................................................................................6
MUT Taste (Stumm) .........................................................................7
P
Play / Pause (
) ..............................................................................5
PTY–Programmtypen ..................................................................11
S
SD/MMC-Card Schlitz .....................................................................7
SEL Taste ............................................................................................6
Sicherheitshinweise ..........................................................................4
Störungsbehebung .........................................................................9
Stummschaltung ..............................................................................7
T
Technische Daten .............................................................................8
/ -Tasten ................................................................................... 7/8
U
Uhrzeit .................................................................................................6
USB Anschluss ..................................................................................7
V
Verkehrssicherheit ............................................................................4
W
Wichtige Zusatzinformationen zum Einbau ................................5

Español
13
Instrucciones de servicio
Le agradecemos la confianza depositada en este producto y
esperamos que disfrute de su uso.
Avisos de Seguridad
Antes de la puesta en servicio de este aparato lea detenida-
mente el manual de instrucciones y guarde éste bien incluido
la garantía, el recibo de pago y si es posible también el
cartón de embalaje con el embalaje interior.
• Utiliceelaparatoúnicamenteparalanalidadparalaque
ha sido construido.
• Monteelequipodetalmaneraquenosetapenlas
aberturas de ventilación disponibles.
• Jamásseabrirálacarcasadelcuerpodelaparato.Las
reparaciones mal hechas pueden generar considerables
peligros para el usuario. En el caso de daños en el equipo
no siga utilizándolo, sino déjelo reparar por un experta.
Estos símbolos pueden encontrarse en caso dado en el
aparato, y son para indicar lo siguiente:
El símbolo con el signo de exclamación advierte
al usuario que hay instrucciones de manejo y de
mantenimiento importantes en la documentación
que va adjunta.
Aparatos que llevan puesto este símbolo operan
con un “Lector Clase 1” para explorar el CD. Los
interruptores de seguridad incorporados sirven
para impedir que el usuario esté expuesto a luz
láser invisible peligrosa para la vista del usuario
cuando está abierto el compartimiento del CD.
Bajoningúnconceptosehadehacerunpuenteadosobre
estos interruptores de seguridad ni deben ser manipulados.
De hacerlo, existe el peligro de que Vd. esté expuesto a la
luz láser.
Símbolos en este manual de instrucciones
Advertencias importantes para su seguridad están señaladas
en especial. Siga estas advertencias incondicionalmente,
para evitar accidentes y daños en el aparato:
AVISO:
Advierte ante los peligros para su salud y demuestra posi-
bles riesgos de herida.
ATENCIÓN:
Indica los posibles riesgos para el aparato u otros objetos.
NOTA:
Pone en relieve consejos e informaciones para usted.
Niños y personas débiles
• Paralaseguridaddesusniñosnodejematerialdeemba-
laje (Bolsas de plástico, cartón, poliestireno etc.) a su
alcance.
AVISO!
Nodejejugaralosniñosconlalámina.¡Existe peligro
de asfixia!
Seguridad en el Transporte
AVISO:
• Laseguridadeneltransporteeselaspectomás
importante. Le rogamos que siempre utilice el radio de
automóvil de tal manera, que Ud. esté capaz en cada
momento de adaptarse a la situación de tráfico actual.
• Porfavorobservequeaunavelocidadde50km/hel
automóvil conduce 14 m por segundo.
• Lerecomendamosquenoutiliceelequipoen
situaciones críticas.
• Esnecesarioquepuedapercibirlasadvertencias,por
ejemplo de la policía y los bomberos, en el vehículo a
tiempo.
• Porestarazón,porfavorsolamenteescuchelos
programas a un volumen apropiado.
• Paraevitarseriosaccidentesdetráco,instaleel
aparato de tal manera que no estorbe al manejar el
volante, la palanca de cambio etc..
• Asimismono se deben entorpecer las instalaciones de
seguridad, como p.ej. el airbag o la vista libre. Durante
el montaje y la conexión por fa.
Notas de seguridad para el momento de
montaje/conexión
• Primerodesconecteelpolonegativoyluegoelpolo
positivo de la batería. (Conectar por orden contrario.)
Por favor observe: Si la batería no está conectada toda
la información grabada provisionalmente se perderá. Por
favor observe los avisos de seguridad del fabricante de
automóviles.
• Elfusibleprincipaltienequeserinstaladomuycerca
(con una distancia máxima 30 cm) en el polo positivo de
la batería, para que el vehículo esté protegido contra
un eventual incendio de los cables, por ejemplo por un
accidente. Si la instalación no concuerda con este prere-
quisito, se perderá la cobertura del seguro.
• Laseccióntransversaldelcablepositivoynegativo
respectivamentenodebeserinferiora1,5mm².

Español
14
4. Segúneltipoconcretodecoche,puedensurgirinter-
ferencias durante el funcionamiento de la radio/CD.
Estas se eliminan con un correspondiente filtro adicional
eliminador de interferencias. Su aparato ya está equipa-
do de serie con un filtro eliminador de interferencias. De
todas formas se pueden originar perturbaciones a causa
del tipo de vehículo.
Los filtros eliminadotes de interferencias se obtienen en
negocios de piezas de recambio para el coche y/o en su
taller de coches.
5. Al incorporar su radio se ruega prestar atención de que la
parte posterior de la radio tenga suficiente espacio libre,
para que se pueda garantizar una refrigeración suficiente.
6. Referente a la conexión de la antena hay dos normas
diferentes. Primero, existe la conexión antigua (50 Ohm)
con un largo contacto redondo que sale de la parte del
vehículo y un enchufe redondo en la parte de la radio.
Segundo,hayelenchufedelaantenasegúnlanormaISO
(150 Ohm). Fabricantes de accesorios y/o su taller automó-
vilístico disponen de adaptadores para ambos formatos.
NOTA:
En los casos de VW/Audi es absolutamente necesa-
rio que observe lo siguiente: Su coche puede tener
una antena activa. Precisa de una alimentación propor-
cionada solamente por la radio para coche original. En
tal caso, use un adaptador de antena con alimentación
fantasma.
Dispone de adaptadores de antena en vendedores de
accesorios automovilísticos y/o su taller mecánico.
Instalación
Monteelreceptorderadiosegúnlassiguientespresentaciones.
Consejos para la instalación
• Capasprotectorasparacablesimpidenqueellosdeso-
llen en las partes agudas de la carrocería.
• Elmaterialaislantedelcablenodebeserdañadoenla
instalación.
• ParalainstalacióndeequiposCar-HiFisiemprehayque
utilizar las herramientas adecuadas.
Segúnelsistemadeconstrucción,elvehículopuededivergir
deestadescripción.Noasumimosningunaresponsabilidad
por daños causados por errores de instalación o conexión y
daños resultantes.
¡Informaciones adicionales de importancia
para el montaje de su autorradio!
1. El aparato está expuesto al polo negativo de la pila que
debe estar conectado a la carrocería del coche. Se ruega
controlar esto antes de iniciar la instalación.
2. En la instalación/conexión del equipo le rogamos que
observe que no todos los vehículos disponen de una
“conexión ISO”. En este caso le recomendamos que
utilice un adaptador ISO específico para automóviles.
Puede adquirir adaptadores en el comercio de acceso-
rios automovilísticos y/o en su taller automovilístico.
3. En la puesta en estado de ocupación de “Duración +”
(Conexión de corriente convencional) se podrían originar,
dependiendo del tipo de vehículo, irregularidades. (Pero
esto es necesario para la memorización de las estaciones
de las emisoras).
Para garantizar todas las funciones es absolutamente ne-
cesarioquelainstalaciónseefectúesegúnestemanual
de usuario. En el caso de que tenga dudas le rogamos
que se dirija a un taller automovilístico autorizado.
A causa de los diferentes tipos de automóviles es decir
fabricantes de automóviles, no se puede garantizar la
ocupación correcta de la clavija ISO, aunque las conexio-
nes de las clavijas ISO coincidan mecánicamente. Por ello,
quizás sea necesario cambiar la acometida eléctrica es
decir utilizar un adaptador específico para automóviles.
NOTA:
Si la conexión es correcta la radio se podrá conectar es
decir desconectar a través del encendido. En causa de
la eventual pérdida del emisor almacenado, la radio
norecibiráningún“Duración+”,necesarioparael
almacenamiento del emisor.
ATENCIÓN:
En caso de una conexión en “Duración +” sin encen-
dido, se puede cargar demasiado la batería de coche,
aunque esté la radio desconectada. En el peor de los
casos se puede haber descargado la batería de coche.

Español
15
Conexión de un amplificador externo
Para conectar un amplificador externo, use la salida de cincha
audioLINEOUTenlaparteposteriordeldispositivo.Consul-
te el manual de instrucciones del amplificador externo.
Avisos de Manejo
1. Noenciendaeldispositivosielinteriordelcocheestá
muy caliente, por ejemplo pasado un estacionamiento
prolongado a la luz del sol directa. Espere a que el inte-
rior se haya enfriado tras una breve circulación.
2. Cualquier posible funcionamiento incorrecto puede
rectificarse pulsando el tecla RESET. Pulse el tecla RESET
con un alambre o similar (10) para reiniciar la electrónica
(RESET).
3. La hora mostrada en modo espera se establece automá-
ticamenteencuantoescuchaunaemisoraderadio.No
es posible la configuración manual.
Manejo
A continuación se describen las funciones de los botones
segúnlailustración “Indicación de los elementos de
manejo“.
1 Tecla-MODE
Pulse este tecla para seleccionar los distintos modos.
(Radio, USB, CARD y AUX)
NOTE:
El modo -USB y -CARD sólo se podrá seleccionar, si
tiene un medio correspondiente conectado.
2 Memorias de emisora (1-6)
a) En modo radio:
• Mantengapulsadoeltecladememoriadeemi-
sora deseado para guardar una emisora.
• Paraelegirunaemisoraderadio,pulsebreve-
mente el tecla de emisora correspondiente.
• Paraseleccionaruntipodeprograma.
Página 17 “Tecla BAND/PTY”
b) En modo USB/CARD:
Seleccióndirectadeunarchivodemúsica.
Página 17 “tecla AS/PS”
a Tuerca
b Arandela elástica
c Arandela
d Tornillo
e Angulo de montaje
f Perno roscado
g Carcasa de unidad enchufable
h Herramienta extractora (Llave para el desmontaje)
Conexión
Realicelasconexionessegúnlapresentación.
Rojo R
Salida-RCA
Blanco L
Gris
Violeta
Violeta/ Negro
Gris/ Negro
izquierda parte posterior
Encendido
Conexión de antena
Conexión-ISO
Medidas
Conexión de corriente
convencional
Altavoces izquierda parte
delantera
Verde
Verde/ Negro
Blanco/ Negro
Blanco
Rojo
fusible
fusible
Negro
Amarillo
Antena automática (Azul)
Altavoces
derecha parte
delantera
derecha parte
posterior
ATENCIÓN:
• Hagausodealtavocesconunaimpedanciade
4 ohmios.
• Laconexióndealtavocesdebesersinconexiónamasa.

Español
16
3 Control de volumen /Encendido-Apagado / Tecla-SEL
(Selección)
a) Pulse el control para encender el dispositivo. Man-
tenga pulsado el control para apagar el dispositivo.
Aparecerá la hora en pantalla.
b) Durante el modo de reproducción normal, el control
se usa para controlar el volumen.
Junto con el control previamente pulsado (tecla SEL),
puederealizarcambiosenelmenú,porejemploel
modo de sonido.
c) PulseelteclaSELbrevementeparaaccederalmenú
de selección. Pulsando repetidamente el tecla SEL
seleccionaentradasindividualesdelmenú.Puede
cambiar la configuración de las entradas individuales
delmenúgirandoelmandodevolumen.
BAS (Graves)
TRE (Agudos)
BAL (Balance)
FAD (Fader)
AF ON/AF OFF
AF (Frecuencias Alternativas) es una función compa-
tible con RDS (Radio Data System) y puede usarse
solamente en emisoras FM. En segundo plano, el
dispositivo busca la mejor frecuencia para la emisora
seleccionada.
• ON: Si una emisora concreta tiene una mala
recepción, el dispositivo pasa automáticamente
a una emisora que emita el mismo programa
mediante la misma cadena de emisión RDS.
• OFF: La función está desactivada.
REG ON/REG OFF
En ciertos momentos, algunas emisoras segmentan
sus programas en programas regionales con conteni-
do distinto.
• ON: Solamente se reproducen programas regio-
nales de la emisora.
• OFF: Reproducir también programas nacionales.
VOL (Volumen)
4 Tecla
/DIR
a) En modo radio para elegir una emisora de radio.
b) En modo USB/CARD:
• Pulseelteclaparaelegirelsiguientetítulode
música.
• Mantengapulsadoelteclaparaelegirelsiguien-
te directorio (si existen directorios en los medios
de almacenamiento).
5 Tecla-
/MUT
a) Pulse este tecla para interrumpir la reproducción de
música(funcióndepausa).Presioneestateclade
nuevo, para anular esta función.
b) Si mantiene pulsado este tecla, la reproducción se
silenciará. Para apagar la función, mantenga pulsado
el tecla de nuevo.
6 Display -LCD (Visualizador de cristal líquido)
7 Ranura SD/MMC-Card
Ponga la tarjeta de memoria en la apertura correspon-
diente con la etiqueta adelante hasta que encaje. En el
display figura CARD.
Los datos se reproducirán de forma automática.
NOTA:
Para buscar/seleccionar títulos determinados, proceda
como descrito debajo de punto 13 (Tecla AS/PS como
funcióndebúsquedaenelmodoMP3).
Para retirar la tarjeta de memoria, pulse de nuevo el
extremo de la tarjeta de memoria. Se desacoplará con un
chasquido y podrá sacarse.
ATENCIÓN:
Sacarla directamente puede dañar la ranura y/o la tarje-
ta de memoria.
8 AUX conector
Para la conexión a aparatos análogos de reproducción. A
través de esta hembrilla también le es posible escuchar
por el altavoz el sonido de otros aparatos de reproduc-
ción, como MP3-Player, CD-Player, etc.
1. Conecte por favor el aparato externo, con una clavija
jack estéreo 3,5 mm, a la toma hembra AUX (8).
2. Pulse el tecla MODE (1) hasta que figure “AUX” en el
panel de control.
3. Escuchará la reproducción del dispositivo externo
por los altavoces. Puede cambiar el volumen con el
control de volumen (3).
4. Para proseguir tome las indicaciones de operación
del equipo/aparato externo.
NOTA:
Ajuste el volumen del aparato externo a un volumen
apropiado.
9 Conexión-USB
En el caso de que desee reproducir datos de una tarjeta
USB, metála en la abertura prevista. En el display figura
USB. Los datos se reproducen automáticamente.

Español
17
NOTA: Apagar la función
SimantienepulsadoelteclaBAND/PTYportercera
vez la función se apaga.
A continuación, pulse los botones de emisora 1-6
pararealizarlaselecciónPTY.Eltipodeprograma
seleccionado aparecerá en pantalla.
SiseseleccionaPTY,laradiocomenzaráabuscarla
informaciónPTYrespectivaysedetendrácuando
encuentrelainformaciónPTYdeseada.
Si no se encuentra el tipo de programa deseado, el
mensaje“NOPTY”apareceráenpantalla.
SilainformaciónPTYyanoexiste,lafunciónPTY
cambiará automáticamente a modo normal.
13 Tecla AS/PS
Modo radio:
a) Pulse brevemente el tecla para reproducir las emiso-
ras guardadas secuencialmente durante aprox.
5 segundos. Pulse la emisora deseada para salir de la
operación y reproducir la emisora de radio.
b) Mantenga pulsado este tecla para iniciar la explora-
ción automática de emisoras. Aparecerá SEARCH
enpantalla.Elprocesodebúsquedapuedetardar
unos minutos. Las emisoras se guardan en orden de
frecuencias ascendente. A continuación, las emisoras
guardadas se reproducen brevemente. Pulse un tecla
de emisora para salir de la operación.
Modo USB/CARD:
Seleccióndirectadeunarchivodemúsica.
PulseelteclaAS/PS,semostrará“NUM---”enpan-
talla. Gire el control de volumen al archive deseado, o
introduzcaelnúmeroconlosbotonesdeemisora(Tecla
1-6, MODE = 7,
/DIR = 8, /DIR =9,BAND=0).
A continuación, pulse el tecla SEL (3) para reproducir el
archivo.
Datos técnicos
Generalidades
Tensión de alimentación ...................... DC 12 V (tierra negativo)
Consumo de corriente ......................................................5 A Max.
Potencia.................................................................4 x 80 W (PMPO)
Formatos de archivo reproducibles ..........................MP3, WMA
Medidas de la carcasa
(Instalación) ..................................182 ancho x 52 alto x 108 largo
Gama-FM
Gama de frecuencias ................................87,5 MHz ~ 108,0 MHz
Sensibilidad utilizable ................................................................4 µV
Frecuencia I.F .....................................................................10,7 MHz
Noreservamoselderechodeefectuarmodicaciones
técnicas.
NOTA:
• Parabuscar/seleccionartítulosdeterminados,
proceda como descrito debajo de punto 13 (Tecla
AS/PScomofuncióndebúsquedaenelmodo
MP3).
• Observe: La conexión USB solamente está dise-
ñada para reproducir medios de almacenamiento,
no para cargar dispositivos externos. Solamente se
puede ofrecer una alimentación de baja potencia
(100 mA). Esta conexión USB no está diseñada
para conducir, por ejemplo, discos duros externos
de 2,5“, que precisan corriente inicial de hasta
1100 mA. Para reproducir desde su teléfono, iPod o
iPhone,uselatomaAUX-IN,diseñadaparataln.
10 Tecla Reset (reinicio)
Consulte la sección “Avisos de Manejo” en la página 15.
11 Tecla /DIR
a) En modo radio para elegir una emisora de radio.
b) En modo USB/CARD:
• Pulseelteclaparaelegirelsiguientetítulode
música.
• Mantengapulsadoelteclaparaelegirelsiguien-
te directorio (si existen directorios en los medios
de almacenamiento).
12 Tecla-BAND/PTY
a) Funcionamiento de radio
PulsebrevementeelteclaBAND/PTYparacambiar
entre las tres zonas FM- (UKW). La denominación de
la banda correspondiente se indicará en la indicación
LCD.
b) Tecla PTY
Funcionamiento de radio:
PTY Seleccionar el tipo de programa
Aparte del nombre de la emisora, algunas emisoras
emiten información sobre el tipo de programa. Esta
información puede mostrarse en la radio del coche.
El programa puede ser de los tipos siguientes, por
ejemplo:
SPORT NEWS POP CLASSICS
UsandolafunciónPTY,puedeseleccionaremisoras
concretas de cierto tipo de programa. Los tipos de
programa individuales se dividen en dos categorías:
MúsicayVoz.Puedeencontrarunalistadetiposde
programa en la página 19.
• MantengapulsadoelteclaBAND/PTY1vezpara
activar la función y seleccionar la categoría “Voz“.
• MantengapulsadoelteclaBAND/PTY2veces
paraseleccionarlacategoría“Música”.

Español
18
Esteaparatosehaexaminadosegúnlasnormativasactuales
y vigentes de la Comunidad Europea, como p.ej. compati-
bilidad electromagnética y directiva de baja tensión y se ha
construidosegúnlasmásnuevasespecicacionesenrazón
de la seguridad.
Reparación de averías
Antes de revisar el recordatorio, se ruega concluir la
conexión. Si después de haber revisado el recordatorio,
existen todavía cuestiones pendientes, contacte por favor su
próximo servicio técnico.
Síntoma de error Causa Solución
Ningunafunción. El encendido está
desconectado.
Gire la llave de
contactoa“ON”o
“ACC”.
Uno o varios
fusibles se han
fundido.
Sustituya el fusible
por otro fusible
5 A /1 A.
El equipo no deja
encenderse o
apagarse por el
encendido.
Conexión fallada
(cada fabricante
automovilísto tiene
la conexión ISO en
otro sitio.)
Por favor contacte
a su taller auto-
movilístico o un
experta automovi-
lístico por adapta-
dores de conexión
específicos para
vehículos
El aparato no
funciona correcta-
mente.
La microcom-
putadora se ha
perturbado a causa
de campos electro-
magnéticos.
Desconecte el
aparato y después
conéctelo de
nuevo.
Nohayrecepción
de radio.
El cable de antena
no está conectado.
Introduzca bien el
cable de antena en
el jack de antena
del aparato.
Recepción insufi-
ciente de radio.
Es posible que su
vehículo tenga una
antena especial
(antena con tensión
en modo fantasma)
Por favor contacte
a su taller auto-
movilístico o un
experta automovi-
lístico. (Para vehícu-
los “extranjeros”
hay vías específicas
de alimentación o
adaptadores espe-
ciales de tensión.)

Español
19
PTY – Tipos de programa
Botones de emisora PTY de categoría “Voz” Botones de emisora PTY de categoría “Música”
1
NEWS
1
POP M
AFFAIRS
ROCK
INFO
2
SPORT
2
LIGHT
EDUCATION
EASY
DRAMA
3
CULTURE
3
CLASSIC
SCIENCE
OTHER
VARIED
4
WEATHER
4
COUNTRY
FINANCE
JAZZ
CHILDREN
5
SOCIAL
5
NATIONAL
RELIGION
OLDIES
PHONEIN
6
TRAVEL
6 FOLKLEISURE
DOCUMENT

Español
20
A
Ajustar el volumen .........................................................................16
Apagar ..............................................................................................16
Avisos de Seguridad ......................................................................13
Avisos de Manejo ...........................................................................15
AUX conector ..................................................................................16
B
BAND/PTYtecla ...........................................................................17
C
Conexión..........................................................................................15
Conexión-USB ................................................................................16
D
Datos técnicos ................................................................................17
E
Encender ..........................................................................................16
H
Hora ..................................................................................................15
I
Importantes informaciones adicionalespara la instalación ....14
Instalación ........................................................................................14
Instalación (Avisos de Seguridad) ...............................................13
M
Manejo .............................................................................................15
MODE tecla .....................................................................................15
P
Play / Pause tecla (
)...................................................................16
PTY–Tiposdeprograma ..............................................................19
R
Ranura SD/MMC-Card..................................................................16
Recomendaciones de instalación ...............................................14
Reparación de averías ...................................................................18
S
Seguridad en el transporte ..........................................................13
SEL tecla ...........................................................................................16
Silenciado.........................................................................................16
T
Tecla AS/PS ......................................................................................17
/ tecla ...................................................................................16/17
Tecla MUT (silencio) .......................................................................16
Índice

Português
21
Manual de instruções
Obrigado por escolher o nosso produto. Esperamos que
goste de utilizar o aparelho.
Indicações de segurança
Antes de pôr este aparelho a funcionar, leia muito atenta-
mente as instruções de emprego e guardeas muito bem, jun-
tamente com o talão de garantia, o talão de compra e, tanto
quanto possível, a embalagem com os elementos interiores.
Se puser o aparelho à disposição de terceiros, entregue-lhes
também as Instruções de Utilização.
• Utilizeoaparelhosóparaomprevisto.
• Montaroaparelhodeformaaqueasaberturasdeventi-
lação não fiquem tapadas.
• Nuncasedeveabriracaixadoaparelho.Devidoacon-
sertos inadquados poderão resultar da’grandes perigos
paraoutilizadordoaparelho.Nocasodeestragosno
aparelho, principalmente referentes ao cabo da rede,
nunca se deverá voltar a pôr o aparelho a funcionar, mas
sim mandar consertálo por um especialista.
Poderão encontrarse estes simbolos no aparelho. Eles ser-
vem para chamar a atenção para o seguinte:
O simbolo com pontos de exclamação deverá
chamar a atenção ao utilizador para importantes
instruções de serviço e de assistência que se
encontram nas folhas anexas.
Aparelhos com este simbolo trabalham com
um “Laser de 1-classe” o qual examina o CD.
O interruptor de segurança que se encontra
montado, serve para evitar que o utilizador, ao
abrir a gaveta de CD fique exposto à luz laser, a
qual é muito perigosa e não é visivel aos olhos
humanos.
Com estes interruptores de segurança nunca se deverá
fazer ponte nem manipular senão existe o perigo de se ficar
exposto à radiação laser.
Símbolos nestas Instruções de uso
Indicações importantes para a sua segurança estão marcadas
de forma especial. Preste incondicionalmente atenção a es-
tas indicações, para evitar acidentes e estragos no aparelho:
AVISO:
Chamaaatençãoparaperigosexistentesparaasuasaúde
e para possíveis riscos de ferimento.
ATENÇÃO:
Chama a atenção para possíveis perigos existentes para o
aparelho ou para outros objectos.
INDICAÇÃO:
Realça sugestões e informações para si.
Crianças e pessoas débeis
• Paraasegurançadosseuslhos,nãodeixepartesda
embalagem (sacos plásticos, papelão, esferovite, etc.) ao
alcance dos mesmos.
AVISO!
Nãodeixecriançaspequenasbrincaremcomfolhasde
plástico. Perigo de asfixia!
Segurança no tráfego
AVISO:
• Asegurançanotráfegoéumpreceitodeimportância
máxima. Utilize por isso o seu rádio de automóvel
sempre de maneira, a que tenha a situação actual do
trânsitobemcontrolada.
• Tenhaemcontaquecomumavelocidadede50km/h
percorre 14 m num segundo.
• Emsituaçõescríticasdesaconselhamosautilizaçãodo
rádio.
• Asindicaçõesdeavisoporex.dapolíciaedosbom-
beiros têm de ser perceptíveis no automóvel a tempo
e com segurança.
• Oiçaporissooseuprogramaduranteaconduçãocom
o volume de som adequado.
• Paraevitaracidentesdeviaçãosérios,instaleoapare-
lho de modo a não impedir a utilização do volante, da
alavanca das mudanças, etc.
• Tambémdispositivosdesegurança,comoporexem-
plo o Airbag e a vista livre não se devem encontrar
impedidos.
Notas de segurança para o momento da
instalação/ligação
• Desapertarprimeiroopólonegativodabateriaesó
depois o pólo positivo. (Para apertar os pólos, em ordem
contrária.)
Observar por favor: Se a bateria foi retirada da rede,
todas as memórias temporárias perdem as suas informa-
ções. Observe as indicações de segurança do fabricante
do veículo.
• Ofusívelprincipaldevesermontadoomaispróximo
possível (no máximo 30 cm depois) do pólo positivo da
bateria, para o carro ficar protegido de um eventual in-
cêndio dos cabos, originado por ex. por um acidente. A
cobertura do seguro deixa de ter efeito se esta directiva
não for observada.
• Odiâmetrodocabopositivoenegativonãodeveser
menordoque1,5mm².

Português
22
Propostas para montagem:
• Tubosdeprotecçãodecabosprotegemosmesmosde
desgastes contra partes da carrossaria com arestas vivas.
• Oisolamentodoscabosnãodeveserdanicadodurante
a montagem.
•
Partese do princípio de que são usadas as ferramentas ade-
quadas na montagem da aparelhagem HIFI no automóvel.
O seu automóvel pode, consoante o modelo, não corres-
ponderaestadescrição.Nãoassumimosaresponsabilidade
por erros de montagem ou de ligação e pelos danos que
possam surgir em consequência disso.
Infomação importante para a instalação
do deu auto-rádio
1. O aparelho está concebido para o pólo negativo da
bateria, que tem de ser ligado à carrossaria do veículo.
Verifique isto por favor antes da montagem.
2. Tenha ao montar/ligar o seu aparelho por favor atenção a
que, nem todo o veículo está equipado com uma “ligação
ISO”.Nestecasoaconselhamosousodeumadaptador
ISO específico para veículos.
Obtém adaptadores junto do seu comerciante de aces-
sórios para automóveis e/ou na sua oficina de veículos.
3. Naocupaçãodo“Pólopermanente+“(ligaçãode
corrente de regime permanente) pode haver variações
conforme o modelo de veículo. (Tal é contudo necessário
para a memo-rização das estações de emissão.)
Para garantir todas as funções a montagem de acordo
com estas instruções é absolutamente necessária. Em
casodedúvidasdirijaseaumaocinaautorizada.
Devido à existência de diferentes tipos de viaturas e de
fabricantes de viaturas, não é garantido que a ficha de
ligação ISO seja a correcta, mesmo quando as fichas de
ligação ISO encaixam mecanicamente uma na outra.
Pode por isso ser eventualmente necessário de alterar
a ligação à corrente, ou melhor, utilizar um adaptador
específico para veículos motorizados.
INDICAÇÃO:
Com uma ligação correcta o rádio pode ser ligado ou
desligadopormeiodaignição.Nocasodeumaeven-
tual perda das emissoras memorizadas, o rádio não
dispõe da necessária “Duração +“ para a memorização
de emissoras.
ATENÇÃO:
Com uma ligação a “Duração +“ sem ignição pode ocor-
rerumadescargadesnecessáriadabateriadocarro.No
pior dos casos a bateria pode descarregarse por completo.
4. Dependendo do tipo específico de veículo, podem
ocorrer interferências durante o funcionamento de rádio/
CD. Estes podem ser eliminados com um filtro adicional
de supressão de interferências. O seu aparelho já está
equipado de fábrica com um filtro de supressão de inter-
ferências. Apesar de tudo pode, conforme os veículos,
haver interferências.
Obtém filtros de supressão de interferências no comércio de
acessórios de automóveis e/ou na sua oficina de veículos.
5. Atenda a que, ao montar o seu rádio, haja na parte de
trás do mesmo espaço livre suficiente para garantir uma
refrigeração adequada.
6. Há na ligação da antena duas normas diferentes.
Primei-ramente a ligação antiga com o contacto circular
(50 Ohm) comprido e preponderante e com uma toma-
da circular do lado do rádio. Segundo a ficha de antena
de norma ISO (150 Ohm). Adaptadores para os dois
formatos são oferecidos por fabricantes de acessórios
e/ou pela sua oficina.
INDICAÇÃO:
Para VW/Audi ter imprescindivelmente em conta: O
seu veículo poderá ter uma antena activa. Esta necessita
de uma fonte de abastecimento de energia fornecida
apenaspelosrádiosoriginaisdosveículos.Nestecaso,uti-
lize um adaptador de antena com alimentação fantasma.
Os adaptadores de antena estão disponíveis em forne-
cedores de acessórios automóveis e/ou na sua oficina
automóvel.
Installação
A instalação do auto-rádio deve ser efectuada de acordo
com as figuras seguintes:

Português
23
a porca de parafuso
b anilha de borracha
c anilha rasa
d parafuso
e acessório de suporte
f cavilha do parafuso
g passagem da caixa
h ferramenta (chave) de extracção
Ligação
Ligue o aparelho de acordo com o seguinte diagrama.
Vermelho R
Saída RCA
Branco L
Cinzento
Violeta
Violet/Preto
Cinz/Preto
Posterior esquerda
Ignição
Ligação Antena
Ligação ISO
Terra
Ligação de corrente
permanente
Coluna frontal
esquerda
Verde
Verde/Preto
Branco/Preto
Branco
vermelho
Fusível
Fusível
preto
amarelo
Antena automática (azul)
Coluna frontal
direita
Posterior direita
cinchLINEOUTnapartetraseiradoaparelho.Consulteo
manual de instruções relativamente ao amplificador externo.
Instruções de funcionamento
1. Nãoligueoaparelhoseointeriordoveículoestiver
extremamente quente, por exemplo, após estaciona-
mento prolongado sob luz directa solar. Aguarde até que
o interior arrefeça após um curto tempo de condução.
2. Possíveis avarias durante o funcionamento podem ser
resolvidas premindo o botão RESET. Prima o botão
RESET com um arame ou algo do género (10) para repor
a electrónica (RESET).
3. As horas apresentadas durante o modo de espera são
definidas automaticamente assim que escutar uma
estaçãoderádio.Nãoépossívelefectuaradenição
manualmente.
Utilização
Seguidamente, as funções dos botões de função individuais
são descritos de acordo com a ilustração “Descrição dos
elementos de serviço”.
1 Tecla MODE
Prima este botão para seleccionar modos diferentes.
(Radio, USB, CARD e AUX)
INDICAÇÃO:
O modo USB e CARD só pode ser seleccionado se
tiver ligado um media correspondente.
2 Estações predefinidas (1-6)
a) Nomododerádio:
• Segureobotãopredenidodaestaçãopretendi-
da para guardar uma estação de rádio.
• Paraseleccionarumaestaçãoderádio,prima
brevemente o respectivo botão de estação.
• Paraseleccionarotipodeprograma.
Página 25 “botão BAND/PTY”
b) NomodoUSB/CARD:
Selecçãodirectadeumcheirodemúsica
Página 25 “botão AS/PS”
3 Controlo do volume/Ligar-Desligar/Tecla SEL (selecção)
a) Prima o controlo para ligar o aparelho. Segure o
controlo para desligar o aparelho. As horas aparecem
no visor.
b) Durante o modo normal de reprodução, o controlo é
utilizado para controlar o volume.
Juntamente com o controlo previamente premido
(botão SEL), é possível efectuar alterações no menu,
por exemplo, o modo de som.
c) Prima o botão SEL brevemente para entrar no menu
de selecção. Premir repetidamente o botão SEL
selecciona entradas do menu individuais. É possível
alterar as definições das entradas do menu individu-
ais rodando o controlo do volume.
ATENÇÃO:
• Utilizeascolunascomumaimpedânciade4ohm.
• Oscabosdosaltifalantestêmdeestarisentosdemassa.
Ligação de um amplificador externo
Para ligação de um amplificador externo utilize a saída de áu-
dio

Português
24
BAS (Graves)
TRE (Agudos)
BAL (Equilíbrio)
FAD (Variação gradual)
AF ON/AF OFF
AF (Alternative Frequencies – frequências alternati-
vas) é uma função que funciona com o RDS (Radio
Data System – sistema de dados de rádio) e apenas
pode ser utilizada com estações FM. Sem se notar,
o aparelho pesquisa a melhor frequência para a
estação pretendida.
• ON: Se uma certa estação emissora possuir má
recepção, o aparelho muda automaticamente
para uma estação emissora a emitir o mesmo
programa através da mesma cadeia de emissão
RDS.
• OFF: A função é desactivada.
REG ON/REG OFF
Em certos momentos, algumas estações segmen-
tam os seus programas em programas regionais de
diferenteconteúdo.
• ON: São reproduzidos apenas programas regio-
nais da estação.
• OFF: Reproduz também programas nacionais.
VOL (Volume)
4 Botão
/DIR
a) Para seleccionar uma estação de rádio no modo de
rádio.
b) NomodoUSB/CARD:
• Primaobotãoparaseleccionarapróximamúsica.
• Segureobotãoparaseleccionarodirectório
seguinte (se existirem directórios no dispositivo
de memória).
5 Botão
/ MUT
a) Prima o botão para interromper a reprodução de
umamúsica(funçãodepausa).Volteapremiresta
tecla para voltar à leitura do CD.
b) Se segurar este botão, a reprodução será emudeci-
da. Para desactivar esta função, segure novamente o
botão.
6 Ecrã LCD (Indicação em cristais líquidos)
7 Ranhura para cartão SD/MMC
Deslize o cartão de memória para dentro da entrada
respectiva com a marca para a frente até prender com
umruídode„clique“.Noecrãvisualiza-seaindicação
CARD.
Os dados são lidos automaticamente.
INDICAÇÃO:
Para procurar/seleccionar determinadas pistas, proce-
da como descrito sob o ponto 13 (botão AS/PS como
função de procura no modo MP3).
Para remover o cartão de memória, prima novamente a
extremidade do cartão de memória. Este desprende-se
com um „clique“ e pode ser removido.
ATENÇÃO:
Simplesmente puxar o cartão pode danificar a ranhura
e/ou o cartão de memória.
8 Tomada AUX
Para ligação de aparelhos de leitura analógicos. Também
pode por meio desta tomada e dos altifalantes ouvir o
som de outros aparelhos de leitura tais como o leitor
MP3, o leitor de CDs, etc.
1. Ligue por favor o aparelho externo com uma ficha de
jaque estéreo de 3,5 mm à tomada AUX (8).
2. Prima o botão MODE (1) tantas vezes quantas neces-
sárias até se visualizar “AUX“ no ecrã.
3. Escuta a reprodução do dispositivo externo através
das colunas. É possível alterar o volume através do
controlo do volume (3).
4. Para o restante procedimento consulte o manual de
instruções da fonte de som externa.
INDICAÇÃO:
Regule o volume de som do aparelho externo para o
volume de som que deseja ouvir.
9 Ligação USB
Se quiser ter acesso a dados gravados num Stick USB, enfie
o mesmo na abertura para tal prevista. Visualiza-se no ecrã
a indicação USB. Os dados são lidos automaticamente.
INDICAÇÃO:
• Paraprocurar/seleccionardeterminadaspistas,
proceda como descrito sob o ponto 13 (botão
AS/PS como função de procura no modo MP3).
• Indicação: A ligação USB destina-se apenas à
reprodução de dispositivos de memória e não ao
carregamento de dispositivos externos. Apenas
é possível fornecer uma potência baixa (100 mA).
Esta ligação USB não se destina a discos rígidos,
por exemplo, discos rígidos externos de 2,5“,
que necessitam de correntes até 1100 mA. Para
reproduzir a partir do seu smartphone, iPod ou
iPhone,utilizeaentradaAUX-IN,concebidapara
esse propósito.

Português
25
Se o tipo de programa pretendido não for encontra-
do,amensagem“NOPTY”aparecenovisor.
SeasinformaçõesPTYjánãoexistirem,afunçãoPTY
muda automaticamente para o modo normal.
13 Botão AS/PS
Modo de rádio:
a) Prima o botão brevemente para reproduzir as esta-
ções gravadas sequencialmente durante cerca de
5 segundos. Prima a estação pretendida para sair da
operação e reproduzir a estação de rádio.
b) Segure este botão para iniciar a pesquisa automática
de estações. Aparece SEARCH no visor. O proces-
so de pesquisa pode demorar alguns minutos. As
estações são guardadas por ordem ascendente de
frequência. Então, as estações gravadas são reprodu-
zidas durante um curto espaço de tempo. Prima um
botão de estação para sair da operação.
Modo USB/CARD:
Selecçãodirectadeumcheirodemúsica.
PrimaobotãoAS/PS,“NUM---”seráapresentadono
visor. Rode o controlo do volume para o ficheiro preten-
didoouintroduzaonúmerocomosbotõesdasestações
(botões 1-6, MODE = 7,
/DIR = 8, /DIR = 9,
BAND=0).Emseguida,primaobotãoSEL(3)para
reproduzir o ficheiro.
Características técnicas
Generalidades
Tensão da rede ....................................... DC 12 V (terra negativo)
Consumo de energia ........................................................5 A Max.
Capacidade .......................................................... 4 x 80 W (PMPO)
Formatos de ficheiros reprodutívei ...........................MP3, WMA
Dimensões da caixa (Instalação) ...182 larg. x 52 alt. x 108 prof.
Área FM
Gama de frequências ...............................87,5 MHz ~ 108,0 MHz
Sensibilidade utilizávelt .............................................................4 µV
I.F. Frequência ....................................................................10,7 MHz
Reserva-se o direito de alterações!
Este aparelho foi controlado nos termos das actuais directivas
da CEE aplicáveis, tais como inocuidade electromagnética e
directiva sobre baixa tensão, e fabricado de acordo com as
mais novas prescrições da segurança técnica.
10 Botão Reset (repor)
Consulte a secção “Instruções de funcionamento” na
página 23.
11 Botão
/DIR
a) Para seleccionar uma estação de rádio no modo de
rádio.
b) NomodoUSB/CARD:
• Primaobotãoparaseleccionarapróximamúsica.
• Segureobotãoparaseleccionarodirectório
seguinte (se exisitrem directórios no dispositivo
de memória).
12 Botão BAND/PTY
a) Função rádio
PrimabrevementeobotãoBAND/PTYparaalternar
entre as três áreas FM- (UKW). A desginação do nível
correspondente é visualizada na indicação do LCD.
b) Botão PTY
Funcionamento do rádio:
PTY Seleccionar o tipo de programa
Além do nome da estação, algumas estações emitem
informações sobre o tipo de programa. Estas informa-
ções podem ser apresentadas no seu rádio automóvel.
O programa pode ser dos seguintes tipos, por exem-
plo:
SPORT NEWS POP CLASSICS
UtilizandoafunçãoPTY,épossívelseleccionaresta-
ções específicas de um certo tipo de programa. Os
tipos de programas individuais estão divididos em
duas categorias: Music e Speech. É possível encon-
trar uma lista dos tipos de programas na página 27.
• SegureobotãoBAND/PTY1xparaligarafunção
e para seleccionar a categoria “Speech”.
• SegureobotãoBAND/PTY2xsparaseleccionar
a categoria “Music”.
INDICAÇÃO: Desligar a função
SesegurarobotãoBAND/PTYumaterceiravez,a
função será desligada.
Então, prima os botões de estação 1-6 para efectuar
aescolhadePTY.Otipodeprogramaseleccionado
aparece no visor.
SePTYestiverseleccionado,orádioiniciaumapes-
quisapelasinformaçõesPTYrespectivasepáraquan-
doasinformaçõesPTYpretendidassãoencontradas.

Português
26
Eliminação de avarias
Antes de ler a lista de verificações, conclua por favor de
seguida a ligação. Se depois da verificação da lista ainda
houver perguntas em aberto, dirija-se por favor ao posto de
assistência técnica mais próximo.
Simptoma de erro Causa Solução
Nãoháfunção. A ignição está
desligada.
Rodar a chave de
igniçãopara“ON“
ou para “ACC“.
Rebentaram um ou
mais do que um
fusíveis.
Substituir o fusível
por um outro com
5 A /1 A.
O aparelho não
se deixa “ligar“
ou “desligar“ por
meio da ignição.
Ligação defeituosa
(cada fabricante
de veículos dispõe
a ligação ISO no
veículo de outra
maneira).
Entre em contacto
com a sua oficina
ou com um espe-
cialista em auto-
móveis, por causa
do adaptador para
a ligação específi-
co do veículo.
O aparelho não
funciona correcta-
mente.
O microcomputa-
dor sofre a interfe-
rência de campos
electromag-
néticos.
Desligar o aparelho
e voltar a ligá-lo.
O rádio não dá
sinal de captação.
O cabo da antena
não está ligado.
Enfiar com firmeza
o cabo da antena
na tomada para a
antena do apare-
lho.
Má recepção de
rádio.
O seu veículo tem
eventualmente
uma antena
especial (an-tena
alimentada com
fantasma.)
Entre por favor em
contacto com a
sua oficina ou com
um espe-cialista
em automóveis.
(Para aparelhos de
outras marcas exis-
tem filtros separa-
dores específicos
na alimen-tação ou
adpatadores de
tensão.)

Português
27
PTY – Tipos de programas
Botões de estação PTY da categoria “Speech” Botões de estação PTY da categoria “Music”
1
NEWS
1
POP M
AFFAIRS
ROCK
INFO
2
SPORT
2
LIGHT
EDUCATION
EASY
DRAMA
3
CULTURE
3
CLASSIC
SCIENCE
OTHER
VARIED
4
WEATHER
4
COUNTRY
FINANCE
JAZZ
CHILDREN
5
SOCIAL
5
NATIONAL
RELIGION
OLDIES
PHONEIN
6
TRAVEL
6 FOLKLEISURE
DOCUMENT

Português
28
B
Botões
/ .............................................................................24/25
Botão AS/PS ....................................................................................25
BotãoBAND/PTY ..........................................................................25
Botão MUT (mudo) ........................................................................24
C
Características técnicas .................................................................25
D
Desligar ............................................................................................23
E
Eliminação de avarias ....................................................................26
Emudecer ........................................................................................24
I
Infomação importante para a instalação
do deu Installação ..........................................................................22
Installação ........................................................................................22
Indicações de segurança ..............................................................21
Instruções de funcionamento ......................................................23
Installação (Indicações de segurança) ........................................21
L
Ligação .............................................................................................23
Ligar .................................................................................................23
Ligação USB ....................................................................................24
M
MODE Tecla ....................................................................................23
Momento .........................................................................................23
P
Play / Pause (
) ............................................................................24
Propostas para montagem ..........................................................22
PTY–Tiposdeprogramas ...........................................................27
R
Regule o volume ............................................................................23
Ranhura para cartão SD/MMC ....................................................24
S
Segurança no tráfego ....................................................................21
T
Tecla SEL ..........................................................................................23
Tomada AUX ...................................................................................24
U
Utilização ..........................................................................................23
Registo de palavras-chave – Índice

Italiano
29
Istruzioni per l’uso
Grazie per aver scelto il nostro prodotto. Vi auguriamo un
buon utilizzo del dispositivo.
Avvertenze di sicurezza
Prima di mettere in funzione questo apparecchio, leggere
molto attentamente le istruzioni per l’uso e conservarle con
cura unitamente al certificato di garanzia, allo scontrino e, se
possibile, alla scatola di cartone con la confezione interna.
• Utilizzarel’apparecchiosoloperl’usoprevisto.
• Montarel’apparecchioinmodocheleapertureperla
ventilazione presenti non vengano coperte.
• Nontoglieremailaprotezionedell’apparecchio.Ripara-
zioni non a regola d’arte possono causare notevoli peri-
coliperl’utente.Nelcasodidanneggiamentodell’appa-
recchio non metterlo più in funzione ma farlo riparare da
un esperto.
Questisimbolipossonotrovarsieventualmentesull’apparec-
chio e rimandano ai seguenti elementi:
Il simbolo con il punto esclamativo fa presente
all’utente la presenza di importanti avvertenze
per l’uso e la manutenzione nei fogli di accompa-
gnamento dell’apparecchio.
Gli apparecchi dotati di questo simbolo lavorano
con un “Laser classe 1” per riprodurre i CD. Gli
interruttori di sicurezza integrati hanno lo scopo di
impedire che l’utente venga esposto alla luce non
visibile del laser, pericolosa per l’occhio umano,
aprendo lo scomparto per i CD.
Questiinterruttoridisicurezzanondevonomaiessereca-
vallottati né manipolati perché altrimenti sussiste il rischio di
esposizione alla luce del laser.
Simboli per questo manuale di istruzioni per l’uso
Le indicazioni importanti per la propria sicurezza sono indicati
appropriatamente. Osservare assolutamente queste indica-
zioni, per evitare incidenti e danni all’apparecchio:
AVVISO:
Previene i rischi della propria salute ed indica possibili rischi
di ferite.
ATTENZIONE:
Indica possibili pericoli per l‘apparecchio o altri oggetti.
NOTA:
Mette in risalto consigli ed informazioni.
Bambini e persone fragili
• Persicurezzatenerel’imballaggio(sacchettodiplastica,
scatola, polistirolo, ecc,) fuori dalla portata dei bambini.
AVVISO!
Nonlasciargiocareibambinipiccoliconlapellicola.
Pericolo di soffocamento!
Sicurezza della circolazione
AVVISO:
• Lasicurezzadellacircolazioneèsemprel’obiettivoprin-
cipale.Quindiutilizzaresemprel’autoradioinmododa
essere sempre pronti a far fronte alla situazione stradale
attuale.
• Tenerecontocheadunavelocitàdi50km/hsipercor-
rono 14 m al secondo.
• Insituazionicritichesenesconsigliailcomando.
• Leavvertenze,p.e.dellapoliziaedeivigilidelfuoco,
devono poter essere sempre percepite tempestiva-
mente e con sicurezza nel veicolo.
• Perquestaragioneduranteilviaggioascoltatesempre
il vostro programma con un volume adeguato.
• Perevitaregraviincidentidellastrada,installarel’appa-
recchio in modo tale da non ostacolare il conducente
durante la guida (uso del volante, cambio delle marce
eccetera).
• Ancheidispositividisicurezza,peresempioairbag,eil
campo visivo non devono essere ostacolati.
Note sulla sicurezza per il tempo di mon-
taggio/connessione
• Scollegareprimailpolonegativopoiquellopositivodella
batteria. (Collegare in ordine inverso.)
Attenzione: Selabatteriaèstaccatadallarete,tuttele
memorie volatili perdono le loro informazioni. Per corte-
sia osservare le avvertenze di sicurezza del produttore del
veicolo.
• Lasicuraprincipaledeveessereinstallatapossibilmente
vicina (max. dopo 30 cm) al polo positivo della batteria
affinché, in caso di incidente, l’auto sia protetta da un
eventuale incendio dei cavi. Se l’installazione non do-
vesse corrispondere a questa direttiva di produzione, la
protezione assicurativa cessa.
• Lasezionetrasversaledelcavopositivoenegativonon
deveessereinferiorea1,5mm².
Consigli per l’installazione
• Itubidiprotezionepercaviproteggonoicavidall’abra-
sione su parti spigolose della carrozzeria.
• L’isolamentodeicavinondeveesseredanneggiato
durante l’installazione.

Italiano
30
• Ovviamentenell’installazionediunHiFiperautosidevo-
no usare gli utensili corretti.
A seconda del tipo di costruzione il vostro veicolo può differi-
re da questa descrizione. Decliniamo ogni responsabilità per
danni insorti a causa di errori di montaggio o collegamento e
per danni successivi.
Informazioni importanti per il montaggio
della vostra autoradio!
1. L’apparecchioèconguratoperilpolonegativodella
batteria, il quale deve essere collegato alla carrozzeria del
veicolo. Accertarsene prima di procedere all’installazione.
2. Durante il montaggio/collegamento del vostro appa-
recchiotenercontochenonogniveicoloèdotatodi
un “collegamento ISO”. In questo caso consigliamo
l’impiego di un adattatore ISO specifico per autoveicoli.
Gli adattatori sono disponibili nei negozi di accessori per
auto e/o presso la vostra officina di fiducia.
3. Nelcasodi“Durata+”(Collegamentodicorrenteper-
manente), a seconda del tipo di veicolo possono esserci
differenze.(Questoènecessariopermemorizzarele
stazioni emittenti).
Pergarantiretuttelefunzionièassolutamentenecessario
eseguire il montaggio conformemente a queste istruzio-
ni. In caso di dubbio rivolgersi ad un’officina autorizzata.
A causa dei diversi tipi di autovetture e produttori, una
congurazionecorrettadellaspinaISOnonègarantita
nemmeno quando i collegamenti a spina ISO coincidono
meccanicamente. Perciò può essere eventualmente ne-
cessario cambiare il collegamento elettrico o l’adattatore
specifico dell’autovettura.
NOTA:
Seilcollegamentoècorretto,sipuòaccendereespe-
gnere la radio mediante l’accensione. In caso di perdita
delle emittenti memorizzate, la radio non riceve “Durata
+”, necessaria per la memorizzazione delle emittenti.
ATTENZIONE:
Con un collegamento a “Durata +” senza accensio-
ne, può verificarsi un carico inutile della batteria della
macchinamalgradolaradiosiaspenta.Nelpeggiore
dei casi può accadere che la batteria della macchina si
scarichi.
4. In base al tipo di macchina specifico, le interferenze
possono verificarsi durante il funzionamento radio/CD.
Questisipossonoeliminareconun filtro antidisturbo
supplementare. Malgrado il vostro apparecchio CD sia
già dotato in serie di un filtro antidisturbo, possono esser-
ci ugualmente limiti dovuti alla vettura.
Potete avere questo filtro nei negozi di accessori auto e/
o presso la vostra officina di fiducia.
5. Durante il montaggio della radio fare attenzione che il
retro della radio abbia abbastanza spazio affinché sia
garantita una ventilazione sufficiente.
6. Nelcollegamentodell’antennacisonoduenorme
diverse. Prima la spina vecchia (50 Ohm) con contatto
radio lungo sporgente verso l’esterno sul lato veicolo
e una presa rotonda sul lato radio. Poi la spina antenna
ISO (150 Ohm). Adattatori per entrambi i formati sono
disponibili presso i produttori di accessori e/o presso la
vostra officina autorizzata.
NOTA:
Con VW/Audi osservare assolutamente: La mac-
chinapotrebbeavereun‘antennaattiva.Necessitadi
un‘alimentazione come fornita dalle radio per auto
originali. In questo caso, usare l‘adattatore antenna con
alimentazione fantasma.
Gli adattatore fantasma sono disponibili ai fornitori di
accessori per auto e/o officine.
Installazione
Montare la radio operando conformemente alle illustrazioni
seguenti.
a Dado
b Rosetta elastica
c Rondella
d Vite
e Squadra di montaggio
f Tirante filettato
g Alloggiamento di inserimento
h Dispositivo di estrazione
(chiave per le operazioni di smontaggio)

Italiano
31
Allacciamento
Realizzare l’allacciamento conformemente a quanto indicato
dal grafico.
Rosso R
Uscita RCA
Rosso L
Grigio
Viola
Viola/nero
Grigio/nero
a sinistra dietro
Accensione
Collegamento
per antenna
Collegamento ISO
Massa
Collegamento di
corrente permanente
Altoparlante a sinistra
davanti
Verde
Verde/nero
Bianco/nero
Bianco
Rosso
fusibile
fusibile
Nero
Giallo
Antenna automatica (Blu)
Altoparlante
a destra davanti
a destra dietro
audioLINEOUTpresentesulretrodeldispositivo.Far
riferimento al manuale d‘istruzione relativo all‘amplificatore
esterno.
Avvertenze per l’uso
1. Nonaccendereildispositivosel‘internodellamacchina
èmoltocaldo,adesempiodopounparcheggiolungo
alla luce solare diretta. Attendere che l‘interno si raffreddi
dopo un breve periodo di tempo.
2. Possibili malfunzionamenti durante il funzionamento
possono essere risolti premendo il tasto RESET. Premere
il tasto RESET con un cavo o simile (10) per ripristinare
l‘elettronica (RESET).
3. L‘oravisualizzatainmodalitàdistandbyèimpostataauto-
maticamente non appena si ascolta una stazione radio.
L‘impostazionemanualenonèpossibile.
Funzionamento
Di seguito le funzioni dei tasti del singolo dispositivo sono
descritte secondo l‘immagine
“Elementi di comando”.
1 Tasto MODE
Premere questo tasto per selezionare diverse modalità.
(Radio, USB, CARD e AUX)
NOTA:
La modalità USB e CARD può essere selezionata solo
quandoèstatocollegatouncorrispettivomezzo.
2 Preimpostazioni di stazioni (1-6)
a) In modalità radio:
• Tenerepremutoiltastopreimpostatodellastazio-
ne desiderata per salvare la stazione radio.
• Perscegliereunastazioneradio,premereper
breve tempo il relativo tasto della stazione.
• Perselezionareuntipodiprogramma.
Pagina 33 “tasto BAND/PTY”
b) In modalità USB/CARD:
Selezione diretta di un file musicale.
Pagina 33 “tasto AS/PS”
3 Controllo volume / On-/Off / Tasto SEL (selezione)
a) Premere il controllo per accendere il dispositivo. Te-
nere premuto il controllo per spegnere il dispositivo.
L‘ora compare sul display.
b) Durante la riproduzione in modalità normale, il con-
trolloèusatopercontrollareilvolume.
Assieme al controllo precedentemente premuto (tasto
SEL), le modifiche possono essere effettuate nel
menu, ad. es. la modalità audio.
c) Premere il tasto SEL per breve tempo per accedere al
menu di selezione. Premendo ripetutamente il tasto
SEL si selezionano le voci del menu singole. È pos-
sibile cambiare le impostazioni delle voci del menu
individuale girando il controllo volume.
ATTENZIONE:
• Siconsigliadiutilizzarealtoparlanticonun’impedenza
pari a 4 ohm.
• Ilcablaggiodeglialtoparlantideveessereprivodi
massa.
Connessione ad un amplificatore esterno
Per la connessione di un amplificatore esterno usare l‘uscita
cinch

Italiano
32
BAS (Bassi)
TRE (Acuti)
BAL (Bilanciamento)
FAD (Dissolvenza)
AF ON/AF OFF
AF (Alternative Frequencies)èunafunzionechesiat-
tiva con RDS (Radio Data System) e può essere usata
solo con stazioni FM. In sottofondo, il dispositivo cerca
la frequenza migliore per la stazione selezionata.
• ON: Se una certa stazione di trasmissione ha una
cattiva ricezione, il dispositivo passa in automatico
ad una stazione che trasmette lo stesso program-
ma tramite la stessa catena di trasmissione RDS.
• OFF: Lafunzioneèdisattivata.
REG ON/REG OFF
In determinati momenti, alcune stazioni segmentano i
loro programmi in programmi regionali con contenuti
diversi.
• ON: Solo i programmi regionali della stazione
sono riprodotti.
• OFF: Riproduci anche programmi a livello nazio-
nale.
VOL (Volume)
4 Tasto
/DIR
a) In modalità radio per selezionare una stazione radio.
b) In modalità USB/CARD:
• Premereiltastoperselezionareiltitolomusicale
successivo.
• Tenerepremutoiltastoperselezionareladirec-
tory successiva (se le directory sono presenti sul
supporto di memoria).
5 Tasto
/MUT
a) Premere il tasto per interrompere la riproduzione di
una traccia musicale (funzione di pausa). Per avviare
nuovamente la riproduzione del CD, azionare nuova-
mente questo pulsante.
b) Se si preme questo tasto, la riproduzione si disattiva.
Per disattivare questa funzione, tenere premuto
nuovamente il tasto.
6 Display LCD (display a cristalli liquidi)
7 Fessura scheda SD/MMC
Far scorrere la scheda di memoria nella rispettiva fessura
conl‘etichettainavantinoasentireun“clic”.Neldisplay
compare la scritta CARD.
I dati vengono riprodotti automaticamente.
NOTA:
Per cercare/selezionare determinati track procedere
come descritto al punto 13 (tasto AS/PS come funzione
di ricerca nel modo MP3).
Per rimuovere la scheda di memoria, premere di nuovo la
fine della scheda di memoria. Si sgancia con un “clic” e
può essere rimosso.
ATTENZIONE:
La semplice estrazione può danneggiare la fessura e/o
la scheda di memoria.
8 Presa AUX
Per il collegamento di apparecchi analogici per la ripro-
duzione. Grazie a questa boccola si può ricevere il tono
anche da altri apparecchi di riproduzione come MP3-
player, lettore cd ecc.
1. Collegare l’apparecchio esterno alla presa AUX (8)
con un jack stereo di 3,5 mm.
2. Premere il tasto MODE (1) finché nel display compare
“AUX”.
3. È possibile ascoltare la riproduzione dal dispositivo
esterno tramite gli altoparlanti. È possibile cambiare il
volume con il controllo volume (3).
4. Seguire poi le istruzioni d’uso dell’apparecchio ester-
no.
NOTA:
Adeguare il volume dell‘apparecchio esterno.
9 Collegamento USB
Se si desidera riprodurre dati da un supporto USB, infi-
larlonell’aperturaprevista.Neldisplaycomparelascritta
USB. I dati vengono riprodotti automaticamente.
NOTA:
• Percercare/selezionaredeterminatitrackprocede-
re come descritto al punto 13 (tasto AS/PS come
funzione di ricerca nel modo MP3).
• Tenete presente che:LaconnessioneUSBèdesti-
nata solo alla riproduzione di supporti di archivia-
zione e non per dispositivi esterni di caricamento.
Può essere fornito solo un alimentatore a bassa
tensione(100mA).QuestaconnessioneUSBnon
èadattadurantelagiudaades.dischissiesterni
2,5“, che necessitano correnti fino a 1100 mA. Per la
riproduzione di smartphone, iPod o iPhone, usare
lapresaAUX-IN,previstaatalescopo.
10 Tasto Reset (ripristino)
Vedi sezione “Avvertenze per l’uso” a pagina 31.

Italiano
33
Seiltipodiprogrammadesideratononètrovato,il
messaggio“NOPTY”comparesuldisplay.
SeleinformazioniPTYnonesistonopiù,lafunzione
PTYpasseràinautomaticoallamodalitànormale.
13 Tasto AS/PS
Modalità radio:
a) Premere per breve tempo il tasto per riprodurre le
stazioni salvate in modo sequenziale per ca. 5 secon-
di. Premere la stazione desiderata per interrompere il
funzionamento e riprodurre la stazione radio.
b) Tenere premuto questo tasto per avviare la ricerca
automatica delle stazioni. SEARCH comparirà sul di-
splay. Il processo di ricerca può impiegare alcuni mi-
nuti. Le stazioni sono salvate nell'ordine di frequenze
ascendenti.Quindi,lestazionisalvatesonoriprodotte
per breve tempo. Premere un tasto stazione per
interrompere il funzionamento.
Modalità USB/CARD:
Selezione diretta di un file musicale.
PremereiltastoAS/PS,“NUM---”compariràsuldisplay.
Regolare il controllo volume al livello desiderato, o
immettere il numero con i tasti stazione (tasto 1-6,
MODE = 7,
/DIR = 8, /DIR =9,BAND=0).
Poi, premere il tasto SEL (3) per riprodurre il file.
Dati tecnici
Generalità
Tensione di rete ...................................... DC 12 V (terra negativo)
Consumo di corrente ........................................................5 A Max.
Potenza .................................................................. 4 x 80 W (PMPO)
Formati file riproducibili ...............................................MP3, WMA
Dimensioni dell’alloggiamento
(Installazione) ...................................................182 L x 52 H x 108 P
Ambito FM
Ambito di frequenza .................................87,5 MHz ~ 108,0 MHz
Sensibilità utile ............................................................................ 4 µV
Frequenza I.F ......................................................................10,7 MHz
Con riserva di apportare modifiche tecniche!
Questoapparecchioèstatocontrollatosullabasedituttele
direttive CE attuali in vigore in questo settore, quali per esem-
pio la normativa in materia di compatibilità elettromagnetica
eladirettivainmateriadibassatensione,edèstatocostruito
conformemente alle norme di sicurezza più moderne.
11 Tasto /DIR
a) In modalità radio per selezionare una stazione radio.
b) In modalità USB/CARD:
• Premereiltastoperselezionareiltitolomusicale
successivo.
• Tenerepremutoiltastoperselezionareladirec-
tory successiva (se le directory sono presenti sul
supporto di memoria).
12 Tasto BAND/PTY
a) Modalità radio
PremereperbrevetempoiltastoBAND/PTYper
selezionare le tre aree FM- (UKW). La denominazione
delle corrispndenti onde viene indicata nell’indicazio-
ne LCD.
b) Tasto PTY
Funzionamento radio:
PTY Selezionando il tipo di programma
Oltre al nome della stazione, alcune stazioni tra-
smettono informazioni sul tipo di programma del
programma.Questeinformazionipossonoessere
visualizzate sulla radio della macchina.
Il programma può essere dei seguenti tipi, ad esem-
pio:
SPORT NEWS POP CLASSICS
UsandolafunzionePTY,èpossibileselezionarestazio-
ni specifiche di un determinato tipo di programma. I
tipi di programmi singoli sono divisi in due categorie:
Musica e discorsi. È possibile trovare un elenco di tipi
di programmi su pagina 35.
• TenerepremutoiltastoBAND/PTY1voltaper
attivare la funzione e selezionare la categoria
“Discorso”.
• TenerepremutoiltastoBAND/PTY2volteper
selezionare la categoria “Musica”.
NOTA: Disattivare la funzione
SesitienepremutoiltastoBAND/PTYperuna
terza volta, la funzione si disattiverà.
Poi, premere i tasti stazione 1-6 per effettuare la scelta
PTY.Iltipodiprogrammaselezionatocomparesul
display.
SevieneselezionatoPTY,laradioiniziaacercareleri-
spettiveinformazioniPTYesifermaquandovengono
trovateleinformazioniPTYdesiderate.

Italiano
34
Eliminazione delle anomalie
Prima di esaminare la lista di riscontro, completare in primo
luogol’allacciamento.Nelcasoincuivisianoancoradoman-
de in seguito alla verifica sulla base della lista di riscontro, si
consiglia di rivolgersi al centro di assistenza tecnica più vicino.
Anomalie Causa Soluzione
Nessunafunzione. Il sistemadi accen-
sioneèdisattivato.
Ruotare la chiave
di accensione su
“ON”oppure
“ACC”.
Una o più sicure
sono fuse.
Sostituire il dispo-
sitivo di sicurezza
con un altro da
5 A /1 A.
Nonèpossibile
accendere l’ap-
parecchio tramite
l’accensione on/
off.
Collegamento
errato (ogni
produttore di
automobili occupa
il collegamento
ISO nel veicolo
diversamente).
Contattare la
propria officina
o un esperto in
automobili per un
adattatore di colle-
gamento specifico
per auto.
L’apparecchio non
funziona corretta-
mente
Ilmicrocomputerè
stato disturbato da
campi elettroma-
gnetici.
Disattivare l’appa-
recchio e riattivarlo
nuovamente.
Nonvièalcuna
ricezione radio.
Il cavo dell’antenna
nonècollegato.
Inserire corret-
tamente il cavo
dell’antenna nella
presa corrispon-
dente dell’appa-
recchio.
Pessima ricezione
radio.
Eventualmente
il vostro veicolo
ha un’antenna
speciale (antenna
ad alimentazione
artificiale).
Contattare la
propria officina
o un esperto in
automobili. (Per
“fabbricati di terzi”
ci sono scambi di
alimentazione spe-
cifici ovvero adatta-
tori di tensione.)

Italiano
35
PTY – Tipi di programma
Tasti stazione
PTY della categoria
“Discorso”
Tasti stazione
PTY della categoria
“Musica”
1
NEWS
1
POP M
AFFAIRS
ROCK
INFO
2
SPORT
2
LIGHT
EDUCATION
EASY
DRAMA
3
CULTURE
3
CLASSIC
SCIENCE
OTHER
VARIED
4
WEATHER
4
COUNTRY
FINANCE
JAZZ
CHILDREN
5
SOCIAL
5
NATIONAL
RELIGION
OLDIES
PHONEIN
6
TRAVEL
6 FOLKLEISURE
DOCUMENT

Italiano
36
Elenco tematico - Indice
M
Montaggio (avvertenze di sicurezza) ..........................................29
O
Ora ....................................................................................................31
P
Presa AUX ........................................................................................32
Play / Pause ( ) ..........................................................................32
PTY–Tipidiprogramma ..............................................................35
S
Sicurezza della circolazione ..........................................................29
Spegnere .........................................................................................31
T
Tasto / .................................................................................32/33
TastoBAND/PTY ............................................................................33
Tasto MODE ....................................................................................31
Tasto MUT (silenzioso) ..................................................................32
Tasto SEL .........................................................................................31
Tasto AS/PS .....................................................................................33
A
Avvertenze di sicurezza .................................................................29
Allacciamento .................................................................................31
Accensione ......................................................................................31
Avvertenze per l’uso ......................................................................31
C
Consigli per l’installazione ............................................................29
Collegamento USB ........................................................................32
D
Disattivare l'audio ...........................................................................32
Dati tecnici .......................................................................................33
E
Eliminazione delle anomalie ........................................................34
F
Funzionamento ...............................................................................31
Fessura scheda SD/MMC.............................................................32
I
Importanti informazioni aggiuntive per il montaggio ...........30
Installazione .....................................................................................30
Imposare il volume .........................................................................31

English
37
Instruction Manual
Thank you for choosing our product. We hope you will enjoy
using the appliance.
Safety Information
Read the operating instructions carefully before putting the
appliance into operation and keep the instructions including
the warranty, the receipt and, if possible, the box with the
internal packing.
• Usethedeviceonlyfortheintendedpurpose.
• Thedeviceshouldbeinstalledinsuchawaythatexisting
ventilation holes are not covered.
• Neveropenthehousingofthedevice.Incorrectrepairs
can constitute a considerable risk for the user. If the
device is damaged it should not be used, but repaired by
a specialist.
These symbols may be found on the machine and are
intended to indicate the following:
The symbol with an exclamation mark should
advise the user of important operation or
maintenance instructions in the accompanying
documentation.
Devices bearing this symbol work with a “class
1 laser” for tracing the CD. The built-in safety
switches should prevent the user being exposed
to dangerous laser light, which is invisible to
the human eye, when the CD compartment is
opened.
Under no circumstances should these safety switches be
bypassed or manipulated, as this could result in a danger of
exposure to the laser light.
Symbols in these Instructions for Use
Important information for your safety is specially marked. It is
essential to comply with these instructions in order to avoid
accidents and prevent damage to the machine:
WARNING:
This warns you of dangers to your health and indicates pos-
sible injury risks.
CAUTION:
This refers to possible hazards to the machine or other
objects.
NOTE:
This highlights tips and information.
Children and Frail Individuals
• Inordertoensureyourchildren‘ssafety,pleasekeepall
packaging (plastic bags, boxes, polystyrene etc.) out of
their reach.
WARNING!
Caution! Do not allow small children to play with the
foil as there is a danger of suffocation!
Road Safety
WARNING:
• Roadsafetyisofparamountimportance.Youshould
therefore use your car radio at all times in such a way
that you are able to cope with the current traffic situa-
tion.
• Pleaserememberthatataspeedof30mph(50kph)
you travel 15 yards (14 metres) in one second.
• Weadviseyounottooperatetheradioincriticalsitua-
tions.
• Itmustbepossibletohearthesirensofpoliceandre
brigade vehicles etc. from inside the vehicle in good
time.
• Whendrivingyoushouldthereforenotturntheradio
volume up excessively.
• Inordertoavoidseriousroadaccidents,thedevice
should be installed in such a way that you are not hin-
dered when operating the steering wheel, gear lever
etc.
• Similarly,safetyaspectssuchasairbagsandyourclear
view of the road must not be obstructed either.
Safety notes for the time of assembly/
connection
• Firstdisconnecttheminuspoleandthenthepluspoleof
the battery. (connection in the reverse order.)
Please note: Once the battery has been disconnected
the information is lost from all volatile memory. Please
note the safety information provided by the vehicle
manufacturer.
• Themainfusemustbeinstalledascloselyaspossible(not
more than 30 cm away) to the plus pole of the battery so
that the car is protected from any cable fire caused, for
example, by an accident. If the above is not complied
with the insurance protection no longer applies.
• Thecross-sectionoftheplusandminuscablemustnot
exceed1.5mm².

English
38
Installation Tips
• Cableprotectionsleevesprotectcablesagainstfraying
on sharp body parts.
• Theinsulationofthecablesmustnotbedamagedduring
installation.
• Itisessentialtousethecorrecttoolswheninstallingcar
hi-fi.
Depending on the model, your vehicle may deviate from the
above description. We do not accept any liability for damage
caused by installation or connection errors or for consequen-
tial damage.
Important Information for installing your
carradio!
1. The device is designed for the minus pole of the battery,
which must be connected to the body of the vehicle.
Please check this before installation.
2. When installing/connecting your device please note that
not every vehicle is equipped with an “ISO connection”.
In this case we recommend the use of an ISO adapter
specifically designed for your vehicle.
Adapters are available from car accessory shops and/or
from your vehicle workshop.
3. Depending on the specific car type, different wiring
connection of the “Duration +” wire (Constant current
connection) are available. (However, this is necessary for
storing the radio stations).
In order to guarantee all functions, installation in line with
these instructions is essential. In cases of doubt please
contact an authorised car workshop.
Due to the various types of motor vehicles and motor
manufacturers, it is not possible to guarantee that the
pin assignment of the ISO plug is correct, even if the ISO
plug connections fit together mechanically. It may there-
fore be necessary to modify the electrical connection or
use vehicle-specific adapters.
NOTE:
If the device is correctly connected, the radio can
be switched on and off via the ignition. If the stored
stations are lost, this indicates that the radio is not
receiving any “continuous +”, current which is required
for storing the stations.
CAUTION:
Where there is a connection to “continuous +” without
the ignition being switched on, the car battery might be
drained of power even if the radio is switched off. This
may even result in the battery becoming completely
flat.
4. Depending on the specific car type, interferences may
arise during radio/CD operation. These interferences can
avoided easily with an additional Interferences filter.
YourcarradioisoriginallypreparedwithanInterference
Filter already.
In these case, please contact your authorized car dealer.
5. When installing your radio please ensure that there is
enough space at the rear of the radio to ensure sufficient
cooling.
6. For the antenna connection there are two different
norms. The first of these is the old (50 ohm) version with
a long protruding round contact on the vehicle and a
round socket on the radio end. The second is the ISO-
standardised antenna plug (150 ohm). Adapters for both
formats are available from accessory manufacturers and/
or your car workshop.
NOTE:
Important information for VW/Audi vehicles: Your
car may have an active antenna. It requires a power
supply as it is provided only by original car radios. In this
case, use a phantom-powered antenna adapter.
Antenna adapters are available at car accessory suppli-
ers and/or your automotive workshop.
Installation
Please install the car radio as shown below.
a Nut
b Spring washer
c Plain washer
d Screw
e Mounting bracket

English
39
f Threaded bolt
g Slide-in housing
h Extraction tool (spanner for dismantling)
Connection
Connect the device as shown in the diagram.
Red R
RCA output
White L
Grey
Violet
Violet/black
Grey/black
Rear left
Ignition
Antenna connection
ISO connection
Earth
Constant current connection
Loudspeaker, front left
Green
Green/black
White/black
White
Red
fuse
fuse
Black
Yellow
Automatic antenna (Blue)
Loudspeaker
Front right
Rear right
outputLINEOUTattherearsideofthedevice.Referto
the instruction manual concerning the external amplifier.
Operating Instructions
1. Do not switch on the device if the car interior is extremely
hot, for example after an extended parking in direct sun-
light. Wait until the interior is cooled down after a short
drive.
2. Possible malfunctions during operation can be resolved
by pushing the RESET button. Push the RESET button
with a wire or similar (10) to reset the electronics (RESET).
3. The time displayed in standby mode is set automatically
as soon as you listen to a radio station. Manual setting is
not possible.
Operation
In the following, the functions of the individual device buttons
are described according to the illustration
“Overview of
the Components”.
1 MODE Button
Press this button to select the different modes. (Radio,
USB, CARD and AUX)
NOTE:
The USB and CARD mode can only be selected if you
have connected a corresponding medium.
2 Station presets (1-6)
a) In radio mode:
• Holddownthedesiredstationpresetbuttonto
save a radio station.
• Tochoosearadiostation,shortlypressthe
respective station button.
• Toselectaprogramtype.
Page 41
“BAND/PTY button”
b) In USB/CARD mode:
Direct selection of a music file.
Page 41
“AS/PS button”
3 Volume control / On-/Off / SEL Button (Select)
a) Press the control to switch on the device. Hold down
the control to switch off the device. The time appears
on the display.
b) During normal playback mode, the control is used to
control the volume.
Together with the previously pressed control (SEL
button), changes can be made in the menu, e. g. the
sound mode.
c) Press the SEL button shortly to enter the selection
menu. Repeated pressing of the SEL button selects
individualmenuentries.Youcanchangethesettings
of the individual menu entries by turning the volume
control.
CAUTION:
• Pleaseuseloudspeakerswithanimpedanceof4ohm.
• Theloudspeakercablesmustbeunearthed.
Connection of an external amplifier
For the connection of an external amplifier use the audio
cinch

English
40
BAS (Bass)
TRE (Treble)
BAL (Balance)
FAD (Fader)
AF ON/AF OFF
AF (Alternative Frequencies) is a function working
with RDS (Radio Data System) and can only be used
with FM stations. In the background, the device
searches the best frequency for the selected station.
• ON: If a certain broadcast station has bad recep-
tion, the device switches automatically to a broad-
cast station broadcasting the same program via
the same RDS broadcast chain.
• OFF: The function is deactivated.
REG ON/REG OFF
At certain times, some stations are segmenting their
programs in regional programs with different content.
• ON: Only regional programs of the station are
played.
• OFF: Play nationwide programs as well.
VOL (Volume)
4
/DIR Button
a) In radio mode to choose a radio station.
b) In USB/CARD mode:
• Pressthebuttontochoosethenextmusictitle.
• Holddownthebuttontochoosethenextdirec-
tory (if directories are existing on the storage
media).
5
/MUT Button
a) Press the button to interrupt the playback of a music
title (pause function). Press this button again to con-
tinue listening to the CD.
b) If you hold down this button, the playback will be
muted. To switch this function off, hold down the but-
ton again.
6 LCD (liquid crystal display)
7 SD/MMC Card Slot
Slide the memory card into the respective opening with
the label ahead until it latches with a “click“. The word
CARD appears in the display.
The data are automatically played back.
NOTE:
In order to search for/select certain tracks proceed as
described under section 13 (AS/PS button as search
function in MP3 mode).
To remove the memory card, press again onto the end of
the memory card. It unlatches with a “click“ and can be
removed.
CAUTION:
Simple pulling out can damage the slot and/or the
memory card.
8 AUX socket
To connect analogue replay devices. Using this socket it
is possible to hear the sound of other playback devices
such as MP3 players, CD players etc. through the loud-
speaker.
1. Please connect the external device with a 3.5 mm
stereo jack plug to the AUX socket (8).
2. Press the MODE button (1) repeatedly until “AUX”
appears in the display.
3. Youheartheplaybackfromtheexternaldevicevia
theloudspeakers.Youcanchangethevolumewith
the volume control (3).
4. For the remaining procedure please see the operat-
ing instructions of the external sound source.
NOTE:
Adjust the volume of the external device to a comfort-
able level.
9 USB Connection
If you would like to play back data contained on a USB
stick, please insert the stick into the opening provided. e
word USB appears in the display. The data is played back
automatically.
NOTE:
• Inordertosearchfor/selectcertaintracksproceed
as described under section 13 (AS/PS button as
search function in MP3 mode).
• Please note: The USB connection is only designed
for playing back storage media and not for charg-
ing external devices. Only a low power (100 mA)
supply can be provided. This USB connection is not
designed for driving e. g. external 2.5“ hard discs,
needing starting currents of up to 1100 mA. For
playing back your smartphone, iPod or iPhone, use
theAUX-INsocket,intendedforthatpurpose.
10 Reset-Button (reset)
See section “Operating Instructions” on page 39.

English
41
13 AS/PS-button
Radio mode:
a) Press the button shortly to play the saved stations
sequentially for approx. 5 seconds. Press the desired
station to quit the operation and to play the radio
station.
b) Hold down this button to start the automatic station
scanning. SEARCH appears on the display. The
search process can take some minutes. The stations
are saved in the order of ascending frequencies.
Then, the saved stations are played for a short time.
Press a station button to quit the operation.
USB/CARD mode:
Direct selection of a music file.
PresstheAS/PSbutton,“NUM---”willbedisplayedon
the display. Turn the volume control to the desired file,
or enter the number with the station buttons (button 1-6,
MODE = 7,
/DIR = 8, /DIR =9,BAND=0).Then,
press the SEL button (3) to play the file.
Technical data
General
Supply voltage ................................... DC 12 V (negative ground)
Power consumption...........................................................5 A Max.
Power .....................................................................4 x 80 W (PMPO)
Playable file formats ......................................................MP3, WMA
Housing dimensions (Installation) ............ 182 W x 52 H x 108 D
FM band
Frequency range .......................................87.5 MHz ~ 108.0 MHz
Effective sensitivity .....................................................................4 µV
I.F. frequency ......................................................................10.7 MHz
Subject to technical changes without prior notice!
This device has been tested according to all relevant current
CE guidelines, such as electromagnetic compatibility and low
voltage directives, and has been constructed in accordance
with the latest safety regulations.
11 /DIR Button
a) In radio mode to choose a radio station.
b) In USB/CARD mode:
• Pressthebuttontochoosethenextmusictitle.
• Holddownthebuttontochoosethenextdirec-
tory (if directories are existing on the storage
media).
12 BAND/PTY Button
a) Radio Operation
ShortlypresstheBAND/PTYbuttontoswitchbe-
tween the three FM- (UKW) areas. The designation of
the corresponding level appears in the LCD display.
b) PTY button
Radio operation:
PTY Selecting the program type
Besides the station name, some stations broadcast
information about the program type of your program.
This information can be displayed on your car radio.
The program can be of the following types, for
example:
SPORT NEWS POP CLASSICS
UsingthePTYfunction,youcanselectspecic
stations of a certain program type. The individual
program types are divided into two categories: Music
andSpeech.Youcanndalistofprogramtypeson
page 43.
• HolddowntheBAND/PTYbutton1xtoswitchon
the function and to select the category “Speech”.
• HolddowntheBAND/PTYbutton2xstoselect
category “Music”.
NOTE: Switch off the function
IfyouholddowntheBAND/PTYbuttonforathird
time, the function will be switched off.
Then,pressstationbuttons1-6tomakethePTY
choice. The selected program type appears in the
display.
IfPTYisselected,theradiostartstosearchforrespec-
tivePTYinformationandstopswhenthedesiredPTY
information is found.
If the desired program type is not found, the mes-
sage“NOPTY”appearsonthedisplay.
IfthePTYinformationdoesnotexistanymore,the
PTYfunctionwillautomaticallyswitchtonormal
mode.

English
42
Troubleshooting
Before going through the checklist please make all the con-
nections first. If you still have questions after going through
the checklist, please consult your local customer service
representative.
Fault Symptoms Cause Solution
Nofunction. The ignition is
switched off.
Turn the ignition
keyto“ON”or
“ACC”.
One or more fuses
have blown.
Replace the fuse
by another 5 A /1 A
fuse.
Device cannot be
switched on or off
via the ignition.
Incorrect con-
nection (each car
manufacturer wires
the ISO connection
in the vehicle differ-
ently).
Please contact your
car workshop or
a vehicle special-
ist for connection
adapters may
specifically for your
model.
The device does
not work correctly.
The microcom-
puter has been
interfered with by
electromagnetic
fields.
Switch the device
off and on again.
Noradiorecep-
tion.
The antenna cable
is not connected.
Insert the antenna
cable firmly into
the antenna socket
of the device.
Poor radio recep-
tion.
It is possible that
your vehicle has
a special antenna
(phantom-pow-
ered antenna.)
Please contact your
car workshop or a
vehicle specialist.
(For other manu-
facturers there are
specific phantom
power supply
adapters and
voltage adapters
available.)

English
43
PTY – Program types
Station buttons
PTY of the category
“Speech”
Station buttons
PTY of the category
“Music”
1
NEWS
1
POP M
AFFAIRS
ROCK
INFO
2
SPORT
2
LIGHT
EDUCATION
EASY
DRAMA
3
CULTURE
3
CLASSIC
SCIENCE
OTHER
VARIED
4
WEATHER
4
COUNTRY
FINANCE
JAZZ
CHILDREN
5
SOCIAL
5
NATIONAL
RELIGION
OLDIES
PHONEIN
6
TRAVEL
6 FOLKLEISURE
DOCUMENT

English
44
Index
P
Play / Pause (
) ............................................................................40
PTY–Programtypes .....................................................................43
R
Road Safety .....................................................................................37
S
Safety Information ..........................................................................37
SD/MMC Card Slot ........................................................................40
SEL Button .......................................................................................39
Switching off ....................................................................................39
Switching on ....................................................................................39
T
Technical Data .................................................................................41
Time ..................................................................................................39
Troubleshooting .............................................................................42
U
USB Connection .............................................................................40
A
Adjust the volume ..........................................................................39
AS/PS Button ..................................................................................41
AUX socket ......................................................................................40
B
/ Buttons .............................................................................40/41
BAND/PTYButton .........................................................................41
C
Connection ......................................................................................39
I
Important Additional Installation Information ..........................38
Installation ........................................................................................38
Installation (Safety Information) ...................................................37
Installation Tips ...............................................................................38
M
MODE Button .................................................................................39
MUT button (mute) ........................................................................40
Muting ..............................................................................................40
O
Operation ........................................................................................39
Operating instructions ..................................................................39

Język polski
45
Instrukcja użytkowania
Dziękujemy za wybór naszego produktu. Mamy nadzieję, że
korzystanie z urządzenia sprawi Państwu radość.
Wskazówki bezpieczeństwa
Przed uruchomieniem urządzenia proszę bardzo dokładnie
przeczytać instrukcję obsługi. Proszę zachować ją wraz z kartą
gwarancyjną, paragonem i w miarę możliwości również karto-
nem z opakowaniem wewnętrznym.
• Urządzenienależyużywaćtylkozgodniezjegoprzezna-
czeniem.
• Urządzeniewbudowaćuważając,abyniezasłonićotwo-
rów wentylacyjnych.
• Nigdyniewolnootwieraćobudowyurządzenia.Niefa-
chowo przeprowadzone naprawy mogą być groźne w
skutkachdlaużytkownika.Niewłączaćuszkodzonego
urządzenia, jedynie przekazać go fachowcowi do napra-
wy.
Poniższe symbole mogą znajdować się na urządzeniu i mają
zwracać Państwa uwagę na:
Symbol z wykrzyknikiem ma zwrócić uwagę
użytkownika na znajdujące się w załączonych do-
kumentach ważne wskazówki związane z obsługą
i konserwacją urządzenia.
Urządzenia z tym symbolem używają do odczyty-
wania dźwięku z płyty kompaktowej „Lasera klasy
A“. Wbudowany wyłącznik bezpieczeństwa ma
zapobiec temu, żeby użytkownik w czasie otwiera-
nia kieszeni odtwarzacza płyt kompaktowych
został poddany niebezpiecznemu dla ludzkich
oczu oddziaływaniu niewidocznego światła lasera.
Wyłącznika tego nie należy w żadnym wypadku zmostkować
lub też przy nim manipulować, ponieważ grozi to niebezpie-
czeństwem, że użytkownik poddany zostanie oddziaływaniu
niebezpiecznego dla ludzkich oczu niewidocznego światła
lasera.
Symbole użyte w tej instrukcji obsługi
Ważne informacje dotyczące bezpieczeństwa użytkownika są
specjalnie wyróżnione. Koniecznie stosuj się do tych wskazó-
wek, aby uniknąć wypadków i uszkodzenia urządzenia.
OSTRZEŻENIE:
Ostrzega przed zagrożeniami dla zdrowia i wskazuje na
potencjalne ryzyka obrażeń.
UWAGA:
Wskazuje na potencjalne zagrożenia dla urządzenia lub
innych przedmiotów.
WSKAZÓWKA:
Wyróżnia porady i informacje ważne dla użytkownika.
Dzieci i osoby niepełnosprawne
• Dlabezpieczeństwadzieciproszęniezostawiaćswobod-
nie dostępnych części opakowania (torby plastikowe,
kartony, styropian itp.).
OSTRZEŻENIE!
Niepozwalajdzieciombawićsięfolią.Niebezpieczeń-
stwo uduszenia!
Bezpieczeństwo ruchu drogowego
OSTRZEŻENIE:
• Bezpieczeństworuchudrogowegojestnajważniejszym
przykazaniem. Dlatego też z odbiornika samochodo-
wego należy korzystać tak, aby w pełni panować nad
aktualnymi sytuacjami drogowymi.
• Należypamiętaćotym,żeprzyprędkościjazdy
50 km/h w ciągu sekundy pojazd pokonuje 14 m.
• Wkrytycznychsytuacjachodradzamyobsługęradia.
• Wskazówkibezpieczeństwanp.policjilubstrażypożar-
nej muszą być w pojeździe odbierane niezwłocznie i
świadomie.
• Słuchaniawybranegoprogramunależypodczasjazdy
dokonywać wyłącznie z odpowiednim nastawienia
głośności.
• Abyuniknąćpoważnychwypadkówdrogowych,
urządzenie należy zainstalować w taki sposób, aby nie
przeszkadzało w korzystaniu z kierownicy, przekładni
biegów i innych elementów wyposażenia pojazdu.
• Należyrównieżpamiętaćotym,żeinstalacjaurządzenia
nie może wpływać na elementy zabezpieczające, na
przykład poduszki powietrzne, ani zakłócać widoczności.
Środki ostrożności dotyczące czasu mon-
tażu/połączeń
• Odbateriiodłączaćnajpierwbiegunujemny,anastępnie
dodatni. (Podłączać w odwrotnym kierunku.)
Uwaga: Przy odłączonej baterii następuje wygaszenie ws-
zystkichinformacjiniestałejpamięci.Należypostępować
wg wskazówek bezpieczeństwa producenta pojazdu.
• Bezpiecznikgłównymusibyćzainstalowanymożliwieblisko
(maks. 30 cm) bieguna dodatniego baterii w celu zabez-
pieczenia samochodu przed ewentualnym pożarem kabla
spowodowanym np. wypadkiem. Postępowanie niezgod-
ne z powyższym powoduje wygaszenie gwarancji.
• ŚrednicakabliPlusiMinusniemożebyćmniejszaod
1,5mm².

Język polski
46
Porady instalacyjne
• Tulejkiochronykablazabezpieczająkabelprzedprzecie-
ra-niem na ostrych częściach karoserii.
• Izolacjakablaniemożebyćuszkodzonapodczasinstalacji.
•
Podczas instalacji Car-HiFi niezbędne są właściwe narzę-dzia.
W zależności od rodzaju budowy pojazdu możliwe są
odchyłkiodniniejszegoopisu.Nieprzejmujemyżadnej
odpowiedzialności za uszkodzenia spowodowane błędnym
wbudowaniem i podłączeniem oraz za uszkodzenia będące
rezultatem powyższego.
Ważne informacje dodatkowe, dotyczące
instalacji Waszego radioodbiornika samo-
chodowego!
1. Urządzenie dostosowane jest do podłączenia do ujemne-
go bieguna akumulatora, który musi być podłączony
do karoserii pojazdu. Prosimy o sprawdzenie tego przez
instalacją.
2. Podczas instalacji/podłączania odbiornika zwróci uwagę
na fakt, że nie każdy pojazd wyposażony jest „łącze ISO”.
W takim przypadku zalecamy zastosowanie specyficzne-
go dla pojazdu adaptera normy ISO.
Adapter jest do nabycia w ośrodkach handlowych części
samochodowych i/albo w warsztatach samochodowych.
3. Przy zajęciu „czas trwania +“ (Przyłącze prądu ciągłego),
w zależności od typu pojazdu, może dojść do odchyleń.
(Potrzebne jednak do zapisywania stacji nadawczych do
pamięci).
Dla zapewnienia wszystkich funkcji niezbędne jest postę-
powanie zgodne z instrukcją. W niepewnych przypadkach
należy skontaktować się z autoryzowanym warsztatem
samochodowym.
Prawidłowy rozkład złącza ISO nie jest gwarantowany
nawet wtedy, gdy złącza pasują do siebie pod względem
mechanicznym, ponieważ zależy to od rodzaju i produ-
centa pojazdu. Może być konieczne zmodyfikowanie
przyłącza lub zastosowanie adaptera do samochodów
mechanicznych.
WSKAZÓWKA:
Jeżeli przyłącze jest właściwe, radio można włączać i
wyłączać za pomocą zapłonu. Zapisane stacje mogą
zostać utracone, ponieważ do radia nie jest przypisywa-
ne złącze „Trwałe +”, niezbędne do zapisywania stacji.
UWAGA:
Jeżeli radio jest podłączone do złącza „Trwałe +” i nie
jest połączone z zapłonem, to nawet mimo jego wyłą-
czenia akumulator samochodu może być niepotrzebnie
obciążony. W najgorszym przypadku może dojść do
jego rozładowania.
4. Zależnie od danego typu samochodu, mogą pojawić się
zakłócenia podczas pracy radia/CD. Można je odpowied-
nio usunąć przez dodatkowy filtr przeciwzakłóceniowy.
Mimo tego, że Wasz aparat już seryjnie wyposażony jest
w filtr przeciwzakłóceniowy, to w zależności od pojazdu
może dojść do pogorszonego odbioru.
Otrzymają je Państwo w handlu z akcesoriami samocho-
dowymi i/lub w Waszym warsztacie samochdowym.
5. Podczas instalacji radioodbiornika proszę zwrócić uwagę
na to, by jego tył miał wystarczająco dużo wolnej prze-
strzeni, aby zagwarantowane było dostateczne chłodze-
nie.
6. Przy podłączeniu anteny istnieją dwie różne normy. W
pierwszym przypadku; stare (50 Ohm) z długim, wystają-
cym, okrągłym kontaktem po stronie pojazdu i okrągłym
gniazdem po stronie radia. W drugim przypadku wtyk an-
tenowy wg normy ISO (150 Ohm). Adaptery dla każdego
z tych przypadków są do nabycia u producentów części
samochodowych i/albo w warsztatach samochodowych.
WSKAZÓWKA:
Do niezbędnej uwagi przy VW/Audi: Państwa
samochód może posiadać aktywną antenę. Wymaga
zasilania takiego jak zapewniają oryginalne radia sa-
mochodowe. W tym przypadku należy użyć zasilanego
fantomowo adaptera anteny.
Adaptery antenowe dostępne są u sprzedawców akce-
soriów samochodowych i/lub w warsztacie samochodo-
wym.
Instalacja
Radioodbiornik należy zamontować zgodnie z poniższą
ilustracją.

Język polski
47
a nakrętka
b podkładka sprężysta
c podkładka
d śruba
e kątownik montażowy
f kołki gwintowane
g wsuwana obudowa
h narzędzie do wysu-wania sprzętu (klucz do demontażu)
Podłączenie
Wykonać połączenia zgodnie ze schematem.
czerwony R
Wyjście RCA
biały L
szary
fioletowy
fioletowy/czarny
szary/czarny
lewy tylny
Zapłon
Przyłącze antenowe
Przyłącze ISO
Masa
Przyłącze
prądu ciągłego
Głośnik lewy przedni
zielony
zielony/czarny
biały/czarny
biały
czerwony
bezpiecznik
bezpiecznik
czarny
żółty
Automatyczna antena (niebieski)
Głośnik
prawy przedni
prawy tylny
Podłączenie zewnętrznego wzmacniacza
Aby podłączyć zewnętrzny wzmacniacz, użyć wyjścia typu
audiocinchLINEOUTwtylnejczęściurządzenia.Sprawdzić
w instrukcjach punkty dotyczące zewnętrznego wzmacniacza.
Instrukcja obsługi
1. Niewłączaćurządzeniajeśliwnętrzesamochodujest
bardzo gorące, na przykład po przedłużonym w czasie
parkowaniu w miejscu bezpośrednio nasłonecznionym.
Poczekać na schłodzenie wewnątrz po krótkiej jeździe.
2. Możliwe nieprawidłowości podczas pracy mogą być
rozwiązanepoprzeznaciśnięcieprzyciskuRESET.Naci-
snąć przycisk RESET przewodem lub podobnym (10) aby
zresetować elektronikę (RESET).
3. Czas wyświetlany w trybie czuwania ustawiany jest auto-
matyczniedopierogdysłuchamystacjiradiowej.Niejest
możliwe manualne ustawianie.
Obsługa
Poniżej funkcje poszczególnych przycisków urządzenia opisa-
ne są według ilustracji „Przegląd elementów obłsugi”.
1 Przycisk MODE
Nacisnąćtenprzycisk,abywybraćróżnetryby.(Radio,
USB, CARD oraz AUX)
WSKAZÓWKA:
Tryb USB i CARD można wybrać tylko wtedy, gdy urzą-
dzenie zawiera odpowiedni nośnik.
2 Ustawienia stacji (1-6)
a) W trybie radiowym:
• Przytrzymaćprzyciskustawieńwybranejstacji,aby
zapisać stację radiową.
• Abywybraćstacjęradiowąszybkonacisnąć
odpowiedni przycisk stacji.
• Abywybraćtypprogramu.
strona 49 /Przycisk BAND/PTY :
b) W trybie USB/CARD :
Bezpośredni wybór pliku muzycznego.
strona 49 Przycisk „AS/PS”
3 Kontrolka głośności/ wł/ wył / Przycisk SEL (wybór)
a) Nacisnąćkontrolkę,abywłączyćurządzenie.Przytrzy-
maćkontrolkę,abywyłączyćurządzenie.Nawyświe-
tlaczu pojawia się czas.
b) W normalnym trybie odtwarzania, kontrolka używana
jest do sterowania głośnością.
Razem z poprzednio wciśniętą kontrolką (przycisk
SEL ), w menu można dokonywać zmian, np. trybu
dźwięku.
UWAGA:
• Należystosowaćgłośnikioimpedancji4ohm.
• Oprzewodowaniegłośnikówniemożebyćpołączonez
masą.

Język polski
48
c) NacisnąćszybkoprzyciskSELabywprowadzićmenu
wyboru. Kilkakrotne powtarzanie przycisku SEL to
wybór poszczególnych wpisów menu. Można zmienić
ustawienia poszczególnych wpisów menu poprzez
obracanie kontrolką głośności.
BAS (Basy)
TRE (Soprany)
BAL (Balans)
FAD (Wzmacniacz)
AF ON/AF OFF
AF (ang. Alternative Frequencies- alternatywne
częstotliwości) to funkcja działająca z RDS (Radio
Data System- radiowy system danych) i może być
użyta tylko z stacjami FM. W tle urządzenie wyszukuje
najlepszej częstotliwości dla wybranej stacji.
• ON: Jeśli dana stacja radiowa ma słaby odbiór,
urządzenie przełącza się automatycznie na stację
nadawczą, nadająca ten sam program poprzez
ten sam łańcuch nadawczy RDS.
• OFF: Funkcja nie jest aktywna.
REG ON/REG OFF
O pewnych godzinach, niektóre stacje grupują swoje
programy w programach regionalnych o różnej treści.
• ON: Odtwarzane są wyłącznie regionalne progra-
my stacji.
• OFF: Odtwarzane są również programy ogólno-
krajowe.
VOL (głośność)
4 Przycisk
/DIR
a) IW trybie radiowym wybór stacji.
b) W trybie USB/CARD :
• Nacisnąćprzycisk,abywybraćnastępnytytuł
muzyczny.
• Przytrzymaćprzycisk,abywybraćnastępnykata-
log (jeśli są katalogi w mediach)
5 Przycisk
/MUT
a) Nacisnąćprzycisk,abyprzerwaćodtwarzanietytułu
muzycznego (funkcja pauzy). Ponowne naciśnięcie
tego przycisku wznowi odtwarzanie płyty.
b) Jeśli przytrzymamy ten przycisk, odtwarzanie wyciszy
się. Aby wyłączyć funkcję, przytrzymać ponownie
przycisk.
6 Wyświetlacz LCD (wyświetlacz ciekłokrystaliczny)
7 Szczelina na kartę SD/MMC
Wsunąć kartę pamięci do odpowiedniego otworu z
etykietą do góry, aż zatrzaśnie się za pomocą „kliknięcia”.
NawyświetlaczupojawiasięinformacjaCARD.
Dane zawarte na niej odtwarzane są automatycznie.
WSKAZÓWKA:
W celu wyszukiwania/wyboru specjalnych ścieżek
należy postępować wg kroków opisanych w punkcie 13
(Przycisk AS/PS jako funkcja szukania w trybie MP3).
Aby wyjąc kartę pamięci, należy ponownie nacisnąć na
końcówkę karty pamięci. Otwiera się za pomocą „kliknię-
cia” i można ją wyjąć.
UWAGA:
Proste wyciąganie może uszkodzić slot i/lub kartę
pamięci.
8 Gniazdko AUX
Dla podłączenia urządzeń odtwarzania analogowego. Za
pomocą tego gniazdka można odsłuchiwać przez głośniki
także nagrania z innych odtwarzaczy, np. odtwarzacza
MP3, odtwarzacza CD.
1. Podłącz zewnętrzne urządzenie za pomocą wtyczki
jack 3,5 mm stereo do gniazda AUX (8).
2. NaciskajprzyciskMODE(1)ażnawyświetlaczuukaże
się napis „AUX”.
3. Słychać odtwarzanie z zewnętrznego urządzenia
poprzez głośniki. Można zmienić głośność za pomocą
kontrolki głośności (3).
4. Dalej proszę postępować jak podano na instrukcji
obsługi zewnętrznego źródła dźwięku.
WSKAZÓWKA:
Ustaw optymalną głośność w zewnętrznym urządzeniu.
9 Podłączenie USB
W przypadku zamiaru odtwarzania danych z pamięci
„USB styk” należy wetknąć ją do przeznaczonego do
tegootworu.Nawyświetlaczupojawiasięinformacja.
Następujeautomatyczneodtwarzaniedanych.
WSKAZÓWKA:
• Wceluwyszukiwania/wyboruspecjalnychścieżek
należy postępować wg kroków opisanych w punk-
cie 13 (Przycisk AS/PS-jako funkcja szukania w trybie
MP3).
• Prosimy zauważyć: Połączenie USB jest przezna-
czone tylko do odtwarzania mediów, a nie do łado-
wania urządzeń zewnętrznych. Tylko niskie zasilanie
(100 mA) może być zapewnione. To połączenie USB
nie jest przeznaczone do obsługi np. zewnętrznych
twardych dysków 2,5“, wymagając natężenia na
rozruchu do 1100 mA. Do odtwarzania smartfonu,
urządzeńiPodlubiPhone,użyćgniazdkaAUX-IN,
przeznaczonego do tego celu.

Język polski
49
Jeśli nie odnaleziono wybranego typu programu, na
wyświetlaczupojawiasiękomunikat„NOPTY”.
JeśliniemajużinformacjiPTY,funkcjaPTYautoma-
tycznie przełączy się do trybu normalnego.
13 Przycisk AS/PS
Tryb radia:
a) Nacisnąćszybkoprzycisk,abyodtworzyćzapisane
stacjewciąguprzezok.5sekund.Nacisnąćwybrana
stację, aby zamknąć operację i odtworzyć stacje
radiową.
b) Przytrzymać przycisk, aby uruchomić automatyczne
skanowanie stacji. SEARCH pojawia się na wyświe-
tlaczu. Proces wyszukiwania może zabrać kilka minut.
Stacje zapisywane są w porządku rosnących częstotli-
wości.Następniezapisanestacjesąodtwarzaneprzez
krótkiczas.Nacisnąćprzyciskstacji,abyzakończyć
operację.
W trybie USB/CARD :
Bezpośredni wybór pliku muzycznego.
NacisnąćprzyciskAS/PSa„NUM---”wyświetlisięna
wyświetlaczu. Ustawić kontrolkę głośności na wybranym
pliku lub wprowadzić numer przyciskami stacji (przycisk
1-6, MODE = 7,
/DIR = 8, /DIR =9,BAND=0).
NastępnienacisnąćprzyciskSEL(3)abyodtworzyćplik.
Dane techniczne
Ogólne
Napięciezasilania ..........................DC 12 V (ujemne uziemienie)
Pobór prądu ........................................................................5 A Max.
Moc ........................................................................ 4 x 80 W (PMPO)
Formaty pliku odtwarzalnego .....................................MP3, WMA
Wymiaru obudowy (Instalacja) .....182 szer. x 52 wys.x 108 głęb.
Zakres FM
Zakres częstotliwości ................................87,5 MHz ~ 108,0 MHz
Czułość używalna ........................................................................4 µV
Częstotliwość pośrednia ..................................................10,7 MHz
Zastrzega się prawo do zmian technicznych!
Niniejszeurządzenieodpowiadawymaganiomnormybez-
pieczeństwa użytkowania oraz spełnia wymagania dyrektywy
niskonapięciowej i kompatybilności elektromagnetycznej.
10 Przycisk Reset (resetowanie)
Patrz rozdział „Instrukcja obsługi” na stronie 47.
11 Przycisk
/DIR
a) W trybie radiowym wybór stacji.
b) W trybie USB/CARD:
• Nacisnąćprzycisk,abywybraćnastępnytytuł
muzyczny.
• Przytrzymaćprzycisk,abywybraćnastępnykata-
log (jeśli są katalogi w mediach).
12 Przycisk BAND/PTY
a) Tryb radia
SzybkonacisnąćprzyciskBAND/PTYwceluprze-
łączaniamiędzytrzemaobszaramiFM-(UKW).Na
wskaźniku LCD zostanie wyświetlony wybrany zakres.
b) Przycisk PTY
Obsługa radia
PTY Wybór typu programu
Poza nazwą stacji, kilkoma informacjami na temat
stacji radiowej na temat typu programu w Państwa
programie, taka informacja może wyświetlić się na
radiu samochodowym.
Programem może być jeden z poniższych rodzajów,
na przykład:
SPORT NEWS POP CLASSICS
ZapomocąfunkcjiPTYmożnawybraćspecyczne
stacje dla pewnego typu programu. Poszczególne
typy programów dzielą się na dwie kategorie: Muzyka
i Słowa. Można znaleźć listę z typami programu na
stronie 51.
• Przytrzymać1xprzyciskBAND/PTYabywłączyć
funkcje i wybrać kategorię „Słowa”.
• Przytrzymać2xprzyciskBAND/PTYabywybrać
kategorię „Muzyka”.
WSKAZÓWKA: Wyłączyć funkcję
JeśliporaztrzeciprzytrzymamyprzyciskBAND/
PTY,funkcjazostaniewyłączona.
Następnienacisnąćprzyciskistacji1-6abydokonać
wyboruPTY.Nawyświetlaczupojawiasięwybranytyp
programu.
JeśliwybranoPTYradiozaczynawyszukiwaćswojej
informacjiPTYizatrzymujesię,kiedyżądanainforma-
cjaPTYjestodnaleziona.

Język polski
50
Usuwanie usterek
Przed skorzystaniem z listy kontrolnej należy najpierw spraw-
dzić, czy urządzenie jest właściwie podłączone. Jeżeli po
sprawdzeniu całej listy kontrolnej usterka nie zostanie w pełni
usunięta, należy skonsultować się z najbliższym punktem
serwisowym.
Oznaki usterki Powód Sposób usunięcia
usterk
Brak funkcjonowa-
nia.
Włączony zapłon. Obrócić kluczyk
zapłonu w pozycję
„ON”lub„ACC”.
Nastąpiłoprzepa-
lenie jednego lub
kilku bezpieczni-
ków.
Wymienić bez-
piecznik na inny
bezpiecznik 5 A /
1 A .
Odbiornika nie
można zapłonem
„Wł.” lub „Wył.”.
Błędne podłącze-
nie (każdy produ-
cent samochodów
rozmiesz-cza
inaczej podłączenie
ISO w pojeździe).
Skontaktować się
z warsztatem lub
specjalistą własne-
go samochodo-
wym z zapytaniem
o specyficzny dla
pojazdu adapter.
Urządzenie nie
działa prawidłowo
Nastąpiłozakłó-
cenie mikrokom-
putera przez pola
elektromagnetycz-
ne.
Wyłączyć i po-
nownie włączyć
odbiornik.
Brak odbioru radio-
wego.
Niepodłączony
kabel antenowy.
Mocno wetknąć
kabel antenowy w
złącze antenowe
na urządzeniu.
Słaby odbiór radio-
foniczny.
Ew. pojazd
wyposażony jest w
specjalną antenę
(Antenę pochodnie
zakodowaną.)
Skontaktować
się z warsztatem
lub specjalistą
własnego samo-
chodowym. (W
przypadku „ob-
cych fabrykatów”
istnieją specyficzne
zwrotnice zasilania
wzgl. adaptery
napięciowe.)
Ogólne warunki gwarancji
Producent / Dystrybutor udziela 24 miesięcy gwarancji na
zakupione urządzenie. Okres gwarancji liczony jest od daty
zakupu urządzenia.
W tym okresie uszkodzone urządzenie będzie bezpłatnie
wymienione na wolne od wad. W przypadku, gdy wymiana
będzieniemożliwadozrealizowania,Nabywcaotrzymazwrot
ceny zakupu urządzenia.
Za uszkodzone urządzenie uważa się takie, które nie spełnia
funkcji określonych w instrukcji obsługi, a przyczyną takiego
stanu jest wewnętrzna wada fabryczna lub materiałowa.
Gwarancją nie są objęte uszkodzenia mechaniczne,
chemiczne, termiczne, powstałe w wyniku działania sił
zewnętrznych (np. przepięcie w sieci energetycznej czy
wyładowania atmosferyczne), jak również wady powstałe w
wyniku obsługi niezgodnej z instrukcją obsługi urządzenia.
Nabywcyprzysługujeprawodowymianyurządzenianawolne
od wad lub, jeśli wymiana jest niemożliwa, zwrotu gotówki
tylko po dostarczeniu do punktu zakupu kompletnego
urządzenia z oryginalnymi akcesoriami, instrukcją obsługi
i w oryginalnym opakowaniu wraz z dowodem zakupu i
prawidłowo wypełnioną kartą gwarancyjną (pieczątka sklepu,
data sprzedaży urządzenia).
Gwarancja oraz zawarte w niej warunki obowiązują na terenie
Rzeczpospolitej Polskiej.
Niniejszagwarancjaniewyłącza,nieograniczaaninie
zawieszauprawnieńNabywcywynikającychzprzepisów
Ustawy z dnia 27 lipca 2002 r. o szczególnych warunkach
sprzedaży konsumenckiej oraz o zmianie kodeksu cywilnego
(Dz.U.z2002r.Nr141,poz.1176).

Język polski
51
PTY – Typy programów
Przycisk stacji PTY kategorii „Słowa” Przycisk stacji PTY kategorii „Muzyka”
1
NEWS
1
POP M
AFFAIRS
ROCK
INFO
2
SPORT
2
LIGHT
EDUCATION
EASY
DRAMA
3
CULTURE
3
CLASSIC
SCIENCE
OTHER
VARIED
4
WEATHER
4
COUNTRY
FINANCE
JAZZ
CHILDREN
5
SOCIAL
5
NATIONAL
RELIGION
OLDIES
PHONEIN
6
TRAVEL
6 FOLKLEISURE
DOCUMENT

Język polski
52
Indeks rzeczowy
P
Play / Pause ( ) ...........................................................................48
Podłączenie .....................................................................................47
Podłączenie USB ............................................................................48
Porady instalacyjne ........................................................................46
Przycisk AS/PS .................................................................................49
PrzyciskBAND/PTY........................................................................49
Przycisk MODE ...............................................................................47
Przycisk MUT (wyciszenie) ............................................................48
Przyciskoi / .........................................................................48/49
Przycisk SEL......................................................................................47
PTY–Typyprogramów .................................................................51
R
Regulacja głośności .......................................................................47
S
Szczelina na kartę SD/MMC.........................................................48
U
Usuwanie usterek ...........................................................................50
W
Ważne informacje dodatkowe dotyczące wbudowania ........46
Włączenie .........................................................................................47
Wskazówki bezpieczeństwa .........................................................45
Wyciszanie .......................................................................................48
Wyłączenie .......................................................................................47
B
Bezpieczeństwo ruchu drogowego............................................45
C
Czas ...................................................................................................47
D
Dane techniczne .............................................................................49
G
Gniazdko AUX ................................................................................48
I
Instalacja ...........................................................................................46
Instrukcja obsługi ...........................................................................47
M
Montaż (wskazówki bezpieczeństwa) .........................................45
O
Obsługa ............................................................................................47


Stand 11/11
Elektro-technische Vertriebsges. mbH
IndustrieringOst40•47906Kempen
Hotline@etv.de
AR 4027 USB/CR
-
 1
1
-
 2
2
-
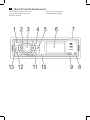 3
3
-
 4
4
-
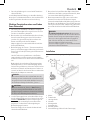 5
5
-
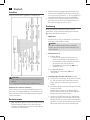 6
6
-
 7
7
-
 8
8
-
 9
9
-
 10
10
-
 11
11
-
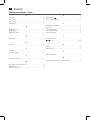 12
12
-
 13
13
-
 14
14
-
 15
15
-
 16
16
-
 17
17
-
 18
18
-
 19
19
-
 20
20
-
 21
21
-
 22
22
-
 23
23
-
 24
24
-
 25
25
-
 26
26
-
 27
27
-
 28
28
-
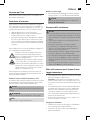 29
29
-
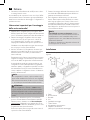 30
30
-
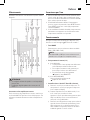 31
31
-
 32
32
-
 33
33
-
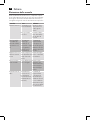 34
34
-
 35
35
-
 36
36
-
 37
37
-
 38
38
-
 39
39
-
 40
40
-
 41
41
-
 42
42
-
 43
43
-
 44
44
-
 45
45
-
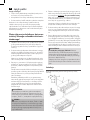 46
46
-
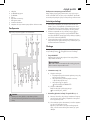 47
47
-
 48
48
-
 49
49
-
 50
50
-
 51
51
-
 52
52
-
 53
53
-
 54
54


AEG CR El manual del propietario
- Tipo
- El manual del propietario
- Este manual también es adecuado para
en otros idiomas
- italiano: AEG CR Manuale del proprietario
- Deutsch: AEG CR Bedienungsanleitung
- português: AEG CR Manual do proprietário
- polski: AEG CR Instrukcja obsługi
Otros documentos
-
Clatronic AR 687 El manual del propietario
-
Silvercrest BLUETOOTH KH 2376 Operating Instructions Manual
-
-
-
Clatronic AR 815 El manual del propietario
-
Silvercrest SAR 28 A1 Operating Instructions Manual
-
-
Pioneer keh-p2033r Manual de usuario
-
Trevi XCD 5740 BT Manual de usuario
-
VDO CD1537X Manual de usuario