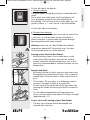
Krups VB5020US Manual de usuario
- Categoría
- Pequeños electrodomésticos de cocina
- Tipo
- Manual de usuario
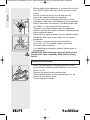
Este manual también es adecuado para

0827 984-C
CouvertureB90onewayUS0827984-B.qxd:CouvertureB90onewa#2699F0.qxd29/01/089:20Page1

CouvertureB90onewayUS0827984-B.qxd:CouvertureB90onewa#2699F0.qxd29/01/089:20Page2

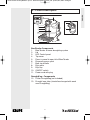
1 - Important safeguards 2
2 - General Information 4
3 - Product description 5
4 - Before use 6
5 - Using the BeerTender
®
7
6 - Troubleshooting 11
7 - Disposal 16
8 - Consumer service 16
9 - Limited warranty 17
ENGLISH
1
1-BeertenderonewayB90US.qxd:1-B95onewayAmsterdam_UK.qxd29/01/089:22Page1

2
ENGLISH
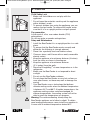
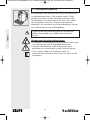
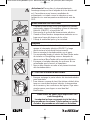
1 - IMPORTANT
SAFEGUARDS
When using electrical appliances, basic safety
precautions should always be followed to reduce the
risk of fire, electric shock, and/or injury to persons
including the following :
1. Read all instructions.
2. To protect against fire, electric shock and injury
to persons, do not place cord, plugs or
appliance in water or other liquid.
3. Close supervision is necessary when any
appliance is used near children. Keep appliance
out of reach of children. Product not intended
for use by children.
4. Unplug from outlet when not in use and before
cleaning. Allow to cool before putting on or
taking off parts, and before cleaning the rest
of the appliance.
5. Do not operate any appliance with a damaged
cord or plug or after the appliance malfunctions,
or has been damaged in any manner. Return
appliance to your nearest authorized KRUPS
Service Center for examination, repair or
adjustment (see Limited Warranty).
6. The use of an accessory not evaluated for use
with this appliance by KRUPS may result in fire,
electric shock or injury to persons.
7. Do not use outdoors.
8. Do not let cord hang over edge of table or
counter, or touch hot surfaces.
9. Do not place on or near a hot gas or electric
burner, or in a heated oven.
10. To disconnect, turn the control to «off» then
remove plug from wall outlet.
11. Do not use appliance for other than intended
use.
12. Appliance for household indoor use only.
13. Do not immerse in water.
SAVE THESE INSTRUCTIONS
1-BeertenderonewayB90US.qxd:1-B95onewayAmsterdam_UK.qxd29/01/089:22Page2

3
ENGLISH
CAUTION
This appliance is for household use only. Any
servicing other than cleaning and user maintenance
should be performed by an authorized service
representative.
• To reduce the risk of fire or electric shock, do not
remove the base. No user serviceable parts
inside. Repair should be done by authorized
service personnel only.
• Check voltage to be sure that the voltage
indicated on the name plate is compatible with
your voltage.
• Never clean with scouring powders or harsh
chemicals.
• Never make technical changes or use the
appliance in any manner other than as directed.
SHORT CORD
INSTRUCTIONS
A. We do not recommend using an extension cord
with this device.
B. If an extension cord is absolutely necessary :
1 - the marked electrical rating of the
extension cord should be at least as great as
the electrical rating of the appliance.
2 - To reduce the risk of injury, do not drape
cord over the counter top or table top where
it can be pulled on by children or tripped
over unintentionally.
3 - The extension cord should be at least 18 AWG.
1-BeertenderonewayB90US.qxd:1-B95onewayAmsterdam_UK.qxd29/01/089:22Page3

4
ENGLISH
2 General information
The BeerTender
®
is designed to dispense chilled beer in
a domestic setting. Only a Heineken
®
5 Liter
DraughtKeg
TM
and Heineken Premium Light
®
5 Liter
DraughtKeg
TM
can be used with the BeerTender. You
should not use any other commercially available beer
containers or kegs. Do not introduce any materials other
than the DraughtKeg inside the appliance.
BeerTender is designed for use by responsible adults of
legal drinking age.
Guidelines for reading these instructions
* The warning triangle indicates instructions that are
important for the userʼs safety.
* Please adhere strictly to these directions to ensure
proper use and avoid serious injury!
* This symbol highlights information that is especially
important for making the best use of the machine.
1-BeertenderonewayB90US.qxd:1-B95onewayAmsterdam_UK.qxd29/01/089:22Page4

5
ENGLISH
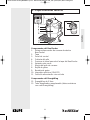
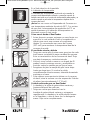
3 - Product description
BeerTender Components
1. BeerTender at home draughting system
2. Lid
3. LED Control panel
4. Tap cover
5. Press-in panel to open lid of BeerTender
6. Dispensing pour spout
7. Beer tap handle
8. Drip grate
9. Drip tray
10. ON/OFF switch
11. Power cord with plug
DraughtKeg
TM
Components
12. 5 Liter DraughtKeg (not included)
13. Draught beer tube (should be changed with each
new DraughtKeg)
13
12
1-BeertenderonewayB90US.qxd:1-B95onewayAmsterdam_UK.qxd29/01/089:22Page5

6
ENGLISH
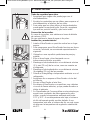
4 - Before use
Child Safety Lock
* Make sure that children can not play with the
appliance.
* Do not leave the materials used to pack the appliance
within childrenʼs reach.
* To prevent children from using the appliance, you can
remove the tap handle. To remove the handle, make
sure that it is in an upright position and pull upward.
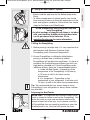
Fire prevention
In the event of a fire, use carbon dioxide (CO2)
extinguishers.
Do not use water or powder extinguishers.
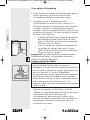
Setup and Maintenance
* Install the BeerTender® in an upright position in a safe
place.
* To ensure that the BeerTender works correctly and
efficiently, the following is strongly advised.
* Place it on a perfectly level and stable surface;
* Choose a clean, well-lit area with an easily accessible
electric socket.
* Keep the appliance at a minimum distance (4 inches)
from the stove as shown in the diagram.
* Keep the appliance at a minimum distance
(2 ½ inches) from the walls.
* Store the DraughtKeg
TM
at room temperature or in the
refrigerator.
* Make sure the BeerTender is not exposed to direct
sunlight.
* Do not use the BeerTender outdoors.
* Do not place the BeerTender on very hot surfaces or
near open flames, as these may melt or damage the
casing.
* Your BeerTender uses a technology that delivers
ultimate cooling results when the ambient temperature
is between 54°F and 86°F. At colder temperatures, the
appliance cooling system could be damaged. At
warmer temperatures, the cooling system will not be
able to reach the temperature you program.
Warning! To avoid overheating, always keep the
BeerTender appliance out of direct sunlight. To obtain
good cooling performance, never install your machine in
a room with an ambient temperature above 86°F.
54°F
86°F
1-BeertenderonewayB90US.qxd:1-B95onewayAmsterdam_UK.qxd29/01/089:22Page6

7
ENGLISH
5 - Using the BeerTender® System
* Always hold the appliance by the bottom edge when
lifting.
* To obtain draught beer of optimal quality you should
keep two basic factors in mind, the temperature of the
beer and hygienic conditions. Follow these few simple
steps for the ideal use of BeerTender.
A new draught beer tube should be used with
each DraughtKeg
TM
An initial package of draught beer tubes is included
with your machine. Additional draught beer tubes
can be purchased from Heineken. Go to
www.BeerTender.com for more information.
Chilling the DraughtKeg
1. Before pouring a draught beer, it is very important that
the Heineken and Heineken Premium Light
DraughtKeg reach the correct temperature.
2. Ensure DraughtKeg is sufficiently chilled before
pouring a draught beer. Insufficiently chilled
DraughtKegs will produce too much foam. It is ideal to
purchase the DraughtKeg pre-chilled or pre-chill over
night before intended use. If the DraughtKeg needs
additional chilling, there are 2 recommended options:
a. Inside the BeerTender – Depending on the
temperature of the DraughtKeg, it will take up
to 18 hours to chill to the ideal serving
temperature.
b. In a refrigerator – Depending on the
temperature of your refrigerator, it will take up to
12 hours to chill to the ideal serving temperature.
Tip: We recommend that you always keep an extra
DraughtKeg in your refrigerator to always have a chilled
keg available.
Preparing the BeerTender
IMPORTANT: It is important that the BeerTender power
switch is turned on before inserting the DraughtKeg. This
allows the scale to reset and accurately measure the
amount of beer left in the keg. If you remove a partially
full DraughtKeg from an operating machine or open the
lid while power is on, the scale will need to be reset.
1-BeertenderonewayB90US.qxd:1-B95onewayAmsterdam_UK.qxd29/01/089:22Page7

8
ENGLISH
Simply open the lid and lift up the keg for approximately
5-10 seconds before setting back into the machine and
closing the lid.
* After setting up the BeerTender and before use, it is
vital to clean the detachable pour spout – this is the
only part of the appliance that will come into contact
with the beer. The spout should be rinsed by hand.
After cleaning, screw back into place.
* Before inserting the DraughtKeg into the BeerTender,
simply snap the patented disposable draught beer
tube (included) onto the DraughtKeg.
* Open the BeerTender cover by pressing in the release
panel on the front of the machine.
* Open the tap spout cover by turning counter
clockwise.
* Insert DraughtKeg into BeerTender and position the
draught beer tube as shown on drawing.
* Close the tap by turning clockwise and snapping into
place.
* Carefully close the lid.
* Set the drip tray and grate in place at the front of the
appliance. Make sure the drip tray is properly fitted
and positioned.
WARNING! The drip tray must be positioned on a level
surface and must not jut out from the surface it is resting
on.
Control Panel
Your appliance features a large display providing you
with important and useful information.
°F
1-BeertenderonewayB90US.qxd:1-B95onewayAmsterdam_UK.qxd29/01/089:22Page8

9
ENGLISH
On the left side of the display:
a. Volume indicator
The BeerTender DraughtKeg volume is indicated with 4
levels.
The 4 levels are visible when the DraughtKeg is full.
They disappear progressively while emptying the
DraughtKeg. The last level starts to blink when only two
glasses of beer (+ / - one) are left in the DraughtKeg.
On the right side of the display:
b. Temperature indicator
The temperature indicator goes from red, for a beer that
is too warm, to orange when cooling of the beer is
almost complete, to green when the perfect draught
beer temperature has been reached.
Warning: never use your BeerTender with ambient
temperature above 86°F. Above that level, the ideal
serving temperature can not be attained.
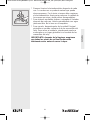
Pouring a beer from the BeerTender
* Before pouring a beer, rinse a clean glass in cold
water which chills the glass and wets the inside to
enable a perfectly smooth draught pour. Use of 8 oz
glasses is recommended to maintain the ideal serving
temperature.
Draught and Drink
* Be aware that the first glass you pour from every new
DraughtKeg will contain mostly foam. This is typical of
draught beer. Allow the foam to settle and continue to
pour.
* Tilt and pour: Tilt your glass at a 45 degree angle as
you pour and adjust upright as the glass fills.
* Ensure you pull the tap handle all the way down. Not
opening the handle all the way will result in excessive
foam.
* For the optimal draught beer drinking experience,
serve your beer with a foam head of 2 fingers in height
(approximately 1.5”).
Proper Care and Cleaning of your BeerTender
* The drip tray and grate should be emptied and
cleaned after each use.
°F
1-BeertenderonewayB90US.qxd:1-B95onewayAmsterdam_UK.qxd29/01/089:22Page9

* Before cleaning the appliance, it is essential to turn off
the ON/OFF switch and then pull the plug out of the
socket.
* Keep in mind that during use the drip tray will
have to be emptied and rinsed regularly.
The tray and grate are dishwasher safe or can be
washed by hand with a mild detergent. Dry completely.
* Always wipe down the interior of the BeerTender after
use. Beer is a natural product that can spoil.
Therefore, you should always keep the appliance
clean to maintain the quality of the beer dispensed and
avoid unpleasant odors.
* Rinse the pour spout between uses for optimal results.
Handwash with warm soapy water. Do not wash in
dishwasher.
* To remove, unscrew turning counterclockwise
from main unit. To re-attach, simply screw back
in place turning clockwise.
* You should never attempt to access internal parts of
the appliance.
IMPORTANT: After cleaning, ensure all parts of your
BeerTender
®
have completely dried before closing
the lid.
Storing the BeerTender
®
* When the BeerTender is not being used for a long
period of time, remove the DraughtKeg
TM
and turn the
control to “off”.
* Remove the plug from the power outlet.
* Store the BeerTender at room temperature in a dry
place out of childrenʼs reach.
* Protect from dust and dirt.
ENGLISH
10
1-BeertenderonewayB90US.qxd:1-B95onewayAmsterdam_UK.qxd29/01/089:22Page10

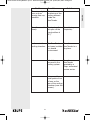
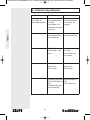
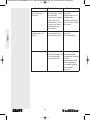
6 - Troubleshooting
ENGLISH
11
The appliance
does not turn on.
The appliance is
not connected to
the main power
supply.
Connect the
appliance to the
power supply.
No beer is being
dispensed.
The appliance is
off.
Switch the
appliance on.
The DraughtKeg
is empty.
Replace the
DraughtKeg with
a new one.
There is not a
DraughtKeg
inside the
BeerTender
appliance.
Install a
DraughtKeg
inside the
BeerTender
appliance.
The BeerTender
appliance tap
handle is not
correctly installed/
positioned.
Install/position the
tap correctly.
Problem Possible causes Solutions
1-BeertenderonewayB90US.qxd:1-B95onewayAmsterdam_UK.qxd29/01/089:22Page11

ENGLISH
12
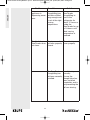
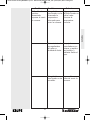
Problem Possible causes Solutions
The BeerTender
produces too
much foam when
dispensing beer.
The BeerTender
DraughtKeg has
not reached the
right dispensing
temperature.
Allow the
BeerTender
DraughtKeg to
cool to the right
temperature.
The tap handle is
being moved too
slowly.
Firmly and quickly
pull the handle
down and forward
as far as it will go.
The DraughtKeg
has been shaken.
Wait 4 hours
before dispensing
beer.
The Volume Level
indicator is
blinking.
The Scale needs
to be reset with
each new
DraughtKeg.
Turn the power on
before inserting
DraughtKeg. If
DraughtKeg is
inside, open the
BeerTender Cover
and lift up the
DraughtKeg for 3-
5 seconds before
replacing into
machine.
1-BeertenderonewayB90US.qxd:1-B95onewayAmsterdam_UK.qxd29/01/089:22Page12

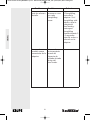
13
ENGLISH
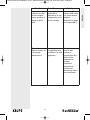
Problem Possible causes Solutions
There is a slight
buzz or hum
coming from my
machine.
This is the normal
functioning of the
cooling element
inside the
BeerTender.
Beer flows out too
slowly.
The tap handle is
not open all the
way.(position at
45°).
Open the tap
completely.
Ice forms in the
cooling chamber.
The BeerTender
has been installed
in a humid
environment.
Move the
BeerTender to a
dry place.
A fault has
occurred in the
cooling system.
Have the
BeerTender
repaired by a
Krups authorized
service center.
It is normal for a
small patch of ice
to form on the
rear of the cooling
chamber (near the
screws).
1-BeertenderonewayB90US.qxd:1-B95onewayAmsterdam_UK.qxd29/01/089:22Page13

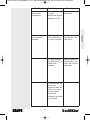
ENGLISH
14
The BeerTender
appliance is
dispensing warm
beer.
The BeerTender
DraughtKeg has
not been chilled
long enough and
is not at the right
serving
temperature.
Allow the
BeerTender
DraughtKeg to
cool in the
refrigerator for
about 12 hours or
inside the
BeerTender for up
to 18 hours until
ideal serving
temperature is
reached.
The lid of the
BeerTender does
not close.
The tap cover has
not been properly
closed.
Close the tap
cover properly.
The BeerTender
DraughtKeg has
not been correctly
installed.
Install the tap
correctly.
Ensure the
draught tube has
been installed
completely and is
not preventing the
lid from closing.
Problem Possible causes Solutions
1-BeertenderonewayB90US.qxd:1-B95onewayAmsterdam_UK.qxd29/01/089:22Page14

ENGLISH
15
The temperature
indicator on the
control display
never reaches a
ready-to-drink
level.
The BeerTender
®
appliance is
exposed to a hot
temperature or to
direct sunlight.
Use the appliance
indoors and move
to a room where
ambient
temperature does
not exceed 86°F.
The control
display shows an
increasing
temperature.
A warm
DraughtKeg was
installed in a cold
appliance.
Allow the
BeerTender
system to
compensate the
effect of the
temperature
change.
Displayed
temperature
should start
decreasing after 1
hour maximum.
Problem Possible causes Solutions
1-BeertenderonewayB90US.qxd:1-B95onewayAmsterdam_UK.qxd29/01/089:22Page15

7 - Disposal
* To dispose of your BeerTender®, dispose properly
according to your local ordinances for disposing small
appliances.
8 - Consumer service
If you have additional questions, please call our
Consumer Service Department.
It is helpful to have the product available at the time of
your call and to know the reference number that can
generally be found on the base of the product.
USA :
Online www.Krupsusa.com
Phone 1-866-232-0788
Hours* Monday – Friday from 8:00 a.m. – 6:30 p.m.
(EST)
Letters should be addressed to :
Krups
196 Boston Avenue
Medford, MA 02155
Only letters can be accepted. Packages without a
return authorization number will be refused.
*Please note hours are subject to change.
16
ENGLISH
1-BeertenderonewayB90US.qxd:1-B95onewayAmsterdam_UK.qxd29/01/089:22Page16

17
ENGLISH
9 - LIMITED WARRANTY
This Krups product is warranted for 1 year from the date
of purchase against defects in material and
workmanship. During this period, the Krups product that,
upon inspection by Krups, is proved defective,
will be repaired or replaced, at Krupsʼ option, without
charge to the customer. If a replacement product is sent,
it will carry the remaining warranty of the original product.
This warranty does not apply to any
defect arising from a buyerʼs or userʼs misuse of the
product, negligence, failure to follow Krupsʼ instructions,
use on current or voltage other than that stamped on the
product, wear and tear, alteration or
repair not authorized by Krups, or use for commercial
purposes.
THE WARRANTIES SET FORTH HEREIN ARE
EXCLUSIVE AND NO OTHER WARRANTIES,
EXPRESS OR IMPLIED, INCLUDING BUT NOT
LIMITED TO ANY WARRANTY OF
MERCHANTABILITY OR FITNESS
FOR A PARTICULAR PURPOSE OR USE, ARE MADE
BY KRUPS OR ARE AUTHORIZED TO BE MADE
WITH RESPECT TO THE PRODUCT.
Some states do not allow limitation on how long an
implied warranty lasts or do not allow the exclusion of
incidental or consequential damages, so the above
limitations may not apply to you.
This warranty gives you specific legal rights, and you
may also have other rights, which vary from state to
state. If you believe your product is defective, bring the
product (or send it, postage prepaid) along with proof of
purchase to the nearest authorized Krups Service
Center. (To find the nearest authorized Krups Service
Center visit the Krups Website or contact the Krups
Consumer Service indicated below).
If you send the product, please include a letter explaining
the nature of the claimed defect.
1-BeertenderonewayB90US.qxd:1-B95onewayAmsterdam_UK.qxd29/01/089:22Page17

18
1 - Medidas de seguridad importantes 19
2 - Información general 22
3 - Especificaciones técnicas 23
4 - Antes de usar 24
5 - Uso del sistema BeerTender 25
6 - Solución de problemas 30
7 - Cómo desechar la unidad 36
8 - Servicio al consumidor 36
9 - Garantía limitada 37
ESPAÑOL
2-BeertenderonewayB90MEX.qxd:1-B95onewayAmsterdam_UK.qxd29/01/089:25Page18

1 - MEDIDAS DE
SEGURIDAD
IMPORTANTES
Al utilizar un electrodoméstico, siempre es preciso
tomar precauciones básicas de seguridad para
reducir el riesgo de incendio, descarga eléctrica o
lesiones a las personas. Entre estas precauciones se
incluyen las siguientes:
1. Lea todas las instrucciones.
2. Para protegerse de incendios, descargas
eléctricas o lesiones a las personas, no coloque
el cable, los enchufes, ni el electrodoméstico en
el agua o en otro líquido.
3. Cuando un electrodoméstico se utiliza cerca de
los niños, es necesaria una supervisión cercana.
Mantenga el electrodoméstico fuera del alcance
de los niños. Este producto no fue diseñado para
ser utilizado por niños.
4. Desenchufe la unidad del tomacorriente cuando
no la use y antes de limpiarla. Deje enfriar antes
de colocar o quitar piezas y antes de limpiar el
resto del electrodoméstico.
5. No ponga en funcionamiento ningún
electrodoméstico que tenga el cable o el enchufe
dañado, después de desperfectos del
electrodoméstico o si ha sido dañado de alguna
manera. Lleve el electrodoméstico a su Centro de
Servicio KRUPS autorizado más cercano para que
lo revisen, reparen o ajusten (consulte la Garantía
limitada).
6. El uso de un accesorio no evaluado por KRUPS
para ser utilizado con este electrodoméstico
puede ocasionar un incendio, una descarga
eléctrica o lesiones a las personas.
7. No utilice la unidad al aire libre.
8. No deje que el cable cuelgue por el borde de la
mesa o mostrador, ni permita que entre en
contacto con superficies calientes.
9. No coloque la unidad encima o cerca de un
quemador a gas o eléctrico caliente, ni dentro de
un horno caliente.
19
ESPAÑOL
2-BeertenderonewayB90MEX.qxd:1-B95onewayAmsterdam_UK.qxd29/01/089:25Page19

10. Para desconectar la unidad, lleve el control a
«off» (apagado) y luego saque el enchufe del
tomacorriente de la pared.
11. No dé al electrodoméstico un uso para el que no
fue diseñado.
12. Este electrodoméstico es sólo para uso
doméstico en interiores.
13. No sumerja la unidad en el agua.
GUARDE ESTAS
INSTRUCCIONES
PRECAUCIÓN
Este electrodoméstico es sólo para uso doméstico.
Cualquier servicio que no sea limpieza y
mantenimiento del usuario debe realizarlo un
representante de servicio autorizado.
• Para reducir el riesgo de incendio o descarga
eléctrica, no saque la base. No hay piezas que
pueda reparar el usuario en el interior. La
reparación debe realizarla únicamente el personal
de Servicio autorizado.
• Verifique el voltaje para asegurarse que el voltaje
indicado en la placa de identificación coincida
con su voltaje.
• Nunca limpie la unidad con polvos para fregar ni
con productos químicos agresivos.
• Nunca haga cambios técnicos ni use la unidad de
ninguna otra manera que la indicada.
INSTRUCCIONES BREVES
SOBRE EL CABLE
A. No recomendamos el uso de una extensión
eléctrica con este dispositivo.
B. Si es absolutamente necesario utilizar una
extensión eléctrica :
1 - La clasificación eléctrica marcada de la
extensión debe ser al menos la clasificación
eléctrica del electrodoméstico.
20
ESPAÑOL
2-BeertenderonewayB90MEX.qxd:1-B95onewayAmsterdam_UK.qxd29/01/089:25Page20

21
2 - Para reducir el riesgo de lesiones, no deje
que el cable cuelgue sobre el mostrador o la
mesa, ya que un niño podría jalarlo o una
persona podría tropezarse accidentalmente.
3 - El cable de extensión debe ser por lo
menos 18 AWG.
ESPAÑOL
2-BeertenderonewayB90MEX.qxd:1-B95onewayAmsterdam_UK.qxd29/01/089:25Page21

22
ESPAÑOL
2 - Información general
El BeerTender está diseñado para servir cerveza fría en
un ambiente doméstico. Sólo pueden usarse 5 litros
barriles Heineken y 5 litros Heineken Premium Light
DraughtKegs con el BeerTender. No debe usar ningún
otro recipiente o barril de cerveza comercialmente
disponible. No introduzca en el electrodoméstico ningún
otro material que no sea el DraughtKeg.
El BeerTender está diseñado para ser utilizado por
adultos responsables y en edad legal para beber
alcohol.
Normas para leer estas instrucciones
* El triángulo de advertencia indica las instrucciones que
son importantes para la seguridad del usuario.
* Respete estrictamente estas instrucciones para
garantizar un uso adecuado y evitar lesiones graves.
* Este símbolo destaca la información que es
especialmente importante para hacer un mejor uso de
la máquina.
2-BeertenderonewayB90MEX.qxd:1-B95onewayAmsterdam_UK.qxd29/01/089:25Page22

23
ESPAÑOL
3 - Especificaciones técnicas
Componentes del BeerTender
1. Sistema dispensador de cerveza doméstico
BeerTender
2. Tapa
3. Panel de control
4. Cubierta del grifo
5. Presione el panel para abrir la tapa del BeerTender
6. Vertedor para servir
7. Manija del grifo de cerveza
8. Rejilla de goteo
9. Bandeja de goteo
10. Interruptor eléctrico (ON/OFF)
11. Cable de alimentación con enchufe
Componentes del DraughtKeg
12. DraughtKeg de 5 litros
13. Tubo dispensador reemplazable (debe cambiarse
con cada DraughtKeg)
13
12
2-BeertenderonewayB90MEX.qxd:1-B95onewayAmsterdam_UK.qxd29/01/089:25Page23

24
ESPAÑOL
4 - Antes de usar
Traba de seguridad para niños
* Asegúrese que ningún niño pueda jugar con el
electrodoméstico.
* No deje los materiales que se utilizan para empacar el
electrodoméstico al alcance de los niños.
* Para evitar que los niños utilicen el electrodoméstico,
puede quitar la manija del grifo. Para ello, asegúrese
que esté en posición vertical y jale hacia arriba.
Prevención de incendios
En caso de incendios, use extintores a base de dióxido
de carbono (CO2).
No use extintores a base de agua ni de polvo.
Instalación y mantenimiento
* Instale el BeerTender en posición vertical en un lugar
seguro.
* Para asegurarse que el BeerTender funcione en forma
correcta y eficiente, se recomienda especialmente lo
siguiente:
* Ubíquelo en una superficie perfectamente pareja y
estable;
* Elija un área limpia y bien iluminada con un
tomacorriente eléctrico accesible;
* Mantenga el electrodoméstico a una distancia mínima
(2 ½ pies [76 cm]) de la cocina, como se muestra en
el diagrama;
* Mantenga el electrodoméstico a una distancia mínima
(4 pulgadas [10 cm]) de las paredes;
* Guarde el DraughtKeg a temperatura ambiente o en el
refrigerador;
* Asegúrese de no exponer el BeerTender a la luz del
sol directa,
* No use el BeerTender al aire libre.
* No ubique el BeerTender en superficies muy calientes
ni cerca de llamas abiertas, ya que puede derretirse o
dañar el gabinete.
* Su Dispensador de Cerveza utiliza una tecnología que
aporta unos resultados de última generación para
enfríar, cuando la temperatura ambiente está entre
12°C y 30°C. A una temperatura más baja, el sistema
de frío del aparato podría resultar dañado. A una
temperatura más alta, el sistema de frío no será capaz
de alcanzar la temperatura de regulación establecida
de 3°C.
12°C
30°C
2-BeertenderonewayB90MEX.qxd:1-B95onewayAmsterdam_UK.qxd29/01/089:25Page24

25
ESPAÑOL
¡Advertencia! Para evitar el sobrecalentamiento,
mantenga siempre el barril alejado de la luz directa del
sol. Para obtener unos buenos resultados de
enfriamiento, no instale nunca la máquina en una
habitación con una temperatura ambiente de más de
30ºC.
Almacenamiento del BeerTender
* Cuando el BeerTender no se usa durante un período
prolongado, saque el DraughtKeg y lleve el interruptor
eléctrico (ON/OFF) a la posición off.
* Desconecte el enchufe del tomacorriente eléctrico.
* Guarde el BeerTender a temperatura ambiente en un
lugar seco fuera del alcance de los niños.
* Proteja la unidad del polvo y la suciedad.
Limpieza
* Antes de limpiar el electrodoméstico, es esencial
apagar el interruptor eléctrico (ON/OFF) y luego
desconectar el enchufe del tomacorriente.
* Nunca sumerja el electrodoméstico en el agua.
* Se recomienda limpiar el interior del BeerTender antes
de instalar un DraughtKeg nuevo o después de
desconectar el BeerTender del suministro eléctrico.
* Enjuague el vertedor después de cada uso. No se
recomienda que lo lave en el lavaplatos.
* Nunca debe intentar acceder a las piezas interiores
del electrodoméstico.
5 - Uso del sistema BeerTender
* Siempre sostenga la parte inferior del electrodoméstico
para levantarlo.
* Para obtener cerveza de barril de óptima calidad, debe
tener en cuenta dos factores básicos: la temperatura
de la cerveza y las condiciones de higiene. Siga estos
simples pasos para lograr un uso ideal del
BeerTender.
Debe usarse un nuevo tubo dispensador con
cada DraughtKeg
La máquina incluye un paquete inicial de tubos
dispensadores de cerveza. Puede realizar un pedido
de tubos dispensadores adicionales a Heineken.
2-BeertenderonewayB90MEX.qxd:1-B95onewayAmsterdam_UK.qxd29/01/089:25Page25

26
ESPAÑOL
Cómo enfriar el DraughtKeg
1. Antes de servir la cerveza, es muy importante que los
barriles Heineken y Heineken Premium Light
DraughtKeg alcancen la temperatura correcta.
2. Asegúrese de que el DraughtKeg esté lo
suficientemente frío antes de servir cerveza. Si el
barril está caliente, la cerveza tendrá mucha espuma.
Lo ideal es comprar el DraughtKeg previamente
enfriado o enfriarlo previamente durante toda la noche
antes del uso previsto. Si el barril necesita un enfriado
adicional, hay 2 opciones:
a. Dentro del BeerTender: según la temperatura
del DraughtKeg, puede llevar hasta 18 horas
enfriar el barril para que alcance la temperatura
ideal para servir la cerveza.
b. En un refrigerador: según la temperatura de
su refrigerador, puede llevar hasta 12 horas
enfriar el barril para que alcance la temperatura
ideal para servir la cerveza.
Sugerencia: le recomendamos que siempre tenga un
DraughtKeg adicional en el refrigerador para tener
siempre un barril frío disponible.
Preparación del BeerTender
IMPORTANTE: es importante encender el interruptor
eléctrico del BeerTender antes de insertar el
DraughtKeg. De esta manera, la balanza se pondrá en
cero y medirá la cantidad de cerveza que queda en el
barril con precisión. Si retira un DraughtKeg
parcialmente lleno de una máquina en funcionamiento
o abre la tapa mientras la máquina está encendida,
deberá poner la balanza en cero. Simplemente abra la
tapa y sostenga el barril elevado entre 5 y 10
segundos; luego colóquelo nuevamente en la máquina
y cierre la tapa.
* Después de preparar el BeerTender y antes de
utilizarlo, es fundamental limpiar el vertedor para servir
desmontable: ésta es la única parte del
electrodoméstico que entrará en contacto con la
cerveza. El vertedor puede lavarse en el lavaplatos o
manualmente. Después de la limpieza, vuelva a
enroscarlo en su lugar.
2-BeertenderonewayB90MEX.qxd:1-B95onewayAmsterdam_UK.qxd29/01/089:25Page26

27
ESPAÑOL
* Antes de insertar el DraughtKeg en el BeerTender,
simplemente introduzca el tubo dispensador
desechable patentado (incluido) en el DraughtKeg.
* Para abrir la cubierta del vertedor del grifo, presione el
panel de liberación ubicado en la parte delantera de la
máquina.
* Abra la cubierta del vertedor del grifo en sentido
contrario al de las manecillas del reloj.
* Inserte el barril en el BeerTender y ubique el tubo
dispensador como se muestra en el dibujo.
* Cierre el grifo girándolo en el sentido de las
manecillas del reloj hasta que encaje en su lugar.
* Cierre la tapa con cuidado.
* Coloque la bandeja y la rejilla de goteo en su lugar en
la parte delantera del electrodoméstico. Asegúrese
que la bandeja de goteo haya encajado y esté
ubicada correctamente.
¡ADVERTENCIA! La bandeja de goteo debe colocarse
en una superficie pareja y no debe sobresalir de la
superficie sobre la que está apoyada.
Display de control
El dispensador posee un gran display que le
proporcionará información importante y útil.
En la parte izquierda del display:
a. Indicador de volumen
El volumen del barril BeerTender aparece indicado con
4 niveles. Los 4 niveles son visibles cuando el barril está
lleno. Luego van desapareciendo progresivamente
mientras se vacía el barril. El último nivel empieza a
parpadear cuando sólo quedan dos jarras de cerveza
(± 1) en el barril. Esto le brinda la posibilidad de tener
preparado de antemano un nuevo barril para colocarlo
en el dispensador.
2-BeertenderonewayB90MEX.qxd:1-B95onewayAmsterdam_UK.qxd29/01/089:25Page27

28
ESPAÑOL
En el lado derecho de la pantalla:
b. Indicador de temperatura
El indicador de temperatura cambia de rojo cuando la
cerveza está demasiado caliente, a naranja cuando la
bebida casi está en el punto de enfriamiento adecuado y a
verde cuando se alcanza la temperatura óptima de la
cerveza de barril.
¡Aviso! no use nunca su Dispensador de Cerveza con
una temperatura ambiente de más de 30°C. Por encima
de ese nivel, la temperatura de regulación de 3°C no
podrá alcanzarse y el indicador de temperatura no
alcanzará nunca el nivel verde.
Cómo servir desde el BeerTender
* Antes de servir cerveza, enjuague un vaso limpio con
agua fría, lo cual enfriará el vaso y humedecerá su
interior para servir una cerveza en condiciones
ideales. Se recomienda usar vasos de 8 onzas
(237 cm3) para mantener la temperatura ideal de la
cerveza al servirla.
El resultado: sírvala y bébala
* Tenga en cuenta que el primer vaso que sirve de cada
barril nuevo contendrá la mayor cantidad de espuma.
Esto es característico de las cervezas de barril. Deje
que baje la espuma y continúe sirviendo.
* Incline y sirva: incline su vaso en un ángulo de 45
grados cuando comienza a servir y acomódelo en
posición vertical a medida que se llena el vaso.
* Asegúrese de jalar la manija del grifo hacia abajo
hasta que haga tope. Si no abre la salida
completamente de esta manera, obtendrá demasiada
espuma en el vaso.
* Para obtener una experiencia óptima con la cerveza
de barril, sirva la cerveza con una espuma de 2 dedos
de altura (aproximadamente 1.5” [4 cm]).
Cuidado adecuado para su BeerTender
* La bandeja y la rejilla de goteo deben vaciarse y
limpiarse después de cada uso.
* Tenga en cuenta que durante el uso la
bandeja de goteo deberá vaciarse y enjuagarse
regularmente. La bandeja y la rejilla pueden lavarse
en el lavaplatos, o bien a mano con un detergente
suave. Deje secar completamente.
2-BeertenderonewayB90MEX.qxd:1-B95onewayAmsterdam_UK.qxd29/01/089:25Page28

29
ESPAÑOL
* Siempre limpie el electrodoméstico después de cada
uso. La cerveza es un producto natural que puede
descomponerse. Por lo tanto, siempre debe mantener
el electrodoméstico limpio para preservar la calidad de
la cerveza que sirve y evitar olores desagradables.
* Para obtener resultados óptimos, enjuague el Vertedor
después de cada uso. Lávelo manualmente con agua
jabonosa tibia. No lo lave en el lavaplatos.
* Para sacarlo, desenrósquelo de la unidad Principal
girándolo en sentido contrario al de las manecillas del
reloj. Para volver a instalarlo, simplemente vuelva a
enroscarlo en su lugar girándolo en el sentido de las
manecillas del reloj.
IMPORTANTE: después de la limpieza, asegúrese
que todas las piezas de su BeerTender estén
totalmente secas antes de cerrar la tapa.
2-BeertenderonewayB90MEX.qxd:1-B95onewayAmsterdam_UK.qxd29/01/089:25Page29

30
ESPAÑOL
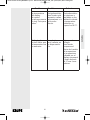
6 - Solución de problemas
No se puede
encender el
electrodoméstico.
El
electrodoméstico
no está
conectado a la
fuente de energía
principal.
Conecte el
electrodoméstico
a la fuente de
energía.
No sale cerveza. El
electrodoméstico
está apagado.
Encienda el
electrodoméstico.
El barril del
BeerTender está
vacío.
Reemplace el
barril del
BeerTender por
uno nuevo.
No hay barril
dentro del
BeerTender.
Instale un barril
dentro del
BeerTender.
La manija del grifo
del BeerTender no
está
instalada/ubicada
correctamente.
Instale/ubique el
grifo
correctamente.
Problema Posibles causas Soluciones
2-BeertenderonewayB90MEX.qxd:1-B95onewayAmsterdam_UK.qxd29/01/089:25Page30

31
ESPAÑOL
Problema Posibles causas Soluciones
El BeerTender
produce
demasiada
espuma al servir
la cerveza.
El barril del
BeerTender no ha
alcanzado la
temperatura
adecuada para
servir la cerveza.
Deje que el barril
del BeerTender se
enfríe hasta
alcanzar la
temperatura
correcta.
El movimiento de
la empuñadera
del grifo es
demasiado lento.
Empuje la
empuñadera con
firmeza y rapidez
hacia abajo y
adelante hasta el
tope.
El barril del
BeerTender se ha
sacudido.
Espere 4 horas
antes de servir la
cerveza.
2-BeertenderonewayB90MEX.qxd:1-B95onewayAmsterdam_UK.qxd29/01/089:25Page31

32
ESPAÑOL
El Indicador de
nivel de volumen
destella.
La Balanza debe
ponerse en cero
con cada
DraughtKeg
nuevo.
Antes de insertar
el DraughtKeg,
encienda la
máquina. Si el
DraughtKeg está
adentro, abra la
cubierta del
BeerTender y
sostenga el
DraughtKeg
elevado durante 3
a 5 segundos
antes de volver a
colocarlo en la
máquina.
Se escucha un
zumbido suave
proveniente de la
máquina.
Éste es el
funcionamiento
normal del
elemento de
enfriado ubicado
dentro del
BeerTender.
Problema Posibles causas Soluciones
2-BeertenderonewayB90MEX.qxd:1-B95onewayAmsterdam_UK.qxd29/01/089:26Page32

33
ESPAÑOL
Problema Posibles causas Soluciones
La cerveza sale
demasiado
lentamente.
La manija del grifo
no está
totalmente abierta
(ubíquela a 45º).
Abra el grifo
totalmente.
Se forma hielo en
la cámara de
enfriado.
El BeerTender ha
sido instalado en
un lugar húmedo.
Traslade el
BeerTender a un
lugar seco.
Se ha producido
una falla en el
sistema de
enfriado.
Lleve a reparar el
BeerTender a un
centro de servicio
autorizado.
Es normal que se
forme una
pequeña capa de
hielo en la parte
posterior de la
cámara de
enfriado (cerca de
los tornillos).
2-BeertenderonewayB90MEX.qxd:1-B95onewayAmsterdam_UK.qxd29/01/089:26Page33

34
ESPAÑOL
El BeerTender
sirve cerveza
caliente.
El barril del
BeerTender no se
ha enfriado
durante el tiempo
suficiente en el
refrigerador y por
lo tanto no tiene
la temperatura
adecuada.
Deje enfriar el
barril del
BeerTender en el
refrigerador
durante alrededor
de 12 horas hasta
18 horas.
La tapa del
BeerTender no
cierra.
No se ha cerrado
correctamente la
cubierta del grifo.
Cierre la cubierta
del grifo
correctamente.
El grifo del barril
del BeerTender no
se ha instalado
correctamente.
Instale el grifo
correctamente.
Asegúrese de que
el tubo
dispensador esté
bien instalado y
no impida que la
tapa pueda
cerrarse.
Problema Posibles causas Soluciones
2-BeertenderonewayB90MEX.qxd:1-B95onewayAmsterdam_UK.qxd29/01/089:26Page34

35
ESPAÑOL
El indicador
de temperatura
del display
de control
no alcanza nunca
el nivel “listo para
beber”.
El
electrodoméstico
BeerTender está
expuesto a altas
temperaturas o a
la luz solar
directa.
Utilice el
electrodoméstico
en interiores y
trasládelo a una
habitación donde
la temperatura
ambiente no
supere los 86 °F.
El display de
control indica que
la temperatura va
en aumento.
Se colocó un
barril caliente en
un dispensador
frío.
Deje que el
sistema
BeerTender
compense el
efecto del cambio
de temperatura.
La temperatura
indicada por el
display empezará
a bajar después
de 1 hora como
máximo.
Problema Posibles causas Soluciones
2-BeertenderonewayB90MEX.qxd:1-B95onewayAmsterdam_UK.qxd29/01/089:26Page35

36
ESPAÑOL
7 - Cómo desechar la unidad
* Para desechar su BeerTender, siga las disposiciones
locales relativas al desecho de electrodomésticos
pequeños.
8 - Servicio al consumidor
Si tiene preguntas adicionales, comuníquese con nuestro
Departamento de Servicio al Consumidor.
Será de utilidad tener el producto a mano en el momento
en que nos llama y conocer el número de referencia que
por lo general puede encontrarse en la base de la
unidad.
EE. UU. :
Visite www.Krupsusa.com
Teléfono 1-800-232-0788
Horario* de lunes a viernes de 8:00 a.m. a 6:30 p.m.
(HORA DEL ESTE)
La correspondencia debe dirigirse a:
Krups
196 Boston Avenue
Medford, MA 02155
Sólo se aceptarán cartas enviadas a esta dirección. Se
rechazarán los paquetes sin número de autorización de
retorno.
*Tenga en cuenta que el horario está sujeto a
modificación.
2-BeertenderonewayB90MEX.qxd:1-B95onewayAmsterdam_UK.qxd29/01/089:26Page36

37
ESPAÑOL
9 - GARANTÍA LIMITADA
Este producto Krups tiene una garantía de 1 año a partir
de la fecha de compra por defectos de los materiales y
la fabricación. Durante este período, el producto Krups
que, tras una inspección de Krups, resulte ser
defectuoso,
será reparado o reemplazado, a elección de Krups, sin
cargo para el cliente. Si se envía un producto de
reemplazo, tendrá la garantía restante del producto
original. Esta garantía no se aplica a ningún defecto
surgido a causa del uso incorrecto del comprador o el
usuario del producto, negligencia, incumplimiento de las
instrucciones de Krups, uso con una corriente o voltaje
distintos de los indicados en el producto, uso y desgaste,
alteración o
reparación no autorizada por Krups, o uso con fines
comerciales.
LAS GARANTÍAS PRESENTADAS AQUÍ SON
EXCLUSIVAS Y KRUPS NO OTORGARÁ NI
AUTORIZARÁ QUE SE OTORGUE NINGUNA OTRA
GARANTÍA, EXPRESA O IMPLÍCITA, ENTRE LAS
QUE SE INCLUYEN GARANTÍAS DE
COMERCIABILIDAD O IDONEIDAD, PARA UN
PROPÓSITO O USO PARTICULAR, CON RESPECTO
A ESTE PRODUCTO.
Algunos estados no permiten la limitación de la duración
de una garantía implícita o no permiten la exclusión de
daños accidentales o consiguientes, por lo cual es
posible que las limitaciones anteriores no se apliquen en
su caso.
Esta garantía le otorga derechos legales específicos, y
además usted puede tener otros derechos que varían de
un estado al otro. Si cree que su producto es defectuoso,
llévelo (o envíelo por correo con franqueo pagado) junto
con un comprobante de compra al Centro de Servicio de
Krups autorizado más cercano. (Para encontrar el Centro
de Servicio de Krups autorizado más cercano visite el
sitio web de Krups o comuníquese con el Servicio al
Consumidor de Krups que se indica a continuación).
2-BeertenderonewayB90MEX.qxd:1-B95onewayAmsterdam_UK.qxd29/01/089:26Page37
-
 1
1
-
 2
2
-
 3
3
-
 4
4
-
 5
5
-
 6
6
-
 7
7
-
 8
8
-
 9
9
-
 10
10
-
 11
11
-
 12
12
-
 13
13
-
 14
14
-
 15
15
-
 16
16
-
 17
17
-
 18
18
-
 19
19
-
 20
20
-
 21
21
-
 22
22
-
 23
23
-
 24
24
-
 25
25
-
 26
26
-
 27
27
-
 28
28
-
 29
29
-
 30
30
-
 31
31
-
 32
32
-
 33
33
-
 34
34
-
 35
35
-
 36
36
-
 37
37
-
 38
38
-
 39
39


Krups VB5020US Manual de usuario
- Categoría
- Pequeños electrodomésticos de cocina
- Tipo
- Manual de usuario
- Este manual también es adecuado para
en otros idiomas
- English: Krups VB5020US User manual