

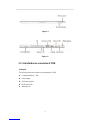
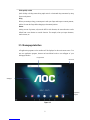
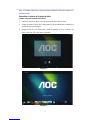
1 Introduction
1.1 Acknowledgements
Many thanks for you choosing this product. The product belongs to MID(Mobile Internet
Device), which is a kind of mobile internet device, delicate, small and exquisite, and
also portable. It is also equipped with a piece of touch LCD of high definition, which
can be used to watch vedios and pictures of high definition. It supports installation of
multiple application programs on office and entertainment. The fantastic operation
interface will give you a brand-new user experience.
This manual systematically introduces diversified functions, using skills and matters needing
attention of this MID, please read this manual carefully before using it.
1.2 Safety Notice
Before using MID, please read information in this section, and make your children learn
about the information. About more detailed information, please refer to safety instructions
and matters needing attention.
Please don’t use MID when you are driving, for fear of hindering safe driving.
In medical places, please observe relevant stipulations and regulations. And in regions
near the medical devices, please shut down MID.
Please shut down MID or enable the airplane mode when boarding, so that the wireless
signals will not interfere control signal of the airplane.
Please shut down MID neighboring electronic equipments with high accuracy, otherwise,
breakdown of electronic equipments may be brought about.
Please don’t dismantle the MID and its accessories on yourself, and only the authorized
agency can maintain this MID.
1

Please keep MID far away from magnetic equipment, radiation from MID will erase
information stored on the magnetic equipment.
Please don’t use MID in places with high temperature and inflammable gas (such as
nearby gas station).
Please put MID and its accessories in places beyond children’s touch, please don’t let
children use MID without supervision.
During using of this MID, please observe related laws and regulations, respect privacy
and legitimate rights of others.
Please strictly abide by relevant explanations in this manual when using USB data line,
otherwise, MID or personal computer may be damaged.
Please don’t use the MID in humid environment such as bathroom, etc., and the MID
being soaked or rinsed by liquid must be avoided.
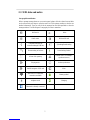
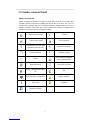
1.3 Abbreviation/term
Abbreviation/term Full name Explanations
MID Mobile Internet Device Mobile internet terminal
WIFI Wireless Fidelity Wireless Local Area Network
based on IEEE 802.11 a/b/g/n
TF Trans Flash Alternate name Micro SD,
super miniature storage card
HDMI High Definition
Multimedia Interface
High definition multi-media
interface
2


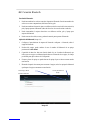
2.3 MID state and notice
Icon graph for notification
When a prompt message shows on your notice panel, please click the column box and slide
on the screen with your finger to open the notice list. Click options needing to check to see
detailed information. Then you may click the message box and slide upwards to close the
message window. The following are iconography for icons in status bar:
Mail notice Mute
Gmail notice Without SD card
Computer and MID are
connected through USB line Uploading/Downloading
Events waiting to be done Downloading finished
Alarm clock opening
General notice (for example:
synchronous error)
Playing music In data synchronism
Insufficient space of SD card More
WIFI service is connected,
network is available Battery symbol
Airplane mode Charging
Bluetooth is already connected
5

3 Quick start
3.1 Key function
Descriptions for key function:
Power key Press this key for a long time to start up
Under starting up state, press this key for a long time to pop up
shutdown option
Under starting up state, press this key to close the screen
Under starting up state or when breakdown appears, press the
power key for 7 seconds to make your device to restart
Multitask
key
Press this key to browse tasks which have been opened
Return key Press this key to return the last operating step or the previous
operating interface
Homepage
key
Press this key to return back main function interface from any
interface
3.2 Starting up and turning off
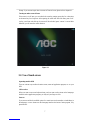
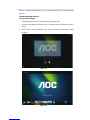
Starting up
Press the power key for 3 seconds, you can see the starting up picture. After the system is
started, the machine enters into screen lock state, please unlock according to direction
indication of sliding icon on the interface.
Turning off
1. After pressing the power key for a long time, the shutdown option will pop up.
2. Click Power off.
3.3 Unlocking and closing of the screen
The machine will close automatically when the screen is left unused
1.After the screen being left unused for a period of time, the machine will close screen
automatically, so as to save battery power.
2.Under screen on state, press the power key, the screen will close immediately.
6

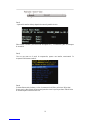
Prompt: if you want to inquire how to set turn-off time of screen, please refer to chapter 9.1.
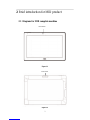
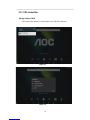
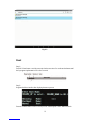
Turning on under screen off state
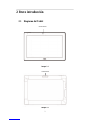
If the screen is in off state, you can unlock the screen by pressing power key for a short time
or the return key for a long time. After opening, the screen will enter lock state, press “lock”
icon by your finger and slide up, the screen will be unlocked, press “camera” icon and slide
leftwards, you can enter the camera function.
Figure 3-1
3.4 Use of touch screen
Operating mode in MID
There are various ways to skim the main screen, menu and application program, etc. on your
MID.
Click to select
When you want to use screen keyboard entry, and you want to select items on the homepage
interface such as application program, you only use your finger to click.
Press on
If you want to unlock the available option of a certain item (such as textbox or interlinkage in
the webpage), or move shortcut on the homepage interface and menu of main program, only
press the item.
7

Slide quickly or slide
Quick sliding or sliding means doing rapid vertical or horizontal drag movement by using
finger on the picture.
Drag
Before you starting to drag, you must press it with your finger and impose a certain pressure,
and don’t loosen the finger before dragging to the wanted position.
Rotate
Aiming at most of pictures, only turn the MID in side direction, the screen direction can be
shifted from cross direction to vertical direction. For example, when you input characters,
watch cinema, etc.
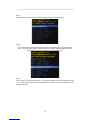
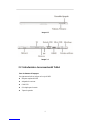
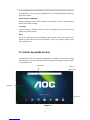
3.5 Homepage interface
All application programs on the machine will be displayed on the main menu screen. You
may use application program, shortcut and user-defined mode to set wallpaper of your
homepage interface
Figure 3-2
Notice bar
Wallpaper
Google Search
Application
program
8

Skill: in any application programs, you can press homepage key to return homepage
interface.
Custom homepage interface
Change desktop wallpaper
1. Press blank region on the homepage interface to pop up the menu.
2. When the menu popping up, choose source of homepage interface wallpaper you want to
change.
3. After clicking source of wallpaper, click picture you want, and then select “setting
wallpaper”.
Figure 3-3
Figure 3-4
9


Copy the document to storage card
1. Connect MID and computer together with USB cable. Notice bar will indicate
connection.
2. Select ‘Transfer files (MTP)’
3. Make sure your computer have installed MTP drive if it is Windows xp; Windows
7 ,Windows 10 or above will auto install MTP drive..
4. Open your computer, in my computer, examine content in “A110-E”.
5. Find the document you want to copy, copy it to “Internal storage”.
6. After completion of copying, click “safely remove hardware” in taskbar of your
computer to unload.
7. For Apple Macintosh – Download from internet the free “Android File Transfer”
Application or similar.
Content of MID storage device
1. NAND FLASH storage device, space for MID to store document itself.
2. TF removable memory card.
3. The two above-mentioned storage devices both can be visited through connection with
your computer with USB.
Attention: when your MID is connected with USB cable, if you start up USB storage
device, you will cannot visit the memory card through MID, if you want to
visit memory card in MID, only disconnect USB cable.
3.7 Memory card
Copy the document to storage card
You can transmit document between MID and computer, such as music and picture, etc. If
you want to see documents in MID, only click the file manager to look through content in the
SD card.
Delete documents on the storage card of MID
1. Find document you want to delete.
2. Press the document name you need to delete, a file menu will pop up.
3. Click Delete.
11

Removing storage card when the MID is in starting up state
If need to remove storage card under starting up state of MID, you must unload the storage
card firstly, for fear of failure or damage of the storage card.
1. Select settings of apk list.
2. Click Storage&USB.
3. Find SD card under Portable storage.
4. Click to uninstall the SD card.
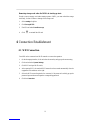
4 Connection Establishment
4.1 WIFI Connection
Your MID can be connected onto Wi-Fi network to connect the operation:
1. On the homepage interface, click and select the menu key and pop up the menu setting;
2. Click and select the System Settings;
3. Click Wi-Fi and open Wi-Fi switch;
4. After opening Wi-Fi, the searched Wi-Fi network can be scanned automatically from the
equipment in the windows on the right.
5. Select the Wi-Fi network required to be connected, if the password is added, pop up the
password input windows and input the corresponding password.
6. Click the Connection
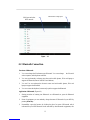
12

Figure 4-1
4.2 Bluetooth Connection
Functions of Bluetooth:
1. You can exchange the files between two Bluetooth. You can exchange the files with
other computers, mobile phones and PDA.
2. You can synchronously exchange pims data with mobile phones, PDA and laptop to
support the Bluetooth( data of outlook E-mail address).
3. You can You can exchange the electronic name card with mobile phones, PDA and
laptop to support the Bluetooth.
4. You can connect the keyboard, mouse and joystick to support the Bluetooth.
Application of Bluetooth (Figure 4-2)
1. Setting procedure of entering into Bluetooth: set ->Bluetooth set, open the Bluetooth
equipment
2. Name of equipment: you can randomly change the name of Bluetooth for your MID by
pressing Menu key.
3. Detectability: open this function by clicking the place for name of Bluetooth, which
indicates that your MID Bluetooth can be searched by other Bluetooth equipments, this
Advanced Wifi setting option
Click here and select
WIFI network
13

default time for this opening is of 120 seconds.
4. Scan and look for equipment: you can detect the equipment desired to be connected by
utilizing this function.
5. Bluetooth: after employing the scan to look for the equipment, all Bluetooth equipments
searched by your MID can display under this function.
Figure 4-2
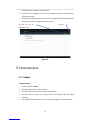
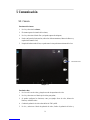
5 Communication
5.1 Camera
Camera functions
1. Click and select the camera;
2. The system enters into the camera interface;
3. Click and select the Photo button and easily take the photos;
4. Set such functions as photo sixe, storage location, white balance and focal length
regulating;
5. After completion of taking photo, there is a mini image displayed for previewing photo.
Menu key
Click this and open the
detectability function
14

Figure 5-1
Videotape function
1. Click the videotape icon and convert it as video recorder mode;
2. Click and select the red videotape button to take video ;
3. Set such setting functions as color effect, white balance and video quality;
4. Switch 720P and 480P high-definition video recording.
5. Click and select the video recording button, end the video recording, and observe the
previewed video.
Photo function
start/stop key
Cut Front or Rear
15

Figure 5-2
5.2 HDMI
HDMI High-definition video interface
The MID and the high-definition television are connected by a standard HDMI cable. This
interface supports the picture with highest quality of 1080p resolution ratio.
1. MID is in the boot status.
2. The MID and the high-definition television are connected by a standard HDMI cable.
3. The system interface on MID is automatically synchronized with the high-definition TV
screen.
4. Click HDMI settings in settings-Display.
5. Click HDMI resolution to set the resolution ratio of HD TV.
6 Other Applications
6.1 File Management
Browse files
Slide the desktop to locate the File Manager.
You can use the file manager to manage, edit and delete the files and folders.
16

Fig. 6-1
Cut and copy files
1. In the file browser, press and select the file you want to operate.
2. Pop up operating menus, including Cut, Copy, Delete, Rename, share and etc.
3. Click Cut or Copy file or folder.
4. Click into the folder you want to paste, and pop up menu by pressing the Menu key.
5. Click to paste.
Delete files
1. In the file browser, press the file you want to delete.
2. Click .
Folder setup
1. Select to Directory
2. Click to create New folder.
3. Click pop-up window and input the name of the new folder in the text box.
4. Click OK to create the folder.
Create sharing
1. Load File Manager. (Fig. 6-2)
2. Click and press on a file and select .
3. The system will automatically search all the way for sharing.
17

Fig. 6-2
Reset
Step 1)
Press the Volume button + and the power switch at the same time. Do not release the buttons until
the logo appears implementation for at least 5 seconds.
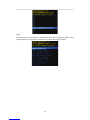
Step 2)
It appears the below interface after displaying the start-up screen.
Press the Volume+ button to select “Recovery Mode” and then press Volume- button to switch.
18

Step 3)
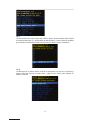
After entering the recovery mode, an interface appears, stating "Android recovery"
Step 4)
If you want to remove all data and return to the factory reset, please select “Wipe data/factory
reset”, and slide the touch panel to select the option you want (The Return button is to select
downwards). Press the Power button to confirm the selection.
Step 5)
Once you select “Wipe data/factory reset”, a new interface appears. Slide the touch panel to select
“Yes—delete all user data” and press the Power button to confirm. The system will format all user
data and cache then.
19


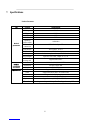
7. Specifications
Product Parameter
Type
Details
Descriptions
Basical
parameter
MID model A110-E
CPU type MT8163
CPU speed 1.3GHz
DDR 1GB
NAND FLASH
32GB
Operating
system version Andriod6.0
Network
connections
WIFI 802.11a/b/g/n +BT
USB interface
Micro USB*1, OTG*1
HDMI interface
HDMI 1.4a
battery Lithium-ion polymer battery, 3.7V/5800mAh
Power adapter Input: AC 100V-240V; output: DC 5V, 2A
External
memory card Support SDHC/SDXC
Product
appearance
LCD 10.1” inch (16:10),800*1280IPS
Dimensions 259.4*173.6*10.7mm
Weight Tablet:572g
Application
Vedio Support MEPG,H.263/H.264,etc.
Audio
Support MP3,WMA,WAV,etc (need license)
Games Support to the third party programs
Input method Android keyboard
photos Support browsing BMP, JPG, GIF, PNG,etc.
Office software
Support reading and editing office files;Support browsing PDF
21

FCCSTATEMENT
ThisequipmenthasbeentestedandfoundtocomplywiththelimitsforaClassB
digitaldevice,pursuanttoPart15oftheFCCRules.Theselimitsaredesignedto
providereasonableprotectionagainstharmfulinterferenceinaresidential
installation.Thisequipmentgeneratesusesandcanradiateradiofrequencyenergy
and,ifnotinstalledandusedinaccordancewiththeinstructions,maycauseharmful
interferencetoradiocommunications.However,thereisnoguaranteethat
interferencewillnotoccurinaparticularinstallation.Ifthisequipmentdoescause
harmfulinterferencetoradioortelevisionreception,whichcanbedeterminedby
turningtheequipmentoffandon,theuserisencouragedtotrytocorrectthe
interferencebyoneormoreofthefollowingmeasures:
‐‐Reorientorrelocatethereceivingantenna.
‐‐Increasetheseparationbetweentheequipmentandreceiver.
‐‐Connecttheequipmentintoanoutletonacircuitdifferentfromthattowhichthe
receiverisconnected.
‐‐Consultthedealeroranexperiencedradio/TVtechnicianforhelp.
Thisdevicecomplieswithpart15oftheFCCRules.Operationissubjecttothe
followingtwoconditions:
(1)Thisdevicemaynotcauseharmfulinterference,and(2)thisdevicemustaccept
anyinterferencereceived,includinginterferencethatmaycauseundesiredoperation
changesormodificationsnotexpresslyapprovedbythepartyresponsiblefor
compliancecouldvoidyour
authoritytooperatetheequipment.
Changesormodificationsnotexpresslyapprovedbythepartyresponsiblefor
compliancecouldvoidyourauthoritytooperatetheequipment.
DuringSARtesting,thisdeviceissettotransmitatitshighestcertifiedpowerlevelin
alltestedfrequencybands,andplacedinpositionsthatsimulateRFexposurein
usagenearthebodywiththeseparationof0mm.AlthoughtheSARisdeterminedat
thehighestcertifiedpowerlevel,theactualSARlevelofthewhileoperatingcanbe
wellbelowthemaximumvalue.Thisisbecausethedeviceisdesignedtooperateat
multiplepowerlevelssoastouseonlythepowerrequiredtoreachthenetwork.In
general,thecloseryouaretoawirelessbasestationantenna,thelowerthepower
output.
TheSARlimitofUSA(FCC)is1.6W/kgaveragedoveronegramoftissue.Device
typesTabletPC(FCCID:2AEB5‐A110)hasalsobeentestedagainstthisSARlimit.
ThehighestSARvaluereportedunderthisstandardduringproductcertificationfor
usewhenproperlywornonthebodyis0.472W/kg.


1 Introducción
1.1 Bienvenida
Muchas gracias por elegir este producto. El producto pertenece a MID (Mobile Internet
Device), que es un tipo de dispositivo de Internet móvil, pequeño y excelente, además de ser
portátil. También está equipado con una pantalla táctil LCD de alta definición, que se puede
usar para ver videos e imágenes en alta definición. Soporta la instalación de varios programas
en Office y para el entretenimiento. La increíble interfaz de operación le dará al usuario una
experiencia completamente nueva.
Este manual presenta de forma sistemática las funciones diversificadas, usando las
habilidades y elementos con respecto a este MID, favor de leer cuidadosamente este manual
antes de usarlo.
1.2 Aviso sobre seguridad
Antes de usar el equipo , favor de leer la información de esta sección y asegúrese de que los
niños conozcan esta información. Para mayor información, favor de consultar las
instrucciones de seguridad y cuestiones importantes al respecto.
No usar el equipo cuando está manejando
En clínicas y hospitales, favor de consultar las condiciones y respectivas reglas. En
zonas que se encuentren cerca de dispositivos médicos, favor de apagar el equipo.
Apagar el equipo o habilitar el modo avión cuando se aborda, con el fin de que las
señales inalámbricas no interfieran con las señales de control del avión.
Favor de apagar el equipo cerca de equipos electrónicos de alta precisión; de lo contrario,
se podría ocasionar una avería.
No desmantelar el equipo ni los accesorios, solo el personal autorizado podrá dar
mantenimiento al equipo.
1

Mantener el equipo lejos del equipo magnético, la radiación al aplicada al equipo podría
eliminará información almacenada en el equipo magnético.
No usar el equipo en lugares a altas temperaturas y de gas inflamable (por ejemplo cerca
de una gasolinera).
Colocar el equipo y sus accesorios fuera del alcance de los niños. Que los niños usen el
equipo sin la supervisión de un adulto podría afectar el equipo y la cobertura de la
garantía.
Mientras use este equipo, debe consultar las normas y leyes de las paginas a las que se
ingrese , respetando la privacidad y derechos legítimos de otros.
Debe seguir con precisión las respectivas explicaciones de este manual cuando se use el
cable de datos USB; de lo contrario, el equipo o la computadora personal puede llegar a
dañarse.
No usar el equipo en ambientes húmedos como el baño, etc. Evitar que el equipo se moje
con algún líquido.
1.3 Abreviaturas/términos
Abreviaturas/tér
minos
Nombre completo Explicación
MID Mobile Internet Device Dispositivo móvil para
Internet
WIFI Fidelidad Inalámbrica
Red de área local inalámbrica
en IEEE 802.11 a/b/g/n
estándar
TF Trans Flash
Nombre alterno Micro SD,
tarjeta de almacenamiento
miniatura
HDMI High Definition
multi-media Interface
Interfaz multimedia de alta
definición
2


2.3 Estado y avisos del Tablet
Símbolos de notificación
Cuando se muestra un mensaje en el panel de avisos, favor de dar clic en el cuadro de la
columna y deslizar el dedo sobre la pantalla para abrir la lista de los avisos. Dar clic en las
opciones que se revisarán para ver la información detallada. Después puede dar clic en el
mensaje y deslizarlo hacia arriba para cerrar la ventana del mensaje. A continuación se
muestran los íconos que aparecen en la barra de estado:
Notificación de mensaje Silenciar
Notificación de Gmail No hay tarjeta SD
La computadora y el MID están
conectados a través de USB Cargando/Descargando
Eventos pendientes Descarga completa
Alarma
Aviso general (por ejemplo:
error de sincronización)
Reproducir música Sincronización de datos
Espacio insuficiente en la tarjeta
SD Más
WiFi conectado, red disponible Símbolo de batería
Modo avión Cargando
Bluetooth conectado
5

3 Inicio rápido
3.1 Función de las teclas
Descripciones de la función de las teclas:
Botón de
encendido
Dejar este botón presionado por un momento para encenderlo
Cuando se encuentra en modo encendido, déjelo presionado por
más tiempo para que aparezca la opción de apagar
Cuando se encuentra en modo encendido, presione este botón para
cerrar la pantalla
Cuando se encuentra en modo encendido o cuando aparezca falla,
presione el botón de encendido por más de 7 segundos para hacer
que el dispositivo entre en modo falla
Botón Menú Presionar este botón para abrir el menú de la interfaz actual
Botón
Regresar
Presionar este botón para regresar al último paso o a la interfaz
anterior de la operación
Botón de
Inicio
Presionar este botón para regresar a la interfaz de la función
principal desde cualquier otra interfaz
3.2 Iniciar y apagar
Iniciar
Presione el botón de inicio por 3 segundos, verá la imagen de iniciar. Después de que el
sistema se haya iniciado, la máquina se bloquea, favor de desbloquear de acuerdo a las
indicaciones deslizando el ícono en la interfaz.
Apagar
1. Después de dejar presionando el botón de encendido por unos segundos, se mostrará el
mensaje de apagar.
2. De clic en Power off.
3.3 Bloqueo y cierre de la pantalla
La máquina se cerrará automáticamente cuando la pantalla no esté en uso
1.Después de que la pantalla se haya dejado de usar por un tiempo, la máquina se cerrará
6

automáticamente, con el fin de ahorrar energía.
2.Bajo la barra de estado, presione la tecla de encendido y la pantalla se cerrará
immediatamente.
Aviso: si quiere saber cómo quitar la hora en la pantalla, vaya al capítulo 9.1.
Encendido de la pantalla cuando está bloqueada
Si la pantalla está bloqueada, puede desbloquearla presionando la tecla de encendido o la
tecla de regresar por varios segundos. Después de abrirse, la pantalla se volverá a bloquear en
algún momento, para desbloquearla debe presionar el ícono “desbloquear” con el dedo y
deslícelo hacia la derecha, si toca el ícono “bloquear” y lo desliza hacia la izquierda puede
entrar a la función de la cámara.
Imagen 3-1
3.4 Uso de la pantalla táctil
Modo de operación en Tablet
Hay varias formas de ver la pantalla principal, el menú y las aplicaciones, etc. en el equipo.
Dar clic para seleccionar
Cuando desee usar el teclado de la pantalla y desee seleccionar los elementos en la interfaz de
la pantalla de inicio como alguna aplicación, use su dedo para dar clic.
Presione
7

Si desea desbloquear la opción disponible de cierto elemento (como caja de texto o vínculo en
una página Web), o mover un atajo a la pantalla de inicio y menú del programa principal, sólo
presione el elemento.
Deslice normal o rápidamente
Deslizar rápidamente o solo deslizar significar un movimiento vertical u horizontal rápido
usando el dedo sobre la imagen.
Arrastrarg
Antes de comenzar a arrastrar, se debe tocar con cierta presión y no soltar el dedo antes de
arrastrar a la posición deseada.
Rotar
Con el fin de adaptarse a todas las imágenes, ponga el equipo de lado y la dirección de la
pantalla se puede cambiar de dirección horizontal a vertical. Por ejemplo, cuando ingresa
texto, ve películas, etc.
3.5 Interfaz de pantalla de inicio
Todas las aplicaciones en la máquina se desplegarán en la pantalla de menú de inicio. Puede
usar la aplicación, atajo y el modo definido por el usuario para configurar el fondo de pantalla
de la pantalla de inicio
Imagen 3-2
Barra de
notificaciones
Wallpaper
Google Search
Aplicaciones
8

Nota: en cualquier aplicación, se puede presionar el botón de inicio para regresar a la
pantalla de inicio.
Personalizar la interfaz de la página de inicio
Cambiar el fondo de pantalla del escritorio
1. Presione en una área en blanco en la interfaz de inicio para mostrar el menu.
2. Cuando se muestre el menú, elija la fuente para el fondo de pantalla para la interfaz de la
pantalla de inicio que desea fijar.
3. Después de dar clic en la Fuente para el fondo de pantalla, de clic en la imagen que
desea y seleccione “fijar como fondo de pantalla”.
Imagen 3-3
Imagen 3-4
9


2. Seleccione 'Transferir archivos (MTP)'
3. Haga clic en la barra de estado, se mostrarán las opciones de la barra de estado.
4. Dentro de las opciones del estado, haga clic para seleccionar USB conectado, después
de clic para abrir el dispositivo de almacenamiento USB.
5. En este tiempo, la USB se ha conectado.
6. Para Apple Macintosh – Descargar desde el Internet la aplicación “Android File
Transfer”.
Contenido del dispositivo de almacenamiento
1. El dispositivo de almacenamiento NAND FLASH, espacio para el equipo para
almacenar el documento.
2. Tarjeta de memoria SD extraíble.
3. Los dos dispositivos de almacenamiento antes mencionados pueden estar visible a través
de la conexión con el USB con la computadora.
Atención: cuando el equipo esté conectado con el cable USB, si inicia el dispositivo de
almacenamiento USB, no verá la tarjeta de memoria a través del equipo, si
desea visualizar la tarjeta de memoria en el equipo, sólo desconecte el
cable USB.
3.7 Tarjeta de memoria
Copiar el documento a la tarjeta de almacenamiento
Puede compartir un documento entre el equipo y la computadora, como música e imágenes,
etc. si desea ver el documento en el equipo, de clic en el navegador del archivo para ver el in
contenido en la tarjeta SD.
Borrar los documentos en la tarjeta de almacenamiento del equipo
1. Busque el documento que dese borrar.
2. Presione le nombre del documento que desee borrar, se mostrará el menú del archivo.
3. De clic en .
Quitar la tarjeta de almacenamiento cuando el equipo esté en modo de
arranque
11

Si necesita quitar la tarjeta de almacenamiento en el modo de arranque del equipo, debe
descargar primero la tarjeta de almacenamiento para evitar cualquier falla o daño en la tarjeta
de almacenamiento.
1. Seleccione la configuración de la lista de apk..
2. Haga clic en Almacenamiento y USB.
3. Busque la tarjeta SD en Almacenamiento portátil.
4. Haga clic para desinstalar la tarjeta SD.
4 Establecimiento de la conexión
4.1 Conexión WiFi
El equipo se puede conectar a la red Wi-Fi:
1. En la interfaz de la página de inicio, de clic y pulse la tecla Menú y abra la configuración
del menú
2. De clic y seleccione Configuración del sistema
3. De clic en la red Wi-Fi y abrir el swich del Wi-Fi
4. Después de abrir el Wi-Fi, la red Wi-Fi se puede escanear de forma automática desde el
equipo en las ventanas de la derecha
5. Seleccione la red Wi-Fi a la que desea conectarse, si se requiere de contraseña, se abre
una ventana solicitándolo y deberá ingresar la respectiva contraseña.
6. De clic en Conexión
Image 4-1
De clic aquí y seleccione
la red WiFi
Opción avanzada de
configuración de WiFi
12

4.2 Conexión Bluetooth
Función del Bluetooth:
1. Puede intercambiar los archivos entre dos dispositivos Bluetooth. Puede intercambiar los
archivos con otras computadoras, teléfonos móviles y pda.
2. Puede intercambiar información pims con teléfonos móviles a través de la sincronización,
pda y laptop soportan el bluetooth (datos de dirección de correo electrónico outlook).
3. Puede intercambiar la tarjeta electrónica con teléfonos móviles, pda y laptop para
soportar el bluetooth.
4. Puede conectar el teclado, mouse y palanca de mando para soportar el bluetooth.
Aplicación del bluetooth (Image 4-2)
1. Configura el procedimiento de ingresar al bluetooth: configurar -> bluetooth, abrir el
equipo de bluetooth
2. Nombre del equipo: puede cambiar al azar el nombre del bluetooth de su equipo
presionando la tecla Menú.
3. Capacidad de detección: abrir esta función dando clic en el nombre de bluetooth, que
indica que otro equipo con bluetooth puede buscar el bluetooth de su equipo, el tiempo
por default para que lo abra es de 120 segundos.
4. Escanea y busca el equipo: se puede detectar el equipo al que se desea conectar usando
esta función.
5. Bluetooth: después de escanear para encontrar el equipo, todos los equipos de bluetooth
que busque el equipo se muestran en esta función.
Image 4-2
De clic para buscar el
equipo
De clic aquí y abra la
función de detección
13

5 Comunicación
5.1 Cámara
Funciones de la cámara
1. De clic y seleccione la cámara;
2. El sistema ingresa a la interfaz de la cámara;
3. De clic y seleccione el botón Foto y así puede capturar las imágenes;
4. Puede configurar las funciones foto, ubicación de almacenamiento, balance de blancos y
regulación de tamaño focal;
5. Después de haber tomado la foto, se puede tener la vista preliminar miniatura de la foto.
Imagen 5-1
Función de video
1. De clic en el ícono de video y póngalo en modo de reproductor de video
2. De clic y seleccione en el botón rojo de video para grabar ;
3. Se pueden configurar las funciones; como por ejemplo efecto de color, balance de
blancos y calidad de video
4. Cambiar la grabación de video a alta definición 720P y 480P.
5. De clic y seleccione el botón de grabación de video, finalice la grabación del video y
Función de la foto
14

puede seleccionar su vista preliminar.
Imagen 5-2
5.2 HDMI
La interfaz del video de alta definición HDMI
El equipo y la televisión en alta definición se conectan con un cable estándar HDMI. Esta
interfaz soporta imágenes con la más alta calidad de 1080p de resolución.
1. El equipo se encuentra en el estado boot.
2. El equipo y la televisión de alta definición están conectados por un cable estándar
HDMI.
3. La interfaz del sistema en el equipo se sincroniza automáticamente con la televisión de
alta definición.
4. Haga clic en Configuración de HDMI en la.
5. Haga clic en Resolución HDMI para establecer la proporción de resolución de HD TV.
niciar/detener
Frontal o trasera
15

6 Otras aplicaciones
6.1 Administración de archivos
Búsqueda de archivos
Desplázate al escritorio para ubicar el Navegador del archivo.
Puede utilizar el administrador de archivos para administrar, editar y eliminar los archivos y
carpetas..
Imagen. 6-1
Cortar y copiar archivos
1. En el navegador del archivo, presione y seleccione el archive que desea operar.
2. Despliegue los menús operativos, incluyendo Cortar, Copiar, Eliminar, Renombrar,
compartir y etc..
3. De clic en Cortar o Copiar el archivo o la carpeta.
4. De clic en la carpeta en donde desea pegar, abra el menú presionando la tecla Menú.
5. De clic en y después de clic en Pegar.
Borrar archivos
1. En el navegador del archivo, presione el archive que desea eliminar.
2. De clic en .
Configuración de la carpeta
16

1. En el navegador del archivo, abra el menú presionando la tecla Menú
2. De clic en
3. De clic en la ventana emergente e ingrese el nombre de la nueva carpeta en el cuadro de
texto.
4. De clic en OK para crear la carpeta.
Compartir
1. Cargar buscador de archivo ES. (Fig. 6-2)
2. Haga clic y presione en un archivo y seleccione .
3. El sistema buscará automáticamente todo el camino para compartir..
Fig. 6-2
REINICIO
Paso1)
Pulse el botón Volumen + y el interruptor de encendido a la vez. No suelte los botones hasta que
aparezca el logotipo de la puesta en marcha durante al menos 5 segundos.
17

Paso2)
Aparecerá la interfaz de abajo después de mostrar la pantalla de inicio.
Pulse el botón Volumen - para seleccionar "Recuperación" y, a continuación, pulse el interruptor
de encendido
Paso3)
Una vez que entra en el modo de recuperación, aparece una interfaz, mencionando "la
recuperación del sistema Android"
Paso4)
Si desea eliminar todos los datos y volver a la restauración de fábrica, seleccione "Wipe data /
factory reset" y pulse el botón de retorn táctil para seleccionar la opción que desee. Pulse el botón
de encendido para confirmar la selección.
18

Paso5)
Una vez que seleccione "reinicio Wipe data / fábrica", aparece una nueva interfaz. Pulse el botón
de retorn para seleccionar "Sí - eliminar todos los datos de usuario" y pulse el botón de encendido
para confirmar. El sistema dará formato a todos los datos de usuario y caché a continuación.
Paso6)
La tablet entra en la primera interfaz del modo de recuperación una vez que la operación se
terminó. Seleccione "reiniciar el sistema ahora" y pulse el botón "Power" para confirmar. El
sistema se reiniciará.
19

7. Specifications
Parámetro del producto
Tipo
Detalles
Descripciones
Parámetro
básico
Modelo MID A110-E
Tipo CPU MT8163
Velocidad de
CPU
1.3GHz
DDR 1GB
NAND
FLASH
32GB
Versión del
sistema
operativo
Andriod6.0
Conexiones
de red
WIFI 802.11a/b/g/n +BT
Interfaz USB Micro USB*1, OTG*1
Interfaz
HDMI
HDMI 1.4a
Batería
Batería de polímero de litio, 3.7V/5800mAh
Adaptador de
energía Input: AC 100V-240V; output: DC 5V, 2A
Memoria
externa Soporta SDHC/SDXC
Apariencia
del
producto
LCD 10.1” inch (16:10),800*1280IPS
Dimensions 259.4*173.6*10.7mm
Peso
Tablet:572g
Aplicacion
Video Soporta MEPG,H.263/H.264,etc.
Audio Soporta MP3,WMA,WAV,etc. (necesita licencia)
Juegos
Soporta programas de terceros
Método de
ingreso
Teclado Andriod
Fotos Soporta la búsqueda de BMP, JPG, GIF, PNG, etc.
Office
software
Soporta la lectura y edición de archivos de Office; soporta la
búsqueda de PDF
20

DECLARACIÓN DE FCC
Se ha comprobado que este equipo cumple con los límites de un dispositivo digital de Clase
B, de conformidad con la Parte 15 de las Reglas de FCC. Estos límites están diseñados para
proporcionar una protección razonable contra las interferencias dañinas en una instalación
residencial. Este equipo genera usos y puede irradiar energía de radiofrecuencia y, si no se instala
y utiliza de acuerdo con las instrucciones, puede causar interferencias dañinas a las
comunicaciones de radio. Sin embargo, no hay garantía de que no se produzcan interferencias en
una instalación en particular. Si este equipo causa interferencias perjudiciales a la recepción de
radio o televisión, lo que puede ser determinado apagando el equipo, se recomienda al usuario que
intente corregir la interferencia con una o más de las siguientes medidas:
-- Reoriente o reubique la antena receptora.
-- Aumente la separación entre el equipo y el receptor.
-- Conecte el equipo a una toma de corriente en un circuito distinto al que está conectado el
receptor.
-- Consulte con el distribuidor o un técnico de radio /técnico de TV para obtener ayuda.
Este dispositivo cumple con la Parte 15 de las Reglas de la FCC. El funcionamiento está
sujeto a las dos condiciones siguientes:
(1) Este dispositivo debe aceptar cualquier interferencia recibida, incluyendo la interferencia que
pueda causar cambios no deseados de operación o modificaciones no expresamente aprobadas por
la parte responsable del cumplimiento, podría anular su autoridad para operar el equipo.
Los cambios o las modificaciones no expresamente aprobados por la parte responsable del
cumplimiento podrían anular su autoridad para operar el equipo.
21
-
 1
1
-
 2
2
-
 3
3
-
 4
4
-
 5
5
-
 6
6
-
 7
7
-
 8
8
-
 9
9
-
 10
10
-
 11
11
-
 12
12
-
 13
13
-
 14
14
-
 15
15
-
 16
16
-
 17
17
-
 18
18
-
 19
19
-
 20
20
-
 21
21
-
 22
22
-
 23
23
-
 24
24
-
 25
25
-
 26
26
-
 27
27
-
 28
28
-
 29
29
-
 30
30
-
 31
31
-
 32
32
-
 33
33
-
 34
34
-
 35
35
-
 36
36
-
 37
37
-
 38
38
-
 39
39
-
 40
40
-
 41
41
-
 42
42
-
 43
43
-
 44
44
-
 45
45


AOC A110-E Manual de usuario
- Tipo
- Manual de usuario
- Este manual también es adecuado para
en otros idiomas
- English: AOC A110-E User manual