Sylvania 6427GFGA El manual del propietario
- Categoría
- Televisores LCD
- Tipo
- El manual del propietario

OWNER'S MANUAL
I TO RECEIVE DIGITAL SIGNAL IYOU MUST CONNECT ANTENNA

TO REDUCE THE RiSK OF FiRE OR ELECTRIC SHOCK, DO NOT EXPOSE THiS APPLi-
ANCE TO RAiN OR MOISTURE,
CAUTION
CAUTION: TO REDUCE THE RiSK OF ELEC-
TRIC SHOCK, DO NOT REMOVE COVER (OR BACK).
NO USER SERVICEABLE PARTS iNSIDE. REFER
SERViCiNG TO QUALIFIED SERVICE PERSONNEL.
The important note is located on the rear of the cabinet.
THIS SYMBOL INDICATES THAT DANGER-
OUS VOLTAGE CONSTITUTING A RISK OF
ELECTRIC SHOCK IS PRESENT WITHIN
THIS UNIT.
THIS SYMBOL INDICATES THAT THERE
ARE IMPORTANT OPERATING AND MAIN-
TENANCE INSTRUCTIONS IN THE LITERA-
TURE ACCOMPANYING THE APPLIANCE.
1. Read instructions-All the safety and operating instructions
should be read before the appliance is operated.
2. Retain Instructions-The safety and operating instructions
should be retained for future reference.
3. Heed Warnings-All warnings on the appliance and in the
operating instructions should be adhered to.
4. Follow Instructions-All operating and use instructions
should be followed.
5. Cleaning-Unplug TV from the wall outlet before cleaning.
Do not use liquid cleaners or aerosol cleaners. Use a
damp cloth for cleaning.
EXCEPTION: A product that is meant for uninterrupted
service and, that for some specific reason, such as the
possibility of the loss of an authorization code for a CATV
converter, is not intended to be unplugged by the user for
cleaning or any other purpose, may exclude the reference
to unplugging the appliance in the cleaning description
otherwise required in item 5.
6. Attachments-Do not use attachments not recommended by
the TV manufacturer as they may cause hazards.
7. Water and Moisture-Do not use this TV near water, for
example, near a bath tub, wash bowl, kitchen sink, or laun-
dry tub, in a wet basement, or near a swimming pool, and
the like.
8. Accessories-Do not place this TV on an unstable cart,
stand, tripod, bracket, or table. The TV may fall, causing
serious injury to someone, and serious damage to the
appliance. Use only with a cart, stand, tripod, bracket, or
table recommended by the manufacturer, or sold with the
TV.
Any mounting of the appliance should follow the manufac-
turer's instructions and should use a
mounting accessory recommended by
the manufacturer. An appliance and
cart combination should be moved
with care. Quick stops, excessive
force, and uneven surfaces may cause
the appliance and cart combination to
overturn.
PORTABLE CART WARNING
@
AMEUBLES- Cet appareil ne dolt 6tre plac6 que sur un
meuble (avec ou sans roulettes) SYMBOLED.AVERTIS_EMENTPOUR
LES COMPOSANTES
recommand6 par le fabricant. Si vous APPAREILETMEUBLEAROULETFES
rinstallez sur un meuble & roulettes,
d6placez les deux ensembles avec
pr6caution. Un arr6t brusque, I'utilisa-
tion d'une force excessive et des sur-
faces irr6guli6res risquent de d6sta-
biliser rensemble et de le renverser.
9. Ventilation-Slots and openings in the cabinet and the back
or bottom are provided for ventilation and to ensure reli-
able operation of the TV and to protect it from overheating,
these openings must not be blocked or covered. The open-
ings should never be blocked by placing the TV on a bed,
sofa rug or other similar surface. This TV should never be
placed near or over a radiator or heat register. This TV
should not be placed in a built-in installation such as a
bookcase or rack unless proper ventilation is provided or
the manufacturer's instructions have been adhered to.
10. Power Sources-This TV should be operated only from the
type of power source indicated on the marking label. If you
are not sure of the type of power supply to your home,
consult your appliance dealer or local power company. For
TVs intended to operate from battery power, or other
sources, refer to the operating instructions.
11. Grounding or Polarization-This TV is equipped with a
polarized alternating-current line plug(a plug having one
blade wider than the other). This plug will fit into the power
outlet only one way. This is a safety feature. If you are
unable to insert the plug fully into the outlet, try reversing
the plug. If the plug should still fail to fit, contact your elec-
trician to replace your obsolete outlet. Do not defeat the
safety purpose of the polarized plug.
12. Power-cord protection-Power-supply cords should be rout-
ed so that they are not likely to be walked on or pinched
by items placed upon or against them, paying particular
attention to cords at plugs, convenience receptacles, and
the point where they exit from the appliance.
EN

FIGURE A
EXAMPLE OFANTENNA GROUNDING AS PER
NATIONAL ELECTRICAL CODE
ROUNO
ELECTRIC
SERVICE
NEC - NATIONAL ELECTRFCAL CODE
$2898A
13,Outdoor Antenna groundingqf an outside antenna or cable
system is connected to the TV, be sure the antenna or
cable system is grounded so as to provide some protec-
tion against voltage surges and built-up static charges.
Article 810 of the National Electrical Code, ANSI/NFPA
No. 70, provides information with respect to proper
grounding of the mast and supporting structure, grounding
of the lead-in wire to an antenna discharge unit, size of
grounding conductors, location of antenna-discharge unit,
connection to grounding electrodes, and requirements for
the grounding electrode. (Fig. A)
14, Lightning-For added protection for this TV receiver during
a lightning storm, or when it is left unattended and unused
for long periods of time, unplug it from the wall outlet and
disconnect the antenna or cable system. This will prevent
damage to the TV due to lightning and power-line surges.
15, Power Lines-An outside antenna system should not be
located in the vicinity of overhead power lines or other
electric light of power circuits, or where it can fall into such
power lines or circuits. When installing an outside antenna
system, extreme care should be taken to keep from touch-
ing such power lines or circuits as contact with them might
be fatal.
16, Overloading-Do not overload wall outlets and extension
cords as this can result in a risk of fire or electric shock.
17,Object and Liquid Entry-Never push objects of any kind
into this TV through openings as they may touch danger-
ous voltage points or short out parts that could result in a
fire or electric shock. Never spill liquid of any kind on the
TV,
18, Servicing-Do not attempt to service this TV yourself as
opening or removing covers may expose you to dangerous
voltage or other hazards, Refer all servicing to qualified
service personnel,
ANTENNA
LEAD IN
WIRE
_GRO _NTENNA
DISCHARGE UNIT
(NEC SECTION 810-20)
UND_NG CONDUCTORS
(NEO SECTFON 810-21)
ELECTRODE SYSTEM
/NEC ART 250 PART H)
19. Damage Requiring Service-Unplug this TV from the wall
outlet and refer servicing to qualified service personnel
under the following conditions:
a. When the power supply cord or plug is damaged or
frayed.
b. If liquid has been spilled, or objects have fallen into the
TV,
c, If the TV has been exposed to rain or water.
d. If the TV does not operate normally by following the
operating instructions. Adjust only those controls that
are covered by the operating instructions, as improper
adjustment of other controls may result in damage and
will often require extensive work by a qualified techni-
cian to restore the TV to its normal operation.
e. If the TV has been dropped or damaged in any way.
f. When the TV exhibits a distinct change in performance,
this indicates a need for service.
20. Replacement Parts-When replacement parts are required,
be sure the service technician uses replacement parts
specified by the manufacturer that have the same charac-
teristics as the original part. Unauthorized substitutions
may result in fire, electric shock, injury to persons or other
hazards.
21. Safety Check-Upon completion of any service or repairs to
this TV, ask the service technician to perform routine safe-
ty checks to determine that the TV is in proper operating
condition.
22. Heat-This TV product should be situated away from heat
sources such as radiators, heat registers, stoves, or other
products (including amplifiers) that produce heat.
09
t¢
,<
LJJ
L,L
O0
Z
0
EN

_,Owner's Manual _,Remote control unit oBatteries
(1EMN21254) (NE601U E) ("AA" x 2)
_. ¸¸¸¸¸¸/
• If you need to replace these accessories, please refer to the PART NO, above the illustrations and call our
help line mentioned on the front page.
• Depending on your antenna system, you may need different types of Combiners (Mixer) or Separator
(Splitter). Contact your local electronics store for these items.
_,Place your TV in a room with adequate ventilation.
,,Keep your TV set away from sources of direct heat, such as heat registers or direct sunlight.
_,Do not place your TV on soft surfaces, such as rugs or blankets.
,,Leave enough room for air to circulate around the bottom, top and back of the set.
FOC WARNING: This equipment may generate or use radio frequency energy. Changes or modifications
to this equipment may cause harmful interference unless the modifications are expressly approved in the
owner's manual. The user could lose the authority to operate this equipment if an unauthorized change or
modification is made.
CAUTION: TO PREVENT ELECTRIC SHOCK, MATCH WIDE BLADE OF PLUG TO WIDE SLOT, FULLY
INSERT.
ATTENTION: POUR E_VITER LES CHOC E_LECTRIQUES, INTRODUIRE LA LAME LA PLUS LARGE
DE LA FICHE DANS LA BORNE CORRESPONDANTE DE LA PRISE ET POUSSER JUSQU'AU FOND.
A NOTE ABOUT RECYCLING: Batteries should never be thrown away or incinerated but disposed of in
accordance with your IocaI regulations concerning chemical wastes.
Note to CATV system installer:
This reminder is provided to carl the CATV system instafler's attention to Article 820-40 of the NEC that
provides guidelines for proper grounding and, in particular, specifies that the cable ground should be
connected to the grounding system of the building as close to the point of cable entry as practical
The seriai number of this product may be found on the back of the TM No others have the same serial num-
ber as yours. You should record the number and other vitat information here and retain this book as a perma-
nent record of your purchase to aid identification in case of theft.
Model No. Date of Purchase
Serial No. Dealer Phone No.
Dealer Puchase from Dealer Address
EN

,, DTV/TV/OATV
This TV lets you easily switch TV(NTSC) and DTV(ATSC) with the remote control. This feature enables you
to simply view from conventional analog TV to Standard Definition TV, High Definition TV.You can also con-
nect this TV to CATV if you have a CATV box.
,, Program _nformation Display (DTV}
You can display the title, contents and other information of the current DTV program on the screen.
,,Auto Preset Channel
This TV can automatically scan and memorize the channels receivable in your residential area. This feature
eliminates the need of a difficult setting procedure.
oV-CHIP
This feature Iets you set the viewing limitations to prevent your children from watching inappropriate programs.
,,Cmoeed Caption Decoder
This TV contains the built-in Closed Caption Decoder that displays text across the screen. It allows you to
read the dialogue of a TV program or other information in the Closed Caption-supported programs.
,, MTS/SAP Tuner
This feature allows you to select with the remote control your desired audio language.
,,Auto Shut Off Function
The power of the main unit is automatically turned off when there has been no signal or key input for more
than 15 minutes.
,, Resume Function
When the TV is turned off while viewing due to power failure, it will automatically turn on after the power
recovers.
,,SmeepTimer
This feature wiII automatically turn off the power of the main unit at a preset time.
, On-Screen Function Dispmay (ENGLISH/SPANISH/FRENCH)
This feature lets you select the language displayed in the MENU screen from ENGLISH, SPANISH or
FRENCH.
,,Stereo Sound Function
,, Full-Function Remote Controt
,, PLL Frequency Synthesized Tuning
,, FmatScreen Picture Tube
,,S-WDEO Input
,, Front / Rear AV _nput
,,Component WDEO _nput
,, Rear Digital Audio Output
09
t_
,<
L_J
L,L
¢o
z
O
EN

IMPORTANTSAFEGUARDS............................................................ 2
SUPPLIEDACCESSORIES............................................................. 4
PRECAUTIONS...................................................................... 4
FEATURES......................................................................... 5
PREPARATION FOR USE ................................................... 7
CONNECTION ....................................................................... 7
ANTENNA/BASIC CABLE CONNECTION .................................................. 7
CONNECTION TO CABLE/SATELLITE BOX ................................................ 8
COMPONENT CONNECTION ........................................................... 8
EXTERNAL CONNECTION ............................................................. 9
USING FRONT ,aJV CONNECTION ....................................................... 10
DIGITAL AUDIO CONNECTION ......................................................... 10
INSTALLING THE BATTERIES .......................................................... 11
FUNCTIONS .............................................................. 12
REMOTE CONTROL AND FRONT PANEL FUNCTION ........................................ 12
OPERATIONS ............................................................. 13
INITIAL AUTO PRESET ............................................................... 13
MENU SCREEN ..................................................................... 14
LANGUAGE SELECTION .............................................................. 15
WATCHING TV ............................................................ 16
SWITCHING ANALOG MODE/DIGITAL MODE .............................................. 16
CHANNEL SELECTION ............................................................... 16
VOLUME ADJUSTMENT .............................................................. 17
SWITCHING AUDIO .................................................................. 17
SCREEN INFORMATION .............................................................. 18
CHANGING THE SCREEN DISPLAY MODE ................................................ 19
OPTIONAL SETTINGS ...................................................... 20
PICTURE ADJUSTMENT .............................................................. 20
CLOSED CAPTION ................................................................... 2!
V-CHIP ............................................................................ 24
SLEEP TIMER ...................................................................... 26
OTHER SETTINGS ......................................................... 27
SWITCHING EXTERNAL INPUT ......................................................... 27
AUTO PRESET OH ................................................................... 28
CHANNEL ADD/DELETE .............................................................. 30
D.S.T. ............................................................................ 32
TIME ZONE ........................................................................ 33
MISCELLANEOUS ......................................................... 34
TROUBLESHOOTING GUIDE ........................................................... 34
GLOSSARY ........................................................................ 36
MAINTENANCE ..................................................................... 86
SPECIFICATIONS .......................................................... 37
SYMBOLS USED mNTHINSMANUAL
The following is the description for the symbols used in this manual,
: Settings only for the analog mode
: Settings only for the digital mode
: Common settings for the analog mode and digital mode
1
EN

iii!iiiiiiii_iii_iiiiiiiiiiiiiiii_ii,!i_iii
P EPARAT,O.FORUSE
This section describes how to connect this TV to reception and other sources.
[ANTENNA / BASIC CABLE CONNECTION]
When connectinq TV to antenna *For digital signal
1) Connect the RF cable or antenna cable on your home outlet to the ANT. iN jack of this TV.
or
incoming Cable
Rear of this TV
Antenna Selecto_
(if necessary)
COMMERCIALLYAVAiLAbLE
w
d_
as
O
z
O
,5
w
z
z
0
When connectinq TV to basic cable [without box). *For analog reception onmy
1) Connect the RF cable or incoming cable on your home outlet to the ANT. IN jack of this TV.
NOTES:
* For your safety and to avoid damages to the unit, unplug the antenna cable ifom the ANT. IN jack before moving if_e unit.
* if you use an antenna in order to receive analog TV, the same antenna generally wi# work for DTV reception,
Outdoor or attic antennas will be more effective than set-top versions,
* Some cable channels cannot be viewed when the TV is connected to an aerial antenna because DTV program does not cover all
cable channels. You can watch them bY switchiag to the cable connected to CATV,
* To easily switch between antenna and cable wires, you can pumhase 'Antenna Selector" commercially available.
*Once connections are completed, turn on the TV and begin initial setup.
Channel scanning is necessary for the TV to memorize all availabJe channels in your area if using antenna
or basic cable. [Refer to "iNiTiAL AUTO PRESET" on page 13.)
EN

{CONNECTION TO CABLE/SATELUTE BOX]
1) Connect the antenna cable on your home outlet to the input jack of the CABLE/SATELLITE box.
2) Use the corresponding cable to connect the ANT. IN jack of this TV and the output jack of the
CABLE/SATELLITE box.
*Required cabies in 2) and connecting methods differ depending on the CABLE/SATELLITE box. For more
information, please contact the store where you purchased the CABLE/SATELLITE box or nearby electric
appliance stores.
CABLES NOTINCLUDED
CABLE Box
or SATELLITE Box
RF Cable iiii
IN OUT
Rear of this TV
[COMPONENT CONNECTION]
1) This is the best method to connect this TV to video devices with the component output jack, such as DVD
player, etc. It can minimize the deterioration of image quality.
Use the COMPONENT cable (commercially available) for connection.
_ _'I_ ,NPOTaoko_, ..........................................................
To_/_/'_COM PQN E NT VlBEQ
OUTPUT jacks N MP NENTV
..............................................o CO O IDBO ...........................................................
R +oAUD,O, UT
I J !J To AUDIO OUTPUT
k I
_aC S , I
_:: .........................oJ
_ CABLES NOT INCLUDED _\_
NOTE:
This TV cart on!y accept a 480i (interlaced) video signal.
EN

[EXTERNAL CONNECTION]
When using the Audio/Video cables
1) This is the general method to connect this TV to video devices with the video or audio output jacks, such
as VCR etc.
When the audio jack of video devices is monaural, connect this TV to the AUDIO L jack.
Ex.ItE
VCR
CABLES NOT INCLUDED
]b AUDIO iNPUT
jacks
Rear of this TV
w
d_
as
O
z
O
w
When using the S-video cable
1) This is how to connect this TV to the video devices with the S-video output jack. You can expect better pic-
ture quality than the normal video cable connection.
Use the S-video cable (commercially available) for connection.
[........ ]
DVD/VCR
CABLES NOT INCLUDED
NOTE:
If you connect to the .9-VIDEO jack and the VIDEO jack at the same time, S-video connection will have priority.
EN

[USING FRONT A/V CONNECTION]
1) This is how to use the AN jack in front of this TV and connect to external devices.
This is useful when you use game playing devices etc.
When the audio jack of external devices is monaural, connect this TV to the AUDIO L jack.
To VIDEO
/ To AUDIO OUTPUT jack U jacks
* CABLES NOT UNCLUDED
[D_GITAL AUDIO CONNECTION]
1) If you connect this TV to the digital-supported audio devices, you can enjoy much more of the digital
broadcasting programs with the feeling of being at a live program.
Use the DIGITAL AUDIO COAXIAL cable (commercially avaiiable) for connection.
Ex,
MD deck, DAT deck etc.
Dolby Digital decoder
Rear of this TV
* CABLES NOT iNCLUDED
I rlB_ Manufactured under Hcense from Dolby Laboratories. "Dolby" and the double-D symbol are trade- I
I
D... TAL marks of Dolby Laboratories.
I
EN

Instail two AA batteries (supplied) matching the
polarity indicated inside battery compartment of
the remote control.
)BATTERY PRECAUTIONS]
,, Be sure to fol!ow the correct polarity as indbated in the battery compartment.
Reversed batteries may cause damage to the device.
_,Do not mix different types of batteries together (e.g. Alkaline and Carbon-Zinc) or old batteries with fresh
ones.
_,if the device is not to be used for a long period of time, remove the batteries to prevent damage or injury
from possible battery leakage.
_,Do not try to recharge batteries not intended to be recharged; they can overheat and rupture.
Features of digital broadcasting
Digital broadcasting uses the newest broadcasting technology such as compression of audio and video
signals and provides much more improved image and sound quality than analog broadcasting. For image
quality, digital broadcasting have realized the High Definition Television (HDTV) that can display sharper
and finer images than Standard Definition Television (SDTV) with double scanning lines, and can adopt
the 16:9 wide screen format that fits more to range of human vision.
For audio quality, digita! broadcasting offers the 5.1ch surround broadcast to give you the feeling of being
at a stadium or a theater.
in addition, digital broadcasting enables to broadcast 2 or 3 programs of Standard Definition Television
(SDTV), which is the analog television format, at the same time by 1 channel. This feature has made the
program planning more diversified, in addition, digital broadcasting has overcome problems experienced
with analog television such as ghosting or interference with digital technology.
Minor channem of digital broadcasting
in digitaI broadcasting, the selected channel can have the sub channel, it is called the minor channel.
Though the minor channel programs provide a little poorer image quality than the High Definition
Television (HDTV) programs, they have such an advantage as it will not move back other programs even
when a sport relay is extended.
LU
d)
aS
O
Z
O
LU
EN

POWER button
Toturn TV on/off
Channet number buttons (p16)
-/ENT button (p16)
Toconfirm the command of
channel number buttons
OH A/'_ buttons (p13)
To select channels and move up/down
through menu items
MENU button (p14)
To display on-screen menu
INPUT SELECT button (p27)
To select TV or external input mode
(to access camcorders, games, etc.)
SLEEP button (p26)
Toturn the power off automatically
at preset time
AUDIO button (p17)
Analog mode (TV)
To select audio mode
Digital mode (DTV)
To select audio language
DTV/TV button (p16)
To switch between digital mode (DTV)
and analog mode
INFO button (p18)
Analog mode (TV)
To display channe! No.
Digital mode (DTV)
To display channel information
CHANNEL RETURN button (p16)
Toreturnto previouslyviewedchannel
+100 button (p16)
o CATV
To enter the channel number for 100
or higher channels
o Digital mode (DTV)
To select the minor channel
MUTE button (p17)
VOL A/V buttons (p13)
Toadjustvolume,and to changesettings
/ to moveto nextscreenfor menuitems
VIDEO input jack (plO)
_MENU button (p14)
To view on-screenmenu
"_'_VOLU[VlEA/V buttons (p17)
To adjustvolume
'_'CHANNEL _./_"buttons (p16)
To selectchannels
_',_',_,_POWER button
To turn TV on/off
MENU V_mlU_IEA .CHtNNELI m_R
L/R input jacks (plO) Infrared Sensor Window
To receive the infrared rays
transmitted from the remote
control
EN

_i!!@_i@i_i!ii_ii_!:ii{il
ERATIONS
This section describes the initial settings when you
first turn on the power after purchase. The initial
setting items are shown below.
NOTE:
Be sure that antenna or cable is connected proper!y before
plugging tbe power cold.
- D,S,To(Daylight Saving Time)
You can set the air time display for digital broad-
casting. When you set this function to ON, the
date information adjusted for the area set by TIME
ZONE will be adjusted to the one added by anoth-
er 1 hour. In addition, the time difference will be
adjusted as follows: 2 a.m. on first Sunday in April
to 3 a.m. 1 hour ahead, and 2 a.m. on last
Sunday in October to 1 a.m, 1 hour behind.
- TIME ZONE
The EPG information in digital broadcasting is
adjusted based on the area set in TIME ZONE.
- AUTO PRESET OR (DTViTV)
(When using antenna)
The channels broadcasted in DTV and TV are
automatically scanned and memorized. Only the
receivable channels in the area where this TV is
used will be memorized.
- AUTO PRESET OR (CATV)
(When using basic cable)
The channels broadcasted in CATV are automati-
cally scanned and memorized.
OH A/T
CD GD G3
CD G:) G)
CD CD GD
oooo
"I Set the D.S.T. (Dayiight Saving Time)
When you first turn on the power, the following
screen is displayed.
1 PLEASECONNECT ANTENNATO
THE UNIT
2 SET UPTHE ITEMSWITH
A,VAND TBUTTONS
• DS T (DaylightSaving) [---]
TIMEZONE [---]
AUTO PRESETCH(DTVTM)
AUTO PRESETOH(CAW)
,,Using [VOL A/V] on the remote control, set
"D.S.T. (Daylight Saving)" to [ON].
1 PLEASECONNECTANTENNATO
THEUNIT
2 SETUPTHEITEMSWITH
AVANDTBUTTONS
_" DS T (DaylightSaving) [ON]
TIMEZONE {---]
AUTO PRESETCH(DTV_TV)
AUTO PRESETCH(CATV)
2 Using [CH Af_] on the remote control, select
"TIME ZONE".
1 PLEASE CONNECTANTENNATO
THE UNIT
2 SET UPTHE ITEMSWITH
A VAND_ BUTTONS
DST (DaylightSaving) [ON]
TINEZONE [---]
AUTO PRESETCH(DTWTV)
AUTO PRESETCH(CATV)
oEvery time you press [VOL ,_N] on the remote
control, the area will be switched as below.
[ALASKA]
[NAWAI|]
[PAC|F|C]
[MOUNTA|N]
[CENTRAL]
[EASTERN]
t,b
Z
o
uJ
O
d}
z
O
o
z
:3
oSet your area.
NOTE:
You must set 'D.S.7:" and 'TIME ZONE" before presetting
channels.
EN

3 Set the AUTO PRESET CH.
NOTES:
* If "D.S. 7[ (Daylight Saving)" and "TIME ZONE" is not set.
you cannot select "AUTO PRESET CH't
* Make sure ff the TV is connected to antenna or cable.
When antenna is connected, select '_AUTO PRESET OH
(TV/DTV)" at the procedure below. When connected to
CAT_ select '_AUTOPRESET CH (CATV)'t
Here describes the case for searching and
memorizing channels for DTV/TM
,,Using [CH A/T] on the remote control, select
"AUTO PRESET CH(DTV/TV)".
IPLEASEOONNECTANTENNATO
THEUNIT
2SETUPTHEITEMSWITH
A_ANDYBUTTONS
DST (DaylightSaving) [ON]
TIMEZONE [ALASKA]
_" AUTOPRESETOH(DTV_TV)
AUTO PRESETCH(CATV)
,,When you press [VOL A] on the remote control,
scanning the channels in both anaIog and digitaI
modes wiil automatically start.
AUTO PRESETOH:DTV/TV
_I_
,,When scanning is completed, the memorized
smallest channel will be displayed.
NOTES:
* The initial AUTO PRESET CH function can be executed for
either DTV/TV o1"CATV on!y once. If you want to scan both
DT[V/7[V and CAT_ you need to select "CHANNEL SET" in
the MENU screen to scan and memorize another channels
after initial presetting is completed. (Refer to page 28.)
You can exit the initial AUTO PRESET menu bY [MENU] on
the remote control.
When you press [MENU] while scanning, the scanning is
interrupted and the memorized smallest channel is dis-
played.
tf you press [POWER], the power will be turned off When
the scanning is not completed, initial AUTO PRESET OH
screen is displayed evelly time you turn on the powel:
* When no channel can be received bY AUTO PRESET OH,
"NO TV SIGNALS" is displayed on the screen.
NOTVSIGNALS
This section describes the overview of the MENU
screen displayed when you press [MENU]. For
more details, see the reference page for each item.
The MENU screen consists of the function setting
items below.
_* PICTURE
CHANNEL SET
[ENG]iESPPRA
V-CHIPSET UP
CAPTION{OFF]
DTV SET UP
'_PICTURE
You can adjust the picture quality (BRIGHT, CON-
TRAST, COLOR, TINT, SHARPNESS),
(Refer to "PICTURE ADJUSTMENT" on page 20,)
,_CHANNEL SET
You can automatically scan the receivable chan-
nels and add or delete the channel as necessary.
(Refer to "AUTO PRESET CH" on page 28.)
'_ENG/ESP/FRA
You can change the language (ENGLISH, SPAN-
ISH, FRENCH) displayed in the MENU screen,
(Refer to "LANGUAGE SELECTION" on page 15,)
,,V-CHiP SET UP
You can set the viewing limitations.
(Refer to "V-CHP" on page 24.)
,,CAPTION
You can change the display' format for CLOSED
CAPTION, which displays the dialogue of a TV
program or other information across the screen.
(Refer to "CLOSED CAPTION" on page 21 .)
'_DTV SET UP
You can set the screen display or CAPTION in the
DTV mode.
(Refer to "CHANGING THE SCREEN DISPLAY
MODE" on page 19.)
NOTES:
* "DTV SET UP" can be displayed on!y in the DTV mode.
To move to the normal screen, press [MENU] again.
EN

You can change the language used on the MENU
screen. ENGLISH, SPANISH or FRENCH can be
selected.
How to change the language in the MENU screen
is shown below.
(::D Q (_3
(23_@
¢H_.EL
c5@Q5
_CD CD CD CD
_.¢ _UcTT aEEP _)
, VOL A/v
d_
z
0
¢¢
w
0
"I Display the MENU screen.
,, Press [MENU] on the remote control.
The following MENU screen is displayed.
PICTURE
CHANNEL SET
[ENG]_ESP/FRA
V-CHIPS£T UP
CAPTION[OFF]
_V SETUP
2 Select "ENG/ESP/FRA".
,, Using [OH A/T] on the remote control, select
"[ENG]/ESP/FRA".
PICTURE
CHANNEL SET
• [ENG]_ESP/FRA
V-CHIPSET UP
CAPTION[OFF]
DTV SETUP
,, Every time you press [VOL AN] on the remote
control, the language will be switched as below.
Select the language.
[ENG(iish)]
[ESP(aSol)]
3 To return to the screen before setting, press
[MENU] on the remote control.
EN

TV
You can easily switch the TV (NTSC) and DTV
(ATSC) with the remote controi and enjoy viewing the
High Definition TV programs as welI as the Standard
Definition TV programs with simple operation.
O_ © .......DTV/TV
_,JOlO INFO
GO
C3DCD CD
CD CD (_D
CD CD Q3
1 Press [DTV/TV].
,,The analog mode and digital mode switch alter-
nately.
,,When you press [DTV/TV] on the remote con-
trol in external input, the analog mode and digi-
tal mode will be switched.
NOTE:
When you switch the analog mode to the d_gital mode it may
take a while until the digital channel selection is completed.
The following screen is displayed while switching the mode.
NOWSCANNING
You can select the channel by using either [OH ,_JT]
or Channem number buttons. How to select the
channel in each w_ , is shown below.
Channe_
number
buttons
qENT
CH A/_
©CD O CD
¢_N_ _U_T SLEEP (M_p
CHANNEL
RETURN
+100
Using [OH A/_]
,, Using [OH ,_/_] on the remote control, change
the channel.
,,When you press [CHANNEL RETURN], the
previously selected channel wiII be selected.
,, Same operation is available with [OH A/_] on
the front panel of the main unit.
Using Channe_ number buttons
,,When you select a channel from 1 to 99, press
the channel number you want to view with
Channei number buttons. The selected chan-
nel will be displayed.
,,When you select a channe! larger than 100,
press [+100] first. Then use channel number
buttons to press the lower 2 digits.
,,To search the minor channei of the major chan-
nel currently viewed in DTV, press [+100]. If you
know the minor channel while viewing the major
channel with 1-digit channel number, press the
major channel number and press [4ENT]. Then,
press the minor channel number you want to
view. In case the major channel number is 2
digits, press the major channel number and
press the minor channel number directly. If you
press [-/ENT] after pressing the 2-digit major
channel number, the smallest minor channel wiil
be selected.
,,When you press [CHANNEL RETURN], the
previously selected channel wiII be selected.
NOTE:
In the DTV broadcasting one channel sometimes broadcasts
multiple programs depending on the air time. In this case, the
main channel is called major channel and the sub channel is
called minor channel.
EN

This section describes how to adjust the volume
when viewing TM The MUTE function, which is use-
ful when you have a visitor or a phone call, will be
also described.
CO (2b _
GO Q (Z)
(2_ Q CD
¢H_NEL
c5Q 5
J Uft
C;:DC;DCD CB,_
CMTN_ l_T T _EEP (M_E;
<VOL _/v
MUTE
1 Using [VOL AFT]
,,You can adjust the audio volume with [VOL AF7]
on the remote control.
,,The volume bar is displayed at the bottom of
the screen when adjusting the voIume.
oSame operation is available with [VOL AF7] on
the front panel of the main unit.
VOLUME
_I_
2 Using [MUTE]
o Press [MUTE] on the remote control to mute
the sound.
The colored volume bar is displayed on the
screen while muting.
SWt tN AUDIO
This section describes how to switch the audio in
the analog mode and how to switch the audio lan-
guage in the digital mode.
,,,,AUDIO
1 Switch the audio.
,,Every time you press [AUDIO], the audio will
be switched as below.
MANN : Outputs main-audio.
SAP :Outputs second audio channel.
MONO : Outputs mono-audio.
]! Switch the audio language.
,,When you press [AUDIO] on the remote con-
trol, the currently selected language and the
number of received languages will be displayed
on the screen.
Audio
t_
z
o
VOLUME
IIIIIIIIIIIIIIII
,,To release the MUTE status, press [MUTE]
again or press [VOL A!V].
,,Every time you press [AUDIO] on the remote
control, the language will be switched.
,,Languages you can switch differ depending on
the receiving broadcast.
NOTE: not
Even if you press [AUDIO] in external input, the audio will
be switched.
EN

You can display the currently selected channel
number or other information such as the audio
mode on the screen for checking.
f
(Z)_ C:)
CD O "_JNFO
CD CD CD
_CDGD
_CDCD
0 (D _ CD
In the analog mode, the currently selected channel
number and the audio mode are displayed=
1 Display the channel number and the audio
mode.
,,Press [JNFO] on the remote control.
The currently selected channel number and the
audio mode are displayed at the top right of the
screen.
CHI0 }
STEREO
,,To clear the display, press [JNFO] again.
,,The following screens are displayed when con-
necting to external devices:
1) When using video cable for connection
VIDEO 2
In the digital mode, the detailed information for the
currently selected channel such as the program
guide is displayed.
Display the detailed information for the channel.
,, Every time you press [JNFO], the display mode
will be switched as below.
[D|SPLAY OFF]
f
[INFO1]
[INFO2]
* The following information is displayed in the
INFO1 mode.
(1) Channel number
(2) Channel title
(3) Program title (max. 2 lines displayed)
(4) Audio language ("OTHER" is displayed
when the audio language cannot be
acquired, or the acquired languages are
other than ENGLISH, SPANISH or
FRENCH.)
(5) Program air time
,,The program guide added to the displayed
information in the INFO1 mode is displayed in
the INFO2 mode.
2) When using component video cable for con-
nection
COMPONENT
NOTES:
* When the program guide is displayed in more than 6 lines,
use [VOL A/v] and scroll for reading.
"No description provided" is displayed when the program
guide is not provided.
WMle the information is displayed in the tNF02 mode, the
CLOSED CAPTION function is interrupted.
EN

2 types of display mode can be selected in the digital
mode.
You can select your favorite display mode and enjoy
the program.
cz:) CD Q
CDQG3
(Z) QD (i)
¢H_"EL
6Q@5
/ "_ _,5
,,CD (ZD(ZD CD
,,_VOL ,_/v
1 Display the MENU screen.
,, Press [MENU] on the remote control.
The followinc MENU screen is displayed,
_" PICTURE
CHANNEL SET
[ENG]_ESPIFRA
V-CHIPSET UP
CAPTION[OFF]
DTV SETUP
3 Select the display mode.
,,Every time you press [VOL ,_/V] on the remote
control, [LETTERBOX] and [ZOOM] will be
switched alternately.
LETTERBOX ZOOM
[LETTERBOX]
Display the digkaFsupported program in fub
screen.
Black borders will spread in the upper and
lower screen.
[zooM]
Enlarge and display the center area of the dJgitaF
supported program.
The right and left image will be cut off.
4 To exit the menu, press [MENU] on the remote
control.
NOTE:
You may not switch the display mode depending on the pro-
gmm.
>,
b-
{5
z
o
2 Select "DTV SET UP".
,, Using [OH ,&/T] on the remote control, select
"DTV SET UP".
PICTURE
CHANNEL SET
[ENG]_ESP/FRA
V4;HIP SET UP
CAPTION[OFF]
• DTV SETUP
,,When you press [VOL ,_] on the remote control,
the MENU screen will be displayed as below.
• DTV DISPLAY[LETTERBOX]
DTVCC
D ST[Daylight Saving] [ON]
TIMEZONE [ALASKA]
EN

PTJONAL SETTINGS
You can adjust the brightness, contrast, co|or, tint
and sharpness of the picture,
CDGDQ
CD (Z) (i3
(!) (D (:D
C_NEL
_Q@5,
/ t
-CD CD CD CD
*VOLA/V
3 Adjust the picture quality,
,, Using [CH A/T] on the remote control, select
the picture quality item you want to adjust,
[BRIGHT]
[CONTRAST]
[co_.oR]
[TilT]
Display the MENU screen,
,,Press [MENU] on the remote control,
The following MENU screen is displayed,
_*PICTURE
CHANNEL SET
[ENG]_ESP/FRA
V-CHIP SETUP
CAPTION [OFF]
DTV SET UP
2 Select "PICTURE",
,,Using [CH A/T] on the remote controI, select
"PICTURE" and press [VOL A] to confirm,
_"PICTURE
CHANNEL SET
[ENG]_ESP/FRA
V-CHIP SETUP
CAPTION [OFF]
DTV SET UP
,,The adjustment bar for picture quality item is
displayed in the screen,
{'] 8RIGW [+]
_1_
BRIGHT
A: To increase brightness
T: To decrease brightness
CONTRAST
A: To increase contrast
T: To decrease contrast
COLOR
A: To brilliant
T: To pale
TiNT
A: To green
T: To purple
SHARPNESS
A: To clear
T: To soft
_,Using [VOL AFT] on the remote control, adjust
the picture quality,
NOTES:
* The display will disappear automatically after 10 seconds
unless you press a button.
* Magnetism from nearby appliances and speakers might
affect the color of the TV picture. If this happens, press
[POWER] to turn off the TV and turn it on again affer about
30 minutes.
EN

You can view speciaIIy Iabeled (cc) TV programs,
movies, news and prerecorded tapes, etc. with
either a dialogue caption or text display added to
the program.
You can also change the font size and font style of
the caption in the digitaI broadcasting.
CD (D GO
VOL _/v
,,o CD CD CD
1 Display the MENU screen.
,, Press [MENU] on the remote control.
The followinc MENU screen is displayed.
_"PICTURE
CHANNEL SET
[ENG]/ESP/FRA
V-CHIPSET UP
CAPTION[OFF]
[}TV SETUP
2 Select "CAPTION".
,, Using [OH A/_'] on the remote control, select
"CAPTION".
PICTURE
CHANNEL SET
[ENG]_ERP/FRA
V-CHIPSET UP
• CAPTION[OFF]
OTVSETUP
[CAPTION MODE (01, C2)]
,,CAPTION1 (C1)
Displays standard closed captions (what a char-
acter is saying).
,,CAPTION2 (C2)
Displays foreign language closed captions (for-
eign language words showing what a character
is saying).
oThere are three display modes according to
programs:
Paint+on mode: Displays input characters on the
screen immediately.
Pop+on mode : Once characters are stored in
memory, they are displayed all
at once.
Roll+up mode : Displays the characters continu-
ously by scrolling (max. 4 lines).
[TEXT MODE (T1, T2)]
,,TEXT1 (T1) and TEXT2 (T2) disptay hag
screen text by scrolling (such as a channel
guide, schedule or announcement).
Exit the menu.
o Press [MENU] on the remote controI.
NOTES:
* tf the closed caption is not broadcasted, nothing is displayed.
* When your TV receives a special effects playback, signal
(i.e., Search, Slow and Still) from a VCR3 video output
channel (OH3 or CH4), the TV may not display" the correct
caption or texL
Captions and texts may not match the TV voice exactly.
interference may cause the closed caption system not to
function properly.
The caption or text characters will not be displayed while the
menu display or functions display is shown.
if a black, box appears on the screen, this means that the
TV is set to TEXT mode. Toclear screen, select CAPTION
[C1]. [C2] or [OFF].
3 Switch the CAPTION mode.
oWhen you press [VOL ,_FZ] on the remote
control, CAPTION will be switched as below.
[OFF]
f
Display the MENU screen.
oPress [MENU] on the remote control.
The following MENU screen is displayed.
_"PICTURE
CHANNEL SET
[ENG]_ESP_ERA
V-CHIP SETUP
CAPTION [OFF]
DTV SET UP
o0
t_
z
E
w
09
,,,,,,J
z
o
F-
0,,
0
EN

2 Select "DTV SET UP".
,,Using [OH Akf_] on the remote control, select
"DTV SET UP".
PICTURE
CHANNEL SET
[ENG]_ESP/FRA
V-CHIP SETUP
CAPTION [OFF]
_"DTV SET UP
,,Press [VOL ,_] on the remote control.
The following screen is displayed.
_*DTV DISPLAY [LETTERBOX]
DTVCC
D S T[DayEightSav_r_g] [ON]
TIME ZONE [ALASKA]
3 Select "DTVCC".
,,Using [OH A/T] on the remote control, select
"DTVCCL
DTV DIS£LAY [LETTERBOK]
_*DTVCC
D S T[Daylight Savhg] [ON]
TIME ZONE [ALASKA]
NOTE:
CAPTION SERVICE you can switch differs depending on the
broadcast description.
5 Use "USER SETTING".
,,The "USER SETTING" function Iets you
change the caption size and font style.
,, Using [CN A/T] on the remote control, select
"USER SETTING".
CAPTIONSERVICE [SERVICEU6]
_" USER SETTING [OFF]
CAPTIONSIZE [MIDDLE]
FONT STYLE [STYLE1!6]
CHARACTER EDGE [NONE]
FORE OPAOITY [SOLID]
FORE COLOR [WHITE]
8AONOPACITY [SOLID]
8AON ONLOR [BLACK]
,, Press [VOL ,_] on the remote control and set
"USER SETTING" to [ON].
6 Set each item.
,,When "USER SETTING" is set to ON, you can
set the following items.
I'* CAPTIONSERVICE [SERVICE1/6]
,,Press [VOL ,_] on the remote control.
The following screen is displayed.
CAPTION SERVICE [OFF]
USER SETTING [OFF]
CA£TIOR SIZE [MIDZ}LE]
FONT STYLE [STYLE1/S]
CHARACTER EDGE [NONE]
FORE OPACITY [SOLE}]
FORE COLOR [WHITE]
8AOK ONACITY [SOLE}]
SACK COLOR [BLACK]
4 Select "CAPTION SERVICE".
,,When you press [VOL ,_FT] on the remote
control, you can switch CAPTION as below.
Select CAPTION SERVICE you want to use.
IOn:F]
[SE_WCEI/62
ESERVICE2/6]
[SERVUCE3/6]
[SERVICE4/6]
[SERV|CES/6]
,, Using [CH A/T] on the remote control, select
the item you want to set.
,,You can switch the setting for each item with
[VOL ,_/V] on the remote control.
,,The setting description for each item is shown
below.
[CAPTION S(ZE]
Text size of the displayed caption can be
switched as below.
[MIDDLE]
[LARGE]
[SMALL]
EN

[FONT STYLE]
Font style of the displayed caption can be
switched as below=
[STYLEII8]
[STYLE2tS]
[STYLE3/8]
[STYLE4/8]
[STYLES/8]
f
[STYLE6/8]
f
[STYLETIS]
[CHARACTER EDGE]
Text edging of the displayed caption can be
switched as below=
[NJNE]
$
[RAISEE)]
$
[DEPRESSED]
[UNHFORH]
[SHADOW LEFT]
$
[SHAE)OW RHGHT]
[FORE OPACITY]
Text opacity of the displayed caption can be
switched as below=
[SOLUE)]
$
[TRANSLUCENT]
[FLASH]
[FORE COLOR]
Text color of the displayed caption can be
switched as below=
[TRANSPARENT]
$
[W_mTE]
[R_E)]
[GREEN]
[BLUE]
$
[YELLOW]
$
[HAGENTA]
[CYAN]
[BACK OPACITY]
Background opacity of the displayed caption can
be switched as below=
[SOL|E)]
$
[TRANSLUCENT]
$
[FLASH]
[BACK COLOR]
Background co!or of the displayed caption can
be switched as below=
[TRANSPARENT]
[W_|TE]
[BL;CK]
[R_E)]
[GR_EN]
[YELLOW]
$
[HAGENTA]
[CYAN]
or)
Z
E
LU
09
=J
,<
z
o
F-
O,,
O
EN

You can set the viewing limitations to prevent your
children from watching inappropriate programs
including disagreeable expression and description.
The viewing limitations set for the program can be
released by entering the access code.
Channel +
number
buttons
CH AIT
MENU
AUDIO INtO
CDCD
+VOL A
CD CC)CD CD
1 Display the MENU screen.
* Press [MENU] on the remote control
The following MENU screen is displayed.
_*PICTURE
CHANNEL SET
[ENG]_ESP]FRA
V-CHIP SETUP
CAPTION [OFF]
DTV SET UP
2 Select "V-CHIP SET UP".
* Using [CH A/T] on the remote control, select
"V-CHIP SET UP".
PICTURE
CHANNEL SET
[ENG]_ESP]FRA
V-CHIP SETUP
CAPTION [OFF]
DTV SET UP
,,Press [VOL A] on the remote control.
The access code entry screen is displayed.
3 Enter the access code.
+ Use Channe_ number buttons and enter the
4-digit number.
+When you have not set up your access code,
enter 0000.
+When the access code is correct, the following
"V-CHIP SET UP" screen is displayed.
_" TV RATING .......
MPAARATING I _[_
CHANGECODE
See the following description for setting each
item+
[] TV RATmNG
4 Display the "TV RATING" screen.
, Using [CH A/T] on the remote control, select
"TV RATING".
Press [VOL A] on the remote control.
TV RATING
MPAARATING
CHANGECODE
5 Set "TV RATING".
+ Using [OH A/T] on the remote control, select
the rating+
TV-Y7( ) [VIEW]
TV-G [V_EV_
TV-£G( ) [V_EV,.q
TV-14( ) [VIEWI
TV-MA( ) [VIEW]
ACCESS CODE
<Semection>
, TV-Y :
+TV+Y7 :
, TV-G :
+TV-PG :
+TV-14 :
+TV-MA :
<Rating Category Explarmtions>
Appropriate for all children
Appropriate for children seven
and older
General Audience
Parental Guidance suggested
Unsuitable for children under 14
Mature audience only
EN

6 Set [BLOCK] or [VIEW].
,, Press [VOL A] on the remote control and set
to [BLOCK] or [VIEW] for the rating without sub
categories.
TV-Y [VIEW]
TV.Y7 ( ) [VIEW]
• TV-G [BLOCK]
TV-PG(DLSV) [BLOCK]
TV-14 (DLS_ [BLOCK]
TV-MA(LSV) IBLOCK]
5 Set "MPAA RATING".
,' Using the [CH _,/T] on the remote control,
select the rating.
PG [VlEW_
PGq3 [VIEW]
R [V_EW]
NC-17 [VIEW]
x [v_Ew]
o For the rating with sub categories, they are dis-
played by'pressing [VOL A] on the remote control
twice. Press [CH _'] on the remote control and
select the rating. Then press [VOL ,_] and set to
[BLOCK[ or [VIEW].
l TV-Y [VIEW]
TT_:YG7_[[_I_] ]
";ii iii!i!i
Sub categories
l[ TVeG [BLOCK]
D [BLOCK]
L [BLOCK]
S [BLOCK]
V [BLOCK]
<Selection> <Rating Category Explanations>
, TV-Y7
FV : Fantasy Violence
, TV-PG / TV-14 / TV-MA :
D Suggestive Dialog
(TV-PG, TV-14 only)
L : Coarse Language
S : Sexual Situation
V : Vioience
7' To exit the menu, press [MENU] on the remote
control.
[] MPAA RATING
4 Display the "MPAA RATING" screen.
o Using [CH A/_'] on the remote control, select
"MPAA RATING".
o Press [VOL A[ on the remote control.
TV RATING
• MPAARATING
CHANGE CODE
<Semection>
-G:
,PG:
, PG-13 :
oR:
, NC-17 :
-X:
<Rating Category Explanations>
General Audience
Parental Guidance suggested
Unsuitable for children under
13
Restricted; under 17 requires
accompanying parent or adult
guardian
No one under 17 admitted
Mature audience only
6 Set [BLOCK] or [VIEW].
,,Press [VOL z,,] and set to [BLOCK] or [VIEW].
G [v_Evq
PG [VIEW]
PC-13 [VIEW]
R [BLOCK]
NCq7 [BLOCK]
X [BLOCK]
To exit the menu, press [MENU[ on the remote
control.
NOTES:
for TV RATING and MPAA RATING
* You cannot access the setup menu when the "PROTECTED
PROGRAM bY ..." message appeals, You need to move to
an unblocked channel to access the setup menu.
* When you select a rating and set it to [BLOCK], the higher
ratings will be blocked automatically. The lower ratings will
be available for viewing.
* When you set the lowest rating to [WEW]. all other ratings
wifl automatica#y be available for viewing.
co
_5
z
E
uJ
¢o
J
<
z
o
ll
&,
0
EN

[] CHANGE CODE
4 Display the "CHANGE CODE" screen.
,, Using [OH A/T] on the remote control, select
"CHANGE CODE".
TVRATING
MPAARATING
CHANGEOODE
,, Press [VOL A] on the remote control
5 Change the access code.
,, Use ChanneJ number buttons on the remote
control and enter the NEW 4-digit CODE.
,, Enter code again in CONFIRM CODE box.
NEW CODE
CONFIRMCODE
6 To exit the menu, press [MENU] on the remote
control
NOTES:
* Make sure to enter the exact same new code in the "CON-
FIRM CODE" space as one in the "NEW CODE" space, tf
they are different, the "NEW CODE" space is cleared for
reentering.
* Yourpersonal access code will be erased and return to the
default (0000) when a power failure occuls or when you turn
off the power using a waft switch, tf you forget the code,
unplug the power cord for 10 seconds to restore the access
code to 0000.
The SLEEP TIMER function will automaticaIJy turn
off the power of the unit at a preset time.
CZ) (D GD
(3D CD CD
(Z) (D (ZD
SLEEP
1 Use SLEEP TIMER.
,, Press [SLEEP] on the remote control
,,The setting display for SLEEP TIMER is shown
in the screen.
SLEEP0
2 Set the timer.
,, Every time you press [SLEEP] on the remote
control, the time increases by 10 minutes.
,,You can set the timer up to 90 minutes.
,,After setting, you can check the remained time
per 1 minute by pressing [SLEEP].
SLEEP16
NOTES:
* When you disconnect the unit h'om the AC outlet or when a
power failure occurs, the sleep timer setting will be can-
celed.
* To cancel the sleep tlmel press [SLEEP] on the remote
control repeatedly until "SLEEP 0" is displayed.
* The Sleep Timer setting display will automatically disappear
after 10 seconds.
EN

SETTINGS
When you connect externaJ devices including a
video cassette recorder and home audio system,
you can easily switch the input mode with the
remote control.
mNPUTSELECT
(]D CD CD
CD G3 CD
GD (i) CD
¢._.EL
6 Q5
• When you press [INFO], the current external
input mode will be displayed at the top right of
the screen.
1) When usingVDEO-1 INPUT ack
VIDFO 1
2) When usm( VDEO-2 INPUT ack
VIDEO 2
Switch the input mode.
,,When you press [INPUT SELECT] on the
remote control, the input mode will be switched
as below:
TV channel
V|DEO1 or S-VHDEO (Rear)
VUDE02 (Front)
COMPONENT
° To use the VIDEO-1 INPUT jacks on the rear of
the TV, select "VIDEO1 ".
(If you use the S-VIDEO jack, "S-VIDEO" is dis-
played.)
, To use the jacks on the front of the TV, select
"VIDE02".
, To use the COMPONENT VIDEO INPUT iacks
on the rear of the TV, select "COMPONENT".
3) When using COMPONENT VIDEO INPUT
jack
COMPONENT
4) When using S-VIDEO INPUT ack
S-VIDE0
o9
t_
z
uJ
o9
uJ
O
EN

if you switch wires (e.g. between antenna and
CATV) or if you move the TV to a different area
after the initial setting, you need to perform AUTO
PRESET CH again. This function Iets you easily
select the receivable channels with [OH A/_'] and
the TV memorizes them even if you switch wires.
(3D CD CD
(Z) Q GD
CD (D CD
oooo
, VOL_
NOTE:
* Make sure if the TV is connected to antenna or cable.
When aerial antenna is connected, select "AUTO PRESET
CH (TV)" or '(TV/DTV)" at step 3. When connected to
CATV_ select "AUTO PRESET OH (CATV)L
4 *Only for TV channels
,, Using [OH ,&/_] on the remote control, select
"AUTO PRESET CH(TV)".
ADD/DELFTE
_" AUTO PRESETCH(TV)
AUTO PRESETCH(OATV)
AUTO PRESETCH([}TV_V)
o Press [VOL ,_] on the remote control.
Scanning and memorizing the channels auto-
matically starts.
AUTO PRESETCH_
_I_
,,When the scanning and memorizing are com-
pleted, the memorized smallest channel in the
analog broadcasting will be displayed.
When scanning TV or CATV only
Select analog mode by pressing [DTV_V].
2 Display the MENU screen.
,,Press [MENU] on the remote control.
The following MENU screen is displayed.
I,-PICTURE
CHANNEL SET
[ERG]_ESP/FRA
V-CHIP SETUP
CAPTION [OFF]
4 *Only for CATV channels
,, Using ION ,&/_] on the remote control, select
"AUTO PRESET CH(CATV)".
ADD/DELETE
AUTO PRESETCH(TV)
_" AUTO PRESETGH(CATV)
AUTO PRESETGH([}TV/TV)
,, Press [VOL ,_] on the remote control.
Scanning and memorizing the channels auto-
matically starts.
3 Select "CHANNEL SET".
,,Using [OH A/_] on the remote control, select
"CHANNEL SET".
AUTO PRESETCR(CATV)
_1_
PICTURE
CHANNEL SET
[ENG]_ESP/PRA
V-CHIP SETUP
CAPTION [OFF]
,,When the scanning and memorizing are com-
pleted, the memorized smallest channel in the
CATV will be displayed.
,,Press [VOL ,_] on the remote control.
EN

When scanning DTV only
1 Select digitai mode by pressing [DTV/TV].
2 Display the MENU screen,
,, Press [NENU] on the remote control.
The followinc MENU screen is displayed.
PICTURE
CHANNEL SET
[ENG]_ESP/FRA
V-CHIPSET UP
CAPTION[OFF]
DTV SETUP
3 Select "CHANNEL SET".
,, Using [OH A/T] on the remote control, select
"CHANNEL SET".
PICTURE
• CHANNEL SET
[ENG]_ESP/FRA
V-CHIPSET UP
CAPTION[OFF]
UTV SETUP
When scanning both DTV and TV at the same time
* You can access this menu from both modes
(analog / digital).
Display the MENU screen and select
"CHANNEL SET".
,,Press [MENU] and select "CHANNEL SET"
using [CH ,L_] on the remote control.
PICTURE
_"CHANNELSET
[ENG]/ESPPRA
V-CHIPSETUP
CAPTION[OFE]
DTVSETUP
,,Press [VOL A] on the remote control.
2 Using [OH A/T] on the remote control, select
"AUTO PRESET CH(DTV/TV)".
ADO/DELETE(DW)
AUTO PRESET CN(DW)
• AUTO PRESET CN(DWrH)
¢o
z
w
09
w
I-
0
,, Press [VOL A] on the remote control.
4 Using [OH A/T] on the remote control, select
"AUTO PRESET CH(DTV)".
,,Press [VOL ,_] on the remote control.
Scanning and memorizing the channels auto-
maticaIly starts.
ADD!DELETE(DTV)
• AUTO PRESETCN(DT_0
AUTO PRESETCN(DTVfrV)
AUTOPRESETOH(DTV/TV)
_1_
,, Press [VOL ,_] on the remote control.
Scanning and memorizing the channels auto-
matically starts.
AUTO PRESETCN(DT_O
_1_
,,When the scanning and memorizing are com-
pleted, the memorized smallest channel in the
digital broadcasting will be displayed.
,,When the scanning and memorizing are com-
pleted, the memorized smallest channel in the
analog broadcasting will be displayed, if no
analog channe! is memorized, the memorized
smalIest channel in the digital broadcasting will
be displayed.
NOTES:
* If you press [POWER] or [MENU] on the remote control
while setting AUTO PRESET CH. AUTO PRESET OH set-
ting will be canceled.
if there is no TV signal input, "NO TV SIGNALS" will appear
on the display after the completion of channel scanning.
NO TVSIGNALS
EN

The CHANNEL ADD/DELETE function lets you add
the channel that was not added by the AUTO PRE-
SET CH function due to the bad reception status at
the initial setting. You can also delete the unneces-
sary channels.
CD (Z) CO
(D G:) G_
C) (Z) (D
_QQ5
VOL A/V
MENU _0 0 CD 0
¢------------------_pS_&_T SLEEP ,_)
1 Select analog mode by pressing [DTVFt:V].
2 Display the MENU screen.
,,Press [MENU] on the remote control.
The following MENU screen is displayed.
PICTURE
CHANNEL SET
[ENG]_ESP/PRA
V-CHIP SETUP
CAPTION [OFF]
3 Select "CHANNEL SET".
,,Using [CH A/T] on the remote control, select
"CHANNEL SET".
4 Select "ADD/DELETE".
,, Using ION A/T] on the remote control, select
"ADD/DELETE".
_- ADDIOELETE
AUTO PRESETCH(TV)
AUTO PRESETCH(CATV)
AUTO PRESETCH(OTV/TV)
o Press [VOL ,_] on the remote control.
5 Select the channel you want to add or delete.
,, Using [OH A/T] or Channel number buttons
on the remote control, select the channel.
ADDIOELETE:W
,, Select ADD or DELETE with [VOL AFT] on the
remote control.
,, Color of channel numbers displayed at the right
top of the screen
Blue/Green: The selected channel will be added.
Pink/Red: The selected channel will be deleted.
To exit the menu, press [MENU] on the remote
control.
PICTURE
_"CHANNEL SET
[ENG]_ESP/PRA
V-CHIP SETUP
CAPTION [OFF]
,,Press [VOL ,_] on the remote control.
The following CHANNEL SET screen is dis-
played.
I,-ADD/DELETE
AUTO PRESETCH(T'_,,
AUTO PRESETOH(CA%_)
AUTO PRESETCH(OTV/TV)
EN

"I Select digitaI mode by pressing [DTViTV].
2 Display the MENU screen.
,, Press [NENU] on the remote control,
The following MENU screen is displayed.
• PICTURE
CHANNEL SET
[ENG]_ESP/FRA
V-CHIPSET UP
CAPTION[OFF]
OTV SETUP
3 Select "CHANNEL SET".
,, Using [CH A/T] on the remote control, select
"CHANNEL SET".
PICTURE
• CHANNEL SET
[ENG]_ESP/FRA
V-CHIPSET UP
CAPTION[OFF]
OTVSETUP
6 To exit the menu, press [MENU] on the remote
control.
NOTES:
* The menu will disappear automatica#y after about 10 sec-
onds.
* in the digital mode (DTV), you can add or delete channels
on!y for Major channel.
0
z
l,u
¢o
l,u
0
,, Press [VOL ,_] on the remote control.
4 Select "ADD/DELETE(DTV)".
,, Using ION A/T] on the remote control, select
"ADD/DELETE(DTV)".
• ADD!DELETE(DTV)
AUTO PRESETCH(DT_z)
At.q'o PRESETCH(DTVrrV)
,, Press [VOL ,_] on the remote control.
5 Select the channel you want to add or delete.
,, Using ION A/T] or Channem number buttons
on the remote control, select the channel.
D12
ADD/DELETE:DTV
,,Select ADD or DELETE with [VOL AN] on the
remote control.
,,Color of channel numbers displayed at the right
top of the screen
Blue/Green: The selected channel will be added.
Pink/Red: The selected channel will be deleted.
EN

After the initial setting you set when you first turned
on the power, you can set the D.S.T. (Daylight
Saving Time) again. When you set this function to
ON, the date information adjusted for the area you
set will be adjusted to the one added by another 1
hour. In addition, the time difference wiII be adjust-
ed as follows: 2 a.m. on first Sunday in April to 3
a.m., 1 hour ahead, and 2 a.m. on last Sunday in
October to 1 a.m. 1 hour behind.
(D CD CD
G3 G3 GD
CD (_) Q
C_NEL
6QQS,
,,CDCC)CD C)
44_u? S_UP_TSLEEP L_
,-VOL A/v
3 Select "D.S.T. (Daylight Saving)".
,, Using [OH A/T] on the remote control, select
"D.S.T. (Daylight Saving)".
DTVDISPLAYIL£TTERSOX]
DTVCS
_'-DST(DaylightSawng) [---]
TINEZONE [ALASKA]
4 Set "D.S.T. (Daylight Saving)".
,, Using [VOL ,_FZ] on the remote control, set to
[ON] or [OFF].
DTVDISPLAYILETTERSOX]
DTVCC
_'-DST(DaylightSawng) [ON]
T]NEZONE [ALASKA]
Display the MENU screen.
,,Press [MENU] on the remote control.
The following MENU screen is displayed.
J"PICTURE
CHANNEL SET
[ENG]_ESP/FRA
V-CHIP SETUP
CAPTION [OFF]
DTV SET UP
5 To exit the menu, press [MENU] on the remote
control.
NOTE:
When you set D.S. 7_to OFF. the date and time information
adjusted for the area set bY TIME ZONE is displayed.
2 Select "DTV SET UP".
,,Using [OH AkfT] on the remote control, select
"DTV SET UP".
PICTURE
CHANNEL SET
[ENG]_ESP/FRA
V-CHIP SETUP
CAPTION [OFF]
_"DTV SET UP
,,When you press [VOL ,_] on the remote control,
the following MENU screen is displayed.
_*DTV DISPLAY [LETTERBOX]
DTVCC
D S 3"[Daylight Sav_ng][---]
TIME ZONE [ALASKA]
EN

Hfyou move the TV to a different area after the ini-
tial setting you set when you first turned on the
power, you can set the area again+
CD C2:)(3D
C:DG::) CD
C3DCD CD
,,0 0 0 0
+VOL A/v
1 Display the MENU screen+
,, Press [MENU] on the remote control+
The following MENU screen is displayed+
• PICTURE
CHANNEL SET
[ENG]_ESP/FRA
V-CHIPSET UP
CAPTION[OFF]
DTV SETUP
2 Select "DTV SET UP".
,, Using ION A/T] on the remote control, select
"DTV SET UP "+
PICTURE
CHANNEL SET
[ENG]_ESP/FRA
V-CHtPSET UP
CAPTION[OFF]
• OTVSETUP
oWhen you press [VOL A] on the remote con-
troI, the following MENU screen is displayed.
• £}TVDISPLAY[LETTERBOX]
DTVCC
DSTIDay4ight Saving] [ON]
TtMEZONE [ALASKA]
3 Select "TIME ZONE".
,,Using [CH A/T] on the remote control, select
"TIME ZONE".
DTV DISPLAY [LETTERBOX]
DTVCC
D S T[Daylight Savir_g] [ON]
_"TIME ZONE [ALASKA]
4{ Select your "TIME ZONE".
oWhen you press [VOL AF7] on the remote
control, the TiME ZONE will be switched as
below.
[ALASKA]
€
[NAWA||]
¢
[PACUF|C]
€
[MOUNTA|N]
¢
[CENTRAL]
+
[EASTERN]
+
,,Based on the world standard time information
acquired from digital broadcasting, the time dif-
ference will be adjusted as below.
ALASKA -9 hours
HAWAII -10 hours
PACIFIC -8 hours
MOUNTAIN -7 hours
CENTRAL -6 hours
EASTERN -5 hours
ATLANTIC -4 hours
t_
z
btJ
03
ua
F-
O
5 To exit the menu, press [MENU] on the remote
control.
EN

x x
iii! i,i !ii i ii i! i@iiii i!iliiii !iliiii !ii!i!il
JSCELLANEOUS
Before caIJing for service, check the following chart again.
No power
m . -e
• Be sure the Power cord is connected to outlet.
• If a power failure occurs, unplug the power cord for 30
minutes to allow the unit to reset itself.
No picture or sound • Check the power is turned on.
• Check the outlet connection.
• Check the antenna or cable connection to the main unit.
• When the outside antenna is used, check the wire condi-
tion and connection.
• Try to view other channels. It may be the problem on the
broadcasting station.
• Turn off the power and wait for about 1 minute, then turn
it on again.
No color • Check the antenna or cable connection to the main unit.
• When the outside antenna is used, check the wire condi-
tion and connection.
• Try to view other channels. It may be the problem on the
broadcasting station.
• Adjust the color in the MENU screen.
Sound OK, Picture Poor
• Check the antenna or cable connection to the main unit.
• When the outside antenna is used, check the wire condi-
tion and connection.
• Electric waves may be interfered due to the electric appli-
ances, etc. nearby.
• Adjust CONTRAST and BRIGHT in the MENU screen.
• Try to view other channels. It may be the problem on the
broadcasting station.
Picture Distorted
• When the outside antenna is used, check the wire condi-
tion and connection.
• Try to view other channels. It may be the problem on the
broadcasting station.
Weak Picture • Check the antenna or cable connection to the main unit.
• When the outside antenna is used, check the wire condi-
tion and connection.
• Adjust CONTRAST and BRIGHT in the MENU screen.
• Try to view other channels. It may be the problem on the
broadcasting station.
Lines or Streaks in Picture
• When the outside antenna is used, check the wire condi-
tion and connection.
• Electric waves may be interfered due to the electric appli-
ances, etc. nearby.
• Try to view other channels. It may be the problem on the
broadcasting station.
Picture blurred
• When the outside antenna is used, check the wire condi-
tion and connection.
• Try to view other channels. It may be the problem on the
broadcasting station.
Ghosts in picture
• Check the antenna or cable connection to the main unit.
• When the outside antenna is used, check the wire condi-
tion and connection.
• Electric waves may be interfered due to the electric appli-
ances, etc. nearby.
• Try to view other channels. It may be the problem on the
broadcasting station.
EN

Bars on screen
" " -e
• When the outside antenna is used, check the wire condi-
tion and connection.
• Electric waves may be interfered due to the electric appli-
ances, etc. nearby.
Picture roils vertically
• When the outside antenna is used, check the wire condi-
tion and connection.
• Electric waves may be interfered due to the electric appli-
ances, etc. nearby.
• Try to view other channels. It may be the problem on the
broadcasting station.
Different color marks on screen
• Move the TV apart from electric appliances nearby. Turn
off the power and wait for about 30 minutes, then turn it
on again.
• Try to view other channels. It may be the problem on the
broadcasting station.
Poor reception on some channels
• Check the antenna or cable connection to the main unit.
• When the outside antenna is used, check the wire condi-
tion and connection.
• Electric waves may be interfered due to the electric appli-
ances, etc. nearby.
• Try to view other channels. It may be the problem on the
broadcasting station.
Picture OK, sound poor • Electric waves may be interfered due to the electric appli-
ances, etc. nearby.
• Try to view other channels. It may be the problem on the
broadcasting station.
Remote control doesn't work • Check the antenna or cable connection to the main unit.
• Check the battery life of the remote control.
• Check if there is an obstacle between the sensor and the
remote control.
• Test the signal output. If OK, then possible remote sensor
trouble. (Refer to "IR SIGNAL CHECK" on page 36.)
Problems on Closed Caption
Misspelled captions are displayed. • Closed captioning production companies may broadcast
programs without correcting the misspelling in a live
broadcast.
Captions are not entireIy displayed, or
captions are delayed behind the dia-
logue.
• Captions that are delayed a few seconds behind the actual
dialogue are common for live broadcasts. Most captioning
production companies can display a dialogue to a maximum
of 220 words per minute. If a dialogue exceeds that rate,
selective editing is used to insure that the captions remain
up-to-date with the current TV screen dialogue.
Captions are displayed as a white box.
No caption is displayed in the Closed
Caption-supported program.
• When electric waves are interfered due to buildings,
weather conditions etc., incomplete captions may be dis-
played.
• Broadcasting station may shorten the program to insert
the advertisement. The closed caption decoder cannot
read the information of the shortened program.
No caption is displayed when playing • The videotape may be illegally copied, or the caption sig-
the videotape containing captions, nal may fail to be read while coping.
Black box is displayed in the screen. • [TEXT] mode is selected for caption. Select [Cl], [C2] or
[OFF].
09
O
w
z
..,J
w
o
EN

ATSC
Acronym that stands for Advanced
Television Systems Committee
and the name of the digitaI broad-
casting standard in the United
States.
High Definition TV (BDTV)
Ultimate digital format that pro-
duces high resolution and high
picture quality.
Letterbox
Letterbox refers to the format dis-
playing a wide-screen picture on a
standard 4:3 aspect ratio televi-
sion screen with black bars above
and below. It is used to maintain
the aspect ratio of the original
source such as a motion picture
(16:9 or wider).
NTSC
Acronym that stands for National
Television Systems Committee
and the name of the current ana-
log broadcasting standard used in
the United States.
SAP(Secondary Audio Program)
Second-audio channel delivered
separately from maimaudio chan-
nel. This audio channel is used as
an alternate in bilingual broadcast-
ing.
Standard Definition TV (SDTV)
Standard digital format that is sim-
ilar to the NTSC picture quality.
S-Video output
It delivers independently each sig-
nal of color(C) and luminance (Y)
to TV as video signals, so that
higher-quality picture will be
gained.
_,Wipe the front panel and other exterior surfaces of
the TV with a soft cloth immersed in lukewarm
water and wrung dry.
_,Never use a solvent or alcohol. Do not spray insec-
ticide liquid near the TV. Such chemicals may
cause damage and discoloration to the exposed
surfaces.
Wipe the picture tube of the TV with a soft c!oth.
Before cleaning the picture tube, disconnect the
power cord.
if the remote control doesn't work properly, You can
test if the remote control sends out the infrared sig-
nal with AM radio or a digital camera (including built-
in camera of ce!Iular phone), it will help to define the
cause of malfunction.
oWith an AM radio:
Tune a AM radio to a band with
no broadcasting. Press a button
on remote control toward the
radio. Sound will be fluttering
when you press any key and the
radio receives the signal This
means the remote control unit is
working.
_,Should your unit become inoperative, do not try to
correct the problem by yourself. There are no
userserviceable parts inside. Turn off, unplug the
power cord and please call our help line mentioned
on the front page, to locate an Authorized Service
Center.
,,With a digital camera (including built-
in camera of cellular phone):
Direct a digital camera to remote con-
trol, press and hold a button on remote
control, if infrared light appears
through digital camera, the remote is
working.
EN

Television system: NTSC-M
Closed Caption
System:
Channel coverage
VHF:
UHF:
DTV:
CATV:
Tuning System
Channel access:
Terminals
Antenna input:
S-Video input:
Video input:
Audio input:
TV Standard
§15.119/FCC
2--13
14 -_69
1 -- 99
2 -_13, A -_W,
W+I - W+84,
A-5 -_A-l, 5A
181 channel
frequency synthesized
tuning system
Direct access keyboard,
programmable
scan and up/down
VHF/UHF/DTV/CATV
75 ohm unbalanced
(F-type)
Mini DiN 4-pin jack
RCA connector x 2
(1 x Front / 1 x Rear)
RCA connector x 4
(2 (L/R) x Front / 2 (L/R) x Rear)
Coaxial digital audio output:
One pin jack, 500mmVpp (75 ohm)
Component Video/Audio input:
One pin jack (Y) / lVpp (75 ohm)
Two pin jacks (Pb/Pr) / 700mVpp (75 ohm)
RCA connector x 2 (L/R)
Stereo Sound System
2 speakers
Sound output: 2W, 8 ohm x 2
"1
Remote control: Digital encoded
Operating
temperature:
Power requirements:
Power consumption
(Maximum):
Picture tube:
Dimensions:
Weight:
infrared light system
5°C to 40°C
(41°F to 104°F)
AC120V, 60Hz
110W
27"
H : 23-1/4" (590ram)
W: 29-5/16" (745mm)
D : 19-7/8" (505ram)
92.6 Ibs. (42kg)
d}
z
O
O
O
w
t_
09
,, Designs and specifications are subject to change without notice and without our legal obligation.
_,if there is a discrepancy between languages, the default language will be English.
EN

SYLVANmA
UMITED WARRANTY
FUNAI CORR will repair this product, free of charge in the USA in the event of defect in materials or workmanship
as follows:
DURATION:
PARTS: FUNAi CORR will provide parts to replace defective parts without charge for one (!) year from the
date of original retail purchase. Two (2) years for Picture Tube. Certain parts are excluded from this
warranty.
LABOR: FUNAt CORR will provide the labor without charge for a period of ninety (90) days from the date of
original retail purchase.
LIMITS AND EXCLUSIONS:
THIS WARRANTY IS EXTENDED ONLY TO THE ORIGINAL RETAIL PURCHASER. A PURCHASE RECEIPT OR
OTHER PROOF OF ORIGINAL RETAIL PURCHASE WILL BE REQUIRED TOGETHER WITH THE PRODUCT TO
OBTAIN SERVICE UNDER THIS WARRANTY.
This warranty shall not be extended to any other person or transferee.
This warranty is void and of no effect if any serial numbers on the product are altered, replaced, defaced, missing or
if service was attempted by an unauthorized service center. This limited warranty does not apply to any product not
purchased and used in the United States.
This warranty only covers failures due to defects in materia! or workmanship which occurs during normal use. It does
not cover damage which occurs in shipment, failures which are caused by repairs, alterations or product not supplied
by FUNA! CORR, or damage which results from accident, misuse, abuse, mishandling, misapplication, alteration,
faulty insta!lation, improper maintenance, commercial use such as hotel, rental or office use of this product or dam-
age which results from fire, flood, lightning or other acts of God.
THIS WARRANTY DOES NOT COVER PACKING MATERIALS, ANY ACCESSORIES (EXCEPT REMOTE CON-
TROL), ANY COSMETIC PARTS, COMPLETE ASSEMBLY PARTS, DEMO OR FLOOR MODELS.
FUNAI CORR AND ITS REPRESENTATIVES OR AGENTS SHALL IN NO EVENT BE LIABLE FOR ANY GENERAL,
INDIRECT OR CONSEQUENTIAL DAMAGES ARISING OUT OF OR OCCASIONED BY THE USE OF OR THE
INABILITY TO USE THIS PRODUCT. THIS WARRANTY IS MADE IN LIEU OF ALL OTHER WARRANTIES,
EXPRESS OR IMPLIED, AND OF ALL OTHER LIABILITIES ON THE PART OF FUNAI, ALL OTHER WARRANTIES
INCLUDING THE WARRANTY OF MERCHANTABILITY AND FITNESS FOR A PARTICULAR PURPOSE, ARE
HEREBY DISCLAIMED BY FUNAt AND ITS REPRESENTATIVES IN THE UNITED STATES.
ALL WARRANTY INSPECTIONS AND REPAIRS MUST BE PERFORMED BY AN AUTHORIZED SERVICE CENTER.
THIS WARRANTY IS ONLY VALID WHEN THE UNIT IS CARRIED-IN TO AN AUTHORIZED SERVICE CENTER.
THE PRODUCT MUST BE ACCOMPANIED BY A COPY OF THE ORIGINAL RETAIL PURCHASE RECEIPT. IF NO
PROOF OF PURCHASE IS ATTACHED, THE WARRANTY WILL NOT BE HONORED AND REPAIRS COSTS WILL
BE CHARGED.
IMPORTANT:
THIS LIMITED WARRANTY GIVES YOU SPECIFIC LEGAL RIGHTS. YOU MAY HAVE OTHER RIGHTS THAT VARY FROM
STATETO STATE, IR AT ANY TIME DURING THE WARRANTY PERIOD, YOU ARE UNABLE TO OBTAIN SATISFACTION
WITH THE REPAIR OF THIS PRODUCT, PLEASE CONTACT FUNAI CORR
ATTENTION:
FUNAI CORR RESERVES THE RIGHT TO MODIFY ANY DESIGN OF THIS PRODUCT
WITHOUT PRIOR NOTICE,
To locate your nearest AUTHORIZED SERVICE CENTER or for general service inquiries,
please contact us at :
FUNAI CORPORATION
Customer Service
Tel :1-800-605-8453
htt p://www.SylvaniaConsumerE_ect tonics°corn
19900 Van Ness Avenue, Torrance, CA 90501
1EMN21254 Printed in Malaysia
L3822UC lk__ lk_

MANUAL DEL USUARIO
PARA RECIBIR SENAL DIGITAL ]
I
DEBE CONECTAR LA ANTENA

PARA REDUCIR EL RIESGO DE INCENDIO O CHOQUE ELECTRICO, NO EXPONGA ESTE
EQUIPO A LA LLUVIA O HUMEDAD,
PRECAUCmON
_'It_U!U|UI_: PARA REDUCIR EL RIESGO DE
CHOQUE ELI_CTRICO, NO RETIRE LA CUBIERTA (0 PARTE
POSTERIOR). NO EX!STEN PARTES REPARABLES POR EL
USUARIO EN EL INTERIOR. LAS REPARACIONES DEBEN
REALIZARSE POR PERSONAL DE SERVlC!O CALIFICADO.
La nota importante eeta situada en ta parte traeera de[ gabinete,
ESTE S[MBOLO INDICA QUE DENTRO DE
ESTA UNIDAD SE ENCUENTRA PRESENTE
VOLTAJE PELIGROSO QUE CONSTITUYE UN
RIESGO DE CHOQUE ELECTRICO.
ESTE S[MBOLO INDICA QUE EXlSTEN
IMPORTANTES INSTRUCC!ONES DE
OPERAC!ON Y MANTENIMIENTO EN LA
MTERATURA QUE ACOMRAI_A ESTE
ARARATO.
1. Lea las instrucciones - Se deber&n leer todas las instruc-
clones de seguridad y operacion antes de operar el apara-
to.
2. Conserve las instrucciones - Las instrucciones de seguri-
dad y de operaci6n deber&n conservarse parR referencia
futura.
3. Tome en cuenta las advertencias - Deber_in seguirse
todas las advertencias en la unidad yen las instrucciones
de operaci6n.
4. Siga las instrucciones - Deberan seguirse todas las
instrucciones de operaci6n y uso.
5. Limpieza - Desconecte la unidad del tomacorriente antes
de limpiarla. No use limpiadores Ifquidos o en aerosol. Use
un pa[io hOmedo para limpiar.
EXCEPCION: Los productos que requieren el use de ser-
vicio ininterrumpido y que, por alguna raz6n especffica,
come la posibilidad de p6rdida del c6digo de autorizaci6n
del convertidor CATV. no permiten que el usuario los
desconecte parr limpiarlos o por cualquier otra raz6n, no
requieren seguir las instrucciones que indican desconectar
el aparato en la descripci6n de limpieza necesaria en el
punto 5.
6. Accesorios - No use accesorios que no hayan side
recomendados por el fabricante de la unidad ya que
podr[an causar problemas peligrosos.
7. Agua y humedad - No use esta unidad cerca del agua por
ejemplo, cerca de una baPiera, lavabo, fregadero de coci-
na, o lavadero en un s6tano mojado o cerca de una pisci-
na, o en lugares similares.
8. Accesorios - No coloque esta unidad ADVERT_NCIASOBR£
sobre una carretilla, tr[pode, platafor- LACARR_TILLAPORT_,TIL
ma o mesa inestable. La unidad podria ,_lll"_k
caerse y causar lesiones graves a
alguna persona y da[ios graves al
aparato. Use s61o con carretillas,
tr[podes, plataformas, o mesas
recomendadas por el fabricante o que
se vendan con la unidad. Cualquier
montaje del aparato debera seguir las instrucciones del
fabricante y deberan usarse accesorios de montaje
recomendados por el fabricante. La combinaci6n de este
equipo y carretilla debe moverse con cuidado. Las paradas
repentinas, la fuerza excesiva y las superficies irregulares
pueden causar que el equipo y la carretilla se volteen de
lado.
9. Ventilacion - Las ranuras y aberturas en el gabinete yen la
parte posterior o inferior se proporcionan parr fines de
ventilacion, parr asegurar la operacion confiable de la
unidad y parr protegerla contra el sobrecalentamiento;
estas aberturas no deberan bloquearse o cubrirse. Las
aberturas no deberan bloquearse nunca al colocar la
unidad sobre una cama, sofA, alfombra u otra superficie
similar. Este unidad no deberEi colocarse nunca cerca o
sobre un radiador o registro de calefacci6n. Esta unidad no
deber_ colocarse en una instalacion integrada, como un
librero o estanteria, a menos que se proporcione venti-
laci6n apropiada o se hayan seguido las instrucciones del
fabricante.
10. Fuentes de energia - Esta unidad debe operarse unica-
mente con el tipo de fuente de energia que se indica en la
etiqueta de marcaje. Si no esta seguro del tipo de fuente
de energia que usa en el hogar, consulte con el distribuidor
del equipo o con la compa_da local de energia electrica.
ParR unidades dise[iadas parR funcionar con pilas, u otras
fuentes, consulte las instrucciones de operacion respecti-
vas.
1 1.Conexi6n a tierra o polarizaci6n - Esta unidad est& equipa-
da con un enchufe polarizado de corriente alterna (un
enchufe que tiene una lamina mrs ancha que la otra).
Este enchufe se conecta al tomacorriente de una sola
forma. Esta es una caracterl'stica de seguridad. Si no
puede insertar completamente el enchufe en el tomacorri-
ente, intente dar vuelta al enchufe. Si aOn as[ el enchufe
no entra, comun[quese con su electricista parr que reem-
place el tomacorriente obsoleto. No anule el prop6sito de
seguridad del conector a tierra polarizado.
12. Protecci6n del cable de alimentaci6n - Los cables de alp
mentaci6n el6ctrica deben colocarse de tal forma que no
se pisen o queden aplastados per objetos colocados con-
tra ellos; preste atenci6n especial a los cables conectados
a tomacorrientes y al lugar de donde salen del equipo.
SP

FIGURA A
EJEMPLODECONEXIONATIERRADELA ANTENA
$EGUNELCODIGONAC]ONALDEELECTRICIDAD "_._l----_ _ CABLEPRINCIPAL
DE LA ANTENA
ABF_AZADERA
DE CONEX]ON A TIEffRA
(NEC SECCFON 810-20)
EQU_PO DE
SERVlCIO
ELECT£1CO
NDUCTO£ES DE OONEXION
AT_EnaA_NECSECC_ONS10-21_
CODIGO NACIONAL DE ELECT£1CIDAD - NEC .-J--.II_- _ISTEMA DEL ELECT_ODO A TIERRA DEC SERV_ClO
DE ENEf_GIA (NEC ARTICULO 250 PARTE }4)
$2898A
13.Conexi6n a tierra de la antena al aire libre - S[ una antena
externa o un sistema de cable esta conectado al equipo,
asegOrese de que la antena o el sistema de cable este
conectado a tierra, para proporcionar algo de protecci6n
contra sobretensiones de voltaje y la acumulaci6n de car-
gas estAticas. El art[culo 810 del c6digo nacional el6ctrico,
ANS!/NFPA No. 70 proporciona informaci6n con respecto
a la conexi6n a tierra del poste y la estructura de soporte,
la conexi6n a tierra del alambre principal de una unidad
de descarga de antena el tama[io de los conductores de
la conexi6n a tierra y la conexi6n del electrodo de conex-
i6n a tierra. (Fig. A)
14. Relampagos - Para protecci6n adicional de esta unidad
durante una tormenta con relAmpagos, o cuando no se
use durante largos periodos desconSctela del tomacorri-
ente y desconecte la antena o el sistema de cable. Esto
evitarA da[ios al unidad debido a sobretensi6n en las
Ifneas de alto voltaje o relampagos.
15. Lfneas de alto voltaje - El sistema de antena exterior no
debera estar ubicado cerca de Ifneas de alto voltaje u
otros circuitos de luz el6ctrica o de energfa, o donde
pueda caer sobre dichos circuitos o Ifneas de alto voltaje.
AI instalar un sistema de antena externa, se debe tener
cuidado extremo para no tocar los circuitos o lineas de
alto voltaje ya que el contacto con ellos podr[a set fatal.
16. Sobrecarga - No sobrecargue los tomacorrientes y los
cables de extensi6n ya que esto podrfa resultar en riesgo
de incendio o choque el6ctrico.
17. Introducci6n de objetos y I[quidos - Nunca inserte objetos
de ningOn tipo en esta unidad a trav6s de las aberturas,
ya que podrian tocar puntos de voltaje peligrosos o hacer
corto circuito con otros componentes que podr[an resultar
en incendio o choque el6ctrico. Nunca derrame Ifquidos
de ninguna clase sobre la unidad.
18. Reparaciones - No trate de reparar esta unidad usted
mismo, ya que abrir o retirar las cubiertas puede exponer-
Io a voltajes peligrosos u otros riesgos. Remita todas las
reparaciones al personal de servicio calificado.
19. Da[ios que requieren reparacion - Desconecte esta unidad
del tomacorriente y refiera la reparaci6n a personal califi-
cado bajo las siguientes condiciones:
a. Cuando el cable de alimentaci6n o enchufe est6 da5a-
do o ra[do.
b. Si se ha derramado Ifquido o han cafdo objetos dentro
de la unidad.
c. Si la unidad se ha expuesto a Iluvia o agua.
d. Si la unidad no opera normalmente al seguir las instru-
ciones de operaci6n. Ajuste s61o los controles que se
cubren en las instrucciones de operaci6n, ya que el
ajuste incorrecto de otros controles podfia resultar en
da[ios y con frecuencia requerirA trabajo intensivo con
un t6cnico calificado para restaurar la operaci6n normal
de la unidad.
e. Si la unidad se ha caido o da_lado de cualquier forma.
f. Cuando la unidad muestra un cambio evidente en el
funcionamiento, esto indica que necesita reparaci6n.
20. Repuestos - Cuando se requieren repuestos, asegOrese
de que el t6cnico de reparaci6n use repuestos especifica-
dos pot el fabricante o que tengan las mismas caracteris-
ticas que la parte original. Las substituciones no autor-
izadas pueden resultar en incendio, choque el6ctrico,
lesiones a personas u otros peligros.
21. Verificacion de seguridad - Despu6s de completar la
reparaci6n de esta unidad, pida al t6cnico de servicio que
realice verificaciones de seguridad para determinar que la
unidad se encuentra en condiciones de operacion apropia-
da.
22.Calor - Esta unidad debera situarse lejos de fuentes de
calor como radiadores, registros de calefacci6n, estufas u
otros aparatos (incluso amplificadores) que produzcan
calor.
t¢
(5
LJJ
09
¢0
t¢
_,_
Z
o
SP

_,Manual del usuario
(1EMN21254)
_,Unidad de control remoto oPilas
(NE601UE) ("AA" x 2)
_. ¸¸¸¸¸¸/
• Si necesita cambiar estos accesorios, consulte el NO. de PIEZA encima de la ilustraci6n y Ilame a
nuestra linea de asistencia mencionado en la pagina delantera.
• Dependiendo del sistema de su antena, es posible que necesite diferentes tipos de combinadores (mezclado-
ra) o separadores (divisor). Comunfquese con la tienda local de electr6nica para adquirir estos articulos.
_,Coloque el TV en una habitaci6n suficientemente ventilada.
,,Mantengalo alejado de fuentes de calor, como aparatos de calefacci6n, o de la acci6n directa del sol.
_,No coloque el TV sobre superficies blandas, come alfombrillas o mantas.
,,Deje suficiente espacio para que circule el aire alrededor del equipo.
ADVERTENOIA DE LA FCC - Este equipo puede generar o utilizar energ[a de radiofrecuencia. Los
cambios o modificaciones deI equipo pueden causar serias interferencias si dichos cambios o
modificaciones no han sido expresamente aprobados en el manual del usuario. El usuario podra perder la
autoridad para operar este equipo si efectOa una modificaci6n o cambio no autorizado.
PREOAUOION: PARA EVHTARCHOQUES ELE_CTRHCOS,CONECTE LA LAMHNA ANCHA DEL
ENCHUFE EN LA RANURA ANCHA DE LA TOMA DE CORRHENTE; HNSERTE POR COMPLETO.
NOTA SOBRE REOIOLADO: Las pilas no deben tirarse o incinerarse, sino descartarse de acuerdo con
Ias normativas locales concernientes a desechos qu[micos.
Nora para el instalador del sistema CATV:
Este recordatorio se propordona para que e/ insta/ador de! sistema CATV preste atencidn a/ Artfcu/o
820-40 del NEC e/ cuat proporciona pautas para una correcta conexidn a tierra y, en particular, especifi-
ca que fa conexidn a tierra det cable debe estar conectada a/ sistema de tierra del edificio, tan cema at
punto de entrada det cable come sea prbctico.
Podra encontrar e! nOmero de serie correspondiente en la parte trasera de Ia unidad. Ninguna otra unidad
tiene el mismo nOmero de serie que Ia suya. DeberA registrar aqu[ el nOmero y otra informaci6n importante, y
conservar este Iibro como registro permanente de su compra para ayudarle a identificar la unidad en caso de
robo. Los nOmeros de serie no se conservan en el archivo.
Modelo nt]m. Fecha de compra
Nt]m. de serie Telefono de la tienda
Tienda donde se compro Direccion de la tienda
SP

DTV/TV/CATV
Este TV le permite cambiar f_cilmente entre TV(NTSC) y DTV(ATSC) con e! mando a distancia. Con esta
funci6n se puede ver Ia televisi6n anal6gica convencional come televisi6n de definici6n estandar o de alta t¢
definici6n. Tambien se puede conectar a Ia CATV, si dispone de caja de CATV. :_
t_
* PantaHa de informaci6n de programae (DTV) uJ
09
Se puede mostrar en la pantalla el t(tulo, los contenidos y otra informaci6n acerca del programa DTV que se :_
estA viendo, c0
<
* Canamde preajuste automatico t¢
Este TV puede buscar y memorizar automAticamente los canales que se reciban. Con esta funci6n se elim-
ina la necesidad de Ilevar a cabo complicados procedimientos de ajuste, ud
° V-CHiP z
Esta funci6n le permite establecer una serie de limitaciones de cara a evitar que los ni_os puedan ver deter-
minados programas.
0
. Desoodificador de subt_tulos
Este TV dispone de descodificador de subt[tulos incorporado que muestra el texto en la pantalla. Le permite
leer los didIogos de un programa de TV o cualquier otra informaci6n en los programas que disponen de esta
funci6n de subt[tulos.
. Sintonizador MTS/SAP
Mediante esta funci6n puede seIeccionar el idioma deseado con el mando a distancia.
. Funci6n de apagado automatico
El equipo se apaga automAticamente cuando no hay sehal de la antena o se toca ningOn bot6n durante
mAs de 15 minutes.
. Funcion de reanudacion
Cuando se apaga el TV debido a un falIo de la corriente, se volvera a encender automAticamente tras
volver 6sta.
. Temporizador de apagado automatico
Le permite apagar Ia unidad automaticamente a una hora determinada.
. tdioma de pantaHa (_NGLES/ESPANOL/FRANOE_S}
Esta funci6n Ie permite seteccionar el idioma que se visualiza en la pantalla de MENU entre INGLE_S,
ESPANOL o FRANCE'S.
. Funcion de sorddo estereo
. Mando a distancia con todas lae funciones
. Sintonizaci6n sintetizada de frecuencia PLL
. Tubo de imagen de pantalla pmana
. Entrada S-VIDEO
. Entrada audiovisuam frontam/trasera
. Toma de entrada VIDEO
. Salida de audio digital trasera
SP

IMPORTANTEPARASUSEGURIDAD..................................................... 2
ACCESORIOSSUMINISTRADOS........................................................ 4
PRECAUCIONES..................................................................... 4
CARACTERfSTICAS.................................................................. 5
PREPARACm6N PARA EL USO ................................................ 7
CONEXION ......................................................................... 7
CONEXION DE ANTENA/CABLE B,ASICQ .................................................. 7
CONEXION CON CAJA DE CONVERTIDOR/CAJA DE SATELITE ................................ 8
CONEXION DE CQMPONENTE ......................................................... 8
CONEXION EXTERNA ................................................................ 9
USO DE CONEXJON AN FRONTAL ...................................................... 10
CONEXiON DE AUDIO DIGITAL ......................................................... 10
INSTALACION DE LAS PILAS .......................................................... 11
FUNCmONES .............................................................. 12
FUNCIONES DEL MANDO A DISTANCIA Y EL PANEL FRONTAL ............................... 12
OPERACIONES ........................................................... 13
PREAJUSTE AUTOMATICO INICIAL ...................................................... 13
PANTALLA MENU .................................................................... 14
SELECCION DE IDIOMA .............................................................. 15
PARA MIRAR TV ........................................................... 16
CAMBIO DEL MODO ANALOGICO/DIGITAL ................................................ 16
SELECCION DE CANAL ............................................................... 16
AJUSTE DEL VOLUMEN .............................................................. 17
CAMBIO DEL MODO DE AUDIO ........................................................ 17
JNFORMACION DE PANTALLA .......................................................... 18
CAMBIO DEL MODO DE VISUALIZACION DE PANTALLA ..................................... 19
AJUSTES OPCIONALES .................................................... 20
AJUSTE DE LA IMAGEN .............................................................. 20
SUBTfTULOS ....................................................................... 21
V-CHIP ............................................................................ 24
TEMPORIZADOR DE APAGADO AUTOM,_TICO ............................................. 26
OTROS AJUSTES ......................................................... 27
SELECCION DE LA ENTRADA EXTERNA ................................................. 27
PREA. AUTO CA ..................................................................... 28
AGREGAR/BORRAR CANALES ......................................................... 30
HORA DE VERANO .................................................................. 32
HUSO HORARiO .................................................................... 33
VARIOS ................................................................. 34
GUiA DE LOCALIZACION DE PROBLEMAS ................................................ 34
GLOSARIO ......................................................................... 36
MANTENIMIENTO ................................................................... 36
ESPECmFmCACmONES ....................................................... 37
S_MBOLOS EMPLEADOS EN ESTE MANUAL
A continuaci6n se describen los simbolos utilizados en este manual:
: Ajustes solo para el modo anal6gico
: Ajustes solo para el modo digital
Ajustes comunes para el modo anai6gico y digital
SP

iii!i!:!i!:!iiiiii_i_!iiiiii_iiii_iiiii_iiiii
P EPA.ACU6.PA.AEL.SO
En esta secci6n se describe c6mo hay que conectar este TV a fuentes receptoras y otras.
[CONEX[ON DE ANTENA/CABLE B_,S[CO]
Cuando se conecta el TV a la antena *Para seffal digital
1) Conecte el cable RF o cable de ia antena de televisi6n de su casa a la toma ANTJN del TV.
An
a6r
•... i J --/ ....... _
i __
c_b_eRr _ _i,!!!!!!!!!!!!!!!!!!!!!!!!_"XH
I "_ " NO SE INCLUYEN LOS CABLE_ ,_ =_===
..................m o
[_ _ N N NNN uO_ Parte rasera del TV
I Cab e de entrada _ .....
IuIuIuIuIuIuIuIuIuIuIuIuIuIuIuIuIuHIol_l_l_l_Hmm___ _ .............
Selecclonador de Antena
(Si es i!ecesa_io)
* D_SPONI_L_ COMFY1 ERCIALEtvl ENTE
O
¢o
_J
uJ
t_
z
,o
o
<_
_u
Cuando se conecta el TV aI cable bSsico (sin caia} *Para seFia_ ana_ogica solo
1) Conecte el cable RF o cable de la antena de televisi6n de su casa a la toma ANTJN del TV.
NOTA:
* Para su seguridady con objeto de evitarpodbles d_hos en 15unid_d, desenchufe el c_ble de antena de la toma ANTTIN antes de moverla,
* Si utiliza una antena para recibir TV anal6giea, la misma antena permitirb recibir/a DT_
Las antenas exteriores o en e! teaho serbn robs efectivae que /a versienes eneima de/aparate de TV,
* Algunos canales de cable no pueden verse cuando 15 TV estb conectada a una antena po_que el programa D TV no transmite _odos
los canales de cable. Puede verlos cambiando al cable conectado al CATV (TV cable),
* Para cambiar fbcflmente entre los cables de antena y de cable puede comprar un "Selector de Antena" de venta en los comercios.
*Una vez hechas Ias conexiones, encienda el TV y empiece con los ajustes iniciales.
La exploraci6n de canales es necesaria para que el TV memorice todos los canales disponibles en su regi6n
si utiliza la antena o cable basico. (Consulte el "PREAJUSTES AUTOMA,TICO INICIAL" en la pb.gina 13.)
SP

[CONEXI6N CON CAJA DE CONVERTIDOR/CAJA DE SATEUTE]
1) Conecte eI cable de la antena de la toma de su casa aI conector de entrada de la caja de
CABLE/SATE'LITE.
2) UtiIice el cabIe correspondiente para conectar la toma ANT. IN del TV y la clavija de salida a la caja de
CABLE/SATE'_LITE.
*Los cables requeridos en 2) y los m6todos de conexi6n difieren segOn Ia caja CABLE/SATELLITE. Para
mas informaci6n, p6ngase en contacto con el establecimiento deride adquiri6 la caja de CABLE/SATE'LITE
u otro establecimiento similar.
* NO SEINCLUYEN LOS CABLES
Parte trasera del TV
[CONEXION DE COMPONENTE]
1) Este es el meier metodo para conectar e! TV a los equipos de video con Ia clavija de satida del compo-
nente, come e! reproductor de DVD, etc. As[ se minimiza el deterioro de la calidad de imagen.
Para la conexi6n utilice el cable del COMPONENTE (comercialmente disponibie).
A__ conectores COMPONEN_
VIDEO OUTPUT ........................................AI conectores COMPONENT ............................................................
/
AIoon+ot....
l ReptodUctor de DVD _+ +[ AUD O NPUT
_ AI ..... tores AUDIO OUTPUT Part; trasera del TV
* NO BE SUMINISTRAN LOS CABLES
NOTA:
Este TV solo puede aceptar se#a/ de vfdeo (entre/azada) de 480i.
SP

[CONEX[ON EXTERNAl
Cuando se usan los cables de Audio/Vfdeo
1) Este es et metodo general para conectar el TV a aparatos de vfdeo, como pot ejemplo una videograbadora,
mediante Ias tomas de salida de audio o vfdeo.
Cuando el conector audio de los equipos de video sea monoaurat, conecte el TV a la clavija AUDIO h
* NO SEUNCLUYEN LOS CABLES
AI conector VIDEO-1 INPUT
Cuando se use et cable S-video
1) C6mo conectar el TV a los aparatos de vfdeo con la toma de salida S-VIDEO. Obtendra una calidad de
imagen mejor que con la conexi6n normal de cable de video.
Para realizar la conexi6n, utilice el cable S-video (comercialmente disponible).
O
o9
w
z
,o
o
<_
w
* NO SE SUM[NISTRAN LOS CABLES
NOTA:
Si se conecta al mismo tiempo al conector S_VIDEO y al conector VIDEO serb la conexidn del S_video la que tenga prioridad.
SP

[USO DE CONEXiON A/V FRONTAL]
1) Esta es la forma de usar el conector A/V situado en la parte frontal del TV para reaiizar conexiones con
los equipos externos.
Este es Otil cuando usted usa dispositivos de juego etc.
Cuando el conector audio de los equipos externos sea monoaural, conecte el TV a la clavija AUDHO h
AI conector
Ex"_a
vi "mr
VIDEO OUTPUT
Parte frontal del TV
AI conectores
AUDIO OUTPUT
AI conectores
AUDIO INPUT
* NO SEINCLUYEN LOS CABLES
[CONEX_ON DE AUD+O D_G+TAL]
1) Si conecta el TV a aparatos de audio digitales, podra disfrutar mucho mas de los programas de emisi6n
digital, pues tendr& la sensaci6n de estar viendo el programa en directo.
Para reaIizar la conexi6n, utilice el cable COAXHAL AUDHO DIGITAL (comercialmente disponible).
Ex,
MD deck, DAT deck etc.
Descodificador Dotby Dig+tat
AI conector COAXIAL
DIGIIAL AUDIO INPUT
_l AI conector DIGITAL
Parte trasera del TV
+NO SE INCI UYEN lOS CABLES
I BB_ Fabricado bajo Iicencia de Dolby Laboratories+ "DoJby" y el s[mboJo de Ja doble D son marcas I
I
oi Qi +,,L comerciales de Dolby Laboratories.
I
SP

Coloque Ias dos pilas AA suministradas haciendo
coincidir Ia poIaridad indicada dentro del compar-
timento del mando a distancia.
[PRECAUCIONES RELACJONADAS CON LAS PILAS]
_,AsegOrese de respetar ia poiaridad correcta como se indica en el compartimiento de las pilas. Si invierte las
pilas puede causar daSo aI dispositivo.
_,No combine tipos diferentes de pilas. (pot ej. Alcatinas y Carb6n-Zinc) o pilas usadas con pilas nuevas.
_,Sf el dispositivo no se usara pot un periodo largo, se deben retirar Ias pilas para evitar daSos o lesiones
causadas por et posible derrame de! Acido en su interior.
_,No intente recargar pilas que no estAn diseSadas para ese fin, ya que pueden sobrecalentarse y agrietarse.
Caracteristicae de maradiodifusi6n digital
La radiodifusi6n digital emplea la mAs avanzada tecnotog[a de transmisi6n para la compresi6n de las
se_ales de audio y video, proporcionando una calidad de imagen y sonido muy superiores a Ia de Ia
transmisi6n anat6gica. En cuanto a la calidad de imagen, la radiodifusi6n digital ha desarrotlado la tele-
visi6n de atta definici6n o HDTV (High Definition Television) que ofrece unas imageries mucho mAs finas
y detalladas que la televisi6n estAndar o SDTV (Standard Definition Television), con el doble de I[neas de
exploraci6n, pudiendo adoptar el formato de pantalla 16:9 que mejor se ajusta aI alcance de la visi6n
humana.
En Io que respecta a la calidad audio, Ia radiodifusi6n digital ofrece un sonido envolvente con 5,1 canales
que da Ia sensaci6n aI espectador de encontrarse en un estadio o un teatro.
Ademas, Ia radiodifusi6n digital permite transmitir 2 6 3 programas de tetevisi6n de definici6n estandar
(SDTV), que es eI formato de Ia televisi6n anal6gica, ai mismo tiempo pot 1 canal Esta caracter[stica ha
permitido realizar una planificaci6n de programas mAs diversificada. Ademas, la radiodifusi6n digita! ha
Iogrado superar problemas que sufre la televisi6n anal6gica, como las imagenes fantasma o las interfer-
encias con la tecnologfa digital.
Canal menor de maradiodifusi6n digitam
En la radiodifusi6n digital, e! canal seleccionado puede tenet un subcanal. Se le conoce como el canal
menor. Aunque los programas de este canal menor ofrecen una calidad de imagen un poco peor que Ios
programas de la televisi6n de alta definici6n (HDTV), tienen la ventaja de que no retirarb.n otros progra-
mas, incluso cuando se alargue una retransmisi6n deportiva.
O
o9
uJ
t¢
z
,o
o
<_
w
SP

_l!_!i_iii_i_i_!_i_i!_!_:_!_i_iii_!i_!_!_i_i!i_i_ii_i;i_!_!;iii_
Bot6n POWER
Para encender y apagar e! TV
Botches de NQmero de canal (pag.16)
Bot6n WENT (p#_g.16)
Para confirmar Iaorden de
los botches de NOmerode canal
Botches CH _,/_' (gAg. 13)
Para seleccionar los canales y
desplazarse hacia arriba y abajo a
traves de los elementos de los menOs
Bot6n MENU (p&g.14)
Para mostrar el menOen pantalla
Bot6n INPUT SELECT (pAg.27)
Para seleccionar el modo de TV o
de entrada externa (acceso a
videocAmaras, videoconsolas, etc.)
Bot6n SLEEP (pag.26)
Para apagar automAticamente el
aparato a la hora prefijada
Bot6n AUDIO (pAg.17)
, Modo anal6gico (TV)
Para seleccionar el modo audio
Modo digital (DTV)
Para seleccionar el idioma de audio
Bot6n DTV/TV (p_g.16)
Para cambiar entre e! modo digital
(DTV) y el modo anal6gico
Bot6n INFO (pag,18)
. Modo anal6gico (TV)
Para mostrar el nOmero de canal
Modo digital (DTV)
Para mostrar la informaci6n del canal
Bot6n CHANNEL RETURN (pag.16)
Paravolveralcanalqueseestabaviendoantes
Bot6n +100 (p#_g.16)
o CATV
Para introducir el numero de canal
100 u otros mas altos
o Modo digital (DTV)
Para seleccionar el canal menor
Bot6n MUTE (pag.17)
Bot6n VOL A/V (p&g.13)
Para ajustar e! volumen y cambiar los
ajustedpara pasar a la siguiente pan-
talla y tener acceso a los elementos de
los menOs
_,_*Bot6n MENU (pag,14)
Paraver el menOen pantalla
*'_"Botches VOLUME LdV (pag.17)
Para ajustar e! volumen
I1 Illl II11©
Conectores de entrada
AUDIO LIR (pAg.10)
Conector de entrada VIDEO
(p_g. 10)
Sensor de infrarrojos
Para recibir los rayos infrar-
rojos trasmitidos desde el
mando a distancia
SP

ii !i:@:i! !:i!ii! i@i! iii iii i
PERACJONES
En esta secci6n se describen los ajustes iniciales
cuando se enciende per primera vez e! equipo tras
su compra. M_s abajo se muestran los elementos
de dichos ajustes.
NOTA:
Aseg_rese de que la antena o el cable est_n con'ectamente
conectados antes de enchufar el cable de la con'iente.
" HORA DE VERANO
Sirve para ajustar la pantalla de la hera local
transmitida digitaImente. Cuando esta funciCn
esta en ON, la informaciCn de fecha de Ia zona
seleccionada per el HUSO HORARHO se ajustara
con la hora ahadida. AdemAs, Ia diferencia horaria
se ajustara deI siguiente mode: Ias 2 a.m. del
primer domingo de abril pasaran a ser las 3 a.m.,
una hora mAs; y Ias 2 a.m. del Oltimo domingo de
octubre pasarb.n a set la 1 a.m., es decir, una
hera rnenos.
,, HUSO HORARIO
La informaciCn EPG de la transm[siCn digital se
ajusta bas_ndose en la zona establecida en el
HUSO HORARIO.
- PREAo AUTO CA, (OTVfTV)
(Usando antena)
Los canales emitidos en DTV y TV se buscan y
memorizan autom_ticamente. Solo quedar_n
memorizados Ios canales que se puedan recibir
en la zona en donde se use el TV.
- PREA, AUTO CA. (CATV)
(Usando cabte b_sico)
Los canales emitidos en CATV se buscan y mem-
orizan automaticamente.
GD CDG:)
GD G::)GD
(3D GD (D
CH_"EL
1c5cD Q _5
VOL ,_/v
0000
"I Ajuste de la HORA DE VERANO
Cuando encienda per primera vez el equipo, se
mostrara la siguiente pantaIla.
1 PLEASECONNECTANTENNATO
THEUNIT
2 SETUPTHEITEMSWITH
A,'TANDYBUTTONS
DST (DaylightSaving) [---]
TINEZONE {---]
AUTOPRESETCH(DTWTV)
AUTOPRESETCH(CATV)
NOTAS:
El ajuste por defeeto para el idioma del menO es el ingl#s.
Cuando quiera visualizar el menO en espadoL presione
[MENU] del mando a distancia y seleccione el idioma antes
de i_alizar el siguiente paso. (Vea el apartado "SELECCI(}N
DE IDIOMA" en la pa'gina 15). DespuCs apague y encienda
/a unidad para comenzar el ajuste iniciaL
Debe ajustar "HORA DE VERANO" y "HUSO HORARIO"
antes de prefijar los canales.
oCon [VOL AFX] de! mando a distancia, ponga
la "HORA DE VERANO" en [ON].
1 CONECTELA ANTENA A LA
UNIDAD
2 CONFIGURE LOS ELEMENTOS
CON LOS 8OTONESA _ YT
_" HORA DEVERANO [ON]
HUSO HORARIO [-- -]
PREA AUTO CA (DTV/TV)
PREA AUTO CA (CATV)
2 Con[cH A/_r]deI mando a distancia, selec-
cione "HUSO HORARIO".
1 CONECTELA ANTENA A LA
UNIDAD
2 CONFIGURE LOS ELEMENTOS
CON LOS 8OTONESA_Y T
HORA DEVERANO [ON]
HUSO HORARIO [---]
PREA AUTO CA (DTVrP/)
PREA AUTO CA (CAW)
,,Cada vez que presione [VOL ,_/v] en el
mando a distancia, cambiara la zona como se
indica a continuaci6n.
[ALASKA]
[HAWAU]
[PACiFHCO]
[MONTAI_A]
[CENTRAL]
[ORIENTAL]
09
W
Z
O
O
<_
O
09
#J
Z
O
oSeleccione su zona.
SP

3 Ajuste deI PREA. AUTO CA.
NOTAS:
* Si no estb a/us_ado "FLORA DE VERANO"y el "HUSO
HORARIO". no podrb seleccionar el "PREA. AUTO CA.'t
* Aseg#rese que el TV estb conectado al came de antena.
Cuando la antena estb conectada, seleccione "PREA.
AUTO CA.(TV/DTV)" con el siguiente procedirniento.
Cuando estb. conecrado al CATV, seleccione "PREA. AUTO
CA.(CATV)':
Aqu[ se describe el case de Habusqueda y
memorizaci6n de canabs para DTV/TV.
,,Con [OH ,_JT] deI mando a distancia, seleccione
"PREA. AUTO CA.(DTV/TV)'k
1 CONEOTELAANTENAALA
UNIDAD
2 OONFIGURELOSELEMENTCS
CONLOSBOTONESA_TyT
HORADEVERANO ION]
HUSOHORARIO [ALASKA]
_" PREAAUTOCA(DTVq'Vi
PREAAUTOCA(CATV)
,,Cuando presione [VOL ,_] del mando a distan-
cia, se iniciar_ automaticamente la exploraci6n
de canaries tanto eJ mode digitaI come en eJ
anal6gico.
PREAAUTOCA:DTV_TV
_I_
,,Cuando se haya terminado la expHoraci6n, se
mostrara eJcanaI memorHzado m_s pequeSo.
NOTAS:
* La funcidn inicial PREA. AUTO CA. puede ejecutarse tango
para DTV/TV como CATV sdlo una vez. Si desea explorar
tanto DTV/TV como CAT_Z debe seleccionar "CANAL PREP."
en la pantafla del MENU palt_ explorar y memorizar otros
canales despu6s de terminar el prefijado iniciaL (Consulte la
pbgina 28.)
Puede salir del men8 PREA. AUTO usando [MENU] del
mando a distancia.
Si presiona [MENU] mientras que se est4 realizando la
exploracidn, 4sta se interrumpir4 mostrbndose el canal mas
pequeho memorizado.
* Sipresiona [POWER]. se apagarb la corHente. Si no se ha
finalizado la exploraci6n, se mostrara" la pantalla in/cial
PREA. AUTO CA. en el momento que encienda nueva-
mente la corriente.
Si no se puede recibir ningSn canal mediante el PREA.
AUTO CA., se mostrar4 en la pantalla la "NO NAY SE#,tAL
DE TV?
NOHAYSE_ALDETV
Esta secci6n describe et resumen de la pantaIla
MENU que se muestra al presionar [MENU]. Para
mas detaHes, vea Hapagina de referencia de cada
eJemento.
La pantalla MENU esta formada por Hoselementos
que se muestran a continuaci6n.
IMAGEN
CANALPREP
[ESP_FRAiENG
AJUSTEDEV-CHIP
TITULO[OF_
INSTALAQON DTV
,__MAGEN
Para ajustar la caHidadde imagen (CLARIDAD,
CONTRASTE, COLOR, MATIZ, AGUDEZA).
(Vea el apartado "AJUSTE DE LA IMAGEN" en la
p_gina 2&)
'_CANAL PREP.
Para buscar automaticamente los canaJes que se
pueden recibir, y agregar o borrar Jos que se
necesiten.
(Yea e! apartado "PREA. AUTO CA." en la p4gina 2&)
,_ENG/ESP/FRA
Para cambiar el idioma riNGLEtS, ESPANOL,
FRANCE'S) que se muestra en la pantalla MENU.
(Vea el apartado "SELECCION DE IDIOMA" en la
p_gina 1&)
'_AJUSTE DE V-CH_P
Para ajustar las Jimitaciones de visi6n.
(Vea "V-CHHP" en la p_gina 24.)
TJTULO
Para cambiar e! fermato de visualizaci6n del
SUBTiTULOS que muestran los di_Iogos de un
programa de TV u otra Jnformaci6n en Ia pantalla.
(Vea el apartado "SUBTiTULOS" en la p4gina 21 .)
,, INSTALACI6N DTV
Para ajustar la visualizaci6n de HapantalHa o el
TITULO en el mode DTV.
(Vea el apartado "CAMBIO DEL MODO DE VlSU-
AUZACION DE PANTALLA" en la pagina 19.)
NOTAS:
* ka "INSTALACION DTV" solo se puede ver en el modo DT£_
* Para ira la pantalla normal, presione [MENU] otra vez.
SP

Se puede cambiar el idioma empleado en Ia pantalla
MENU. Las opciones posibles son INGLE_S,
ESPA_]OL o FRANCE'S.
A continuaci6n se muestra el modo de hacerlo.
OH AIT
MENU
(EDQ_
(3DQ@
¢H_NEL
/ /
J /
/ 2.,_
.0(2:300
VOL AIV
w
z
0
_z
w
0
1 Visuatizaci6n de Ia pantalIa MENU.
,, Presione [MENU] de! mando a distancia.
Se mostrara ta siguiente pantalla de MENU.
• PICTURE
CHANNEL SET
[ENG]_ZSP/FRA
V-CHIPSET UP
CAPTION[OFF]
OTVSETUP
2 Selecci6n de "ENG/ESP/FRA".
,,Con [OH _JT] del mando a distancia, seleccione
"[ENG]/ESP/FRA".
PICTURE
CHANNEL SET
• [ENG]_ZSP/FRA
V-CHIPSET UP
CAPTION[OFF]
OTVSETUP
,,Cada vez que presione [VOL A/V] del mando
a distancia se cambiarA de idioma come se
muestra mAs abajo. Seleccione el idioma
deseado.
[ENG(INGLES)]
[ESP(ESPANOL}]
[FRA(FRANCE$)]
3 Para volver a la pantaila de antes deI ajuste,
presione [MENU] del mando a distancia.
SP

MJRAR TV
Se puede cambiar f_cilmente entre TV (NTSC) y
DTV (ATSC) con e! mando a distancia y disfrutar
de Ios programas de Ia televisi6n de alta definici6n,
as[ como de Ios de Ia de definici6n est_ndar con
una simple operaci6n.
©_ _-oDTVI TV
_uDio i._o
CDCD
CD CD CD
CDCD_
CD CD C53
1 Presione [DTV/TV].
,,Se pasarA alternativamente del modo anal6gico
al digital.
,,Cuando presione [DTV/TV] de! mando a dis-
tancia en la entrada externa, se cambiarA entre
er modo anaI6gico yer digital
NOTA:
El cambio del modo analdgico al digital puede Ilevar unos
momentos hasta que se finafice la seleccidn del canal digital.
Mientras que se estb cambiando de modo so mostrarb la
siguiente pantalla.
ESOANEANDO
Puede sebccionar e! canal usando been[OH A/v] o
los botones de Nr_mero de canal A continuaci6n se
muestran los dos modos de hacerlo.
Botches de
Numero de
canal
4ENT
CH A/T
oooo
CHANNEL
RETURN
+100
Usando [CH A/'_']
,, Cambie e! canal usando [CH A/T] del mando
a distancia.
,, Cuando presione [CHANNEL RETURN], se
sebccionara el canal anteriormente seleccionado.
,, En el panel frontal de la unidad principal se
encuentra disponible la misma operaci6n con
[CH A/_, ].
Usando los botones de Numero de canam
" Si desea sebccionar un canal del 1 aI 99, pre-
sione su numero con los botones de Numero
de canal Se mostrara eI canal seleccionado.
,, Si desea vet un canal superior a1100, presione
pr[mero [+100]. Despu_s use los botones de
Nurnero de canam para introducir los dos Olti-
mos d[gitos.
,, Para buscar el canal menor de! canal mayor
que este viendo actualmente en DTV, presione
[+100]. S[ conoce el canal menor mientras que
estA viendo e! canal mayor con NQmero de
canal de 1 d[gito, presione el nOmero de canal
mayor y [4ENT]. A continuaci6n, presione e!
numero de canal menor que desee ver. En caso
de que el nOmero de! canal mayor sea de 2
d[gitos, presione el nOmero de canal mayor y el
de! canal menor directamente. Si presiona
[4ENT] despues de presionar el numero de
canal mayor de 2 d[gitos, se seleccionarb, el
canal menor mas peque¢io.
,, S[ presiona [CHANNEL RETURN], se selec-
cionarA el canal seleccionado con anterioridad.
NOTA:
En la radiodifusidn DTV a veces un canal emite m_ltiples
programas dependiendo de la hora de emisidn. En este caso,
el canal principal se conoce como canal mayor y el subcanal
como canal menoK
SP

A | H T | | H
En esta secci6n se describe el modo de ajustar el
volumen cuando se esta viendo Ia TM Tambien se
describe la funci6n MUTE, la cual resulta muy Otil
cuando se tiene una visita o se recibe una Ilamada
de telefono.
CE)(D C_D
_ (D (:D
@ (Z) (ED
¢,_NEL
d:5Q Q 5
/ l
CD C2DCD C_,_
1 Use [VOL ,5F7]
,,Se puede ajustar el volumen de sonido con
[VOL ,_FT] del mando a distancia.
,,AI ajustar e! volumen, se mostrar_ la barra de
progreso en la parte inferior de la pantalla.
,, En el panel frontal del TV podr_ realizar la
misma operaci6n con [VOL ,_/_
VOLUMEN
_I_
2 Use[MUTE]
,, Presione [MUTE] del mando a distancia para
quitar eI sonido.
Mientras que se tiene activada la funci6n de
silencio, en la pantalla se mostrar& la barra de
volumen coloreada.
En esta secci6n se describe el modo de cambiar el
sistema de audio en e! modo anaI6gico y como
seleccionar el idioma de audio en el mode digitaL
"I Cambio de audio.
,,Cada vez que presione [AUDIO], _ste cam-
biara come se indica a continuaci6n.
MAIN :Saca el audio principal.
SAP : Saca el segundo canal de audio.
MONO: Saca el audio en mono.
Cambio deI idioma de audio.
,,Si se presiona [AUDIO] del mando a distancia,
se mostraran en la pantalla el idioma actual-
mente seleccionado y el nOmero de idiomas
recibidos.
Idioma de
audio
<_
t_
t_
VOLUMEN
IIIIIIIIIIIIIIII
,, Para liberar el estado MUTE, vuelva a presionar
[MUTE] o presione [VOL z:J_].
,,Cada vez que presione [AUDIO] deI mando a
distancia, se cambiara el idioma.
,,Los idiomas que se pueden seleccionar difieren
dependiendo de Ia emisi6n que se reciba.
NOTA:
El audio no se cambiarb incluso en el caso de que presione
[AUDIO] en la entrada externa.
SP

tNEORMACtON PANTALLA
Con esta funci6n se puede visualizar en la pantaIIa
el n0mero de canal sebccionado u otra informaci6n
como el modo de audio para su comprobaci6n.
f
(Z)_ (:D
_uDio IN_O
CD C:> _ JNFO
(3D (ID CD
(ED(Z) (X)
_CDCD
0 (D _ CD
En el modo anaI6gico, se muestra el n0mero de
canal seleccionado y el modo de audio.
1 Visualizaci6n del n0mero de canal y eI modo de audio.
,,Presione [JNFO] del mando a distancia.
El n0mero de canal seleccionado y el modo de
audio apareceran en la parte superior derecha
de la pantalla.
CA10 }
ESTEREO
,,Para borrar la pantalla, presione nuevamente
[INFO].
,,Cuando se conecten equipos externos se
mostrar&n Ias siguientes pantallas:
1) Cuando se use el cable de video para la
conexi6n
AUX 2 }
2) Cuando se use el cable de v(deo componente
para la conexi6n
COMPONENTES
En el modo digital, se mostrar_, la informaci6n
detallada para el canal actualmente seleccionado,
como la gufa de programaci6n.
Visualizaci6nde la informaci6n detallada para el canal.
-Cada vez que presione [INFO], et modo de
visualizaci6n cambiara como se describe a
continuaci6n.
[PANTALLA APAGADA]
t
[iNFO1]
t
[INFO2]
,, En el modo INFO1 aparecera la siguiente infor-
maci6n.
(1) NOmero de canal
(2) Tftulo de! canal
(3) TituJo de! programa (se muestra un maximo
de 2 Fneas)
(4) Idioma audio (se muestra "OTRO" cuando
no se puede obtener el idioma o los que se
consiguen no son e! INGLE_S, ESPANOL o
(5) Hora del programa
o La gufa de programaci6n afiadida a la informa-
ci6n visualizada en el modo INFO1 se muestra
en el modo INFO2.
Guia de
programaci6n
NOTAS:
* Cuando la gufa de programacidn ocupe mbs de 6 ILneas,
u tilice [VOL A/V] para desplazarse por el texto.
Aparecerb. el mensale "No description provided" (No se ha
facilitado descripcidn) cuando no hava gufa de progra-
macidn.
Mientas que se muestre la informacidn en el modo INF02,
se interrumpirb la funcidn de SUBTfTUL OS.
SP

En el modo digital se pueden seleccionar 2 tipos
de modo de visualizaci6n.
Puede seleccionar su modo favorito y disfrutar del
programa.
CD_Q
CD (:D CD
CDCD@
¢"_NEL
6QQ5
\ /
}
42D CD C) C)
,_VOLA/V
1 Visualizaci6n de Ia pantaila MENU.
o Presione [MENU] de! mando a distancia.
Se visualizara Lasiguiente pantalla de MENU,
• IMAGEN
CANALPREP
[ESP]/FRA/ENG
AJUSTEDEV-CHIP
TITULO[OFF]
INSTALACI6N DTV
3 SeJecci6n de! modo de visualizaci6n.
,,Cada vez que presione [VOL ,_FT] del mando
a distancia se cambiara alternativamente entre
[ANCNO BUZON] y [ZOOM].
ANCHO BUZ0N ZOOM
[ANCHO BUZON]
Muestra eI programa digital en pantaiIa completa.
Los bordes en negro se ampliaran en la parte
superior e inferior de la pantalla.
[ZOOM]
Amplia y muestra la zona centrai del programa
digital.
Se vera cortada la parte derecha e izquierda
de la imagen.
4 Para salir del menO, presione [MENU] del
mando a distancia.
NOTA:
Dependiendo de/programa, podrfa no set necesario tenet
que cambiar el modo de visualizacidn.
2 Selecci6n de "INSTALACION DTV".
oCon ION A/_'] det mando a distancia, seleccione
"INSTALACION DTV".
<_
IMAGEN
CANALPREP
[ESP]/FRNENG
AJUSTEDEV-CHIP
TITULO{OFF]
• INSTALACIONDTV
oCuando presione [VOL A] dei mando a distancia,
la pantalla MENU se mostrar_ como se indica a
continuaci6n.
• PANTALLADTV{ANCHOBUZON]
DTVCC
NORADEVERANO [ON]
HUSONORARIO IALASKA]
SP

J USTES OPCJONALES
A | H | A |
MA
Con esta funci6n se puede ajustar Ia claridad,
contraste, color, matiz y agudeza de la imagen.
CD CD C_
(3D (Z) CD
(Z) (Z) @
,0 CD 0 0
_ J_ SLEEP<t_
VOLA/V
3 Ajuste de la calidad de imagen.
,, Con [CH ,&f_] del mando a distancia, seleccione
el elemento de calidad de imagen que desee
ajustar.
[CLARHDAD]
[CONTRASTE]
€
[COLOR]
f
[MATIZ]
1 Visualizaci6n de la pantaHa MENU.
oPresione [MENU] o de! mando a distancia.
Se visualizarA la siguiente pantalla de MENU.
_"IMAGEN
CANAL PREP
[ESP]_PRA/ENG
AJUSTEDE V-CHIP
TITULO[OPP]
INSTALACION DTV
2 Selecci6n de "HMAGEN".
oMediante [OH A/_'] del mando a distancia,
seleccione 'qMAGEN" y presione en [VOL A/
para confirmar su selecci6n.
_"IMAGEN
CANAL PREP
[ESP}_PR_VENG
AJUSTEDE V-CHIP
,,En Ia pantaila aparecerA la barra de ajuste del
elemento de la calidad de imagen.
{'] CLARIDAD [+]
_1_
CLARIDAD
A: Para aumentar Ia claridad
_: Para disminuir la claridad
CONTRASTE
,_: Para aumentar el contraste
'_: Para disminuir el contraste
COLOR
A: MAs brillante
_: MAs pAIido
MATIZ
A: M_s verde
_r: MAs pOrpura
AGUDEZA
A: MAs claror
_: MAs suave
_,Con [VOL A/_] deI mando a distancia, aiuste
la calidad de imagen.
NOTAS:
* La pantafla desaparecerb ,:_utomb.ticamente despu_s de 10
segundos a menos que se pl'_sioR_, un botdn.
El magnetismo procedente de e/ectrodom#sticos o altavoces
que se encuentren cercanos puede afectar al color de/a ima-
den de TV. Si ocun'iera esto. apague el TV presionando
[POWER] y vuelva a encendelto de nuevo despu#s de unos
30 minutos.
SP

Podro5vet pelfcuIas, noticias, programas de TV, etc.
especialmente identificados (cc) ya sea con subt[-
tulos del diAiogo o con visuaIizaci6n de texto agre-
gados al programa.
Con el sistema de radiodifusi6n digital, tambi_n podr_
cambiar el tamale _el estiIo de la fuente de los titulos.
+OOCDCD
VOL A/v
1 Visualizaci6n de la pantaiIa MENU.
,, Presione [MENU] del mando a distancia+
Se visualizar_ ta siguiente pantalla de MENU.
• IMAGEN
CANALPREP
[ESP]/FRA/ENG
AJUSTEDEV-CHIP
TITULO{OFF]
INSTALACIONDTV
2 Selecci6n de "TITULO".
,,Con [OH A/_] del mando a distancia, seleccione
"TITULO"+
IMAGEN
CANALPREP
[ESP]/FRNENG
AJUSTEDE V-CHIP
• TITULO{OFP]
INSTALACION[}TV
3 Cambio al modo TfTULO.
oAI presionar [VOL ,_#7] de! mando a distancia,
TiTULO cambiarA come se muestra a contin-
uaci6n+
[OFF]
t
E% I
[MODO DE TITULO (01, 02)]
,,TiTUL01 (C1)
Muestra los subt[tulos est&ndar (Io que dice cada
personaje).
,,TiTULO2 (C2)
Muestra Ios subtRulos en un idioma extranjero
(palabras en et idioma extranjero que muestran
Io que dice cada personaje).
oNay tres modos de visualizaci6n de acuerdo
con Ios programas:
Modo Paint-on: Muestra inmediatamente Ios
caracteres de entrada en la
pantalla.
Modo Pop-on : Una vez que se han guardado
los caracteres en la memoria,
se muestran todos a Ia vez.
Modo Roml+up : Muestra los caracteres avanzando
de forma continua (max. 4 lineas).
[MODO DE TEXTO (T1,T2)]
,,TEXT01 (T1) y TEXT02 (T2) muestran eI texto
en media pantalla desplazAndoio (como una
gu[a, programaci6n o informaci6n de canal).
Salir de! men&
oPresione [MENU] dei mando a distancia.
NOTES:
* Si la emisidn que se estb recibiendo no tiene subtf_ulos, no
se verb nada.
* Cuando el TV recibe una sehal de reproduccidn con efectos
es,oeciales (es decir, bOsqueda, c_mara lenta e imagen con-
gelada) del canal de salida de vfdeo del VOR (CH3 o OH4),
el TV podrfa dejar de mostrar el tftulo o texto correcto.
. Los fftulos y textos pueden no coincidir de forma exacta con
1,3S VOOe&
* Las interferencias pueden provocar que el sistema de subff-
tulos no funoione correctamente.
. Los caracteres de los fitulos o los textos no se mostrarbn mien-
tins que se esten viendo las pantallas de menJ o de funciones,
* Si aparece un cuac?o negro en la pantalla quiere decir que
el TV estb aJustado para el modo TEXTO. Papa borrar la
pantalla seleccione TITULO [Cl], [02] o [OFF].
Visualizaci6n de Ia pantalIa MENU.
,,Presione [MENU] deI mando a distancia+
Se visualizar_ la siguiente pantalla de MENU.
IMAGEN
CANAL PREP
[ESP]/PRA/ENG
AJUSTEDE V-CHIP
TITULO[OPP]
INSTALACION DTV
¢0
l,u
,,,,,,J
<(
z
o
0
0
09
w
SP

2 Sebcci6n de 'INSTALACHON DTV".
oCon ION _JT,] de+mando a distancJa, seleccione
qNSTALACHON DTV".
IMAGEN
CANAL PREP
[ESP}$RA/ENG
AJURTEDE V-CHIP
TITULO[OFF]
_"INSTALACION DTV
,,Presione [VOL A] de! mando a distancia.
Se mostrara la siguiente pantalla.
_"PANTALLADTV{ANCHORUZON]
DTVCC
NORA DEVERANO [ON]
NURO NORARIO [ALASKA]
3 SeleccJ6n de "DTVCC".
,,Con [OH hJT] del mando a distancia, seleccione
"DTVCC".
PANTALLADTV{ANCHORUZON]
_*DTVCC
NORA DEVERANO [ON]
NUSO NORARIO [ALASKA]
NOTE:
El SERVICIO TITUL O que puede cambiar difiere dependien-
do de la descripcidn de la emisidn.
5 Uso de "CONHG. USUARD".
+ La funci6n "CONHG. USUARHD" le permite
cambiar el tama_o y e! estilo de fuente del tftulo.
+ Con ION A/T] del mando a distancia, selec-
clone "CONHG. USUARD".
SERVlQO TITULO [SIRVEI/6]
_" CONPIG USUARID [OFF]
TAMA'_O"[ITULO [MEOIANO]
ESTILOPUENTE [ES'FILOI/8]
RORDECARACTER {NINGUNq
OPAOOAOELANTE [RELLENA]
COLORADELANTE [BLANOO]
OPAOOATRAS [RELLENAj
COLORPONDO [NEGRO]
, Presione [VOL A] del mando a distancia y
ponga "CONFIG. USUARD" en [ON].
6 Ajuste de cada elemento.
, Cuando "CONFIG. USUARID" este puesto en
ON, podrH ajustar los siguientes elementos.
_* SERVIQO TITULO [SIRVE1/6]
,,Presione [VOL ,_] det mando a distancia.
Se mostrara la siguiente pantalla.
SERVICIO TITULO [OFF]
CONFIG USUARIO [OFF]
TAMA'_OTITULO [MEDIANO]
ESTILOPNENTE [ESTILOI/q
RORDECARACTER [NINGUNO]
OPACOADELANTE [RELLENA]
COLORADELANTE [RLANCO]
OPACOATR_,S [RELLENA]
COLORPONDO [NEGRO]
4 Sebcci6n de "SERVICIO TITULO".
oAt presionar [VOL ,_FT] de+mando a distancia
podrH cambiar el TITULO como se muestra
mils abajo. Sebccione el SER\dCIO TITULO
que desee usar.
[o_]
[smvEw+:]
+
[stovE2/+]
+
[smw3/+]
+
[SlRVlE4/6]
+
[SlRVES/+]
+
[s_Rw6/+]
, Con [OH A/_'] del mando a distancJa, seleccione
el elemento que desee ajustar.
+ Puede cambiar Ia configuraci6n de cada uno
de los elementos con [VOL AFT] del mando a
distancia.
+ A continuaci6n se muestra Ia descnpci6n de
los ajustes de estos elementos.
[TA_'IA[_O T_TULO]
El tamaSo deI texto de! titulo mostrado se puede
cambiar del si uiente modo.
[NEDJANO]
+
[GRANDE]
+
SP

[EST(LO FUENTE]
Se puede camb(ar e! estilo de fuente del t[tulo
mostrado de la sigu(ente forma.
[ESTiLO1/8]
f
[EST|LO2/8]
[EST|LO3/8]
[ESTiLO4/8]
[ESTILOSI8]
[ESTiLO6/8]
[EST|LOT/8]
[BORDE CARACTER]
Se puede cambiar e! borde de Ios caracteres de)
tRulo mostrado de (a siguiente forma,
!
[N|NGUNO]
[ELEVADO]
[HUNDHDO]
[UNIFORME]
[$OMBRA |ZQo]
[SOMBRA DER°]
[OPACO ADELANTE]
Se puede camb(ar )a opacidad de) texto del t[tulo
mostrado de )a siguiente forma,
l
[RELLENA]
[TRANSLUCiDA]
[DESTELLO]
[COLOR ADELANTE]
Se puede camb(ar el color del texto del t[tuio
mostrado de la siguiente forma.
[TRANSPARENTE]
[BLANCO]
[NE?RO]
[RI_O]
[VERDE]
[A:%UL]
[AMARLLO]
[NAGENTA]
[CYAN]
[OPACO ArRAs]
Se puede camb(ar Ia opacidad de! fondo del titu-
Io mostrado de la siguiente forma,
[RELLENA]
[TRANSLUCiE)A]
[DESTELLO]
[COLOR FONDO]
Se puede camb(ar eI co!or de fondo del t(tulo
mostrado de (a s(guiente forma,
[TRANSPARENTE]
[BLANCO]
[NE?RO]
[RIJO]
[VERDE]
[A_UL]
[AMARLLO]
[HAGENTA]
f
[CYAN]
¢0
uJ
.,J
z
o
O
_L
O
09
uJ
d)
SP

Permite que Ios padres eviten que sus nihos vean
programas de televisi6n que contienen material
inapropiado, incluyendo expresiones y descrip-
ciones desagradaNes. Se pueden cancelar las Iim-
itaciones de programas establecidas introduciendo
el c6digo de acceso.
Botones de ,.,,
Numero de
canal
CH A/T
MENU
AUDIO INtO
OdD
,-VOL A
CD CD CD CD
_up @t_T SLEEP <_J
Visualizaci6n de la pantalia MENU.
,,Presione [MENU] de! mando a distancia.
Se visuaiizar_, la siguiente panta!la de MENU.
_"IMAGEN
CANAL PREP
[ESP]_FRA/ENG
AJUSTEDE V-CHIP
TITULO[OPF]
INSTALA@ON DTV
2 Selecci6n de "AJUSTE DE V-CHIP".
,,Con [OH ,_/T] de! mando a distancia, seleccione
"AJUSTE DE V-CHIP".
IMAGEN
CANAL PREP
(ESP_PRA/ENG
_"AJUSTEDE V-CHIP
,,Presione [VOL ,_] deI mando a distancia.
Se mostrarA Ia pantaIla de introducci6n del
c6digo de acceso.
CODIGO DE ACCESO
3 Introducci6n deI c6digo de acceso.
,, Con los botones de NQmero de canal intro-
duzca el nOmero de 4 d[gitos.
,, Si todavfa no ha configurado su c6digo de
acceso, introduzca 0000.
,, Cuando e! c6digo de acceso sea e! correcto,
se mostrar_ Ia sig@ente pantaila de "AJUSTE
DE V-CHIP".
Para realizar el aiuste de cada uno de los ele-
mentos vea la siguiente descripci6n.
[] CLASE DE TV
4[ Visualizaci6n de la pantalla "CLASE DE TV'L
,, Con [CH A/'_] del mando a distancia, seleccione
"CLASE DE TV'L
Presione [VOL ,_] del mando a distancia.
_- CLAREDETV
CLAREDEMPAA
CAMSIARCO01GO
5 Ajuste de "CLASE DE TV%
,, Con ION A/T] del mando a distancia, seleccione
la clase.
_TVsy [MIRAR]
TV-Y7( )[MIRAR]
TV-G [MIRAR]
TV-PG( )[MIRAR]
TV-14 ( )[MIRAR]
TV-MA( )IMIRAR]
<SeBecci6n>
,,TV-Y :
,,TV-Y7
,,TV-G :
,,TV-PG
,,TV-14
,,TV-MA
<Explicaci6n de macategoda>
Apropiado para nihos de todas
las edades
Apropiado para nihos de 7 o
m_s aSos
PQblico general
Se recomienda Ia presencia
de Ios padres
No adecuado para niSos de
menos de 14 aSos
Solo para ad@tos
SP

6 Ajuste de [BLOQ.] o [MIRAR].
,, Presione [VOL A] del mando a distancia y
ajuste [BLOQ.] o [MIRAR] para la clase sin
subcategoHas.
TV-Y [MIRAR]
TV-Y7 ( ) [MIRAR]
_' TV-G [BLOQ]
TV-PG(DLSV} [BLOQ ]
TV-14 (DLSV) [BLOQ]
TV-MA(LSV) [BLOQ]
5 Ajuste de "CLASE DE MPAA".
,,Con [OH ,_JT] del mando a distancia, seleccione
la clase.
G [MIRAR]
PG [MJRAR]
PGq3 [M]RAR]
R [MJRAR]
N0-17 [MIRAR]
X [MIRAR]
o En la ctase con subcategor[as, se muestran
presionando dos veces [VOL A] de! mando a
distancia. Presione ION _.fT] del mando a dis-
tancia y seleccione Ia clase. Despu6s presione
[VOL A] y ajuste [BLOQ.] o [MIRAR].
ITV+I[TVPG+00
TV"Y7_ i/[MIRAR]
TV-G I _[MIRAR] _ D [BLOQ]
t" TV-PG_ 'i_[MIRAR] L [BLOQ]
TV-14 _ )_[MIRAR] $ [BL0O]
TV-MN_[MIRAR] V [BLOQ]
+
Subcategorfas
<Selecci6n> <E×plicaci6n de la eategoda>
+TV-Y7
FV : Fantasia violencia
+TV-PG / TV-1 4 / TV-MA :
D : Di&Iogos provocativos
(solo TV-PG, TV-14)
L : Lenguaje vulgar
S : Escenas de car&cter sexual
V : Violencia
<Selecci6n>
+G:
oPG:
oPG-13 :
oR:
,,NC-17 :
+X:
<E×pHcaci6n de la categoda>
POblico general
Se recomienda Ia presencia
de los padres
No adecuado para ni5os de
menos de 13 aSos
Restdngido; los menores de
17 aSos necesitan de la pres-
encia de Ios padres o algOn
adulto
Prohibido para menores de 17
aSos
S61o para adultos
6 Ajuste de [BLOQ.] o [MIRAR]
,,Presione [VOL A] del mando a distancia y
ajuste [BLOQ.] o [MIRAR].
G [MIRAR]
PG [MIRAR]
PGq3 [MIRAR]
R [BLOQ ]
NC-17 [BLOQ]
X [BLOQ]
7' Para satir del menO, presione [MENU] del
mando a distancia.
[] CLASE DE MPAA
4 Visualizaci6n de la pantalla "CLASE DE MPAA".
,,Con [OH A/_] del mando a distancia, seleccione
"CLASE DE MPAA".
,, Presione [VOL ,_] deI mando a distancia.
CLASE DETV
• CLASE DEMPAA
OAMBIARCO£}IGO
Para satir del menO, presione [MENU] del
mando a distancia.
NOTAS:
para la CLASE DE TV y CLASE DE MPAA
* No se puede acceder al men(l de ajustes cuando aparece
el mensaje "PROGRAMA PROHIBIDO polt..'t Para poder
acceder deberb pasar a un canal desb/oqueado.
, Cuando seleccione una clase y la ponga en [BLOQ]. se
bloquearbn automb.ticamente las clases que est6n per enci-
ma. Las que queden per debajo estarbn disponibles para
poder verlas.
* Cuando seleccione una clase y la ponga en [MIRAR], el
resto de clases estarbn autombficamente disponibles para
vel:
o9
uJ
z
o
0
0
o9
uJ
o9
SP

[] CAMBIAR CODIGO
4 Visualizaci6n de la pantalla "CAMBHAR CODHGO".
,,Con [OH ,_J_'] deI mando a distancia, seleccione
"CAMBHAR CODHGO".
CLASE DETV
OLASEDE MPAA
• CAM81ARCODIGO
,,Presione [VOL A] deI mando a distancia.
5 Cambio deI c6digo de acceso.
,,Con Ios botones de Nt_mero de canam del
mando a distancia, introduzca eI CODHGO
NUEVO de 4 dfgitos.
,,Vuelva a introducirlo en eJcuadro CODHGO
CONHRMADO.
CODIGO NUEVO
CODIGO OONFIRMADO
6 Para satir del menO, presione [MENU] del
mando a distancia.
NOTAS:
* Aseg_rese de introducir exactamente el mismo nuevo c6di-
go en el espacio de 'CODIGO CONFIRMADO" que el intro-
ducido en "CODIGO NUEVO". Si fuera diferente, se bon'arb
el espacio para 'CODIGO NUEVO" con el fin de que vuelva
a introducMo.
* Si se produce un fallo en la cordente o si la desconecta del
enchufe, se borrarb el cddigo personal de acceso volviendo
al valor predeterminado (0000). Si olvida el cddigo, des-
enchufe el cable del tomacon'iente durante un perfodo de
10 segundos para recuperar el cddigo de acceso predeter-
minado 0000.
La funci6n TEMPORIZADOR DE APAGADO
AUTOM_,TICO apagara automfiticamente la cord-
ente de la unidad a una hora determinada=
CDCD_
(_3 G3 (::D
(_ CD (ED C:3
SLEEP
dE.U'_ _UP_T SLEEP (M_
_y
Uso deI TEMPORIZADOR DE APAGADO
AUTOM_,THCO=
,, Presione [SLEEP] de! mando a distancia=
,, Se mostrarA la pantalla para el ajuste del TEM-
PORIZADOR DE APAGADO AUTOMATICO.
REPOSARO
2 Ajuste del temporizador.
,, Cada vez que presione [SLEEP] del mando a
distancia, Ia hora aumentarA 10 minutos.
,, El temporizador se puede aiustar hasta 90
minutos.
,, Despu6s de ajustarlo, podr_, verificar et tiempo
restante en minutos presionando [SLEEP]=
REPOSAR16
NOTAS:
* Si desconecta la unidad del tomacorriente o si se produce
un fallo en la con'iente, se cancelarb el ajuste del tempo-
rizador de apagado automb.tico.
ara cancelar el tempodzador de apagado autombtico, pre-
sione repetidamente [SLEEP] del mando a distancia hasta
que aparezca "REPOSAR O't
La pantalla del temporizador de apagado autombtico desa-
parecerb autombficamente tras 10 segundos.
SP

}ROS AJUSTES
Si se conectan equipos externos, inctuyendo
grabadores de vfdeo y sistemas de cine en casa,
se podr_ seleccionar f_cilmente el modo de entra-
da con el mando a distancia.
mNPUTSELECT
CD CD CD
(Z:) Q (D
C2D_ (23
(:D GD (SDCC)
4,_ 'NUTTaEEP _)
• Si presiona [INFO], se mostrar_ el modo de
entrada externa actual en la parte superior
derecha de la pantaIIa.
1) Si usa el conector VIDEOd INPUT
AUXI
2) Si usa el conector VIDEOo2 INPUT
AUX 2
1 Selecci6n del modo de entrada.
,,Si se presiona [INPUT SELECT] de! mando a
distancia, se cambiar& el modo de entrada
como se muestra a continuaci6n.
Canal deTV
AUX1 oV|DEO-S (Trasera_)
AUX2 (Fronta0
COMPONENTES
,, Para usar los conectores VIDEO-1 INPUT de la
parte trasera deI TV, seleccione "AUX1 ".
(Si utiliza el conector S-VIDEO, se visualiza
"VDEO-S".)
,, Para usar Ios conectores de la parte frontal del
TV, seleccione "AUX2".
,, Para usar los conectores COMPONENT
VIDEO INPUT de la parte trasera del TV,
seleccione "COMPONENTES".
3) Si usa el conector COMPONENT VIDEO
INPUT
COMPONENTES
4) Si usa eiconector S-VDEO INPUT
VIDEO-S
09
#J
d_
d_
O
a:
O
SP

Si conmuta Ios canales (por ejempIo entre la ante-
nay CATV) o si mueve el TV a una regi6n distinta
despues deI ajuste inicial, ser_ necesario velvet a
hacer PREA. AUTO CA. Esta funci6n permite
seleccionar f_cflmente los canales sintonizabies
con [OH A/'_'] y el TV los memoriza incluso si con-
muta cables.
C£) CD (D
CD CD CD
CD (:D GD
6@@o
CD 0 CD CD
_Lp 8'_ SLEEP ¢_
VOLA
NOTA:
* Aseg6rese que el TV estb conectado a la antena o cable.
Cuando estb conectada la antena, seleccione "PREA.
AUTO CA.(TV)" o (TV/DTV)" en el paso 3. Cuando estb
conectado al CAT_/ seleccione "PREA.AUTO CA.(CATV)'t
Cuando explore s6to TV o CATV
1 Seleccione e! mode anaI6gico presionando
[DTV/TV].
2 Visualizaci6n de la pantalla MENU.
oPresione [MENU] del mando a distancia.
Se visuafizarb, la siguiente pantalla de MENU.
_"IMAGEN
CANAL PREP
[ESP_FR_VENG
AJUSTEDE V-CHIP
TITULO[OEP]
4 *Solo para canaIes de TV
_,Con [OH A/T] del mando a distancia, seleccione
"PREA. AUTO CA.(TV)".
AGREGAR_RORRAR
_" PREA AUTOCA(W)
PREA ALrTOCA (CATV_
PREA AUTOCA (DTVrrV_
o Presione [VOL A] del mando a distancia.
Se iniciarA automAticamente la bOsqueda y
memorizaci6n de los canales.
PREA AUTO CA(W)
_I_
_,Cuando finaJice este proceso, se mostrarb, el
canal m4s pequefio memorizado de la emisi6n
anal6gica.
4 *Solo para canales de CATV
o Con [OH ,A/'_] del mando a distancia, seleccione
"PREA. AUTO CA.(CATV)".
AGREGAR_RORRAR
PREA AUTOCA(W)
_" PREA AUTOCA (CATV_
PREA AUTOCA (DTVfrV)
o Presione [VOL ,_] del mando a distancia.
Se iniciarA automAticamente la bOsqueda y
memorizaci6n de los canales.
3 Selecci6n de "CANAL PRER".
,,Con [CH A/T] del mando a distancia, seleccione
"CANAL PRER".
IMAGEN
_"CANAL PREP
[ESP}_FRA/ENG
AJUSTEDE V-CHIP
TITULO[OPP]
PREA AUTO CA(CAW)
BBBBBIBBBBBBBBBB
_,Cuando finaJice este proceso, se mostrarA el
canal mAs pequefio memorizado del CATM
oPresione [VOL A] del mando a distancia.
SP

Cuando explore s61o DTV
1 Seleccione el mode digital presionando [DTV/TV].
2 Visualizaci6n de Ia pantaIIa MENU.
,, Presione [MENU] de! mando a distancia.
Se visualizara la siguiente pantaIIa de MENU.
• IMAGEN
CANALPREP
[ESP]/FRNENG
AJUSTEDEV-CHIP
TITULO{OFF]
INSTALACIONDTV
3 Selecci6n de "CANAL PRER".
,,Con [OH _t_] del mando a distancia, seleccione
"CANAL PRER".
IMAGEN
• CANALPREP
[ESP]/FRNENG
AJUSTEDEV-CHIP
TITULOIOFF]
INSTALACIONDTV
,, Presione [VOL A] del mando a distancia.
,_ Con [OH ,AJ_] del mando a distancia, seleccione
"PREA. AUTO CA.(DTV)".
Cuando explore ambos DTV y TV al mismo tiempo
* Puede acceder a este menLi en ambos modos
(anal6gico/digital).
Visualizaci6n de la pantalla MENU y selecci6n
de "CANAL PRER".
,,Presione [MENU] y seleccione "CANAL PRER"
con [CH _] del mando a distancia.
IMAGEN
_"CANAL PREP
[ESP]iPRAENG
AJUSTEDE V-CHIP
TFULOIOFP]
INSTALACION DTV
,,Presione [VOL A] deI mando a distancia.
2 Con [OH ,_dT] del mando a distancia, seleccione
"PREA. AUTO CA.(DTV/TV)".
AGREGAPJBORRAR(DTV)
PREA AUTO CA (DW)
• PREA AUTOCA (DTVrrv)
,,Presione [VOL ,_] deI mando a distancia.
Se iniciar_ automAticamente la bOsqueda y
memorizaci6n de los canales.
09
uJ
d_
<
d_
O
O
AGREGAR/BORRAR(DT'_,,
_" PREA AUTO CA (OTV)
PREA AUTO CA (OTV/TV)
PREAAUTO CA(DTV#VI
_I_
,, Presione [VOL ,_] de! mando a distancia.
Se iniciarA automAticamente Ia bOsqueda y
memorizaci6n de los canales.
PREA AUTO CA(DTV)
_1_
,,Cuando haya finalizado Ia exploraci6n y Ia
memorizaci6n, se visualizarA el canal inferior
memorizado de la emisi6n digital.
,,Cuando finalice este proceso, se mostrarA el
canal mAs peque_o memorizado de la emisi6n
anal6gica. Si no se memodza ning0n canal
ana!6gico, se visualizardt e! canal inferior mem-
orizado de la emisi6n digital.
NOTAS:
* Sipresiona [POWER] o [MENU] en el mando a dis_ancia
mientras est,4 Ilevando a cabo el PREA, AUTO CA, se can-
celarb dicha operacidn de pre,ljuste de canales.
* Si no hay entPada de sehal de T_Z tras la finalizacidn de la
bOsqueda de canales en la pantafa se mostrarb el mensaje
'NO HAY SEA/AL DE TV".
NORAYSENALDETV
SP

La funci6n AGREGAR/BORRAR CANALES Ie per-
mite agregar algOn canai que no se hubiera a_adi-
do durante e! proceso de PREA. AUTO CA. debido
a un maEestado de recepci6n durante los ajustes
iniciales. Igualmente, se pueden eliminar canaies
que no se necesiten.
CD(DQ
(S:) G:) G3
CD CD CD
C_.EL
CH AIT [
i \
VOL _/v
MENU <D CD O O
4 Selecci6n de "AGREGAR/BORRAR".
_,Con [OH A/_'] del mando a distancia, seleccione
"AGREGAR/BORRAR".
_" AGREGAR_RORRAR
PREA AUTOCA(% _)
PREA AUTOCA (CATV}
PREA AUTOCA (DTVq'V)
_,Presione [VOL A] del mando a distancia.
5 Selecci6n del canal que se desea agregar o borrar.
_,Con [OH ,_/T] o Ios botones de Numero de
canal del mando a distancia, seleccione el
canaI.
Seleccione el mode anaI6gico presionando
[DTVfTV].
2 Visualizaci6n de la pantalla MENU.
oPresione [MENU] del mando a distancia.
Se visuaIizarb, la siguiente pantalla de MENU.
_"IMAGEN
CANAL PREP
[ESP]_PRA/ENG
AJUSTEDE V-CHIP
TITULO[OPP]
3 Selecci6n de "CANAL PRER".
,,Con [CH _J_] del mando a distancia, seleccione
"CANAL PRER".
AGREGAR_BORRAR:TV
_,Seleccione AGREGAR o BORRAR con
[VOL ,G/V] de[ mando a distancia.
_,Color de Ios nOmeros de canal mostrados en Ia
parte superior derecha de Ia pantaIIa
Azul/Verde: Se agregarA el canaI seleccionado.
Rosa/Rojo: Se borrara e! canaI seleccionado.
Para salir de! menQ, presione [MENU] del
mando a distancia.
IMAGEN
_"CANAL PREP
[ESP]_PRA/ENG
AJUSTEDE V43HIP
TITULO[OPP]
oPresione [VOL A] de! mando a distancia.
AparecerA la siguiente pantaIla de CANAL
PRER.
AGREGAPJBORRAR
PREA AUTO CA (TV)
PREA AUTO CA (CATV)
PREA AUTO CA (DTVrrV}
SP

"I Seleccione el modo digital presionando [DTV/TV].
N Visualizacidn de la pantalIa MENU.
o Presione [MENU] de! mando a distancia.
Se visualizar_ Lasiguiente pantalla de MENU.
• IMAGEN
CANALPREP
[ESP]/FRA/ENG
AJUSTEDEV-CHIP
TITULO{OFF]
INSTALACI6N DTV
3 Selecci6n de "CANAL PRER%
,,Con [OH ,_JT] det mando a distancia, seleccione
"CANAL PRER".
]MAGEN
• CANALPREP
[ESP]/FRA/ENG
AJUSTEDEV-CHIP
TITULOIOFF]
INSTALACIONDTV
6 Para salir del menO, presione [MENU] del
mando a distancia.
NOTAS:
El meng desaparecerb autombficamente despu#s de unos
10 segundos.
En el modo digital (DTV), podPb agregar o borrar canales
solo para el canal mayor.
oo
uJ
F-
d_
d_
0
0
,, Presione [VOL A] del mando a distancia.
g Sebcci6n de "AGREGAR/BORRAR(DTV)".
oCon [OH A.,_] del mando a distancia, seleccione
"AGREGAR/BORRAR(DTV)".
AGREGAR/BORRAR(DT_
• PREAAUTO CA(DT_
PREAAUTO CA(DTV_
,, Presione [VOL A] del mando a distancia.
5 Selecci6n del canal que se desea agregar o borrar.
,,Con ION _J'V] o !os botones de Numero de
canamdel mando a distancia, sebccione el canat.
D12
AGREGA_BORRAR:DTV
oSeleccione AGREGAR o BORRAR con
[VOL AFT] del mando a distancia.
oColor de los nQmeros de canal mostrados en la
parte superior derecha de la pantalla
AzuVVerde: Se agregar_ el canal sebccionado.
Rosa/Rojo: Se borrarA el canal seleccionado.
SP

Despu6s de realizar Ios ajustes iniciales a! encen-
der per primera vez Ia cordente, podr_ establecer
de nuevo la NORA DE VERANO. Cuando esta fun-
ci6n est_ en ON, la informaci6n de fecha de la
zona seleccionada se ajustar_ con la hera ariadida.
Adem_s, Ia diferencia horaria se ajustar_ del sigu-
iente modo: Ias 2 a.m. del primer domingo de abril
pasar_n a ser Ias 3 a.m. una hera m_s; y las 2
a.m. de! OItimo domingo de octubre pasaran a ser
la 1 a.m. es decir, una hora menos.
(Z) CD (Z)
CD G:) GD
CD (Z) (D
C_NEL
x45Q@ 5,
cHAir /
VOL A/V
MENU _CD CD CD CD
¢i_ S_t_T SLEEP _;
"I Visualizaci6n de la pantalla MENU.
• Presione [MENU] de! mando a distancia.
Se visualizar_ Ia siguiente pantalla de MENU.
_"IMAGEN
CANAL PREP
[ESP}_PRA/ENG
AJURTEDE V-CHIP
TITULO[OFF]
INSTALACION DTV
3 Selecci6n de "HORA DE VERANO'k
,, Con [OH ,Lf_] del mando a distancia, seleccione
"HORA DE VERANOL
PANTALLADTV[ANCHOBUZON]
DTVCC
HORADEVERANO [---]
HUSOHORARIO [ALASKA]
4 Selecci6n de "HORA DE VERANOL
_,Con [VOL ,_FT] del mando a distancia,
seleccione [ON] u [OFF].
PANTALLADTV[ANSHOBUZON]
DTVCO
"HORADEVERANO ]ON]
HUSOHORARIO [ALASKA]
5 Para salir de! menO, presione [MENU] del
mando a distancia.
NOTA:
Cuando ponga la HORA DE VERANO en OFF. se mostrarb
la informacidn de fecha y hora ajustada para la zona estable-
cida en el HUSO HORARIO.
2 Selecci6n de "INSTALACION DTV".
,,Con [OH _/T] deJmando a distancia, seleccione
"INSTALACION DTV".
IMAGEN
CANAL PREP
[ESP_PRA/ENG
AJUSTEDE V-CHIP
TITULO[OPP]
_"INSTALACION DTV
,,Cuando presione [VOL A] del mando a distan-
cia, la pantalla MENU se mostrarA come se
indica a continuaci6n.
_"PANTALLADTV[ANCHOBUZON]
DTVCC
HORA DEVERANO [-- -]
HUSO HORARIO [#LASKA]
SP

S[ mueve el TV a un Iugar diferente despues de
haber Ilevado a cabo Ios ajustes iniciales al encen-
der por primera vez el aparato, tendrb, que volver a
configurar el huso horario.
QD CD CD
(33 Q (D
(23 CD CD
¢"_NEL
_c5Q Q _5
_-CDCD CD CD
_,VOLA/V
1 V[sualizaci6n de la pantalIa MENU.
,, Presione [MENU] de! mando a d[stancia.
Se visualizar_ la siguiente pantatla de MENU.
• IMAGEN
CANALPREP
[ESP]/FRNENG
AJUSTEDEV-CHIP
TITULO{OF_
INSTALACFONDTV
2 Selecci6n de "[NSTALACHON DTV".
,,Con [OH ,_J_'] det mando a distancia, seleccione
"INSTALACION DTV".
IMAGEN
CANALPREP
[ESP]/FRNENG
AJUSTEDEV-CHIP
TITULO{OF_
• INSTALACIONDTV
,,Cuando presione [VOL ,_] de[ mando a distan-
c[a, Ia pantalla MENU se mostrarA como se
indica a continuaci6n.
• PANTALLADTV{ANCHOBUZON]
DTVCC
NORADEVERANO [ON]
RUSONORARIO [ALASKA]
3 Seleccidn de "HUSO HORARIO'L
,,Con [OH ,_k/T]deI mando a distancia, seleccione
"HUSO HORARIO%
PANTALLADTV{ANCHOBUZON]
DTVCC
RORA DEVERANO ION]
_"RUSO HORARIO [ALASKA]
4 Selecci6n de su "HUSO HORARIO".
,,Cuando presione [VOL ,_/V] en el mando a
distancia, e! HUSO HORARIO cambiara como
se [nd[ca a continuaci6n.
[ALASKA]
f
[NAWAU]
[PACIF|CO]
[MONTAI_A]
f
[CENTRAL]
f
[OR|ENTAL]
,,Bas_.ndose en [a informaci6n horaria estAndar
mundial adquirida mediante la radiodlfusi6n
digital, Ia diferencia horaria se ajustarA del
s[gu[ente modo,
ALASKA
HAWAI
PACiFICO
MONTA_,IA
CENTRAL
ORIENTAL
ATLA,NTICO
-9 horas
-10 horas
-8 horas
-7 horas
-6 horas
-5 horas
-4 horas
5 Para salir del menO, presione [MENU] del
mando a d[stancia.
09
w
d_
d_
O
p,.
O
SP

Antes de Ilamar aI servicio tecnico, compruebe una vez mAs el siguiente cuadro.
No hay corriente • Asegt3rese de que el cable de alimentaci6n estA enchu-
fade en el tomacorriente.
• Si se produce un fallo de corriente, desenchufe el cable
de alimentaci6n durante 30 minutos para permitir que la
unidad se reinicie per si misma.
No hay imagen o sonido • Compruebe que estA encendida la corriente.
Compruebe la conexi6n del tomacorriente.
i ompruebe la antena o el cable de conexi6n de la
unidad principal.
Siesta usando una antena exterior, compruebe el estado
del cable asi como el de la conexi6n.
i rate de ver otros canales. Puede que sea un problema
de la emisora que est& sintonizando.
Apague la corriente, espere aproximadamente 1 minute
y enci6ndala de nuevo.
No hay color [
El sonido es correcto, la imagenes [
deficiente
Compruebe la antena o la conexi6n del cable que va a la
unidad principal.
Si est& usando una antena exterior, compruebe el estado
del cable asi como el de la conexi6n.
Trate de ver otros canales. Puede que sea un problema
de la emisora que esta sintonizando.
Ajuste el color en la pantalla MENU.
Compruebe la antena o la conexi6n del cable que va a la
unidad principal.
Siesta usando una antena exterior, compruebe el estado
del cable asi como el de la conexi6n.
Las ondas el6ctricas pueden verse interferidas debido a
la excesivaproximidad de algt3n electrodom6stico.
Ajuste el CONTRASTE y la CLARIDAD en la pantalla
MENU.
Trate de ver otros canales. Puede que sea un problema
de la emisora que esta sintonizando.
Imagen distorsionada • Siesta usando una antena exterior, compruebe el estado
del cable asi como el de la conexi6n.
• Trate de ver otros canales. Puede que sea un problema
de la emisora que esta sintonizando.
Imagen d6bil
i Compruebe la antena o la conexi6n del cable que va a la
unidad principal.
Si est,. usando una antena exterior, compruebe el estado
del cable asi como el de la conexi6n.
• Ajuste el CONTRASTE y la CLARIDAD en la pantalla MENU.
Trate de ver otros canales. Puede que sea un problema
de la emisora que esta sintonizando.
L[neas o rayas en la imagen • Siesta usando una antena exterior, compruebe el estado
del cable asi como el de la conexi6n.
• Las ondas el6ctricas pueden verse interferidas debido a
la excesiva proximidad de algt_n electrodom6stico.
• Trate de ver otros canales. Puede que sea un problema
de la emisora que estdt sintonizando.
Imagen borrosa • Si estdt usando una antena exterior, compruebe el estado
del cable asi como el de la conexi6n.
• Trate de ver otros canales. Puede que sea un problema
de la emisora que estdt sintonizando.
ImAgenes fantasma • Compruebe la antena o la conexi6n del cable que va a la
unidad principal.
Siesta usando una antena exterior, compruebe el estado
del cable asi como el de la conexi6n.
• Las ondas el6ctricas pueden verse interferidas debido a
la excesiva proximidad de algt_n electrodomestico.
• Trate de ver otros canales. Puede que sea un problema
de la emisora que estdt sintonizando.
SP

BarrasenJapantaJJa •SiestAusandounaantenaexterior,compruebeelestado
delcableas[comeeldelaconexi6n.
• Lasondasel6ctricaspuedenverseinterferidasdebidoa
laexcesivaproximidaddealgQnelectrodomestico.
La[magensedesplazaverticalmente•SiestAusandounaantenaexterior,compruebeelestado
delcableas[comeeldelaconexi6n.
i asondasel6ctricaspuedenverseinterferidasdebidoa
laexcesivaproximidaddealgt_nelectrodomestico.
Tratedeverotroscanales.Puedequeseaunproblema
delaemisoraqueestgtsintonizando.
Marcasdeotrocolorenlapantalla •AleeelTVdecualquierelectrodom6sticoquepueda
habercercano.Apagueacorrente,espereunos30mn-
utosyvuelvaaencenderla.
•Tratedeverotroscanales.Puedequeseaunproblema
delaemisoraqueest&sintonizando.
Recepci6ndefectuosadealgunos
canales
i Compruebe la antena o la conexi6n del cable que va a la
unidad principal.
Si estA usando una antena exterior, compruebe el estado d_
del cable as[ come el de la conexi6n. O
i Las ondas el6ctricas pueden verse interferidas debido a
la excesiva proximidad de algt_n electrodom6stico.._t¢
Trate de ver otros canales. Puede que sea un problema
de la emisora que est& sintonizando.
La [magen es correcta, el sonido es • Las ondas el6ctricas pueden verse interferidas debido a
deficiente la excesiva proximidad de algt_n electrodom6stico.
• Trate de ver otros canales. Puede que sea un problema
de la emisora que est& sintonizando.
Et mando a distancia no funciona • Compruebe la antena o la conexi6n del cable que va a la
unidad principal.
Compruebe el estado de las pilas.
Compruebe que no haya obst&culos entre el sensor y el
mando a distancia.
• Haga una prueba de salida de sePial. Si est& bien, puede
haber un fallo del sensor a djstancia. (Vea el apartado
"VERIFICACION DE LA SENAL DE INFRARROJOS" en
la pgtgina 36.)
Probiernas con Jos Subt[tuJos
Seven subtitulos con errores ortogr&fi-
COS.
• En las emisiones en directo, las empresas encargadas
de realizar los subt[tulos pueden emitir programas sin
una correcci6n ortogrgtfica previa.
No seven los subtRulos por completo,
o aparecen retrasados con respecto al
dia!ogo.
• En las emisiones en directo es normal que los subtitulos
vayan retrasados unos segundos con respecto a los diAl-
egos reales. La mayoria de empresas que se dedican a
la producci6n de subtRulos pueden mostrar los digtlogos
a un mgtximo de 220 palabras per minute. Si el di&logo
excede esta velocidad, se utiliza una edici6n selectiva
dPara asegurar que los subtRuios permanecen actualiza-
os con respecto al di&logo que se esta viendo en cada
memento.
Los subtituios aparecen como un • Cuando las ondas electricas seven interferidas debido a
recuadro blanco. No seven Ios subtitu- edificios, condiciones meteorol6gicas, etc., se podrian
los en los programas que si los tienen, ver los subt[tulos de una forma incompleta.
• La estaci6n emisora puede acortar los programas para
insertar anuncios. El descodificador de subtitulos no
puede leer la informaci6n de los programas acortados.
No se ven subtitulos a! poner una cinta • La cinta de video puede ser una copia ilegal o la seSal
de video que los tiene, de los subt[tulos podria haber fallado durante el proceso
de copiado.
Se ve un recuadro negro en la pantalla. • Est,. seleccionado el mode [TEXTO] para los subtitulos.
Seleccione [01], [C2] o [OFF].
SP

Ancho buz6n
El ancho buz6n se refiere al for-
mato que muestra una imagen
aIargada en Ia pantaIIa de teb-
visi6n con una proporci6n est4n-
dar 4:3 y con espacios en negro
por su parte superior e inferior. Se
usa para mantener Ia proporci6n
de la fuente original, como puede
set una pe
PECJFJCACJONE$
Sistema de teJevisi6n: NTSC-M
TV est_indar
Sistema de
subtRuIos:
Gama de canaIes
VHF:
UHF:
DTV:
CATV:
Sistema de sintonizaci6n:
Aooeso de canal:
Terminales
Entrada de antena:
§15.119/FCC
2--13
14 *_69
1 -- 99
2 -_13, A -_W,
W+I - W+84,
A-5 -_A-l, 5A
Sistema de sintonizaci6n
sintetizada de frecuencia de
181 canales
Teclado de acceso directo,
programabie para barrido
arriba/abajo
VHF/UHF/DTV/CATV
75 ohmios desequJlJbrado
(tipo F)
Entrada S-Video: Toma de 4 patillas Mini DIN
Entrada de video: Conector RCA x 2
(1 frontal / 1 trasero)
Entrada de audio: Conector RCA x 4
(2 (L/R) x frontal / 2 (L/R) x traseros)
Salida digital coaxial de audio:
Toma de una patilia, 500 mm Vpp (75 ohmios)
Entrada de vfdeo/audio componente
Una toma de patilla (Y) / lVpp (75 ohmios)
Dos tomas de patilta(Pb/Pr)/ 700mVpp (75 ohmios)
Conector RCA x 2 (L/R)
Sistema de sonido estereo
2 altavoces
Salida de sonido: 2W, 8 ohmios x 2
Mando a distancia: SJstema de infrarrojos con
Temperatura de
funcionamiento:
RequJsitos electdcos:
Consumo e!6ctdco
(m_iximo):
Tubo de imagen:
Dimensiones:
Peso:
codificaci6n digital
5°C a 40°C
(41°F a 104°F)
CA de 120V, 60Hz
110W
27 puIg.
AI : 23-1/4 pulg. (590 mm)
An : 29-5/16 puIg.(745 mm)
Prof: 19-7/8 pulg. (505 mm)
92,6 Ibs. (42kg)
¢0
Z
O
O
o
¢o
* E! diseho y Ias especificaciones est_in sujetos a cambios sin previo aviso y sin obligaci6n legak
* S[ hay una dJferencia entre [diomas, el JdJoma b_isJcoser_ el JngI6s.
SP

SYLVANmA
GARANTmA UMITADA
FUNAI CORR reparar_ este producto libre de cargos en los EE,UU, de America, en caso de defectos en los
materiales u obra de mano, de la siguiente manera:
DURACION:
Partes: FUNAI CORR proveera, las partes necesarias pare. reemplazar las piezas defectuosas sin ningun
cargo durante un (!) afro a partir de la fecha de la compra original al minorista, Dos (2) afios para e!
Tubo Cat6dico, Ciertas partes quedan exclu[das de esta garantfa,
Mano de obra: FUNAI CORR proveer_ la mano de obra necesaria sin cargos por un perfodo de noventa (90) dfas a
partir de la fecha de compra original al minorista,
LIMITES Y EXCLUSIONES:
ESTA GARANTiA ES EXTENSIVA SOLAMENTE AL COMPRADOR ORIGINAL DEL MINORISTA, UN RECIBO DE
COMPRA U OTRA PRUEBA DE LA COMPRA ORIGINAL SERA REQUERIDA JUNTO CON EL PRODUCTO PARA
OBTENER SERVICIO CUBtERTO POR ESTA GARANTfA,
Esta garanfia no ser_ extendida a ninguna otra persona o cesionario,
Esta garanfia queda anulada y no tendrA efecto s{ cualquier nOmero serial del producto es alterado, reemplazado,
mutilado o faltante, o si un centro de servicio no autorizado intenta realizar reparaciones, Esta garantia limitada no
es aplicable a cualquier producto que no haya sido comprado y usado en los Estados Unidos de America,
Esta garanfia solamente cubre fallas debido a defectos en los materiales o mano de obra que hayan ocurrido
durante el uso normal del producto, Pot Io tanto no cubre danos ocurridos durante su transporte, o fallas causadas
per su reparaci6n, alteraci6n o productos no provistos por FUNAt CORPORATION, o daf_os que resulten de
accidentes, mal uso, abuso, maltrato, uso indebido, alteraci6n, instalaci6n defectuosa, mantenimiento incorrecto, uso
comercia! como en hoteles, renta u oficinas, o da_os como consecuencia de incendio, inundaci6n, rayos u otros
casos de fuerza mayor,
ESTA GARANTIA NO CUBRE LOS MATERIALES DE EMPAQUE, NINGUN ACCESORtO (EXCEPTO EL
CONTROL REMOTO), NINGUNA PARTE COSMETICA, PARTES COMPLETAS DE MONTAJE, DEMOSTRACION
O MODELOS DE EXHIBICION,
FUNAI CORR Y SUS REPRESENTANTES O AGENTES NO SERAN SOMETIDOS BAJO NINGUN CONCEPTO A
NINGUNA RESPONSABILIDAD POR DA_JOS GENERALES, INDIRECTOS O COMO CONSECUENCIA,
ORIGINADOS U OCASIONADOS POR EL USO O LA tNCAPACIDAD DE USAR ESTE PRODUCTO, ESTA
GARANTIA ES EMITIDA EN LUGAR DE CUALQUIER OTRA GARANTIA, EXPRESA O IMPLICITA, Y DE
CUALQUIER OTRA RESPONSABILIDAD DE PARTE DE FUNAI, CUALQUIER OTRA GARANTIA INCLUYENDO
LA GARANTIA DE COMERCIALIZACION, Y APTITUD PARA UN OBJETIVO EN PARTICULAR, QUEDA POR LA
PRESENTE RECHAZADA POR FUNAt Y SUS REPRESENTANTES EN LOS ESTADOS UNIDOS DE AMERICA,
CUALQUIER INSPECCION Y REPARACtON BAJO GARANTIA DEBERA SER REALIZADA POR EL CENTRO DE
SERVlCIO AUTORIZADO, ESTA GARANTIA ES VALIDA CUANDO EL APARATO ES LLEVADO A UN CENTRO DE
SERVICIO AUTORIZADO,
EL PRODUCTO DEBERA LLEGAR ACOMPA[qADO POR UNA COPIA DEL RECIBO ORIGINAL DE COMPRA, Sl
NO SE AGREGA NINGUN COMPROBANTE DE LA COMPRA, LA GARANTIA NO TENDRA VALIDEZ Y LOS
GASTOS DE REPARACION SERAN CARGADOS AL CLIENTE,
iMPORTANTE:
ESTA GARANTtA LIMITADA LE OTORGA A USTED DERECHOS LEGALES ESPECIALES, POSIBLEMENTE
USTED TENGA OTROS DERECHOS QUE VARIAN DE ACUERDO AL ESTADO EN QUE VIVE, SI, EN
CUALQUIER MOMENTO DURANTE EL PER!ODO DE GARANTIA USTED SE VE IMPEDIDO DE SENTIRSE
SATISFECHO CON LA REPARACION DE ESTE PRODUCTO, POR FAVOR CONTACTE A FUNAI CORR
ATENCmON:
FUNAH CORR SE RESERVA EL DERECHO A MODHFHCARCUALQUER PARTE DEL
DHSENO DE ESTE PRODUCTO SIN PREVHO AVHSO,
Pare HocaHizarsu Centro de Servicio Autorizado m_.scercano o para preguntas generaHes
de servicio, por favor ponte en contacto con nosotros a :
FUNAt CORPORATION
Servicio al Cliente
Te_ :1-800-605-8453
htt p://www°SymvaaiaCoasumerE_ectroaics°com
19900 Van Ness Avenue, Torrance, CA 90501
L3822UC
-
 1
1
-
 2
2
-
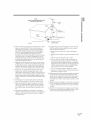 3
3
-
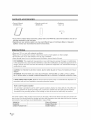 4
4
-
 5
5
-
 6
6
-
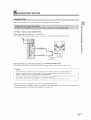 7
7
-
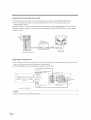 8
8
-
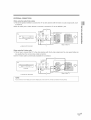 9
9
-
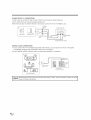 10
10
-
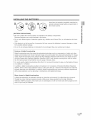 11
11
-
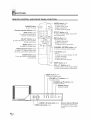 12
12
-
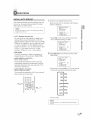 13
13
-
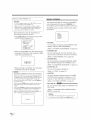 14
14
-
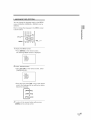 15
15
-
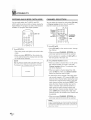 16
16
-
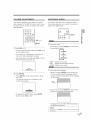 17
17
-
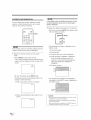 18
18
-
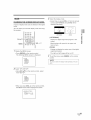 19
19
-
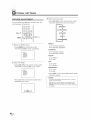 20
20
-
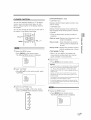 21
21
-
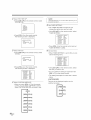 22
22
-
 23
23
-
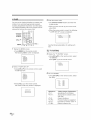 24
24
-
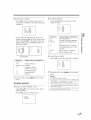 25
25
-
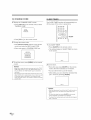 26
26
-
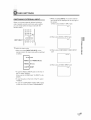 27
27
-
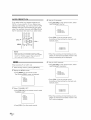 28
28
-
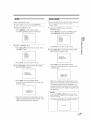 29
29
-
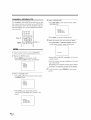 30
30
-
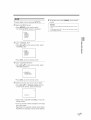 31
31
-
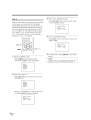 32
32
-
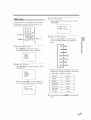 33
33
-
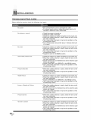 34
34
-
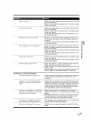 35
35
-
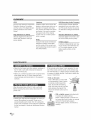 36
36
-
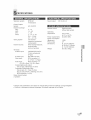 37
37
-
 38
38
-
 39
39
-
 40
40
-
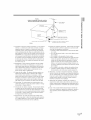 41
41
-
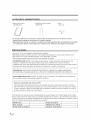 42
42
-
 43
43
-
 44
44
-
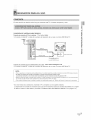 45
45
-
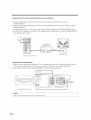 46
46
-
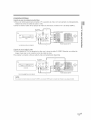 47
47
-
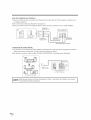 48
48
-
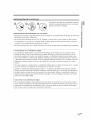 49
49
-
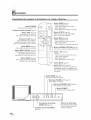 50
50
-
 51
51
-
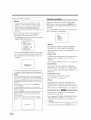 52
52
-
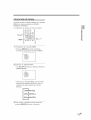 53
53
-
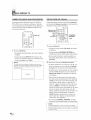 54
54
-
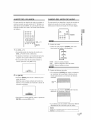 55
55
-
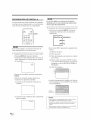 56
56
-
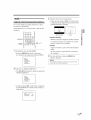 57
57
-
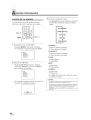 58
58
-
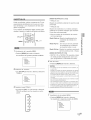 59
59
-
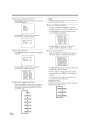 60
60
-
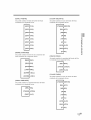 61
61
-
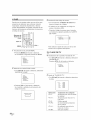 62
62
-
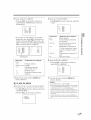 63
63
-
 64
64
-
 65
65
-
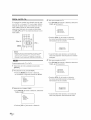 66
66
-
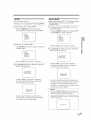 67
67
-
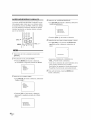 68
68
-
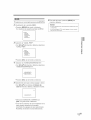 69
69
-
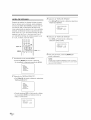 70
70
-
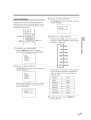 71
71
-
 72
72
-
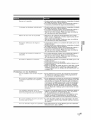 73
73
-
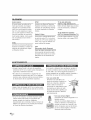 74
74
-
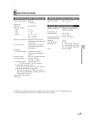 75
75
-
 76
76


Sylvania 6427GFGA El manual del propietario
- Categoría
- Televisores LCD
- Tipo
- El manual del propietario
en otros idiomas
- English: Sylvania 6427GFGA Owner's manual
Artículos relacionados
-
Sylvania 6427GFF El manual del propietario
-
-
-
-
Emerson CRT Television EWFG2705 Manual de usuario
-
-
-
-