Barazza B_Free PBF036TK Series Instrucciones de operación
- Categoría
- Barbacoas
- Tipo
- Instrucciones de operación
Este manual también es adecuado para

1PBF036TK#00--
PBF036TK#00--
taste of design
B_Free Teppanyaki
Manual de instalación y uso
Installation and use manual

2
Le damos la enhorabuena por haber adquirido
un equipo Barazza.
Se trata de un equipo de gran calidad que le acom-
pañará en su trabajo durante mucho tiempo de
manera fiable y segura, ofreciendo unas prestaciones
de altísimo nivel.
La instalación y el uso del equipo resultan sencillos
e inmediatos.
Le invitamos a leer detenidamente este manual: esto
le permitirá instalar y utilizar el equipo correctamente,
manteniendo su eficiencia y perfecto estado a lo largo
de los años.
Para facilitar la lectura del manual se emplean los
siguientes símbolos:
Instrucciones importantes para la seguridad
personal y del equipo
Información general
Congratulations on purchasing a Barazza ap-
pliance!
This safe and reliable high-quality appliance can assist
you in your work with long-lasting top-level perform-
ance.
It also has the added advantage of being quick and
simple to install and easy to use.
Please read this manual carefully, as it provides im-
portant information for the correct installation and
use of the appliance which will ensure its long-term
efficiency.
The following symbols are used to assist you in reading
this manual:
Important rules for personal safety and the
safety of the appliance
General information
El Fabricante se reserva el derecho de modicar sus
productos y este manual de la manera que considere oportuna
sin obligación de previo aviso.
Los dibujos, los esquemas de instalación y las tablas contenidas
en el manual deben considerarse indicativos y únicamente a
título informativo.
Las instalaciones de acometida del edicio deben cumplir las
normas nacionales vigentes.
Se prohíbe la copia, la reproducción total o parcial de los conteni-
dos y la transmisión de este manual a terceros sin la autorización
del Fabricante.
Este aparato cumple con los requisitos de las Directivas comunita-
rias 2014/35/UE de baja tensión y 2014/30/UE de compatibilidad
electromagnética y con los requisitos del Reglamento comunita-
rio 2016/426 para los aparatos de gas.
Las instrucciones de este manual sólo son válidas para el país
de destino.
The manufacturer reserves the right to make any changes
deemed suitable to the product without prior notice.
The drawings, installation diagrams and tables contained in this
manual are approximate and for informational purposes only.
The systems for connecting the appliance must comply with current
national regulations.
The partial or complete reproduction or photocopying of the contents
of this manual is forbidden, as well as the sending of this manual to
third parties, without the Manufacturer’s permission.
This appliance is compliant with the EU Low Voltage Directive
2014/35/EU, Electromagnetic Compatibility Directive 2014/30/EU
and Gas Appliances Regulation 2016/426.
The instructions in this booklet are valid only for the country of
destination.

3
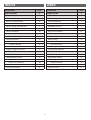
ÍNDICE INDEX
DESCRIPCIÓN PÁG.
DATOS TÉCNICOS 4
INSTALACIÓN 5
Advertencias de seguridad 5
Revisión y desplazamiento 6
Eliminación de los embalajes 6
Elección del lugar de instalación 7
Conexión eléctrica 8
Encastre del equipo 10
USO 12
Advertencias de seguridad 12
Antes de comenzar 14
Conocer el equipo 14
Conviene saber que 14
Uso del equipo 15
Algunos consejos de cocción 17
MANTENIMIENTO 18
Advertencias de seguridad 18
Mantenimiento ordinario 19
Limpieza 19
Periodos de inactividad 20
Eliminación al nal de la vida útil 21
Asistencia postventa 21
DESCRIPTION PAGE
TECHNICAL DATA 4
INSTALLATION 5
Safety warnings 5
Checks and handling 6
Disposal of the packaging 6
Installation site choice 7
Connection to the power mains 8
Built-in unit installation 10
USAGE 12
Safety warnings 12
Before starting 14
Understanding the appliance 14
Useful information 14
Using the appliance 15
Some cooking suggestions 17
MAINTENANCE 18
Safety warnings 18
Maintenance schedule 19
Cleaning 19
Periods of inactivity 20
End-of-life disposal 21
After-sales service 21

4
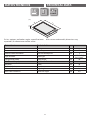
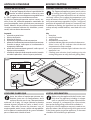
DATOS TÉCNICOS TECHNICAL DATA
Datos técnicos Technical data
Tensión Voltage V 220-240
Frecuencia Frequency Hz 50
Potencia total absorbida Total absorbed power kW 3
Tipo de cable Cable type
H05V2V2-F
3x1,5 mm
2
Longitud del cable Cable length cm 90
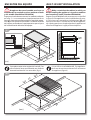
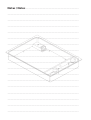
Medidas del equipo Appliance dimensions
Anchura Width cm 36
Profundidad Depth cm 51
Altura del borde Edge height cm 0,6
Altura de la cubierta Enclosure height cm 6,8
51
6,8
36
[cm]
36
36
Insulating
class
1
1
L=90cm
En los equipos realizados según especificaciones
especiales, las dimensiones totales varían.
With custom made models, dimensions vary.

5
SAFETY WARNINGS
Read this instruction booklet carefully before instal-
lation and/or use of the appliance and keep it handy
so that all the users can consult it; if you give away or sell
the appliance, please ensure that you give this booklet
to the new user so that he can be informed about its
installation, use and safety rules.
The installation and any interventions on the
appliance (special maintenance, etc.) must be carried
out by qualified personnel only, as specified in this
booklet.
The connection systems and installation rooms must
be suitable and satisfy the safety standards in force in
the country of use (protective isolating switch, earthing
system, equipotential system, etc.).
The manufacturer will not be held liable if the above
requirements are not satisfied.
During installation, maintenance or repair work,
always switch off the main electrical switch and remove
the connection plug from the socket.
The appliance is not designed for outdoor use.
Appliances may have sharp edges; handle them
with caution and use personal safety equipment (protec-
tive shoes, safety gloves, etc.).
INSTALACIÓN INSTALLATION
ADVERTENCIAS DE SEGURIDAD
Lea detenidamente este manual de instrucciones
antes de la instalación y/o el uso del equipo y
consérvelo en un lugar accesible a todos los usuarios
para futuras consultas; en caso de traspaso o venta
del equipo, asegúrese de entregar también este
manual al nuevo usuario para que pueda conocer
sus procedimientos de instalación y uso, así como las
medidas de seguridad.
La instalación y las intervenciones en los equi-
pos (mantenimiento extraordinario, etc.) deben ser
realizadas solo por personal cualificado siguiendo
las especificaciones de este manual.
Las instalaciones de acometida y los locales de ins-
talación deben ser aptos y cumplir las normas de
seguridad vigentes en el país de uso (interruptor de
protección y separación, instalación de tierra, equi-
potencial, etc.).
El fabricante declina toda responsabilidad si no se
cumplen las instrucciones descritas.
Durante las operaciones de instalación,
mantenimiento o reparación, apague siempre el in-
terruptor eléctrico principal y desconecte el enchufe
de conexión.
Este equipo no está diseñado para su funcio-
namiento al aire libre.
Los equipos podrían presentar bordes espe-
cialmente cortantes; manéjelos con cuidado y utili-
zando equipos de protección individual adecuados
(calzado de seguridad, guantes, etc.).

6
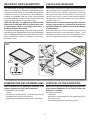
CHECKS AND HANDLING
After having unpacked the appliance and removed all
the packing materials and protective films from the sur-
faces, check for any anomalies: if you find an anomaly,
do not proceed with the installation but contact your
retailer within 8 days, reporting the data provided on
the appliance’s data plate and describing the problems
you found
(figure 1).
Attention! Do not leave the packing materials (plas-
tic bags, polystyrene, etc.) unattended, as they are a
potential hazard for children and animals (danger
of suffocation).
Move the appliance to the installation location using
appropriate personal safety equipment (figure 1) and
adopting all the precautions necessary to prevent dam-
age to the appliance, people, animals and property.
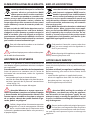
DISPOSAL OF THE PACKAGING
Attention! Dispose of the packaging in compliance
with current regulations in the country where the
appliance is installed.
Package composition:
- cardboard
- polyethylene/ polypropylene: outer packaging film,
instructions bag
- expanded polystyrene: impact protections.
REVISIÓN Y DESPLAZAMIENTO
Tras desembalar el equipo quitando todos los mate-
riales de embalaje y las películas de protección de las
superficies, compruebe si se perciben desperfectos
evidentes: de ser así, no comience la instalación y
acuda a su vendedor antes de 8 días, comunicando
los datos indicados en la placa de características del
equipo y los problemas encontrados
(fig. 1).
¡Atención! No deje sin vigilancia el material utili-
zado para el embalaje (bolsas, poliestireno, etc),
ya que puede suponer un peligro para niños y
animales (peligro de asfixia).
Transporte el equipo hasta el lugar de instalación uti-
lizando equipos de protección individual adecuados
(fig. 1) y adoptando todas las precauciones necesarias
para no ocasionar daños al equipo o a personas,
animales y cosas.
OK!
1
ELIMINACIÓN DE LOS EMBALAJES
¡Atención! Elimine los embalajes conforme a las
normas vigentes en el país de instalación.
Composición del embalaje:
- cartón
- polietileno/ polipropileno: película externa del
embalaje, bolsa de las instrucciones
- poliestireno expandido: protecciones antigolpes.

7
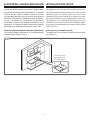
ELECCIÓN DEL LUGAR DE INSTALACIÓN
Características del local de instalación
Los equipos deben colocarse en locales interiores aptos
para tal fin con temperatura máxima de 25°C y humedad
máxima del 60%; además, deben cumplir las normas
de seguridad vigentes en el país de uso (interruptor de
protección y separación, instalación de tierra, equipoten
-
cial, etc.). Los equipos no son aptos para su instalación
al aire libre, expuestos a los agentes atmosféricos o a la
intemperie. Los equipos pueden montarse en muebles
fabricados con materiales resistentes al calor (120°C).
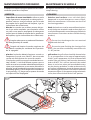
Distancia respecto a paredes laterales o posteriores
Los equipos deben mantenerse a una determinada
distancia de las paredes (
fig. 2).
C
A= min. 3,5 cm
B= min. 4,5 cm
C= min. 56 cm
A
B
2
INSTALLATION SITE CHOICE
Installation site characteristics
The appliances must be placed in suitable interior loca-
tions with a maximum temperature of 25°C and maximum
humidity of 60%; the locations must satisfy the safety
standards in force in the country of use (protective isolat
-
ing switch, earthing system, equipotential system, etc.).
The appliances are not designed for outdoor use, to be
exposed to the elements or bad weather conditions. Appli
-
ances may be assembled onto units made of heat-resistant
materials (120°C).
Distance from side and back walls
The appliances must be kept at a specified distance from
walls (figure 2).

8
CONNECTION TO THE POWER MAINS
Before making the connection, make certain
that the voltage and frequency indicated on the data
plate match those of the power supply system.
The appliance is supplied with a 90cm-long power cord
(
H05V2V2-F) on which a 16A plug must be installed to
then be connected with a power outlet
(figure 3a).
Alternatively, the cable can be connected directly to
the distribution network (figure 3b): in this case an om-
nipolar disconnecting switch must be provided, with a
minimum opening of the contacts that allows complete
disconnection in category III overvoltage conditions.
Both the power outlet and omnipolar switch must
be up to standard and located in a position which is
accessible even after the appliance is installed.
If the appliance is installed together with an oven, the
connection of the two appliances must be independ-
ent for electrical safety reasons.
The power cord must NOT:
- be crushed or rolled up;
- come into contact with any type of liquid, sharp or hot
objects or corrosive substances;
- reach, at any point, a temperature which is 50°C higher
than the room temperature;
- be replaced with a different type of cable (see “Techni-
cal data” on page 4)
or with a cable which is not up to
standard;
- be lengthened with extensions.
CONEXIÓN ELÉCTRICA
Antes de la conexión, asegúrese de que
la tensión y la frecuencia indicadas en la placa de
características coincidan con las de la instalación
de alimentación.
El equipo incluye de serie un cable de alimentación
(
H05V2V2-F) de 90 cm de largo, al que se deberá aplicar
un enchufe capaz de soportar 16 A, que a su vez deberá
conectarse a una toma de corriente (fig. 3a).
También se puede conectar el cable directamente a
la red de distribución
(fig. 3b): en este caso deberá
instalarse un dispositivo para la desconexión omnipo-
lar con una separación entre contactos que permita
la desconexión completa en las condiciones de la
categoría III de sobretensión.
Tanto la toma de corriente como el interruptor om-
nipolar deben ser conformes a las normas y estar
instalados en un lugar accesible incluso con el equipo
empotrado. Si se monta el equipo en combinación
con un horno, la conexión de los dos equipos debe ser
independiente, por motivos de seguridad eléctrica.
El cable de alimentación NO debe:
- estar aplastado o enrollado sobre sí mismo;
- entrar en contacto con líquidos de cualquier tipo,
objetos cortantes o calientes ni sustancias corrosivas;
- alcanzar en ningún punto una temperatura que
supere en 50°C la temperatura ambiente;
- ser sustituido por otro de distinto tipo (véase “Datos
técnicos”, pág. 4)
o no conforme a las normas;
- ser alargado con prolongadores.
8
H05V2V2-F
3x1,5mm
2
90 cm
16A
B
A
Mod.
Art.
N°
...V ...Hz ...Kw
Questo apparecchio deve essere installato conformemente
alle norme in vigore. Consultare il libretto istruzioni prima
di installare e usare l’apparecchio
F.lli Barazza S.r.l
MADE IN ITALY
3

9
SUSTITUCIÓN DEL CABLE DE ALIMENTACIÓN
En caso necesario, el cable de alimentación
puede sustituirse por otro del mismo tipo
(véase
“Datos técnicos”, pág. 4)
que cumpla las normas
vigentes en el país de instalación.
Si el equipo ya está conectado, desconéc-
telo de la alimentación eléctrica.
Para acceder a las conexiones eléctricas, desmonte la
tapa de la regleta de bornes desenroscando el tornillo
que la sujeta
(fig. 4).
Desconecte el cable antiguo de los bornes y extráigalo;
conecte el nuevo cable (únicamente de tipo H05V2V2-
F
) a los bornes correspondientes, N - L - Tierra.
Sujete el nuevo cable con el sujetacable previsto
y vuelva a cerrar la regleta de bornes colocando la
tapa en su sitio.
N
L
4
POWER CORD REPLACEMENT
If necessary, the power cord can be replaced
with an identical type
(see “Technical data” on page
4)
in compliance with current regulations in the
country where the appliance is installed.
If the appliance is already connected, discon-
nect the electrical power.
To access the electrical connections, remove the cover
from the terminal board by unscrewing the screws
(figure 4).
Disconnect the old cord from the terminal board and
remove it; connect the new cord (only the H05V2V2-F
type) into the respective terminals N - L - Earth.
Cover the new cord with the appropriate cord holder and
re-close the terminal, replacing its cover.

10
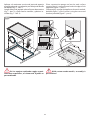
ENCASTRE DEL EQUIPO
Asegúrese de que el mueble en el que se
empotrarán los equipos esté en perfecto estado
y sea estable (Normativa DIN 68930).
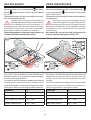
Prepare un hueco de encastre con las medidas indicadas
en la fig. 5; si se va a empotrar el equipo encima de un
horno, es necesario montar también un panel de separa
-
ción (B) a una distancia mínima de 1 cm desde el fondo
de la placa, perforado en la parte posterior para el paso
de la alimentación eléctrica del equipo.
49
34
[cm]
1 cm
min.
B
5
Se pueden montar varios equipos de la serie B_Free
uno al lado del otro, considerando una distancia
intermedia mínima de 2 cm entre ellos (
fig. 6).
490
340
40
340
[mm]
360
360
20
6
BUILTIN UNIT INSTALLATION
Make certain that the cabinet in which you
will be installing the appliance is in perfect condition
and completely stable (Standard DIN 68930).
Prepare an embedded hole with measurements as specified
in figure 5; if the appliance is to be installed above an oven,
it is also necessary to provide an isolating panel (B) with
a distance of at least 1 cm from the base of the appliance;
the isolating panel must be placed under the appliance to
allow for the appliance’s supply of electrical power.
It is possible to install additional B_Free appliances;
there must be a minimum clearance of 2 cm between
the appliances (
figure 6).

11
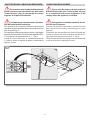
Aplique a la encimera una tira de junta de esponja
asegurándose de no colocarla por debajo del borde
del equipo (
fig. 7 - det. 1).
Luego coloque el equipo sobre el hueco de encastre
(
fig. 7 - det. 2) y fíjelo con los tornillos y pletinas in-
cluidos (
fig. 7 - det. 3).
1
2
G
3
G
1
OK!
7
En los equipos realizados según especi-
ficaciones especiales, el sistema de fijación es
personalizado.
Place a protective sponge seal on the work surface
ensuring that it is not positioned under the edges of the
appliance (
figure 7 - part 1).
Subsequently, arrange the appliance above the embed-
ded hole (
figure 7 - part 2) secure it using the screws and
brackets provided (
figure 7 - part 3).
With custom made models, assembly is
personalised.

12
USO
ADVERTENCIAS DE SEGURIDAD
PARA UN USO CORRECTO Y SEGURO
Este equipo ha sido concebido y fabricado
únicamente para la cocción de alimentos. Cualquier
uso diferente será considerado impropio y por tanto
potencialmente peligroso para personas, animales y
cosas. Además podría ocasionar daños irreparables
al equipo: en este caso, el Fabricante declina toda
responsabilidad y no reconoce el derecho de Garantía.
Cierre siempre el interruptor eléctrico omni-
polar antes de cualquier operación de limpieza o si se
prevén largos periodos de inactividad.
Asegúrese de que todos los mandos estén en
la posición “0 - apagado” después de cada uso.
Si percibiese cualquier problema, no utilice el
equipo y póngase en contacto con un Centro de Asis-
tencia autorizado, comunicando los datos indicados
en la placa de características.
Este equipo no es apto para ser utilizado por
personas (incluidos los niños) con dificultades físicas,
sensoriales o mentales o que carezcan de la experien
-
cia y los conocimientos necesarios, a menos que una
persona responsable de su seguridad se encargue de
su supervisión o de instruirlas en el uso del equipo.
Es necesario vigilar a los niños para asegu-
rarse de que no jueguen con el equipo o con sus
componentes.
No utilice sprays cerca de este equipo mien-
tras esté funcionando.
No modifique este equipo.
¡Peligro de incendio!
No utilice el equipo como superficie de apoyo.
¡Peligro de incendio!
No coloque nunca objetos sensibles al calor o inflama-
bles (ej. agarradores de cacerolas, persianas, botellas
de bebidas alcohólicas, etc..) cerca del equipo.
USAGE
SAFETY WARNINGS
FOR SAFE AND CORRECT USE
This appliance has been designed and manufac-
tured exclusively for cooking food. Any other use is consid-
ered improper and thus potentially hazardous for people,
animals and property. Furthermore, it may permanently
damage the appliance: in this case, the Manufacturer will
not be held liable and the Guarantee will be void.
Always disconnect the appliance from the power
supply using the omnipolar switch before carrying out
any cleaning operations or when the appliance will not
be used for an extended period.
Make sure that all the knobs are turned to “0 - off”
when you finish using the appliance.
If you should note any anomalies, do not use the
appliance but contact an authorized Service Centre and
report the data indicated on the data plate.
This appliance is not suited for use by persons
(including children) with physical, sensorial or mental
difficulties or lacking proper experience and knowledge,
unless supervised or instructed on the use of the appli
-
ance by the person responsible for their safety.
Children must be supervised to ensure that they
do not play with the appliance or parts of it.
Do not spray aerosols in the vicinity of this ap-
pliance while it is in operation.
Do not modify this appliance.
Fire hazard!
Do not use the appliance as a support surface.
Fire hazard!
Never place heat-sensitive and flammable objects (for
example, oven gloves, curtains, alcoholic containers,
etc..) near the appliance.

13
La zona próxima al equipo podría estar muy
caliente; tenga cuidado al colocar en este
espacio tomas de corriente, otros electrodo-
mésticos, cables eléctricos, tuberías y cualquier ma-
terial sensible al calor o inflamable.
PARA LA COCCIÓN
¡Peligro de quemaduras!
Durante el funcionamiento y durante algunos minutos
tras el uso, algunas partes del equipo alcanzan tempe
-
raturas muy altas. No entre en contacto con estas partes
sin llevar puestas protecciones personales adecuadas.
¡Peligro de incendio!
Si comienzan a arder la grasa o el aceite caliente, no
apague nunca las llamas con agua; sofóquelas con un
trapo húmedo o similares y avise inmediatamente a
los bomberos.
¡Peligro de incendio!
No revista el equipo o partes de él con hojas de alu-
minio o similares.
¡Peligro de explosión!
No caliente nunca sobre el equipo latas o recipientes
cerrados herméticamente: la sobrepresión generada
por el calor podría hacer que explotasen, ocasionando
graves daños personales.
Mantenga vigilado el aparato durante todo
su funcionamiento.
Durante las operaciones de cocción, adopte
todas las precauciones posibles para no rayar
la plancha de cocina.
The area surrounding the appliance may be-
come very hot, so take precautions when posi-
tioning power outlets, other household appli-
ances, electrical cables, hoses and any heat-sensitive or
flammable materials in this area.
FOR COOKING
Burn hazard!
During operation and for a few minutes after use, some
parts of the appliance reach extremely high temperatures!
Do not touch these parts without suitable personal pro
-
tection.
Fire hazard!
In the case where fats or oils lead to fire, never put out
flames with water, instead suffocate the flames using a
moist dishcloth or a similar material and immediately
call the fire services.
Fire hazard!
Do not cover the appliance or parts of the appliance with
aluminium foil or similar materials.
Explosion hazard!
Never heat up tin cans or hermetically closed containers
on the appliance; the excess pressure generated by the
heat may cause containers to explode, consequently
leading to serious personal injury.
Monitor the appliance during the entire time it
is in operation.
During cooking operations, always abide by all
possible precautions in order to avoid scratching
the hob.

14
BEFORE STARTING
UNDERSTANDING THE APPLIANCE
The Teppanyaki appliance grants you the choice
of cooking on both grilling zones or solely the
back grilling zone and with the use of a thermo-
stat knob, it allows you to adjust the temperature in the
range of between 0 and 250°C.
The Teppanyaki grill al-
lows you to cook meat, vegetables, fruit, etc...using small
quantities of vegetable fats (butter, oil, coconut oil, lard.
In addition to cooking, the appliance can also be used
to keep already cooked food hot, even food still in the
pans.
Key
1
data plate
2 mounting bracket
3 grilling zone
4 temperature control knob
5 operation indicator light connected to the thermostat:
when it turns off, this indicates that the desired
temperature has been reached
6 main operation indicator light: indicates that the
appliance is on
7 cooking area selection knob (cooking using the
entire grilling zone or solely the back grilling zone)
ANTES DE COMENZAR
CONOCER EL EQUIPO
El equipo Teppanyaki ofrece la posibilidad de
cocinar en toda la plancha o solo en la parte
posterior, con una temperatura regulable entre
0 y 250°C mediante un mando de termostato.
La plancha Teppanyaki permite cocinar carnes, ver-
duras, fruta, etc. utilizando pequeñas cantidades de
grasa (mantequilla, aceite, grasa de coco, manteca de
cerdo). Además de para cocinar, el equipo también
sirve para mantener calientes los alimentos ya coci-
nados, incluso dentro de cacerolas.
Leyenda
1
placa de características
2 pletina de fijación
3 plancha de cocina
4 mando de regulación de la temperatura
5 piloto de funcionamiento conectado al termostato:
cuando se apaga, indica que se ha alcanzado la
temperatura deseada
6 piloto de funcionamiento general: indica que el
equipo está encendido
7 mando de selección de la zona de cocción (cocción
en toda la plancha o solo en la parte posterior)
1
2
Mod.
Art.
N°
...V ...Hz ...Kw
Questo apparecchio deve essere installato conformemente
alle norme in vigore. Consultare il libretto istruzioni prima
di installare e usare l’apparecchio
F.lli Barazza S.r.l
MADE IN ITALY
3
4
5
6
7
8
CONVIENE SABER QUE
Antes de utilizar el equipo por primera vez,
límpielo, junto con sus componentes, de la
manera descrita en el cap. “
Mantenimiento
ordinario” de la pág. 19
; luego caliente la plancha
durante algunos minutos en vacío, es decir, sin ali-
mentos sobre ella. Durante los primeros usos, el
equipo podría emitir humo y olores desagradables:
esto se debe a la combustión de las grasas utilizadas
para su fabricación. Ventile el local.
USEFUL INFORMATION
Before using the appliance for the first time, care-
fully clean the appliance including its compo-
nents as specified in the Chapter “
Routine Main-
tenance” on page 19
, subsequently, for a few minutes,
heat up the empty grilling surface with no food on it.
During this time the appliance may emit smoke or un-
pleasant odours (due to the burning of the grease used
in the factory processing of the appliance), so the room
should be well aired during its operation.

15
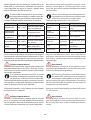
USO DEL EQUIPO
Elija entre cocinar solo en la zona posterior
o en toda la
plancha
girando el mando (7) hasta la posición deseada
(
fig. 9 det. 1).
El encendido del piloto (6) indica que el equipo está conec-
tado a la alimentación eléctrica.
Si decide utilizar solo la parte posterior, debido a la
continuidad de la plancha, la parte anterior también
se verá afectada por el calor (por ejemplo, si la
parte posterior está a 200°C, la anterior tendrá una tempera
-
tura de 100°C de todos modos), por lo que se puede utilizar
para mantener calientes los alimentos ya cocinados.
¡Peligro de quemaduras! ¡No toque la parte anterior con
las manos desnudas pensando que está fría!
7
6
5
4
4
1
2
1
9
(fig. 9 det. 2) Gire el mando (4) hasta la temperatura
deseada; el piloto (5) se encenderá y luego se apagará,
al alcanzarse el valor definido.
La selección de la temperatura depende del tipo de
alimento que se desee cocinar, de su tamaño y de su
grado de humedad: a continuación se expone una tabla
con algunos datos, de carácter puramente indicativo.
Alimento °C
Pescado 170°C - 180°C
Verdura/fruta 200°C
Carnes (cerdo, buey, ternera)
180°C - 200°C
Carnes (cordero, aves) 150°C - 180°C
USING THE APPLIANCE
After selecting whether to cook solely on the back grilling zone
or the entire grilling zone
rotate the knob (7) to the desired
position (
figure 9 part 1).
Illumination of the indicator light (6) indicates that the appliance
is being powered.
If you choose to only use the back grilling zone, due
to the flush arrangement of the grill surface, the front
grilling zone will also heat up (for example, if the back
grilling zone is heated to 200°C, the front grilling zone will reach
a temperature of 100°C) and can therefore be used to keep
cooked food hot.
Burn hazard! Do not touch the back grilling zone with
unprotected hands thinking that it will be cool!
(figure 9 part 2) Rotate the knob (4) to select the desired
temperature; the indicator light (5) will illuminate and
will then switch off once the set temperature has been
reached.
The choice of temperature depends on the type of food
that you want to cook, its size and its water content: a
table listing guidelines is provided as follows.
Food type °C
Fish 170°C - 180°C
Vegetables/fruit 200°C
Meat (pork, beef, veal) 180°C - 200°C
Meat (lamb, poultry) 150°C - 180°C

16
Espere algunos minutos hasta que la plancha se ca-
liente bien; a continuación, utilizando una espátula,
unte la plancha con grasas o aceites y ponga sobre
ella los alimentos que desea cocinar.
En función del alimento que se vaya a cocinar y
de la temperatura elegida, se deben untar dife-
rentes tipos de grasas/aceites sobre la plancha.
La tabla de abajo facilita indicaciones al respecto.
Grasa °C Apta para
Mantequilla 150 - 180°C
pescado, hígado, sobre
todo si son picantes
Mantequilla
aromatizada
- no apta para asar
Aceite (cacahue-
te, maíz, etc.)
200 - 250°C carnes en general
Aceite de oliva 150 - 200°C
pescado, carnes (filete,
caza, bistecs)
Manteca de
cerdo
200 - 250°C
asados (cerdo, buey),
platos orientales
Grasa de coco 200 - 250°C
asados (cerdo, buey)
Dé la vuelta a los alimentos
solo cuando se despeguen
fácilmente de la plancha:
tenga cuidado para no rayar
la plancha de cocina con los utensilios: en concreto,
elija instrumentos de cocina con bordes redondeados.
¡Peligro de quemaduras!
Durante el funcionamiento, algunas partes del equipo
alcanzan temperaturas muy altas. No entre en con-
tacto con estas partes sin llevar puestas protecciones
personales adecuadas.
Si es necesario, durante la cocción se puede
modificar la temperatura; podrían pasar algu-
nos hasta que se alcance el nuevo valor defi-
nido, tiempo necesario para que se caliente o se enfríe
más la plancha: el apagado del piloto (5) indicará que
se ha alcanzado el nuevo valor definido.
Al finalizar la cocción, vuelva a poner los dos mandos
en la posición “0 - apagado”.
¡Peligro de quemaduras!
Durante el funcionamiento y durante algunos minutos
tras el uso, algunas partes del equipo alcanzan tempe
-
raturas muy altas. No entre en contacto con estas partes
sin llevar puestas protecciones personales adecuadas.
Wait a few minutes until the grill heats up well, subse-
quently, with the help of a spatula, spread fats or oils
across the grill surface and place the food to be cooked
on this surface.
Relative to the food type to be cooked and the cho-
sen temperature, you will need to use different types
of fats/oils to spread across the grill surface.
The following table provides useful guidelines.
Fats °C Suitable for
Butter 150÷180°C
fish, liver, particularly
if spicy
Butter
flavoured
-
not suitable for roast-
ing
Oil (peanut,
maize, etc...)
200÷250°C meat in general
Olive oil 150÷200°C
fish, meat (fillet, game,
steak)
Lard 200÷250°C
roasts (pork, beef), ori-
ental dishes
Coconut oil 200÷250°C
roasts (pork, beef)
Only turn the food
once it comes away easily from the
grill surface:
take care not to scratch the cooking surface
with utensils: carefully choose kitchen equipment with
rounded edges.
Burn hazard!
During operation, some parts of the appliance reach
extremely high temperatures! Do not touch these parts
without suitable personal protection.
Whilst cooking, if required, it is possible to adjust
the temperature: a few minutes may be required
for heating or cooling down of the grill surface
before reaching the newly set temperature: the turning
off of the indicator light (5) indicates that the newly set
temperature has been reached.
When you have finished cooking, turn both knobs to the
“0 - off” position.
Burn hazard!
During operation and for a few minutes after use, some
parts of the appliance reach extremely high temperatures!
Do not touch these parts without suitable personal pro
-
tection.

17
ALGUNOS CONSEJOS DE COCCIÓN
• Si decide utilizar solo la parte posterior de la plan-
cha, aproveche la parte anterior (que está caliente
de todos modos) para mantener calientes los
alimentos ya cocinados.
• La plancha mantiene el calor durante mucho tiempo,
incluso después de apagarla; para ahorrar energía,
se puede apagar antes de que finalice la cocción y
seguir cocinando aprovechando el calor residual, o
bien utilizarla para mantener calientes los alimentos
ya cocinados.
En la tabla se dan algunos datos aproximados.
Proceso Temperatura Duración
Enfriamiento de 0° a 150°C
aproximada. 45 min.
Enfriamiento de 150° a 200°C
aproximada. 70 min.
Enfriamiento más de 200°C
aproximada. 90 min.
•
Elija cuidadosamente la temperatura de cocción; ante
la duda, seleccione la inferior.
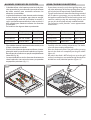
•
Distribuya los alimentos de manera uniforme y homo-
génea por toda la superficie de la plancha, asegurán-
dose de que los alimentos se apoyen completamente
sobre ella
(fig. 10).
•
Se recomienda NO cortar los alimentos directamente
sobre la plancha, sino cocinar los trozos ya separados
en pequeñas porciones
(fig. 11).
10
SOME COOKING SUGGESTIONS
• If you choose to only use the back grilling zone, you
can take advantage of the front grilling zone (which
will also be hot) to keep already cooked food hot.
• The grill surface remains hot even after being switched
off; in order to save energy, you can therefore switch
the appliance off before the end of cooking time and
continue cooking using the remaining heat or you
can use this heat to keep already cooked food hot.
The following table provides some approximate
information.
Process Temperature Cooking time
Cooling down
from 0° to 150°C
approx. 45 mins.
Cooling down
from 150° to 200°C
approx. 70 mins.
Cooling down
above 200°C
approx. 90 mins.
•
Carefully select the cooking temperature; if in doubt,
select the lower cooking temperature.
•
Place the food evenly across the grill surface, ensuring
that the the food rests completely on the grill surface
(figure 10).
•
We advise that food is NOT directly cut up on the grill
surface, but that pieces are cooked having already been
divided into small, individual portions
(figure 11).
11

18
ADVERTENCIAS DE SEGURIDAD
Apague siempre el interruptor eléctrico
principal y desconecte el enchufe antes de realizar
cualquier operación de limpieza o si se prevé un
largo periodo de inactividad.
Compruebe periódicamente que el cable
eléctrico esté en perfecto estado y no aplastado:
si percibiese cualquier desperfecto, no utilice el
equipo y no intente cambiarlo usted mismo; avise
inmediatamente a un centro de asistencia para
que lo sustituya.
Realice la limpieza después de cada uso, cuan-
do se hayan enfriado los componentes del equipo:
esto facilita la operación y evita que puedan arder
los restos de comida.
Limpie TODAS las partes del equipo aplicando
únicamente los procedimientos y productos indicados
en este manual (en concreto, evite a toda costa el uso
de esponjas abrasivas, rasquetas, detergentes ácidos
o agresivos, aparatos de vapor o a presión y chorros
de agua directos).
Si se realiza la limpieza de manera distinta respecto a
la expresamente descrita, se podría poner en peligro
la seguridad de personas, animales y cosas y ocasionar
daños al equipo no cubiertos por la Garantía.
¡Peligro de quemaduras!
Durante algunos minutos tras el uso, algunas par-
tes del equipo mantienen temperaturas muy altas.
Antes de limpiar el equipo, espere a que se enfríen
por completo.
Si determinadas sustancias especialmente
ácidas (ej. vinagre, zumo de limón, etc.) per-
manecen durante mucho tiempo en contacto
con el equipo, podrían atacar las superficies forman-
do antiestéticas marcas que, en cualquier caso, no
afectan al funcionamiento del equipo.
MANTENIMIENTO
SAFETY WARNINGS
Always disconnect the appliance from the
power supply and remove the connection plug from
the socket before carrying out any cleaning opera-
tions or when the appliance will not be used for an
extended period.
Regularly check that the electrical cable is in
tact and not crushed: if a fault is noted, do not use the
appliance and do not attempt to replace the cable,
instead, immediately inform the Service Centre and
ask for a replacement.
After each use, clean the appliance once it has
cooled: this facilitates the cleaning operation and pre-
vents the burning of food residue.
Clean ALL parts of the appliance using only the
procedures and products indicated in this manual (in
particular, do not use abrasive sponges, scrapers, acidic
or aggressive detergents, steam or pressure cleaning
devices, direct water jets).
Any cleaning performed in a manner different from that
specified may endanger the safety of people, animals
and property as well as cause damage to the appliance
which is not covered by the Guarantee.
Burn hazard!
For a few minutes after use, some parts of the appli-
ance maintain extremely high temperatures! Before
cleaning the appliance, wait until it has completely
cooled down.
If some particularly acidic substances (for exam-
ple, vinegar, lemon juice, etc.) remain for ex-
tended time periods on the appliance, they may
corrode the surface, leaving unsightly marks, which, in
any case, do not affect the operation of the appliance.
MAINTENANCE

19
MANTENIMIENTO ORDINARIO
El equipo no requiere ninguna operación de mante-
nimiento aparte de su limpieza.
LIMPIEZA
• Superficies de acero inoxidable: utilice un paño
suave ligeramente empapado en detergente es-
pecífico neutro o vinagre caliente: para el modo
de empleo de los productos de limpieza, siga las
indicaciones de su fabricante.
• Mando: los mandos no se deben extraer del per-
no al que están acoplados: para limpiarlos utilice
un paño suave apenas empapado en detergente
neutro (para el modo de empleo de los productos
de limpieza, siga las indicaciones de su fabricante).
Asegúrese de que no se produzcan filtraciones
de detergente bajo el mando.
Después de limpiar el mando, asegúrese de
no haberlo movido por accidente de la posición
de “0 - apagado”.
• plancha: la plancha debería limpiarse cuando su
temperatura sea de unos 50-60°C; de este modo
resulta más fácil eliminar los restos de comida.
Si la plancha está fría, ponga el mando del termos-
tato a 50-60°C; si aún está caliente, espere a que se
enfríe: en este caso, cuando se decide limpiarla, para
saber a qué temperatura se encuentra realmente la
plancha, gire el mando del termostato hasta que se
encienda el piloto y vea la temperatura indicada en
la serigrafía
(fig. 12); luego vuelva a poner el mando
en la posición de “0-apagado”.
19
5
4
4
1 2
12
MAINTENANCE SCHEDULE
No regular maintenance is required for the hotplates
except cleaning.
CLEANING
• Stainless steel surfaces: use a soft cloth lightly
dampened in neutral detergent or warm vinegar:
follow the manufacturer’s instructions on the use of
the cleaning products.
• Knob: the knobs must not be removed from the pivots
on which they are attached: in order to clean them, use
a soft cloth dampened in neutral detergent (follow the
manufacturer’s instructions on the use of the cleaning
products).
Ensure that the detergent has not remained
lodged under the knob.
Ensure that upon finishing the cleaning of the
knob, it has not been accidentally moved from the
“0 - off” position.
• grill surface: the grill surface should be cleaned when
it is at a temperature in the range of approximately
50-60°C; at this temperature, it is easier to remove food
residue. If the grill surface is cold, move the thermostat
knob to 50-60°C, if it is still hot, wait until it has cooled
down: in such a case, when you have decided to carry
out the cleaning procedure, in order to determine the
grill surface’s temperature, rotate the thermostat until
the indicator light illuminates and read the indicated
temperature
(figure 12) that appears on the velvet touch
screen, then return the knob to the “0-off” position.

20
Retire de la plancha los restos más grandes utilizando
una espátula (elija utensilios de bordes redondeados
para no rayar la plancha); a continuación moje la
plancha con un poco de agua y jabón para platos
y deje que actúen durante algunos minutos para
permitir que se disuelvan los restos incrustados.
No utilice detergentes con componentes
abrasivos o demasiado ácidos.
Utilizando un paño o papel de cocina, elimine los
restos que se hayan despegado de la plancha y el
agua jabonosa.
Aclare varias veces la plancha usando un paño
humedecido en agua y séquela con cuidado.
Algunas proteínas y ácidos pueden dejar
manchas en la plancha: evite el contacto
prolongado con estas sustancias. Si la plancha
estuviese ligeramente manchada, trate las manchas
con ácido cítrico comercial.
Si desea limpiar la plancha entre una cocción y la
siguiente, elimine los restos más grandes con una
espátula y ponga sobre la plancha caliente cubitos
de hielo y zumo de limón.
Al derretirse, los cubitos ablandarán los restos
incrustados, y el limón eliminará los olores de los
alimentos cocinados antes.
Retírelo todo con la espátula.
PERIODOS DE INACTIVIDAD
Si no piensa utilizar el aparato durante un largo pe-
riodo de tiempo (más de 2-3 semanas):
• limpie en profundidad el equipo siguiendo las
indicaciones del capítulo correspondiente;
• desconecte el enchufe de alimentación eléctrica.
Remove, with the help of a spatula, the larger residues
(select utensils with rounded edges in order to avoid
scratching the grill surface), subsequently, wet the
grill surface with a little water mixed with washing-
up detergent and leave it to soak for a few minutes in
order to remove the encrustations.
Do not use detergents that contain abrasive or
extremely acidic substances.
Using a cloth or kitchen roll, remove residues which
have become stuck to the grill surface and the water
mixed with the detergent.
Rinse the grill surface numerous times using a wet
cloth and carefully dry the grill surface.
Some protein substances and acids may mark
the grill surface; avoid extended contact with
these types of substances. In the case where the
grill surface is slightly marked, treat it with household
lemon juice.
If you wish to clean the grill surface between two
cooking operations, using a spatula, remove the larger
residues and place ice cubes and lemon juice on the
hot grill surface.
The melting ice cubes will soften the encrustations
whilst the Iemon juice will remove the odours of the
previously cooked food.
Use the spatula to remove the remaining residues.
PERIODS OF INACTIVITY
If the appliance will not be used for a long period of time
(more than 2-3 weeks):
• thoroughly clean the appliance following the instruc-
tions in the respective chapter;
• disconnect the electric power supply plug.

21
ELIMINACIÓN AL FINAL DE LA VIDA ÚTIL
El símbolo de la papelera tachada que figu-
ra en el producto indica que los residuos de
aparatos eléctricos y electrónicos (RAEE)
deben separarse de los residuos mezclados,
de manera que puedan ser sometidos a los
debidos procesos para su reutilización o a un trata
-
miento específico destinado a retirar y eliminar de
forma segura las posibles sustancias nocivas para el
medio ambiente y extraer las materias primas reci
-
clables.
Así pues, en Italia los RAEE deben depositarse en los
Centros de Recogida previstos a tal efecto. Además,
al adquirir un nuevo aparato, se pueden entregar los
RAEE al vendedor, que está obligado a recogerlos
gratuitamente. La eliminación indebida o incorrecta
del producto conlleva la aplicación de las sanciones
que establece la actual normativa legal.
Para más información, acuda a su servicio local
de eliminación de residuos.
Inutilice el equipo para su eliminación quitan-
do el cable de alimentación.
ASISTENCIA POSTVENTA
Barazza srl le garantiza la máxima colaboración en
caso de que surgiesen problemas técnicos o cualquier
otra necesidad.
Procedimiento en caso de fallos de funcionamiento
Antes de ponerse en contacto con el Centro de
Asistencia más conveniente, realice las siguientes
operaciones:
• compruebe que haya corriente eléctrica;
• consulte los datos del equipo en la placa de carac-
terísticas
(posición de la placa de características
- véase la pág. 14)
;
• consulte la fecha de compra del equipo.
¡Atención! Mientras se espera a que se re-
suelva el problema, conviene no utilizar el equipo
y desconectarlo de la alimentación eléctrica. No
intente reparar o modificar el equipo en ninguna
de sus partes: además de quedar anulada la ga-
rantía, podría ser peligroso.
Solicite y haga utilizar únicamente repuestos
originales: el uso de componentes distintos
de los suministrados por el Fabricante anula
la Garantía y puede ocasionar daños a las personas y
al propio equipo.
ENDOFLIFE DISPOSAL
The crossed bin symbol on the product indi-
cates that the waste arising from electrical
and electronic equipment (WEEE) must be
handled separately from undifferentiated
waste, so that it can undergo special opera
-
tions for re-use, or specific treatment to remove and
safely discard any substances which may be harmful
to the environment and extract any raw materials
that can be recycled.
In Italy, WEEE must therefore be taken to a dedicated
collection points. When you purchase a new appli
-
ance, you can hand the WEEE over to the shopkeeper,
who is required by law to collect it for free. The un
-
lawful or incorrect disposal of the product entails
the application of the penalties provided for by the
applicable legal regulations in force.
If the product is located in a country other than
Italy, you must comply with the regulations in
force in your country.
Before disposing of the appliance, render it unus-
able by removing the power cord.
AFTERSALES SERVICE
Barazza srl ensures you the utmost collaboration in the
event of technical problems or for any other needs you
may have.
Procedure to follow if your appliance is malfunctioning
Before contacting your nearest Service Centre, do the
following:
• check that the appliance is supplied with power;
• obtain the appliance data from the data plate
(for
data plate position - see page 14)
;
• find the appliance purchase data.
Attention! While waiting for resolution of
the problem, you should stop using the appliance
and disconnect it from the power supply. Do not
attempt to repair or modify the appliance in any of
its parts: in addition to voiding the Guarantee, this
may be dangerous.
Request or demand that only original spare parts
be used: the use of components other than those
supplied by the manufacturer voids the Guaran-
tee and may cause personal injuries or damage the
appliance.

Notas / Notes .............................................................................................................................................
.............................................................................................................................................................................................
.............................................................................................................................................................................................
.............................................................................................................................................................................................
.............................................................................................................................................................................................
.............................................................................................................................................................................................
.............................................................................................................................................................................................
.............................................................................................................................................................................................
.............................................................................................................................................................................................
.............................................................................................................................................................................................
.............................................................................................................................................................................................
.............................................................................................................................................................................................
.............................................................................................................................................................................................
.............................................................................................................................................................................................
.............................................................................................................................................................................................
.............................................................................................................................................................................................
.............................................................................................................................................................................................
.............................................................................................................................................................................................


Progetto grafico Artlinea cod.PBFT6 rev. 02 - 11.2017
Barazza srl
31025 Sarano di S.Lucia di Piave (TV) ITALIA
Via Risorgimento, 14
Tel. +39 0438 62888
Fax +39 0438 64901
info@barazzasrl.it
www.barazzasrl.it
taste of design
-
 1
1
-
 2
2
-
 3
3
-
 4
4
-
 5
5
-
 6
6
-
 7
7
-
 8
8
-
 9
9
-
 10
10
-
 11
11
-
 12
12
-
 13
13
-
 14
14
-
 15
15
-
 16
16
-
 17
17
-
 18
18
-
 19
19
-
 20
20
-
 21
21
-
 22
22
-
 23
23
-
 24
24


Barazza B_Free PBF036TK Series Instrucciones de operación
- Categoría
- Barbacoas
- Tipo
- Instrucciones de operación
- Este manual también es adecuado para
en otros idiomas
Artículos relacionados
-
Barazza 1PBFBQ Instrucciones de operación
-
Barazza 1PBF1 Instrucciones de operación
-
-
Barazza 1FSPMP Instrucciones de operación
-
-
-
Barazza 1PLBC3IDN Instrucciones de operación
-
-
-
Barazza 1PMD95N Instrucciones de operación