WeatherStar C2012439 Instrucciones de operación
- Tipo
- Instrucciones de operación

WINDOW
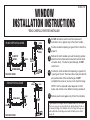
INSTALLATION INSTRUCTIONS
*READ CAREFULLY BEFORE INSTALLING
1
Do NOT remove the plastic band from window until
instructed to do so (applies only to Two-Track models).
Position window into opening or against trim to check for a
proper fit.
Remove the storm window and caulk the existing window
where the storm window will be mounted (caulk the head
and jambs only!). *To allow for good drainage, do NOT
caulk the sill.
Position the storm window into the opening or against trim,
“squaring up” the unit. Then install the screws provided into
pre-punched holes of the window flange. Do
NOT
overtighten the screws or you may crush down the flange.
NOTE: If unit has expander adjust expander so that it
makes even contact across bottom of existing window sill.
Remove plastic band (applies only to Two-Track models).
8020064 7/07
2
3
4
If your window is too large it can be trimmed down to fit as follows:
There are score grooves provided on the window flange. Decide on
the amount of flange to be trimmed. Score the flange in the grooves
with a utility knife. Bend flange back and forth with a pliers until it
breaks off.
BLIND STOP
SURFACE
OPENING WIDTH
BLIND STOP
SURFACE
CAULK
HEAD
JAMB JAMB
OPENING
HEIGHT
SILL
CAULK
BLIND STOP INSTALLATION
3-TRACK UNIT SHOWN
OPENING
HEIGHT
OVERLAP
TRIM
CAULK
HEAD
SILL
OVERLAP
OPENING WIDTH
TRIM
CAULK
JAMB
JAMB
OVERLAP INSTALLATION
3-TRACK UNIT SHOWN
5

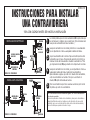
INSTRUCCIONES PARA INSTALAR
UNA CONTRAVIDRIERA
*LEA CON CUIDADO ANTES DE HACER LA INSTALACIÓN
1
La cinta de plástico que está en la contravidriera NO se quita hasta que
las instrucciones le indiquen que se puede hacer. (Esta instrucción vale
sólo para las contravidrieras de dos correderas.)
Coloque la contravidriera en la ventana y determine si se acomoda bien
ya sea empotrada en el marco o solapando la moldura del marco.
Separe la contravidriera de la ventana. Tape con masilla la juntura de la
contravidriera con el marco. Ponga masilla solamente en el dintel y los
maderos laterales del marco donde se montará la contravidriera. *Para
que haya buen drenaje,
NO ponga masilla en el antepecho de la ventana.
"
Coloque la contravidriera en la ventana, ya sea empotrada en el marco o
solapando la moldura del marco. Cuadre bien la contravidriera.
Aprovechando los agujeros que están en el reborde de la contravidriera,
sujete la contravidriera con tornillos. Para que no se deforme el
reborde,
NO apriete demasiado los tornilos.
Para las contravidrieras que tienen sólo dos correderas: quite la cinta
de plástico que está en la contravidriera.
8020064 7/07
2
3
4
5
Si la contravidriera resulta demasiado grande, los surcos marcados en
el reborde se podrán:
Aprovechar para reducir el tamaño de la contravidriera y hacer que la contravidriera se
adapte bien. Determine cuánto se tendrá que recortar del reborde. Con una cuchilla
industrial, raye los surcos del reborde. Con alicates, doble el reborde hacia adelante y
hacia atrás hasta que se quiebre el reborde en la raya.
SUPERFICIE
EMBUTIDA
DE SOPORTE
ANCHURA DE LA
VENTANA
SUPERFICIE EMBUTIDA
DE SOPORTE
MASILLA
DINTEL
MARCO
MARCO
ANCHURA
DE LA
VENTANA
MASILLA
ANTEPECHO
INSTALACIÓN EMPOTRADA
MODELO DE 3 CORREDERAS
ANCHURA DE LA
VENTANA
SOLAPA
MOLDURA
MASILLA
DINTEL
ANTEPECHO
SOLAPA
ANCHURA DE LA
VENTANA
MOLDURA
MASILLA
MARCO
MARCO
INSTALACIÓN SOLAPADA
MODELO DE 3 CORREDERAS
-
 1
1
-
 2
2


WeatherStar C2012439 Instrucciones de operación
- Tipo
- Instrucciones de operación
en otros idiomas
Otros documentos
-
 Kenmore Elite 25377150610 Guía de instalación
-
Kenmore 25376250312 Guía de instalación
-
Friedrich SH14 Manual de usuario
-
-
Andersen 9180391 Guía de instalación
-
Frigidaire FFRA2822U2 Instrucciones de operación
-
-
 Therma-Tru Pre-hung Door Systems Manual de usuario
-
Frigidaire FFRE2233S2 Guía de instalación
-
Fedders a6k32e7b Manual de usuario

