
How to be an
Expert Nixplayer
A Brief Guide to Your Nixplay
Model: W15F

Read This First,
Please
Nixplay cares deeply about providing your family with a great frame and service. We go to
great lengths to ensure your frame is delivered into your hands in perfect working order.
If your Nixplay isn’t working perfectly, please do let us know. We’re here to help.
We’re just a phone call, email or chat away.
Find our telephone number, email and web address at the back of this guide.

Battery Warning:
The remote control supplied, is powered with and includes a coin/button cell battery.
1) This product contains a coin/button cell battery. If the coin/button cell battery is swallowed,
it can cause severe internal burns in just 2 hours and can lead to death;
2) If the battery compartment does not close securely, stop using the product
and keep it away from children;
3) Disposal of a battery into re or a hot oven, or mechanically crushing or cutting of
a battery, that can result in an explosion;
4) Leaving a battery in an extremely high temperature surrounding environment that can result
in an explosion or the leakage of ammable liquid or gas;
5) A battery subjected to extremely low air pressure that may result in an explosion or the
leakage of ammable liquid or gas.
Please read all instructions before use. Retain instructions for future reference.
Important Safety Information

Table of Contents
English
Get to know your Nixplay Smart Photo Frame
Before using the Remote Control
Positioning your Frame
Wall mounting your Frame
Create Nixplay Account
Power your Frame
Pairing your Frame
Start Sharing
Deutsch
Lernen Sie Ihren Nixplay Smart Bilderrahmen kennen
Vor der Verwendung der Fernbedienung
Aufstellen des Rahmens
Wandmontage des Rahmens
Nixplay-Konto erstellen
Rahmen einschalten
Verbindung zum Bilderrahmen einrichten
Fangen Sie an zu teilen
Italiano
Scopri la tua cornice digitale Nixplay
Prima di usare il telecomando
Posiziona la tua cornice
Come montare la cornice sulla parete
Crea un account Nixplay
Accendi la tua cornice
Associa la tua cornice
Inizia a condividere
Français
Informations essentielles sur votre cadre photo
intelligent Nixplay
Avant d’utiliser la télécommande
Positionner votre cadre
Monter votre cadre au mur
Créer votre compte Nixplay
Allumer votre cadre
Apparier votre cadre
Commencez à partager
5
9
11
13
17
19
21
23
5
9
11
13
17
19
21
23
5
9
11
13
17
19
21
23
5
9
11
13
17
19
21
23

Español
Conozca a su marco fotográco inteligente de Nixplay
Antes de usar el mando a distancia
Colocación del marco
Fijación del marco en la pared
Crear una cuenta de Nixplay
Encender el marco
Emparejamiento del marco
Empiece a compartir
FCC
English
ISED
English
Français
Contact us
5
9
11
13
17
19
21
23
25
26
26
29

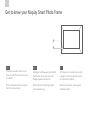
Get to know your Nixplay Smart Photo Frame
B
A
A) Senses movement and turns the
frame on and off when motion sensor
is enabled.
B) Infra-red Sensor: Receives signals
from the remote control.
EN
A) Reagiert auf Bewegung und schaltet
den Rahmen ein und aus, wenn der
Bewegungssensor aktiviert ist.
B) Infrarotsensor: Empfängt Signale
der Fernbedienung.
DE
A) Percepisce il movimento e accende
e spegne la cornice quando il sensore
di movimento è abilitato.
B) Sensore infrarosso: riceve segnali
dal telecomando.
IT
5

A) Détecte les mouvements et allume
ou éteint le cadre lorsque le détecteur
de mouvement est activé.
B) Capteur infrarouge : Reçoit le signal
de la télécommande.
FR
A) Detecta el movimiento y activa
o desactiva el marco si se habilita
el sensor de movimiento.
B) Sensor de infrarrojos: Recibe señales
del mando a distancia.
ES
6

D
E
C
F
G
H
K
L
I
J
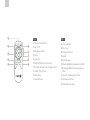
C) Infra-red Transmitter*
D) On / Off
E) Navigation Menu
F) Back
G) Settings
H) Display Playlists (photos only)
I) Transition effects when playing photos
J) Select / Play / Pause
K) Volume Up
L) Volume Down
EN
C) Infrarotsender*
D) Ein / Aus
E) Navigationsmenü
F) Zurück
G) Einstellungen
H) Wiedergabelisten anzeigen (nur Fotos)
I) Übergangseffekte beim Anzeigen von
Fotos
J) Auswahl / Wiedergabe / Pause
K) Lautstärke erhöhen
L) Lautstärke verringern
DE
7

C) Trasmettitore a infrarossi*
D) Acceso / Spento
E) Menù di navigazione
F) Indietro
G) Impostazioni
H) Visualizza playlist (solo foto)
I) Effetti di transizione durante la
riproduzione delle foto
J) Seleziona / Play / Pausa
K) Volume alto
L) Volume basso
IT
C) Émetteur infrarouge*
D) Marche / arrêt
E) Menu de navigation
F) Retour
G) Réglages
H) Afchage des listes de lecture
(photos uniquement)
I) Effets de transition lors de la lecture
des photos
J) Sélectionner / Lire / Mettre en pause
K) Augmenter le volume
L) Baisser le volume
FR
C) Transmisor de infrarrojos*
D) Encender / Apagar
E) Menú de navegación
F) Atrás
G) Conguración
H) Listas de reproducción de la pantalla
(solo fotografías)
I) Efectos de transición al reproducir
fotografías
J) Seleccionar / Reproducir / Pausa
K) Subir el volumen
L) Bajar el volumen
ES
8

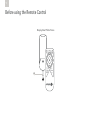
Before using the Remote Control
Nixplay Smart Photo Frame
M
9

M) Remove battery protector.
EN
M) Batterieschutzfolie entfernen.
DE
M) Rimuovi la striscia dal vano batteria.
IT
M) Retirez l’étiquette transparente.
FR
M) Tire de la banda transparente.
ES
10

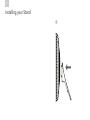
Installing your Stand
11
1

12
Slide Up
2 3

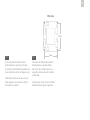
1) Use the included Wall Mounting Guide
to align where the screws need to be
drilled on the wall.
2 x M4 screws are included and required
for wall mount.
Depending on your wall type, you may
need to drill in the included anchors
before securing the screws.
2) Leave a 10mm gap between the wall
and the head of each screw where the
power cable can run through.
EN
1) Verwenden Sie die mitgelieferte
Schablone für die Wandmontage, um die
Bohrlöcher an der Wand zu markieren.
2 x M4 Schrauben sind im Lieferumfang
enthalten und für die Wandmontage
erforderlich.
Je nach Beschaffenheit der Wand müssen
Sie möglicherweise die mitgelieferten
Dübel vor dem Eindrehen der Schrauben
einsetzen.
2) Lassen Sie zwischen Wand und
Schraubenkopf einen Abstand von 10
mm, durch den das Netzkabel geführt
werden kann.
Wall mounting your Frame
1) Usa la guida per il montaggio a parete
per il posizionamento corretto delle viti
sulla parete.
A seconda del tipo di parete, potrebbe
essere necessario forare e inserire i
tasselli prima di ssare le viti.
2) Lascia uno spazio di 10 mm tra
la parete e la testa di ogni vite per
consentire il passaggio del cavo di
alimentazione.
1
DE IT
13

1) Use la guía de jación a la pared
incluida para alinear la posición de
perforación de los tornillos en la pared.
Se incluyen 2 tornillos M4 que son
necesarios para la jación del dispositivo
a la pared.
En función del tipo de pared, es posible
que deba realizar la perforación y la
jación de los anclajes antes de ajustar
los tornillos.
2) Deje un espacio de 10 mm entre la
pared y la cabeza de los tornillos para
pasar el cable de alimentación.
1) Utilisez le guide xation murale ci-joint
pour marquer l’emplacement des trous à
percer au mur.
Deux vis M4 sont incluses et doivent
être utilisées pour le montage mural.
Sur certains types de murs, vous devrez
percer et insérer les ancrages ci-inclus
avant de xer les vis.
2) Laissez un espace de 10 mm entre
le mur et la tête de chaque vis, pour
pouvoir y glisser le câble.
FR ES
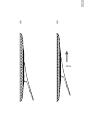
2
10mm
(0.4 inch)
14

3 4
3) Schließen Sie das Netzkabel direkt an
den Anschluss hinter dem Rahmen an.
(Wenn Ihr Kabel einen Clip hat, entfernen
Sie diesen vor der Wandmontage.)
4) Setzen Sie den Rahmen auf die beiden
Schrauben auf und schieben Sie ihn nach
unten, um ihn zu xieren.
DE
3) Connect the power cable directly into
the port behind the frame.
(If your cable comes with a clip, remove
it before wall mounting.)
4) Mount the frame onto the 2 screws and
slide down to lock into place.
EN
3) Collega il cavo di alimentazione
direttamente nella porta dietro la cornice.
(Se c’è una clip sul cavo, toglierla prima
di montare la cornice.)
4) Monta la cornice sulle 2 viti e fai
scorrere verso il basso per bloccare in
posizione.
IT
15

3) Connectez directement le câble
d’alimentation au port situé à l’arrière
du cadre. (Si votre câble est équipé d’une
pince, retirez-la avant le montage au mur.)
4) Montez le cadre sur les deux vis puis
faites-le glisser vers le bas pour le xer
fermement en position.
FR
3) Conecte el cable de alimentación
directamente en el puerto detrás
del marco. (Si su cable viene con un
enganche, retírelo antes de instalarlo
en la pared)
4) Coloque el marco en los 2 tornillos y
deslícelo hacia abajo para ajustarlo.
ES
VESA holes
16
75mm
75mm

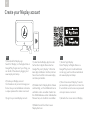
Create your Nixplay account
1) Download the Nixplay app
Search for ‘Nixplay’ on the Apple Store or
Google Play. If apps aren’t your thing, you
can do all of the above by logging in at
www.nixplay.com/setup.
2) Create your Nixplay account
You’ll need one to pair and manage your
frame. Use your email address and create
a unique password to create an account.
3) Login to your new Nixplay account.
EN
1) Laden Sie die Nixplay-App herunter
Suchen Sie im Apple Store oder bei
Google Play nach „Nixplay“. Wenn Sie
keine App installieren möchten, können
Sie sich auch einfach unter www.nixplay.
com/setup anmelden.
2) Erstellen Sie Ihr Nixplay-Konto. Dieses
wird benötigt, um Ihren Bilderrahmen zu
verbinden und zu verwalten. Geben Sie
Ihre E-Mail-Adresse und ein individuelles
Passwort ein, um das Konto zu erstellen.
3) Melden Sie sich bei Ihrem neuen
Nixplay-Konto an.
DE
1) Scarica l’app Nixplay
Cerca ‘Nixplay’ sull’Apple Store o su
Google Play. Se non hai dimestichezza
con le app, puoi fare tutto accedendo al
sito www.nixplay.com/setup.
2) Crea il tuo account Nixplay. Ti servirà
per associare e gestire la tua cornice. Usa
il tuo indirizzo e-mail e crea una password
unica per creare un account.
3) Accedi al tuo nuovo account Nixplay.
IT
17

1) Téléchargez l’application Nixplay
Recherchez « Nixplay » sur Apple Store
ou Google Play. Si les applications ne
sont pas votre truc, vous pouvez faire
la même chose en vous connectant sur
www.nixplay.com/setup.
2) Créez votre compte Nixplay. Vous aurez
besoin d’un compte pour apparier et
gérer votre cadre. Pour créer un compte,
vous devrez utiliser votre adresse e-mail et
un mot de passe unique.
3) Connectez-vous sur votre nouveau
compte Nixplay.
FR
1) Descargue la aplicación Nixplay
Busque Nixplay en Apple Store o Google
Play. Si preere no usar ninguna aplicación,
puede realizar todas las acciones indicadas
anteriormente mediante el inicio de sesión
en www.nixplay.com/setup.
2) Cree su cuenta de Nixplay. Necesitará
una cuenta para emparejar y gestionar
su marco. Use su dirección de correo
electrónico y proporcione una clave única
para crear una cuenta.
3) Inicie una sesión en su cuenta de Nixplay.
ES
18

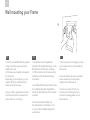
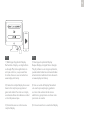
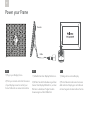
Power your Frame
1) Plug in your Nixplay frame.
2) Point your remote control at the sensor
of your Nixplay screen to control your
frame. Follow the on-screen instructions.
EN
1) Schließen Sie Ihren Nixplay Rahmen an.
2) Richten Sie die Fernbedienung auf den
Sensor Ihres Nixplay-Bildschirms, um den
Rahmen zu bedienen. Folgen Sie den
Anweisungen auf dem Bildschirm.
DE
1) Collega la tua cornice Nixplay.
2) Punta il telecomando verso il sensore
dello schermo Nixplay per controllare la
cornice. Segui le istruzioni sullo schermo.
IT
19
Remote
Cable

1) Branchez votre cadre Nixplay.
2) Pointez la télécommande vers le
capteur de votre écran Nixplay pour
contrôler le cadre. Suivez les instructions
à l’écran.
FR
1) Conecte su marco de Nixplay.
2) Apunte con el mando a distancia al
sensor de la pantalla de Nixplay para
controlar el marco. Siga las instrucciones
en la pantalla.
ES
20
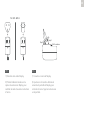
Pull to release
Step1 Step2
For U.K. & E.U.
+ +

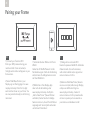
Pairing your Frame
1) Connect your frame to Wi-Fi
Enter your WiFi password using your
remote control. Once connected, a
16-digit serial number will appear on your
frame screen.
2) Select ‘Add New Frame’ in your
Nixplay app or after logging in to www.
nixplay.com/setup. Enter the 16-digit
serial number shown on your frame. You
are now paired and ready to start sharing
memories!
EN
1) Verbinden Sie den Rahmen mit Ihrem
WLAN
Geben Sie Ihr WLAN-Passwort mit der
Fernbedienung ein. Nach der Verbindung
erscheint eine 16-stellige Seriennummer
auf Ihrem Bildschirm.
2) Wählen Sie in Ihrer Nixplay-App
oder nach der Anmeldung unter
www.nixplay.com/setup. die Option
„Add a New Frame“ (Neuen Rahmen
verbinden). Geben Sie die 16-stellige
Seriennummer ein, die auf Ihrem Rahmen
angezeigt wird. Sie sind jetzt verbunden
und können Fotos teilen!
DE
1) Collega la tua cornice al Wi-Fi
Inserisci la password del Wi-Fi utilizzando
il telecomando. Una volta connesso,
sullo schermo della cornice apparirà un
numero di serie a 16 cifre.
2) Seleziona ‘Add New Frame’ (Associa
una nuova cornice) nella tua app Nixplay
o dopo aver effettuato il login su
www.nixplay.com/setup. Inserisci il
numero di serie a 16 cifre presente sulla
cornice. A questo punto è associata e
puoi iniziare a condividere ricordi!
IT
21

1) Connectez votre cadre au Wi-Fi.
Saisissez le mot de passe de votre Wi-Fi
à l’aide de la télécommande. Une fois
connecté, un numéro de série à 16
chiffres apparaîtra sur l’écran de votre
cadre.
2) Sélectionnez « Add New Frame »
(Apparier un nouveau cadre) sur votre
application Nixplay ou après vous être
connecté sur www.nixplay.com/setup.
Saisissez le numéro de série à 16 chiffres
indiqué sur votre écran. Votre cadre
est désormais apparié et vous pouvez
commencer à partager vos souvenirs !
FR
1) Conecte el marco a su red Wi-Fi
Escriba la clave de la red Wi-Fi mediante
el mando a distancia. Después de
conectarse, se mostrará un número de
serie de 16 dígitos en la pantalla del
marco.
2) Seleccione ‘Add New Frame’
(Emparejar un nuevo marco) en la
aplicación Nixplay o después de iniciar
sesión en www.nixplay.com/setup. Escriba
el número de serie de 16 dígitos que se
muestra en el marco. El emparejamiento
se ha completado. Ahora está listo para
empezar a compartir sus recuerdos.
ES
22

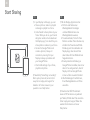
Start Sharing
1) In your Nixplay mobile app, you can:
a. Share a photo or video to a playlist
and assign a playlist to a frame.
b. Invite friends to share photos to your
frame. When you do so, your friends
will get an email invite to download
the Nixplay app, from which they can
share photos or videos to your frame.
c. Connect to Google Photos and
create a dynamic, ‘always on’
connection, ensuring that your
Nixplay is always up-to-date with
your Google Photos.
d. Control all settings of your frame,
playlists and photos.
2) Need help? Something not working?
We’re just a phone call, email or chat
away. Go to nixplay.com/support for
details or to nd an answer to your
question in our Help Center.
1) Mit der Nixplay App können Sie:
a. Ein Foto oder Video einer
Wiedergabeliste hinzufügen
und dem Bilderrahmen eine
Wiedergabeliste zuweisen.
b. Freunde einladen, Fotos für Ihren
Rahmen zu teilen. Wenn Sie dies tun,
erhalten Ihre Freunde eine E-Mail-
Einladung zum Herunterladen der
Nixplay-App, über die sie Fotos
oder Videos für Ihren Bilderrahmen
freigeben können.
c. Eine dynamische Verbindung zu
Google Photos herstellen, die immer
aktiv ist. So wird garantiert, dass Ihr
Nixplay mit Ihren Google Photos
immer auf dem neuesten Stand ist.
d. Alle Einstellungen Ihres Rahmens,
Ihrer Wiedergabelisten und Fotos
verwalten.
2) Brauchen Sie Hilfe? Funktioniert
etwas nicht? Sie können uns jederzeit
per Telefon, E-Mail oder Chat erreichen.
Unter nixplay.com/support nden Sie
weitere Informationen und unser
Help Center.
EN DE
23

1) Nella tua app mobile Nixplay, puoi:
a. Condividere una foto o un video su
una playlist e assegnare una playlist
a una cornice.
b. Invitare gli amici a condividere foto
sulla tua cornice. In tal caso, i tuoi
amici riceveranno un’e-mail d’invito
a scaricare l’app Nixplay, da cui
possono condividere foto o video
sulla tua cornice.
c. Collegati a Google Foto e crea una
connessione dinamica ‘sempre
attiva’, assicurandoti che la tua
Nixplay sia sempre aggiornata con
il tuo Google Foto.
d. Controlla tutte le impostazioni della
cornice, delle playlist e delle foto.
2) Ti serve aiuto? Qualcosa non funziona?
Basta una telefonata, un’e-mail o una
chat. Per saperne di più vai su nixplay.
com/support o trova una risposta alla
tua domanda nel nostro Help Center.
1) Sur votre application mobile Nixplay,
vous pouvez :
a. Partager une photo ou une vidéo sur
une liste de lecture et attribuer une
liste de lecture à un cadre.
b. Invitez vos amis à partager des photos
sur votre cadre. Dans ce cas, vos
amis recevront un e-mail les invitant
à télécharger l’application Nixplay,
depuis laquelle ils pourront partager
leurs photos ou vidéos sur votre cadre.
c. Vous connecter à Google Photos
et créer une connexion dynamique
et « permanente » pour que votre
cadre Nixplay demeure constamment
synchronisé avec votre compte
Google Photos.
d. Contrôler tous les réglages de votre
cadre, de vos listes de lecture et de
vos photos.
2) Besoin d’aide ? Quelque chose ne
fonctionne pas ? Il vous suft de nous
contacter par téléphone, par e-mail ou
par chat. Visitez nixplay.com/support
pour en savoir plus ou pour trouver
une réponse à votre question sur notre
Centre d’assistance.
1) En la aplicación móvil de Nixplay podrá:
a. Compartir una fotografía o un vídeo
en una lista de reproducción y
asignar dicha lista a un marco.
b. Invitar a sus amigos a compartir
fotografías en su marco. Cuando
realice esta acción, sus amigos
recibirán un correo electrónico en
el que se les invita a descargarse la
aplicación de Nixplay, desde la cual
podrán compartir fotografías
o vídeos en su marco.
c. Conéctese a Google Photos y cree
una conexión continua y dinámica
para que Nixplay siempre esté
sincronizado con Google Photos.
d. Controle todas las opciones de su
marco, las listas de reproducción
y las fotografías.
2) ¿Necesita ayuda? ¿Hay alguna cosa
que no funciona? Estamos a tan solo una
llamada, un correo electrónicao o un chat
de distancia. Vaya a nixplay.com/support
para obtener más información o para
encontrar la respuesta a sus preguntas
en nuestro Centro de ayuda.
IT FR ES
24

FCC Compliance Notication
Warning:
This device complies with Part 15 of the FCC Rules. Operation is subject to the following two conditions:
1. this device may not cause harmful interference, and
2. this device must accept any interference received, including interference that may cause undesired operation. Changes or modications
not expressly approved by the party responsible for compliance could void the user’s authority to operate the equipment.
This equipment has been tested and found to comply with the limits for a Class B digital device, pursuant to Part 15 of the FCC Rules.
These limits are designed to provide reasonable protection against harmful interference in a residential installation. This equipment
generates, uses and can radiate radio frequency energy and, if not installed and used in accordance with the instructions, may cause
harmful interference to radio communications. However, there is no guarantee that interference will not occur in a particular installation.
If this equipment does cause harmful interference to radio or television reception, which can be determined by turning the equipment
off and on, the user is encouraged to try to correct the interference by one or more of the following measures:
• Reorient or relocate the receiving antenna.
• Increase the separation between the equipment and receiver.
• Connect the equipment into an outlet on a circuit different from that to which the receiver is connected.
• Consult the dealer or an experienced radio/TV technician for help.
This equipment complies with FCC radiation exposure limits set forth for an uncontrolled environment. This equipment should be
installed and operated with minimum distance 20cm between the radiator and your body. This transmitter must not be co-located
or operating in conjunction with any other antenna or transmitter.
EN
25

26
ISED Compliance Notication
Warning:
This device contains licence-exempt transmitter(s)/receiver(s) that comply with Innovation, Science and Economic Development Canada’s
licence-exempt RSS(s). Operation is subject to the following two conditions:
1. This device may not cause interference.
2. This device must accept any interference, including interference that may cause undesired operation of the device.
This equipment complies with IC RSS-102 radiation exposure limits set forth for an uncontrolled environment. This equipment should
be installed and operated with minimum distance 20cm between the radiator and your body.
Avertissement:
L’émetteur/récepteur exempt de licence contenu dans le présent appareil est conforme aux CNR d’Innovation, Sciences et Développement
économique Canada applicables aux appareils radio exempts de licence. L’exploitation est autorisée aux deux conditions suivantes :
1. L’appareil ne doit pas produire de brouillage;
2. L’appareil doit accepter tout brouillage radioélectrique subi, même si le brouillage est susceptible d’en compromettre le fonctionnement.
Cet équipement est conforme aux limites d’exposition aux radiations IC CNR-102 établies pour un environnement non contrôlé. Cet
équipement doit être installé et utilisé avec une distance minimale de 20 cm entre le radiateur et votre corps.
Caution:
Risk of explosion if battery is replaced by an incorrect type. Dispose of used batteries according to the instructions.
FR
EN


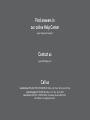
Something’s Wrong?
Need Answers?
Or Help?
We’re just a phone call, email or chat away.

Call us
Contact us
United States (855)-649-7529 | (855)-NIXPLAY | Mon – Sat | 9am - 5pm, Central Time
United Kingdom 01784 605 066 | Mon – Fri | 7am - 5pm, GMT
Deutschland +49 32 211 122362 | Bitte hinterlassen Sie eine Nachricht.
Wir melden uns umgehend zurück.
support@nixplay.com
Find answers in
our online Help Center
www.nixplay.com/support

Happy Nixplaying!
-
 1
1
-
 2
2
-
 3
3
-
 4
4
-
 5
5
-
 6
6
-
 7
7
-
 8
8
-
 9
9
-
 10
10
-
 11
11
-
 12
12
-
 13
13
-
 14
14
-
 15
15
-
 16
16
-
 17
17
-
 18
18
-
 19
19
-
 20
20
-
 21
21
-
 22
22
-
 23
23
-
 24
24
-
 25
25
-
 26
26
-
 27
27
-
 28
28
-
 29
29
-
 30
30
-
 31
31
-
 32
32


nixplay W15F 15 inch Smart Digital Photo Frame Guía del usuario
- Tipo
- Guía del usuario
- Este manual también es adecuado para
en otros idiomas
Artículos relacionados
Otros documentos
-
Muse M-510 WPF Manual de usuario
-
Denver PFF-711WHITE Manual de usuario
-
 Pix Star PXT515WR04 Manual de usuario
-
Motorola LS1000W Guía de inicio rápido
-
Hama 00095252 El manual del propietario
-
-
Braun Photo Technik DF1960 El manual del propietario
-
