White 4041 Manual de usuario
- Categoría
- Máquinas de coser
- Tipo
- Manual de usuario
La página se está cargando ...
La página se está cargando ...
La página se está cargando ...
La página se está cargando ...
La página se está cargando ...

NSTRUCCIONES
IMPORTANTES
DE
SEGURIDAD
3ando
utiHce
un
aparato
eléctrico,
se
deben
respetar
siempre
ciertas
precancones
báscas
de
seguridad,
incuyendo
as
siguientes:
ea
todas
las
frstrucciones antes
de
utilizarlo
(este
aparato).
ELJGRO
—
—
Para
reducir
el
riesgo
de
descargas
eléctricas:
‘JJnca
Se
deoe
deiar
desatendido
un
aparato
que
este
enchufado
a
a
corriente
elbctrica.
Desenchufe
siempre
este
aparato
de
a
orra
ddc:r:ca
mmeaiatarnente
después
de
su
jtilización
y
antes
de
impiarlo.
i
r’
—
—
Para
reducw
el
riesgo
de
quemaduras,
ncendios,
descargas
&éctricas,
0
esiones
personales:
No
oermca
que
sea
utilizado
como
un
juguete.
Cuando
este
aarato
es
utilizado
par,
a
cerca
de,
ninos,
es
necesario
prestar
esoeca
atancón.
2.
Utilice
este
aparato
solo
para
el
usa
al
que
se
destina,tal
como
se
describe
en
este
manual.
Utilice
ünicamente
los
accesorios
recommendaaos
aor
ci
fabricante
que
se
incluyen
en
este
manual.
3.
No
utilice
nunca
ese
parato
si
ci
cable
a
ci
enchufe
estOn
dañados,
Si
flO
funciona
correctamente,
si
se
ha
dejado
caer
a
ha
sufrido aiqun
data,
si
ha
sida
sumergido
en
agua.
Devuelva
ci
aparato
al
concesionaria
antorizado
mas cercano
para
que
sea
exammado,
ieparado
o
alustada
mecánica
a
electricamente.
4.
No
utilice
nunca
a
aparato
silos
onficios
de
ventilaciOn
están
bloqueados.
Mantenga
los
orifcios
de
ventilaciOn
de
Ia
máquina
de
coser
y
del
pedal
control
Sin
acumulaciones
de
hilo,
polyo
y
fragmentos
de
tela.
5.
Nunca
deje
caer
a
intraduzca
ningun
objecto
en
ninguna
abertura.
6.
No
a
utilice
al
aire
libre.
7’.
No
utilice
nunca
asze
aparato
en
lugares
donde
se
estOn
utilizando
productos
en
aerosol
(spray)
o
donde
se
esté
administrado
oxigeno.
8,
Para
desconectarlo,
apague
todos
los
controles
(posiciOn
‘0”)
y
despueS
desconecte
ci
enchufe
de
a
toma
de
corriente.
9.
No
desencnure
ci
aparato
tirando
del
cable.
Para
desenchufar.
lire
del
enchufe,
no
del
cable.
EL1GRO
1.
Desenchufe
Siempre
ci
aparato
antes
de
cambiar
Ia
bombilla.
Reemplace
a
bambilla
con
una
del
mismo
tipo,
homologada
para
15
vatios.
2.
No
intente
cager
un
aparato
que
haya
caldo
al
agua.
Desenchüfelo
inmediatamente.
3.
No
coloaue
a
guarde
ci
aparata
en
un
ugar
donde
pueda
caerse
o
ser
empujado dentro
de
una
bañera
a
lavaba.
No
panga
a
dee
gotear
aqua
u
otro
iquido
sobre
ci
apa’rato.

Espanol
ADVERTENCIA
1
Mantenga
los
aedos
alejados
de
las
piezas
en
movimiento.
Se
debe
prestar
especial
atencidn
en
las
proximidades
de
Ia
aguja.
2.
Utilice
siempre
una
placa
de
aguja
adecuada.
Una
placa
incorrecta
puede
causer
a
ruptura
de
Ia
aguja.
3.
No
utilice
agujas
dobiadas.
4.
No
tire
de
a
tela
o
a
empuje
mientras
cosa
a
mãquina.
Puede
desviar
Ia
aguja
y
romperla.
5.
Apague
(‘0”)
Ia
rnáquina
de
coser
cuando
haga
ajustes
en
el
area
de
Ia
aguja,
por
ejemplo,
cuando
enhebre
le
aguja,
cuando
cambie
a
aguja,
cuando
coloque
a
bobina
o
cuando
cambie
el
pedal,
etc.
5.
Desenchufe
siempre
a
máquina
de
coser
de
Ia
toma
eléctrica
cuando
retire
as
cubiertas,
lubrique
el
aparato,
o
cuando
realice
cualquier
otro
ajuste mencionado
en
el
manual
de
intrucciones
7.
No
utilice
nunca
el
aparato
sobre
una
superficie
blanda,
tal
como
a
un
sofa,
donde
los
orificios
de
ventilacibn
puen
quedar
blo
queados.

¶NDCE
NOMBRE
DE
LAS
PARTES
.1
ACC2SCRCS
3
3.
ANTES
DE
EMPEZAR
A
COSER
5
TABLERO
DE
EXTENSiON
RETIRABLE
5
OONECCON
DEL
PEDAL
Y
CABLE
DE
CORRIENTE
6
3NHSSRAMIEN7D)
DEL
-iLO
SUPERIOR
7
USER
EL
ENHE31PADOE
DE
AGUJA
7
,.LL
EL
HILO
INFERIOR
10
AJUSTAR
LA
PRESCN
DEL
PIE
PRENSATELAS
12
DE
RLEEL
13
AuUSTE
CE
LA
iESON
DEL
HILO
16
4.
COMENZAR
A
COSER
17
BOBINADO
17
COLOCACION
DEL
CARRETE
EN
LA
BOBINA
19
DAMBIO
DEL
PIE
PRENSATELA
21
OAMB1O
CE
LA
AGUJA
22
TABLA
DE
IELAS,
HILOS
Y
AGUJAS
25
CONTROL
PARA
SELECCIONAR
LA
PUNTADA
26
CONTROL
DEL
LARGO
DE
LA
PUNTADA
27
CAMSiC
CE
DIREOCION
CE
PESTUNTE
27
OOSTURA
EN
PE’/ERSA
28
OOSTURA
EN
TELAS
GRUESAS
30
DOPLE
C’DC
DEL
ELEVADCR
DEL
PIE
PRENSATELA
31
COMO
USAR
UNA
AGUJA
DOBLE
31
COSTURA
ARMADA
33
ESCOGEP
LA
PUNTADA
34
COSTURA
RECTA
34
COSTURA
EN
ZIG-ZAG
34
Tension
del
Hilo
para
Costura
Zig-Zag
35
COSTURA
INVISIBLE
Y
DOBLADILLO
35
SOBRE
COSTURA
37
COSTURA
“OVERLOCK”
38
COSTURA
ELASTICA
DE
DISEJOS
AUTOMATICOS
38
CONFECCION
DE
OJALES
39
DeterminaciOn
del
Largo
40
Determinar
Ia
posicion
del
pie
prensatelas
para
ojale
40
Confeccion
de
ojales
automaticos
41
Equilibrio
de
los
lados
derecho
y
zquierdo
del
ojal
42
Corte
del
Ojal
43
COSTURA
DE
CIERRES
43
COSTURA
PARA
REMENDAR
44
COSTURA
DE
APLICACION
(PARCHES
DE
ADORNO)
45
FRUNCIDO
47
PALANCA
PARA
MOVER
LOS
DIENTES
48
COSTURA
PARA
BORDAR
48
6.
MANTENIMIENTO
50
KIMP1EZA
50
ACIETADO
51
7. TABLA
DE
PROBLEMAS
54
AJUSTE
DETENSKDN
DE
LA
BOBINA
56
LIMPIEZA
DE
LA
CAJA
DEL
CANGREJO
58
CAMBIO
DEL
FOCO
59
La página se está cargando ...
La página se está cargando ...

ngIish
Handie
2.
Thread
guide
for
bobbin
winding
3.
Take-cp
ever
Jooer
tension
plate
5.
Face
cover
5.
Jocr
:hread
tension
dial
ro
occr
3.
Thread
guice
or
upoer
threading
9.
Presser
oot
thumo
screw
do
12.
Needle
plate
13.
Sxtenson
aoie
(Accessory
box)
14.
Spool
oin
1
5.
Boobin
wlncirg
spindle
6.
Hanawheei
Seclutca
<ccc
3.
Presser
oo
fter
19.
Pattern
selection
dial
20.
Socket
21
Switch
22.
Free
arm
‘23.
Reverse
sewing
lever
Z4.
D:cc
eec
ever
çlrside)
25.
Stitcn
ength
dial
25.
:igzag
widtn
control
1.
Manija
Español
2.
Gula
para
enhebrar
el
hilo
3.
Tira
hilo
4.
Gula
del
hilo
superior
5.
Tapa
frontal
6.
Control
de
a
tension
del
hilo
superior
7.
Cuchilla
para
cortar
el
fib
8.
Gula
del
hiio
superior
9.
Tornilbo
del pie
prensatela
10.
Pie
prensatela
11.
Dientes
12.
Placa
de
Ia
aguia
13.
Tablero
de
extensiOn
(Caja
de
accesorios)
14.
Porta carretel
15.
Devanador
16.Volante
17.
Seguro
del
volante
18.
Elevadoe
del
pie
prensatela
19.
Control
para
seleccionar
a
puntada
20.
Enchufe
21.
Interruptor
22.
Brazo
ibre
23.
Palanca
para
coser
en
veversa
24.
Pa{anca
para
mover
los
dientes
25.
Control
del
largo
de
Ia
puntada
26.
Control
del
ancho
del
zig-zag
Page2
La página se está cargando ...

English
1.
Zigzag
sewing
foot
(on
machine)
2.
Zipper
‘cot
3.
Buttonhole
foot
4.
Qudting
guide
5.
Buttonhole
cutter
3.
Oer
7.
Bobbuis
(3
pcs.,
class
15)
8.
Standara
needles
(3
pcs.,
#14)
9.
Standard
needle
(lpc.,
#11)
10,
Ball
point
needle
(1
pc.)
ii.
Twin
needle
(1
pc.)
12.
Screw
driver
(1
pc.,
small)
13.
Extra
spool
cm
(for
twin
needle
sewing)
14.
Neeaie
plate
screw
driver
15.
Oeanng
brusn
-
-
Optional
accessories
not
included.
Español
1.
Pie
de
costura
zig-zag
(en
a
maquina)
2.
Pie
para
coser
cierres
3.
Pie
para
ojal
4.
Gula
para
acoichar
5.
Cortador
para
ci
ojal
6.
Aceitera
7.
Carretes
(3
pzas)
8.
Agujas
normales
(3
pzas)
9.
Aguias
normal
(1
pza)
10.
Aguja
de
punta
redonda
(1
pza)
11.
Aguja
doble
(1
pza)
12.
Desarmadores
(Pequeno)
(1
pza)
13.
Porta
carretel
extra
(para
costura
con
dos
hilos)
14.
Llave
para
desatornillar
a
placa
de
a
aguja
15.
Brocha
para
impiar
a
máquina
±
±
Accesorios
opcionales
no
están
incluidos.
Page4

Page5
11
Tit
3.
BEFORE
SEWING
3.
ANTES
DE
EMPEZAR
A
COSER
The
machine
is
stored
with
the
detachaole
extension
table,
La
máquina
se
presenta
en
which
makes
work
easier
for
forma
plana
para
hacer
más
ordinary sewing.
fácil
su
labor
en
Ia
costura
normal.
DETACHABLE
EXTENSION
TABLERO
DE
EXTENSON
TASL
RETIRABLE
Remove
the
table
and
the
Quitar
esta
parte
y
a
máquina
machine
is
used
as
a
free-arm
se
puede
usar
con
el
brazo
machine.
libre.
The
free-arm
is
more
conve-
El
brazo
libre
es
recomend
nien!
to
sew
trousers.
sleeves,
able
para
coser
o
bordar
oan
cuffs
of
T-shirts
or
blouses.
talones,
mangas,
puños
de
Reverse
the
above
steps
to
camisas,
blusas,
etc.
attach
the
extension
table.
Colocar
nuevamente
Ia
caja
de
accesorios.

Page6
Section
3
-\ccessories
may
be
stored
in
Para
abrir
(a
tapa
de
(a
caja
de
ted.
accesorios,
jalarla
como
se
indica.
.5
iCTING
FOOT
CON-
CONECCION
DEL
PEDAL
V
/
ZR:
.
.ND
POWER
CABLE
DE
CORRIENTE
Conectar
ci
pedal
y
el
cable
jJ
Connect
foot
controller
and
de
corriente
sguiendo
los
cower
cord
t.
pasos
(t
y
©.
±
te1c(e
Diugging
in
your
Ames
de
conectar
Ia
c(avija
—ac.
c,
no
sure
that
the
volt-
do
a
máquina,
asegurarse
de
age
a
:he
same
as
that
of
cue
ci
voltaje
de
a
maquina
(
jcur
macnine
(written
on
a
sea
igual
que
ci
de
su
toma
oate
at
back
of
machine).
de
corriente.
Swttcn
on
to
turn
on
the
(±
e(
voltaje
está
escrito
sobre
macmne
and
he
sewing
light.
una
placa
en
Ia
parte
posterior
Swoch
off
to
turn
off
the
de
a
maquina.)
ON
OFF
machine
and
the
sewing
light.
Note:
Accione
ci
botón
de
a
-\wavs
swrtch
off
and
unplug
máquina,
para
ci
fun
tne
machine
when
not
in
use.
cionamiento
del
pedal
y
del
j
foco.
j_____
OFF-Aagado
ON
-
Encencido

THREADING
UPPER
THREAD
Raise
the
presser
foot
lifter.
aise
the
take-up
lever
to
the
highest
position
by
turning
the
handwneel
toward
you.
Thread
following
numbers
D
-
Dass
the
tnreaa
through
guide
Guide
thread
through
either
sice
cf
ension
disc
©.
Hooc
the
thread
under
the
guide
©
as
shown.
ENHEBRAMIENTO
DEL
HILO
SUPERIOR
Levantar
ci
elevador
eel
pie
prensatela.
Levantar
el
tira
bib
a su
posi
ción
mãs
alta
girando
ci
volante
hacia
Ud.
Para
enhebrar
seguir
los
pasos
del
(D
al
©.
Pasar
ci
hue
a
través
de
a
gula
©.
Jalar
ci
hilo
hacia
ci
frente
y
pasarlo
por
cualquier
unidad
de
Ia
gula
.
Enhebrar
ci
hilo
en
Ia
gula
y
jaiar
ci
hilo
hacia
arriba
para
insertarlo
en
ci
resorte.
En9Uh
I
Espanol
I
—.---
L’J,\
\\
i;4i1:1
e
-
Page
7
tiäi4

English
I
Español
Pages
Thread
take-up
lever
®.
Pass
thread
through
needle
guide
(use
left
one)
then
through
the
needle
eye
©
from
front
to
back.
Pull
about
15
cm
(6”)
of
thread
and
place
it
under
30t.
Enhebrar
el
hilo
en
Ia
gula
®.
Jalar
el
hilo
a
través
de
Ia
gula
‘)
(usar
izquierda).
Enhebrar
en
Ia
aguja
de
ade
lante
hacia
atrás
.
Dejar
aproximadamente
15
cm
de
hilo
extra.
4!:5
-Ci
‘D
NDLE
THREADER
Needle
threader
can
be
used
to
thread
needle
more
easily.
Thread
to
thread
guide
of
nee
le
bar
©.
Allow
about
15
cm
(6”)
of
exira
thread.
USER
EL
ENHE3RADOR
DE
AGUJA
El
enhebrador
de
aguja
puede
ayudarle
a
enhebrar
más
fácilmente.
Pase
el
hue
sucerior
por
Ia
gula
de
a
agua
®.
Tire
15
cm
de
hilo
hacia
atrás.
—
1•
Section
3
La
/2’

i.
Lower
presser
foot
lifter.
2.
3ring
needle
to
its
highest
DOSi
an
by
turning
hand-
wheel
toward
you.
r
3.
Lower
needle
threader
ever
t
and
bring
thread
under
guide
0
from
the
ei
3:ce.
4.
Lower
needle
threader
ever
:o
its
lowest
position
c
:rat
OOi<
oasses
througn
the
needle
eye.
5.
Bnng
:hread
from
guide
:o
right
side
under
the
hook
.
1.
Baje
ia
palanca
del
pie
de
prensatelas.
2.
Ponga
a
aguja
en
Ia
oasi
ción
alta
girando
Ia
rueda
hacia
Usted.
3.
Baje
Ia
palanca
del
en
hebrador
y
deslizar
et
hilo
en
ci
gancnillo
oe
a
izquieraa
hac:a
Ia
derecna.
4.
Baje
[a
palanca
del
enhebrador
en
posicidn
baja
hasta
que
el
ganchillo
entre
en
el
ojo
de
a
aguja.
5.
Hacer
deslizar
el
bib
desde
Ia
gula
©
hacia
Ia
derecha
debajo
del
gan
chillo
©.
+
The
<nac
of
hooking:
TaKe
hread
under
hook
Duloe
and
bring
it
up
to
:he
ignt,
pressing
thread
against
the
needle.
±
Enhebrar
con
talento:
Tire
del
hibo
bajo
de
Ia
gula
del
ganchiblo
0
y
tire
Ia
hacia
ariba,
apretandolo
contra
Ia
aguja.
I
Engflsfl
Español
,//\
\\\
T

•age
10
ectit
-
.
e
ease
the
needle
thread
5.
Afloje
a
palanca
del
ever
‘
are
oreac
at
the
enhecs:,
ennebrar
same
time.
Thread
is
at
misi
a
::;srrDo.
El
hilo
outed
by
hook
and
passes
esa
tirado
par
ci
ganchillo
:-irouch
needle
eye.
y
pasa
par
el
ojo
de
aguja.
Ij.
“
.
-
coo
of
thread
through
7.
Tire
ci
bib
a
través
act
ojo.
.
sale
eye.
Nota:
a.
Vuelva
a
err
peza
si
ci
hilo
Necale
threader
does
not
no
está
bien
enhe-brado.
work
when
needle
is
not
at
Si
Ia
aguja
no
está
bien
fila-
1
/
-
—
‘hest
,csiicn.
da,
no
ocdrá
enhe-brarla.
\
c%
DRAWING
UP
BOBBIN
COMO
LEVANTAR
EL
H!LO
NFERIOR
end
of
the
upper
Sostener
ci
axtremo
dcl
nib
thread
with
the
eft
nand
as
superior
con
Ia
mane
izquierda.
,sr-:ad,
Girar
ci
voante
entarnente
Turn
the
handwheel
slowly
hacia
Ud.
hasta
que
a
aguja
—
toward
you
until
the
needle
bale
y
suba
atra
vez.
moves
dowr
and
up
again
to
its
highest
position.

?age
ii
Sectio
he
per
thread
slowly
Jalar
ei hiio
superior
Ienta
and
he
lower
thread
will
oe
mente
y
el
hilo
nferior
se
L
L-
zrouqht
up
n
a
loop.
alzará
en
forma
de
presilla.
___
Pull
out
both
threads
to
about
Jalar
ambos
hilos
15
cm
15
cm
(6”)
and
place
them
aproximadamente
y
ponerlos
-
:oged’er
under
the
presser
juntos
debalo
del
pie
pren
foot.
satela
hacia
el
lado
izquierdo.
The
more
ycu
press
the
foot
A
major
presión
del
pedal,
coniroller,
the
faster
the
mayor
será
a
velocidad
con
machine
runs.
que
a máquina
coserá.

PRESSER
FOOT
PRES
SURE
The
oresser
foot
pressure
is
adjusted
by
turning
the
dial
at
the
top
of
the
machine.
When
sewing
normal
or
heavy
a2nc,
turn
to
3.
When
sewing
thin
or
stretch
taboo,
turn
to
2-3.
i\ihefl
oaraing,
turn
to
1-2.
PRESION
DEL
PRENSATE
LAS
La
presión
del
prensatelas
se
efectüa
mediante
el
tornillo.
Para
coser
en
telas
normales
o
gruesas,
girar
hasta
3.
Para
coser
en
telas
tinas
o
elásticas,
girar
hasta
2-3.
Para
rernendar
y
zurcir,
girar
nasta
1-2.
-.-
-
‘:-
•.‘‘i.’
-
Pagel2

‘age
3
Section
3
ii•I
RIAL
SEWING
COSTURA
DE
PRUEBA
ow
thaf
iou
nave
finished
Ahora
Ud.
ha
terminado
os
:he
first
steps
(page
1-12),
primeros
pesos
(de
Ia
página
iou
are
familiar
with
the
con-
1
a
a
12).
El
manejo
de
su
rols
of
he
machine
and
with
maquina
y
accesorios
le
son
the
accessories
provided,
you
familiares
a
Ud..
Esta
todo
en
are
ready
o
start
sewing
orden
para
comenzar
a
coser
con
su
nueva
maquina.
-r
sJch
Comenzaremos
a
probar
a
Make
sure
the
machine
is
costura
recta.
set
as
llustrated.
1.
Asegurase
qua
su
máquina
2.
Paern
selection
dial
to
estd
completamente
como
(
for
center
needle
posi-
aparece
indicado.
tion.
2.
Control
para
seleccionar
Z,
oper
tnread
tension
dial
a
puntada
a
(
“f.
a
5.
3.
Control
de
Ia
tension
del
aorc
under
the
bib
superior
al
No.
5.
oresser
foot.
4.
Colocar
a
tela
debajo
del
pie
prensatela.
5.
Take-up
lever
in
its
highest
5.
Cobocar
Ia
palanca
en
Ia
oostion.
posiciOn
mbs
alta.
aoric
should
be
placed
±
La
tela
debe
quedar
cole
nder
rhe
presser
foot
with
cada
debajo
del
pie
pren
:he
uIk
or
the
fabric
to
the
satela
con
a
mayor
parte
eft
of
the
neecle,
and
the
sobre
Ia
zquierda
de
Ia
right
edge
of
the
material
aguja.
Y
cobocar
el
borde
oiaced
with
the
appropriate
del
lado
derecho
de
al
tela
seam
allowance,
con
ci
apropiado
espaco
para
a
costura.
.—

6.
Bajar
el
elevador
del
pie
orensatela.
Presionar
a
aecai
igera
mente
V
oomenzar
a
coser
auianao
a
tela
con
a
mano
mientras
avanza
esta.
Nunca
se
debe
tironear
a
empuiar
a
tela.
3.
arar
a
:a
:nacra
e
aGo
zquiercto
cuanao
Se
nava
erminaao
de
coser.
Pace
14
+
SiemDre
terminar
cada
cos
tura
con
a
aguja
en
su
osicrcn
mas
aita.
+
Dear
aproximacamente
5
cm
del
iio
extra
hac:a
atras
para
que
no
se
aesprenda
ci
hilo
de
a
aguja.
9.
Cortar
los
hilos
con
a
cuchilla.
Reverse
sewing
1
At
first,
sew
forward.
Then.
pusr
cown
:he
everse
sewing
iever
to
sw
jCl-<vjDrd
C
.eease
eier
to
-atom
to
forward
sewing.
±
Reverse
sewing
5
often
acne
‘Cr
-ernfcrcement
at
ne
ceginning
coo
ano
CT
team
caDK
st;tctmngt.
Vamos
a
probar
Ia
costura
en
reversa.
1.
Al
orincipro.
coser
hacia
adeiante.
Despues.
emourar
Ia
paiarca
cue
esa
sobre
casta
acao,
osmo
e
indica
an
a
figura.
Psta
es
a
costura
en
reversa.
2.
Soltar
a
palanca
e
niciar
a
costura
hacia
adelante.
+
La
•oostura
an
-eversa
as
mucoas
ieces
cara
reforzar
a
costLira
en
las
orlias
ce
a
tera.
N
.iLijL
/
S.
Lower
oresser
foot
lifter.
C
P”ess
foot
controller
lightS’
ana
sew
‘orwara
.ouioing
:ne
facric
cy
nanc
as
:t
s
ea.
Never
pusn
or
pull
the
.
\-
lf
i’
‘obric.
3.
Romove
fabric
to
the
left
when
sewing
is
finished.
Awavs
hnish
sewing
each
seam
with
the
needle
at
its
Hcnest
DOSrtlOfl.
Leave
at
east
15
cm
61
or
:hreac
aenino
the
nee
dle
so
that
t
will
not
be
drawn
out
CT
the
needle
eye
when
starting
the
next
stitch.
9.
Cut
threacs
with
the
thread
-:jtter.
Sectf
a
a
3

Zigzag
sewing
jattern
selection
dial
2,
Set
wicth
dial
at
required
number,
the
higher
the
number,
the
wider
the
stitch.
Set
it
at
0
for
straight
3ewfl3.
3.
Foliow
above
step
4-9.
:c:sg
sewing.
-.
ry
aifferen
stitcn
lengths.
Short
(low
number)
stitch
.vidth-satin
szitch
is
used
icr
appliqué.
I
Vamos
a
probar
Ia
costura
en
zigzag.
1.
Colocar
el
Control
para
seleccional
Ia
puntada
a
().
2.
Seguir
los
pasos
arriba
del
4
al
9.
Ndth
rfr
JFJ
I

Dj’JflNG
THREAD
TEN
SiC
N
?ter
sewing
the
above
stitch
es.
check
f
the
upper
and
lower
thread
tensions
are
anti
strong
enough
to
‘ok
fnth
ircais
n
center
as
i
uaper
tension
is
too
tight,
ccs
‘hrad
lies
straight
doe:
surface
ci
fabric
If
Icwer
tension
is
too
tight
wer
.reac
ies
straight
cong
ower
surface
of
fabric
©.
Correct
by
turning
tension
dial
n
•he
direction
of
arrow,
lNays
c,ieck
the
oalance
cf
upper
3nd
lower
ten
sors
cy
test
sewing using
fabric,
neeale,
thread
and
stitcn
paitern
you
plan
to
use
(See
page
24).
AJUSTE
DE
LA
TENSION
DEL
H1LO
©
Para
a
costura
correcta.
a
tension
de
ambos
hilos
es
igual
y
tendrá
que
juntar
amoos
hilos
en
ci
centro.
Si
a
tension
del
hilo
supe
uor
esta
muy
aiustada,
ci
hilo
superior
quedará
recto
C
Ia
argo
de
a
superficie
superior
cc
a
teia.
©
Si
a
tensiOn
del
hilo
supe
rior
estä
muy
suelta,
ci
hiio
inferior
quedara
recta
a
10
largo
de
a
superficie
infe
rior
de
Ia
fda.
Es
recomendaole
ensayar
antes
en
un
pedazo
de
[a
fda:
ci
moide
de
a
costa
ra.
a
tensiOn
cc
los hilos
(superior
a
inferior),
a
aguja.
y
ci
hilo.
(Consultar
[a
Table
de
Teias.
Hilos
y
Agujas
en
Ia
pãgina
25.)
Pagel6
x
®
4
Section
3
.

‘ge
17
English
I
Espanol
4.
STARTING
TO
SEW
BOBBIN
WINDING
Set
the
needle
in
the
highest
position
oy
turning
the
hand
wneel
toward
you.
Open
scuttle
oovr,
4.
COMENZAR
A
COSER
BOBINADO
Colocar
a
aguja
en su
posi
ción
más alta
girando
ci
volante
hacia
Ud.
Abrir
a
cubierta
del
lansadera.
Section
Ooen
atcn
sf
bobbin
case
Abrir
ci
seguro
de
a
bobina
y
and
pull
out.
sacarla.
41
Close
latch
of
bobbin
case
Soltar
ei
seguro
de
Ia
bobina
y
and
boboin
comes
out
easily.
ci
carrete
saidrã
fãciimente.
I

English
a
Espanol
Pagel8
Fold
the
handle
back.
Insert
spool
pin.
Mover
hacia
atrbs
Ia
manija.
Levantar
el
porta
carretel.
Put
a
spool
of
:hread
on
spool
Din.
Craw
Thread
from
spool
pin
through
thread
guide
and
pre
tensicn
device;
following
num
bers
and
.
Wind
thread
clockwise
around
bobbin
several
times.
Push
bobbin
onto
spindle.
Move
the
declutch
knob
in
the
handwheel
to
the
(
)
direc
tion.
Before
starting
to
wind
bobbin,
please
make
sure
the
groove
in
the
bobbin
is
located
into
the
lug
on
the spindle
so
the
bobbin
is
all
the
way on
spindle.
Note:
Unless
groove
and
lug
are
ocated
correctly,
bobbin
winding
cannot
be
done successfully.
Coiocar
un
hilo
en
ei
porta
carretel.
Pasar
el
hilo
del
porta
carretel
como
se
muestra
en
el
dibujo.
(pesos
D
y
)
Enredar
el
hilo
varias
veces
alrededor
del
carrete
en
direc
ciOn
a
las
manecillas
del
relol.
Colocar
el
carrete
sobre
el
eje.
Mover
el
botbn
que
se
encuentra
en
el
volante
hacia
el
dibujo
(
).
(indicando
el
carrete).
Antes
de
empezar
a
bobinar
a
canilla,
asegurese
que
el
hueco
de
Ia
canilla
esta
bien
fijado
en
el
saliente
del
pivote.
Nota:
Puede
ser
peligrosol
A
menos
que
el
hueco
el
saliente
no
esten
ajustados,
el
bocinar
no
se
podrá
hacer
correc
tamente.
:;...
.
.
-
3:
Section.
4
14

ag
9
Section
4
Tz—
?ush
boccin
in
the
direction
of
Mover
ci
carrete
se
indica
en
arrow
.
a
flecha
®.
Press
down
foot
controller
to
Presionar
ci
pedal
para
deva
wind
bobbin.
The
bobbin
will
nar.
Cuando
el
carrete
esta
stop
when
fully
wound
.
como
se
indica
en
Ia
figura
©.
Push
be
boocin
to
the
left
as
Pare
a
mãquina
y
mueva
e
srown
©
to
remove
bobbin.
carrete
haca
a
zquierda
como
se
indic
en
a
figura
©
para
desparenderlo.
Take
bobbin
off
the
spindle
Nota:
Al
devanar
cuide
que
ci
ara
cut
the
thread.
volu
men
del
hllo
no
Move
the
aeclutch
knob
in
the
exceda
Ia
capacidad
handwheei
into
the
(
I
)
del
carrete.
direction,
Quitar
ci
carrete
del
eje
y
cor
tar
ci
hilo.
Mover
el
botón
del
volante
en
dirección
a
Ia
aguja(
!
L
INSERTING
BO8BN
COLOCACIÔN
DEL
CARRETE
EN
LA
BOBtNA
Pace
the
bobbin
in
its
case
with
the
thread
running
in
Colocar
el
carrete
dentro
de
at
irection
of
arrow
(clockwise),
bobbin
con
el
hilo
en
direccián
a
Ia
flecha.

Page
20
Sectiorr
4
—
Guide
thread
into
slot
©
of
Gular
el
hilo
por
a
ranura
©
—®
bobbin
case.
de
a
caja
porta
bobina.
P’wing
thread
to
left,
bring
it
Extraer
el
bib
hacia
a
izquier
unaer
tension
spring
then
to
da,
conducirlo
hacia
abajo
del
oasario
per
a
ranura
Kt.
delivery
eye
.
resorte
de
tension
y
luego
_________
Raise
the
needle
to
the
high-
Levantar
a
aguja
a
su
post
es
oosition.
don
mãs
alta.
ena
of
thread
about
10
Dejar
en
el
extremo
del
hilo
cm
4’)
rcm
oobbin
case.
unos
10cm
fuera
ae
a
bobina.
raKe
hold
of
latch
and
push
Tomar
el
seguro
ae
a
bobina
bobbin
case
into
shuttle,
as
y
empujarla
hacia
adentro
del
*
;llustrated.
cangrejo,
coma
se
indica.
Release
latch
when
bobbin
Soltar
el
seguro
cuando
Ia
case
s
fully
inserted.
bobina
estd
completamente
I
-
Press
firmly
on
boboin
case
to
adentro
det
cangrejo
ce
sure
it
s
locked
in
place.

‘age
2
English
Español
CHANGING
FOOT
Raise
presser
foot
lifter
D.
Set
needle
in
the
highest
ocsi
don
by
turning
the
handwheei
fowarc
iou
CAM
BlO
DEL
PIE
PRENSATELA
Levantar
el
elevador
del
pie
prensatela
Colocar
a
aguja
en
a
posi
cidn
más
alta,
girando
ci
volante
hacia
Ud.
©.
t
©
l1_
&©
Sectioa
A.
®
Push
lever
of
holder
toward
©
Oprimir
Ia
palanca
del
you
and
toot
will
drop
off,
soporte
del pie
prensatela
hacia
Ud.
y
el
pie
se
sor
]
tarã.
*,
position
a
new
foot
by
(
Poner
un
pie
prensatela
aligning
holding
groove
of
con
ci
poste
justamente
I
ii
shank
with
pin
of
foot.
debajo
de
Ia
hendidura
Lower
presser
foot
lifter
so
del
soporte.
that
shank
catches
press-
Bajar
ci
elevador
del
pie
I
er
foot.
prensatela
y
el
soporte
detendrá
ci
pie
inmediata
mente.
4r

Section
4
:
[_Page22
CHANGING
NEEDLE
CAMBIO
DE
LA
AGUJA
Set
the
needle
in
the
highest
Colocar
Ia
aguja
en
a
posi
cosition
by
turning
the
hand-
ción
rnás
alta
girando
el
wneei
toward
you.
volance
hacia
Ud.
Loosen
needle
clamp
screw
Aflolar
el
tornillo
de
presión
de
and
take
out
needle.
a
aguja
y
quitarla.
,
tat
sae
away
trorn
On
a
parte
otana
hacia
—
you,
insert
a
new
needle
into
atrás,
inserte
a
nueva
aguja
:he
neeale
Dar.
dentro
de
Ia
cavidad.
Pusn
needle
mo
clamp
until
it
Empujar
a
aguja
hacia
arriba
reaches
stop
and
tighten
hasta
el
tope
figuro
®
y
apri
eed1e
ciamo
screw
firmly.
ete
el
tornillo
de
presión
firme-
r
mente.

Always
use
a
good
quality
ceeale.
Using
defective
or
worn
nee
dles
not
only
causes
stitch
skipoing,
breakage
of
needles
or
snapping
of
thread:
t
also
can
damage
shuttle
and
nee
dle
date.
Note:
Ajwavs
use
needle
type
5xiñO5
Key:
ragfl
scarf
y
Sharp
point
Usar
siempre
agujas
bien
derechas,
con
buena
punta.
Usar
agujas
defectuosas
o
gastadas
no
solaments
causa
que
se
omitan
puntadas,
rotu
ra
de
agujas
o
que
se
corra
el
hilo;
tamblén
pueden
dañarse
el
cangrejo
y
a
placa
de
a
aguja.
Nota:
Usar
siempre
agujas
tico
15
x
1.
Leyenda:
x
Agua
derecha
y
Punta
aguda
English
I
Espanol
x
y
:i*
4
La página se está cargando ...

Dage
25
TABLA
DETELAS.
HILOS
AGUJAS
HILOS
AGLJAS
TEL4S
Algodon
Algodon
Algodon
Meolda
Tipo
de
OBSERVA
Poliester
americana
ClONES
mercerizad
Seda,
Nylon
15x1
Puntaoa
70
60
Seda,
Nylon
9
Normal
dos
puntos
LlGRAS:
Crepe.
jino,
50-70
60
Seda,
Nylon
9
Normal
oraanoi
a:etan
I
2
ao.
iia.
30
50
Seaa
I
Normal
DcCacC.
-i’:
CEDIAN
ia,
cana.
mo,
r
,,
30
50
Seda
li-la
Normal
‘eIade’o!a
PESADAS:Dr’.ii,
oneta,
ona
30
Extrafuerte
Poliester
16
Normai
Section
sPDAS:
Tapiceria,
30
Extrafuerte
Poliester
19
Normal
4
LIVIANAS:
Thcoz
50-70
60
Seda,
Nylon
9
Red
MEDIANAS:
Jersey,
30
50
Seda,
Nylon
9-10
Red
I
Calado
ooble
Poliester
PESADAS:Caiaaodoble
30
50
Seda,N6on
11-14
,
Red
MITAc:cN
PIEL.
VELCUR
30
Extrafuerte
Polleater
4-6
Red
[CUERO1
TELAS
VINILICAS
30
50
Poliester
14
Cuna
TELAS
VINILICAS
I
30
50
Poliester
14-16
Cuna
LIVIANAS
0
MEDIANAS
I
2LS’C
‘37
‘SSO
30
Extrafuerte
Poliester
16-18
Cuna
:DECDRACCS
MATELASSEI
Seda
retorcioa
1618
Normal
SORDADO
MACUINA
Medida50-
70
3-11
Normai

PATTERN
SELECTION
DIAL
The
desired
stitch
will
be
obtained
by
turning
the
stitch
selector,
it
can
be
turned
crther
o
the
right
or
to
the
left.
‘Ice:
IVhen
operating
selec
:or,
maKe
sure
the
nee
dle
s
in
the
highest
Tho
o
Dhes
are
shown
as
be
I
OW:
1
Scallop
stitch
2
Pearl
decorative
stitch
3
Stra;gnt
stitch
center
csition
Zigzag
stitch
3traight
stitch
left
position
5
Slraight
stitch
right
position
6
Blind
hem
7
Mending
stitcn
3
Buttonhole
stitch
3-10
Overcast
stitch
1
1
Oasing
stitch
2
Overlock
stitch
13
Fatlock
stretch
stitch
14
eather
stitch
_‘/e’cc:<
stitco
7
Stratgnt
stretch
stitch
°icRac
stretch
sntcn
-oneycornb
sitich
19-20
Overedge
CONTROL
PARA
SELEC
CIONAR
LA
PUNTADA
Girar
ci
control
de
zquierda
a
derecha
para
seleccionar
a
puntada
que
Ud.
desee.
Nota:
Siempre
asegbrese
he
que
a
agua
se
encuentre
en
su
posi
c:on
más
alta
cuando
se
maniobre
este
control.
Las
puntadas
se
indican
como
sigue:
1
Feston
de
honda
2
Feston
de
rombo
3
Costura
en
zig-zag
4-5
Costura
recta
6
Costura
invisible
7
Costura
para
remendar
8
9-10
11
12
13
14
15-16
17
18
19-20
Ojal
Costura
overlook
Puntada
de
union
Costura
elbstica
sobre
as
orillas
Costura
elãstica
oerlock
Punto
de
esquiga
Costura
elãstica
sobre
as
oriilas
Zig-zag
elbstica
costura
Costura
elãstica
recta
Fruncido
Page
26
position.
Section
4
1
0.2-0.4
11
1-2
‘F
5
3-5
2
°‘
12
3
13
14
5
5
-0
15
5
6
16
.—
1-2
7
.
17
—
3-o
“0
0
8
:
0.2-0.4
18
9
19
10
20

27
Section
JTITCH
ENGTH
DIAL
Set
dial
at
indicating
point
according
to
stitcn
length
desired.
For
a
longer
stitch,
turn
dial
to
right.
or
a
shorter
stitch,
turn
t
o
let.
For
normal
sewing,
it
s
set
setween
2
and
3.
CONTROL
D
LA
PUNTADA
Poner
el
control
como
se
mdi
ca
en
el
punto
de
acuerda
con
Ia
puntada
que
se
requiera
Para
una
puntada
más
larga
girar
el
control
a
Ia
derecha.
Para
una
puntada
más
corta
girar
el
control
a
Ia
izquierda.
Para
a
costura
normal
poner
ci
ccntroi
entre
los
nümeros
2
y
3.
%
4
TURNING
A
SQUARE
CORNER
To
turn
a
square
corner
5/8”
from
the
abric
edge,
stop
stitching
with
the
needle
tip
piercing
the
fabric.
Raise
the
presser
foot
and
turn
the
fabric.
New
stitching
line
will
align
with
5/8”
seam
guide
on
side
of
needle
plate.
Lower
the
presser
foot
and
begin
stitch
ng
in
e’
tirection.
CAMBIO
DE
DIRECCION
DE
PESTtJNTE
Parar
a
máquina
en
el
punto
de
rotación
con
a
aguja
en
el
tejido.
Subir
Ia
palanca
del
pie
prensatelas
y
girar
el
tejido
en
el
sentido
deseado.
Balar
Ia
palanca
del
pie
prensatelas
y
volver
a
coser
en
Ia
nueva
direcciOn.
Hi
L
I

English
I
Espanol
Page28
Section
fREVESE
SEWING
(Starting
to
sew)
Place
fabric
under
foot
about
cm
5,8”)
nside
the
edge.
cwer
Dresser
foot
lifter.
Reverse
sewing)
etnicrce
seam,
sew
bacK
varo
o
the
edge
of
facnc
by
Dusting
reverse
sewing
button.
COSTURA
EN
REVERSA
(Empezar
a
coser)
Colocar
a tela
debajo
del
pie
prensateta
aproximadamente
a
1
cm
de
Ia
orilla.
Bajar
el
elevador
del
pie
pren
-
sateia.
(Costura
en
reversa)
Para
retorzar
a
costura
coser
en
sennac
conrraro
de
a
orula
s
ea
accnando
a
palanca
para
coser
en
rever
sa.
eease
button
and
com
mence
forward
sewing
by
guiding
fabric
as
it
is
fed.
Never
pull
fabric.
-
r%
s”
c
Soltar
Ia
palanca
e
inicial
Ia
costura
hacia
adelante
girando
Ta
tela
con
Ta
mano
segün
se
vaya
avanzando.
Nunca
se
debe
tironear
Ta
tela.
4

Sew
reverse
stitches
for
rein
Coser
con
puntadas
en
rever-
forcement
at
end
of
seam.
sa
para
reforzar
el
final
de
una
if
costura
Remove
aDrIc
to
left
wtien
Lievar
a
tela
hacia
el
ado
sewing
is
finished.
izquierdo
cuando
se
haya
teminado
de
coser.
IW
Page
29
Section
4

For
thick
fabric
sewing,
it
is
moortant
to
sew
slowly
and
se
the
proper
needle
size
and
type.
A
sharp
needle
OrkS
best
for
denim,
endy
guice
the
fabric
as
you
Direction
of
needle
Direction
of
fabric
mprcper
maneuvering
of
thick
fabric
causes
deflection
and
possible
breaking
of
the
needle.
Key:
x
Direction
of
needle
y
Direction
of
fabric
‘--:.
ENTELAS
GRUESAS
(DriI
de
aigodOn
en
particular)
Para
coser
as
telas
gruesas,
io
que
importa
es
que
se
siga
las
instrucciones
cuidadosa
mente.
Asegurarse
de
coiocar
a
fda
verticalment.
La
aguja
debe
estar
perpendicular
a
Ia
costura
para
que
Ia
aguja
penetre
a
teia
apropiadamente.
(ver
figura
No.
(I)
Layenda:
x
Dirección
aguja
y
Direccion
tela
La
mala
colocacidn
causara
que
se
doble
y
posiblemente
se
rompa
a
aguja.
Para
coser
las
telas
muy
gruesas,
coser
suavemente
manteniendo
a
tela
en
a
mano.
La
rotura
de
Ia
aguja
no
es
problema
mecanico,
sino
mal
uso.
Leyenda:
x
Dirección
aguja
y
Direccidn
tela
‘-
i__
‘HICK
FABRf
C
:
rcuiarly
derum)
Pago3O
z-ipy
[L
Section’
4

XTRA
PESSE
FOOT
DOBLE
ACCIÔN
DEL
liFT
ELEVACOR
DEL
PIE
PRENSATELA
;r
order
to
obtain
a
larger
ooening
when
using
very
thick
Para
tener
mayor
espaclo
acric,
firmly
push
presser
foot
entre
el
pie
y
a
teia.
cuando
upward
as
far
as
it
will
go.
se
usan
materiales
muy
grue
SOS
Ilevar
hacm
arriba
el
dc
vador
del
pie
tanto
como
se
1
cueda.
OW
TO
USE
TWIN
COMO
USAR
UNA
AGUJA
lEEDLE
DOBLE:
Twin
needle
threading
Costura
con
dos
hilos
ra
oco
zn
s
packed
n
(Doble
agua)
accessory
ray.
Un
porta
carrete
vene
ncludo
\
nsert
the
extra
spool
pin
into
en
Ia
caja
de
os
accesorios.
The
tole,
and
put
another
Inserter
ci
porta
carrete
en
ci
spooi
of
thread
on
it.
espacio
correspondiente.
Thread
in
the
same
way
as
Enhebrar
normal,
excepto
en
normal
threading,
except
at
los
puntos
th,
y
4.
crs
.:
and
.

‘rnf
).
Dass
threads
sep
arateiy
to rigrit
and
left
of
ten
sion
disc.
At
point
.
pass
threads
trough
seoarate
guides.
one
on
the
eft.
one
on
the
right.
At
coint
©,
thread
from
right
side
snoulo
lead
to
rignt
needle
eye,
and
thread
from
left
side
to
left
needle
eye.
Allow
about
15
cm
(6”)
of
extra
thread.
CAUTiON:
emember
to
use
no
more
than
2.5
zIgzag
width.
Needle
threader
cannot
be
En
el
punto
),
pasar
un
hilo
por
el
lado
derecho
y
ci
otro
por
Ia
izquierda
de
Ia
gula.
(ver
‘igura
b)
El
punto
,
Pasar
los
hilos
en
las
uias.
En
el
punto
©,
enhebrar
el hilo
derecho
en
a
aguia
derecha
y
ci
hilo
izquierdo
en
Ia
agua
zquierda.
Dejar
un
extremo
aproximada
mente
de
15
cm.
PRECAUEION:
Recuerde
no
usar
más
de
2.5
en
el
ancho
de
zig-zag.
Enhebrador
automático
no
se
puede
utiHzar.
Page32
1
J2
Section
4
5H,
jsed,

Espaftot
PIN
TUCKING
USiNG
TWIN
COSTURA
ARMADA
NEEDLE
Preparar
a
maquina
como
se
indica.
Para
una
mejor
aQariencia
se
aconsea
usar
teias
tinas
y
aumentar
un
poco
Ia
tensiOn
del
bib
inferior,
Set
the
macnine
as
shown.
Sew
on
light
weght
fabric
with
sraignt
51(00.
Lerth
LJ
___
.
Insert
the
optional
quilting
Insertar
a
guia
para
acoichar
on
:he
shank.
satela.
guide
under
the
spring
plate
en
el
soporte
del
pie
pren
Mark
the
first
line
with
pencil
Marcar
a
primera
Thea
con
or
tailor’s
chalk
ard
sew.
lapiz
c
gis
do
sst’a
j
coser.
For
the
secor
.
A
partit
de
a
segunda
Thea
following
the
-,
.:
coser
siguiendo
a
costura
de
The
ntervals
between
the
El
esacio
aue
lay
entre
as
‘0
s
o.
a
primera
linea
con
a
gu(a.
7/
7.
.—
—
cbs
of
stitch
can
ce
adjusted
costuras
so
cuede
alustar
,_7
77
—
7
77
/7
—
cy
moving
the
guide
in
the
moviendo
Ia
guia
en
direccidn
direction
of
the
arrow.
a
las
flechas.
7.-’
7-’
/7
/7
77
.—..
._/
7,,
,—7
7,-
—
/.‘
7.-’
“1
7,.’
7,,.
7,’
7._fl
,-7
.—7
77
7,-’
77
77
/7
/7
7/
77
77
77
7,’
,/7
7,_
7.,-
77
771

Section
S
SELECTING
THE
STITCH
e
desired
stitch
will
be
cainea
turning
the
srtern
Selection
Dial.
s/hen
onerating
the
selec
.i,
rtae
sure
the
9eedle
a
in
the
nighest
position.
5.
ESCOGER
LA
PUNTADA
Girar
ci
selector
cara
escoger
a
puntaca
cue
se
requiere.
±
Asegurarse
que
a
aquja
esté
siempre
en
su
post
dOn
mOs
alta
al
operar
ci
selector.
Dage
34
S
\GHT
SEWING
COSTURA
RECTA
N1pj
Set
the
machine
as
shown
for
Preparar
máquina
como
mdi-
3 4
et,
tght
or
center
needle
cado
para
posiciOn
de
aguja
5)
5)
S(:Ofl.
izquierda,
cerecha
o
recta.
U
n
S’itch
Needle
I
Selection
Selection
S:cr
oepunaa
dentaoa
No
4
Left
No
4
Lzquierda
I
No.
5
Right
No.
5
Derecna
:iGZAG
SEWING
COSTURA
EN
ZG-ZAG
hh
Set
the
me.
:own.
Preparar
a
mOquina
como
se
orevn
.
ray-
ndica.
,:.
3
ellina,
:ar
.
Dara
evitar
que
en
a
termi-
-J
a;cr.
nac’o
e
.a
costura
se
everse
at
Deginning
and
end-
deshiie,
preparar
a
mOquina
f
seam.
para
ma
puntada
recta
y
coser
-‘rnust
vidth
dial
for
wider
or
en
reversa
al
principio
y
al
9
rower
zigzag.
final
de
a
costura.

Thread
Tension
For
Zigzag
Stitch
Satin
z:gzag
stitching
requires
ess
upoer
tension
than
straiht
stitching.
LDOSOfl
upper
tension
slightly.
Key:
x
Wrong
side
y
Snt
side
Tensióin
del
Hilo
para
Costura
Zig-Zag
Para
una
mejor
apariencia
de
Ia
puntada
en
zig-zag
se
requiere
demenor
tension
superior
que
a
que
se
usa
en
a
puntada
recta.
Aflojar
a
tensiOn
superior
Iigeramente.
Leyenda:
x
RevOs
y
Derecho
BUND
HEM
STITCH
COSTURA
INVISIBLEY
DOBLADILLO
N
eroth
Set
he
macnine
as
shown.
Preparar
a
rnOauina
como
so
I
6
‘
L
L__
j
qe
35
I
Español
x\/Y
4

Page36
Foid
tabnc
as
shown
and
place
it
under
the
presser
foot.
For
a
neater
finish,
it
is
prefer
able
to
pin
and
press
hem
beforenand.
Key:
x
Wrong
side
v
Right
sine
Plegar
Ia
tela
como
se
ndica
y
colocar
debajo
del
pie
pren
satela.
Para
un
meior
acabado
es
preferible
hilvanar
o
planchar
ci
doblez
previamente.
Leyenda:
x
Revés
y
Derecno
/
Section
5
3.-mm(1
/4—,
Sw
carefuily,
so
that
straight
Coser
cuidadosamente
para
sutches
are
made
on
hem
que
las
puntaoas
estén
edge,
and
zigzag
stitches
hechas
sobre
a
orilla
del
catch
only
one
or
two
threads
pliegue.
y
las
puntadas
f
oia.
despiazadas
tomen
sola
mente
uno
o
dos
hilos
del
dobladillo.
:
Correct
seam.
®
Costura
correcta
Needle
is
catching
edge
of
©
La
aguja
está
tomando
0
fold
too
much.
demasiado
Ia
orilla
del
®
©
©
Needle
is
not
catching
edge
doblez.
of
fold
at
all.
©
La
aguja
no
está
tomando
Key:
Ia
orilla
del
doblez.
x
.
-.
Cl:
;ce
Lyenda:
y
Wrong
sine
x
Revés
y
Derecno
LJ

DJERCASTNG
:.ieigo
fabric:
Set
:he
machine
as
shown.
Dvercasting
prevents
edge
of
cric
from
fraying
and
pro
duces
a
neat
finish.
SOBRE
COSTURA
Para
materiafes
ligeros:
Preparar
a
maquina
como
se
ndica.
Evita
que
las
orillas
de
Ia
tela
se
deshilen
y
crea
una
mejor
anariencia
en
el
acabado.
‘1T
—r
,Vidth
Length
I
an
ne
seam
allowance
Goser
cuidadosamente
para
..ncer
fle
Dresser
toot
with
the
que
todas
las
puntadas
estén
dce
-f
:he
acnc
in
line
with
niveladas
con
a
orilla
de
Ia
—
nC
3.dC
c
he
oresser
foot
as
tea.
illustrated.
-
For
heavy-weight
fabric:
Para
telas
gruesas
y
Set
the
machine
as
shown.
elásticas:
Nth
th
Sew
in
the
same
way
as
Peparar
Ia
máquina
come
Se
aocve.
ndica.
..—
7
Coser
de
Ia
misma
forma,
I
coma
en
as
indicaciones
I
‘
Li
anteriores.
___

Dage
38
SectionL
S
1N
iT1
DVSRLOCK1NG
COSTURA
“OVERLOCK”
Dverlocking
stitches
make
it
hacen
posible
coser
y
reforzar
Set
the
machine
as
shown.
Las
puntadas
en
overlock
oossibie
to
sew
and
overcast
a
costura
al
mismo
tiempo.
seams
a
the
same
time.
Preparar
a
maquina
como
se
ndica.
-
=i
L___
u.
:vc
pieces
of
fabric
Poner
dos
telas
jurnas,
con
el
together
with
the
right
sides
derecho
de
as
mismas
cara
a
together
and
sew.
cara
y
coser.
sew
so
that
right
side
stitches
onlias,
coser
de
modo
que
el
/
drcp
off
cuter
edge
of
fabric,
ado
derecho
de
as
puntadas
To
orevent
edges
from
fraying,
Para
evitar
que
se
deshilen
las
3
,
n
some
cases
overlocking
caiga
fuera
del
borde
de
las
szitcnes
can
be
used
for
over-
telas.
-
-
casting.
En
algunos
casos
a
puntada
en
overlock
puede
usarse
para
retorzar
Ia
costura.
S
RSTCH
STITCHING
COSTURA
2LASTCA
DE
DISENOS
AUTOMATICOS
e
cllowing
stitctes
snown
an
ce
used
with
stretch
and
Estas
puntadas
especiales
knit
fabrics.
These
are
special
son
de
uso
prãctico
en
telas
stitcnes
built
in
the
machine
elbsticas
y
teiidos,
y
vienen
for
your
quick
selection.
integradas
en
a
mbquina.

12.
Overlook
stitch
13.
iatlock
stretch
stitch
7,
SicRac
stretch
stitch
Set
sThch
length
to
5
3Cfl
width
to
5
12.
Puntada
overlock
elástica
13.
Elástica
sobre
Is
orillas
17.
Zig-zag
elãstica constura
12
13
17
<
-3
;
>
<H
3
ction
5
MAKING
BUTTONHOLES
CONFECCON
DE
OJALES
Lengts
3.5
0
2-0.4
I
Set
The
machine
as
shown.
Preparar
Ia
mãauina
como
se
indica.
;
1
ii
+
Snap
on
outtonhole
foot.
‘
Poner
el
pie
prensatelas
para
ojales.
_____
When
setting
buttonhole
foot.
A!
poner
el
pie
presatelas
‘TISKC
sLre
Dutton
plate
S
para
oj
ales,
aseguress
de
que
set
to
back
side.
Ia
place
del
botón
®
esté
Incorrect
setting
may
cause
puesta
en
a
parte
detrAs.
neecle
Th
break
and
injury.
Pontendola
de
una
manera
incorrecta
puede
romper
ci
hilo
y
perjudicarle.

Damune
Length
iarx
Dtarting
oinz
of
button
ole
on
raonc.
Hl
Dart
of
buttonhole
foot
a:
button
n
part
as
r.
/be
Jsng
soft
or
elastic
aonc,
it
s
recommended
to
•se
nterfacing
material
e’•een
the
faortcs.
Determinar
Ia
longitud
Marcar
el
punto
de
oartida
del
pie
prensatelas
sobre
el
tejido.
Tirar
a
parte
®
del
pie
pren
satelas
y
poner
ci
botón
en
as
partes
como
esta
indicado.
Al
coser
telidos
ligeros
o
elásticos,
esta
recomendado
poner
un
tejido
intermedio
entre
os
teiidos.
Set
Position
of
Buttonhole
Foot
bower
the
presser
foot
and
align
the
slot
ci
with
marking
o
te
facrics
as
snown.
Determrnar
Ia
posicion
del
pie
prensatelas
para
ojales
Bajar
ci
pie
prensatelas
y
aim-
ear
a
ranura
con
Ia
marca
sobre
ci
tejido
como
esta
mdi
cado.
L

One
Sten
Ruttonhole
i.
•et
pattern
selection
dial
to8
(
).
2.
null
down
automatic
button
9oIe
ever
and
push
ever
toward
The
cack
as
coown.
3.
—od
Thread
lightly
Then
art
:oe
nacnine.
4.
8.Thcnhc
sewing
s
done
n
order,
14
as
shown.
±
The
front
bar
tack
is
sewn
first.
5.
Stan
The
machine
when
the
s.cwing
comes
back
to
starting
point.
Then
button
hole
sewing
s
complete.
÷
It
is
recommended
to
make
a
sample
buttonhole
on
a
scrap
piece
of
fabric
oecre
maKing
it
on
your
CUTfCN:
DO
NOT
TOUCH
METAL
PART
OF
BUTTONHOLE
LEVER
Confección
de
o’ales
automáticos
1.
Ajustar
ci
punto
al
nUmero
8
1
)
con
a
rueda
de
selección.
2.
Tirar
hasta
aoajo
de
Ia
palanca
de
oj
al
automatico
©
y
empujarla
brevemente
hasta
atrás
como
esta
ndicadc.
3.
Suerar
el
bib
y
empezar
a
coser.
4.
El
ojal
se
hace
en
ci
orden
1-4
como
esta
sefialacdo.
-
El
hilvãn
delantero
esta
cosido
en
primero.
5.
Parar
Ia
máquuina
cuando
blega
al
punto
de
partida.
Entonces,
ci
ojale
esta
cosido.
-
Esta
recomendado
hacer
una
prueba
sobre
una
muestra
antes
de
coser
su
tejido.
ATENCIÔN:
NOTOCAR
LA
PARTE
METALICA
DE
LA
PALAN
CA
DEL
OJAL
English
T
r
pI
garment.
3
2—4
1

Page42
Sectioi
5
llfli
—
n
Dase
of
rsot
ooon-
aso
de
reoebcdn
del
hole
sewing,
set
the
slot
ojale,
poner
Ia
ranura
to
cach
start
point
and
en
c
cada
punto
de
parti
push
ever
toward
the
da
y
emoujarla
breve
oack,
then
repeat
from
mente
hasta
atras
coma
step
3.
esta
ndicado
y
seguir
desde
ci
punto
3.
E
sure
o
pusn
buttonhole
ever
backward
before
±
No
olvidar
Doner
Ia
placa
:ar!lng
outtonhole.
del
boton
en
su
sitio
desoues
de
coser
ojales.
Buttonnole
Oensfty
Equillbrio
de
los
lados
Ocoas;onay,
ne
eft
or
right
derechio
y
zquierdo
del
side
or
outtonhole
may
need
ojal
to
be
balanced
on
speciality
Los
puntos
de
los
lados
dere
fabric.
cho
y
zquierdo
no
se
pueden
n
This
oase,
adjust
stitch
bal-
equilibrar
sabre
:ejidos
difer-
7/
ance
by
turning
adiusting
dial
entes.
En
este
caso.
ajustar
ci
located
on
the
back
of
the
equilibro
girando
ci
control
de
machine.
ajuste
para
olales.
___
f
The
oght
side
of
buttonhole
Si
el
ado
derecho
del
ojal
s
co
dense.
turn
dial
to
left
as
esta
demasiao
cerca
del
ado
shown.
izquierdo,
girar
el
cintrol
hasta
If
The
left
side
of
the
button-
Ia
izquierda
coma
esta
sefial
hole
is
too
dense,
turn
dial
to
ado.
rignt
as
shown.
Si
ci
lado
izquierdo
del
oji
esta
demasiaoo
cerca
del
lado
(
derecho.
girar
el
control
hasta
a
derecfla coma
esta
sefialado.

ctiora
Suttonholes
P’ace
a
pin
thrcugh
the
bar
acics
c
oreveni
over-cutting.
Out
the
huttonhole
along
cen
er
Null
the
buttonhole
cutter.
Corte
del
ojal
Poner
un
alfiler
en
inc
de
los
extremos
del
otal
para
evitar
un
corte
de
mas.
.,.:;,.
r—’•-
-
age
.13
Espaioi
“
COSTURA
DE
CtERRES
—
W,dth
Lrqth
0
1-5
Set
the
machine
as
shown.
Preparar
a máquina
como
se
3
By
using
a
special
zipper
foot,
indica,
:pper
ceivng
oan
be
done
Al
usar
el
pie
prensatela
easily,
especial
para
cierres
a
costu
ra
puede
resultar
mas
rácl
sin
dar
vueita
a
Ia
tela.
I
L
Set
the
zioper
foot
on
the
right
Poner
ci
pie
para
Ia
costura
de
1
/
of
the
9eedle.
clerres
a
Ia
derecha
de
Ia
Sew
rignt
side
of
zipper
guid-
aguja.
ng
fabric
carefully
so
that
Coser
ci
ado
derecho
del
-:rt
side
:eeth
of
zipper
are
cierre
y
cuidar
que
los
dientes
oaraiel
with
lert
edge
of
foot.
del
cierre
queden
paralelos
al
borde
izquierdo
del
pie.
—

Section
5
age-’4
eset
zpoer
foot
to
the
oi
Pasar
ci
pie
para
cierres
at
toe
needle.
lado
izqulerdo
de
Ia
aguja.
Sew
ett
side
of
zipper
in
the
Coser
ci
!aoo
izquerdo
del
same
way.
cierre
de
a
misma
torma.
I____
MNDlNG
COSTURA
PARA
1
S:ttheachine
as
shown.
mdauina
como
se
j
P’ace
the
patch
over
the
worn
Poner
un
parche
sabre
a
part.
parte
rota.
Jalar
los
extremos
Pull
the
thread
ends
toward
de
os
hilos
hacia
atrás
o
a
a
back
or
ert
when
starting
to
laquierda
cuando
se
va
a
sew.
empezar
a
coser.
Sew
along
the
edge
of
the
Coser
por
el
derecho
toda
a
patch
on
the
right
side.
Trim
orilla
del
parche.
DespUes
away
the
worn
part close
to
recortar
Ia
parte
rota
de
atrás.
:
tne
seam
on
the
wrong
side.
••_,v,,vV,,

DaGe
Section
5
Mending
a
Rip
Set
the
machine
in
the
same
way
as
for
patching.
Sew
the
edges
of
tear
together
first.
Then
sew
two
more
seams
on
either
side.
A
piece
of
faoric
can
be
olaced
joaernearh
to
rein
force the
rio.
Remiendo
de
una
Rasgadura
Preparar
a
máquina
de
a
misma
forma
como
en
el
par
chado.
Primero
coser
las
orillas
de
Ia
rasgadura
abarcando
ambos
lados.
Despues
ccser
mas
de
dos
veces
en
caca
odo,
cerca
de
Ia
costura
anterior.
Un
pedazo
de
teia
puede
ser
colocada
debajo.
para
reforzar
Ia
costura
en
Ia
rasgadura.
APPLIQUE
WORK
COSTURA
DE
APUCACON
(PARCHES
DE
ADORNO)
0thHi
Set
the
machine
as
shown.
Preparar
a
máquina
como
se
indica.

Page
6
-j
Sectcn
5
Draw
design
on
material
to
be
Dibujar
ci
diseño
sobre
ci
sec
as
an
aopliqud
ann
cut
it
material
que
se
va
a
utilizar
out.
Place
cut-out
on
base
tab-
como
parche
de
adorno
y
cc
with
stabilizer
under
base
recortarlo.
ccc
and
baste
or
oin
in
Colocar
ci
oarche
de
adorno
cace.
sobre
ci
maenai
nilvanario.
Sew
around
the
outline
with
Coser
airededor
del
molde
satin
zigzag
stitch.
con
puntada
en
zig-zag.
Th
change
direction
at
cor-
Para
cambiar
a
direccion
en
-
sew
very
smail
c:r-
as
esqiuinas
o
par
coser
en
:ne
machine.
posi-
circulos
muy
pequenos,
parar
-:e
lust
away
from
Ia
máquina,
colocar
Ia
aguja
edge
ot
c.t-out,
itt
presser
en
Ia
Dunta
de
a
orila
del
toot
and
ttrn
fabric.
Lower
parche.
evantar
ci
pie
pren
presser
fooc
and
continue
saceia
y
girar
ci
rnateral.
sewing.
Despues
bajar
ci
pie
pren
satela
j
continuar
a
costura.

Pine
37
I
Espanol
f1_18T1
SiCOK1NG
FRUNCDO
Set
:ne
machine
as
shown.
Preparar
a
maquina
como
se
indica
I
Th
cather
:he
fabric,
sew
two
Para
fruncr
a
tela.
coser
dos
straiçnt
lines
with
stitch
length
costuras
rectas
con
el
largo
S
anc
very
loose
upper
ten-
de
puntada,
y
con
a
tension
sion,
Make
knots
in
one
end.
superior
muy
suelta.
Gather
fabric
toward
knots
Hacer
aigunos
nudos
al
final.
wrule
holding
the
other
end
of
Juntar
Ia
tela
hacia
los
nudos
ower
dreads
with
fingers.
mientras
sostiene
los
Jextremos
de
los
bibs
inferi
ores.
/
Sew
smocking
stitches
on
Coser
el
fruncido
sobre
ía
cathered
cart
between
two
parte
recogida
en
medio
de
straignt
lines
of
stitches.
las
dos
costuras
rectas.
Take
out
the
threads
of
the
Sacar
los
bibs
utilizados
para
straigflz
stitching
after
you
fin-
juntar
ía
tela
despues
de
ter
sh
sewing.
minar.
:

I
Español
Page
48
DROP FEED
TEETH
Droo
feed
lever
‘
is
located
lsiae
of
snuitle
cover.
To
ower
feed
teeth,
push
he
ever,
then
slice
t
to
the
left.
Ths
positicn
is
used
for
but
.Dn
sewing,
carning
and
emoroider’,.
cr
orma
sewing,
push
the
lever
to
the
:hen
release
it.
HAND
EMBROIDERY
Drop
teed
teeth.
Set
the
machine
as
shown.
Remove
foot
and
holder
screw.
ceep
ower
thread
from
ceing
pulled
reduce
upper
thread
tension.
For
good
embroidery,
it
is
important
to
use
the correct
needle
and
thread.
Use
embroidery
thread
for
ioper
thread
and
thinner
thread
of
same
kind
and
color
for
lower
thread.
Trace
your
design
on fabric
and
place
it
in
the
embroidery
hoop,
making
sure
fabric
is
taut.
PALANCA
PARA
MOVER
LOS
DIENTES
La
patanca
D
estã
en
Ia
parte
de
adentro
de
Ia
cubierta
del
cangrejo,
Para
baiar
los
dientes
ce
arrastre,
apretar
at
palanca
nac:a
adelante.
desouès
a
a
zauierda.
sza
DosicOn
so
iZa
para
pegaao
do
DOtofleS,
zurcido
y
bordado.
Para
coser
normal.
apretar
Ia
paianca
a
a
derecna
y
soltarla.
COSTURA
PARA
BOROAR
Preparar
a
mäquina
como
se
indica.
Quitar
el
pie
prensatela
y
et
soporte
con
el
tornillo.
Para
evitar
que
se
jale
el
hilo
inferior
reducir
a
tension
del
hilo
superior.
Para
hacer
un
buen
bordado
es
importante
usar
las
agujas
e
hilos
apropiados.
Usar
hilo
de
seda
en
Ia
parte
superior,
y
en
Ia
parte
inferior
(carrete)
uno
más delgado
del
mismo
color.
Trazar
el
diseño
sobre
el
material
y
oentrarlo
en
el
bastidor.
Deoe
asegurarse
que
el
mate
rial
este
estirado.
Needle
Thread
No.
9
120—100
No.11
100—80
No.14
60—50
Agula
Hilo
No.
9
120—100
I
NO.11
100—80
No.14
60—50
Section
4
05
E
H

qe49
—
-ul
us
Icwer
hreaa
by
turnna
Ba!ar
agula
y
voiver
a
suoir,
/
j
/
-
nandwneef
owaro
you
wnue
:aiando
Ud.
el
bib
superior
fr
/
—S
holdi-
jcper
hreaii
ightly.
saldrã
el
inferior,
para
comen
Lower
resser
oat
ifter.
zar
a
bordar.
“—__-—
-7
Bajarla
palanca
del
pie
oren
eU00)
a:
;awnc
aona
the
outline
Comenzar
a
coser
el
contorno
/
/
Continue
sewing
while
guiding
satin
Coninuar
Section
hooo
by
nand.
guiando
el
bastidor
con
a
fr—J
\
:ris-
jilinc.
aw
several
mano.
‘
/—
I
\
rn
)
Cobocar
una
hoa
de
papel
—‘‘
debajo
de
a
tela
cuando
ésta
sea
muy
delgada.
I
.
..
.
.-.

•lTNANCE
Your
macnine
requires
regular
oeaning
and
lubrication
for
sausfactory
sewing.
A
machine
which
is
used
for
a
cw
ours
a
day
needs
to
oe
ta
oiled
onco
a
mc
Dsc,nnect
power
supoiy
o
oerforming
mainte
:n
ne
macnine.
6.
MANTENMJENTC
Para
un
funcionamiento
ade
cuado
su
máquina
requiere
regularmente
cc
limopieza
y
aceitado,
Una
mãquina
que
se
use
durante
pocas
horas
al
cIa
necesda
imoiarse
y
acetarse
una
ye:
al
mes.
Importante:
Desconectar
a
clavija
de
a
mdquina
para
flacerie
ci
mantenimiento.
OLANNG
LiMPIEZA
Remove
presser
toot
and
nec-
Quitar
ci
pie
prensatela
y
a
ale.
aguja.
Ve
N
Turn
atches
of
shuttle
out
irar
los
seguros
nacia
ward.
afuera.
[_
Page5O
s&tror

.
,
F
Secticn
Remove
shuttle
race
cover.
Quitar
Ta
tapa
del
cangrejo.
Remove
shuttle.
Clean
shuttle
Quitar
el
cangrejo.
Limpiar
Ta
race
with
a
cleaning
brush
caja
del
cangrejo
con
un
and
soft
cloth.
cepillo
y
un
trapo
suave.
OILiNG
ACIETADO
Use
oil
manufactured
special-
Usar
solo
aceite
especial
para
‘
‘or
sewing
machine
use.
mãquinas
de
coser.
Otro
Other
cii
iIl
eventually
cause
aceite
causarã
daños
al
\\
mechanism
to
jam.
mecanismo
de
Ta
máquina.
pply
one
drop
of
oil
on
the
Aplicar
una
gota
de
aceite
a
Ia
shuttle
where
friction
occurs.
cápsula
en
Ta
parte
donde
hace
fricción.
La página se está cargando ...
La página se está cargando ...

ABLADEPROBLEMAS
PROBLEMA
CAUSA
PROBABLE
CORRECCION
rnoe
&
bib
Hibo
del
carrete
disparejo
o
no
conductdo
haca
arnba
P19,
P.7,
8
correctamente.
Demasada
tension
en
el
bib
inferior.
P56,
57
Peusa
acumulada
en
a
bobina
y
en
el
resorte
de
tensiOn...
Quitar
pelusa
con
ceo.
Omson
Ce
puntaoas
CoocaciOn
inadecuada
ae
Ia
aguja.
P.22
Aguia
doblada.
P.22
Section
7
Hibo
o
aguja
inadecuados
para
a
teba.
P.25
Enhebrado
incorrecto
del
hibo
superior.
P.7
Demasiado
aceite
en
Ia
cãpsula,
P.50
Costuras
irregulares
Medida
de
aguja
no
correcta
para
a
tela
utilizada.
P.25
TensiOn
del
bib
superior
demasiado
baia.
P16
TensiOn
incorrecta
del
hibo
inferior.
P.56,
57
La
ela
no
se
mueve
Ei
selector
de
diseño
no
accionado
correctamente.
P.26
Altura
incorrecta
o
pelusas
en
los
dientes.
Haca
ruido
Pelusa
0
bib
atorados
en
a
cãpsula.
P.49.
P.58

‘2qe
55
Section
-
A.
PRCBLEMA
CAUSA
PROBABLE
CORRECCION
La
tea
so
arruga
Tension
superior
o
inferior
muy
ada.
P.16.
P57
Puntaaa
demasiada
arga
para
a
tela.
P.26
Hilo
cernasiado
grueso.
P25
Enhebrado
incorrecto
de
los
hilos
sunerior
o
inferior.
P.7,
P.20
Se
rompe
a
aguja
ColocaciOn
inadecuada
de
a
aguja.
P22
Aguja
doblada.
P22
El
torniflo
de
presiOn
do
Ia
aguja
esta
muy
flojo.
P22
TensiOn
del
hilo
superior
muy
aita.
P16
Aguja
demasiada
delgada
para
a
tela.
P25
Cambiar
el
modelo
o
el
ancho
de
Ia
puntada
con
a
aguja
P26
en
posiciOn
inferior.
±
Si
adn
los
problemas
continUan,
recruuir
al
centro
de
servici
más
cercano.
No
tratar
d
ecorregir
Ia
falla
Ud.
mismo.
4
-

LOWER
TENSiON
ADJUST
MSNT
the
machine
skips
stitches
or
coos
stitches,
t
may
require
a
:ension
adjustment.
To
ofleck
the
oobbin
tension,
follow
these
steos:
sfl
iatcnes
of
the
shuttle
‘ace
cover
outward,
as
shown
fl
figure
.
‘
Remove
shuttle
cover
as
scown
n
figure
.
1
Remove
snuttle
as
snown
fl
figure
©.
Suspend
bobbin,
bobbin
case,
and
shuttle
all
together.
f’/hen
pulling
the
thread
siightly,
all
of
them
should
siide
down
with
light
resis
tance
.
if
they
do
not
slide
down
with
a
slight
pull
of
the
thread,
the
bobbin
case
ten
sion
is
too
tight.
If
they
slide
aown
too
easily,
the
bobbin
case
tension
is
too
loose.
See
following
page
for
adjustment
of
the
bobbin
case.
Once
the
bobbin
case
is
correctly
adjusted,
use
the
upper
tension
to
balance
:he
stitches
as
shown
on
page
16.
x
Shuttle
y
Bobbin
and
bobbin
case
All
of
them
descend
with
igflt
resistance.
AJUSTE
DETENSION
DE
LA
SOBNA
Si
Ia
máquina
pierde
puntos
o
nace
nudos
por
ci
reves
en
Ia
costura
no
es
problema
de
Ia
maquina,
sino
de
a
ensián.
Para
verificar
a
tension
cc
a
oobina,
se
debe
tomar
ésta
y
ci
cangrejo
como
se
indica
en
ci
dibujo
si
Ia
tension
es
ocr-
recta
se
desplazaran
enta
mente.
Después
ajustar
Ia
tensiOn
superior
con
los
nOmero
4,
5.
oB.
Girar
los
seguros
hacia
afuera.
Quitar
a
tapa
def
cangrejo
©
Quitar
ci
cangrelo.
x
Cancrejo
y
Carrete
y
bobina
El
cangrejo
y
Ia
bobina
se
desplazarán
lentamente.
ae56
I
Section
©
x.y

For
tension
adjustment,
turn
screw
Jsirtg
smail
screwariver.
Kay:
x
Right
to
tighten
i
ft
c
loosen
Para
ajustar
a
tension.
utilizar
ci
desai’maaor
y
apretar
a
aflojar
ci
tornillo
segun
sea
necesario.
Apretar:
Para
hacer
ía
tensiOn
rnOs
ada
del
hiio
interior.
fIojar:
Para
hacer
a
tensiOn
baja
del
hiio
inferior.
L
syen
da:
x
TensiOn
inferior
mas
alta
y
TensiOn
inferior
baja
Sectton
7
Replace
shuttle.
Poner
ci
cangrejo.
±
Lay
the
machine
on
its
back
Para
facilitar
ía
operaciOn,
to
make
it
easier.
:
0
.1a
mãquina
en
ía
Replace
shuttle
cover.
Poner
ía
tapa
del
cangrejo.

iNG
SHUTTLE
CASE
Thread
caught
between
shut
tle
and
shuttle
case causes
3ucccn
ad
unning
or
stoo
he
machine,
n
tis
case
you
should
pro
case
as
follows:
Z)
Lift
presser
foot
and
smove
bobbin
case.
©
Push
latches
®
outward
and
remove
shuttle
cover
and
shuttle
with
fingers.
Clean
shuttle
and shuttle
case
and
reassemble
them.
LlMPEZA
DE
LA
CAJA
DEL
CANGREJO
El
hilo
atorado
en
Ia
caja
del
cangrejo,
causarä
una
pequena
falla
en su
máquina.
En
este
caso
proceder
como
se aescribe
en
seguida.
D
Lievar
hacia arriba
ci
elevador
del
pie
y
quitar
a
bobina.
Girar
os
seguros
del
can
grejo
hacia afuera
®,
y
quitar a
tapa
y
el
cangrejo.
Limpiar
cangrejo
y
caja,
volviendolos
a
armar.
Page
58
,
cas
toward
center.
EflgIish,
Españ1
Girar
os
seguros
nacia
cen
tro.
j,—
Section
7
&
“V
4
:

Sectiorr
•.lNT
LIGHT
BULB
Unciug
the machine.
Lccsen
the
screw
and
remove
face
cover
as
shown.
Remove
the
bulb
by
unscrew
ing
t
counterclockwise.
retail
a
ew
auth
by
screw’g
=
ewise.
Ncie
ers
e
IGV
15W
bulb.
CAMBIC
DEL
FOCO
Desconectar
a
máquina.
Afiolar
el
tornhllo
como
Se
indica,
y
abrir
Ia
cubierta.
Quitar
el
foco
girándolo
en
sentido
contrario
at
movimiento
de
as
menecillas
del
relol
Poner
un
unevo
foco
atornilldndolo.
Loosen
Tighten
,
-
ye
/
-
-=—
,
-
.r.
.
Transcripción de documentos
NSTRUCCIONES IMPORTANTES DE SEGURIDAD 3ando utiHce un aparato eléctrico, se deben respetar siempre ciertas precancones báscas de seguridad, incuyendo as siguientes: ea todas las frstrucciones antes de utilizarlo (este aparato). ELJGRO Para reducir el riesgo de descargas eléctricas: — — ‘JJnca Se deoe deiar desatendido un aparato que este enchufado a a corriente elbctrica. Desenchufe siempre este aparato de a orra ddc:r:ca mmeaiatarnente después de su jtilización y antes de impiarlo. i r’ — — Para reducw el riesgo de quemaduras, ncendios, descargas &éctricas, 0 esiones personales: No oermca que sea utilizado como un juguete. Cuando este aarato es utilizado par, a cerca de, ninos, es necesario prestar esoeca atancón. 2. Utilice este aparato solo para el usa al que se destina,tal como se describe en este manual. Utilice ünicamente los accesorios recommendaaos aor ci fabricante que se incluyen en este manual. 3. No utilice nunca ese parato si ci cable a ci enchufe estOn dañados, Si flO funciona correctamente, si se ha dejado caer a ha sufrido aiqun data, si ha sida sumergido en agua. Devuelva ci aparato al concesionaria antorizado mas cercano para que sea exammado, ieparado o alustada mecánica a electricamente. 4. No utilice nunca a aparato silos onficios de ventilaciOn están bloqueados. Mantenga los orifcios de ventilaciOn de Ia máquina de coser y del pedal control Sin acumulaciones de hilo, polyo y fragmentos de tela. 5. 6. 7’. 8, 9. Nunca deje caer a intraduzca ningun objecto en ninguna abertura. No a utilice al aire libre. No utilice nunca asze aparato en lugares donde se estOn utilizando productos en aerosol (spray) o donde se esté administrado oxigeno. Para desconectarlo, apague todos los controles (posiciOn ‘0”) y despueS desconecte ci enchufe de a toma de corriente. No desencnure ci aparato tirando del cable. Para desenchufar. lire del enchufe, no del cable. EL1GRO 1. Desenchufe Siempre ci aparato antes de cambiar Ia bombilla. Reemplace a bambilla con una del mismo tipo, homologada para 15 vatios. 2. No intente cager un aparato que haya caldo al agua. Desenchüfelo inmediatamente. 3. No coloaue a guarde ci aparata en un ugar donde pueda caerse o ser empujado dentro de una bañera a lavaba. No panga a dee gotear aqua u otro iquido sobre ci apa’rato. Espanol ADVERTENCIA 1 Mantenga los aedos alejados de las piezas en movimiento. Se debe prestar especial atencidn en las proximidades de Ia aguja. 2. Utilice siempre una placa de aguja adecuada. Una placa incorrecta puede causer a ruptura de Ia aguja. 3. No utilice agujas dobiadas. 4. No tire de a tela o a empuje mientras cosa a mãquina. Puede desviar Ia aguja y romperla. 5. Apague (‘0”) Ia rnáquina de coser cuando haga ajustes en el area de Ia aguja, por ejemplo, cuando enhebre le aguja, cuando cambie a aguja, cuando coloque a bobina o cuando cambie el pedal, etc. 5. Desenchufe siempre a máquina de coser de Ia toma eléctrica cuando retire as cubiertas, lubrique el aparato, o cuando realice cualquier otro ajuste mencionado en el manual de intrucciones 7. No utilice nunca el aparato sobre una superficie blanda, tal como a un sofa, donde los orificios de ventilacibn puen quedar blo queados. ¶NDCE NOMBRE DE LAS PARTES ACC2SCRCS 3. ANTES DE EMPEZAR A COSER TABLERO DE EXTENSiON RETIRABLE OONECCON DEL PEDAL Y CABLE DE CORRIENTE 3NHSSRAMIEN7D) DEL -iLO SUPERIOR USER EL ENHE31PADOE DE AGUJA EL HILO INFERIOR ,.LL AJUSTAR LA PRESCN DEL PIE PRENSATELAS DE RLEEL AuUSTE CE LA iESON DEL HILO 4. COMENZAR A COSER BOBINADO COLOCACION DEL CARRETE EN LA BOBINA DAMBIO DEL PIE PRENSATELA OAMB1O CE LA AGUJA TABLA DE IELAS, HILOS Y AGUJAS CONTROL PARA SELECCIONAR LA PUNTADA CONTROL DEL LARGO DE LA PUNTADA CAMSiC CE DIREOCION CE PESTUNTE OOSTURA EN PE’/ERSA OOSTURA EN TELAS GRUESAS DOPLE C’DC DEL ELEVADCR DEL PIE PRENSATELA COMO USAR UNA AGUJA DOBLE COSTURA ARMADA ESCOGEP LA PUNTADA .1 3 5 5 6 7 7 10 12 13 16 17 17 19 21 22 25 26 27 27 28 30 31 31 33 34 COSTURA RECTA COSTURA EN ZIG-ZAG Tension del Hilo para Costura Zig-Zag COSTURA INVISIBLE Y DOBLADILLO SOBRE COSTURA COSTURA “OVERLOCK” COSTURA ELASTICA DE DISEJOS AUTOMATICOS CONFECCION DE OJALES DeterminaciOn del Largo Determinar Ia posicion del pie prensatelas para ojale Confeccion de ojales automaticos Equilibrio de los lados derecho y zquierdo del ojal Corte del Ojal COSTURA DE CIERRES COSTURA PARA REMENDAR COSTURA DE APLICACION (PARCHES DE ADORNO) FRUNCIDO PALANCA PARA MOVER LOS DIENTES COSTURA PARA BORDAR 6. MANTENIMIENTO KIMP1EZA ACIETADO 7. TABLA DE PROBLEMAS AJUSTE DETENSKDN DE LA BOBINA LIMPIEZA DE LA CAJA DEL CANGREJO CAMBIO DEL FOCO 34 34 35 35 37 38 38 39 40 40 41 42 43 43 44 45 47 48 48 50 50 51 54 56 58 59 Page2 ngIish Handie 2. Thread guide for bobbin winding 3. Take-cp ever Jooer tension plate 5. Face cover 5. Jocr :hread tension dial ro occr 3. Thread guice or upoer threading 9. Presser oot thumo screw do 12. 13. 14. 1 5. 6. 3. 19. 20. 21 22. ‘23. Z4. 25. 25. Needle plate Sxtenson aoie (Accessory box) Spool oin Boobin wlncirg spindle Hanawheei Seclutca <ccc Presser oo fter Pattern selection dial Socket Switch Free arm Reverse sewing lever D:cc eec ever çlrside) Stitcn ength dial :igzag widtn control Español 1. Manija 2. Gula para enhebrar el hilo 3. Tira hilo 4. Gula del hilo superior 5. Tapa frontal 6. Control de a tension del hilo superior 7. Cuchilla para cortar el fib 8. Gula del hiio superior 9. Tornilbo del pie prensatela 10. Pie prensatela 11. Dientes 12. Placa de Ia aguia 13. Tablero de extensiOn (Caja de accesorios) 14. Porta carretel 15. Devanador 16.Volante 17. Seguro del volante 18. Elevadoe del pie prensatela 19. Control para seleccionar a puntada 20. Enchufe 21. Interruptor 22. Brazo ibre 23. Palanca para coser en veversa 24. Pa{anca para mover los dientes 25. Control del largo de Ia puntada 26. Control del ancho del zig-zag Page4 English 1. Zigzag sewing foot (on machine) 2. Zipper ‘cot 3. Buttonhole foot 4. Qudting guide 5. Buttonhole cutter 3. Oer 7. Bobbuis (3 pcs., class 15) 8. Standara needles (3 pcs., #14) 9. Standard needle (lpc., #11) 10, Ball point needle (1 pc.) ii. Twin needle (1 pc.) 12. Screw driver (1 pc., small) 13. Extra spool cm (for twin needle sewing) 14. Neeaie plate screw driver 15. Oeanng brusn - - Optional accessories not included. Español 1. Pie de costura zig-zag (en a maquina) 2. Pie para coser cierres 3. Pie para ojal 4. Gula para acoichar 5. Cortador para ci ojal 6. Aceitera 7. Carretes (3 pzas) 8. Agujas normales (3 pzas) 9. Aguias normal (1 pza) 10. Aguja de punta redonda (1 pza) 11. Aguja doble (1 pza) 12. Desarmadores (Pequeno) (1 pza) 13. Porta carretel extra (para costura con dos hilos) 14. Llave para desatornillar a placa de a aguja 15. Brocha para impiar a máquina ± ± Accesorios opcionales no están incluidos. Page5 11 Tit 3. BEFORE SEWING The machine is stored with the detachaole extension table, which makes work easier for ordinary sewing. 3. ANTES DE EMPEZAR A COSER La máquina se presenta en forma plana para hacer más fácil su labor en Ia costura normal. TASL TABLERO DE EXTENSON RETIRABLE Remove the table and the machine is used as a free-arm machine. Quitar esta parte y a máquina se puede usar con el brazo libre. The free-arm is more convenien! to sew trousers. sleeves, cuffs of T-shirts or blouses. Reverse the above steps to attach the extension table. El brazo libre es recomend able para coser o bordar oan talones, mangas, puños de camisas, blusas, etc. Colocar nuevamente Ia caja de accesorios. DETACHABLE EXTENSION Page6 -\ccessories may be stored in ted. .5 ZR: iCTING FOOT CON.ND POWER . Section Connect foot controller and 3 t. cower cord te1c(e Diugging in your —ac. c, no sure that the voltage a :he same as that of jcur macnine (written on a oate at back of machine). Swttcn on to turn on the macmne and he sewing light. Swoch off to turn off the Para abrir (a tapa de (a caja de accesorios, jalarla como se indica. CONECCION DEL PEDAL V CABLE DE CORRIENTE Conectar ci pedal y el cable de corriente sguiendo los pasos (t y ©. / jJ ± Ames de conectar Ia c(avija do a máquina, asegurarse de cue ci voltaje de a maquina sea igual que ci de su toma de corriente. ( (± e( voltaje está escrito sobre una placa en Ia parte posterior de a maquina.) ON machine and the sewing light. Note: -\wavs swrtch off and unplug tne machine when not in use. Accione ci botón de a máquina, para ci fun cionamiento del pedal y del foco. OFF-Aagado ON - Encencido j_____ j OFF Page 7 En9Uh THREADING UPPER THREAD Raise the presser foot lifter. aise the take-up lever to the highest position by turning the handwneel toward you. Thread following numbers D Dass tiäi4 the tnreaa through guide Guide thread through either sice cf ension disc ©. Hooc the thread under the guide © as shown. I Espanol ENHEBRAMIENTO DEL HILO SUPERIOR Levantar ci elevador eel pie prensatela. Levantar el tira bib a su posi ción mãs alta girando ci volante hacia Ud. Para enhebrar seguir los pasos del (D al ©. Pasar ci hue a través de a gula ©. Jalar ci hilo hacia ci frente y pasarlo por cualquier unidad de Ia gula . Enhebrar ci hilo en Ia gula y jaiar ci hilo hacia arriba para insertarlo en ci resorte. I —.--- L’J ,\ \\ e - i;4i1:1 Pages English I Español Thread take-up lever ®. Pass thread through needle (use left one) then guide through the needle eye © from front to back. Enhebrar el hilo en Ia gula ®. Jalar el hilo a través de Ia gula ‘) (usar izquierda). Enhebrar en Ia aguja de ade lante hacia atrás Pull about 15 cm (6”) of thread and place it under Dejar aproximadamente 15 cm de hilo extra. . 30t. -Ci ‘D THREADER Section 3 — NDLE Needle threader can be used to thread needle more easily. Thread to thread guide of nee le bar ©. Allow about 15 cm (6”) of exira thread. 4!:5 USER EL ENHE3RADOR DE AGUJA El enhebrador de aguja puede ayudarle a enhebrar más fácilmente. Pase el hue sucerior por Ia gula de a agua ®. Tire 15 cm de hilo hacia atrás. La /2’ 1• Engflsfl i. Lower presser foot lifter. r 2. 3ring needle to its highest DOSi an by turning handwheel toward you. 3. Lower needle threader ever t and bring thread under guide 0 from the ei 3:ce. needle threader ever :o its lowest position oasses OOi< :rat c througn the needle eye. 5. Bnng :hread from guide :o right side under the hook 4. Lower . T + The <nac of hooking: TaKe hread under hook and bring it up to Duloe :he ignt, pressing thread against the needle. Español 1. Baje ia palanca del pie de prensatelas. 2. Ponga a aguja en Ia oasi ción alta girando Ia rueda hacia Usted. 3. Baje Ia palanca del en y deslizar et hebrador hilo en ci gancnillo oe a Ia hac:a izquieraa derecna. 4. Baje [a palanca del enhebrador en posicidn baja hasta que el ganchillo entre en el ojo de a aguja. 5. Hacer deslizar el bib desde Ia gula © hacia Ia derecha debajo del gan chillo ©. \\\ ,//\ ± Enhebrar con talento: Tire del hibo bajo de Ia gula del ganchiblo 0 y tire Ia hacia ariba, apretandolo contra Ia aguja. I •age 10 - e ease the needle thread are oreac at the ever Thread is same time. outed by hook and passes :-irouch needle eye. . ‘ 5. Afloje a palanca del ennebrar enhecs:, at misi a ::;srrDo. El hilo esa tirado par ci ganchillo y pasa par el ojo de aguja. Ij. “ . - . ectit coo of thread through sale eye. a. Necale threader does not work when needle is not at ‘hest ,csiicn. 7. Tire ci bib a través act ojo. Nota: Vuelva a err peza si ci hilo no está bien enhe-brado. Si Ia aguja no está bien filada, no ocdrá enhe-brarla. 1 / - — \ c% DRAWING UP BOBBIN COMO LEVANTAR EL H!LO NFERIOR end of the upper thread with the eft nand as ,sr-:ad, Turn the handwheel slowly toward you until the needle moves dowr and up again to its highest position. Sostener ci axtremo dcl nib superior con Ia mane izquierda. Girar ci voante entarnente hacia Ud. hasta que a aguja bale y suba atra vez. — ?age ii he per thread slowly and he lower thread will oe zrouqht up n a loop. Jalar ei hiio superior Ienta mente y el hilo nferior se alzará en forma de presilla. L L- _ __ Sectio Pull out both threads to about 15 cm (6”) and place them :oged’er under the presser Jalar ambos hilos 15 cm aproximadamente y ponerlos juntos debalo del pie pren foot. satela hacia el lado izquierdo. The more ycu press the foot coniroller, the faster the machine runs. A major presión del pedal, mayor será a velocidad con que a máquina coserá. - Pagel2 PRESSER FOOT PRES SURE PRESION DEL PRENSATE LAS The oresser foot pressure is adjusted by turning the dial at the top of the machine. La presión del prensatelas se efectüa mediante el tornillo. When sewing normal or heavy a2nc, turn to 3. When sewing thin or stretch taboo, turn to 2-3. i\ihefl oaraing, turn to 1-2. -.- ‘:- •.‘‘i.’ - Para coser en telas normales o gruesas, girar hasta 3. Para coser en telas tinas o elásticas, girar hasta 2-3. Para rernendar y zurcir, girar nasta 1-2. ‘age 3 ii•I RIAL SEWING ow thaf iou nave finished :he first steps (page 1-12), iou are familiar with the conrols of he machine and with the accessories provided, you are ready o start sewing Section 3 COSTURA DE PRUEBA Ahora Ud. ha terminado os primeros pesos (de Ia página 1 a a 12). El manejo de su maquina y accesorios le son familiares a Ud.. Esta todo en orden para comenzar a coser con su nueva maquina. sJch -r Make sure the machine is set as llustrated. 2. Paern selection dial to ( for center needle position. Z, oper tnread tension dial a 5. aorc under the oresser foot. Comenzaremos a probar a costura recta. 1. Asegurase qua su máquina estd completamente como aparece indicado. 2. Control para seleccionar a puntada a ( “f. 3. Control de Ia tension del bib superior al No. 5. 4. Colocar a tela debajo del pie prensatela. 5. Take-up lever in its highest oostion. aoric should be placed nder rhe presser foot with :he uIk or the fabric to the eft of the neecle, and the right edge of the material oiaced with the appropriate seam allowance, 5. Cobocar Ia palanca en Ia posiciOn mbs alta. ± La tela debe quedar cole cada debajo del pie pren satela con a mayor parte sobre Ia zquierda de Ia aguja. Y cobocar el borde del lado derecho de al tela con ci apropiado espaco para a costura. .— Pace 14 Sectf a a 3 Bajar el elevador del pie orensatela. Presionar a aecai igera mente V oomenzar a coser auianao a tela con a mano mientras avanza Nunca se debe esta. tironear a empuiar a tela. 3. arar a :a :nacra e aGo zquiercto cuanao Se nava erminaao de coser. Lower oresser foot lifter. P”ess foot controller lightS’ ana sew ‘orwara .ouioing :ne facric cy nanc as :t s ea. Never pusn or pull the ‘obric. 3. Romove fabric to the left when sewing is finished. 6. Awavs hnish sewing each seam with the needle at its Hcnest DOSrtlOfl. Leave at east 15 cm 61 or :hreac aenino the nee dle so that t will not be drawn out CT the needle eye when starting the next stitch. 9. Cut threacs with the thread + S. C + 9. lf \. i’ SiemDre terminar cada cos tura con a aguja en su osicrcn mas aita. Dear aproximacamente 5 cm del iio extra hac:a atras para que no se aesprenda ci hilo de a aguja. Cortar los hilos con a cuchilla. -:jtter. Reverse sewing At first, sew forward. 1 Then. pusr cown :he everse sewing iever to sw jCl-<vjDrd C .eease eier to -atom to forward sewing. ± Reverse sewing 5 often acne ‘Cr -ernfcrcement at ne ceginning coo ano CT team caDK st;tctmngt. Vamos a probar Ia costura en reversa. 1. Al orincipro. coser hacia adeiante. Despues. emourar Ia paiarca cue esa sobre casta acao, osmo e indica an a figura. Psta es a costura en reversa. 2. Soltar a palanca e niciar a costura hacia adelante. + La •oostura an -eversa as mucoas ieces cara reforzar a costLira en las orlias ce a tera. N .iLijL / Zigzag sewing jattern selection dial 2, Set wicth dial at required number, the higher the number, the wider the stitch. Set it at 0 for straight 3ewfl3. 3. Foliow above step 4-9. :c:sg sewing. -. Vamos a probar Ia costura en zigzag. 1. Colocar el Control para seleccional Ia puntada a (). 2. Seguir los pasos arriba del 4 al 9. Ndth rf r JFJ ry aifferen stitcn lengths. Short (low number) stitch .vidth-satin szitch is used icr appliqué. I I Pagel6 Dj’JflNG THREAD TEN SiC N AJUSTE DE LA TENSION DEL H1LO ?ter sewing the above stitch es. check f the upper and lower thread tensions are anti strong enough to ‘ok fnth ircais n center as © Para a costura correcta. a i Section 3 . uaper tension is too tight, ccs ‘hrad lies straight doe: surface ci fabric If Icwer tension is too tight wer .reac ies straight cong ower surface of fabric ©. Correct by turning tension dial n •he direction of arrow, lNays c,ieck the oalance cf upper 3nd lower ten sors cy test sewing using fabric, neeale, thread and stitcn paitern you plan to use (See page 24). tension de ambos hilos es igual y tendrá que juntar amoos hilos en ci centro. Si a tension del hilo supe uor esta muy aiustada, ci hilo superior quedará recto C Ia argo de a superficie superior cc a teia. © Si a tensiOn del hilo supe rior estä muy suelta, ci hiio inferior quedara recta a 10 largo de a superficie infe rior de Ia fda. Es recomendaole ensayar antes en un pedazo de [a fda: ci moide de a costa ra. a tensiOn cc los hilos (superior a inferior), a aguja. y ci hilo. (Consultar [a Table de Teias. Hilos y Agujas en Ia pãgina 25.) x ® 4 ‘ge 17 English I Espanol 4. STARTING TO SEW 4. COMENZAR A COSER BOBBIN WINDING BOBINADO Set the needle in the highest position oy turning the hand wneel toward you. Colocar a aguja en su posi ción más alta girando ci volante hacia Ud. Abrir a cubierta del lansadera. Open scuttle oovr, Ooen atcn sf bobbin case and pull out. Abrir ci seguro de a bobina y sacarla. Section 41 Close latch of bobbin case and boboin comes out easily. Soltar ei seguro de Ia bobina y ci carrete saidrã fãciimente. I Pagel8 English 4 - Espanol Fold the handle back. Insert spool pin. Mover hacia atrbs Ia manija. Levantar el porta carretel. Put a spool of :hread on spool Coiocar un hilo en ei porta carretel. Pasar el hilo del porta carretel como se muestra en el dibujo. (pesos D y ) Din. Section. a Craw Thread from spool pin through thread guide and pre tensicn device; following num bers and . Wind thread clockwise around bobbin several times. Push bobbin onto spindle. Move the declutch knob in the handwheel to the ( ) direc tion. Before starting to wind bobbin, please make sure the groove in the bobbin is located into the lug on the spindle so the bobbin is all the way on spindle. Note: Unless groove and lug are ocated correctly, bobbin winding cannot be done successfully. :;... 3: . . Enredar el hilo varias veces alrededor del carrete en direc ciOn a las manecillas del relol. Colocar el carrete sobre el eje. Mover el botbn que se encuentra en el volante hacia el dibujo ( ). (indicando el carrete). Antes de empezar a bobinar a canilla, asegurese que el hueco de Ia canilla esta bien fijado en el saliente del pivote. Nota: Puede ser peligrosol A menos que el hueco el saliente no esten ajustados, el bocinar no se podrá hacer correc tamente. 14 ag 9 Tz— ?ush boccin in the direction of arrow Press down foot controller to wind bobbin. The bobbin will stop when fully wound Push be boocin to the left as srown © to remove bobbin. Mover ci carrete se indica en a flecha ®. Presionar ci pedal para deva nar. Cuando el carrete esta como se indica en Ia figura ©. Pare a mãquina y mueva e carrete haca a zquierda como se indic en a figura © para desparenderlo. Take bobbin off the spindle ara cut the thread. Move the aeclutch knob in the handwheei into the ( I ) direction, Nota: Al devanar cuide que ci volu men del hllo no exceda Ia capacidad del carrete. Quitar ci carrete del eje y cor tar ci hilo. Mover el botón del volante en dirección a Ia aguja( ! . . Section 4 L INSERTING BO8BN Pace the bobbin in its case with the thread running in irection of arrow (clockwise), COLOCACIÔN DEL CARRETE EN LA BOBtNA Colocar el carrete dentro de at bobbin con el hilo en direccián a Ia flecha. Page 20 — Guide thread into slot bobbin case. © of P’wing thread to left, bring it unaer tension spring then to delivery eye . Sectiorr Gular el hilo por a ranura de a caja porta bobina. © —® Extraer el bib hacia a izquier da, conducirlo hacia abajo del resorte de tension y luego oasario per a ranura Kt. 4 _________ Raise the needle to the highes oosition. ena of thread about 10 cm 4’) rcm oobbin case. raKe hold of latch and push bobbin case into shuttle, as ;llustrated. Release latch when bobbin case s fully inserted. Press firmly on boboin case to ce sure it s locked in place. Levantar a aguja a su post don mãs alta. Dejar en el extremo del hilo unos 10cm fuera ae a bobina. Tomar el seguro ae a bobina y empujarla hacia adentro del cangrejo, coma se indica. Soltar el seguro cuando Ia bobina estd completamente adentro det cangrejo I * - ‘age 2 Español English CHANGING FOOT Raise presser foot lifter D. Set needle in the highest ocsi don by turning the handwheei fowarc iou CAM BlO DEL PIE PRENSATELA Levantar el elevador del pie prensatela Colocar a aguja en a posi cidn más alta, girando ci volante hacia Ud. ©. t © l1_ &© ® Push lever of holder toward you and toot will drop off, © Sectioa Oprimir Ia palanca del soporte del pie prensatela hacia Ud. y el pie se sor tarã. A. ] *, position a new foot by aligning holding groove of shank with pin of foot. Lower presser foot lifter so that shank catches presser foot. ( Poner un pie prensatela con ci poste justamente debajo de Ia hendidura del soporte. Bajar ci elevador del pie prensatela y el soporte detendrá ci pie inmediata mente. ii I I 4r [_Page22 CHANGING NEEDLE CAMBIO DE LA AGUJA Set the needle in the highest cosition by turning the handwneei toward you. Loosen needle clamp screw and take out needle. Colocar Ia aguja en a posi ción rnás alta girando el volance hacia Ud. Aflolar el tornillo de presión de a aguja y quitarla. , Section tat sae away trorn you, insert a new needle into :he neeale Dar. Pusn needle mo clamp until it and tighten reaches stop eed1e ciamo screw firmly. 4 : On a parte otana hacia atrás, inserte a nueva aguja dentro de Ia cavidad. Empujar a aguja hacia arriba hasta el tope figuro ® y apri ete el tornillo de presión firmemente. — r English Always use a good quality ceeale. Using defective or worn nee dles not only causes stitch skipoing, breakage of needles or snapping of thread: t also can damage shuttle and nee dle date. Note: Ajwavs use needle type 5xiñO5 Key: ragfl scarf y 4 Sharp point I Espanol Usar siempre agujas bien derechas, con buena punta. Usar agujas defectuosas o gastadas no solaments causa que se omitan puntadas, rotu ra de agujas o que se corra el hilo; tamblén pueden dañarse el cangrejo y a placa de a aguja. Nota: Usar siempre agujas tico 15 x 1. Leyenda: x Agua derecha y Punta aguda x y :i* Dage 25 TABLA DETELAS. HILOS AGUJAS AGLJAS HILOS Algodon Algodon mercerizad Algodon Poliester Seda, Nylon Meolda americana 15x1 Tipo de Puntaoa 70 60 Seda, Nylon 9 Normal 50-70 60 Seda, Nylon 9 Normal 30 50 Seaa I Normal 30 50 Seda li-la Normal 30 Extrafuerte Poliester 16 Normai 30 Extrafuerte Poliester 19 Normal 50-70 60 Seda, Nylon 9 Red 30 50 Seda, Nylon Poliester 9-10 Red 30 50 Seda,N6on 11-14 MITAc:cN PIEL. VELCUR 30 Extrafuerte Polleater 4-6 Red [CUERO1 TELAS VINILICAS 30 50 Poliester 14 Cuna 50 Poliester 14-16 Cuna Extrafuerte Poliester 16-18 Cuna Seda retorcioa 1618 Normal Medida50- 70 3-11 Normai TEL4S dos puntos LlGRAS: Crepe. jino, oraanoi a:etan ao. iia. I 2 DcCacC. -i’: ia, CEDIAN cana. mo, r ‘eIade’o!a PESADAS:Dr’.ii, oneta, ona sPDAS: Tapiceria, ,, Section 4 LIVIANAS: Thcoz MEDIANAS: Jersey, ooble I Calado PESADAS:Caiaaodoble TELAS VINILICAS LIVIANAS 0 MEDIANAS 2LS’C ‘37 ‘SSO :DECDRACCS MATELASSEI SORDADO MACUINA OBSERVA ClONES I 30 I 30 , Red Page 26 Section 4 PATTERN SELECTION DIAL CONTROL PARA SELEC CIONAR LA PUNTADA The desired stitch will be obtained by turning the stitch selector, it can be turned crther o the right or to the left. ‘Ice: IVhen operating selec :or, maKe sure the nee dle s in the highest position. Girar ci control de zquierda a derecha para seleccionar a puntada que Ud. desee. Nota: Siempre asegbrese he se agua a que encuentre en su posi c:on más alta cuando se maniobre este control. Tho o Dhes are shown as be I OW: Scallop stitch 1 Pearl decorative stitch 2 Stra;gnt stitch center 3 csition Zigzag stitch 3traight stitch left position Slraight stitch right 5 position Blind hem 6 Mending stitcn 7 Buttonhole stitch 3 3-10 Overcast stitch Oasing stitch 11 Overlock stitch 2 Fatlock stretch stitch 13 eather stitch 14 Las puntadas se indican como sigue: Feston de honda 1 Feston de rombo 2 Costura en zig-zag 3 4-5 Costura recta Costura invisible 6 Costura para remendar 7 Ojal 8 9-10 Costura overlook Puntada de union 11 Costura elbstica sobre 12 as orillas 13 Costura elãstica oerlock Punto de esquiga 14 15-16 Costura elãstica sobre as oriilas 17 Zig-zag elbstica costura 18 Costura elãstica recta 19-20 Fruncido _‘/e’cc:< stitco 7 Stratgnt stretch stitch °icRac stretch sntcn -oneycornb sitich 19-20 Overedge 1 ‘F 0.2-0.4 5 °‘ 2 5 -0 14 5 15 5 16 6 .— . — 8 12 13 3 7 1-2 3-5 11 : 1-2 3-o 0.2-0.4 17 18 9 19 10 20 “0 0 27 JTITCH ENGTH DIAL Set dial at indicating point according to stitcn length desired. For a longer stitch, turn dial to right. or a shorter stitch, turn t o let. For normal sewing, it s set setween 2 and 3. CONTROL D LA PUNTADA % Poner el control como se mdi ca en el punto de acuerda con Ia puntada que se requiera Para una puntada más larga girar el control a Ia derecha. Para una puntada más corta girar el control a Ia izquierda. Para a costura normal poner ci ccntroi entre los nümeros 2 y 3. Section 4 TURNING A SQUARE CORNER CAMBIO DE DIRECCION DE PESTtJNTE To turn a square corner 5/8” from the abric edge, stop stitching with the needle tip piercing the fabric. Raise the presser foot and turn the fabric. New stitching line will align with 5/8” seam guide on side of needle plate. Lower the presser foot and begin stitch Parar a máquina en el punto de rotación con a aguja en el tejido. Subir Ia palanca del pie prensatelas y girar el tejido en el sentido deseado. Balar Ia palanca del pie prensatelas y volver a coser en Ia nueva direcciOn. ng in e’ tirection. Hi I L Page28 English I Espanol fREVESE SEWING COSTURA EN REVERSA (Starting to sew) (Empezar a coser) Place fabric under foot about cm 5,8”) nside the edge. cwer Dresser foot lifter. Colocar a tela debajo del pie prensateta aproximadamente a 1 cm de Ia orilla. Bajar el elevador del pie pren sateia. Reverse sewing) etnicrce seam, sew bacK varo o the edge of facnc by Dusting reverse sewing button. - (Costura en reversa) Para retorzar a costura coser en sennac conrraro de a orula s ea accnando a palanca para coser en rever sa. Section 4 - r% s” c eease button and com mence forward sewing by guiding fabric as it is fed. Never pull fabric. Soltar Ia palanca e inicial Ia costura hacia adelante girando Ta tela con Ta mano segün se vaya avanzando. Nunca se debe tironear Ta tela. Page 29 Sew reverse stitches for rein forcement at end of seam. Remove aDrIc to left wtien sewing is finished. Section 4 Coser con puntadas en reversa para reforzar el final de una costura Lievar a tela hacia el ado izquierdo cuando se haya teminado de coser. if IW Pago3O i__ ‘- ‘HICK FABRf C : rcuiarly derum) For thick fabric sewing, it is moortant to sew slowly and se the proper needle size and type. A sharp needle OrkS best for denim, endy guice the fabric as you Direction of needle Direction of fabric Para coser as telas gruesas, io que importa es que se siga las instrucciones cuidadosa mente. Asegurarse de coiocar a fda verticalment. La aguja debe estar perpendicular a Ia costura para que Ia aguja penetre a teia apropiadamente. (ver figura No. (I) Layenda: Section’ 4 ENTELAS GRUESAS (DriI de aigodOn en particular) x y mprcper maneuvering of thick fabric causes deflection and possible breaking of the needle. Key: x Direction of needle y Direction of fabric Dirección aguja Direccion tela La mala colocacidn causara que se doble y posiblemente se rompa a aguja. Para coser las telas muy gruesas, coser suavemente manteniendo a tela en a mano. La rotura de Ia aguja no es problema mecanico, sino mal uso. Leyenda: x y ‘--:. Dirección aguja Direccidn tela z-ipy [L XTRA PESSE FOOT liFT ;r order to obtain a larger ooening when using very thick acric, firmly push presser foot upward as far as it will go. DOBLE ACCIÔN DEL ELEVACOR DEL PIE PRENSATELA Para tener mayor espaclo entre el pie y a teia. cuando se usan materiales muy grue SOS Ilevar hacm arriba el dc vador del pie tanto como se cueda. OW TO USE TWIN lEEDLE COMO USAR UNA AGUJA DOBLE: Twin needle threading ra oco zn s packed n accessory ray. nsert the extra spool pin into The tole, and put another spooi of thread on it. Thread in the same way as normal threading, except at crs .: and Costura con dos hilos (Doble agua) Un porta carrete vene ncludo . en Ia caja de os accesorios. Inserter ci porta carrete en ci espacio correspondiente. Enhebrar normal, excepto en los puntos th, y 4. 1 \ Page32 ‘rnf ). Dass threads sep arateiy to rigrit and left of ten sion disc. En el punto ), pasar un hilo por el lado derecho y ci otro por Ia izquierda de Ia gula. (ver ‘igura b) At point pass threads trough seoarate guides. one on the eft. one on the right. El punto las uias. . Section 4 At coint ©, thread from right side snoulo lead to rignt needle eye, and thread from left side to left needle eye. Allow about 15 cm (6”) of extra thread. CAUTiON: emember to use no more than 2.5 zIgzag width. Needle threader cannot be jsed, , 1 J2 Pasar los hilos en En el punto ©, enhebrar el hilo derecho en a aguia derecha y ci hilo izquierdo en Ia agua zquierda. Dejar un extremo aproximada mente de 15 cm. PRECAUEION: Recuerde no usar más de 2.5 en el ancho de zig-zag. Enhebrador automático no se puede utiHzar. 5H, Espaftot COSTURA ARMADA PIN TUCKING USiNG TWIN NEEDLE Set the macnine as shown. Sew on light weght fabric with sraignt 51(00. Preparar a maquina como se indica. Para una mejor aQariencia se aconsea usar teias tinas y aumentar un poco Ia tensiOn del bib inferior, Lerth LJ . Insert the optional quilting guide under the spring plate on :he shank. Insertar a guia para acoichar en el soporte del pie pren satela. Mark the first line with pencil or tailor’s chalk ard sew. For the secor .: following the s o. ‘0 The ntervals between the cbs of stitch can ce adjusted cy moving the guide in the direction of the arrow. Marcar a primera Thea con lapiz c gis do sst’a j coser. A partit de a segunda Thea coser siguiendo a costura de a primera linea con a gu(a. El esacio aue lay entre as costuras so cuede alustar moviendo Ia guia en direccidn a las flechas. . -, 7/ 7. .— 7 ,_7 77 — 77 /7 — — 77 /7 /7 7-’ ,—7 7,, ._/ .—.. 7.-’ /.‘ — “1 7._fl 7,’ 7,,. 7,.’ 77 77 77 7,-’ .—7 ,-7 77 77 77 7/ /7 /7 771 77 7.,7,_ ,/7 7,’ 7.-’ 7,- Dage 34 5. ESCOGER LA PUNTADA SELECTING THE STITCH e desired stitch will be turning the cainea srtern Selection Dial. s/hen onerating the selec .i, rtae sure the 9eedle a in the nighest position. S Section COSTURA RECTA \GHT SEWING Set the machine as shown for et, tght or center needle S(:Ofl. S Girar ci selector cara escoger a puntaca cue se requiere. ± Asegurarse que a aquja esté siempre en su post dOn mOs alta al operar ci selector. S’itch S:cr Needle No 4 No. 5 Left Right N1pj Preparar máquina como mdicado para posiciOn de aguja izquierda, cerecha o recta. 5)3 U n Selection Selection oepunaa dentaoa I No 4 No. 5 I Lzquierda Derecna COSTURA EN ZG-ZAG :iGZAG SEWING :own. Set the me. rayorevn ellina, :ar a;cr. everse at Deginning and endf seam. -‘rnust vidth dial for wider or rower zigzag. . . 4 5) Preparar a mOquina como se ndica. Dara evitar que en a terminac’o e .a costura se deshiie, preparar a mOquina para ma puntada recta y coser en reversa al principio y al final de a costura. hh 3 ,:. -J 9 qe 35 I Thread Tension For Zigzag Stitch Satin z:gzag stitching requires ess upoer tension than straiht stitching. LDOSOfl upper tension slightly. Key: x y Wrong side Snt side BUND HEM STITCH Set he macnine as shown. Español Tensióin del Hilo para Costura Zig-Zag Para una mejor apariencia de Ia puntada en zig-zag se requiere demenor tension superior que a que se usa en a puntada recta. Aflojar a tensiOn superior Iigeramente. Leyenda: x RevOs y Derecho x\/Y 4 COSTURA INVISIBLEY DOBLADILLO N eroth Preparar a rnOauina como so 6 I L L__ ‘ j Page36 Foid tabnc as shown and place it under the presser foot. For a neater finish, it is prefer able to pin and press hem beforenand. Key: x Wrong side v Right sine Plegar Ia tela como se ndica y colocar debajo del pie pren satela. Para un meior acabado es preferible hilvanar o planchar ci doblez previamente. / Leyenda: x y Revés Derecno 3.-mm(1 /4—, Section 5 Sw carefuily, so that straight sutches are made on hem edge, and zigzag stitches catch only one or two threads f oia. Coser cuidadosamente para que las puntaoas estén hechas sobre a orilla del pliegue. y las puntadas despiazadas tomen sola mente uno o dos hilos del dobladillo. : Correct seam. Needle is catching edge of fold too much. © Needle is not catching edge of fold at all. ® © Key: . y Cl: ;ce Wrong sine -. Costura correcta La aguja está tomando demasiado Ia orilla del doblez. © La aguja no está tomando Ia orilla del doblez. Lyenda: x Revés y Derecno 0 ® x LJ © ‘1T —r DJERCASTNG :.ieigo fabric: SOBRE COSTURA ,Vidth Set :he machine as shown. Dvercasting prevents edge of cric from fraying and pro duces a neat finish. Para materiafes ligeros: Preparar a maquina como se ndica. Evita que las orillas de Ia tela se deshilen y crea una mejor anariencia en el acabado. an ne seam allowance ..ncer fle Dresser toot with the dce -f :he acnc in line with nC 3.dC c he oresser foot as illustrated. Goser cuidadosamente para que todas las puntadas estén niveladas con a orilla de Ia tea. Length I — - For heavy-weight fabric: Set the machine as shown. Sew in the same way as aocve. Para telas gruesas y elásticas: Peparar Ia máquina come Se ndica. Coser de Ia misma forma, coma en as indicaciones anteriores. Nth th ..— I I __ _ ‘ Li 7 Dage 38 1N iT1 DVSRLOCK1NG COSTURA “OVERLOCK” Set the machine as shown. Las puntadas en overlock hacen posible coser y reforzar a costura al mismo tiempo. Preparar a maquina como se ndica. Dverlocking stitches make it oossibie to sew and overcast seams a the same time. - =i L___ SectionL S u. :vc pieces of fabric together with the right sides together and sew. To orevent edges from fraying, sew so that right side stitches drcp off cuter edge of fabric, n some cases overlocking szitcnes can be used for overcasting. Poner dos telas jurnas, con el derecho de as mismas cara a cara y coser. Para evitar que se deshilen las onlias, coser de modo que el ado derecho de as puntadas caiga fuera del borde de las telas. En algunos casos a puntada en overlock puede usarse para retorzar Ia costura. S RSTCH STITCHING COSTURA 2LASTCA DE DISENOS AUTOMATICOS e cllowing stitctes snown an ce used with stretch and knit fabrics. These are special stitcnes built in the machine for your quick selection. Estas puntadas especiales son de uso prãctico en telas elbsticas y teiidos, y vienen integradas en a mbquina. 3, / - - 12. Overlook stitch 13. iatlock stretch stitch 7, SicRac stretch stitch 12. Puntada overlock elástica 13. Elástica sobre Is orillas 17. Zig-zag elãstica constura 12 13 17 < Set sThch length to 5 3Cfl width to 5 -3 ; > <H MAKING BUTTONHOLES CONFECCON DE OJALES 3.5 3 Set The machine as shown. ction Preparar Ia mãauina como se indica. + Snap on outtonhole foot. ‘ 5 Lengts 0 2-0.4 i ; i 1 Poner el pie prensatelas para ojales. _____ When setting buttonhole foot. ‘TISKC sLre Dutton plate S set to back side. Incorrect setting may cause neecle Th break and injury. A! poner el pie presatelas para oj ales, aseguress de que Ia place del botón ® esté puesta en a parte detrAs. Pontendola de una manera incorrecta puede romper ci hilo y perjudicarle. I Damune Length iarx Dtarting oinz of button ole on raonc. Determinar Ia longitud Marcar el punto de oartida del pie prensatelas sobre el tejido. a: button n part as Tirar a parte ® del pie pren satelas y poner ci botón en as partes como esta indicado. /be Jsng soft or elastic aonc, it s recommended to •se nterfacing material e’•een the faortcs. Al coser telidos ligeros o elásticos, esta recomendado poner un tejido intermedio entre os teiidos. Set Position of Buttonhole Foot bower the presser foot and align the slot ci with marking o te facrics as snown. Determrnar Ia posicion del pie prensatelas para ojales Hl Dart of buttonhole foot r. Bajar ci pie prensatelas y aimcon Ia marca ear a ranura sobre ci tejido como esta mdi cado. L English One Sten Ruttonhole •et pattern selection dial to8 ( ). 2. null down automatic button 9oIe ever and push ever toward The cack as coown. 3. —od Thread lightly Then art :oe nacnine. i. 4. T 8.Thcnhc sewing s done n order, 14 as shown. ± The front bar tack is sewn first. 5. Stan The machine when the s.cwing comes back to starting point. Then button hole sewing s complete. ÷ It is recommended to make a sample buttonhole on a scrap piece of fabric oecre maKing it on your garment. CUTfCN: DO NOT TOUCH METAL PART OF BUTTONHOLE LEVER Confección de o’ales automáticos 1. Ajustar ci punto al nUmero 8 1 ) con a rueda de selección. 2. Tirar hasta aoajo de Ia palanca de oj al automatico © y empujarla brevemente hasta atrás como esta ndicadc. 3. Suerar el bib y empezar a coser. 4. El ojal se hace en ci orden 1-4 como esta sefialacdo. - r pI 3 El hilvãn delantero esta cosido en primero. 5. Parar Ia máquuina cuando blega al punto de partida. Entonces, ci ojale esta cosido. Esta recomendado hacer una prueba sobre una muestra antes de coser su tejido. 2—4 - ATENCIÔN: NOTOCAR LA PARTE METALICA DE LA PALAN CA DEL OJAL 1 Page42 llfli — n Dase of rsot ooonhole sewing, set the slot to cach start point and push ever toward the oack, then repeat from step 3. E sure o pusn buttonhole ever backward before :ar!lng outtonhole. Buttonnole Oensfty Sectioi 5 Ocoas;onay, ne eft or right side or outtonhole may need to be balanced on speciality fabric. n This oase, adjust stitch balance by turning adiusting dial located on the back of the machine. aso de reoebcdn del ojale, poner Ia ranura en c cada punto de parti da y emoujarla breve mente hasta atras coma esta ndicado y seguir desde ci punto 3. ± No olvidar Doner Ia placa del boton en su sitio desoues de coser ojales. Equillbrio de los lados derechio y zquierdo del ojal Los puntos de los lados dere cho y zquierdo no se pueden equilibrar sabre :ejidos diferentes. En este caso. ajustar ci equilibro girando ci control de ajuste para olales. 7/ ___ f The oght side of buttonhole s co dense. turn dial to left as shown. If The left side of the buttonhole is too dense, turn dial to rignt as shown. Si el ado derecho del ojal esta demasiao cerca del ado izquierdo, girar el cintrol hasta Ia izquierda coma esta sefial ado. Si ci lado izquierdo del oji esta demasiaoo cerca del lado derecho. girar el control hasta a derecfla coma esta sefialado. ( age .13 Espaioi Suttonholes P’ace a pin thrcugh the bar acics c oreveni over-cutting. Out the huttonhole along cen er Null the buttonhole cutter. Corte del ojal Poner un alfiler en inc de los extremos del otal para evitar un corte de mas. COSTURA DE CtERRES “ W,dth — 0 ctiora Set the machine as shown. By using a special zipper foot, :pper ceivng oan be done easily, Set the zioper foot on the right of the 9eedle. Sew rignt side of zipper guidng fabric carefully so that -:rt side :eeth of zipper are oaraiel with lert edge of foot. .,.:;,. r—’•- - Preparar a máquina como se indica, Al usar el pie prensatela especial para cierres a costu ra puede resultar mas rácl sin dar vueita a Ia tela. Poner ci pie para Ia costura de clerres a Ia derecha de Ia aguja. Coser ci ado derecho del cierre y cuidar que los dientes del cierre queden paralelos al borde izquierdo del pie. Lrqth 1-5 3 I L 1 / — age-’4 oi eset zpoer foot to the toe needle. Sew ett side of zipper in the same way. Pasar ci pie para cierres at lado izqulerdo de Ia aguja. Coser ci !aoo izquerdo del cierre de a misma torma. I____ MNDlNG Section 1 COSTURA PARA S:ttheachine as shown. 5 mdauina como se j P’ace the patch over the worn part. Pull the thread ends toward back or ert when starting to sew. Sew along the edge of the patch on the right side. Trim away the worn part close to tne seam on the wrong side. Poner un parche sabre a parte rota. Jalar los extremos de os hilos hacia atrás o a a laquierda cuando se va a empezar a coser. Coser por el derecho toda a orilla del parche. DespUes recortar Ia parte rota de atrás. : ••_,v,,vV,, DaGe Mending a Rip Set the machine in the same way as for patching. Sew the edges of tear together first. Then sew two more seams on either side. A piece of faoric can be olaced joaernearh to rein force the rio. Remiendo de una Rasgadura Preparar a máquina de a misma forma como en el par chado. Primero coser las orillas de Ia rasgadura abarcando ambos lados. Despues ccser mas de dos veces en caca odo, cerca de Ia costura anterior. Un pedazo de teia puede ser colocada debajo. para reforzar Ia costura en Ia rasgadura. Section 5 APPLIQUE WORK COSTURA DE APUCACON (PARCHES DE ADORNO) Set the machine as shown. Preparar a máquina como se indica. 0thHi Page 6 Draw design on material to be sec as an aopliqud ann cut it out. Place cut-out on base tabcc with stabilizer under base ccc and baste or oin in cace. Dibujar ci diseño sobre ci material que se va a utilizar como parche de adorno y recortarlo. Colocar ci oarche de adorno sobre ci maenai nilvanario. Sew around the outline with satin zigzag stitch. Coser airededor del molde con puntada en zig-zag. Th change direction at corsew very smail c:r:ne machine. posi-:e lust away from edge ot c.t-out, itt presser toot and ttrn fabric. Lower presser fooc and continue sewing. Para cambiar a direccion en as esqiuinas o par coser en circulos muy pequenos, parar Ia máquina, colocar Ia aguja en Ia Dunta de a orila del parche. evantar ci pie pren saceia y girar ci rnateral. Despues bajar ci pie pren satela j continuar a costura. Sectcn 5 - -j Pine 37 I I Espanol SiCOK1NG FRUNCDO Set :ne machine as shown. Preparar a maquina como se indica Th cather :he fabric, sew two straiçnt lines with stitch length S anc very loose upper tension, Make knots in one end. Gather fabric toward knots wrule holding the other end of ower dreads with fingers. f1_18T1 Para fruncr a tela. coser dos costuras rectas con el largo de puntada, y con a tension superior muy suelta. Hacer aigunos nudos al final. Juntar Ia tela hacia los nudos mientras sostiene los Jextremos de los bibs inferi ores. / Sew smocking stitches on cathered cart between two straignt lines of stitches. Take out the threads of the straigflz stitching after you finsh sewing. : Coser el fruncido sobre ía parte recogida en medio de las dos costuras rectas. Sacar los bibs utilizados para juntar ía tela despues de ter minar. Page 48 I DROP FEED TEETH is located Droo feed lever lsiae of snuitle cover. To ower feed teeth, push he ever, then slice t to the left. Ths positicn is used for but .Dn sewing, carning and emoroider’,. cr orma sewing, push the lever to the :hen release it. Español PALANCA PARA MOVER LOS DIENTES ‘ Section 4 HAND EMBROIDERY Drop teed teeth. Set the machine as shown. Remove foot and holder screw. ceep ower thread from ceing pulled reduce upper thread tension. For good embroidery, it is important to use the correct needle and thread. Use embroidery thread for ioper thread and thinner thread of same kind and color for lower thread. Trace your design on fabric and place it in the embroidery hoop, making sure fabric is taut. Needle No. 9 Thread 120—100 No.11 No.14 100—80 60—50 La patanca D estã en Ia parte de adentro de Ia cubierta del cangrejo, Para baiar los dientes ce arrastre, apretar at palanca nac:a adelante. desouès a a zauierda. sza DosicOn so iZa para pegaao do DOtofleS, zurcido y bordado. Para coser normal. apretar Ia paianca a a derecna y soltarla. COSTURA PARA BOROAR Preparar a mäquina como se indica. Quitar el pie prensatela y et soporte con el tornillo. Para evitar que se jale el hilo inferior reducir a tension del hilo superior. Para hacer un buen bordado es importante usar las agujas e hilos apropiados. Usar hilo de seda en Ia parte superior, y en Ia parte inferior (carrete) uno más delgado del mismo color. Trazar el diseño sobre el material y oentrarlo en el bastidor. Deoe asegurarse que el mate rial este estirado. Agula NO.11 Hilo 120—100 100—80 No.14 60—50 No. 9 I 05 E H qe49 — -ul us Icwer hreaa by turnna nandwneef owaro you wnue holdi- jcper hreaii ightly. Lower resser oat ifter. Ba!ar agula y voiver a suoir, :aiando Ud. el bib superior saldrã el inferior, para comen zar a bordar. Bajarla palanca del pie oren / j fr / / - —S “—__-— -7 eU00) Section a: ;awnc aona the outline Continue Comenzar a coser el contorno sewing while guiding hooo by nand. :ris- jilinc. aw several satin Coninuar guiando el bastidor con mano. / fr—J a ‘ /— / I ) rn Cobocar una hoa de papel debajo de a tela cuando ésta sea muy delgada. —‘‘ I .. . .-. \ \ [_ Page5O •lTNANCE 6. MANTENMJENTC Your macnine requires regular oeaning and lubrication for sausfactory sewing. A machine which is used for a cw ours a day needs to oe ta oiled onco a Para un funcionamiento ade cuado su máquina requiere regularmente cc limopieza y aceitado, Una mãquina que se use durante pocas horas al cIa necesda imoiarse y acetarse una ye: al mes. mc Dsc,nnect power supoiy o oerforming mainte :n ne macnine. Importante: Desconectar a clavija de a mdquina para flacerie ci mantenimiento. OLANNG LiMPIEZA Remove presser toot and necale. Quitar ci pie prensatela y a aguja. s&tror Ve N Turn atches of shuttle out ward. irar los afuera. seguros nacia . , Remove shuttle race cover. Remove shuttle. Clean shuttle race with a cleaning brush and soft cloth. Quitar Ta tapa del cangrejo. Quitar el cangrejo. Limpiar Ta caja del cangrejo con un cepillo y un trapo suave. OILiNG ACIETADO Use oil manufactured special‘or sewing machine use. Other cii iIl eventually cause mechanism to jam. pply one drop of oil on the shuttle where friction occurs. Usar solo aceite especial para mãquinas de coser. Otro aceite causarã daños al mecanismo de Ta máquina. Aplicar una gota de aceite a Ia cápsula en Ta parte donde hace fricción. F Secticn ‘ \\ ABLADEPROBLEMAS CAUSA PROBABLE PROBLEMA rnoe & bib Hibo del carrete disparejo o no conductdo haca arnba correctamente. Demasada tension en el bib inferior. Peusa acumulada en a bobina y en el resorte de tensiOn... Omson Ce puntaoas Section 7 Costuras irregulares P19, P.7, 8 P56, 57 Quitar pelusa con ceo. CoocaciOn inadecuada ae Ia aguja. P.22 Aguia doblada. P.22 Hibo o aguja inadecuados para a teba. P.25 Enhebrado incorrecto del hibo superior. P.7 Demasiado aceite en Ia cãpsula, P.50 Medida de aguja no correcta para a tela utilizada. P.25 TensiOn del bib superior demasiado baia. TensiOn incorrecta del hibo inferior. La ela no se mueve CORRECCION Ei selector de diseño no accionado correctamente. P16 P.56, 57 P.26 Altura incorrecta o pelusas en los dientes. Haca ruido Pelusa 0 bib atorados en a cãpsula. P.49. P.58 ‘2qe 55 PRCBLEMA La tea so arruga CAUSA PROBABLE CORRECCION Tension superior o inferior muy ada. P.16. P57 Puntaaa demasiada arga para a tela. P.26 Hilo cernasiado grueso. P25 Enhebrado incorrecto de los hilos sunerior o inferio r. Se rompe a aguja Section - ColocaciOn inadecuada de a aguja. P.7, P.20 P22 Aguja doblada. P22 El torniflo de presiOn do Ia aguja esta muy flojo. P22 TensiOn del hilo superior muy aita. P16 Aguja demasiada delgada para a tela. P25 Cambiar el modelo o el ancho de Ia puntada con a aguja en posiciOn inferior. P26 ± Si adn los problemas continUan, recruuir al centro de servici más cercano. No tratar d ecorregir Ia falla Ud. mismo. A. 4 - ae56 LOWER TENSiON ADJUST MSNT the machine skips stitches or coos stitches, t may require a :ension adjustment. To ofleck the oobbin tension, follow these steos: sfl iatcnes of the shuttle ‘ace cover outward, as shown fl figure Remove shuttle cover as scown n figure 1 Remove snuttle as snown fl figure ©. Suspend bobbin, bobbin case, and shuttle all together. f’/hen pulling the thread siightly, all of them should siide down with light resis tance . if they do not slide down with a slight pull of the thread, the bobbin case ten sion is too tight. If they slide aown too easily, the bobbin case tension is too loose. See following page for adjustment of the bobbin case. Once the bobbin case is correctly adjusted, use the upper tension to balance :he stitches as shown on page 16. x Shuttle y Bobbin and bobbin case All of them descend with igflt resistance. . ‘ . Section AJUSTE DETENSION DE LA SOBNA Si Ia máquina pierde puntos o nace nudos por ci reves en Ia costura no es problema de Ia maquina, sino de a ensián. Para verificar a tension cc a oobina, se debe tomar ésta y ci cangrejo como se indica en ci dibujo si Ia tension es ocrrecta se desplazaran enta mente. Después ajustar Ia tensiOn superior con los nOmero 4, 5. oB. Girar los seguros hacia afuera. Quitar a tapa def cangrejo © Quitar ci cangrelo. x Cancrejo y Carrete y bobina El cangrejo y Ia bobina se desplazarán lentamente. © x.y I Sectton For tension adjustment, turn screw Jsirtg smail screwariver. Kay: x Right to tighten i ft c loosen Para ajustar a tension. utilizar ci desai’maaor y apretar a aflojar ci tornillo segun sea necesario. Apretar: Para hacer ía tensiOn rnOs ada del hiio interior. fIojar: Para hacer a tensiOn baja del hiio inferior. L syen da: x TensiOn inferior mas alta y TensiOn inferior baja Replace shuttle. ± Lay the machine on its back to make it easier. Poner ci cangrejo. Para facilitar ía operaciOn, mãquina en ía .1a 0 : Replace shuttle cover. Poner ía tapa del cangrejo. 7 Page 58 , EflgIish, cas toward center. Españ1 Girar os seguros nacia cen tro. j,— iNG SHUTTLE CASE Thread caught between shut tle and shuttle case causes 3ucccn ad unning or stoo he machine, n tis case you should pro case as follows: Z) Lift presser foot and smove bobbin case. © Push latches ® outward and remove shuttle cover and shuttle with fingers. Clean shuttle and shuttle case and reassemble them. Section 7 & : LlMPEZA DE LA CAJA DEL CANGREJO El hilo atorado en Ia caja del cangrejo, causarä una pequena falla en su máquina. En este caso proceder como se aescribe en seguida. D Lievar hacia arriba ci elevador del pie y quitar a bobina. Girar os seguros del can grejo hacia afuera ®, y quitar a tapa y el cangrejo. Limpiar cangrejo y caja, volviendolos a armar. “V 4 •.lNT LIGHT BULB Unciug the machine. Lccsen the screw and remove face cover as shown. Remove the bulb by unscrew ing t counterclockwise. retail a ew auth by screw’g ewise. = Ncie ers e IGV 15W bulb. CAMBIC DEL FOCO Desconectar a máquina. Afiolar el tornhllo como Se indica, y abrir Ia cubierta. Quitar el foco girándolo en sentido contrario at movimiento de as menecillas del relol Poner un unevo foco atornilldndolo. Loosen Tighten , Sectiorr - ye / - -=— , - .r. .-
 1
1
-
 2
2
-
 3
3
-
 4
4
-
 5
5
-
 6
6
-
 7
7
-
 8
8
-
 9
9
-
 10
10
-
 11
11
-
 12
12
-
 13
13
-
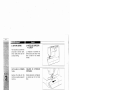 14
14
-
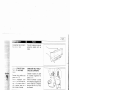 15
15
-
 16
16
-
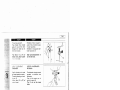 17
17
-
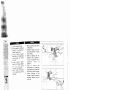 18
18
-
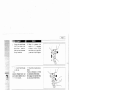 19
19
-
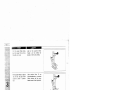 20
20
-
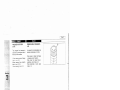 21
21
-
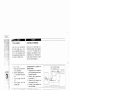 22
22
-
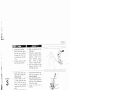 23
23
-
 24
24
-
 25
25
-
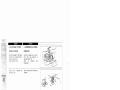 26
26
-
 27
27
-
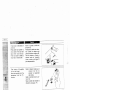 28
28
-
 29
29
-
 30
30
-
 31
31
-
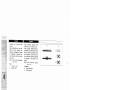 32
32
-
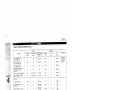 33
33
-
 34
34
-
 35
35
-
 36
36
-
 37
37
-
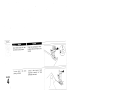 38
38
-
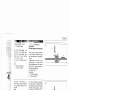 39
39
-
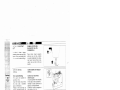 40
40
-
 41
41
-
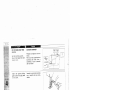 42
42
-
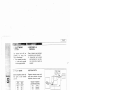 43
43
-
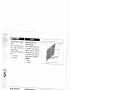 44
44
-
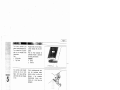 45
45
-
 46
46
-
 47
47
-
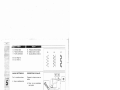 48
48
-
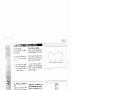 49
49
-
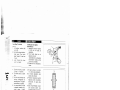 50
50
-
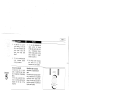 51
51
-
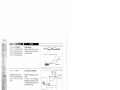 52
52
-
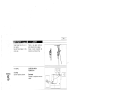 53
53
-
 54
54
-
 55
55
-
 56
56
-
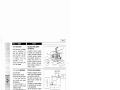 57
57
-
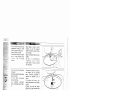 58
58
-
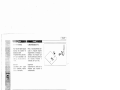 59
59
-
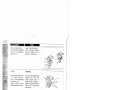 60
60
-
 61
61
-
 62
62
-
 63
63
-
 64
64
-
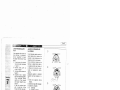 65
65
-
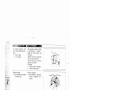 66
66
-
 67
67
-
 68
68


White 4041 Manual de usuario
- Categoría
- Máquinas de coser
- Tipo
- Manual de usuario
En otros idiomas
- English: White 4041 User manual
