Bella Multi Use 10 Speed Immersion Blender, and Chrome El manual del propietario
- Categoría
- Pequeños electrodomésticos de cocina
- Tipo
- El manual del propietario
Este manual también es adecuado para

IMMERSION BLENDER
LICUADORA DE MANO
Instruction Manual (Recipe Guide)
Manual de instrucciones (Guía de recetas)
Register your product and get support at:
Para registrar y obtener asistencia de su producto ir:
www.bellahousewares.com
14769 BELLA ImmersionBlender_IM_R4.indd 1 2020-01-22 10:37 AM

THANK YOU
For Your Purchase
BellaLifestyle
BellaLife
@
bellahousewares.com
#get inspired
Register
& sign up for special
announcements and trendy
recipes!
Tell us what you think!
Rate, review or ask us a question.
14769 BELLA ImmersionBlender_IM_R4.indd 2 2020-01-22 10:37 AM

1
Table of Contents
Important Safeguards ....................................................................................................................................................2
Notes on the Plug ............................................................................................................................................................3
Electric Power ..................................................................................................................................................................3
Getting to Know Your Immersion Blender .................................................................................................................4
Before Using for the First Time ....................................................................................................................................5
Immersion Blender..........................................................................................................................................................5
Immersion Blender: For Best Results ..........................................................................................................................5
Whisk Attachment ..........................................................................................................................................................6
Whisk: For Best Results .................................................................................................................................................7
Chopper Attachment ......................................................................................................................................................7
Chopper: For Best Results .............................................................................................................................................8
User Maintenance Instructions ....................................................................................................................................8
Care & Cleaning Instructions ........................................................................................................................................8
Storing Instructions ........................................................................................................................................................ 9
Immersion Blender/Attachment Processing Guide ................................................................................................... 9
Recipe ..............................................................................................................................................................................10
Warranty .........................................................................................................................................................................16
Índice
Medidas de seguridad importantes ...........................................................................................................................18
Notas sobre el enchufe ................................................................................................................................................19
Corriente eléctrica ........................................................................................................................................................19
Conozca su Licuadora de mano ..................................................................................................................................20
Antes de usar por primera vez ....................................................................................................................................21
Licuadora de mano .......................................................................................................................................................21
Licuadora de mano: Para mejores resultados ..........................................................................................................22
Batidor ............................................................................................................................................................................22
Batidor: Para mejores resultados ...............................................................................................................................23
Cuchilla de picar ............................................................................................................................................................24
Picar: Para mejores resultados ...................................................................................................................................25
Instrucciones de uso .....................................................................................................................................................25
Instrucciones de cuidado y limpieza ..........................................................................................................................25
Instrucciones mantenimiento ....................................................................................................................................25
Licuadora de mano /Guía para licuar alimentos ......................................................................................................26
Recetas ...........................................................................................................................................................................27
Garantía ..........................................................................................................................................................................34
14769 BELLA ImmersionBlender_IM_R4.indd 1 2020-01-22 10:37 AM

2
IMPORTANT SAFEGUARDS
When using electrical appliances, basic safety precautions should always be
followed, including the following:
1. READ ALL INSTRUCTIONS.
2. To protect against electrical shock, do not put the motor body, cord or
electrical plug of this Immersion Blender in water or other liquid. The
detachable blending shaft of this appliance has been designed for immersion
into water or other liquids. Never submerge any other portion of this unit.
If the motor body falls into liquid, remove immediately. Do not reach into the
liquid without unplugging the unit rst.
3. This appliance is not intended for use by persons (including children) with
reduced physical, sensory or mental capabilities, or lack of experience
and knowledge, unless they have been given supervision or instruction
concerning use of the appliances by a person responsible for their safety.
4. Close supervision is necessary when any appliance is used by or near
children.
5. Unplug from outlet when not in use, before putting on or taking off
attachments and before cleaning.To unplug, grasp plug and pull from
electrical outlet. Never pull cord.
CAUTION: AVOID CONTACT WITH MOVING PARTS.
6. Do not operate any appliance with a damaged cord or plug or after the
appliance malfunctions, or it is dropped, or has been damaged in any
manner. Contact Consumer Service for examination, repair or adjustment.
7. The use of attachments, including canning jars, not recommended by the
manufacturer may cause a risk of injury to persons.
8. Do not use outdoors.
9. Do not use for other than intended use.
10. Do not let cord hang over edge of table or counter.
11. Do not let cord contact hot surfaces, including the stove.
SAVE THESE INSTRUCTIONS
FOR HOUSEHOLD USE ONLY
14769 BELLA ImmersionBlender_IM_R4.indd 2 2020-01-22 10:37 AM

3
CAUTION: NEVER process boiling liquids. Allow to cool rst and use care when
blending hot liquids. Fill a tall container no more than halfway, and process small
quantities at a time to reduce spillage and avoid injury.
WARNING: To avoid damage to the chop/grind “S” blade, do not chop or grind
hard items such as frozen foods, ice, nutmeg, hard spices, rice, chocolate bars or
coffee beans.
12. Keep hands, hair, clothing and utensils away from attachments and any
moving blades while processing food to reduce the risk of severe injury to
persons or damage to the Immersion Blender. A scraper or spatula may be
used but must be used only when the Immersion Blender is not running.
CAUTION: Blades are SHARP. Handle the stainless steel blending blade with care.
Do not place your bare ngers inside the blade guard.
CAUTION: Always handle the chop/grind “S” blade attachment by the blade stem
when assembling, removing or cleaning.
13. Check chopper bowl for presence of foreign objects before using.
14. Be certain the chopper bowl lid is securely locked onto the chopper bowl
before operating the Immersion Blender.
15. Remove the 8-inch stainless steel shaft, whisk holder and whisk, or chop/grind
“S” blade and chopper bowl lid from the motor body before washing.
Notes on the Plug
This appliance has a polarized plug (one blade is wider than the other). To reduce
the risk of electric shock, this plug will t in a polarized outlet only one way. If
the plug does not t fully into the outlet, reverse the plug. If it still does not t,
contact a qualied electrician. Do not modify the plug in any way.
Notes on the Cord
A. A short power-supply cord (or detachable power-supply cord) is to be
provided to reduce the risk resulting from becoming entangled in or tripping
over a longer cord.
B. Longer detachable power-supply cords or extension cords are available and
may be used if care is exercised in their use.
C. If a long detachable power-supply cord or extension cord is used:
1. The marked electrical rating of the cord or extension cord should be at least
as great as the electrical rating of the appliance;
2. If the appliance is of the grounded type, the extension cord should be a
grounding-type3-wire cord.
3. The longer cord should be arranged so that it does not drape over the
countertop or table top where it can be pulled on by children or tripped
over unintentionally.
Electric Power
If the electrical circuit is overloaded with other appliances, your appliance may
not operate properly. It should be operated on a separate electrical circuit from
other appliances.
14769 BELLA ImmersionBlender_IM_R4.indd 3 2020-01-22 10:37 AM

4
Getting to Know Your Immersion Blender
Product may vary slightly from illustration
1. Extra-Long Electrical Cord. Enables you to blend soups and sauces directly in the saucepan (not
shown).
2. Variable Speed Control Dial (1 – 5). Use when slower speeds for blending, chopping, mincing, grinding,
or whisking are needed.
3. VARIABLE (
|
) Button. Press and quickly release to PULSE. Turn the control dial to change speed. Hold
button for continuous action. When the button is released, processing will STOP.
4. HIGH (
||
) Button. Press and quickly release to PULSE. Hold for continuous high speed action. When the
button is released, processing will STOP.
5. Motor Body with Ergonomic Handle. Easy to grip.
6. 8-inch Stainless Steel Shaft to reach inside deep vessels.
7. Stainless Steel Blender Blade with Blade Guard. The stainless housing partially covers the blade and
keeps splashing to a minimum.
8. Whisk Holder. Fits easily onto the motor body.
9. Whisk Attachment. Use to whip cream and egg whites.
10. Chopper Bowl Lid. Fits and locks easily onto the chopper bowl.
11. “S” Blade Stem. Always handle the “S” Blade by its stem.
12. Chop/Grind “S” Blade. Chop, mince and grind with ease.
13. 2-1/2 Cup Chopper Bowl with Center Pin and Non-Slip Feet.
14. 3-1/2 Cup/800 ml. Spouted Beaker. Microwave and dishwasher-safe. Use to blend drinks, shakes, salad
dressings and more. Designed for easy gripping and drip-free pouring.
Figure 1
Variable Speed
Control Dial
VARIABLE (|) Button
HIGH (||) Button
Motor Body with
Ergonomic Handle
8-inch Stainless
Steel Shaft
Stainless Steel
Blender Blade with
Blade Guard
Whisk Holder
Chopper Bowl Lid
“S” Blade Stem
2-1/2 Cup
Chopper Bowl
3-1/2 Cup/800 ml.
Spouted Beaker
Chop/Grind
“S” Blade
Whisk
Attachment
14769 BELLA ImmersionBlender_IM_R4.indd 4 2020-01-22 10:37 AM

5
Before Using for the First Time
1. Read all operating instructions carefully.
2. Carefully unpack the Immersion Blender and attachments. Remove all packaging materials and any
labels from the outer surfaces.
CAUTION: Blades are SHARP. Handle the stainless steel blending blade with care. Do not place your bare
ngers inside the blade guard.
CAUTION: Always handle the chop/grind “S” blade attachment by the stem when assembling, removing
or cleaning.
3. Wipe the Immersion Blender motor body with a clean, damp cloth to remove any dirt or dust. Dry
thoroughly with a soft absorbent cloth. Handle carefully.
4. Wash the stainless steel shaft, chopper bowl lid, chop/grind “S” blade, chopper bowl, whisk holder and
whisk attachment, and beaker by hand or in the top rack of your dishwasher.
5. Dry thoroughly before use.
CAUTION: To protect against electric shock, NEVER immerse the Immersion Blender motor body or allow
cord to come into contact with water or other liquids.
Immersion Blender
1. IMPORTANT: Always make sure the stainless steel shaft is dry with no moisture in the connection point.
1. Place the motor body and 8-inch stainless steel shaft on a at, clean work area.
2. Align the center (
•
) dot on the motor body with the 8-inch stainless steel shaft’s UNLOCK (
) icon.
(See Figure 2.)
3. Turn the shaft clockwise until the LOCK (
) icon is directly under the center (
•
) dot and both pieces are
locked together. (See Figure 3.)
4. Plug the power-supply cord into a 120V AC electrical wall outlet.
5. To process at slower speeds, turn the variable speed control dial at the top of the motor body to the
desired speed (1 – 6).
IMPORTANT: To avoid splattering and over-processing, begin slower, then increase speed as needed.
6. Place food to be processed into the beaker or any tall cooking or mixing container.
7. Insert the blending shaft deep into the bottom of the container. (See Figure 4.)
8. Press and quickly release either speed button for PULSE action.
9. Press and hold the top VARIABLE speed (
|
) button to blend at slower speeds. Increase speed setting by
turning the variable speed control dial. When the button is released, blending will STOP.
10. For a consistently fast speed, press and hold the HIGH speed (
||
) button. Blend ingredients with a gentle
lift and lower motion.
11. When the button is released, the Immersion Blender will turn OFF.
Figure 2 Figure 3 Figure 4
14769 BELLA ImmersionBlender_IM_R4.indd 5 2020-01-22 10:37 AM

IMPORTANT: If food becomes lodged around the blending blade or the blade guard, release the speed button
and unplug the Immersion Blender. Turn to unlock and remove the stainless steel shaft from the motor
body. Use a long handled kitchen brush to clear debris and rinse well under running water. Assemble unit
and continue processing.
12. When processing is complete, and the blades are completely stopped, lift the Immersion Blender out of
the beaker or blending container.
WARNING: To avoid splattering, make sure the blade has completely stopped.
13. Remove the plug from the electrical outlet.
Whisk Attachment
IMPORTANT: Always make sure the whisk holder is dry with no moisture in the connection point.
1. Place the motor body, whisk holder and whisk on a at, clean work area.
2. Insert the both wings on the stem of the whisk into the whisk holder. (See Figure 5.) Press rmly until the
whisk locks into the holder.
3. Align the center (
•
) dot on the motor body with the whisk holder’s UNLOCK (
) icon. (See Figure 6.)
4. Turn the shaft clockwise until the LOCK (
) icon is directly under the center (
•
) dot and both pieces are
locked together.
5. Plug the power-supply cord into a 120V AC electrical wall outlet.
6. To whisk at slower speeds, turn the variable speed control dial at the top of the motor body to the desired
speed (1 – 6).
IMPORTANT: To avoid splattering and over-processing, begin slower, then increase speed as needed.
7. Place food to be processed into the beaker or any tall cooking or mixing container.
8. Insert the whisk attachment so that it skims the surface of the ingredients. (See Figure 7.)
9. Press and quickly release either speed button for PULSE action.
10. Press and hold the top VARIABLE speed (
|
) button to blend at slower speeds. When the button is
released, blending will STOP. Increase speed setting as needed.
11. For a consistently fast speed, press and hold the HIGH speed (
||
) button. Blend ingredients with a gentle
lift and lower motion.
12. When the button is released, the Immersion Blender will turn OFF.
13. When processing is complete, and the whisk has completely stopped, lift the whisk attachment
out of the beaker or blending container.
WARNING: To avoid splattering, make sure the whisk has completely stopped.
14. Remove the plug from the electrical outlet.
6
Figure 5 Figure 6 Figure 7
14769 BELLA ImmersionBlender_IM_R4.indd 6 2020-01-22 10:37 AM

Whisk: For Best Results.
• Use a sufciently deep, and wide container with room to move the whisk through the ingredients.
• To keep the mixing bowl stable, set the mixing bowl on a damp cloth during whisking.
• To avoid damage to the whisk attachment, do not allow the whisk to hit the bottom or sides of mixing
bowl while using the whisk.
• Always use fresh chilled cream and fresh eggs at room temperature to achieve greater and more stable
volume when whisking.
• Always use the whisk attachment at the highest speed when whisking egg whites and cold cream.
• Use a deep bowl with a rounded bottom to whip cold cream.
• Hold the whisk attachment so that it skims the surface; whip until the cream begins to thicken. Immerse
the whisk totally into the cream.
• To ensure the best whipped cream, chill both the glass or metal bowl and the whisk attachment.
• To keep the whipped cream from “breaking”, add a whipped cream stabilizer such as instant pudding or
Oetker
®
Whip It.™
• Use the whisk attachment at lower speeds to whisk eggs for scrambled eggs or uffy omelets.
• Do not attempt to make egg white meringues on a rainy or very humid day.
• Always make sure the whisk and mixing bowl are completely clean and free of fat before whisking egg
whites.
• To help stabilize egg whites, add 1/8 teaspoon of cream of tartar per egg white prior to whisking.
(If using a copper bowl omit the cream of tartar.)
• Whisk egg whites until soft peaks form; then add sugar very slowly. Do not over-whisk.
Chopper Attachment
IMPORTANT: Always make sure the chopper bowl lid is dry with no moisture in the connection point.
1. Place the chopper bowl, chop/grind “S” blade, and chopper bowl lid on a at, clean work area.
2. Mount the center of the chop/grind “S” blade onto the chopper bowl’s center pin. (See Figure 8.)
3. Add food to be processed into the chopper bowl.
4. Add the chopper bowl lid to the chopper bowl. Make sure the center of the lid ts securely over the
“S” blade stem. The 2 pins on the side of the lid will t into each of the side tracks. (See Figure 9.) Turn
clockwise to lock the lid into place.
5. Align the center (•) dot on the motor body with the UNLOCK (
) icon on the chopper bowl lid. (See
Figure 10.) Turn the motor body clockwise until the LOCK (
) icon is directly under the center (•) dot and
both pieces are locked together. (See Figure 11.)
7
Figure 11Figure 10Figure 9Figure 8
14769 BELLA ImmersionBlender_IM_R4.indd 7 2020-01-22 10:37 AM

8
6. Plug the power-supply cord into a 120V AC electrical wall outlet.
7. To process at slower speeds, turn the variable speed control dial at the top of the motor body to the
desired speed (1 – 6).
IMPORTANT: To avoid over-processing, press and quickly release either speed button for PULSE action.
8. Press and hold the top VARIABLE speed (
|
) button to blend at slower speeds. When the button is
released, blending will STOP. Increase speed setting as needed.
9. For a consistently fast speed, press and hold the HIGH speed (
||
) button.
10. When the button is released, the Immersion Blender will turn OFF.
IMPORTANT: If food becomes lodged under or around the blade, turn the chopper bowl lid counter-
clockwise to unlock. Grasping the motor body handle, lift the motor body and attached lid up and off
the chopper bowl. Use a long handled small spatula to loosen ingredients. Assemble unit and continue
processing.
11. When processing is complete, unlock and remove the chopper bowl lid. Grasping the motor body
handle, lift the motor body and attached lid up and off the chopper bowl. With the lid in one hand, and
the motor body in the other, turn the center (•) dot on the motor body counter-clockwise until it aligns
with the UNLOCK (
) icon and separate the lid.
12. Remove the plug from the electrical outlet.
Chopper: For Best Results
• Freeze meats or sh partially before processing to ensure chopped (not pulverized) results.
• To avoid damage to the chop/grind “S” blade, do not chop or grind hard items such as frozen foods, ice,
nutmeg, hard spices, rice, chocolate bars or coffee beans.
• To avoid over-processing, release the speed button and check food consistency periodically.
• Although the chopper bowl’s non-slip feet will stabilize bowl during chopping, it is recommended that
while chopping, hold the motor body handle in one hand, and brace the chopping bowl with the other.
• NEVER process boiling liquids or very hot foods in the chopper bowl.
• Cut food in uniform sizes to ensure faster, evenly textured results.
Do not operate the chopper attachment continuously for more than 1 minute. Allow the motor to rest for 1
minute between each use.
User Maintenance Instructions
This appliance requires little maintenance. It contains no user serviceable parts. Do not try to repair it yourself.
Contact a qualied appliance repair technician if the product requires servicing.
Care & Cleaning Instructions
CAUTION: Never immerse the power base, plug or cord in water or any other liquid.
1. Always unplug the Immersion Blender before cleaning.
2. Immersion Blender: Rinse the 8-inch stainless steel shaft under warm running water after each use.
3. If food becomes lodged around the blending blade or the blade guard, release the speed button and
unplug the Immersion Blender. Turn to unlock and remove the stainless steel shaft from the motor
body. Use a long handled kitchen brush to clear debris and rinse well under running water.
CAUTION: BLADE IS SHARP! Do not place your bare ngers near the blade.
4. Whisk Attachment: Rinse the whisk attachment under warm running water after each use.
5. Turn to unlock and remove the whisk holder. Grasp rmly and pull to remove whisk attachment. Rinse
whisk under running water.
6. Chopper Attachment: Unlock and remove the chopper bowl lid; carefully lift the chop/grind “S” blade
by the stem up and off the center pin. Clean the blade using a long handled kitchen brush.
7. Rinse the chop/grind “S” blade, chopper bowl and lid under running water after each use.
8. The 8-inch stainless steel shaft, whisk attachment, chopper bowl lid, “S” blade, chopper bowl, and
beaker are top-rack dishwasher safe.
9. Wipe the motor body and whisk holder with a damp cloth or sponge. Dry thoroughly.
WARNING: DO NOT IMMERSE THE MOTOR BODY IN WATER
14769 BELLA ImmersionBlender_IM_R4.indd 8 2020-01-22 10:37 AM

9
Immersion Blender & Attachment Processing Guide
WARNING: This Immersion Blender is not designed to operate continuously for more than 1 minute. Allow the
motor to rest for 1 minute before resuming. When processing dry, thick or heavy mixtures, never mix for more
than 15 sec. Stop processing ingredients and stir by hand before continuing.
Freeze meats partially before processing to ensure chopped but not pulverized results.
FOOD ATTACHMENT SPEED PROCESSING
TIME
ACTION
Milkshakes, Smoothies Blender Maximum 30 sec. Use cold ingredients.
Cocktails, Fruit Frappes Blender Mid to Maximum 30 sec. Use cold ingredients.
Soups, Dips, Baby Food Blender Mid to Maximum 30 sec. – 1 min. Blend until smooth.
Creamy Salad Dressings Blender Mid to Maximum 30 sec. Blend until smooth.
Cheese, 1/2 lb. Chopper Maximum PULSE Partially freeze soft cheese.
Cut into 3/4- inch cubes.
Carrot, 1/2 lb. Chopper Maximum PULSE Cut into 3/4- inch cubes.
Onion, 1 oz. Chopper Mid PULSE Do not over process.
Nuts, 5 oz. Chopper Maximum PULSE Do not over-process.
Beef, Pork, Shrimp, 1/2 lb. Chopper Maximum PULSE Partially freeze ingredients.
Cut into 3/4- inch cubes.
Fish Fillets, 1/2 lb. Chopper Mid to Maximum PULSE Partially freeze sh.
Cut into 1- inch cubes.
Chicken, 1/2 lb., boneless,
skinless
Chopper Mid to Maximum PULSE Partially freeze chicken.
Cut into 3/4- inch cubes.
Cream, 1-1/2 cups Whisk Maximum 20 - 30 sec. Use cold bowl and whisk.
Do not over process.
Egg Whites Whisk Maximum 20 - 30 sec. Use room temperature eggs.
Use clean bowl and whisk.
Light Batters Whisk Mid 10 - 30 sec. Cakes. Pancakes. Wafes
Do not overmix.
Mayonnaise Whisk Low to Maximum 3 – 4 minutes Drizzle oil VERY slowly.
Scrambled Eggs Whisk Low to Mid 4 - 10 sec. Whisk until frothy light yellow.
Omelettes Whisk Low to Mid 4 - 10 sec. Whisk until frothy light yellow.
Storing Instructions
1. Unplug and clean the Immersion Blender and all parts and attachments.
2. Assemble the Immersion Blender body to the 8-inch stainless steel shaft. Lock the whisk attachment
into the whisk holder. Assemble the chopper bowl, chop/grind “S” blade and chopper bowl lid following
the detailed procedures previously outlined in this instruction manual.
3. Never store the Immersion Blender while the motor body is plugged in.
4. Never wrap cord tightly around the appliance. Never place any stress on cord, especially where the cord
enters the power base, as this could cause the cord to fray and break.
5. Store the Immersion Blender and attachments in its original box or in a clean, dry place.
14769 BELLA ImmersionBlender_IM_R4.indd 9 2020-01-22 10:37 AM

10
Recipes
Avocado Pear Baby Puree
• 1/4 cup formula/breast milk or water, plus
more to thin
• 1 ripe Haas avocado, cut in half, pit removed
• 1 ripe Bartlett pear, peeled, cut in half
• baby cereal, if needed to thicken
1. Add 1/4 cup milk or water to the beaker.
2. Scoop the esh out of the avocado. Chop into 2-inch chunks and add to the beaker.
3. Remove the stem and center seed pod from the peeled pear. Chop into 2-inch chunks and add
to the beaker.
4. Lock the 8-inch stainless steel shaft to the motor body. Insert the Immersion Blender to the
bottom center of the beaker.
5. Press and quickly release the HIGH speed (
||
) button to PULSE several times to begin.
6. Press and hold the HIGH speed (
||
) button. Blend ingredients with a gentle lift and lower motion
until the avocado and pear are pureed. If a thinner consistency is desired, add more formula/
breast milk or water. To thicken, add baby cereal.
7. Store in a BPA-free air tight container for up to 3 days.
Hint: Freeze leftover puree in ice cube molds. Empty cubes into a zipper freezer bag, and label for
future use. Frozen Avocado Pear Baby Puree is safe to use for 3 months. Simply thaw overnight in
the refrigerator for use the next day.
Sweet and spicy, creamy goodness in a bowl. We saved the seeds and roasted them in our Air
Fryer for garnish and a satisfying crunch.
Roasted Butternut Squash Soup
Serves 2 - 3
• 2 tablespoons olive oil
• 2 tablespoons seasoned salt
• 2 tablespoons dry Italian seasoning
• 2 cups butternut squash, chopped into 1-in.
chunks
• 1 cup carrots, (2 - 3) cut into chunks
• 1 poblano pepper
• 1/2 teaspoon ground allspice
• 1 cup almond milk
• 1/2 cup water
• 2 tablespoons organic maple syrup
• roasted squash seeds, for serving
• maple syrup, for serving
1. Roast Vegetables. Add butternut squash, carrots and poblano pepper to a large zipper bag.
Add oil, salt and Italian seasoning to the bag. Close bag, mix and massage seasoned oil onto
all veggies.
2. Empty veggies onto a large roasting pan. Roast @ 400ºF for 20 minutes, turn vegetables.
Continue to roast for 15 to 20 minutes, or until squash and carrots are caramel brown
and knife-tender.
3. Prepare Soup. Place roasted vegetables and the remaining ingredients into a medium soup pot.
Heat on medium high until warm. Turn the heat OFF.
4. Lock the 8-inch stainless steel shaft to the motor body. Insert the Immersion Blender to the
bottom center of the pot.
5. Press and quickly release the HIGH speed (
||
) button to PULSE several times to begin.
6. Press and hold the HIGH speed (
||
) button. Blend ingredients with a gentle lift and lower motion
until the soup is pureed. If a thinner consistency is desired add water, 1/4 cup at a time.
7. Serve soup with salted, roasted squash seeds and a drizzle of maple syrup.
Avocados and ripe pears are ideal first foods for babies. Nutritious, soft, mild … loaded with essential fats,
vitamins and nutrients that growing babies need. Smooth and creamy, avocados and sweet pears are both
easily digested and naturally tolerated!
14769 BELLA ImmersionBlender_IM_R4.indd 10 2020-01-22 10:37 AM

11
Roasted Garlic Aioli
• 1/2 teaspoon sea salt
• 1/3 cup Whole Egg Simple Mayonnaise
(recipe included)
• 2 tablespoons freshly squeezed lemon juice
• 2 tablespoons grated Parmesan cheese
• 1/2 teaspoon Dijon mustard
• cayenne pepper, pinch
• 1/2 teaspoon Worcestershire sauce chopped
fresh parsley, for garnish
1. Roast Garlic. Chop and discard the top the head of garlic to expose the garlic cloves. Peel away
excess skins. Center garlic on a 4-inch x 4-inch piece of aluminum foil. Drizzle cloves lightly
with olive oil and season with salt and pepper. Wrap garlic into a tight package. Roast at 380ºF
for 35 to 40 minutes. Remove from oven and when cool enough to handle, squeeze the roasted
garlic out of the skins into the beaker.
2. Prepare Aioli. Add the remaining ingredients to the beaker.
3. Lock the 8-inch stainless steel shaft to the motor body. Insert the Immersion Blender to the
bottom center of the beaker. Press and hold the HIGH speed (
||
) button and blend ingredients
until the mixture has emulsied and the aioli is creamy smooth.
WHISK ATTACHMENT
Meringue. For Best Results.
• Remove eggs from refrigerator at least 30 minutes before whipping.
• Copper, stainless-steel, or glass bowls work best for making meringues.
• Avoid using plastic bowls for whipping egg whites as plastic can absorb fat and hinder stiff
peaks from forming.
• Utensils MUST BE immaculately clean, completely grease-free, and dry.
• Meringues are very sensitive, and they do not like any moisture. Do not attempt to make egg
white meringues on a rainy or very humid day.
Egg White Meringue
• 3 egg whites (fresh, free-range, organic or
pasteurized eggs)
• 3/4 cup confectioner’s sugar
1. Egg whites should be room temperature before whisking.
2. Place the egg whites into a large, tall bowl
3. Lock the whisk attachment to the motor body. Set the top VARIABLE speed (
|
) control to 3.
4. Insert the whisk into the bowl so that it skims the surface of the egg whites.
5. Press and hold the VARIABLE speed (
|
) button. Slowly lift the blade up and around. Release
button.
6. Increase speed to HIGH. Press and hold the HIGH speed (
||
) button and move the whisk through
the foam until the egg whites form soft peaks.
7. For optimum volume and velvety texture, add sugar gradually. Make sure sugar is dissolved
before adding more.
8. Meringue is done when a swirl holds its shape.
Recipes
Roasting mellows and sweetens the taste of garlic. The creamy mayonnaise base makes it the perfect
condiment for dipping vegetables, roasted or fried potatoes, steamed artichokes, cold steamed shrimp. Smear
Roasted Garlic Aioli over toasted bread for fabulous steak, pork, or chicken sandwiches. Use Roasted Garlic
Aioli as a sauce for poached salmon.
14769 BELLA ImmersionBlender_IM_R4.indd 11 2020-01-22 10:37 AM

12
Recipes
White Chocolate Cardamom Tangerine
Whipped Cream Sandwiches
Makes: 1-1/2 cups
• 1 cup heavy cream
• 2 tablespoons instant white chocolate
pudding mix (powder)
• 2 teaspoons cardamom syrup*
• 1/2 teaspoon cinnamon
• 2 tangerines, zested
• 2 tablespoons Confectioner’s sugar, optional
cookies for sandwiches: chocolate, chocolate
chip, sugar, vanilla wafers
IMPORTANT: Always chill both a large, tall glass (or metal) bowl and the whisk attachment before
preparing whipped cream.
1. Add cream to the chilled tall glass (or metal) bowl.
2. Lock the chilled whisk attachment to the motor body. Insert the whisk into the bowl so that it
skims the surface of the cream.
3. Press and hold the HIGH speed (
||
) button. Lift the blade up and around and through the cream,
until soft peaks are formed.
4. Slowly add the remaining ingredients. Whisk until the whipped cream reaches the desired
stiffness.
WARNING: Do not over-whip or you will end up with butter!
While making fresh mayonnaise at home can sometimes be tricky and labor-intensive, this recipe simplifies
the process by using whole eggs and flavorful Dijon mustard to create a perfect emulsion. Using both oils
adds a richer; full-bodied flavor. Whole Egg Mayonnaise is the perfect pallate to add your own touches:
fresh herbs, pesto, relish, avocado.
Whole Egg Mayonnaise
Makes: 2-1/4 cups
• 1/2 cup olive oil
• 2 whole eggs, room temperature (fresh, free-
range, organic or pasteurized)
• 2 tablespoons freshly squeezed lime juice
• 1⁄2 teaspoon Dijon mustard
• 1-1/2 teaspoons salt
• 1/4 teaspoon sugar
• 1-1/2 cups vegetable oil
• 2 tablespoons hot water
1. Add all ingredients except vegetable oil and hot water to a large, tall bowl.
2. Lock the whisk attachment to the motor body.
3. Press and hold the HIGH speed (
||
) button. Whisk ingredients (except oil and hot water) until
they are well combined.
4. Add the vegetable oil a couple drops at a time. Do not add more until the oil has been well
combined. Slowly begin to drizzle in the oil (it could take up to 1 minute) until a rich, creamy
mayonnaise begins to form. Stream in the remainder of the oil until it is smooth and creamy,
and the oil is completely emulsied.
IMPORTANT: When mayonnaise is thickened to your liking, STOP adding oil.
5. Finally, whisk in the hot water.
6. Refrigerate until use.
Prepare cardamom simple syrup ahead of time. The flowery note of cardamom and warm cinnamon combines
with a subtle tangerine aroma and rich white chocolate creaminess. This recipe makes a frosting-like cream
perfect for stuffing between 2 of your favorite cookies.
14769 BELLA ImmersionBlender_IM_R4.indd 12 2020-01-22 10:37 AM

13
Recipes
Make sure to keep this rich and luscious spread on hand as a base for creamy salad dressings. Add Avocado
Salad Mayonnaise to tuna, hard-boiled eggs, chicken, turkey, tomatoes, roasted vegetables or smear on
sandwiches, wraps, or pipe onto tacos.
Avocado Salad Mayonnaise
Makes: 1 cup
• 2 large egg yolks, room temperature (fresh,
free-range, organic or pasteurized)
• 2 teaspoons fresh squeezed lime juice
• 1 teaspoon Dijon mustard
• 1 teaspoon sugar
• pinch of pink Himalayan sea salt
• 1 cup avocado olive oil
• 1/2 cup chopped cornichons
• 1/4 cup chopped jarred Peppadew peppers
• 1/2 cup chopped capers
1. Add all ingredients except oil to a large, tall bowl.
2. Lock the whisk attachment to the motor body.
3. Insert the whisk to the bottom center of the bowl.
4. Press and hold the HIGH speed (
||
) button. Whisk ingredients (except oil) until they are well
combined.
5. Add the avocado oil a couple drops at a time. Do not add more until the oil has been well
combined. Slowly begin to drizzle in the oil (it could take up to 5 minutes) until a rich, greenish
mayonnaise begins to form. Mayonnaise should be smooth and creamy; the oil should be
completely emulsied.
IMPORTANT: When mayonnaise is thickened to your liking, STOP adding oil.
6. When mayonnaise is ready, fold cornichons, peppers and capers into the Avocado Salad Mayo.
Store refrigerated in an airtight container for up to 3 days.
CHOPPER ATTACHMENT
Perfect served ice cold on a hot summer day…loaded with crunch and healthy freshness. A great
accompaniment for grilled fish or chicken. This recipe may be doubled or adjusted to your liking.
If a larger batch is needed, chop vegetables in batches and combine in a large serving pitcher.
Gazpacho
Makes 4 cups
• 6 radishes
• 1/4 small red onion
• 1 medium cucumber, peeled
• 3 baby red bell pepper, seeded, ribs removed
• 1 jalapeño pepper, seeded, ribs removed
• 3 large tomatoes
• 2 cloves roasted garlic
• 1/4 cup extra-virgin olive oil
• Kosher or ne sea salt
• 2 teaspoons red-wine vinegar
• 1/2 cup fresh parsley or cilantro
• 1 – 2 cups Bloody Mary Mix (may substitute
vegetable or tomato juice)
• 3 limes, cut into wedges, for serving
• basil-infused olive oil, or any olive oil of your
choice garlic croutons, for serving
1. Depending on the portions, chill 4 to 6 soup bowls for 1 hour before serving.
2. Add half of the ingredients to the chopper bowl. Attach and lock the lid.
3. Lock the motor body onto the chopper lid.
4. Press and quickly release the HIGH speed (
||
) button to PULSE several times until veggies are
chunky.
5. Press and hold the HIGH speed (
||
) button until ingredients are chopped to the consistency you prefer.
6. Add Gazpacho to a large covered storage container, mix well.
7. Repeat this procedure with the remaining ingredients.
8. Add the second half of the Gazpacho to a large covered storage container, mix well. Taste and
adjust salt and vinegar if needed.
9. Chill soup for at least 1 hour prior to serving. Ladle soup into chilled bowls. Drizzle with basil
oil and top with plenty of garlic croutons.
14769 BELLA ImmersionBlender_IM_R4.indd 13 2020-01-22 10:37 AM

14
Recipes
Tomatillos are low in saturated fat, very low in cholesterol and sodium, a good source of iron, magnesium,
phosphorus and copper, and a very good source of dietary fiber, vitamin C, vitamin K, niacin, potassium and
manganese. Naturally sour and tangy, the tomatillo is best enjoyed slightly charred.
WARNING! This salsa packs a punch. Feel free to reduce the chilies or replace with sweet peppers,
if you are so inclined.
Roasted Tomatillo Salsa
Makes 1-1/2 - 2 cups
• 6 tomatillos, husked and rinsed, roasted
• 1 - 2 jalapeño or serrano chilies, roasted
• 1/3 cup chopped onion, soaked for 5 minutes
in cold water, drained
• 1/2 cup coarsely chopped cilantro
• Salt to taste
1. Roast tomatillos and peppers. Remove the outer husks of the tomatillos and rinse well.
2. Arrange tomatillos and peppers on a large roasting pan. Roast tomatillos @ 400ºF, turning
as they brown, for 5 to 10 minutes until darkened, but not split to keep juices intact. Remove
tomatillos. Continue cooking peppers until tender.
3. Prepare Salsa. Add all ingredients to the chopper bowl. Attach and lock the lid.
4. Lock the motor body onto the chopper lid..
5. Press and quickly release the HIGH speed (
||
) button to PULSE several times to break down
the tomatillos.
6. Press and hold the HIGH speed (
||
) button until ingredients are chopped to the consistency
you prefer
Flavorful marinated artichokes add healthy fiber and lemony luxuriousness.
Artichoke Hummus
• 1 (12 oz.) jar marinated artichoke hearts
• 1 (15 oz.) can chickpeas or garbanzo beans
• 1/4 cup tahini
• 2 tablespoons lemon juice
• 1 tablespoon cumin
• 1 tablespoon turmeric
• 1 teaspoon Kosher salt, more to taste
• 1/2 cup fresh parsley, for serving
• pita chips
• fresh carrots, celery, cauliower and broccoli,
trimmed and cut for dipping
1. Add artichokes and marinade to the chopper bowl. Rinse chickpeas and add the remaining
ingredients to the chopper bowl. Attach and lock the lid.
2. Lock the motor body onto the chopper lid..
3. Press and quickly release the HIGH speed (
||
) button to PULSE several times until artichokes are
broken down.
4. Press and hold the HIGH speed (
||
) button until ingredients are pureed to a smooth and creamy
consistency. If hummus is too coarse, add water to thin.
5. Sprinkle the top of the bowl of Artichoke Hummus with fresh chopped parsley. Serve with pita
chips and fresh vegetables for dipping.
14769 BELLA ImmersionBlender_IM_R4.indd 14 2020-01-22 10:37 AM

15
Recipes
This chunky dressing is fresh, thick, loaded with flavor. The natural sweetness of the pear and carrots,
mellow out the spicy ginger and cherry peppers.
Ginger Pear Salad Dressing
Makes 2-1/2 to 3 cups
• 1 (2-1/2-inch) piece of fresh ginger root,
peeled, cut into chunks
• 2 medium carrots, cut into chunks
• 1 pear, seeded, cut into chunks
• 6 “hot & sweet“ cherry peppers, peppadews,
or any pickled peppers of your choice
• 1/3 cup fresh orange juice, more to taste (may
substitute apple or pineapple)
• 2 tablespoons ketchup
• 2/3 cup celery chopped
• 1 tablespoon Ponzu sauce
• 3 tablespoons rice wine vinegar
• 2 teaspoons toasted sesame oil
• 4 tablespoons extra-virgin olive oil
• 1/3 cup water, optional
1. Add ginger to the chopper bowl. Attach and lock the lid.
2. Lock the motor body onto the chopper lid..
3. Press and quickly release the HIGH speed (
||
) button to PULSE several times to begin.
4. Press and hold the HIGH speed (
||
) button until ginger is completely chopped.
5. Remove the lid. Add the remaining ingredients to the chopper bowl.
6. Press and hold the HIGH speed (
||
) button until the Ginger Pear Salad Dressing consistency
is to your liking.
7. If a thinner consistency is desired, add water to thin.
14769 BELLA ImmersionBlender_IM_R4.indd 15 2020-01-22 10:37 AM

16
Limited TWO-YEAR Warranty
SENSIO Inc. hereby warrants that for a period of TWO YEARS from the date
of purchase, this product will be free from mechanical defects in material and
workmanship, and for 90 days in respect to non-mechanical parts. At its sole
discretion, SENSIO Inc. will either repair or replace the product found to be defective,
or issue a refund on the product during the warranty period.
The warranty is only valid for the original retail purchaser from the date of initial
retail purchase and is not transferable. Keep the original sales receipt, as proof of
purchase is required to obtain warranty validation. Retail stores selling this product
do not have the right to alter, modify, or in any way revise the terms and conditions of
the warranty.
EXCLUSIONS:
The warranty does not cover normal wear of parts or damage resulting from
any of the following: negligent use of the product, use of improper voltage or
current, improper routine maintenance, use contrary to the operating instructions,
disassembly, repair, or alteration by anyone other than qualied SENSIO Inc.
personnel. Also, the warranty does not cover Acts of God such as re, oods,
hurricanes, or tornadoes.
SENSIO Inc. shall not be liable for any incidental or consequential damages caused
by the breach of any express or implied warranty. Apart from the extent prohibited
by applicable law, any implied warranty of merchantability or tness for a particular
purpose is limited in time to the duration of the warranty. Some states, provinces or
jurisdictions do not allow the exclusion or limitation of incidental or consequential
damages, or limitations on how long an implied warranty lasts, and therefore, the
above exclusions or limitations may not apply to you. The warranty covers specic
legal rights which may vary by state, province and/or jurisdiction.
HOW TO OBTAIN WARRANTY SERVICE:
You must contact Customer Service at our toll-free number: 1-866-832-4843.
A Customer Service Representative will attempt to resolve warranty issues over
the phone. If the Customer Service Representative is unable to resolve the problem,
you will be provided with a case number and asked to return the product to SENSIO
Inc. Attach a tag to the product that includes: your name, address, daytime contact
telephone number, case number, and description of the problem. Also, include a
copy of the original sales receipt. Carefully package the tagged product with the sales
receipt, and send it (with shipping and insurance prepaid) to SENSIO Inc.’s address.
SENSIO Inc. shall bear no responsibility or liability for the returned product while in
transit to SENSIO Inc.’s Customer Service Center.
14769 BELLA ImmersionBlender_IM_R4.indd 16 2020-01-22 10:38 AM

17
14769 BELLA ImmersionBlender_IM_R4.indd 17 2020-01-22 10:38 AM

18
INSTRUCCIONES DE SEGURIDAD
IMPORTANTES
Cuando se usan artefactos eléctricos, se deben siempre seguir las precauciones
básicas de seguridad, incluso lo siguiente:
1. LEA TODAS LAS INSTRUCCIONES.
2. Para protegerse del riesgo de descarga eléctrica, no sumerja el motor, el
cable ni el enchufe de esta licuadora de mano la en agua ni en ningún otro
líquido. La barra del mezclador desmontable ha sido diseñado para inmersión
en agua u otros líquidos. Nunca sumerja en líquidos ninguna otra parte de
esta unidad. Si el cuerpo del motor cae en líquido, quítelo inmediatamente.
No ponga las manos en el líquido sin desenchufar primero la unidad.
3. Este electrodoméstico no debe ser utilizado por personas (incluidos niños)
con capacidades físicas, sensoriales o mentales reducidas, o con falta de
experiencia y conocimientos, a menos que una persona responsable de su
seguridad les haya brindado supervisión o instrucciones sobre el uso de los
electrodomésticos.
4. Es necesario supervisar a los niños cuando usen un aparato o si éste se usa
cerca de ellos.
5. Desenchufe el electrodoméstico del tomacorriente cuando no esté en uso y
antes de colocar accesorios o limpiarlo. Para desenchufarlo, tome el enchufe
y tire del tomacorriente. Nunca tire del cordón.
PRECAUCIÓN: EVITAR EL CONTACTO CON PIEZAS EN MOVIMIENTO.
6. No opere ningún artefacto si el cable está dañado o si no funciona
correctamente de alguna manera. Póngase en contacto con el servicio al
cliente para el examen, reparación o ajustes.
7. El uso de accesorios, incluidos los frascos de conservas, no recomendados
por el fabricante puede causar lesiones corporales.
8. No lo utilice en exteriores.
9. No use el aparato con nes para los que no fue diseñados.
10. No permita que el cable cuelgue del borde de la mesa o encimera.
11. No permita que el cable entre en contacto con las supercies calientes,
incluida la estufa.
GUARDE ESTAS INSTRUCCIONES
SOLO PARA EL USO DOMÉSTICO
14769 BELLA ImmersionBlender_IM_R4.indd 18 2020-01-22 10:38 AM

19
PRECAUCIÓN: NUNCA procese líquidos en ebullición. Deje enfriar primero y
tenga cuidado al licuar líquidos calientes. Llene un recipiente alto a no más
de la mitad y procese pequeñas cantidades a la vez para reducir el derrame y
evitar lesiones.
ADVERTENCIA: Para evitar daños en la cuchilla "S", no corte ni mueva
elementos duros como alimentos congelados, hielo, nueces, especias duras,
arroz, barras de chocolate o granos de café.
12. Mantenga las manos, el cabello, la ropa y los utensilios alejados de los
accesorios y las cuchillas en movimiento mientras licua los alimentos para
reducir el riesgo de lesiones graves a personas o daños a la licuadora de
inmersión. Se puede usar un raspador o una espátula, pero solo se debe usar
cuando la licuadora de mano no está funcionando.
PRECAUCIÓN: Las cuchillas son AFILADAS. Maneje con cuidado la cuchilla
mezcladora de acero inoxidable. No coloque los dedos desnudos dentro del
protector de la cuchilla.
PRECAUCIÓN: Siempre maneje el accesorio de cuchilla “S” por la barra de
la cuchilla al ensamblar, desmontar o limpiar.
13. Verique que no haya objetos extraños en el recipiente de picar antes de
usarlo.
14. Asegúrese de que la tapa del bol de picar rmemente asegurada en el
recipiente antes de operar la licuadora de mano.
15. Antes de lavar, retire la barra de acero inoxidable de 8 pulgadas, el soporte
para batidor y el batidor, la cuchilla "S" y la tapa del bol de picar.
Notas sobre el enchufe
Este aparato tiene un enchufe polarizado (una hoja es más ancha que la otra).
Para reducir el riesgo de descarga eléctrica, este enchufe encajará en una toma
de corriente polarizada sólo de una manera. Si el enchufe no entra
completamente en el tomacorriente, invierta el enchufe. Si el enchufe no puede
encajar en la toma eléctrica, póngase en contacto con un electricista calicado.
No modique el enchufe de ninguna manera.
Notas sobre el cable
A. Un cable corto de alimentación (o cable de alimentación desmontable) es
suministrado para reducir el riesgo de que se enreden o se tropiecen con un
cable más largo.
B. Cables de alimentación más largos y removibles o las alargadoras son
disponibles y se pueden utilizarlos si se ejerce cuidado.
C. Si un cable largo y removible o una alargadora sea usado:
1. La potencia eléctrica marcada del cordón o de la alargadora debe ser, por
lo menos, tan fuerte como la potencia eléctrica del aparato;
2. Si el aparato es del tipo con conexión a tierra, el cable o la alargadora debe
ser un enchufe de 3 hojas con conexión a tierra.
3. El cordón debe estar dispuesto de manera que no cuelga del borde de la
encimera o la mesa donde pueda ser tirado por niños o donde alguien se
tropiece involuntariamente con el cable.
Corriente eléctrica
Si el circuito eléctrico está sobrecargado con otros artefactos, es posible que el
electrodoméstico no funcione correctamente. El electrodoméstico debe funcionar
en un circuito eléctrico separado de otros aparatos.
14769 BELLA ImmersionBlender_IM_R4.indd 19 2020-01-22 10:38 AM

20
Conozca su licuadora de mano
El producto puede diferir levemente de las ilustraciones.
1. Cable extralargo. Le permite mezclar sopas y salsas directamente en la cacerola (no mostrado).
2. Dial de control de velocidad variable (1 – 5). Se usa cuando se necesitan velocidades más lentas para
mezclar, cortar en pedazos, picar, moler o batir.
3. Botón VARIABLE (
|
). Pulse y suelte rápidamente para PULSAR. Gire el dial de control para cambiar la
velocidad. Mantenga pulsado el botón para la acción continua. Cuando se suelta el botón, el mezclado
se detiene.
4. Botón ALTO (
||
). Pulse y suelte rápidamente para PULSAR. Mantenga pulsado para acción de alta
velocidad continua. Cuando se suelta el botón, el mezclado se detiene.
5. Motor con mango ergonómico. Fácil de agarrar.
6. Barra de acero inoxidable de 8 pulgadas para llegar al interior de los recipientes profundos.
7. Cuchilla de batir de acero inoxidable con protector de hoja. La carcasa de acero inoxidable cubre
parcialmente la cuchilla y mantiene las salpicaduras al mínimo.
8. Soporte para batidor. Se adapta fácilmente al cuerpo del motor.
9. Batidor. Se utiliza para batir crema y claras de huevo.
10. Tapa de bol de picar. Se ajusta y se bloquea fácilmente en el bol de picar.
11. Barra de cuchilla “S”. Maneje siempre la cuchilla “S” por su barra.
12. Cuchilla de picar/moler “S”. Picar, y moler con facilidad.
13. Bol de picar de 2 ½ tazas con imperdible central y patas antideslizante.
14. Vaso con boca de 3 ½ tazas/800 ml. Apta para microondas y lavavajillas. Se usa para mezclar bebidas,
batidos, aderezos para ensaladas y más. Diseñado con agarre fácil y para verter sin goteo.
Figura 1
Dial de control de
velocidad variable
Botón VARIABLE (|)
Botón ALTO (||)
Motor con
mango ergonómico
Barra de acero
inoxidable de
8 pulgadas
Cuchilla de batir de
acero inoxidable con
protector de hoja
Soporte para
batidor
Tapa de bol de picar
Barra de
cuchilla “S”
Bol de picar
de 2 ½ tazas
Vaso con boca de
3 ½ tazas/800 ml
Cuchilla de
picar/moler
“S”
Batidor
14769 BELLA ImmersionBlender_IM_R4.indd 20 2020-01-22 10:38 AM

21
Antes de usar por primera vez
1. Lea atentamente todas las instrucciones de uso.
2. Desempaque con cuidado la licuadora de mano y los accesorios. Saque todos los materiales de
embalaje y las etiquetas de las supercies exteriores.
PRECAUCIÓN: Las cuchillas son AFILADAS. Maneje con cuidado la cuchilla de mezclar de acero inoxidable.
No coloque los dedos desnudos dentro del protector de la cuchilla.
PRECAUCIÓN: Siempre maneje el accesorio de cuchilla "S" picar/moler por la barra al montar, retirar o
limpiar.
3. Limpie el cuerpo del motor de licuadora a mano con un trapo limpio y húmedo para eliminar la basura o
el polvo. Seque bien con un trapo suave y absorbente. Maneje con cuidado.
4. Lave la barra de acero inoxidable, la tapa del bol de picar, la cuchilla "S" picar/moler, el bol de picar,
el soporte para batidor y el batidor, y el vaso de precipitados a mano o en la rejilla superior de su
lavavajillas.
5. Seque bien antes de usar.
PRECAUCIÓN: Para protegerse contra una descarga eléctrica, NUNCA sumerja el cuerpo del motor de la
licuadora de mano ni permita que el cable entre en contacto con agua u otros líquidos.
Licuadora de mano
IMPORTANTE: Asegúrese siempre de que la barra de acero inoxidable esté seca, sin humedad en el punto
de conexión.
1. Coloque el cuerpo del motor y la barra de acero inoxidable de 8 pulgadas en un lugar de trabajo
nivelada y limpia.
2. Alinee el punto central (
•
) en el cuerpo del motor con el icono DESBLOQUEO (
) de la barra de acero
inoxidable de 8 pulgadas. (Véase gura 2).
3. Gire la barra en el sentido horario hasta que el icono de BLOQUEO (
) esté directamente debajo del
punto central y ambas piezas queden bloqueadas. (Véase gura 3.)
4. Enchufe el cable a un tomacorriente de pared de 120 VCA.
5. Para mezclar a velocidades más lentas, gire el dial de control de velocidad variable en la parte superior
del cuerpo del motor a la velocidad deseada (1 - 6).
IMPORTANTE: para evitar las salpicaduras y el mezclar excesivo, comience más lento y luego aumente la
velocidad según sea necesario.
6. Coloque los alimentos que quiere mezclar en el vaso o en cualquier recipiente alto para cocinar o
mezclar.
7. Introduzca la barra de mezclar profundamente en la parte inferior del recipiente. (Véase gura 4)
8. Pulse y suelte rápidamente cualquier botón de velocidad para la acción de PULSAR.
9. Mantenga pulsando el botón variable (
|
) para mezclar a velocidades más lentas. Aumente el ajuste de
velocidad girando el dial de velocidad variable. Cuando se suelta el botón, la mezcla se detiene.
Figura 2 Figura 3 Figura 4
14769 BELLA ImmersionBlender_IM_R4.indd 21 2020-01-22 10:38 AM

22
10. Para una velocidad rápida constante, mantenga pulsando el botón de ALTA velocidad (
||
). Mezcle los
ingredientes con una elevación suave y un movimiento más bajo
11. Cuando se suelta el botón, la licuadora de mano se apaga.
IMPORTANTE: si la comida se atasca alrededor de la cuchilla de mezclar o del protector de la cuchilla, suelte
el botón de velocidad y desenchufe la licuadora de mano. Gire para desbloquear y quitar la barra de acero
inoxidable del cuerpo del motor. Use un cepillo de cocina de mango largo para eliminar los residuos y
enjuague bien con agua corriente. Monte la unidad y sigue mezclando.
12. Cuando nalice el procesamiento y las cuchillas estén completamente detenidas, levante la licuadora para
extraerlo del vaso o del recipiente de mezclado.
ADVERTENCIA: Para evitar salpicaduras, asegúrese de que la cuchilla se haya detenido completamente.
13. Desenchufe del tomacorriente.
Licuadora de mano: Para mejores resultados.
• Para evitar mezclar excesivamente, suelte el botón de velocidad y verique periódicamente la
consistencia de los alimentos.
• NUNCA utilice líquidos en ebullición. Los alimentos deben estar un poco fríos antes de mezclar.
• El cable largo y la barra larga de 8 pulgadas le permiten licuar los ingredientes directamente en la
cacerola. Esto hace que la mezcla de sopas y salsas sea muy fácil. SIEMPRE quite la cacerola del fuego
antes de licuar.
• Pique los alimentos en tamaños uniformes para garantizar resultados uniformes al mismo tiempo que los
purés y la mezcla.
• Los líquidos que se agregan a las sopas y los purés deben estar calientes para asegurar una mezcla
uniforme.
• ADVERTENCIA: esta licuadora de mano no está diseñada para funcionar de forma continua durante más
de 1 minuto. Permita que el motor descanse durante 1 minuto antes de reanudar su función.
• Cuando mezcle mezclas secas, gruesas o pesadas, nunca mezcle durante más de 15 segundos. Deje de
mezclar los ingredientes y revuelva a mano antes de continuar.
• NO coloque la barra de acero inoxidable en el bol de picar para mezclar los ingredientes.
Batidor
IMPORTANTE: Asegúrese siempre de que el soporte para batidor esté seco y sin humedad en el punto de
conexión.
1. Coloque el cuerpo del motor, el soporte para batidor y el batidor en un área de trabajo nivelada y limpia.
Figura 5 Figura 6 Figura 7
14769 BELLA ImmersionBlender_IM_R4.indd 22 2020-01-22 10:38 AM

23
2. Coloque las dos alas en la barra del batidor en el soporte para batidor. (Véase la gura 5). Pulse
rmemente hasta que el batidor encaje en el soporte.
3. Alinee el punto central (
•
) en el cuerpo del motor con el icono DESBLOQUEO (
) del soporte para batidor.
(Véase gura 6)
4. Gire la barra en el sentido horario hasta que el icono de BLOQUEO (
) esté directamente debajo del punto
central () y ambas piezas queden unidas entre sí
5. Enchufe el cable de alimentación en un tomacorriente de pared de 120V CA.
6. Para batir a velocidades más lentas, gire el dial de control de velocidad variable en la parte superior del
cuerpo del motor a la velocidad deseada (1 - 6).
IMPORTANTE: para evitar las salpicaduras y el mezclar excesivo, comience más lento y luego aumente la
velocidad según sea necesario.
7. Coloque los alimentos para licuar en el vaso o en cualquier recipiente alto para cocinar o mezclar.
8. Introduzca el accesorio para batir de manera que raspe la supercie de los ingredientes. (Véase gura 7)
9. Pulse y suelte rápidamente cualquiera de los botones de velocidad para la acción de PULSAR.
10. Mantenga pulsando el botón variable (
|
) para mezclar a velocidades más lentas. Aumente el ajuste de
velocidad girando el dial de velocidad variable. Cuando se suelta el botón, la mezcla se detiene. Aumente
la conguración de velocidad según sea necesario.
11. Para una velocidad rápida constante, mantenga pulsando el botón de ALTA velocidad (
||
). Mezcle los
ingredientes con una elevación suave y un movimiento más bajo.
12. Cuando se suelta el botón, la licuadora de mano se apaga.
13. Cuando nalice el procesamiento y el batidor esté completamente detenido, levante la licuadora para
extraerlo del vaso o del recipiente de mezclado.
ADVERTENCIA: Para evitar salpicaduras, asegúrese de que la cuchilla se haya detenido completamente.
14. Desenchufe del tomacorriente.
Batir: Para mejores resultados.
• Use un recipiente sucientemente profundo y ancho con espacio para mover el batidor a través de
los ingredientes.
• Para mantener estable el bol de mezclar, colóquelo sobre un trapo húmedo durante el batido
• Para evitar dañar el batidor, no permita que el batidor golpee el fondo o los lados del bol para mezclar
mientras usa el batidor.
• Siempre use crema fresca enfriada y huevos frescos a temperatura ambiente para lograr un volumen
mayor y más uniforme al batir.
• Siempre use el accesorio para batir a la velocidad más alta cuando bate las claras de huevo y la crema
fría.
• Use un recipiente hondo con un fondo redondeado para batir la crema fría.
• Sostenga el accesorio para batir de manera que roza la supercie; Bate hasta que la crema comience a
espesar. Sumerja el batidor completamente en la crema.
• Para garantizar la mejor crema batida, enfríe el recipiente de vidrio o metal y el batidor.
• Para evitar que la crema batida se "rompa", agregue un estabilizador de crema batida, como la crema
Oetker
®
Whip It.™
• Use el batidor a velocidades más bajas para batir los huevos y obtener los huevos revueltos o las tortillas
esponjosas.
• No intente hacer merengues de clara de huevo en un día lluvioso o muy húmedo.
• Siempre asegúrese de que el batidor y el bol estén completamente limpios y libres de grasa antes de batir
las claras de huevo.
• Para ayudar a estabilizar las claras de huevo, agregue 1/8 cucharadita de crema de tártaro por clara de
huevo antes de batir. (Si usa un tazón de cobre, omita la salsa tártara.)
• Bate las claras de huevo hasta que se formen picos suaves; Luego agregue el azúcar muy lentamente.
No sobre-batir.
14769 BELLA ImmersionBlender_IM_R4.indd 23 2020-01-22 10:38 AM

24
Acesorio para picar
IMPORTANTE: Asegúrese siempre de que la tapa del recipiente bol de picar esté seca sin humedad en el
punto de conexión.
1. Coloque el bol de picar, la cuchilla "S" de picar/moler y la tapa del bol en un lugar de trabajo nivelada y
limpia.
2. Monte el centro de la cuchilla "S" en el pin central del bol de picar. (Véase gura 8).
3. Agregue los alimentos para picar en el bol.
4. Agregue la tapa del bol de picar al bol. Asegúrese de que el centro de la tapa encaje rmemente sobre
la barra de la hoja “S”. Los 2 pins en el lado de la tapa encajarán en cada una de las pistas laterales.
(Consulte la gura 9). Gire hacia la derecha para bloquear la tapa en su lugar.
5. Alinee el punto central (
•
) en el cuerpo del motor con el ícono DESBLOQUEO (
) en la tapa del recipiente
de la picadora. (Consulte la Figura 10). Gire el cuerpo del motor en el sentido horario hasta que el icono de
BLOQUEO (
) esté directamente debajo del punto central () y ambas piezas queden bloqueadas entre sí.
(Vease gura 11).
6. Enchufe el cable de alimentación en un tomacorriente de pared de 120V CA.
7. Para batir a velocidades más lentas, gire el dial de control de velocidad variable en la parte superior del
cuerpo del motor a la velocidad deseada (1 - 6).
IMPORTANTE: To avoid over-processing, press and quickly release either speed button for PULSE action.
8. Mantenga pulsando el botón variable (|) para mezclar a velocidades más lentas. Aumente el ajuste de
velocidad girando el dial de velocidad variable. Cuando se suelta el botón, la mezcla se detiene. Aumente
la conguración de velocidad según sea necesario.
9. Para una velocidad rápida constante, mantenga pulsando el botón de ALTA velocidad (||).
10. Cuando se suelta el botón, la licuadora de mano se apaga.
IMPORTANTE: Si los alimentos se alojan debajo o alrededor de la cuchilla, gire la tapa del bol de picar en
sentido antihorario para desbloquear. Sujete el asa del cuerpo del motor, levante el cuerpo del motor y la
tapa adjunta hacia arriba y hacia afuera del bol de picar. Use una espátula pequeña de mango largo para
aojar los ingredientes. Monte la unidad y siga picando.
11. Cuando se complete el procesamiento, desbloquee y quite la tapa del bol. Sujete el asa del cuerpo del
motor, levante el cuerpo del motor y la tapa adjunta hacia arriba y hacia afuera del bol de picar. Con
la tapa en una mano y el cuerpo del motor en la otra, gire el punto central () en el cuerpo del motor en
sentido antihorario hasta que se alinee con el icono DESBLOQUEO (
) y separe la tapa.
12. Desenchufe del tomacorriente.
Figura 11Figura 10Figura 9Figura 8
14769 BELLA ImmersionBlender_IM_R4.indd 24 2020-01-22 10:38 AM

25
Picar: Para mejores resultados
• Congele las carnes o el pescado un poco antes de picar para asegurar resultados picados
(no pulverizados).
• Para evitar daños en la cuchilla “S”, no corte ni mueva elementos duros como alimentos congelados,
hielo, nueces, especias duras, arroz, barras de chocolate o granos de café.
• Para evitar el procesamiento excesivo, suelte el botón de velocidad y verique la consistencia de los
alimentos periódicamente.
• Aunque las patas antideslizantes del bol estabilizan el bol durante el corte, se recomienda que, al picar,
sujete el mango del cuerpo del motor con una mano y sujete el bol con la otra.
• NUNCA procese líquidos hirvientes o alimentos muy calientes en el tazón de la picadora.
• Pique los alimentos en tamaños uniformes para garantizar resultados más rápidos y con una textura
uniforme.
• No haga funcionar la cuchilla durante más de 1 minuto. Permita que el motor descanse durante 1 minuto
entre cada uso.
Instrucciones de mantenimiento
Este aparato requiere poco mantenimiento. No contiene piezas que el usuario pueda reparar. Cualquier servicio
que requiera el desmontaje que no sea la limpieza debe ser realizada por un técnico calicado.
Instrucciones de cuidado y limpieza
PRECAUCIÓN: Nunca sumerja la base de alimentación, el enchufe o el cable en agua o cualquier otro líquido.
1. Siempre desenchufe la licuadora antes de limpiarla.
2. Licuadora de mano: : enjuague la barra de acero inoxidable de 8 pulgadas con agua corriente tibia
después de cada uso.
3. Si los alimentos se alojan alrededor de la cuchilla o el protector de la cuchilla, suelte el botón de velocidad
y desenchufe la licuadora. Gire para desbloquear y retirar la barra de acero inoxidable del cuerpo del
motor. Use un cepillo de cocina de mango largo para eliminar los residuos y enjuague bien con agua
corriente.
PRECAUCIÓN: ¡LA CUCHILLA ES AFILADA! No coloque los dedos desnudos cerca de la hoja.
4. Batidor: Enjuague el accesorio para batidor con agua corriente tibia después de cada uso.
5. Gire para desbloquear y retire el soporte del batidor. Sujete rmemente y tire para quitar el accesorio de
batidor. Enjuague el batidor con agua corriente.
6. Cuchilla: Desbloquee y retire la tapa del bol de picar; Levante con cuidado la cuchilla "S" por la barra hacia
arriba y sáquela del pin central. Limpie la cuchilla con un cepillo de cocina de mango largo.
7. Enjuague la cuchilla "S", el bol de picar y la tapa con agua corriente después de cada uso.
8. La barra de acero inoxidable de 8 pulgadas, el batidor, la tapa del bol de picar, la cuchilla "S", bol de picar
y el vaso son aptos para el lavaplatos en el estante superior.
9. Limpie el cuerpo del motor y el soporte del batidor con un paño húmedo o una esponja. Secar bien.
ADVERTENCIA: NO SUMERGIR EL CUERPO DEL MOTOR EN EL AGUA.
Instrucciones de almacenamiento
1. Desenchufe y limpie la licuadora de mano y todas las piezas y accesorios.
2. Ensamble el cuerpo de la licuara en la barra de acero inoxidable de 8 pulgadas. Fije el batidor en el
soporte para batidor. Ensamble el bol de picar, la cuchilla “S” y la tapa del bol de picar siguiendo los
procedimientos detallados anteriormente descritos en este manual de instrucciones.
3. Nunca almacene la licuadora mientras el cuerpo del motor esté enchufado.
4. Nunca enrolle el cable rmemente alrededor del aparato. Nunca coloque ningún esfuerzo sobre el cable,
especialmente cuando el cable entra en la base de alimentación, ya que esto podría hacer que el cable se
deshilache y se rompa.
5. Guarde la licuadora de inmersión y los accesorios en su caja original o en un lugar limpio y seco.
14769 BELLA ImmersionBlender_IM_R4.indd 25 2020-01-22 10:38 AM

26
Licuadora & Guía para licuar alimentos
ADVERTENCIA: Esta licuadora de mano está diseñada para funcionar de forma continua durante más de
1 minuto. Permita que el motor descanse durante 1 minuto antes de reanudar el trabajo. Cuando procese
mezclas secas, gruesas o pesadas, nunca mezcle durante más de 15 segundos. Deje de procesar los
ingredientes y mezcle a mano antes de continuar.
Congelar carnes ligeramente antes de picar o licuar para asegurar resultados picados, pero no demasiados.
ALIMENTOS ACCESORIOS VELOCIDAD TIEMPO
PARA LICUAR
ACCIÓN
Batidos, Batidos de frutas Cuchilla de licuar Máximo 30 segundos. Usar ingredientes fríos.
Cocteles, Frappés de frutas Cuchilla de licuar Media a Máximo 30 segundos. Usar ingredientes fríos.
Sopas, Salsas, Comidas
de bebé
Cuchilla de licuar Media a Máximo 30 segundos. –
1min.
Licuar hasta que todo esté suave
Vinagretas cremosas Cuchilla de licuar Media to Máximo 30 segundos. Licuar hasta que todo esté suave
Queso, 1/2 lb. Cuchilla de picar Máximo PULSAR Congelar ligeramente queso.
Picar en cubitos de 3/4 pulgadas
Zanahorias, 1/2 lb. Cuchilla de picar Máximo PULSAR Picar en cubitos de 3/4 pulgadas.
Cebollas, 1 oz. Cuchilla de picar Media PULSAR No sobre licuar.
Nueces, 5 oz. Cuchilla de picar Máximo PULSAR No sobre licuar.
Carne, Cerdo,
Camarones, 1/2 lb.
Cuchilla de picar Máximo PULSAR Congelar ingredientes
ligeramente. Picar en cubitos de
3/4 pulgadas.
Filetes de pescado, 1/2 lb. Cuchilla de picar Media a Máximo PULSAR Congelar pescado ligeramente.
Picar en cubitos de 1 pulgada.
Pollo, 1/2 lb., sin huesos,
sin piel
Cuchilla de picar Media a Máximo PULSAR Congelar pollo ligeramente. Picar
en cubitos de 3/4 pulgadas.
Crema, 1-1/2 cups Batidor Máximo 20 - 30
segundos.
Usar bol y batidor frescos.
No sobre licuar.
Claros de huevos Batidor Máximo 20 - 30
segundos.
Usar huevos a temperatura
ambiente. Usar bol y batidor
limpios.
Masa suaves Batidor Media 10 - 30 segundos. Tortas. Panqueques. Wafes
No sobre mezclar.
Mayonesa Batidor Bajo a Máximo 3 – 4 minutos Lloviznar aceite
MUY lentamente.
Huevos revueltos Batidor Bajo a Media 4 - 10 segundos. Batir hasta que esté espumoso
amarillo claro.
Tortillas (omelets) Batidor Bajo a Media 4 - 10 segundos. Batir hasta que esté espumoso
amarillo claro.
14769 BELLA ImmersionBlender_IM_R4.indd 26 2020-01-22 10:38 AM

27
Puré de bebé de aguacates y peras
Para 4 personas
• 1/4 taza leche de fórmula/ leche materna o
agua, y más para adelgazar
• 1 aguacate Haas maduro, cortado por la
mitad, sin hueso.
• 1 pera Bartlett madura, pelada y cortada por
la mitad.
• cereal para bebé, si es necesario para
espesar
1. Agregue 1/4 taza de leche o agua al vaso.
2. Saque la pulpa del aguacate. Pique en pedazos de 2 pulgadas y agregue al vaso.
3. Saque el tallo y la vaina de semillas de la pera pelada. Pique en pedazos de 2 pulgadas y
agregue al vaso.
4. Fije la barra de acero inoxidable de 8 pulgadas al cuerpo del motor. Coloque la licuadora en la
parte inferior central del vaso.
5. Pulse y suelte rápidamente el botón ALTA velocidad (||) para PULSAR varias veces para
comenzar.
6. Mantenga pulsando el botón de ALTA velocidad (||). Mezcle los ingredientes con una suave
elevación y un movimiento más bajo hasta que el aguacate y la pera estén puré. Si desea una
consistencia más na, agregue más fórmula / leche materna o agua. Para espesar, agregue
cereal de bebé.
7. Almacene en un recipiente hermético sin BPA por hasta 3 días.
Consejo: Congele el puré sobrante en moldes de cubitos de hielo. Vacíe los cubos en una bolsa de
congelación con cremallera y etiquételos para usarlos en el futuro. El puré de bebé de pera de
aguacate congelado es seguro de usar durante 3 meses. Simplemente descongele durante la
noche en el refrigerador para usar al día siguiente.
Dulce y picante, bondad cremosa en un bol. Guardamos las semillas y las asamos en nuestra
Freidora de aire para decorar y hacer un crujido satisfactorio.
Sopa de calabaza asada
Para 2 - 3 personas
• 2 cucharadas de aceite de oliva
• 2 cucharadas de sal sazonada
• 2 cucharadas de condimento italiano seco
• 2 tazas de calabaza, picada en 1 pulgada.
• 1 taza de zanahorias, (2 - 3) cortadas en
trozos
• 1 chile poblano
• 1/2 cucharadita de pimienta de Jamaica
• 1 taza de leche de almendras
• 1/2 taza de agua
• 2 cucharadas de jarabe de arce orgánico
• Semillas de calabaza asadas, para servir.
• Jarabe de arce, para servir
1. Asar verduras. Agregue calabaza, zanahorias y pimiento poblano a una bolsa grande con
cremallera. Añadir el aceite, la sal y el condimento italiano a la bolsa. Cierre la bolsa, mezcle y
masajee aceite sazonado en todas las verduras.
2. Vacíe los vegetales en una asadera grande. Asar a 400ºF por 20 minutos, girar las verduras.
Continúe asando por 15 a 20 minutos, o hasta que la calabaza y las zanahorias estén color café
caramelo y estén tiernas.
3. Preparar la sopa. Coloque las verduras asadas y los ingredientes restantes en una olla mediana
para sopa. Caliente a fuego medio alto hasta que esté caliente. Apague el fuego.
4. Fije la barra de acero inoxidable de 8 pulgadas al cuerpo del motor. Coloque la licuadora en el
centro inferior de la olla.
5. Pulse y suelte rápidamente el botón ALTA velocidad (||) para PULSAR varias veces para
comenzar.
Los aguacates y las peras maduras son los primeros alimentos ideales para los bebés. Nutritivos, dulces,
suaves ... llenados con grasas esenciales, vitaminas y nutrientes que necesitan los bebés en crecimiento.
¡Las peras suaves y cremosas, de aguacate y dulces son fáciles de digerir y toleradas naturalmente!
14769 BELLA ImmersionBlender_IM_R4.indd 27 2020-01-22 10:38 AM

28
Recetas
6. Mantenga pulsando el botón de ALTA velocidad (||). Mezcla los ingredientes con una levadura
suave y un movimiento más bajo hasta que la sopa se haga puré. Si se desea una consistencia
más na, agregue agua, 1/4 taza a la vez.
7. Sirva la sopa con semillas de calabaza asadas y saladas y un chorrito de jarabe de arce.
El asado suaviza y endulza el sabor del ajo. La base cremosa de mayonesa lo convierte en el condimento
perfecto para mojar verduras, papas asadas o fritas, alcachofas al vapor y camarones al vapor fríos. Frotis de
ajo asado Aioli sobre pan tostado para un sándwich de filete, cerdo o pollo. Utilice Aioli de ajo asado como
salsa para el salmón escalfado.
Aioli de ajo asado
• 1 cabeza entera de ajo asado.
• aceite de oliva virgen
• Sal kosher
• pimienta negra recién molida
• 1/2 cucharadita de sal marina
• 1/3 taza de mayonesa entera
(receta incluida)
• 2 cucharadas de jugo de limón
reciénexprimido
• 2 cucharadas de queso parmesano rallado
• 1/2 cucharadita de mostaza Dijon
• pimienta de cayena, pizca
• 1/2 cucharadita de salsa inglesa
• perejil fresco picado, para decorar
1. Asar ajo. Pique y deseche la parte superior de la cabeza de ajo para obtener los dientes de
ajo. Pele el exceso de pieles. Centre el ajo en un pedazo de papel de aluminio de 4 pulgadas
x 4 pulgadas. Rocíe los dientes ligeramente con aceite de oliva y sazone con sal y pimienta.
Envuelva el ajo en un paquete apretado. Asar a 380ºF durante 35 a 40 minutos. Retire del horno
y cuando esté lo sucientemente frío como para manejar, exprima el ajo asado de las pieles en
el vaso de precipitados.
2. Preparar Aioli. Añada los ingredientes restantes al vaso.
3. Fije la barra de acero inoxidable de 8 pulgadas al cuerpo del motor. Coloque la licuadora en la
parte inferior central del vaso. Mantenga pulsando el botón de ALTA velocidad (||) y mezcle los
ingredientes hasta que la mezcla se haya emulsionado y el alioli sea cremoso y suave.
Batidor
Merengue. Para mejores resultados.
• Saque los huevos del refrigerador al menos 30 minutos antes de batir.
• Los tazones de cobre, acero inoxidable o vidrio funcionan mejor para hacer merengues.
• Evite usar tazones de plástico para batir claras de huevo ya que el plástico puede absorber la
grasa y dicultar la formación de picos rígidos.
• Los utensilios DEBEN ESTAR inmaculadamente limpios, completamente libres de grasa y secos.
• Los merengues son muy sensibles y no les gusta la humedad. No intente hacer merengues de
clara de huevo en un día lluvioso o muy húmedo.
14769 BELLA ImmersionBlender_IM_R4.indd 28 2020-01-22 10:38 AM

29
Recetas
Merengue
• 3 claras de huevo (huevos frescos, de granja, orgánicos o pasteurizados)
• 3/4 taza de azucar de reposteria
1. Las claras de huevo deben estar a temperatura ambiente antes de batirlas.
2. Coloque las claras de huevo en un tazón grande y alto.
3. Bloquee el accesorio de batidor al cuerpo del motor. Establezca el control de velocidad
VARIABLE superior (|) en 3.
4. Coloque el batidor en el recipiente para que roza la supercie de las claras de huevo.
5. Mantenga pulsando el botón de velocidad VARIABLE (|). Levante lentamente la cuchilla hacia
arriba y alrededor. Botón de liberación.
6. Aumente la velocidad a ALTA. Mantenga pulsando el botón de ALTA velocidad (||) y mueva el
batidor a través de la espuma hasta que las claras de huevo formen picos suaves.
7. Para un volumen óptimo y una textura aterciopelada, agregue azúcar gradualmente. Asegúrese
de que el azúcar se disuelva antes de agregar más.
8. El merengue se hace cuando un remolino mantiene su forma.
Preparar el jarabe de cardamomo simple antes de tiempo. La nota floral del cardamomo y la canela cálida se
combinan con un aroma sutil a mandarina y una rica cremosidad de chocolate blanco. Esta receta hace una
crema glaseada perfecta para rellenar entre 2 de tus galletas favoritas
Sándwiches de chocolate blanco,
mandarinas y crema batida
Hace: 1-1/2 tazas
• 1 taza de crema espesa
• 2 cucharadas de mezcla de pudín de
chocolate blanco instantáneo (en polvo)
• 2 cucharaditas de jarabe de cardamomo*
• 1/2 cucharadita de canela
• 2 mandarinas, peladas
• 2 cucharadas de azúcar de repostería,
opcional
• Galletas para sándwiches: chocolate, chispas
de chocolate, azúcar, galletas de vainilla.
IMPORTANTE: Siempre enfríe un tazón grande o alto de vidrio (o metal) y el batidor antes de
preparar la crema batida..
1. Agregue la crema al recipiente de vidrio (o metal) alto y frío.
2. Bloquee el batidor refrigerado en el cuerpo del motor. Inserte el batidor en el recipiente para
que roza la supercie de la crema.
3. Mantenga pulsando el botón de ALTA velocidad (||). Levante la cuchilla hacia arriba y alrededor
ya través de la crema, hasta que se formen picos suaves.
4. Agregue lentamente los ingredientes restantes. Bata hasta que la crema batida alcance la
rigidez deseada.
ADVERTENCIA: ¡No batas demasiado o terminarás con mantequilla!
Aunque hacer mayonesa fresca en casa a veces puede ser difícil y laborioso, esta receta simplifica el proceso
utilizando huevos enteros y mostaza de Dijon para crear una emulsión perfecta. El uso de ambos aceites
agrega un sabor de cuerpo completo más rico. Mayonesa de huevo entero es el pallate perfecto para agregar
sus propios toques: hierbas frescas, pesto, condimento, aguacate.
14769 BELLA ImmersionBlender_IM_R4.indd 29 2020-01-22 10:38 AM

30
Recetas
Mayonesa de huevos enteros
Hace: 2-1/4 tazas
• 1/2 taza de aceite de oliva
• 2 huevos enteros, temperatura ambiente
(frescos, de granja, orgánicos o
pasteurizados)
• 2 cucharadas de jugo de limón recién
exprimido
• 1⁄2 cucharadita de mostaza Dijon
• 1-1 / 2 cucharaditas de sal
• 1/4 cucharadita de azúcar
• 1-1 / 2 tazas de aceite vegetal
• 2 cucharadas de agua caliente
1. Agregue todos los ingredientes excepto el aceite vegetal y el agua caliente a un tazón
grande y alto.
2. Bloquee el accesorio de batidor al cuerpo del motor.
3. Mantenga pulsando el botón de ALTA velocidad (||). Bata los ingredientes (excepto el aceite
y el agua caliente) hasta que estén bien combinados.
4. Añada el aceite vegetal unas gotas a la vez. No agregue más hasta que el aceite se haya
combinado bien. Lentamente comience a rociar el aceite (puede tardar hasta 1 minuto) hasta
que comience a formarse una mayonesa rica y cremosa. Vierta en el resto del aceite hasta que
esté suave y cremoso, y el aceite esté completamente emulsionado
IMPORTANTE: cuando la mayonesa se espese a su gusto, DEJE de agregar aceite.
5. Finalmente, bata en el agua caliente.
6. Refrigere hasta su uso.
Asegúrase de tener a mano esta rica y deliciosa variedad como base para los aderezos cremosos para
ensaladas. Agregue la ensalada de aguacate mayonesa al atún, los huevos duros, el pollo, el pavo, los tomates,
las verduras asadas o los frotis en sándwiches, envoltorios o pipa en los tacos.
Ensalada de aguacate y mayonesa
Hace: 1 taza
• 2 yemas de huevo grandes, a temperatura
ambiente (frescas, de campo, orgánicas o
pasteurizadas)
• 2 cucharaditas de jugo de limón recién
exprimido
• 1 cucharadita de mostaza Dijon
• 1 cucharadita de azúcar
• pizca de sal rosa del Himalaya
• 1 taza de aceite de oliva de aguacate
• 1/2 taza de pepinillos picados
• 1/4 taza de pimientos picados de Peppadew
• 1/2 taza de alcaparras picadas
1. Agregue todos los ingredientes excepto el aceite a un tazón grande y alto.
2. Bloquee el accesorio de batidor al cuerpo del motor.
3. Coloque el batidor en el centro inferior de la taza.
4. Mantenga pulsando el botón de ALTA velocidad (||). Bata os ingredientes (excepto el aceite)
hasta que estén bien combinados.
5. Agregue el aceite de aguacate un par de gotas a la vez. No agregue más hasta que el aceite se
haya combinado bien. Lentamente comience a rociar el aceite (puede tardar hasta 5 minutos)
hasta que comience a formarse una mayonesa rica y verdosa. La mayonesa debe ser suave y
cremosa; El aceite debe estar completamente emulsionado.
6. IMPORTANTE: cuando la mayonesa se espese a su gusto, DEJE de agregar aceite.
7. Cuando la mayonesa esté lista, doble los pepinillos los pimientos y las alcaparras en la
ensalada de aguacate y mayonesa. Almacene refrigerado en un recipiente hermético hasta por
3 días.
14769 BELLA ImmersionBlender_IM_R4.indd 30 2020-01-22 10:38 AM

31
Recetas
CHOPPER ATTACHMENT
Perfecto servido con hielo en un día caluroso... llenado con sabor crujido y frescura saludable. Un gran
acompañamiento de pescado o pollo a la parrilla. Esta receta puede ser duplicada o ajustada a su gusto. Si se
necesita un lote más grande, corte las verduras en lotes y combine en una jarra grande para servir.
Gazpacho
Hace 4 tazas
• 6 rábanos
• 1/4 cebolla roja pequeña
• 1 pepino mediano, pelado
• 3 pimientos rojos pequeños, sin semillas
• 1 jalapeño, sin semillas
• 3 tomates grandes
• 2 dientes de ajo asado
• 1/4 taza de aceite de oliva virgen
• Sal marina o na
• 2 cucharaditas de vinagre de vino tinto
•
• 1/2 taza de perejil fresco o cilantro
• 1 - 2 tazas de Bloody Mary Mix (puede
sustituir jugo de tomate o de verduras)
• 3 limas, cortadas, para servir.
• Aceite de oliva con infusión de albahaca, o
cualquier aceite de oliva de su elección.
• Picatostes de ajo para servir
• 1/2 cup coarsely chopped cilantro
• Salt to taste
1. Dependiendo de las porciones, enfríe de 4 a 6 tazones de sopa durante 1 hora antes de servir.
2. Agregue la mitad de los ingredientes al bol de picar. Coloque y cierre la tapa.
3. Bloquee el cuerpo del motor en la tapa del bol.
4. Pulse y suelte rápidamente el botón de ALTA velocidad (||) para PULSAR varias veces hasta que
los vegetales estén gruesos.
5. Mantenga pulsando el botón de ALTA velocidad (||) hasta que los ingredientes se tajen según la
consistencia que preera.
6. Agregue el Gazpacho a un recipiente de almacenamiento cubierto grande, mezcle bien.
7. Repita este procedimiento con los ingredientes restantes.
8. Agregue la segunda mitad del Gazpacho a un recipiente de almacenamiento cubierto grande,
mezcle bien. Pruebe y ajuste la sal y el vinagre si es necesario.
9. Enfríe la sopa durante al menos 1 hora antes de servir. Sirva la sopa en tazones refrigerados.
Rocíe con aceite de albahaca y cúbralo con sucientes picatostes de ajo.
Los tomatillos son bajos en grasa saturada, muy bajos en colesterol y sodio, una buena fuente de hierro,
magnesio, fósforo y cobre, y una muy buena fuente de fibra dietética, vitamina C, vitamina K, niacina, potasio
y manganeso. Naturalmente agrio y picante, el tomatillo se disfruta mejor chamuscado.
¡ADVERTENCIA! Esta salsa es picante. Siéntase libre de reducir los chiles o reemplácelos con pimientos
dulces, si lo desea.
Salsa de tomatillos asados
Hace 1-1/2 - 2 tazas
• 6 tomatillos, descascarillados y enjuagados,
asados.
• 1 - 2 chiles jalapeños o serranos, asados
• 1/3 taza de cebolla picada, remojada por 5
minutos en agua fría, escurrida
• 1/2 taza de cilantro picado
• Sal al gusto
1. Asar tomatillos y pimientos. Saque las cáscaras exteriores de los tomatillos y enjuague bien.
2. Coloque los tomatillos y los pimientos en una asadera grande. Tueste los tomatillos a 400ºF,
dándoles vuelta mientras se doran, durante 5 a 10 minutos hasta que se oscurezcan, pero no se
dividan para mantener los jugos intactos. Quite los tomatillos. Siga cocinando pimientos hasta
que estén tiernos.
3. Preparar la salsa. Agregue todos los ingredientes al recipiente picador. Coloque y cierre la tapa.
14769 BELLA ImmersionBlender_IM_R4.indd 31 2020-01-22 10:38 AM

32
Recetas
4. Bloquee el cuerpo del motor en la tapa del helicóptero.
5. Pulse y suelte rápidamente el botón ALTA velocidad (||) para PULSAR varias veces para
descomponer los tomatillos.
6. Mantenga presionado el botón de ALTA velocidad (||) hasta que los ingredientes se tajen a la
consistencia que preera
Las sabrosas alcachofas marinadas agregan fibra saludable y sabor de limón.Ginger Pear Salad Dressing
Hummus de Alcachofas
• 1 (12 oz.) frasco de corazones de alcachofa
marinados
• 1 lata (15 oz.) De garbanzos o garbanzos
• 1/4 taza de tahini
• 2 cucharadas de jugo de limón
• 1 cucharada de comino
• 1 cucharada de cúrcuma
• 1 cucharadita de sal kosher, más al gusto
• 1/2 taza de perejil fresco, para servir
• chips de pita
• Zanahorias frescas, apio, colior y brócoli,
recortadas y cortadas para mojar
1. Agregue las alcachofas y la marinada al plato picador. Enjuague los garbanzos y agregue los
ingredientes restantes al bol de picar. Coloque y cierre la tapa.
2. Bloquee el cuerpo del motor en la tapa del bol.
3. Pulse y suelte rápidamente el botón ALTA velocidad (||) para PULSAR varias veces hasta que las
alcachofas se descompongan.
4. Mantenga pulsando el botón de ALTA velocidad (||) hasta que los ingredientes se hagan puré
hasta obtener una consistencia suave y cremosa. Si el hummus es demasiado grueso, agregue
agua para adelgazar.
5. Espolvoree la parte superior del bol de Hummus de Alcachofas con perejil fresco picado. Servir
con chips de pita y verduras frescas para mojar.
Este aderezo grueso es fresco, espeso, cargado de sabor. La dulzura natural de la pera y las zanahorias suaviza
el picante jengibre y los pimientos cherry.
Vinagreta de jengibre y pera
Hace 2-1/2 a 3 tazas
• 1 (2-1 / 2-inch) pedazo de raíz de jengibre
fresco, pelado, cortado en trozos
• 2 zanahorias medianas, cortadas en trozos
• 1 pera, sin semillas, cortada en trozos
• 6 “picantes y dulces” pimientos, peppadews
• o cualquier pimiento al escabeche de su
elección
• 1/3 taza de jugo de naranja fresco, más al
gusto (puede sustituir a manzana o piña)
• 2 cucharadas de salsa de tomate
• 2/3 taza de apio picado
• 1 cucharada de salsa ponzu
• 3 cucharadas de vinagre de vino de arroz
• 2 cucharaditas de aceite de sésamo tostado
• 4 cucharadas de aceite de oliva virgen
• 1/3 taza de agua, opcional
1. Agregue el jengibre al bol de picar. Coloque y cierre la tapa.
2. Bloquee el cuerpo del motor en la tapa del bol.
3. Pulse y suelte rápidamente el botón ALTA velocidad (||) para PULSAR varias veces para
comenzar.
4. Mantenga pulsando el botón de ALTA velocidad (||) hasta que el jengibre esté completamente
picado.
5. Saque la tapa. Agregue los ingredientes restantes al bol de picar.
6. Mantenga pulsando el botón ALTA velocidad (||) hasta que la consistencia del aderezo para
ensaladas de pera de jengibre sea de su agrado.
7. Si se desea una consistencia más na, agregue agua para adelgazar.
14769 BELLA ImmersionBlender_IM_R4.indd 32 2020-01-22 10:38 AM

33
14769 BELLA ImmersionBlender_IM_R4.indd 33 2020-01-22 10:38 AM

34
Garantía limitada de DOS AÑOS
Mediante la presente, SENSIO Inc. garantiza que, durante el plazo de DOS AÑOS a
partir de la fecha de compra, este producto no presentará defectos mecánicos en el
material ni en la mano de obra, y durante 90 días, no los presentará en las piezas no
mecánicas. A su entera discreción, SENSIO Inc. reparará o reemplazará el producto
que resulte defectuoso, o emitirá un reembolso por el producto durante el plazo de
garantía.
Esta garantía es válida únicamente para el comprador minorista original a partir de la
fecha de compra minorista inicial y no es transferible. Conserve el recibo de compra
original, ya que se exige una prueba de compra para obtener la validación de la
garantía. Las tiendas minoristas no tienen derecho a alterar, modicar ni corregir de
ninguna manera los términos y condiciones de la garantía.
EXCLUSIONES:
La garantía no cubre el desgaste normal de las piezas ni el daño ocasionado por
cualquiera de las siguientes causas: uso negligente del producto, uso de un voltaje
o corriente incorrectos, mantenimiento de rutina inadecuado, uso contrario al de
las instrucciones de funcionamiento, desarmado, reparación o alteración a cargo de
personas que no sean miembros del personal calicado de SENSIO Inc. Asimismo, la
garantía no cubre actos de la naturaleza, como incendios, inundaciones, huracanes o
tornados.
SENSIO Inc. no asumirá responsabilidad por daños incidentales o resultantes
ocasionados por la violación de cualquier garantía expresa o implícita. Salvo en
la medida en que lo prohíban las leyes aplicables, cualquier garantía implícita de
comerciabilidad o aptitud para un propósito particular se limita temporalmente a la
duración de la garantía. Algunos estados, provincias o jurisdicciones no permiten la
exclusión ni la limitación de daños incidentales o resultantes, o limitaciones sobre
la duración de una garantía implícita y, por lo tanto, es posible que las exclusiones o
limitaciones mencionadas no le correspondan. La garantía cubre derechos legales
especícos que pueden variar de un estado, una provincia o una jurisdicción a otros.
CÓMO OBTENER EL SERVICIO DE GARANTÍA:
Debe comunicarse con el Servicio de atención al cliente a nuestro número telefónico
gratuito: 1-866-832-4843. Un representante del Servicio de atención al cliente
intentará resolver los problemas referidos a la garantía por teléfono. Si este no puede
resolver el problema, le proporcionarán un número de caso y le solicitarán que
devuelva el producto a SENSIO Inc. Adhiera una etiqueta al producto que incluya: su
nombre, dirección, número telefónico de contacto durante el día, número de caso y
descripción del problema. Además, incluya una copia del recibo de compra original.
Envuelva cuidadosamente el producto etiquetado con el recibo de compra, y envíelo
(con el envío y el seguro prepagados) a la dirección de SENSIO Inc. SENSIO Inc. no
asumirá obligación ni responsabilidad alguna por el producto devuelto que esté en el
trayecto hacia el Centro de servicio al cliente de SENSIO Inc.
14769 BELLA ImmersionBlender_IM_R4.indd 34 2020-01-22 10:38 AM

GRACIAS
Para su compra
BellaLifestyle
BellaLife
@
bellahousewares.com
inspírate
Registrarse
y rmar para arriba
para anuncios especiales y los
ingresos de la moda!
Cuéntanos lo que piensas!
Evaluar, revisar o hacernos una
pregunta.
!
35
14769 BELLA ImmersionBlender_IM_R4.indd 35 2020-01-22 10:38 AM

For customer service questions or comments
Dudas o comentarios contactar el departamento de servicio al cliente
1-866-832-4843 / [email protected]
Sensio Inc., New York, NY 10016/USA
All rights reserved.
Sensio Inc., New York, NY 10016/USA
Todos los derechos reservados.
14769_R4
14769 BELLA ImmersionBlender_IM_R4.indd 36 2020-01-22 10:38 AM
-
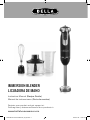 1
1
-
 2
2
-
 3
3
-
 4
4
-
 5
5
-
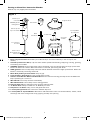 6
6
-
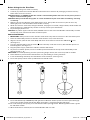 7
7
-
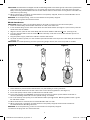 8
8
-
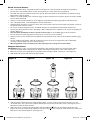 9
9
-
 10
10
-
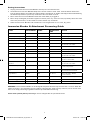 11
11
-
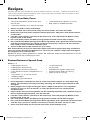 12
12
-
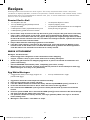 13
13
-
 14
14
-
 15
15
-
 16
16
-
 17
17
-
 18
18
-
 19
19
-
 20
20
-
 21
21
-
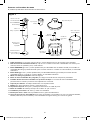 22
22
-
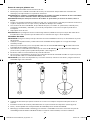 23
23
-
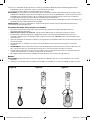 24
24
-
 25
25
-
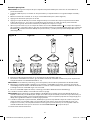 26
26
-
 27
27
-
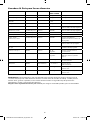 28
28
-
 29
29
-
 30
30
-
 31
31
-
 32
32
-
 33
33
-
 34
34
-
 35
35
-
 36
36
-
 37
37
-
 38
38


Bella Multi Use 10 Speed Immersion Blender, and Chrome El manual del propietario
- Categoría
- Pequeños electrodomésticos de cocina
- Tipo
- El manual del propietario
- Este manual también es adecuado para
en otros idiomas
Artículos relacionados
-
Bella Hand Immersion Blender El manual del propietario
-
-
-
-
-
Bella 12 Piece Rocket Blender And Chrome El manual del propietario
-
-
Bella Double Tier Egg Cooker El manual del propietario
-
-
Otros documentos
-
Continental Electric CE22841 Manual de usuario
-
-
Hamilton Beach 72950 Guía de inicio rápido
-
KitchenAid KHB2571SX Guía del usuario
-
-
Silvercrest 403995 El manual del propietario
-
KitchenAid 5KHB2571EER Guía del usuario
-
Black & Decker BDSB34-AR Manual de usuario
-
-
Black & Decker PS2000BD Guía del usuario