
PROLIGHT 844 P
User Manual/Manual de usuario
88 88
FLASH
STAND BY SOUND
BEAT FULL ON LATCH 5 LATCH 6 LATCH 7
LATCH 8
PROGRAM
SPEED
POWER
FLASH
Rev 2.0 April 2003
AUTHORIZED DISTRIBUTOR:
www.equipson.es

Contents
Features 1
2.4 1,2,3 Channel Chaser 10
General Instructions 2
1. Overview 3
2. Operation Guide 6
1.1 Front View 3
2.1 4 Channel Chaser 6
2.2 4 Channel Switchpack 8
2.1.1 Select Programs 6
2.1.2 Select Speed 6
2.1.3 Sound Mode 7
2.1.4 Beat Mode 7
2.1.5 Flash & Latch Effects 7
2.3 Stand By & Full On 9
1.2 Rear View 5
Improvement and changes to
specifications, design and this
manual, may be made at any time
without prior notice.
All rights reserved.
Technical Specifications 11
Especificaciones Tecnicas
Alimentación ................................................ AC 230V~50Hz, 16A max.
Salida de canal ............................................... 5A/CH., Total 16A max.
Entrada de Audio ......................................... Jack mono 1/4" , 0.1V-1Vpp
Fusible ..................................................... F6.3A 250V 5x20mm(Carga)
.F0.315A 250V 5x20mm(Control)
Dimensiones ................................................................ 482x157x89mm
Peso(aprox.) ............................................................................ 3.3 kg
22
PROLIGHT 844P
®

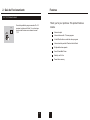
Features
Thank you for your purchase. This product features
include:
1
4 channel chaser with 17 chase programs
99 adjustable chase speeds
Stand by and Full on
Power failure memory
Sound Chase/Beat Chase
4 channel switch pack with Flash and Latch effects
4 Latch/Flash buttons override the chase programs
8 channel output
2. Guia de Funcionamiento
2.4 1,2,3 Chaser de canal
FLA SH 1
01
PRO GRAM
Cuando la pantalla de progrma muestra 01 o 02
presione los botones de Flash 1-4, eso hará que
que la unidad funcione como chaser de canal
1,2, 3.
21

General Instructions
2
Safe and Efficient Use
Product Care
To prevent fire or shock hazard, do not expose this product to
rain or moisture.
In the event of a malfunction(burning smell, etc.), immediately
stop operation, disconnect the power supply plug, and consult
authorized service personnel.
Replace the fuse with the same type.
Take care not to damage the power cord.
Do not make any inflammable liquids, water or metal objects
enter the unit.
This product must be earthed.
Do not dismantle or modify the unit.
Place this unit in a stable location.
Do not use the unit in places subject to excessive humidity,
vibration or bumps.
Unplug the power plug from the sockets when not using the
unit for extended period.
This product is intended for indoor use only.
Please read through this operating instructions before installing or using
your new product. After you have finished reading the instructions, put
them away in a safe place for future reference.
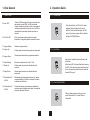
2. Guia de Funcionamiento
2.2 4 Switchpack de canal
LATC H 8
2.3 Stand By y Full On
STAN D BY
FULL ON
Si desea mantener encendido un canal del
5 al 8, presione la tecla Latch del canal que
desea encender a pesar del programa de chase.
Pulse la tecla Latch una segunda vez para
desbloquear lafunción Latch.
Presone la tecla Stand by, su LED parpadea
los canales 1-4 se apagan. Presione la tecla
otra vez, el LED se apaga y los canales
vuelven al modo normal.
Presione la tecla Full On , el LED se enciende
todos los canales pasan a encendio a pesar
del programa. Presioe la tecla otra vez, el
LED se apaga, todos los canales vuleven
al modo normal.
20

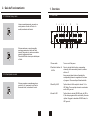
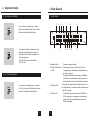
1. Overview
1.1 Front View
3
1. Power switch
2. Flash/Latch buttons 1-4
& LEDs
Turns on or off the power.
Press to activate flash function, corresponding
channel(s) will be momentarily turned on, release
will turn off.
Keep pressing these buttons will maintain the
corresponding channel on regardless of the chase
of programs. The second tap will deactivate latch.
3. Stand By & LED
Tap the button to kill the output of channel 1-4, its
LED blinks. The second tap returns to normal mode
and its LED goes out.
4. Sound & LED
Tap the button to activate SOUND mode, its LED is
lit, the chase programs will be controlled by the music
rhythms. Tap again to deactivate SOUND mode, its
LED goes out.
88 88
FLASH
STAND BY SOUND
BEAT FULL ON LATCH 5 LATCH 6 LATCH 7
LATCH 8
PROGRAM
SPEED
POWER
1 2
3
4
5
6
7
8 9
10
11 12
13
14
FLASH
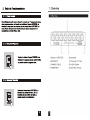
2. Guia de Funcionamiento
2.1.5 Efectos Flash y Latch
FLA SH 1
FLA SH 1
2.2 4 Switchpack de canal
FLA SH 5
I desea, momentáneamente, encender un
canal, presione el botón de Flash, si lo
suelta, desactivará esta función
Si desea mantener un canal encendido,
mantenga presionado el botón de Flash
durante 2 segundos, el canal se encederá a
pesar del programa de chase.
Pulse latecla Flash otravez para desbloquear
el Latch.
Si desea encender momentáneamente un
canal del 5 al 8, presione la tecla Flash, si
libera este botón, se deactiva la función.
19

1. Overview
1.1 Front View
4
5. Beat & LED
When Sound LED is lit, tap the button to activate
BEAT mode, its LED is lit. When a music beat is
picked up, the chase programs will execute one
step and the channel LEDs will go out.
When Sound LED is off, Beat mode is not available.
6. Full On & LED Tap the button to maintain all channels full on, its
LED is lit. The second tap deactivates this function
and its LED goes out.
7. Program Display Shows the current program.
8. Program Up Press to select the program by increasing the
program.
9. Program Down Press to select the program by decreasing the
program.
10. Speed Display Shows the current speed from 01-99.
11. Speed Up Press to select the chase speed by increasing the
speed.
12. Speed Down Press to select the chase speed by decreasing the
speed.
13. Flash buttons 5-8
& LEDs
Keep pressing these buttons to momentarily turn
the corresponding channel on, the corresponding
LED is lit, release will deactivate this function.
14. Latch buttons 5-8
& LEDs
Tap the buttons to maintain the corresponding
channel on regardless of the chase of programs,
the corresponding LED is lit. The second tap will
deactivate this function.
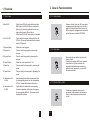
2. Guia de Funcionamiento
2.1.3 Modo Sonido
SOU ND
2.1.4 Modo Beat
BEAT
2.1.5 Efectos Flash y Latch
FLA SH 1
Presione el botón Sound, se LED se enciende
el programa será controlado por el ritmo de la
música. Presione el botón Sound otra vez, su
LED se apagará y el programa será controlado
por los botones de velocidad UP/DOWN.
Este modo sólo está ac6tivo cuando lo está
el modo Sound.
Cuando se encienda el LED Sound, presione
la tecla Beat, su LED se encenderá, los
programas sde ejecutará de acuerdo a los
golpes de audio, despues de lo cual el LED
de canal dará salida.
Cuando un programa de chase se está
ejecutando, puede presionar los botones de
Flash 1-4 para seleccioar los efectos Latch
o Flash.
18


7
2. Operation Guide
2.1.3 Sound Mode
SOU ND
Press Sound button, its LED is lit, the chase
programs will be controlled by the music
rhythms. Press Sound button again, its LED
goes out, the chase program will be controlled
by Speed UP/DOWN buttons.
2.1.4 Beat Mode
BEAT
Beat mode is available only when Sound mode
is activated.
When Sound LED is lit, press Beat button causing
its LED is lit, the chase programs will be executed
by one step according music beat, after while the
channel LEDs go out.
2.1.5 Flash & Latch Effects
FLA SH 1
When a chase program is running, you can
press Flash buttons 1-4 to select Flash or
Latch effect.
1. Vista General
1.1 Vista Frontal
5. Beat y LED
6. Full On & LED
7. Program Display
8. Program Up
9. Program Down
10. Speed Display
11. Speed Up
12. Speed Down
13. Flash buttons 5-8
& LEDs
14. Latch buttons 5-8
& LEDs
Cuando el LED de sonido se ilumina, pulse esta tecla
para activar el modo BEAT, su LED se enciende.
Cuando se produce un golpe de audio, los programas
de chase se ejecutarán un paso por vez y los LED se
encenderán.En ausencia de sonido este modo no
funciona.
Pulse la tecla para mantener todos los canales
encendidos. La segunda pulsación desactiva el modo
Muestra el programa actual
Presione para seleccionar el programa por incremento.
Presione para seleccionar el programa decreciente.
Muestra la velocidad actual entre 01 y 99.
Presione para seleccionar la velocidad de modo
decreciente.
Presione para seleccionar la velocidad de modo
creciente.
Manteniendo presionado estos botones, los canales
correspondientesy sus LEDs se encienden, soltando
se desactiva esta función.
Pulse estos botones para mantener encendidos los
canales a pesar del programa de chase. Una segunda
pulsación, desactiva la función.
15

8
2. Operation Guide
2.1.5 Flash & Latch Effects
FLA SH 1
If you want to momentarily turn on certain
channel, just press the Flash button, release
this button to deactivate this function.
FLA SH 1
If you want to maintain a channel on, keep
pressing the Flash button for 2 seconds,
the channel will be turned on regardless of
the chase programs.
Tap the Flash button a second time to
"unlock" Latch.
2.2 4 Channel Switchpack
FLA SH 5
If you want to momentarily turn on a channel
of CH.5-8, just press the Flash button, release
this button will deactivate this function.
1. Vista General
1.1 Vista Frontal
88 88
FLASH
STAND BY SOUND
BEAT FULL ON LATCH 5 LATCH 6 LATCH 7
LATCH 8
PROGRAM
SPEED
POWER
1 2
3
4
5
6
7
8 9
10
11 12
13
14
1.Interruptor de red
2. Botones Flash/Latch 1-4
y LEDs
Enciende o apaga la unidad.
Presione para activar la función flash, el canal
Correspondiente, se iluminará momentáneamente y
al soltar se apagará.
El mantener presionado estos botones, mantendrá
encendido el correspondiente canal a pesar de que
este encendido el chase. Otra pulsación lo desactiva
3. Stand By y LED
Pulse esta tecla para eliminar la salida de canales 1-4
Su LED parpadea. Otra pulsación lleva al estado normal.
y su LED se apaga.
4. Sonido y LED
Pulse este botón para activar el modo SOUND, su
LED se enciende y los programas se controlan por
audio. Pulse otra vez para desactivar este modo
El LED se apagará.
FLASH
14

9
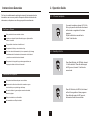
2. Operation Guide
2.2 4 Channel Switchpack
LATC H 8
If you want to maintain a channel of CH.5-8 to
full on, just press the Latch button the channel
will be turned on regardless of the chase
programs.
Tap the Latch button a second time to
"unlock" Latch function.
2.3 Stand By & Full On
STAN D BY
Press Stand By button, its LED blinks, channel
1-4 will be turned off. Press this button again,
its LED goes out, channel 1-4 will return to
normal mode.
FULL ON
Press Full On button, its LED is lit, all channel
will be full on regardless of chase programs.
Press this button again, its LED goes out,
all channel will return to normal mode.
Instrucciones Generales
Uso Seguro y Eficiente
Precauciones con el producto
Para prevenir el riesgo de fuego o descargas electricas, no
exponga la unidad a la lluvia o la humedad.
En el caso de mal funcionamiento ( olor a quemado, etc), detenga
Inmediatamente el funcionamiento, desconecte el cable de red
y consulte a un servicio tecnico autorizado.
Reemplace el fusible por otro del mismo tipo.
Tenga cuidado de no danar el cable de red.
Impida que cualquier líquido inflamable, agua u objeto metálico
entre en la unidad.
Este producto debe ser conectado a tierra.
No desmantele o modifique la unidad.
Coloque la unidad en un sitio estable.
No use la unidad en lugares sujetos a excesiva humedad,
vibración o golpes.
Desconecte el cable de red del enchufe cuando no vaya a
usar la unidad por un periodo largo de tiempo.
Este producto está disenado para usos en interior.
Por favor, lea cuidadosametne estas instrucciones de funcionamiento antes
de instalar o usar su nuevo producto. Despues de finalizar la lectura de las
instrucciones, colóquelas en un sitio seguro para futuras referencias.
13

10
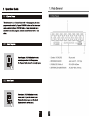
2. Operation Guide
2.4 1,2,3 Channel Chaser
FLA SH 1
01
PRO GRAM
When Program Display shows 01 or 02, press
Flash button 1-4 will take the corresponding
channel out of the chase program, that is, this
unit serves as 1,2,3 channel chaser.
Características
Gracias por su adquisición. Entre sus características
incluye:
Chaser de 4 canales con 17 programas.
99 velocidades de chase ajustables.
Stand by y Full on
Memoria ante fallos de alimentación.
Sound Chase/Beat Chase
4 canales switch pack con efectos Flash y Latch
4 Botones Latch/Flash que tienen preferencia sobre los programas.
8 canales de salida
12

Technical Specifications
Power Input ................................................ AC 230V~50Hz, 16A max.
Channel Output ............................................... 5A/CH., Total 16A max.
Audio Input ................................................. 1/4" mono jack, 0.1V-1Vpp
Fuse ..................................................... F6.3A 250V 5x20mm(Loading)
.F0.315A 250V 5x20mm(Control)
Dimensions ................................................................. 482x157x89mm
Weight(appro.) ............................................................................ 3.3 kg
11
Contenidos
Características 1
2.4 1,2,3 Canales Chaser 10
Instrucciones Generales 2
1. Vista General 3
2. Guía de Funcionamiento 6
1.1 Vista Frontal 3
2.1 4 Chaser de canal 6
2.2 4 Canales Switchpack 8
2.1.1 Seleción de Programas 6
2.1.2 Selección de Velocidad 6
2.1.3 Modo Audio 7
2.1.4 Modo Beat 7
2.1.5 Efectos Flash y Latch 7
2.3 Stand By y Full On 9
1.2 Vista Trasera 5
Todos los derechso reservados.
Especificaciones Tecnicas 11
Cambios y modificaciones en el
diseno de este manual, podrán
ser realizados sin previo aviso.
PROLIGHT 844P
®
-
 1
1
-
 2
2
-
 3
3
-
 4
4
-
 5
5
-
 6
6
-
 7
7
-
 8
8
-
 9
9
-
 10
10
-
 11
11
-
 12
12
-
 13
13


