
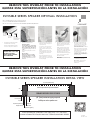
INVISIBLE SERIES SPEAKER INSTALLATION DETAIL VIEW
REMOVE THIS OVERLAY PRIOR TO INSTALLATION
QUITAR ESTA SUPERPOSICIÓN ANTES DE LA INSTALACIÓN
REMOVE THIS OVERLAY PRIOR TO INSTALLATION
QUITAR ESTA SUPERPOSICIÓN ANTES DE LA INSTALACIÓN
FOR TECHNICAL SUPPORT CALL (949) 492-7777 OR VISIT
WWW.SONANCE.COM/IN-WALL-IN-CEILING/INVISIBLE-SERIES
33-5759
Rev 04.12.17
16” (40.6cm) standard framing
Drywall
Stud
Fiberglass Mesh Tape
Joint Compound
Drywall Screw (wall board)
Drywall Screw (speaker)
Height Shim
Speaker Frame
SONANCE INVISIBLE SERIES SPEAKER
1/8” (3mm) maximum topping compound
buildup over active speaker area
Enclosure required for all open attic installations
INVISIBLE SERIES SPEAKER DRYWALL INSTALLATION
TALL SIDE
5/8” (16MM)
DRYWALL
SHORT SIDE
1/2” (12MM)
DRYWALL
1. Select the appropriate shim for the application.
Use cardboard shims for fine tuning.
Seleccione la cuña apropiada para la aplicación.
Use cuñas de carton para el acabado fino.
2. Secure speaker with drywall screws.
DO NOT USE NAILS.
TEST THE SPEAKER FOR 60 SECONDS WITH
A TEST TONE OR AMPLIFIED AUDIO SOURCE
BEFORE COVERING WITH COMPOUND! This
is the last point any wiring corrections can
be made.
Asegure la bocina para prueba con tornillos
para yeso.
NO USE CLAVOS.
PRUEBE LA BOCINA POR 60 SEGUNDOS
CON UN TONO DE PRUEBA O UN FUENTE
DE AUDIO AMPLIFICADO! Este es el ultimo
punto donde se pueden hacer correcciones
del cableado.
3. If needed, fill gap between speaker and
drywall with 5 minute setting type joint
compound (hot mud).
Si es necesario, rellene la ranura entre
la bocina y el yeso con compuesto de
juntar caliente de 5 minutos (compuesto
caliente).
Apply mesh fiberglass tape over seam
to add strength to the joint. Do not tape
over the raised portion of the speaker.
(diaphragm).
Aplique cinta de fibra de vidrio sobre la
grieta para añadir fuerza a la juntura. No
aplicar la cinta sobre la porción elevada de
la bocina (diafragma).
4. Apply topping compound over speaker(1/8”
[3mm] max. compound buildup), feather
edges to achieve a flat finish. Continue to
finish wall as required.
Aplique compuesto encima de la bocina
(1/8” [3mm] maxima acumulacion de
compuesto), talle las orillas ligeramente
para conseguir un acabado plano. Continue
de terminar la pared como se require.
See website for additional finishing options.
Visite el sitio de internet para optiones
adicionales de acabado.
WWW.SONANCE.COM/IN-WALL-IN-CEILING/
INVISIBLE-SERIES
Best Practice - A 60 Micron Sanding Film
is recommended for final sanding.
Mejor Práctica - Una hoja de lija 60
Micrones es recomendada para el
lijamiento final.
5. After final coat is applied and has dried,
use a manual pole sander or block sander
on entire wall (do not use a power sander).
Wall surface should show no signs of a
speaker. If any defect is found, coat affected
area and sand to smooth finish.
Despues de que la capa final sea aplicada
y haya secado,use un poste lijador manual
o bloque lijador en la pared entera ( no
use un lijador electrico).
La superficie de la pared no debe reflejar
señales de la bocina. Si cualquier defecto
es encontrado, cubra el area afectada y lije
para un terminado liso.
THIN SHIM
5/16” (8MM)
INTERNATIONAL
APPLICATIONS
NOTE: To install SONANCE Invisible Series Speakers for any finish other than drywall,
please visit our website: WWW.SONANCE.COM/IN-WALL-IN-CEILING/INVISIBLE-SERIES
NOTA: Visite el sitio de internet para opciones adicionales de acabado: WWW.SONANCE.COM/IN-WALL-IN-CEILING/INVISIBLE-SERIES
TEST THE SPEAKER FOR 60
SECONDS WITH A TEST TONE
OR AMPLIFIED AUDIO
SOURCE BEFORE COVERING
WITH COMPOUND!
-
 1
1

Sonance IS2 Quickstart Overlay
- Tipo
- Quickstart Overlay
en otros idiomas
- English: Sonance IS2
