
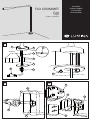
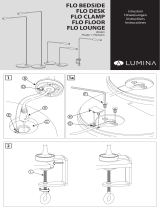
FLO GROMMET
F20
Istruzioni
Hinweisungen
Instructions
Instrucciònes
design
Foster + Partners
L
H
B
M
P
Q
N
O
CLICK
C
A
Ø20mm
D
E
F
G
I
B
I
1
2 2a

D
Leuchte aus Stahl und Aluminium, für Montage auf Schreibtische,
Regale usw. Der Arm der Nachttisch-, Tisch- und Stehversion
kann pro Richtung je um 90° und der Reektor um 155° gedreht
werden. Bestückt mit LED von 6W oder 3W.
Zweistufenschaltung am Reektor.
IsolierungsklasseIII
Das Gerät kann auf normal entzündbaren Flächen montiert wer-
den.
Das Gerät sendet schwache photobiologischen emissionge-
fahren unter normalen Einsatzbedingungen (Risikogruppe 1 nach
EN62471:2008.
Nur für Innenbereich geeignet.
Achtung: Wir empfehlen, die Montageanleitung genau zu befol-
gen und die Installierung vom Fachpersonal durchführen zu las-
sen.
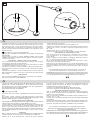
MONTAGE
Abb. 1: •Auf der Fläche ein Loch mit Ø 20 mm für die Montage der
Leuchte bohren.
•Den Stecker “B” nel foro “A” durchführen.
•Stift “C” nel foro “A” einführen.
•Jack “B” durch Scheibe “D” führen.
•Leuchte in die gewünschte Position bringen, dabei den Flansch
“E” drehen. Die Angabe “I” zeigt die Rotationsmitte des Armes
90°+90° an.
•Die Scheibe “D” auf Stift “C” positionieren.
•Mutter und Scheibe “F” auf Stift “C” positionieren, danach fest
anschrauben. •Schraube “G” anschrauben.
MONTAGE NETZGERÄT UND STECKER
Abb. 2: •Kupplung “B” in Punkt “H” einstecken. Achtung: Auskeh-
lung “L” muss mit Zacke “M” zusammenpassen, danach Kupplung
um 90° nach rechts drehen.
Abb. 2a: •Den für die Voltzahl passenden Stecker in Punkt “Q” ein-
stecken: “N” - “O ” - “P”.
Leuchte nicht im warmen Zustand reinigen. Nur Neutralprodukte
verwenden.
Leuchte mit Verkabelung Typ Y: Sollte das Kabel beschädigt sein,
muss dieses vom Hersteller oder dessen Kundendienst oder Fach-
personal ausgetauscht werden, um Gefahren zu vermeiden.
Die Sicherheit dieses Gerätes ist nur gewährleistet, wenn
diese Montageanleitung genau beachtet wird. Wir empfehlen
daher diese aufzubewahren.
GARANTIE Für dieses Gerät gelten die im Kauand herausgegebenen
Garantiebedingungen. Zur Inanspruchnahme von Garantieleistungen
ist in jedem Fall aber die Vorlage des Kaufbeleges erforderlich.
I
Lampada in alluminio e acciaio, montabile su piani come scrivanie,
mensole, ecc. Il braccio può ruotare sulla base di 90°+ 90°, la testa
può ruotare di 155° + 155°, la fonte luminosa è un LED da 6W o
3W, comandato da un interruttore che permette al primo aziona-
mento di avere la massima intensità luminosa, al secondo di avere
mezza intensità.
Esecuzione in classe di isolamento III
Apparecchio installabile direttamente su superci normalmente
inammabili.
L’apparecchio secondo la norma EN62471: 2008, nelle normali
condizioni di utilizzo è appartenente al gruppo di rischio 1 (basso).
Solo per uso interno.
Attenzione: si raccomanda di seguire attentamente le istruzioni e
far eseguire il montaggio da personale specializzato.
MONTAGGIO
g.1: •Fare un foro Ø20mm nel piano su cui montare la lampada.
•Far passare il jack “B” nel foro “A”.
•Inserire il perno “C” nel foro “A”.
•Far passare il jack “B” nel disco “D”.
•Disporre la lampada nella posizione desiderata facendo ruotare
la angia “E”, la tacca “I” indica il centro di rotazione del braccio:
90° + 90°.
•Posizionare il disco “D” sul perno “C”.
•Posizionare il dado e la ranella “F” sul perno “C” ed avvitare a fon-
do.
•Avvitare la vite “G”.
MONTAGGIO ALIMENTATORE E SPINA
g.2: •Inserire il jack “B” nella sede “H”, attenzione: far combacia-
re la scanalatura “L” con il dente “M” poi ruotare il jack in senso
orario di 90°.
g.2a: •Scegliere la spina adatta al voltaggio della rete elettrica:
“N” - “O” - “P” e inserirla a fondo nella sede “Q”.
Per la pulizia dell’apparrecchio non eettuare l’operazione a lam-
pada calda, usare solo prodotti neutri.
Apparecchio con cablaggio tipo Y: se il cavo di alimentazione risul-
tasse danneggiato, deve essere sostituito dal costruttore o dal suo
servizio di assistenza o da personale qualicato al ne di evitare
pericoli.
La sicurezza dell’apparecchio è garantita dalla osservanza di
queste istruzioni pertanto si raccomanda di conservarle.
GARANZIA Per questo apparecchio valgono le condizioni di garanzia
valide nella rispettiva nazione. La garanzia viene riconosciuta soltanto
se accompagnata dal documento giusticativo dell’acquisto.
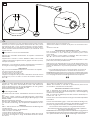
90° 90° 155° 155°
I
II
III OFF
3

GB
A light tting in aluminium and steel, to be mounted on surfaces
like desks, shelves, etc. with an arm pivoting on its base by 90°+90°.
Its head rotates by 155°+155°. Lighting source is an LED 6W or 3W,
which you can switch on with one click for full light intensity, with
two clicks for half light intensity.
Insulation class III
Fitting suitable for mounting on normally ammable surfaces.
During the normal use the device has a low photobiological risk
(Risk Group 1 according to EN62471:2008).
Only for interiors.
Warning: read and carefully follow this instruction: we recom-
mend that a specialized technician carries out this job.
MOUNTING
Pic.1: • Drill a Ø20mm hole where the lamp is to be placed..
•Pass the DC jack cable “B” through hole “A”.
•Insert base plate “C” in hole “A”.
•Insert the DC jack “B” in plate “D”.
•Place the lamp in the position you prefer by rotating base plate
“E”. The mark “I” indicates the rotating center of the arm : 90°+90°.
•Place plate “D” onto base plate “C”.
•Place nut and washer “F” on base plate “C” and tighten it.
•Tighten screw “G”.
HOW TO MOUNT THE PLUG FEEDER
Pic. 2: •Plug the jack “B” into its housing “H”, pay attention: groove
“L” must t with tooth “M”, then turn the jack clockwise by 90° ;
Pic. 2a: •Choose the appropriate plug for voltage of your electric
network: “N” - “O” - “P”, slide it into its housing “Q” until it clicks.
Clean the light tting after cooling down, and use neutral sub-
stances only.
Light tting with wiring type Y: if the feeding cable results
damaged, it must be replaced by the manufacturer, by an
authorized after sales service or by a qualied technician, in order
to avoid any danger.
Carefully read the instructions before assembling the light
tting which is guaranteed safe and reliable when it has been
correctly installed and properly used. We recommend to
conserve the instructions.
GUARANTEE This light tting is guaranteed under the conditions
in force in the Country of sale. For claims under guarantee, the sales
receipt must be shown.
F
Lampe en aluminium et acier, à installer sur tableaux, bureaux, éta-
gères etc. avec bras pivotant 90°+90° sur son socle. Tête orientable
de 155°+155°. Source à LED de 6W ou 3W, réglable par un inter-
rupteur (un déclic pour la pleine intensité de lumière; deux pour
la moitié).
Classe d’ isolation III
Appareil apte au montage sur les surfaces normalement inam-
mables.
L’appareil présente un rèduit risque photobiologique dans
des conditions normales d’utilisation (Risque Groupe 1 selon
EN62471:2008).
Emploi à l’intérieur exclusivement.
Attention: nous recommandons de suivre scrupuleusement les
instructions et de faire eectuer le montage que par des techni-
ciens qualiés. MONTAGE
Img.1: • Percez un trou de Ø20mm dans la surface où vous voulez
monter l’appareil.
•Laissez glisser la pièce “B” dans le trou “A”.
•Introduisez la pièce “C” dans le le trou “A”.
•Laissez glisser le jack “B” dans le tube “D”.
•Installez la lampe dans la position que vous préférez en tournant
le collier “E”. Le signe sur “I” indique le point de rotation du bras:
90° + 90°.
•Mettez le tube “D” sur la pièce “C”.
•Mettez l’écrou et la rondelle “F” sur la pièce “C” et serrez à fond.
•Serrez vis “G”.
MONTAGE DE LA FICHE D’ALIMENTATION
Img. 2: •Enlez le jack “B” dans son emplacement “H”, Attention:
la rainure “L” doit correspondre avec la dent “M”. Après cela, tour-
nez le jack en sens horaire de 90°.
Img. 2a: •Choisissez la che la plus appropriée pour le voltage de
votre réseau d’électricité : “N” - “O” - “P”, enlez-le dans son em-
placement “Q” à fonds.
Ne jamais nettoyer l’appareil allumé ou encore chaud. Utilisez des
produits neutres.
Appareil avec câblage de type Y: en cas où le câble d’alimentation
s’averait abîmé, celui-ci doit obligatoirement étre remplacé par le
fabriquant, par votre service d’assistance ou par des profession-
nels experts an d’éviter toute sorte de dangers.
La sécurité d’emploi de cette lampe est soumise à
l’observation de ces instructions et il est donc conseillé de les
conserver.
GARANTIE Les conditions de garantie sont celles en vigueur dans le
Pays dans lequel l’achat a été eectué. La garantie ne sera appliquée
que sur présentation de la facture d’achat.
E
Làmpara de alumínio y acero, para su montaje en la supercie de
escritorios, estantes, etc. con brazo giratorio de 90°+90° sobre su
píe. Cabeza orientable de 155°+155°. Fuente LED de 6W ó 3W, re-
gulable por un interruptor (un clic para el 100% de intensidad de
luz; dos para el 50%).
Ejecución en clase de aislamiento III
Aparato idóneo para el montaje sobre supercies normalmente
inamables.
El aparato persenta un riesgo fotobiològico reducido en condicio-
nes normales de uso (Grupo de riesgo 1 segùn EN62471:2008).
Aparato idóneo solo para interiores.
Atención: lea y siga cuidadosamente esta recomendación: reco-
mendamos que este trabajo lo realice un técnico espcializado.
INSTALACIÓN
Img.1: • hacer un agujero de Ø 20 mm en la placa donde se quiere
montar la lámpara.
•Deja pasar el enchufe “B” en el agujero “A”.
•Inserte el pivote “C” en el agujero “A”.
•Deje pasar el enchufe “B” en el disco “D”.
•Poner la lámpara en la posición que preera, haciendo girar la pie-
za “E”, la marca “I” es el centro de la rotación del brazo: 90°+90°.
•Poner la arandela “D” en el pivote “C”.
•Poner la tuerca y la arandela “F” en el pivote “C” y apretar a fon-
do.
•Apretar el tornillo “G”.
MONTAJE DE LA FICHA DE ALIMENTACIÓN
Img. 2: •Enlar el jack “B” en su emplazamiento “H”, cuidado: la
ranura “L” tiene que corresponder con el diente “M”. Luego, girar
el jack en el sentido de las agujas del reloj, de 90°.
Img. 2a: •Escoger la cha más apropiada par el voltaje de su red
eléctrica: “N” - “O” - “P”, enlarla en su emplazamiento “Q”.
Emplear productos neutros para limpiar el aparato hacer esta
operación con la lámpara fria.
Aparato con cableado de tipo Y: de ser este estropeado, tiene que
ser reemplazado por el fabricante, por un servicio de asistencia
autorizado o por un tecnico profesional, para evitar peligros.
La seguridad del aparato está garantizada con la observancia
de estas instrucciones, por lo tanto se recomienda
conservarlas.
GARANTIA Para este aparato, rigen las condiciones de garantía
vigentes en el País de venta. Para disfrutar de las condiciones de
garantía, es necesario presentar el recibo de compra.

AVVERTENZE PER LA SICUREZZA D’UTILIZZO
L’apparecchio di illuminazione che avete acquistato è costruito secondo le vigenti
normative di sicurezza europee ed è stato collaudato e certicato da un Istituto
qualicato.
L’utilizzo sicuro di apparecchi elettrici con parti ad elevata temperatura richiede,
oltre alla normale prudenza, l’osservanza delle seguenti istruzioni.
Leggere attentamente e conservare le istruzioni allegate all’apparecchio per
future necessità.
Si consiglia di far installare l’apparecchio da personale specializzato.
Non usare l’apparecchio per usi impropri non previsti dal normale utilizzo secondo la
tipologia per la quale è stato progettato.
Non montare lampadine (se presenti) di potenza superiore o diverso tipo da quelle
indicate nelle istruzioni di montaggio e sulle etichette apposte sull’apparecchio stesso.
Per sostituire la lampadina (se presente) o pulire l’apparecchio SI DEVE:
a) staccare la spina se l’apparecchio ne è munito o togliere
la tensione elettrica dell’impianto;
b) lasciare rareddare completamente la lampadina e l’apparecchio
prima di toccarlo con mani.
NON PULIRE MAI l’apparecchio acceso o ancora caldo.
NON UTILIZZARE liquidi inammabili per la pulizia.
Tenere presente che le parti in vetro, lampadina compresa, possono rompersi
costituendo frammenti taglienti, pertanto usare molta cautela nel maneggiarli.
Non installare apparecchi in zone ove possano facilmente essere urtati, in particolar
modo tenerli lontano dalla portata dei bambini.
Non montare l’apparecchio troppo vicino a materiali facilmente inammabili come
tende o altro e non coprire l’apparecchio impedendone il rareddamento.
Non consentire ai bambini di giocare con l’apparecchio.
Se il cavo di alimentazione risultasse (se presente) danneggiato o si vericassero altri
guasti o funzionamenti anomali, far riparare l’apparecchio da un punto vendita Lumina.
ANWEISUNGEN FÜR DEN SICHEREN GEBRAUCH
Das erworbene Beleuchtungsgerät ist gemäß den derzeit geltenden Europäischen
Sicherheitsnormen konstruirt worden und wurde von einem qualizierten Institut geprüft.
Der sicherer Gebrauch von elektrischen Geräten mit Teilen in erhöhter Temperatur,
verlangt neben der gewöhnlichen Vorsicht, die Beachtung der folgenden
Anweisungen:
Die dem Gerät beigefügte Gebrauchsanweisungen genau durchlesen und für
zukünftige Bedarfsfälle aufheben.
Es wird empfohlen, das Gerät durch qualiziertes Personal installieren zu lassen.
Das Gerät nicht für unangebrachte Zwecke nutzen, die nicht zum normalen Gebrauch
zählen, gemäß der Typologie für welche es geplant wurde.
Keine Leuchtmittel (falls vorhanden) mit höherer Stärke oder anderen Typs verwenden, als
in den Anweisungen und Beschriftungen auf dem Gerät selber angegeben.
Um das Leuchtmittel (falls vorhanden) auszuwechseln oder das Gerät zu reinigen muß
man:
a) Stecker ausziehen oder Spannung unterbrechne.
b) Das Leuchtmittel und das Gerät vollständig erkalten lassen, bevor es mit den Händen
berührt wird.
Nie das eingeschaltete oder warme Gerät reinigen.
Keine brennbaren Flüssigkeiten zum Reinigen benutzen.
Zur Kenntnis nehmen, daß die Glasteile, Leuchtmittel eingeschlossen, zerbrechen können
und dadurch scharfe Scherben entstehen können, deshalb sehr vorsichtig damit umgehen.
Nicht an Stellen installieren, wo sie leicht zu stoßen sind, vor allem in Reichweite von
Kindern fernhalten.
Das Gerät nicht zu nahe an leicht brennbaren Materialien wie Gardinen oder anderem
installieren und das Gerät nicht abdecken um die Abkühlung zu verhindern.
Kindern nicht zulassen, mit dem Gerät zu spielen.
Sollte das Leitungskabel (falls vorhanden) beschädigt sein oder andere Schäden
oder abweichendes Funktionieren eintreten, sollte das Gerät bei einem Lumina-
Stützpunkthändler repariert werden.
Notes

REMARKS FOR A SAFE USE
The light tting that you have purchased has been designed and built according to
European security norms in force and is certied by an appointed Institute.
The safe use of a light tting emboding high temperature components requires,
beyond the necessary attention, to carefully follow these instructions:
Read carefully and conserve the instructions for the correct use of the light tting.
We suggest to have the tting installed by a specialized technician.
Do not use the light tting for improper applications, that haven’t been foreseen in
the project.
Do not use bulbs (if any) of higher power than the one specied in the instructions and
on the labels sticked on the light tting.
When cleaning or changing the bulb (if any) of the light tting, remember to previously
unplug the same or switch o the main.
Let the light tting and the bulb cool down before touching it with the hands.
Moreover, we suggest to remember:
Never clean the light tting when hot or under tension.
Never use ammable products to clean the light tting.
The glass components - bulb included - can break and therefore are dangerous if
uncarefully handled.
Light ttings should be installed out of the reach of children and in such a position
where they cannot be hit by anything.
Do not install the light tting too close to ammable materials (curtains, etc.), nor cover
it, to prevent the normal cooling.
Do not allow children to play with the tting.
In case of troubles, misworking or damage to the cable (if any), contact your Lumina
dealer for checking and repairing.
NOTICES POUR LA SÉCURITÉ D’EMPLOI
L’appareil éclairant que vous avez acheté est construit suivant les normes de sécurité
en vigueur dans la Communauté Européenne, et il a été testé et certié par un institut
qualié
Au bout de l’utilisation plus sûre d’appareils éléctriques avec des pièces
composantes qui dégagent des temperatrues très élevées, il faut observer, outre
que la prudence normale, les instructions qui sont reportées ci-dessous:
Lisez et conservez (pour toute eventualité à l’avenir) très soigneusement les
instructions dont l’appareil est équippé.
Nous conseillons de faire installer l’appareil par des techniciens specialisés.
N’utilisez pas l’appareil pour des usages impropres c’est à dire qui ne sont pas prévus en
base à la typologie pour laquelle il a été projeté.
Ne montez pas d’ampoules (si présentes) de puissances supérieures ou de types
diérents par rapport à ce qui est indiqué dans les instructions de montage et sur les
étiquettes portées sur l’appareil même.
Pour remplacer l’ampoule (si présente) ou pour nettoyer l’appareil il faut:
a) debrancher la che si l’appareil en est muni ou enlever le courant
éléctrique du reseau;
b) laisser l’ampoule et l’appareil se refroidir complètement avant des les
toucher avec vos mains.
NE JAMAIS NETTOYER l’appareil allumé ou encore chaud.
NE JAMAIS UTILISER des liquides ammables pour le nettoyage.
N’oubliez pas que les parties en verre, y compris l’ampoule, peuvent se casser et originer
des morceaux tranchants: il faut donc faire beaucoup d’attention en les manipulant.
N’installez pas les appareils aux endroits où ils peuvent ètre heurtés, et surtout tenez-les
hors de portée des enfants.
Ne montez pas l’appareil trop rapproché à des matériaux facilement ammables,
comme les rideaux ou d’autres, et ne couvrez pas l’appareil ce qui en empecherait le
raroidissement.
Ne permettez pas aux enfants de jouer avec l’appareil.
Dans le cas où le câble d’alimentation (si présente) s’averait endommagé ou s’ils
s’averaient d’autres défauts ou d’anomalies de fonctionnement, faites eectuer la
réparation de l’appareil par un revendeur de Lumina.
ADVERTENCIA PARA SEGURIDAD DE UTILIZACIÓN
El aparato de iluminación que ha adquirido está costruido según la vigente normativa
de seguridad europea y ha sido probado y certicado por un conocido Instituto.
La utilización segura de aparatos eléctricos con partes de elevada temperatura
requiere, además de la prudencia normal, la observancia de las siguientes
instrucciones.
LEER Y CONSERVAR ATENTAMENTE las instrucciones adjuntas al aparato para
necesidades futuras.
Se aconseja hacer instalar el aparato por personal especializado.
No usar el aparato para usos improprios no previstos en la normal utilización según la
tipologia para la cual ha sido proyectado.
No montar bombillas de potencia superior (si presentes) o de distinto tipo a las
indicadas en las instrucciones de montaje y en las etiquetas pegadas sobre el mismo
aparato.
Para sustituir la bombilla (si presentes) o limpiar el aparato SE DEBE:
a) Quitar el enchufe de la toma eléctrica si el aparato va provisto o cortar la corriente
eléctrica de la instalación.
b) Dejar enfriar totalmente la bombilla y el aparato antes de tocarlo con las manos.
NO LIMPIAR NUNCA el aparato encendido o todavía caliente.
NO UTILIZAR líquidos inamables para la limpieza.
Tener presente que las partes de vidrio, bombilla incluida, pueden romperse
costituyendo fragmentos cortantes, por lo tanto ser muy prudentes en su manejo.
No instalar aparatos en zonas donde puedan ser facilmente golpeados en particular
mantenerlos alejados de los niños.
No montar el aparato demasiado cerca de material facilmente inamable como
cortinas o similares y no cubrirlo impidiendo su refrigeración.
No permitir a los niños de jugar con el aparato.
Si el cable de alimentación (si presentes) resultase dañado o sufriera cualquier otro
desperfecto o funcionamiento anormal, hacer reparar el aparato en un punto de venta
Lumina.
LUMINA ITALIA Srl
via Casorezzo, 63
20010 Arluno (MI)
Tel. +39 02 903752.1
Fax +39 02 90376655

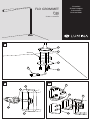
FLO GROMMET
F46
Istruzioni
Hinweisungen
Instructions
Instrucciònes
design
Foster + Partners
F
E
B
G
M
N
H
L
CLICK
B
C
A
D
Ø45mm I
1
2 2a

D
Leuchte aus Stahl und Aluminium, für Montage auf Schreibtische,
Regale usw. Der Arm der Nachttisch-, Tisch- und Stehversion kann
pro Richtung je um 90° und der Reektor um 155° gedreht wer-
den. Bestückt mit LED von 6W oder 3W.
Zweistufenschaltung am Reektor.
IsolierungsklasseIII
Das Gerät kann auf normal entzündbaren Flächen montiert wer-
den.
Das Gerät sendet schwache photobiologischen emissionge-
fahren unter normalen Einsatzbedingungen (Risikogruppe 1 nach
EN62471:2008. Nur für Innenbereich geeignet.
EMPFEHLUNG FÜR DIE MONTAGE
•Wir empfehlen, die Montageanleitung genau zu befolgen und die
Installierung vom Fachpersonal durchführen zu lassen.
•Leuchte kann mit den mitgelieferten Schrauben auf Flächen mit
Stärke zwischen 12 und 13 mm montiert werden. •Bei Flächen
unter 12 mm zwischen der unteren Fläche und Scheibe “C“ Ab-
stände mit passender Höhe berücksichtigen. •Bei Flächen über 13
mm Schrauben M4 mit passender Länge (= Fläche minus 2 mm)
verwenden.
MONTAGE
Abb. 1: •Auf der Fläche ein Loch mit Ø 45 mm für die Montage der
Leuchte bohren. •Stecker “B” durch Loch Ø 45 mm einführen.
•Buchse “A” in Loch positionieren. •Stecker “B” durch mittleres
Loch der Scheibe “C” führen. •Leuchte in die gewünschte Position
bringen, dabei den Flansch “A” drehen. Die Angabe “I” zeigt die
Rotationsmitte des Armes 90°+90° an.
•Scheibe “C” auf Befestigungsansch “B” positionieren.
•Die drei Schrauben “D” mit Abstandscheiben festziehen.
MONTAGE NETZGERÄT UND STECKER
Abb. 2: •Kupplung “B” in Punkt “E” einstecken. Achtung: Auskeh-
lung “F” muss mit Zacke “G” zusammenpassen, danach Kupplung
um 90° nach rechts drehen.
Abb. 2a: •Den für die Voltzahl passenden Stecker in Punkt “N” ein-
stecken: “H” - “L” - “M”.
Leuchte nicht im warmen Zustand reinigen. Nur Neutralprodukte
verwenden.
Leuchte mit Verkabelung Typ Y: Sollte das Kabel beschädigt sein,
muss dieses vom Hersteller oder dessen Kundendienst oder Fach-
personal ausgetauscht werden, um Gefahren zu vermeiden.
Die Sicherheit dieses Gerätes ist nur gewährleistet, wenn
diese Montageanleitung genau beachtet wird. Wir empfehlen
daher diese aufzubewahren.
GARANTIE Für dieses Gerät gelten die im Kauand herausgegebenen
Garantiebedingungen. Zur Inanspruchnahme von Garantieleistungen
ist in jedem Fall aber die Vorlage des Kaufbeleges erforderlich.
I
Lampada in alluminio e acciaio, montabile su piani come scrivanie,
mensole, ecc. Il braccio può ruotare sulla base di 90°+ 90°, la testa
può ruotare di 155° + 155°, la fonte luminosa è un LED da 6W o
3W, comandato da un interruttore che permette al primo aziona-
mento di avere la massima intensità luminosa, al secondo di avere
mezza intensità.
Esecuzione in classe di isolamento III
Apparecchio installabile direttamente su superci normalmente
inammabili.
L’apparecchio secondo la norma EN62471: 2008, nelle normali
condizioni di utilizzo è appartenente al gruppo di rischio 1 (basso).
Solo per uso interno
ATTENZIONI - CONSIGLI PER L’INSTALLAZIONE
•Si raccomanda di seguire attentamente le istruzioni e far eseguire
il montaggio da personale specializzato.
•La lampada può essere montata, con le viti in dotazione, su piani
con spessore compreso tra 12 e 13mm.
•Per spessori inferiori a 12mm l‘installatore deve provvedere ad in-
serire tra il piano inferiore ed il disco “C” dei distanziali di altezza
adeguata.
•Per spessori superiori a 13mm l‘installatore deve usare delle viti
M4 di lunghezza adeguata che si ha sottraendo allo spessore del
piano 2mm.
MONTAGGIO
g.1: •Fare un foro Ø45mm nel piano su cui montare la lampada.
•Far passare il jack “B” nel foro Ø45mm.
•Inserire la angia “A” nel foro.
•Far passare il jack “B” nel foro centrale del disco “C”.
•Disporre la lampada nella posizione desiderata facendo ruotare
la angia “A”, la tacca “I” indica il centro di rotazione del braccio:
90° + 90°.
•Posizionare il disco “C” sotto la angia “A”.
•Avvitare a fondo le tre viti “D” con le relative ranelle dentellate.
MONTAGGIO ALIMENTATORE E SPINA
g.2: •Inserire il jack “B” nella sede “E”, attenzione: far combacia-
re la scanalatura “F” con il dente “G” poi ruotare il jack in senso
orario di 90°.
g.2a: •Scegliere la spina adatta al voltaggio della rete elettrica:
“H” - “ L” - “M” e inserirla a fondo nella sede “N”.
Per la pulizia dell’apparrecchio non eettuare l’operazione a lam-
pada calda, usare solo prodotti neutri.
Apparecchio con cablaggio tipo Y: se il cavo di alimentazione risul-
tasse danneggiato, deve essere sostituito dal costruttore o dal suo
servizio di assistenza o da personale qualicato al ne di evitare
pericoli.
La sicurezza dell’apparecchio è garantita dalla osservanza di
queste istruzioni pertanto si raccomanda di conservarle.
GARANZIA Per questo apparecchio valgono le condizioni di garanzia
valide nella rispettiva nazione. La garanzia viene riconosciuta soltanto
se accompagnata dal documento giusticativo dell’acquisto.
90° 90° 155° 155°
I
II
III OFF
3

GB
A light tting in aluminium and steel, to be mounted on surfaces
like desks, shelves, with an arm pivoting on its base by 90°+90°. Its
head rotates by 155°+155°. Lighting source is an LED 6W or 3W,
which you can switch on with one click for full light intensity, with
two clicks for half light intensity.
Insulation class III
Fitting suitable for mounting on normally ammable surfaces.
During the normal use the device has a low photobiological risk
(Risk Group 1 according to EN62471:2008). Only for interiors.
MOUNTING SUGGESTIONS
•Read and carefully follow this instruction: we recommend that a
specialized technician carries out this job.
•The lamp can be mounted with included screws, on surfaces 12-
13mm thick.
•For surfaces thinner than 12mm, please use suitable spacers
between the lower surface and “C” plate.
•For surfaces thicker than 13mm, please use longer M4 screws, ac-
cording to the requirement.
MOUNTING
Pic.1: • Drill a Ø45mm hole where the lamp is to be placed.
•Insert the DC jack “B” and the wire in the Ø45mm hole.
•Place ange “A” in the hole.
•Insert the DC jack in the central hole of plate “C”.
•Place the lamp in the position you prefer by rotating base plate
“A”. The mark “I” indicates the rotating center of the arm : 90°+90°.
•Place plate “C” under ange “A”.
•Tighten the three screws “D” with the related jagged washers.
HOW TO MOUNT THE PLUG FEEDER
Pic. 2: •Plug the jack “B” into its housing “E”, pay attention: groove
“F” must t with tooth “G”, then turn the jack clockwise by 90°.
Pic. 2a: •Choose the appropriate plug for voltage of your electric
network: “H” - “L” - “M”, slide it into its housing “N” until it clicks.
Clean the light tting after cooling down, and use neutral sub-
stances only.
Light tting with wiring type Y: if the feeding cable results damaged,
it must be replaced by the manufacturer, by an authorized after
sales service or by a qualied technician, in order to avoid any
danger.
Carefully read the instructions before assembling the light
tting which is guaranteed safe and reliable when it has been
correctly installed and properly used. We recommend to
conserve the instructions.
GUARANTEE This light tting is guaranteed under the conditions
in force in the Country of sale. For claims under guarantee, the sales
receipt must be shown.
F
Lampe en aluminium et acier, tableaux, bureaux, étagères etc. avec
bras pivotant 90°+90° sur son socle. Tête orientable de 155°+155°.
Source à LED de 6W ou 3W, réglable par un interrupteur (un déclic
pour la pleine intensité de lumière; deux pour la moitié).
Classe d’ isolation III
Appareil apte au montage sur les surfaces normalement inam-
mables.
L’appareil présente un rèduit risque photobiologique dans
des conditions normales d’utilisation (Risque Groupe 1 selon
EN62471:2008). Emploi à l’intérieur exclusivement.
CONSEILLES DE MONTAGE
•On peut monter la lampe avec les vis en dotation sur des surfaces
d’épaisseur compris entre 12 et 13mm.
•Pour surfaces inferieures à 12mm, on vous conseille l’emploi des
épaisseurs entre la surface inferieure et la rondelle “C”.
•Pour surfaces supérieures à 13mm, on vous conseille l’emploi des
vis M4 plus longues, selon le besoin.
MONTAGE
Img.1: • Percez un trou de Ø 45 mm dans la surface où vous vou-
lez monter l’appareil. •Laissez glisser la pièce “B” et le câble élec-
trique à travers le trou de Ø45mm.
•Introduisez le collet “A” dans le trou.
•Laissez glisser la pièce “B” à travers le trou central de la rondelle
“C”.
•Installez la lampe dans la position que vous préférez en tournant
le collier “A”. Le signe sur “I” indique le point de rotation du bras:
90° + 90°.
•Mettez la rondelle “C” sous le collet “A”.
•Serrez le trois vis “D” à fond ses rondelles dentelées.
MONTAGE DE LA FICHE D’ALIMENTATION
Img. 2: •Enlez le jack “B” dans son emplacement “E”, Attention:
la rainure “F” doit correspondre avec la dent “G”. Après cela, tour-
nez le jack en sens horaire de 90°.
Img. 2a: •Choisissez la che la plus appropriée pour le voltage de
votre réseau d’électricité : “H” - “L” - “M”, enlez-le dans son em-
placement “N” à fonds.
Ne jamais nettoyer l’appareil allumé ou encore chaud. Utilisez des
produits neutres.
Appareil avec câblage de type Y: en cas où le câble d’alimentation
s’averait abîmé, celui-ci doit obligatoirement étre remplacé par le
fabriquant, par votre service d’assistance ou par des profession-
nels experts an d’éviter toute sorte de dangers.
La sécurité d’emploi de cette lampe est soumise à
l’observation de ces instructions et il est donc conseillé de les
conserver.
GARANTIE Les conditions de garantie sont celles en vigueur dans le
Pays dans lequel l’achat a été eectué. La garantie ne sera appliquée
que sur présentation de la facture d’achat.
E
Làmpara de alumínio y acero, para su montaje en la supercie de
escritorios, estantes, etc con brazo giratorio de 90°+90° sobre su
píe. Cabeza orientable de 155°+155°. Fuente LED de 6W ó 3W, re-
gulable por un interruptor (un clic para el 100% de intensidad de
luz; dos para el 50%).
Ejecución en clase de aislamiento III
Aparato idóneo para el montaje sobre supercies normalmente
inamables. El aparato persenta un riesgo fotobiològico reducido
en condiciones normales de uso (Grupo de riesgo 1 segùn
EN62471:2008). Aparato idóneo solo para interiores.
CONSEJOS PARA SU INSTALACIÓN
•Lea y siga cuidadosamente esta recomendación: recomendamos
que este trabajo lo realice un técnico espcializado.
•La lámpara se puede montar con tornillos, en supercies con un
espesor entre 12 y 13 mm. •Para espesores inferiores a 12 mm, el
instalador debe prever para insertar entre la planta baja y el disco
“C” de los separadores de altura adecuada.
•Para espesores superiores a 13 mm, el instalador debe utilizar tor-
nillos M4 de longitud adecuada.
INSTALACIÓN
img.1: •hacer un agujero de Ø 45 mm en la placa donde se quiere
montar la lámpara. •Deja pasar el enchufe “B” y su hilo eléctrico a
travès el agujero de Ø 45 mm. •Inserte la arandela “A“ en el agu-
jero.
•Deja pasar el enchufe “B” en el agujero central del disco “C”.
•Poner la lámpara en la posición que preera, haciendo girar la pie-
za “A”, la marca “I” es el centro de la rotación del brazo: 90°+90°.
•Poner el disco “C” bajo la arandela “A”.
•Cerrar los tres tornillos “D” a fondo con sus arandelas dentelladas.
MONTAJE DE LA FICHA DE ALIMENTACIÓN
img. 2: •Enlar el jack “B” en su emplazamiento “E”, Cuidado: la
ranura “F” tiene que corresponder con el diente “G”. Luego, girar
el jack en el sentido de las agujas del reloj, de 90°.
img. 2a: •Escoger la cha más apropiada par el voltaje de su red
eléctrica: “H” - “L” - “M”, enlarla en su emplazamiento “N”.
Emplear productos neutros para limpiar el aparato hacer esta
operación con la lámpara fria
Aparato con cableado de tipo Y: de ser este estropeado, tiene que
ser reemplazado por el fabricante, por un servicio de asistencia
autorizado o por un tecnico profesional, para evitar peligros.
La seguridad del aparato está garantizada con la observancia
de estas instrucciones, por lo tanto se recomienda
conservarlas.
GARANTIA Para este aparato, rigen las condiciones de garantía
vigentes en el País de venta. Para disfrutar de las condiciones de
garantía, es necesario presentar el recibo de compra.

AVVERTENZE PER LA SICUREZZA D’UTILIZZO
L’apparecchio di illuminazione che avete acquistato è costruito secondo le vigenti
normative di sicurezza europee ed è stato collaudato e certicato da un Istituto
qualicato.
L’utilizzo sicuro di apparecchi elettrici con parti ad elevata temperatura richiede,
oltre alla normale prudenza, l’osservanza delle seguenti istruzioni.
Leggere attentamente e conservare le istruzioni allegate all’apparecchio per
future necessità.
Si consiglia di far installare l’apparecchio da personale specializzato.
Non usare l’apparecchio per usi impropri non previsti dal normale utilizzo secondo la
tipologia per la quale è stato progettato.
Non montare lampadine (se presenti) di potenza superiore o diverso tipo da quelle
indicate nelle istruzioni di montaggio e sulle etichette apposte sull’apparecchio stesso.
Per sostituire la lampadina (se presente) o pulire l’apparecchio SI DEVE:
a) staccare la spina se l’apparecchio ne è munito o togliere
la tensione elettrica dell’impianto;
b) lasciare rareddare completamente la lampadina e l’apparecchio
prima di toccarlo con mani.
NON PULIRE MAI l’apparecchio acceso o ancora caldo.
NON UTILIZZARE liquidi inammabili per la pulizia.
Tenere presente che le parti in vetro, lampadina compresa, possono rompersi
costituendo frammenti taglienti, pertanto usare molta cautela nel maneggiarli.
Non installare apparecchi in zone ove possano facilmente essere urtati, in particolar
modo tenerli lontano dalla portata dei bambini.
Non montare l’apparecchio troppo vicino a materiali facilmente inammabili come
tende o altro e non coprire l’apparecchio impedendone il rareddamento.
Non consentire ai bambini di giocare con l’apparecchio.
Se il cavo di alimentazione risultasse (se presente) danneggiato o si vericassero altri
guasti o funzionamenti anomali, far riparare l’apparecchio da un punto vendita Lumina.
ANWEISUNGEN FÜR DEN SICHEREN GEBRAUCH
Das erworbene Beleuchtungsgerät ist gemäß den derzeit geltenden Europäischen
Sicherheitsnormen konstruirt worden und wurde von einem qualizierten Institut geprüft.
Der sicherer Gebrauch von elektrischen Geräten mit Teilen in erhöhter Temperatur,
verlangt neben der gewöhnlichen Vorsicht, die Beachtung der folgenden
Anweisungen:
Die dem Gerät beigefügte Gebrauchsanweisungen genau durchlesen und für
zukünftige Bedarfsfälle aufheben.
Es wird empfohlen, das Gerät durch qualiziertes Personal installieren zu lassen.
Das Gerät nicht für unangebrachte Zwecke nutzen, die nicht zum normalen Gebrauch
zählen, gemäß der Typologie für welche es geplant wurde.
Keine Leuchtmittel (falls vorhanden) mit höherer Stärke oder anderen Typs verwenden, als
in den Anweisungen und Beschriftungen auf dem Gerät selber angegeben.
Um das Leuchtmittel (falls vorhanden) auszuwechseln oder das Gerät zu reinigen muß
man:
a) Stecker ausziehen oder Spannung unterbrechne.
b) Das Leuchtmittel und das Gerät vollständig erkalten lassen, bevor es mit den Händen
berührt wird.
Nie das eingeschaltete oder warme Gerät reinigen.
Keine brennbaren Flüssigkeiten zum Reinigen benutzen.
Zur Kenntnis nehmen, daß die Glasteile, Leuchtmittel eingeschlossen, zerbrechen können
und dadurch scharfe Scherben entstehen können, deshalb sehr vorsichtig damit umgehen.
Nicht an Stellen installieren, wo sie leicht zu stoßen sind, vor allem in Reichweite von
Kindern fernhalten.
Das Gerät nicht zu nahe an leicht brennbaren Materialien wie Gardinen oder anderem
installieren und das Gerät nicht abdecken um die Abkühlung zu verhindern.
Kindern nicht zulassen, mit dem Gerät zu spielen.
Sollte das Leitungskabel (falls vorhanden) beschädigt sein oder andere Schäden
oder abweichendes Funktionieren eintreten, sollte das Gerät bei einem Lumina-
Stützpunkthändler repariert werden.
Notes

REMARKS FOR A SAFE USE
The light tting that you have purchased has been designed and built according to
European security norms in force and is certied by an appointed Institute.
The safe use of a light tting emboding high temperature components requires,
beyond the necessary attention, to carefully follow these instructions:
Read carefully and conserve the instructions for the correct use of the light tting.
We suggest to have the tting installed by a specialized technician.
Do not use the light tting for improper applications, that haven’t been foreseen in
the project.
Do not use bulbs (if any) of higher power than the one specied in the instructions and
on the labels sticked on the light tting.
When cleaning or changing the bulb (if any) of the light tting, remember to previously
unplug the same or switch o the main.
Let the light tting and the bulb cool down before touching it with the hands.
Moreover, we suggest to remember:
Never clean the light tting when hot or under tension.
Never use ammable products to clean the light tting.
The glass components - bulb included - can break and therefore are dangerous if
uncarefully handled.
Light ttings should be installed out of the reach of children and in such a position
where they cannot be hit by anything.
Do not install the light tting too close to ammable materials (curtains, etc.), nor cover
it, to prevent the normal cooling.
Do not allow children to play with the tting.
In case of troubles, misworking or damage to the cable (if any), contact your Lumina
dealer for checking and repairing.
NOTICES POUR LA SÉCURITÉ D’EMPLOI
L’appareil éclairant que vous avez acheté est construit suivant les normes de sécurité
en vigueur dans la Communauté Européenne, et il a été testé et certié par un institut
qualié
Au bout de l’utilisation plus sûre d’appareils éléctriques avec des pièces
composantes qui dégagent des temperatrues très élevées, il faut observer, outre
que la prudence normale, les instructions qui sont reportées ci-dessous:
Lisez et conservez (pour toute eventualité à l’avenir) très soigneusement les
instructions dont l’appareil est équippé.
Nous conseillons de faire installer l’appareil par des techniciens specialisés.
N’utilisez pas l’appareil pour des usages impropres c’est à dire qui ne sont pas prévus en
base à la typologie pour laquelle il a été projeté.
Ne montez pas d’ampoules (si présentes) de puissances supérieures ou de types
diérents par rapport à ce qui est indiqué dans les instructions de montage et sur les
étiquettes portées sur l’appareil même.
Pour remplacer l’ampoule (si présente) ou pour nettoyer l’appareil il faut:
a) debrancher la che si l’appareil en est muni ou enlever le courant
éléctrique du reseau;
b) laisser l’ampoule et l’appareil se refroidir complètement avant des les
toucher avec vos mains.
NE JAMAIS NETTOYER l’appareil allumé ou encore chaud.
NE JAMAIS UTILISER des liquides ammables pour le nettoyage.
N’oubliez pas que les parties en verre, y compris l’ampoule, peuvent se casser et originer
des morceaux tranchants: il faut donc faire beaucoup d’attention en les manipulant.
N’installez pas les appareils aux endroits où ils peuvent ètre heurtés, et surtout tenez-les
hors de portée des enfants.
Ne montez pas l’appareil trop rapproché à des matériaux facilement ammables,
comme les rideaux ou d’autres, et ne couvrez pas l’appareil ce qui en empecherait le
raroidissement.
Ne permettez pas aux enfants de jouer avec l’appareil.
Dans le cas où le câble d’alimentation (si présente) s’averait endommagé ou s’ils
s’averaient d’autres défauts ou d’anomalies de fonctionnement, faites eectuer la
réparation de l’appareil par un revendeur de Lumina.
ADVERTENCIA PARA SEGURIDAD DE UTILIZACIÓN
El aparato de iluminación que ha adquirido está costruido según la vigente normativa
de seguridad europea y ha sido probado y certicado por un conocido Instituto.
La utilización segura de aparatos eléctricos con partes de elevada temperatura
requiere, además de la prudencia normal, la observancia de las siguientes
instrucciones.
LEER Y CONSERVAR ATENTAMENTE las instrucciones adjuntas al aparato para
necesidades futuras.
Se aconseja hacer instalar el aparato por personal especializado.
No usar el aparato para usos improprios no previstos en la normal utilización según la
tipologia para la cual ha sido proyectado.
No montar bombillas de potencia superior (si presentes) o de distinto tipo a las
indicadas en las instrucciones de montaje y en las etiquetas pegadas sobre el mismo
aparato.
Para sustituir la bombilla (si presentes) o limpiar el aparato SE DEBE:
a) Quitar el enchufe de la toma eléctrica si el aparato va provisto o cortar la corriente
eléctrica de la instalación.
b) Dejar enfriar totalmente la bombilla y el aparato antes de tocarlo con las manos.
NO LIMPIAR NUNCA el aparato encendido o todavía caliente.
NO UTILIZAR líquidos inamables para la limpieza.
Tener presente que las partes de vidrio, bombilla incluida, pueden romperse
costituyendo fragmentos cortantes, por lo tanto ser muy prudentes en su manejo.
No instalar aparatos en zonas donde puedan ser facilmente golpeados en particular
mantenerlos alejados de los niños.
No montar el aparato demasiado cerca de material facilmente inamable como
cortinas o similares y no cubrirlo impidiendo su refrigeración.
No permitir a los niños de jugar con el aparato.
Si el cable de alimentación (si presentes) resultase dañado o sufriera cualquier otro
desperfecto o funcionamiento anormal, hacer reparar el aparato en un punto de venta
Lumina.
LUMINA ITALIA Srl
via Casorezzo, 63
20010 Arluno (MI)
Tel. +39 02 903752.1
Fax +39 02 90376655
-
 1
1
-
 2
2
-
 3
3
-
 4
4
-
 5
5
-
 6
6
-
 7
7
-
 8
8
-
 9
9
-
 10
10


en otros idiomas
- français: Lumina Flo Grommet Manuel utilisateur
- italiano: Lumina Flo Grommet Manuale utente
- English: Lumina Flo Grommet User manual
- Deutsch: Lumina Flo Grommet Benutzerhandbuch
Artículos relacionados
-
 Lumina Daphinette Manual de usuario
-
 Lumina Flo Floor Manual de usuario
-
 Lumina Daphinette Portatile Manual de usuario
-
 Lumina Daphine Cilindro Manual de usuario
-
 Lumina Limbus Eye Manual de usuario
-
 Lumina Daphine Terra Manual de usuario
-
 Lumina dot Manual de usuario
-
 Lumina Limbus Chandelier Manual de usuario
-
 Lumina Moove Manual de usuario


Otros documentos
-
DOMUS LINE LAB D-M Guía de instalación
-
DOMUS LINE MISS D-M Manual de usuario
-
DOMUS LINE APEX D-M Guía de instalación
-
Trixie REPTILAND Directions For Use Manual
-
Hitachi UB18DGL El manual del propietario
-
-
IMG Stage Line TWIST-252 El manual del propietario
-
-
Hikoki BSL 18UA Manual de usuario
-
CP Electronics EBMINT-PRM Guía de instalación