Signature Kitchen Suite SKSSV3001S El manual del propietario
- Categoría
- Microondas
- Tipo
- El manual del propietario

ENGLISH ESPAÑOL
MFL51224531_05
SKSSV3001S
OWNER’S MANUAL
ELECTRIC CONVECTION BUILT-IN OVEN
www.signaturekitchensuite.com
Copyright © 2020 - 2023 Signature Kitchen Suite. All Rights Reserved.

2TABLE OF CONTENTS
TABLE OF CONTENTS
3 IMPORTANT SAFETY
INSTRUCTIONS
7 PRODUCT OVERVIEW
7 Parts
8 Accessories
9 OPERATION
9 Control Panel Overview
10 Getting Started
10 Changing Oven Settings
10 Settings
10 Lockout
11 Date & Time
11 Clock Themes
11 Sabbath Mode
12 Wi-Fi
12 Remote Start
12 Brightness
12 Display
12 Convection Auto Conversion
13 Language Selection
13 Volume
13 Preheat Alarm Light
13 Temperature Adjustment
13 Temperature Units
14 Smart Diagnosis™
14 Program Update
14 Demo Mode
14 Factory Data Reset
14 Open Source License
14 Oven Cooling
15 Timer
15 Using the Oven
15 Before Using the Oven
15 Removing and Replacing Standard Oven
Racks
16 Rack and Pan Placement
16 Oven Vent
16 Using Gliding Oven Racks
17 Bake
18 Convection Modes
19 RapidHeat Roast+
20 Broil
21 Recommended Broiling Guide
23 Warm
24 Proof
24 Probe
27 My Recipe
27 Auto Cook
28 Auto Cook Guide
29 Gourmet Steam Guide
30 Steam Function
31 Remote Start
32 Sous Vide
33 SMART FUNCTIONS
33 LG ThinQ Application
34 Smart Diagnosis™ Feature
36 FCC Notice
36 FCC RF Radiation Exposure Statement
37 MAINTENANCE
37 Self Clean
39 Steam Feeder Tank
39 Cleaning Scale on Oven Bottom
39 Descaling
39 Drying
39 Evaporation
40 SpeedClean™
42 Cleaning the Exterior
44 Changing the Oven Light
44 Removing and Replacing the Oven Door
46 TROUBLESHOOTING
46 FAQs
48 Before Calling for Service
51 WARRANTY (USA)

3
IMPORTANT SAFETY INSTRUCTIONS
ENGLISH
IMPORTANT SAFETY INSTRUCTIONS
Read and follow all instructions before using your oven to prevent the risk of fire, electric
shock, personal injury, or damage when using the oven. This guide does not cover all
possible conditions that may occur. Always contact your service agent or manufacturer
about problems that you do not understand.
Download this owner's manual at: www.signaturekitchensuite.com
This is the safety alert symbol. This symbol alerts you to potential hazards that
can result in property damage and/or serious bodily harm or death. All safety
messages will follow the safety alert symbol and either the word WARNING or
CAUTION. These words mean:
WARNING - Indicates a hazardous situation which, if not avoided, could result
in death or serious injury.
CAUTION - Indicates a hazardous situation which, if not avoided, could result in
minor or moderate injury.
SAFETY PRECAUTIONS
•Be certain your appliance is properly installed and grounded by a qualified technician.
•Do not repair or replace any part of the appliance unless specifically recommended in the
manual.
•All other servicing should be referred to a qualified technician.
•Always disconnect power to appliance before servicing by unplugging, removing the fuse
or switching off the circuit breaker.
•DO NOT TOUCH HEATING ELEMENTS OR INTERIOR SURFACES OF OVEN.
Heating elements may be hot even though they are dark in color. Interior surfaces of an
oven become hot enough to cause burns. During and after use, do not touch or let clothing
or other flammable materials contact heating elements or interior surfaces of oven until
they have had sufficient time to cool. Other surfaces of the appliance may become hot
enough to cause burns. Among these surfaces are oven vent openings and surfaces near
these openings, oven doors, and windows of oven doors.
•Use care when opening door.
Let hot air or steam escape before you remove or replace food in the oven.
•Do not heat unopened food containers.
Build-up of pressure may cause containers to burst and result in injury.
•Keep oven vent ducts unobstructed.
The oven vent could become hot during oven use. Never
block this vent and never place plastic or heat-sensitive
items on or near the vent.
Metal bottom trim
(Vent)
NOTE
•For proper operation, the vent trim must be installed.

4IMPORTANT SAFETY INSTRUCTIONS
WARNING
•NEVER use your appliance for warming or heating the room.
•DO NOT use water on grease fires. Should an oven fire occur, leave the oven door
closed and turn the oven off. If the fire continues, throw baking soda on the fire or use a
fire extinguisher.
•Use dry pot holders only. Moist or damp pot holders on hot surfaces may result in
burns from steam. Do not let the pot holder touch hot heating elements. Do not use a
towel or other bulky cloth.
•Do not use the oven or the drawer for storage. Flammable materials should not be
stored in or on an oven.
•Wear proper apparel. Loose-fitting or hanging garments should never be worn while
using the appliance.
•Check the contents of the oven before using the Wi-Fi features.
•Be certain all packing materials are removed from the appliance before operating.
Keep plastics, clothes, and paper away from parts of the appliance that may become hot.
•DO NOT force the door open. This can damage the automatic door locking system. Use
care when opening the oven door after the self-cleaning cycle. Stand to the side of the
oven when opening the door to allow hot air or steam to escape. The oven may still be
VERY HOT.
•DO NOT use a steel-wool pad. It will scratch the surface.
•DO NOT use harsh etching, abrasive cleaners or sharp metal scrapers to clean
the oven door glass since they can scratch the surface. This may result in the glass
shattering.
•Be careful when removing and lifting the door.
•DO NOT lift the door by the handle. The door is very heavy.
•DO NOT step or sit on the oven door. Be sure to follow proper installation instructions.
FLAMMABLE MATERIALS
WARNING
Be certain that all packing materials are removed from the appliance before operating.
Keep plastic, clothes, paper, and other flammable materials away from parts of the
appliance that may become hot.
•Do not store flammable materials in the oven, including paper, plastic, pot holders, linens,
wall coverings, curtains, and gasoline or other flammable vapors and liquids such as
grease or cooking oil. These materials can be ignited when the oven is in use.
•Use only oven-safe cookware in the oven. Flammable materials such as paper and plastic
can be ignited when the oven is in use.
•Wear proper apparel. Do not wear loose-fitting or hanging garments, which may ignite if
they contact hot surfaces, and cause severe burns.
•Do not use the oven for drying clothes. Only use the oven for its intended purpose.
•If cabinet storage is provided directly above the oven, place items that are not frequently
used and can be safely stored in an area subjected to heat. Temperatures may be unsafe
for volatile items such as flammable liquids, cleaners or aerosol sprays.

5
IMPORTANT SAFETY INSTRUCTIONS
ENGLISH
ELECTRICAL SAFETY
•Protective Liners. Do not use aluminum foil or any other material to line the oven
bottoms. Improper installation of these liners may result in a risk of electric shock or fire.
•Do Not allow aluminum foil or the meat probe to contact heating elements.
WARNING
•DO NOT place aluminum foil directly
on the oven bottom.
No aluminum foil
•DO NOT line the oven walls, racks, bottom, or any other part of the oven with
aluminum foil or any other material. Doing so will disrupt heat distribution, produce poor
baking results and cause permanent damage to the oven interior (aluminum foil will melt
to the interior surface of the oven.)
•Before replacing your oven light bulb, switch off the electrical power to the oven at
the main fuse or circuit breaker panel. Failure to do so can result in severe personal
injury, death, or electrical shock.
SAFETY DURING USE
•Oven Racks. Always place oven racks in the desired position while the oven is cool.
•Always use pot holders or oven mitts when removing food from the oven.
Hot cookware or plates can cause burns.
•Use caution with the TIMED BAKE or DELAYED TIMED BAKE features. Use
the automatic timer when cooking cured or frozen meats and most fruits and
vegetables. Foods that can easily spoil, such as milk, eggs, fish, meat or poultry,
should be chilled in the refrigerator first. Even when chilled, they should not stand
in the oven for more than 1 hour before cooking begins, and should be removed
promptly when cooking is completed. Eating spoiled food can result in sickness from
food poisoning.
•Should an oven fire occur, leave the oven door closed and turn the oven off. If the
fire continues, throw baking soda on the fire or use a fire extinguisher.
•DO NOT put water or flour on the fire. Flour may be explosive and water can cause a
grease fire to spread and cause personal injury.
•DO NOT use the broiler pan without the grid. DO NOT cover the grid with aluminum
foil.

6IMPORTANT SAFETY INSTRUCTIONS
CHILD SAFETY
WARNING
•Children should be kept away from the oven.
•Accessory parts will become hot when the broiler is in use.
CAUTION
•Children should not be left alone or unattended in an area where the appliance is
in use. Children should never be allowed to sit or stand on any part of the appliance.
•DO NOT leave small children unattended near the appliance. During the self-
cleaning cycle, the outside of the oven can become very hot to the touch.
SAFETY WHEN CLEANING
•Do not clean the door gasket. The door gasket is essential for a good seal. Care should
be taken not to rub, damage, or move the gasket.
•Do not use oven cleaners. No commercial oven cleaner or oven liner protective coating
of any kind should be used in or around any part of the oven.
•Before self cleaning the oven, remove broiler pan, all oven racks, meat probe and any
other utensils from the oven cavity.
•Never keep pet birds in the kitchen. The health of birds is extremely sensitive to the
fumes released during an oven self-clean cycle. Fumes may be harmful or fatal to birds.
Move birds to a well-ventilated room.
•Important instruction : In the event the self clean error code F is displayed, and error
melody sounds, the oven is malfunctioning in the self clean mode. Switch off the electrical
power to the main fuse or breaker and have the appliance serviced by a qualified
technician.
•Make sure oven lights are cool before cleaning. Clean only parts listed in manual.
•DO NOT block the oven vent during operation. This can
damage the electric parts of the oven. Air must be able
to move freely. The metal bottom trim (vent) should be
properly assembled on the front bottom of the oven before
installing the oven door.
Metal bottom trim
(Vent)
COOK MEAT AND POULTRY THOROUGHLY
To protect against food-borne illnesses, cook meat and poultry thoroughly. The USDA has
indicated the following as safe minimum internal temperatures for consumption:
•Ground meat: 160 °F
•Poultry: 165 °F
•Beef, veal, pork, or lamb: 145 °F
•Fish/seafood: 145°F

7
PRODUCT OVERVIEW
ENGLISH
PRODUCT OVERVIEW
Parts
Make sure to understand the name and function of each part.
Control panel
Steam feeder tank
Broiler pan & grid
Standard racks
Gliding racks (2)
Oven door
Gasket
Rating label, model and
serial number plate
Spacer (2)
- One on each side
NOTE
•The model and serial number can be verified at the rating label.

8PRODUCT OVERVIEW
Accessories
Make sure that all parts are included after purchasing this product.
Accessories for Cooking
Grid Heavy duty
standard rack
Broiler pan Gliding rack
(2)
Meat probe
Accessories for Installation
4X14
6 wood screws for mounting
(2 needed for installation
and 4 extras)
4X24
6 Wood Screws for Mounting
(for Flush Installation)
4X22
2 Self-Tapping Screws
for Cover Bracket
2 Cover Brackets
for Flush Installation
4X10
Screws (2)
(For bottom decorative trim)
Bottom decorative trim
(1)
Manuals
Owner’s manual Installation manual
NOTE
•Contact SIGNATURE KITCHEN SUITE Customer Service if any accessories are missing.
•For your safety and for extended product life, only use authorized components.
•The manufacturer is not responsible for product malfunction or accidents caused by the use of separately
purchased, unauthorized components.
•The images in this guide may be different from the actual components and accessories, which are subject
to change by the manufacturer without prior notice for product improvement purposes.
•Do not remove gliding racks from the base packing.

9
OPERATION
ENGLISH
OPERATION
Control Panel Overview
1 23 4
1
Oven Mode Knob
2
Temp Knob
3
LCD Display On/Off
4
LCD Touchscreen for Oven
Display Icons
1 2
3 4 5 6 7 8
*Icons appear in display when activated.
1
Timer Icon
Touch to set a timer
2
Lamp Icon
Touch to turn light on/off
3
Oven Cooling Icon
Appears during or after oven operation to indicate
cooling fan is running in oven
4
Probe Icon
Appears when probe is connected
5
Auto Conversion Icon
Appears when Convection Auto Conversion is
turned on
6
Wi-Fi Icon
•Appears when range is connected to Wi-Fi
•Appears when range is disconnected from
Wi-Fi or is not registered
7
Remote Start Icon
Appears when Remote Start is active
8
Lock Icon
Appears when Lockout is on

10 OPERATION
Getting Started
After turning on the range for the first time, adjust the
settings to suit your preferences.
1Touch POWER on the LCD display.
2After the startup animation, select the desired
language and touch NEXT.
3Scroll the fields up or down to set the correct
date, and touch NEXT.
4Set the correct time of day and choose between
a 12-hour or 24-hour time format. Then touch
NEXT.
5If desired, change the default clock theme by
swiping through the examples. Then press
NEXT.
6Read through the application guide in the display
and touch DONE.
7Turn the oven mode knob.
8The mode screen appears in the display.
Changing Oven Settings
Settings
To adjust settings after the initial setup, touch the
display to open the Main screen. Touch Settings at
the bottom center of the Main screen.
Swipe the screen or touch the <> arrow keys to
navigate through the Settings screens.
Location of Settings
•Page 1: Lockout, Date & Time, Clock Themes,
Sabbath Mode, Wi-Fi Setup, Remote Start
•Page 2: Brightness, Display, Convection Auto
Conversion, Language Selection, Volume, Preheat
Alarm Light
•Page 3: Temperature Adjustment, Temperature
Units, Smart Diagnosis™, Program Update, Demo
Mode, Factory Data Reset
•Page 4: Open Source License
Lockout
The Lockout feature automatically prevents most
oven controls from being turned on. It does not
disable the clock, timer and the interior oven light.
Lock
1Touch Settings at the center bottom of the Main
screen.
2Touch Lockout on the first Settings screen.
3When Lockout is turned on, the lock icon
appears at the top of the display.

11
OPERATION
ENGLISH
Unlock
1Touch any part of screen while Lockout is on.
2A popup screen appears. Touch Unlock for 3
seconds.
3The lock icon disappears from the top of the
display.
Date & Time
The date and time show in the LCD display when the
oven is not in use.
Setting Date
1Touch Settings at the center bottom of the Main
screen. Then touch Date & Time on the Settings
screen.
2Touch Date, and scroll to set the correct date.
3Touch OK.
Setting Time of Day
1Touch Settings at the center bottom of the Main
screen. Then touch Date & Time on the Settings
screen.
2Touch Time, and scroll to set the correct hour
and minutes. You can also touch the number
pad icon and enter the desired numbers.
3Select either a 12-hour or 24-hour clock mode
(12H/24H).
4Touch OK.
Clock Themes
There are six different clock themes available,
including several analog and digital clocks.
Selecting a Clock Theme
1Touch Settings at the center bottom of the Main
screen.
2Touch Clock Themes on the first Settings screen
and swipe to browse through the clock themes.
3Select a clock theme and touch OK.
Sabbath Mode
Sabbath mode is used on the Jewish Sabbath and
Holidays.
While the oven is in Sabbath mode, the temperature
cannot be changed and the timer, light, and alarm
functions are disabled. Only the cooking mode and
set temperature appear in the display.
NOTE
•If the oven light is turned ON and the SABBATH
mode is active, the oven light will turn OFF.
If the oven light needs to be OFF, be sure to
turn the oven light OFF before activating the
SABBATH mode. SABBATH mode can only be
used in Bake mode.
Setting Sabbath Mode
1Disconnect the probe. The Probe function is not
available in Sabbath mode.
2Touch Settings at the center bottom of the Main
screen, and touch Sabbath in the first Settings
screen.
3Set the desired temperature and cook time. Any
cook time can be set from 1 minute to 73 hours
59 minutes.
4To stop Sabbath mode, press POWER on the
LCD display.
NOTE
•If a cook time is set, the oven turns off
automatically at the end of the cook time,
without chiming. The oven remains in Sabbath
mode, but is turned off.
•If no cook time is set, the oven will not
automatically turn off.
•After a power failure, the display will turn back
on in Sabbath mode, but the oven will be off.

12 OPERATION
Wi-Fi
Connect the appliance to a home Wi-Fi network to
use Remote Start and other smart functions. See the
Smart Functions section for more details.
Setting Up Wi-Fi
1Touch Settings at the center bottom of the Main
screen, and touch Wi-Fi in the first Settings
screen.
2Follow the instructions in the Wi-Fi Guide in the
display.
3Select ON, OFF, or RESET and touch OK.
4If ON is selected, the Wi-Fi icon appears at
the top of the display.
5Selecting RESET initializes the IP address.
Remote Start
Remotely starts or stops the preheating function of
the appliance. The appliance must be registered on a
home Wi-Fi network to use Remote Start.
Setting Remote Start
1Touch Settings at the center bottom of the Main
screen, and touch Remote Start in the first
Settings screen.
2Select On or Off and touch OK.
3If ON is selected, the Remote Start icon
appears at the top of the display.
Brightness
Adjust the brightness of the LCD display from 20 % to
100 % in increments of 20 %.
Setting Display Brightness
1Touch Settings at the center bottom of the Main
screen, swipe to the second Settings screen,
and touch Brightness.
2Adjust the display brightness by touching and
dragging the dot across the bar, by tapping
anywhere on the bar, or by touching + or –.
3Touch OK.
Display
Set the length of time before the display sleeps.
There are three options you can select.
•ON : Always on
•OFF : Automatically turns off if idle for 30 minutes.
•Night OFF : Turns off from 10:00 PM to 5:00 AM.
Setting Display Option
1Touch Settings at the center bottom of the Main
screen, swipe to the second Settings screen,
and touch Display.
2Select the desired option.
3Touch OK.
Convection Auto Conversion
There is no need to remember to convert standard
recipe temperatures for convection cooking.
Convection Auto Conversion automatically subtracts
25 °F / 14 °C from the set temperature when a
convection cooking mode is selected. The converted
temperature appears in the display once preheating
is finished.
For example, select Convection Bake and enter 350
°F. The temperature will auto-convert to 325°F and
display the converted temperature.
Convection Auto Conversion is turned ON by default.
Turning Convection Auto Conversion On/Off
1Touch Settings at the center bottom of the Main
screen, swipe to the second Settings screen,
and touch Convection Auto Conversion.
2Select ON or OFF.
3When Convection Auto Conversion is ON, the
icon appears at the top of the display.
NOTE
If Convection Auto Conversion is ON, the icon
flashes in the display while cooking in a
convection mode.

13
OPERATION
ENGLISH
Language Selection
Set the display language to English, Spanish, or
French.
Selecting a Language
1Touch Settings at the center bottom of the Main
screen, swipe to the second Settings screen,
and touch Language Selection.
2Select the desired language.
3Touch OK.
Volume
Adjust the volume of the oven controls.
Setting the Volume
1Touch Settings at the center bottom of the Main
screen, swipe to the second Settings screen,
and touch Volume.
2Select Mute, Low, or High.
3Touch OK.
Preheat Alarm Light
When the oven reaches its set-temperature, the
preheating alarm light flashes 5 times or until the
oven door is opened.
You can turn the preheat alarm light on or off.
Setting the Preheat Alarm
1Touch Settings at the center bottom of the Main
screen, swipe to the second Settings screen,
and touch Preheat Alarm Light.
2Select ON or OFF.
3Touch OK.
Temperature Adjustment
Your new oven may cook differently than the one
it replaced. Use your new oven for a few weeks to
become more familiar with it before changing the
temperature settings. If after familiarizing yourself with
the new oven, you still think that it is too hot or too
cold, you can adjust the oven temperature yourself.
NOTE
To begin, either raise or lower the thermostat 15
°F (8 °C). Try the oven with the new setting. If the
oven still needs adjustment, raise or lower the
thermostat again, using the first adjustment as a
gauge. For example, if the adjustment was too
much, raise or lower the thermostat 10 °F (5 °C).
If the adjustment was not enough, raise or lower
the thermostat 20 °F (12 °C). Proceed in this way
until the oven is adjusted to your satisfaction.
Adjusting the Thermostat
1Touch Settings at the center bottom of the Main
screen, swipe to the third Settings screen, and
touch Temperature Adjustment.
2To make large adjustments, drag the central
indicator toward the + or - ends of the scale
or tap a location on the scale. To make small
adjustments, tap + or - to raise or lower the
thermostat in 1-degree increments. Tap and hold
+ or - to scroll up or down the scale.
3When the desired change appears above the
range, touch OK.
Temperature Units
Set the oven temperature display to show either
Fahrenheit or Celsius units.
The oven defaults to Fahrenheit unless changed by
the user.
Setting Temperature Units
1Touch Settings at the center bottom of the Main
screen, swipe to the third Settings screen, and
touch Temperature Units.
2Select °F or °C.
3Touch OK.

14 OPERATION
Smart Diagnosis™
Smart Diagnosis™ can be run through a smartphone
application or by calling for support. Place your
smartphone's mouthpiece near the top left corner of
the screen. See "Smart Diagnosis Function" in the
Smart Functions section for detailed instructions.
1Touch Settings at the center bottom of the Main
screen, swipe to the third Settings screen, and
touch Smart Diagnosis.
2Touch START to start the diagnostic tone.
Program Update
Once the appliance is connected to a home Wi-Fi
network, use this setting to check for available
programming updates and install them.
1Touch Settings at the center bottom of the Main
screen, swipe to the third Settings screen, and
touch Program Update.
2The display shows available programming
updates. Touch UPDATE to download and install
the new version.
Demo Mode
Demo Mode for showroom use only. The oven will not
heat up.
1Touch Settings at the center bottom of the Main
screen, and touch Demo Mode on the Settings
screen.
2Select either the ON or OFF mode.
3Touch OK.
NOTE
•When Demo Mode is on, the appliance will not
heat up.
•The oven Demo Mode icon appears in the
display if the Demo Mode is on.
Factory Data Reset
This function returns all settings to the factory
defaults.
1Touch Settings at the center bottom of the Main
screen, swipe to the third Settings screen, and
touch Factory Data Reset.
2If you want to reset data to the factory defaults,
touch RESET and then OK.
WARNING
•All stored data will be deleted.
Open Source License
This screen displays a list of the open source
software contained in this product. Refer to the
indicated licenses for the terms and conditions of their
use.
1Touch Settings at the center bottom of the Main
screen and swipe to the fourth Settings screen.
2Touch Open Source License.
Oven Cooling
The oven cooling icon appears in the display if
the temperature inside the oven is high during or
after operation. The icon disappears if the oven
temperature is below 210°F (100°C).

15
OPERATION
ENGLISH
Timer
The oven timers don't affect oven operation or
cooking time. Use them as extra kitchen timers. Once
the time runs out, the oven chimes and "Timer 1 or 2
finished" appears in the display.
Setting the Timer
1Touch either clock icon at the bottom of the
display.
2Scroll through the numbers in the popup until
the desired time appears in the display or touch
the number pad icon( ) to enter the numbers
directly and touch OK.
3The time remaining appears next to the clock
icon in the display.
Adjusting or Cancelling the Timer
1Touch the remaining time next to the clock icon
in the display.
2To cancel the timer, touch Reset ( ) in the
popup. Then touch OK.
3To adjust the time, scroll the numbers in the
popup until the desired time appears. Then
touch OK.
4The remaining time in the display is adjusted.
Using the Oven
Before Using the Oven
NOTE
•The temperature registered by an oven
thermometer may differ from the actual set
oven temperature.
•It is normal for the convection fan to run while
preheating during a regular bake cycle.
•The convection fan motor may run periodically
during a regular bake cycle.
Removing and Replacing Standard
Oven Racks
The racks have a turned-up back edge that prevents
them from being pulled completely out of the oven
cavity.
CAUTION
•Replace oven racks before turning the oven on
to prevent burns.
•DO NOT cover the racks with aluminum foil,
or any other material, or place anything on the
bottom of the oven. Doing so will result in poor
baking and may damage the oven bottom.
•Only arrange oven racks when the oven is cool.
Removing the Racks
1While wearing oven mitts, grasp the oven rack.
2Pull the rack straight out until it stops.
3Lift up the front of the rack.
4Pull out the rack.
Replacing the Racks:
1While wearing oven mitts, place the end of the
rack on the support.
2Tilt the front end of the rack up.
3Push the rack in.
4Check that the rack is properly in place.

16 OPERATION
Rack and Pan Placement
If cooking on two racks:
Place standard oven racks in positions B and D.
Place the cookware as shown below. If baking with
more than one pan, place the pans so that each one
has at least 1” to 1 ½” of air space around them.
A
B
C
D
E
Multiple Rack Baking
Standard Rack (Position B) Standard Rack (Position D)
Single Rack Baking
Rack
Type of Food Rack Position
Angel food cake, frozen pies C
Bundt or pound cakes B
Biscuits, muffins, brownies, cookies,
cupcakes, layer cakes, pies C
Casseroles B
Turkey, roasts, or ham A
Frozen pizza C
Roast chicken B
When baking cakes and cookies on multiple racks,
use the Convection Bake mode and place racks in
positions B and D.
Oven Vent
•Areas near the vent may become hot during
operation and may cause burns.
•Do not block the vent opening at the bottom of the
oven.
•Avoid placing plastics near the vent as heat may
distort or melt the plastic.
•It is normal for steam to be visible when cooking
foods with high moisture.
Using Gliding Oven Racks
The gliding racks slide in and out on a frame. This
keeps heavy cookware level and prevents it from
sliding forward when the rack is completely extended.
Installing Gliding Racks
1Start with the rack in the closed position. Hold
the rack with one hand at the center front and
the other hand at the back right corner.
2Carefully insert the rack between the rack
guides, and slide it back until the shelf drops into
place.
Rack guides
3Once the rack is secured in the back, pull the
entire rack forward until the rack locks into place.
Removing Gliding Racks
1With the rack in the closed position, grasp the
front of the rack and frame and lift up. Slowly
push the rack towards the back wall until it is
free of the rack stop.
2After disengaging the rack stop, lift the back of
the rack and pull the rack and frame out between
the rack guides.
CAUTION
•Place oven racks in the desired location before
turning on the oven to avoid burns.
•Do not cover the racks with aluminum foil, or
any other material, or place anything on the
bottom of the oven. Doing so will result in poor
baking and may damage the oven bottom.

17
OPERATION
ENGLISH
Bake
Use BAKE to prepare foods such as pastries, breads
and casseroles. The oven can be programmed to
bake at any temperature from 170°F (80°C) to 550°F
(285°C). The default temperature is 350°F (175°C).
Setting the BAKE mode
1Turn the Oven Mode knob to select the Bake
mode.
2Set the oven temperature. Turn the Temp knob
clockwise/counterclockwise, scroll through the
numbers on the display, or touch the number
pad icon to enter the numbers directly.
3If desired, set the cook time and delayed start
time using the same method. Touch the arrow
key on the right side of the display to see the
delayed start time settings.
4Touch Start. The oven starts to preheat.
5If the cook time is set, the remaining time
appears in the display. If a delayed start time is
set, the start time appears in the display.
6A chime sounds once preheating is complete.
7A chime sounds at the end of the set cook time
and a notification appears in the display. Open
the oven door and remove the food.
•If no cook time is set, the oven turns off
automatically after 12 hours.
Changing the Cook Settings
1Touch Edit in the display to bring up the Cook
Settings screen.
2Adjust the settings using the number pad or
scroll function.
3Touch Start.
To Stop Cooking
1Touch Stop in the display, and select Yes, or turn
the Mode knob to OFF position.
NOTE
It is normal for the convection fan to operate
periodically throughout a normal bake cycle In the
oven. This is to ensure even baking results.
Baking Tips
Follow the recipe or convection food directions for
baking temperature, time, and rack position. Baking
time and temperature will vary depending on the
ingredients, size, and shape of the baking pan used.
•For best results, food should be placed on a single
rack with at least 1” to 1 1/2” of air space between
the pans and oven walls.
•Check for doneness at the minimum time.
•Use metal bakeware (with or without a nonstick
finish), heatproof glass-ceramic, ceramic or other
bakeware recommended for oven use.
•Dark metal pans or nonstick coatings will cook
faster with more browning. Insulated bakeware will
slightly lengthen the cooking time for most foods.
NOTE
The oven bottom has a porcelain-enamel finish.
To make cleaning easier, protect the oven bottom
from excessive spillovers by placing a cookie
sheet on the rack below the rack you are cooking
on.
This is particularly important when baking a
fruit pie or other foods with a high acid content.
Hot fruit fillings or other foods that are highly
acidic may cause pitting and damage to the
porcelain-enamel surface and should be wiped up
immediately.

18 OPERATION
Convection Modes
Convection Bake and Convection Roast use a fan to
circulate heat evenly within the oven. This improves
heat distribution and allows for even cooking and
excellent results whether cooking on one rack or
multiple racks.
The convection modes on the oven can be
programmed to cook at temperatures from 170°F
(80°C) to 550°F (285°C). The default temperature is
350°F (175°C).
A
B
C
D
E
Using Convection
1Turn the Oven Mode knob to select the Conv.
Bake or Conv. Roast mode.
2Set the temperature. Turn the Temp knob
clockwise/counterclockwise, scroll through the
numbers on the display, or touch the number
pad icon to enter the numbers directly.
3If desired, set the cook time and delayed start
time using the same method. Touch the arrow
key on the right side of the display to see the
delayed start time settings.
4Touch Start. The oven starts to preheat.
5If the cook time is set, the remaining time
appears in the display. If a delayed start time is
set, the start time appears in the display.
6A chime sounds once preheating is complete.
7A chime sounds at the end of the set cook time
and a notification appears in the display. Open
the oven door and remove the food.
•If no cook time is set, the oven turns off
automatically after 12 hours.
Changing the Cook Settings
1Touch Edit in the display to bring up the Cook
Settings screen.
2Adjust the settings using the number pad or
scroll function.
3Touch Start.
To Stop Cooking
1Touch Stop in the display, and select Yes, or turn
the Mode knob to OFF position.
NOTE
The oven fan runs while convection baking and
convection roasting. The fan stops when the door is
opened. In some cases, the fan may shut off during
a convection bake cycle.
Tips for Convection Baking
•Use Convection Bake for faster and more even
multiple-rack cooking of pastries, cookies, muffins,
biscuits, and breads of all kinds.
•Bake cookies and biscuits on pans with no sides
or very low sides to allow heated air to circulate
around the food. Food baked on pans with a dark
finish will cook faster.
•When using Convection Bake with a single rack,
place the gliding rack in position C. If cooking on
multiple racks, place the gliding racks in positions B
and D (for two racks).
•Multiple oven rack cooking may slightly increase
cook times for some foods.
•Cakes, cookies and muffins have better cooking
results when using multiple racks.
Convection Roast
The Convection Roast feature is designed to give
optimum roasting performance. Convection Roast
combines cooking with the convection fan to roast
meats and poultry. The heated air circulates around
the food from all sides, sealing in juices and flavors.
Foods are crispy brown on the outside while staying
moist on the inside. Convection roasting is especially
good for large tender cuts of meat, uncovered.
NOTE
The heating elements and a fan turn off
immediately when the door is opened. They
turn on again approximately 1 second after the
door is closed. Touch Stop in the display or Turn
the Oven Mode knob to OFF position to cancel
Convection Bake and Convection Roast at any
time.

19
OPERATION
ENGLISH
Tips for Convection Roasting
Use a broiler pan and grid when preparing meats for
Convection roast, RapidHeat Roast and Broil. The
broiler pan catches grease spills and the grid helps
prevent grease splatters.
1Place the oven rack in position A or B. See the
Rack and Pan Placement.
2Place the grid in the broiler pan.
3Place the broiler pan on the oven rack.
Broiler pan
Grid
CAUTION
•Do not use a grid without a broiler pan.
•Do not cover the grid with aluminum foil.
•Position food fat side up on the grid.
RapidHeat Roast+
The RapidHeat Roast+ feature is designed to quickly
roast poultry. The combination of intense heat from
the upper and lower heating elements and heated air
from the back heating element results in crispier food
and shorter cooking times. The RapidHeat Roast+ is
especially good for medium sized poultry (about 3.3 lb.)
The RapidHeat Roast+ feature uses steam to roast
poultry with more browning.
NOTE
•The recommended cook time is 55~65 minutes
for the oven for a whole chicken weighing 3.3 lb.
•Adjust the cook time according to the weight of
the poultry.
•Place the oven rack in position B.
•RapidHeat Roast+ is designed to reduce the
cooking time. There is no need for preheating.
•This function is optimized for poultry, so the
cooking temperature cannot be adjusted.
•It is normal for the fan to operate during the
RapidHeat Roast+ function.
•If the descaling reminder appears, press OK to
run the Descaling function.
•When the temperature rise in the oven, steam
may not be visible.
•Take care when opening the oven door during
or after steam cooking. Hot steam can cause
scalding.
•After any steam cooking cycle, the drying
function will run a. It is normal to hear the steam
pump running during the drying function.
Setting the RapidHeat Roast+ Function
1Turn the Oven Mode knob to select the
RapidHeat Roast+ mode.
2Touch Start.
3If the cook time is set, the remaining time
appears in the display. If a delayed start time is
set, the start time appears in the display.
•Make sure the steam feeder tank is filled with water
before starting the RapidHeat Roast+ mode.
Changing the Cook Settings
1Touch Edit in the display to bring up the Cook
Settings screen.
2Adjust the settings using the number pad or
scroll function.
3Touch Start.
To Stop Cooking
1Touch Stop in the display, and select Yes, or turn
the Mode knob to OFF position.

20 OPERATION
Broil
Broiling uses an intense, radiant heat to cook food.
Both the inner and outer broil elements heat during
full broiling. Only the inner broil element heats during
center broiling. The element(s) cycle on and off at
intervals to maintain the oven temperature. The meat
probe cannot be used with this mode.
Keep the oven door closed while broiling. Let the
oven preheat for approximately 5 minutes before
cooking food.
CAUTION
•DO NOT use a grid without a broiler pan. Oil
can cause a grease fire.
•DO NOT cover the grid and broiler pan with
aluminum foil. Doing so will cause a fire.
•Always use a broiler pan and grid for excess fat
and grease drainage. This will help to reduce
splatter, smoke, and flare-ups.
•Should an oven fire occur, leave the oven
door closed and turn the oven off. If the fire
continues, throw baking soda on the fire or use
a fire extinguisher.
•DO NOT put water or flour on the fire.
−Flour may be explosive and water can cause
a grease fire to spread and cause personal
injury.
NOTE
This oven is designed for closed-door broiling.
Close the door to set the Broil function. If the
door is open, the Broil function cannot be set
and DOOR OPEN appears on the display. Close
the door and reset the Broil function. If the door
is opened during broiling, the broil burner turns
off after 5 seconds. The broiler turns back on
automatically once the door is closed.
Setting the BROIL Mode
1Place food on the broiler pan grid.
2Turn the Oven Mode knob to select the Broil
mode.
3Scroll to set the desired temperature: Low,
Medium, or High. If desired, scroll to set a cook
time.
4Touch Start. If the cook time was set, the
remaining time appears in the display. The oven
door must be closed to use the Broil function.
5Let the oven preheat for approximately 5 minutes
before cooking the food.
6If the cook time is set, the remaining time
appears in the display. If a delayed start time is
set, the start time appears in the display.
7Touch STOP to cancel at any time or when
cooking is complete.
•If the cook time is not set, the oven automatically
turns off after 3 hours.
Changing the Broil Settings
1Touch Edit in the display to bring up the Cook
Settings screen.
2Adjust the settings.
3Touch Start.
To Stop Broiling
1Touch Stop in the display, and select Yes, or turn
the Mode knob to OFF position.

21
OPERATION
ENGLISH
Smoking
Due to the intense heat associated with broiling, it
is normal to experience smoke during the cooking
process. This smoke is a natural by-product of
searing and should not cause you to worry. If you are
experiencing more smoke than you are comfortable
with, use the following tips to reduce the amount of
smoke in your oven.
1Always use a broiler pan. Do not use saute pans
or regular baking sheets for safety reasons.
2NEVER use a broiler pan that is not thoroughly
cleaned and at room temperature at the
beginning of cooking.
3ALWAYS run your cooktop ventilation system or
vent hood during broiling.
4Keep the interior of your oven as clean as
possible. Leftover debris from prior meals can
burn or catch fire.
5Avoid fatty marinades and sugary glazes. Both
of these will increase the amount of smoke you
experience. If you would like to use a glaze,
apply it at the very end of cooking.
6If you are experiencing significant smoke with
any food item, consider:
•Lowering the broiler to the LO setting.
•Lowering the rack position to cook the food
further away from the broiler.
•Using the HI broil setting to achieve the
level of searing you desire, and then either
switching to the LO broil setting, or switching
to the BAKE function.
7As a rule, fattier cuts of meat and fish will
produce more smoke than leaner items.
8Adhere to the recommended broil settings and
cooking guidelines in the chart on the following
page whenever possible.
NOTE
The heating element(s) turn off immediately
when the door is opened. They turn on again
approximately 1 second after the door is closed.
Touch Stop in the display or turn the Oven Mode
knob to OFF position to cancel Broil at any time.
Recommended Broiling Guide
The size, weight, thickness, starting temperature, and
your preference of doneness will affect broiling times.
The following guide is based on meats at refrigerator
temperature.
NOTE
Always use a broiler pan and grid when broiling.
A
B
C
D
E

22 OPERATION
Broiling Chart
Food Quantity and/ or
Thickness
Rack
Position
First Side
Time
(min.)
Second
Side Time
(min.)
Comments
Ground Beef 1 lb. (4 patties)
1/2 to 3/4” thick
E 4-6 3-4 Space evenly. Up to 9 patties may
be broiled at once.
Beef Steaks
Rare
Medium
Well Done
Rare
Medium
Well Done
1” thick
1 to 1-1/2 lbs.
1-1/2” thick
2 to 2-1/2 lbs.
D
D
D
D
D
D
6
7
8
10
12
14
2–3
2–3
3–4
4–6
4–8
8–10
Steaks less than 1” thick cook
through before browning. Pan
frying is recommended. Remove
fat.
Chicken 1 whole cut up
2 to 2-1/2 lbs.,
split lengthwise
2 Breasts
C
C
20
20
6–8
6–10
Broil skin-side-down first.
Lobster Tails 2–4
10 to 12 oz. each
C 12-14 Do not turn
over.
Cut through back of shell. Spread
open. Brush with melted butter
before broiling and after half of
broiling time.
Fish Fillets 1/4 to 1/2” thick D or E 5-6 3–4 Handle and turn very carefully.
Brush with lemon butter before
and during cooking, if desired.
Ham Slices
(precooked)
1/2” thick D 5 3–5 Increase time 5 to 10 minutes per
side for 1-1/2” thick or home-cured
ham.
Pork Chops
Well Done
2 (1/2” thick)
2 (1” thick) about
1 lb.
D or E
D or E
7
9-10
6–8
7–9
Remove fat.
Lamb Chops
Medium
Well Done
Medium
Well Done
2 (1” thick) about 10
to 12 oz.
2 (1-1/2” thick) about
1 lb.
D
D
D
D
6
8
11
13
4–6
7–9
9
9–11
Remove fat.
Salmon
Steaks
2 (1” thick)
4 (1” thick) about 1
lb.
D or E
D or E
8
9
3–4
4–6
Grease pan. Brush steaks with
melted butter.

23
OPERATION
ENGLISH
Broiling Tips
Beef
•Steaks and chops should always be allowed to rest
for 5 minutes before being cut into and eaten. This
allows the heat to distribute evenly through the food
and creates a more tender and juicy result.
•Pieces of meat that are thicker than two inches
should be removed from the refrigerator 30 minutes
prior to cooking. This will help them cook more
quickly and evenly, and will produce less smoke
when broiling. Cooking times will likely be shorter
than the times indicated in the Broiling Chart.
•For bone-in steaks or chops that have been
Frenched (all meat removed from around the bone),
wrap the exposed sections of bone in foil to reduce
burning.
Seafood
•When broiling skin-on fish, always use the Medium
broil setting and always broil the skin side last.
•Seafood is best consumed immediately after
cooking. Allowing seafood to rest after cooking can
cause it to dry out.
•It is a good idea to rub a thin coating of oil on the
surface of the broiling pan before cooking to reduce
sticking, especially with fish and seafood. You can
also use a light coating of non-stick pan spray.
Vegetables
•Toss vegetables lightly in oil before cooking to
improve browning.
Warm
The WARM mode maintains an oven temperature of
200°F (93°C) or less. Use the Warm mode to keep
cooked food at serving temperature for up to three
hours after the end of the cooking cycle. Do not use
the Warm mode to try to cook food or reheat cold
food.
Setting the WARM Mode
1Turn the Oven Mode knob to select the Warm
mode.
2Scroll to set the desired temperature: Low,
Medium, or High. If desired, scroll to set a run
time.
3Touch Start. If the run time was set, the
remaining time appears in the display.
NOTE
•The warm feaure has three temperature levels:
High=200 °F, Med=170 °F, Low=140 °F
(High=93.3 °C, Med=76.7 °C, Low=60 °C)
NOTE
•The WARM function is intended to keep food
warm. Do not use it to cool food down.
Changing the Warm Settings
1Touch Edit in the display to bring up the Cook
Settings screen.
2Adjust the settings as desired.
3Touch Start.
Canceling the Warm Function
1Touch Stop in the display, and select Yes, or turn
the Mode knob to OFF position.

24 OPERATION
Proof
The Proof feature maintains a warm environment for
rising yeast-leavened products before baking.
NOTE
For best results, cover the dough with a cloth or
with plastic wrap. (The plastic may need to be
anchored underneath the container so the oven
fan does not blow it off.)
Setting the PROOF Mode
This feature maintains a warm oven for rising yeast-
leavened products before baking.
1Turn the Oven Mode knob to select the Proof
mode.
2Scroll through the numbers to set a proofing time
or touch the number pad icon to enter the
numbers directly.
3Touch Start. The remaining proofing time
appears in the display.
•If the proofing time is not set, the oven automatically
turns off after 12 hours.
Canceling the Proof Function
1Touch Stop in the display, and select Yes, or turn
the Mode knob to OFF position.
NOTE
•To avoid lowering the oven temperature and
lengthening proofing time, do not open the oven
door unnecessarily. Check bread products early
to avoid over proofing.
•Do not use the proofing mode for warming
food or keeping food hot. The proofing oven
temperature is not hot enough to keep foods
at safe temperatures. Use the WARM feature
to keep food warm. Proofing doesn't operate
when the oven is above 125°F(52°C). OVEN IS
HOT shows in the display.
Probe
The probe accurately measures the internal
temperature of meat, poultry and casseroles. It should
not be used during the broiling, sous vide, steam
maintenance, rapid heat roast +, self cleaning, speed
cleaning, warming or proofing mode. Always unplug
and remove the probe from the oven before removing
food. Before using, insert the probe into the center
of the thickest part of meat or into the inner thigh or
breast of poultry, away from fat or bone. Place food
in the oven and connect the meat probe to the jack.
Keep the probe as far away from heat sources as
possible.
•The probe cannot be used in Broil, Self Clean,
SpeedClean™, Warm or Proof modes.
•For thin cuts of meat, insert probe in thickest side
of meat.
Recommended Probe Placement Chart
Category Examples of
Food
Probe
Placement
Ground
Meat & Meat
Mixtures
Meatloaf Insert in the
thickest part
Meatballs
Fresh Beef,
Veal, Lamb
Steaks, Roasts,
Chops
Insert in the
thickest part,
away from bone,
fat and gristle
Poultry
Whole Chicken
or Turkey Insert in the
thickest part of
thigh, avoiding
bone
Poultry Breasts
or Roasts
Duck, Goose,
Pheasant
Stuffing (Alone or
in Bird)
Insert in the
thickest part of
the dish
Pork & Ham
Fresh Pork Insert in the
thickest part,
away from bone,
fat and gristle
Fresh Ham
(Raw)
Precooked Ham
(Reheat & Serve)
Leftovers &
Casseroles
Leftovers Insert in the
thickest part of
the dish
Casseroles
Seafood
Whole Fish
Insert in the
thickest part of
the fish
Fish Fillet (Side
of Fish)
Fish Steaks or
Portions

25
OPERATION
ENGLISH
Using the Meat Probe Feature
1Insert the probe into the food.
2Connect the probe to the jack in the oven, “Probe
is connected” pops up in the display and the
probe icon appears at the top of the display.
3Turn the Oven Mode knob to select an
appropriate cooking mode.
4Set the oven temperature. Turn the Temp knob
clockwise/counterclockwise, scroll through the
numbers on the display, or touch the number
pad icon to enter the numbers directly. The
default probe temperature is 150 °F (65 °C), but
can be changed to any temperature between 80
°F (27 °C) and 210 °F (100 °C).
5If desired, set the delayed start time using the
same method. Touch the arrow key on the right
side of the display to see the additional settings.
6Touch Start. If a delayed start time has been set,
the start time appears in the display.
7When the set probe temperature is reached, the
oven shuts off automatically.
NOTE
Calculating a total cooking time by weight is no
longer necessary using this feature. The following
chart is recommended for setting the probe
temperature.
CAUTION
•Always use an oven mitt to remove the
temperature probe. Do NOT touch the broil
element.
−Failure to follow this warning can result in
severe personal injury.
Changing the Probe Temperature while Cooking
1Touch Edit in the display to bring up the Cook
Settings screen.
2Adjust the settings as desired.
3Touch Start.
To Stop Cooking
1Touch Stop in the display, and select Yes, or turn
the Mode knob to OFF position.
IMPORTANT NOTE
Touch Stop in the display or turn the Oven Mode knob
to OFF position on the display at any time to cancel a
cooking operation. To avoid breaking the probe, make
sure food is completely defrosted before inserting.
CAUTION
•Always use an oven mitt to remove the
temperature probe. Do not touch the broil
element. Failure to obey this caution can result
in severe personal injury.
•To avoid damage to the meat probe, do
not use tongs to pull on the probe when
removing it.
•Do not store the meat probe in the oven.
NOTE
•The meat probe can't be used with the Broil,
Sous Vide, Steam Maintenance, RapidHeat
Roast+, Self Clean, SpeedClean™, Warm, or
Proof modes.
•While the meat probe mode is running,
SpeedClean™ does not respond.

26 OPERATION
Recommended Probe Temperature Chart
Category Examples of Food Target Internal
Temp. Desired Doneness
Ground Meat &
Meat Mixtures
Meatloaf 160 °F (71 °C)
Meatballs 165 °F (74 °C)
Fresh Beef, Veal,
Lamb Roasts 145 °F (63 °C)
Rare : 120 °F (49 °C)
Medium rare : 125 °F (52 °C)
Medium : 130 °F (54 °C)
Medium well done : 135 °F (57 °C)
Well done : 140 °F (60 °C)
Poultry
Whole Chicken or Turkey
165 °F (74 °C)
Poultry Breasts or Roasts
Duck, Goose, Pheasant
Stuffing (Alone or in Bird)
Pork & Ham
Fresh Pork 145 °F (63 °C) Well Done: 170 °F (77 °C)
Fresh Ham (Raw) Well Done: 160 °F (71 °C)
Precooked Ham (Reheat & Serve) 140 °F (60 °C)
Leftovers &
Casseroles
Leftovers 165 °F (74 °C)
Casseroles

27
OPERATION
ENGLISH
My Recipe
For frequently used cooking menus, you can combine
up to three different temperatures and cooking modes
into one hot key.
Creating My Recipe
•When combining two or more cooking modes, a
cooking time or probe temperature must be set
before selecting an additional cooking mode.
•The Probe function cannot be used with the
Broil, Sous Vide, Steam Maintenance, RapidHeat
Roast+, Warm, Proof modes.
1Turn the Oven Mode knob to select the My
Recipe mode.
2Touch Create to make a new hot key.
3Select a first cook mode listed in the display and
set the desired cook temperature.
4Touch Set Cook Time or Set Probe.
5If there are no additional cooking stages, touch
Done. To add another cooking stage, set a
cooking time or probe temperature for the first
stage. Then touch Add Cook Stage.
6Repeat steps 3-5 until all desired cooking stages
have been entered. Then touch Done.
7Enter a name for your recipe using the keyboard
and touch Save.
8The recipe name is added to the My Recipes
menu.
NOTE
•If the probe was inserted in the oven jack to
add a probe temperature, remember to remove
it.
•After the steam mode is used for 8 hours, a
reminder to descale the product appears in
the display the next time the steam mode is
selected. You will not be able to use the steam
mode until the Descaling function is run. To
avoid this delay, run the Descaling function
after every 2-3 uses of the steam mode.
•If the descaling reminder appears, press OK to
run the Descaling function.
•Proofing doesn't operate when the oven is
above 125 °F (52 °C).
•If using Proof after cooking, wait for the oven to
cool first.
•The Proof mode can only be set as a single
stage, not as part of multi-stage cooking.
Editing My Recipe
•The Edit function cannot add or remove cooking
stages to a recipe. Only the oven temperature,
probe temperature and cook time can be changed.
1Turn the Oven Mode knob to select My Recipe
mode.
2Select the recipe to edit then touch the pencil
icon at the bottom left of the screen.
3Edit the settings for the first cooking stage and
touch Done to proceed to the next cooking
stage, if any.
4Edit the next cooking stage, touch Done, and
proceed through all cooking stages in the same
way.
5Once the last cooking stage has been edited,
enter a new name for the recipe or keep the
previous name. Then touch Save.
Deleting My Recipe
1Select the desired oven and touch My Recipe in
the Cooking Modes screen.
2Select the recipe and touch the trash can icon at
the bottom left of the screen.
3Touch Yes.
Auto Cook
The Auto Cook function provides guidance for cooking
foods or dishes that may be unfamiliar. It contains
preset programs for cooking many popular food
items, with information on recommended preheating,
accessories, and rack position for optimal results.
Setting Auto Cook Function
1Turn the Oven Mode knob to select Auto Cook
mode.
2Touch a category to filter the options.
3Scroll through or tap the letters to find and select
an item.
4Follow the recommendations in the display
regarding accessories and rack position.
5Touch Start.

28 OPERATION
Auto Cook Guide
•Preheat oven first for most items.
•Preheat for 5 minutes when broiling.
•If using probe, insert after preheating.
NOTE
•When cooking thin cuts of meat, insert the probe
into the thickest part of the meat. If the probe is
inserted incorrectly, the oven could turn off too
soon. See the Probe section for instructions.
Category Menu Accessories/Cookware Shelf
Position
Cooking time in
min.
Meat
Beef
Beef
Tenderloin
Rare Grid on broiler pan 2 30~60
Medium rare Grid on broiler pan 2 35~65
Medium Grid on broiler pan 2 40~70
Medium well done Grid on broiler pan 2 45~75
Well done Grid on broiler pan 2 50~80
Pot Roast Ovenproof pot with cover 2 50~80
Roast Beef
Rare Grid on broiler pan 2 40~70
Medium rare Grid on broiler pan 2 45~75
Medium Grid on broiler pan 2 50~80
Medium well done Grid on broiler pan 2 55~85
Well done Grid on broiler pan 2 60~90
London
Broil
Rare Grid on broiler pan 5 3~10 + 3~10
Medium rare Grid on broiler pan 5 5~15 + 3~10
Medium Grid on broiler pan 5 5~15 + 5~10
Medium well done Grid on broiler pan 5 8~15 + 5~10
Well done Grid on broiler pan 5 10~15 + 8~15
Steak
Rare Grid on broiler pan 5 3~10 + 3~10
Medium rare Grid on broiler pan 5 5~15 + 3~10
Medium Grid on broiler pan 5 5~15 + 5~10
Medium well done Grid on broiler pan 5 8~15 + 5~10
Well done Grid on broiler pan 5 10~15 + 8~15
Beef Marinade Grid on broiler pan 3 20~50
Meat Loaf Loaf pan 2 40~60
Pork
Pork Butt Casserole dish 2 60~90
Pork Chops Grid on broiler pan 4 30~50
Pork Loin Grid on broiler pan 2 50~80
Pork Tenderloin Grid on broiler pan 2 20~40
Lamb Rack Grid on broiler pan 2 10~30
Bone-in Leg of Lamb Grid on broiler pan 4 20~40
Veal
Veal Top Sirloin Grid on broiler pan 2 80~100
Veal Chops Grid on broiler pan 5 4~15 + 3~10
Veal Rolled Roast Grid on broiler pan 2 50~70
Veal Rib Roast Grid on broiler pan 2 50~80
Veal Tenderloin Grid on broiler pan 2 50~80
Fish
Fish Fillet Baking dish 4 10~15
Whole Baking dish 4 15~30
Shrimp Grid on broiler pan 5 5~15
Lobster Tails Grid on broiler pan 4 20~30
Steak Salmon
Rare Baking dish 4 15~20
Medium rare Baking dish 4 20~25
Well done Baking dish 4 15~30
Poultry Chicken
Legs & Thighs Baking dish 4 20~40
Wings (Fresh) Grid on broiler pan 5 8~20
Wings (Frozen) Grid on broiler pan 4 20~40
Breasts Baking dish 4 20~40
Cutlet Casserole dish 4 20~30
Whole Grid on broiler pan 2 60~80
Whole Turkey Grid on broiler pan 2 150~240
Casserole Lasagna (Fresh) Baking dish 3 50~70

29
OPERATION
ENGLISH
Category Menu Accessories/Cookware Shelf
Position
Cooking time in
min.
Pizza
Frozen Thin Crust
Directly on rack 3 10~20
On pizza pan 3 10~20
On pizza stone 3 10~20
Frozen Rising Crust
Directly on rack 3 10~20
On pizza pan 3 10~20
On pizza stone 3 10~20
From Scratch/Homemade
Directly on rack 3 10~20
On pizza pan 3 10~20
On pizza stone 3 10~20
Desserts
Brownies Baking dish 3 30~40
Cheesecake Cake pan 3 60~70
Fruit pie Whole Pie Pie pan 3 25~45
Par Bake Bottom Crust Only Pie pan 3 20~40
Fruit tart Tart pan 3 20~40
Cakes Layer Cake Cake pan 3 25~45
Angel Food Cake Cake pan 3 30~40
Muffins/Cupcakes Muffin pan 3 20~30
Puff Pastry Baking sheet 3 20~40
Cookies Single Tray Baking sheet 3 15~20
Multiple Tray Baking sheet 2+4 20~28
Biscuits/Scones Baking sheet 3 10~20
Souffle Souffle dish 2 60~80
Miscellaneous
Proof Ovenproof bowl with cover 3 30~40
Drying/Dehydrating (Fruit or Vegetable) Baking sheet 3 120 ~ 480
Slow Roasting Grid on broiler pan 2 120 ~ 240
Gourmet Steam Guide
Category Menu Accessories/Cookware Shelf
Position
Cooking time in
min.
Breads
White
Bread
Homemade Loaf pan 3 20~50
Frozen Loaf pan 3 20~50
Par Baked Loaf pan 3 20~50
Baguette
Homemade Perforated baguette pan 3 15~35
Frozen Perforated baguette pan 3 15~35
Par Baked Perforated baguette pan 3 15~35
Cinnamon Raisin Bread Loaf pan 3 20~40
Walnut Bread Loaf pan or perforated tray 3 40~50
Whole
Grain
Bread
Homemade Loaf pan 3 25~45
Frozen Loaf pan 3 25~45
Par baked Loaf pan 3 25~45
Banana
Bread Homemade Loaf pan 3 25~50
CAUTION
•Take care when opening the oven door during or after steam cooking. Hot steam can cause scalding.
•After any steam cooking cycle, the drying function will run automatically. It is normal to hear the steam
pump running during the drying function.

30 OPERATION
Steam Function
Steam cooking uses the moist heat of steam to cook
food. This is an ideal cooking method for delicate
food items such as seafood, which can lose nutrients
when boiled.
The oven provides 3 methods of steam cooking:
Gourmet Steam, SousVide and Steam Combi.
CAUTION
•Take care when opening the oven door during
or after steam cooking. Hot steam can cause
scalding.
•After any steam cooking cycle, the drying
function will run automatically. It is normal to
hear the steam pump running during the drying
function.
Using the Steam Feeder Tank
The steam feeder tank is located over the oven cavity.
1Gently push the front of the steam feeder tank to
slide it out.
2Remove the tank and place it on a flat surface.
3Remove the tank cover or flip open the fill lid at
the front of the tank cover.
4Fill the tank to the max line located at the front of
the tank. Use softened, filtered water, if possible.
Hard water may clog the steam generator more
quickly with scale buildup.
MAX LINE
5Assemble the cover or snap closed the fill lid.
Tank Cover
Fill lid
CAUTION
•Make sure the tank cover and fill lid are closed
before putting in the oven.
•Use potable water only.
•Do not fill the steam feeder tank with any fluid
or mixture other than water.
•Do not fill the tank with hot water.
•Fill the steam feeder tank up to the line
indicated on the front.
•Do not tilt the steam feeder tank while it is full.
•Discard any remaining water and clean the
steam feeder tank after cooking.
•Use the steam feeder tank only for its intended
purpose of providing water for steam cooking.
•Monitor the water level in the tank and refill as
needed for steam cooking.
6Carefully insert the tank into the steam feeder
slot, making sure to keep the tank level while
carrying it. If the tank is not kept level, water will
drain out of the tubes in the back.
7Slide the tank into the slot until it clicks into
place.
Steam-Combi Mode
The Steam-Combi mode heats food gradually, using
both the oven heating elements and moist steam
heat. The oven can be programmed to cook at any
temperature from 210°F (100 °C) to 550 °F (285 °C).
Preset temperature options start at 350 °F (175 °C).
Setting Steam-Combi Mode
1Turn the Oven Mode knob to select Steam Cook
mode.
2Touch Steam-Combi in the display.
3Select the desired temperature and steam level:
Low, Medium, or High.
4If desired, scroll to set the cook time and delayed
start time. Touch the arrow key on the right
side of the display to see the delayed start time
settings.
5Touch Start.
6Once cooking is finished, allow oven to cool
completely. Then wipe up any water left on the
oven interior.

31
OPERATION
ENGLISH
Once Steam-Combi cooking is started, an indicator
on the display shows the status of the steam function.
Make sure the steam feeder tank is filled with water
before starting the Steam-Combi mode. If the water in
the tank runs out during cooking, a chime sounds and
a popup appears in the display. The oven continues
to cook without steam.
NOTE
•Remember to drain the steam feeder tank after
use.
•When the temperature rise in the oven, steam
may not be visible.
Changing the Steam Cook Settings
1Touch Edit in the display to bring up the Cook
Settings screen.
2Adjust the settings as desired.
3Touch Start.
To Stop Steam Cooking
1Touch Stop in the display, and select Yes, or turn
the Mode knob to OFF position.
Gourmet Steam
Get great results using preset steam cooking recipes
that include recommendations for accessories and
rack position.
Setting Gourmet Steam Function
1Turn the Oven Mode knob to select Steam Cook
mode.
2Touch Gourmet Steam in the display.
3Touch a category to filter the options.
4Scroll through or tap the letters to find and select
an item.
5Follow the recommendations in the display
regarding accessories and rack position.
6Touch Start.
7Once cooking is finished, allow oven to cool
completely. Then wipe up any water left on the
oven interior.
NOTE
It is normal to hear the sound of boiling water from the
steam generator while running the steam functions.
Remote Start
If the appliance is registered on a home Wi-Fi
network, the preheating function of the oven can be
started or stopped using the LG ThinQ smart phone
app.
Preparing the Oven for a Remote Start
1Open the oven door to make sure the oven is
empty and ready for preheating. Do not place
food in the oven. Close the oven door. Remote
Start can only be set when the oven door is
closed.
2Touch SETTINGS, located at the center bottom
of the display. Touch Remote Start on the first
Settings screen, and then select On. Follow
the instructions on the popup that opens in the
display
3Follow the instructions in the LG ThinQ
smartphone app for using the Remote Start
function.
NOTE
•Remote Start is disconnected in the following
situations:
−Remote Start is never set up in the smart
phone app.
−The Remote Start status is “ready”.
−Remote Start experiences a problem during
operation.
•The Wi-Fi icon on the display shows the status
of the appliance's network connection. If the
Wi-Fi icon is not lit, use the smart phone app to
select the Wi-Fi network or register the product
again.
•A faulty Wi-Fi connection could delay the
Remote Start function.
•Disconnect the probe if attached.

32 OPERATION
Sous Vide
Sous vide cooking uses steam to cook foods “low
and slow.” Use it to cook meat, fish, seafood, poultry
or vegetables. Food must be vacuum packced in
pouches.
It is not necessary to preheat the oven when using
sous vide.
Refer to the cooking guide for recommended sous
vide settings.
Benefits of Sous Vide
The lower temperatures and long cooking times used
in sous vide cooking provide many benefits
Healthier
Compared to other cooking methods, sous vide
retains most of the original nutrients in food.
Safe and Convenient
The long cooking times used in sous vide cooking
allow food to be pasteurized. Because food is vacuum
packed before cooking, the unopened pouches can
be quickly chilled then easily stored after cooking.
Crisp and Moist Results
The fine temperature control of sous vide cooking is
an excellent way to achieve the perfect texture when
cooking meat and poultry. The low temperatures used
retain more of the moisture in food than conventional
cooking methods. After cooking, a final sear in a
frying pan adds the perfect crisp finish.
Setting Sous Vide Mode
1Fill the tank with water up to the max line located
at the front of the tank
2Place the standard rack in position C and place
the sealed food bag on it.
3Turn the Oven Mode knob to select Steam Cook
mode.
4Touch Sous vide in the display.
5Select the desired temperature.
6If desired, scroll to set the cook time and delayed
start time. Touch the arrow key on the right side of
the display to see the delayed start time settings.
7Touch Start.
8Once cooking is finished, allow the oven to cool
completely. Then wipe up any water left on the
oven interior
Changing the Sous Vide Settings
1Touch Edit in the display to bring up the cook
settings screen.
2Adjust the settings as desired.
3Touch Start.
To Stop Cooking
1Touch Stop in the display, and select Yes, or turn
the Mode knob to OFF position.
NOTE
As the temperature in the oven rises, steam may
not be visible.
Sous Vide Cooking Guide
The size, weight, thickness, starting temperature, and
your personal preferences will affect operating times.
This guide is only for reference. Adjust cook time
according to your preference.
Temp. Time
Min Target Max
Beef steak
(Medium
rare)
1" thick,
400-500 g 135 °F - 2.5 hr 3 hr
Chicken
breast 120-150 g 149 °F - 2.5 hr 3 hr
Salmon 1" thick,
200 g 140 °F - 2 hr 2.5 hr
Asparagus 80 g / 6 ea,
160 g / 12 ea 185 °F 20 min. 30 min. 45 min.
Cook 30 mins. or 1 hour more if you use meats
thicker than 1".
If you use larger meats, cut to match the
recommended weight. Be careful not to put pieces of
meat too close together.

33
SMART FUNCTIONS
ENGLISH
SMART FUNCTIONS
LG ThinQ Application
This feature is only available on models with Wi-Fi.
The LG ThinQ application allows you to communicate
with the appliance using a smartphone.
LG ThinQ Application Features
•SpeedClean™
−Allows you to set SpeedClean™ alerts, read the
instruction guide, and simulate and compare
energy consumption when using SpeedClean™
versus self clean cycles.
•Smart Diagnosis™
−This function provides useful information for
diagnosing and solving issues with the appliance
based on the pattern of use.
•Settings
−Allows the user to change oven settings,
including the hour mode, preheat alarm light,
beeper volume, temperature units, convection
auto conversion, thermostat adjustment and
language.
•Remote Start
−Remotely start the preheat mode or turn off the
oven. After opening and closing the door, place
the mode dial back to Remote Start within 30
seconds.
•Monitoring
−This function helps you check the current status,
remaining time, cook settings and end time in
one place.
•Product Notifications
−Turn on the Push Alerts to receive appliance
status notifications. The notifications are triggered
even if the LG ThinQ application is not open.
•Timer
−You can set the timer from the application.
NOTE
•If you change your wireless router, Internet
service provider, or password, delete the
registered appliance from the LG ThinQ
application and register it again.
•This information is current at the time of
publication. The application is subject to change
for product improvement purposes without
notice to users.
Installing LG ThinQ Application and
Connecting an LG Appliance
Models with QR Code
Scan the QR code attached to the product using the
camera or a QR code reader application on your
smartphone.
Models without QR Code
1Search for and install the LG ThinQ application
from the Google Play Store or Apple App Store
on a smartphone.
2Run the LG ThinQ application and sign in with
your existing account or create an LG account to
sign in.
3Touch the add (+) button on the LG ThinQ
application to connect your LG appliance.
Follow the instructions in the application to
complete the process.
NOTE
•To verify the Wi-Fi connection, check that the
Wi-Fi indicator on the control panel is lit.
•The appliance supports 2.4 GHz Wi-Fi networks
only. To check your network frequency, contact
your Internet service provider or refer to your
wireless router manual.
•LG ThinQ is not responsible for any
network connection problems or any faults,
malfunctions, or errors caused by network
connection.
•The surrounding wireless environment can
make the wireless network service run slowly.
•If the distance between the appliance and the
wireless router is too far, the signal becomes
weak. It may take a long time to connect or fail
to install the application.
•If the appliance is having trouble connecting
to the Wi-Fi network, it may be too far from
the router. Purchase a Wi-Fi repeater (range
extender) to improve the Wi-Fi signal strength.
•The network connection may not work properly
depending on the Internet service provider.
•The Wi-Fi may not connect or the connection
may be interrupted because of the home
network environment.

34 SMART FUNCTIONS
NOTE
•If the appliance cannot be connected due to
problems with the wireless signal transmission,
unplug the appliance and wait about a minute
before trying again.
•If the firewall on your wireless router is enabled,
disable the firewall or add an exception to it.
•The wireless network name (SSID) should be a
combination of English letters and numbers. (Do
not use special characters.)
•Smartphone user interface (UI) may vary
depending on the mobile operating system (OS)
and the manufacturer.
•If the security protocol of the router is set to
WEP, network setup may fail. Change the
security protocol (WPA2 is recommended), and
connect the product again.
Smart Diagnosis™ Feature
Use this feature to help you diagnose and solve
problems with your appliance. NFC or Wi-Fi equipped
models can also transmit data to a smartphone using
the LG ThinQ application.
NOTE
•For reasons not attributable to LGE’s
negligence, the service may not operate due to
external factors such as, but not limited to,
Wi-Fi unavailability, Wi-Fi disconnection, local
app store policy, or app unavailability.
•The feature may be subject to change without
prior notice and may have a different form
depending on where you are located.
Using LG ThinQ to Diagnose Issues
If you experience a problem with your Wi-Fi equipped
appliance, it can transmit troubleshooting data to a
smartphone using the LG ThinQ application.
•Launch the LG ThinQ application and select the
Smart Diagnosis feature in the menu. Follow the
instructions provided in the LG ThinQ application.

35
SMART FUNCTIONS
ENGLISH
Using Audible Diagnosis to Diagnose
Issues
Follow the instructions below to use the audible
diagnosis method.
•Launch the LG ThinQ application and select the
Smart Diagnosis feature in the menu. Follow the
instructions for audible diagnosis provided in the
LG ThinQ application.
1Touch SETTINGS, located at the center bottom
of the main display screen. Swipe to the third
settings screen and select Smart Diagnosis™.
Follow the instructions in the display.
NOTE
Do not touch any other buttons or icons on the
display screen.
2Touch Start.
3Keep the phone in place until the tone
transmission has finished. The display will count
down the time. Once the countdown is over and
the tones have stopped, the diagnosis will be
displayed in the application.
4Once the tones have stopped, resume your
conversation with the call agent, who will assist
you in using the information transmitted.
NOTE
•For best results, do not move the phone while
the tones are being transmitted.
Open Source Software Notice
Information
To obtain the source code that is contained in this
product, under GPL, LGPL, MPL, and other open
source licenses that have the obligation to disclose
source code, and to access all referred license terms,
copyright notices and other relevant documents,
please visit https://opensource.lge.com.
SIGNATURE KITCHEN SUITE will also provide open
source code to you on CD-ROM for a charge covering
the cost of performing such distribution (such as the
cost of media, shipping, and handling) upon email
request to [email protected]. This offer is valid
to anyone in receipt of this information for a period of
three years after our last shipment of this product.
Wireless LAN Module Specications
Model LCW-009
Frequency Range 2412 MHz – 2462 MHz
Output Power (Max) < 30 dBm

36 SMART FUNCTIONS
FCC Notice
The following notice covers the transmitter module
contained in this product.
This equipment has been tested and found to comply
with the limits for a Class B digital device, pursuant
to Part 15 of the FCC Rules. These limits are
designed to provide reasonable protection against
harmful interference in a residential installation. This
equipment generates, uses, and can radiate radio
frequency energy and, if not installed and used in
accordance with the instructions, may cause harmful
interference to radio communications. However, there
is no guarantee that interference will not occur in a
particular installation. If this equipment does cause
harmful interference to radio or television reception,
which can be determined by turning the equipment
off and on, the user is encouraged to try to correct
the interference by one or more of the following
measures:
•Reorient or relocate the receiving antenna.
•Increase the separation between the equipment
and the receiver.
•Connect the equipment into an outlet on a
circuit different from that to which the receiver is
connected.
•Consult the dealer or an experienced radio/TV
technician for help.
This device complies with part 15 of the FCC Rules.
Operation is subject to the following two conditions:
(1) This device may not cause harmful interference
and
(2) This device must accept any interference
received, including interference that may cause
undesired operation
Any changes or modifications in construction of this
device which are not expressly approved by the party
responsible for compliance could void the user’s
authority to operate the equipment.
FCC RF Radiation Exposure
Statement
This equipment complies with FCC radiation exposure
limits set forth for an uncontrolled environment. This
transmitter must not be co-located or operating in
conjunction with any other antenna or transmitter.
This equipment should be installed and operated with
a minimum distance of 20 cm (7.8 inches) between
the antenna and your body. Users must follow the
specific operating instructions for satisfying RF
exposure compliance.

37
MAINTENANCE
ENGLISH
MAINTENANCE
Self Clean
The Self Clean cycle uses extremely hot temperatures
to clean the oven cavity. While running the Self Clean
cycle, you may notice smoking or an odor. This is
normal, especially if the oven is heavily soiled.
During the Self Clean cycle, the kitchen should be
well-ventilated to minimize the odors from cleaning.
CAUTION
•DO NOT leave small children unattended near
the appliance. During the Self Clean cycle, the
outside of the oven can become very hot to
touch.
•If you have pet birds, move them to another
well-ventilated room. The health of some birds
is extremely sensitive to the fumes given off
during the Self Clean cycle of any oven.
•DO NOT line the oven walls, racks, bottom or
any other part of the oven with aluminum foil or
any other material. Doing so will destroy heat
distribution, produce poor baking results and
cause permanent damage to the oven interior
(aluminum foil will melt to the interior surface of
the oven).
•DO NOT force the door open. This can damage
the automatic door locking system. Use care
when opening the oven door after the Self
Clean cycle. Stand to the side of the oven when
opening the door to allow hot air or steam to
escape. The oven may still be VERY HOT.
Before Starting Self Clean
•Remove the water tank, oven racks, broiler pan,
broiler grid, all cookware, aluminum foil or any other
material from the oven.
Leaving items in the oven will cause permanent
damage to the oven interior.
•If you don't remove the water tank from the oven,
a beep sounds, and the Self Clean cycle does not
start.
•The kitchen should be well ventilated to minimize
the odors from cleaning.
•Wipe any heavy spillovers on the bottom of the
oven.
•Make sure that the oven light bulb cover is in place
and the oven light is off.
•The oven light cannot be turned on during a Self
Clean cycle. The oven light cannot be turned on
until the oven temperature has cooled below
500 ˚F (260 ˚C) after a Self Clean cycle is complete.
NOTE
•Remove oven racks and accessories before
starting the Self Clean cycle.
•If oven racks are left in the oven cavity during
the Self Clean cycle, they will discolor and
become difficult to slide in and out.
•Clean the frame of the oven and door with hot
soapy water. Rinse well.
•Do not clean the gasket. The fiberglass material
of the oven door gasket cannot withstand
abrasion.
•It is essential for the gasket to remain intact. If
you notice it becoming worn or frayed, replace
it.
•It is normal for the fan to operate during the Self
Clean cycle.

38 MAINTENANCE
Setting Self Clean
The Self- Clean function has cycle times of 3, 4, or 5
hours.
Self Clean Soil Guide
Soil Level Cycle Setting
Lightly soiled oven cavity 3 Hour Self Clean
Moderately soiled oven cavity 4 Hour Self Clean
Heavily soiled oven cavity 5 Hour Self Clean
1Remove all racks and accessories from the oven.
2Turn the Oven Mode knob to select the Clean
mode, and Touch Self clean. The oven defaults
to the recommended four-hour self clean for a
moderately soiled oven.
3Select the desired cycle time.
4If desired, scroll to set a delayed start time or
touch the number pad icon to enter the start
time directly.
5Touch Start. The remaining time or the delayed
start time appears in the display.
6Once the self-clean cycle is set, the oven door
locks automatically and the lock icon displays.
You will not be able to open the oven door
until the oven has cooled. The lock releases
automatically when the oven has cooled.
CAUTION
DO NOT force the oven door open when the
lock icon is displayed. The oven door will remain
locked until the oven temperature has cooled.
Forcing the door open will damage the door.
NOTE
It may become necessary to cancel or interrupt a
self clean cycle due to excessive smoke or fire in
the oven. To cancel the Self Clean function, touch
Stop in the display or turn the Oven Mode knob
to OFF position.
During Self Clean
•The self clean cycle uses extremely hot
temperatures to clean the oven cavity. While
running the Self Clean cycle, you may notice
smoking or an odor.
This is normal, especially if the oven is heavily
soiled.
•As the oven heats, you may hear sounds of metal
parts expanding and contracting. This is normal
and will not damage the oven.
•Do not force the oven door open when the lock
is displayed. The oven door remains locked until
the oven temperature has cooled. Forcing the door
open will damage the door.
NOTE
•The Self Clean cycle cannot be started if the
Lockout feature is active.
•Once the Self Clean cycle is set, the oven door
will lock automatically. You will not be able to
open the oven door until the oven is cooled.
The lock will release automatically.
•Once the door has been locked, the lock
indicator light stops flashing and remains on.
Allow about 15 seconds for the oven door lock
to activate.
•If the clock is set for a 12 hour display (default)
the Delayed Self Clean can never be set to
start more than 12 hours in advance.
•After the oven is turned off, the convection
fan keeps operating until the oven has cooled
down.
After the Self Clean Cycle
•The oven door will remain locked until the oven
temperature has cooled.
•You may notice some white ash in the oven. Wipe
it off with a damp cloth or a non-scratch scrub pad
after the oven cools. If the oven is not clean after
one clean cycle, repeat the cycle.
•If oven racks were left in the oven and do not slide
smoothly after a clean cycle, wipe racks and rack
supports with a small amount of vegetable oil to
make them glide more easily.
•Fine lines may appear in the porcelain because it
went through heating and cooling. This is normal
and will not affect performance.

39
MAINTENANCE
ENGLISH
Steam Feeder Tank
The steam feeder tank is used during the steam cooking
functions. Use filtered, softened water if possible.
NOTE
•After using the steam function, the steam feeder
tank should be drained. To avoid bacteria or
odors, clean and dry the steam feeder tank
after every use.
•Do not clean in a dishwasher.
•If the steam feeder tank does
not slide in as smoothly as it
should, clean the bottom of
the tank.
Hard Water Scale
If hard water is used in the steam feeder tank,
the steam generator may become clogged with
hard water scale. In areas with hard water, run the
Descaling function frequently or use softened water.
Cleaning Scale on Oven
Bottom
To remove mineral deposits that remain on the oven
bottom after using the steam mode, use a cloth
or sponge soaked in vinegar or a weak citric acid
solution. For more stubborn or extensive scaling, use
the Descaling function.
Descaling
Use this function to remove the white deposits that
form after the steam generator is used for a long
period.
The Descaling function runs for 1 hour 43 minutes.
Water will come out of the steam generator while it is
being cleaned.
For instructions on removing and filling the steam
feeder tank, see "Using the Steam Feeder Tank."
Setting Descaling
1Fill the steam feeder tank with a 20:1 mixture of
water and citric acid. For example, use 4 tsp of
citric acid in 4
1
/
4
cups water (20 g citric acid in
1000 ml water).
2Insert the steam feeder tank into the slot over the
oven cavity and push it in until it clicks into place.
3Turn the Oven Mode knob to select Clean mode.
Touch Steam Maintenance and Descaling in that
order.
4After 1 hour 43 minutes of descaling, a popup will
appear in the display. Following the instructions,
drain the tank and fill it with clean water.
5Insert the tank and start the Rinsing function.
6Once the Rinsing function is complete, dry
the inside of the oven with a soft cloth. Leave
the oven door open and allow the oven to dry
completely.
NOTE
•The Rinsing function must be completed even if
the Descaling function is canceled.
•If water remains on the oven bottom after
descaling, it can leave a residue after the
oven is used. To remove the residue, see the
instructions under "Cleaning Scale on Oven
Bottom."
•After running the Descaling function, clean the
steam feeder tank.
Drying
The Drying function removes residual water inside
the steam generator. The function takes a little over
1 minute and runs automatically after any steam
cooking cycle. The Drying function can also be
started manually, if needed.
Setting Drying
1Make sure that the steam feeder tank is empty.
2Turn the Oven Mode knob to select Clean mode.
Touch Steam Maintenance and Drying in that
order.
3Touch Start to begin Drying. The remaining time
appears in the display.
Evaporation
Use the Evaporation function to dry the oven cavity
after a steam cooking cycle. Evaporation runs for 12
minutes.
Setting Evaporation
1Turn the Oven Mode knob to select Clean mode.
Touch Steam Maintenance and Evaporation in
that order.
2Touch Start to begin Evaporation. The remaining
time appears in the display.

40 MAINTENANCE
BENEFITS OF SpeedClean™
•Helps loosen light soils before hand-cleaning
•SpeedClean™ only uses water; no chemical
cleaners
•Makes for a better Self Clean experience
−Delays the need for a Self Clean cycle
−Minimizes smoke and odors
−Can allow shorter Self Clean time
When to use SpeedClean™
Suggested
Cleaning Method Example of Oven Soiling Soil Pattern Types of
Soils
Common Food Items
That Can Soil Your Oven
SpeedClean™
Small drops or
spots
Cheese
or other
ingredients
Pizza
Light splatter Fat/grease
Steaks, broiled
Fish, broiled
Meat roasted at low
temperatures
Self Clean*
Medium to
heavy splatter Fat/grease Meat roasted at high
temperatures
Drops or spots
Filling or
Sugar based
soils
Pies
Cream or
tomato
sauce
Casseroles
* The Self Clean cycle can be used for soil that has been built up over time.
SpeedClean™
SIGNATURE KITCHEN SUITE'S new oven with
SpeedClean™ enamel technology provides
two cleaning options for the oven interior. The
SpeedClean™ feature takes advantage of
SIGNATURE KITCHEN SUITE'S new enamel to help
lift soils without harsh chemicals, and it runs using
ONLY WATER for just 10 minutes in low temperatures
to help loosen LIGHT soils before hand-cleaning.
While SpeedClean™ is quick and effective for small
and LIGHT soils, the Self Clean feature can be
used to remove HEAVY built up soils. The intensity
and high heat of the Self Clean cycle may result in
smoke which will require the opening up of windows
to provide ventilation. Compared to the more intense
Self Clean process, your SIGNATURE KITCHEN
SUITE oven gives you the option of cleaning with
LESS HEAT, LESS TIME, and virtually NO SMOKE
OR FUMES.
When needed, your oven still provides the Self Clean
option for longer, more thorough cleaning for heavier,
built up soils.

41
MAINTENANCE
ENGLISH
Cleaning Tips
•Allow the oven to cool to room temperature before
using the SpeedClean™ cycle.
•A plastic spatula can be used as a scraper to
scrape off any chunks or debris before and during
oven cleaning.
•Using the rough side of a non-scratch scouring pad
may help to take off burnt-on stains better than a
soft sponge or towel.
•Certain non-scratch scrubbing sponges, such as
those made of melamine foam, available at your
local stores, can also help improve cleaning.
•The oven should be level to ensure that the bottom
surface of the oven cavity is entirely covered by
water at the beginning of the SpeedClean™ cycle.
•For best results, use distilled or filtered water. Tap
water may leave mineral deposits on the oven
bottom.
•Soil baked on through several cooking cycles will
be more difficult to remove with the SpeedClean™
cycle.
•Do not open the oven door during the
SpeedClean™ cycle. Water will not get hot enough
if the door is opened during the cycle.
•For hard to reach areas such as the back surface
of the oven, it is better to use the Self Clean cycle.
CAUTION
•Do not use oven cleaners, harsh chemical
cleaners, bleach, vinegar, steel scouring pads,
or abrasive pads or cleansers to clean the
oven, as they can permanently damage the
oven surface.
•Do not clean the gasket.
SpeedClean™ Instruction Guide
1Remove oven racks and accessories from the
oven.
2Scrape off and remove any burnt-on debris with
a plastic scraper.
Suggested plastic scrapers:
•Hard plastic spatula
•Plastic pan scraper
•Plastic paint scraper
•Old credit card
3If cleaning the oven, fill the steam feeder tank to
the maximum fill line with water.
4Turn the Oven Mode knob to select the Clean
mode. Then select SpeedClean in the display.
5Touch Start. The remaining time appears in the
display.
CAUTION
•Some surfaces may be hot after the
SpeedClean™ cycle. Wear rubber gloves while
cleaning to prevent burns.
•During the SpeedClean™ cycle, the oven
bottom becomes hot enough to cause burns.
Wait until the cycle is over before wiping the
inside surface of the oven. Failure to do so may
result in burns.
•Avoid leaning or resting on the oven door glass
while cleaning the oven cavity.
6A tone will sound at the end of the 10-minute
cycle. turn the Oven Mode knob to the OFF
position to clear the display and end the tone.
7After the cleaning cycle and during hand-
cleaning, enough water should remain on the
oven bottom to completely submerge all soils.
Add water if necessary. Place a towel on the
floor in front of the oven to capture any water
that may spill out during hand-cleaning.

42 MAINTENANCE
8Clean the oven cavity immediately after the
SpeedClean™ cycle by scrubbing with a wet,
non-scratch scouring sponge or pad. (The
scouring side will not scratch the finish.) Some
water may spill into the bottom vents while
cleaning, but it will be captured in
a pan under the oven cavity and
will not hurt the burner.
NOTE
DO NOT use any steel scouring pads, abrasive
pads or cleaners as these materials can
permanently damage the oven surface.
9Once the oven cavity is cleaned, wipe any
excess water with a clean dry towel. Replace
racks and any other accessories.
10 If some light soils remain, repeat the above
steps, making sure to thoroughly soak the
soiled areas. If stubborn soils remain after
multiple SpeedClean™ cycles, run the Self
Clean cycle. Be sure that the oven cavity is
empty of oven racks and other accessories,
and that the oven cavity surface is dry before
running the Self Clean cycle. Consult the Self
Clean section for further details.
NOTE
•The cavity gasket may be wet when the
SpeedClean™ cycle finishes. This is normal.
Do not clean the gasket.
•If mineral deposits remain on the oven bottom
after cleaning, use a cloth or sponge soaked in
vinegar to remove them.
•Using commercial oven cleaners or bleach to
clean the oven is not recommended.
Instead, use a mild liquid cleanser with a PH
value below 12.7 to avoid discoloring the
enamel.
Cleaning the Exterior
Painted Surfaces
For general cleaning, use a cloth with hot soapy
water. For more difficult soils and built-up grease,
apply a liquid detergent directly onto the soil. Leave it
on for 30 to 60 minutes. Rinse with a damp cloth and
dry. Do not use abrasive cleaners.
Stainless Steel Surfaces
To avoid scratches, do not use steel wool pads.
1Place a small amount of stainless steel
appliance cleaner or polish on a damp cloth or
paper towel.
2Clean a small area, rubbing with the grain of the
stainless steel if applicable.
3Dry and buff with a clean, dry paper towel or soft
cloth.
4Repeat as necessary.
NOTE
•Do not use a steel wool pad. it will scratch the
surface.
•To clean the stainless steel surface, use warm
sudsy water or a stainless steel cleaner or
polish.
•Always wipe in the direction of the metal
surface finish.
•Stainless steel appliance cleaner or polish can
be purchased online or from most retailers of
appliances or home goods.

43
MAINTENANCE
ENGLISH
Oven Door
•Use soapy water to thoroughly clean the oven door.
Rinse well. DO NOT immerse the door in water.
•You may use a glass cleaner on the outside glass
of the oven door. DO NOT spray water or glass
cleaner on the door vents.
•DO NOT use oven cleaners, cleaning powders, or
harsh abrasive cleaning materials on the outside of
the oven door.
•DO NOT clean the oven door gasket. The oven
door gasket is made of a woven material that is
essential for a good seal. Care should be taken not
to rub, damage, or remove this gasket.
CAUTION
Do not use harsh cleaners or harsh abrasive
cleaning materials on the outside of the oven
door. Doing so can cause damage.
Do not hand
clean oven
door gasket
Remove
any debris
from door
Broiler Pan and Grid
•Do not store a soiled broiler pan or grid anywhere
in the oven.
•Do not clean the broiler pan or grid in the self
cleaning mode.
•Remove the grid from the pan. Carefully pour out
the grease from the pan into a proper container.
•Wash and rinse the broiler pan and grid in hot water
with a soap-filled or plastic scouring pad.
•If food has burned on, sprinkle the grid with cleaner
while hot and cover with wet paper towels or a
dishcloth. Soaking the pan will remove burned-on
foods.
•Both the broiler pan and grid may be cleaned with a
commercial oven cleaner or in the dishwasher.
Oven Racks
Remove the oven racks before operating the Self
Clean cycle. Leaving the racks in place could cause
discoloration.
If the racks are cleaned in the Self Clean cycle, their
color will turn slightly blue and the finish will be dull.
After the Self Clean cycle is complete and the oven
has cooled, rub the sides of the racks with wax paper
or a cloth containing a small amount of oil. This will
make the racks glide more easily into the rack tracks.
Oven Cavity
DO NOT use oven cleaners.
NEVER wipe a warm or hot porcelain surface with a
damp sponge; it may cause chipping or crazing (tiny
hairlike cracks). Food spills should be cleaned when
the oven cools. At high temperature, foods react with
porcelain and a permanent dull spot can result. When
cleaning a spot, use only non-abrasive cleaners or
scrubbers.

44 MAINTENANCE
Changing the Oven Light
The oven light is a standard 25-watt halogen bulb.
WARNING
•Make sure that the oven and bulb are cool.
•Disconnect the electrical power to the oven at
the main fuse or circuit breaker panel. Failure
to do so can result in severe personal injury,
death, or electrical shock.
•Wear gloves while changing the oven light.
Glass fragments from broken bulbs can cause
risk of injury.
•Gently twist the screwdriver blade while
changing the oven light. If you apply force, the
glass or oven may crack.
To replace lamps located on the side wall:
•Make sure oven and bulb are cool.
1Unplug oven or disconnect power.
2Remove oven racks.
3Slide a flat blade screwdriver between the
housing and the glass light cover.
4Support the glass light cover with two fingers to
prevent the cover from falling to the bottom of the
oven.
Glass Light Cover
Flat blade screwdriver
5Gently twist the screwdriver blade to loosen the
glass light cover and remove it.
Housing
6Remove bulb from socket.
7Replace the bulb, and snap the light cover back
into place.
8Plug in oven or reconnect power.
Removing and Replacing the
Oven Door
CAUTION
•The door is very heavy. Be careful when
removing and lifting the door.
•DO NOT lift the door by the handle. The handle
is not designed to support the weight of the
door and could break.
•DO NOT hit the glass with pots, pans, or any
other object.
•Scratching, hitting, jarring or stressing the glass
may weaken its structure, causing an increased
risk of breakage at a later time.
Removing the Oven Door
1Fully open the door.
2Unlock the hinge on both sides, rotating them as
far toward the open door frame as they will go.
Slot
Unlock
Lock
Hinge lock
Hinge arm
3Firmly grasp both sides of the door at the top.
4Close the door to the removal position
(approximately 5 degrees) which is halfway
between the broil stop position and fully closed.
If the position is correct, the hinge cams will
move freely.
about 5°
Removal Position
5Lift door up and out until the hinge cams are
clear of the slots.

45
MAINTENANCE
ENGLISH
Replacing the Door
1Firmly grasp both sides of the door at the top.
2With the door at the same angle as the removal
position, seat the indentation of the hinge cams
into the bottom edge of the hinge slots. The
notch in the hinge cams must be fully seated into
the bottom edge of the slots.
Hinge arm
Bottom
edge of slot
Indentation
3Open the door fully. If the door will not open fully,
the indentation is not seated correctly in the
bottom edge of the slots.
4Lock the hinges on either side of the door,
rotating them back toward the slots in the oven
frame until they lock.
Hinge arm
Hinge lock
Push hinge locks up to lock
5Close the oven door.
Door Care Instructions
Most oven doors contain glass that can break.
CAUTION
•Do not close the oven door until all the oven
racks are fully in place.
•Do not hit the glass with pots, pans, or any
other object.
•Scratching, hitting, jarring, or stressing the
glass may weaken its structure causing an
increased risk of breakage at a later time.

46 TROUBLESHOOTING
TROUBLESHOOTING
FAQs
My new oven doesn’t cook like my old one. Is
there something wrong with the temperature
settings?
No, Your oven has been factory tested and calibrated.
For the first few uses, follow your recipe times and
temperatures carefully. If you still think your new
oven is too hot or too cold, you can adjust the oven
temperature yourself to meet your specific cooking
needs. Refer to the Temperature Adjustment section,
page 13, for easy instructions on how to adjust your
thermostat.
Is it normal to hear a clicking noise coming from
the back of my oven when I am using it?
Your new oven is designed to maintain a tighter
control over your oven’s temperature. You may
hear your oven’s heating elements “click” on and off
more frequently on your new oven. This is a normal
operation.
During convection cooking the fan stops when I
open the door. Is that normal?
Yes, this is normal. When the door is opened, the
convection fan will stop until the door is closed.
Can I use aluminum foil to catch drippings in my
oven cavity?
Never use aluminum foil to line the bottom or sides
of the oven. The foil will melt and stick to the bottom
surface of the oven, and will not be removable. Use
a sheet pan placed on a lower oven rack to catch
drippings instead. (If foil has already melted onto the
bottom of the oven, it will not interfere with the oven’s
performance.)
Can I use aluminum foil on the racks?
Do not cover racks with aluminum foil. Covering
entire racks with foil restricts air flow, leading to poor
cooking results. Use a sheet pan lined with foil under
fruit pies or other acidic or sugary foods to prevent
spillovers from damaging the oven finish.
CAUTION
Foil may be used to wrap food in the oven, but
do not allow the foil to come into contact with the
exposed heating/broiling elements in the oven.
The foil could melt or ignite, causing smoke, fire,
or injury.
Can I leave my racks in the oven when running a
Self Clean cycle?
No. Although it will not damage the racks, it will
discolor them and may make them hard to slide in
and out during use. Remove all items from the oven
before starting a Self Clean cycle.
What should I do if my racks are sticky and have
become hard to slide in and out?
Over time, the racks may become hard to slide in
and out. Apply a small amount of olive oil to the ends
of the racks. This will work as a lubricant for easier
gliding.
Should I broil with the door open or closed?
Your oven isn't designed for open door broiling. If you
broil with the oven door open, it can damage the oven
knobs and display.
Why aren't the function buttons working?
Make sure that the oven is not in Lockout mode. The
lock symbol will show in the display if Lockout is
activated. To deactivate Lockout, tap the display to
see the unlock popup. Press UNLOCK for 3 seconds
to cancel the lockout function. The lock icon will
disappear at the upper right in the display.
My oven is still dirty after running the
SpeedClean™ cycle. What else should I do?
The SpeedClean™ cycle only helps to loosen light
soils in your oven to assist in hand-cleaning of your
oven. It does not automatically remove all soils
after the cycle. Some scrubbing of your oven is
required after running the SpeedClean™ cycle.
I tried scrubbing my oven after running
SpeedClean™, but some soils still remain. What
can I do?
The SpeedClean™ feature works best when
the soils are fully soaked and submerged in
water before running the cycle and during hand-
cleaning. If soils are not sufficiently soaked in water,
it can negatively affect the cleaning performance.
Repeat the SpeedClean™ process using sufficient
water. Sugar-based and certain greasy soils are
especially hard to clean. If some stubborn soils
remain, use the Self Clean feature to thoroughly
clean your oven.

47
TROUBLESHOOTING
ENGLISH
Soils on my oven walls are not coming off. How
can I get the oven walls clean?
Soils on the side and rear walls of your oven may be
more difficult to fully soak with water. Try repeating
the SpeedClean™ process with more than the 1/5
cup (2 oz or 60 ml) spray recommended.
Will SpeedClean™ get all of the soils and stains
out completely?
It depends on the soil type. Sugar-based and certain
grease stains are especially hard to clean. Also, if
stains are not sufficiently soaked in water, this can
negatively affect cleaning performance. If stubborn
or built-up stains remain, use the Self Clean
feature. Refer to the Self Clean section of this
manual.
Are there any tricks to getting some of the
stubborn soils out?
Scraping the soils with a plastic scraper before
and during hand-cleaning is recommended. Fully
saturating soils with water is also recommended.
However, certain types of soil are harder to clean than
others. For these stubborn soils, the Self Clean
cycle is recommended. Consult the Self Clean
section of this manual for details.
Is it safe for my convection fan, broil burner or
heater element to get wet during SpeedClean™?
Yes. The convection fan, broil burner or heater
element may get a little wet during cleaning. However,
direct spray onto the broil burner and heater elements
is not necessary because these are self-cleaning
during regular use.
I see “smoke” coming out of my oven's vents
during SpeedClean™. Is this normal?
This is normal. This is not smoke. It is actually water
vapor (steam) from the water in the oven cavity. As
the oven heats briefly during SpeedClean™, the
water in the cavity evaporates and escapes through
the oven vents.
How often should I use SpeedClean™?
SpeedClean™ can be performed as often as you
wish. SpeedClean™ works best when your oven is
LIGHTLY soiled from such things as LIGHT grease
splatter and small drops of cheese. Please refer to
the SpeedClean™ section in your owner's manual for
more information.
What is required for SpeedClean™?
A spray bottle filled with 10 oz (300 ml) of water, a
plastic scraper, a nonscratch scrubbing pad and a
towel. You should not use abrasive scrubbers such as
heavy-duty scouring pads or steel wool.

48 TROUBLESHOOTING
Before Calling for Service
Before you call for service, review this list. It may save you time and expense.
The list includes common occurrences that are not the result of defective workmanship or materials in this
appliance.
Symptoms Possible Causes / Solutions
Oven control beeps
and displays any F
error code.
•Electronic control has detected a fault
condition. Touch any button and turn
any knob once to clear the display
and stop the beeping. Reprogram
oven.
If fault reoccurs, record fault number.
Clear the display and stop the
beeping. Then contact a qualified
service technician.
CODE CAUSE
F-19 No heating
Oven will not work
•Plug on oven is not completely inserted in the electrical outlet.
−Make sure electrical plug is plugged into a live, properly grounded outlet.
•A fuse in your home may be blown or the circuit breaker tripped.
−Replace the fuse or reset the circuit breaker.
•Oven controls improperly set.
See the Using the Oven section.
•Oven too hot.
−Allow the oven to cool to below locking temperature.
•Service wiring is not complete. Contact your appliance service person for
assistance.
•Power outage. Check house lights to be sure. Call your local electric company
for service.
Oven light does not
work.
•Replace or tighten bulb. See Changing the Oven Light section in this Owner’s
Manual.
Oven smokes
excessively during
broiling.
•Control not set properly. Follow instructions under Setting Oven Controls.
•Meat too close to the element. Reposition the rack to provide proper clearance
between the meat and the element. Preheat broil element for searing.
•Meat not properly prepared. Remove excess fat from meat. Cut remaining fatty
edges to prevent curling, but do not cut into lean.
•Grid on broiler pan upside down and grease not draining. Always place grid on
the broiler pan with ribs up and slots down to allow grease to drip into pan.
•Grease has built up on oven surfaces. Regular cleaning is necessary when
broiling frequently. Old grease or food spatters cause excessive smoking.
Food does not bake
or roast properly
•Oven controls improperly set.
−See the Using the Oven Section.
•Rack position is incorrect or the rack is not level.
−See the Using the Oven Section.
•Incorrect cookware or cookware of improper size being used.
−See the Using the Oven Section.
•Oven sensor needs to be adjusted.
−See Temperature Adjustment in the Changing Oven Settings section.

49
TROUBLESHOOTING
ENGLISH
Symptoms Possible Causes / Solutions
Food does not broil
properly
•Oven controls improperly set.
−See the Broil Section.
•Improper rack position being used.
−See the Broiling Guide.
•Cookware not suited for broiling.
−Use the broiling pan and grid that came with your oven.
•Aluminum foil has been used on the broiling pan, grid has not been fitted
properly, or slits are not on correct side.
−See the Using the Oven Section.
•In some areas the power (voltage) may be low.
−Preheat the broil element for 10 minutes.
−See the Broiling Guide.
Oven temperature too
hot or too cold
•Oven Sensor needs to be adjusted.
−See Temperature Adjustment in the Changing Oven Settings section.
Oven will not self
clean
•The oven temperature is too high to set a Self Clean operation.
−Allow the oven to cool and reset the controls.
•Oven controls improperly set.
−See the Self Clean section.
•A Self Clean cycle cannot be started if oven door is open.
Crackling or popping
sound
•This is the sound of the metal heating and cooling during both the cooking and
cleaning functions.
−This is normal.
Excessive smoking
during a Self Clean
cycle
•Excessive soil.
−Set both Oven Mode knobs to the OFF position or press the STOP button.
Open the windows to rid the room of smoke. Wait until the Self Clean mode is
cancelled. Wipe up the excess soil and restart the Self Clean cycle.
Oven door does not
open after a Self
Clean cycle
•Oven is too hot.
−Allow the oven to cool below locking temperature.
Oven not clean after a
Self Clean cycle
•Oven controls not properly set.
−See the Self Clean section.
•Oven was heavily soiled.
−Clean up heavy spillovers before starting the clean cycle. Heavily soiled ovens
may need to self-clean again or for a longer period of time.
Door locked icon
shows in the display
when you want to
cook
•The oven door is locked because the temperature inside the oven has not
dropped below the locking temperature.
−Press the STOP button. Allow the oven to cool.
Burning or oily odor
emitting from the vent
•This is normal in a new oven and will disappear in time.
−To speed the process, set a Self Clean cycle for a minimum of 3 hours. See
the Self Clean section.

50 TROUBLESHOOTING
Symptoms Possible Causes / Solutions
Cooling fan continues
to run after oven is
turned off
•The fan turns off automatically when the electronic components have cooled
sufficiently.
−This is normal.
Warm air venting into
kitchen after oven has
been turned off.
•Warm air exhaust is needed to maintain and cool down oven temperatures. It
turns off automatically when the heat cools to a safe temperature.
−This is normal.
Moisture collects on
oven window or steam
comes from oven vent
•This is normal when cooking foods high in moisture.
•Excessive moisture was used when cleaning the window.
Oven will not steam
cook
•Make sure to slide the tank into the slot until it clicks into place.
•The drain in the water tank may be clogged with hard water scale. If this
happens, the descaling function must be run before the steam function can be
used.
Water pools in the
bottom of the oven
during or after steam
cooking
•During steam cooking, the water in the water tank is transferred to the bottom of
the oven. It is normal for water to fill the bottom of the oven during or after the
Steam mode.
•If the water leaves mineral deposits on the oven bottom, remove the deposits
with a cloth or sponge soaked in vinegar.
White residue appears
on the oven bottom
after steam cooking
•Using hard water in the water tank can result in hard water scale on the oven
bottom.
•To remove mineral deposits that remain on the oven bottom, use a cloth or
sponge soaked in vinegar or a weak citric acid solution.
Trouble connecting
appliance and
smartphone to Wi-Fi
network
•The password for the Wi-Fi network was entered incorrectly.
−Delete your home Wi-Fi network and begin the registration process again.
•Mobile data for your smartphone is turned on.
−Turn off the Mobile data on your smartphone before registering the appliance.
•The wireless network name (SSID) is set incorrectly.
−The wireless network name (SSID) should be a combination of English letters
and numbers. (Do not use special characters.)
•The router frequency is not 2.4 GHz.
−Only a 2.4 GHz router frequency is supported. Set the wireless router to
2.4 GHz and connect the appliance to the wireless router. To check the router
frequency, check with your Internet service provider or the router manufacturer.
•The appliance is too far from the router.
−If the appliance is too far from the router, the signal may be weak and the
connection may not be configured correctly. Move the router closer to the
appliance or purchase and install a Wi-Fi repeater.
The sous vide
module beeps during
operation
•This alert sounds when the sous vide module is operated without water in the
steam feeder tank.
−Fill the steam feeder tank to the recommended level before using.

51
WARRANTY
ENGLISH
WARRANTY (USA)
Should your SIGNATURE KITCHEN SUITE Oven ("Product") fail due to a defect in materials or workmanship
under normal and proper use, during the warranty period set forth below, SIGNATURE KITCHEN SUITE will, at
its option, repair or replace the Product. This limited warranty is valid only to the original retail purchaser of the
Product and applies only when purchased lawfully and used within the United States including U.S. Territories.
WARRANTY PERIOD HOW SERVICE IS HANDLED
Three (3) years from the date of
original retail purchase.
Any part of the oven that fails due to a defect in materials or
workmanship. During this full three-years warranty, SIGNATURE
KITCHEN SUITE will also provide, free of charge, all labor and in-
home service to replace the defective part.
•Replacement Products and parts are warranted for the remaining portion of the original warranty period or
ninety (90) days, whichever is greater.
•Replacement Products and parts may be new, reconditioned, refurbished, or otherwise factory remanufactured.
•Replaced Product or part(s) will be the property of SIGNATURE KITCHEN SUITE.
•Proof of original retail purchase specifying the Product model and date of purchase is required to obtain
warranty service under this limited warranty.
EXCEPT TO THE EXTENT PROHIBITED BY APPLICABLE LAW, ANY IMPLIED WARRANTY OF
MERCHANTABILITY OR FITNESS FOR A PARTICULAR PURPOSE ON THE PRODUCT IS LIMITED IN
DURATION TO THE DURATION OF THE ABOVE LIMITED WARRANTY. UNDER NO CIRCUMSTANCES
SHALL SIGNATURE KITCHEN SUITE OR ITS U.S. DISTRIBUTORS/DEALERS BE LIABLE FOR ANY
INDIRECT, INCIDENTAL, CONSEQUENTIAL, SPECIAL, OR PUNITIVE DAMAGES, INCLUDING, WITHOUT
LIMITATION, LOST GOODWILL, LOST REVENUES OR PROFITS, WORK STOPPAGE, IMPAIRMENT OF
OTHER GOODS, COST OF REMOVAL AND REINSTALLATION OF THE PRODUCT, LOSS OF USE, OR ANY
OTHER DAMAGES WHETHER BASED IN CONTRACT, TORT, OR OTHERWISE. SIGNATURE KITCHEN
SUITE’S TOTAL LIABILITY, IF ANY, SHALL NOT EXCEED THE PURCHASE PRICE PAID BY YOU FOR THE
PRODUCT.
SOME STATES DO NOT ALLOW THE EXCLUSION OR LIMITATION OF INCIDENTAL OR CONSEQUENTIAL
DAMAGES OR LIMITATIONS ON HOW LONG AN IMPLIED WARRANTY LASTS, SO THE ABOVE
EXCLUSIONS OR LIMITATIONS MAY NOT APPLY TO YOU. THIS LIMITED WARRANTY GIVES YOU
SPECIFIC LEGAL RIGHTS AND YOU MAY ALSO HAVE OTHER RIGHTS THAT VARY FROM STATE TO
STATE.
THIS LIMITED WARRANTY DOES NOT APPLY TO:
•Service trips to deliver, pick up, or install, educate how to operate, correct wiring, or correct unauthorized
repairs.
•Damage or failure of the Product to perform during power failures and interrupted or inadequate electrical
service.
•Damage or failure caused by leaky or broken water pipes, frozen water pipes, restricted drain lines, inadequate
or interrupted water supply or inadequate supply of air.
•Damage resulting from operating the product in a corrosive atmosphere or contrary to the product owner’s
manual.
•Damage or failure to the Product caused by accidents, pests and vermin, lightning, wind, fire, floods, acts of
God, or any other causes beyond the control of SIGNATURE KITCHEN SUITE.
•Damage or failure of the Product caused by unauthorized modification or alteration, or if the Product is used
for other than the intended purpose, or any water leakage where the Product was not properly installed.
•Damage or failure of the Product caused by incorrect electrical current, voltage, or plumbing codes.
•Damage or failure of the Product caused by transportation, storage, and/or handling, including scratches,
dents, chips, and/or other damage to the finish of the Product, unless such damage is reported within one (1)
week of delivery.

52 WARRANTY
•Damage or failure of the Product resulting from misuse, abuse, improper installation, repair, or maintenance.
Improper repair includes the use of parts not authorized by SIGNATURE KITCHEN SUITE.
Improper installation or maintenance includes installation or maintenance contrary to the Product owner’s
manual.
•Damage or failure of the Product caused by the use of parts, components, accessories, consumable cleaning
products, or any other products or services that were not authorized by SIGNATURE KITCHEN SUITE.
•Damage or missing items to any display or open box Product.
•Refurbished Product or any Product sold “As Is”, “Where Is”, “With all Faults”, or similar disclaimer.
•Products with original serial numbers that have been removed, altered, or cannot be readily determined.
•Increases in utility costs and additional utility expenses.
•Any noises associated with normal operation.
•Products used for other than normal and proper household use (e.g., commercial or industrial use) or contrary
to the Product owner’s manual.
•Costs associated with removal and reinstallation of the Product for repairs, or the removal and reinstallation of
the Product if it is installed in an inaccessible location or not installed in accordance with the Product Owner's
manual.
•Accessories, removable components, or consumable parts (e.g. Shelves, door bins, drawers, water/air filters,
racks, light bulbs, batteries, etc., as applicable), except for internal/functional parts covered under this limited
warranty.
This warranty is extended to the original purchaser for products purchased for home use within the U.S.A. In
Alaska, the warranty excludes the cost of shipping or service calls to your home. Some states do not allow the
exclusion or limitation of incidental or consequential damages, so this exclusion or limitation may not apply to
you. This warranty gives you specific legal rights, and you may also have other rights which vary from state to
state. To know what your legal rights are, consult your local or state consumer affairs or your state’s Attorney
General.
CUSTOMER ASSISTANCE INFORMATION:
To Prove Warranty Coverage Retain your Sales Receipt to prove date of purchase.
A copy of your Sales Receipt must be submitted at the
time warranty service is provided.
To Obtain the Nearest Authorized Service Center
or Sales Dealer, or to Obtain Product, Customer,
or Service Assistance
Call 1-855-790-6655 (Phone answered 24 hours -
365 days a year) and choose the appropriate prompt from
the menu; or visit our website at:
www.signaturekitchensuite.com;
or by mail: SIGNATURE KITCHEN SUITE Customer
Service P.O. Box 240007 Huntsville, AL 35813 ATTN: CIC

ESPAÑOL
MFL51224531_05
SKSSV3001S
MANUAL DEL PROPIETARIO
HORNO DE CONVECCIÓN
ELÉCTRICO EMPOTRADO
www.signaturekitchensuite.com
Copyright © 2020 - 2023 Signature Kitchen Suite. Todos los Derechos Reservados.

2ÍNDICE
ÍNDICE
3 INSTRUCCIONES IMPORTANTES
DE SEGURIDAD
7 DESCRIPCIÓN GENERAL DEL
PRODUCTO
7 Partes
8 Accesorios
9 FUNCIONAMIENTO
9 Descripción general del panel de control
10 Guía de inicio
10 Cambio de la configuración del horno
10 Configuración
10 Bloqueo
11 Fecha y hora
11 Aspecto del reloj
11 Modo sabbat
12 Wi-Fi
12 Inicio remoto
12 Brillo
12 Pantalla
12 Conversión automática a convección
13 Selección de idioma
13 Volumen
13 Luz de alarma de precalentamiento
13 Ajuste de la temperatura
13 Unidades de temperatura
14 Smart Diagnosis™
14 Actualización del programa
14 Modo de demostración
14 Restablecimiento de los datos de fábrica
14 Licencia de código abierto
14 Enfriamiento del horno
15 Temporizador
15 Uso del horno
15 Antes de usar el horno
15 Extracción y colocación de los estantes
estándar del horno
16 Colocación de estantes y bandejas
16 Ventilación del horno
16 Uso de los estantes deslizantes del horno
17 Hornear
18 Modos de convección
19 RapidHeat Roast+
20 Asar
21 Guía de recomendaciones para asar
23 Calentar
24 Leudar
24 Sonda
27 Mi receta
27 Cocción automática
28 Guía del cocción automática
29 Guía para cocinar al vapor al estilo gourmet
30 Función de vapor
31 Inicio remoto
32 Cocción al vacío (Sous Vide)
33 FUNCIONES INTELIGENTES
33 Aplicación LG ThinQ
34 Función Smart Diagnosis™
36 Aviso de la FCC
36 Declaración sobre exposición a la radiación de
RF de la FCC
37 MANTENIMIENTO
37 Self Clean (Autolimpieza)
39 Tanque del alimentador de vapor
39 Limpieza de sarro en la base del horno
39 Descalcificación
39 Secado
39 Evaporación
40 SpeedClean™
42 Limpieza del Exterior
44 Cómo cambiar la luz del horno
44 Extracción y reemplazo de la puerta del horno
46 SOLUCIÓN DE PROBLEMAS
46 PREGUNTAS FRECUENTES
48 Antes de llamar al servicio técnico
51 GARANTÍA

3
INSTRUCCIONES IMPORTANTES DE SEGURIDAD
ESPAÑOL
INSTRUCCIONES IMPORTANTES DE SEGURIDAD
Lea y siga todas las instrucciones antes de utilizar el horno para evitar riesgos de incendios,
descargas eléctricas, lesiones personales o daños cuando lo utilice. Esta guía no incluye todas las
situaciones posibles que podrían ocurrir. Siempre comuníquese con su agente de servicio técnico o
con el fabricante cuando haya problemas que no comprenda.
Descargue este manual del usuario en: www.signaturekitchensuite.com
Este es el símbolo de alerta de seguridad. Este símbolo le advierte sobre posibles
riesgos que pueden ocasionar daños materiales, lesiones personales graves o la
muerte. El símbolo de alerta de seguridad siempre estará acompañado de las palabras
"ADVERTENCIA" o "PRECAUCIÓN". Estos términos significan lo siguiente:
ADVERTENCIA -
Indica una situación peligrosa que, de no evitarse, podría causar
lesiones graves o la muerte.
PRECAUCIÓN -
Indica una situación peligrosa que, de no evitarse, podría causar
lesiones menores o moderadas.
PRECAUCIONES DE SEGURIDAD
•Asegúrese de que un técnico calificado instale el electrodoméstico correctamente y lo conecte a
tierra.
•No repare ni reemplace ninguna parte del electrodoméstico, excepto en caso de que haya
recomendaciones específicas en el manual.
•Un técnico calificado debe estar a cargo de todas las demás tareas de mantenimiento.
•Siempre desconecte el electrodoméstico de la electricidad antes de realizar el mantenimiento
desenchufándolo, quitando el fusible o utilizando el disyuntor.
•NO TOQUE LOS QUEMADORES NI LAS SUPERFICIES INTERIORES DEL HORNO.
Los quemadores podrían mantenerse a altas temperatura incluso cuando presenten un color
oscuro. Las superficies interiores del horno se calientan lo suficiente como para causar quemaduras.
Durante y después del uso, no toque ni permita que la vestimenta u otro material inflamable entren
en contacto con las hornallas o las superficies interiores del horno, hasta que hayan tenido tiempo
suficiente para enfriarse. Otras superficies del electrodoméstico pueden calentarse lo suficiente
como para causar quemaduras. Algunas de estas superficies son la ventilación del horno y las
superficies cercanas a las mismas, la puerta del horno y los visores de las puertas.
•Abra la puerta del horno con cuidado.
Permita que el aire caliente o el vapor salgan del horno antes de sacar o colocar nuevamente los
alimentos en el horno.
•No caliente recipientes cerrados de alimentos.
Una acumulación de presión puede hacer que los recipientes revienten y provoquen lesiones.
•Mantenga la abertura de ventilación del horno sin
obstrucciones.
La abertura de ventilación puede calentarse durante el uso del
horno. Nunca bloquee esta ventilación y nunca coloque elementos
plásticos o sensibles al calor sobre la ventilación o cerca de ella.
Rejilla metálica del
piso (ventilación)
NOTA
•Para que el horno funcione correctamente, debe estar instalada la rejilla de ventilación.

4INSTRUCCIONES IMPORTANTES DE SEGURIDAD
ADVERTENCIA
•NUNCA utilice su electrodoméstico para calefaccionar el ambiente.
•NO UTILICE agua para apagar incendios provocados por grasa. Si se produce un incendio
en el horno, mantenga la puerta del horno cerrada y apáguelo. Si el fuego continúa, arroje
bicarbonato de sodio sobre el fuego o utilice un extinguidor.
•Utilice únicamente agarraderas secas. Las agarraderas húmedas o mojadas sobre superficies
calientes podrían producir quemaduras por vapor. No permita que la agarradera toque los
quemadores. No use paños de cocina de toalla u otra tela gruesa.
•No utilice el horno ni el cajón para almacenar objetos. No se deben guardar materiales
inflamables dentro ni sobre el horno.
•Use vestimenta adecuada. Nunca se deben usar prendas holgadas o que cuelguen al usar el
electrodoméstico.
•Revise el contenido del horno antes de usar las funciones de Wi-Fi.
•Asegúrese de retirar todos los materiales del electrodoméstico antes de ponerlo en
funcionamiento. Mantenga el plástico, las telas y el papel lejos de las partes del electrodoméstico
que se podrían calentar.
•NO fuerce la puerta del horno para abrirla. Podría dañar el sistema automático de bloqueo de la
puerta. Tenga cuidado cuando abra la puerta del horno después del ciclo de autolimpieza. Póngase
junto al horno cuando abra la puerta para dejar que salgan el aire y el vapor calientes. El horno
todavía puede estar MUY CALIENTE.
•NO use lana de acero para limpiar. Este elemento rayará la superficie.
•NO utilice limpiadores ásperos, abrasivos ni espátulas de metal filosas para limpiar el vidrio
de la puerta del horno, ya que podrían rayar la superficie. Esto podría hacer que se astille el
vidrio.
•Tenga cuidado cuando quite y levante la puerta.
•NO levante la puerta de la manija. La puerta es muy pesada.
•NO se pare ni se siente sobre la puerta del horno. Asegúrese de seguir las instrucciones de
instalación correspondientes.
MATERIALES INFLAMABLES
ADVERTENCIA
Asegúrese de retirar todos los materiales del electrodoméstico antes de la puesta en
funcionamiento. Mantenga el plástico, telas, papel y otros materiales inflamables lejos de las
partes del electrodoméstico que se podrían calentar.
•No almacene materiales inflamables en el horno, incluidos papel, plástico, agarraderas, telas,
recubrimientos para paredes, cortinas y gasolina u otros vapores inflamables y líquidos como grasa
o aceite de cocina. Estos materiales pueden prenderse fuego cuando el horno está en uso.
•Use solo recipientes de cocina seguros para el horno. Los materiales inflamables como el papel y el
plástico pueden prenderse fuego cuando el horno está en uso.
•Use vestimenta adecuada. No use prendas holgadas o que cuelguen, ya que podrían prenderse
fuego en contacto con superficies calientes y causar quemaduras graves.
•No utilice el horno para secar ropa. Solo use el horno para el propósito para el que fue diseñado.
•Si tiene gabinetes de almacenamiento directamente sobre el horno, guarde allí los objetos que use
con poca frecuencia y que puedan almacenarse de manera segura en un lugar expuesto al calor.
Las altas temperaturas pueden ser peligrosas para objetos volátiles como líquidos inflamables,
limpiadores o aerosoles.

5
INSTRUCCIONES IMPORTANTES DE SEGURIDAD
ESPAÑOL
SEGURIDAD ELÉCTRICA
•Revestimientos de protección. No utilice papel de aluminio ni ningún otro material para revestir
la base del horno. La instalación inadecuada de estos revestimientos podría causar riesgo de
descarga eléctrica o incendio.
•No permita que el papel de aluminio ni la sonda para carne entren en contacto con los quemadores.
ADVERTENCIA
•NO coloque papel aluminio directamente
sobre la base del horno.
No use papel
aluminio
•NO recubra las paredes del horno, los estantes, la base ni ninguna otra parte del horno con
papel aluminio ni ningún otro material. Hacer esto interrumpe la distribución de calor, produce
resultados de horneado deficientes y causa daños permanentes al interior del horno (el papel
aluminio se fundirá en la superficie interior del horno).
•Antes de reemplazar la lamparita de su horno, desconecte la energía eléctrica del horno
desde el fusible principal o el panel de disyuntores. El no hacerlo podría causar lesiones graves,
descargas eléctricas o la muerte.
SEGURIDAD DURANTE EL USO
•Estantes del horno. Siempre acomode los estantes del horno en la posición deseada solo
cuando el horno esté frío.
•Utilice siempre agarraderas o guantes para horno cuando retire alimentos del horno.
Los recipientes o platos calientes pueden provocar quemaduras.
•Utilice con precaución las funciones TIMED BAKE (HORNEADO TEMPORIZADO) o DELAYED
TIMED BAKE (HORNEADO TEMPORIZADO RETARDADO). Utilice el reloj temporizador
automático al cocinar carnes curadas o congeladas y la mayoría de las frutas y los vegetales.
Los alimentos que pueden echarse a perder fácilmente como la leche, huevos, pescado,
carne o aves se deben enfriar primero en el refrigerador. Incluso si están fríos, no deben
permanecer en el horno durante más de 1 hora antes de iniciar la cocción y se los debe
retirar rápidamente una vez que la cocción haya terminado. Ingerir alimentos en mal estado
puede producir intoxicaciones alimentarias.
•Si se produce un incendio en el horno, mantenga la puerta del horno cerrada y apáguelo. Si
el fuego continúa, arroje bicarbonato de sodio sobre el fuego o utilice un extinguidor.
•NO arroje agua ni harina sobre el fuego. La harina podría ser explosiva y el agua podría hacer
que un incendio causado por grasa se propague y cause lesiones personales.
•NO utilice la asadera sin su rejilla. NO cubra la rejilla con papel aluminio.

6INSTRUCCIONES IMPORTANTES DE SEGURIDAD
SEGURIDAD DE LOS NIÑOS
ADVERTENCIA
•Los niños deben mantenerse alejados del horno.
•Los accesorios podrían calentarse cuando se utiliza el asador.
PRECAUCIÓN
•No se debe dejar a los niños solos o sin supervisión en un área donde el electrodoméstico
está en uso. Nunca debe permitir que los niños se sienten o paren en ninguna parte del
electrodoméstico.
•NO deje a niños pequeños sin supervisión cerca del electrodoméstico. Durante el ciclo de
autolimpieza, el exterior del horno puede estar muy caliente al tacto.
SEGURIDAD AL LIMPIAR
•No limpie las juntas de la puerta del horno. La junta del horno es esencial para un buen sellado.
No debe frotar, dañar ni mover la junta.
•No utilice limpiadores para hornos. No debe utilizarse ningún limpiador de hornos comercial ni
ningún tipo de revestimiento de protección dentro o alrededor de ninguna parte del horno.
•Antes de realizar la autolimpieza del horno, retire la asadera, todos los estantes del horno, la
sonda para carne y cualquier otro utensilio de la cavidad del horno.
•Nunca deje aves domésticas en la cocina. La salud de las aves es sumamente sensible a los
gases liberados durante un ciclo de autolimpieza del horno. Los gases podrían ser nocivos o fatales
para las aves. Traslade las aves a un ambiente bien ventilado.
•Instrucción importante : En caso de que se muestre el código F de error de autolimpieza y
suene la melodía de error, el horno no está funcionando correctamente en el modo autolimpieza.
Desconecte la energía eléctrica del horno desde el fusible principal o el disyuntor y solicite
reparación del electrodoméstico a cargo de un técnico calificado.
•Asegúrese de que las luces del horno estén frías antes de limpiar. Limpie solo las partes
enumeradas en el manual.
•NO bloquee la ventilación del horno durante su
funcionamiento. Esto podría provocar daños en las partes
eléctricas del horno. El aire debe poder pasar sin obstrucciones.
La rejilla metálica de la base (ventilación) debe encontrarse
correctamente ensamblada en la parte inferior delantera del horno
antes de que se instale la puerta del mismo.
Rejilla metálica del
piso (ventilación)
MODO CORRECTO DE COCINAR CARNES Y AVES
Para evitar enfermedades transmitidas por los alimentos, cocine bien las carnes rojas y aves. La
USDA ha indicado las siguientes como las temperaturas internas mínimas de seguridad para el
consumo:
•Carne molida: 71 °C (160 °F)
•Aves: 74 °C (165 °F)
•Carne de vaca, ternera, cerdo o cordero: 63 °C (145 °F)
•Pescado/mariscos: 63 °C (145°F)

7
DESCRIPCIÓN GENERAL DEL PRODUCTO
ESPAÑOL
DESCRIPCIÓN GENERAL DEL PRODUCTO
Partes
Asegúrese de entender el nombre y la función de cada parte.
Panel de control
Tanque del alimentador de
vapor
Asadera y rejilla
Estantes estándar
Estantes deslizantes (2)
Puerta del horno
Junta
Etiqueta de calicación,
placa de número de serie y
modelo
Separador (2)
- Uno en cada lado
NOTA
•El número de serie y modelo se pueden verificar en la etiqueta de calificación.

8DESCRIPCIÓN GENERAL DEL PRODUCTO
Accesorios
Asegúrese de que todas las partes están incluidas después de comprar este producto.
Accesorios para cocinar
Rejilla Estante estándar de alta
resistencia
Asadera Estante deslizante
(2)
Sonda para carne
Accesorios para la instalación
4X14
6 tornillos de madera para el montaje
(2 se necesitan para la instalación y
4 son adicionales)
4X24
6 tornillos de madera para el montaje
(para instalación empotrado)
4X22
2 tornillos autorroscantes para
la cubierta
2 soportes de la cubierta para
la instalación empotrada
4X10
Tornillos (2)
(Para el reborde decorativo inferior)
Reborde decorativo inferior
(1)
Manuales
Manual del propietario Guía de instalación
NOTA
•Póngase en contacto con el Servicio de Atención al Cliente de SIGNATURE KITCHEN SUITE si le falta algún accesorio.
•Para su seguridad y para extender la vida útil del producto, solo debe utilizar componentes autorizados.
•El fabricante no es responsable del mal funcionamiento del producto ni de accidentes causados por el uso de piezas no
autorizadas y compradas por separado.
•Las imágenes de esta guía podrían ser diferentes a los componentes y accesorios reales, que están sujetos a cambios a
discreción del fabricante, sin previo aviso, con fines de mejorar el producto.
•No quite los estantes deslizantes ubicados en el empaque de la base.

9
FUNCIONAMIENTO
ESPAÑOL
FUNCIONAMIENTO
Descripción general del panel de control
1 23 4
1 Perilla de modo Oven
2 Perilla de temperatura
3 Pantalla LCD Encendida/Apagada
4 Pantalla táctil LCD para horno
Íconos de visualización
1 2
3 4 5 6 7 8
*Los íconos aparecen en la pantalla cuando
están activados.
1Ícono de temporizador
Presione para establecer un temporizador
2Ícono de lámpara
Presione para encender/apagar la luz
3Ícono de enfriamiento del horno
Aparece durante o después del funcionamiento del
horno para indicar que está funcionando el ventilador de
enfriamiento en el horno
4Ícono de sonda
Aparece cuando la sonda está conectada
5Ícono de conversión automática
Aparece cuando la conversión automática a convección
está encendida
6 Ícono de Wi-Fi
•Aparece cuando la cocina está conectada a Wi-Fi
•Aparece cuando la cocina está desconectada de Wi-Fi
o no está registrada
7Ícono de inicio remoto
Aparece cuando el inicio remoto está activo
8Ícono de bloqueo
Aparece cuando el bloqueo está activado

10 FUNCIONAMIENTO
Guía de inicio
Después del primer encendido, ajuste la configuración para
adaptarla a sus preferencias.
1Presione POWER (ENCENDER) en la pantalla LCD.
2Después de la animación de inicio, seleccione el idioma
deseado y presione NEXT (SIGUIENTE).
3Deslícese por los campos hacia arriba y abajo
para establecer la fecha correcta y presione NEXT
(SIGUIENTE).
4Configure la hora correcta y elija entre formato de hora
de 12 horas o de 24 horas. Luego presione NEXT
(SIGUIENTE).
5Si lo desea, cambie la melodía del reloj predeterminada
navegando por los ejemplos. Luego presione NEXT
(SIGUIENTE).
6Lea la guía de aplicación en la pantalla y presione DONE
(LISTO).
7Gire la perilla de modo Oven (Horno).
8La pantalla de modo aparece en pantalla.
Cambio de la configuración del
horno
Conguración
Para ajustar las configuraciones antes del encendido inicial,
toque la pantalla para abrir la pantalla Principal. Presiones
Settings (Configuración) en la parte inferior central de la
pantalla principal.
Desplácese por la pantalla o presione las flechas <> para
navegar por las pantallas de Settings (Configuración).
Ubicación de las configuraciones
•Página 1: Bloqueo, fecha y hora, aspectos del reloj, modo
Sabbath (Sabbat), configuración de Wi-Fi, Inicio remoto
•Página 2: Brillo, pantalla, conversión automática a
convección, Selección de idioma, volumen, luz de alarma de
precalentamiento
•Página 3: Ajuste de la temperatura, unidades de
temperatura, Smart Diagnosis™, actualización del programa,
modo demostración, restablecimiento de los datos de fábrica
•Página 4: Licencia de código abierto
Bloqueo
La función bloqueo evita que se activen automáticamente la
mayoría de los controles del horno. No inhabilita el reloj, el
temporizador ni la luz interior del horno.
Bloqueo
1Presione Settings (Configuración) en la parte inferior
central de la pantalla principal.
2Presione Lockout (Bloqueo) en la primera pantalla de
Settings (Configuración).
3Cuando la función bloqueo está activada, aparece
el ícono de un candado en la parte superior de la
pantalla.

11
FUNCIONAMIENTO
ESPAÑOL
Desbloqueo
1Presione cualquier parte de la pantalla mientras el
bloqueo está activado.
2Aparecerá una pantalla emergente. Presione Unlock
(Desbloquear) durante 3 segundos.
3Desaparecerá el ícono del candado de la parte superior
de la pantalla.
Fecha y hora
La fecha y la hora se muestran en la pantalla LCD cuando no
se utiliza el horno.
Configuración de la fecha
1Presione Settings (Configuración) en la parte inferior
central de la pantalla principal. Luego presione
Date & Time (Fecha y hora) en la pantalla Settings
(Configuración).
2Presione Date (Fecha) y deslícese para establecer la
fecha correcta.
3Presione OK (Aceptar).
Configuración de la hora
1Presione Settings (Configuración) en la parte inferior
central de la pantalla principal. Luego presione
Date & Time (Fecha y hora) en la pantalla Settings
(Configuración).
2Presione Time (Hora) y deslícese para establecer la hora
correcta. También puede presionar el ícono del teclado
numérico e ingresar los números deseados.
3Seleccione el modo de reloj de 12 horas o 24 horas
(12H/24H).
4Presione OK (Aceptar).
Aspecto del reloj
Hay disponibles seis aspectos del reloj diferentes, incluidos
varios relojes análogos y digitales.
Seleccionar un aspecto para el reloj
1Presione Settings (Configuración) en la parte inferior
central de la pantalla principal.
2Presione Clock Themes (Aspecto del reloj) en la primera
pantalla de Settings (Configuración) y deslícese para
navegar por los distintos estilos.
3Seleccione un aspecto para el reloj y presione OK
(Aceptar).
Modo sabbat
El modo sabbat se usa para el sabbat y otras fiestas de la
comunidad judía.
Mientras el horno está en el modo sabbat, no se pueden
cambiar la temperatura, y el temporizador, la luz y las
funciones de alarma están desactivados. En la pantalla solo
aparecerán el modo de cocción y la temperatura establecida.
NOTA
•Si la luz del horno está ENCENDIDA y el modo
SABBATH está activo, la luz del horno se APAGARÁ.
Si la luz del horno debe estar apagada, asegúrese de
que lo esté antes de activar el modo SABBAT. El modo
SABBATH solo se puede usar en el modo Bake.
Configurar el modo sabbat
1Desconecte la sonda. La función de la sonda no está
disponible en el modo sabbat.
2Presione Settings (Configuración) en la parte inferior
central de la pantalla principal y presione sabbat en la
primera pantalla de Settings (Configuración).
3Configure la temperatura y el tiempo de cocción
deseados. Puede configurarse cualquier tiempo de
cocción desde 1 minuto a 73 horas 59 minutos.
4Para detener el modo sabbat, presione POWER
(ENCENDER) en la pantalla LCD.
NOTA
•Si se configura un tiempo de cocción, el horno se apaga
automáticamente al final de ese tiempo de cocción,
sin emitir ningún sonido. El horno permanece en modo
sabbat pero está apagado.
•Si no se configura un tiempo de cocción, el horno no se
apagará automáticamente.
•Después de un corte de energía, la pantalla volverá al
modo sabbat pero el horno estará apagado.

12 FUNCIONAMIENTO
Wi-Fi
Conecte el artefacto a una red de Wi-Fi doméstica para utilizar
el Inicio remoto y otras funciones inteligentes. Diríjase a la
sección Funciones Inteligentes para más detalles.
Configuración de Wi-Fi
1Presione Settings (Configuración) en la parte inferior
central de la pantalla principal y presione Wi-Fi en la
primera pantalla de Settings (Configuración).
2Siga las instrucciones en la Guía de Wi-Fi que se
muestran en la pantalla.
3Seleccione ON (ENCENDIDO), OFF (APAGADO) o
RESET (REINICIAR) y presione OK (Aceptar).
4Si está seleccionado ON (ENCENDIDO), aparecerá el
ícono de Wi-Fi en la parte superior de la pantalla.
5Seleccionar RESET (REINICIAR) registra la dirección IP.
Inicio remoto
Inicia o detiene de forma remota la función de precalentar del
electrodoméstico. El electrodoméstico debe estar registrado en
una red Wi-Fi doméstica para utilizar el Inicio remoto.
Configuración del inicio remoto
1Presione Settings (Configuración) en la parte inferior
central de la pantalla principal y presione Remote
Start (Inicio remoto) en la primera pantalla de Settings
(Configuración).
2Seleccione ON (ENCENDIDO) u OFF (APAGADO) y
presione OK (Aceptar).
3Si está seleccionado ON (ENCENDIDO), aparecerá
el ícono de Inicio remoto en la parte superior de la
pantalla.
Brillo
Ajuste el brillo de la pantalla LCD de 20 % a 100 % en
incrementos de 20 %.
Configuración del brillo de la pantalla
1Presione Settings (Configuración) en la parte inferior
central de la pantalla principal, pase a la segunda pantalla
de Settings (Configuración) y presione Brightness (Brillo).
22 Ajuste el brillo de la pantalla presionando y arrastrando
el punto a lo largo de la barra, al tocar en cualquier lugar
sobre la barra o tocando + o -
3Presione OK (Aceptar).
Pantalla
Establezca la duración de tiempo antes de que la pantalla
entre en modo de suspensión.
Puede seleccionar entre tres opciones.
•ON (ENCENDIDO): Siempre encendida
•OFF (APAGADO): Se apaga automáticamente si está
inactiva por 30 minutos.
•Night OFF (APAGADO nocturno): Se apaga desde las 10
p. m. hasta las 5 a. m.
Configuración de las opciones de pantalla
1Presione Settings (Configuración) en la parte inferior
central de la pantalla principal, pase a la segunda pantalla
de Settings (Configuración) y presione Display (Pantalla).
2Seleccione la opción deseada.
3Presione OK (Aceptar).
Conversión automática a convección
No hay necesidad de recordar convertir las temperaturas de
una receta estándar para cocinar a convección. La conversión
automática a convección resta 14 °C/25 °F de la temperatura
configurada automáticamente cuando se selecciona un modo
de cocción a convección. La temperatura convertida aparece
en la pantalla una vez que finaliza el precalentamiento.
Por ejemplo, seleccione Convection Bake (Horneado por
convección) e ingrese 176 °C (350 °F). La temperatura se
convertirá automáticamente a 163 °C (325 °F) y mostrará la
temperatura convertida.
La función Convection Auto Conversion (Conversión
automática a convección) está ON (ENCENDIDA) en forma
predeterminada. Encender o apagar la función Convection
Auto Conversion (Conversión automática a convección)
Turning Convection Auto Conversion On/Off
1Presione Settings (Configuración) en la parte inferior
central de la pantalla principal, pase a la segunda pantalla
de Settings (Configuración) y presione Convection Auto
Conversion (Conversión automática a convección)
2Seleccione ON (ENCENDIDO) u OFF (APAGADO).
3Cuando la función Convection Auto Conversion
(Conversión automática a convección) está ON
(ENCENDIDA), aparece un ícono en la parte superior
de la pantalla.
NOTA
Si la función Convection Auto Conversion (Conversión
automática a convección) está ON (ENCENDIDA),
el ícono parpadea en la pantalla mientras se está
cocinando en modo de convección.

13
FUNCIONAMIENTO
ESPAÑOL
Selección de idioma
Configure el idioma de la pantalla para inglés, español o
francés.
Seleccionar un idioma
1Presione Settings (Configuración) en la parte inferior
central de la pantalla principal, pase a la segunda
pantalla de Settings (Configuración) y presione Language
Selection (Selección de idioma).
2Seleccione el idioma deseado.
3Presione OK (Aceptar).
Volumen
Ajuste el volumen de los controles del horno.
Configurar el volumen
1Presione Settings (Configuración) en la parte inferior
central de la pantalla principal, pase a la segunda
pantalla de Settings (Configuración) y presione Volume
(Volumen).
2Seleccione Mute (Silenciar), Low (Bajo) o High (Alto).
3Presione OK (Aceptar).
Luz de alarma de precalentamiento
Cuando el horno alcanza la temperatura configurada, la luz de
alarma de precalentamiento parpadeará 5 veces o hasta que
se abra la puerta del horno.
Usted puede encender o apagar la luz de alarma de
precalentamiento.
Configurar la alarma de precalentamiento
1Presione Settings (Configuración) en la parte inferior
central de la pantalla principal, pase a la segunda
pantalla de Settings (Configuración) y presione Preheat
Alarm Light (Luz de alarma de precalentamiento).
2Seleccione ON (ENCENDIDO) u OFF (APAGADO).
3Presione OK (Aceptar).
Ajuste de la temperatura
El horno nuevo podría cocinar de manera diferente a su
horno anterior. Use el horno nuevo durante algunas semanas
para familiarizarse con él antes de cambiar los ajustes de
temperatura. Si, después de familiarizarse con el horno, sigue
pensando que la temperatura es muy alta o muy baja puede
ajustarla.
NOTA
Para comenzar, suba o baje el termostato 8 °C (15 °F).
Pruebe el horno con la nueva configuración. Si el horno
aún necesita ajuste, suba o baje nuevamente el termostato
y utilice el primer ajuste como referencia medidora.
Por ejemplo, si el ajuste fue excesivo, suba o baje el
termostato 10 °F (5 °C). Si el ajuste no fue suficiente,
suba o baje el termostato 20 °F (12 °C). Proceda de
esta manera hasta que el horno quede ajustado para su
satisfacción.
Ajuste del termostato
1Presione Settings (Configuración) en la parte inferior
central de la pantalla principal, pase a la segunda
pantalla de Settings (Configuración) y presione
Temperature Adjustment (Ajuste de la temperatura).
2Para hacer ajustes grandes, arrastre el indicador
central hacia los extremos + o - de la escala o presione
una ubicación en la misma. Para hacer pequeños
ajustes, presione + o - para subir o bajar el termostato
en incrementos de 1 grado. Presione y mantenga
presionado + o - para deslizarse hacia arriba o abajo de
la escala.
3Cuando aparezca el cambio deseado sobre el indicador,
presione OK (Aceptar).
Unidades de temperatura
Configure la visualización de la temperatura del horno para
que muestre unidades Fahrenheit o Celsius.
El ajuste predeterminado del horno es en unidades Fahrenheit,
a menos que lo cambie el usuario.
Configuración de unidades de temperatura
1Presione Settings (Configuración) en la parte inferior
central de la pantalla principal, pase a la segunda
pantalla de Settings (Configuración) y presione
Temperature Units (Unidades de temperatura).
2Seleccione °F o °C.
3Presione OK (Aceptar).

14 FUNCIONAMIENTO
Smart Diagnosis™
Puede ejecutar el Smart Diagnosis™ desde una aplicación
en su teléfono o llamando al Servicio Técnico. Coloque el
micrófono de su teléfono cerca de la esquina superior izquierda
de la pantalla. Consulte "Función Smart Diagnosis" en la
sección Funciones inteligentes para obtener instrucciones
detalladas.
1Presione Settings (Configuración) en la parte inferior
central de la pantalla principal, pase a la segunda
pantalla de Settings (Configuración) y presione Smart
Diagnosis (Diagnóstico inteligente).
2Presione START (INICIO) para iniciar el tono de
diagnóstico.
Actualización del programa
Una vez que el electrodoméstico está conectado a una
red Wi-Fi doméstica, utilice esta configuración para buscar
actualizaciones del programa e instalarlas.
1Presione Settings (Configuración) en la parte inferior
central de la pantalla principal, pase a la tercera pantalla
de Settings (Configuración) y presione Program Update
(Actualización del programa).
2La pantalla muestra las actualizaciones de programa
disponibles. Presione UPDATE (ACTUALIZAR) para
descargar e instalar la nueva versión.
Modo de demostración
Este modo solo se usa con fines demostrativos. El horno no
calentará.
1Presione Settings (Configuración) en la parte inferior
central de la pantalla principal y presione Demo Mode
(Modo de demostración) en la pantalla de Settings
(Configuración).
2Seleccione el modo ON (ENCENDIDO) u OFF
(APAGADO).
3Presione OK (Aceptar).
NOTA
•Cuando está encendido el modo de demostración, el
electrodoméstico no calentará.
•Cuando este modo está encendido aparecerá el ícono
del modo de demostración en la pantalla.
Restablecimiento de los datos de
fábrica
Esta función regresará todas las configuraciones a los valores
predeterminados de fábrica.
1Presione Settings (Configuración) en la parte inferior
central de la pantalla principal, pase a la tercera pantalla
de Settings (Configuración) y presione Factory Data
Reset (Restablecimiento de los datos de fábrica).
2Si desea restablecer los datos a los valores
predeterminados de fábrica, presione RESET
(RESTABLECER) y luego OK (ACEPTAR).
ADVERTENCIA
•Se eliminarán todos los datos almacenados.
Licencia de código abierto
Esta pantalla muestra una lista de software de código abierto
que contiene este producto. Consulte las licencias indicadas
para conocer los términos y condiciones de su uso.
1Presione Settings (Configuración) en la parte inferior
central de la pantalla principal y pase a la cuarta pantalla
de Settings (Configuración).
2Licencia de código abierto.
Enfriamiento del horno
El ícono de enfriamiento del horno aparece en la pantalla si
la temperatura interior del horno es alta durante o después
del funcionamiento. El ícono desaparece si la temperatura del
horno es inferior a 100 °C (210 °F).

15
FUNCIONAMIENTO
ESPAÑOL
Temporizador
Los temporizadores del horno no afectan su funcionamiento
ni el tiempo de cocción. Utilícelos como temporizadores de
cocina extra. Una vez que termine el tiempo, el horno emite un
sonido y aparece "Time 1 or 2 finished" (Temporizador 1 o 2
finalizado) en la pantalla.
Configuración del temporizador
1Presione el ícono del reloj en la parte inferior de la
pantalla.
2Deslícese por los números que aparecen en la pantalla
emergente hasta que aparezca el tiempo deseado en la
pantalla, o presione el ícono del tablero numérico ( )
para ingresar los números directamente y presione OK
(ACEPTAR).
3Al lado del ícono del reloj en la pantalla aparece el tiempo
restante.
Ajuste o cancelación del temporizador
1Presione el tiempo restante que aparece al lado del
ícono del reloj en la pantalla.
2Para cancelar el temporizador presione Reset (Reiniciar)
() en la pantalla emergente. Luego presione OK
(ACEPTAR).
3Para ajustar el horario, deslícese por los números en
la pantalla emergente hasta que aparezca el horario
deseado. Luego presione OK (ACEPTAR).
4Se ajusta el tiempo restante en la pantalla.
Uso del horno
Antes de usar el horno
NOTA
•La temperatura registrada por un termómetro de horno
puede diferir de la temperatura del horno real.
•Es normal que el ventilador de convección funcione
durante el precalentamiento en un ciclo normal de
horneado.
•El motor del ventilador de convección podría funcionar
periódicamente durante un ciclo normal de horneado.
Extracción y colocación de los
estantes estándar del horno
Los estantes tienen un borde trasero doblado hacia arriba que
evita que se salgan por completo de la cavidad del horno.
PRECAUCIÓN
•Vuelva a colocar los estantes del horno antes de
encenderlo para evitar quemaduras.
•NO cubra los estantes con papel de aluminio ni ningún
otro material, ni coloque nada sobre la base del horno.
Si lo hace, podría generar un proceso de horneado
deficiente y dañar la base del horno.
•Acomode los estantes solo cuando el horno esté frío.
Extracción de los estantes
1Con los guantes para horno puestos, sujete el estante.
2Tire de él hacia afuera, sin inclinarlo, hasta que se
detenga.
3Levante el frente del estante.
4Retírelo.
Colocación de los estantes
1Con los guantes para horno puestos, coloque el extremo
del estante sobre el soporte.
2Incline el extremo frontal del estante hacia arriba.
3Empújelo hacia adentro.
4Verifique que haya quedado bien colocado.

16 FUNCIONAMIENTO
Colocación de estantes y bandejas
Si cocina en dos estantes:
Coloque los estantes estándar del horno en las posiciones B y
D.
Coloque los recipientes como se muestra a continuación. Si
hornea en más de una bandeja, colóquelas de modo tal que
cada una tenga un espacio libre de 1" a 1, como mínimo, a su
alrededor.
A
B
C
D
E
Horneado en varios estantes
Estante estándar (Posición B) Estante estándar (Posición D)
Horneado en un solo estante
Estante
Tipo de alimento Posición del estante
Bizcocho liviano, pasteles congelados C
Pasteles savarín o budines B
Galletas, muffins, brownies, galletitas,
cupcakes, pasteles en capas, tartas C
Estofados B
Pavo, rostizados o cordero A
Pizza congelada C
Pollo rostizado B
Cuando hornee pasteles y galletas en varios estantes, utilice el
modo Convection Bake (Horneado por convección) y coloque
los estantes en las posiciones B y D.
Ventilación del horno
•Las áreas cercanas a la ventilación podrían calentarse
durante el funcionamiento y causar quemaduras.
•No bloquee la abertura de ventilación en la parte inferior del
horno.
•Evite colocar plásticos cerca de la ventilación, ya que el
calor podría deformarlos o derretirlos.
•Es normal que se vea vapor cuando se cocinan alimentos
con un alto contenido de humedad.
Uso de los estantes deslizantes del
horno
Las estantes deslizantes se deslizan dentro y fuera de un
marco. Esto mantiene nivelados los recipientes pesados y
evita que se deslicen cuando el estante está completamente
extendido.
Instalación de los estantes deslizantes
1Comience con el estante en la posición cerrada.
Sostenga el estante con una mano en la parte central del
frente y la otra mano en la esquina trasera derecha.
2Introduzca cuidadosamente el estante entre las guías y
deslícelo hasta que quede en el lugar.
Guías de la
bandeja
3Una vez que el estante está asegurado en la parte
trasera, tire de él hacia afuera hasta que se bloquee en el
lugar.
Extracción de los estantes deslizantes
1Con el estante en la posición cerrada, tómelo del frente
y del marco y levántelo. Empuje suavemente el estante
hacia la pared trasera hasta que se libere del tope.
2Una vez que se libere del tope, levante la parte trasera
del estante y tire de él y del marco para sacarlos entre las
guías.
PRECAUCIÓN
•Para evitar quemaduras, coloque los estantes del horno
en la ubicación deseada antes de encenderlo.
•No cubra los estantes con papel de aluminio ni ningún
otro material, ni coloque nada sobre la base del horno.
Si lo hace, podría generar un proceso de horneado
deficiente y dañar la base del horno.

17
FUNCIONAMIENTO
ESPAÑOL
Hornear
Utilice BAKE (HORNEAR) para preparar alimentos como
pasteles, panes y estofados. Es posible programar el horno
para hornear a cualquier temperatura entre 170°F (80°C) y
550°F (285°C). La temperatura predeterminada es 350°F
(175°C).
Configuración del modo BAKE (HORNEAR)
1Gire la perilla de modo Oven (Horno) hasta seleccionar el
modo Bake (Hornear).
2Configure la temperatura del horno. Gire la perilla de
temperatura en sentido horario/antihorario, deslícese
por los números en la pantalla, o presione el ícono del
teclado numérico para ingresar directamente los
números.
3Si lo desea, configure el tiempo de cocción y el tiempo
de inicio retardado utilizando el mismo método. Presione
la tecla de la flecha en el costado derecho de la pantalla
para ver la configuración del tiempo de inicio retardado.
4Presione Start (Inicio). El horno comienza a precalentar.
5Si el tiempo de cocción está configurado, aparece el
tiempo restante en la pantalla. Si está configurado un
tiempo de inicio retardado, aparece el tiempo de inicio en
la pantalla.
6Una vez que el precalentamiento haya finalizado, suena
una alarma.
7Cuando termina el tiempo de cocción configurado suena
una alarma y aparece una notificación en la pantalla.
Abra la puerta del horno y retire los alimentos.
•Si no se configura un tiempo de cocción, el horno se
apagará automáticamente después de 12 horas.
Cambiar la configuración de cocción
1Presione Edit (Editar) en la pantalla para que aparezca la
pantalla Cook Settings (Configuración de cocción).
2Ajuste la configuración utilizando el teclado numérico o la
función de deslizamiento.
3Presione Start (Inicio).
Cómo detener la cocción
1Presione Stop (Detener) en la pantalla y seleccione
Yes (Sí) o gire la perilla de modo a la posición OFF
(APAGADO).
NOTA
Es normal que el ventilador de convección funcione
periódicamente durante un ciclo normal de horneado en el
horno. Esto sucede para asegurar resultados parejos de
horneado.
Sugerencias de horneado
Siga la receta o las directivas de cocción de alimentos por
convección para establecer la temperatura, el tiempo de
horneado y la posición del estante. El tiempo y la temperatura
de horneado variarán según los ingredientes, el tamaño y la
forma del recipiente que se utilice para hornear.
•Para obtener mejores resultados, los alimentos deben
colocarse en un solo estante con al menos 1" a 11/2" de
espacio para que pase el aire entre los recipientes y las
paredes del horno.
•Verifique el punto de cocción de los alimentos en el tiempo
mínimo.
•Use recipientes metálicos (con o sin acabado antiadherente),
de vitrocerámica templada, de cerámica u otro tipo de
recipiente recomendado para uso en el horno.
•Las bandejas metálicas oscuras o con revestimientos
antiadherentes cocinarán los alimentos más rápido y
quedarán más dorados. Los recipientes con aislamiento
prolongarán ligeramente el tiempo de cocción de la mayoría
de los alimentos.
NOTA
La base del horno tiene un acabado de porcelana
esmaltada.
Para facilitar la limpieza, proteja la base del horno de
derrames excesivos colocando una placa para horno
sobre el estante que está debajo de la que está usando
para cocinar.
Esto es especialmente importante al hornear un pastel
de frutas u otros alimentos con alto contenido de ácido.
Los rellenos frutales calientes u otros alimentos con alto
contenido de ácido pueden causar picaduras y daños en
la superficie de la porcelana esmaltada y se deben limpiar
de inmediato.

18 FUNCIONAMIENTO
Modos de convección
El horneado por convección y el rostizado por convección
utilizan un ventilador para hacer circular el calor de manera
pareja dentro del horno. Esto mejora la distribución del calor
y permite una cocción pareja y excelentes resultados, ya sea
que se cocine en un solo estante o en varios.
Los dos modos por convección en los que se puede programar
el horno para que cocine a temperaturas entre 170 °F (80 °C)
y 550 °F (285 °C). La temperatura predeterminada es 350°F
(175°C).
A
B
C
D
E
Utilización de la convección
1Gire la perilla de modo Oven (Horno) hasta seleccionar
el modo Conv. Bake (Hornear por convección) o Conv.
Roast (Asar por convección).
2Configure la temperatura. Gire la perilla de temperatura
en sentido horario/antihorario, deslícese por los números
en la pantalla, o presione el ícono del teclado numérico
para ingresar directamente los números.
3Si lo desea, configure el tiempo de cocción y el tiempo
de inicio retardado utilizando el mismo método. Presione
la tecla de la flecha en el costado derecho de la pantalla
para ver la configuración del tiempo de inicio retardado.
4Presione Start (Inicio). El horno comienza a precalentar.
5Si el tiempo de cocción está configurado, aparece el
tiempo restante en la pantalla. Si está configurado un
tiempo de inicio retardado, aparece el tiempo de inicio en
la pantalla.
6Una vez que el precalentamiento haya finalizado, suena
una alarma.
7Cuando termina el tiempo de cocción configurado suena
una alarma y aparece una notificación en la pantalla.
Abra la puerta del horno y retire los alimentos.
•Si no se configura un tiempo de cocción, el horno se
apagará automáticamente después de 12 horas.
Cambiar la configuración de cocción
1Presione Edit (Editar) en la pantalla para que aparezca la
pantalla Cook Settings (Configuración de cocción).
2Ajuste la configuración utilizando el teclado numérico o la
función de deslizamiento.
3Presione Start (Inicio).
Cómo detener la cocción
1Presione Stop (Detener) en la pantalla y seleccione
Yes (Sí) o gire la perilla de modo a la posición OFF
(APAGADO).
NOTA
El ventilador del horno funciona mientras se hornea y
rostiza por convección. El ventilador se detiene cuando la
puerta está abierta. En algunos casos, el ventilador podría
apagarse durante un ciclo de horneado por convección.
Sugerencias para hornear por convección
•Use el horneado por convección para cocinar más rápido y
de manera más pareja en varios estantes: pasteles, galletas,
muffins, galletitas y panes de todo tipo.
•Hornee galletas y galletitas en bandejas sin bordes o con
bordes muy bajos para que el aire caliente circule alrededor
de los alimentos. Los alimentos horneados en bandejas con
un acabado oscuro se cocinan más rápido.
•Cuando utilice la función de horneado por convección con
un solo estante, coloque el estante deslizante en la posición
C. Si cocina en varios estantes, coloque los estantes
deslizantes en las posiciones B y D (para dos estantes).
•La cocción en varios estantes del horno puede aumentar
ligeramente los tiempos de cocción para algunos alimentos.
•Los pasteles, las galletas y los muffins resultan mejores
cuando se usan varios estantes.
Rostizado por convección
La función para rostizar por convección está diseñada para
ofrecer resultados de rostizado óptimos. Combina la cocción
con el ventilador de convección para rostizar carnes y aves. El
aire caliente circula alrededor de los alimentos desde todos los
ángulos y sella los jugos y los sabores. Los alimentos quedan
dorados y crocantes por fuera y jugosos por dentro. La función
para rostizar por convección es ideal para cortes grandes de
carne tierna sin cubrir.
NOTA
Los quemadores y un ventilador se apagan
inmediatamente cuando se abre la puerta. Se vuelven a
encender aproximadamente 1 segundo después de que
se cierra la puerta. Pulse Stop (Detener) en la pantalla o
gire la perilla de modo Oven (Horno) hacia la posición OFF
(APAGADO) para cancelar el horneado por convección y
el asado por convección en cualquier momento.

19
FUNCIONAMIENTO
ESPAÑOL
Sugerencias para rostizar por convección
Use una asadera con rejilla al preparar carnes para rostizar
por convección, rostizado con RapidHeat y para asar. La
asadera recibe los derrames de grasa y la rejilla ayuda a evitar
salpicaduras de grasa.
1Coloque el estante del horno en la posición A o B.
Consulte la sección "Colocación de estantes y bandejas".
2Coloque la rejilla en la asadera.
3Coloque la asadera sobre el estante del horno.
Asadera
Rejilla
PRECAUCIÓN
•No utilice una rejilla sin una asadera.
•No cubra la rejilla con papel de aluminio.
•Posicione los alimentos con el lado de la grasa hacia
arriba sobre la rejilla.
RapidHeat Roast+
La función RapidHeat Roast (Rostizado RapidHeat) está
diseñada para rostizar aves. La combinación de calor intenso
de las hornallas superiores e inferiores y el aire caliente de los
quemadores traseros logra alimentos más crocantes y tiempos
de cocción más breves. El rostizado RapidHeat es especialmente
bueno para aves de tamaño mediano (alrededor de 1,5 kg [3,3
lb]).
La función RapidHeat Roast+ utiliza vapor para asar aves y
dejarlas más doradas.
NOTA
•El tiempo de cocción recomendado es de 55~65 minutos
para el horno para un pollo entero con un peso de 3,3 lb.
•Ajuste el tiempo de cocción según el peso del ave.
•Coloque el estante del horno en la posición B.
•La función de RapidHeat Roast+ (Rostizado RapidHeat)
está diseñada para reducir el tiempo de cocción. No es
necesario precalentar.
•Esta función está optimizada para cocinar aves, de
modo que la temperatura no se puede ajustar.
•Es normal que el ventilador funcione durante la función
de RapidHeat Roast+ (Rostizado RapidHeat) rápido.
•Si aparece el recordatorio de descalcificación, presione
OK (ACEPTAR) para ejecutar la función Descaling
(Descalcificación).
•Cuando la temperatura aumenta en el horno puede que
no sea visible el vapor.
•Tenga cuidado al abrir la puerta del horno durante o
después de cocinar al vapor. El vapor caliente puede
causar quemaduras.
•Después de cualquier ciclo de cocción al vapor, se
ejecutará la función de secado. Es normal escuchar el
funcionamiento de la bomba de vapor durante la función
de secado.
Configuración de la función RapidHeat Roast+ (Rostizado
RapidHeat)
1Gire la perilla de modo Oven (Horno) hasta seleccionar el
modo RapidHeat Roast+.
2Presione Start (Inicio).
3Si el tiempo de cocción está configurado, aparece el
tiempo restante en la pantalla. Si está configurado un
tiempo de inicio retardado, aparece el tiempo de inicio en
la pantalla.
•Asegúrese de que el tanque del alimentador de vapor esté
lleno de agua antes de iniciar el modo RapidHeat Roast+
(Rostizado RapidHeat).
Cambiar la configuración de cocción
1Presione Edit (Editar) en la pantalla para que aparezca la
pantalla Cook Settings (Configuración de cocción).
2Ajuste la configuración utilizando el teclado numérico o la
función de deslizamiento.
3Presione Start (Inicio).
Cómo detener la cocción
1Presione Stop (Detener) en la pantalla y seleccione
Yes (Sí) o gire la perilla de modo a la posición OFF
(APAGADO).

20 FUNCIONAMIENTO
Asar
La función de asar utiliza un calor intenso y radiante para
cocinar los alimentos. Durante el asado completo se calientan
los elementos asadores internos y externos. Durante el asado
central, solo se calienta el elemento asador interno. El ciclo
de lo(s) elemento(s) se enciende y apaga a intervalos para
mantener la temperatura del horno. La sonda para carne no se
puede utilizar con este modo.
Mantenga la puerta del horno cerrada durante el asado. Deje
que el horno se precaliente aproximadamente 5 minutos antes
de cocinar los alimentos.
PRECAUCIÓN
•NO utilice una rejilla sin una asadera. El aceite puede
provocar un incendio causado por grasa.
•NO cubra la rejilla ni la asadera con papel de aluminio.
Si lo hace, se prenderá fuego.
•Siempre use una asadera con rejilla para capturar el
exceso de grasa. Esto ayuda a reducir las salpicaduras,
el humo y las llamaradas ocasionales.
•Si se produce un incendio en el horno, mantenga
la puerta del horno cerrada y apáguelo. Si el fuego
continúa, arroje bicarbonato de sodio sobre el fuego o
utilice un extinguidor.
•NO arroje agua ni harina sobre el fuego.
−La harina podría ser explosiva y el agua podría hacer
que un incendio causado por grasa se propague y
cause lesiones personales.
NOTA
Este horno está diseñado para asar con la puerta
cerrada. Cierre la puerta para configurar la función
Asar. Si la puerta estuviera abierta, no será posible
configurar la función de Asar y en la pantalla aparecerá
la leyenda DOOR OPEN (PUERTA ABIERTA). Cierre
la puerta y vuelva a configurar la función Asar. Si abre
la puerta durante el asado, el quemador del asador se
apagará después de 5 segundos. El asador se enciende
automáticamente una vez que se cierra la puerta.
Configuración del modo BROIL (ASADO)
1Coloque los alimentos en la asadera con rejilla.
2Gire la perilla de modo Oven (Horno) hasta seleccionar el
modo Broil (Asado).
3Deslícese por las opciones para configurar la temperatura
deseada: Baja, Media o Alta. Si lo desea, deslícese para
configurar un tiempo de cocción.
4Presione Start (Inicio). Si el tiempo de cocción está
configurado, aparece el tiempo restante en la pantalla. La
puerta del horno debe estar cerrada durante la función de
asado.
5Deje que el horno se precaliente aproximadamente 5
minutos antes de cocinar los alimentos.
6Si el tiempo de cocción está configurado, aparece el
tiempo restante en la pantalla. Si está configurado un
tiempo de inicio retardado, aparece el tiempo de inicio en
la pantalla.
7Presione STOP (DETENER) para cancelar la cocción en
cualquier momento o cuando haya terminado de cocinar.
•Si no se configura un tiempo de cocción, el horno se
apagará automáticamente después de 3 horas.
Cómo cambiar la configuración de asado
1Presione Edit (Editar) en la pantalla para que aparezca la
pantalla Cook Settings (Configuración de cocción).
2Ajuste la configuración.
3Presione Start (Inicio).
Cómo detener el asado
1Presione Stop (Detener) en la pantalla y seleccione
Yes (Sí) o gire la perilla de modo a la posición OFF
(APAGADO).

21
FUNCIONAMIENTO
ESPAÑOL
Humo
Debido al calor intenso que se produce cuando se asa, es
normal que haya humo durante el proceso de cocción. Este
humo es un subproducto natural del sellado y no es motivo de
preocupación. Si se genera más humo del que puede tolerar,
aplique los siguientes consejos para reducir la cantidad de
humo del horno.
1Siempre use una asadera. Por seguridad, no use
sartenes ni placas para horno comunes.
2NUNCA utilice una asadera que no esté bien limpia y a
temperatura ambiente antes de comenzar a cocinar.
3SIEMPRE haga funcionar el sistema de ventilación de la
placa de cocción o la campana de ventilación mientras
asa.
4Mantenga el interior del horno lo más limpio posible. Los
residuos de comidas anteriores se pueden quemar o
encender.
5Evite los marinados grasos y los glaseados azucarados.
Estos aumentan la cantidad de humo que se genera. Si
desea usar un glaseado, aplíquelo al final de la cocción.
6Si hay una cantidad significativa de humo con cualquier
alimento, considere las siguientes opciones:
•Bajar el asador a la configuración LO (Bajo).
•Bajar el estante para cocinar los alimentos más lejos
del asador.
•Utilizar la configuración del asador en modo HI (Alto)
para lograr el nivel de sellado que desea y luego
cambiar a la configuración LO (Bajo) de la función
Asar o cambiar a la función BAKE (HORNEAR).
7Generalmente, los cortes de carne y pescados más
grasos siempre producirán más humo que los alimentos
más magros.
8Siga las recomendaciones de configuración para asar y
las pautas de cocción del cuadro de la página siguiente
siempre que sea posible.
NOTA
Los quemadores se apagan inmediatamente cuando se
abre la puerta. Se vuelven a encender aproximadamente
1 segundo después de que se cierra la puerta. Pulse Stop
(Detener) en la pantalla o gire la perilla de modo Oven
(Horno) hacia la posición OFF (APAGADO) para cancelar
el modo Broil (Emparrillar) en cualquier momento.
Guía de recomendaciones para asar
El tamaño, el peso, el espesor, la temperatura inicial y su
preferencia de cocción afectarán el tiempo de asado.
La siguiente guía se basa en carnes a temperatura de
refrigerador.
NOTA
Siempre use una asadera con rejilla cuando ase.
A
B
C
D
E

22 FUNCIONAMIENTO
Tabla de recomendaciones para asar
Alimento Cantidad o espesor
Posición
del
estante
Tiempo
del primer
lado (min.)
Tiempo del
segundo
lado (min.)
Comentarios
Carne molida 450 g (1 lb)
(4 hamburguesas)
1/2 a 3/4" de espesor
E 4-6 3-4 Espaciar de manera uniforme. Se pueden
asar hasta 9 hamburguesas.
Bistecs de
carne de vaca
Poco cocidos
Cocción media
Bien cocido
Poco cocidos
Cocción media
Bien cocido
1" de espesor
450 g a 680 g (1 a 1-1/2 lb)
1-1/2" de espesor
900 g a 1100 g (2 a 2-1/2 lb)
D
D
D
D
D
D
6
7
8
10
12
14
2–3
2–3
3–4
4–6
4–8
8–10
Los bistecs de menos de 1" de espesor se
cocinan totalmente antes de dorarse. Se
recomienda sellar en una sartén. Quitar la
grasa.
Pollo 1 corte entero de 900 g a
1100 g (2 a 2-1/2 lb),
dividido a lo largo
2 pechugas
C
C
20
20
6–8
6–10
Ase primero con el lado de la piel hacia
abajo.
Colas de
langosta
2–4
10 a 12 oz. cada una
C 12-14 No voltee. Corte la parte trasera del caparazón. Abra
bien. Pincele con mantequilla derretida
antes de asar y a la mitad de la cocción.
Filetes de
pescado
1/4 a 1/2” de espesor D o E 5-6 3–4 Mueva y voltee con mucho cuidado.
Pincele con mantequilla con limón antes
de la cocción y durante la cocción si lo
desea.
Lonjas de
jamón
(precocidas)
1/2” de espesor D 5 3–5 Aumente el tiempo de 5 a 10 minutos por
lado para un espesor de 1-1/2" o para
jamón casero.
Chuletas de
cerdo
Bien cocido
2 (1/2" de espesor)
2 (1" de espesor)
aproximadamente 450 g (1 lb)
D o E
D o E
7
9-10
6–8
7–9
Quitar la grasa.
Chuletas de
cordero
Cocción media
Bien cocidas
Cocción media
Bien cocidas
2 (1” de espesor)
aproximadamente 10 a 12 oz.
2 (1-1/2" de grosor)
aproximadamente 450 g (1 lb)
D
D
D
D
6
8
11
13
4–6
7–9
9
9–11
Quitar la grasa.
Filetes de
salmón
2 (1" de espesor)
4 (1" de espesor)
aproximadamente 450 g (1 lb)
D o E
D o E
8
9
3–4
4–6
Engrase la asadera. Pincele los filetes
con mantequilla derretida.

23
FUNCIONAMIENTO
ESPAÑOL
Consejos para asar
Carne de vaca
•Los bistecs y las chuletas siempre se deben dejar reposar
durante cinco minutos antes de cortarlos y comerlos. Esto
permite que el calor se distribuya uniformemente en el
alimento y resulta más tierno y jugoso.
•Los trozos de carne que tengan más de dos pulgadas de
espesor deberán retirarse del refrigerador 30 minutos antes
de su cocción. Esto permite una cocción más rápida y
uniforme, y produce menos humo al asar. Los tiempos de
cocción probablemente sean menores que los indicados en
el Cuadro para asar.
•En el caso de bistecs con hueso o chuletas cortadas a
la francesa (se retira toda la carne alrededor del hueso),
envuelva las partes expuestas del hueso en papel de
aluminio para que no se quemen demasiado.
Mariscos
•Cuando ase mariscos con su caparazón, siempre use la
configuración Medium (Medio) y siempre ase el lado de la
piel al final.
•Es mejor consumir los mariscos inmediatamente después
de la cocción. Si se dejan reposar los mariscos después de
la cocción, se secarán.
•Resulta buena idea aplicar una fina capa de aceite en la
superficie de la asadera antes de cocinar para evitar que se
pegue la comida, especialmente los pescados y mariscos.
También puede usar una capa fina de aerosol antiadherente.
Verduras
•Mezcle las verduras levemente en aceite antes de cocinarlas
para mejorar el dorado.
Calentar
El modo WARM (CALENTAR) mantiene una temperatura
del horno de 93 °C (200 °F) o menos. Utilice el modo Warm
(Calentar) para mantener los alimentos cocidos a temperatura
ambiente por hasta tres horas después de finalizado el ciclo
de cocción. No utilice el modo Warm (Calentar) para tratar de
cocinar alimentos o recalentar alimentos fríos.
Configuración del modo WARM (CALENTAR)
1Gire la perilla de modo Oven (Horno) hasta seleccionar el
modo Warm (Calentar).
2Deslícese por las opciones para configurar la temperatura
deseada: Baja, Media o Alta. Si lo desea, deslícese para
configurar un tiempo de funcionamiento.
3Presione Start (Inicio). Si el tiempo de funcionamiento
está configurado, aparece el tiempo restante en la
pantalla.
NOTA
•La función warm (calentar) tiene tres niveles de
temperatura:
Alta=93,3 °C (200 °F), Media=76,7 °C (170 °F),
Baja= 60 °C (140 °F)
NOTA
•La función WARM (CALENTAR) tiene como finalidad
mantener la comida caliente. No la utilice para bajar la
temperatura de los alimentos.
Cómo cambiar la configuración de la función Warm
(Calentar)
1Presione Edit (Editar) en la pantalla para que aparezca la
pantalla Cook Settings (Configuración de cocción).
2Ajuste la configuración como desee.
3Presione Start (Inicio).
Cancelación de la función Warm (Calentar)
1Presione Stop (Detener) en la pantalla y seleccione
Yes (Sí) o gire la perilla de modo a la posición OFF
(APAGADO).

24 FUNCIONAMIENTO
Leudar
La función Proof (Leudar) mantiene el horno cálido para
favorecer el leudado de la masa con levadura antes del
horneado.
NOTA
Para obtener mejores resultados, cubra la masa con
un paño o con un film plástico. (Puede que el plástico
deba quedar sujetado debajo del recipiente para que el
ventilador del horno no lo sople).
Configuración del modo PROOF (LEUDAR)
Esta función mantiene el horno tibio para leudar productos con
levadura antes de hornearlos.
1Gire la perilla de modo Oven (Horno) hasta seleccionar el
modo Proof (Leudar).
2Deslícese por los números para configurar un tiempo de
leudado o presione el teclado numérico para ingresar
el número directamente.
3Presione Start (Inicio). El tiempo restante de leudado
aparece en la pantalla.
•Si no se configura un tiempo de leudado, el horno se
apagará automáticamente después de 12 horas.
Cancelación de la función Proof (Leudar)
1Presione Stop (Detener) en la pantalla y seleccione
Yes (Sí) o gire la perilla de modo a la posición OFF
(APAGADO).
NOTA
•Para evitar que la temperatura del horno baje y que
se prolongue el tiempo de leudado, no abra la puerta
del horno si no es necesario. Revise los alimentos
panificados con tiempo para evitar un leudado excesivo.
•No use el modo de leudado para calentar comida ni
para mantener calientes los alimentos. La temperatura
del horno para el leudado no es lo suficientemente alta
para mantener alimentos a temperaturas seguras. Use
la función WARM (CALENTAR) para mantener calientes
los alimentos. El leudado no funciona cuando el horno
está por encima de los 52 °C (125 °F). La pantalla
presentará un mensaje de OVEN IS HOT (HORNO
CALIENTE).
Sonda
La sonda mide con precisión la temperatura interna de la
carne, las aves y los estofados. No se debe utilizar durante
el asado, la cocción al vacío, el mantenimiento de vapor, el
rostizado con RapidHeat+, la autolimpieza, la limpieza rápida,
el modo calentar o leudar. Siempre desconecte y extraiga la
sonda del horno cuando retire la comida. Antes de usarla,
inserte la sonda en el centro de la parte más gruesa de la
carne o en el muslo interno o la pechuga de las aves, alejada
de la grasa o los huesos. Coloque la comida en el horno y
enchufe la sonda para carne en el conector hembra. Mantenga
la sonda lo más alejada de las fuentes de calor que le sea
posible.
•La sonda no se puede utilizar en los modos Broil (Asar), Self
Clean (Autolimpieza), SpeedClean™, Warm (Calentar) o
Proof (Leudar).
•Para cortes de carne delgados, inserte la sonda en el lado
más grueso de la carne.
Cuadro de ubicación recomendada para la sonda
Categoría Ejemplos de
alimentos
Ubicación de la
sonda
Carne molida
y mezclas de
carne
Pastel de carne Inserte en la parte
más gruesa
Albóndigas
Carne fresca
de vaca,
ternera, cerdo
Bistecs, rostizados,
chuletas
Inserte en la parte
más gruesa, lejos
del hueso, la grasa
y el cartílago
Aves
Pollo o pavo entero Inserte en la parte
más gruesa del
muslo, evitando el
hueso
Pechugas o
rostizados de ave
Pato, ganso, faisán
Relleno (solo o en
ave)
Inserte en la parte
más gruesa del
plato
Cerdo y jamón
Cerdo fresco Inserte en la parte
más gruesa, lejos
del hueso, la grasa
y el cartílago
Jamón fresco
(crudo)
Jamón precocido
(recalentar y servir)
Sobras y
estofados
Sobras Inserte en la parte
más gruesa del
plato
Estofados
Mariscos
Pescado entero
Inserte en la parte
más gruesa del
pescado
Filetes de pescado
(lateral del pescado)
Bistecs o porciones
de pescado

25
FUNCIONAMIENTO
ESPAÑOL
Cómo utilizar la función Meat Probe (sonda para carne)
1Inserte la sonda en el alimento.
2Conecte la sonda al conector hembra del horno.
Aparecerá en la pantalla la leyenda "Probe is connected"
(La sonda está conectada) y aparecerá el ícono de la
sonda en la parte superior de la pantalla.
3Gire la perilla de modo Oven (Horno) hasta seleccionar
el modo de cocción adecuado.
4Configure la temperatura del horno. Gire la perilla de
temperatura en sentido horario/antihorario, deslícese
por los números en la pantalla, o presione el ícono
del teclado numérico para ingresar los números
directamente. La temperatura predefinida para la sonda
es de 150 °F (65 °C), pero puede modificarse a cualquier
temperatura entre 80 °F (27 °C) y 210 °F (100 °C).
5Si lo desea, configure el tiempo de inicio retardado
utilizando el mismo método. Presione la tecla de la
flecha en el costado derecho de la pantalla para ver la
configuración adicional.
6Presione Start (Inicio). Si se ha configurado un tiempo
de inicio retardado, aparece el tiempo de inicio en la
pantalla.
7Cuando se alcanza la temperatura configurada para la
sonda, el horno se apaga de forma automática.
NOTA
Calcular el tiempo de cocción total por peso ya no es
necesario cuando se utiliza esta función. Se recomienda
consultar la siguiente tabla para configurar la temperatura
de la sonda.
PRECAUCIÓN
•Utilice siempre un guante para horno para retirar la
sonda de temperatura. NO toque el asador.
−Si no respeta esta advertencia, se pueden producir
lesiones personales graves.
Cómo cambiar la temperatura de la sonda durante la
cocción
1Presione Edit (Editar) en la pantalla para que aparezca
la pantalla Cook Settings (Configuración de cocción).
2Ajuste la configuración como desee.
3Presione Start (Inicio).
Cómo detener la cocción
1Presione Stop (Detener) en la pantalla y seleccione
Yes (Sí) o gire la perilla de modo a la posición OFF
(APAGADO).
NOTA IMPORTANTE
Pulse Stop (Detener) en la pantalla o gire la perilla de modo
Oven (Horno) hacia la posición OFF (APAGADO) en la pantalla
en cualquier momento para cancelar un ciclo de cocción. Para
evitar que la sonda se rompa, asegúrese de que la comida
esté totalmente descongelada antes de insertarla.
PRECAUCIÓN
•Utilice siempre un guante para horno para retirar
la sonda de temperatura. No toque el asador. Si no
se cumple con esta precaución, se pueden producir
lesiones personales graves.
•Para evitar daños en la sonda para carne, no use
pinzas para tirar de la sonda cuando la retire.
•No guarde la sonda para carne dentro del horno.
NOTA
•La sonda para carne no se puede utilizar con los
modos Broil (Asar), Sous Vide (cocción al vacío),
Steam Maintenance (Mantenimiento de vapor),
RapidHeat Roast+ (Rostizado RapidHeat+), Self Clean
(Autolimpieza), SpeedClean™, Calentar o Leudar.
•Mientras la sonda para carne está en funcionamiento,
la función SpeedClean™ no responde.

26 FUNCIONAMIENTO
Cuadro de temperatura recomendada para la sonda
Categoría Ejemplos de alimentos Temperatura
interna objetivo Punto de cocción deseado
Carne molida y
mezclas de carne
Pastel de carne 71 °C (160 °F)
Albóndigas 74 °C (165 °F)
Carne fresca de
vaca, ternera, cerdo Alimentos rostizados 63 °C (145 °F)
Poco cocido: 49 °C (120 °F)
Poco cocido a medio cocido: 52 °C (125 °F)
Medio cocido: 54 °C (130 °F)
Medio cocido a bien cocido: 57 °C (135 °F)
Bien cocido: 60 °C (140 °F)
Aves
Pollo o pavo entero
74 °C (165 °F)
Pechugas o rostizados de ave
Pato, ganso, faisán
Relleno (solo o en ave)
Cerdo y jamón
Cerdo fresco 63 °C (145 °F) Bien cocido: 77 °C (170 °F)
Jamón fresco (crudo) Bien cocido: 71 °C (160 °F)
Jamón precocido (recalentar y servir) 60 °C (140 °F)
Sobras y estofados Sobras 74 °C (165 °F)
Estofados

27
FUNCIONAMIENTO
ESPAÑOL
Mi receta
Para menús de cocción frecuentemente utilizados, puede
combinar hasta tres temperaturas y modos de cocción
diferentes en una tecla rápida.
Cómo crear Mi receta
•Cuando combina dos o más modos de cocción, debe
configurar un tiempo de cocción o la temperatura de la
sonda antes de seleccionar un modo de cocción adicional.
•La sonda no se puede utilizar con los modos Broil
(Asar), Sous Vide (cocción al vacío), Steam Maintenance
(Mantenimiento de vapor), RapidHeat Roast+ (Rostizado
RapidHeat+), Calentar o Leudar.
1Gire la perilla de modo Oven (Horno) hasta seleccionar el
modo My Recipe (Mi receta).
2Presione Create (Crear) para crear una nueva tecla
rápida.
3Seleccione un primer modo de cocción enumerado en la
pantalla y configure la temperatura de cocción deseada.
4Presione Set Cook Time (Configurar tiempo de cocción)
o Set Probe (Configurar sonda).
5Si no hay fases de cocción adicionales, presione Done
(Listo). Para agregar otra fase de cocción, configure
un tiempo de cocción o temperatura de sonda para la
primera fase. Luego presione Add Cook Stage (Añadir
fase de cocción).
6Repita los pasos 3-5 hasta que se hayan ingresado las
fases de cocción deseadas. Luego presione Done (Listo).
7Ingrese un nombre para su receta utilizando el teclado y
presione Save (Guardar).
8El nombre de la receta se agrega al menú My Recipes
(Mis recetas).
NOTA
•Si la sonda se insertó en el conector del horno para
agregar una temperatura de sonda, recuerde retirarla.
•Después de que el modo vapor ha sido usado durante
8 horas, la siguiente vez que se selecciona este modo
aparece en la pantalla un recordatorio para descalcificar
el producto. No podrá usar el modo vapor hasta que
se ejecute la función Descalcificación. Para evitar esta
demora, ejecute la función Descalcificación después de
cada 2 o 3 usos del modo vapor.
•Si aparece el recordatorio de descalcificación, presione
OK (ACEPTAR) para ejecutar la función Descaling
(Descalcificación).
•El leudado no funciona cuando el horno está por
encima de los 52 °C (125 °F).
•Si utiliza la función Proof (Leudar) después de cocinar,
espere a que el horno se enfríe primero.
•El modo de prueba solo se puede configurar como
etapa única, no como parte de una cocción de múltiples
etapas.
Cómo editar Mi receta
•La función Edit (Editar) no puede agregar o eliminar
fases de cocción a una receta. Solo se puede modificar
la temperatura del horno, la temperatura de la sonda y el
tiempo de cocción.
1Gire la perilla de modo Oven (Horno) hasta seleccionar el
modo My Recipe (Mi receta).
2Seleccione la receta a editar y luego presione el ícono del
lápiz en la parte inferior izquierda de la pantalla.
3Edite las configuraciones para la primera fase de cocción
y presione Done (Listo) para proceder a la siguiente fase,
si es que existe.
4Edite la siguiente fase de cocción, presione Done (Listo)
y continúe por todas las fases de cocción en la misma
manera.
5Una vez que se haya editado la última fase de cocción,
ingrese un nuevo nombre para la receta o mantenga el
nombre anterior. Luego presione Save (Guardar).
Cómo borrar Mi receta
1Seleccione el horno deseado y presione My Recipe
(Mi receta) en la pantalla Cooking Modes (Modos de
cocción).
2Seleccione la receta y luego presione el ícono del bote de
basura en la parte inferior izquierda de la pantalla.
3Presione Yes (Sí).
Cocción automática
La función Auto Cook (Cocción automática) ofrece
orientación para cocinar alimentos o platos que pueden ser
inusuales. Contiene programas preconfigurados para cocinar
muchos alimentos populares, con recomendaciones sobre
precalentamiento, accesorios y posición de los estantes para
lograr resultados óptimos.
Configuración de la función Cocción automática
1Gire la perilla de modo Oven (Horno) hasta seleccionar
el modo Cocción automática.
2Presione una categoría para filtrar las opciones.
3Deslícese o presione las letras para encontrar y
seleccionar un elemento.
4Siga las recomendaciones en la pantalla en relación con
los accesorios y la posición del estante.
5Presione Start (Inicio).

28 FUNCIONAMIENTO
Guía del cocción automática
•Precaliente el horno para la mayoría de los elementos.
•Precaliente por 5 minutos cuando tenga que asar.
•Si va a utilizar la sonda, insértela luego del precalentamiento.
NOTA
•Cuando cocine cortes de carne delgados, inserte la
sonda en la parte más gruesa de la carne. Si la sonda
se inserta de forma incorrecta, el horno podría apagarse
demasiado pronto. Consulte la sección "Sonda de
temperatura" para ver instrucciones.
Categoría Menú Accesorios/recipientes Posición
del estante
Tiempo de cocción
en minutos
Carne
Carne de
vaca
Solomillo
de vaca
Poco cocido Rejilla sobre la asadera 2 30~60
Poco cocido a medio cocido Rejilla sobre la asadera 2 35~65
Cocción media Rejilla sobre la asadera 2 40~70
Medio cocido a bien cocido Rejilla sobre la asadera 2 45~75
Bien cocido Rejilla sobre la asadera 2 50~80
Estofado
Recipiente apto para horno con tapa
2 50~80
Rosbif
Poco cocido Rejilla sobre la asadera 2 40~70
Poco cocido a medio cocido Rejilla sobre la asadera 2 45~75
Cocción media Rejilla sobre la asadera 2 50~80
Medio cocido a bien cocido Rejilla sobre la asadera 2 55~85
Bien cocido Rejilla sobre la asadera 2 60~90
Asado
estilo
inglés
(London
Broil)
Poco cocido Rejilla sobre la asadera 5 3~10 + 3~10
Poco cocido a medio cocido Rejilla sobre la asadera 5 5~15 + 3~10
Cocción media Rejilla sobre la asadera 5 5~15 + 5~10
Medio cocido a bien cocido Rejilla sobre la asadera 5 8~15 + 5~10
Bien cocido Rejilla sobre la asadera 5 10~15 + 8~15
Bistec
Poco cocido Rejilla sobre la asadera 5 3~10 + 3~10
Poco cocido a medio cocido Rejilla sobre la asadera 5 5~15 + 3~10
Cocción media Rejilla sobre la asadera 5 5~15 + 5~10
Medio cocido a bien cocido Rejilla sobre la asadera 5 8~15 + 5~10
Bien cocido Rejilla sobre la asadera 5 10~15 + 8~15
Marinado de ternera Rejilla sobre la asadera 3 20~50
Pastel de carne Fuente alargada 2 40~60
Cerdo
Nalga de cerdo Cazuela 2 60~90
Chuletas de cerdo Rejilla sobre la asadera 4 30~50
Lomo de cerdo Rejilla sobre la asadera 2 50~80
Solomillo de cerdo Rejilla sobre la asadera 2 20~40
Cordero Costillas Rejilla sobre la asadera 2 10~30
Pata de cordero sin deshuesar Rejilla sobre la asadera 4 20~40
Ternera
Lomo de ternera Rejilla sobre la asadera 2 80~100
Chuletas de ternera Rejilla sobre la asadera 5 4~15 + 3~10
Arrollado de carne de ternera Rejilla sobre la asadera 2 50~70
Costillar de ternera Rejilla sobre la asadera 2 50~80
Solomillo de ternera Rejilla sobre la asadera 2 50~80
Pescados
Filete de pescado Fuente para horneado 4 10~15
Entero Fuente para horneado 4 15~30
Camarones Rejilla sobre la asadera 5 5~15
Colas de langosta Rejilla sobre la asadera 4 20~30
Bistec Salmón
Poco cocido Fuente para horneado 4 15~20
Poco cocido a medio cocido Fuente para horneado 4 20~25
Bien cocido Fuente para horneado 4 15~30
Aves Pollo
Patas y muslos Fuente para horneado 4 20~40
Alas (frescas) Rejilla sobre la asadera 5 8~20
Alas (congeladas) Rejilla sobre la asadera 4 20~40
Pechugas Fuente para horneado 4 20~40
Supremas Cazuela 4 20~30
Entero Rejilla sobre la asadera 2 60~80
Pavo entero Rejilla sobre la asadera 2 150~240
Guisados y estofados
Lasaña (fresca) Fuente para horneado 3 50~70

29
FUNCIONAMIENTO
ESPAÑOL
Categoría Menú Accesorios/recipientes Posición
del estante
Tiempo de cocción
en minutos
Pizza
A la piedra congelada
Directamente sobre el estante 3 10~20
Sobre una bandeja para pizza 3 10~20
Sobre una piedra para pizza 3 10~20
De molde congelada
Directamente sobre el estante 3 10~20
Sobre una bandeja para pizza 3 10~20
Sobre una piedra para pizza 3 10~20
Casera
Directamente sobre el estante 3 10~20
Sobre una bandeja para pizza 3 10~20
Sobre una piedra para pizza 3 10~20
Postres
Brownies Fuente para horneado 3 30~40
Cheesecake Molde para pastel 3 60~70
Pastel de
frutas
Tarta entera Molde para tarta 3 25~45
Solo base congelada precocida Molde para tarta 3 20~40
Tarta de frutas Molde para tartas 3 20~40
Pasteles Pastel en capas Molde para pastel 3 25~45
Bizcochuelo liviano (angel food) Molde para pastel 3 30~40
Muffins/Cupcakes Molde para muffins 3 20~30
Hojaldre Placa para horno 3 20~40
Galletas Bandeja simple Placa para horno 3 15~20
Bandeja múltiple Placa para horno 2+4 20~28
Bizcochos/Escones Placa para horno 3 10~20
Suflés Recipiente para suflés 2 60~80
Otros
Leudar Recipiente apto para horno con
tapa 3 30~40
Secado/Deshidratado (frutas o verduras) Placa para horno 3 120 ~ 480
Rostizado lento Rejilla sobre la asadera 2 120 ~ 240
Guía para cocinar al vapor al estilo gourmet
Categoría Menú Accesorios/recipientes Posición
del estante
Tiempo de cocción
en minutos
Panes
Pan
blanco
Casero Fuente alargada 3 20~50
Congelado Fuente alargada 3 20~50
Precocido Fuente alargada 3 20~50
Baguette
Casera Bandeja para baguette
perforada 3 15~35
Congelada Bandeja para baguette
perforada 3 15~35
Precocida Bandeja para baguette
perforada 3 15~35
Pan de pasas con canela Fuente alargada 3 20~40
Pan de nuez Fuente alargada o bandeja
perforada 3 40~50
Pan
integral
Casero Fuente alargada 3 25~45
Congelado Fuente alargada 3 25~45
Precocido Fuente alargada 3 25~45
Pan de
banana Casero Fuente alargada 3 25~50
PRECAUCIÓN
•Tenga cuidado al abrir la puerta del horno durante o después de cocinar al vapor. El vapor caliente puede causar
quemaduras.
•Después de cualquier ciclo de cocción al vapor se ejecutará automáticamente la función de secado. Es normal escuchar el
funcionamiento de la bomba de vapor durante la función de secado.

30 FUNCIONAMIENTO
Función de vapor
La cocción al vapor utiliza el calor húmero del vapor para
cocinar los alimentos. Este es un método de cocción ideal
para alimentos delicados como mariscos, que pueden perder
nutrientes cuando se hierven.
El horno ofrece 3 métodos de cocción al vapor: Gourmet
Steam (al vapor estilo gourmet), SousVide (cocción al vacío y
Steam Combi (combinación de vapor).
PRECAUCIÓN
•Tenga cuidado al abrir la puerta del horno durante o
después de cocinar al vapor. El vapor caliente puede
causar quemaduras.
•Después de cualquier ciclo de cocción al vapor se
ejecutará automáticamente la función de secado. Es
normal escuchar el funcionamiento de la bomba de
vapor durante la función de secado.
Cómo usar el tanque del alimentador de vapor
El tanque de inyección de vapor está ubicado sobre la cavidad
del horno.
1Empuje suavemente el frente del tanque del alimentador
de vapor para deslizarlo hacia afuera.
2Retire el tanque y colóquelo sobre una superficie plana.
3Retire la cubierta del tanque o abra la tapa de llenado en
la parte frontal de la carcasa del tanque.
4Llene el tanque hasta la línea máxima ubicada en el
frente del mismo. Utilice agua filtrada y ablandada, si
es posible. El agua dura puede obstruir el generador de
vapor más rápidamente con acumulación de sarro.
LÍNEA DE NIVEL
MÁXIMO
5Vuelva a colocar la cubierta o cierre la tapa de llenado.
Cubierta del tanque
Tapa de llenado
PRECAUCIÓN
•Asegúrese de que la cubierta del tanque y la tapa de
llenado estén cerradas antes de colocar el tanque en el
horno.
•Use solamente agua potable.
•No llene el tanque del alimentador de vapor con ningún
líquido o mezcla que no sea agua.
•No llene el tanque con agua caliente.
•Llene el tanque del alimentador de vapor hasta la línea
indicada en el frente.
•No incline el tanque del alimentador de vapor mientras
está lleno.
•Descarte cualquier agua sobrante y limpie el tanque del
alimentador de vapor después de cocinar.
•Utilice el tanque del alimentador de vapor solo para su
uso previsto, que es el de proporcionar agua para la
cocción al vapor.
•Monitoree el nivel del agua en el tanque y rellene
cuando sea necesario para la cocción al vapor.
6Inserte cuidadosamente el tanque en la ranura del
alimentador de vapor y trate de mantener el tanque
nivelado mientras lo transporta. Si no se mantiene
nivelado drenará agua de los tubos en la parte trasera.
7Deslice el tanque en la ranura hasta que haga un clic.
Modo Steam-Combi
El modo Steam-Combi calienta los alimentos gradualmente,
utilizando los quemadores del horno y el calor húmedo del
vapor. Es posible programar el horno para cocinar a cualquier
temperatura entre 210 °F (100 °C) y 550 °F (285 °C).
Preconfigure las opciones de temperatura inicial a 350 °F
(175 °C).
Configuración del modo Steam-Combi
1Gire la perilla de modo Oven (Horno) para seleccionar el
modo Steam Cook (Cocinar al vapor).
2Presione Steam-Combi en la pantalla.
3Seleccione la temperatura y el nivel de vapor deseados:
Baja, Media o Alta.
4Si lo desea, deslícese para configurar el tiempo de
cocción y el tiempo de inicio retardado. Presione la tecla
de la flecha en el costado derecho de la pantalla para ver
la configuración del tiempo de inicio retardado.
5Presione Start (Inicio).
6Una vez finalizada la cocción, deje que el horno se enfríe
completamente. Luego limpie cualquier resto de agua
que haya quedado en el interior del horno.

31
FUNCIONAMIENTO
ESPAÑOL
Una vez que se inicia la función Steam-Combi, un indicador en
la pantalla muestra el estado de la función de vapor.
Asegúrese de que el tanque del alimentador de vapor esté
lleno de agua antes de iniciar el modo Steam-Combi. Si el
agua del tanque se agota durante la cocción, suena una
alarma y aparece un cartel en la pantalla. El horno continúa
cocinando sin vapor.
NOTA
•Recuerde vaciar el tanque del alimentador de vapor
después de usarlo.
•Cuando la temperatura aumenta en el horno puede que
no sea visible el vapor.
Cómo cambiar la configuración de cocción al vapor
1Presione Edit (Editar) en la pantalla para que aparezca la
pantalla Cook Settings (Configuración de cocción).
2Ajuste la configuración como desee.
3Presione Start (Inicio).
Cómo detener la cocción al vapor
1Presione Stop (Detener) en la pantalla y seleccione
Yes (Sí) o gire la perilla de modo a la posición OFF
(APAGADO).
Cocción al vapor al estilo gourmet
Obtenga excelentes resultados utilizando las recetas
de cocción al vapor preconfiguradas, que incluyen
recomendaciones de accesorios y la posición de los estantes.
Configuración de la función Gourmet Steam (cocción al
vapor al estilo gourmet)
1Gire la perilla de modo Oven (Horno) para seleccionar el
modo Steam Cook (Cocinar al vapor).
2Presione Gourmet Steam (Cocción al vapor al estilo
gourmet) en la pantalla.
3Presione una categoría para filtrar las opciones.
4Deslícese o presione las letras para encontrar y
seleccionar un elemento.
5Siga las recomendaciones en la pantalla en relación con
los accesorios y la posición del estante.
6Presione Start (Inicio).
7Una vez finalizada la cocción, deje que el horno se enfríe
completamente. Luego limpie cualquier resto de agua
que haya quedado en el interior del horno.
NOTA
Es normal escuchar ruido de agua hirviendo proveniente
del generador de vapor cuando está ejecutando
funciones de vapor.
Inicio remoto
Si el electrodoméstico está registrado en una red Wi-Fi
doméstica, la función de precalentamiento del horno se
puede iniciar o detener utilizando la aplicación para teléfonos
inteligentes de LG ThinQ.
Cómo preparar el horno para un inicio remoto
1Abra la puerta del horno para asegurarse de que esté
vacío y listo para el precalentamiento. No coloque
alimentos en el horno. Cierre la puerta del horno. El Inicio
remoto solo se puede configurar cuando la puerta del
horno está cerrada.
2Presione SETTINGS (CONFIGURACIÓN) en la parte
inferior central de la pantalla. Presione Remote Start
(Inicio remoto) en la primera pantalla de Settings
(Configuración) y luego seleccione On (Encender). Siga
las instrucciones del mensaje emergente que aparece en
la pantalla.
3Siga las instrucciones que se detallan en la aplicación
para teléfonos inteligentes de LG ThinQ para utilizar la
función de inicio remoto.
NOTA
•La función de Remote Start (Inicio remoto) se encuentra
desconectada en las siguientes situaciones:
−Si el Remote Start (Inicio remoto) nunca se instaló en
la aplicación para teléfonos inteligentes.
−Si el estado de Remote Start (Inicio remoto) es
"ready" (“listo”).
−Si Remote Start (Inicio remoto) experimenta un
problema durante el funcionamiento.
•El ícono de Wi-Fi en la pantalla muestra el estado de
conexión a la red del electrodoméstico. Si el ícono
de Wi-Fi no está encendido, utilice la aplicación para
teléfonos inteligentes para seleccionar la red Wi-Fi o
para registrar nuevamente el producto.
•Una conexión a Wi-Fi defectuosa podría retrasar la
función Remote Start (Inicio remoto).
•Desconecte la sonda si se encuentra instalada.

32 FUNCIONAMIENTO
Cocción al vacío (Sous Vide)
La cocción al vacío utiliza vapor para cocinar alimentos de
modo "lento y suave". Utilícela para cocinar carne, pescado,
mariscos, aves o verduras. Los alimentos deben estar
envasados al vacío en bolsas.
No es necesario precalentar el horno cuando se utiliza la
cocción al vacío. Consulte la guía de cocción para conocer las
configuraciones de cocción al vacío recomendadas.
Beneficios de la cocción al vacío
Las bajas temperaturas y los tiempos de cocción prolongados
utilizados en la cocción al vacío ofrecen muchos beneficios
Más saludable
En comparación con otros métodos de cocción, el método de
cocción al vacío retiene la mayoría de los nutrientes en los
alimentos.
Seguro y conveniente
Los tiempos de cocción prolongados utilizados en la cocción al
vacío permiten que los alimentos sean pasteurizados. Debido
a que los alimentos están envasados al vacío antes de la
cocción, las bolsas sin abrir se pueden enfriar rápidamente
para guardarlas con facilidad después de la cocción.
Resultados jugosos y tiernos
El control fino de la temperatura de la cocción al vacío es
una excelente forma de lograr una textura perfecta cuando
se cocinan carne y aves. Las temperaturas bajas utilizadas
retienen más la humedad en los alimentos frente a los métodos
de cocción convencionales. Después de la cocción, un dorado
final en sartén añade un acabado crujiente perfecto.
Configuración del modo de cocción al vacío (Sous Vide)
1Llene el tanque con agua hasta el nivel máximo indicado
en el frente del mismo.
2Coloque el estante estándar en la posición C y coloque la
bolsa de alimentos sellada sobre él.
3Gire la perilla de modo Oven (Horno) para seleccionar el
modo Steam Cook (Cocinar al vapor).
4Presione la opción de Sous vide (Cocción al vacío) en la
pantalla.
5Seleccione la temperatura deseada.
6Si lo desea, deslícese para configurar el tiempo de
cocción y el tiempo de inicio retardado. Presione la tecla
de la flecha en el costado derecho de la pantalla para ver
la configuración del tiempo de inicio retardado.
7Presione Start (Inicio).
8Una vez finalizada la cocción, deje que el horno se enfríe
completamente. Luego limpie cualquier resto de agua
que haya quedado en el interior del horno.
Cómo cambiar las configuraciones de cocción al vacío
1Presione Edit (Editar) en la pantalla para que aparezca la
pantalla Cook Settings (Configuración de cocción).
2Ajuste la configuración como desee.
3Presione Start (Inicio).
Cómo detener la cocción
1Presione Stop (Detener) en la pantalla y seleccione
Yes (Sí) o gire la perilla de modo a la posición OFF
(APAGADO).
NOTA
Cuando la temperatura aumenta en el horno puede que
no sea visible el vapor.
Guía de cocción al vacío (Sous Vide)
El tamaño, el peso, el espesor, la temperatura de inicio
y sus preferencias personales afectarán los tiempos de
funcionamiento. Esta guía es solo una referencia. Ajuste el
tiempo de cocción según su preferencia.
Temp. Tiempo
Mín. Objetivo Máx.
Bistec de
came de
vaca (Poco
cocido
a medio
cocido)
1" de espesor,
400-500 g
57 °C
(135 °F) - 2,5 h 3 h
Pechuga de
pollo 120-150 g 65 °C
(149 °F) - 2,5 h 3 h
Salmón 1" de espesor,
200 g
60 °C
(140 °F) - 2 h 2.5 h
Espárragos 80 g/6 unid.,
160 g/12 unid.
85 °C
(185 °F) 20 min 30 min 45 min
Cocine durante 30 min. o 1 hora más si utiliza carnes de un
espesor superior a 1".
Si utiliza cortes de carne más grandes, trócelos para que
coincidan con el peso recomendado. Tenga cuidado de no
poner los trozos de carne demasiado juntos.

33
FUNCIONES INTELIGENTES
ESPAÑOL
FUNCIONES
INTELIGENTES
Aplicación LG ThinQ
Esta característica solo está disponible en modelos con Wi-Fi.
La aplicación LG ThinQ le permite comunicarse con el
electrodoméstico usando un teléfono inteligente.
Funciones de la aplicación LG ThinQ
•SpeedClean™
−Le permite establecer alertas de SpeedClean™, leer la
guía de instrucciones, y simular y comparar el consumo
de energía cuando se usan SpeedClean™ frente a ciclos
de autolimpieza.
•Smart Diagnosis™
−Esta función brinda información útil para diagnosticar y
resolver problemas con el producto conforme a su patrón
de uso.
•Configuración
−Permite al usuario cambiar la configuración del horno,
incluidos el modo de la hora, la luz de la alarma de
precalentamiento, el volumen del indicador sonoro, las
unidades de la temperatura, la conversión automática a
convección, el ajuste del termostato y el idioma.
•Remote Start (Inicio remoto)
−Apague el horno o inicie el precalentamiento del horno de
forma remota. Luego de abrir y cerrar la puerta, coloque
el selector de modo nuevamente en Remote Start (Inicio
remoto) dentro de los 30 segundos.
•Monitoreo
−Esta función le ayuda a comprobar el estado actual, el
tiempo restante, la configuración de cocción y la hora de
finalización en un lugar.
•Notificaciones de productos
−Active las Alertas Push para recibir notificaciones del
estado del electrodoméstico. Las notificaciones se emiten
incluso si la aplicación LG ThinQ no está abierta.
•Temporizador
−Se puede configurar el temporizador desde la aplicación.
NOTA
•Si cambia de enrutador inalámbrico, proveedor de
Internet o contraseña, borre el electrodoméstico
conectado desde la aplicación LG ThinQ y conéctelo
de nuevo.
•Esta información está actualizada en el momento de
su publicación. La aplicación está sujeta a cambios,
con fines de mejorar el producto, sin previo aviso a los
usuarios.
Instalación de la aplicación LG ThinQ
y conexión de un electrodoméstico
LG
Modelos con código QR
Escanee el código QR que trae el producto con la cámara
o una aplicación lectora de códigos QR en su teléfono
inteligente.
Modelos sin código QR
1Busque la aplicación LG ThinQ en la tienda Google Play
o Apple App Store e instálela en su teléfono inteligente.
2Ejecute la aplicación LG ThinQ e inicie sesión con su
cuenta actual, o cree una cuenta LG para iniciar sesión.
3Pulse el botón Agregar (+) en la aplicación LG ThinQ
para conectar su electrodoméstico LG.
Siga las instrucciones en la aplicación y complete el
proceso.
NOTA
•Para verificar la conexión Wi-Fi, revise que el indicador
de Wi-Fi en el panel de control esté encendido.
•El electrodoméstico funciona únicamente con redes Wi-
Fi de 2.4 GHz. Contacte a su proveedor de servicios de
internet o verifique el manual del enrutador inalámbrico
para revisar la frecuencia de su red.
•LG ThinQ no es responsable por ningún problema
de conexión en red, falla, mal funcionamiento o error
causado por la conexión de red.
•El entorno inalámbrico circundante puede hacer que el
servicio de red inalámbrica funcione lentamente.
•Si la distancia entre el electrodoméstico y el enrutador
inalámbrico es muy grande, la señal será débil.
Probablemente le tome más tiempo conectarse o no
pueda instalar la aplicación.
•Si el aparato tiene problemas para conectarse a la red
Wi-Fi, es posible que se encuentre demasiado lejos
del router. Adquiera un repetidor Wi-Fi (extensor de
alcance) para mejorar la intensidad de la señal Wi-Fi.
•Es posible que la conexión de red no funcione bien por
cuestiones relacionadas con su proveedor de servicios
de Internet.
•Es posible que el equipo no se conecte a la red Wi-Fi
o que se interrumpa la conexión debido alentorno de la
red doméstica.

34 FUNCIONES INTELIGENTES
NOTA
•Si el electrodoméstico no puede conectarse debido a
problemas con la transmisión de la señal inalámbrica,
desenchufe el artefacto y espere alrededor de un
minuto antes de intentarlo de nuevo.
•Si el cortafuegos de su enrutador inalámbrico está
activado, desactivelo o añada una excepción a éste.
•El nombre de la red inalámbrica (SSID) debe ser una
combinación de letras y números. (No utilice símbolos
especiales)
•La interfaz de usuario (IU) del teléfono inteligente puede
variar dependiendo del sistema operativo (OS) del móvil
y del fabricante.
•Puede que la configuración de red falle si el protocolo
de seguridad del enrutador está en WEP. Cambie el
protocolo de seguridad por otro (se recomienda el
WPA2) y conecte el producto de nuevo.
Función Smart Diagnosis™
Utilice esta función como ayuda para diagnosticar y resolver
problemas con su electrodoméstico. Los modelos equipados
con NFC o Wi-Fi pueden también transmitir datos a un teléfono
inteligente usando la aplicación LG ThinQ.
NOTA
•Por motivos no atribuibles a la negligencia de LGE, es
posible que el servicio no pueda funcionar debido a
factores externos como por ejemplo, la indisponibilidad
de Wi-Fi, desconexión de Wi-Fi, política de la tienda de
aplicaciones local o indisponibilidad de aplicaciones,
entre otros.
•Esta función puede estar sujeta a cambios sin previo
aviso y puede tener una forma diferente según dónde
se encuentre ubicado.
Uso de LG ThinQ para diagnosticar
problemas
Si experimenta un problema con su electrodoméstico equipado
con Wi-Fi, este puede transmitir datos sobre la resolución
de problemas a un teléfono inteligente con la aplicación LG
ThinQ.
•Inicie la aplicación LG ThinQ y seleccione la función Smart
Diagnosis en el menú. Siga las instrucciones provistas en
la aplicación LG ThinQ.

35
FUNCIONES INTELIGENTES
ESPAÑOL
Uso del diagnóstico audible para
diagnosticar problemas
Siga las instrucciones a continuación para utilizar el método de
diagnóstico audible.
•Inicie la aplicación LG ThinQ y seleccione la función Smart
Diagnosis en el menú. Siga las instrucciones para el
diagnóstico audible provistas en la aplicación LG ThinQ.
1Toque Configuraciones, situado en la parte inferior de
la pantalla principal. Deslice hasta la tercera pantalla
de ajustes y seleccione Smart Diagnosis™. Siga las
instrucciones en la pantalla.
NOTA
No presione ningún otro botón ni icono de la pantalla.
2Toque Start.
3Mantenga el teléfono en su lugar hasta que haya
finalizado la transmisión del tono. La pantalla hará un
conteo regresivo del tiempo. Una vez que haya finalizado
y se hayan detenido los tonos, se mostrará el diagnóstico
en la aplicación.
4Cuando finalicen los tonos, reanude la conversación con
el agente telefónico, que lo ayudará a usar la información
transmitida.
NOTA
•Para obtener resultados óptimos, no mueva el teléfono
mientras se transmitan los tonos.
Software de código abierto
Para obtener el código fuente bajo GPL, LGPL, MPL y otras
licencias de código abierto con las obligaciones para divulgar
el código abierto, que contiene este producto, y para acceder a
todos los términos de la licencia, avisos de derechos de autor y
otros documentos relevantes, visite https://opensource.lge.com.
SIGNATURE KITCHEN SUITE también le proporcionará el
código abierto en un CD-ROM por un costo que cubra los
gastos de dicha distribución (como el costo del medio, del
envío y de la manipulación) una vez realizado el pedido por
correo electrónico a la dirección [email protected]. Esta
oferta es válida para todo aquel que reciba esta información
durante un período de tres años después de que se envíe el
último cargamento de este producto.
Especicaciones módulo LAN
inalámbrico
Modelo LCW-009
Rango de frecuencia 2412 MHz – 2462 MHz
Rango de frecuencia
(max.) < 30 dBm

36 FUNCIONES INTELIGENTES
Aviso de la FCC
El siguiente aviso cubre el módulo transmisor contenido en
este producto.
Este equipo fue probado y se determinó que cumple con
los límites para los dispositivos digitales de Clase B, en
conformidad con la parte 15 de las normas de la FCC.
Estos límites están diseñados para ofrecer una protección
razonable contra interferencias dañinas en una instalación
residencial. Este equipo genera, usa y puede emitir energía
de radiofrecuencia y, si no se instala y utiliza de acuerdo con
las instrucciones, podría causar interferencias dañinas a las
comunicaciones por radio. Sin embargo, no se garantiza
que dicha interferencia no pueda ocurrir en instalaciones
particulares. Si este equipo causa interferencia dañina a la
recepción de radio o televisión, que se puede determinar
encendiendo y apagando el equipo, se aconseja al usuario
intentar corregir la interferencia realizando alguna de las
siguientes acciones:
•Reoriente o reubique la antena receptora.
•Aumente la separación entre el equipo y el receptor.
•Conecte el equipo a una toma de corriente en un circuito
diferente del utilizado por el receptor.
•Solicite ayuda a su vendedor o a un técnico especialista en
radio o TV.
Este dispositivo cumple con la parte 15 de las normas
de la FCC. La operación está sujeta a las dos siguientes
condiciones:
(1) Este dispositivo no debe causar interferencia dañina, y
(2) Este dispositivo debe aceptar cualquier interferencia
recibida, incluso aquellas que pudieran causar un
funcionamiento no deseado.
Cualquier cambio o modificación en la construcción de
este dispositivo que no cuente con la aprobación expresa
de la parte responsable del cumplimiento puede anular la
autorización del usuario para operar este equipo.
Declaración sobre exposición a
la radiación de RF de la FCC
Este equipo cumple con los límites de exposición a la radiación
de la FCC establecidos para entornos no controlados. Este
transmisor no se debe ubicar ni operar junto con ninguna otra
antena ni transmisor.
El equipo se debe instalar y operar con una distancia mínima
de 20 cm (7.8 pulg.) entre la antena y su cuerpo. Los usuarios
deben seguir las instrucciones de operación específicas de
manera tal de cumplir con las normas de exposición a la RF.

37
MANTENIMIENTO
ESPAÑOL
MANTENIMIENTO
Self Clean (Autolimpieza)
El ciclo de autolimpieza usa temperaturas sumamente altas
para limpiar la cavidad del horno. Mientras se ejecute el ciclo
de autolimpieza, es posible que perciba humo u olor. Esto es
normal; especialmente si el horno está muy sucio.
Durante el ciclo Self Clean (Autolimpieza), se debe ventilar
bien la cocina para minimizar los olores de la limpieza.
PRECAUCIÓN
•NO deje a niños pequeños sin supervisión cerca
del electrodoméstico. Durante el ciclo Self Clean
(Autolimpieza), el exterior del horno puede estar muy
caliente al tacto.
•Si tiene aves domésticas, llévelas a otra sala bien
ventilada. La salud de algunas aves es muy sensible a
los vapores que se emanan durante el ciclo Self Clean
(Autolimpieza) de cualquier horno.
•NO recubra las paredes del horno, los estantes, la
base ni ninguna otra parte con papel de aluminio ni
ningún otro material. Hacer esto destruye la distribución
de calor, produce resultados de horneado deficientes
y causa daños permanentes al interior del horno (el
papel de aluminio se fundiría en la superficie interior del
horno).
•NO fuerce la puerta del horno para abrirla. Podría dañar
el sistema automático de bloqueo de la puerta. Tenga
cuidado cuando abra la puerta del horno después
del ciclo de autolimpieza. Póngase junto al horno
cuando abra la puerta para dejar que salgan el aire y
el vapor calientes. El horno todavía puede estar MUY
CALIENTE.
Antes de comenzar la autolimpieza
•Retire del horno el tanque de agua, los estantes del horno,
la asadera, la rejilla de la asadera, cualquier recipiente, el
papel aluminio y cualquier otro material.
Dejar los elementos en el horno podría causar un daño
permanente en el interior del mismo.
•Si no retira el tanque de agua del horno, sonará la alarma y
el ciclo de Autolimpieza no comenzará.
•La cocina debe estar bien ventilada para minimizar los
olores de la limpieza.
•Limpie los derrames notorios de la base del horno.
•Asegúrese de que la tapa de la bombilla de la luz del horno
esté en su lugar y que la luz esté apagada.
•La luz del horno no puede encenderse durante un ciclo de
autolimpieza. La luz del horno no puede encenderse hasta
que la temperatura del horno haya descendido por debajo
de los 260 °C (500 °F) después de que se completa un ciclo
de autolimpieza.
NOTA
•Quite los estantes del horno y los accesorios antes de
iniciar el ciclo de autolimpieza.
•Si se dejan los estantes en la cavidad del horno durante
el ciclo de autolimpieza, cambiarán de color y será
difícil deslizarlos para ponerlos o sacarlos.
•Limpie el marco del horno y la puerta con agua
jabonosa caliente. Enjuague bien.
•No limpie la junta. La fibra de vidrio de la junta de la
puerta no resiste la abrasión.
•Es fundamental que la junta permanezca intacta. Si
nota que está gastada o deshilachada, reemplácela.
•Es normal que el ventilador funcione durante el ciclo de
autolimpieza.

38 MANTENIMIENTO
Conguración de la autolimpieza
La función de autolimpieza tiene ciclos de 3, 4 o 5 horas.
Guía de suciedad para autolimpieza
Nivel de suciedad Configuración del ciclo
Cavidad del horno levemente
sucia Autolimpieza de 3 horas
Cavidad del horno
moderadamente sucia Autolimpieza de 4 horas
Cavidad del horno muy sucia Autolimpieza de 5 horas
1Quite todas los estantes y los accesorios del horno.
2Gire la perilla de modo Oven (Horno) para seleccionar el
modo Clean (Limpieza) y pulse Self Clean (Autolimpieza).
El horno entra de manera predeterminada en la
autolimpieza de cuatro horas recomendada para un
horno moderadamente sucio.
3Seleccione el tiempo de ciclo deseado.
4Si lo desea, deslícese hasta un grupo de tiempo de inicio
retardado o presione el ícono del teclado numérico
para ingresar el horario de inicio directamente.
5Presione Start (Inicio). El tiempo restante o el horario de
inicio retardado aparece en la pantalla.
6Una vez que esté configurado el ciclo de autolimpieza, la
puerta del horno se traba automáticamente y aparece el
ícono del candado.
No podrá abrir la puerta del horno hasta que el horno
se haya enfriado. El bloqueo se abrirá automáticamente
cuando el horno se haya enfriado.
PRECAUCIÓN
NO fuerce la puerta del horno para abrirla cuando vea
el icono del candado. La puerta del horno permanecerá
trabada hasta que baje la temperatura. Si abre la puerta a
la fuerza, se dañará.
NOTA
Puede que sea necesario cancelar o interrumpir el ciclo
de autolimpieza debido a exceso de humo o la presencia
de fuego en el horno. Para cancelar la función de Self
Clean (Autolimpieza), pulse Stop (Detener) en la pantalla
o gire la perilla de modo Oven (Horno) a la posición OFF
(APAGADO).
Durante la autolimpieza
•El ciclo de autolimpieza usa temperaturas sumamente altas
para limpiar la cavidad del horno. Mientras se ejecute el
ciclo de autolimpieza, es posible que perciba humo u olor.
Esto es normal; especialmente si el horno está muy sucio.
•A medida que el horno se calienta, es posible que escuche
ruido de la expansión y contracción de las partes metálicas.
Es normal y no dañará el horno.
•No fuerce la puerta del horno para abrirla cuando vea el
ícono del candado . La puerta permanecerá trabada
hasta que baje la temperatura del horno. Si abre la puerta a
la fuerza, se dañará.
NOTA
•El ciclo de autolimpieza no se puede iniciar si está
activa la función Lockout (Bloqueo).
•Una vez que se haya configurado el ciclo de
autolimpieza, la puerta del horno se trabará
automáticamente. No podrá abrir la puerta del horno
hasta que el horno se haya enfriado. El bloqueo se
liberará automáticamente.
•Una vez que la puerta se haya trabado, la luz
indicadora de bloqueo dejará de parpadear y
quedará encendida. Espere unos 15 segundos para
que se active la traba de la puerta del horno.
•Si el reloj está configurado para una visualización de
12 horas (predeterminado), la autolimpieza retardada
nunca se puede iniciar con más de 12 horas de
anticipación.
•Una vez que se apaga el horno, el ventilador de
convección sigue funcionando hasta que el horno se
enfría.
Después del ciclo de autolimpieza
•La puerta del horno permanecerá trabada hasta que baje la
temperatura.
•Es posible que note un poco de ceniza blanca en el horno.
Límpiela con un paño húmedo o una esponja de lana de
acero después de que el horno se enfríe. Si el horno no está
limpio después de un ciclo de autolimpieza, repita el ciclo.
•Si se dejaron los estantes en el horno y no se deslizan bien
después de un ciclo de autolimpieza, aplique un poco de
aceite vegetal a los estantes y sus soportes para que se
desplacen con facilidad.
•Pueden aparecer líneas finas en la porcelana porque fue
sometida al calentamiento y enfriado. Esto es normal y no
afecta su desempeño.

39
MANTENIMIENTO
ESPAÑOL
Tanque del alimentador de
vapor
El tanque del alimentador de vapor se utiliza durante las funciones
de cocción al vapor. Utilice agua blanda y filtrada, si es posible.
NOTA
•Después de utilizar la función al vapor, el tanque del
alimentador de vapor debe vaciarse. Para evitar la
presencia de bacterias u olores, limpie y seque el
tanque del alimentador de vapor después de cada uso.
•No lo lave en un lavavajillas.
•Si el tanque alimentador de vapor
no se desliza hacia adentro tan
suavemente como debería, limpie
el fondo del tanque.
Sarro producido por aguas duras
Si se utiliza agua dura en el tanque del alimentador de vapor,
el generador de vapor puede obstruirse con sarro producido
por aguas duras. En áreas con agua dura, ejecute la función
Descaling (Descalcificación) frecuentemente o utilice agua
ablandada.
Limpieza de sarro en la base
del horno
Para eliminar los depósitos minerales que quedan en la base
del horno después de utilizar el modo de vapor, utilice un paño
o una esponja impregnada en vinagre o una solución de ácido
cítrico débil. Para la suciedad rebelde o cuando hay mayor
cantidad de sarro, utilice la función Descaling (Descalcificación).
Descalcificación
Utilice esta función para eliminar los depósitos blancos que se
forman después de que se utiliza el generador de vapor por un
largo período de tiempo.
La función Descaling (Descalcificación) se ejecuta por 1 hora
y 43 minutos. Saldrá agua del generador de vapor mientras se
limpia. Para obtener instrucciones sobre cómo extraer y llenar
el tanque del alimentador de vapor, consulte "Cómo usar el
tanque del alimentador de vapor".
Configuración de la descalcificación
1Llene el tanque del alimentador de vapor con una mezcla
20:1 de agua y ácido cítrico. Por ejemplo, utilice 4 cdta.
de ácido cítrico en 4 1/4 tazas de agua (20 g de ácido
cítrico en 1000 ml de agua).
2Inserte el tanque de inyección de vapor en la ranura
sobre la cavidad del horno y empújelo hasta quedar
ubicado correctamente en su lugar.
3Gire la perilla del modo Oven (Horno) para seleccionar
el modo Clean (Limpieza). Presione Steam Maintenance
(Mantenimiento de vapor) y Descaling (Descalcificación)
en ese orden.
4Después de 1 hora y 43 minutos de descalcificación,
aparecerá un mensaje emergente en la pantalla.
Siguiendo las instrucciones, desagote el tanque y llénelo
con agua limpia.
5Inserte el tanque e inicie la función Rinsing (Enjuague).
6Una vez que la función Rinsing (Enjuague) esté completa,
seque el interior del horno con un paño suave. Deje la
puerta del horno abierta y deje que el horno se seque
completamente.
NOTA
•La función Rinsing (Enjuague) debe completarse incluso
si se cancela la función Descaling (Descalcificación).
•Si queda agua en la base del horno después de la
descalificación, puede dejar un residuo después de
que se use el horno. Para quitar el residuo, vea las
instrucciones en "Limpieza de sarro en la base del
horno".
•Después de ejecutar la función Descaling, limpie el
tanque de alimentación de vapor.
Secado
Esta función extrae restos de agua del generador de
vapor. La función lleva poco más de 1 minuto y se ejecuta
automáticamente después del ciclo de cocción al vapor. La
función Drying (Secado) también se puede iniciar manualmente
si es necesario.
Configuración del secado
1Asegúrese de que el tanque del alimentador de vapor
esté vacío.
2Gire la perilla del modo Oven (Horno) para seleccionar
el modo Clean (Limpieza). Presione Steam Maintenance
(Mantenimiento de vapor) y Drying (Secado) en ese
orden.
3Presione Start (Inicio) para comenzar el Secado. El
tiempo restante aparece en la pantalla.
Evaporación
Utilice la función Evaporation (Evaporación) para secar la
cavidad del horno después de un ciclo de cocción al vapor. La
evaporación se ejecuta durante 12 minutos.
Configuración de la evaporación
1Gire la perilla del modo Oven (Horno) para seleccionar
el modo Clean (Limpieza). Presione Steam Maintenance
(Mantenimiento de vapor) y Evaporation (Evaporation)
en ese orden.
2Presione Start (Inicio) para comenzar la Evaporación. El
tiempo restante aparece en la pantalla.

40 MANTENIMIENTO
BENEFICIOS DE SpeedClean™
•Ayuda a aflojar la suciedad leve antes de la limpieza
manual
•SpeedClean™ solo usa agua; no usa limpiadores químicos
•Favorece una mejor experiencia de autolimpieza
−Demora la necesidad de un ciclo de autolimpieza
−Minimiza el humo y los olores
−Puede acortar el tiempo de la autolimpieza
Cuándo utilizar SpeedClean™
Método sugerido de
limpieza Ejemplo de suciedad en el horno Forma de la
suciedad
Tipos de
suciedad
Alimentos comunes que
pueden ensuciar el horno
SpeedClean™
Gotitas o
manchitas
Queso u otros
ingredientes Pizza
Salpicadura leve Grasa/aceite
Bistecs, asados
Pescado, asado
Carne rostizada a baja
temperatura
Self Clean*
Salpicadura
mediana a
grande
Grasa/aceite Carne rostizada a alta
temperatura
Gotas o
manchas
Relleno o
suciedad de
alimentos con
azúcar
Tartas
Crema o salsa
de tomate Estofados
* El ciclo de autolimpieza puede usarse para suciedad que se haya acumulado con el tiempo.
SpeedClean™
El nuevo horno de SIGNATURE KITCHEN SUITE con
tecnología de esmalte SpeedClean™ proporciona dos
opciones de limpieza para el interior del horno. La función
SpeedClean™ aprovecha el nuevo esmalte de SIGNATURE
KITCHEN SUITE para ayudar a despegar la suciedad sin usar
químicos fuertes y funciona SOLAMENTE CON AGUA durante
apenas 10 minutos a baja temperatura para aflojar la suciedad
LEVE antes de realizar la limpieza manual.
Si bien la función SpeedClean™ es rápida y eficaz para la
suciedad LEVE y pequeña, la función de autolimpieza se
puede usar para quitar suciedad DIFÍCIL acumulada. La
intensidad y la alta temperatura del ciclo de autolimpieza
pueden producir humo, por lo que tendrá que abrir las
ventanas para ventilar. En comparación con el proceso más
intenso de autolimpieza, el horno SIGNATURE KITCHEN
SUITE le brinda la opción de limpiar con MENOS CALOR, en
MENOS TIEMPO y, prácticamente, SIN HUMO NI VAPORES.
Cuando sea necesario, el horno ofrece también la opción
de autolimpieza más prolongada y profunda para quitar la
suciedad difícil acumulada.

41
MANTENIMIENTO
ESPAÑOL
Consejos de limpieza
•Permita que el horno se enfríe a temperatura ambiente
antes de usar el ciclo SpeedClean™.
•Se puede usar una espátula plástica como raspador para
quitar los restos o residuos grandes antes de la limpieza del
horno o durante la limpieza.
•Puede resultar de ayuda usar el lado áspero de una esponja
que no raye para quitar manchas quemadas mejor que con
una esponja blanda o un paño.
•Algunas esponjas que no rayan disponibles en las tiendas
locales, como las hechas de espuma de melamina, también
pueden ayudar a mejorar la limpieza.
•El horno debe estar nivelado para que la superficie inferior
de la cavidad del horno esté completamente cubierta con
agua al comienzo del ciclo SpeedClean™.
•Para obtener mejores resultados, use agua destilada o
filtrada. El agua del grifo puede dejar depósitos minerales en
la base del horno.
•La suciedad quemada en varios ciclos de cocción será más
difícil de quitar con el ciclo SpeedClean™.
•No abra la puerta del horno durante el ciclo SpeedClean™.
El agua no se calienta lo suficiente si se abre la puerta
durante este ciclo.
•Para limpiar áreas difíciles de alcanzar, como la superficie
trasera del horno, es mejor usar el ciclo de Autolimpieza.
PRECAUCIÓN
•No utilice limpiadores para hornos, limpiadores
químicos abrasivos, lejía, vinagre, esponjas de acero ni
paños o limpiadores abrasivos para limpiar el horno, ya
que pueden dañar permanentemente la superficie del
horno.
•No limpie las juntas.
Guía de Instrucciones de
SpeedClean™
1Quite los estantes y los accesorios del horno.
2Raspe y retire los residuos quemados con un raspador
plástico.
Raspadores plásticos sugeridos:
•Espátula de plástico dura
•Raspador plástico para bandejas
•Raspador plástico para pintura
•Tarjeta de crédito vieja
3Si está limpiando el horno, llene el tanque de inyección
de vapor hasta el nivel máximo de llenado con agua.
4Gire la perilla del modo Oven (Horno) para seleccionar el
modo Clean (Limpieza). Luego seleccione SpeedClean
en la pantalla.
5Presione Start (Inicio). El tiempo restante aparece en la
pantalla.
PRECAUCIÓN
•Algunas superficies pueden quedar calientes después
del ciclo SpeedClean™. Use guantes de goma cuando
limpie para evitar quemaduras.
•Durante el ciclo SpeedClean™, la base del horno se
calienta lo suficiente como para provocar quemaduras.
Espere hasta que el ciclo termine antes de limpiar
la superficie interna del horno. Si no espera, podría
quemarse.
•Evite inclinarse o apoyarse en el vidrio de la puerta del
horno mientras limpia las cavidades del horno.
6Sonará un tono al final del ciclo de 10 minutos. Gire la
perilla de modo Oven (Horno) hasta la posición OFF
(APAGADO) para borrar la pantalla y apagar el tono.
7Después del ciclo de limpieza y durante la limpieza
manual, debe quedar suficiente agua en la base del
horno para sumergir completamente la suciedad.
Agregue agua si fuera necesario. Coloque una toalla en
el piso frente al horno para absorber el agua que pueda
derramarse durante la limpieza manual.

42 MANTENIMIENTO
8Limpie la cavidad del horno inmediatamente después del
ciclo SpeedClean™. Para ello, friegue con una esponja o
un paño de limpieza húmedos que no rayen. El lado para
refregar no rayará el acabado). Se puede derramar un
poco de agua en las ventilaciones de
la base cuando se realice la limpieza,
pero se recogerá en una bandeja que
está debajo de la cavidad del horno y
no dañará el quemador.
NOTA
NO use esponjas de acero ni paños o limpiadores
abrasivos, ya que estos materiales pueden dañar en
forma permanente la superficie del horno.
9Una vez que haya limpiado la cavidad del horno, quite
el exceso de agua con una toalla limpia y seca. Vuelva
a colocar los estantes y los demás accesorios.
10 Si queda alguna suciedad leve, repita los pasos
anteriores y asegúrese de empapar bien las áreas
sucias. Si queda suciedad rebelde después de varios
ciclos SpeedClean™, ejecute el ciclo de autolimpieza.
Asegúrese de que se hayan retirado de la cavidad
del horno los estantes y los demás accesorios, y
que la superficie de la cavidad esté seca antes de
ejecutar el ciclo de autolimpieza. Consulte la sección
"Autolimpieza" para obtener más detalles.
NOTA
•La junta de la cavidad puede quedar mojada cuando
termine el ciclo SpeedClean™. Esto es normal. No
limpie la junta.
•Si quedan depósitos minerales en la base del horno
después de la limpieza, use un paño o una esponja
impregnada en vinagre para quitarlos.
•No es recomendable el uso de limpiadores comerciales
o cloro para la limpieza en el horno.
En su lugar, utilice un limpiador líquido suave con un
valor de pH inferior a 12.7 para evitar la decoloración
en el esmalte.
Limpieza del Exterior
Supercies pintadas
Para la limpieza general, use un paño con agua jabonosa
caliente. En el caso de suciedad más difícil y grasa acumulada,
aplique detergente líquido directamente sobre la suciedad.
Déjelo reposar allí entre 30 y 60 minutos. Enjuague con un
paño húmedo y seque. No use limpiadores abrasivos.
Supercies de acero inoxidable
Para evitar hacer rayas, no use esponjas de lana de acero.
1Coloque una pequeña cantidad de limpiador o pulimento
para electrodomésticos de acero inoxidable en un paño o
una toalla de papel húmedos.
2Limpie un área pequeña y friegue siguiendo el grano del
acero inoxidable si corresponde.
3Seque y saque brillo con un paño suave o una toalla de
papel secos y limpios.
4Repita si fuera necesario.
NOTA
•No utilice esponjas de lana metálica porque rayarán la
superficie.
•Para limpiar la superficie de acero inoxidable, utilice
agua tibia jabonosa o un limpiador o pulidor para acero
inoxidable.
•Limpie siempre en la dirección del acabado de la
superficie de metal.
•El limpiador o pulidor de artefactos de acero inoxidable
se puede comprar en línea o en la mayoría de los
vendedores minoristas de electrodomésticos o artículos
para el hogar.

43
MANTENIMIENTO
ESPAÑOL
Puerta del horno
•Use agua jabonosa para limpiar bien la puerta del horno.
Enjuague bien. NO sumerja la puerta en agua.
•Puede usar un limpiador para vidrios en la parte externa de
la puerta del horno. NO rocíe agua ni limpiador para vidrios
en las ventilaciones de la puerta.
•NO use limpiadores para horno, polvos limpiadores ni
materiales abrasivos de limpieza en el exterior de la puerta
del horno.
•NO limpie la junta de la puerta del horno. La junta está
hecha de material tejido que es fundamental para lograr un
buen sellado. Se debe tener cuidado de no frotar, dañar ni
quitar esta junta.
PRECAUCIÓN
No use limpiadores fuertes ni materiales abrasivos de
limpieza en el exterior de la puerta del horno. Si lo hace,
puede dañarla.
No limpie
manualmente
la junta de
la puerta del
horno
Quite
cualquier
resto de la
puerta
Asadera y rejilla
•No guarde asaderas ni rejillas sucias en ninguna parte del
horno.
•No limpie la asadera ni la rejilla en el modo de autolimpieza.
•Quite la rejilla de la asadera. Vierta cuidadosamente la
grasa de la asadera en un recipiente adecuado.
•Lave y enjuague la asadera y la rejilla en agua caliente con
una esponja plástica o impregnada con jabón.
•Si la comida se quemó, rocíe la rejilla con limpiador mientras
esté caliente y cúbrala con toallas de papel o un paño
húmedos. Si se remoja la asadera, se podrá quitar la comida
quemada.
•Tanto la asadera como la rejilla se pueden limpiar con
limpiador para hornos comercial o en el lavavajillas.
Estantes del horno
Retire los estantes del horno antes de ejecutar el ciclo de
autolimpieza. Dejarlas en el lugar podría causar decoloración.
Si limpia los estantes usando el ciclo de autolimpieza, el color
cambiará a azul claro y el acabado perderá el brillo. Una vez
finalizado el ciclo de autolimpieza y después de que el horno
se haya enfriado, frote los costados de los estantes con
papel encerado o con un paño que contenga una pequeña
cantidad de aceite. Esto hará que los estantes se deslicen más
fácilmente en las guías.
Cavidad del horno
NO utilice limpiadores para hornos.
NUNCA limpie una superficie de porcelana caliente o tibia con
una esponja húmeda; podría causar astillamientos o cuarteo
(rajaduras pequeñas muy delgadas). Las salpicaduras de
alimentos se deberán limpiar cuando el horno se enfríe. A
altas temperaturas, los alimentos reaccionan con la porcelana
y puede quedar una mancha permanente. Cuando esté
limpiando una mancha, utilice solo limpiadores o raspadores
no abrasivos.

44 MANTENIMIENTO
Cómo cambiar la luz del horno
La luz del horno es una bombilla halógena estándar de 25
vatios.
ADVERTENCIA
•Asegúrese de que el horno y la bombilla estén fríos.
•Desconecte la energía eléctrica del horno desde el
fusible principal o el panel disyuntor. El no hacerlo
podría causar lesiones graves, descargas eléctricas o
la muerte.
•Use guantes mientras cambia la luz del horno. Los
fragmentos de vidrio provenientes de bombillas rotas
pueden causar riesgos de lesiones.
•Gire suavemente el destornillador mientras cambia la
luz del horno. Si aplica más fuerza, el vidrio o el horno
podrían romperse.
Para reemplazar las lámparas ubicadas en la pared lateral:
•Asegúrese de que el horno y la bombilla estén fríos.
1Desenchufe el horno o desconecte la energía.
2Retire los estantes del horno.
3Deslice un destornillador de hoja plana entre la carcasa y
la cubierta de vidrio de la lámpara.
4Sostenga la cubierta de vidrio de la lámpara con dos
dedos para evitar que caiga a la base del horno.
Cubierta de vidrio de la lámpara
Destornillador de hoja plana
5Gire suavemente el destornillador para aflojar la cubierta
y quitarla.
Carcasa
6Retire la bombilla del portalámparas.
7Reemplace la bombilla y presione la cubierta de la luz
hasta que se trabe en su lugar.
8Enchufe el horno o vuelva a conectar la energía.
Extracción y reemplazo de la
puerta del horno
PRECAUCIÓN
•La puerta es muy pesada. Tenga cuidado cuando quite
y levante la puerta.
•NO levante la puerta de la manija. La manija no está
diseñada para soportar el peso de la puerta y se podría
romper.
•NO golpee el vidrio con ollas, sartenes ni con ningún
otro objeto.
•Si se raya, golpea, hace vibrar o fuerza el vidrio, se
puede debilitar su estructura, lo que aumenta el riesgo
de rotura más adelante.
Cómo retirar la puerta del horno
1Abra totalmente la puerta.
2Desbloquee las trabas de las bisagras a ambos lados.
Para ello, gírelas alejándolas lo más posible del marco
de la puerta abierta.
Ranura
Desbloqueo
Bloqueo
Traba de la bisagra
Brazo de la bisagra
3Tome firmemente ambos lados de la puerta desde la
parte superior.
4Cierre la puerta hasta la posición de remoción
(aproximadamente cinco grados), que es a mitad de
la distancia entre la posición de tope del asador y
totalmente cerrada. Si la posición es correcta, los brazos
de las bisagras se moverán libremente.
aprox.5°
Posición de extracción
5Levante la puerta y tire hacia fuera hasta que los brazos
de las bisagras salgan de las ranuras.

45
MANTENIMIENTO
ESPAÑOL
Cómo colocar la puerta
1Tome firmemente ambos lados de la puerta desde la
parte superior.
2Con la puerta en el mismo ángulo que la posición de
remoción, apoye la hendidura de los brazos de las
bisagras en el borde inferior de las ranuras de las
bisagras. Las muescas de los brazos de las bisagras
deben estar totalmente apoyadas en el borde inferior de
las ranuras.
Brazo de la
bisagra
Borde borde
de la ranura
Hendidura
3Abra totalmente la puerta. Si la puerta no se abre
completamente, la hendidura no está bien apoyada en el
borde inferior de la ranura.
4Bloquee las bisagras a ambos lados de la puerta. Para
ello, gírelas nuevamente hacia las ranuras del marco del
horno hasta que traben.
Brazo de la bisagra
Traba de la bisagra
Presione las trabas de la bisagra hasta que queden trabadas
5Cierre la puerta del horno.
Instrucciones para el cuidado de la
puerta
La mayoría de las puertas de hornos contienen un vidrio que
puede romperse.
PRECAUCIÓN
•No cierre la puerta del horno hasta que todos los
estantes estén bien colocados en su lugar.
•No golpee el vidrio con ollas, sartenes ni con ningún
otro objeto.
•Si se raya, golpea, hace vibrar o fuerza el vidrio, se
puede debilitar su estructura, lo que aumenta el riesgo
de rotura más adelante.

46 SOLUCIÓN DE PROBLEMAS
SOLUCIÓN DE
PROBLEMAS
PREGUNTAS FRECUENTES
Mi nuevo horno no cocina como el que tenía antes. ¿Hay
algo mal con los ajustes de temperatura?
No, su horno fue probado y calibrado en la fábrica. Durante
los primeros usos, siga cuidadosamente los tiempos y las
temperaturas de su receta. Si todavía piensa que el horno
nuevo es muy caliente o muy frío, puede ajustar usted la
temperatura del horno para adecuarla a sus necesidades
específicas de cocción. Consulte la sección de "Ajuste de
temperatura", en la página 13, para obtener instrucciones
fáciles sobre cómo ajustar el termostato.
¿Es normal que se escuche un chasquido que proviene de
la parte trasera del horno cuando lo uso?
Su nuevo horno está diseñado para mantener un control
estricto de la temperatura. Es posible que escuche que los
quemadores hacen un chasquido al encenderse y apagarse
con más frecuencia en su horno nuevo. Es un funcionamiento
normal.
Durante la cocción por convección, el ventilador se
detiene cuando abro la puerta. ¿Es normal?
Sí, es normal. Cuando se abre la puerta, el ventilador de
convección se detiene hasta que se cierra la puerta.
¿Puedo usar papel de aluminio para que recolecte las
gotas en la cavidad del horno?
No utilice nunca papel aluminio para revestir el fondo o los
costados del horno. El papel se derretirá y se pegará a la
superficie del fondo del horno y no se podrá quitar. En lugar de
eso, coloque una bandeja sobre un estante inferior del horno
y úsela para recolectar las gotas. (Si ya se ha derretido papel
de aluminio en el fondo del horno, esto no interferirá con el
rendimiento del horno).
¿Puedo usar papel de aluminio en los estantes?
No cubra los estantes con papel de aluminio. Cubrir estantes
por completo con papel de aluminio restringe el flujo de aire, lo
que se traduce en resultados de cocción deficientes. Coloque
una bandeja cubierta con papel de aluminio debajo de tartas
de frutas u otros alimentos ácidos o dulces para evitar que los
derrames dañen el acabado del horno.
PRECAUCIÓN
Puede utilizar papel aluminio para envolver los alimentos
dentro del horno, pero no permita que el papel aluminio
entre en contacto con los quemadores/asadores
expuestos del horno. El papel aluminio podría derretirse o
prenderse fuego, lo que ocasionaría humo, un incendio o
lesiones.
¿Puedo dejar los estantes en el horno cuando ejecute un
ciclo de Autolimpieza?
No, aunque no dañará los estantes, esto los decolorará y no
se deslizarán bien cuando los use. Quite todos los elementos
del horno antes de comenzar un ciclo de autolimpieza.
¿Qué debo hacer si los estantes están pegajosos y es
difícil deslizarlos hacia dentro y hacia fuera?
Con el tiempo, se puede hacer difícil deslizar los estantes.
Aplique una pequeña cantidad de aceite de oliva en los
extremos de los estantes. Este actuará como lubricante para
un deslizamiento mejor.
¿Debo asar con la puerta abierta o cerrada?
Su horno no está diseñado para asar con la puerta abierta. Si
asa con la puerta abierta podría dañar las perillas y la pantalla.
¿Por qué no funcionan los botones de función?
Asegúrese de que el horno no esté en modo Lockout (Bloqueo).
El símbolo de bloqueo aparecerá en la pantalla si el modo
Lockout (Bloqueo) está activado. Para desactivar el bloqueo,
presione la pantalla para ver el mensaje de desbloqueo
emergente. Presione UNLOCK (DESBLOQUEAR) durante 3
segundos para cancelar la función de bloqueo. El ícono de
candado desaparecerá en la esquina superior derecha de la
pantalla.
Mi horno todavía está sucio después de ejecutar el ciclo
SpeedClean™. ¿Qué más debo hacer?
El ciclo SpeedClean™ solo ayuda a aflojar la suciedad leve
del horno para contribuir con su limpieza manual. No quita
automáticamente toda la suciedad después del ciclo.
Es posible que necesite fregar el horno después del ciclo
SpeedClean™.
Probé fregar el horno después de ejecutar SpeedClean™,
pero hay suciedad que queda, ¿qué puedo hacer?
La función SpeedClean™ tiene un mejor resultado cuando
la suciedad se empapa y sumerge totalmente en agua
antes de ejecutar el ciclo y durante la limpieza manual. Si
la suciedad no está muy empapada en agua, puede afectar
negativamente el desempeño de la limpieza. Repita el proceso
SpeedClean™ utilizando suficiente agua. La suciedad de
azúcar y algunos residuos grasosos es particularmente
difícil de limpiar. Si queda alguna suciedad rebelde, use la
función Self Clean (Autolimpieza) para limpiar bien el horno.

47
SOLUCIÓN DE PROBLEMAS
ESPAÑOL
La suciedad de las paredes del horno no sale. ¿Cómo
puedo dejar limpias las paredes del horno?
La suciedad en las paredes laterales y traseras del horno
puede resultar más difícil de empapar con agua. Pruebe de
repetir el proceso SpeedClean™ con más agua que el
rociado recomendado de 1/5 taza (2 oz o 60 ml).
¿SpeedClean™ quita toda la suciedad y las manchas
completamente?
Depende del tipo de suciedad. Las manchas de azúcar y
algunas de grasa son particularmente difíciles de limpiar.
Además, si las manchas no están muy empapadas en
agua, esto puede afectar negativamente el desempeño de
la limpieza. Si todavía quedan manchas rebeldes o de
acumulación, use la función Self Clean (Autolimpieza).
Consulte la sección "Autolimpieza" de este manual.
¿Hay algún truco para eliminar algo de la suciedad
rebelde?
Se recomienda raspar la suciedad con un raspador plástico
antes de limpiar manualmente y mientras limpia. También se
recomienda saturar completamente con agua la suciedad.
Sin embargo, hay suciedad que es más difícil de limpiar que
otra. Para la suciedad rebelde, se recomienda usar el ciclo
Self Clean (Autolimpieza). Consulte la sección Autolimpieza
de este manual para obtener más detalles.
¿Es seguro que el ventilador de convección, el
asador o los quemadores se mojen durante la función
SpeedClean™?
Sí. El ventilador de convección, el asador o el quemador
pueden mojarse un poco durante la limpieza. Sin embargo,
no es necesario aplicar un rocío directo sobre el asador ni los
quemadores porque se limpian automáticamente durante el
uso regular.
Veo "humo" que sale de la ventilación del horno durante
SpeedClean™. ¿Es normal?
Esto es normal. No es humo. En realidad, es vapor de agua
del agua que está en la cavidad del horno. Cuando el horno
se calienta brevemente durante SpeedClean™, el agua de la
cavidad se evapora y sale por la ventilación del horno.
¿Con cuánta frecuencia debo usar SpeedClean™?
SpeedClean™ se puede usar las veces que desee.
SpeedClean™ funciona mejor cuando el horno está
LEVEMENTE sucio, por ejemplo, con salpicaduras de grasa
LEVES y gotas pequeñas de queso. Consulte la sección
SpeedClean™ del manual del propietario para obtener más
información.
¿Qué se necesita para ejecutar SpeedClean™?
Un envase rociador con 10 oz (300 ml) de agua, un raspador
plástico, una esponja que no raye y un paño. No debe usar
esponjas abrasivas como las de trabajo pesado ni lana de
acero.

48 SOLUCIÓN DE PROBLEMAS
Antes de llamar al servicio técnico
Antes de llamar para solicitar servicio, revise esta lista. Puede ahorrarle tiempo y gastos.
La lista incluye incidentes comunes que no son consecuencia de problemas de fabricación ni de los materiales de este
electrodoméstico.
Síntomas Causas/soluciones posibles
El control del horno suena
y muestra un código de
error F.
•El control electrónico ha detectado una falla.
Presione cualquier botón y gire cualquier
perilla una vez para borrar la pantalla y
detener el pitido. Reprograme el horno.
Si la falla se repite, registre el número de
falla. Borre la pantalla y detenga el pitido.
Luego póngase en contacto con un técnico
de servicio calificado.
CÓDIGO CAUSA
F-19 No calienta
El horno no funciona
•El enchufe del horno no está insertado completamente en la toma de corriente.
−Asegúrese de que el enchufe esté conectado a una toma de corriente funcional y conectado
a tierra.
•Es posible que se haya quemado un fusible o que se haya disparado el disyuntor de su casa.
−Reemplace el fusible o restablezca el disyuntor.
•Los controles del horno están mal configurados.
Consulte la sección Uso del horno.
•Horno demasiado caliente.
−Deje que el horno se enfríe a una temperatura inferior a la de bloqueo.
•El cableado de servicio no está completo. Póngase en contacto con el personal de servicio del
electrodoméstico para recibir asistencia.
•Corte de energía. Verifique las luces de la casa para asegurarse. Llame a la empresa de
electricidad local para solicitar servicio.
La luz del horno no
funciona.
•Reemplace o ajuste la bombilla. Consulte la sección "Cómo cambiar la luz del horno" de este
manual del usuario.
El horno emite mucho
humo cuando asa.
•El control no está bien configurado. Siga las instrucciones para el ajuste de los controles del
horno.
•La carne está demasiado cerca de quemador. Coloque el estante en otra posición para dejar
un espacio suficiente entre la carne y el quemador. Precaliente el asador para sellar.
•La carne no está bien preparada. Quite el exceso de grasa de la carne. Corte los bordes de
grasa restantes para evitar que la carne se retuerza, pero no corte la parte magra.
•La rejilla en la asadera está al revés y la grasa no drena. Siempre coloque la rejilla en la
asadera con las muescas hacia arriba y las ranuras hacia abajo para permitir que la grasa
gotee en la bandeja.
•Se ha acumulado grasa en las superficies del horno. Es necesario realizar una limpieza
regular cuando se asa con frecuencia. Las salpicaduras viejas de comida o grasa producen
mucho humo.
La comida no se hornea ni
se rostiza correctamente
•Los controles del horno están mal configurados.
−Consulte la sección Uso del horno.
•La posición del estante es incorrecta o este no está nivelado.
−Consulte la sección Uso del horno.
•Se están usando recipientes incorrectos o del tamaño incorrecto.
−Consulte la sección Uso del horno.
•Se debe ajustar el sensor del horno.
−Consulte los Ajustes de la temperatura en la sección "Cómo cambiar las configuraciones del
horno".

49
SOLUCIÓN DE PROBLEMAS
ESPAÑOL
Síntomas Causas/soluciones posibles
La comida no se asa
correctamente
•Los controles del horno están mal configurados.
−Consulte la sección de recomendaciones para asar.
•Se está utilizando el estante en una posición incorrecta.
−Consulte la Guía de recomendaciones para asar.
•Los recipientes no son adecuados para asar.
−Utilice la asadera y rejilla para asar que viene con su horno.
•Se ha utilizado papel aluminio en una bandeja para asar, la rejilla no se ha encastrado
correctamente o las muescas no están del lado correcto.
−Consulte la sección Uso del horno.
•En algunas áreas la energía (voltaje) puede ser baja.
−Precaliente el asador por 10 minutos.
−Consulte la Guía de recomendaciones para asar.
La temperatura del horno
es muy alta o muy baja
•Se debe ajustar el sensor del horno.
−Consulte los Ajustes de la temperatura en la sección "Cómo cambiar las configuraciones del
horno".
El horno no se limpia
automáticamente
•La temperatura del horno es demasiado alta para configurar una operación de autolimpieza.
−Deje que el horno se enfríe y restablezca los controles.
•Los controles del horno están mal configurados.
−Consulte la sección Autolimpieza.
•Un ciclo de autolimpieza no puede comenzar si la puerta del horno está abierta.
Sonido de crujido o
explosión
•Es el sonido del metal que se calienta y se enfría durante las funciones de cocción y limpieza.
−Esto es normal.
Humo excesivo durante
un ciclo de autolimpieza
•Suciedad excesiva.
−Coloque ambas perillas del modo Oven (Horno) en la posición OFF (APAGADO) o presione
el botón STOP (DETENER). Abra las ventanas para sacar el humo de la habitación. Espere
hasta que se cancele el modo de autolimpieza. Limpie el exceso de suciedad y reinicie el
ciclo de autolimpieza.
La puerta del horno no se
abre después de un ciclo
de autolimpieza
•El horno está demasiado caliente.
−Deje que el horno se enfríe a una temperatura inferior a la de bloqueo.
El horno no está limpio
después de un ciclo de
autolimpieza
•Los controles del horno no están bien configurados.
−Consulte la sección Autolimpieza.
•El horno está muy sucio.
−Limpie los derrames grandes antes de comenzar el ciclo de limpieza. Los hornos muy
sucios pueden necesitar otro ciclo de autolimpieza o un ciclo con un período más
prolongado.
Aparece el ícono de
bloqueo de la puerta
en la pantalla cuando
quiere cocinar
•La puerta del horno está bloqueada porque la temperatura interior no bajó a menos de la
temperatura de bloqueo.
−Presione el botón STOP (DETENER). Deje que el horno se enfríe.
Sale olor a quemado o a
aceite de la ventilación
•Esto es normal en un horno nuevo y desaparecerá con el tiempo.
−Para acelerar el proceso, programe un ciclo de Autolimpieza durante un mínimo de 3 horas.
Consulte la sección Self Clean (Autolimpieza).

50 SOLUCIÓN DE PROBLEMAS
Síntomas Causas/soluciones posibles
El ventilador de
enfriamiento continúa
funcionando después de
que se apaga el horno
•El ventilador se apaga automáticamente cuando los componentes electrónicos se han enfriado
lo suficiente.
−Esto es normal.
Hay ventilación de aire
cálido en la cocina
después de que el horno
se ha apagado.
•La salida del aire cálido es necesaria para mantener y enfriar las temperaturas del horno. Se
apaga automáticamente cuando el calor baja a una temperatura segura.
−Esto es normal.
Se acumula humedad en
el visor del horno o sale
vapor de la ventilación del
horno
•Esto es normal cuando se cocinan alimentos con alto contenido de humedad.
•Se utilizó demasiada humedad cuando se limpió la ventana.
El horno no cocina al
vapor
•Asegúrese de deslizar el tanque en la ranura hasta que oiga un clic.
•El desagote del tanque de agua se puede obstruir con sarro producido por aguas duras. Si
esto ocurre, se debe ejecutar la función de descalcificación antes de poder utilizar la función
de vapor.
Hay charcos de agua en
la base del horno durante
o después de la cocción
al vapor.
•Durante la cocción al vapor, el agua en el tanque de agua se traslada a la base del horno. Es
normal que el agua llene la base del horno durante o después del modo Vapor.
•Si el agua deja depósitos minerales en la base del horno, quite los depósitos con un paño o
esponja impregnados en vinagre.
Aparece residuo de
color blanco en la base
del horno después de la
cocción al vapor
•Utilizar agua dura en el tanque de agua puede hacer que se acumule sarro en la base del
horno.
•Para quitar los depósitos minerales que quedan en la base del horno utilice un paño o una
esponja impregnados en vinagre o una solución de ácido cítrico débil.
Se presentan problemas
al conectar el
electrodoméstico y el
teléfono inteligente a una
red Wi-Fi.
•La contraseña para la red de Wi-Fi se ingresó de forma incorrecta.
−Borre su red Wi-Fi doméstica y comience nuevamente el proceso de registro.
•La opción Datos móviles para su teléfono inteligente está encendida.
−Apague la opción Datos móviles en su teléfono inteligente antes de registrar el
electrodoméstico.
•El nombre de la red inalámbrica (SSID) se configuró de forma incorrecta.
−El nombre de la red inalámbrica (SSID) debe ser una combinación de números y letras en
inglés. (No utilice caracteres especiales).
•La frecuencia del enrutador no es de 2,4 GHz.
−Solo soporta una frecuencia de enrutador de 2,4 GHz. Configure el enrutador inalámbrico a
2,4 GHz y conecte el electrodoméstico al enrutador inalámbrico. Para verificar la frecuencia
del enrutador, verifique con su proveedor de servicio de internet o el fabricante del
enrutador.
•El electrodoméstico está muy lejos del enrutador.
−Si el electrodoméstico está muy lejos del enrutador, la señal puede ser débil y la conexión
puede no estar configurada correctamente. Acerque el enrutador al electrodoméstico o
compre e instale un repetidor de Wi-Fi.
El módulo de cocción al
vacío (sous vide) emite
un pitido durante el
funcionamiento
•Esta alerta suena cuando el módulo de cocción al vacío (sous vide) está funcionando sin agua
en el tanque del alimentador de vapor.
−Llene el tanque del alimentador de vapor hasta el nivel recomendado antes de usarlo.

51
GARANTÍA
ESPAÑOL
GARANTÍA (EE. UU.)
En caso de que su SIGNATURE KITCHEN SUITE Horno (“Producto”) presente alguna falla por defectos de materiales o de
fabricación bajo uso apropiado y normal durante el período de garantía establecido más abajo, será reparado o reemplazado
por SIGNATURE KITCHEN SUITE, a su opción. Esta garantía limitada es válida únicamente para el comprador final original del
producto, y únicamente cuando el producto ha sido comprado y utilizado dentro de los Estados Unidos, incluidos los territorios
norteamericanos.
PERÍODO DE GARANTÍA CÓMO SE MANEJA EL SERVICIO TÉCNICO
Tres (3) años a partir de la fecha de compra
minorista original
Cualquier parte del horno que falle debido a un defecto en materiales o mano
de obra. Durante la totalidad de estos tres años de garantía, SIGNATURE
KITCHEN SUITE también proporcionará, sin costo alguno, toda la mano
de obra y el servicio técnico a domicilio necesarios para reemplazar piezas
defectuosas.
•Los productos y las piezas de repuesto están garantizados durante el tiempo restante del período original de garantía o noventa
(90) días, lo que resulte mayor.
•Los productos y las piezas de repuesto pueden ser nuevos, reparados, reacondicionados, o reconstruidos por la fábrica.
•Los Productos o piezas reemplazados serán propiedad de SIGNATURE KITCHEN SUITE.
•Es necesario presentar prueba de la compra minorista especificando el modelo del producto y la fecha de compra para obtener
el servicio de garantía bajo esta garantía limitada.
SALVO LO PROHIBIDO POR LA LEY, TODA GARANTÍA DE COMERCIALIZACIÓN O IDONEDAD IMPLÍCITA, PARA UN
PROPÓSITO PARTICULAR EN EL PRODUCTO, ESTÁ LIMITADA A LA DURACIÓN DE LA GARANTÍA ARRIBA EXPRESADA.
BAJO NINGUNA CIRCUNSTANCIA DEBERÁ SIGNATURE KITCHEN SUITE O SUS DISTRIBUIDORES/REPRESENTANTES
SER RESPOSABLE POR CUALQUIER DAÑO INDIRECTO, INCIDENTAL, CONSECUENTE, ESPECIAL, O PUNITIVO, LO
CUAL INCLUYE PERO NO SE LIMITA A, PÉRDIDA DE FONDOS DEL COMERCIO, GANANCIAS PERDIDAS, INTERRUPCIÓN
DEL TRABAJO, DETERIORO DE OTROS BIENES, COSTO DE REMOVER Y REINSTALAR EL PRODUCTO, PÉRDIDA DE
USO, O CUALQUIER OTRO DAÑO YA SEA BASADO EN CONTRATO, PERJUICIO, U OTROS. LA RESPONSABILIDAD TOTAL
DE SIGNATURE KITCHEN SUITE, EN CASO EXISTA, NO EXCEDERÁ EL PRECIO QUE USTED PAGÓ POR ADQUIRIR EL
PRODUCTO.
ALGUNOS ESTADOS NO PERMITEN LA EXCLUSIÓN O LIMITACIÓN DE DAÑOS INCIDENTALES O EMERGENTES,
O LIMITACIONES A LA DURACIÓN DE LA GARANTÍA IMPLÍCITA, POR LO QUE LA EXCLUSIÓN O LIMITACIÓN
ANTERIORMENTE MENCIONADA PODRÍAN NO CORRESPONDER EN SU CASO. ESTA GARANTÍA LIMITADA LE OTORGA
DERECHOS LEGALES ESPECÍFICOS Y ES POSIBLE QUE USTED CUENTE CON OTROS DERECHOS QUE VARÍAN SEGÚN
EL ESTADO.
ESTA GARANTÍA LIMITADA NO CUBRE LO SIGUIENTE:
•Viajes del servicio técnico para entregar, buscar o instalar el producto, instruir al cliente sobre la operación del mismo, corregir el
cableado o las reparaciones/instalaciones no autorizadas.
•Daño o fallo del producto al operar durante fallas e interrupciones del suministro eléctrico, o resultado de un servicio eléctrico
inadecuado.
•Daños o fallas causadas por tuberías de agua rotas o con fugas, tuberías de agua congeladas, líneas de desagüe restringidas,
suministro de agua inadecuado o interrumpido, o suministro de aire inadecuado.
•Daños resultantes de operar el producto en una atmósfera corrosiva o contraria a las instrucciones detalladas en el manual del
propietario del producto.
•Daños o fallos del producto causados por accidentes, pestes y alimañas, rayos, viento, incendio, inundaciones, hechos de fuerza
mayor, o cualquier otra causa fuera del control de SIGNATURE KITCHEN SUITE.
•Daños o fallos del Producto causados por modificaciones o alteraciones no autorizadas, o por utilizar el Producto para fines
distintos de lo previsto, o pérdida de agua cuando el Producto no se instaló adecuadamente.
•Daños o fallos del Producto causados por corriente eléctrica o voltaje incorrectos, o códigos de cañería.
•Daños o fallos del Producto causados por el transporte, almacenamiento o manipulación, incluidos rayas, muescas, astillados u
otros daños al acabado, a menos que tales defectos se informen en el plazo de una (1) semana a partir de la entrega.

52 GARANTÍA
•Daños o fallos del Producto causados por mal uso, abuso, instalación, reparación o mantenimiento incorrectos.
Una reparación incorrecta incluye el uso de piezas no autorizadas, aprobadas o especificadas por SIGNATURE KITCHEN
SUITE. La instalación o el mantenimiento inadecuado incluye aquellos contrarios a lo especificado en el manual del usuario del
Producto.
•Daños o fallos del Producto causados por el uso de piezas, componentes, accesorios, productos de limpieza consumibles, u
otros productos o servicios no autorizados por SIGNATURE KITCHEN SUITE.
•Daños o artículos faltantes con la caja abierta o que hayan estado en exhibición.
•Productos reacondicionados o cualquier producto vendido con los avisos “En el estado actual”, “En el sitio actual”, “Con todos
sus defectos” o similares.
•Productos cuyos números de serie originales hayan sido retirados, alterados o no se puedan determinar fácilmente.
•Aumentos en los costos de los servicios públicos y otros gastos adicionales de dichos servicios.
•Cualquier ruido asociado con la operación normal.
•Productos utilizados de otra forma que no sea uso doméstico usual y normal (p. ej., uso comercial o industrial) o de forma
contraria al manual del usuario del Producto.
•Costos asociados con la remoción y reinstalación del Producto para reparaciones o la remoción y reinstalación del Producto si
está instalado en una ubicación inalcanzable o no está instalado de acuerdo con el Manual del propietario del producto.
•Accesorios, componentes extraíbles o partes consumibles (por ejemplo, estantes, compartimentos de la puerta, cajones, filtros
de agua o aire, rejillas, bombillas, baterías, etc. según corresponda), excepto las partes internas/funcionales cubiertas por esta
garantía limitada.
Esta garantía se extiende al comprador original para productos comprados para uso residencial dentro de los EE. UU. En Alaska,
la garantía no incluye el costo del envío o las visitas del servicio técnico a su domicilio. Algunos estados no permiten la exclusión
o limitación de daños incidentales o emergentes, por lo que esta exclusión o limitación podría no corresponder en su caso. Esta
garantía le otorga derechos legales específicos y es posible que usted cuente con otros derechos que varían según el estado. Para
conocer sus derechos legales, consulte en la Oficina de defensa al consumidor local o estatal o al Procurador general de su estado.
INFORMACIÓN DE ASISTENCIA AL CONSUMIDOR:
Comprobante de la cobertura de la garantía Conserve su factura de compra para probar la fecha de
compra.
Se debe presentar una copia de la factura de compra al
momento en que se proporciona el servicio de garantía.
Para conocer el Centro de Servicios Autorizados o el
Distribuidor de Ventas más cercano, o para obtener asistencia
sobre el producto, el servicio al cliente o el mantenimiento
Llame al 1-855-790-6655 (se atienden llamados las 24 horas,
los 365 días del año) y elija la indicación apropiada del menú;
o visite nuestro sitio web en www.signaturekitchensuite.com;
O por correo: SIGNATURE KITCHEN SUITE Customer
Service P.O. Box 240007 Huntsville, AL 35813 ATTN: CIC

53
MEMO
ESPAÑOL
MEMO

54 MEMO
MEMO

55
MEMO
ESPAÑOL
MEMO

Customer Information Center
For inquires or comments, call:
1-855-790-6655 USA Printed in Korea
-
 1
1
-
 2
2
-
 3
3
-
 4
4
-
 5
5
-
 6
6
-
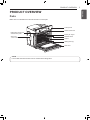 7
7
-
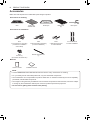 8
8
-
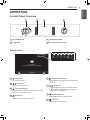 9
9
-
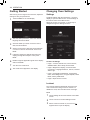 10
10
-
 11
11
-
 12
12
-
 13
13
-
 14
14
-
 15
15
-
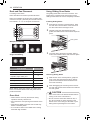 16
16
-
 17
17
-
 18
18
-
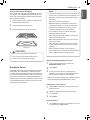 19
19
-
 20
20
-
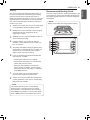 21
21
-
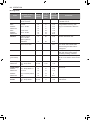 22
22
-
 23
23
-
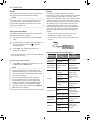 24
24
-
 25
25
-
 26
26
-
 27
27
-
 28
28
-
 29
29
-
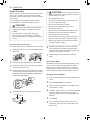 30
30
-
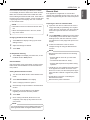 31
31
-
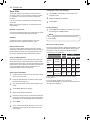 32
32
-
 33
33
-
 34
34
-
 35
35
-
 36
36
-
 37
37
-
 38
38
-
 39
39
-
 40
40
-
 41
41
-
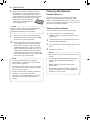 42
42
-
 43
43
-
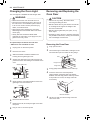 44
44
-
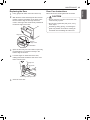 45
45
-
 46
46
-
 47
47
-
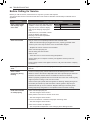 48
48
-
 49
49
-
 50
50
-
 51
51
-
 52
52
-
 53
53
-
 54
54
-
 55
55
-
 56
56
-
 57
57
-
 58
58
-
 59
59
-
 60
60
-
 61
61
-
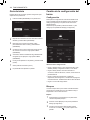 62
62
-
 63
63
-
 64
64
-
 65
65
-
 66
66
-
 67
67
-
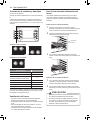 68
68
-
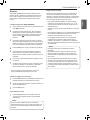 69
69
-
 70
70
-
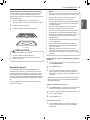 71
71
-
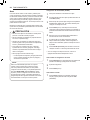 72
72
-
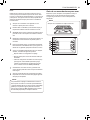 73
73
-
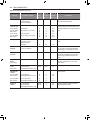 74
74
-
 75
75
-
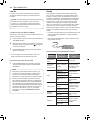 76
76
-
 77
77
-
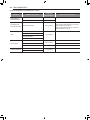 78
78
-
 79
79
-
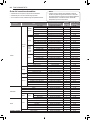 80
80
-
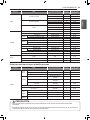 81
81
-
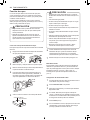 82
82
-
 83
83
-
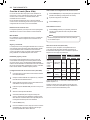 84
84
-
 85
85
-
 86
86
-
 87
87
-
 88
88
-
 89
89
-
 90
90
-
 91
91
-
 92
92
-
 93
93
-
 94
94
-
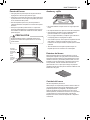 95
95
-
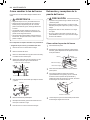 96
96
-
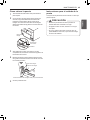 97
97
-
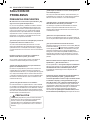 98
98
-
 99
99
-
 100
100
-
 101
101
-
 102
102
-
 103
103
-
 104
104
-
 105
105
-
 106
106
-
 107
107
-
 108
108


Signature Kitchen Suite SKSSV3001S El manual del propietario
- Categoría
- Microondas
- Tipo
- El manual del propietario