Marshalltown 29592 Spin Screed Gas Powered Unit Manual de usuario
- Tipo
- Manual de usuario

SPIN SCREED® GAS UNIT
Part #SPNRSSAGAS | EDI #29592
104 S. 8th Ave. | Marshalltown, IA
Phone 800-888-0127 / 641-753-0127 | Fax 800-477-6341 / 641-753-6341
www.MARSHALLTOWN.com
WS2860revC

2 of 12 104 S. 8th Ave. Marshalltown, IA Phone 800-888-0127 / 641-753-0127 • Fax 800-477-6341 / 641-753-6341 www.MARSHALLTOWN.com WS2860revC
INTRODUCTION
Thank you for purchasing the Spin Screed®. The Spin Screed® is a simple and effective tool to screed concrete. Its simplicity
allows even the most inexperienced operators to screed effectively and accurately.
Specifications:
Part#: SPNRSSAGAS
EDI: 29592
Dimensions:
Power Head length: 49⁄" Dead End T-Handle length: 61⁄"
Power Head width: 11⁄" Dead End T-Handle width: 14⁄"
Live End diameter: 1⁄" Dead End T-Handle diameter: 1"
Live End length: 5" Dead End Pipe Adapter length: 4"
Live End Pipe Adapter diameter: 3.98"
Engine: Honda GX35, 35CC 4 Stroke Gasoline
Spin Screed® Pipe is sold separately. Specification of the 4" Schedule 40 seamless aluminum Spin Screed® Pipe:
Diameter: 4⁄ "
Thickness: ⁄ "
TABLE OF CONTENTS
SAFETY PRECAUTIONS .................................................................................................................................................................................3
WARRANTY ......................................................................................................................................................................................................4
ASSEMBLY GUIDE .......................................................................................................................................................................................5-6
PRODUCT OPERATION ...............................................................................................................................................................................7-8
MAINTENANCE ................................................................................................................................................................................................ 9
TROUBLESHOOTING ...................................................................................................................................................................................... 9
SIGNAL WORDS
UNDERSTAND SIGNAL WORDS
A signal word — DANGER, WARNING, or CAUTION — is used with the safety-alert system symbol. DANGER
identifies the most serious hazards.
DANGER!
• DANGER or
WARNING!
WARNING safety signs are located near specific hazards.
CAUTION!
• General precautions are listed on CAUTION safety signs.

3 of 12
104 S. 8th Ave. Marshalltown, IA Phone 800-888-0127 / 641-753-0127 • Fax 800-477-6341 / 641-753-6341 www.MARSHALLTOWN.comWS2860revC
SAFETY PRECAUTIONS
IMPORTANT — READ THIS MANUAL BEFORE ASSEMBLING OR OPERATING
After referring to the operation manual, if you still require assistance, please contact our customer
service department.
This operator’s manual has been prepared to provide the information you need to correctly operate and
maintain your unit. Read it carefully and keep it for future reference.
The replacement of any part on this product by other than the manufacturer’s authorized replacement part may adversely
affect the performance, durability, or safety of this product. Should you ever require repair parts or service, contact your
authorized parts and service dealer.
The manufacturer reserves the right to make changes or add improvements to its product at any time without prior notice.
The manufacturer also reserves the right to decide, upon its discretion at any time, to discontinue a product.
Read and follow all safety precautions and operating instructions in this manual.
Familiarity and proper training are required for the safe operation of this equipment. Equipment operated improperly or
by untrained personnel can damage equipment or cause bodily harm. Read the operating instructions contained in this
manual to familiarize yourself with the location and proper use of all the controls.
• DO NOT operate this machine until you have read the operating and safety instructions. ALWAYS operate the
machine in accordance with the manufacturer’s instructions.
• ALWAYS inspect your Spin Screed® upon arrival for damage or tampering that can rarely occur during shipping. If
damage is found, file a claim with your carrier immediately! Mark corresponding delivery receipt as “damaged
shipment”.
• NEVER allow untrained personnel to operate your Spin Screed®. Individuals who operate this screed should have
adequate training in operating procedures.
• CALIFORNIA PROPOSITION 65 WARNING: This product can expose you to chemicals known to the State of California
to cause cancer, birth defects, or other reproductive harm.
• NEVER use over-the-counter hardware to replace manufacturers’ hardware. Contact MARSHALLTOWN Customer
Service Department for information regarding replacement parts: 800-888-0127.
• DO NOT attempt to clean or service screed while machine is running.
• DO NOT use gasoline, other fuels, or any flammable solvent to clean parts, especially in enclosed areas. Fumes from
fuels and solvents can cause serious health problems if you are exposed to them over an extended period.
• ALWAYS wear adequate hearing protection while running your Spin Screed®.
• Refer to the included engine manufacturer’s manual for specific electrical requirements and safety information.
CAUTION!
CAUTION!
CAUTION!
CAUTION!
DANGER!

4 of 12 104 S. 8th Ave. Marshalltown, IA Phone 800-888-0127 / 641-753-0127 • Fax 800-477-6341 / 641-753-6341 www.MARSHALLTOWN.com WS2860revC
WARRANTY
This product is warranted to the original purchaser only, to be free of defects in material and workmanship under normal
use, for one year from purchase date. MARSHALLTOWN shall without charge for parts and labor, repair or replace such
parts which are found to be defective. All transportation charges for replacement parts must be borne by the purchaser.
For warranty service, the product must be delivered, with proof of purchase date, to MARSHALLTOWN. Contact
MARSHALLTOWN Customer Service to determine the best method of delivering the product that is under warranty. The
delivery of the product must be made no later than 30 days after the expiration of the warranty period.
If difficulty is encountered in having warranty work performed, contact 800-888-0127.
All implied warranties, including those of merchantability and fitness for a particular purpose, are limited to one year from
date of purchase by the original retail customer and to the extent permitted by law any and all implied warranties are
excluded and disclaimed after the expiration of such period.
Some states do not allow limitations on how long an implied warranty lasts, or the exclusion or limitations of incidental or
consequential damages, so the above limitations or exclusions may not apply to you. This warranty gives you specific legal
rights, and you may also have other rights, which vary from state to state.
Exclusion from this warranty:
1. All consequential damages, including pickup and delivery of the unit, communication, mileage charges and/or rental of
a replacement unit during repairs are not covered under this warranty, or are any loss of income and/or other loss resulting
from the failure of the product to function due to a warranty defect.
2. This warranty will not apply when the product becomes inoperative due to misuse, normal wear, neglect, improper
maintenance, accident or freight damage; has not been operated and maintained in accordance with the instructions
furnished in the Operator’s Manual; or has been altered or modified without approval from the factory Service
Department.
No parts or products are to be returned to the factory without prior written approval from the factory.

5 of 12
104 S. 8th Ave. Marshalltown, IA Phone 800-888-0127 / 641-753-0127 • Fax 800-477-6341 / 641-753-6341 www.MARSHALLTOWN.comWS2860revC
ASSEMBLY GUIDE
1. Lay out all the components of the Spin Screed® Assembly. Note: Pipe sold separately
B
A
K
C
J I
HE
D
D
Hole on end E
Pipe Sold Separately — Several Available Lengths
F
2. Squeeze the buckle release to open the filter cover and access the throttle connection point.
G
3. Ensure that the throttle adjuster is threaded onto the throttle cable (G) end and hook the cable end into the
throttle linkage.

6 of 12 104 S. 8th Ave. Marshalltown, IA Phone 800-888-0127 / 641-753-0127 • Fax 800-477-6341 / 641-753-6341 www.MARSHALLTOWN.com WS2860revC
ASSEMBLY GUIDE
4. Swivel the throttle adjuster into the adjustment bracket, with the jam nut on one side and the full-sized nut
on the other.
5. Tighten the nuts to secure the throttle adjustment bracket then close the air filter cover.
6. Attach handle bar (A) to end of shaft using (2x) ⁄"-18 UNC x 2" LONG HHCS, washers and nuts (included). Prior to
tightening the handle bar on the end of the shaft, select right- or left-handed throttle lever position by flipping handle
bar over and adjust the balance of the handle bar (left to right) to achieve best handling for the specific application.
Attach both parts of the Dead-End T-Handle (D) and screw in the handle components (E). NOTE: It is best to have
the hole at the end perpendicular to the T-Handle.
7. Remove the cover and gasket from the throttle lever.

7 of 12
104 S. 8th Ave. Marshalltown, IA Phone 800-888-0127 / 641-753-0127 • Fax 800-477-6341 / 641-753-6341 www.MARSHALLTOWN.comWS2860revC
ASSEMBLY GUIDE
8. Hook the throttle cable end into the throttle lever linkage.
9. Re-Install the gasket and cover onto the throttle lever.
10. Take the Small Tool (F) from the Handle (A). Remove the power axle from Live End (J) by depressing the spring with
the Small Tool. Return the Small Tool to the Handle.
11. NOTE: Ends (I&J) must be installed in screed pipe before these steps. See next page. Connect the Power Head (B)
by depressing the locking pin on the power axle which is installed in the Live End (J). Insert the square drive lug on the
power axle into the Live End (J) pivot coupling. Check to assure the catch pin has popped into the pivot coupling by
trying to pull it away from the Power Head (B).
12. For safety, cover the exposed axle (the side not being used) with the Safety Boot (C) and attach to the gearbox with
hardware provided.
13. Connect the T-Handle (D) to the Dead End (I) by removing the Pin (H), placing the T-Handle through the opening and
replacing the Pin.

8 of 12 104 S. 8th Ave. Marshalltown, IA Phone 800-888-0127 / 641-753-0127 • Fax 800-477-6341 / 641-753-6341 www.MARSHALLTOWN.com WS2860revC
INSTALLING PIPE ENDS
Step 1 – You’ll need: 12" Pipe Wrench, 9" Chain Clamp Vice
Grip, and a ⁄" Allen Wrench. Use the Chain Clamp Vice
Grip to hold the Pipe (Note: Do not attempt to or have a
co-worker hold the Pipe. You will not be able to produce
enough the torque necessary to tighten the Ends).
Step 4 – Insert set screw and tighten using the ⁄" Allen
Wrench.
Step 3 – Use the Pipe Wrench to tighten the Live End (J)
(Note: the Live End should be secured very tightly). Make
sure it is lined up with the set screw opening.
Step 2 – Insert the Live End (J) into the Pipe, make sure set
screw is removed.
Step 6 - Use the Pipe Wrench to tighten the Dead End.
Step 5 – Insert the Dead End (I) into the Pipe.

9 of 12
104 S. 8th Ave. Marshalltown, IA Phone 800-888-0127 / 641-753-0127 • Fax 800-477-6341 / 641-753-6341 www.MARSHALLTOWN.comWS2860revC
PRODUCT OPERATION
BEFORE STARTING
Before starting the Spin Screed®, there are a few items that need to be checked to prevent damage or personal injury.
• Affix safety boot (C) to unused side of screed power unit to cover rotating axle. Uncovered rotating axle may entangle
footgear, causing injury.
• Make sure that both Ends (I&J) are securely fastened to the end of the Pipe.
• Check all threaded connections to make sure that they are not loose.
• Check handles (D&E) to make sure that they will not loosen or detach during the operation of the Spin Screed®.
ENGINE MAINTENANCE RECOMMENDATIONS
Replace oil in engine with Honda #08209-10W30 oil after first 20 hours of operation. Replace again after next 40 hours of
operation. Using Honda #08209-10W30 product will prevent overfilling the engine. Failure to replace oil will dramatically
reduce engine life. See GX35 engine user's manual for operation of engine choke for cold startup and further maintenance
recommendations.
OPERATION
Operating your Spin Screed® correctly will assist you in achieving the desired outcome of a pour. Follow the instructions
below to operate your screed correctly.
• Start engine. Refer to Honda GX35 owners manual for basic starting instructions.
• Engage the power unit and begin to pull the Spin Screed® over forms, screed pipe, or screed rail, distributing the
concrete aggregate to the desired level. Make sure the Pipe is spinning away from you.
• The Spin Screed® is meant to run at a slow speed.
• Each operator must properly maintain control of both handles, guiding the Pipe over the concrete aggregate at a
speed and direction best suited for the aggregate’s respective slump.
• DO NOT allow either end of the unit to enter wet concrete. Keep each end on the forms, screed pipes, or screed rails
to prevent contamination of the plugs or motor.
• If the concrete is not being added at the appropriate rate, slow the screed down to compensate.
• The speed at which the screed should be pulled back and forth depends on the slump of the concrete (see slump
guidelines below). It is important to pay close attention to the aggregates, slump, and concrete modifying agents to
compensate the speed of the engine adequately.
• Do not allow the Spin Screed® to run in the same position for an extended period. If screeding is delayed, turn the
engine off and let the Spin Screed® sit in a position where it is best suited to start again. When the placement of
aggregate resumes, slowly engage the engine and continue screeding.
SLUMP GUIDELINES
The Spin Screed® will handle stiff concrete having only a 3-inch slump. When you first start using the Spin Screed®, pour
with a slump level that is consistent with your past practices. As with any new tool, certain operation techniques must be
learned.

10 of 12 104 S. 8th Ave. Marshalltown, IA Phone 800-888-0127 / 641-753-0127 • Fax 800-477-6341 / 641-753-6341 www.MARSHALLTOWN.com WS2860revC
PRODUCT OPERATION
STRAIGHT PULL METHOD - WET CONCRETE OPERATING METHOD ONE
Slump levels of 5 or more, maintain 1 to 2 inch surcharge
When working with wet concrete, start the Spin Screed®, squeeze the throttle lever, and slowly pull it over the concrete
while muckers maintain about a 2-inch surcharge of concrete in front of the screed. After advancing 6 to 8 feet, allow the
spinning Spin Screed® to move slowly backward over the freshly screeded concrete. This slow backwards pass pushes
aggregate left on the surface down while bringing paste to the surface. After backing over the poured section, slow down
the Spin Screed® and pull the screed back to the area where more concrete has been placed. Begin screeding again. With
concrete wetter than a 5-inch slump, pulling over the concrete surface a second time with the motor running will produce
a flatter surface with sufficient paste for floating. Examine the surfaces prepared by the Spin Screed® and adjust your
technique to product the desired surface for floating.
BUMP AND RUN METHOD - STIFF CONCRETE OPERATING METHOD TWO
Slump levels of 3 to 4 inches, maintain 2.5 to 3.5 inch surcharge
With stiff concrete, pulling the Spin Screed® over the concrete produces a rough surface that is difficult to float. To get the
best results, use the “bump and run” technique. Start by squeezing the throttle lever to start the Spin Screed® and gently
bumping a 2-3-inch surcharge with the Spin Screed®, causing it to advance a few inches, and then allow it to retreat 4 to 6
inches. Advance the Spin Screed® again. Continue the “bump and run” technique until you have advanced 6 to 8 feet, then
allow the Spin Screed® to move backward slowly over the freshly screeded concrete with the Spin Screed® still running.
This slow backwards pass pushes aggregate left on the surface down while bringing paste to the surface. After backing
over the poured section, turn off the Spin Screed® and pull the screed back to the area where more concrete has been
placed. Begin screeding again. The screeded section is ready for floating and should be done immediately. When screeding
stiffer concrete, pulling the Spin Screed® forward a second time tends to remove the layer of paste that has been worked
to the surface and makes the surface more difficult to float and finish.
IMPORTANT
Ensure the Spin Screed® is cleaned immediately after use to prevent concrete from curing in the engine drive shaft, engine
enclosure, handle joints, or on the Pipe.
Cleaning the engine should be done by blowing compressed air and washing by hand—avoid getting water near the
carburetor. Pressure washers are recommended for cleaning the Pipe but should NOT be used to clean the engine or gear
box.
Spin Screed Techniques of Operation:
The Spin Screed power head has been designed with a reversing switch. The power head can be made to operate on
either side of the pour moving in either direction.
As with any electric tool, proper operating voltage is essential. Always use heavy-duty properly grounded extension
cords and follow the directions associated with the spin motor for maximum length and gauge of extension cords.
The spin motor draws 10 amperes of current at 120 volts when fully loaded. A portable electric generator can easily
provide this voltage and current requirement if a source of 120 volt AC is not otherwise available. GFI breakers are an
OSHA requirement for tools used on the construction site. All extension cords and power cords should be inspected
and tested for defects before being placed into operations. Defective cords not protected by GFI breakers could lead
to death or severe injury.
The Spin Screed will handle stiff concrete having only a 3-inch slump or any larger slump that you choose to pour. We
advise that when you rst start using the Spin Screed, you pour with a slump level that is consistent with your past
practices. As with any new tool you bring onto your job site, certain techniques of operation must be learned so the
quality level of work you demand can be achieved.
With wet concrete, you will probably nd that the spin motor can be energized and the Spin Screed slowly pulled over
the concrete while muckers are maintaining about a two-inch surcharge of concrete in front of the screed. Once you
have advanced for 6 to 8 feet or more, you will want to allow the Spin Screed to move backward slowly over the freshly
screeded concrete while the Spin Screed is still spinning. This slow backward pass pushes any concrete aggregate
that may be above the surface down into the surface while at the same time bringing paste to the surface. Once you
have backed over the section just poured, you will want to turn off the spin motor and simply pull the screed back to
the area where more concrete has been placed and begin the screeding operation again. With concrete wetter than a
5 inch slump, you may nd that pulling over the concrete surface a second time, while the spin motor is still running,
will produce a atter surface with sufcient paste for bull oating. The general rule is to examine the surface prepared
by the Spin Screed and adjust your screeding technique to produce the most desirable surface for bull oating.
1-888-329-6039 • www.spinscreed.com
Wet Concrete
Operating Method No. 1:
Slump levels of 5 inches
or more. Maintain 1 to 2
inch surcharge.
Stiff Concrete
Operating Method
No. 2:
Slump levels of 3 to
4 inches. Maintain
2.5 inch to 3.5 inch
surcharge.
STRAIGHT PULL
BUMP AND RUN
(OVER)

11 of 12
104 S. 8th Ave. Marshalltown, IA Phone 800-888-0127 / 641-753-0127 • Fax 800-477-6341 / 641-753-6341 www.MARSHALLTOWN.comWS2860revC
MAINTENANCE
After each use, ensure the Spin Screed® is cleaned and stored carefully. Find a
secure location for the Pipe to prevent any objects from falling on or damaging it.
After every three to four uses, lubricate the Dead End Pipe Adapter through the
grease fitting using a standard lever-action grease gun.
Prior to starting the engine, add engine oil at the fill port at the base of the engine.
THE ENGINE WAS SHIPPED WITHOUT OIL IN THE CRANKCASE. A small bottle is
included with the product which corresponds with the precise amount needed.
Retain the bottle for future measuring purposes.
Following first 20 hours of run time replace the engine oil. The oil is drained by
removing the drain plug from the base of the engine and tipping the engine.
Fill only the amount recommended by engine manufacturer — DO NOT OVERFILL
THE ENGINE.
Engine oil is to be replaced after every subsequent 40 hours of use.
Check sponge air cleaner by squeezing the plastic intake cover catches and pull it
off. The air cleaner can be rinsed with water. Be sure to squeeze out as much water
as possible prior to replacing.
The gearbox is delivered fully greased. After approximately 40 hours use it is
recommended that the user inject NLGI #0 Lithium Grease into the zerk mounted
on the side of the gearbox. The drain screw must be removed to allow old grease
to escape. Be sure to replace drain screw when finished.
Repeat grease replacement every 40 hours.
TROUBLESHOOTING
If the Spin Screed® is not spinning or functioning properly, refer to the following guide to diagnose and resolve your issue.
• Refer to Honda GX35 owner's manual for engine troubleshooting.
• Check if the end plugs are fully tightened. Tighten them if required.
ITEM PART#
Dead End Pipe Adapter SPNDE
Live End Pipe Adapter SPNLE
Power Head* SPNRSSGAS
Pipe** SPNP4 – SPNP22
Quick Disconnect Pin SPNQDP
Dead End T Handle SPNDH
Gearbox, Gas Screed, Replace 29588
Throttle Lever Replace 29589
Engine Switch Replace 29590
Axle Assembly Replace 29591
PTO Cover Replace 29593
Throttle Cable Replace 29594
*Handle & Motor enclosure with Power Head **Pipe available from 4’ to 22’ in even numbers
PARTS AVAILABLE FOR REPLACEMENT
Zerk
Drain
Drain
Plug

104 S. 8th Ave., Marshalltown, IA
Phone 800-888-0127 / 641-753-0127
Fax 800-477-6341 / 64 1-753-6341
www.MARSHALLTOWN.com
WS2860revC

ENRASADORA SPIN SCREED® DE GASOLINA
N.º de pieza SPNRSSAGAS | N.º EDI 29592
104 S. 8th Ave. | Marshalltown, IA
Teléfono 800-888-0127 / 641-753-0127 | Fax 800-477-6341 / 641-753-6341
www.MARSHALLTOWN.com
WS2860revC

2 de 12 104 S. 8th Ave. Marshalltown, IA Teléfono 800-888-0127 / 641-753-0127 • Fax 800-477-6341 / 641-753-6341 www.MARSHALLTOWN.com WS2860revC
INTRODUCCIÓN
Gracias por su compra de la enrasadora Spin Screed®. La Spin Screed® es una herramienta simple y eficaz para enrasar
hormigón. Su simplicidad permite que incluso los operadores sin experiencia enrasen de manera eficaz y precisa.
Especificaciones:
N.º de pieza: SPNRSSAGAS
EDI: 29592
Dimensiones:
Longitud del motor: 49⁄" (1267 mm) Longitud del mango en T para extremo cerrado: 61⁄" (1568 mm)
Ancho del motor: 11⁄" (292 mm) Ancho del mango en T para extremo cerrado: 14⁄" (368 mm)
Diámetro del extremo abierto: 1⁄" (32 mm) Diámetro del mango en T para extremo cerrado: 1" (25 mm)
Largo del extremo abierto: 5" (127 mm) Largo del adaptador de tubo del extremo cerrado: 4" (102 mm)
Diámetro del adaptador de tubo del extremo abierto: 3.98" (101 mm)
Motor: Honda GX35, 35CC de 4 tiempos a gasolina*
El tubo de la Spin Screed® se vende por separado. Especificación del tubo de la Spin Screed® de aluminio de una sola pieza,
cédula 40 de 4":
Diámetro: 4⁄ " (114 mm)
Espesor: ⁄ " (6.35 mm)
CONTENIDO
PRECAUCIONES DE SEGURIDAD ................................................................................................................................................................. 3
GARANTÍA ......................................................................................................................................................................................................... 4
GUÍA DE MONTAJE ...................................................................................................................................................................................... 5-6
OPERACIÓN DEL PRODUCTO ....................................................................................................................................................................7-8
MANTENIMIENTO ............................................................................................................................................................................................9
DIAGNÓSTICO DE FALLAS .............................................................................................................................................................................9
PALABRAS DE AVISO
ENTENDER LAS PALABRAS DE AVISO
Una palabra de aviso PELIGRO, ADVERTENCIA o PRECAUCIÓN se utiliza con el símbolo del sistema de alerta-
seguridad. PELIGRO identifica los riesgos más graves.
• Los letreros de seguridad PELIGRO o ADVERTENCIA se encuentran ubicados cerca de riesgos específicos.
• Las medidas de seguridad generales se enumeran en los letreros de seguridad de PRECAUCIÓN.
DANGER!
PELIGRO
DANGER!
ADVERTENCIA
DANGER!
PRECAUCIÓN

3 de 12
104 S. 8th Ave. Marshalltown, IA Teléfono 800-888-0127 / 641-753-0127 • Fax 800-477-6341 / 641-753-6341 www.MARSHALLTOWN.comWS2860revC
PRECAUCIONES DE SEGURIDAD
IMPORTANTE: LEA ESTE MANUAL ANTES DEL MONTAJE U OPERACIÓN
Después de consultar el manual de operación, si aún necesita asistencia, comuníquese con nuestro
departamento de servicio al cliente.
Este manual del operador se ha preparado para proporcionar la información que necesita para operar y
mantener correctamente su unidad. Léalo con atención y consérvelo para futuras consultas.
El reemplazo de cualquier pieza de este producto por una pieza de repuesto de cualquier otro fabricante puede afectar
negativamente el desempeño, durabilidad o seguridad de este producto. En caso de necesitar piezas de repuesto o
mantenimiento, comuníquese con su distribuidor autorizado de mantenimiento y piezas de repuesto.
El fabricante se reserva el derecho de hacer cambios o añadir mejoras a su producto cualquier momento y sin previo
aviso. El fabricante también se reserva el derecho a decidir, a su entera discreción en cualquier momento, descontinuar un
producto.
Lea y siga todas las instrucciones de operación y precauciones de seguridad que se encuentran en este manual.
Es necesario que se familiarice y reciba el entrenamiento correcto para poder operar este equipo de manera segura. Un
equipo operado incorrectamente o por un personal sin entrenamiento puede dañar el equipo y ocasionar daños personales.
Lea las instrucciones de operación contenidas en este manual para familiarizarse con la ubicación y el uso correcto de todos
los controles.
• NO opere esta máquina hasta que haya leído las instrucciones de operación y seguridad. SIEMPRE opere la máquina
de conformidad con las instrucciones del fabricante.
• SIEMPRE inspeccione la enrasadora Spin Screed® al recibirla a fin de buscar daños o alteraciones que pueden
presentarse en raras ocasiones durante el envío. Si se descubre algún daño, ¡presente inmediatamente una
reclamación a su transportista! Marque el recibo de entrega correspondiente como “envío dañado”.
• NUNCA permita que el personal sin entrenamiento opere la Spin Screed®. Las personas que operan esta
enrasadora deben recibir un entrenamiento adecuado sobre los procedimientos de la operación.
• ADVERTENCIA DE LA PROPUESTA 65 DE CALIFORNIA: Este producto puede exponerlo a químicos que en el estado
de California se conocen como causantes de cáncer, defectos de nacimiento u otros daños reproductivos.
• NUNCA utilice herrajes de venta libre para reemplazar los herrajes del fabricante. Comuníquese con el
Departamento de Servicio al Cliente de MARSHALLTOWN para obtener información sobre las piezas de repuesto:
800-888-0127.
• NO intente limpiar o dar mantenimiento a la enrasadora mientras la máquina está en funcionamiento.
• NO use gasolina, otros combustibles o cualquier solvente inflamable para limpiar piezas, especialmente en áreas
encerradas. Los vapores de los combustibles y solventes pueden ocasionar graves problemas de salud si usted es
expuesto a ellos por un periodo prolongado.
• SIEMPRE use la protección para los oídos apropiada mientras utiliza la enrasadora Spin Screed®.
• Consulte el manual del fabricante del motor que se incluye para obtener información sobre los requisitos eléctricos
específicos y los datos de seguridad.
DANGER!
PRECAUCIÓN
DANGER!
PRECAUCIÓN
DANGER!
PRECAUCIÓN
DANGER!
PRECAUCIÓN
DANGER!
PELIGRO

4 de 12 104 S. 8th Ave. Marshalltown, IA Teléfono 800-888-0127 / 641-753-0127 • Fax 800-477-6341 / 641-753-6341 www.MARSHALLTOWN.com WS2860revC
GARANTÍA
Este producto está garantizado solo al comprador original frente a defectos en material y mano de obra bajo un uso normal,
por un año a partir de la fecha de compra. MARSHALLTOWN reparará o reemplazará, sin cargo alguno por piezas y mano de
obra, dichas piezas que se determinen como defectuosas. Todos los cargos de transportación de las piezas de repuesto
deberán ser pagados por el comprador.
Para obtener el servicio de garantía, el producto debe ser enviado, con prueba de la fecha de compra, a MARSHALLTOWN.
Comuníquese con el servicio al cliente de MARSHALLTOWN para determinar el mejor método para enviar el producto que
está bajo la garantía. El producto debe enviarse a más tardar 30 días después del vencimiento del periodo de garantía.
Si tiene dificultades para que se efectúe un trabajo cubierto en la garantía, comuníquese al 800-888-0127.
Todas las garantías implícitas, incluyendo aquellas de comerciabilidad e idoneidad para una finalidad en especial, están
limitadas a un año a partir de la fecha de compra por parte el cliente minorista original y en la medida que lo permita la ley,
además se excluyen y se renuncia a todas las garantías implícitas después del vencimiento de dicho periodo.
Algunos estados no permiten limitaciones sobre la duración del periodo de una garantía implícita, o la exclusión o
limitaciones de daños indirectos o consecuentes, por lo que las limitaciones o exclusiones mencionadas pueden no aplicar
a su caso. Esta garantía le otorga derechos legales específicos y es posible que usted tenga otros derechos que varían de
estado a estado.
Exclusión de esta garantía:
1. Todos los daños consecuentes, incluyendo la recolección y entrega de la unidad, comunicación, cargos por kilometraje
y/o renta de una unidad de reemplazo durante reparaciones no están cubiertos por esta garantía ni tampoco cualquier
pérdida de ingresos y/u otras pérdidas que resulten por la falla de funcionamiento del producto debido a un defecto
cubierto por la garantía.
2. Esta garantía no aplicará cuando el producto se vuelva inoperativo debido al mal uso, desgaste normal, negligencia,
mantenimiento inadecuado, accidente o daño en el transporte; no ha sido operado y mantenido de conformidad con
las instrucciones proporcionadas en el manual del operador o ha sido alterado o modificado sin la aprobación del
Departamento de Servicio de la fábrica.
Ninguna pieza o producto debe regresarse a la fábrica sin la aprobación previa por escrito de la fábrica.

5 de 12
104 S. 8th Ave. Marshalltown, IA Teléfono 800-888-0127 / 641-753-0127 • Fax 800-477-6341 / 641-753-6341 www.MARSHALLTOWN.comWS2860revC
GUÍA DE MONTAJE
1. Ponga a la vista todos los componentes del conjunto de la enrasadora Spin Screed®. Nota: El tubo se vende por
separado
B
A
K
C
J I
HE
D
D
Orificio en el extremo E
El tubo se vende por separado (disponible en varias longitudes)
F
2. Apriete la hebilla para abrir la cubierta del filtro y tener acceso al punto de conexión del acelerador.
G
3. Asegúrese de que el ajustador del acelerador esté enroscado en el extremo del cable del acelerador (G) y
enganche el extremo del cable en la conexión del acelerador.

6 de 12 104 S. 8th Ave. Marshalltown, IA Teléfono 800-888-0127 / 641-753-0127 • Fax 800-477-6341 / 641-753-6341 www.MARSHALLTOWN.com WS2860revC
GUÍA DE MONTAJE
4. Use un movimiento giratorio para introducir el ajustador del acelerador al soporte de ajuste con la tuerca de
seguridad en un lado y la tuerca de tamaño completo en el otro.
5. Apriete las tuercas para fijar el soporte de ajuste del acelerador, luego cierre la cubierta del filtro de aire.
6. Coloque la barra del mango (A) en el extremo del eje usando (2x) tornillos de cabeza hexagonal 5/16"-18 UNC x 2"
DE LARGO, arandelas y tuercas (se incluyen). Antes de apretar la barra del mango en el extremo del eje, seleccione
la posición de la palanca del acelerador a la derecha o izquierda girando el mango y ajuste el equilibrio del mango (de
izquierda a derecha) para lograr el mejor manejo para la aplicación específica. Conecte ambas partes del mango en
T para el extremo cerrado (D) y atornille los componentes del mango (E). NOTA: Lo más recomendable es tener el
orificio en el extremo perpendicular al mango en T.
7. Retire la cubierta y el empaque de la palanca del acelerador.

7 de 12
104 S. 8th Ave. Marshalltown, IA Teléfono 800-888-0127 / 641-753-0127 • Fax 800-477-6341 / 641-753-6341 www.MARSHALLTOWN.comWS2860revC
GUÍA DE MONTAJE
8. Enganche el extremo del cable en la conexión de la palanca del acelerador.
9. Vuelva a instalar el empaque y la cubierta en la palanca del acelerador.
10. Tome la herramienta pequeña (F) del mango (A). Retire el eje de potencia del extremo abierto (J) presionando el resorte
con la herramienta pequeña. Regrese la herramienta pequeña al mango.
11. NOTA: Los extremos (I y J) deben instalarse en el tubo de la enrasadora antes de efectuar estos pasos. Vea la
siguiente página. Conecte el cabezal de potencia (B) presionando el pasador de bloqueo en el eje de potencia que está
instalado en el extremo abierto (J). Inserte la orejeta de transmisión cuadrada en el eje de potencia en el acoplamiento
de pivote del extremo abierto (J). Verifique para asegurarse de que el pasador de retención se haya insertado en el
acoplamiento de pivote tratando de alejarlo del cabezal de potencia (B).
12. Por seguridad, cubra el eje expuesto (el lado que no se usa) con la bota de seguridad (C) y fíjela a la caja de cambios con
los accesorios provistos.
13. Conecte el mango en T (D) al extremo cerrado (I) quitando el pasador (H), pasando el mango en T por la abertura y
volviendo a colocar el pasador.

8 de 12 104 S. 8th Ave. Marshalltown, IA Teléfono 800-888-0127 / 641-753-0127 • Fax 800-477-6341 / 641-753-6341 www.MARSHALLTOWN.com WS2860revC
INSTALACIÓN DE LOS EXTREMOS DEL TUBO
Paso 1: necesitará lo siguiente: Llave de tubo de 12", alicate de
sujeción de cadena de 9" y llave Allen de ⁄". Use el alicate de sujeción
de cadena para sostener el tubo (Nota: No intente sostener el tubo
usted mismo ni le pida que lo haga a un compañero de trabajo. No
podrá producir el par de torsión necesario para apretar los extremos).
Paso 4: inserte el tornillo de fijación y apriételo usando la llave Allen
de ⁄".
Paso 3: use la llave de tubo para apretar el extremo abierto (J)
(Nota: El extremo abierto debe quedar muy apretado). Asegúrese
de que quede alineado con la abertura del tornillo de fijación.
Paso 2: inserte el extremo abierto (J) en el tubo, asegurándose de
que el tornillo de fijación no esté presente.
Paso 6: use la llave de tubo para apretar el extremo cerrado.
Paso 5: inserte el extremo cerrado (I) en el tubo.

9 de 12
104 S. 8th Ave. Marshalltown, IA Teléfono 800-888-0127 / 641-753-0127 • Fax 800-477-6341 / 641-753-6341 www.MARSHALLTOWN.comWS2860revC
OPERACIÓN DEL PRODUCTO
ANTES DE COMENZAR
Antes de arrancar la enrasadora Spin Screed®, hay algunos puntos que deben verificarse para evitar daños o lesiones personales.
• Coloque la bota de seguridad (C) en el lado no utilizado de la unidad de potencia de la enrasadora para cubrir el eje giratorio. El eje
giratorio descubierto puede enredar el calzado y causar lesiones.
• Asegúrese de que ambos extremos (I y J) estén firmemente sujetados a la punta del tubo.
• Verifique que las conexiones roscadas no estén sueltas.
• Verifique que los mangos (D y E) no se aflojarán o desprenderán durante la operación de la Spin Screed®.
RECOMENDACIONES DE MANTENIMIENTO DEL MOTOR
Reemplace el aceite del motor con aceite Honda # 08209-10W30 después de las primeras 20 horas de funcionamiento. Reemplácelo
nuevamente después de las próximas 40 horas de funcionamiento. El uso del producto Honda # 08209-10W30 evitará que el motor se
sobrellene. No reemplazar el aceite reducirá drásticamente la vida útil del motor. Consulte el manual del usuario del motor GX35 para
conocer el funcionamiento del estrangulador del motor para obtener información sobre el arranque en frío y otras recomendaciones de
mantenimiento.
OPERACIÓN
Operar la enrasadora Spin Screed® correctamente le ayudará a lograr el resultado deseado de un vertimiento. Siga estas instrucciones
para operar correctamente la enrasadora.
• Arranque el motor. Consulte el manual del propietario del Honda GX35 para obtener instrucciones básicas de arranque.
• Encienda la unidad de potencia y comience a pasar la Spin Screed® sobre encofrados, tubos de enrasado o rieles de enrasado,
distribuyendo el agregado de hormigón al nivel deseado. Asegúrese de que el tubo esté girando en dirección opuesta a donde usted
está.
• La enrasadora Spin Screed® está diseñada para funcionar a baja velocidad.
• Cada operador debe mantener correctamente el control de los dos mangos, guiando el tubo sobre el agregado de hormigón a una
velocidad y dirección que sean las adecuadas para el asentamiento respectivo del agregado.
• NO permita que ninguno de los extremos de la unidad ingrese al hormigón húmedo. Mantenga cada extremo sobre los encofrados,
tubos de enrasado o rieles de enrasado para evitar la contaminación de los tapones o del motor.
• Si el hormigón no se está agregando a la velocidad adecuada, disminuya la velocidad de la enrasadora para compensar.
• La velocidad a la que la enrasadora debe jalarse y empujarse depende del asentamiento del hormigón (vea guías para asentamientos
a continuación). Es importante prestar atención a los agregados, el asentamiento y los agentes modificadores del hormigón para
compensar con la velocidad del motor según corresponda.
• No permita que la enrasadora Spin Screed® avance en la misma posición por un periodo prolongado. Si el enrasado se demora,
apague el motor y deje la enrasadora Spin Screed® en una posición donde sea más adecuado volver a comenzar. Cuando se reanude
la colocación del agregado, encienda el motor lentamente y continúe enrasando.
GUÍAS PARA ASENTAMIENTOS
La enrasadora Spin Screed® puede manejar hormigón rígido que tiene un asentamiento de solo 3 pulgadas. Cuando comience a usar por
primera vez la enrasadora Spin Screed®, vierta con un nivel de asentamiento que sea consistente con sus experiencias pasadas. Al igual
que con cualquier herramienta nueva, deben aprenderse ciertas técnicas de operación.

10 de 12 104 S. 8th Ave. Marshalltown, IA Teléfono 800-888-0127 / 641-753-0127 • Fax 800-477-6341 / 641-753-6341 www.MARSHALLTOWN.com WS2860revC
OPERACIÓN DEL PRODUCTO
MÉTODO DE TIRO RECTO: MÉTODO UNO DE OPERACIÓN EN HORMIGÓN HÚMEDO
Niveles de asentamiento de 5 (125 mm) o más, mantenga una sobrecarga de 1 a 2 pulgadas (2.5 a 5 cm)
Cuando trabaje con hormigón húmedo, arranque la enrasadora Spin Screed®, apriete la palanca del acelerador y jale la enrasadora
lentamente sobre el hormigón mientras los niveladores mantienen una sobrecarga de hormigón de aproximadamente 2 pulg (5 cm)
enfrente de la enrasadora. Después de avanzar 6 a 8 pies (2 a 2.5 m), permita que la enrasadora giratoria Spin Screed® se mueva
lentamente hacia atrás sobre el hormigón recién enrasado. Esta pasada lenta hacia atrás empuja hacia abajo el agregado que se quedó en
la superficie al tiempo que eleva la pasta a la superficie. Después de retroceder sobre la sección vertida, desacelere la Spin Screed® y jale
la enrasadora hacia atrás al área donde se ha colocado más hormigón. Comience a enrasar de nuevo. Con hormigón más húmedo que un
asentamiento de 5 pulg (125 mm), pasar la enrasadora por la superficie del hormigón una segunda vez con el motor funcionando producirá
una superficie más plana con suficiente pasta para pasar la aplanadora. Verifique las superficies preparadas por la Spin Screed® y ajuste
su técnica a fin de producir la superficie deseada para pasar la aplanadora.
MÉTODO DE BULTO Y EXTENSIÓN: MÉTODO DOS DE OPERACIÓN DEL HORMIGÓN RÍGIDO
Niveles de asentamiento de 3 a 4 pulgadas, manteniendo una sobrecarga de 2.5 a 3.5 pulgadas
Con hormigón rígido, pasar la enrasadora Spin Screed® sobre el hormigón produce una superficie áspera que es difícil de alisar con
aplanadora. Para obtener mejores resultados, use la técnica de “bulto y extensión”. Comience jalando la palanca del acelerador para
arrancar la Spin Screed® y abulte suavemente una sobrecarga de 2 a 3 pulg (5 a 7.5 cm) con la Spin Screed® haciendo que avance unas
pulgadas y luego dejándola replegarse 4 a 6 pulga (10 a 15 cm). Mueva de nuevo la enrasadora Spin Screed® hacia adelante. Continúe con
la técnica de “bulto y extensión” hasta que haya avanzado 6 a 8 pies (2 a 2,5 m), luego deje que la enrasadora Spin Screed® se mueva
hacia atrás lentamente sobre el hormigón recién enrasado con la Spin Screed® aún funcionando. Esta pasada lenta hacia atrás empuja
hacia abajo el agregado que se quedó en la superficie al tiempo que eleva la pasta a la superficie. Después de retroceder sobre la sección
vertida, apague la Spin Screed® y jale la enrasadora hacia atrás al área donde se ha colocado más hormigón. Comience a enrasar de nuevo.
La sección enrasada está lista para aplanarse, lo cual debe llevarse a cabo inmediatamente. Cuando se enrasa hormigón más rígido, jalar
la Spin Screed® hacia adelante una segunda vez tiende a eliminar la capa de pasta que se ha trabajado en la superficie y hace que esta sea
más difícil de aplanar y acabar.
IMPORTANTE
Asegúrese de que la enrasadora Spin Screed® se limpie inmediatamente después de usarse a fin de evitar que el hormigón se endurezca
en el eje impulsor del motor, el alojamiento del motor, las juntas del mango o en el tubo.
La limpieza del motor se debe llevar a cabo soplando aire comprimido y lavándolo manualmente, evitando que ingrese agua cerca del
carburador. Se recomienda el uso de lavadoras a presión para limpiar el tubo, pero NO deben usarse para limpiar el motor ni la caja de
engranajes.
Spin Screed Techniques of Operation:
The Spin Screed power head has been designed with a reversing switch. The power head can be made to operate on
either side of the pour moving in either direction.
As with any electric tool, proper operating voltage is essential. Always use heavy-duty properly grounded extension
cords and follow the directions associated with the spin motor for maximum length and gauge of extension cords.
The spin motor draws 10 amperes of current at 120 volts when fully loaded. A portable electric generator can easily
provide this voltage and current requirement if a source of 120 volt AC is not otherwise available. GFI breakers are an
OSHA requirement for tools used on the construction site. All extension cords and power cords should be inspected
and tested for defects before being placed into operations. Defective cords not protected by GFI breakers could lead
to death or severe injury.
The Spin Screed will handle stiff concrete having only a 3-inch slump or any larger slump that you choose to pour. We
advise that when you rst start using the Spin Screed, you pour with a slump level that is consistent with your past
practices. As with any new tool you bring onto your job site, certain techniques of operation must be learned so the
quality level of work you demand can be achieved.
With wet concrete, you will probably nd that the spin motor can be energized and the Spin Screed slowly pulled over
the concrete while muckers are maintaining about a two-inch surcharge of concrete in front of the screed. Once you
have advanced for 6 to 8 feet or more, you will want to allow the Spin Screed to move backward slowly over the freshly
screeded concrete while the Spin Screed is still spinning. This slow backward pass pushes any concrete aggregate
that may be above the surface down into the surface while at the same time bringing paste to the surface. Once you
have backed over the section just poured, you will want to turn off the spin motor and simply pull the screed back to
the area where more concrete has been placed and begin the screeding operation again. With concrete wetter than a
5 inch slump, you may nd that pulling over the concrete surface a second time, while the spin motor is still running,
will produce a atter surface with sufcient paste for bull oating. The general rule is to examine the surface prepared
by the Spin Screed and adjust your screeding technique to produce the most desirable surface for bull oating.
1-888-329-6039 • www.spinscreed.com
Wet Concrete
Operating Method No. 1:
Slump levels of 5 inches
or more. Maintain 1 to 2
inch surcharge.
Stiff Concrete
Operating Method
No. 2:
Slump levels of 3 to
4 inches. Maintain
2.5 inch to 3.5 inch
surcharge.
STRAIGHT PULL
BUMP AND RUN
(OVER)

11 de 12
104 S. 8th Ave. Marshalltown, IA Teléfono 800-888-0127 / 641-753-0127 • Fax 800-477-6341 / 641-753-6341 www.MARSHALLTOWN.comWS2860revC
MANTENIMIENTO
Después de cada uso, asegúrese de que la Spin Screed® se limpie y almacene
cuidadosamente. Busque un lugar seguro para el tubo a fin de evitar que caigan objetos sobre
él o que lo dañen.
Después de cada tres o cuatro usos, lubrique el adaptador del tubo del extremo cerrado
mediante una grasera usando una pistola grasera de palanca estándar.
Antes de arrancar el motor, agregue aceite de motor en el puerto de llenado en la base del
motor. EL MOTOR FUE ENVIADO SIN ACEITE EN EL CÁRTER. Se incluye una pequeña botella
con el producto que corresponde a la cantidad precisa necesaria. Conserve la botella para
futuras mediciones.
Después de las primeras 20 horas de funcionamiento, reemplace el aceite del motor. El
aceite se drena quitando el tapón de drenaje de la base del motor e inclinando el motor.
Llene solo la cantidad recomendada por el fabricante del motor; NO LLENE DE MÁS EL
MOTOR.
El aceite del motor debe reemplazarse cada 40 horas posteriores de uso.
Revise el limpiador de aire de esponja apretando los pestillos de la cubierta de entrada de
plástico y retírelo. El limpiador de aire se puede enjuagar con agua. Asegúrese de exprimir la
mayor cantidad de agua posible antes de volver a colocarlo.
La caja de cambios se entrega completamente engrasada. Después de aproximadamente 40
horas de uso, se recomienda que el usuario inyecte grasa de litio NLGI #0 en el acoplamiento
zerk montado en el costado de la caja de cambios. Se debe quitar el tornillo de drenaje para
permitir que la grasa vieja
escape. Asegúrese de reemplazar el tornillo de drenaje cuando termine.
Repita el cambio de grasa cada 40 horas.
RESOLUCIÓN DE PROBLEMAS
Si la Spin Screed® no está girando o funcionando correctamente, consulte la siguiente guía para diagnosticar y resolver su problema.
• Consulte el manual del propietario de Honda GX35 para la resolución de problemas del motor.
• Verifique que los tapones del extremo estén ajustados. Apriételos de ser necesario.
ARTÍCULO N.º DE PIEZA
Adaptador de tubo del extremo cerrado SPNDE
Adaptador de tubo del extremo abierto SPNLE
Motor* SPNRSSGAS
Tubo** SPNP4 – SPNP22
Pasador de desconexión rápida SPNQDP
Mango en T para extremo cerrado SPNDH
Caja de cambios, enrasadora a gasolina, reemplazar 29588
Reemplace la palanca del acelerador 29589
Reemplace el interruptor del motor 29590
Reemplace el conjunto del eje 29591
Reemplace la cubierta PTO 29593
Reemplace el cable del acelerador 29594
*Carcasa de mango y motor con cabezal de potencia **Tubo disponible de 4' a 22' (1.22 m a 6.7 m) en números pares
PIEZAS DE REPUESTO DISPONIBLES
Zerk
Dren
Dren Tapón

104 S. 8th Ave., Marshalltown, IA
Teléfono 800-888-0127 / 641-753-0127
Fax 800-477-6341 / 64 1-753-6341
www.MARSHALLTOWN.com
WS2860revC

SPIN SCREED® À ESSENCE
Réf. SPNRSSAGAS | EDI 29592
104 S. 8th Ave. | Marshalltown, IA
Téléphone 800-888-0127 / 641-753-0127 | Télécopieur 800-477-6341 / 641-753-6341
www.MARSHALLTOWN.com
WS2860revC

2 de 12
104 S. 8th Ave. Marshalltown, IA Téléphone 800-888-0127 / 641-753-0127 • Télécopie 800-477-6341 / 641-753-6341 www.MARSHALLTOWN.com
WS2860revC
INTRODUCTION
Merci d’avoir acheté le rouleau Spin Screed®. Le Spin Screed® est un outil simple et efficace pour araser le béton. Sa
simplicité permet aux ouvriers même les plus inexpérimentés d’araser le béton avec efficacité et précision.
Caractéristiques techniques:
Réf.: SPNRSSAGAS
EDI: 29592
Dimensions :
Longueur tête motorisée: 49⁄po (1267mm) Longueur manche en té côté libre: 61⁄po (1568mm)
Largeur tête motorisée: 11⁄po (292mm) Largeur manche en té côté libre: 14⁄po (368mm)
Diamètre embout moteur: 1⁄po (32mm) Diamètre manche en té côté libre: 1po (25mm)
Longueur embout moteur: 5po (127mm) Longueur adaptateur de cylindre côté libre: 4po (102mm)
Diamètre adaptateur de cylindre côté moteur: 3,98po (101mm)
Moteur: Honda GX35, 35cc 4 temps à essence*
Le cylindre Spin Screed® est vendu séparément. Caractéristique du cylindre Spin Screed® de 4po en aluminium de
nomenclature 40 sans soudure:
Diamètre: 4⁄ po (114mm)
Épaisseur: ⁄ po (6,35mm)
TABLE DES MATIÈRES
MESURES DE SÉCURITÉ ................................................................................................................................................................................3
GARANTIE ......................................................................................................................................................................................................... 4
GUIDE D’ASSEMBLAGE .............................................................................................................................................................................. 5-6
FONCTIONNEMENT DU PRODUIT .............................................................................................................................................................7-8
ENTRETIEN .......................................................................................................................................................................................................9
DÉPANNAGE .....................................................................................................................................................................................................9
MOTS-INDICATEURS
COMPRENDRE LES MOTS-INDICATEURS
Les mots-indicateurs DANGER, AVERTISSEMENT et ATTENTION sont utilisés avec le symbole de mise en garde.
DANGER identifie les risques les plus graves.
• Les panonceaux DANGER et AVERTISSEMENT sont placés à proximité de zones dangereuses particulières.
• Les panonceaux ATTENTION comportent des mesures générales de précaution.
DANGER!
DANGER
DANGER!
AVERTISSEMENT
DANGER!
ATTENTION

3 de 12
104 S. 8th Ave. Marshalltown, IA Téléphone 800-888-0127 / 641-753-0127 • Télécopie 800-477-6341 / 641-753-6341 www.MARSHALLTOWN.com
WS2860revC
MESURES DE SÉCURITÉ
IMPORTANT — LIRE CE MANUEL AVANT ASSEMBLAGE OU UTILISATION
Après avoir consulté le manuel d’utilisation, si une assistance est toujours nécessaire, s’adresser à notre
service après-vente.
Ce manuel de l’utilisateur a été rédigé pour fournir l’information nécessaire à une utilisation et un entretien
corrects la machine. Veiller à le lire avec attention et à le conserver pour toute consultation ultérieure.
Le remplacement de toute pièce de ce produit autrement que par des pièces de rechange agréées par le fabricant peut
avoir un effet contraire sur le fonctionnement, la durabilité ou la sécurité de ce produit. Pour les pièces de rechange et les
réparations, s’adresser à un concessionnaire agréé.
Le fabricant se réserve le droit de modifier ou améliorer le produit à tout moment sans préavis. Le fabricant se réserve
également le droit de décider, à son entière discrétion et à tout moment, d’abandonner un produit.
Veiller à lire et respecter toutes les consignes de sécurité et instructions d’utilisation de ce manuel.
La sécurité de ce matériel exige qu’on soit familiarisé et formé comme il se doit à son utilisation. Une utilisation incorrecte
ou par du personnel non formé peut endommager le matériel ou provoquer des blessures corporelles. Veiller à lire les
instructions d’utilisation figurant dans ce manuel pour se familiariser avec l’emplacement et la bonne utilisation des
commandes.
• NE PAS utiliser cette machine avant d’avoir lu les instructions d’utilisation et de sécurité. TOUJOURS utiliser la
machine conformément aux instructions du fabricant.
• TOUJOURS contrôler le Spin Screed® à la réception pour vérifier l’absence de rares dommages ou altérations
susceptibles de se produire durant le transport. Si des dommages sont constatés, soumettre une réclamation au
transporteur immédiatement! Inscrire «Marchandise endommagée» sur le bon de livraison.
• NE JAMAIS laisser de personnel non formé utiliser le Spin Screed®. Les personnes qui utilisent ce rouleau doivent
être correctement formées à ses procédures de fonctionnement.
• PROPOSITION 65 DE CALIFORNIE - AVERTISSEMENT: Ce produit peut exposer son utilisateur à des substances
que l’État de Californie a déclarées responsables de cancer, malformations congénitales et autres effets nocifs sur
la reproduction.
• NE JAMAIS utiliser de visserie du commerce pour remplacer la visserie du fabricant. Pour toute information
concernant les pièces de rechange, communiquer avec le service après-vente de MARSHALLTOWN. 800-888-0127.
• NE PAS tenter d’effectuer le nettoyage ou l’entretien du rouleau à araser alors qu’il est en marche.
• NE PAS utiliser d’essence, d’autres carburants ni de solvants inflammables pour nettoyer les pièces, en particulier
dans un espace fermé. Les vapeurs des carburants et solvants peuvent provoquer des problèmes de santé graves
en cas d’exposition pendant une durée prolongée.
• TOUJOURS porter une protection auditive adaptée durant la marche du Spin Screed®.
• Voir les exigences et consignes de sécurité spécifiques à la partie électrique dans le manuel du fabricant de moteur
joint à cette documentation.
DANGER!
ATTENTION
DANGER!
ATTENTION
DANGER!
ATTENTION
DANGER!
ATTENTION
DANGER!
DANGER

4 de 12
104 S. 8th Ave. Marshalltown, IA Téléphone 800-888-0127 / 641-753-0127 • Télécopie 800-477-6341 / 641-753-6341 www.MARSHALLTOWN.com
WS2860revC
GARANTIE
Ce produit est garanti à l’acheteur initial seulement contre les défauts de matériau et de fabrication dans des conditions
normales d’utilisation, pendant un an à compter de la date d’achat. MARSHALLTOWN s’engage à réparer ou à remplacer,
sans frais de pièces ou de main-d’œuvre, toute pièce jugée défectueuse. Tous les frais de port pour les pièces de rechange
seront à la charge de l’acheteur.
Pour recourir à la garantie, le produit doit être renvoyé à MARSHALLTOWN accompagné d’un justificatif de la date d’achat.
Communiquer avec le service après-vente de MARSHALLTOWN pour déterminer la meilleure méthode de renvoi du produit
sous garantie. Le produit devra être renvoyé au plus tard 30 jours après l’expiration de la période de garantie.
En cas de difficulté à faire effectuer les travaux couverts par la garantie, appeler le 800-888-0127.
Toutes les garanties implicites, notamment de qualité marchande ou d’adaptation à un emploi particulier, sont limitées à une
année à compter de la date d’achat par l’acheteur au détail initial et, dans la mesure permise par la loi, toutes les garanties
sont exclues et rejetées après l’expiration de cette période.
Certains états ou provinces interdisent les limites de durée des garanties implicites ou l’exclusion ou la limitation des
dommages accessoires ou indirects, par conséquent les limites ou exclusions ci-dessous peuvent ne pas s’appliquer à
vous. La présente garantie vous confère des droits juridiques particuliers et vous pouvez également avoir d’autres droits,
susceptible de changer d’une juridiction à l’autre.
Exclusions de la présente garantie:
1. Tous les dommages indirects, y compris l’enlèvement et la livraison de la machine, les communications, les frais de
déplacement et la location de toute machine durant les réparations ne sont pas couverts aux termes de la présente
garantie, ni aucun manque à gagner ou autre perte liée à un défaut de fonctionnement du produit en raison d’une
défectuosité couverte par la garantie.
2. La présente garantie ne s’applique pas si le produit devient inopérant suite à une utilisation détournée, usure normale,
négligence, entretien incorrect, accident ou dommages liés au transport; s’il n’a pas été utilisé et entretenu conformément
aux instructions figurant dans le manuel d’utilisation; ou s’il a été altéré ou modifié sans l’autorisation du service après-
vente du fabricant.
Ne pas renvoyer de pièces ou produits à l’usine sans autorisation écrite préalable du fabricant.

5 de 12
104 S. 8th Ave. Marshalltown, IA Téléphone 800-888-0127 / 641-753-0127 • Télécopie 800-477-6341 / 641-753-6341 www.MARSHALLTOWN.com
WS2860revC
GUIDE D’ASSEMBLAGE
1. Déballer toutes les pièces du Spin Screed®. Remarque: Cylindre vendu séparément
B
A
K
C
J I
HE
D
D
Trou à l’extrémité E
Cylindre vendu séparément — Plusieurs longueurs disponibles
F
2. Serrer les pattes de blocage pour ouvrir le couvercle de filtre et accéder au point d’attache de la commande des gaz.
G
3. Vérifier que la vis de réglage de la commande des gaz est engagée sur l’extrémité du câble de commande (G) et
accrocher la tête du câble à la biellette de commande des gaz..

6 de 12
104 S. 8th Ave. Marshalltown, IA Téléphone 800-888-0127 / 641-753-0127 • Télécopie 800-477-6341 / 641-753-6341 www.MARSHALLTOWN.com
WS2860revC
GUIDE D’ASSEMBLAGE
4. Pivoter la vis de réglage pour la placer dans l’étrier, avec le contre-écrou d’un côté et l’écrou plus épais de l’autre.
5. Serrer les écrous pour attacher la vis de réglage à l’étrier de commande des gaz, puis refermer le couvercle de filtre à air.
6. Attacher le guidon (A) à l’extrémité de l’arbre avec deux (2) vis HHCS de 5/16po-18 UNC x 2po de long, rondelles et
écrous (fournis). Avant de serrer le guidon sur l’extrémité de l’arbre, choisir la position du levier de commande des gaz,
pour droitier ou gaucher, en tournant le guidon comme il se doit, puis ajuster l’équilibrage du guidon (de gauche à droite)
de manière à optimiser sa maniabilité pour l’utilisation particulière considérée. Attacher les deux parties du manche
en té du côté libre (D) et visser les deux poignées (E). REMARQUE: Il est préférable que le trou à l’extrémité soit
perpendiculaire à la poignée en té.
7. Retirer le couvercle et le joint du levier de commande des gaz.

7 de 12
104 S. 8th Ave. Marshalltown, IA Téléphone 800-888-0127 / 641-753-0127 • Télécopie 800-477-6341 / 641-753-6341 www.MARSHALLTOWN.com
WS2860revC
GUIDE D’ASSEMBLAGE
8. Accrocher la tête du câble de commande des gaz à la biellette du levier de commande des gaz.
9. Remonter le joint et le couvercle sur le levier de le commande des gaz.
10. Prendre le petit outil (F) de la poignée (A). Détacher l’axe d’entraînement de l’embout moteur (J) en enfonçant le
ressort avec le petit outil. Remettre le petit outil dans la poignée.
11. REMARQUE: Les embouts (I et J) doivent être montés dans le cylindre d’arasement avant de poursuivre. Voir
page suivante. Raccorder la tête motorisée (B) en appuyant sur la goupille de blocage de l’axe d’entraînement monté
sur l’embout moteur (J). Insérer l’ergot d’entraînement carré de l’axe d’entraînement dans l’accouplement pivot de
l’embout moteur (J). Essayer de tirer sur la tête motorisée pour vérifier que la goupille de blocage s’est bien enclenchée
dans l’accouplement (B).
12. Pour plus de sécurité, couvrir l’axe exposé (le côté non utilisé) avec le manchon de protection (C) et l’attacher au
réducteur avec la visserie fournie.
13. Pour raccorder le manche en té (D) à l’embout libre (I), retirer la goupille (H), placer le manche dans l’étrier et remettre
la goupille en place.

8 de 12
104 S. 8th Ave. Marshalltown, IA Téléphone 800-888-0127 / 641-753-0127 • Télécopie 800-477-6341 / 641-753-6341 www.MARSHALLTOWN.com
WS2860revC
POSE DES EMBOUTS DU CYLINDRE
Étape 1 – Outils nécessaires: Clé à tuyau de 12po, pince-
étau à chaîne de 9po et clé Allen de ⁄po. Utiliser la
pince-étau à chaîne pour tenir le cylindre (remarque: ne pas
tenter d’immobiliser le cylindre à la main, cela ne permet pas
d’obtenir le couple nécessaire pour serrer les embouts).
Étape 4 – Insérer la vis de calage et la serrer à l’aide de la clé
Allen de ⁄po.
Étape 3 – Serrer l’embout moteur (J) à l’aide de la clé à tuyau
(remarque: l’embout moteur doit être serré très fermement).
S’assurer qu’il est aligné sur l’orifice de la vis de calage.
Étape 2 – Insérer l’embout moteur (J) dans le cylindre, en
s’assurant que la vis est retirée.
Étape 6 – Serrer l’embout libre à l’aide de la clé à tuyau.
Étape 5 – Insérer l’embout libre (I) dans le cylindre.

9 de 12
104 S. 8th Ave. Marshalltown, IA Téléphone 800-888-0127 / 641-753-0127 • Télécopie 800-477-6341 / 641-753-6341 www.MARSHALLTOWN.com
WS2860revC
FONCTIONNEMENT DU PRODUIT
AVANT DE DÉMARRER
Avant de démarrer le Spin Screed®, il y a quelques points à vérifier pour écarter les risques de dégâts matériels et de
blessures corporelles.
• Attacher le manchon de protection (C) au côté inutilisé du moteur de rouleau pour couvrir l’axe tournant. Un axe non
couvert en rotation peut s’enchevêtrer dans une chaussure et provoquer une blessure.
• Vérifier que les deux embouts (I et J) sont solidement attachés aux extrémités du cylindre.
• Vérifier le bon serrage de tous les assemblages vissés.
• Vérifier la fixation du manche et des poignées (D et E) pour éviter qu’elles se desserrent ou se détachent durant
l’utilisation du Spin Screed®.
RECOMMANDATIONS D’ENTRETIEN DU MOTEUR
Remplacer l’huile dans le moteur par de l’huile Honda n°08209-10W30 après les 20 premières heures d’utilisation. La
changer à nouveau après les 40 heures suivantes d’utilisation. L’utilisation du produit Honda n° 08209-10W30 évite de trop
remplir le moteur. Le fait de ne pas changer l’huile réduit considérablement la durée de vie du moteur. Voir les instructions
d’utilisation du volet de départ du moteur pour les démarrage à froid et les autres recommandations d’entretien dans le
manuel de l’utilisateur du GX35.
FONCTIONNEMENT
L’utilisation correcte du Spin Screed® permettra d’obtenir le résultat souhaité pour l’ouvrage. Suivre les instructions ci-
dessous pour utiliser correctement le rouleau à araser.
• Démarrer le moteur. Voir les instructions générales de démarrage dans le manuel de l’utilisateur Honda GX35.
• Mettre le moteur en marche et tirer le Spin Screed® sur le coffrage, les tuyaux-guides ou les rails-guides de façon à
étaler le béton frais au niveau souhaité. S’assurer que le cylindre tourne dans le sens de l’éloignement.
• Le Spin Screed® est conçu pour avancer à vitesse lente.
• Chaque opérateur doit bien garder le contrôle des deux poignées et guider le cylindre sur le béton frais à la vitesse et
dans le sens qui conviennent le mieux en fonction de l’affaissement du granulat.
• NE PAS laisser l’une ou l’autre extrémité de la machine s’enfoncer dans le béton humide. Maintenir chaque extrémité sur
le coffrage, les tuyaux-guides ou les rails-guides afin d’éviter de salir les embouts ou le moteur.
• Si le béton n’est pas mis en place à une cadence suffisante, ralentir le rouleau à araser pour compenser.
• La vitesse de passage du rouleau dans un sens et dans l’autre dépend de l’affaissement du béton (voir les conseils
concernant l’affaissement ci-dessous). Veiller à accorder une attention particulière au granulat, à l’affaissement et aux
agents modificateurs du béton et à ajuster la vitesse du moteur comme il se doit.
• Ne pas laisser le Spin Screed® tourner sur place pendant une durée prolongée. Si l’arasement doit être interrompu,
éteindre le moteur et laisser le Spin Screed® reposer à un emplacement qui convient bien pour le redémarrage. Lorsque
la mise en place du béton reprend, engager lentement le moteur et poursuivre l’arasement.
CONSEILS CONCERNANT L’AFFAISSEMENT
Le Spin Screed® permet d’araser un béton ferme présentant un affaissement de 3po (75mm) seulement. Lors des
premières utilisations du Spin Screed®, couler un béton de même consistance que d’habitude. Comme avec tout nouvel
outil, certaines techniques d’utilisation nécessitent une période apprentissage.

10 de 12
104 S. 8th Ave. Marshalltown, IA Téléphone 800-888-0127 / 641-753-0127 • Télécopie 800-477-6341 / 641-753-6341 www.MARSHALLTOWN.com
WS2860revC
FONCTIONNEMENT DU PRODUIT
MÉTHODE PAR TRACTION DIRECTE - MÉTHODE 1 POUR BÉTON FLUIDE
Affaissement de 5po (125mm) ou plus, maintenir une surcharge de 1 à 2po (2,5 à 5cm)
Lorsqu’on travaille avec un béton fluide, démarrer le Spin Screed® en appuyant sur la commande des gaz et le tirer lentement sur le béton
tandis que les ouvriers à l’étalement maintiennent une surcharge de béton d’environ 2po (5cm) devant le cylindre. Après avoir progressé
de 6 à 8pi (2 à 2,5m), laisser le Spin Screed® en rotation revenir lentement sur le béton fraîchement arasé. Cette passe lente vers l’arrière
enfonce le granulat qui dépasse tout en ramenant la pâte vers la surface. Après être repassé sur la portion arasée, ralentir le Spin Screed®
et le ramener jusqu’à la limite du nouveau béton mis en place. Recommencer à araser. Avec le béton fluide de plus de 5po (125mm)
d’affaissement, la deuxième passe sur l’ouvrage avec le moteur en marche produit une surface plus plane avec suffisamment de pâte
pour le talochage. Examiner les surfaces préparées par le Spin Screed® et ajuster la technique de façon à produire la surface souhaitée
pour le talochage.
MÉTHODE PAR À-COUPS - METHODE 2 POUR BÉTON FERME
Affaissement de 3 à 4po (75 à 100mm), maintenir une surcharge de 2,5 à 3,5po (6,5 à 9cm)
Avec un béton ferme, le passage du Spin Screed® produit une surface irrégulière difficile à talocher. Pour obtenir de
meilleurs résultats, utiliser la technique «par à-coups». Appuyer sur le levier de commande des gaz pour démarrer le Spin
Screed® et repousser doucement une surcharge de 2 à 3po (5 à 7,5cm) avec le Spin Screed®, en le laissant avancer de
quelques centimètres, puis le laisser revenir en arrière de 4 à 6po (10 à 15cm). Faire à nouveau avancer le Spin Screed®.
Continuer cette technique «par à-coups» jusqu’à avoir avancé de 6 à 8pi (2 à 2,5m), puis ramener le Spin Screed®
lentement en arrière avec le moteur en marche sur le béton fraîchement arasé. Cette passe lente vers l’arrière enfonce
le granulat qui dépasse tout en ramenant la pâte vers la surface. Après être repassé sur la portion arasée, arrêter le Spin
Screed® et le ramener jusqu’à la limite du nouveau béton mis en place. Recommencer à araser. La portion arasée est prête
pour le talochage, qui doit être effectué immédiatement. Lors de l’arasement d’un béton ferme, le passage du Spin Screed®
une deuxième fois en marche avant a tendance à enlever la couche de pâte qui a été remontée à la surface, ce qui rend le
talochage et le finissage plus difficiles à effectuer.
IMPORTANT
Veiller à bien nettoyer le Spin Screed® immédiatement après l’avoir utilisé afin d’éviter que du béton durcisse dans l’arbre
d’entraînement du moteur, le bloc moteur, les articulations des manches ou sur le cylindre.
Pour nettoyer le moteur, le souffler à l’air comprimé et le laver à la main en évitant de faire couler de l’eau près du
carburateur. Il est conseillé d’utiliser un nettoyeur à haute pression pour laver le cylindre, mais PAS pour nettoyer le moteur
ou le réducteur.
Spin Screed Techniques of Operation:
The Spin Screed power head has been designed with a reversing switch. The power head can be made to operate on
either side of the pour moving in either direction.
As with any electric tool, proper operating voltage is essential. Always use heavy-duty properly grounded extension
cords and follow the directions associated with the spin motor for maximum length and gauge of extension cords.
The spin motor draws 10 amperes of current at 120 volts when fully loaded. A portable electric generator can easily
provide this voltage and current requirement if a source of 120 volt AC is not otherwise available. GFI breakers are an
OSHA requirement for tools used on the construction site. All extension cords and power cords should be inspected
and tested for defects before being placed into operations. Defective cords not protected by GFI breakers could lead
to death or severe injury.
The Spin Screed will handle stiff concrete having only a 3-inch slump or any larger slump that you choose to pour. We
advise that when you rst start using the Spin Screed, you pour with a slump level that is consistent with your past
practices. As with any new tool you bring onto your job site, certain techniques of operation must be learned so the
quality level of work you demand can be achieved.
With wet concrete, you will probably nd that the spin motor can be energized and the Spin Screed slowly pulled over
the concrete while muckers are maintaining about a two-inch surcharge of concrete in front of the screed. Once you
have advanced for 6 to 8 feet or more, you will want to allow the Spin Screed to move backward slowly over the freshly
screeded concrete while the Spin Screed is still spinning. This slow backward pass pushes any concrete aggregate
that may be above the surface down into the surface while at the same time bringing paste to the surface. Once you
have backed over the section just poured, you will want to turn off the spin motor and simply pull the screed back to
the area where more concrete has been placed and begin the screeding operation again. With concrete wetter than a
5 inch slump, you may nd that pulling over the concrete surface a second time, while the spin motor is still running,
will produce a atter surface with sufcient paste for bull oating. The general rule is to examine the surface prepared
by the Spin Screed and adjust your screeding technique to produce the most desirable surface for bull oating.
1-888-329-6039 • www.spinscreed.com
Wet Concrete
Operating Method No. 1:
Slump levels of 5 inches
or more. Maintain 1 to 2
inch surcharge.
Stiff Concrete
Operating Method
No. 2:
Slump levels of 3 to
4 inches. Maintain
2.5 inch to 3.5 inch
surcharge.
STRAIGHT PULL
BUMP AND RUN
(OVER)

11 de 12
104 S. 8th Ave. Marshalltown, IA Téléphone 800-888-0127 / 641-753-0127 • Télécopie 800-477-6341 / 641-753-6341 www.MARSHALLTOWN.com
WS2860revC
ENTRETIEN
Après chaque utilisation, s’assurer que le Spin Screed® est nettoyé et rangé avec
soin. Trouver un lieu sûr pour le cylindre, où d’autres objets ne risquent pas de
tomber dessus et l’endommager.
Toutes les trois à quatre utilisations, lubrifier l’embout de cylindre du côté libre par
son graisseur à l’aide une pompe à graisse à levier standard.
Avant de démarrer le moteur, faire le plein d’huile moteur par l’orifice de remplissage
au bas du moteur. LE MOTEUR EST LIVRÉ SANS HUILE DANS LE CARTER. Le petit
flacon fourni avec le produit correspond à la quantité exacte nécessaire. Conserver
le flacon pour les mesures ultérieures.
Au bout des 20 premières heures de marche, changer l’huile moteur. Pour vidanger
l’huile, retirer le bouchon de vidange au bas du moteur et incliner le moteur.
Remplir uniquement avec la quantité recommandée par le fabricant du moteur - NE
PAS TROP REMPLIR LE MOTEUR.
L’huile moteur doit être changée toutes les 40 heures d’utilisation par la suite.
Pour contrôler le filtre à air en éponge, serrer les pattes de blocage du couvercle
d’admission en plastique et le retirer. Le filtre à air peut être rincé à l’eau. Veiller à
essorer autant d’eau que possible avant de le remettre en place.
Le réducteur est fourni entièrement graissé. Au bout de 40 heures d’utilisation
environ, il est conseillé d’injecter de la graisse au lithium NLGI n°0 par le graisseur
monté sur le côté du réducteur. La vis de vidange doit être retirée pour permettre à
la graisse usagée de s’échapper. Veiller à bien remettre la vis de vidange en place à
la fin.
Répéter le renouvellement de la graisse toutes les 40 heures.
DÉPANNAGE
Si le Spin Screed® ne tourne pas ou ne fonctionne pas correctement, se reporter au guide suivant pour diagnostiquer et
résoudre le problème.
• Voir les instructions de dépannage du moteur dans le manuel de l’utilisateur Honda GX35.
• Vérifier que les embouts de cylindre sont complètement serrés. Les resserrer s’il y a lieu.
ARTICLE RÉF. PIÈCE
Adaptateur de cylindre côté libre SPNDE
Adaptateur de cylindre côté moteur SPNLE
Tête motorisée* SPNRSSGAS
Cylindre** SPNP4 – SPNP22
Goupille à démontage rapide SPNQDP
Manche en té côté libre SPNDH
Réducteur de rechange, essence 29588
Levier de commande des gaz de rechange 29589
Interrupteur moteur de rechange 29590
Axe de rechange 29591
Couvercle de prise de force de rechange 29593
Câble de commande des gaz de rechange 29594
*Manche et bloc moteur avec la tête motorisée **Cylindre proposé de 4pi (1,22m) à 22pi (6,7m) par valeurs (en pieds) paires
PIÈCES DE RECHANGE DISPONIBLES
Graisseur
Vidange
Bouchon de
vidange

104 S. 8th Ave., Marshalltown, IA
Téléphone 800-888-0127 / 641-753-0127
Télécopie 800-477-6341 / 64 1-753-6341
www.MARSHALLTOWN.com
WS2860revC
-
 1
1
-
 2
2
-
 3
3
-
 4
4
-
 5
5
-
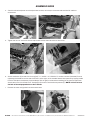 6
6
-
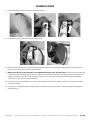 7
7
-
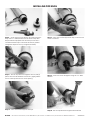 8
8
-
 9
9
-
 10
10
-
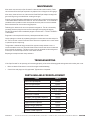 11
11
-
 12
12
-
 13
13
-
 14
14
-
 15
15
-
 16
16
-
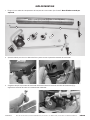 17
17
-
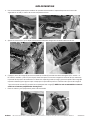 18
18
-
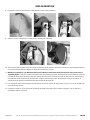 19
19
-
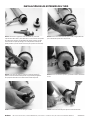 20
20
-
 21
21
-
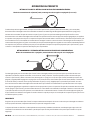 22
22
-
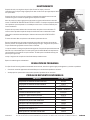 23
23
-
 24
24
-
 25
25
-
 26
26
-
 27
27
-
 28
28
-
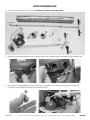 29
29
-
 30
30
-
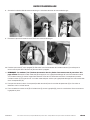 31
31
-
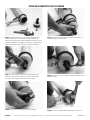 32
32
-
 33
33
-
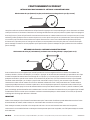 34
34
-
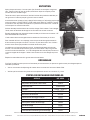 35
35
-
 36
36


Marshalltown 29592 Spin Screed Gas Powered Unit Manual de usuario
- Tipo
- Manual de usuario
en otros idiomas
Artículos relacionados
Otros documentos
-
Wal-Board Tools WAL-BOARD TOOLS 051-007 Pro Manual de usuario
-
 Marshalltown Company Enforcer E400 Manual de usuario
-
Wacker Neuson P31A Parts Manual
-
Wacker Neuson P35A-X Parts Manual
-
Wacker Neuson P35A Parts Manual
-
-
Wacker Neuson P35 Parts Manual
-
-
 Euromair Máquina de bombeo X-SCREED D60 - stage V 42kW El manual del propietario

