Weitech HRW6107-LA HRW6107-CL Guía del usuario
- Categoría
- Pequeños electrodomésticos de cocina
- Tipo
- Guía del usuario
Este manual también es adecuado para

Manual de uso y cuidado
Use & Care Manual
HRW6107-L A, HRW6107-CL, HRW6107-AR
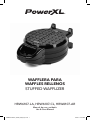
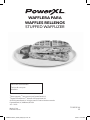
WAFFLERA PARA
WAFFLES RELLENOS
STUFFED WAFFLIZER
HRW6107Series_29332_SE_IB_A.indd 1HRW6107Series_29332_SE_IB_A.indd 1 4/3/23 10:02 AM4/3/23 10:02 AM

2
3
Número
de modelo
Alimentación
eléctrica
Potencia
nominal
HRW6107-LA
HRW6107-CL
HRW6107-AR
120V~ 60Hz
220V~ 60Hz
220V~ 60Hz
1000W
1000W
1000W
PowerXL™ Wafera Para
Wafes Rellenos
ANTES DE EMPEZAR
La waera PowerXL™ Wafflera Para Waffles Rellenos
le permite cocinar wafes estilo belga rellenados con
todos sus alimentos y rellenos favoritos y así disfrutar
de posibilidades innitas de comidas y golosinas
personalizadas. Pero antes de comenzar, es muy
importante leer todo el manual, asegurándose de estar
familiarizado completamente con el funcionamiento
y las precauciones adecuadas de este aparato.
Especicaciones
HRW6107Series_29332_SE_IB_A.indd 2HRW6107Series_29332_SE_IB_A.indd 2 4/3/23 10:02 AM4/3/23 10:02 AM

2
3
Tabla de contenidos
INSTRUCCIONES IMPORTANTES DE SEGURIDAD 4
Piezas y Accesorios 7
Intrucciones de uso 8
Guía y consejos de Cocción 11
Cuidado y Limpieza 12
Resolución de fallas 13
Preguntas frecuentes 14
HRW6107Series_29332_SE_IB_A.indd 3HRW6107Series_29332_SE_IB_A.indd 3 4/3/23 10:02 AM4/3/23 10:02 AM

4
5
• Lea todas las instrucciones antes de usar el
producto.
• No toque las superficies calientes. Utilice
mangos o perillas.
• A fin de protegerse contra una descarga
eléctrica, no sumerja el cable de
alimentación, los enchufes o el aparato en
agua ni en ningún otro líquido.
• Este aparato cuenta con un enchufe de
dos clavijas. Este enchufe está diseñado
para entrar de solo una manera en un
tomacorriente polarizado. NOT INTENTE
modificar este enchufe de manera alguna.
• Utilice este aparato solo para el fin para el
que has sido diseñado según se describe en
este manual.
• No utilice ningún aparato con un cable o
enchufe dañado, o después de presentar un
fallo en su funcionamiento o haberse dañado
de manera alguna. Devuelva el aparato al
centro de servicio autorizado más cercano
para su revisión, reparación o ajuste.
• El uso de accesorios no recomendados por
el fabricante del aparato puede ocasionar
lesiones.
• NO utilice químicos corrosivos en este
aparato.
• Este aparato no se destina para utilizarse
por personas (incluyendo niños) cuyas
capacidades físicas, sensoriales o mentales
sean diferentes o estén reducidas, o carezcan
de experiencia o conocimiento, a menos que
dichas personas reciban una supervisión
o capacitación para el funcionamiento del
aparato por una persona responsable de su
seguridad.
• Los niños deben supervisarse para asegurar
que ellos no empleen los aparatos como
juguete
• No coloque el aparato sobre o cerca de una
hornilla caliente eléctrica o de gas o dentro de
un horno caliente.
• Se debe tomar extrema precaución al mover
un aparato conteniendo aceite caliente u
otros líquidos calientes.
• NO utilice ningún aparato con un cable o
enchufe dañado, o después de presentar
un fallo en su funcionamiento o que se ha
dañado de manera alguna o caído.
• Un cable de alimentación corto es provisto
para reducir el riesgo de enredarse o tropezar
con un cable más largo.
• Desenchufe el aparato cuando no esté en
uso.
• Mantenga el cable de alimentación alejado
del agua y superficies calientes.
• NO permita que el cable cuelgue del borde
de una mesa o mostrador.
• PARA EVITAR UNA DESCARGA ELÉCTRICA,
NO coloque ningún tipo de líquido dentro de
la caja principal de la unidad que contiene los
componentes eléctricos.
• Mantenga el aparato y su cable de
alimentación ALEJADOS DEL ALCANCE de
los niños cuando el aparato esté funcionando
o durante el proceso de enfriamiento.
• Siempre asegúrese de que la palanca de
cierre esté enganchada, ya que el vapor se
puede acumularse y ocasionar que la mezcla
se eleve.
•
Por favor lea este instructivo antes de usar el producto.
INSTRUCCIONES IMPORTANTES
DE SEGURIDAD
Cuando se utilizan aparatos eléctricos, siempre se deben respetar las precauciones básicas
de seguridad para reducir el riesgo de incendio, descarga eléctrica, y/o lesiones personales,
incluyendo las siguientes:
HRW6107Series_29332_SE_IB_A.indd 4HRW6107Series_29332_SE_IB_A.indd 4 4/3/23 10:02 AM4/3/23 10:02 AM

4
5
• UTILICE GUANTES DE HORNO cuando
manipule lo componentes calientes o toque
las superficies calientes.
• Si el aparato emitiera un humo negro,
DESENCHÚFELO INMEDIATAMENTE y
espere a que el humo se desaparezca antes
de manipular el aparato.
• Todo servicio al aparato debe ser realizado
solamente por un representante de servicio
autorizado. Comuníquese con servicio al
cliente, utilizando la información localizada al
final de este manual.
• Mientras cocina, la temperatura interna
alcanza varios cientos de grados Fahrenheit.
NUNCA coloque sus manos dentro del
aparato a menos que éste se haya enfriado
completamente.
• Cuando vaya a cocinar, no coloque el
aparato contra una pared ni cerca de otros
electrodomésticos. NO coloque nada encima
del aparato.
• NO almacene ni use este aparato en el
exterior.
• NO coloque ni utilice este aparato cerca del
agua, tal como cerca o en la parte superior del
fregadero o áreas similares. Nunca sumerja
este aparato en agua.
• NO coloque el aparato sobre una estufa,
aun cuando la estufa esté fría, ya que
podría encender accidentalmente la estufa,
ocasionando un incendio, dañando el
aparato, su superficie de cocción y su hogar.
• NO utilice este aparato sobre o cerca de
materiales combustibles, tales como
manteles o cortinas.
• Antes de utilizar su nuevo producto sobre
cualquier superficie de mostrador, verifique
con el fabricante o instalador de mostrador
para recomendaciones sobre el uso de
electrodomésticos sobre sus superficies.
Algunos fabricantes e instaladores pueden
recomendar proteger su superficie,
colocando una almohadilla resistente al
calor o un salvamanteles debajo del aparato
para protegerlo contra el calor. Su fabricante
o instalador puede recomendar que las
bandejas calientes, cazuelas o aparatos
eléctricos no deben utilizarse directamente
sobre el mostrador. Si no está seguro,
coloque un salvamanteles o almohadilla
resistente al calor debajo del aparato antes de
utilizarlo.
• NO coloque nada que no sea comestible
dentro del aparato ni coloque el aparato
en ningún recipiente ni espacio pequeño
limitado mientras el aparato esté caliente o
funcionando.
• Siempre utilice el aparato sobre un
superficie horizontal, nivelada, estable y no
combustible.
• NO deje este aparato desatendido mientras
esté funcionando.
• NO utilice alimentos crudos como rellenos: si
es necesario, pre cocine los rellenos. Rellenos
crudos, como carnes de red, pollo y huevos
no se cocinarán completamente en este
aparato. Rellenos crudos deben cocinarse
antes de utilizarlos como relleno. Consulte la
guía de recetas para instrucciones detalladas.
• NO llene en exceso el aparato con la mezcla
o masa. Las mezclas y masas se expandirán
durante el proceso de cocción.
• NO intente forzar el aparato para cerrarlo. Si
contiene demasiada cantidad de mezcla o
relleno, extraiga según sea necesario.
• NO intente desalojar los alimentos ni
desenganchar la palanca de cierre o abrir el
aparato mientras esté en uso.
• NO utilice utensilios afilados (cuchillos
o tenedores) para extraer los alimentos
del aparato. Estos pueden dañar la capa
antiadherente del aparato.
• Siempre desenchufe el aparato después
de utilizar y luego deje que el aparato se
enfríe 30 minutos como mínimo antes de
manipular, limpiar y almacenarlo.
• Limpie el aparato después de cada uso.
• Cuando limpie el interior del aparato, solo
utilice jabón o detergente suave, no abrasivo,
aplicado a una esponja o paño suave.
HRW6107Series_29332_SE_IB_A.indd 5HRW6107Series_29332_SE_IB_A.indd 5 4/3/23 10:02 AM4/3/23 10:02 AM

6
7
ENCHUFE POLARIZADO
Este aparato cuenta con un enchufe polarizado (un contacto es más ancho que el otro).
A fin de reducir el riesgo de un choque eléctrico, este enchufe encaja en un tomacorriente
polarizada en un solo sentido. Si el enchufe no entra en el tomacorriente, inviértalo
y si aun así no encaja, consulte con un electricista. Por favor no trate de alterar
esta medida de seguridad.
TORNILLO DE SEGURIDAD
Advertencia: Este aparato cuenta con un tornillo de seguridad para evitar la remoción
de la cubierta exterior del mismo. A fin de reducir el riesgo de incendio o de choque
eléctrico, por favor no trate de remover la cubierta exterior. Este producto no contiene
piezas reparables por el consumidor. Toda reparación se debe llevar a cabo únicamente
por personal de servicio autorizado
CABLE ÉLECTRICO
1. El producto debe proporcionarse con un cable corto para reducir el riesgo
de enredarse o de tropezar con un cable largo.
2. Se encuentran disponibles cables de extensión más largos,
que es posible utilizar si se emplea el cuidado debido.
3. Si se utiliza un cable de extensión:
a) El régimen nominal del cable separable o del cable de extensión debe ser,
como mínimo, igual al del régimen nominal del aparato.
b) Si el aparato es de conexión a tierra, el cable de extensión debe ser un
cable de tres alambres de conexión a tierra.
c) Uno debe de acomodar el cable más largo de manera que no cuelgue
del mostrador o de la mesa, para evitar que un niño tire del mismo o que
alguien se tropiece.
Nota: Este aparato tiene importantes marcas en la hoja del enchufe.
El enchufe o el cable entero (si el enchufe está moldeado en el cable)
no es adecuado para el reemplazo. Si está dañado, el electrodoméstico
debe ser remplazado.
Para México solamente: Si el cable de alimentación es dañado, este debe sustituirse
por personal calicado o por el centro de servicio autorizado.
CONSERVE ESTAS INSTRUCCIONES.
Este aparato eléctrico es para uso doméstico solamente.
• Este aparato no está diseñado para utilizarse con temporizador externo o sistemas de control
remoto.
• Este aparato es solo para uso doméstico. Si el aparato se utiliza inadecuadamente o para
propósitos profesionales o semiprofesionales o si no se utiliza de acuerdo a las instrucciones del
manual del usuario, la garantía se convierte invalida y Empower Brands, LLC no será responsable
por los daños.
HRW6107Series_29332_SE_IB_A.indd 6HRW6107Series_29332_SE_IB_A.indd 6 4/3/23 10:02 AM4/3/23 10:02 AM

6
7
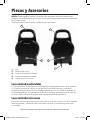
Piezas y Accesorios
El producto puede variar ligeramente del que aparece ilustrado aquí.
1. Asa
2. Palanca de cierre
3. Luces indicadoras frontales
4. Luces indicadoras traseras
5. Cable de alimentación
NOTA: Desempaque todo el contenido del paquete. Revise el material del
paquete cuidadosamente por pieza. Retire toda capa protectora transparente de
los componentes.
*Artículos opcionales pueden venderse por separado.
Luces indicadoras frontales
La luz indicadora roja se ilumina inmediatamente después de enchufar el aparato
a un tomacorriente de 120V y se mantendrá iluminada, siempre y cuando el
aparato esté enchufado. La luz indicadora verde se ilumina cuando el aparato se
ha precalentado. La luz indicadora verde se enciende y apaga durante el ciclo de
cocción, indicando que el aparato está manteniendo la temperatura.
Luces indicadoras traseras
Las luces indicadoras traseras son rojas y se iluminan tan pronto como el aparato
esté enchufado y se mantendrá iluminada, siempre y cuando el aparato esté
enchufado.
4
3
1
2
7
HRW6107Series_29332_SE_IB_A.indd 7HRW6107Series_29332_SE_IB_A.indd 7 4/3/23 10:02 AM4/3/23 10:02 AM

8
9
Intrucciones de uso
Antes de utilizar por primera vez
1. Leer todo material, etiquetas adhesivas de advertencia y las etiquetas.
2. Retire todo material de empaque.
3. Limpie la supercie exterior del aparato con un paño humedecido con agua
caliente y detergente suave,
4. Limpie el interior del aparato con agua caliente, detergente suave y un paño
o esponja no abrasiva. Nunca sumerja el aparato en agua ni lo lave en el
lavaplatos.
5. Enjuague el aparato con un paño limpio y húmedo. Utilice un paño limpio y
seco para secar el interior del aparato. No deje agua estancada en el aparato.
6. Haga funcionar el aparato por unos minutos para quemar la capa protectora
de aceite del fabricante (un ligero olor o humo puede producirse durante
este proceso, esto es normal):
a. Coloque el aparato sobre una supercie seca, estable, resistente al calor.
b. Asegúrese de que el aparato esté cerrado, asegurado con la palanca de
cierre y girado sobre su costado de manera que las luces indicadoras
dobles roja y verde estén mirando directo hacia arriba.
c. Enchufe el cable de alimentación a un tomacorriente de 120V. La
luz indicadora roja debe iluminarse para indicar que el aparato está
precalentando.
d. Espere a que el aparato termine de precalentar, indicado por la luz por la luz
indicadora verde cuando se ilumina.
e. Permita que el aparato funcione por 3 minutos. Luego, desenganche la
palanca de cierre del aparato.
f. Limpie el aparato con un paño húmedo o esponja para eliminar cualquier
residuo.
HRW6107Series_29332_SE_IB_A.indd 8HRW6107Series_29332_SE_IB_A.indd 8 4/3/23 10:02 AM4/3/23 10:02 AM

8
9
Intrucciones de Uso
Uso del Aparato
1. Coloque el aparato sobre una
supercie seca, nivelada, estable
y resistente al calor.
2. Asegúrese de que el aparato esté
cerrado, asegurado con la palanca
de cierre y girado sobre su costado
de manera que las luces indicadoras
dobles roja y verde estén mirando
directo hacia arriba.
3. Enchufe el cable de alimentación
a un tomacorriente de 120V. La luz
indicadora roja debe iluminarse
para indicar que el aparato está
precalentando.
4. Espere a que el aparato termine de
precalentar, indicado por la luz por
la luz indicadora verde cuando se
ilumina.
5. Desenganche la palanca de cierre
y abra el aparato, teniendo cuidado
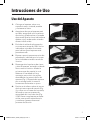
de no tocar el interior. Añada la
primera capa de mezcla, la cual
debe ser la cantidad mínima
necesaria para cubrir las rejillas
de wafes en la parte inferior del
aparato (Fig i). Después de reposar
por unos segundos, la mezcla
comenzara a elevarse un poco.
6. Posicione el relleno sobre el centro
de la primera capa de mezcla (Fig.
ii) y cubra con el resto de la mezcla,
llenando unos tres cuartos de
capacidad del nivel más alto (Fig.
iii) NO llene completamente hasta
arriba; esto podría sobrellenarlo
y ocasionar goteos durante el
proceso de cocción.
Fig. i
Fig. ii
Fig. iii
HRW6107Series_29332_SE_IB_A.indd 9HRW6107Series_29332_SE_IB_A.indd 9 4/3/23 10:02 AM4/3/23 10:02 AM

10
11
Intrucciones de Uso
7. Cierre el aparato y asegúrelo con
la palanca de cierre. Luego, utilice
el mango para voltear el aparato
(Fig. iv). Después de 5 a 7 minutos,
puede abrir el aparato para vericar
el progreso de los alimentos. Puede
volver a cerrar el aparato para
continuar el proceso de cocción
para alimentos que requieren
más tiempo de cocción. NO trate
de abrir el aparato durante el
proceso de cocción. El vapor puede
acumularse mientras la masa se está
cocinando.
8. Cuando los alimentos terminen
de cocinarse, puede retirarlos
del aparato. Utilice guantes de
horno antes de manipularlos para
protegerse contra el vapor que
escapa del aparato. Desenganche
la palanca de cierre y abra el
aparato. Luego, utilice utensilios de
plástico/madera/goma para extraer
con cuidado el wae y colocarlo
sobre un plato. No utilice utensilios
alados de metal que pueden rayar
la capa antiadherente de cocción
(Fig. v).
9. Desenchufe el aparato y déjelo
enfriar antes de limpiarlo (consulte
la sección de “Limpieza y Cuidado”).
Este aparato cuenta con una capa
de cocción antiadherente. NO utilice
rociadores antiadherentes en aerosol
con este aparato. Puede aplicarse una
cantidad pequeña antes de verter la
mezcla de la masa para ayudar a retirar
el wafe cocinado.
Es normal que se escape vapor y se
acumule condensación por ambos lados
del aparato durante su uso.
Fig. iv
Fig. v
HRW6107Series_29332_SE_IB_A.indd 10HRW6107Series_29332_SE_IB_A.indd 10 4/3/23 10:02 AM4/3/23 10:02 AM

10
11
Guía y consejos de Cocción
Consejos
• El uso de guantes de cocina puede
proteger contra el contacto accidental
con las superficies calientes y el vapor
que escapa cuando se desengancha la
palanca de cierre del aparato.
• Rellenos, como las carnes, el pollo y los
huevos deben cocinarse y los alimentos
congelados deben descongelarse
antes de utilizarlos para preparar
waffles. El tiempo de cocción no es lo
suficientemente largo y la temperatura
de cocción no está lo suficientemente
caliente para cocinar adecuadamente
los alimentos crudos o para calentar
alimentos congelados utilizados para
rellenos.
• La primera capa de la mezcla de
masa debe consistir de la cantidad
mínima necesaria para cubrir las
rejillas de waffles en la parte inferior
del aparato. Después de reposar por
unos segundos, la masa comenzará
a elevarse un poco. Luego, añada su
relleno (posicionado en el centro de
la masa). El relleno no debe colocarse
cerca de los bordes de la masa.
Después de añadir el relleno, cúbralo
con el resto de la masa, cierre la tapa y
voltee el aparato.
• Si utiliza frutas en lata sumergidas
en sirope o vegetales en líquido (no
relleno de pastel), escurra el líquido lo
más posible antes de utilizarlo como
relleno.
• Si su relleno consiste de alimentos más
sólidos, como jamón cortado en cubos,
huevos revueltos o nueces, puede
añadir su relleno y presionarlo hacia
abajo dentro de la masa con la parte
posterior de una cuchara. Asegúrese
de cubrir el relleno con la segunda
capa de masa.
• El aparato puede acomodar
aproximadamente 1 ½ tazas de mezcla
para un waffle sin relleno. Waffles con
rellenos utilizan menos cantidad de
mezcla. La mezcla solo debe llenar
cerca de 3 cuartos de la capacidad
del nivel más alto dentro del aparato.
Espere que la mezcla se expanda
durante el proceso de cocción.
• Para máxima seguridad de los
alimentos, el departamento de
agricultura de los Estados Unidos
recomienda una temperatura de 165°
F/74° C para las aves; 160° F/71° C
para carne molida, ternera y cerdo;
y 145° F/63° C, con un período de
reposo de 3 minutos para todos los
otros tipos de carne de red, cordero y
cerdo. También consulte los estándares
de seguridad para alimentos de la
USDA.
• Para evitar rayones en la capa de
cocción, solo utilice utensilios no
metálicos. No alce ni corte los
alimentos en el aparato utilizando
utensilios afilados o puntiagudos,
como los cuchillos y tenedores, ya que
pueden rayar la superficie de cocción.
• No utilice lana de acero ni otras
esponjas metálicas. Estos podrían dejar
rayones gruesos. Siempre enjuague
bien y seque inmediatamente con una
toalla suave.
• Nunca coloque el aparato en posición
vertical durante la cocción. Solo
colóquelo en posición vertical para
almacenarlo.
HRW6107Series_29332_SE_IB_A.indd 11HRW6107Series_29332_SE_IB_A.indd 11 4/3/23 10:02 AM4/3/23 10:02 AM

12
13
Limpieza
1. Limpie el aparato después
de cada uso. Desenchufe el
cable de alimentación del
tomacorriente y cerciórese de
que el aparato este enfriado
completamente antes de
limpiarlo. NO lo remoje ni
sumerja en agua en agua ni lave
en el lavaplatos.
2. Limpie la supercie exterior
del aparato con un paño
humedecido con agua caliente y
detergente suave.
3. Limpie el interior del aparato
con agua caliente, un detergente
suave y un paño o esponja no
abrasiva.
4. Enjuague el aparato con un
paño limpio y húmedo. Utilice
un paño limpio y seco para secar
el interior del aparato. No deje
agua estancada en el aparato.
Cuidado y Limpieza
1. Desenchufe el aparato y deje enfriar
completamente.
2. Asegúrese de que el aparato esté limpio
y seco.
3. Coloque el aparato en un lugar limpio
y seco. El aparato puede colocarse en
posición vertical para su conveniencia al
almacenar.
Almacenamiento
Este producto no contiene piezas reparables por el consumidor. Para servicio,
por favor consulte con personal calicado.
HRW6107Series_29332_SE_IB_A.indd 12HRW6107Series_29332_SE_IB_A.indd 12 4/3/23 10:02 AM4/3/23 10:02 AM

12
13
Resolución de fallas
PROBLEMA POSIBLE CAUSA SOLUCIÓN
Su aparato no funciona
correctamente.
Puede que el apara-
to no pueda extraer
suciente potencia del
tomacorriente.
Trate de cambiar el
cable de alimentación a
otro tomacorriente que
no tenga enchufado
ningún otro electro-
doméstico.
No se puede cerrar la
palanca de cierre del
aparato.
Verique que no haya
ninguna obstrucción
o impedimento para
cerrarlo. También
asegúrese de que
no haya demasiada
cantidad de alimentos
o mezcla de masa en el
aparato.
Los rellenos no se han
cocinado o calentado
completamente.
Asegúrese de que los
rellenos estén precoci-
nados, si es necesario,
y calentados antes de
añadirlos al aparato.
HRW6107Series_29332_SE_IB_A.indd 13HRW6107Series_29332_SE_IB_A.indd 13 4/3/23 10:02 AM4/3/23 10:02 AM

14
15
Preguntas frecuentes
¿Necesita tiempo el aparato para calentarse?
Sí. El aparato se precalentará automáticamente cuando se enchufa a un tomacorriente. La
luz indicadora verde se ilumina cuando termina el ciclo de precalentamiento y está listo
para cocinar.
¿Cuánto se calienta este aparato?
La escala de temperatura es de 150° C–190° C (302° F–374° F).
¿Cómo sabré cuando ha terminado el ciclo de cocción?
Revise sus alimentos después de 5 a 7 minutos.
¿Cuánta cantidad de mezcla de masa para wafes necesito?
El aparato puede acomodar aproximadamente 1 ½ tazas de mezcla para un wafe sin
relleno. Wafes con rellenos utilizan menos cantidad de mezcla. La mezcla solo debe llenar
cerca de 3 cuartos de la capacidad del nivel más alto dentro del aparato. Espere que la
mezcla se expanda durante el proceso de cocción.
¿Puedo preparar wafes sin relleno?
Sí. Necesitará aproximadamente 1 ½ tazas para el aparato. Las cantidades de mezcla
podrían variar dependiendo de su receta y la mezcla utilizada. Los wafes rellenos utilizarán
menos cantidad de mezcla. Nunca llene el interior del aparato más de los 3 cuartos de
capacidad. Consulte la guía de recetas para ejemplos de cantidades de mezcla utilizadas
con los diferentes rellenos.
¿Por qué goteó la mezcla fuera de los costados durante el ciclo de cocción?
Se añadió demasiada cantidad de mezcla.
¿Por qué hay espacios en mi wafe o por qué no está cubierto mi relleno?
No se añadió la suciente cantidad de mezcla antes o después de añadir el relleno.
¿Por qué mi wafe no está crujiente?
Puede dejar su wae en el aparato por más tiempo para cocinarlo más,
haciéndolo más crujiente.
¿Puedo utilizar mezcla de masa sin gluten o keto en este aparato?
Sí. Puede utilizar la harina sin gluten para preparar mezclas de masas en este aparato.
Siga las instrucciones de su receta.
¿Puedo utilizar puré de frutas tal como salsa de manzana en lugar de aceite en las
recetas para masas?
Sí, los waes pueden prepararse con éxito utilizando puré de frutas como sustituto al aceite.
Cuando levanto el wafe cocinado, éste se separa y solo la mitad de la parte superior
del wafe se desprende. ¿Qué estoy haciendo mal?
El wafe puede contener exceso de relleno, el relleno puede no estar colocado en el
centro, el wafe no se ha cocinado el tiempo suciente o no se ha utilizado la suciente
cantidad de mezcla. Asegúrese de que el relleno esté colocado en el centro de manera
que los bordes del wafe se sellen al cocinar. Cocine el wafe de 30 segundos a 1 minuto
más para permitir que el wafe se cocine completamente.
¿Cómo detengo el funcionamiento/enfrío el aparato?
Debe desenchufar el aparato para detener el proceso de calentamiento y esperar a que se
enfríe un mínimo de 30 minutos.
¿Qué sucede si el aparato aún no funciona después de haber probado con todas las
sugerencias de resolución de problemas?
Nunca intente reparar el aparato en la casa. Comuníquese con servicio al cliente y sigua las
instrucciones del manual. El ignorar este procedimiento podría anular su garantía.
HRW6107Series_29332_SE_IB_A.indd 14HRW6107Series_29332_SE_IB_A.indd 14 4/3/23 10:02 AM4/3/23 10:02 AM

14
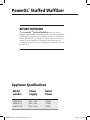
15
PowerXL™ Stuffed Wafizer
Model
number
Power
Supply Rated
Power
HRW6107-LA
HRW6107-CL
HRW6107-AR
120V~ 60Hz
220V~ 60Hz
220V~ 60Hz
1000W
1000W
1000W
BEFORE YOU BEGIN
The PowerXL
™
Stuffed Wafizer lets you cook
Belgian-style wafes stuffed with all your favorite foods
and llings for endless possibilities of custom meals and
treats. But before you begin, it’s very important that you
read this entire manual, making certain that you are
completely familiar with this appliance’s operation and
precautions.
Appliance Specications
HRW6107Series_29332_SE_IB_A.indd 15HRW6107Series_29332_SE_IB_A.indd 15 4/3/23 10:02 AM4/3/23 10:02 AM

16
17
Table of Contents
IMPORTANT SAFEGUARDS 17
Parts & Accessories 20
Instructions for Use 21
Cooking Guidelines & Tips 24
Care and Cleaning 25
Troubleshooting 26
Frequently Asked Questions 27
HRW6107Series_29332_SE_IB_A.indd 16HRW6107Series_29332_SE_IB_A.indd 16 4/3/23 10:02 AM4/3/23 10:02 AM

16
17
• Read all instructions before using the appliance.
• Do not touch hot surfaces. Use handles or knobs.
• To protect against electric shock do not immerse
cord or plugs in water or other liquid.
• This appliance has a two-prong plug. This plug
is intended to fit into a polarized outlet only one
way. DO NOT ATTEMPT to modify the plug in any
way.
• Use this appliance only for its intended use as
described in the manual.
• Do not operate any appliance with a damaged
cord or plug or after the appliance malfunctions,
or has been damaged in any manner. Return
appliance to the nearest authorized service
facility for examination, repair or adjustment.
• The use of accessory attachments not
recommended by the appliance manufacturer
may cause injuries.
• Do not use corrosive chemicals on this appliance.
• This appliance is not intended for use by persons
(including children) with reduced or impaired
physical, sensory or mental capabilities, or
lack of experience and knowledge, unless
such persons have been given supervision
or instruction in operating the appliance by a
person responsible for your safety.
• Children should be supervised to ensure that
they do not play with the appliance.
• Do not place on or near a hot gas or electric
burner, or in a heated oven.
• Extreme caution must be used when moving an
appliance containing hot oil or other hot liquids
• Do not operate this appliance if it has a damaged
cord or plug, if it is not working properly, or if it
has been damaged or dropped.
• NEVER use with an extension cord. A short
power supply cord is provided to reduce the risk
from becoming entangled in or tripping over a
longer cord.
• Unplug the appliance when not in use
• Keep the power cord away from water and
heatedsurfaces.
• Do not let the power cord hang over the edge of
a table or counter.
• TO AVOID ELECTRICAL SHOCK, DO NOT put
liquid of any kind into the Main Unit Housing
containing the electrical components.
• Keep the appliance and its Power Cable OUT
OF THE REACH of children when the appliance is
in operation or during the cooling process.
• Always ensure that the latch is fully engaged
because steam can build up and batter will rise.
• WEAR OVEN MITTS when handling hot
components or touching hot surfaces.
• Should the appliance emit black smoke,
UNPLUG IMMEDIATELY and wait for smoking to
stop before handling the appliance.
• This appliance should be serviced only by
qualified service technicians. Contact Customer
Service using the information located on the
back of this manual.
• While cooking, the internal temperature
reachesseveral hundred degrees Fahrenheit.
NEVER place hands inside the appliance unless
itis thoroughly cooled.
• When cooking, do not place the appliance
against a wall or near other appliances.
Do not place anything on top of the appliance.
• Do not store or use this appliance outdoors.
• Do not place or use this appliance near water,
such as near or above a kitchen sink or similar
locations. Never submerge this appliance in
water.
• Do not place your appliance on a cooktop,
even if the cooktop is cool, because you could
accidentally turn the cooktop on, causing a fire,
damaging the appliance, your cooktop, and your
home.
Please Read and Save this Use and Care Book.
IMPORTANT SAFEGUARDS.
When using electrical appliances, basic safety precautions
should always be followed, including the following:
HRW6107Series_29332_SE_IB_A.indd 17HRW6107Series_29332_SE_IB_A.indd 17 4/3/23 10:02 AM4/3/23 10:02 AM

18
19
• Do not operate this appliance on or near
combustible materials, such as tablecloths
orcurtains.
• Before using your new appliance on any
countertop surface, check with your countertop
manufacturer or installer for recommendations
about using appliances on your surfaces. Some
manufacturers and installers may recommend
protecting your surface by placing a hot pad or
trivet under the appliance for heat protection.
Your manufacturer or installer may recommend
that hot pans, pots, or electrical appliances
should not be used directly on top of the
countertop. If you are unsure, place a trivet or hot
pad under the appliance before using it.
• Do not place anything inedible inside the
appliance or place the appliance in any container
or small, confined space while the appliance is
heated or in operation.
• Always operate the appliance on a horizontal
surface that is level, stable, and noncombustible.
• Do not leave this appliance unattended while in
operation.
• Do not use raw food as filling: pre-cook fillings if
necessary. Raw fillings, such as meats, chicken,
and eggs, will not be cooked completely in this
appliance. Raw fillings should be cooked before
using them as a filling in this appliance. See the
recipe guide for detailed instructions.
• Do not overfill the appliance with batter or
dough. Batters and doughs will expand during
the cooking process.
• Do not attempt to force the appliance closed. If
there is too much batter or filling inside, remove
as needed.
• Do not attempt to dislodge food or unlatch or
open the appliance while in operation.
• Do not use sharp utensils (knives or forks)
to extract food from the appliance. These
implementscan damage the appliance’s
protective nonstick coating.
• Always unplug the appliance after use and
then allow the appliance to cool for at least
30minutes before handling, cleaning,
orstoring.
• Clean the appliance after every use.
• When cleaning the appliance’s interior, use only
mild, nonabrasive soaps or detergents applied
with a sponge or soft cloth.
• This appliance is not intended for operation with
any external timers or remote-control systems.
• This appliance is for home use only. If the
appliance is used improperly or for professional
or semi-professional purposes or if it is not used
according to the instructions in the user manual,
the guarantee becomes invalid and Empower
Brands, LLC will not be held liable for damages.
SAVE THESE INSTRUCTIONS.
This product is for household use only.
HRW6107Series_29332_SE_IB_A.indd 18HRW6107Series_29332_SE_IB_A.indd 18 4/3/23 10:02 AM4/3/23 10:02 AM

18
19
POLARIZED PLUG (120V models only)
This appliance has a polarized plug (one blade is wider than the other). To reduce the
risk of electric shock, this plug is intended to t into a polarized outlet only one way. If
the plug does not t fully into the outlet, reverse the plug. If it still does not t, contact
a qualied electrician. Do not attempt to modify the plug in any way.
TAMPER-RESISTANT SCREW
`
Warning: This appliance is equipped with a tamper-resistant screw to prevent
removal of the outer cover. To reduce the risk of re or electric shock, do not attempt
to remove the outer cover. There are no user-serviceable parts inside. Repair should
be done only by authorized service personnel.
ELECTRICAL CORD
1. A short power-supply cord is provided to reduce the risk resulting from becoming
entangled in or tripping over a longer cord.
2. Extension cords may be used if care is exercised in their use.
3. If a long detachable extension cord is used:
a) The marked electrical rating of the power cord or extension cord should
be at least as great as the electrical rating of the appliance.
b) If the appliance is of the grounded type, the extension cord should be a
grounding-type 3-wire cord.
c) The cord should be arranged so that it will not drape over the countertop
or tabletop where it can be pulled on by children or tripped over.
Note: This appliance has important markings on the plug blade. The attachment plug
or entire cord set (if plug is molded onto cord) is not suitable for replacement.
If damaged, the appliance shall be replaced.
For Mexico market only: If the line cord and plug is damaged it must be replaced
by the warranty department listed in the manual.
SAFETY FEATURES
HRW6107Series_29332_SE_IB_A.indd 19HRW6107Series_29332_SE_IB_A.indd 19 4/3/23 10:02 AM4/3/23 10:02 AM

20
21
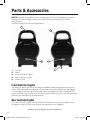
Parts & Accessories
1. Handle
2. Latch
3. Front Indicator Lights
4. Rear Indicator Lights
5. Power Cord
Product may vary slightly from what is illustrated.
NOTE: Unpack all contents from the packaging. Check all packaging material
carefully for parts. Please remove any clear or blue protective lm on the
components.
*Optional items may be sold separately.
Front Indicator Lights
The red Indicator Light will illuminate immediately after plugging the appliance
into a 120V dedicated outlet and will stay lit as long as the appliance is plugged
in. The green Indicator Light illuminates when the appliance has preheated. The
green Indicator Light cycles on and off during the cooking cycle, indicating that the
appliance is maintaining its temperature.
Rear Indicator Lights
The rear Indicator Lights are red and will illuminate as soon as the appliance is
plugged in and will stay lit as long as the appliance is plugged in.
4
3
1
2
7
HRW6107Series_29332_SE_IB_A.indd 20HRW6107Series_29332_SE_IB_A.indd 20 4/3/23 10:02 AM4/3/23 10:02 AM

20
21
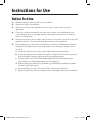
Instructions for Use
Before First Use
1. Read all material, warning stickers, and labels.
2. Remove all packing materials.
3. Wipe the outside of the appliance with a warm, moist cloth and mild
detergent.
4. Clean the inside of the appliance with warm water, a mild detergent, and
a nonabrasive cloth or sponge. Never submerge the appliance in water or
wash in a dishwasher.
5. Rinse the appliance with a clean, damp cloth. Use a clean, dry cloth to dry the
appliance interior. Do not leave standing water in the appliance.
6. Let the appliance run for a few minutes to burn off the manufacturer’s protective
coating of oil (a slight odor or smoking might occur during this process; this is
normal):
a. Locate the appliance on a dry, level, stable, heat-resistant surface.
b. Ensure the appliance is closed, latched, and rotated onto its side so that the
dual red/green Indicator Lights are facing straight upward.
c. Plug the power cord into a 120V dedicated outlet. The red Indicator Light
should light up to indicate the appliance is preheating.
d. Wait for the appliance to nish preheating, indicated by the adjacent green
Indicator Light lighting up.
e. Let the appliance run for 3 minutes. Then, unplug the appliance.
f. Wipe the appliance off with a damp cloth or sponge to remove any residue.
HRW6107Series_29332_SE_IB_A.indd 21HRW6107Series_29332_SE_IB_A.indd 21 4/3/23 10:02 AM4/3/23 10:02 AM

22
23
Using the Appliance
Instructions for Use
1. Place the appliance on a dry, level,
stable, heat-resistant surface.
2. Ensure the appliance is closed,
latched, and rotated onto its side
so that the dual red/green Indicator
Lights are facing straight upward.
3. Plug the power cord into a 120V
dedicated outlet. The red Indicator
Light will light up to indicate the
appliance is preheating.
4. Wait for the appliance to nish
preheating, indicated by the
adjacent green Indicator Light
lighting up.
5. Unlatch and open the appliance,
being careful not to touch the
interior. Add the rst layer of batter,
which should be as little as needed
to cover the wafe prongs on the
bottom of the appliance (Fig. i).
After sitting for a few seconds, the
batter will begin to rise a little.
6. Center the lling over the rst layer
of batter (Fig. ii) and cover with the
remaining batter, lling up to about
three quarters of the way to the top
(Fig. iii). DO NOT ll all the way to
the top; this is overlling and will
cause leaking during the cooking
process.
Fig. i
Fig. ii
Fig. iii
HRW6107Series_29332_SE_IB_A.indd 22HRW6107Series_29332_SE_IB_A.indd 22 4/3/23 10:02 AM4/3/23 10:02 AM

22
23
Instructions for Use
7. Close and latch the appliance. Then,
use the handle to ip the appliance
over (Fig.iv). After 5–7minutes,
the appliance can be opened to
check on the status of the food. The
appliance can be closed again to
continue the cooking process for
more well-done food. DO NOT try
to open the appliance during the
cooking process. Steam can build
up while the batter is cooking.
8. When the food is done cooking,
it can be removed from the
appliance. Wear oven gloves/mitts
before handling to protect against
escaping steam. Unlatch and open
the appliance. Then, use plastic/
wooden/rubber utensils to carefully
lift the wafe onto a plate. Do not
use sharp metal utensils that may
scratch the nonstick coating in the
appliance (Fig. v).
9. Unplug the appliance and let it cool
before cleaning the appliance (see
the “Care & Cleaning” section).
This appliance has a nonstick coating.
DO NOT use nonstick sprays with this
appliance. A small amount of vegetable
oil can be applied before pouring the
batter to help remove the cooked wafe.
It is normal for steam to escape and
condensation to build up on the sides of
the appliance during operation.
Fig. iv
Fig. v
HRW6107Series_29332_SE_IB_A.indd 23HRW6107Series_29332_SE_IB_A.indd 23 4/3/23 10:02 AM4/3/23 10:02 AM

24
25
Cooking Guidelines & Tips
Tips
• Wearing oven mitts/gloves can
protect against accidental contact
with the heated surfaces and
escaping steam when unlatching
the appliance.
• Fillings such as meats, chicken,
and eggs should be cooked and
frozen foods should be thawed
before using them to make
waffles. The cooking time is not
long enough and the cooking
temperature is not hot enough to
adequately cook uncooked food
or heat frozen food used for filling.
• The first layer of batter added
should be as little as needed to
cover the waffle prongs on the
bottom of the appliance. After
sitting for a few seconds, the
batter will begin to rise a little.
Then, add your filling (centered
in the middle of the batter). The
filling should not be placed near
the edges of the batter. After the
filling is added, cover it with the
remaining batter, close the lid, and
flip the appliance.
• If using canned fruits that are in
syrup or vegetables that are in
liquid (not pie filling), drain as
much liquid as possible before
using as a filling.
• If your filling is a more solid food,
like diced ham, scrambled eggs,
or nuts, you can add your filling
and press it down into the batter
with the back of a spoon. Be sure
to cover the filling with the second
layer of batter.
• The appliance can hold
approximately 1½ cups of batter
for an unstuffed waffle. Stuffed
waffles use less batter. The batter
should only fill to about three
quarters of the way to the top of
the inside of the appliance. Expect
the batter to expand during the
cooking process.
• For maximum food safety, the
U.S. Department of Agriculture
recommends 165° F/74° C for
all poultry; 160° F/71° C for
ground beef, lamb, and pork;
and 145°F/63° C, with a 3-minute
resting period, for all other types
of beef, lamb, and pork. Also
review the USDA Food Safety
Standards.
• To prevent scratching the coating,
use only nonmetallic utensils. Do
not lift or cut food in the appliance
using sharp utensils, such as forks
and knives, which can scratch the
cooking surface.
• Do not use steel wool or other
metal pads. They could leave
coarse scratches. Always rinse
thoroughly and dry immediately
with a soft towel.
• Never stand the appliance up
vertically while cooking. Only
stand up the appliance for
storage.
HRW6107Series_29332_SE_IB_A.indd 24HRW6107Series_29332_SE_IB_A.indd 24 4/3/23 10:02 AM4/3/23 10:02 AM

24
25
Cleaning
1. Clean the appliance after each
use. Unplug the power cord from
the outlet and be certain the
appliance is thoroughly cooled
before cleaning. DO NOT soak
or submerge the appliance in
water or wash in a dishwasher.
2. Wipe the outside of the
appliance with a warm, moist
cloth and mild detergent.
3. Clean the inside of the appliance
with warm water, a mild
detergent, and a nonabrasive
cloth or sponge.
4. Rinse the appliance with a
clean, damp cloth. Use a clean,
dry cloth to dry the appliance
interior. Do not leave standing
water in the appliance.
1. Unplug the appliance and let it cool
thoroughly.
2. Make sure the appliance is clean and dry.
3. Place the appliance in a clean, dry place.
The appliance may stand vertically for
convenient storage.
Storage
Care and Cleaning
This product contains no user serviceable parts. Refer service to qualied service
personnel.
HRW6107Series_29332_SE_IB_A.indd 25HRW6107Series_29332_SE_IB_A.indd 25 4/3/23 10:02 AM4/3/23 10:02 AM

26
27
Troubleshooting
PROBLEM POSSIBLE CAUSE SOLUTION
Your appliance is not
working correctly.
The appliance may not
be able to draw enough
operating power from
the outlet.
Try switching the power
cord to an outlet that
has no other appliances
attached to it.
The appliance cannot be
latched shut.
Make sure there is
nothing blocking or
impeding the closure
in anyway. Additionally,
make sure there is not
too much food or batter
in the appliance.
The fillings have not
been cooked or heated
completely.
Ensure that llings are
precooked if necessary
and heated before
adding them to the
appliance.
HRW6107Series_29332_SE_IB_A.indd 26HRW6107Series_29332_SE_IB_A.indd 26 4/3/23 10:02 AM4/3/23 10:02 AM

26
27
Frequently Asked Questions
Does the appliance need time to heat up?
Yes. The appliance will preheat automatically when plugged into an electrical outlet. The
green Indicator Light illuminates when preheating is nished and cooking can begin.
How hot does this appliance get?
The temperature range is 302° F–374° F (150° C–190° C).
How will I know when cooking is complete?
Check your food after 5–7 minutes.
How much wafe batter do I need?
The appliance can hold approximately 1 ½ cups of batter for an unstuffed wafe. Stuffed
wafes use less batter. The batter should only ll to about three quarters of the way to
the top of the inside of the appliance. Expect the batter to expand during the cooking
process.
Can I make a wafe with no lling?
Yes. You will need approximately 1 ½ cups of batter for the appliance. Quantities of batter
may vary depending on your recipe and the batter used. Stuffed wafes will use less batter.
Never ll the interior of the appliance above three-quarters capacity. Refer to the recipe
guide for examples of the amounts of batter used with different llings.
Why did batter leak out of the sides during the cooking cycle?
Too much batter was added.
Why are there gaps in my wafe or why is my lling not covered?
Not enough batter was added before or after adding the lling.
Why is the wafe not crispy?
You can leave your wafe in the appliance longer to cook it more, making it crispier.
Can I use gluten-free or keto wafe batter in this appliance?
Yes. Gluten-free our can be used to make batters to use in the appliance. Follow your
recipe.
Can I use puréed fruit like applesauce in place of oil in the batter recipes?
Yes, wafes can be made successfully using puréed fruit as a substitute for oil.
When I lift the baked wafe, the wafe separates and only the top half of the wafe
comes out. What I am doing wrong?
The wafe may have too much lling, the lling might not be centered, the wafe has
not been baked long enough, or not enough batter has been used. Make sure the lling
is centered so that the edges of the wafe can seal when it cooks. Bake the wafe for
another 30 seconds to 1 minute to allow the wafe to cook through.
How do I stop operation/cool the appliance?
You must unplug the appliance to stop the heating process and allow at least 30 minutes
to cool.
What happens if the appliance still does not work after I have tried all the
troubleshooting suggestions?
Never attempt home repair. Contact Customer Service and follow the procedures set
forth by the manual. Failure to do so could render your guarantee null and void.
HRW6107Series_29332_SE_IB_A.indd 27HRW6107Series_29332_SE_IB_A.indd 27 4/3/23 10:02 AM4/3/23 10:02 AM

® Marca registrada y TM marca comercial por Empower Brands, LLC.
® Registered Trademark and TM Trademark of Empower Brands, LLC
© 2023 Empower Brands, LLC. All rights reserved / Todos los derechos reservados.
Empower Brands, LLC, Middleton, WI 53562
4/23 29332
Made in China.
Fabricado en China.
Sello del Distribuidor:
Fecha de compra:
Modelo:
WAFFLERA PARA
WAFFLES RELLENOS
STUFFED WAFFLIZER
T22-9003214-A
S/E
HRW6107Series_29332_SE_IB_A.indd 28HRW6107Series_29332_SE_IB_A.indd 28 4/3/23 10:02 AM4/3/23 10:02 AM
-
 1
1
-
 2
2
-
 3
3
-
 4
4
-
 5
5
-
 6
6
-
 7
7
-
 8
8
-
 9
9
-
 10
10
-
 11
11
-
 12
12
-
 13
13
-
 14
14
-
 15
15
-
 16
16
-
 17
17
-
 18
18
-
 19
19
-
 20
20
-
 21
21
-
 22
22
-
 23
23
-
 24
24
-
 25
25
-
 26
26
-
 27
27
-
 28
28


Weitech HRW6107-LA HRW6107-CL Guía del usuario
- Categoría
- Pequeños electrodomésticos de cocina
- Tipo
- Guía del usuario
- Este manual también es adecuado para
en otros idiomas
Otros documentos
-
BLACK+DECKER WM2200SD Guía del usuario
-
Black & Decker WM2200SD El manual del propietario
-
Hamilton Beach 26046 Manual de usuario
-
GE 106582 Manual de usuario
-
Oster 3877 Manual de usuario
-
Sunbeam 3856-1 Manual de usuario
-
Krups GQ502D51 Manual de usuario
-
Proctor Silex 26090 Guía del usuario
-
 Continental Electric CP43569 Manual de usuario
