AEG 8000-SERIEN TSC8M181DS KOMBISKAP Manual de usuario
- Tipo
- Manual de usuario

TSC8M181DS
SQ Udhëzimet për përdorim | Frigorifer me Ngrirje 2
EN User Manual | Fridge Freezer 29
FR Notice d'utilisation | Réfrigérateur/congélateur 55
DE Benutzerinformation | Kühl - Gefrierschrank 83
IS Notendaleiðbeiningar | Ískápur-Frystir 112
MK Упатство за ракување | Фрижидер со замрзнувач 137
ES Manual de instrucciones | Frigorífico-congelador 166

PËR REZULTATE PERFEKTE
Faleminderit që keni zgjedhur këtë produkt AEG. Ne e kemi krijuar atë për t'ju ofruar
performancë të përsosur për shumë vite, me teknologji novatore që ndihmojnë në
thjeshtimin e jetës - veçori që mund të mos i gjeni në pajisjet e zakonshme. Kushtojini
pak minuta leximit për ta shfrytëzuar sa më mirë.
Vizitoni faqen tonë të internetit për:
Të marrë këshilla mbi përdorimin, broshura, informacion rreth zgjidhjes së
problemeve, shërbimit dhe riparimit
www.aeg.com/support
Regjistrojeni produktin për shërbim më të mirë:
www.registeraeg.com
Blini aksesorë, pjesë konsumi dhe pjesë origjinale këmbimi për pajisjen:
www.aeg.com/shop
KUJDESI DHE SHËRBIMI NDAJ KLIENTIT
Përdorni gjithmonë pjesë këmbimi origjinale.
Kur kontaktoni Qendrën tonë të Autorizuar të Shërbimit, sigurohuni që të keni në
dispozicion të dhënat e mëposhtme: Modeli, PNC, numri serial.
Ky Informacioni mund të gjendet në pllakën e klasifikimit.
Paralajmërim / Të dhëna rreth sigurisë dhe kujdesit
Të dhëna të përgjithshme dhe këshilla
Të dhëna rreth ambientit
Rezervohet mundësia e ndryshimeve.
PËRMBAJTJA
1. INFORMACIONI I SIGURISË..........................................................................2
2. UDHËZIMET PËR SIGURINË.........................................................................5
3. INSTALIMI.......................................................................................................7
4. PANELI I KONTROLLIT.................................................................................. 9
5. PËRDORIMI I PËRDITSHËM....................................................................... 13
6. NDIHMË DHE KËSHILLA............................................................................. 18
7. KUJDESI DHE PASTRIMI.............................................................................21
8. ZGJIDHJA E PROBLEMEVE........................................................................ 23
9. ZHURMA....................................................................................................... 27
10. TË DHËNAT TEKNIKE................................................................................27
11. INFORMACION PËR INSTITUTET E TESTIMIT........................................27
12. ÇËSHTJE QË LIDHEN ME AMBIENTIN.....................................................28
1. INFORMACIONI I SIGURISË
Përpara instalimit dhe përdorimit të pajisjes, lexoni me kujdes
udhëzimet e ofruara. Prodhuesi nuk është përgjegjës për
lëndimet apo dëmet si rezultat i instalimit apo përdorimit të
2 SHQIP

papërshtatshëm. Gjithmonë mbajini udhëzimet në një vend të
sigurt dhe ku mund të arrihen lehtë për t'iu referuar në të
ardhmen.
1.1 Siguria e fëmijëve dhe personave vulnerabël
• Kjo pajisje mund të përdoret nga fëmijë të moshës 8 vjeç e
sipër dhe persona me aftësi të kufizuara fizike, ndijimesh
ose mendore ose që nuk kanë eksperiencë dhe njohuri,
nëse këta mbahen nën mbikëqyrje ose udhëzohen për
përdorimin e sigurt të pajisjes dhe i kuptojnë rreziqet e
përdorimit.
• Fëmijët e moshës nga 3 deri 8 vjeç lejohen që të mbushin
dhe zbrazin pajisjen me kusht që të kenë marrë udhëzimet
e duhura.
• Kjo pajisje mund të përdoret nga personat me aftësi të
kufizuara shumë të theksuara dhe komplekse, me kusht që
të mbahen nën monitorim të vazhdueshëm.
• Fëmijët më të vegjël se 3 vjeç duhet të mbahen larg nga
pajisja, përveçse kur mbikëqyren në mënyrë të
vazhdueshme.
• Fëmijët duhet të mbikëqyren për tu siguruar që ata të mos
luajnë me pajisjen dhe.
• Fëmijët nuk duhet të kryejnë pastrimin dhe mirëmbajtjen e
pajisjes pa mbikëqyrje.
• Mbajeni të gjithë paketimin larg nga fëmijët dhe hidheni atë
siç kërkohet.
1.2 Siguria e përgjithshme
• Kjo paisje përdoret vetëm për ruajtjen e ushqimeve dhe
pijeve.
• Kjo paisje është krijuar për përdorim shtëpiak në ambient të
brendshëm.
• Kjo paisje mund të përdoret në: zyra, dhoma hoteli, dhoma
bujtine, dhoma hoteli rural, si dhe në vende të ngjashme ku
përdorimi nuk tejkalon (mesatarisht) nivelet e përdorimit
shtëpiak.
SHQIP 3

• Për të shmangur kontaminimin e ushqimit, respektoni
udhëzimet e mëposhtme:
– mos e hapni derën për periudha të gjata;
– pastroni rregullisht sipërfaqet që mund të bien në kontakt
me ushqimin dhe sistemet e aksesueshme të shkarkimit;
– ruajeni mishin e pagatuar dhe peshkun në enë të
përshtatshme në frigorifer, që të mos bien në kontakt me
ushqimet e tjera ose të mos pikojnë mbi ushqimet e tjera.
• PARALAJMËRIM: Mbajini pa pangesa vrimat e ajrimit në
kasën e pajisjes ose në strukturën inkaso.
• PARALAJMËRIM: Mos përdorni pajisje mekanike apo mjete
të tjera për të përshpejtuar procesin e shkrirjes, përveç
atyre të rekomanduara nga prodhuesi.
• PARALAJMËRIM: Mos e dëmtoni qarkun e ftohësit.
• PARALAJMËRIM: Mos përdorni pajisje elektrike brenda
ndarëseve të ruajtjes së ushqimeve të pajisjes, përveç nëse
janë lloji i rekomanduar nga prodhuesi.
• Mos përdorni spërkatësin e ujit dhe avullin për të pastruar
pajisjen.
• Pastrojeni pajisjen me copë të butë e të njomë. Përdorni
vetëm detergjentë neutralë. Mos përdorni produkte
gërryese, materiale të ashpra pastruese, tretës ose objekte
metalike.
• Kur pajisja lihet bosh për periudha të gjata kohe, fikeni,
shkrijeni, pastrojeni, thajeni dhe lëreni derën të hapur për të
mos lejuar zhvillimin e mykut brenda pajisjes.
• Mos mbani substanca shpërthyese si kanaçe aerosoli me
lëndë djegëse të ndezshme në këtë pajisje.
• Për të shmangur rreziqet, nëse kordoni elektrik është e
dëmtuar, duhet zëvendësuar nga prodhuesi, qendra e
autorizuar e shërbimit ose persona me kualifikim të
ngjashëm.
4 SHQIP

2. UDHËZIMET PËR SIGURINË
2.1 Instalimi
PARALAJMËRIM!
Vetëm një person i kualifikuar duhet ta
instalojë këtë pajisje.
• Hiqni të gjithë paketimin.
• Mos instaloni ose mos përdorni një pajisje
të dëmtuar.
• Mos e përdorni pajisjen përpara se ta
instaloni në strukturën inkaso për arsye
sigurie.
• Ndiqni udhëzimet e instalimit të dhëna me
pajisjen.
• Gjithmonë bëni kujdes kur e lëvizni
pajisjen sepse është e rëndë. Përdorni
gjithnjë doreza sigurie dhe këpucë të
mbyllura.
• Sigurohuni që ajri të mund të qarkullojë
rreth pajisjes.
• Pas instalimit të parë ose pas ndryshimit
të krahut të derës, prisni të paktën 4 orë
përpara se të lidhni pajisjen me energjinë
elektrike. Kjo bëhet për të lejuar që vaji të
rrjedhë përsëri në kompresor.
• Përpara se të kryeni çdo lloj veprimi (p.sh.
ndryshimit të krahut të derës), hiqni spinën
nga priza.
• Mos e instaloni pajisjen pranë radiatorëve
apo sobave, furrave apo pianurave,
përveç kur specifikohet ndryshe në
udhëzimet e instalimit.
• Mos e ekspozoni pajisjen ndaj shiut.
• Mos e instaloni pajisjen atje ku ka dritë të
drejtpërdrejtë dielli.
• Mos e instaloni këtë pajisje në zona që
kanë shumë lagështirë ose që janë shumë
të ftohta.
• Kur e lëvizni pajisjen, ngrijeni nga buza e
përparme për të shmangur gërvishtjen e
dyshemesë.
• Pajisja përmban një qese me absorbues
lagështire. Ajo nuk është lodër. Nuk është
ushqim. Hidheni atë menjëherë.
2.2 Lidhja elektrike
PARALAJMËRIM!
Rrezik zjarri dhe goditjeje elektrike.
PARALAJMËRIM!
Kur poziciononi pajisjen, sigurohuni që
kordoni i energjisë të mos ngecë ose
dëmtohet.
PARALAJMËRIM!
Mos përdorni përshtatës me shumë spina
dhe kabllo zgjatuese.
• Pajisja duhet tokëzuar.
• Sigurohuni që parametrat në pllakën e
specifikimeve të përkojnë me vlerat
elektrike të rrjetit elektrik.
• Përdorni gjithmonë një prizë të tokëzuar të
instaluar si duhet.
• Sigurohuni që të mos dëmtoni pjesët
elektrike (p.sh. spinën e rrjetit, kabllon e
rrjetit, kompresorin). Kontaktoni qendrën e
autorizuar të shërbimit ose një elektricist
për të ndërruar pjesët elektrike.
• Kablloja e rrjetit duhet të qëndrojë nën
nivelin e spinës së rrjetit.
• Pajisjen futeni në prizë vetëm në fund të
instalimit. Sigurohuni që spina të jetë e
arritshme pas montimit të pajisjes.
• Mos e shkëputni pajisjen nga rrjeti duke e
tërhequr nga kablloja elektrike. Gjithmonë
tërhiqeni kabllon elektrike duke e kapur
nga spina.
2.3 Përdorimi
PARALAJMËRIM!
Rrezik lëndimi, djegiesh, goditjeje
elektrike ose zjarri.
Pajisja përmban gaz të ndezshëm,
izobutan (R600a), një gaz natyror me nivel të
lartë pajtueshmërie me mjedisin. Bëni kujdes
të mos shkaktoni dëmtime te qarku i agjentit
ftohës që përmban izobutan.
• Mos i ndryshoni specifikimet e pajisjes.
• Ndalohet rreptësisht çdo përdorim i
produktit inkaso më vete.
• Mos vendosni pajisje elektrike (p.sh.
prodhues të akulloreve) në pajisje përveç
SHQIP 5

nëse ato deklarohen të përdorshme nga
prodhuesi.
• Nëse ndodh dëmtim i qarkut të ftohësit,
sigurohuni që të mos ketë flakë dhe
burime të ndezjes në dhomë. Ventiloni
dhomën.
• Mos lejoni që objektet e nxehta të prekin
pjesët plastike të pajisjes.
• Mos vendosni pije jo-alkolike në ndarjen e
ngrirësit. Kjo do të krijojë presion mbi enën
e pijeve.
• Mos mbani gaz dhe lëng të ndezshëm në
pajisje.
• Mos vendosni produkte që marrin flakë
ose sende të lagura me produkte të
ndezshme brenda, pranë pajisjes ose mbi
të.
• Mos e prekni kompresorin ose
kondensatorin. Janë të nxehtë.
• Mos hiqni dhe mos prekni artikujt nga
ndarja e ngrirësit nëse i keni duart të
lagura ose të njoma.
• Mos e ngrini përsëri ushqimin që është
shkrirë.
• Respektoni udhëzimet e ruajtjes që
gjenden tek ambalazhimi i ushqimit të
ngrirë.
• Mbështillini ushqimet me material
mbështjellës përpara se t’i fusni në
ndarjen e ngrirjes.
2.4 Ndriçimi i brendshëm
PARALAJMËRIM!
Rrezik goditjeje elektrike.
• Ky produkt përmban një apo më shumë
burime drite të klasit të efikasitetit të
energjisë G.
• Në lidhje me llambat brenda produktit dhe
llambat e pjesëve të këmbimit të shitura
veçmas: Këto llamba janë prodhuar për
kushte ekstreme fizike në pajisjet
elektroshtëpiake, si p.sh. temperaturë,
dridhje, lagështirë, ose janë prodhuar për
të sinjalizuar informacion rreth statusit të
përdorimit të pajisjes. Ato nuk janë
prodhuar për t’u përdorur në aplikacione të
tjera dhe nuk janë të përshtatshme për
ndriçim në ambiente shtëpiake.
2.5 Kujdesi dhe pastrimi
PARALAJMËRIM!
Rrezik plagosjeje ose dëmtim i pajisjes.
• Përpara se të kryeni mirëmbajtjen e
pajisjes, çaktivizojeni atë dhe hiqeni nga
priza.
• Kjo pajisje përmban hidrokarbure në
njësinë ftohëse. Vetëm një person i
kualifikuar duhet ta kryejë mirëmbajtjen
dhe rimbushjen e njësisë.
• Kontrolloni rregullisht tubin e shkarkimit të
pajisjes dhe nëse është e nevojshme
pastrojeni. Nëse tubi i shkarkimit është i
bllokuar, uji i shkrirë do të mblidhet në
fundin e pajisjes.
2.6 Shërbimi
• Për të riparuar pajisjen kontaktoni me
qendrën e autorizuar të shërbimit.
Përdorni vetëm pjesë rezervë origjinale.
• Ju lutemi vini re se vetëriparimi ose
riparimi joprofesional mund të ketë pasoja
sigurie dhe mund të zhvlerësojë
garancinë.
• Pjesët e mëposhtme të këmbimit do të
jenë të disponueshme për 7 vjet pas
daljes nga qarkullimi të modelit:
termostatet, sensorët e temperaturës,
qarqet, burimet e dritës, dorezat e dyerve,
menteshat e dyerve, vasketat dhe koshat.
Ju lutemi vini re se disa nga këto pjesë
këmbimi janë të disponueshme vetëm për
riparuesit profesionistë, dhe se jo të gjitha
pjesët e këmbimit u përshtaten të gjitha
modeleve.
• Guarnicionet e dyerve do të jenë të
disponueshme për 10 vjet pas daljes nga
qarkullimi të modelit.
2.7 Hedhja e mbeturinave
PARALAJMËRIM!
Rrezik plagosjeje ose mbytjeje.
• Shkëputeni pajisjen nga rrjeti i furnizimit
elektrik.
• Prisni kabllon e lidhjes me rrjetin dhe
hidheni atë.
6 SHQIP

• Hiqni kapësen e derës për të parandaluar
bllokimin brenda pajisjes të fëmijëve dhe
të kafshëve shtëpiake.
• Qarku i ftohjes dhe materialet e izolimit të
kësaj pajisjeje nuk ndikojnë tek ozoni.
• Shkuma izoluese përmban gaz të
ndezshëm. Kontaktoni autoritetin e
bashkisë suaj për t'u informuar mbi
mënyrën e duhur të hedhjes së pajisjes.
• Mos i shkaktoni dëmtime pjesës së njësisë
së ftohjes që është afër shkëmbyesit të
nxehtësisë.
3. INSTALIMI
PARALAJMËRIM!
Referojuni kapitujve të sigurisë.
PARALAJMËRIM!
Referojuni dokumentit të udhëzimeve të
instalimit për të instaluar pajisjen tuaj.
PARALAJMËRIM!
Rregullojeni pajisjen në përputhje me
dokumentin e udhëzimeve të instalimit
për të shmangur rrezikun e
paqëndrueshëmrisë së pajisjes.
3.1 Përmasat
B
A
H1
W1
D1
W2
D2
W3
D3
90°
SHQIP 7

Përmasat e përgjithshme ¹
H1 mm 1772
W1 mm 546
D1 mm 549
¹ lartësia, gjerësia dhe thellësia e pajisjes pa
dorezën
Hapësira e kërkuar në përdorim ²
H2 (A+B) mm 1816
W2 mm 546
D2 mm 551
A mm 1780
B mm 36
² lartësia, gjerësia dhe thellësia e pajisjes
duke përfshirë dorezën, plus hapësirën e
nevojshme për qarkullimin e lirshëm të ajrit të
ftohjes
Hapësira e përgjithshme e kërkuar në
përdorim ³
H3 (A+B) mm 1816
W3 mm 546
D3 mm 1068
³ lartësia, gjerësia dhe thellësia e pajisjes
duke përfshirë dorezën, plus hapësirën e
nevojshme për qarkullimin e lirshëm të ajrit të
ftohjes, plus hapësirën e nevojshme për të
lejuar hapjen e derës në këndin minimal që
lejon heqjen e të gjitha pajisjeve të
brendshme
3.2 Vendndodhja
Për të siguruar funksionimin më të mirë të
pajisjes, nuk duhet ta instaloni pajisjen në një
vend me dritë direkte të diellit. Mos e instaloni
pajisjen pranë radiatorëve apo sobave,
furrave apo pianurave, përveç kur
specifikohet ndryshe në udhëzimet e
instalimit.
Sigurohuni që ajri të qarkullojë lirisht rreth e
qark pjesës së pasme të dollapit.
Kjo pajisje duhet të instalohet në ambient të
brendshëm në një vend të thatë dhe të
ajrosur mirë.
Kjo pajisje është prodhuar për t’u përdorur në
temperaturë ambienti që varion nga 10°C në
43°C.
Funksionimi i saktë i pajisjes mund të
garantohet vetëm brenda diapazonit të
specifikuar të temperaturës.
Nëse keni dyshime se ku mund ta
instaloni pajisjen, konsultohuni me
shitësin, shërbimin tonë të klientit apo me
qendrën më të afërt të servisit të
autorizuar.
Pajisja duhet të shkëputet lirisht nga
korrenti. Për këtë arsye spina duhet të
jetë lehtësisht e arritshme pas instalimit.
3.3 Lidhja elektrike
• Përpara se ta fusni në prizë, sigurohuni që
voltazhi dhe frekuenca e treguar në
pllakën e karakteristikave të jenë në
përputhje me linjën elektrike të shtëpisë.
• Pajisja duhet të lidhet me tokëzimin. Spina
e kabllove të linjës elektrike është e
pajisur me një kontakt për këtë qëllim.
Nëse priza e linjës elektrike e shtëpisë
s’është e tokëzuar, lidheni pajisjen me një
tokëzim të veçantë në përputhje me
rregulloret aktuale, duke u konsultuar me
një elektricist të kualifikuar.
• Prodhuesi nuk mban përgjegjësi nëse nuk
respektohen masat e mësipërme të
sigurisë.
3.4 Kërkesat për ventilim
Lëvizja e ajrit mbrapa pajisjes duhet të jetë e
mjaftueshme.
8 SHQIP

min. 200 cm2
min.
200 cm2
min.
38 mm
min.
38 mm
KUJDES!
Për instalimin, shikoni udhëzimet e
instalimit.
3.5 Ndryshimi i drejtimit të hapjes
së derës
Ju lutemi, referojuni dokumentit të veçantë
me udhëzime mbi instalimin dhe ndryshimin e
krahut të derës.
KUJDES!
Në çdo fazë të ndryshimit të krahut të
derës, mbroni dyshemenë nga gërvishtjet
me një material rezistent.
4. PANELI I KONTROLLIT
1 3 6
91112 10
4 52 7 8
1Treguesi ECOMETER
2Butoni/treguesi Extra Cool
3Treguesi i ndarjes së frigoriferit
4Treguesi i alarmit
5Treguesi i alarmit të derës hapur
6Treguesi i ndarjes së ngrirësit
7Butoni/treguesi Extra Freeze
8Butoni/treguesi i alarmit Filter Reset
9Butoni/treguesi i temperaturës së ngrirësit
10 Treguesi i ndryshimit të filtrit të ajrit
11 Butoni/treguesi i temperaturës së
frigoriferit
12 Butoni ECO
4.1 Ndezja
Lidheni spinën me prizën e rrymës.
Për të zgjedhur një temperaturë tjetër,
referojuni "Rregullimi i temperaturës".
Nëse shfaqet në ekran, referojuni
"Zgjidhja e problemeve".
4.2 Fikja
1. Shtypni dhe mbani butonin e
temperaturës së ngrirësit për 5 sekonda.
Ekrani tregon që pulson.
2. Pasi pajisja fiket, ekrani tregon .
3. Hiqeni pajisjen nga priza.
4.3 Rregullimi i temperaturës
Diapazoni i temperaturës mund të variojë
mes -15°C dhe -24°C për ngrirësin dhe mes
2°C dhe 8°C për frigoriferin.
Shtypni butonat e temperaturës për të
caktuar temperaturën e pajisjes.
SHQIP 9

Temperatura e rekomanduar për vendosje
është:
• +4°C për frigoriferin
• -18°C për ngrirësin
Mund ta caktoni manualisht temperaturën e
rekomanduar përmes butonave të
temperaturës ose duke aktivizuar ECO
funksioni. Për më shumë informacion,
referojuni "ECO funksioni"
Treguesit e temperaturës tregojnë
temperaturën e caktuar.
Temperatura e caktuar do të arrihet
brenda 24 orëve.
Pas ndërprerjes së energjisë pajisja
kthehet në temperaturën që kishte më
parë.
4.4 Fikja e frigoriferit
Është e mundur të fikni vetëm ndarjen e
frigoriferit duke lënë ndarjen e ngrirësit të
ndezur.
1. Shtypni dhe mbani butonin e
temperaturës së frigoriferit për 5 sekonda.
Ekrani tregon që pulson.
2. Pas fikjes së ndarjes së frigoriferit, ekrani
tregon .
4.5 Ndizni frigoriferin
Për të ndezur frigoriferin:
1. Shtypni dhe mbani butonin e
temperaturës së frigoriferit për 5 sekonda.
Ekrani tregon që pulson.
2. Ndarja e frigoriferit ndizet dhe rikthehet
temperatura që ishte caktuar më parë.
Për të rregulluar temperaturën, referojuni
"Rregullimi i temperaturës".
4.6 ECO funksioni
Funksioni ECO cakton temperaturën optimale
për të siguruar ruajtjen e ushqimit ndërsa
minimizohet konsumi i energjisë.
1. Për të aktivizuar funksionin, shtypni
butoninECO.
Temperatura e frigoriferit caktohet në +4°C
dhe temperatura e ngrirësit në -18°C.
2. Për të çaktivizuar funksionin, rishtypni
butonin ECO ose zgjidhni një temperaturë
tjetër (referojuni "Rregullimi i
temperaturës").
Pas çaktivizimit të funksionit ECO
temperatura e frigoriferit vendoset në +2°C
dhe temperatura e ngrirësit në -20°C.
Aktivizimi iECO çaktivizon funksionet
Extra Cool dheExtra Freeze.
Treguesi ECOMETER tregon konsumin
aktual të energjisë së pajisjes. Tri viza
tërësisht të ndriçuara tregojnë
konfigurimin me efikasitetin më të lartë të
energjisë.
4.7 Funksioni Extra Cool
Me funksionin Extra Cool mund të ftohni sasi
të mëdha ushqimi të ngrohtë, p.sh. pas
blerjeve ushqimore, pa ngrohur ushqimet që
ndodhen tashmë në ndarjen e frigoriferit.
Për të aktivizuar funksionin, shtypni butonin
Extra Cool.
Treguesi Extra Cool ndizet. Kur funksioni
Extra Cool është aktivizuar, ventilatori mund
të punojë automatikisht.
Ky funksion ndalon automatikisht pas rreth 6
orësh. Pasi funksioni fiket, treguesi Extra
Cool fiket gjithashtu.
Shtypni butonin Extra Cool për të çaktivizuar
funksionin Extra Cool përpara se të mbarojë
automatikisht.
Për të caktuar një temperaturë tjetër për
frigoriferin, çaktivizoni funksionin Extra
Cool dhe referojuni "Rregullimi i
temperaturës".
4.8 Funksioni Extra Freeze
Funksioni Extra Freeze përdoret për ngrirjen
paraprake dhe ngrirjen e shpejtë në
sekuencë në ndarjen e ngrirësit. Ky funksion
përshpejton ngrirjen e ushqimeve të freskëta
10 SHQIP

dhe në të njëjtën kohë mbron artikujt
ushqimorë tashmë në ruajtje nga ngrohja e
padëshirueshme.
Për të ngrirë ushqime të freskëta,
aktivizoni funksionin Extra Freeze të
paktën 24 orë përpara se ta vendosni
ushqimin për të përfunduar ngrirjen
paraprake.
Për të aktivizuar këtë funksion, shtypni
butonin Extra Freeze.
Ndizet treguesi Extra Freeze. Funksioni Extra
Freeze ndalon automatikisht pas një
maksimumi prej 52 orësh.
Shtypni butonin Extra Freeze për të
çaktivizuar funksionin Extra Freeze përpara
se të mbarojë automatikisht.
4.9 Alarmi i temperaturës së lartë
Kur ka rritje të temperaturës në ndarjen e
ngrirësit (p.sh. për shkak të një ndërprerjeje
të mëparshme të rrymës elektrike), pulson
treguesi i alarmit dhe treguesi i temperaturës
së ngrirësit tregon H° dhe pulson dhe bie
tingulli.
Për të çaktivizuar alarmin, shtypni çfarëdo
butoni.
Treguesi i alarmit dhe tingulli çaktivizohen.
Treguesi i temperaturës së ngrirësit tregon H°
për 5 sekonda përpara se të tregojë sërish
temperaturën e ngrirësit.
Alarmi rifillon një orë pas çaktivizimit
derisa rikthehen kushtet normale.
Nëse nuk shtypni asnjë buton, tingulli
çaktivizohet automatikisht pas rreth një
ore për të shmangur bezdisjen.
4.10 Alarmi i hapjes së derës
Nëse dera e frigoriferit apo e ngrirësit lihet
hapur për rreth 5 minuta ose nëse dera e
ngrirësit lihet hapur për rreth 80 sekonda, bie
tingulli dhe ndizet treguesi i alarmit të derës
hapur. Drita e brendshme e frigoriferit mund
të nisë gjithashtu të pulsojë.
Alarmi ndalon pas mbylljes së derës. Shtypni
çfarëdo butoni për të çaktivizuar tingullin dhe
pulsimin e dritës së brendshme të frigoriferit.
Nëse nuk shtypni asnjë buton, tingulli
çaktivizohet automatikisht pas rreth një
ore për të shmangur bezdisjen.
4.11 Treguesi i ndryshimit të filtrit të
ajrit
Kur filtri i ajrit ka skaduar dhe duhet të
zëvendësohet, ndizen Treguesi i ndryshimit
të filtrit të ajrit dhe treguesi i alarmit Filter
Reset.
Shihni seksionin "Instalimi dhe ndërrimi i filtrit
CleanAir+" në kapitullin "Kujdesi dhe
pastrimi" për udhëzimet e zëvendësimit.
Pas zëvendësimit të filtrit, shtypni butonin e
alarmit Filter Reset për të çaktivizuar alarmin.
4.12 Regjimi Setting
Regjimi Cilësimet ju lejon të:
• Aktivizoni ose çaktivizoni treguesin
ECOMETER
• Aktivizoni ose çaktivizoni tingujt e
butonave
• Ndryshoni njësitë e temperaturës nga °C
në°F
• Rivendoseni pajisjen në cilësimet e
fabrikës
Aktivizimi regjimit Setting
Për të aktivizuar regjimin Cilësimet:
1. Shtypni dhe mbani të shtypur butonin
ECO për afërsisht 3 sekonda. Kur
aktivizohet regjimi Cilësimet, ekrani shfaq
një pulsim .
2. Pasi të aktivizohet regjimi Cilësimet,
ekrani shfaq .
Për të çaktivizuar regjimin Cilësimet, shtypni
dhe mbani butonin ECO për rreth 3 sekonda.
Regjimi Cilësimet çaktivizohet automatikisht
nëse nuk ndërveproni me panelin e kontrollit
për 60 sekonda.
Lundrimi në regjimin Cilësimet
1. Aktivizoni regjimin Cilësimet (referojuni
"Aktivizimi regjimit Setting").
SHQIP 11

Ekrani tregon .
2. Prekni butonin e temperaturës së
frigoriferit (në të majtë) për të ndryshuar
parametrin. Prekni butonin e
temperaturës së ngrirësit (në të djathtë)
për të ndryshuar vlerën e parametrit.
Ekrani Parametra të
paracaktuar
Treguesi ECOMETER
Tingujt e butonave
Njësitë e temperaturës
Cilësimet e fabrikës
ECOMETER treguesi
Në mënyrë që të ndizni ose fikni
ECOMETER:
1. Aktivizoni regjimin Cilësimet (referojuni
"Aktivizimi regjimit Setting").
Ekrani tregon .
2. Shtypni disa herë . Treguesi do të
tregojë përkatësisht për treguesin e
aktivizuar ose për ECOMETER e
çaktivizuar.
3. Shtypni dhe mbani butonin ECO për rreth
3 sekonda për të dalë nga regjimi
Cilësimet.
Tingujt e butonave
Mund të aktivizoni ose çaktivizoni tingujt e
butonit në regjimin Cilësimet. Për të aktivizuar
ose çaktivizuar tingujt:
1. Aktivizoni regjimin Cilësimet (referojuni
"Aktivizimi regjimit Setting").
Ekrani tregon .
2. Shtypni disa herë derisa të shihni .
Shtypni për të aktivizuar ose
çaktivizuar tingujt. Treguesi do të
ndryshojë në për tingujt e aktivizuar
ose për të çaktivizuarit.
3. Shtypni dhe mbani butonin ECO për rreth
3 sekonda për të dalë nga regjimi
Cilësimet.
Njësitë e temperaturës
Duke përdorur regjimin Cilësimet, mund të
ndryshoni njësinë e temperaturës së shfaqur
në panelin e kontrollit nga Celsius në
Fahrenheit. Për të ndryshuar njësinë e
temperaturës:
1. Aktivizoni regjimin Cilësimet (referojuni
"Aktivizimi regjimit Setting").
Ekrani tregon .
2. Shtypni disa herë derisa të shihni
dhe . Shtypni treguesin që tregon
njësinë për t'u zgjedhur ndërmjet për
celsius dhe për farenajt.
3. Shtypni dhe mbani butonin ECO për rreth
3 sekonda për të dalë nga regjimi
Cilësimet.
Cilësimet e fabrikës
Ky funksion rikthen çdo cilësim në cilësimet
paraprake të fabrikës. Për të rikthyer
cilësimet paraprake të fabrikës:
1. Aktivizoni regjimin Cilësimet (referojuni
"Aktivizimi regjimit Setting").
Ekrani tregon .
2. Shtypni disa herë derisa të shihni
dhe . Shtypni disa herë derisa të
shihni .
shndërrohet në pulsues dhe
pastaj në të ndezur, që tregon se janë
rikthyer cilësimet e fabrikës.
3. Shtypni dhe mbani butonin ECO për rreth
3 sekonda për të dalë nga regjimi
Cilësimet.
12 SHQIP

5. PËRDORIMI I PËRDITSHËM
5.1 Vendosja e rafteve të derës
Për të lejuar ruajtjen e paketimeve me
ushqim të përmasave të ndryshme, raftet e
derës mund të vendosen në lartësi të
ndryshme.
1. Ngrijeni raftin gradualisht lart derisa të
lirohet.
2. Ripozicionojeni sipas nevojës.
Ky model është i pajisur me një kuti të
ndryshueshme ruajtëse që mund të lëvizet
anash.
5.2 Raftet e lëvizshme
Muret e frigoriferit janë të pajisura me një
sërë shinash, në mënyrë që raftet të mund të
vendosen sipas dëshirës.
Kjo pajisje është e pajisur edhe me një raft të
përbërë nga dy pjesë. Gjysma e përparme e
raftit mund të vendoset nën gjysmën e dytë
për të shfrytëzuar më mirë hapësirën.
Për të palosur raftin:
1. Nxirreni përgjysmë raftin me delikatesë.
2. Rrëshqiteni atë brenda shinës së
poshtme dhe poshtë gjysmës së dytë.
1
2
Mos e lëvizni raftin prej xhami mbi sirtarin
e zarzavateve për të siguruar qarkullim të
mirë të ajrit.
5.3 Sirtari GreenZone
Ka një sirtar me tërheqje në pjesën e
poshtme të ndarjes së frigoriferit.
Rafti i qelqtë i GreenZone është e pajisur me
një pajisje që rregullon mbylljen e saj dhe
siguron lagështinë optimale brenda sirtarit.
5.4 Heqja e sirtarit GreenZone
Rekomandohet që ta zbrazni sirtarin
përpara se ta hiqni nga frigoriferi.
Për të hequr sirtarin:
1. Nxirrni sirtarin nga frigoriferi.
SHQIP 13

2. Ngrini pjesën e përparme të sirtarit.
3. Nxirrni sirtarin ndërkohë që e ngrini.
Për të hequr kapakun e qelqit të GreenZone
sirtarit:
1. Shkyçni kapëset anësore nga të dy anët
njëherësh.
2
x2
1
2. Tërhiqni suportin e raftit të qelqtë drejt
vetes.
5.5 Heqja e ExtraChill
Ka një sirtar mbi sirtarin GreenZone.
Për të hequr sirtarin:
1. Nxirrni sirtarin nga frigoriferi.
2. Ngrini pjesën e përparme të sirtarit.
14 SHQIP

3. Ngrini dhe rrotulloni sirtarin për ta nxjerrë
nga pajisja.
Për të hequr kapakun e qelqit të ExtraZone
sirtarit:
1. Shkyçni kapëset anësore nga të dy anët
njëherësh.
2
x2
1
2. Tërhiqni suportin e raftit të qelqtë drejt
vetes.
2
1
5.6 Kontrolli i lagështisë
Rafti i qelqtë i sirtarit të GreenZone ka një
pajisje që rregullon mbylljen e tij dhe siguron
lagështinë optimale brenda sirtarit.
Mos vendos asnjë ushqim mbi paisjen e
kontrollit të lagështirës.
SHQIP 15

Për të hequr pajisjen e kontrollit të lagështisë:
1. Hapni sirtarin poshtë raftit të qelqtë dhe
nxirrni kapakun.
2. Nëse duhet të ndërroni membranën e
bardhë të pajisjes, kapeni pajisjen në mes
dhe shqiteni membranën nga kapaku
duke tërhequr kapakun.
3. Vendosni membranën e re në kapak duke
shtypur skajet e membranës në kapak.
4. Romontoni kontrollin e lagështisë përsëri
në sirtar.
Në varësi të sasisë dhe të kushteve të
frutave dhe perimeve të ruajtura në
sirtarin GreenZone, mund të ndodhë
kondensim.
Në rast të tillë, thithni kondensimin duke
përdorur një leckë të butë.
5.7 MULTIFLOW
Ndarja e frigoriferit është e pajisur me
pajisjen MULTIFLOW që lejon ftohjen e
shpejtë dhe më efektive të ushqimit dhe
ruajtjen e një temperature më uniforme në
secilën pjesë të dhomës së frigoriferit.
Kjo pajisje aktivizohet automatikisht kur
nevojitet.
MULTIFLOW funksionon vetëm kur dera
është e mbyllur.
Mos i bllokoni hapjet e ajrit për të lejuar
ftohje më të mirë.
16 SHQIP

Mos e hiqni MULTIFLOW panelin.
Mos përdorni spërkatje me ujë ose avull
për të pastruar pajisjen. Për udhëzimet e
pastrimit, referojuni kapitullit "Kujdesi dhe
pastrimi".
5.8 Filtri CleanAir+
Në pajisja ka një filtër karboni CleanAir+.
Filtri e pastron ajrin nga aromat e
padëshiruara që mund të krijohen në ndarjen
e frigoriferit, duke përmirësuar cilësinë e
ruajtjes.
Gjatë dorëzimit, filtri dhe kasa e tij plastike
janë në një qese plastike me aksesorë të
tjerë (referojuni seksionit "Instalimi dhe
ndërrimi i filtrit CleanAir+" në kapitullin
"Kujdesi dhe pastrimi" për instalimin).
5.9 Bottle Stop
Aksesori parandalon që shishet apo kanaçet
të rrokullisen. Mund t'i vendosni shishet ose
kënaçet mbi njëra-tjetrën për të kursyer vend
në raft dhe për ta organizuar më mirë
frigoriferin.
Aksesori nuk kërkon montim apo vegla.
Vendosni përmbys aksesorin me bazë silikoni
dhe filloni vendosjen e shisheve.
Baza e silikonit e aksesorit është
antirrëshqitëse: nuk do të ngjisë apo të
rrëshqasë.
Ruani një maksimum prej 10 kg shishesh
dhe/ose kënaçesh të madhësive të
ndryshme deri në dy radhë, siç tregohet
në foto.
Mbani vetëm shishe ose kanaçe të mbyllura,
duke i vendosur me anën e hapjes nga para.
Mos vini ushqime të papaketuara në
kontakt të drejtpërdrejtë me aksesorin.
5.10 Ngrirja e ushqimit të freskët
Seksioni i ngrirjes është i përshtatshme për
ngrirjen e ushqimit të freskët dhe ruajtjen e
ushqimit të ngrirë dhe shumë të ngrirë për
kohë të gjatë.
Për të ngrirë ushqime të freskëta, aktivizoni
funksionin Extra Freeze të paktën 24 orë
përpara se të vendosni ushqimin që do të
ngrini në ndarjen e ngrirësit.
Ruajini ushqimet e freskëta duke i
shpërndarë në mënyrë të njëtrajtshme në
ndarjen ose sirtarin e parë nga lart.
Sasia maksimale e ushqimit që mund të
ngrihet pa shtuar ushqime të tjera të freskëta
gjatë 24 orëve, specifikohet në pllakën e
specifikimeve (një etiketë që ndodhet në
brendësi të pajisjes).
SHQIP 17

Kur procesi i ngrirjes të ketë përfunduar,
pajisja kthehet automatikisht në parametrin e
mëparshëm të temperaturës (shihni
"Funksioni Extra Freeze").
Për më shumë informacion, referojuni
"Këshilla për ngrirje".
5.11 Ruajtja e ushqimit të ngrirë
Kur aktivizoni një pajisje për herë të parë ose
pas një periudhe të gjatë mospërdorimi,
përpara se t'i futni produktet në ndarje, lëreni
pajisjen të punojë për të paktën 3 orë me
funksionin Extra Freeze të aktivizuar.
Sirtarët e frigoriferit bëjnë të mundur që të
gjeni shpejt dhe lehtë paketën ushqimore që
dëshironi.
Nëse do të ruhen sasi të mëdha ushqimi
hiqini të gjithë sirtarët dhe vendoseni
ushqimin nëpër rafte.
Mbajini ushqimet jo më pranë se 15 mm nga
dera.
KUJDES!
Në rast të një shkrirjeje aksidentale, për
shembull si pasojë e ndërprerjes së
rrymës elektrike dhe nëse kjo ndërprerje
ka zgjatur më shumë se vlera e shfaqur
në pllakëzën e specifikimeve te “koha në
rritje”, ushqimi i shkrirë duhet të
konsumohet shpejt ose të gatuhet
menjëherë, më pas të ftohet dhe të
rivendoset në ngrirje. Referojuni "Alarmi i
temperaturës së lartë".
5.12 Shkrirja
Ushqimet e ngrira ose të ngrira shumë,
përpara se të konsumohen, mund të shkrihen
në frigorifer ose brenda një qeseje plastike
nën ujë të ftohtë.
Ky veprim varet nga koha në dispozicion dhe
lloji i ushqimit. Copëzat e vogla të ushqimit
mund të gatuhen edhe ndërsa janë ende të
ngrira.
5.13 Prodhimi i kubeve të akullit
Kjo pajisje është e pajisur me një ose më
shumë vasketa të posaçme për prodhimin e
kubave të akullit.
Mos përdorni vegla metalike për të hequr
vasketat nga ngrirësi.
1. Mbushini këto vasketa me ujë.
2. Vendosni vasketat e akullit në dhomën e
ngrirësit.
6. NDIHMË DHE KËSHILLA
6.1 Si të kursejmë energjinë
• Ngrirja: Konfigurimi i brendshëm i pajisjes
është ai që siguron përdorimin më efikas
të energjisë.
• Ftohja: Sigurohet përdorimi më efikas i
energjisë në konfigurimin me sirtarët në
pjesën e poshtme të pajisjes dhe raftet të
shpërndara në mënyrë të njëtrajtshme.
Pozicioni i koshëve të dyerve nuk ndikon
në konsumin e energjisë.
• Mos e hapni shpesh derën ose mos e lini
hapur për një kohë më të gjatë sesa
nevojitet.
• Ngrirja: Sa më të ftohta parametrat e
temperaturës, aq më i lartë konsumi i
energjisë.
• Ftohja: Mos e vendosni temperaturën
shumë të lartë për të kursyer energji,
përveç rastit kur këtë gjë e kërkojnë
karakteristikat e ushqimit.
• Nëse temperatura e ambientit është e
lartë, rregullatori i temperaturës është
caktuar të japë temperaturë të ulët dhe
pajisja është e mbushur plot, kompresori
mund të punojë pa ndërprerje duke
shkaktuar formimin e brymës ose akullit
në aparatin e avullimit. Në këtë rast,
18 SHQIP

vendoseni rregullatorin e temperaturës në
një temperaturë më të lartë për të lejuar
shkrirjen automatike dhe për të kursyer
energjinë në këtë mënyrë.
• Sigurohuni që të ketë ventilim të mirë. Mos
i mbuloni rrjetën ose vrimat e ventilimit.
• Sigurohuni që produktet ushqimore
brenda pajisjes të lejojnë qarkullimin e ajrit
përmes vrimave të dedikuara në fund të
pjesës së brendshme të pajisjes.
6.2 Këshilla për ngrirje
• Aktivizoni funksionin Extra Freeze të
paktën 24 orë përpara se të vendosni
ushqimin brenda ndarjes së ngrirjes.
• Përpara ngrirjes, mbështilleni dhe izolojeni
ushqimin në: letër alumini, letër ose qese
plastike, kuti hermetike me kapak.
• Për ngrirje dhe shkrirje më efikase ndajini
ushqimet në porcione të vogla.
• Rekomandohet që të gjitha ushqimeve të
ngrira t’u vendosni etiketa dhe data. Me
këtë do të mund të identifikoni ushqimet
dhe do të dini se kur duhet të përdoren
përpara se të prishen.
• Ushqimet duhet të jenë të freskëta
përpara se të ngrijnë për të ruajtur cilësinë
e mirë të ushqimit. Veçanërisht, frutat dhe
zarzavatet duhet të ngrihen pasi të
mblidhen për të ruajtur të gjitha vlerat e
tyre ushqyese.
• Mos i ngrini shishet ose kënaçet me
lëngje, veçanërisht pijet që përmbajnë
dyoksid karboni - ato mund të shpërthejnë
gjatë ngrirjes.
• Mos vendosni ushqim të nxehtë në
ndarjen e ngrirësit. Ftoheni në
temperaturë dhome përpara se ta fusni
brenda ndarjes.
• Për të shmangur rritjen në temperaturë të
ushqimeve të ngrira tashmë, mos
vendosni ushqime të freskëta të pa ngrira
direkt pranë tyre. Vendoseni ushqimin në
temperaturë dhome në pjesën e ndarjes
së ngrirësit ku nuk ka ushqime të ngrira.
• Mos hani kuba akulli, akull ose lëpirëse
akulli menjëherë pasi i nxirrni nga ngrirësi.
Rrezik atrofizimi.
• Mos e ngrini përsëri ushqimin e shkrirë.
Nëse ushqimi është shkrirë, gatuajeni,
ftoheni dhe më pas ngrijeni.
6.3 Ruajtja e ushqimit të ngrirë
• Ndarja e ngrirjes është ajo e shënuar me
.
• Parametrat e duhëra të temperaturës, që
garantojnë ruajtjen e produkteve të ngrira,
janë ato që vendosin një temperaturë më
ulët ose të barabartë me -18°C.
Parametrat më të larta të temperaturës
brenda pajisjes mund të sjellin shkurtimin
e jetëgjatësisë së ushqimit.
• E gjithë ndarja e ngrirësit është e
përshtatshme për ruajtjen e produkteve të
ngrira ushqimore.
• Lini hapësirë të mjaftueshme rrotull
ushqimit për të lejuar qarkullimin e lirshëm
të ajrit.
• Për të ditur si të ruani ushqimin në mënyrë
të saktë, referojuni etiketës së paketimit të
ushqimit për të parë jetëgjatësinë e
ushqimit.
• Është e rëndësishme që ta mbështillni
ushqimin në mënyrë të tillë që të
parandalojë hyrjen e ujit, lagështirës ose
kondensimit.
6.4 Këshilla për blerjet
Pas blerjes së ushqimeve:
• Sigurohuni që paketimi të mos jetë
dëmtuar, sepse ushqimi mund të jetë
prishur. Nëse paketimi është i fryrë ose i
lagur, mund të mos jetë ruajtur në kushte
optimale dhe mund të ketë filluar shkrirja.
• Për të kufizuar procesin e shkrirjes blijini
mallrat e ngrira në fund të blerjes së
ushqimeve dhe transportojini ato brenda
një çante termike dhe të izoluar.
• Futini ushqimet e ngrira menjëherë në
ngrirës pasi të ktheheni nga dyqani.
• Nëse ushqimi është shkrirë qoftë edhe
pjesërisht, mos e ngrini përsëri.
Konsumojeni sa më shpejt të mundeni.
• Respektoni datën e skadencës dhe
informacionin mbi ruajtjen në paketim.
SHQIP 19

6.5 Jetëgjatësia në raft për ndarjen e ngrirësit
Lloji i ushqimit Jetëgjatësia (muaj)
Bukë 3
Frutat (përveç agrumeve) 6 - 12
Zarzavate 8 - 10
Ushqimet e mbetura, pa mish 1 - 2
Bulmeti:
Gjalp
Djathi i butë (p.sh. mocarela)
Djathë i fortë (p.sh. parmixhano, çedar)
6 - 9
3 - 4
6
Fruta deti:
Peshk me yndyrë (p.sh. salmon, skumbri)
Peshk pa yndyrë (p.sh. merluc, gjuhëz)
Karkaleca deti
Guaska dhe midhje
Peshk i gatuar
2 - 3
4 - 6
12
3 - 4
1 - 2
Mishi:
Shpezë
Mish lope
Mish derri
Mish qengji
Salsiçe
Proshutë
Ushqimet e mbetura, me mish
9 - 12
6 - 12
4 - 6
6 - 9
1 - 2
1 - 2
2 - 3
6.6 Si të mbajmë ushqimet të
freskëta në frigorifer
• Cilësimi i mirë i temperaturës që garanton
ruajtjen e ushqimit të freskët është
temperatura më pak ose e barabartë me
+4°C.
Cilësimi më i lartë i temperaturës brenda
pajisjes mund të sjellë shkurtimin e
jetëgjatësisë së ushqimit.
• Mbulojeni ushqimin me paketim për të
ruajtur freskinë dhe aromën e tij.
• Gjithmonë përdorni enë të mbyllura për
lëngjet dhe ushqimin, për të shmangur
daljen e aromave ose shijeve në ndarje.
• Për të shmangur kontaminimin mes
ushqimit të gatuar dhe të pagatuar,
mbulojini ushqimet e gatuara dhe ndajini
ato nga ato të pagatuarat.
• Rekomandohet që ta shkrini ushqimin
brenda frigoriferit.
• Mos vendosni ushqim të nxehtë brenda në
pajisje. Sigurohuni që të jetë ftohur në
temperaturë dhome përpara se ta fusni.
• Për të mos lejuar vajtjen dëm të
ushqimeve, ushqimet e reja duhet të
vendosen prapa të vjetrave.
6.7 Si të mbajmë ushqimet në
frigorifer
• Seksioni i ushqimeve të freskëta është
shënuar (në pllakën e specifikimeve) me
.
• Mishi (të gjitha llojet): mbështilleni në
paketim të përshtatshëm dhe vendoseni
në raftin e xhamit që ndodhet mbi sirtarin
e perimeve. Ruajeni mishin për
maksimumi 1-2 ditë.
• Frutat dhe perimet: pastrojini plotësisht
(eliminoni dheun) dhe vendosini në një
sirtar të veçantë (sirtari i perimeve).
• Këshillohet që të mos mbani fruta ekzotike
si bananet, mangot, papajat etj. në
frigorifer.
• Perimet si domatet, patatet, qepët dhe
hudhrat nuk duhet të mbahen në frigorifer.
20 SHQIP

• Gjalpi dhe djathi: vendosini në një kuti
hermetike ose të mbështjella në letër
alumini ose qeska prej polietileni për të
lejuar brenda sa më pak ajër të jetë e
mundur.
• Shishet: mbyllini me kapak dhe vendosini
në raftin e shisheve në derën e pajisjes
ose (nëse është e disponueshme) në
mbajtësen e shisheve.
• Gjithmonë referojuni datës së skadencës
së produkteve për të ditur sa gjatë t’i
mbani.
7. KUJDESI DHE PASTRIMI
PARALAJMËRIM!
Referojuni kapitujve të sigurisë.
7.1 Pastrimi i pjesës së brendshme
Përpara përdorimit të pajisjes për herë të
parë, pjesa e brendshme dhe të gjitha
aksesorët e brendshëm duhen pastruar me
ujë të vakët dhe pak sapun neutral për të
hequr erën tipike të produkteve të reja, pastaj
duhen të thahet plotësisht.
KUJDES!
Mos përdorni detergjentë, pluhura
gërryes, klor apo pastrues me bazë vaji,
pasi këta pastrues mund të dëmtojnë
sipërfaqet e lëmuara.
KUJDES!
Aksesorët dhe pjesët e pajisjes nuk janë
të përshtatshme për larje në lavastovilje.
KUJDES!
Pastroni panelin e kontrollit me një copë
të njomë. Mos përdorni ndonjë
detergjent. Pas pastrimit, thajeni panelin
e kontrollit me një copë të butë.
7.2 Pastrimi periodik
Pajisja duhet pastruar rregullisht:
1. Pastroni pjesën e brendshme dhe
aksesorët me ujë të vakët dhe me pak
sapun neutral.
2. Kontrolloni rregullisht gominat e derës
dhe pastrojini për t’u siguruar që janë të
pastra dhe nuk kanë papastërti.
3. Shpëlajeni dhe thajeni tërësisht.
7.3 Shkrirja e frigoriferit
Shkrirja e dhomëzës së frigoriferit është
automatike. Uji që kondensohet rrjedh në një
enë në kompresor dhe avullon. Ena nuk
mund të hiqet.
7.4 Shkrirja e ngrirësit
Ndarja e ngrirësit është pa formim bryme. Kjo
do të thotë se gjatë procesit të punës nuk
krijohet brymë, as në muret e brendshme as
mbi ushqime.
7.5 Instalimi dhe ndërrimi i filtrit
CleanAir+
Filtri CleanAir+ është një filtër karboni aktiv
që thith aromat e këqija dhe ju lejon të
konservoni shijen dhe aromën më të mirë për
të gjitha produktet ushqimore pa rrezikun e
ndotjes së tërthortë të aromave.
Trajtoni me kujdes filtrin e ajrit për të
shmangur gërvishtjen e sipërfaqes së tij.
Gjatë dorëzimit, filtri i ajrit gjendet në një
qese plastike për të ruajtur
performancën.
Instaloni filtrin e ajrit përpara se të aktivizoni
pajisjen.
1. Shpaketoni filtrin e ajrit nga qesja
plastike.
2. Hapni kapakun e plastikës dhe vendosni
sipërfaqen e palosur në rrjetë, duke e
vendosur filtrin brenda zonës së shënuar
në sipërfaqen prej grile.
SHQIP 21

3. Mbajeni filtrin poshtë ndërsa mbyllni
kutinë plastike derisa të dëgjoni një klik.
4. Hiqni raftin e sipërm prej xhami nga
ndarja e frigoriferit. Rrëshqisni kutinë
plastike me filtrin e ajrit në anën e majtë
të raftit prej xhami.
5. Futeni raftin e qelqit përsëri në ndarjen e
frigoriferit. Kini kujdes të mos e godisni
filtrin kur fusni raftin prej xhami.
Zëvendësimi i filtrit të ajrit
1. Hapni kutinë plastike.
22 SHQIP

1
2
2. Nxirrni filtrin e prërdorur të ajrit.
3. Shpaketoni filtrin e ri të ajrit nga qesja
plastike dhe futeni në sirtar.
4. Mbyllni kutinë plastike.
5. Pas zëvendësimit të filtrit, shtypni butonin
e alarmit Filter Reset në panelin e
kontrollit për të fikur sinjalizimin.
Për performancën më të mirë, vendoseni
kutinë plastike në vendin e duhur (në të majtë
të raftit të xhamit) dhe zëvendësojeni ajrin e
filtrit çdo 6 muaj.Për më shumë informacion,
referojuni "Treguesi i ndryshimit të filtrit të
ajrit".
Filtri i ajrit është një aksesor i
konsumueshëm dhe si i tillë nuk
mbulohet nga garancia.
Mund të blini filtra të rinj ajri nga shitësi
juaj vendor.
7.6 Periudha e mospërdorimit
Kur pajisja nuk përdoret për një periudhë të
gjatë, merrni masat paraprake të mëposhtme:
1. Shkëputeni pajisjen nga furnizimi me
elektricitet.
2. Hiqni të gjithë ushqimin.
3. Pastroni pajisjen dhe të gjithë aksesorët.
4. Lëreni derën paksa hapur për të
shmangur formimin e erërave të
pakëndshme.
8. ZGJIDHJA E PROBLEMEVE
PARALAJMËRIM!
Referojuni kapitujve të sigurisë.
8.1 Çfarë duhet bërë nëse...
Problemi Shkaku i mundshëm Zgjidhja
Pajisja nuk punon. Pajisja është e fikur. Ndizni pajisjen.
SHQIP 23

Problemi Shkaku i mundshëm Zgjidhja
Spina e pajisjes nuk është lidhur siç
duhet me prizën e rrjetit.
Futeni në prizë siç duhet spinën e
pajisjes.
Nuk ka tension në prizën e rrjetit. Lidhni një pajisje tjetër elektrike në
prizën e rrjetit. Kontaktoni një
elektricist të kualifikuar.
Pajisja është e zhurmshme. Pajisja nuk mbështetet siç duhet. Kontrolloni nëse pajisja qëndron e
fiksuar.
Është aktiv alarmi akustik ose
vizual.
Ka pak kohë që kabina është
ndezur.
Referojuni tek "Alarmi i
temperaturës së lartë" ose "Alarmi i
hapjes së derës".
Temperatura në pajisje është tepër
e lartë.
Referojuni tek "Alarmi i
temperaturës së lartë" ose "Alarmi i
hapjes së derës".
Dera është lënë hapur. Mbyllni derën.
Kompresori punon vazhdimisht. Temperatura është vendosur gabim. Referojuni kapitullit "Paneli i
kontrollit".
Në pajisje janë futur njëkohësisht
shumë produkte ushqimore.
Prisni disa orë e më pas kontrolloni
sërish temperaturën.
Temperatura e dhomës është
shumë e lartë.
Referojuni kapitullit "Instalimi".
Produktet ushqimore të vendosura
në pajisje kanë qenë tepër të
ngrohta.
Lërini produktet ushqimore të ftohen
në temperaturën e dhomës përpara
se t'i fusni në pajisje.
Dera nuk është mbyllur siç duhet. Referojuni seksionit "Mbyllja e
derës".
Funksioni Extra Freeze është i
aktivizuar.
Shikoni seksionin “Funksioni Extra
Freeze”.
Funksioni Extra Cool është i
aktivizuar.
Shikoni seksionin “Funksioni Extra
Cool”.
Kompresori nuk fillon menjëherë
pas shtypjes së "Extra Freeze" ose
"Extra Cool", ose pas ndryshimit të
temperaturës.
Kompresori ndizet pas një periudhe
kohore.
Kjo është normale, nuk ka ndodhur
asnjë gabim.
Dera është e pakalibruar ose
pengon skarën e ventilimit.
Pajisja nuk është e niveluar. Shikoni udhëzimet e instalimit.
Dera nuk hapet lehtë. Jeni përpjekur të rihapni derën
menjëherë pas mbylljes.
Prisni pak sekonda mbas mbylljes
dhe rihapjes së derës.
Llamba nuk punon. Llamba është në gjendje
gatishmërie.
Mbyllni dhe hapni derën.
Llamba është me defekt. Kontaktoni Qendrën më të afërt të
Shërbimit të Autorizuar.
Ka shumë brymë dhe akull. Dera nuk është mbyllur siç duhet. Referojuni seksionit "Mbyllja e
derës".
24 SHQIP

Problemi Shkaku i mundshëm Zgjidhja
Guarnicioni është i deformuar ose i
ndotur.
Referojuni seksionit "Mbyllja e
derës".
Produktet ushqimore nuk janë
mbështjellë siç duhet.
Mbështillini produktet ushqimore siç
duhet.
Temperatura është vendosur gabim. Referojuni kapitullit "Paneli i
kontrollit".
Pajisja është mbushur plotësisht
dhe është vendosur në
temperaturën më të ulët.
Vendosni një temperaturë më të
lartë. Referojuni kapitullit "Paneli i
kontrollit".
Temperatura e vendosur në pajisje
është tepër e ulët dhe temperatura e
ambientit është tepër e lartë.
Vendosni një temperaturë më të
lartë. Referojuni kapitullit "Paneli i
kontrollit".
Uji rrjedh në pllakën e pasme të
frigoriferit.
Gjatë procesit automatik të shkrirjes
së akullit, bryma shkrihet në pllakën
e pasme.
Kjo është e saktë.
Në paretin e pasmë të frigoriferit ka
shumë ujë të kondensuar.
Dera është hapur shumë shpesh. Hapeni derën vetëm kur është e
nevojshme.
Dera nuk është mbyllur plotësisht. Sigurohuni që dera të jetë mbyllur
plotësisht.
Ushqimi i ruajtur nuk është
mbështjellë.
Mbështilleni ushqimin në paketime
të përshtatshme përpara se ta ruani
në pajisje.
Uji rrjedh në dysheme. Shkarkuesi i ujit të shkrirjes nuk
është i lidhur me enën e avullimit
poshtë kompresorit.
Bashkangjisni shkarkimin e ujit të
shkrirjes në enën e avullimit.
Temperatura nuk mund të caktohet. Është aktivizuar Extra Freeze
funksioni ose Extra Cool funksioni.
Çaktivizoni Extra Freeze funksionin
ose Extra Cool funksionin
manualisht ose prisni derisa
funksioni të çaktivizohet
automatikisht për të vendosur
temperaturën. Shikoni seksionin
"funksioni Extra Freeze" ose "Extra
Cool funksioni"
Temperatura në pajisje është tepër
e ulët/e lartë.
Temperatura nuk është vendosur
siç duhet.
Vendosni një temperaturë më të
lartë/më të ulët.
Dera nuk është mbyllur siç duhet. Referojuni seksionit "Mbyllja e
derës".
Temperatura e produkteve
ushqimore është tepër e lartë.
Lëreni temperaturën e produkteve
ushqimore të bjerë në temperaturën
e ambientit, përpara se t'i ruani.
Janë ruajtur shumë produkte
ushqimore njëkohësisht.
Ruani më pak produkte ushqimore
njëkohësisht në pajisje.
Dera është hapur shumë shpesh. Hapeni derën vetëm nëse është e
nevojshme.
Funksioni Extra Freeze është i
aktivizuar.
Shikoni seksionin “Funksioni Extra
Freeze”.
SHQIP 25

Problemi Shkaku i mundshëm Zgjidhja
Funksioni Extra Cool është i
aktivizuar.
Shikoni seksionin “Funksioni Extra
Cool”.
Nuk ka qarkullim të ajrit të ftohtë në
pajisje.
Sigurohuni që të ketë qarkullim të
ajrit të ftohtë në pajisje. Referojuni
kapitullit "Ndihmë dhe këshilla".
shfaqet në ekran. Pajisja është në regjim demonstrimi. Për të dalë nga modaliteti i
demonstrimit, shtypni dhe mbani
butonat Extra Cool dhe ECO për
rreth 10 sekonda derisa të dëgjoni 3
tinguj të shkurtër.
Shfaqet simboli dhe
treguesi i alarmit është i ndezur.
Problem komunikimi. Kontaktoni Qendrën më të afërt të
Shërbimit të Autorizuar. Sistemi i
ftohjes do të vazhdojë t’i mbajë
produktet ushqimore të ftohta, por
rregullimi i temperaturës nuk do të
jetë i mundur.
Shfaqen simboli ose
ose dhe
cilësimi aktual në mënyrë alternative
çdo 5 sekonda dhe treguesi i alarmit
është i ndezur.
Problem i sensorit të temperaturës. Kontaktoni Qendrën më të afërt të
Shërbimit të Autorizuar. Sistemi i
ftohjes do të vazhdojë t’i mbajë
produktet ushqimore të ftohta, por
rregullimi i temperaturës nuk do të
jetë i mundur.
Nëse këshilla nuk çon në rezultatin e
dëshiruar, telefonojini Qendrës më të
afërt të Autorizuar të Shërbimit.
8.2 Ndërrimi i llambës
Pajisja është e pajisur me një dritë të
brendshme LED me jetëgjatësi të madhe.
Vetëm shërbimi lejohet për të zëvendësuar
pajisjen e ndriçimit. Kontaktoni Qendrën tuaj
të Autorizuar të Shërbimit.
8.3 Mbyllja e derës
1. Pastroni guarnicionet e derës.
2. Nëse është e nevojshme, rregulloni
derën. Shikoni udhëzimet e instalimit.
3. Nëse është e nevojshme, zëvendësoni
guarnicionet me defekt të derës.
Kontaktoni qendrën e shërbimit të
autorizuar.
26 SHQIP

9. ZHURMA
SSSRRR!
CLICK!
HISSS!
BRRR!
BLUBB!
10. TË DHËNAT TEKNIKE
Informacioni teknik ndodhet në pllakën e
specifikimeve në anën e brendshme të
pajisjes dhe në etiketën e energjisë.
Kodi QR në etiketën e energjisë të dhënë me
pajisjen jep një lidhje interneti tek
informacioni që lidhet me performancën e
pajisjes në databazën e EU EPREL. Ruajeni
etiketën e energjisë për referencë së bashku
me manualin e përdorimit dhe të gjitha
dokumentet e tjera që ofrohen me këtë
pajisje.
Të njëjtin informacion mund ta gjeni
gjithashtu në EPREL duke përdorur lidhjen
https://eprel.ec.europa.eu
, si dhe emrin e
modelit dhe numrin e produktit që gjeni në
pllakën e specifikimeve të pajisjes.
Shikoni lidhjen
www.theenergylabel.eu
për
informacion të detajuar rreth etiketës së
energjisë.
11. INFORMACION PËR INSTITUTET E TESTIMIT
Instalimi dhe përgatitja e pajisjes për çdo
verifikim EcoDesign duhet të jetë në
përputhje me EN 62552. Kërkesat për
ventilimin, dimensionet e zgavrës dhe
hapësirat minimale të pasme duhet të jenë
siç përcaktohet në këtë “Manual përdorimi”
SHQIP 27

në Kapitullin 3. Ju lutemi kontaktoni me
prodhuesin për çdo informacion të
mëtejshëm, duke përfshirë edhe planet e
ngarkimit.
12. ÇËSHTJE QË LIDHEN ME AMBIENTIN
Ricikloni materialet me simbolin .
Vendoseni ambalazhin te kontejnerët e
riciklimit nëse ka. Ndihmoni në mbrojtjen e
mjedisit dhe shëndetit të njerëzve dhe në
riciklimin e mbetjeve të pajisjeve elektrike dhe
elektronike. Mos hidhni pajisjet e shënuara
me simbolin e mbeturinave shtëpiake.
Ktheni produktin në pikën lokale të riciklimit
ose kontaktoni me zyrën komunale.
28 SHQIP

FOR PERFECT RESULTS
Thank you for choosing this AEG product. We have created it to give you impeccable
performance for many years, with innovative technologies that help make life simpler –
features you might not find on ordinary appliances. Please spend a few minutes reading
to get the very best from it.
Visit our website to:
Get usage advice, brochures, trouble shooter, service and repair information:
www.aeg.com/support
Register your product for better service:
www.registeraeg.com
Buy Accessories, Consumables and Original spare parts for your appliance:
www.aeg.com/shop
CUSTOMER CARE AND SERVICE
Always use original spare parts.
When contacting our Authorised Service Centre, ensure that you have the following data
available: Model, PNC, Serial Number.
The information can be found on the rating plate.
Warning / Caution-Safety information
General information and tips
Environmental information
Subject to change without notice.
CONTENTS
1. SAFETY INFORMATION.............................................................................. 29
2. SAFETY INSTRUCTIONS............................................................................ 31
3. INSTALLATION.............................................................................................33
4. CONTROL PANEL........................................................................................ 36
5. DAILY USE....................................................................................................39
6. HINTS AND TIPS.......................................................................................... 45
7. CARE AND CLEANING................................................................................ 47
8. TROUBLESHOOTING.................................................................................. 49
9. NOISES.........................................................................................................53
10. TECHNICAL DATA..................................................................................... 53
11. INFORMATION FOR TEST INSTITUTES.................................................. 53
12. ENVIRONMENTAL CONCERNS................................................................54
1. SAFETY INFORMATION
Before the installation and use of the appliance, carefully read
the supplied instructions. The manufacturer is not responsible
for any injuries or damage that are the result of incorrect
ENGLISH 29

installation or usage. Always keep the instructions in a safe
and accessible location for future reference.
1.1 Children and vulnerable people safety
• This appliance can be used by children aged from 8 years
and above and persons with reduced physical, sensory or
mental capabilities or lack of experience and knowledge if
they have been given supervision or instruction concerning
the use of the appliance in a safe way and understand the
hazards involved.
• Children aged from 3 to 8 years are allowed to load and
unload the appliance provided that they have been properly
instructed.
• This appliance may be used by persons with very extensive
and complex disabilities provided that they have been
properly instructed.
• Children of less than 3 years of age should be kept away
from the appliance unless continuously supervised.
• Children should be supervised to ensure that they do not
play with the appliance.
• Children shall not carry out cleaning and user maintenance
of the appliance without supervision.
• Keep all packaging away from children and dispose of it
appropriately.
1.2 General Safety
• This appliance is for storing food and baverages only.
• This appliance is designed for single household domestic
use in an indoor environment.
• This appliance may be used in, offices, hotel guest rooms,
bed & breakfast guest rooms, farm guest houses and other
similar accommodation where such use does not exceed
(average) domestic usage levels.
• To avoid contamination of food respect the following
instructions:
– do not open the door for long periods;
30 ENGLISH

– clean regularly surfaces that can come in contact with
food and accessible drainage systems;
– store raw meat and fish in suitable containers in the
refrigerator, so that it is not in contact with or drip onto
other food.
• WARNING: Keep ventilation openings, in the appliance
enclosure or in the built-in structure, clear of obstruction.
• WARNING: Do not use mechanical devices or other means
to accelerate the defrosting process, other than those
recommended by the manufacturer.
• WARNING: Do not damage the refrigerant circuit.
• WARNING: Do not use electrical appliances inside the food
storage compartments of the appliance, unless they are of
the type recommended by the manufacturer.
• Do not use water spray and steam to clean the appliance.
• Clean the appliance with a moist soft cloth. Only use neutral
detergents. Do not use abrasive products, abrasive
cleaning pads, solvents or metal objects.
• When the appliance is empty for long period, switch it off,
defrost, clean, dry and leave the door open to prevent
mould from developing within the appliance.
• Do not store explosive substances such as aerosol cans
with a flammable propellant in this appliance.
• If the supply cord is damaged, it must be replaced by the
manufacturer, its Authorised Service Centre or similarly
qualified persons in order to avoid a hazard.
2. SAFETY INSTRUCTIONS
2.1 Installation
WARNING!
Only a qualified person must install this
appliance.
• Remove all the packaging.
• Do not install or use a damaged
appliance.
• Do not use the appliance before installing
it in the built-in structure due to safety
manner.
• Follow the installation instructions supplied
with the appliance.
• Always take care when moving the
appliance as it is heavy. Always use safety
gloves and enclosed footwear.
• Make sure the air can circulate around the
appliance.
ENGLISH 31

• At first installation or after reversing the
door wait at least 4 hours before
connecting the appliance to the power
supply. This is to allow the oil to flow back
in the compressor.
• Before carrying out any operations on the
appliance (e.g. reversing the door),
remove the plug from the power socket.
• Do not install the appliance close to
radiators or cookers, ovens, or hobs,
unless otherwise specified in the
installation instructions.
• Do not expose the appliance to the rain.
• Do not install the appliance where there is
direct sunlight.
• Do not install this appliance in areas that
are too humid or too cold.
• When you move the appliance, lift it by the
front edge to avoid scratching the floor.
• The appliance contains a bag of
desiccant. This is not a toy. This is not
food. Please dispose of it immediately.
2.2 Electrical connection
WARNING!
Risk of fire and electric shock.
WARNING!
When positioning the appliance, ensure
the supply cord is not trapped or
damaged.
WARNING!
Do not use multi-plug adapters and
extension cables.
• The appliance must be earthed.
• Make sure that the parameters on the
rating plate are compatible with the
electrical ratings of the mains power
supply.
• Always use a correctly installed
shockproof socket.
• Make sure not to cause damage to the
electrical components (e.g. mains plug,
mains cable, compressor). Contact the
Authorised Service Centre or an
electrician to change the electrical
components.
• The mains cable must stay below the level
of the mains plug.
• Connect the mains plug to the mains
socket only at the end of the installation.
Make sure that there is access to the
mains plug after the installation.
• Do not pull the mains cable to disconnect
the appliance. Always pull the mains plug.
2.3 Use
WARNING!
Risk of injury, burns, electric shock or
fire.
The appliance contains flammable gas,
isobutane (R600a), a natural gas with a high
level of environmental compatibility. Be
careful not to cause damage to the refrigerant
circuit containing isobutane.
• Do not change the specification of this
appliance.
• Any use of the built-in product as free-
standing is strictly prohibited.
• Do not put electrical appliances (e.g. ice
cream makers) in the appliance unless
they are stated applicable by the
manufacturer.
• If damage occurs to the refrigerant circuit,
make sure that there are no flames and
sources of ignition in the room. Ventilate
the room.
• Do not let hot items to touch the plastic
parts of the appliance.
• Do not put soft drinks in the freezer
compartment. This will create pressure on
the drink container.
• Do not store flammable gas and liquid in
the appliance.
• Do not put flammable products or items
that are wet with flammable products in,
near or on the appliance.
• Do not touch the compressor or the
condenser. They are hot.
• Do not remove or touch items from the
freezer compartment if your hands are wet
or damp.
• Do not freeze again food that has been
thawed.
• Follow the storage instructions on the
packaging of frozen food.
32 ENGLISH

• Wrap the food in any food contact material
before putting it in the freezer
compartment.
2.4 Internal lighting
WARNING!
Risk of electric shock.
• This product contains one or more light
sources of energy efficiency class G.
• Concerning the lamp(s) inside this product
and spare part lamps sold separately:
These lamps are intended to withstand
extreme physical conditions in household
appliances, such as temperature,
vibration, humidity, or are intended to
signal information about the operational
status of the appliance. They are not
intended to be used in other applications
and are not suitable for household room
illumination.
2.5 Care and cleaning
WARNING!
Risk of injury or damage to the appliance.
• Before maintenance, deactivate the
appliance and disconnect the mains plug
from the mains socket.
• This appliance contains hydrocarbons in
the cooling unit. Only a qualified person
must do the maintenance and the
recharging of the unit.
• Regularly examine the drain of the
appliance and if necessary, clean it. If the
drain is blocked, defrosted water collects
in the bottom of the appliance.
2.6 Service
• To repair the appliance contact the
Authorised Service Centre. Use original
spare parts only.
• Please note that self-repair or non-
professional repair can have safety
consequences and might void the
guarantee.
• The following spare parts will be available
for 7 years after the model has been
discontinued: thermostats, temperature
sensors, printed circuit boards, light
sources, door handles, door hinges, trays
and baskets. Please note that some of
these spare parts are only available to
professional repairers, and that not all
spare parts are relevant for all models.
• Door gaskets will be available for 10 years
after the model has been discontinued.
2.7 Disposal
WARNING!
Risk of injury or suffocation.
• Disconnect the appliance from the mains
supply.
• Cut off the mains cable and discard it.
• Remove the door to prevent children and
pets to be closed inside of the appliance.
• The refrigerant circuit and the insulation
materials of this appliance are ozone-
friendly.
• The insulation foam contains flammable
gas. Contact your municipal authority for
information on how to discard the
appliance correctly.
• Do not cause damage to the part of the
cooling unit that is near the heat
exchanger.
3. INSTALLATION
WARNING!
Refer to Safety chapters.
ENGLISH 33

WARNING!
Refer to installation instruction document
to install your appliance.
WARNING!
Fix the appliance in accordance with
installation instruction document to avoid
a risk of instability of the appliance.
3.1 Dimensions
B
A
H1
W1
D1
W2
D2
W3
D3
90°
Overall dimensions ¹
H1 mm 1772
W1 mm 546
D1 mm 549
¹ the height, width and depth of the appliance
without the handle
Space required in use ²
H2 (A+B) mm 1816
Space required in use ²
W2 mm 546
D2 mm 551
A mm 1780
B mm 36
² the height, width and depth of the appliance
including the handle, plus the space
necessary for free circulation of the cooling
air
34 ENGLISH

Overall space required in use ³
H3 (A+B) mm 1816
W3 mm 546
D3 mm 1068
³ the height, width and depth of the appliance
including the handle, plus the space
necessary for free circulation of the cooling
air, plus the space necessary to allow door
opening to the minimum angle permitting
removal of all internal equipment
3.2 Location
To ensure appliance's best functionality, you
should not install the appliance in a place with
direct sunlight. Do not install the appliance
close to radiators or cookers, ovens, or hobs,
unless otherwise specified in the installation
instructions.
Make sure that air can circulate freely around
the back of the cabinet.
This appliance should be installed in a dry,
well ventilated indoor position.
This appliance is intended to be used at
ambient temperature ranging from 10°C to
43°C.
The correct operation of the appliance
can only be guaranteed within the
specified temperature range.
If you have any doubts regarding where
to install the appliance, please turn to the
vendor, to our customer service or to the
nearest Authorised Service Centre.
It must be possible to disconnect the
appliance from the mains power supply.
The plug must therefore be easily
accessible after installation.
3.3 Electrical connection
• Before plugging in, ensure that the voltage
and frequency shown on the rating plate
correspond to your domestic power
supply.
• The appliance must be earthed. The
power supply cable plug is provided with a
contact for this purpose. If the domestic
power supply socket is not earthed,
connect the appliance to a separate earth
in compliance with current regulations,
consulting a qualified electrician.
• The manufacturer declines all
responsibility if the above safety
precautions are not observed.
3.4 Ventilation requirements
The airflow behind the appliance must be
sufficient.
min. 200 cm2
min.
200 cm2
min.
38 mm
min.
38 mm
CAUTION!
Refer to the installation instructions for
the installation.
3.5 Door reversibility
Please refer to the separate document with
instructions on installation and door reversal.
CAUTION!
At every stage of reversing the door
protect the floor from scratching with a
durable material.
ENGLISH 35

4. CONTROL PANEL
1 3 6
91112 10
4 52 7 8
1ECOMETER indicator
2Extra Cool button / indicator
3Fridge compartment indicator
4Alarm indicator
5Door open alarm indicator
6Freezer compartment indicator
7Extra Freeze button / indicator
8Filter Reset alarm button / indicator
9Freezer temperature button / indicator
10 Air filter change indicator
11 Fridge temperature button / indicator
12 ECO button
4.1 Switching on
Connect the mains plug to the power socket.
To select a different set temperature, refer to
"Temperature regulation".
If appears on the display, refer to
"Troubleshooting".
4.2 Switching off
1. Press and hold the freezer temperature
button for 5 seconds.
The display shows blinking .
2. Once the appliance is switched off, the
display reads .
3. Disconnect the mains plug from the
power socket.
4.3 Temperature regulation
The temperature range may vary between
-15°C and -24°C for freezer and between 2°C
and 8°C for fridge.
Press the temperature buttons to set the
temperature of the appliance.
The recommended set temperature is:
• +4°C for the fridge
• -18°C for the freezer
You may set the recommended temperature
manually with temperature buttons or by
switching on the ECO function. Refer to "ECO
function" for more information
The temperature indicators show the set
temperature.
The set temperature will be reached
within 24 hours.
After a power failure, the appliance goes
back to the set temperature.
4.4 Switching off the fridge
It is possible to switch off only the fridge
compartment leaving the freezer
compartment on.
1. Press and hold the fridge temperature
button for 5 seconds.
The display shows blinking .
2. Once the fridge compartment is switched
off, the display reads .
4.5 Switching on the fridge
To switch on the fridge:
1. Press and hold the fridge temperature
button for 5 seconds.
The display shows blinking .
2. The fridge compartment is switched on
and the previous set temperature is
restored.
36 ENGLISH

To adjust the temperature, refer to
"Temperature regulation".
4.6 ECO function
The ECO function sets the optimal
temperature to ensure food preservation
while minimizing energy consumption.
1. To activate the function press the ECO
button.
The fridge temperature is set to +4°C and the
freezer temperature to -18°C.
2. To deactivate the function, press the ECO
button again or select a different set
temperature (refer to "Temperature
regulation").
After deactivating the ECO function, the
fridge temperature is set to +2°C and the
freezer temperature to -20°C.
Activation of the ECO deactivates Extra
Cool and Extra Freeze functions.
The ECOMETER indicator shows the
appliance's current energy consumption.
Three fully lit bars indicate the most
energy-efficient setup.
4.7 Extra Cool function
With the Extra Cool function, you may rapidly
cool large amounts of warm food, for example
after doing grocery shopping, without
warming food already stored in the fridge
compartment.
To activate the function, press the Extra Cool
button.
The Extra Cool indicator lights up. When the
Extra Cool function is on, the fan may work
automatically.
This function stops automatically after
approximately 6 hours. Once the function is
off, the Extra Cool indicator goes out.
Press the Extra Cool button to deactivate the
Extra Cool function before it automatically
ends.
To set a different fridge temperature,
switch off the Extra Cool function and
refer to "Temperature regulation".
4.8 Extra Freeze function
Extra Freeze function is used to pre-freeze
and fast freeze in sequence in the freezer
compartment. This function accelerates the
freezing of fresh food and, at the same time,
protects foodstuffs already stored from
undesirable warming.
To freeze fresh food, activate the Extra
Freeze function at least 24 hours before
placing the food to complete pre-freezing.
To activate this function, press the Extra
Freeze button.
The Extra Freeze indicator lights up. The
Extra Freeze function stops automatically
after a maximum of 52 hours.
Press the Extra Freeze button to deactivate
the Extra Freeze function before it
automatically ends.
4.9 High temperature alarm
When the temperature in the freezer
compartment increases (for example due to
an earlier power failure), the alarm indicator
flashes, the freezer temperature indicator
shows H° and blinks and the sound is on.
To deactivate the alarm, press any button.
The alarm indicator and sound go off. The
freezer temperature indicator shows H° for 5
seconds before indicating the freezer
temperature again.
The alarm restarts one hour after
deactivation until the normal conditions
are restored.
If you do not press any button, the sound
switches off automatically after around
one hour to avoid disturbing.
ENGLISH 37

4.10 Door open alarm
If the fridge door is left open for
approximately 5 minutes or if the freezer door
is left open for approximately 80 seconds, the
sound is on and the door open alarm
indicator turns on. The internal fridge light
may also start flashing.
The alarm stops after closing the door. Press
any button to switch off the sound and
flashing of the internal fridge light.
If you do not press any button, the sound
switches off automatically after around
one hour to avoid disturbing.
4.11 Air filter change indicator
When the air filter has expired and requires
replacement, the Air filter change indicator
and the Filter Reset alarm indicator turn on.
Refer to "Installing and replacing the CleanAir
+ filter" section in "Care and cleaning"
chapter for the replacement instructions.
After the filter replacement, press the Filter
Reset alarm button to turn off the alarm.
4.12 Setting mode
The Setting mode allows you to:
• Enable or disable the ECOMETER
indicator
• Enable or disable the button sounds
• Change the temperature units from °C to
°F
• Reset the appliance to factory settings
Activating the Setting mode
To activate the Setting mode:
1. Press and hold the ECO button for
approximately 3 seconds. When the
Setting mode is being activated, the
display shows a blinking .
2. Once the Setting mode is switched on,
the display shows .
To deactivate the Setting mode, press and
hold the ECO button for approximately 3
seconds.
The Setting mode deactivates automatically if
you do not interact with the control panel for
60 seconds.
Navigating the Setting mode
1. Activate the Setting mode (refer to
"Activating the Setting mode").
The display shows .
2. Tap the fridge temperature button (on the
left) to change the parameter. Tap the
freezer temperature button (on the right)
to change the parameter value.
Display Default parameters
ECOMETER indicator
Button sounds
Temperature units
Factory settings
ECOMETER indicator
In order to switch the ECOMETER on or off:
1. Activate the Setting mode (refer to
"Activating the Setting mode").
The display shows .
2. Tap repeatedly. The indicator will
show respectively for the enabled or
for the disabled ECOMETER
indicator.
3. Press and hold the ECO button for
approximately 3 seconds to exit the
Setting mode.
Button sounds
You can enable or disable the button sounds
in the Setting mode. To enable or disable the
sounds:
1. Activate the Setting mode (refer to
"Activating the Setting mode").
The display shows .
2. Tap repeatedly until you see . Tap
to switch the sounds either on or off.
The indicator will change to for the
enabled or for the disabled sounds.
38 ENGLISH

3. Press and hold the ECO button for
approximately 3 seconds to exit the
Setting mode.
Temperature units
Using the Setting mode, you can change the
temperature unit displayed on the control
panel from Celsius to Fahrenheit. To change
the temperature unit:
1. Activate the Setting mode (refer to
"Activating the Setting mode").
The display shows .
2. Tap repeatedly until you see and
. Tap the indicator showing the unit to
select between for Celsius and
for Fahrenheit.
3. Press and hold the ECO button for
approximately 3 seconds to exit the
Setting mode.
Factory settings
This function restores each setting to the
factory default settings. To restore the factory
default settings:
1. Activate the Setting mode (refer to
"Activating the Setting mode").
The display shows .
2. Tap repeatedly until you see and
. Tap repeatedly until you see .
turns into blinking and then into
solid , which indicates that factory
settings are restored.
3. Press and hold the ECO button for
approximately 3 seconds to exit the
Setting mode.
5. DAILY USE
5.1 Positioning the door shelves
To permit storage of food packages of
various sizes, the door shelves can be placed
at different heights.
1. Gradually pull the shelf up until it comes
free.
2. Reposition as required.
This model is equipped with a variable
storage box which can be moved sideways.
ENGLISH 39

5.2 Movable shelves
The walls of the refrigerator are equipped
with a series of runners so that the shelves
can be positioned as desired.
This appliance is also equipped with a shelf
consisting of two parts. The front half of the
shelf can be placed under the second half to
make better use of space.
To fold the shelf:
1. Take out the front half gently.
2. Slide it into the lower rail and under the
second half.
1
2
Do not move the glass shelf above the
vegetable drawer to ensure correct air
circulation.
5.3 GreenZone drawer
There is a pull-out drawer in the bottom part
of the refrigerator compartment.
The glass shelf of the GreenZone is fitted
with a device that regulates its sealing and
provides for optimal humidity inside the
drawer.
5.4 Removing GreenZone drawer
It is recommended to empty the drawer
before removing it from the refrigerator.
To remove the drawer:
1. Pull out the drawer from the refrigerator.
2. Lift up the front of the drawer.
3. Pull the drawer out while lifting it up.
To remove the glass cover of the GreenZone
drawer:
40 ENGLISH

1. Unlock lateral gripping from both sides
simultaneously.
2
x2
1
2. Pull the glass shelf support towards
yourself.
5.5 Removing ExtraChill
There is a drawer above the GreenZone
drawer.
To remove the drawer:
1. Pull out the drawer from the refrigerator.
2. Lift up the front of the drawer.
3. Lift and turn the drawer to pull it out of the
appliance.
To remove the glass cover of the ExtraZone
drawer:
ENGLISH 41

1. Unlock lateral gripping from both sides
simultaneously.
2
x2
1
2. Pull the glass shelf support towards
yourself.
2
1
5.6 Humidity control
The glass shelf of the GreenZone drawer
features a device that regulates its sealing
and provides for optimal humidity inside the
drawer.
Do not place any food products on the
humidity control device.
To remove the humidity control device:
1. Open the drawer below the glass shelf
and pull out the cover.
2. If you need to replace the device's white
membrane, grab the device in the middle
and separate the membrane from the
cover by pulling the cover.
42 ENGLISH

3. Assemble a new membrane into the
cover by pressing the edge of the
membrane into the cover.
4. Reassemble the humidity control back on
the drawer.
Depending on the quantity and condition
of fruit and vegetables stored in the
GreenZone drawer, condensation may
occur.
In such a case, remove the condensation
using a soft cloth.
5.7 MULTIFLOW
The refrigerator compartment is equipped
with the MULTIFLOW device that allows for
rapid and more effective cooling of food and
maintaining a more uniform temperature in
each part of the refrigerator compartment.
This device activates automatically when
needed.
MULTIFLOW operates only when the door is
closed.
Do not block the air vents to allow better
cooling.
Do not remove the MULTIFLOW panel.
Do not use water spray or steam to clean
the appliance. For cleaning instructions,
refer to the "Care and cleaning" chapter.
5.8 CleanAir+ filter
In the appliance, there is a CleanAir+ carbon
filter.
The filter purifies the air from unwanted
odours in the fridge compartment, improving
the storage quality.
On delivery, the filter and its plastic housing
are in a plastic bag with the other accessories
(refer to "Installing and replacing the CleanAir
+ filter" section in "Care and cleaning"
chapter for the installation).
ENGLISH 43

5.9 Bottle Stop
The accessory prevents bottles or cans from
rolling. You may stack the bottles or cans on
top of each other to save shelf space and
better organize your fridge.
The accessory requires no assembly or tools.
Place the accessory with the silicone base
facing down and start stacking the bottles.
The silicone base of the accessory is anti-
slip: it will not stick or slip.
Store a maximum of 10 kg of bottles
and/or cans of different sizes in up to two
rows, as shown in the picture.
Store only closed bottles or cans, placing
them with the opening facing front.
Do not put unpacked food in direct
contact with the accessory.
5.10 Freezing fresh food
The freezer compartment is suitable for
freezing fresh food and storing frozen and
deep-frozen food for a long time.
To freeze fresh food activate the Extra
Freeze function at least 24 hours before
placing the food to be frozen in the freezer
compartment.
Store the fresh food evenly distributed in the
first compartment or drawer from the top.
The maximum amount of food that can be
frozen without adding other fresh food during
24 hours is specified on the rating plate (a
label located inside the appliance).
When the freezing process is complete, the
appliance automatically returns to the
previous temperature setting (see "Extra
Freeze function").
For more information refer to "Hints for
freezing".
5.11 Storage of frozen food
When activating an appliance for the first time
or after a period out of use, before putting the
products in the compartment let the appliance
run at least 3 hours with the Extra Freeze
function switched on.
The freezer drawers ensure that it is quick
and easy to find the food package you want.
If large quantities of food are to be stored,
remove all drawers and place the food on
shelves.
Keep the food no closer than 15 mm from the
door.
CAUTION!
In the event of accidental defrosting, for
example due to a power failure, if the
power has been off for longer than the
value shown on rating plate under "rising
time", the defrosted food must be
consumed quickly or cooked immediately
then cooled and then re-frozen. Refer to
"High temperature alarm".
5.12 Thawing
Deep-frozen or frozen food, prior to being
consumed, can be thawed in the refrigerator
or inside a plastic bag under cold water.
This operation depends on the time available
and on the type of food. Small pieces may
even be cooked still frozen.
5.13 Ice-cube production
This appliance is equipped with one or more
trays for the production of ice-cubes.
44 ENGLISH

Do not use metallic instruments to
remove the trays from the freezer.
1. Fill these trays with water.
2. Put the ice trays in the freezer
compartment.
6. HINTS AND TIPS
6.1 Hints for energy saving
• Freezer: The internal configuration of the
appliance is the one that ensures the most
efficient use of energy.
• Fridge: Most efficient use of energy is
ensured in the configuration with the
drawers in the bottom part of the
appliance and shelves evenly distributed.
Position of the door bins does not affect
energy consumption.
• Do not open the door frequently or leave it
open longer than necessary.
• Freezer: The colder the temperature
setting, the higher the energy
consumption.
• Fridge: Do not set too high temperature to
save energy unless it is required by the
characteristics of the food.
• If the ambient temperature is high and the
temperature control is set to low
temperature and the appliance is fully
loaded, the compressor may run
continuously, causing frost or ice
formation on the evaporator. In this case,
set the temperature control toward higher
temperature to allow automatic defrosting
and to save energy this way.
• Ensure a good ventilation. Do not cover
the ventilation grilles or holes.
• Make sure that food products inside the
appliance allow air circulation through
dedicated holes in the rear interior of the
appliance.
6.2 Hints for freezing
• Activate Extra Freeze function at least 24
hours before placing the food inside the
freezer compartment.
• Before freezing wrap and seal fresh food
in: aluminium foil, plastic film or bags,
airtight containers with lid.
• For more efficient freezing and thawing
divide food into small portions.
• It is recommended to put labels and dates
on all your frozen food. This will help to
identify foods and to know when they
should be used before their deterioration.
• The food should be fresh when being
frozen to preserve good quality. Especially
fruits and vegetables should be frozen
after the harvest to preserve all of their
nutrients.
• Do not freeze bottles or cans with liquids,
in particular drinks containing carbon
dioxide - they may explode during
freezing.
• Do not put hot food in the freezer
compartment. Cool it down at room
temperature before placing it inside the
compartment.
• To avoid increase in temperature of
already frozen food, do not place fresh
unfrozen food directly next to it. Place food
at room temperature in the part of the
freezer compartment where there is no
frozen food.
• Do not eat ice cubes, water ices or ice
lollies immediately after taking them out of
the freezer. Risk of frostbites.
• Do not re-freeze defrosted food. If the food
has defrosted, cook it, cool it down and
then freeze it.
6.3 Hints for storage of frozen food
• Freezer compartment is the one marked
with .
• Good temperature setting that ensures
preservation of frozen food products is a
temperature less than or equal to -18°C.
Higher temperature setting inside the
appliance may lead to shorter shelf life.
• The whole freezer compartment is suitable
for storage of frozen food products.
• Leave enough space around the food to
allow air to circulate freely.
ENGLISH 45

• For adequate storage refer to food
packaging label to see the shelf life of
food.
• It is important to wrap the food in such a
way that prevents water, humidity or
condensation from getting inside.
6.4 Shopping tips
After grocery shopping:
• Ensure that the packaging is not damaged
- the food could be deteriorated. If the
package is swollen or wet, it might have
not been stored in the optimal conditions
and defrosting may have already started.
• To limit the defrosting process buy frozen
goods at the end of your grocery shopping
and transport them in a thermal and
insulated cool bag.
• Place the frozen foods immediately in the
freezer after coming back from the shop.
• If food has defrosted even partially, do not
re-freeze it. Consume it as soon as
possible.
• Respect the expiry date and the storage
information on the package.
6.5 Shelf life for freezer compartment
Type of food Shelf life (months)
Bread 3
Fruits (except citrus) 6 - 12
Vegetables 8 - 10
Leftovers without meat 1 - 2
Dairy food:
Butter
Soft cheese (e.g. mozzarella)
Hard cheese (e.g. parmesan, cheddar)
6 - 9
3 - 4
6
Seafood:
Fatty fish (e.g. salmon, mackerel)
Lean fish (e.g. cod, flounder)
Shrimps
Shucked clams and mussels
Cooked fish
2 - 3
4 - 6
12
3 - 4
1 - 2
Meat:
Poultry
Beef
Pork
Lamb
Sausage
Ham
Leftovers with meat
9 - 12
6 - 12
4 - 6
6 - 9
1 - 2
1 - 2
2 - 3
6.6 Hints for fresh food refrigeration
• Good temperature setting that ensures
preservation of fresh food is a temperature
less than or equal to +4°C.
Higher temperature setting inside the
appliance may lead to shorter shelf life of
food.
• Cover the food with packaging to preserve
its freshness and aroma.
• Always use closed containers for liquids
and for food, to avoid flavours or odours in
the compartment.
• To avoid the cross-contamination between
cooked and raw food, cover the cooked
food and separate it from the raw one.
• It is recommended to defrost the food
inside the fridge.
46 ENGLISH

• Do not insert hot food inside the
appliance. Make sure it has cooled down
at room temperature before inserting it.
• To prevent food waste the new stock of
food should always be placed behind the
old one.
6.7 Hints for food refrigeration
• Fresh food compartment is the one
marked (on the rating plate) with .
• Meat (all types): wrap in a suitable
packaging and place it on the glass shelf
above the vegetable drawer. Store meat
for at most 1-2 days.
• Fruit and vegetables: clean thoroughly
(eliminate the soil) and place in a special
drawer (vegetable drawer).
• It is advisable not to keep the exotic fruits
like bananas, mangos, papayas etc. in the
refrigerator.
• Vegetables like tomatoes, potatoes,
onions, and garlic should not be kept in
the refrigerator.
• Butter and cheese: place in an airtight
container or wrap in an aluminium foil or a
polythene bag to exclude as much air as
possible.
• Bottles: close them with a cap and place
them on the door bottle shelf, or (if
available) on the bottle rack.
• Always refer to the expiry date of the
products to know how long to keep them.
7. CARE AND CLEANING
WARNING!
Refer to Safety chapters.
7.1 Cleaning the interior
Before using the appliance for the first time,
the interior and all internal accessories should
be washed with lukewarm water and some
neutral soap to remove the typical smell of a
brand-new product, then dried thoroughly.
CAUTION!
Do not use detergents, abrasive
powders, chlorine or oil-based cleaners
as they will damage the finish.
CAUTION!
The accessories and parts of the
appliance are not suitable for washing in
a dishwasher.
CAUTION!
Clean the control panel with a moist
cloth. Do not use any detergents. After
cleaning, wipe the control panel dry with
a soft cloth.
7.2 Periodic cleaning
The equipment has to be cleaned regularly:
1. Clean the inside and accessories with
lukewarm water and some neutral soap.
2. Regularly check the door seals and wipe
them clean to ensure they are clean and
free from debris.
3. Rinse and dry thoroughly.
7.3 Defrosting of the refrigerator
Defrosting of the fridge compartment is
automatic. The water that condenses flows
into a recipient on the compressor and
evaporates. The recipient cannot be
removed.
7.4 Defrosting of the freezer
The freezer compartment is frost free. This
means that there is no build up of frost when
it is in operation, neither on the internal walls,
nor on the foods.
7.5 Installing and replacing the
CleanAir+ filter
The CleanAir+ filter is an activated carbon
filter that absorbs bad odours and allows you
to preserve the best flavour and aroma for all
foodstuffs without risk of odour cross-
contamination.
ENGLISH 47

Handle the air filter carefully to avoid
scratching its surface.
On delivery, the air filter is in a plastic
bag to preserve performance.
Install the air filter before activating the
appliance.
1. Unpack the air filter from the plastic bag.
2. Open the plastic housing and put the
pleated surface on the grid, fitting the
filter inside the marked area on the
gridded surface.
3. Hold the filter down while closing the
plastic housing until you hear a click.
4. Remove the top glass shelf from the
fridge compartment. Slip the plastic
housing with the air filter on the left side
of the glass shelf.
5. Insert the glass shelf back in the fridge
compartment. Be careful not to hit the
filter when inserting the glass shelf.
Replacing the air filter
1. Open the plastic housing.
48 ENGLISH

1
2
2. Pull out the used air filter.
3. Unpack the new air filter from the plastic
bag and insert it in the drawer.
4. Close the plastic housing.
5. After the filter replacement, press the
Filter Reset alarm button on the control
panel to turn off the alert.
For best performance, place the plastic
housing in the proper location (to the left of
the glass shelf) and replace the air filter every
6 months. For more information refer to "Air
filter change indicator".
The air filter is a consumable accessory
and as such is not covered by the
guarantee.
You can purchase new air filters from
your local dealer.
7.6 Period of non-operation
When the appliance is not in use for long
period, take the following precautions:
1. Disconnect the appliance from electricity
supply.
2. Remove all food.
3. Clean the appliance and all accessories.
4. Leave the doors open to prevent
unpleasant smells.
8. TROUBLESHOOTING
WARNING!
Refer to Safety chapters.
8.1 What to do if...
Problem Possible cause Solution
The appliance does not operate. The appliance is switched off. Switch on the appliance.
ENGLISH 49

Problem Possible cause Solution
The mains plug is not connected to
the mains socket correctly.
Connect the mains plug to the
mains socket correctly.
There is no voltage in the mains
socket.
Connect a different electrical appli‐
ance to the mains socket. Contact a
qualified electrician.
The appliance is noisy. The appliance is not supported
properly.
Check if the appliance stands sta‐
ble.
Acoustic or visual alarm is on. The cabinet has been recently
switched on.
Refer to "High temperature alarm"
or "Door open alarm".
The temperature in the appliance is
too high.
Refer to "High temperature alarm"
or "Door open alarm".
The door is left open. Close the door.
The compressor operates continual‐
ly.
Temperature is set incorrectly. Refer to "Control panel" chapter.
Many food products were put in at
the same time.
Wait a few hours and then check the
temperature again.
The room temperature is too high. Refer to "Installation" chapter.
Food products placed in the appli‐
ance were too warm.
Allow food products to cool to room
temperature before storing.
The door is not closed correctly. Refer to "Closing the door" section.
The Extra Freeze function is switch‐
ed on.
Refer to "Extra Freeze function"
section.
The Extra Cool function is switched
on.
Refer to "Extra Cool function" sec‐
tion.
The compressor does not start im‐
mediately after pressing the "Extra
Freeze" or "Extra Cool", or after
changing the temperature.
The compressor starts after a period
of time.
This is normal, no error has occur‐
red.
Door is misaligned or interferes with
ventilation grill.
The appliance is not levelled. Refer to installation instructions.
Door does not open easily. You attempted to re-open the door
immediately after closing.
Wait a few seconds between closing
and re-opening of the door.
The lamp does not work. The lamp is in stand-by mode. Close and open the door.
The lamp is defective. Contact the nearest Authorized
Service Centre.
There is too much frost and ice. The door is not closed correctly. Refer to "Closing the door" section.
The gasket is deformed or dirty. Refer to "Closing the door" section.
Food products are not wrapped
properly.
Wrap the food products better.
Temperature is set incorrectly. Refer to "Control panel" chapter.
50 ENGLISH

Problem Possible cause Solution
Appliance is fully loaded and is set
to the lowest temperature.
Set a higher temperature. Refer to
"Control panel" chapter.
Temperature set in the appliance is
too low and the ambient tempera‐
ture is too high.
Set a higher temperature. Refer to
"Control panel" chapter.
Water flows on the rear plate of the
refrigerator.
During the automatic defrosting
process, frost melts on the rear
plate.
This is correct.
There is too much condensed water
on the rear wall of the refrigerator.
Door was opened too frequently. Open the door only when necessa‐
ry.
Door was not closed completely. Make sure the door is closed com‐
pletely.
Stored food was not wrapped. Wrap food in suitable packaging be‐
fore storing it in the appliance.
Water flows on the floor. The melting water outlet is not con‐
nected to the evaporative tray above
the compressor.
Attach the melting water outlet to
the evaporative tray.
Temperature cannot be set. The Extra Freeze function or Extra
Cool function is switched on.
Switch off Extra Freeze function or
Extra Cool function manually, or
wait until the function deactivates
automatically to set the temperature.
Refer to "Extra Freeze function" or
"Extra Cool function" section.
The temperature in the appliance is
too low/too high.
The temperature is not set correctly. Set a higher/lower temperature.
The door is not closed correctly. Refer to "Closing the door" section.
The food products' temperature is
too high.
Let the food products temperature
decrease to room temperature be‐
fore storage.
Many food products are stored at
the same time.
Store less food products at the
same time.
The door has been opened often. Open the door only if necessary.
The Extra Freeze function is switch‐
ed on.
Refer to "Extra Freeze function"
section.
The Extra Cool function is switched
on.
Refer to "Extra Cool function" sec‐
tion.
There is no cold air circulation in the
appliance.
Make sure that there is cold air cir‐
culation in the appliance. Refer to
"Hints and tips" chapter.
appears on the display. The appliance is in the demonstra‐
tion mode.
To exit the demonstration mode,
press and hold the Extra Cool and
ECO buttons for approximately 10
seconds until you hear 3 short
beeps.
ENGLISH 51

Problem Possible cause Solution
The symbol appears and
the alarm indicator is on.
Communication problem. Contact the nearest Authorised
Service Centre. The cooling system
will continue to keep food products
cold, but temperature adjustment
will not be possible.
The or or
symbol and the current
setting appear alternately every 5
seconds and the alarm indicator is
on.
Temperature sensor problem. Contact the nearest Authorised
Service Centre. The cooling system
will continue to keep food products
cold, but temperature adjustment
will not be possible.
If the advice does not lead to the desired
result, call the nearest Authorized
Service Centre.
8.2 Replacing the lamp
The appliance is equipped with a longlife LED
interior light.
Only service is allowed to replace the lighting
device. Contact your Authorised Service
Centre.
8.3 Closing the door
1. Clean the door gaskets.
2. If necessary, adjust the door. Refer to
installation instructions.
3. If necessary, replace the defective door
gaskets. Contact the Authorised Service
Centre.
52 ENGLISH

9. NOISES
SSSRRR!
CLICK!
HISSS!
BRRR!
BLUBB!
10. TECHNICAL DATA
The technical information is situated in the
rating plate on the internal side of the
appliance and on the energy label.
The QR code on the energy label supplied
with the appliance provides a web link to the
information related to the performance of the
appliance in the EU EPREL database. Keep
the energy label for reference together
with the user manual and all other documents
provided with this appliance.
It is also possible to find the same information
in EPREL using the link
https://eprel.ec.europa.eu
and the model
name and product number that you find on
the rating plate of the appliance.
See the link
www.theenergylabel.eu
for
detailed information about the energy label.
11. INFORMATION FOR TEST INSTITUTES
Installation and preparation of the appliance
for any EcoDesign verification shall be
compliant with EN 62552. Ventilation
requirements, recess dimensions and
minimum rear clearances shall be as stated
in this User Manual at Chapter 3. Please
contact the manufacturer for any other further
information, including loading plans.
ENGLISH 53

12. ENVIRONMENTAL CONCERNS
Recycle materials with the symbol . Put the
packaging in relevant containers to recycle it.
Help protect the environment and human
health by recycling waste of electrical and
electronic appliances. Do not dispose of
appliances marked with the symbol with
the household waste. Return the product to
your local recycling facility or contact your
municipal office.
54 ENGLISH

POUR DES RÉSULTATS PARFAITS
Merci d’avoir choisi ce produit AEG. Nous l’avons conçu pour qu’il vous offre des
performances irréprochables pendant de nombreuses années, en intégrant des
technologies innovantes vous simplifiant la vie – fonctions que vous ne trouverez peut-
être pas sur des appareils ordinaires. Veuillez prendre quelques instants pour lire cette
notice afin d’utiliser au mieux votre appareil.
Consultez notre site pour :
Obtenir des conseils d’utilisation, des brochures, un dépanneur, des informations sur
le service et les réparations :
www.aeg.com/support
Enregistrer votre produit pour un meilleur service :
www.registeraeg.com
Acheter des accessoires, consommables et pièces de rechange d’origine pour votre
appareil :
www.aeg.com/shop
SERVICE ET ASSISTANCE À LA CLIENTÈLE
N’utilisez que des pièces de rechange d’origine.
Avant de contacter notre centre de service agréé, assurez-vous de disposer des
informations suivantes : Modèle, PNC, numéro de série.
Ces informations figurent sur la plaque signalétique.
Avertissement/Consignes de sécurité
Informations générales et conseils
Informations environnementales
Sous réserve de modifications.
TABLE DES MATIÈRES
1. INFORMATIONS DE SÉCURITÉ..................................................................55
2. CONSIGNES DE SÉCURITÉ........................................................................58
3. INSTALLATION.............................................................................................60
4. BANDEAU DE COMMANDE.........................................................................63
5. UTILISATION QUOTIDIENNE...................................................................... 66
6. CONSEILS.................................................................................................... 73
7. ENTRETIEN ET NETTOYAGE..................................................................... 75
8. DÉPANNAGE................................................................................................78
9. BRUITS......................................................................................................... 81
10. DONNÉES TECHNIQUES.......................................................................... 81
11. INFORMATIONS POUR LES LABORATOIRES D’ESSAIS....................... 82
12. EN MATIÈRE DE PROTECTION DE L'ENVIRONNEMENT.......................82
1. INFORMATIONS DE SÉCURITÉ
Avant d'installer et d'utiliser cet appareil, lisez soigneusement
les instructions fournies. Le fabricant ne pourra être tenu pour
FRANÇAIS 55

responsable des blessures et dégâts résultant d'une
mauvaise installation ou utilisation. Conservez toujours les
instructions dans un lieu sûr et accessible pour vous y référer
ultérieurement.
1.1 Sécurité des enfants et des personnes
vulnérables
• Cet appareil peut être utilisé par des enfants âgés d'au
moins 8 ans et par des personnes ayant des capacités
physiques, sensorielles ou mentales réduites ou dénuées
d’expérience ou de connaissance, s'ils sont correctement
surveillés ou si des instructions relatives à l'utilisation de
l'appareil en toute sécurité leur ont été données et s’ils
comprennent les risques encourus.
• Les enfants de 3 à 8 ans peuvent charger et décharger
l’appareil à condition qu’ils aient reçu des instructions
appropriées.
• Cet appareil peut être utilisé par des personnes souffrant de
handicaps très importants et complexes à condition qu’elles
aient reçu des instructions appropriées.
• Les enfants de moins de 3 ans doivent être tenus à l'écart
de l'appareil, à moins d'être surveillés en permanence.
• Veillez à ce que les enfants ne jouent pas avec l’appareil.
• Le nettoyage et l'entretien par l'usager ne doivent pas être
effectués par des enfants sans surveillance.
• Ne laissez pas les emballages à la portée des enfants et
jetez-les convenablement.
1.2 Sécurité générale
• Cet appareil est uniquement destiné à la conservation des
aliments et des boissons.
• Cet appareil est conçu pour un usage domestique ménager,
dans un environnement intérieur.
• Cet appareil peut être utilisé dans les bureaux, les
chambres d’hôtel, les chambres d’hôtes, les maisons
d’hôtes de ferme et d’autres hébergements similaires
56 FRANÇAIS

lorsque cette utilisation ne dépasse pas le niveau (moyen)
de l’utilisation domestique.
• Pour éviter la contamination des aliments, respectez les
instructions suivantes :
– n’ouvrez pas la porte pendant de longues durées ;
– nettoyez régulièrement les surfaces pouvant être en
contact avec les aliments et les systèmes d’évacuation
accessibles ;
– conservez la viande et le poisson crus dans des
récipients appropriés dans le réfrigérateur, afin qu’ils ne
soient pas en contact ou ne coulent pas sur d’autres
aliments.
• AVERTISSEMENT : Veillez à ce que les orifices de
ventilation situés dans l’enceinte de l’appareil ou la
structure intégrée ne soient pas obstrués.
• AVERTISSEMENT : N’utilisez aucun dispositif mécanique
ou autre pour accélérer le processus de dégivrage, outre
ceux recommandés par le fabricant.
• AVERTISSEMENT : Veillez à ne pas endommager le circuit
réfrigérant.
• AVERTISSEMENT : N’utilisez pas d’appareils électriques à
l’intérieur des compartiments de conservation des aliments
de l’appareil, sauf s’ils sont du type recommandé par le
fabricant.
• Ne pulvérisez pas d’eau ni de vapeur pour nettoyer
l’appareil.
• Nettoyez l’appareil avec un chiffon doux et humide. Utilisez
uniquement des produits de lavage neutres. N’utilisez pas
de produits abrasifs, de tampons à récurer, de solvants ou
d’objets métalliques.
• Si l’appareil est vide pendant une longue durée, éteignez-le,
dégivrez-le, nettoyez-le, séchez-le et laissez la porte
ouverte pour empêcher le développement de moisissure
dans l’appareil.
FRANÇAIS 57

• Ne conservez aucune substance explosive dans cet
appareil, comme des aérosols contenant un produit
inflammable.
• Si le câble d’alimentation est endommagé, il doit être
remplacé par le fabricant, son service après-vente ou par
un professionnel qualifié afin d’éviter un danger.
2. CONSIGNES DE SÉCURITÉ
2.1 Installation
AVERTISSEMENT!
L'appareil doit être installé uniquement
par un professionnel qualifié.
• Retirez l'intégralité de l'emballage.
• N'installez pas et ne branchez pas un
appareil endommagé.
• Pour des raisons de sécurité, n'utilisez pas
l'appareil avant de l'avoir installé dans la
structure encastrée.
• Suivez scrupuleusement les instructions
d'installation fournies avec l'appareil.
• Soyez toujours vigilants lorsque vous
déplacez l'appareil car il est lourd. Utilisez
toujours des gants de sécurité et des
chaussures fermées.
• Assurez-vous que l’air puisse circuler
autour de l’appareil.
• Lors de la première installation ou après
avoir inversé la porte, attendez au moins
4 heures avant de brancher l'appareil sur
le secteur. Cela permet à l’huile de
refouler dans le compresseur.
• Avant toute opération sur l'appareil (par
ex. inversion de la porte), débranchez la
fiche de la prise de courant.
• N'installez pas l'appareil à proximité d'un
radiateur ou d'une cuisinière, d'un four ou
d'une table de cuisson, sauf indication
contraire dans les instructions
d'installation.
• N'exposez pas l'appareil à la pluie.
• N’installez pas l’appareil dans un endroit
exposé à la lumière directe du soleil.
• N'installez pas l'appareil dans une pièce
trop humide ou trop froide.
• Lorsque vous déplacez l’appareil, veillez à
le soulever par l’avant pour éviter d’érafler
le sol.
• Cet appareil contient un sachet
déshydratant. Ceci n'est pas un jouet.
Ceci n'est pas un aliment. Veuillez le jeter
immédiatement.
2.2 Branchement électrique
AVERTISSEMENT!
Risque d'incendie ou d'électrocution.
AVERTISSEMENT!
Lorsque vous installez l'appareil,
assurez-vous que le câble d'alimentation
n'est pas coincé ou endommagé.
AVERTISSEMENT!
N'utilisez pas d'adaptateurs multiprises ni
de rallonges.
• L’appareil doit être relié à la terre.
• Assurez-vous que les paramètres figurant
sur la plaque signalétique correspondent
aux données électriques nominale de
l’alimentation secteur.
• Utilisez toujours une prise de courant de
sécurité correctement installée.
• Veillez à ne pas endommager les
composants électriques tels que la fiche
secteur, le câble d'alimentation ou le
compresseur. Contactez le service après-
vente agréé ou un électricien pour
changer les composants électriques.
• Le câble d'alimentation doit rester en
dessous du niveau de la fiche secteur.
• Ne branchez la fiche secteur dans la prise
secteur qu'à la fin de l'installation.
58 FRANÇAIS

Assurez-vous que la prise secteur est
accessible après l'installation.
• Ne tirez pas sur le câble secteur pour
débrancher l'appareil. Tirez toujours sur la
fiche de la prise secteur.
2.3 Utilisation
AVERTISSEMENT!
Risque de blessures, de brûlures,
d'électrocution ou d'incendie.
L'appareil contient un gaz inflammable,
l'isobutane (R600a), un gaz naturel ayant un
niveau élevé de compatibilité
environnementale. Veillez à ne pas
endommager le circuit frigorifique contenant
de l'isobutane.
• Ne modifiez pas les spécifications de cet
appareil.
• Toute utilisation du produit intégré en tant
que produit autonome est strictement
interdite.
• Ne placez aucun appareil électrique
(comme par exemple, une sorbetière)
dans l’appareil si cela n’est pas autorisé
par le fabricant.
• Si le circuit frigorifique est endommagé,
assurez-vous de l’absence de flammes et
de sources d’ignition dans la pièce. Aérez
la pièce.
• Évitez tout contact d’éléments chauds
avec les parties en plastique de l’appareil.
• Ne placez jamais de boissons gazeuses
dans le congélateur. Cela engendrerait
une pression sur le récipient de la
boisson.
• Ne stockez jamais de gaz ou de liquide
inflammable dans l’appareil.
• Ne placez pas de produits inflammables
ou d’éléments imbibés de produits
inflammables à l’intérieur, à proximité ou
au-dessus de l’appareil.
• Ne touchez ni le compresseur, ni le
condenseur. Ils sont chauds.
• Ne retirez pas et ne touchez pas les
éléments du compartiment congélateur
avec les mains mouillées.
• Ne recongelez jamais un aliment qui a été
décongelé.
• Respectez les instructions de stockage
figurant sur l'emballage des aliments
surgelés.
• Emballez les aliments dans un emballage
adapté au contact avec des aliments
avant de les placer dans le compartiment
congélateur.
2.4 Éclairage interne
AVERTISSEMENT!
Risque d'électrocution !
• Ce produit contient une ou plusieurs
sources lumineuses de classe d’efficacité
énergétique G.
• Concernant la/les lampe(s) à l’intérieur de
ce produit et les lampes de rechange
vendues séparément : Ces lampes sont
conçues pour résister à des conditions
physiques extrêmes dans les appareils
électroménagers, telles que la
température, les vibrations, l’humidité, ou
sont conçues pour signaler des
informations sur le statut opérationnel de
l’appareil. Elles ne sont pas destinées à
être utilisées dans d'autres applications et
ne conviennent pas à l’éclairage des
pièces d’un logement.
2.5 Entretien et nettoyage
AVERTISSEMENT!
Risque de blessure corporelle ou de
dommages matériels.
• Avant toute opération d'entretien, éteignez
l'appareil et débranchez la fiche de la prise
secteur.
• Cet appareil contient des hydrocarbures
dans son circuit de réfrigération.
L'entretien et la recharge du circuit de
réfrigération doivent être effectués par un
professionnel qualifié.
• Examinez régulièrement l'écoulement de
l'appareil et si nécessaire, nettoyez-le. Si
l'orifice est bouché, l'eau provenant du
dégivrage s'écoulera en bas de l'appareil.
2.6 Service
• Pour réparer l'appareil, contactez le
service après-vente agréé. Utilisez
FRANÇAIS 59

uniquement des pièces de rechange
d'origine.
• Veuillez noter qu’une autoréparation ou
une réparation non professionnelle
peuvent avoir des conséquences sur la
sécurité et annuler la garantie.
• Les pièces détachées suivantes seront
disponibles pendant 7 ans après l’arrêt du
modèle : thermostats, capteurs de
température, cartes circuits imprimées,
sources lumineuses, poignées de portes,
charnières de portes, plaques et
balconnets. Veuillez noter que certaines
de ces pièces détachées ne sont
disponibles qu’auprès de réparateurs
professionnels et que toutes les pièces
détachées ne sont pas adaptées à tous
les modèles.
• Les joints de portes seront disponibles
pendant 10 ans après l’arrêt du modèle.
2.7 Mise au rebut
AVERTISSEMENT!
Risque de blessure ou d'asphyxie.
• Débranchez l'appareil de l'alimentation
électrique.
• Coupez le câble d'alimentation et mettez-
le au rebut.
• Retirez la porte pour empêcher les enfants
et les animaux de s'enfermer dans
l'appareil.
• Le circuit frigorifique et les matériaux
d'isolation de cet appareil préservent la
couche d'ozone.
• La mousse isolante contient un gaz
inflammable. Contactez votre service
municipal pour obtenir des informations
sur la marche à suivre pour mettre
l'appareil au rebut.
• N'endommagez pas la partie du circuit de
réfrigération située à proximité du
condenseur thermique.
3. INSTALLATION
AVERTISSEMENT!
Reportez-vous aux chapitres relatifs à la
Sécurité.
AVERTISSEMENT!
Consultez les instructions d'installation
pour installer votre appareil.
AVERTISSEMENT!
Fixez l’appareil conformément aux
instructions d’installation pour éviter tout
risque d’instabilité de l’appareil.
60 FRANÇAIS

3.1 Dimensions
B
A
H1
W1
D1
W2
D2
W3
D3
90°
Dimensions hors-tout ¹
H1 mm 1772
W1 mm 546
D1 mm 549
¹ hauteur, largeur et profondeur de l’appareil
sans la poignée
Espace requis en service ²
H2 (A+B) mm 1816
W2 mm 546
D2 mm 551
A mm 1780
Espace requis en service ²
B mm 36
² hauteur, largeur et profondeur de l’appareil
avec la poignée, plus l’espace nécessaire
pour la libre circulation de l’air de
refroidissement
Espace total requis en service ³
H3 (A+B) mm 1816
W3 mm 546
D3 mm 1068
³ hauteur, largeur et profondeur de l’appareil
avec la poignée, plus l’espace nécessaire
pour la libre circulation de l’air de
FRANÇAIS 61

refroidissement, plus l’espace nécessaire
pour autoriser l’ouverture de la porte à l’angle
minimal permettant le retrait de tous les
équipements internes
3.2 Emplacement
Pour garantir le bon fonctionnement de
l'appareil, il ne faut pas l'installer dans un
endroit exposé à la lumière directe du soleil.
N'installez pas l'appareil à proximité d'un
radiateur ou d'une cuisinière, d'un four ou
d'une table de cuisson, sauf indication
contraire dans les instructions d'installation.
Assurez-vous que l’air peut circuler librement
autour de l’arrière du meuble.
Cet appareil doit être installé dans un lieu sec
et bien ventilé en intérieur.
Cet appareil est destiné à être utilisé à une
température ambiante comprise entre 10°C et
43°C.
Seul le respect de la plage de
températures spécifiée peut garantir un
bon fonctionnement de l’appareil.
En cas de doute concernant
l’emplacement d’installation de l’appareil,
veuillez contacter le vendeur, notre
service après-vente ou le service après-
vente agréé le plus proche.
L’appareil doit pouvoir être débranché de
l’alimentation électrique. C’est pourquoi
la prise électrique doit être facilement
accessible après l’installation.
3.3 Branchement électrique
• Avant de brancher, assurez-vous que la
tension et la fréquence indiquées sur la
plaque signalétique correspondent à votre
alimentation électrique domestique.
• L’appareil doit être relié à la terre. La fiche
du câble d’alimentation est munie d’un
contact à cet effet. Si la prise
d’alimentation électrique domestique n’est
pas reliée à la terre, branchez l’appareil à
une prise de terre séparée conformément
aux réglementations en vigueur, en vous
adressant à un électricien qualifié.
• Le fabricant décline toute responsabilité si
les précautions de sécurité ci-dessus ne
sont pas respectées.
3.4 Exigences en matière de
ventilation
Le flux d’air situé derrière l’appareil doit être
suffisant.
min. 200 cm2
min.
200 cm2
min.
38 mm
min.
38 mm
ATTENTION!
Reportez-vous aux instructions relatives
à l’installation.
3.5 Réversibilité de la porte
Veuillez vous reporter au document séparé
contenant des instructions sur l'installation et
l’inversion du sens d’ouverture de la porte.
ATTENTION!
À chaque étape de réversibilité de la
porte, protégez le sol pour éviter les
rayures dues aux matériaux durs.
62 FRANÇAIS

4. BANDEAU DE COMMANDE
1 3 6
91112 10
4 52 7 8
1Voyant ECOMETER
2Touche/voyant Extra Cool
3Voyant du compartiment réfrigérateur
4Voyant d’alarme
5Voyant d’alarme de porte ouverte
6Voyant du compartiment congélateur
7Touche/voyant Extra Freeze
8Touche/voyant d'alarme Filter Reset
9Touche/voyant de température du
congélateur
10 Indicateur de changement du filtre à air
11 Touche/voyant de température du
réfrigérateur
12 Touche ECO
4.1 Activation
Branchez la fiche électrique de l'appareil à la
prise de courant.
Pour sélectionner une température différente,
reportez-vous à « Réglage de la
température ».
Si l'affichage indique , reportez-vous
à « Dépannage ».
4.2 Désactivation
1. Maintenez enfoncée la touche de
température du congélateur pendant
5 secondes.
L’affichage indique clignotant.
2. Une fois l’appareil éteint, l’affichage
indique .
3. Débranchez la fiche d’alimentation de la
prise secteur.
4.3 Réglage de la température
La plage de température peut varier entre
-15 °C et -24 °C pour le congélateur et entre
2 °C et 8 °C pour le réfrigérateur.
Appuyez sur les touches de température pour
régler la température de l’appareil.
La température recommandée est de :
• +4 °C pour le réfrigérateur
• -18 °C pour le congélateur
Vous pouvez régler la température
recommandée manuellement à l’aide des
touches de température ou en activant la
ECO fonction. Reportez-vous à « ECO
fonction » pour plus d’informations
Les indicateurs de température affichent la
température réglée
La température réglée sera atteinte dans
les 24 heures.
Après une coupure de courant, l’appareil
revient à la température réglée.
4.4 Mise à l’arrêt du réfrigérateur
Il est possible d’éteindre uniquement le
compartiment du réfrigérateur et de laisser le
compartiment du congélateur allumé.
1. Maintenez enfoncée la touche de
température du réfrigérateur pendant
5 secondes.
L’affichage indique clignotant.
2. Une fois le compartiment réfrigérateur
éteint, l’affichage indique .
4.5 Mise en marche du réfrigérateur
Pour mettre en marche le réfrigérateur :
FRANÇAIS 63

1. Maintenez enfoncée la touche de
température du réfrigérateur pendant
5 secondes.
L’affichage indique clignotant.
2. Le compartiment réfrigérateur est allumé
et la température réglée précédemment
est rétablie.
Pour régler la température, reportez-vous
à « Réglage de la température ».
4.6 ECO fonction
La fonction ECO règle la température
optimale pour assurer la conservation des
aliments tout en minimisant la consommation
d’énergie.
1. Pour activer la fonction, appuyez sur la
touche ECO.
La température du réfrigérateur est réglée sur
+4 °C et la température du congélateur sur
-18 °C.
2. Pour désactiver la fonction, appuyez à
nouveau sur la touche ECO ou
sélectionnez une température différente
(reportez-vous à « Réglage de la
température »).
Une fois la fonction ECO désactivée, la
température du réfrigérateur est réglée sur +2
°C et la température du congélateur sur -20
°C.
L’activation du mode ECO désactive les
fonctions Extra Cool et Extra Freeze.
Le voyant ECOMETER indique la
consommation d’énergie actuelle de
l’appareil. Trois barres entièrement
éclairées indiquent la configuration la
plus économe en énergie.
4.7 Fonction Extra Cool
Avec la fonction Extra Cool, vous pouvez
refroidir rapidement de grandes quantités
d’aliments tièdes, par exemple après avoir
fait vos courses, sans réchauffer des aliments
déjà stockés dans le compartiment
réfrigérateur.
Pour activer la fonction, appuyez sur la
touche Extra Cool.
Le voyant Extra Cool s’allume. Lorsque la
fonction Extra Cool est activée, le ventilateur
peut fonctionner automatiquement.
La fonction s’arrête automatiquement au bout
d’environ 6 heures. Une fois la fonction
désactivée, le voyant Extra Cool s’éteint.
Appuyez sur la touche Extra Cool pour
désactiver la fonction Extra Cool avant qu’elle
ne s’arrête automatiquement.
Pour régler une température différente
pour le réfrigérateur, désactivez la
fonction Extra Cool et reportez-vous à
« Réglage de la température ».
4.8 Fonction Extra Freeze
La fonction Extra Freeze permet d’effectuer
successivement la précongélation et la
congélation rapide dans le compartiment
congélateur. Cette fonction accélère la
congélation des aliments frais et protège en
même temps les denrées déjà entreposées
d'un réchauffement indésirable.
Pour congeler des aliments frais, activez
la fonction Extra Freeze au moins
24 heures avant de placer les aliments
afin d’achever la précongélation.
Pour activer cette fonction, appuyez sur la
touche Extra Freeze.
Le voyant Extra Freeze s'allume. La fonction
Extra Freeze s’arrête automatiquement au
bout de 52 heures au maximum.
Appuyez sur la touche Extra Freeze pour
désactiver la fonction Extra Freeze avant
qu’elle ne s’arrête automatiquement.
4.9 Alarme haute température
Lorsque la température dans le compartiment
congélateur augmente (par exemple en
raison d’une coupure de courant), le voyant
d’alarme clignote, le voyant de température
du congélateur s’affiche H° et clignote, et le
signal sonore retentit.
64 FRANÇAIS

Pour désactiver l’alarme, appuyez sur
n’importe quel bouton.
Le voyant d’alarme et le signal sonore
s’éteignent. Le voyant de température du
congélateur affiche H° pendant 5 secondes
avant d’indiquer à nouveau la température du
congélateur.
L’alarme redémarre une heure après la
désactivation jusqu’à ce que les
conditions normales soient rétablies.
Si vous n’appuyez sur aucune touche, le
son se coupe automatiquement après
environ une heure pour ne pas déranger.
4.10 Alarme porte ouverte
Si vous laissez la porte du réfrigérateur
ouverte pendant environ 5 minutes ou la
porte du congélateur pendant environ
80 secondes, le signal sonore retentit et le
voyant d’alarme de porte ouverte s’allume.
L’éclairage interne du réfrigérateur peut
également commencer à clignoter.
L’alarme sonore s’arrête dès que la porte est
fermée. Appuyez sur n’importe quelle touche
pour désactiver le signal sonore et le
clignotement de l’éclairage interne du
réfrigérateur.
Si vous n’appuyez sur aucune touche, le
son se coupe automatiquement après
environ une heure pour ne pas déranger.
4.11 Indicateur de changement du
filtre à air
Lorsque le filtre à air est périmé et doit être
remplacé, le Indicateur de changement du
filtre à air et le voyant d’alarme Filter Reset
s’allument.
Reportez-vous à la section « Installation et
remplacement du filtre CleanAir+ » du
chapitre « Entretien et nettoyage » pour les
instructions de remplacement.
Après le remplacement du filtre, appuyez sur
la touche d’alarme Filter Reset pour
désactiver l’alarme.
4.12 Mode Configuration
Le mode Configuration vous permet de :
• Activer ou désactiver le voyant
ECOMETER
• Activer ou désactiver les sons des
boutons
• Changez les unités de température de °C
à °F
• Réinitialisez l’appareil aux réglages
d’usine
Activation du mode Configuration
Pour activer le mode Configuration :
1. Appuyez sur le bouton ECO et
maintenez-le enfoncé pendant environ
3 secondes. Lorsque le mode
Configuration est activé, l’affichage
indique un clignotant.
2. Une fois le mode Configuration activé,
l’affichage indique .
Pour désactiver le mode Configuration,
appuyez sur le bouton ECO et maintenez-le
enfoncé pendant environ 3 secondes.
Le mode Configuration se désactive
automatiquement si vous n’interagissez pas
avec le bandeau de commande pendant
60 secondes.
Navigation dans le mode Configuration
1. Activez le mode Configuration (reportez-
vous à « Activation du mode
Configuration »).
L’affichage indique .
2. Appuyez sur le bouton de température du
réfrigérateur (à gauche) pour modifier le
paramètre. Appuyez sur le bouton de
température du congélateur (à droite)
pour modifier la valeur du paramètre.
Affichage Paramètres par dé‐
faut
Voyant ECOMETER
Sons des boutons
Unités de température
Réglages usine
FRANÇAIS 65

ECOMETER Voyant
Pour allumer ou éteindre le mode
ECOMETER :
1. Activez le mode Configuration (reportez-
vous à « Activation du mode
Configuration »).
L’affichage indique .
2. Appuyez plusieurs fois sur . Le voyant
affiche respectivement pour le voyant
activé ou pour le voyant ECOMETER
désactivé.
3. Appuyez sur le bouton ECO et
maintenez-le enfoncé pendant environ
3 secondes pour quitter le mode
Configuration.
Sons des boutons
Vous pouvez activer ou désactiver les sons
des boutons dans le mode Configuration.
Pour activer ou désactiver les sons :
1. Activez le mode Configuration (reportez-
vous à « Activation du mode
Configuration »).
L’affichage indique .
2. Appuyez plusieurs fois sur jusqu’à ce
que s’affiche. Appuyez sur pour
activer ou désactiver les sons. Le voyant
passera à pour les sons activés ou
désactivés.
3. Appuyez sur le bouton ECO et
maintenez-le enfoncé pendant environ
3 secondes pour quitter le mode
Configuration.
Unités de température
À l’aide du mode Configuration, vous pouvez
modifier l’unité de température (Celsius ou
Fahrenheit) affichée sur le bandeau de
commande. Pour modifier l’unité de
température :
1. Activez le mode Configuration (reportez-
vous à « Activation du mode
Configuration »).
L’affichage indique .
2. Appuyez plusieurs fois sur jusqu’à ce
que et s’affichent. Appuyez sur
l’indicateur affichant l’unité pour choisir
entre pour Celsius et pour
Fahrenheit.
3. Appuyez sur le bouton ECO et
maintenez-le enfoncé pendant environ
3 secondes pour quitter le mode
Configuration.
Réglages usine
Cette fonction restaure chaque réglage aux
réglages usine par défaut. Pour restaurer les
réglages usine par défaut :
1. Activez le mode Configuration (reportez-
vous à « Activation du mode
Configuration »).
L’affichage indique .
2. Appuyez plusieurs fois sur jusqu’à ce
que et s’affichent. Appuyez
plusieurs fois sur jusqu’à ce que
s’affiche.
passe à clignotant puis à fixe,
ce qui indique que les réglages usine
sont restaurés.
3. Appuyez sur le bouton ECO et
maintenez-le enfoncé pendant environ
3 secondes pour quitter le mode
Configuration.
5. UTILISATION QUOTIDIENNE
5.1 Positionnement des étagères de
porte
Pour permettre la conservation d’emballages
alimentaires de différentes tailles, les
balconnets de la porte peuvent être placés à
des hauteurs différentes.
1. Soulevez doucement le balconnet jusqu’à
ce qu’il se détache.
2. Repositionnez comme souhaité.
66 FRANÇAIS

Ce modèle est équipé d’un compartiment de
rangement variable qui peut être déplacé
latéralement.
5.2 Clayettes amovibles
Les parois du réfrigérateur sont équipées
d'une série de glissières afin que les clayettes
puissent être positionnées comme vous le
souhaitez.
Cet appareil est également doté d'une
clayette composée de deux parties. La partie
avant de la clayette peut être rabattue et
placée sous la seconde partie pour une
meilleure utilisation de l'espace.
Pour rabattre la clayette :
1. Sortez doucement la partie avant.
2. Faites-la glisser dans le rail inférieur,
sous la seconde moitié.
1
2
Ne modifiez pas l'emplacement de la
clayette en verre située au-dessus du
bac à légumes, afin de garantir une
circulation d'air optimale.
5.3 Bac GreenZone
Il y a un bac dans la partie inférieure du
compartiment réfrigérateur.
L’étagère en verre du GreenZone est équipée
d’un dispositif qui régule son étanchéité et
fournit une humidité optimale à l’intérieur du
bac.
5.4 Retrait du bac GreenZone
Nous vous recommandons de vider le
bac avant de le sortir du réfrigérateur.
Pour sortir le bac :
1. Tirez le bac hors du réfrigérateur.
FRANÇAIS 67

2. Soulevez légèrement l'avant du bac.
3. Tirez le bac vers l’extérieur tout en le
soulevant.
Pour retirer le couvercle en verre du bac
GreenZone :
1. Déverrouiller simultanément la fixation
latérale des deux côtés.
2
x2
1
2. Tirez le support de la clayette en verre
vers vous.
5.5 Retrait ExtraChill
Un bac se trouve au-dessus du bac
GreenZone.
Pour sortir le bac :
1. Tirez le bac hors du réfrigérateur.
2. Soulevez légèrement l'avant du bac.
68 FRANÇAIS

3. Soulevez et tournez le bac pour le sortir
de l’appareil.
Pour retirer le couvercle en verre du bac
ExtraZone :
1. Déverrouiller simultanément la fixation
latérale des deux côtés.
2
x2
1
2. Tirez le support de la clayette en verre
vers vous.
2
1
5.6 Contrôle de l’humidité
La clayette en verre du bac GreenZone est
équipée d’un dispositif qui régule son
étanchéité et fournit une humidité optimale à
l’intérieur du bac.
Ne placez aucun produit alimentaire sur
le dispositif de contrôle de l’humidité.
FRANÇAIS 69

Pour retirer le dispositif de contrôle de
l’humidité :
1. Ouvrez le bac sous la clayette en verre et
retirez le couvercle.
2. Si vous devez remplacer la membrane
blanche de l’appareil, saisissez l’appareil
au milieu et séparez la membrane du
couvercle en tirant sur le couvercle.
3. Assemblez une nouvelle membrane dans
le couvercle en appuyant sur le bord de la
membrane dans le couvercle.
4. Repositionnez le dispositif de contrôle de
l’humidité sur le bac.
En fonction de la quantité et de l’état des
fruits et légumes stockés dans le
GreenZone bac, il se peut que de la
condensation se produise.
Dans ce cas, éliminez la condensation à
l’aide d’un chiffon doux.
5.7 MULTIFLOW
Le compartiment réfrigérateur est équipé du
dispositif MULTIFLOW qui permet un
refroidissement rapide et plus efficace des
aliments et le maintien d’une température
plus uniforme dans chaque partie du
compartiment réfrigérateur.
Ce dispositif s’active automatiquement en cas
de besoin.
70 FRANÇAIS

Le dispositif MULTIFLOW ne fonctionne que
lorsque la porte est fermée.
N’obstruez pas les orifices d’aération
pour permettre un meilleur
refroidissement.
Ne retirez pas le panneau MULTIFLOW.
Ne pulvérisez pas d’eau ni de vapeur
pour nettoyer l’appareil. Pour les
instructions de nettoyage, reportez-vous
au chapitre « Entretien et nettoyage ».
5.8 Filtre CleanAir+
Dans l’appareil, il y a un filtre à charbon
CleanAir+.
Le filtre purifie l'air contre les odeurs
indésirables dans le compartiment du
réfrigérateur, améliorant ainsi la qualité de la
conservation.
À la livraison, le filtre et son boîtier en
plastique sont placés dans un sac en
plastique avec les autres accessoires
(reportez-vous à la section « Installation et
remplacement du filtre CleanAir+ » du
chapitre « Entretien et nettoyage » pour
l’installation).
5.9 Bottle Stop
L’accessoire empêche le roulement des
bouteilles ou des canettes. Vous pouvez
empiler les bouteilles ou les canettes les
unes sur les autres pour économiser de
l’espace et mieux organiser votre
réfrigérateur.
L’accessoire ne nécessite aucun assemblage
ou outil. Placez l’accessoire avec la base en
silicone vers le bas et commencez à empiler
les bouteilles.
La base en silicone de l’accessoire est
antidérapante : elle ne colle pas et ne glisse
pas.
Stockez un maximum de 10 kg de
bouteilles et/ou de canettes de
différentes tailles en deux rangées au
maximum, comme illustré sur l’image.
Stockez uniquement les bouteilles ou
canettes fermées, en les plaçant avec
l’ouverture face à l’avant.
Ne mettez pas d’aliments sans
emballage en contact direct avec
l’accessoire.
FRANÇAIS 71

5.10 Congeler des aliments frais
Le compartiment du congélateur est parfait
pour congeler des denrées fraîches et
conserver à long terme des aliments surgelés
ou congelés.
Pour congeler des aliments frais, activez la
fonction Extra Freeze au moins 24 heures
avant de placer les aliments à conserver
dans le compartiment de congélation.
Conservez les aliments frais répartis
uniformément dans le premier compartiment
ou le premier bac en partant du haut.
La quantité maximale d'aliments pouvant être
congelés, sans ajouter d'autres aliments frais
pendant 24 heures, figure sur la plaque
signalétique (étiquette située à l'intérieur de
l'appareil).
Une fois le processus de congélation terminé,
l'appareil revient automatiquement au réglage
de température précédent (voir « Fonction
Extra Freeze »).
Pour plus d’informations, reportez-vous au
chapitre « Conseils pour la congélation ».
5.11 Conservation des plats
surgelés
Lors de la mise en service ou après un arrêt
prolongé et avant d’introduire les produits
dans le compartiment, laissez fonctionner
l’appareil au moins 3 heures avec la fonction
Extra Freeze allumée.
Les bacs du congélateur permettent de
retrouver rapidement et facilement les
aliments que vous recherchez.
Si vous devez conserver une grande quantité
d’aliments, retirez tous les bacs et placez les
aliments sur les clayettes.
Les aliments ne doivent pas être placés à
moins de 15 mm de la porte.
ATTENTION!
En cas de décongélation accidentelle
causée par une coupure de courant par
exemple, si la durée de la mise hors
tension est supérieure à la valeur
indiquée sur la plaque signalétique sous
« Autonomie de fonctionnement », les
aliments décongelés doivent être
consommés rapidement ou cuits
immédiatement avant d’être refroidis,
puis recongelés. Reportez-vous à la
section « Alarme haute température ».
5.12 Décongélation
Avant d’être consommés, les aliments
surgelés ou congelés peuvent être
décongelés au réfrigérateur ou dans un
sachet en plastique sous de l’eau froide.
Cette opération dépend du temps disponible
et du type d’aliments. Les petits morceaux
peuvent même être cuits toujours congelés.
5.13 Fabrication de glaçons
Cet appareil est équipé d'un ou plusieurs
bacs à glaçons.
N'utilisez pas d'instruments métalliques
pour décoller les bacs du congélateur.
1. Remplissez les bacs avec de l'eau.
2. Placez les bacs à glaçons dans le
compartiment congélateur.
72 FRANÇAIS

6. CONSEILS
6.1 Conseils pour économiser
l’énergie
• Congélateur : La configuration interne de
l’appareil permet une consommation
d’énergie la plus efficace possible.
• Réfrigérateur : L’utilisation la plus efficace
de l’énergie est assurée dans la
configuration avec les bacs dans la partie
inférieure de l’appareil et les clayettes
réparties uniformément. La position des
compartiments de porte n’affecte pas la
consommation d’énergie.
• Évitez d'ouvrir fréquemment la porte et ne
la laissez ouverte que le temps
nécessaire.
• Congélateur : Plus le réglage de la
température est bas, plus la
consommation électrique est élevée.
• Réfrigérateur : Ne réglez pas une
température trop élevée pour économiser
l’énergie, sauf si cela est requis par les
caractéristiques des aliments.
• Si la température ambiante est élevée,
que le thermostat est réglé sur une
température basse et que l’appareil est
plein, le compresseur fonctionne en
régime continu, ce qui provoque une
formation de givre ou de glace sur
l’évaporateur. Dans ce cas, réglez le
thermostat sur une température plus
élevée pour permettre le dégivrage
automatique et donc d’économiser de
l’énergie.
• Assurez une bonne ventilation. Ne
couvrez pas les grilles ou les orifices de
ventilation.
• Assurez-vous que les produits
alimentaires à l’intérieur de l’appareil
permettent la circulation de l’air par les
orifices dédiés à l’arrière de l’intérieur de
l’appareil.
6.2 Conseils pour la congélation
• Activez la fonction Extra Freeze au moins
24 heures avant de placer les aliments
dans le compartiment du congélateur.
• Avant de congeler des aliments frais, les
emballer dans du papier aluminium, du
film ou des sachets en plastique, des
récipients à couvercles étanches à l’air.
• Pour une congélation et une
décongélation plus efficaces, séparez les
aliments en petites portions.
• Il est recommandé de mettre des
étiquettes et des dates sur tous vos
aliments congelés. Cela permettra
d’identifier les aliments et de savoir quand
ils peuvent être consommés avant leur
détérioration.
• Les aliments doivent être frais lorsqu’ils
sont congelés pour préserver leur qualité.
En particulier, les fruits et les légumes
doivent être congelés après leur récolte
pour préserver tous leurs nutriments.
• Ne congelez pas des bouteilles ou des
canettes avec des liquides, en particulier
des boissons contenant du dioxyde de
carbone : elles pourraient exploser
pendant la congélation.
• Ne placez pas d’aliments chauds dans le
compartiment congélateur. Laissez-les
refroidir à température ambiante avant de
les placer dans le compartiment.
• Pour éviter d’augmenter la température
des aliments déjà surgelés, ne placez pas
d’aliments frais non congelés directement
à proximité. Placez les aliments à
température ambiante dans la partie du
compartiment du congélateur où il n’y a
pas d’aliments congelés.
• Ne mangez pas les glaçons, les glaces à
l’eau ou les bâtonnets glacés dès leur
sortie du congélateur. Risque de gelure.
• Ne recongelez pas des aliments
décongelés. Si les aliments sont
décongelés, cuisez-les, laissez-les
refroidir puis congelez-les.
6.3 Conseils pour le stockage des
plats surgelés
• Le compartiment congélateur est marqué
de .
• Un bon réglage de température qui
garantit la conservation des produits
alimentaires congelés est une température
inférieure ou égale à -18 °C.
FRANÇAIS 73

Un réglage de température plus élevé à
l’intérieur de l’appareil peut entraîner une
durée de conservation plus courte.
• L’ensemble du compartiment du
congélateur est adapté à la conservation
de produits alimentaires congelés.
• Laissez suffisamment d’espace autour des
aliments pour permettre à l’air de circuler
librement.
• Pour une conservation adéquate,
consultez l’étiquette de l’emballage des
aliments pour connaître la durée de
conservation des aliments.
• Il est important d’emballer les aliments de
manière à empêcher l’eau, l’humidité ou la
condensation de pénétrer à l’intérieur.
6.4 Conseils pour vos courses
Après vos courses :
• Assurez-vous que l’emballage n’est pas
endommagé : les aliments pourraient être
détériorés. Si l’emballage est gonflé ou
mouillé, il n’a peut-être pas été conservé
dans des conditions optimales et la
décongélation a peut-être déjà
commencé.
• Pour limiter le processus de
décongélation, achetez les produits
congelés à la fin de vos courses et
transportez-les dans un sac isotherme.
• Placez les aliments congelés dans le
congélateur immédiatement après être
revenu de vos courses.
• Si les aliments sont décongelés même
partiellement, ne les recongelez pas.
Consommez-les dès que possible.
• Respectez la date d’expiration et les
informations de conservation sur
l’emballage.
6.5 Durée de conservation pour le compartiment du congélateur
Type d’aliment Durée de conservation
(mois)
Pain 3
Fruits (sauf agrumes) 6 - 12
Légumes 8 - 10
Restes (sans viande) 1 - 2
Produits laitiers :
Beurre
Fromage à pâte molle (p. ex., mozzarella)
Fromage à pâte dure (p. ex., parmesan, cheddar)
6 - 9
3 - 4
6
Fruits de mer :
Poisson gras (p. ex., saumon, maquereau)
Poisson maigre (p. ex., cabillaud, limande)
Crevettes
Palourdes et moules décortiquées
Poisson cuit
2 - 3
4 - 6
12
3 - 4
1 - 2
Viande :
Volaille
Bœuf
Porc
Agneau
Saucisse
Jambon
Restes (avec viande)
9 - 12
6 - 12
4 - 6
6 - 9
1 - 2
1 - 2
2 - 3
74 FRANÇAIS

6.6 Conseils pour la réfrigération
des aliments frais
• Un bon réglage de température qui
garantit la conservation des aliments frais
est une température inférieure ou égale à
+4 °C.
Un réglage de température plus élevé à
l’intérieur de l’appareil peut entraîner une
durée de conservation plus courte des
aliments.
• Couvrez les aliments avec un emballage
pour conserver leur fraîcheur et leur
arôme.
• Utilisez toujours des récipients fermés
pour les liquides et les aliments afin
d’éviter les saveurs ou les odeurs dans le
compartiment.
• Pour éviter la contamination croisée entre
les aliments cuits et les aliments crus,
couvrez les aliments cuits et séparez-les
des aliments crus.
• Il est conseillé de décongeler les aliments
à l’intérieur du réfrigérateur.
• N’insérez pas d’aliments chauds dans
l’appareil. Assurez-vous qu’ils ont refroidi
à température ambiante avant de les
insérer.
• Pour éviter le gaspillage des aliments, le
nouveau stock d’aliments doit toujours
être placé derrière l’ancien.
6.7 Conseils pour la réfrigération
des aliments
• Le compartiment des aliments frais est
celui indiqué (sur la plaque signalétique)
par .
• Viande (tous types) : enveloppez-la dans
un emballage approprié et placez-la sur
l'étagère en verre au-dessus du bac à
légumes. Ne conservez la viande que 1 ou
2 jours au plus.
• Fruits et légumes : nettoyez
soigneusement (retirez la terre) et placez-
les dans un bac spécial (bac à légumes).
• Il est conseillé de ne pas conserver les
fruits exotiques tels que les bananes, les
mangues, les papayes, etc. dans le
réfrigérateur.
• Les légumes tels que les tomates, les
pommes de terre, les oignons et l'ail ne
doivent pas être conservés dans le
réfrigérateur.
• Beurre et fromage : placez-les dans un
récipient étanche à l'air, ou enveloppez-les
dans une feuille d'aluminium ou un sachet
en polyéthylène, pour les tenir autant que
possible à l'abri de l'air.
• Bouteilles : fermez-les avec un bouchon et
placez-les sur le porte-bouteilles ou (s'il
est installé) dans le balconnet à bouteilles
de la porte.
• Consultez toujours la date d’expiration des
produits pour savoir combien de temps les
conserver.
7. ENTRETIEN ET NETTOYAGE
AVERTISSEMENT!
Reportez-vous aux chapitres relatifs à la
Sécurité.
7.1 Nettoyage de l’intérieur
Avant d’utiliser l’appareil pour la première
fois, nettoyez l’intérieur et tous les
accessoires avec de l’eau tiède savonneuse
(pour supprimer toute odeur de neuf), puis
séchez-les soigneusement.
ATTENTION!
N’utilisez jamais de détergents, de
produits abrasifs, de nettoyants à base
de chlore ou d’huile, car ils pourraient
endommager le revêtement.
FRANÇAIS 75

ATTENTION!
Les accessoires et parties de l’appareil
ne sont pas adaptés au lavage au lave-
vaisselle.
ATTENTION!
Nettoyez le bandeau de commande avec
un chiffon humide. N'utilisez aucun
produit détergent. Après le nettoyage,
essuyez le bandeau de commande avec
un chiffon doux.
7.2 Nettoyage périodique
L'appareil doit être nettoyé régulièrement :
1. Nettoyez l'intérieur et les accessoires
avec de l'eau tiède et du savon neutre.
2. Vérifiez régulièrement les joints de porte
et essuyez-les pour vous assurer qu'ils
sont propres et ne contiennent pas de
résidus.
3. Rincez et séchez soigneusement.
7.3 Dégivrage du réfrigérateur
Le dégivrage du compartiment réfrigérateur
est automatique. L'eau qui se condense
s'écoule vers un réservoir situé sur le
compresseur puis s'évapore. Le réservoir ne
peut pas être retiré.
7.4 Dégivrage du congélateur
Le compartiment congélateur est garanti sans
givre. Cela signifie qu'il n'y a aucune
formation de givre lorsqu'il est en marche, ni
sur les parois intérieures, ni sur les aliments.
7.5 Installation et remplacement du
filtre CleanAir+
Le filtre CleanAir+ est un filtre à charbon actif
qui absorbe les mauvaises odeurs et vous
permet de préserver la meilleure saveur et le
meilleur arôme pour toutes les denrées
alimentaires sans risque de contamination
croisée par les odeurs.
Manipulez le filtre à air avec précaution
pour éviter de rayer sa surface.
Le filtre à air est livré dans un sac
plastique pour préserver son efficacité.
Installez le filtre à air avant d’activer
l’appareil.
1. Déballez le filtre à air du sac en plastique.
2. Ouvrez le boîtier en plastique et placez la
surface plissée sur la grille, en installant
le filtre à l’intérieur de la zone marquée
sur la surface quadrillée.
3. Maintenez le filtre enfoncé tout en
fermant le boîtier en plastique jusqu’à ce
que vous entendiez un clic.
4. Retirez la clayette supérieure en verre du
compartiment réfrigérateur. Faites glisser
le boîtier en plastique avec le filtre à air
sur le côté gauche de l’étagère en verre.
76 FRANÇAIS

5. Insérez la clayette arrière en verre dans
le compartiment réfrigérateur. Veillez à ne
pas heurter le filtre lorsque vous insérez
la clayette en verre.
Remplacement du filtre à air
1. Ouvrir le boîtier en plastique.
1
2
2. Retirez le filtre à air usé.
3. Déballez le nouveau filtre à air du sac en
plastique et insérez-le dans le tiroir.
4. Fermer le boîtier en plastique.
5. Après le remplacement du filtre, appuyez
sur le bouton d’alarme Filter Reset du
panneau de commande pour désactiver
l’alerte.
Pour de meilleures performances, placez le
boîtier en plastique à l’emplacement
approprié (à gauche de l’étagère en verre) et
remplacez le filtre à air tous les 6 mois. Pour
plus d'informations, reportez-vous à
« Indicateur de changement du filtre à air ».
FRANÇAIS 77

Le filtre à air est un accessoire
consommable et, en tant que tel, n’est
pas couvert par la garantie.
Vous pouvez acheter de nouveaux filtres
à air auprès de votre revendeur local.
7.6 Période de non-utilisation
Si l'appareil n'est pas utilisé pendant une
longue période, prenez les précautions
suivantes :
1. Débranchez l’appareil de l’alimentation
électrique.
2. Retirez tous les aliments.
3. Nettoyez l’appareil et tous ses
accessoires.
4. Laissez les portes ouvertes pour éviter
les mauvaises odeurs.
8. DÉPANNAGE
AVERTISSEMENT!
Reportez-vous aux chapitres relatifs à la
Sécurité.
8.1 Que faire si...
Problème Cause probable Solution
L’appareil ne fonctionne pas. L’appareil est à l’arrêt. Mettez l’appareil en fonctionnement.
La fiche d’alimentation n’est pas
correctement branchée à la prise de
courant.
Branchez la fiche secteur sur la pri‐
se de courant.
Il n’y a pas de tension dans la prise
de courant.
Branchez un autre appareil sur la
prise de courant. Contactez un élec‐
tricien qualifié.
L’appareil est bruyant. L’appareil n’est pas positionné cor‐
rectement.
Vérifiez que l’appareil est stable.
Les signaux sonores ou visuels sont
activés.
Le meuble a été allumé récemment. Reportez-vous à « Alarme haute
température » ou à « Alarme porte
ouverte ».
La température à l’intérieur de l’ap‐
pareil est trop élevée.
Reportez-vous à « Alarme haute
température » ou à « Alarme porte
ouverte ».
La porte est laissée ouverte. Refermez la porte.
Le compresseur fonctionne en per‐
manence.
La température est mal réglée. Reportez-vous au chapitre « Ban‐
deau de commande ».
Trop d’aliments ont été introduits si‐
multanément.
Attendez quelques heures et vérifiez
de nouveau la température.
La température ambiante est trop
élevée.
Reportez-vous au chapitre « Instal‐
lation ».
78 FRANÇAIS

Problème Cause probable Solution
Les aliments placés dans l’appareil
étaient trop chauds.
Laissez refroidir les aliments à tem‐
pérature ambiante avant de les ran‐
ger.
La porte n’est pas correctement fer‐
mée.
Reportez-vous à la section « Ferme‐
ture de la porte ».
La fonction Extra Freeze est acti‐
vée.
Consultez le paragraphe « Fonc‐
tion Extra Freeze ».
La fonction Extra Cool est activée. Consultez le paragraphe « Fonc‐
tion Extra Cool ».
Le compresseur ne démarre pas im‐
médiatement après avoir appuyé
sur la touche « Extra Freeze » ou
« Extra Cool », ou après avoir modi‐
fié la température.
Le compresseur démarre au bout
d’un certain temps.
C’est normal, aucune erreur n’est
survenue.
La porte est mal alignée ou interfère
avec le gril de ventilation.
L’appareil n’est pas d’aplomb. Consultez les instructions d’installa‐
tion.
La porte est difficile à ouvrir. Vous avez essayé de rouvrir la por‐
te immédiatement après l’avoir fer‐
mée.
Attendez quelques secondes après
avoir fermé la porte pour la rouvrir.
L’éclairage ne fonctionne pas. L’éclairage est en mode veille. Fermez et ouvrez la porte.
L’éclairage est défectueux. Contactez le service après-vente
agréé le plus proche.
Il y a trop de givre et de glace. La porte n’est pas correctement fer‐
mée.
Reportez-vous à la section « Ferme‐
ture de la porte ».
Le joint est déformé ou sale. Reportez-vous à la section « Ferme‐
ture de la porte ».
Les aliments ne sont pas correcte‐
ment emballés.
Emballez mieux les aliments.
La température est mal réglée. Reportez-vous au chapitre « Ban‐
deau de commande ».
L’appareil est complètement chargé
et réglé sur la température la plus
basse.
Sélectionnez une température plus
élevée. Reportez-vous au chapitre
« Bandeau de commande ».
La température réglée dans l’appa‐
reil est trop basse et la température
ambiante est trop élevée.
Sélectionnez une température plus
élevée. Reportez-vous au chapitre
« Bandeau de commande ».
De l’eau s’écoule sur la plaque ar‐
rière du réfrigérateur.
Pendant le dégivrage automatique,
le givre fond sur la plaque arrière.
C’est normal.
Trop d’eau s’est condensée sur la
paroi arrière du réfrigérateur.
La porte a été ouverte trop fréquem‐
ment.
N’ouvrez la porte qu’en cas de né‐
cessité.
La porte n’est pas entièrement fer‐
mée.
Assurez-vous que la porte est entiè‐
rement fermée.
Les aliments conservés ne sont pas
emballés.
Enveloppez les aliments dans un
emballage adapté avant de les ran‐
ger dans l’appareil.
FRANÇAIS 79

Problème Cause probable Solution
De l’eau s’écoule sur le sol. La sortie d’eau de dégivrage n’est
pas raccordée au bac d’évaporation
situé au-dessus du compresseur.
Fixez la sortie de l’eau de dégivrage
au plateau d’évaporation.
La température ne peut pas être ré‐
glée.
La fonction Extra Freeze ou la fonc‐
tion Extra Cool est activée.
Éteignez la fonction Extra Freeze ou
fonction Extra Cool manuellement,
ou attendez que la fonction se réin‐
itialise automatiquement avant de
régler la température. Reportez-
vous au paragraphe « Extra Free‐
zeFonction » ou « Extra CoolFonc‐
tion ».
La température à l’intérieur de l’ap‐
pareil est trop basse/élevée.
La température n’est pas réglée cor‐
rectement.
Sélectionnez une température plus
élevée/plus basse.
La porte n’est pas correctement fer‐
mée.
Reportez-vous à la section « Ferme‐
ture de la porte ».
La température des aliments est
trop élevée.
Laissez les aliments refroidir à tem‐
pérature ambiante avant de les con‐
server.
Trop d’aliments ont été conservés
simultanément.
Conservez moins de produits en
même temps.
La porte a été ouverte souvent. N’ouvrez la porte que si nécessaire.
La fonction Extra Freeze est acti‐
vée.
Consultez le paragraphe « Fonc‐
tion Extra Freeze ».
La fonction Extra Cool est activée. Consultez le paragraphe « Fonc‐
tion Extra Cool ».
L’air froid ne circule pas dans l’ap‐
pareil.
Assurez-vous que l’air froid circule
dans l’appareil. Reportez-vous au
chapitre « Conseils ».
s’affiche. L’appareil est en mode démonstra‐
tion.
Pour quitter le mode démonstration,
maintenez les touches Extra Cool et
ECO enfoncées pendant environ
10 secondes jusqu’à ce que vous
entendez 3 courts bips.
Le symbole apparaît et
le voyant d’alarme est allumé.
Problème de communication Contactez le service après-vente
agréé le plus proche. Le système de
refroidissement continue de mainte‐
nir les aliments au frais, mais le ré‐
glage de la température n’est pas
possible.
Le symbole ,
ou et le réglage actuel
apparaissent alternativement toutes
les 5 secondes et le voyant d’alarme
est allumé.
Problème de capteur de températu‐
re.
Contactez le service après-vente
agréé le plus proche. Le système de
refroidissement continue de mainte‐
nir les aliments au frais, mais le ré‐
glage de la température n’est pas
possible.
80 FRANÇAIS

Si ces conseils n’apportent pas le résultat
souhaité, veuillez consulter le service
après-vente agréé le plus proche.
8.2 Remplacement de l’ampoule
L’appareil est équipé d’un éclairage à LED
longue durée.
Seul le service de maintenance est autorisé à
remplacer le dispositif d’éclairage. Contactez
le service après-vente agréé.
8.3 Fermeture de la porte
1. Nettoyer les joints de porte.
2. Si nécessaire, régler la porte. Consultez
les instructions d’installation.
3. Si nécessaire, remplacer les joints de
porte défectueux. Veuillez contacter le
service après-vente agréé.
9. BRUITS
SSSRRR!
CLICK!
HISSS!
BRRR!
BLUBB!
10. DONNÉES TECHNIQUES
Les caractéristiques techniques figurent sur
la plaque signalétique située sur à l’intérieur
de l’appareil et sur l’étiquette énergétique.
Le code QR présent sur l’étiquette
énergétique fournie avec l’appareil contient
un lien Web vers les informations relatives
aux performances de l’appareil dans la base
de données EPREL de l’UE. Conservez
FRANÇAIS 81

l’étiquette énergétique à titre de référence
avec la notice d’utilisation et tous les autres
documents fournis avec cet appareil.
Il est également possible de trouver les
mêmes informations dans EPREL à l’aide du
lien
https://eprel.ec.europa.eu
avec le nom du
modèle et le numéro de produit se trouvant
sur la plaque signalétique de l’appareil.
Consultez le lien
www.theenergylabel.eu
pour
obtenir des informations détaillées sur
l’étiquette énergétique.
11. INFORMATIONS POUR LES LABORATOIRES D’ESSAIS
L’installation et la préparation de l’appareil
pour une vérification EcoDesign doivent être
conformes à la norme EN 62552. Les
exigences en matière de ventilation, les
dimensions des évidements et les
dégagements arrière minimum doivent
correspondre aux indications du chapitre 3 de
cette notice d’utilisation. Veuillez contacter le
fabricant pour de plus amples informations,
notamment les plans de chargement.
12. EN MATIÈRE DE PROTECTION DE L'ENVIRONNEMENT
Recyclez les matériaux portant le symbole
. Déposez les emballages dans les
conteneurs prévus à cet effet. Contribuez à la
protection de l'environnement et à votre
sécurité, recyclez vos produits électriques et
électroniques. Ne jetez pas les appareils
portant le symbole avec les ordures
ménagères. Emmenez un tel produit dans
votre centre local de recyclage ou contactez
vos services municipaux.
82 FRANÇAIS

FÜR PERFEKTE ERGEBNISSE
Danke, dass Sie sich für dieses AEG Produkt entschieden haben. Wir haben es
geschaffen, damit Sie viele Jahre von seiner ausgezeichneten Leistung und den
innovativen Technologien, die Ihnen das Leben erleichtern, profitieren können. Es ist mit
Funktionen ausgestattet, die in gewöhnlichen Geräten nicht vorhanden sind. Bitte
nehmen Sie sich ein paar Minuten Zeit, um das Beste aus ihm herauszuholen.
Besuchen Sie uns auf unserer Website, um:
Anwendungshinweise, Prospekte, Informationen zu Fehlerbehebung, Service und
Reparatur zu erhalten:
www.aeg.com/support
Registrieren Sie Ihr Produkt, um einen erstklassigen Service zu erhalten:
www.registeraeg.com
Um Zubehör, Verbrauchsmaterial und Original-Ersatzteile für Ihr Gerät zu kaufen:
www.aeg.com/shop
KUNDENDIENST UND SERVICE
Verwenden Sie immer Original-Ersatzteile.
Halten Sie folgende Angaben bereit, wenn Sie sich an einen autorisierten Kundendienst
wenden: Modell, PNC, Seriennummer.
Die Daten finden Sie auf dem Typenschild.
Warnungs-/Sicherheitshinweise
Allgemeine Informationen und Empfehlungen
Informationen zum Umweltschutz
Änderungen vorbehalten.
INHALTSVERZEICHNIS
1. SICHERHEITSHINWEISE............................................................................ 83
2. SICHERHEITSANWEISUNGEN................................................................... 86
3. MONTAGE.................................................................................................... 88
4. BEDIENFELD................................................................................................91
5. TÄGLICHER GEBRAUCH............................................................................ 94
6. TIPPS UND HINWEISE.............................................................................. 101
7. REINIGUNG UND PFLEGE........................................................................ 104
8. PROBLEMBEHEBUNG...............................................................................106
9. GERÄUSCHE..............................................................................................110
10. TECHNISCHE DATEN..............................................................................110
11. INFORMATIONEN FÜR PRÜFINSTITUTE.............................................. 110
12. UMWELTTIPPS........................................................................................ 111
1. SICHERHEITSHINWEISE
Lesen Sie vor der Montage und dem Gebrauch des Geräts
zuerst die Bedienungsanleitung. Bei Verletzungen oder
DEUTSCH 83

Schäden infolge nicht ordnungsgemäßer Montage oder
Verwendung übernimmt der Hersteller keine Haftung.
Bewahren Sie die Anleitung zum Nachschlagen an einem
sicheren und zugänglichen Ort auf.
1.1 Sicherheit von Kindern und schutzbedürftigen
Personen
• Das Gerät kann von Kindern ab 8 Jahren und Personen mit
eingeschränkten physischen, sensorischen oder geistigen
Fähigkeiten oder mit mangelnder Erfahrung/mangelndem
Wissen benutzt werden, wenn sie durch eine für ihre
Sicherheit zuständige Person beaufsichtigt werden oder
von dieser Person Anweisungen erhalten haben, wie das
Gerät sicher zu bedienen ist und welche Gefahren bei nicht
ordnungsgemäßer Bedienung bestehen.
• Kinder zwischen 3 und 8 Jahren dürfen das Gerät be- und
entladen, vorausgesetzt, sie wurden ordnungsgemäß
eingewiesen.
• Dieses Gerät kann von Personen mit schweren und
komplexen Behinderungen benutzt werden, vorausgesetzt,
sie wurden ordnungsgemäß eingewiesen.
• Halten Sie Kinder unter 3 Jahren vom Gerät fern, wenn sie
nicht ständig beaufsichtigt werden.
• Kinder sollten beaufsichtigt werden, um sicherzustellen,
dass sie nicht mit dem Gerät.
• Kinder dürfen keine Reinigung und Wartung des Geräts
ohne Beaufsichtigung durchführen.
• Halten Sie sämtliches Verpackungsmaterial von Kindern
fern und entsorgen Sie es ordnungsgemäß.
1.2 Allgemeine Sicherheit
• Dieses Gerät ist nur für die Aufbewahrung von
Lebensmitteln und Getränken bestimmt.
• Dieses Gerät ist für den häuslichen Gebrauch im Haushalt
in Innenräumen konzipiert.
84 DEUTSCH

• Dieses Gerät darf in Büros, Hotelzimmern, Gästezimmern
in Pensionen, Bauernhöfen und anderen ähnlichen
Unterkünften verwendet werden, wenn diese Nutzung das
(durchschnittliche) Nutzungsniveau im Haushalt nicht
überschreitet.
• Um eine Kontaminierung von Lebensmitteln zu vermeiden,
beachten Sie die folgenden Hinweise:
– Öffnen Sie die Tür nicht über längere Zeit hinweg;
– Reinigen Sie regelmäßig Oberflächen, die mit
Lebensmitteln in Kontakt kommen können, und
zugängliche Ablaufsysteme;
– Lagern Sie rohes Fleisch und Fisch in geeigneten
Behältern im Kühlschrank, so dass sie nicht mit anderen
Lebensmitteln in Berührung kommen oder auf diese
tropfen.
• WARNUNG: Halten Sie die Lüftungsöffnungen im
Gerätegehäuse oder in der Einbaunische frei von
Hindernissen.
• WARNUNG: Versuchen Sie nicht, den Abtauvorgang durch
andere als vom Hersteller empfohlene mechanische oder
sonstige Hilfsmittel zu beschleunigen.
• WARNUNG: Achten Sie darauf, den Kältekreislauf nicht zu
beschädigen.
• WARNUNG: Betreiben Sie in den Lebensmittelfächern des
Geräts keine anderen als die vom Hersteller empfohlenen
Elektrogeräte.
• Reinigen Sie das Gerät nicht mit Wasserspray oder Dampf.
• Reinigen Sie das Gerät mit einem weichen, feuchten Tuch.
Verwenden Sie ausschließlich Neutralreiniger. Verwenden
Sie keine Scheuermittel, Scheuerschwämme, scharfe
Reinigungsmittel oder Metallgegenstände.
• Wenn das Gerät längere Zeit leer steht, schalten Sie es
aus, tauen Sie es ab, reinigen und trocknen Sie es und
lassen Sie die Tür offen, um Schimmelbildung im Gerät zu
vermeiden.
DEUTSCH 85

• Bewahren Sie keine explosiven Substanzen wie
Aerosoldosen mit brennbarem Treibgas in diesem Gerät
auf.
• Wenn das Netzkabel beschädigt ist, muss es vom
Hersteller, einem autorisierten Kundendienst oder einer
ähnlich qualifizierten Person zur Vermeidung einer
Gefahrenquelle ersetzt werden.
2. SICHERHEITSANWEISUNGEN
2.1 Montage
WARNUNG!
Die Montage des Geräts darf nur von
einer qualifizierten Fachkraft
durchgeführt werden.
• Entfernen Sie das gesamte
Verpackungsmaterial.
• Montieren Sie ein beschädigtes Gerät
nicht und benutzen Sie es nicht.
• Verwenden Sie das Gerät aus
Sicherheitsgründen nicht, bevor es in den
Einbauschrank gesetzt wird.
• Halten Sie sich an die mitgelieferte
Montageanleitung.
• Seien Sie beim Umsetzen des Gerätes
vorsichtig, da es sehr schwer ist. Tragen
Sie stets Sicherheitshandschuhe und
festes Schuhwerk.
• Stellen Sie sicher, dass die Luft um das
Gerät zirkulieren kann.
• Warten Sie nach der Montage oder dem
Wechsel des Türanschlags mindestens 4
Stunden, bevor Sie das Gerät an die
Stromversorgung anschließen. So kann
das Öl in den Kompressor zurückfließen.
• Ziehen Sie den Stecker aus der
Steckdose, bevor Sie am Gerät arbeiten
(z.B. Wechsel des Türanschlags).
• Stellen Sie das Gerät nicht in der Nähe
von Heizkörpern oder Herden, Backöfen
oder Kochfeldern auf, es sei denn, in der
Installationsanleitung ist etwas anderes
angegeben.
• Setzen Sie das Gerät nicht dem Regen
aus.
• Installieren Sie das Gerät nicht an einem
Ort mit direkter Sonneneinstrahlung.
• Stellen Sie dieses Gerät nicht in
Bereichen auf, die zu feucht oder kalt sind.
• Wenn Sie das Gerät verschieben, heben
Sie es an der Vorderkante an, um den
Fußboden nicht zu verkratzen.
• Das Gerät enthält einen Beutel mit
Trockenmittel. Dieser Beutel ist kein
Spielzeug. Dieser Beutel ist kein
Lebensmittel. Bitte entsorgen Sie ihn
umgehend.
2.2 Elektrischer Anschluss
WARNUNG!
Brand- und Stromschlaggefahr.
WARNUNG!
Achten Sie bei der Montage des Geräts
darauf, dass das Netzkabel nicht
eingeklemmt oder beschädigt wird.
WARNUNG!
Verwenden Sie keine
Mehrfachsteckdosen oder
Verlängerungskabel.
• Das Gerät muss geerdet sein.
• Stellen Sie sicher, dass die Daten auf dem
Typenschild mit den elektrischen
Nennwerten der Netzspannung
übereinstimmen.
• Schließen Sie das Gerät nur an eine
ordnungsgemäß installierte
Schutzkontaktsteckdose an.
• Achten Sie darauf, elektrische Bauteile
(wie Netzstecker, Netzkabel und
Kompressor) nicht zu beschädigen.
Wenden Sie sich an den autorisierten
86 DEUTSCH

Kundendienst oder einen Elektriker, um
die elektrischen Bauteile auszutauschen.
• Das Netzkabel muss unterhalb des
Netzsteckers verlegt werden.
• Stecken Sie den Netzstecker erst nach
Abschluss der Montage in die Steckdose.
Stellen Sie sicher, dass der Netzstecker
nach der Montage noch zugänglich ist.
• Ziehen Sie nicht am Netzkabel, wenn Sie
das Gerät von der Stromversorgung
trennen möchten. Ziehen Sie stets am
Netzstecker.
2.3 Gebrauch
WARNUNG!
Es besteht Verletzungs-, Verbrennungs-,
Stromschlag- oder Brandgefahr.
Das Gerät enthält Isobutan (R600a),
ein brennbares Erdgas mit einem hohen Grad
an Umweltverträglichkeit. Achten Sie darauf,
den Kältekreislauf, der Isobutan enthält, nicht
zu beschädigen.
• Nehmen Sie keine technischen
Änderungen am Gerät vor.
• Jegliche Verwendung des eingebauten
Produkts als freistehendes Produkt ist
strengstens untersagt.
• Stellen Sie keine elektrischen Geräte
(z. B. Eisbereiter) in das Gerät, wenn
solche Geräte nicht ausdrücklich vom
Hersteller für diesen Zweck zugelassen
sind.
• Wird der Kältekreislauf beschädigt, stellen
Sie bitte sicher, dass keine Flammen und
Zündquellen im Raum vorhanden sind.
Lüften Sie den Raum.
• Achten Sie darauf, dass keine heißen
Gegenstände auf die Kunststoffteile des
Geräts gelangen.
• Geben Sie keine Softdrinks in das
Gefrierfach. Dadurch entsteht Druck auf
den Getränkebehälter.
• Lagern Sie keine brennbaren Gase und
Flüssigkeiten im Gerät.
• Platzieren Sie keine entflammbaren
Produkte oder Gegenstände, die mit
entflammbaren Produkten benetzt sind, im
Gerät, auf dem Gerät oder in der Nähe
des Geräts.
• Berühren Sie nicht den Kompressor oder
den Kondensator. Diese sind heiß.
• Nehmen Sie keine Gegenstände aus dem
Gefrierfach und berühren Sie diese nicht,
falls Ihre Hände nass oder feucht sind.
• Frieren Sie aufgetaute Lebensmittel nicht
wieder ein.
• Befolgen Sie die Hinweise auf der
Verpackung zur Aufbewahrung
tiefgekühlter Lebensmittel.
• Wickeln Sie die Lebensmittel in
Lebensmittelkontaktmaterial ein, bevor Sie
sie in das Gefrierfach legen.
2.4 Innenbeleuchtung
WARNUNG!
Stromschlaggefahr.
• Dieses Produkt enthält eine oder mehrere
Lichtquellen der Energieeffizienzklasse G.
• Bezüglich der Lampe(n) in diesem Gerät
und separat verkaufter Ersatzlampen:
Diese Lampen müssen extremen
physikalischen Bedingungen in
Haushaltsgeräten standhalten, wie z.B.
Temperatur, Vibration, Feuchtigkeit, oder
sollen Informationen über den
Betriebszustand des Gerätes anzeigen.
Sie sind nicht für den Einsatz in anderen
Geräten vorgesehen und nicht für die
Raumbeleuchtung geeignet.
2.5 Reinigung und Pflege
WARNUNG!
Verletzungsgefahr sowie Risiko von
Schäden am Gerät.
• Schalten Sie das Gerät immer aus und
ziehen Sie den Netzstecker aus der
Steckdose, bevor Reinigungsarbeiten
durchgeführt werden.
• Der Kältekreis des Gerätes enthält
Kohlenwasserstoffe. Das Gerät muss von
einer qualifizierten Fachkraft gewartet und
nachgefüllt werden.
• Prüfen Sie regelmäßig den Wasserabfluss
des Geräts und reinigen Sie ihn
gegebenenfalls. Bei verstopftem
Wasserabfluss sammelt sich das
Abtauwasser am Boden des Geräts an.
DEUTSCH 87

2.6 Wartung
• Wenden Sie sich zur Reparatur des
Geräts an den autorisierten Kundendienst.
Dabei dürfen ausschließlich
Originalersatzteile verwendet werden.
• Bitte beachten Sie, dass eigene
Reparaturen oder Reparaturen, die nicht
von Fachkräften durchgeführt werden, die
Sicherheit des Geräts beeinträchtigen und
zum Erlöschen der Garantie führen
können.
• Die folgenden Ersatzteile werden auch
nach dem Auslauf des Modells 7 Jahre
lang vorgehalten: Thermostate,
Temperatursensoren, Platinen,
Lichtquellen, Lichtquellen, Türscharniere,
Backbleche und Körbe. Bitte beachten
Sie, dass einige dieser Ersatzteile nur an
Reparaturbetriebe geliefert werden
können und nicht alle Ersatzteile für alle
Modelle relevant sind.
• Türdichtungen sind innerhalb von 10
Jahren nach Produkteinstellung des
Modells erhältlich.
2.7 Entsorgung
WARNUNG!
Verletzungs- und Erstickungsgefahr.
• Trennen Sie das Gerät von der
Stromversorgung.
• Schneiden Sie das Netzkabel ab, und
entsorgen Sie es.
• Entfernen Sie die Tür, um zu verhindern,
dass sich Kinder oder Haustiere in dem
Gerät einschließen.
• Der Kältekreislauf und die
Isolierungsmaterialien dieses Gerätes sind
ozonfreundlich.
• Die Isolierung enthält entzündliches Gas.
Für Informationen zur korrekten
Entsorgung des Gerätes wenden Sie sich
an Ihre kommunale Behörde.
• Achten Sie darauf, dass die Kühleinheit in
der Nähe des Wärmetauschers nicht
beschädigt wird.
3. MONTAGE
WARNUNG!
Siehe Kapitel „Sicherheitshinweise“.
WARNUNG!
Lesen Sie zur Installation des Geräts die
Montageanleitung.
WARNUNG!
Befestigen Sie das Gerät gemäß der
Montageanleitung, um das Risiko eines
instabilen Geräts zu vermeiden.
88 DEUTSCH

3.1 Abmessungen
B
A
H1
W1
D1
W2
D2
W3
D3
90°
Gesamtabmessungen ¹
H1 mm 1772
W1 mm 546
D1 mm 549
¹ Höhe, Breite und Tiefe des Geräts ohne
Griff
Platzbedarf während des Betriebs ²
H2 (A+B) mm 1816
W2 mm 546
D2 mm 551
A mm 1780
Platzbedarf während des Betriebs ²
B mm 36
² Höhe, Breite und Tiefe des Geräts
einschließlich Griff und zuzüglich des
notwendigen Freiraums für die Zirkulation der
Kühlluft
Platzbedarf insgesamt während des Be‐
triebs ³
H3 (A+B) mm 1816
W3 mm 546
D3 mm 1068
³ Höhe, Breite und Tiefe des Geräts
einschließlich Griff plus des notwendigen
DEUTSCH 89

Freiraums für die Zirkulation der Kühlluft,
zuzüglich des Platzes, der notwendig ist, um
eine Türöffnung bis zu dem minimalen Winkel
zu ermöglichen, der die Entfernung der
gesamten Innenausstattung erlaubt
3.2 Aufstellungsort
Um die bestmögliche Funktionalität des
Geräts zu gewährleisten, sollten Sie das
Gerät nicht an einem Ort mit direkter
Sonneneinstrahlung aufstellen. Stellen Sie
das Gerät nicht in der Nähe von Heizkörpern
oder Herden, Backöfen oder Kochfeldern auf,
es sei denn, in der Installationsanleitung ist
etwas anderes angegeben.
Stellen Sie sicher, dass die Luft frei um die
Geräterückseite zirkulieren kann.
Dieses Gerät sollte in einem trockenen, gut
belüfteten Innenbereich aufgestellt werden.
Dieses Gerät ist für den Einsatz bei einer
Umgebungstemperatur von 10°C bis 43°C
vorgesehen.
Der ordnungsgemäße Betrieb des Geräts
wird nur innerhalb des angegebenen
Temperaturbereichs gewährleistet.
Wenn Sie Zweifel bezüglich der
Installation des Geräts haben, wenden
Sie sich bitte an den Verkäufer, unseren
Kundenservice oder an den
nächstgelegenen autorisierten
Kundenservice.
Es muss möglich sein, das Gerät vom
Netz zu trennen. Daher muss der Stecker
nach der Installation zugänglich bleiben.
3.3 Elektrischer Anschluss
• Stellen Sie vor dem Anschließen sicher,
dass die auf dem Typenschild angezeigte
Spannung und Frequenz mit Ihrer
Hausstromversorgung übereinstimmt.
• Das Gerät muss geerdet sein. Der
Netzstecker des Stromkabels ist hierfür
mit einem Kontakt versehen. Wenn die
Steckdose nicht geerdet ist, schließen Sie
das Gerät gemäß den geltenden
Vorschriften an eine separate Erdung an
und wenden Sie sich an einen
qualifizierten Elektriker.
• Der Hersteller lehnt jegliche
Verantwortung ab, wenn die oben
genannten Sicherheitsvorkehrungen nicht
eingehalten werden.
3.4 Anforderungen an die Belüftung
Der Luftstrom hinter dem Gerät muss
ausreichend sein.
min. 200 cm2
min.
200 cm2
min.
38 mm
min.
38 mm
VORSICHT!
Lesen Sie die Montageanleitungen für
die Installation.
3.5 Wechselbare Anschlagseite der
Tür
Informationen zu Montage und zum
Wechseln des Türanschlags finden Sie in
einer separaten Anleitung.
VORSICHT!
Wenn Sie den Türanschlag wechseln,
schützen Sie den Boden mit einem
strapazierfähigen Material vor Kratzern.
90 DEUTSCH

4. BEDIENFELD
1 3 6
91112 10
4 52 7 8
1ECOMETER-Anzeige
2Extra Cool Taste / Anzeige
3Anzeige Kühlraum
4Alarmanzeige
5Alarmanzeige Tür offen
6Anzeige Gefrierraum
7Extra Freeze Taste / Anzeige
8Filter Reset Alarmtaste / Anzeige
9Temperaturtaste / -anzeige Gefrierraum
10 Anzeige für Luftfilterwechsel
11 Temperaturtaste / -anzeige Kühlschrank
12 ECO-Taste
4.1 Einschalten
Stecken Sie den Netzstecker in die
Steckdose.
Informationen zur Auswahl einer anderen
eingestellten Temperatur finden Sie unter
„Temperaturregelung“.
Wenn auf dem Display erscheint,
siehe „Problembehebung“.
4.2 Ausschalten
1. Halten Sie die Temperaturtaste des
Gefriergeräts 5Sekunden lang gedrückt.
Das Display zeigt ein blinkendes .
2. Sobald das Gerät ausgeschaltet ist, zeigt
das Display an.
3. Ziehen Sie den Stecker aus der
Wandsteckdose.
4.3 Temperaturregelung
Der Temperatureinstellbereich liegt zwischen
-15 °C und -24 °C für das Gefriergerät und
zwischen 2 °C und 8 °C für den Kühlschrank.
Drücken Sie die Temperaturtasten, um die
Temperatur des Geräts einzustellen.
Die empfohlene Solltemperatur ist:
• +4 °C für den Kühlschrank
• -18 °C für das Gefriergerät
Sie können die empfohlene Temperatur
manuell mit den Temperaturtasten oder durch
Einschalten der ECO Funktion einstellen.
Weitere Informationen finden Sie unter „ECO
Funktion“.
Die Temperaturanzeigen zeigen die
eingestellte Temperatur an.
Die eingestellte Temperatur wird
innerhalb von 24 Stunden erreicht.
Nach einem Stromausfall kehrt das Gerät
auf die eingestellte Temperatur zurück.
4.4 Ausschalten des Kühlschranks
Es ist möglich, nur den Kühlraum
auszuschalten, sodass der Gefrierraum
eingeschaltet bleibt.
1. Halten Sie die Temperaturtaste des
Kühlschranks 5Sekunden lang gedrückt.
Das Display zeigt ein blinkendes .
2. Nach dem Ausschalten des Kühlraums
wird im Display angezeigt.
4.5 Einschalten des Kühlschranks
Einschalten des Kühlschranks:
DEUTSCH 91

1. Halten Sie die Temperaturtaste des
Kühlschranks 5 Sekunden lang gedrückt.
Das Display zeigt ein blinkendes .
2. Der Kühlraum wird eingeschaltet und die
zuvor eingestellte Temperatur wird
wiederhergestellt.
Informationen zum Einstellen der
Temperatur finden Sie unter
„Temperaturregelung“.
4.6 ECO Funktion
Die Funktion ECO stellt die optimale
Temperatur ein, um die Konservierung der
Lebensmittel zu gewährleisten und
gleichzeitig den Energieverbrauch zu
minimieren.
1. Drücken Sie zum Einschalten der
Funktion die ECO-Taste.
Die Kühlschranktemperatur wird auf +4 °C
und die Gefrierschranktemperatur auf -18 °C
eingestellt.
2. Zum Ausschalten der Funktion drücken
Sie die Taste ECO erneut oder wählen
Sie eine andere eingestellte Temperatur
(siehe „Temperaturregelung“).
Nach der Deaktivierung der ECO Funktion
wird die Kühlschranktemperatur auf +2 °C
und die Gefrierschranktemperatur auf -20 °C
eingestellt.
Aktivierung von ECO deaktiviert die
Funktionen Extra Cool und Extra Freeze.
Die Kontrolllampe ECOMETER zeigt den
aktuellen Energieverbrauch des Geräts
an. Drei vollständig beleuchtete Balken
zeigen die energieeffizienteste
Konfiguration an.
4.7 Extra Cool-Funktion
Mit dieser Funktion Extra Cool können Sie
große Mengen warmer Lebensmittel schnell
abkühlen, zum Beispiel nach dem Einkaufen,
ohne bereits im Kühlraum gelagerte
Lebensmittel zu erwärmen.
Drücken Sie zum Einschalten der Funktion
die Taste Extra Cool.
Die Anzeige Extra Cool leuchtet auf. Wenn
die Extra Cool Funktion eingeschaltet ist,
funktioniert der Lüfter möglicherweise
automatisch.
Die Funktion wird nach etwa 6 Stunden
automatisch ausgeschaltet. Sobald die
Funktion ausgeschaltet ist, erlischt die
Anzeige Extra Cool.
Drücken Sie die Taste Extra Cool, um die
Funktion Extra Cool auszuschalten, bevor sie
automatisch beendet wird.
Um eine andere Kühlschranktemperatur
einzustellen, schalten Sie die Funktion
Extra Cool aus und lesen Sie
„Temperaturregelung“.
4.8 Extra Freeze-Funktion
Die Funktion Extra Freeze dient dazu, das
Gefrierfach auf das Vorgefrieren und
anschließende Schnellgefrieren der
Lebensmittel vorzubereiten. Die Funktion ist
eine Schnellgefrierfunktion, die die
Tiefkühlung neu hinzukommender
Lebensmittel beschleunigt und gleichzeitig
die bereits tiefgekühlten Lebensmittel vor
unerwünschter Erwärmung schützt.
Um frische Lebensmittel einzufrieren,
schalten Sie die Funktion Extra Freeze
mindestens 24 Stunden, bevor Sie die
einzufrierenden Lebensmittel in das
Gefrierfach hineinlegen, ein, um das
Vorgefrieren abzuschließen.
Drücken Sie zum Einschalten dieser Funktion
die Taste Extra Freeze.
Die Anzeige Extra Freeze leuchtet auf. Die
Funktion Extra Freeze stoppt automatisch
nach maximal 52 Stunden.
Drücken Sie die Taste Extra Freeze, um die
Funktion Extra Freeze auszuschalten, bevor
sie automatisch beendet wird.
92 DEUTSCH

4.9 Hochtemperaturalarm
Wenn sich die Temperatur im Gefrierraum
erhöht (z. B. aufgrund eines früheren
Stromausfalls), blinkt die Alarmanzeige, die
Temperaturanzeige des Gefrierraums zeigt H
° und blinkt, und der Signalton ertönt.
Um den Alarm auszuschalten, drücken Sie
eine beliebige Taste.
Alarmanzeige und Ton erlöschen. Die
Temperaturanzeige des Gefriergeräts zeigt
5 Sekunden lang H° an, bevor wieder die
Temperatur des Gefriergeräts angezeigt wird.
Der Alarm wird eine Stunde nach
Deaktivierung neu gestartet, bis die
normalen Bedingungen wiederhergestellt
sind.
Wenn Sie keine Taste drücken, schaltet
sich der Ton nach etwa einer Stunde
automatisch ab, um nicht zu stören.
4.10 Alarm - Tür offen
Wenn die Kühlschranktür ca. 5 Minuten
geöffnet bleibt oder die Gefrierschranktür ca.
80 Sekunden geöffnet bleibt, wird der Ton
eingeschaltet und die Alarmanzeige „Tür
offen“ leuchtet auf. Die
Kühlschrankinnenbeleuchtung kann ebenfalls
blinken.
Der Signalton erlischt nach dem Schließen
der Tür. Drücken Sie eine beliebige Taste,
um den Ton und das Blinken der
Kühlschrankinnenbeleuchtung
auszuschalten.
Wenn Sie keine Taste drücken, schaltet
sich der Ton nach etwa einer Stunde
automatisch ab, um nicht zu stören.
4.11 Anzeige für Luftfilterwechsel
Wenn der Luftfilter abgelaufen ist und
ausgetauscht werden muss, leuchten die
Anzeige für Luftfilterwechsel und die Filter
Reset Alarmanzeige auf.
Anweisungen zum Austausch finden Sie im
Abschnitt "Einbau und Austausch des
CleanAir+-Filters" im Kapitel "Reinigung und
Pflege".
Drücken Sie nach dem Filterwechsel die
Filter Reset Alarmtaste, um den Alarm
auszuschalten.
4.12 Einstellmodus
Im Einstellmodus können Sie:
• Den ECOMETER Indikator aktivieren oder
deaktivieren.
• Die Tastentöne aktivieren oder
deaktivieren.
• Die Temperatureinheiten von °C auf °F
ändern
• Zurücksetzen aller Einstellungen auf die
Werkseinstellungen
Aktivieren des Einstellmodus
So aktivieren Sie den Einstellmodus:
1. Halten Sie die ECO Taste ca. 3
Sekunden lang gedrückt. Wenn der
Einstell-Modus aktiviert wird, zeigt das
Display ein blinkendes an.
2. Sobald der Einstell-Modus eingeschaltet
ist, zeigt das Display an.
Zum Deaktivieren des Einstell-Modus halten
Sie die ECO-Taste ca. 3 Sekunden lang
gedrückt.
Der Einstell-Modus wird automatisch
deaktiviert, wenn Sie 60 Sekunden lang nicht
auf das Bedienfeld zugreifen.
Navigieren im Einstell-Modus
1. Aktivieren Sie den Einstell-Modus (siehe
„Aktivieren des Einstellmodus“).
Auf dem Display wird angezeigt.
2. Tippen Sie auf die Temperaturtaste des
Kühlschranks (links), um den Parameter
zu ändern. Tippen Sie auf die
Temperaturtaste des Gefriergeräts
(rechts), um den Parameterwert zu
ändern.
Display Standard-Parameter
ECOMETER-Anzeige
Tastengeräusche
Temperatureinheiten
DEUTSCH 93

Display Standard-Parameter
Werkseinstellungen
ECOMETER Kontrolllampe
Um ECOMETER ein- oder auszuschalten:
1. Aktivieren Sie den Einstell-Modus (siehe
„Aktivieren des Einstellmodus“).
Auf dem Display wird angezeigt.
2. Tippen Sie wiederholt. Die Anzeige
zeigt für die aktivierte bzw. für die
deaktivierte ECOMETER-Anzeige an.
3. Halten Sie die ECO-Taste ca. 3
Sekunden lang gedrückt, um den Einstell-
Modus zu verlassen.
Tastengeräusche
Sie können die Tastentöne im Einstell-Modus
aktivieren oder deaktivieren. Zum Aktivieren
oder Deaktivieren der Töne:
1. Aktivieren Sie den Einstell-Modus (siehe
„Aktivieren des Einstellmodus“).
Auf dem Display wird angezeigt.
2. Tippen Sie wiederholt, bis
angezeigt wird. Tippen Sie auf , um
die Töne ein- oder auszuschalten. Die
Anzeige wechselt zu für die
aktivierten oder zu für die
deaktivierten Töne.
3. Halten Sie die ECO-Taste ca. 3
Sekunden lang gedrückt, um den Einstell-
Modus zu verlassen.
Temperatureinheiten
Mit dem Einstell-Modus können Sie die auf
dem Bedienfeld angezeigte
Temperatureinheit von Celsius auf Fahrenheit
ändern. Zum Ändern der Temperatureinheit:
1. Aktivieren Sie den Einstell-Modus (siehe
„Aktivieren des Einstellmodus“).
Auf dem Display wird angezeigt.
2. Tippen Sie wiederholt, bis Sie
und sehen. Tippen Sie auf die
Anzeige, die die Einheit anzeigt, um
zwischen für Celsius und für
Fahrenheit zu wählen.
3. Halten Sie die ECO-Taste ca. 3
Sekunden lang gedrückt, um den Einstell-
Modus zu verlassen.
Werkseinstellungen
Diese Funktion stellt jede Einstellung auf die
Werkseinstellungen zurück. Zum
Zurücksetzen auf die werkseitigen
Einstellungen:
1. Aktivieren Sie den Einstell-Modus (siehe
„Aktivieren des Einstellmodus“).
Auf dem Display wird angezeigt.
2. Tippen Sie wiederholt, bis Sie
und sehen. Tippen Sie
wiederholt, bis angezeigt wird.
wird zu blinkendem und dann
dauerhaft zu , was anzeigt, dass die
Werkseinstellungen wiederhergestellt
wurden.
3. Halten Sie die ECO-Taste ca. 3
Sekunden lang gedrückt, um den Einstell-
Modus zu verlassen.
5. TÄGLICHER GEBRAUCH
5.1 Positionieren der Türablagen
Um die Lagerung von
Lebensmittelpackungen verschiedener
Größen zu ermöglichen, können die
Türunterteilungsfächer in verschiedenen
Höhen angeordnet werden.
1. Ziehen Sie die Ablage langsam nach
oben, bis diese sich löst.
2. Positionieren Sie diese neu wie
erforderlich.
94 DEUTSCH

Dieses Modell ist mit einer variablen
Lagerbox ausgestattet, die seitlich bewegt
werden kann.
5.2 Verstellbare Ablagen
Die Wände des Kühlschranks sind mit einer
Reihe von Führungsschienen ausgestattet,
die verschiedene Möglichkeiten für das
Einsetzen der Ablagen bieten.
Dieses Gerät ist auch mit einer aus zwei
Teilen bestehenden Ablage ausgestattet. Die
vordere Hälfte kann unter der zweiten Hälfte
platziert werden, um den Stauraum besser
auszunutzen.
Ablage einschieben:
1. Nehmen Sie die vordere Hälfte vorsichtig
heraus.
2. Schieben Sie sie in die untere Führung
und unter die zweite Hälfte.
1
2
Die Glasablage über der
Gemüseschublade sollte jedoch nicht
verstellt werden, um eine korrekte
Luftzirkulation zu gewährleisten.
5.3 GreenZone-Schublade
Im unteren Teil des Kühlschrankfachs
befindet sich eine ausziehbare Schublade.
Die Glasablage des GreenZone ist mit einer
Vorrichtung ausgestattet, die ihre Abdichtung
reguliert und für eine optimale Luftfeuchtigkeit
im Inneren der Schublade sorgt.
5.4 Entnehmen der GreenZone
Schublade
Es wird empfohlen, die Schublade zu
entleeren, bevor Sie sie aus dem
Kühlschrank nehmen.
Entnehmen der Schublade:
DEUTSCH 95

1. Ziehen Sie die Schublade aus dem
Kühlschrank.
2. Heben Sie die Vorderseite der Schublade
an.
3. Ziehen Sie die Schublade heraus,
während Sie sie anheben.
Zum Entfernen der Glasabdeckung der
GreenZone Schublade:
1. Entriegeln Sie die seitlichen Klemmen
von beiden Seiten gleichzeitig.
2
x2
1
2. Ziehen Sie den Glasbodenträger zu sich
heran.
5.5 Entfernen der ExtraChill
Über der GreenZone-Schublade befindet sich
eine Schublade.
Entnehmen der Schublade:
96 DEUTSCH

1. Ziehen Sie die Schublade aus dem
Kühlschrank.
2. Heben Sie die Vorderseite der Schublade
an.
3. Heben und drehen Sie die Schublade, um
sie aus dem Gerät zu ziehen.
Zum Entfernen der Glasabdeckung der
ExtraZone Schublade:
1. Entriegeln Sie die seitlichen Klemmen
von beiden Seiten gleichzeitig.
2
x2
1
2. Ziehen Sie den Glasbodenträger zu sich
heran.
2
1
DEUTSCH 97

5.6 Feuchtigkeitsregelung
Die Glasablage der GreenZone-Schublade ist
mit einer Vorrichtung ausgestattet, die die
Abdichtung reguliert und für eine optimale
Luftfeuchtigkeit im Inneren der Schublade
sorgt.
Legen Sie keine Lebensmittel auf die
Vorrichtung zur Feuchtigkeitskontrolle.
So entfernen Sie die Vorrichtung zur
Feuchtigkeitskontrolle:
1. Öffnen Sie die Schublade unter der
Glasablage und ziehen Sie die
Abdeckung heraus.
2. Wenn Sie die weiße Membran des Geräts
ersetzen müssen, greifen Sie das Gerät
in der Mitte und trennen Sie die Membran
von der Abdeckung, indem Sie an der
Abdeckung ziehen.
3. Setzen Sie eine neue Membran in die
Abdeckung ein, indem Sie den Rand der
Membran in die Abdeckung drücken.
4. Setzen Sie die Feuchtigkeitsregelung
wieder in die Schublade ein.
Abhängig von der Menge und dem
Zustand von Obst und Gemüse, die in
der GreenZone-Schublade gelagert
werden, kann es zu Kondensation
kommen.
Entfernen Sie in einem solchen Fall die
Kondensation mit einem weichen Tuch.
98 DEUTSCH

5.7 MULTIFLOW
Das Kühlfach ist mit einer MULTIFLOW
Vorrichtung ausgestattet, die ein schnelleres
und effektiveres Abkühlen der Lebensmittel
und die Aufrechterhaltung einer
gleichmäßigeren Temperatur in jedem Teil
des Kühlfachs ermöglicht.
Diese Vorrichtung schaltet sich bei Bedarf
automatisch ein.
MULTIFLOW ist nur bei geschlossener Tür in
Betrieb.
Blockieren Sie die Lüftungsöffnungen
nicht, um eine bessere Kühlung zu
ermöglichen.
Entfernen Sie das MULTIFLOW Panel
nicht.
Reinigen Sie das Gerät nicht mit
Wasserspray oder Dampf. Anweisungen
zur Reinigung finden Sie im Kapitel
„Reinigung und Pflege“.
5.8 CleanAir+ Filter
Im Gerät befindet sich ein CleanAir+
Aktivkohlefilter.
Der Filter reinigt die Luft von unangenehmen
Gerüchen im Kühlraum und verbessert die
Lagerqualität.
Bei Lieferung befinden sich der Filter und
sein Kunststoffgehäuse in einem
Kunststoffbeutel mit dem anderen Zubehör
(bezüglich der Installation siehe Abschnitt
„Einbau und Austausch des CleanAir+-
Filters“ im Kapitel „Reinigung und Pflege“).
5.9 Bottle Stop
Das Zubehör verhindert, dass Flaschen oder
Dosen rollen. Sie können die Flaschen oder
Dosen übereinander stapeln, um Platz im
Regal zu sparen und Ihren Kühlschrank
besser zu organisieren.
Das Zubehör erfordert keine Montage oder
Werkzeuge. Platzieren Sie das Zubehör mit
dem Silikonsockel nach unten und beginnen
Sie mit dem Stapeln der Flaschen.
Der Silikonsockel des Zubehörs ist rutschfest:
er klebt nicht und rutscht nicht.
Lagern Sie maximal 10 kg Flaschen und/
oder Dosen unterschiedlicher Größe in
bis zu zwei Reihen, wie in der Abbildung
gezeigt.
Lagern Sie nur geschlossene Flaschen oder
Dosen, wobei die Öffnung nach vorne zeigt.
Bringen Sie unverpackte Lebensmittel
nicht in direkten Kontakt mit dem
Zubehör.
DEUTSCH 99

5.10 Einfrieren frischer
Lebensmittel
Das Gefrierfach eignet sich zum Einfrieren
frischer Lebensmittel und zur langfristigen
Aufbewahrung gefrorener und tiefgefrorener
Lebensmittel.
Um frische Lebensmittel einzufrieren,
aktivieren Sie bitte die Extra Freeze-Funktion
mindestens 24 Stunden, bevor Sie die
einzufrierenden Lebensmittel in das
Gefrierfach legen.
Lagern Sie frische Lebensmittel gleichmäßig
verteilt im ersten Fach oder der ersten
Schublade von oben.
Die maximale Menge an Lebensmitteln, die
ohne Hinzufügen von anderen frischen
Lebensmittel innerhalb von 24 Stunden
eingefroren werden kann, ist auf dem
Typenschild (einem Schild im Gerät)
angegeben.
Nach Abschluss des Gefriervorgangs kehrt
das Gerät automatisch auf die vorherige
Temperatureinstellung zurück (siehe „Extra
Freeze-Funktion“).
Weitere Informationen finden Sie unter „Tipps
zum Einfrieren“.
5.11 Lagerung von
Tiefkühlgerichten
Lassen Sie das Gerät vor der ersten
Inbetriebnahme oder nach einer Zeit, in der
das Gerät nicht benutzt wurde, mindestens
3 Stunden lang mit eingeschalteter Funktion
Extra Freeze laufen, bevor Sie Lebensmittel
in das Fach legen.
Die Gefrierschubladen sorgen dafür, dass
das gewünschte Lebensmittelpaket schnell
und einfach zu finden ist.
Sollen große Mengen an Lebensmitteln
aufbewahrt werden, entfernen Sie alle
Schubladen aus dem Gerät und legen Sie die
Lebensmittel direkt auf die Ablagen.
Lagern Sie die Lebensmittel mit einem
Mindestabstand von 15 mm zur Tür.
VORSICHT!
Kam es zum Beispiel zum Auftauen
durch einen Stromausfall, der länger
dauerte, als der auf dem Typenschild
angegebene Wert unter Lagerzeit bei
Störung, dann müssen die aufgetauten
Lebensmittel schnell verbraucht oder
sofort gekocht und nach dem Abkühlen
wieder eingefroren werden.
Siehe „Hochtemperaturalarm“.
5.12 Abtauen
Tiefgefrorene oder gefrorene Lebensmittel
können vor dem Verzehr im Kühlschrank
oder in einem Plastikbeutel unter kaltem
Wasser aufgetaut werden.
Dieser Vorgang hängt von der verfügbaren
Zeit und der Lebensmittelart ab. Kleinere
Gefriergutteile können sogar noch gefroren
gekocht werden.
5.13 Herstellen von Eiswürfeln
Dieses Gerät ist mit einer oder mehreren
Schalen für die Herstellung von Eiswürfeln
ausgestattet.
Verwenden Sie zum Entnehmen der
Schalen aus dem Gefrierfach keine
Gegenstände aus Metall.
1. Füllen Sie die Schalen mit Wasser.
100 DEUTSCH

2. Stellen Sie die Eisschalen in das
Gefrierfach.
6. TIPPS UND HINWEISE
6.1 Tipps zum Energiesparen
• Gefriergerät: Die interne Konfiguration des
Geräts gewährleistet die effizienteste
Energienutzung.
• Kühlschrank: Die effizienteste
Energienutzung wird erreicht, wenn die
Schubladen im unteren Teil des Geräts
eingesetzt und die Ablagen gleichmäßig
angeordnet sind. Die Position der
Türablagen wirkt sich nicht auf den
Energieverbrauch aus.
• Öffnen Sie die Tür nicht zu häufig, und
lassen Sie diese nicht länger offen als
notwendig.
• Gefriergerät: Je kälter die
Temperatureinstellung, desto höher der
Energieverbrauch.
• Kühlschrank: Stellen Sie die Temperatur
nicht zu hoch ein, um Energie zu sparen,
es sei denn, dies ist wegen der
Beschaffenheit des Lebensmittels
erforderlich.
• Wenn die Umgebungstemperatur hoch ist,
der Temperaturregler auf eine niedrige
Temperatur eingestellt und das Gerät voll
beladen ist, kann es zu andauerndem
Betrieb des Kompressors und damit zu
Reif- oder Eisbildung am Verdampfer
kommen. Stellen Sie in diesem Fall den
Temperaturregler auf eine höhere
Temperatur, um das automatische
Abtauen zu ermöglichen und Energie zu
sparen.
• Sorgen Sie für eine gute Belüftung.
Bedecken Sie die Belüftungsgitter oder -
öffnungen nicht.
• Vergewissern Sie sich, dass die
Lebensmittel im Inneren des Geräts eine
Luftzirkulation durch entsprechende
Öffnungen im hinteren Teil des Geräts
ermöglichen.
6.2 Tipps zum Einfrieren
• Schalten Sie die Extra Freeze-Funktion
mindestens 24 Stunden, bevor Sie die
Lebensmittel in das Gefrierfach hinein
legen, ein.
• Verpacken Sie frische Lebensmittel vor
dem Einfrieren in Aluminiumfolie,
Plastikfolie oder -beutel oder luftdichte
Behälter mit Deckel.
• Teilen Sie die Lebensmittel in kleine
Portionen, um das Einfrieren und Auftauen
zu erleichtern.
• Es wird empfohlen, tiefgekühlte
Lebensmittel mit Etiketten und Datum zu
versehen. So können Sie die Lebensmittel
identifizieren und erkennen, wann sie
verzehrt werden sollten, bevor sie
verderben.
• Die Lebensmittel sollten beim Einfrieren
frisch sein, um eine gute Qualität zu
bewahren. Besonders Obst und Gemüse
sollte direkt nach der Ernte eingefroren
werden, um alle Nährstoffe zu erhalten.
• Frieren Sie keine Flaschen oder Dosen
mit Flüssigkeiten, insbesondere
kohlensäurehaltige Getränke, ein – die
Gefäße können beim Einfrieren
explodieren.
• Geben Sie keine heißen Lebensmittel in
den Gefrierraum. Vergewissern Sie sich,
dass sie auf Raumtemperatur abgekühlt
sind, bevor Sie sie in das Fach legen.
• Um eine Erwärmung bereits eingefrorener
Lebensmittel zu verhindern, legen Sie
frische, nicht gefrorene Lebensmittel nicht
direkt neben sie. Legen Sie Lebensmittel
mit Raumtemperatur in Gefrierfächer, die
keine gefrorenen Lebensmittel enthalten.
• Essen Sie keine Eiswürfel, Wassereis
oder Eis am Stiel, wenn sie direkt aus dem
Gefriergerät genommen wurden. Gefahr
von Erfrierungen.
• Frieren Sie aufgetaute Lebensmittel nicht
wieder ein. Wenn Lebensmittel aufgetaut
wurden, kochen Sie sie, lassen Sie sie
abkühlen und frieren Sie sie dann ein.
DEUTSCH 101

6.3 Hinweise zur Lagerung von
Tiefkühlgerichten
• Das Gefrierfach ist mit
gekennzeichnet.
• Eine gute Temperatureinstellung, die die
Konservierung von Tiefkühlgerichten
sicherstellt, ist eine Temperatur von
weniger oder gleich -18 °C.
Eine höhere Temperatureinstellung im
Gerät kann die Haltbarkeit verkürzen.
• Der gesamte Gefrierraum ist für die
Lagerung von Tiefkühlprodukten geeignet.
• Lassen Sie ausreichend Platz um die
Lebensmittel herum, damit die Luft frei
zirkulieren kann.
• Die Haltbarkeit von Lebensmitteln ist auf
dem Etikett der Lebensmittelverpackung
angegeben.
• Es ist wichtig, die Lebensmittel so zu
verpacken, dass kein Wasser,
Feuchtigkeit oder Kondenswasser ins
Innere gelangt.
6.4 Einkaufstipps
Nach dem Lebensmitteleinkauf:
• Achten Sie darauf, dass die Verpackung
nicht beschädigt ist - die Lebensmittel
könnten verdorben sein. Wenn die
Verpackung aufgequollen oder nass ist,
wurde das Lebensmittel möglicherweise
nicht unter den optimalen Bedingungen
gelagert und das Auftauen hat eventuell
bereits begonnen.
• Um den Auftauprozess zu minimieren,
kaufen Sie Tiefkühlware am Ende Ihres
Einkaufs und transportieren Sie diese in
einer Isoliertasche.
• Legen Sie die tiefgefrorenen Lebensmittel
sofort nach der Rückkehr aus dem Laden
in das Gefriergerät.
• Wenn Lebensmittel auch nur teilweise
aufgetaut sind, dürfen sie nicht wieder
eingefroren werden. Verzehren Sie sie
schnell wie möglich.
• Beachten Sie das Haltbarkeitsdatum und
die Lagerinformationen auf der
Verpackung.
6.5 Lagerdauer im Gefrierfach
Lebensmittel Lagerdauer (Monate)
Brot 3
Früchte (außer Zitrusfrüchten) 6 - 12
Gemüse 8 - 10
Reste ohne Fleisch 1 - 2
Molkereiprodukte:
Butter
Weichkäse (z. B. Mozzarella)
Hartkäse (z. B. Parmesan, Cheddar)
6 - 9
3 - 4
6
Meeresfrüchte:
Fetthaltiger Fisch (z. B. Lachs, Makrele)
Fettarmer Fisch (z. B. Dorsch, Flunder)
Shrimps
Muscheln und Miesmuscheln ohne Schale
Gekochter Fisch
2 - 3
4 - 6
12
3 - 4
1 - 2
Fleisch:
102 DEUTSCH

Lebensmittel Lagerdauer (Monate)
Geflügel
Rindfleisch
Schweinefleisch
Lamm
Wurst
Schinken
Reste mit Fleisch
9 - 12
6 - 12
4 - 6
6 - 9
1 - 2
1 - 2
2 - 3
6.6 Tipps für die Kühlung frischer
Lebensmittel
• Eine gute Temperatureinstellung, die die
Konservierung von frischen Lebensmitteln
sicherstellt, ist eine Temperatur von
weniger oder gleich +4 °C.
Eine höhere Temperatureinstellung im
Gerät kann die Haltbarkeit der
Lebensmittel verkürzen.
• Decken Sie die Lebensmittel mit
Verpackungsmaterial ab, um ihre Frische
und ihr Aroma zu bewahren.
• Verwenden Sie immer geschlossene
Behälter für Flüssigkeiten und
Lebensmittel, um Düfte oder Gerüche im
Fach zu vermeiden.
• Um eine Kreuzkontamination zwischen
gekochten und rohen Lebensmitteln zu
vermeiden, decken Sie die gekochten
Lebensmittel ab und trennen Sie sie von
den rohen.
• Es wird empfohlen, Lebensmittel im
Kühlschrank aufzutauen.
• Stellen Sie keine warmen Lebensmittel in
das Gerät. Vergewissern Sie sich, dass
sie auf Raumtemperatur abgekühlt sind,
bevor Sie sie in das Gerät stellen.
• Um eine Verschwendung von
Lebensmitteln zu vermeiden, sollten neue
Lebensmittel immer hinter die alten gelegt
werden.
6.7 Hinweise für die Kühlung von
Lebensmitteln
• Das Fach für frische Lebensmittel ist (auf
dem Typenschild) gekennzeichnet mit
.
• Fleisch (alle Sorten): Wickeln Sie Fleisch
in geeignetes Material und legen Sie
dieses auf die Glasablage über der
Gemüseschublade. Lagern Sie Fleisch
höchstens 1 - 2 Tage.
• Obst und Gemüse: Gründlich reinigen
(Erde entfernen) und in die spezielle
Schublade (Obst- und Gemüseschublade)
legen.
• Es wird empfohlen, exotische Früchte wie
Bananen, Mangos, Papayas usw. nicht im
Kühlschrank aufzubewahren.
• Gemüse wie Tomaten, Kartoffeln,
Zwiebeln und Knoblauch sollten nicht im
Kühlschrank aufbewahrt werden.
• Butter und Käse: Diese sollten stets in
luftdichten Behältern verpackt sein oder in
Aluminiumfolie bzw. in Polyäthylenbeutel
eingepackt werden, um so wenig Luft wie
möglich in der Verpackung zu haben.
• Flaschen: Sie sollten mit Deckel in der
Flaschenablage in der Tür oder im
Flaschenhalter (falls vorhanden)
aufbewahrt werden.
• Achten Sie auf das Haltbarkeitsdatum der
Lebensmittel, damit Sie wissen, wie lange
sie gelagert werden können.
DEUTSCH 103

7. REINIGUNG UND PFLEGE
WARNUNG!
Siehe Kapitel „Sicherheitshinweise“.
7.1 Reinigung des Innenraums
Vor der ersten Verwendung des Geräts
sollten der Innenraum und das gesamte
interne Zubehör mit lauwarmem Wasser und
etwas neutraler Seife gewaschen werden, um
den typischen Geruch eines brandneuen
Produkts zu entfernen, und anschließend
gründlich getrocknet werden.
VORSICHT!
Verwenden Sie keine chemischen
Reinigungsmittel, Scheuerpulver, chlor-
oder ölhaltige Reinigungsmittel, da diese
die Oberfläche beschädigen.
VORSICHT!
Das Zubehör und die Teile des Geräts
sind nicht zur Reinigung im
Geschirrspüler geeignet.
VORSICHT!
Reinigen Sie das Bedienfeld mit einem
feuchten Tuch. Verwenden Sie keine
Waschmittel. Wischen Sie das
Bedienfeld nach der Reinigung mit einem
weichen Tuch trocken.
7.2 Regelmäßige Reinigung
Das gesamte Gerät muss regelmäßig
gereinigt werden:
1. Reinigen Sie das Innere und die
Zubehörteile mit lauwarmem Wasser und
etwas Neutralseife.
2. Prüfen und säubern Sie die
Türdichtungen in regelmäßigen
Abständen, um zu gewährleisten, dass
diese sauber und frei von Fremdkörpern
sind.
3. Spülen und trocknen Sie diese sorgfältig
ab.
7.3 Abtauen des Kühlschranks
Der Kühlraum taut automatisch ab. Das dabei
angesammelte Wasser läuft in einen Behälter
am Kompressor und verdunstet. Der Behälter
kann nicht entfernt werden.
7.4 Abtauen des Gefriergeräts
Das Gefrierfach ist ein NoFrost-Fach. Das
bedeutet, dass sich während des Betriebs
weder an den Innenwänden noch an
Lebensmitteln Reif bildet.
7.5 Einbau und Austausch des
CleanAir+-Filters
Der CleanAir+-Filter ist ein Aktivkohlefilter,
der unangenehme Gerüche absorbiert und es
Ihnen ermöglicht, den besten Geschmack
und das beste Aroma für alle Lebensmittel zu
erhalten, ohne das Risiko einer
Geruchskreuzkontamination.
Gehen Sie vorsichtig mit dem Luftfilter
um, um Kratzer auf der Oberfläche zu
vermeiden.
Der Luftfilter ist dem Gerät in einem
Kunststoffbeutel beigelegt, damit seine
Leistungsfähigkeit nicht beeinträchtigt
wird.
Installieren Sie den Luftfilter, bevor Sie das
Gerät einschalten.
1. Nehmen Sie den Filter aus der
Kunststoffverpackung.
2. Öffnen Sie das Kunststoffgehäuse und
legen Sie die plissierte Oberfläche auf
das Gitter, indem Sie den Filter in den
markierten Bereich auf der gitterförmigen
Oberfläche einsetzen.
104 DEUTSCH

3. Halten Sie den Filter gedrückt, während
Sie das Kunststoffgehäuse schließen, bis
Sie ein Klicken hören.
4. Nehmen Sie die obere Glasablage aus
dem Kühlraum. Schieben Sie das
Kunststoffgehäuse mit dem Luftfilter auf
die linke Seite der Glasablage.
5. Setzen Sie die Glasablage wieder in den
Kühlraum ein. Achten Sie darauf, dass
Sie beim Einsetzen der Glasablage nicht
gegen den Filter stoßen.
Austausch des Luftfilters
1. Öffnen Sie das Kunststoffgehäuse.
DEUTSCH 105

1
2
2. Ziehen Sie den gebrauchten Luftfilter
heraus.
3. Packen Sie den neuen Luftfilter aus der
Kunststoffverpackung aus und setzen Sie
ihn in die Schublade ein.
4. Schließen Sie das Kunststoffgehäuse.
5. Drücken Sie nach dem Filterwechsel die
Alarmtaste Filter Reset auf dem
Bedienfeld, um den Warnton
auszuschalten.
Für eine optimale Leistung das
Kunststoffgehäuse an der richtigen Stelle
(links neben der Glasablage) platzieren und
den Luftfilter alle 6 Monate. austauschen.Für
weitere Informationen siehe "Anzeige für
Luftfilterwechsel".
Der Luftfilter ist ein Verbrauchsmaterial
und daher nicht von der Garantie
abgedeckt.
Sie können neue Luftfilter bei Ihrem
Händler vor Ort erwerben.
7.6 Stillstandszeiten
Bei längerem Stillstand des Geräts müssen
Sie folgende Vorkehrungen treffen:
1. Trennen Sie das Gerät von der
Stromversorgung.
2. Entfernen Sie alle Lebensmittel.
3. Reinigen Sie das Gerät und alle
Zubehörteile.
4. Lassen Sie die Türen geöffnet, um
unangenehme Gerüche zu vermeiden.
8. PROBLEMBEHEBUNG
WARNUNG!
Siehe Kapitel „Sicherheitshinweise“.
8.1 Was zu tun ist, wenn …
Störung Mögliche Ursache Lösung
Das Gerät funktioniert nicht. Das Gerät ist ausgeschaltet. Schalten Sie das Gerät ein.
106 DEUTSCH

Störung Mögliche Ursache Lösung
Der Netzstecker ist nicht richtig in
die Netzsteckdose eingesteckt.
Stecken Sie den Netzstecker richtig
in die Netzsteckdose.
Die Netzsteckdose hat keine Netz‐
spannung.
Schließen Sie ein anderes Elektro‐
gerät an der Netzsteckdose an.
Wenden Sie sich an einen qualifi‐
zierten Elektriker.
Das Gerät ist laut. Das Gerät ist nicht ordnungsgemäß
abgestützt.
Prüfen Sie, ob sich das Gerät in ei‐
ner stabilen Position befindet.
Es wird ein akustisches oder opti‐
sches Alarmsignal ausgelöst.
Das Gerät wurde vor kurzem einge‐
schaltet.
Siehe „Hochtemperaturalarm“ oder
„Alarm - Tür offen“.
Die Temperatur im Gerät ist zu
hoch.
Siehe „Hochtemperaturalarm“ oder
„Alarm - Tür offen“.
Die Tür ist offen. Schließen Sie die Tür.
Der Kompressor arbeitet ständig. Die Temperatur ist falsch eingestellt. Siehe Kapitel „Bedienfeld“.
Es wurden viele Lebensmittel
gleichzeitig hineingelegt.
Warten Sie einige Stunden und prü‐
fen Sie erneut die Temperatur.
Die Raumtemperatur ist zu hoch. Siehe Kapitel „Montage“.
Die Lebensmittel, die im Gerät auf‐
bewahrt werden, waren zu warm.
Lassen Sie die Lebensmittel vor de‐
ren Aufbewahrung auf Raumtempe‐
ratur abkühlen.
Die Tür ist nicht richtig geschlossen. Siehe Abschnitt „Schließen der Tür“.
Die Funktion Extra Freeze ist einge‐
schaltet.
Siehe Abschnitt „Funktion Extra
Freeze“.
Die Funktion Extra Cool ist einge‐
schaltet.
Siehe Abschnitt „Funktion Extra
Cool“.
Der Kompressor schaltet sich nicht
sofort ein, nachdem Sie „Extra
Freeze“ oder „Extra Cool“ gedrückt
oder die Temperatur auf einen an‐
deren Wert eingestellt haben.
Der Kompressor startet nach einer
gewissen Zeit.
Das ist normal; es ist kein Fehler
aufgetreten.
Die Tür ist falsch ausgerichtet oder
beeinträchtigt das Lüftungsgitter.
Das Gerät ist nicht ausgerichtet. Siehe Montageanleitung.
Die Tür lässt sich nicht leicht öffnen. Sie haben versucht, die Tür unmit‐
telbar nach dem Schließen erneut
zu öffnen.
Warten Sie einige Sekunden zwi‐
schen dem Schließen und erneutem
Öffnen der Tür.
Die Lampe funktioniert nicht. Die Lampe ist im Standby-Modus. Schließen Sie die Tür und öffnen
Sie die Tür wieder.
Die Lampe ist defekt. Wenden Sie sich an das nächste
autorisierte Servicezentrum.
Zu viel Frost und Eis. Die Tür ist nicht richtig geschlossen. Siehe Abschnitt „Schließen der Tür“.
Die Dichtung ist verzogen oder ver‐
schmutzt.
Siehe Abschnitt „Schließen der Tür“.
DEUTSCH 107

Störung Mögliche Ursache Lösung
Die Lebensmittel sind nicht richtig
verpackt.
Verpacken Sie die Lebensmittel
besser.
Die Temperatur ist falsch eingestellt. Siehe Kapitel „Bedienfeld“.
Das Gerät ist voll von Lebensmitteln
und auf die niedrigste Temperatur
eingestellt.
Stellen Sie eine höhere Temperatur
ein. Siehe Kapitel „Bedienfeld“.
Die Temperatur im Gerät ist zu nied‐
rig, und die Umgebungstemperatur
ist zu hoch.
Stellen Sie eine höhere Temperatur
ein. Siehe Kapitel „Bedienfeld“.
Wasser fließt an der Rückwand des
Kühlschranks herunter.
Während des automatischen Abtau‐
prozesses taut das Eis an der Rück‐
wand ab.
Das ist richtig.
An der Rückwand des Kühlschranks
befindet sich zu viel Kondenswas‐
ser.
Die Tür wurde zu häufig geöffnet. Öffnen Sie die Tür nur bei Bedarf.
Die Tür wurde nicht vollständig ge‐
schlossen.
Achten Sie darauf, dass die Tür voll‐
ständig geschlossen ist.
Die aufbewahrten Lebensmittel wa‐
ren nicht verpackt.
Packen Sie die Lebensmittel richtig
ein, bevor Sie diese in das Gerät le‐
gen.
Wasser fließt auf den Boden. Der Tauwasserablauf ist nicht an die
Verdampfungsschale über dem
Kompressor angeschlossen.
Bringen Sie den Tauwasserablauf
an der Verdampfungsschale an.
Die Temperatur kann nicht einge‐
stellt werden.
Die Extra Freeze Funktion oder die
Extra Cool Funktion ist eingeschal‐
tet.
Schalten Sie die Extra Freeze Funk‐
tion oder die Extra Cool Funktion
manuell aus, oder warten Sie mit
dem Einstellen der Temperatur, bis
die Funktion automatisch ausge‐
schaltet wird. Siehe Abschnitt
„Funktion Extra Freeze“ oder „Funk‐
tion Extra Cool“.
Die Temperatur im Gerät ist zu nied‐
rig / zu hoch.
Die Temperatur ist nicht richtig ein‐
gestellt.
Stellen Sie eine höhere / niedrigere
Temperatur ein.
Die Tür ist nicht richtig geschlossen. Siehe Abschnitt „Schließen der Tür“.
Die Temperatur der Lebensmittel ist
zu hoch.
Lassen Sie die Lebensmittel auf
Raumtemperatur abkühlen, bevor
Sie diese in das Kühlgerät legen.
Viele Lebensmittel werden gleich‐
zeitig in das Kühlgerät gelegt.
Legen Sie weniger Lebensmittel
gleichzeitig in das Kühlgerät.
Die Tür wurde zu oft geöffnet. Öffnen Sie die Tür nur bei Bedarf.
Die Funktion Extra Freeze ist einge‐
schaltet.
Siehe Abschnitt „Funktion Extra
Freeze“.
Die Funktion Extra Cool ist einge‐
schaltet.
Siehe Abschnitt „Funktion Extra
Cool“.
108 DEUTSCH

Störung Mögliche Ursache Lösung
Im Gerät herrscht keine Kaltluftzir‐
kulation.
Stellen Sie sicher, dass die Kaltluft
im Gerät zirkulieren kann. Siehe Ka‐
pitel „Tipps und Hinweise“.
erscheint auf dem Dis‐
play.
Das Gerät befindet sich im Demo-
Modus.
Um den Demo-Modus zu verlassen,
halten Sie die Extra Cool und ECO
Tasten ca. 10 Sekunden lang ge‐
drückt, bis Sie 3 kurze Signaltöne
hören.
Das Symbol erscheint
und die Alarmanzeige leuchtet.
Kommunikationsproblem. Wenden Sie sich an das nächste
autorisierte Servicezentrum. Das
Kühlsystem hält zwar die Lebens‐
mittel weiterhin kalt, aber eine Tem‐
peratureinstellung ist nicht mehr
möglich.
Das oder
oder Symbol und die ak‐
tuelle Einstellung werden abwech‐
selnd alle 5 Sekunden angezeigt
und die Alarmanzeige leuchtet.
Problem mit dem Temperatursen‐
sor.
Wenden Sie sich an das nächste
autorisierte Servicezentrum. Das
Kühlsystem hält zwar die Lebens‐
mittel weiterhin kalt, aber eine Tem‐
peratureinstellung ist nicht mehr
möglich.
Wenn die Ratschläge nicht zum
gewünschten Ergebnis führen, wenden
Sie sich an das nächste autorisierte
Servicezentrum.
8.2 Austauschen der Lampe
Das Gerät ist mit einer langlebigen LED-
Innenbeleuchtung ausgestattet.
Nur Service-Fachpersonal darf die
Beleuchtungseinheit ersetzen. Wenden Sie
sich an Ihren autorisierten Kundendienst.
8.3 Schließen der Tür
1. Reinigen Sie die Türdichtungen.
2. Passen Sie die Tür bei Bedarf an. Siehe
Montageanleitung.
3. Tauschen Sie bei Bedarf die defekten
Türdichtungen aus. Wenden Sie sich an
den autorisierten Kundendienst.
DEUTSCH 109

9. GERÄUSCHE
SSSRRR!
CLICK!
HISSS!
BRRR!
BLUBB!
10. TECHNISCHE DATEN
Die technischen Daten befinden sich auf dem
Typenschild innen im Gerät sowie auf der
Energieplakette.
Der QR-Code auf der Energieplakette des
Geräts bietet einen Web-Link zu
Informationen über die Geräteleistung
in der EU EPREL-Datenbank. Bewahren Sie
daher die Energieplakette als Referenz
zusammen mit dieser Bedienungsanleitung
und allen anderen Unterlagen, die mit dem
Gerät geliefert wurden, auf.
Es ist auch möglich, die gleichen
Informationen in EPREL zu finden, indem Sie
den Link
https://eprel.ec.europa.eu
sowie den
Modellnamen und die Produktnummer, die
Sie auf dem Typenschild des Geräts finden,
verwenden.
Beachten Sie den Link
www.theenergylabel.eu
bezüglich detaillierter
Informationen zur Energieplakette.
11. INFORMATIONEN FÜR PRÜFINSTITUTE
Die Installation und die Vorbereitung des
Geräts für eine eventuelle EcoDesign-
Prüfung müssen mit EN 62552
übereinstimmen. Die Lüftungsanforderungen,
die Einbaunische und die Mindestabstände
sind in dieser Bedienungsanleitung in Kapitel
110 DEUTSCH

3 beschrieben. Weitere Informationen
erhalten Sie vom Hersteller, einschließlich
Beladungspläne.
12. UMWELTTIPPS
Recyceln Sie Materialien mit dem Symbol .
Entsorgen Sie die Verpackung in den
entsprechenden Recyclingbehältern.
Recyceln Sie zum Umwelt- und
Gesundheitsschutz elektrische und
elektronische Geräte. Entsorgen Sie Geräte
mit diesem Symbol nicht mit dem
Hausmüll. Bringen Sie das Gerät zu Ihrer
örtlichen Sammelstelle oder wenden Sie sich
an Ihr Gemeindeamt.
DEUTSCH 111

FYRIR FULLKOMINN ÁRANGUR
Þakka þér fyrir að velja þessa AEG vöru. Við höfum framleitt þessa vöru til að starfa
fullkomlega í mörg ár og við höfum notað nýstárlega tækni sem gerir lífið einfaldara með
aðgerðum sem ekki er víst að séu til staðar á venjulegum heimilistækjum. Vinsamlegast
lestu þér til í nokkrar mínútur til að geta nýtt tækið sem best.
HEIMSÆKTU VEFSVÆÐI OKKAR TIL AÐ:
Fá leiðbeiningar um notkun, bæklinga, bilanaleit, þjónustu- og viðgerðarupplýsingar.
www.aeg.com/support
Skrá vöruna þína til að fá enn betri þjónustu:
www.registeraeg.com
Kaupa aukahluti, rekstrarvörur og upprunalega varahluti fyrir heimilistæki þitt:
www.aeg.com/shop
ÞJÓNUSTA VIÐ VIÐSKIPTAVINI
Notaðu alltaf upprunalega varahluti.
Þegar þú hefur samband við viðurkennda þjónustumiðstöð skaltu tryggja að sért með
eftirfarandi gögn tiltæk: Gerð, vörunúmer, raðnúmer.
Upplýsingarnar má finna á merkiplötunni.
Viðvörun / Aðvörun - Öryggisupplýsingar
Almennar upplýsingar og ráð
Umhverfisupplýsingar
Með fyrirvara á breytingum.
EFNISYFIRLIT
1. ÖRYGGISUPPLÝSINGAR.......................................................................... 112
2. ÖRYGGISLEIÐBEININGAR........................................................................114
3. UPPSETNING............................................................................................. 116
4. STJÓRNBORÐ............................................................................................119
5. DAGLEG NOTKUN..................................................................................... 122
6. ÁBENDINGAR OG GÓÐ RÁÐ.................................................................... 128
7. UMHIRÐA OG HREINSUN......................................................................... 130
8. BILANALEIT................................................................................................132
9. HÁVAÐI.......................................................................................................135
10. TÆKNIGÖGN............................................................................................136
11. UPPLÝSINGAR FYRIR PRÓFUNARSTOFNANIR................................... 136
12. UMHVERFISMÁL......................................................................................136
1. ÖRYGGISUPPLÝSINGAR
Fyrir uppsetningu og notkun heimilistækisins skal lesa
meðfylgjandi leiðbeiningar vandlega. Framleiðandinn ber ekki
ábyrgð á neinum meiðslum eða skemmdum sem leiða af
112 ÍSLENSKA

rangri uppsetningu eða notkun. Geymdu alltaf
leiðbeiningarnar á öruggum stað þar sem auðvelt er að
nálgast þær til síðari notkunar.
1.1 Öryggi barna og viðkvæmra einstaklinga
• Börn, 8 ára og eldri og fólk með minnkaða líkamlega-, skyn-
eða andlega getu, eða sem skortir reynslu og þekkingu,
mega nota þetta tæki, ef þau eru undir eftirliti eða hafa verið
veittar leiðbeiningar varðandi örugga notkun tækisins og ef
þau skilja hættuna sem því fylgir.
• Börn á aldrinum 3 til 8 ára er leyfilegt að setja í og taka úr
heimilistækinu, að því tilskildu að þau hafi fengið
almennilegar leiðbeiningar.
• Fólk með miklar og flóknar fatlanir má nota þetta
heimilistæki, að því tilskildu að þau hafi fengið almennilegar
leiðbeiningar.
• Halda ætti börnum yngri en 3 ára frá heimilistækinu nema
þau séu undir stöðugu eftirliti.
• Hafa ætti eftirlit með börnum til að tryggja að þau leiki sér
ekki með.
• Börn eiga ekki að hreinsa eða framkvæma notandaviðhald
á heimilistækinu án eftirlits.
• Haltu öllum umbúðum frá börnum og fargaðu þeim á
viðeigandi hátt.
1.2 Almennt öryggi
• Þetta heimilistæki er eingöngu fyrir geymslu á mat og
drykkjum.
• Þetta heimilistæki er hannað til notkunar innanhúss á
heimilum.
• Þetta heimilistæki má nota á skrifstofum, í herbergjum
hótela, herbergjum gestahúsa, bændagistingum og öðrum
sambærilegum gistirýmum þar sem notkun er ekki meiri en
almenn heimilisnotkun.
• Til að forðast spillingu matvæla skal virða eftirfarandi
leiðbeiningar:
ÍSLENSKA 113

– Hafðu hurðina ekki opna um lengri tíma;
– hreinsaðu reglubundið fleti sem geta komist í snertingu
við matvæli og aðgengileg frárennsliskerfi;
– geymdu hrátt kjöt og fisk í hentugum ílátum í
kæliskápnum þannig að það komist ekki í snertingu við
eða leki niður á önnur matvæli.
• VIÐVÖRUN: Haltu loftræstingaropum, í afgirðingu
heimilistækisins eða í innbyggðu rými, lausu við hindranir.
• VIÐVÖRUN: Notaðu ekki vélrænan búnað eða aðrar
aðferðir til að hraða afísunarferli, annan en þann sem
framleiðandinn mælir með.
• VIÐVÖRUN: Skemmdu ekki kælimiðilsrásina.
• VIÐVÖRUN: Notaðu ekki rafmagnstæki inni í
geymsluhólfum matvæla í heimilistækinu, nema þau séu af
þeirri tegund sem framleiðandinn mælir með.
• Notaðu ekki vatnsúða og gufu til að hreinsa heimilistækið.
• Hreinsaðu heimilistækið með mjúkum rökum klút. Notaðu
aðeins hlutlaus þvottaefni. Notaðu ekki neinar vörur með
svarfefnum, stálull, leysiefni eða málmhluti.
• Þegar heimilistækið er tómt um lengri tíma skal slökkva á
því, afísa, hreinsa, þurrka og skilja hurðina eftir opna til að
koma í veg fyrir að mygla myndist inni í tækinu.
• Geymdu ekki sprengifim efni eins og úðabrúsa með eldfimu
drifefni í þessu heimilistæki.
• Ef rafmagnssnúran er skemmd verður framleiðandi,
viðurkennd þjónustumiðstöð, eða svipað hæfur aðili að
endurnýja hana til að forðast hættu.
2. ÖRYGGISLEIÐBEININGAR
2.1 Uppsetning
AÐVÖRUN!
Einungis löggildur aðili má setja upp
þetta heimilistæki.
• Fjarlægðu allar umbúðir.
• Ekki setja upp eða nota skemmt
heimilistæki.
• Notaðu ekki heimilistækið áður en þú setur
upp innbyggða virkið af öryggisástæðum.
• Fylgdu leiðbeiningum um uppsetningu
sem fylgja með heimilistækinu.
• Alltaf skal sýna aðgát þegar heimilistækið
er fært vegna þess að það er þungt.
Notaðu alltaf öryggishanska og lokaðan
skóbúnað.
• Gakktu úr skugga um að að loft geti flætt í
kringum heimilistækið.
114 ÍSLENSKA

• Við fyrstu uppsetningu eða eftir að
hurðinni hefur verið snúið skal bíða í að
minnsta kosti 4 klukkustundir áður en
heimilistækið er tengt við rafmagn. Þetta
er til að olían nái að flæða aftur í
þjöppuna.
• Áður en þú framkvæmir einhverjar
aðgerðir á heimilistækinu (t.d. snýrð við
hurðinni) skaltu taka klóna úr
rafmagnsinnstungunni.
• Ekki setja heimilistækið upp nálægt
hitagjöfum (ofnum) eða eldavélum,
bökunarofnum eða helluborðum, nema
annað sé tekið fram í leiðbeiningum um
uppsetningu.
• Ekki hafa heimilistækið berskjaldað
gagnvart rigningu.
• Ekki setja heimilistækið upp þar sem það
verður fyrir beinu sólarljósi.
• Ekki setja þetta heimilistæki upp á
svæðum þar sem er of mikill raki eða of
kalt.
• Þegar þú færir til heimilistækið, skaltu lyfta
brúninni að framan til að koma í veg fyrir
að þú rispir gólfið.
• Heimilistækið inniheldur poka af þurrkefni.
Þetta er ekki leikfang. Þetta er ekki
matvara. Vinsamlegast fargaðu því
samstundis.
2.2 Tenging við rafmagn
AÐVÖRUN!
Hætta á eldi og raflosti.
AÐVÖRUN!
Þegar heimilistækið er staðsett skaltu
tryggja að rafmagnssnúran sé hvorki
klemmd né skemmd.
AÐVÖRUN!
Notaðu ekki fjöltengi eða
framlengingarsnúrur.
• Heimilistækið verður að vera jarðtengt.
• Gakktu úr skugga um að færibreyturnar á
merkiplötunni séu samhæfar við
rafmagnsflokkun aðalæðar aflgjafa.
• Notaðu alltaf rétt ísetta innstungu sem ekki
veldur raflosti.
• Gættu þess að valda ekki skaða á
rafmagnsíhlutum (t.d. rafmagnskló,
rafmagnssnúru, þjöppu). Hafðu samband
við viðurkennda þjónustumiðstöð eða
rafvirkja til þess að skipta um
rafmagnsíhluti.
• Rafmagnssnúran þarf að vera fyrir neðan
rafmagnsklóna.
• Aðeins skal tengja rafmagnsklóna við
rafmagnsinnstunguna í lok
uppsetningarinnar. Gakktu úr skugga um
að rafmagnsklóin sé aðgengileg eftir
uppsetningu.
• Ekki toga í snúruna til að taka tækið úr
sambandi. Taktu alltaf um klóna.
2.3 Notkun
AÐVÖRUN!
Hætta á meiðslum, bruna, raflosti eða
eldsvoða.
Heimilistækið inniheldur eldfimt gas,
ísóbútan (R600a), náttúrulegt gas, sem er
mjög umhverfisvænt. Gættu þess að valda
ekki skaða á kælirásinni sem inniheldur
ísóbútan.
• Breytið ekki eiginleikum heimilistækisins.
• Það er harðbannað að nota þessa
innbyggðu vöru sem frístandandi tæki.
• Ekki láta rafmagnstæki (s.s. ísgerðarvélar)
í tækið nema það sé tekið fram af
framleiðanda að þau þoli það.
• Ef rafrásir kælibúnaðarins skemmast skal
gæta þess að það sé enginn logi eða
kveikjugjafar í herberginu. Loftræstu
herbergið.
• Ekki láta heita hluti snerta þá hluta
heimilistækisins sem eru úr plasti.
• Ekki setja gosdrykki í frystihólfið. Við það
myndast þrýstingur innan í drykkjarílátinu.
• Ekki nota heimilistækið til að geyma
eldfimar lofttegundir eða vökva.
• Setjið ekki eldfim efni eða hluti bleytta með
eldfimum efnum í, nálægt, eða á
heimilistækið.
• Ekki snerta þjöppuna eða þéttinn. Þau eru
heit.
• Ekki fjarlægja eða snerta hluti úr
frystihólfinu ef hendur þínar eru rakar eða
blautar.
• Ekki endurfrysta mat sem búið er að þíða.
ÍSLENSKA 115

• Fylgdu geymsluleiðbeiningunum á
umbúðum frystra matvæla.
• Vefðu matnum inn áður en þú setur hann í
frystihólfið.
2.4 Innri lýsing
AÐVÖRUN!
Hætta á raflosti.
• Þessi vara inniheldur einn eða fleiri
ljósgjafa í orkunýtniflokknum G.
• Varðandi ljósin inn í þessari vöru og ljós
sem varahluti sem seld eru sérstaklega:
Þessi ljós eru ætluð að standast
öfgakenndar aðstæður í heimilistækjum
eins og hitastig, titring, raka eða til að
senda upplýsingar um rekstrarstöðu
tækisins. Þau eru ekki ætluð til að nota í
öðrum tækjum og henta ekki sem lýsing í
herbergjum heimila.
2.5 Umhirða og þrif
AÐVÖRUN!
Hætta á meiðslum eða skemmdum á
heimilistækinu.
• Áður en viðhald fer fram á tækinu skal
slökkva á því og aftengja aðalklóna frá
rafmagnsinnstungunni.
• Þetta tæki inniheldur kolvatnsefni í
kælieiningunni. Aðeins hæfir aðilar mega
sinna viðhaldi og endurhleðslu á
einingunni.
• Skoðið frárennsli tækisins reglulega og
hreinsið það ef þörf krefur. Ef frárennslið
er stíflað mun affryst vatn safnast fyrir í
botni heimilistækisins.
2.6 Þjónusta
• Hafðu samband við viðurkennda
þjónustumiðstöð til að gera við
heimilistækið. Notaðu eingöngu
upprunalega varahluti.
• Vinsamlegast athugaðu að ef þú eða
einhver sem ekki er fagmaður gerir við
getur það haft afleiðingar varðandi öryggi
og gæti ógilt ábyrgðina.
• Eftirfarandi varahlutir verða fáanlegir í 7 ár
eftir að hætt hefur verið framleiðslu
gerðarinnar: Hitastillar, hitaskynjarar,
prentplötur, ljósgjafar, hurðahandföng,
hurðalamir, bakkar og grindur.
Vinsamlegast athugaðu að suma þessara
varahluta geta aðeins
atvinnuviðgerðaraðilar fengið og ekki eru
allir varahlutir viðeigandi fyrir allar gerðir.
• Hurðaþéttingar verða fáanlegar í 10 ár eftir
að hætt hefur verið framleiðslu
gerðarinnar.
2.7 Förgun
AÐVÖRUN!
Hætta á meiðslum eða köfnun.
• Aftengið heimilistækið frá
rafmagnsgjafanum.
• Klippa rafmagnssnúruna af og fleygið
henni.
• Fjarlægið hurðina til að koma í veg fyrir að
börn eða dýr geti lokast inni í tækinu.
• Kælirásin og einangrunarefnið á tækinu
eru ósónvæn.
• Einangrunarfroðan inniheldur eldfimar
lofttegundir. Hafið samband við
sveitarfélagið til að fá upplýsingar um
hvernig á að farga heimilistækinu á réttan
hátt.
• Ekki valda skaða á hluta kælieiningarinnar
sem er nálægt hitaskiptinum.
3. UPPSETNING
AÐVÖRUN!
Sjá kafla um öryggismál.
116 ÍSLENSKA

AÐVÖRUN!
Skoðaðu leiðbeiningaskjal um
uppsetningu til að setja upp heimilistækið
þitt.
AÐVÖRUN!
Festu heimilistækið í samræmi við
leiðbeiningaskjal um uppsetningu til að
forðast hættuna af því að heimilistækið
sé óstöðugt.
3.1 Mál
B
A
H1
W1
D1
W2
D2
W3
D3
90°
Heildarmál ¹
H1 mm 1772
W1 mm 546
D1 mm 549
¹ hæð, breidd og dýpt heimilistækisins án
handfangs
Svæði sem þarf til notkunar ²
H2 (A+B) mm 1816
W2 mm 546
D2 mm 551
A mm 1780
B mm 36
ÍSLENSKA 117

² hæð, breidd og dýpt heimilistækisins ásamt
handfangi, auk rýmisins sem þarf til að
tryggja rétt loftflæði fyrir kæliloft
Heildarsvæði sem þarf til notkunar ³
H3 (A+B) mm 1816
W3 mm 546
D3 mm 1068
³ hæð, breidd og dýpt heimilistækisins ásamt
handfangi, auk rýmisins sem þarf til að
tryggja rétt loftflæði fyrir kæliloft, auk
svæðisins sem nauðsynlegt er svo að hurðin
geti opnast við lágmarkshorn sem
nauðsynlegt er til að fjarlægja allan innri
búnað
3.2 Staðsetning
Til að tryggja rétta virkni heimilistækisins, ætti
ekki að setja það upp á stað þar sem
heimilistækið verður fyrir beinu sólarljósi. Ekki
setja heimilistækið upp nálægt hitagjöfum
(ofnum) eða eldavélum, bökunarofnum eða
helluborðum, nema annað sé tekið fram í
leiðbeiningum um uppsetningu.
Gakktu úr skugga um að loftflæði sé gott
aftan við skápinn.
Tækið á að setja upp á þurrum, vel
loftræstum stað innandyra.
Þetta tæki er ætlað til notkunar við
umhverfishita á bilinu 10°C til 43°C.
Eingöngu er hægt að ábyrgjast rétta
virkni heimilistækisins sé það notað á
þessu hitabili.
Ef þú hefur einhverjar efasemdir varðandi
uppsetningu heimilistækisins, skaltu
vinsamlegast ráðfæra þig við seljanda,
þjónustuverið okkar eða næstu
viðurkenndu þjónustumiðstöð.
Það verður að vera hægt að taka
heimilistækið úr sambandi við rafmagn.
Innstungan verður því að vera
aðgengileg eftir uppsetningu.
3.3 Rafmagnstenging
• Áður en stungið er í samband, þarf að
ganga úr skugga um að sú spenna og
tíðni sem sýnd eru á merkiplötunna
samræmist heimilisrafmagninu.
• Heimilistækið verður að vera jarðtengt. Kló
rafmangssnúrunnar er með snertu sem er
ætluð til þess. Ef innstungan á heimilinu er
ekki jarðtengd, þarf að jarðtengja
heimilistækið í aðskilda jörð til að uppfylla
núgildandi reglugerðir. Hafið samband við
fagmenntaðan rafvirkja.
• Framleiðandi hafnar allri ábyrgð ef
ofangreindum öryggisráðstöfunum er ekki
fylgt.
3.4 Viðrunarkröfur
Nauðsynlegt er að tryggja nægilegt loftflæði
fyrir aftan tækið.
min. 200 cm2
min.
200 cm2
min.
38 mm
min.
38 mm
VARÚÐ!
Sjá uppsetningarleiðbeiningar varðandi
uppsetningu.
3.5 Viðsnúningur hurðar
Vinsamlegast skoðaðu sérstakt skjal með
leiðbeiningum um uppsetningu og viðsnúning
hurðar.
118 ÍSLENSKA

VARÚÐ!
Við hvert þrep í viðsnúningi hurðar skal
gæta þess að verja gólfið gegn rispum,
með slitsterku efni.
4. STJÓRNBORÐ
1 3 6
91112 10
4 52 7 8
1ECOMETER vísir
2Extra Cool hnappur / vísir
3Vísir fyrir kælihólf
4Aðvörunarvísir
5Vísir fyrir viðvörun um opna hurð
6Vísir fyrir frystihólf
7Extra Freeze hnappur / vísir
8Filter Reset viðvörunarhnappnur / vísir
9Hnappur/vísir fyrir hitastig frystihólfs
10 Vísir fyrir loftsíuskipti
11 Vísir / hnappur fyrir hitastig kælis
12 ECO-hnappur
4.1 Kveikt á
Tengdu klóna við rafmagnsinnstunguna.
Til að velja annað innstillt hitastig, sjá
„Hitastilling“.
Ef birtist á skjánum, sjá „Bilanaleit“.
4.2 Slökkva
1. Ýttu á og haltu inni hnappinum fyrir
hitastig frystis í 5 sekúndur.
Skjárinn sýnir blikkandi .
2. Þegar slökkt er á heimilistækinu sýnir
skjárinn .
3. Aftengdu klóna frá rafmagnsinnstungunni.
4.3 Hitastilling
Hitasviðið getur verið breytilegt á bilinu -15°C
til -24°C fyrir frystinn og á bilinu 2°C til 8°C
fyrir kælinn.
Ýttu á hitastigshnappana til að stilla hitastig
heimilistækisins.
Ráðlagt hitastig er:
• +4°C fyrir kælinn
• -18°C fyrir frystinn
Þú getur stillt á ráðlagt hitastig handvirkt með
hitastigshnöppunum eða með því að kveikja á
ECO aðgerð. Sjá „ECO aðgerð“ fyrir frekari
upplýsingar
Hitastigsvísar sýna hitastigið sem búið var að
stilla.
Hitastillingunni þarf að ná innan
sólarhrings.
Eftir rafmagnsleysi fer heimilistækið aftur
á stillt hitastig.
4.4 Slökkt á kælinum
Hægt er að slökkva eingöngu á kælihólfinu og
hafa kveikt á frystihólfinu.
1. Ýttu á og haltu inni hnappinum fyrir
hitastig kælis í 5 sekúndur.
Skjárinn sýnir blikkandi .
2. Þegar slökkt er á kælihólfinu sýnir
skjárinn .
ÍSLENSKA 119

4.5 Kveikt á kælinum
Til að kveikja á kælinum:
1. Ýttu á og haltu inni hnappinum fyrir
hitastig kælis í 5 sekúndur.
Skjárinn sýnir blikkandi .
2. Kveikt er á kælihólfinu og fyrri hitastillingu
er stillt á ný.
Til að stilla hitastigið, sjá „Hitastilling“.
4.6 ECO aðgerð
ECO aðgerðin stillir á rétt hitastig til að tryggja
sem best endingu matvæla um leið og
orkunotkun er lágmörkuð.
1. Til að virkja aðgerðina skaltu ýta á ECO-
hnappinn.
Hitastigið í kælinum er stillt á +4°C og -18°C í
frystinum.
2. Til að afvirkja aðgerðina skaltu ýta á aftur
á ECO hnappinn eða velja annað hitastigi
til að stilla á (sjá „Hitastilling“).
Þegar ECO aðgerðin hefur verið virkjuð er
hitastigið í kælinum stillt á +2°C og hitastigið í
frystinum á -20°C.
EfECO er virkjað þá afvirkjastExtra Cool
ogExtra Freeze aðgerðirnar.
ECOMETER vísirinn sýnir núverandi
orkunotkun heimilistækisins. Ef þrjú strik
lýsa er mest orkusparandi uppstillingin í
notkun.
4.7 Extra Cool aðgerð
Með Extra Cool aðgerðinni getur þú kælt
niður mikið magn af matvælum með hraði,
t.d. eftir að þú fórst að kaupa inn, án þess að
maturinn sem fyrir er í kælinum hitni.
Til að virkja aðgerðina skaltu ýta á Extra Cool
hnappinn.
Extra Cool vísirinn lýsir. Þegar kveikt er á
Extra Cool aðgerðinni gæti viftan farið
sjálfkrafa í gang.
Þessi aðgerð stöðvast sjálfkrafa eftir u.þ.b. 6
klst. Þegar slökkt er á aðgerðinni mun
slokkna á Extra Cool vísinum.
Ýttu á Extra Cool hnappinn til að afvirkja
Extra Cool aðgerðina áður en hún stöðvast
sjálfkrafa.
Til að stilla á annað hitastig í kælinum
skaltu slökkva á Extra Cool aðgerðinni og
fara eftir „Hitastilling“.
4.8 Extra Freeze aðgerð
Extra Freeze aðgerðin er notuð til að forfrysta
og hraðfrysta í röð í frystihólfinu. Þessi
aðgerð hraðar frystingu ferskra matvæla og
ver um leið matvæli sem þegar eru geymd
gegn óæskilegri hitnun.
Til að frysta fersk matvæli skal virkja
Extra Freeze aðgerðina minnst sólarhring
áður en maturinn sem á að forfrysta er
settur í frystihólfið.
Til að virkja þessa aðgerð skaltu ýta á Extra
Freeze hnappinn.
Extra Freeze vísirinn lýsir. Extra Freeze
aðgerðin afvirkjast sjálfkrafa eftir að hámarki
52 klukkustundir.
Ýttu á Extra Freeze hnappinn til að afvirkja
Extra Freeze aðgerðina áður en hún stöðvast
sjálfkrafa.
4.9 Aðvörun um háan hita
Þegar hitastigið hækkar í frystihólfinu (til
dæmis vegna þess að rafmagn hafði áður
farið af) mun viðvörunarvísirinn blikka,
hitastigsvísir frystisins sýnir H° og hljóðið fer
á.
Til að afvirkja viðvörunina skaltu ýta á
einhvern hnapp.
Viðvörunarvísirinn og hljóðið slokkna. Vísirinn
fyrir hitastig frystis sýnir H° í fimm sekúndur
áður en hann sýnir hitastigið í frystinum á ný.
120 ÍSLENSKA

Viðvörunin endurstillist eftir eina
klukkustund eftir afvirkjun þangað til
eðlilegar aðstæður hafa náðst.
Ef þú ýtir ekki á neinn hnapp, slekkur
hljóðið á sér sjálfkrafa eftir eina
klukkustund til að forðast truflun.
4.10 Aðvörun fyrir opna hurð
Ef hurðin á kælinum er skilin eftir opin í u.þ.b.
fimm mínútur eða ef hurðin á frystinum er
skilin eftir opin í u.þ.b. 80 sekúndur heyrist
hljóð og viðvörunarvísir fyrir opna hurð
kviknar. Ljósið inni í kælinum mun einnig
byrja að blikka.
Aðvörunin stöðvast eftir að hurðinni er lokað.
Ýttu á hvaða hnapp sem er til að slökkva á
hljóðinu og blikki á ljósinu í kælinum.
Ef þú ýtir ekki á neinn hnapp, slekkur
hljóðið á sér sjálfkrafa eftir eina
klukkustund til að forðast truflun.
4.11 Vísir fyrir loftsíuskipti
Þegar loftsían er útrunnin og þörf er á að
skipta um síu, kviknar Vísir fyrir loftsíuskipti
og Filter Reset viðvörunarvísirinn virkjast.
Sjá hlutann „Að setja upp og skipta um
CleanAir+ síuna“ í kaflanum „Umhirða og
hreinsun“ til að sjá leiðbeiningar fyrir að skipta
um síu.
Þegar búið er að skipta um síuna skaltu ýta á
viðvörunarhnappinn Filter Reset til að slökkva
á viðvöruninni.
4.12 Núllstilling
Stillingarhamurinn gerir þér kleift að:
• Virkja eða afvirkja ECOMETER vísinn
• Virkja eða afvirkja hnappahljóð
• Breyta hitastigseiningunum frá°C til°F
• Endurstilla tækið í verksmiðjustillingar
Stillingarhamur virkjaður
Til að virkja valmöguleikann:
1. Ýttu á og haltu ECO inni í u.þ.b. 3
sekúndur. Þegar verið er að virkja
stillingarhaminn sýnir skjárinn blikkandi
.
2. Þegar kveikt hefur verið á
stillingarhamnum, sýnir skjárinn .
Til að afvirkja stillingarhaminn, ýttu á ECO
hnappinn og haltu honum inni í um það bil 3
sekúndur.
Stillingarhamurinn afvirkjast sjálfkrafa ef þú ef
þú snertir ekki stjórnborðið í 60 sekúndur.
Leiðsögn um stillingarhaminn
1. Stillingarhamurinn virkjaður (sjá
„Stillingarhamur virkjaður“).
Skjárinn sýnir .
2. Ýttu létt á hitastigshnappinn (til vinstri) til
að breyta stikunni. Ýttu létt á
hitastigshnappinn (til hægri) til að breyta
gildi stikunnar.
Skjár Sjálfgefnar stikur
ECOMETER vísir
Hnappahljóð
Hitastigseiningar
Verksmiðjustillingar
ECOMETER vísir
Til að kveikja eða slökkva á ECOMETER:
1. Stillingarhamurinn virkjaður (sjá
„Stillingarhamur virkjaður“).
Skjárinn sýnir .
2. Ýttu endurtekið á . Vísirinn mun hvað
eftir annað sýna fyrir virkjun eða
fyrir afvirkjun á ECOMETER vísinum.
3. Ýttu á og haltu ECO hnappnum inni í
u.þ.b. 3 sekúndur til að fara úr
stillingarham.
Hnappahljóð
Þú getur virkjað eða afvirkjað hnappahljóðið í
stillingarhamnum. Til að virkja eða afvirkja
hljóðið:
1. Stillingarhamurinn virkjaður (sjá
„Stillingarhamur virkjaður“).
Skjárinn sýnir .
ÍSLENSKA 121

2. Ýttu endurtekið á þar til þú sérð .
Ýttu á til að kveikja eða slökkva á
hljóðinu. Vísirinn mun breytast í fyrir
virkjað eða fyrir afvirkjað hljóð.
3. Ýttu á og haltu ECO hnappnum inni í
u.þ.b. 3 sekúndur til að fara úr
stillingarham.
Hitastigseiningar
Með því að nota stillingarhaminn geturðu
breytt hitastigseiningunni sem birtist á
stjórnborðinu úr Celsíus í Fahrenheit. Til að
breyta hitastigseiningunni:
1. Stillingarhamurinn virkjaður (sjá
„Stillingarhamur virkjaður“).
Skjárinn sýnir .
2. Ýttu endurtekið á þar til þú sérð
og . Ýttu á vísirinn sem sýnir
eininguna til að velja á milli fyrir
Celsíus og fyrir Fahrenheit.
3. Ýttu á og haltu ECO hnappnum inni í
u.þ.b. 3 sekúndur til að fara úr
stillingarham.
Verksmiðjustillingar
Þessi aðgerð endurstillir sérhverja stillingu í
sjálfgefnar verksmiðjustillingar. Til að stilla
aftur á sjálfgefnar verksmiðjustillingar:
1. Stillingarhamurinn virkjaður (sjá
„Stillingarhamur virkjaður“).
Skjárinn sýnir .
2. Ýttu endurtekið á þar til þú sérð
og . Ýttu endurtekið á þar til þú
sérð .
fer að blikka og síðan í fast
form, sem gefur til kynna að stillt hafi
verið aftur á verksmiðjustillingar.
3. Ýttu á og haltu ECO hnappnum inni í
u.þ.b. 3 sekúndur til að fara úr
stillingarham.
5. DAGLEG NOTKUN
5.1 Hurðarhillurnar staðsettar
Svo hægt sé að geyma matarumbúðir af
ýmsum stærðum, má staðsetja hurðasvalirnar
á mismunandi hæðarstigum.
1. Togið hilluna smátt og smátt upp þar til
hún losnar.
2. Endurstaðsetjið hana eftir þörfum.
Þessi gerð er búin breytilegum geymslukassa
sem hægt er að færa til hliðar.
122 ÍSLENSKA

5.2 Færanlegar hillur
Hliðar kæliskápsins eru búnar röðum af
hillustoðum þannig að hægt sé að staðsetja
hillurnar eftir þörfum.
Þetta heimilistæki er einnig búið hillu sem
samanstendur af tveimur hlutum. Hægt er að
setja framhluta hillunnar undir afturhlutann til
að nýta betur plássið.
Til að brjóta saman hilluna:
1. Takið framhlutann varlega út.
2. Rennið honum inni í neðri grindina og
undir afturhlutann.
1
2
Færið ekki glerhilluna fyrir ofan
grænmetisskúffuna, til að tryggja rétt
loftstreymi.
5.3 GreenZone skúffa
Í neðsta hólfi kælisins er skúffa til að draga út.
Glerhillan í GreenZone er með búnaði sem
stýrir þéttni þess og veitir ákjósanlegt rakastig
í skúffunni.
5.4 GreenZone skúffan fjarlægð
Mælt er með því að tæma skúffuna áður
en hún er fjarlægð úr kælinum.
Fjarlægðu skúffuna:
1. Dragðu skúffuna út úr kæliskápnum.
2. Lyftu upp framhlið skúffunnar.
3. Dragðu út skúffuna um leið og þú lyftir
henni upp.
Til að fjarlægja glerlokið af GreenZone
hólfinu:
ÍSLENSKA 123

1. Aflæstu láréttum gripum samtímis á
báðum hliðum.
2
x2
1
2. Dragðu glerhillustoðirnar í átt að þér.
5.5 ExtraChill fjarlægt
Það er skúffa fyrir ofan GreenZone skúffuna.
Fjarlægðu skúffuna:
1. Dragðu skúffuna út úr kæliskápnum.
2. Lyftu upp framhluta skúffunnar.
3. Lyftu upp og snúðu skúffunni til að draga
hana út úr heimilistækinu.
Til að fjarlægja glerlokið af ExtraZone hólfinu:
124 ÍSLENSKA

1. Aflæstu láréttum gripum samtímis á
báðum hliðum.
2
x2
1
2. Dragðu glerhillustoðirnar í átt að þér.
2
1
5.6 Rakastýring
Glerhillan í GreenZone skúffunni inniheldur
búnað sem stillir þéttnina og veitir ákjósanlegt
rakastig inni í skúffunni.
Ekki setja neinar matvörur á
rakastýringarbúnaðinn.
Til að fjarlægja rakastýringarbúnaðinn:
1. Opnaðu skúffuna fyrir neðan glerhilluna
og dragðu út lokið.
2. Ef þú þarft að endurnýja hvítu himnu
búnaðarins skaltu taka í búnaðinn fyrir
miðju og aðskilja himnuna frá lokinu með
því að toga í lokið.
ÍSLENSKA 125

3. Settu nýja himnu á lokið með því að
þrýsta brúnum himnunnar á lokið.
4. Settu rakastýringuna aftur í skúffuna.
Eftir því hvaða magn ávaxta og
grænmetis er geymt í GreenZone
skúffunni gæti rakaþétting myndast.
Í slíku tilfelli skaltu fjarlægja rakaþéttingu
með mjúkum klút.
5.7 MULTIFLOW
Kæliskápshólfið er með MULTIFLOW búnaði
sem gerir hraða og skilvirka kælingu matvæla
mögulega og viðhaldi á jafnara hitastigi í
kælihólfinu.
Þessi búnaður virkjast sjálfkrafa þegar þörf er
á.
MULTIFLOW gengur aðeins þegar hurðin er
lokuð.
Ekki loka fyrir loftunargöt, til að betri
kæling sé möguleg.
Ekki fjarlægja MULTIFLOW spjaldið.
Notaðu ekki vatnsúða eða gufu til að
hreinsa heimilistækið. Fyrir upplýsingar
um hreinsun, sjá kaflann „Umhirða og
hreinsun“.
5.8 CleanAir+-sía
Í heimilistækinu er CleanAir+ kolefnissía.
Sían hreinsar loftið og tekur óæskilega lykt úr
kælihólfinu sem bætir geymslugæðin.
Við afhendingu er sían og plasthólf hennar í
plastpoka með öðrum aukabúnaði (sjá
hlutann „Að setja upp og skipta um CleanAir+
síuna“ í kaflanum „Umhirða og hreinsun“ fyrir
uppsetningu).
5.9 Bottle Stop
Aukabúnaðurinn kemur í veg fyrir að flöskur
og dósir rúlli. Þú getur staflað flöskunum eða
dósunum hver ofan á aðra til að spara
hillupláss og bæta skipulag í kælinum.
Aukabúnaðurinn krefst engrar samsetningar
eða verkfæra. Settu aukabúnaðinn inn með
silíkon botninn niður og byrjaðu að raða
flöskum.
126 ÍSLENSKA

Silíkon botninum er ætlað að koma í veg fyrir
að aukabúnaðurinn renni til: hann festist
hvorki né rennur til.
Geymdu að hámarki 10 kg af flöskum
og/eða dósum af mismunandi stærðum í
allt að tveimur röðum eins og sést á
myndinni.
Geymdu aðeins lokaðar flöskur eða dósir
þannig að hliðinni sem opnast er snúið fram.
Ekki setja mat sem ekki er vel pakkaður í
snertingu við aukabúnaðinn.
5.10 Frysta fersk matvæli
Frystihólfið hentar til þess að frysta fersk
matvæli og geyma frosin og djúpfrosin
matvæli til lengri tíma.
Til að frysta fersk matvæli skal virkja Extra
Freeze aðgerðina minnst 24 klukkustundum
áður en maturinn sem á að frysta er settur í
frystihólfið.
Dreifið fersku matvælunum jafnt yfir fyrsta
hólfið eða skúffuna talið ofan frá.
Hámarksmagn matvæla sem hægt er að
frysta á sólarhring án þess að bæta við
öðrum ferskum matvælum er tilgreint á
merkiplötunni (merkingu sem staðsett er inni í
heimilistækinu).
Að frystiferlinu loknu, fer heimilistækið
sjálfkrafa aftur í fyrri hitastillingu (sjá „Extra
Freeze aðgerðina“).
Til að fá frekari upplýsingar, sjá „Ábendingar
um frystingu“.
5.11 Geymsla á frosnum matvælum
Þegar heimilistækið er virkjað í fyrsta sinn
eða eftir notkunarhlé skal láta það ganga í
minnst 3 klukkustundir áður en vörurnar eru
settar í hólfið með kveikt á Extra Freeze
aðgerðinni.
Frystiskúffurnar tryggja að það sé auðvelt og
fljótlegt að finna matarpakkann sem vantar.
Ef það á að geyma mikið magn af matvælum,
skal fjarlægja allar skúffur og láta matvælin í
hillurnar.
Geymið matinn ekki nær hurðinni en 15 mm.
VARÚÐ!
Ef þiðnun verður fyrir slysni, til dæmis af
því að rafmagnið fer af, og
rafmagnsleysið hefur varað lengur en
gildið sem sýnt er á merkiplötunni undir
„hækkunartími“, þarf að neyta þídda
matarins fljótt eða elda hann strax, kæla
og frysta hann svo aftur. Sjá „Aðvörun
um háan hita“.
5.12 Þíðing
Djúpfrosinn eða frosinn mat er hægt að þíða í
kælinum í eða í plastpoka undir köldu vatni,
áður en maturinn er notaður.
Þessi aðgerð veltur á því hversu mikill tími er
til boða og tegund matarins. Litla bita má
jafnvel elda frosna.
5.13 Ísmolaframleiðsla
Með þessu heimilistæki fylgir einn eða fleiri
bakkar til ísmolagerðar.
Ekki nota málmverkfæri til að losa
bakkana úr frystinum.
1. Fylltu þessa bakka af vatni.
2. Settu ísbakkana í frystihólfið.
ÍSLENSKA 127

6. ÁBENDINGAR OG GÓÐ RÁÐ
6.1 Ábendingar um orkusparnað
• Frystir: Innri uppsetning heimilistækisins er
það sem tryggir skilvirkustu notkun orku.
• Kælir: Skilvirkasta notkun orku er tryggð í
þeirri uppsetningu að skúffum í neðri hluta
heimilistækisins og.hillum sé jafnt dreift.
Staðsetning kassa í hurð hefur ekki áhrif á
orkunotkun.
• Ekki opna hurðina oft eða hafa hana opna
lengur en nauðsyn krefur.
• Frystir: Því kaldari sem stillingin er, því
meiri orku notar hún.
• Kælir: Ekki still á of háan hita til að spara
orku nema eiginleikar matarins krefjist
þess.
• Ef umhverfishitastigið er hátt, hitastýringin
stillt á lágan hita og heimilistækið
fullhlaðið, getur verið að þjappan sé
stöðugt í gangi, en það getur valdið því að
hrím eða ís hlaðist utan á eiminn. Í þessu
tilfelli skaltu setja hitastýringuna í átt að
hærra hitastigi til að leyfa sjálfvirka þíðingu
og spara orku á þann hátt.
• Tryggðu gott loftflæði. Ekki hylja
loftræstiristarnar eða götin.
• Gakktu úr skugga um að matvaran inn í
heimilistækinu komi ekki í veg fyrir að loft
geti flætt út um þar til gerð göt aftan á
innanverðu heimilistækinu.
6.2 Ábendingar um frystingu
• Virkjaðu Extra Freeze aðgerðina að
minnsta kosti einum sólarhring áður en
maturinn er látinn í frystihólfið.
• Áður en ferskur matur er frystur skal setja
hann í álpappír, plastfilmu eða poka,
loftþétt ílát með loki.
• Til að fá skilvirkari frystingu og þíðingu ætti
að skipta matvælunum í minni skammta.
• Mælt er með því að láta merkingar og
dagsetningar á öll frosin matvæli. Það
mun hjálpa þér að þekkja matvælin og vita
hvenær þarf að nota þau áður en þau fara
að spillast.
• Maturinn á að vera ferskur þegar hann er
frystur til að varðveita gæðin. Sérstaklega
ætti að frysta ávexti og grænmeti eftir
uppskeru til að varðveita öll næringarefni
þeirra.
• Ekki frysta dósir eða flöskur með vökva,
sérstaklega kolsýrða drykki - þær geta
sprungið þegar þær eru frystar.
• Ekki láta heitan mat í frystihólfið. Kældu
niður að stofuhita áður en hann er látinn
inn í hólfið.
• Til að forðast hækkun hitastigs fyrir
matvæli sem þegar voru frosin skal ekki
setja fersk, ófrosin matvæli beint við hlið
þeirra. Láttu matvæli við stofuhita í þann
hluta frystihólfsins þar sem eru engin
frosin matvæli.
• Ekki borða ísmola, vatnsís eða íspinna
strax eftir að þeir hafa verið teknir úr frysti.
Hætta er á kali.
• Ekki endurfrysta þiðin matvæli. Ef
matvælin eru þiðin skaltu elda þau, kæla
og frysta.
6.3 Ábendingar um geymslu á
frosnum mat
• Frystihólfið er það sem er merkt með
.
• Góð hitastilling sem varðveitir frosna
matvöru er -18°C eða lægri.
Sé hærri hiti stilltur fyrir heimilistækið getur
það leitt til styttri endingartíma fyrir
vörurnar.
• Allt frystihólfið hentar fyrir geymslu á
frosnum vörum.
• Skildu eftir nægilegt pláss í kringum
matvælin til að loft nái að flæða vel um
þau.
• Fyrir fullnægjandi geymsluskilyrði, skal
skoða fyrningardagsetninguna á
matarumbúðum.
• Það er mikilvægt að pakka matvælunum
þannig að vatn, raki og vatnsgufa komist
ekki að þeim.
6.4 Innkaupaábendingar
Eftir að hafa keypt í matinn:
• Gakktu úr skugga um að umbúðirnar séu
ekki skaddaðar - maturinn gæti hafa
spillst. Ef umbúðirnar eru bólgnar eða
blautar, getur verið að þær hafi ekki verið
geymdar við réttar aðstæður og hafi þegar
byrjað að þiðna.
128 ÍSLENSKA

• Til að takmarka þíðingu ætti að kaupa
frosnar vörur í lok verslunarleiðangursins
og flytja þær í kælitösku eða hitastillandi
tösku.
• Settu frosnu matvælin samstundis í
frystinn þegar þú snýrð aftur úr búðinni.
• Ef maturinn hefur þiðnað, jafnvel bara að
hluta, skal ekki endurfrysta hann. Neyta
skal matarins eins fljótt og hægt er.
• Virtu síðasta neysludag og
geymsluupplýsingarnar sem finna má á
umbúðum.
6.5 Endingartími fyrir frystihólf
Tegund matvæla Endingartími (mánuð‐
ir)
Brauð 3
Ávextir (fyrir utan sítrusávexti) 6 - 12
Grænmeti 8 - 10
Afgangar án kjöts 1 - 2
Mjólkurvörur:
Smjör
Mjúkur ostur (t.d. mozzarella)
Harður ostur (t.d. parmesan, cheddar)
6 - 9
3 - 4
6
Sjávarfang:
Feitur fiskur (t.d. lax, makríll)
Magur fiskur (t.d. þorskur, flundra)
Rækjur
Skelfiskur og kræklingur án skelja
Eldaður fiskur
2 - 3
4 - 6
12
3 - 4
1 - 2
Kjöt:
Alifuglakjöt
Nautakjöt
Svínakjöt
Lambakjöt
Pylsur
Skinka
Afgangar með kjöti
9 - 12
6 - 12
4 - 6
6 - 9
1 - 2
1 - 2
2 - 3
6.6 Ábendingar um kælingu á
ferskum matvælum
• Góð hitastilling sem varðveitir ferska
matvöru er +4°C eða lægri.
Sé hærri hiti stilltur fyrir heimilistækið getur
það leitt til styttri endingartíma fyrir
matvælin.
• Láttu umbúðir yfir matvælin til að varðveita
ferskleika þeirra og bragð.
• Notaðu alltaf lokuð ílát fyrir vökva og fyrir
mat, til að forðast að lykt eða bragð safnist
í hólfið.
• Til að forðast víxlmengun á milli eldaðrar
og óeldaðrar matvöru, skal þekja eldaða
matvöru og halda henni aðskildri frá hrárri
matvöru.
• Mælst er til þess að matvörur séu þíddar
inn í kælinum.
• Ekki stinga heitri matvöru inn í
heimilistækið. Gakktu úr skugga um að
matvaran hafi náð að kólna að stofuhita
áður en gengið er frá henni.
• Til að koma í veg fyrir matarsóun skal
alltaf setja ný matvæli fyrir aftan þau eldri.
ÍSLENSKA 129

6.7 Ábendingar um góða kælingu
• Ferskvöruhólfið er það sem er merkt (á
merkiplötunni) með .
• Kjöt (af öllum gerðum): Pakka inn í
hentugar umbúðir og setja á glerhilluna
fyrir ofan grænmetisskúffuna. Kjöt skal
ekki geyma lengur en 1-2 daga.
• Ávextir og grænmeti: Hreinsa vandlega
(fjarlægja alla mold) og geyma í sérstakri
skúffu (grænmetisskúffunni).
• Ekki er æskilegt að geyma framandi ávexti
eins og banana, mangó, papæjualdin,
o.s.frv. í kæliskápnum.
• Grænmeti, svo sem tómata, kartöflur, lauk
og hvítlauk, skal ekki geyma í
kæliskápnum.
• Smjör og ostur: Setja í loftþéttar umbúðir
eða pakka inn í álpappír eða pólýþen-poka
til að útiloka eins mikið loft og hægt er.
• Flöskur: Loka með loki og setja í
flöskuhilluna í hurðinni, eða (ef til staðar) í
flöskurekkann.
• Skoðaðu alltaf „best fyrir“ dagsetningu
varanna til að vita hversu lengi á að
geyma þær.
7. UMHIRÐA OG HREINSUN
AÐVÖRUN!
Sjá kafla um öryggismál.
7.1 Innra byrði hreinsað
Áður en heimilistækið er notað í fyrsta sinn,
skal þvo innri og alla innri fylgihluti með volgu
vatni og hlutlausri sápu til að losna við
dæmigerða lykt af nýrri vöru og þurrka svo
vandlega.
VARÚÐ!
Ekki nota þvottaefni, slípiduft, klór eða
olíublönduð hreinsiefni, þar sem það
skemmir áferðina.
VARÚÐ!
Aukahlutir og hlutar heimilistækisins eru
ekki ætlaðir fyrir uppþvottavélar.
VARÚÐ!
Hreinsaðu stjórnborðið með rökum klút.
Ekki nota neitt þvottaefni. Eftir að
hreinsun er lokið skaltu þurrka
stjórnborðið með mjúkum klút.
7.2 Reglubundin hreinsun
Hreinsa þarf búnaðinn reglulega:
1. Hreinsaðu innra byrðið og aukahluti með
volgu vatni og hlutlausri sápu.
2. Skoðaðu hurðarþéttingar reglulega og
strjúktu af þeim svo þær séu hreinar og
lausar við óhreinindi.
3. Skolaðu og þurrkaðu vandlega.
7.3 Ísskápurinn affrystur
Þíðing kælihólfsins er sjálfvirk. Vatnið sem
þéttist rennur inn í móttakara á þjöppunni og
gufar upp. Ekki er hægt að fjarlægja
móttakarann.
7.4 Affrysting frystisins
Frystihólfið er hrímlaust. Það þýðir að ekkert
hrím safnast upp þegar það er í notkun,
hvorki á innri veggjum né á matvælunum.
7.5 Að setja upp og skipta um
CleanAir+ síuna
CleanAir+ sían er virk kolefnissía sem dregur
í sig slæma lykt og gerir það að verkum að
hægt er að viðhalda besta bragði og lykt
matvæla án þess að hætta sé á víxlmengun á
óþef.
Meðhöndlaðu loftsíuna af varkárni til að
forðast að yfirborð hennar rispist.
Við afhendingu er kolefnissían í
plastpoka til að viðhalda frammistöðu
hennar.
Settu loftsíuna upp áður en heimilistækið er
virkjað.
1. Taktu loftsíuna úr plastpokanum.
130 ÍSLENSKA

2. Opnaðu plasthólfið og settu hrjúft
yfirborðið á grindina og komdu síunni fyrir
á merktu svæði á grófu yfirborðinu.
3. Haltu síunni niðri á meðan plasthólfinu er
lokað þar til þú heyrir smell.
4. Fjarlægðu efstu glerhilluna úr
kæliskápnum. Renndu plasthólfinu með
loftstíunni á vinstri hlið glerhillunnar.
5. Settu glerhilluna aftur í kæliskápinn.
Varastu að rekast í síuna þegar hillan er
sett aftur í.
Skipt um loftsíuna
1. Opnaðu plasthólfið.
ÍSLENSKA 131

1
2
2. Dragðu út notuðu loftsíuna.
3. Taktu nýja loftsíu úr plastpokanum og
settu hana í skúffuna.
4. Lokaðu plasthólfinu.
5. Þegar búið er að skipta um síuna skaltu
ýta á Filter Reset viðvörunarhnappinn á
stjórnborðinu til að slökkva á viðvöruninni.
Fyrir bestan árangur skaltu setja plasthólfið á
réttan stað (vinstra megin við glerhilluna) og
skipta um loftsíuna á sex mánaða fresti.Sjá
„Vísir fyrir loftsíuskipti“ fyrir frekari
upplýsingar.
Loftsían er aukahlutur og fellur því ekki
undir ábyrgð.
Hægt er að kaupa nýjar loftsíur hjá
staðbundnum söluaðila.
7.6 Tímabundið ekki í notkun
Þegar heimilistækið er ekki í notkun til lengri
tíma, skal grípa til eftirfarandi ráðstafana:
1. Aftengja tækið frá rafmagni.
2. Fjarlægja allan mat.
3. Hreinsa heimilistækið og alla aukahluti
þess.
4. Hafa skal hurðirnar opnar til að koma í
veg fyrir vonda lykt.
8. BILANALEIT
AÐVÖRUN!
Sjá kafla um öryggismál.
8.1 Hvað skal gera ef…
Vandamál Möguleg ástæða Lausn
Heimilistækið virkar ekki. Slökkt er á heimilistækinu. Kveiktu á heimilistækinu.
132 ÍSLENSKA

Vandamál Möguleg ástæða Lausn
Rafmagnsklóin er ekki rétt tengd við
rafmagnsinnstunguna.
Tengdu klóna við rafmagnsinnstung‐
una með réttum hætti.
Það er ekkert rafmagn á rafmagns‐
innstungunni.
Tengdu annað raftæki við rafmagns‐
innstunguna. Hafðu samband við
faglærðan rafvirkja.
Heimilistækið gefur frá sér mikinn
hávaða.
Heimilistækið er ekki með réttan
stuðning.
Kannaðu hvort heimilistækið sé
stöðugt.
Heyranleg eða sjónræn aðvörun er í
gangi.
Nýlega hefur verið kveikt á skápn‐
um.
Sjá „Aðvörun um háan hita“ eða
„Aðvörun fyrir opna hurð“.
Hitastig heimilistækisins er of hátt. Sjá „Aðvörun um háan hita“ eða
„Aðvörun fyrir opna hurð“.
Hurðin hefur verið skilin eftir opin. Lokaðu hurðinni.
Þjappan gengur samfellt. Hitastig er rangt stillt. Sjá „Stjórnborð“ kaflann.
Margar matvörur voru settar inn á
sama tíma.
Bíddu í nokkrar klukkustundir og
athugaðu svo hitastigið aftur.
Stofuhitinn er of hár. Sjá „Uppsetning“ kaflann.
Matvara sem látin var í heimilistækið
var of heit.
Leyfðu matvörunni að kólna að
stofuhita áður en hún er látin til
geymslu.
Hurðin er ekki nægilega vel lokuð. Sjá „Hurðinni lokað“ hlutann.
Kveikt er á Extra Freeze aðgerðinni. Sjá kaflann „Extra Freeze Aðgerð“ .
Kveikt er á Extra Cool aðgerðinni. Sjá kaflann „Extra Cool Aðgerð“ .
Þjappan fer ekki strax í gang eftir að
ýtt er á „Extra Freeze“ eða „Extra
Cool“, eða eftir að hitastigi er breytt.
Þjappan ræsist eftir nokkurn tíma. Þetta er eðlilegt, engin villa hefur
komið upp.
Hurðin er skökk eða rekst í loftræst‐
iristina.
Tækið er ekki lárétt. Sjá leiðbeiningar um uppsetningu.
Hurð opnast ekki auðveldlega. Þú reyndir að opna hurðina aftur
strax eftir að þú lokaðir henni.
Bíddu í nokkrar sekúndur á milli
þess að loka og opna hurðina aftur.
Ljósið virkar ekki. Ljósið er í reiðuham. Lokaðu og opnaðu hurðina.
Ljósið er bilað. Hafðu samband við næstu viður‐
kenndu þjónustumiðstöð.
Það er of mikið hrím og klaki. Hurðin er ekki nægilega vel lokuð. Sjá „Hurðinni lokað“ hlutann.
Þéttiborðinn er afmyndaður eða óhr‐
einn.
Sjá „Hurðinni lokað“ hlutann.
Matvöru er ekki rétt pakkað. Pakkaðu matvörunni betur.
Hitastig er rangt stillt. Sjá „Stjórnborð“ kaflann.
Heimilistækið er fullhlaðið og er stillt
á lægsta hitastig.
Stilltu hærra hitastig. Sjá „Stjórn‐
borð“ kaflann.
ÍSLENSKA 133

Vandamál Möguleg ástæða Lausn
Hitastigið sem stillt er á heimilistæk‐
inu er of lágt og umhverfishitastig er
of hátt.
Stilltu hærra hitastig. Sjá „Stjórn‐
borð“ kaflann.
Vatnið flæðir á afturplötu kæliskáp‐
sins.
Á meðan á sjálfvirka affrystingarferl‐
inu stendur, bræðir það frostið á af‐
turplötunni.
Þetta er í lagi.
Of mikið vatn þéttist á afturvegg
kæliskápsins.
Hurðin var opnuð of oft. Opnaðu hurðina aðeins þegar
nauðsynlegt er.
Hurðinni var ekki lokað til fulls. Gakktu úr skugga um að hurðinni sé
lokað til fulls.
Geymdum mat var ekki pakkað. Pakkaðu mat í hentugar pakkningar
áður en þú setur hann í heimilistæk‐
ið.
Vatn flæðir á gólfinu. Vatnsbræðsluúttakið er ekki tengt
við uppgufunarbakkann fyrir ofan
þjöppuna.
Tengdu vatnsbræðsluúttakið við
uppgufunarbakkann.
Ekki er hægt að stilla hitastigið. Kveikt er á Extra Freeze aðgerð eða
Extra Cool aðgerð.
Slökktu handvirkt á Extra Freeze að‐
gerð eða Extra Cool aðgerð , eða
bíddu þar til aðgerðin afvirkjast sjálf‐
krafa til þess að stilla hitastigið. Sjá
kaflana „Extra Freeze Aðgerð“ eða
„Extra Cool Aðgerð“.
Hitastig heimilistækisins er of lágt/
hátt.
Hitastigið er ekki rétt stillt. Stilltu hitastigið hærra/lægra.
Hurðin er ekki nægilega vel lokuð. Sjá „Hurðinni lokað“ hlutann.
Hitastig matvörunnar er of hátt. Láttu hitastig matvörunnar lækka að
stofuhita áður en hún er geymd.
Of mikið af matvöru er geymt í einu. Bættu við minna af matvöru í einu.
Hurðin hefur verið opnuð of oft. Opnaðu hurðina aðeins ef nauðsyn
krefur.
Kveikt er á Extra Freeze aðgerðinni. Sjá kaflann „Extra Freeze Aðgerð“ .
Kveikt er á Extra Cool aðgerðinni. Sjá kaflann „Extra Cool Aðgerð“ .
Það er ekkert kalt loftflæði í heimilis‐
tækinu.
Gakktu úr skugga um að það sé kalt
loftflæði í heimilistækinu. Sjá
„Ábendingar og góð ráð“ kaflann.
birtist á skjánum. Heimilistækið er í sýnikennsluham. Til að hætta í sýnikennsluham skaltu
ýta á Extra Cool og ECO hnappana
og halda þeim inni í um það bil 10
sekúndur þar til þú heyrir 3 stutt píp.
Táknið birtist og viðvör‐
unarvísir er kveiktur.
Samskiptavandi. Hafðu samband við næstu viður‐
kenndu þjónustumiðstöð. Kælikerfið
mun halda áfram að halda matvæl‐
um köldum en aðlögun hitastigs
verður ekki möguleg.
134 ÍSLENSKA

Vandamál Möguleg ástæða Lausn
Táknið eða
eða og núverandi still‐
ingar birtast til skiptis á 5 sekúndna
fresti og viðvörunarvísirinn er kveikt‐
ur.
Vandamál með hitaskynjara. Hafðu samband við næstu viður‐
kenndu þjónustumiðstöð. Kælikerfið
mun halda áfram að halda matvæl‐
um köldum en aðlögun hitastigs
verður ekki möguleg.
Ef ráðið skilar ekki óskaðri niðurstöðu
skaltu hringja í næstu viðurkenndu
þjónustumiðstöð.
8.2 Skipt um ljósið
Heimilistækið er búið ljósdíóðuljósi með
langan endingartíma.
Aðeins viðgerðarþjónustuaðilar mega skipta
um ljósabúnaðinn. Hafið samband við
viðurkennda þjónustumiðstöð.
8.3 Hurðinni lokað
1. Þrífið þéttiborða hurðarinnar.
2. Stillið af hurðina ef nauðsynlegt er. Sjá
leiðbeiningar um uppsetningu.
3. Ef nauðsynlegt reynist, skal skipta um
ónýta þéttiborða. Hafið samband við
viðurkennda þjónustumiðstöð.
9. HÁVAÐI
SSSRRR!
CLICK!
HISSS!
BRRR!
BLUBB!
ÍSLENSKA 135

10. TÆKNIGÖGN
Tæknilegar upplýsingar eru á merkiplötunni, á
ytri eða innri hlið heimilistækisins og á
orkumerkimiðanum.
QR-kóðinn á orkumerkingunni sem fylgir
þessu tæki, gefur upp tengil á vefsíðu
varðandi upplýsingar um frammistöðu
tækisins í gagnagrunni EU EPREL. Geymdu
orkumerkimiðann til uppflettingar ásamt
notandahandbókinni og öllum öðrum skjölum
sem fylgja með þessu heimilistæki.
Það er einnig mögulegt að nálgast sömu
upplýsingar í EPREL með því að nota
tengilinn:
https://eprel.ec.europa.eu
og
gerðarheiti og framleiðslunúmer sem finna
má á merkiplötu heimilistækisins.
Skoðaðu tengilinn
www.theenergylabel.eu
varðandi ítarlegar upplýsingar um
orkumerkingar.
11. UPPLÝSINGAR FYRIR PRÓFUNARSTOFNANIR
Uppsetning og undirbúningur heimilistækisins
fyrir EcoDesign-vottun verður að samræmast
EN 62552. Loftræstingarkröfur, stærðir
skotsins og lágmarksbil að aftan verður að
vera eins og tilgreint er í 3. kafla í þessari
notandahandbók. Hafðu samband við
framleiðanda fyrir allar frekari upplýsingar,
þar með talið hleðsluáætlanir.
12. UMHVERFISMÁL
Endurvinna þarf öll efni merkt tákninu .
Setjið umbúðirnar í viðeigandi sorpílát til
endurvinnslu. Leggið ykkar að mörkum til
verndar umhverfinu og heilsu manna og dýra
og endurvinnið rusl sem fylgir raftækjum og
raftrænum búnaði. Hendið ekki
heimilistækjum sem merkt eru með tákninu
í venjulegt heimilisrusl. Farið með vöruna í
næstu endurvinnslustöð eða hafið samband
við sveitarfélagið.
136 ÍSLENSKA

ЗА СОВРШЕНИ РЕЗУЛТАТИ
Ви благодариме што го избравте овој AEG производ. Го создадовме за да ви
обезбедиме долгогодишна беспрекорна работа, со иновативни технологии кои го
прават животот поедноставен - функции што можеби нема да ги најдете кај
обичните апарати. Ве молиме одвојте неколку минути за читање за да го добиете
најдоброто од овој апарат.
Посетете ја нашата страница за да:
Добиете совети за користење, брошури, водич за решавање проблеми,
информации за сервисирање и поправка:
www.aeg.com/support
Регистрирајте го вашиот производ за подобро сервисирање:
www.registeraeg.com
Купувајте дополнителен прибор, потрошни материјали или оригинални резервни
делови за вашиот апарат:
www.aeg.com/shop
ГРИЖА ЗА КОРИСНИЦИ И СЕРВИСИРАЊЕ
Ви препорачуваме да користите оригинални резервни делови.
Кога ќе контактирате со нашиот овластен сервисен центар, погрижете се да ги
имате на располагање следниве податоци: Модел, Број на производот, Сериски
број.
Информациите можат да се најдат на етикетата со информации.
Предупредување / Внимание-Безбедносни информации
Општи информации и совети
Информации за животната средина
Можноста за промени е задржана.
СОДРЖИНА
1. БЕЗБЕДНОСНИ ИНФОРМАЦИИ..............................................................138
2. БЕЗБЕДНОСНИ УПАТСТВА..................................................................... 140
3. МОНТАЖА..................................................................................................142
4. КОНТРОЛНА ТАБЛА................................................................................. 145
5. СЕКОЈДНЕВНА УПОТРЕБА..................................................................... 149
6. СОВЕТИ И ПОМОШ.................................................................................. 155
7. НЕГА И ЧИСТЕЊЕ.................................................................................... 157
8. РЕШАВАЊЕ ПРОБЛЕМИ......................................................................... 160
9. БУЧАВА...................................................................................................... 164
10. ТЕХНИЧКИ ПОДАТОЦИ..........................................................................164
11. ИНФОРМАЦИИ ЗА ТЕСТИРАЊЕ...........................................................165
12. ГРИЖА ЗА ОКОЛИНАТА.........................................................................165
МАКЕДОНСКИ 137

1. БЕЗБЕДНОСНИ ИНФОРМАЦИИ
Пред монтирање и користење на апаратот, ве молиме
внимателно да ги прочитате приложените упатства.
Производителот не сноси одговорност за направена
повреда или штета кои се резултат на неправилна
монтажа или употреба. Секогаш чувајте ги упатствата на
сигурно и безбедно место за подоцнежна употреба.
1.1 Безбедност на деца и ранливи лица
• Овој апарат може да го користат деца над 8 години и
лица со намалени физички, сетилни или ментални
способности или лица без искуство и знаење доколку
тоа го прават под надзор или доколку им биле дадени
упатства како безбедно да го употребуваат апаратот, и
доколку ги разбираат опасностите поврзани со него.
• На децата на возраст од 3 до 8 години им е дозволено
да го полнат и да го празнат апаратот доколку добиле
соодветни упатства.
• Овој апарат може да го користат лица со многу обемни
и сложени пречки во развојот доколку добиле соодветни
упатства.
• Апаратот не смее да биде во дофат на деца помали од
3 години освен ако не се под постојан надзор.
• Децата треба да бидат под надзор да не играат со
апаратот.
• Децата не треба да го чистат или да го оддржуваат
апаратот без надзор.
• Држете ја амбалажата подалеку од деца и фрлете ја
соодветно.
1.2 Општа безбедност
• Уредот служи само за складирање храна и пијалаци.
• Уредот е наменет да го користи едно домаќинство во
домашни услови во затворен простор.
138 МАКЕДОНСКИ

• Уредот може да се користи во канцеларии, хотелски
соби, гостилници, фарми со гостилници и други слични
сместувања каде неговото користење не надминува
(просечно) ниво на користење во домаќинство.
• За да се избегне контаминација на храна, почитувајте ги
следниве упатства:
– не отварајте ги вратите подолги временски периоди;
– редовно исчистете ги површините што може да
допираат храна и достапните системи за цедење;
– чувајте сурово месо и риба во соодветни контејнери
во фрижидерот, така што тоа не е во контакт со или
не капе врз друга храна.
• ПРЕДУПРЕДУВАЊЕ: Отворите за вентилација, во
околината на апаратот или во вградената конструкција,
треба да се ослободени од пречки.
• ПРЕДУПРЕДУВАЊЕ: Не користете механички уреди
или вештачки средства за забрзување на процесот на
одмрзнување, освен оние што ги препорачува
производителот.
• ПРЕДУПРЕДУВАЊЕ: Не оштетувајте го ладилното
коло.
• ПРЕДУПРЕДУВАЊЕ: Не користете електрични апарати
во одделите за складирање храна на апаратот, освен
ако не се од типот што е препорачан од
производителот.
• Не користете чистач со воден спреј и пареа за чистење
на апаратот.
• Чистете го апаратот со влажна мека крпа. Користете
само неутрални детергенти. Не користете абразивни
производи, абразивни сунѓери за чистење,
растворувачи или метални предмети.
• Кога апаратот е празен подолг период, исклучете го,
одмрзнете го, исчистете го, исушете го и оставете ја
вратата отворена за да спречите развивање на мувла
во апаратот.
МАКЕДОНСКИ 139

• Не чувајте експлозивни материи како аеросолни
конзерви со запалив погон во овој апарат.
• Доколку кабелот за напојување се оштети, треба да се
замени од страна на производителот, негов овластен
сервисен центар или слични квалификувани лица за да
се избегне опасност.
2. БЕЗБЕДНОСНИ УПАТСТВА
2.1 Монтажа
ПРЕДУПРЕДУВАЊЕ!
Апаратот мора да го монтира само
квалификувано лице.
• Извадете ја целата амбалажа.
• Немојте да монтирате ниту да
користите оштетен апарат.
• Не користете го апаратот пред да го
монтирате во вградената конструкција
од безбедносни причини.
• Следете ги инструкциите за монтирање
дадени со апаратот.
• Секогаш внимавјте кога го пренесувате
апаратот затоа што е тежок. Секогаш
носете заштитни ракавици и
приложените обувки.
• Проверете дали воздухот може да
кружи околу апаратот.
• Кога првпат инсталирате или откако сте
ја замениле вратата почекајте најмалку
4 часа пред да го поврзете апаратот на
струја. Ова е за да се овозможи
маслото да тече назад во компресорот.
• Пред да извршите било каква работа на
самиот апарат (на пр. промена на
врата), извадате го кабелот од
штекерот.
• Не монтирајте го апаратот во близина
на радијатори или шпорети, рерни или
плочи за готвење, освен ако не е
поинаку специфицирано во упатствата
за монтирање.
• Не го изложувајте апаратот на дожд.
• Не го инсталирајте апаратот таму каде
што има директна сончева светлина.
• Не го монтирајте овој апарат во многу
влажни и студени места.
• Кога го преместувате апаратот,
подигнете го предниот раб за да не го
изгребете подот.
• Во апаратот има кеса со средство за
сушење. Тоа не е играчка. Тоа не е
храна. Ве молиме да ја фрлите веднаш.
2.2 Поврзување на струја
ПРЕДУПРЕДУВАЊЕ!
Ризик од пожар и струен удар.
ПРЕДУПРЕДУВАЊЕ!
Кога го поставуваме апаратот,
проверете дали гајтанот за струја е
заплеткан или оштетен.
ПРЕДУПРЕДУВАЊЕ!
Не користете адаптери со повеќе
приклучоци и продолжни кабли.
• Апаратот мора да биде заземјен.
• Проверете дали параметрите на
плочката со спецификации се
компатибилни со електричната моќност
на мрежата на електрична енергија.
• Секогаш користете правилно монтиран
штекер отпорен на струјни удари.
• Внимавајте да не ги оштетите
електричните компоненти (на пр.
приклучокот за струја, кабелот,
компресорот). Контактирајте со
Овластениот сервисен центар или со
електричар за да ги смени
електричните компоненти.
• Кабелот за струја мора да стои под
нивото на приклучокот.
• Поврзете го приклучокот за струја со
штекерот на крајот од монтажата.
140 МАКЕДОНСКИ

Проверете дали приклучокот за струја е
пристапен по монтирањето.
• Не влечете го кабелот за да го
исклучите апаратот од струја. Секогаш
повлекувајте го приклучокот за струја.
2.3 Употребa
ПРЕДУПРЕДУВАЊЕ!
Ризик од повреда, изгореници, струен
удар или пожар.
Апаратот содржи запаллив гас,
изобутан (R600a), природен гас со високо
ниво на компатибилност со околината.
Внимавајте да не гo оштетите водот за
ладење кој содржи изобутан.
• Не менувајте ја спецификацијата на
овој апарат.
• Секое користење на вградениот
производ како самостоен е строго
забрането.
• Не ставајте електрични апарати (на
пример, апарати за правење сладолед)
во апаратот, освен ако производителот
не навел дека е применливо.
• Ако дојде до оштетување на ладилното
коло, проверете дали во просторијата
има пламен и извори на палење.
Проветрете ја просторијата.
• Не дозволувајте жешки предмети да ги
допрат пластичните делови на
апаратот.
• Не ставајте безалкохолни пијалоци во
преградата за замрзнување. Ова ќе
создаде притисок врз садот со пијалок.
• Не чувајте запалив гас и течност во
апаратот.
• Не ставајте запаливи производи или
предмети кои се мокри заедно со
запаливи производи во апаратот, или
во негова близина.
• Не ги допирајте компресорот или
кондензаторот. Тие се жешки.
• Не вадете и не допирајте ги предметите
од преградата за замрзнување ако
рацете ви се мокри или влажни.
• Не ја замрзнувајте повторно храната
што е одмрзната.
• Следете ги упатствата за чување
замрзната храна што се наоѓаат на
пакувањето.
• Завиткајте ја храната во материјал кој е
безбеден за чување на храна пред да ја
ставите во преградата на замрзнувачот.
2.4 Внатрешна светилка
ПРЕДУПРЕДУВАЊЕ!
Опасност од струен удар.
• Овој производ содржи еден или повеќе
извори на светлина од класа на
енергетска ефикасност G.
• Во однос на светилите во внатрешноста
на овој производ и резервните светилки
што се продаваат посебно: Овие
светилки се предвидени да издржат
екстремни физички услови во
апаратите за домаќинство, како што се
температура, вибрации, влажност или
се предвидени за давање сигнали за
работната состојба на апаратот. Тие не
се предвидени да се користат за други
намени и не се погодни за осветлување
простории во домот.
2.5 Нега и чистење
ПРЕДУПРЕДУВАЊЕ!
Ризик од повреда или оштетување на
апаратот.
• Пред одржувањето, исклучете го
апаратот и исклучете го кабелот од
штекерот за струја.
• Апаратот содржи јаглеводороди во
уредот за ладење. Само квалификувано
лице смее да го одржува апаратот и
повторно да ја полни единицата.
• Редовно вршете проверка на одводот
на фрижидерот и ако е потребно
исчистете го. Ако одводот е блокиран,
ќе се собира одмрзната вода на дното
на апаратот.
2.6 Сервис
• За да го поправите апаратот,
контактирајте со овластениот сервисен
центар. Користете само оригинални
резервни делови.
МАКЕДОНСКИ 141

• Треба да знаете дека само-поправката
или непрофесионалната поправка може
да имаат последици врз безбедноста и
може да ја направи гаранцијата
неважечка.
• Следниве резервни делови ќе бидат
достапни 7 години по прекинувањето на
моделот: термостати, температурни
сензори, печатени плочки, светлосни
извори, рачки за врати, шарки за врати,
тави и кошници. Треба да знаете дека
некои од овие резервни делови се
достапни само кај професионални
сервисери, и дека не сите резервни
делови се релевантни за сите модели.
• Дихтунзите за вратите ќе бидат
достапни 10 години откако моделот ќе
прекине да се произведува.
2.7 Расходување
ПРЕДУПРЕДУВАЊЕ!
Ризик од повреда или задушување.
• Исклучете го апаратот од приклучокот
за струја.
• Отсечете го кабелот за струја и фрлете
го.
• Извадете ја вратата за да спречите
затворање на деца и миленичиња во
апаратот.
• Водовите за ладење и изолираните
материјали на овој апарат се еколошки
производи.
• Изолациската пена содржи запалив гас.
Контактирајте со општинската власт за
да добиете информации за правилно
расходување на апаратот.
• Не оштетувајте го делот за ладење
којшто се наоѓа во близина на
разменувачот на топлина.
3. МОНТАЖА
ПРЕДУПРЕДУВАЊЕ!
Видете во поглавјата за безбедност.
ПРЕДУПРЕДУВАЊЕ!
Погледнете во упатството за монтажа
за да го монтирате уредот.
ПРЕДУПРЕДУВАЊЕ!
Поправете го апаратот во согласност
со упатството за монтажа за да
избегнете ризик од нестабилност на
апаратот.
142 МАКЕДОНСКИ

3.1 Димензии
B
A
H1
W1
D1
W2
D2
W3
D3
90°
Вкупни димензии ¹
H1 mm 1772
W1 mm 546
D1 mm 549
¹ височината, широчината и должината на
апаратот без рачката
Потребен простор при употребата ²
H2 (A+B) mm 1816
W2 mm 546
D2 mm 551
A mm 1780
Потребен простор при употребата ²
B mm 36
² височината, широчината и должината на
апаратот вклучувајќи ја рачката, плус
потребниот простор за слободно кружење
на воздухот за ладење
Вкупен простор потребен при
употребата ³
H3 (A+B) mm 1816
W3 mm 546
D3 mm 1068
³ височината, широчината и должината на
апаратот вклучувајќи ја рачката, плус
МАКЕДОНСКИ 143

потребниот простор за слободно кружење
на воздухот за ладење, плус потребниот
простор за да се овозможи отворање на
вратата до минималниот агол што
дозволува вадење на целата внатрешна
опрема
3.2 Локација
За да обезбедите најдобра
функционалност на апаратот, не треба да
го монтирате апаратот на место со
директна сончева светлина. Не монтирајте
го апаратот во близина на радијатори или
шпорети, рерни или плочи за готвење,
освен ако не е поинаку специфицирано во
упатствата за монтирање.
Погрижете се воздухот да може да кружи
слободно околу задниот дел на
фрижидерот.
Апаратот треба да се постави на суво,
добро проветрено место, во затворено.
Апаратот е предвиден за користење на
собна температура во опсег од 10°C до
43°C.
Правилното работење на апаратот
може да се гарантира само во
наведениот температурен опсег.
Ако не сте сигурни каде да го
монтирате апаратот, обратете се кај
продавачот, до нашата служба за
клиенти или до најблискиот овластен
сервисен центар.
Мора да овозможите апаратот да се
исклучува од напојувањето. Оттаму, по
инсталацијата штекерот мора да биде
лесно достапен.
3.3 Поврзување на струјата
• Пред вклучување, проверете дали
напонот и фреквенцијата прикажани на
плочката со спецификации одговараат
на вашето домашно напојување.
• Апаратот мора да биде заземјен.
Приклучокот за кабел за напојување е
обезбеден со контакт за таа цел. Ако
домашниот приклучок за напојување не
е заземјен, поврзете го апаратот на
посебно заземјување во согласност со
важечките прописи, консултирајте се со
квалификуван електричар.
• Производителот не прифаќа
одговорност доколку не се почитуваат
горенаведените безбедносни мерки.
3.4 Стандарди за вентилација
Зад апаратот мора да има доволно
струење на воздухот.
min. 200 cm2
min.
200 cm2
min.
38 mm
min.
38 mm
ВНИМАНИЕ!
Видете ги упатствата за монтирање.
3.5 Менување на страната на
отворање на вратата
Видете ги посебните документи со
упатства за монтажа и менување и
враќање на вратата.
ВНИМАНИЕ!
На секоја фаза од враќање на вратата
заштитете го подот од гребење со
издржлив материјал.
144 МАКЕДОНСКИ

4. КОНТРОЛНА ТАБЛА
1 3 6
91112 10
4 52 7 8
1ECOMETER Показна светилка
2Копче/показател за Extra Cool
3Показател за преграда на фрижидер
4Показател за аларм
5Показател за отворена врата
6Показател за преграда на замрзнувач
7Копче/показател за Extra Freeze
8Копче/показател за аларм за Filter
Reset
9Копче/показател за температура на
замрзнувач
10 Показно светло за промена на
филтерот за воздух
11 Копче/показател за температура на
ладилник
12 Копче ECO
4.1 Вклучување
Ставете го приклучокот за струја во
штекерот.
За да изберете различна поставена
температура, погледнете во „Регулирање
на температурата“.
Ако на екранот се појави ,
погледнете во „Решавање проблеми“.
4.2 Исклучување
1. Притиснете и задржете го копчето за
температура на замрзнувачот 5
секунди.
На екранот се прикажува што трепка.
2. Откако апаратот ќе се исклучи, на
екранот е напишано .
3. Извaдете го приклучокот за струја од
штекерот.
4.3 Регулирање на температурата
Опсегот на температурата може да варира
од -15°C до -24°C за замрзнувачот и од
2°C до 8°C за фрижидерот.
Притиснете ги копчињата за температура
за да ја поставите температурата на
апаратот.
Препорачаната поставена температура е:
• +4°C за фрижидерот
• -18°C за замрзнувачот
Може да ја поставите препорачаната
температура рачно со копчињата за
температура или со вклучување на ECO
функција. За повеќе информации,
погледнете во „ECO функција“
Показните светла за температура ја
покажуваат поставената температура.
Поставената температура ќе биде
достигната за 24 часа.
По прекин на струја, апаратот се враќа
на поставената температура.
4.4 Исклучување на фрижидерот
Може да се исклучи само преградата на
ладилникот, оставајќи ја вклучена
преградата за замрзнување.
1. Притиснете и задржете го копчето за
температура на ладилникот 5 секунди.
На екранот се прикажува што трепка.
2. Откако преградата на ладилникот ќе се
исклучи, на екранот е напишано .
4.5 Вклучување на фрижидерот
За да го вклучите ладилникот:
МАКЕДОНСКИ 145

1. Притиснете и задржете го копчето за
температура на ладилникот 5 секунди.
На екранот се прикажува што трепка.
2. Преградата на ладилникот се вклучува
и се обновува претходната поставена
температура.
За да ја приспособите температурата,
погледнете во „Регулирање на
температурата“.
4.6 ECO функција
Функцијата ECO ја поставува оптималната
температура за да обезбеди зачувување
на храната додека ја минимизира
потрошувачката на енергија.
1. За да ја вклучите оваа функција,
притиснете го копчето ECO.
Температурата на ладилникот е поставена
на +4 °C, а температурата на
замрзнувачот на -18 °C.
2. За да ја деактивирате функцијата,
притиснете го копчето ECO повторно
или изберете различна поставена
температура (погледнете во
„Регулирање на температурата“).
По исклучувањето на функцијата ECO,
температурата на ладилникот е поставена
на +2 °C, а температурата на
замрзнувачот на -20 °C.
Вклучувањето наECO ги исклучува
функциите Extra Cool и Extra Freeze.
Показателот ECOMETER ја покажува
тековната потрошувачка на енергија
на апаратот. Три целосно осветлени
цртички покажуваат најекономично
енергетско поставување.
4.7 функција Extra Cool
Со функцијата Extra Cool, може брзо да
ладите големи количини топла храна, на
пример, откако ќе купите намирници, без
да ја загреете храната што е веќе
складирана во фрижидерот.
За да ја активирате функцијава,
притиснете го копчето Extra Cool.
Показното светло за Extra Cool се пали.
Кога функцијата Extra Cool е вклучена,
вентилаторот може да работи автоматски.
Оваа функција се исклучува автоматски по
околу 6 часа. Штом функцијата ќе се
исклучи, показателот за Extra Cool
престанува да свети.
Притиснете го копчето Extra Cool за да ја
деактивирате функцијата Extra Cool пред
да заврши автоматски.
За да ја поставите температурата на
ладилникот, исклучете ја функцијата
Extra Cool и погледнете во
„Регулирање на температурата“.
4.8 функција Extra Freeze
Функцијата Extra Freeze се користи за
предзамрзнување и брзо замрзнување во
низа во преградата на замрзнувачот. Оваа
функција го забрзува смрзнувањето свежа
храна и, истовремено, ја штити храната
што е веќе ставена внатре од несакано
загревање.
За да замрзнете свежа храна,
активирајте ја функцијата Extra Freeze
најмалку 24 часа пред да ја ставите
храната за комплетно
предзамрзнување.
За да ја активирате функцијава,
притиснете го копчето Extra Freeze.
Светлото за Extra Freeze се пали
Функцијата Extra Freeze престанува
автоматски после максимум 52 часа.
Притиснете го копчето Extra Freeze за да
ја деактивирате функцијата Extra Freeze
пред да заврши автоматски.
4.9 Аларм за висока температура
Кога температурата во преградата на
замрзнувачот се зголемува (на пример,
поради претходен прекин на
напојувањето), трепка показателот за
146 МАКЕДОНСКИ

аларм, показателот за температура на
замрзнувачот покажува H° и трепка, а
звучниот сигнал е вклучен.
За да го исклучите звукот, притиснете го
кое било копче.
Показателот за аларм и звучниот сигнал
се исклучуваат. Показателот за
температура на замрзнувачот покажува H°
5 секунди пред повторно да ја покаже
температурата на замрзнувачот.
Алармот се рестартира еден час по
деактивирањето додека не се обноват
нормалните услови.
Доколку не притиснете ниту едно
копче, звучниот сигнал се исклучува
автоматски по околу еден час за да не
пречи.
4.10 Аларм за отворена врата
Ако вратата на ладилникот се остави
отворена приближно 5 минути или ако
вратата на замрзнувачот се остави
отворена приближно 80 секунди, се
огласува звучен сигнал и се вклучува
показателот за аларм за отворена врата.
Внатрешната светилка на ладилникот исто
така може да започне да трепка.
Алармот запира по затворање на вратата.
Притиснете го кое било копче за да го
исклучите звучниот сигнал и трепкањето
на внатрешната светилка на ладилникот.
Доколку не притиснете ниту едно
копче, звучниот сигнал се исклучува
автоматски по околу еден час за да не
пречи.
4.11 Показно светло за промена
на филтерот за воздух
Кога филтерот за воздух е истечен и треба
да се замени, се вклучува показното
светло за алармот Показно светло за
промена на филтерот за воздух и Filter
Reset.
Погледнете во делот „Монтирање и
менување на филтерот за CleanAir+„ во
поглавјето „Нега и чистење“ за упатство за
замена.
По замената на филтерот, притиснете го
копчето за аларм Filter Reset за да го
исклучите алармот.
4.12 Режим на поставување
Режимот за нагодување ви овозможува:
• Вклучете или исклучете го ECOMETER
индикатор
• Вклучете или исклучете ги звуците на
копчињата
• Променете ги темп. единици од °C до °F
• Ресетирајте го апаратот на фабричките
поставки
Активирање на режимот за
поставување
Да го активирате режимот за нагодување:
1. Притиснете и држете го притиснато
копчето ECO на вашиот апарат
3 секунди. Кога се активира режимот за
нагодување, екранот покажува
што трепка.
2. Откако е вклучен режимот за
нагодување, екранот покажува
.
За да го деактивирате режимот за
нагодување, притиснете и држете го
копчето ECO приближно 3 секунди.
Режимот за нагодување се деактивира
автоматски ако не комуницирате со
контролната табла 60 секунди.
Навигација на режимот за нагодување
1. Активирајте го режимот за нагодување
(видете во „Активирање на режимот за
поставување“).
На екранот се прикажува .
2. Допрете го копчето за температура на
фрижидерот (лево) за да го промените
параметарот. Допрете го копчето за
температура на замрзнувачот (десно)
за да ја промените вредноста на
параметарот.
МАКЕДОНСКИ 147

Екран Стандардни
параметри
ECOMETER Показна
светилка
Звуци на копчињата
Температурни единици
Фабрички поставки
ECOMETER показател
Со цел да го вклучите или исклучите
ECOMETER:
1. Активирајте го режимот за нагодување
(видете во „Активирање на режимот за
поставување“).
На екранот се прикажува .
2. Допрете неколкупати. Индикаторот
ќе се покаже соодветно за
вклучениот или исклучениот
ECOMETER индикатор.
3. Притиснете и држете го притиснато
копчето ECO 3 секунди за да излезете
од режимот за нагодување.
Звуци на копчињата
Можете да ги вклучите или исклучите
звуците на копчињата во режимот за
нагодување. За да ги вклучите или
исклучите звуците:
1. Активирајте го режимот за нагодување
(видете во „Активирање на режимот за
поставување“).
На екранот се прикажува .
2. Допирајте постојано додека не
видите . Допрете за да ги
вклучите или исклучите звуците.
Индикаторот ќе се промени во за
вклучените или за исклучените
звуци.
3. Притиснете и држете го притиснато
копчето ECO 3 секунди за да излезете
од режимот за нагодување.
Температурни единици
Користејќи го режимот за нагодување,
можете да ја промените единицата
температура прикажана на контролната
табла од Целзиус во Фаренхајт. За
промена на температурната единица:
1. Активирајте го режимот за нагодување
(видете во „Активирање на режимот за
поставување“).
На екранот се прикажува .
2. Допрете неколкупати додека не
видите и . Допрете го
индикаторот што го прикажува уредот
за да изберете помеѓу за Целзиуси
и за Фаренхајти.
3. Притиснете и држете го притиснато
копчето ECO 3 секунди за да излезете
од режимот за нагодување.
Фабрички поставки
Оваа функција ја враќа секоја поставка на
стандардните фабрички поставки. За да ги
вратите стандардните фабрички поставки:
1. Активирајте го режимот за нагодување
(видете во „Активирање на режимот за
поставување“).
На екранот се прикажува .
2. Допрете неколкупати додека не
видите и . Допрете
неколкупати додека не видите .
се претвора во трепкање а
потоа во постојано , што покажува
дека фабричките поставки се вратени.
3. Притиснете и држете го притиснато
копчето ECO 3 секунди за да излезете
од режимот за нагодување.
148 МАКЕДОНСКИ

5. СЕКОЈДНЕВНА УПОТРЕБА
5.1 Местење на полиците на
вратата
За да се овозможи складирање пакети со
храна со различна големина, полиците на
вратата може да се стават на различна
височина.
1. Постепено извлекувајте ја полицата сè
додека не се ослободи.
2. Преместете според потреба.
Моделот е опремен со варијабилна кутија
за чување која може да се помести
странично.
5.2 Подвижни полици
На ѕидовите на фрижидерот се монтирани
низа шини така што полиците може да се
наместат по желба.
Овој апарат е опремен со полица која има
два дела. Предната половина на полицата
може да се стави под втората половина за
подобро искористување на просторот.
За да ја превиткате полицата:
1. Извадете ја внимателно предната
половина.
2. Лизнете ја во долната шина и под
втората половина.
1
2
Не поместувајте ја стаклената полица
над фиоката за зеленчук за да не го
попречите правилното струење на
воздухот.
5.3 GreenZone фиока
Во долниот дел од преградата на
фрижидерот има фиока на извлекување.
Стаклената полица на GreenZone е
опремена со уред што го регулира своето
запечатување и обезбедува оптимална
влажност во фиоката.
5.4 Вадење на фиоката за
GreenZone
Се препорачува да се испразни
фиоката пред да ја извадите од
фрижидерот.
За да ја отстраните фиоката:
МАКЕДОНСКИ 149

1. Извлечете ја фиоката од фрижидерот.
2. Кренете го малку предниот дел на
фиоката.
3. Извлечете ја фиоката додека ја
подигнувате.
За да го отстраните стаклениот капак на
фиоката GreenZone:
1. Отклучете ја страничната површина за
фаќање од двете страни истовремено.
2
x2
1
2. Повлечете ја потпорната стаклена
полица кон себе.
5.5 Отстранување на ExtraChill
Над фиоката за GreenZone има фиока.
За да ја отстраните фиоката:
150 МАКЕДОНСКИ

1. Извлечете ја фиоката од фрижидерот.
2. Кренете го малку предниот дел на
фиоката.
3. Подигнете ја и завртете ја фиоката за
да ја извлечете од апаратот.
За да го отстраните стаклениот капак на
фиоката ExtraZone:
1. Отклучете ја страничната површина за
фаќање од двете страни истовремено.
2
x2
1
2. Повлечете ја потпорната стаклена
полица кон себе.
2
1
МАКЕДОНСКИ 151

5.6 Контрола на влажност
Стаклената полица на фиоката на
GreenZone има уред што го регулира
своето запечатување и обезбедува
оптимална влажност во фиоката.
Не ставајте прехранбени производи на
уредот за контрола на влажноста.
За да го отстраните уредот за контрола на
влажноста:
1. Отворете ја фиоката под стаклената
полица и извлечете го капакот.
2. Ако треба да ја замените белата
мембрана на уредот, фатете го уредот
во средината и одвојте ја мембраната
од капакот со повлекување на капакот.
3. Склопете нова мембрана во капакот со
притискање на работ на мембраната
во капакот.
4. Повторно склопете го уредот за
контролата на влажноста во фиоката.
Во зависност од количината и
состојбата на овошјето и зеленчукот
складирани во фиоката на GreenZone,
може да настане кондензација.
Во таков случај, отстранете ја
кондензацијата користејќи мека крпа.
5.7 MULTIFLOW
Преградата на фрижидерот е опремена со
уред за MULTIFLOW кој овозможува брзо и
152 МАКЕДОНСКИ

поефективно ладење на храната и
одржување поизедначена температура во
секој дел од преградата на фрижидерот.
Овој уред се активира автоматски по
потреба.
MULTIFLOW работи само кога е затворена
вратата.
Не блокирајте ги отворите за воздух за
да се овозможи подобро ладење.
Не отстранувајте ја плочата за
MULTIFLOW.
Не користете чистач со воден спреј и
пареа за чистење на апаратот. За
инструкции за чистење, видете во
поглавјето „Нега и чистење“.
5.8 Филтер за CleanAir+
Во апаратот, има јаглероден филтер
CleanAir+.
Филтерот го прочистува воздухот од
несакани миризби во преградата на
фрижидерот, подобрувајќи го квалитетот
на чувањето.
При испорака, филтерот и неговото
пластично куќиште се во пластична ќеса
со другите додатоци (за монтирање,
видете во делот „Монтирање и менување
на филтерот за CleanAir+“ во поглавјето
„Нега и чистење“).
5.9 Bottle Stop
Додатокот спречува тркалање на шишиња
или лименки. Може да ги редите
шишињата или лименките едно врз друто
за да заштедите простор на полица и
подобро да го организирате вашиот
ладилник.
Додатокот не бара склопување или алатки.
Поставете го додатокот со силиконската
основа свртена надолу и почнете да ги
редите шишињата.
Силиконската основа на додатокот е
нелизгава: нема да се залепи или лизга.
Чувајте шишиња од максимум 10 кг.
и/или лименки со различни големини
во најмногу два реда, како што е
прикажано на сликата.
Чувајте ги само затворените шишиња или
лименки, ставајќи ги со отворот свртен
напред.
Не ставајте ја неспакуваната храна во
директен контакт со додатокот.
МАКЕДОНСКИ 153

5.10 Замрзнување свежа хана
Преградата за замрзнување е соодветна
за замрзнување свежа храна и за чување
замрзната и длабоко замрзната храна
долго време.
За да замрзнете свежа храна, вклучете ја
функцијата Extra Freeze барем 24 часа
пред да ја ставите храната да се замрзне
во преградата за замрзнување.
Чувајте ја свежата храна рамномерно
распоредена во првата преграда или
фиока од горниот дел.
Максималната количина на храна што
може да се замрзне без додавање друга
свежа храна во период од 24 часа е
наведена на плочката со спецификации
(етикета што се наоѓа во апаратот).
Кога ќе заврши замрзнувањето, апаратот
автоматски се враќа на претходната
поставка за температура (видете во „Extra
Freeze“).
За повеќе информации, видете во „Совети
за замрзнување“.
5.11 Складирање замрзната храна
По првото вклучување или по извесен
период некористење, пред да ставите
производи во преградата, оставете
апаратот да работи барем 3 часа со
вклучена Extra Freeze функција .
Фиоките на замрзнувачот овозможуваат
брзо и лесно наоѓање на пакетот храна
што го барате.
Ако сакате да чувате големи количини на
храна извадете ги сите фиоки и ставете ја
храната на полиците.
Најмалата оддалеченост од вратата до
храната треба да биде 15 mm.
ВНИМАНИЕ!
Во случај на случајно одмрзнување, на
пример поради снемување струја, ако
немало струја подолго време од
времето наведено на плочката со
спецификации под „време на
одржување“, одмрзнатата храна мора
да се изеде брзо или да се зготви
веднаш, потоа да се олади и потоа
повторно да се замрзне. Погледнете
во „Аларм за висока температура“.
5.12 Одмрзнување
Длабоко смрзнатата или смрзнатата
храна, пред да се јаде, може да се
одмрзне во фрижидерот или во пластична
кеса под ладна вода.
Оваа операција зависи од расположливото
време и од типот на храната. Мали
парчиња може да се готват уште смрзнати.
5.13 Правење коцки мраз
Апаратот е опремен со еден или повеќе
садови за правење коцки мраз.
Не користете метални алатки за
вадење на садовите од замрзнувачот.
1. Наполнете ги овие садови со вода.
2. Ставете ги садовите за мраз во
преградата за замрзнување.
154 МАКЕДОНСКИ

6. СОВЕТИ И ПОМОШ
6.1 Совети за заштеда на енергија
• Замрзнувач: Внатрешната
конфигурација на апаратот е онаа која
обезбедува најефикасна употреба на
енергија.
• Фрижидер: Најефикасна употреба на
енергија е обезбедена во
конфигурацијата со фиоките во долниот
дел на апаратот и со рамномерно
распоредени полици. Позицијата на
корпите на вратите не влијае на
потрошувачката на енергија.
• Не отворајте ја вратата често и не
оставајте ја отворена подолго отколку
што е неопходно.
• Замрзнувач: Колку е постудена
поставката за температура, толку е
повисока потрошувачката на енергија.
• Фрижидер: Не поставувајте превисока
температура за штедење енергија
освен ако тоа не го бараат
карактеристиките на храната.
• Доколку собната температура е висока
и регулаторот за температура е на
ниска температура и апаратот е
целосно наполнет, компресорот може
да работи непрестано, што ќе
предизвика формирање слана или мраз
на испарувачот. Во овој случај,
поставете го регулаторот на
температурата на повисока
температура за да дозволите
автоматско одмрзнување и да
заштедите енергија на овој начин.
• Обезбедете добро проветрување. Не
покривајте ги решетките или отворите
за проветрување.
• Погрижете се прехрамбените
производи во апаратот да
овозможуваат кружење на воздухот низ
предвидените отвори во задниот
внатрешен дел на апаратот.
6.2 Совети за замрзнување
• Активирајте ја функцијата Extra Freeze
најмалку 24 часа пред да ја ставите
храната во преградата за замрзнување.
• Пред замрзнувањето, завиткајте ја и
запечатете ја свежата храна во:
алуминиумска фолија, пластична
фолија или кеси, херметички садови со
капак.
• За поефикасно замрзнување и
одмрзнување поделете ја храната во
мали порции.
• Се препорачува ставање етикети и
датуми на целата замрзната храна. Тоа
ќе помогне за идентификување на
храната и за да се знае кога треба да
се искористи пред да се расипе.
• Храната треба да е свежа пред да се
замрзне за да се зачува добриот
квалитет. Особено овошјето и
зеленчукот треба да се замрзнат откако
ќе се наберат за да се зачуваат сите
нивни хранливи материи.
• Не замрзнувајте шишиња или лименки
со течности, особено пијалоци кои
содржат јаглерод диоксид - може да
експлодираат при замрзнувањето.
• Не ставајте топла храна во преградата
за замрзнување. Изладете ја на собна
температура пред да ја ставите во
преградата.
• За да се избегне зголемување на
темпертурата на веќе смрзнатата
храна, не ја ставјте веќе смрзнатата
храна директно до неа. Ставете храна
на собна температура во делот на
преградата за замрзнување кадешто
нема замрзната храна.
• Немојте да јадите коцки мраз, мраз или
лижавчиња мраз веднаш после вадење
од замрзнувачот. Опасност од
замрзнатини.
• Не замрзнувајте ја повторно
одмрзнатата храна. Доколку храната се
одмрзнала, згответе ја, изладете ја и
потоа замрзнете ја.
6.3 Складирање замрзната храна
• Преградата за замрзнување е
обележана со .
• Добра поставка на температурата што
обезбедува зачувување на смрзнатите
прехрамбени производи е температура
пониска или еднаква на -18 °C.
МАКЕДОНСКИ 155

Поставка за повисока температура во
апаратот може да доведе до помала
трајност.
• Целата преграда за замрзнување е
погодна за чување замрзнати
прехрамбени производи.
• Оставете доволно простор околу
храната за да овозможите слободно
кружење на воздухот.
• За соодветно чување, видете ја
етикетата на амбалажата на храната за
да го видите рокот на употреба.
• Важно е да се завитка храната на таков
начин што спречува влегување на вода,
влажност или кондензација.
6.4 Совети за купување
По набавката на продукти:
• Уверете се дека амбалажата не е
оштетена - храната може да се расипе.
Ако амбалажата е надуена или влажна,
храната можеби не била правилно
чувана во оптимални услови и можеби
веќе започнала да се одмрзнува.
• За да се ограничи процесот на
одмрзнување, купувајте замрзнати
работи на крајот на купувањето
продукти и транспортирајте ги во
термално или изолирано студено ќесе.
• Веднаш откако ќе се вратите од
продавницата, ставете ја замрзнатата
храна во замрзнувачот.
• Доколку храната се одмрзнала дури и
делумно, не ја замрзнувајте повторно.
Консумирајте ја најбрзо што можете.
• Придржувајте се до рокот на траење и
информациите за чување на
амбалажата.
6.5 Рок на траење за преградата за замрзнување
Вид јадење Рок на траење
(месеци)
Леб 3
Овошје (освен агруми) 6 - 12
Зеленчук 8 - 10
Остатоци без месо 1 - 2
Млечни производи:
Путер
Меко сирење (на пр. моцарела)
Тврдо сирење (на пр. пармезан, чедар)
6 - 9
3 - 4
6
Морска храна:
Мрсна риба (на пр. лосос, скуша)
Посна риба (на пр. бакалар, риба-лист)
Шкампи
Излуштени школки и школки со оклоп
Готвена риба
2 - 3
4 - 6
12
3 - 4
1 - 2
Mесо:
Живина
Говедско месо
Свинско
Јагнешко
Колбас
Шунка
Остатоци со месо
9 - 12
6 - 12
4 - 6
6 - 9
1 - 2
1 - 2
2 - 3
156 МАКЕДОНСКИ

6.6 Совети за ладење свежа храна
• Добра поставка на температурата што
обезбедува зачувување на свежата
храна е температура пониска или
еднаква на +4°C.
Поставка за повисока температура во
апаратот може да доведе до помала
трајност на храната.
• Покријте ја храната со амбалажа за да
ја зачувате нејзината свежина и арома.
• Секогаш користете затворени садови за
течности и за храна за да ги избегнете
миризбите во преградата.
• За да избегнете вкрстена
контаминација меѓу готвената и
суровата храна, покријте ја готвената
храна и одвојте ја од суровата.
• Се препорачува храната да се
одмрзнува во фрижидерот.
• Не ставајте топла храна во апаратот.
Уверете се дека е изладена на собна
температура пред да ја ставите.
• За да спречите фрлање на храната,
новите залихи храна треба секогаш да
се ставаат зад старите.
6.7 Совети за ладење храна
• Преградата за свежа храна е
обележана (на плочката со
спецификации) со .
• Месо (сите видови): виткајте го во
пластични ќесички и ставајте го на
стаклената полица над фиоката за
зеленчук. Месото чувајте го најмногу
1-2 дена.
• Овошје и зеленчук: исчистете ги
темелно (отстранете ја земјата) и
ставете ги во специјална фиока (фиока
за зеленчук).
• Препорачливо е да не се чува јужно
овошје како банани, манго, папаја итн.
во фрижидерот.
• Зеленчук како домати, компири, кромид
и лук не треба да се чува во
фрижидерот.
• Путер и сирење: ставете ги во
херметчки сад или завиткајте ги со
алуминиумска фолија или пластично
ќесе за да го извадите воздухот колку
што може повеќе.
• Шишиња: затворете ги со капаче и
ставете ги на полицата за шишиња на
вратата или на држачот за шишиња
(ако има).
• Секогаш гледајте го рокот на траење на
производите за да знаете колку долго
да ги чувате.
7. НЕГА И ЧИСТЕЊЕ
ПРЕДУПРЕДУВАЊЕ!
Видете во поглавјата за безбедност.
7.1 Чистење на внатрешноста
Пред првото користење на апаратот,
внатрешноста и сите внатрешни додатоци
треба да се измијат со млака вода и со
неутрален сапун за да се отстрани
миризбата на нов производ, а потоа добро
да се исушат.
ВНИМАНИЕ!
Не користите детергенти, абразивни
средства, средства за чистење со хлор
или на база на масло затоа што може
да ја оштетат политурата.
ВНИМАНИЕ!
Додатоците и деловите на апаратот не
смеат да се мијат во машина за
садови.
ВНИМАНИЕ!
Чистете ја контролната табла со мокра
крпа. Не користете никаков детергент.
По чистењето, избришете ја
контролната табла со мека крпа.
МАКЕДОНСКИ 157

7.2 Периодично чистење
Опремата треба да се чисти редовно:
1. Измијте ги внатрешноста и додатоците
со млака вода и со неутрален сапун.
2. Редовно проверувајте ги заптивките на
вратата и бришете ги за да бидат
чисти и без остатоци од храна.
3. Исплакнете и избришете целосно.
7.3 Одмрзнување на фрижидерот
Одмрзнувањето на преградата на
фрижидерот е автоматско. Водата којашто
се кондензира влегува во примател на
компресорот и испарува. Овој примател не
може да се вади.
7.4 Одмрзнување на
замрзнувачот
Преградата за замрзнување нема мраз.
Тоа значи дека не се формира мраз
додека работи, ниту на внатрешните
ѕидови, ниту на храната.
7.5 Монтирање и менување на
филтерот за CleanAir+
Филтерот за CleanAir+ е филтер со
активен јаглен кој ги апсорбира лошите
мириси и ви овозможува да ги зачувате
најдобрите вкус и арома за сите
прехранбени производи без ризик од
вкрстување на мирисите.
Внимателно ракувајте со филтерот за
воздух за да не ја изгребете неговата
површина.
При испорака, филтерот за воздух е
спакуван во пластична ќесичка за да ги
зачува перформансите.
Инсталирајте го филтерот за воздух пред
да го вклучите апаратот.
1. Распакувајте го филтерот за воздух од
пластичното ќесе.
2. Отворете го пластичното куќиште и
ставете ја плисираната површина на
решетката, вградувајќи го филтерот во
означената површина на решеткастата
површина.
3. Држете го филтерот додека го
затворате пластичното куќиште додека
не слушнете клик.
4. Извадете ја горната стаклена полица
од преградата на фрижидерот.
Лизнете го пластичното куќиште со
филтерот за воздух на левата страна
од стаклената полица.
158 МАКЕДОНСКИ

5. Вметнете ја стаклената полица назад
во преградата на фрижидерот.
Внимавајте да не го удрите филтерот
кога ја ставате стаклената полица.
Замена на филтерот за воздух
1. Отворете го пластичното куќиште.
1
2
2. Извлечете го надвор употребениот
филтер за воздух.
3. Отпакувајте го новиот филтер за
воздух од пластичното ќесе и вметнете
го во фиоката.
4. Затворете го пластичното куќиште.
5. По замената на филтерот, притиснете
го копчето за аларм Filter Reset на
контролната табла за да го исклучите
предупредувањето.
За најдобри перформанси, ставете го
пластичното куќиште на соодветна
локација (лево од стаклената полица) и
менувајте го филтерот на секои 6
месеци.За повеќе информации видете во
"Показно светло за промена на филтерот
за воздух".
МАКЕДОНСКИ 159

Филтерот за воздух е потрошен
додаток и како таков не е покриен со
гаранцијата.
Можете да купите нови филтри за
воздух од вашиот локален продавач.
7.6 Периоди на неработење
Кога апаратот не се користи подолго
време, преземете ги следниве мерки за
заштита:
1. Исклучете го апаратот од
напојувањето со струја.
2. Извадeте ја целата храна.
3. Исчистете го апаратот и сите
додатоци.
4. Оставете ги вратите отворени за да
спречите непријатни миризби.
8. РЕШАВАЊЕ ПРОБЛЕМИ
ПРЕДУПРЕДУВАЊЕ!
Видете во поглавјата за безбедност.
8.1 Што да се направи ако…
Проблем Можна причина Решение
Апаратот не функционира. Апаратот е исклучен. Вклучете го апаратот.
Електричниот приклучок не е
поврзан со штекерот за струја.
Правилно поврзете го
приклучокот за струја со
штекерот.
Нема струја во штекерот. Поврзете друг електричен апарат
со штекерот. Јавете се на
електричар.
Апаратот е бучен. Апаратот не е соодветно потпрен. Проверете дали апаратот стои
стабилно.
Се вклучува звучен или визуелен
аларм.
Машината е вклучена неодамна. Видете во „Аларм за висока
температура“ или во „Аларм за
отворена врата’.
Температурата на апаратот е
превисока.
Видете во „Аларм за висока
температура“ или во „Аларм за
отворена врата’.
Вратата е оставена отворена. Затворете ја вратата.
Компресорот континуирано
работи.
Температурата е неточно
поставена.
Видете во поглавјето „Контролна
табла“.
Истовремено се внесени многу
прехранбени производи.
Почекајте неколку часови и
повторно проверете ја
температурата.
Собната температура е
превисока.
Видете во поглавјето „Монтажа“.
160 МАКЕДОНСКИ

Проблем Можна причина Решение
Производите ставени во апаратот
биле многу топли.
Оставете ги прехранбените
производи да се изладат до собна
температура пред да ги зачувате.
Вратата не е добро затворена. Видете во делот „Затворање на
вратата“.
Вклучена е функцијата Extra
Freeze.
Видете во делот „Функција Extra
Freeze“.
Вклучена е функцијата Extra Cool. Видете во делот „Функција Extra
Cool“.
Компресорот не започнува да
работи веднаш по притискање на
копчето „Extra Freeze“ или „Extra
Cool“, или после менување на
температурата.
Компресорот почнува да работи
по некое време.
Ова е нормално, не настанал
дефект.
Вратата не е нивелирана и ѝ
пречи на решетката за
вентилација.
Апаратот не е нивелиран. Видете во упатството за
монтирање.
Вратата не се отвора лесно. Сте се обиделе да ја отворите
вратата веднаш по затворањето.
Почекајте неколку секунди меѓу
затворањето и повторното
отворање на вратата.
Светлото не работи. Светлото е во состојба на
мирување.
Затворете ја и отворете ја
вратата.
Светилката не е исправна. Контактирајте со најблискиот
овластен сервисен центар.
Има премногу слана и мраз. Вратата не е добро затворена. Видете во делот „Затворање на
вратата“.
Дихтунгот е деформиран или
валкан.
Видете во делот „Затворање на
вратата“.
Прехранбените производи не се
добро завиткани.
Завиткајте ги подобро.
Температурата е неточно
поставена.
Видете во поглавјето „Контролна
табла“.
Апаратот е наполнет и е поставен
на најниска температура.
Поставете повисока температура.
Видете во поглавјето „Контролна
табла“.
Температурата во апаратот е
премногу ниска и собната
температура е премногу висока.
Поставете повисока температура.
Видете во поглавјето „Контролна
табла“.
Тече вода на задната плоча на
фрижидерот.
Во текот на процесот на
автоматско одмрзнување, мразот
се топи на задната плоча.
Тоа е правилно.
Има премногу кондензирана вода
на задниот ѕид на фрижидерот.
Вратата била често отворана. Отворајте ја вратата само доколку
е неопходно.
Вратата не е целосно затворена. Погрижете се дека вратата е
целосно затворена.
МАКЕДОНСКИ 161

Проблем Можна причина Решение
Складираната храна не е
завиткана.
Завиткајте ја храната во
соодветно пакување пред да ја
ставите во апаратот.
Тече вода на подот. Отворот за водата од топење не е
поврзан со садот за испарување
над компресорот.
Закачете го отворот за вода од
топење со садот за испарување.
Не може да се постави
температурата.
Вклучена е Extra Freeze
функцијата или Extra Cool
функцијата.
Исклучете ја Extra Freeze
функцијата или Extra Cool
функцијата рачно, или почекајте
додека функцијата не се
деактивира автоматски за да ја
поставите температурата. Видете
во делот „Функција Extra
Freeze“ или „Функција Extra Cool“.
Температурата на апаратот е
прениска/превисока.
Температурата не е точно
поставена.
Поставете повисока/пониска
температура.
Вратата не е добро затворена. Видете во делот „Затворање на
вратата“.
Температурата на производите е
превисока.
Оставете ги продуктите да се
изладат до собна температура
пред да ги складирате.
Истовремено се внесени многу
производи.
Ставајте помалку прехрамбени
производи истовремено.
Вратата била отворена често. Отворајте ја вратата само доколку
е неопходно.
Вклучена е функцијата Extra
Freeze.
Видете во делот „Функција Extra
Freeze“.
Вклучена е функцијата Extra Cool. Видете во делот „Функција Extra
Cool“.
Во апаратот не кружи студен
воздух.
Погрижете се во апаратот да
кружи студен воздух. Видете во
поглавјето „Совети и помош“.
се појавува на екранот. Апаратот е во режим на
демострација.
За да излезете од режимот на
демонстрација, притиснете и
задржете ги копчињата Extra Cool
и ECO околу 10 секунди додека не
слушнете 3 кратки звучни
сигнали.
Симболот се појавува
и показателот за аларм е вклучен.
Проблем во комуникацијата. Контактирајте со најблискиот
овластен сервисен центар.
Системот за разладување ќе
продолжи да ги лади
прехранбените производи, но
нема да може да се постави
температурата.
162 МАКЕДОНСКИ

Проблем Можна причина Решение
Симболот или
или и
тековната поставка се појавуваат
наизменично на секои 5 секунди и
показателот за аларм е вклучен.
Проблем со сензорот за
температура.
Контактирајте со најблискиот
овластен сервисен центар.
Системот за разладување ќе
продолжи да ги лади
прехранбените производи, но
нема да може да се постави
температурата.
Ако советот не доведе до саканиот
резултат, јавете се во најблискиот
овластен сервисен центар.
8.2 Замена на светилката
Апаратот е опремен со LED внатрешно
светло со долг работен век.
Дозволено е само сервисер да го замени
уредот за осветлување. Контактирајте со
вашиот овластен сервисен центар.
8.3 Затворање на вратата
1. Исчистете ги заптивките на вратата.
2. Доколку е потребно, прилагодете ја
вратата. Видете во упатството за
монтирање.
3. Доколку е потребно, заменете ги
неисправните заптивки на вратата.
Контактирајте со овластен сервисен
центар.
МАКЕДОНСКИ 163

9. БУЧАВА
SSSRRR!
CLICK!
HISSS!
BRRR!
BLUBB!
10. ТЕХНИЧКИ ПОДАТОЦИ
Техничките информации се наоѓаат на
плочката со спецификации на
внатрешната страна на апаратот и на
етикетата за енергија.
На QR-кодот на енергетската етикета која
е доставена со апаратот има интернет-
врска која води до информациите
поврзани со перформансите на апаратот
во базата на податоци на ЕУ EPREL
(Европска база на податоци за
регистрација на производи со етикети за
енергија). Чувајте ја енергетската етикета
како прирачник заедно со корисничкото
упатство и сите други документи
испорачани со овој апарат.
Истите информации може да се најдат и
во EPREL (Европска база на податоци за
регистрација на производи со етикети за
енергија) на врската
https://eprel.ec.europa.eu
и името на
моделот и бројот на производот што ќе ги
најдете на плочката со спецификации на
апаратот.
Одете на врската
www.theenergylabel.eu
за
детални информации за етикетата за
енергија.
164 МАКЕДОНСКИ

11. ИНФОРМАЦИИ ЗА ТЕСТИРАЊЕ
Монтажата и подготовката на апаратот за
потврда EcoDesign треба да бидат
усогласени со EN 62552. Потребите за
проветрување, димензиите на отворот и
минималните растојанија во задниот дел
треба да бидат како што е наведено во
овој Прирачник за корисникот во Поглавје
3. Стапете во контакт со производителот
за други дополнителни информации,
вклучувајќи ги и плановите за полнење.
12. ГРИЖА ЗА ОКОЛИНАТА
Рециклирајте ги материјалите со симболот
. Ставете ја амбалажата во соодветни
контејнери за да ја рециклирате.
Помогнете во заштитата на живтната
средина и човековото здравје и
рециклирајте го отпадот од електрични и
електронски апарати. Не фрлајте ги
апаратите озанчени со симболот во
отпадот од домаќинството. Вратете го
производот во вашиот локален капацитет
за рециклирање или контактирајте ја
вашата општинска канцеларија.
МАКЕДОНСКИ 165

PARA UNOS RESULTADOS PERFECTOS
Gracias por elegir este producto AEG. Lo hemos creado para brindarle un rendimiento
impecable durante muchos años, con tecnologías innovadoras que lo ayudan a
simplificar la vida, características que quizás no encuentre en los electrodomésticos
comunes. Dedique unos minutos a leer este documento para sacarle el máximo partido.
Visite nuestro sitio web para:
Obtener consejos, folletos, soluciones a problemas e información de servicio y
reparación:
www.aeg.com/support
Registrar su producto para recibir un mejor servicio:
www.registeraeg.com
Comprar accesorios, artículos de consumo y piezas de recambio originales para su
aparato:
www.aeg.com/shop
ATENCIÓN AL CLIENTE Y SERVICIO
Le recomendamos que utilice recambios originales.
Cuando se ponga en contacto con nuestro Centro de servicio técnico, asegúrese de
tener los siguientes datos disponibles: Modelo, código numérico del producto (PNC),
número de serie.
La información se encuentra en la placa de características.
Advertencia / Precaución - Información sobre seguridad
Información general y consejos
Información relativa al medioambiente
Salvo modificaciones.
CONTENIDO
1. INFORMACIÓN SOBRE SEGURIDAD.......................................................166
2. INSTRUCCIONES DE SEGURIDAD.......................................................... 169
3. INSTALACIÓN............................................................................................ 171
4. PANEL DE CONTROL................................................................................ 174
5. USO DIARIO............................................................................................... 177
6. CONSEJOS.................................................................................................183
7. CUIDADO Y LIMPIEZA............................................................................... 186
8. SOLUCIÓN DE PROBLEMAS.................................................................... 188
9. RUIDOS...................................................................................................... 192
10. DATOS TÉCNICOS.................................................................................. 192
11. INFORMACIÓN PARA INSTITUTOS DE PRUEBAS............................... 193
12. ASPECTOS MEDIOAMBIENTALES.........................................................193
1. INFORMACIÓN SOBRE SEGURIDAD
Antes de instalar y utilizar el aparato, lea atentamente las
instrucciones facilitadas. El fabricante no se hace
166 ESPAÑOL

responsable de lesiones o daños producidos como resultado
de una instalación o un uso incorrectos. Conserve siempre
estas instrucciones en lugar seguro y accesible para futuras
consultas.
1.1 Seguridad de niños y personas vulnerables
• Este aparato puede ser utilizado por niños de 8 años en
adelante y personas cuyas capacidades físicas, sensoriales
o mentales estén disminuidas o que carezcan de la
experiencia y conocimientos suficientes para manejarlo,
siempre que cuenten con las instrucciones o la supervisión
sobre el uso del electrodoméstico de forma segura y
comprendan los riesgos.
• Los niños de 3 a 8 años pueden cargar y descargar el
aparato siempre que hayan sido debidamente instruidos.
• Este aparato puede ser utilizado por personas con
discapacidades muy extensas y complejas, siempre que
hayan sido instruidas adecuadamente.
• Es necesario mantener alejados del aparato a los niños de
menos de 3 años salvo que estén bajo supervisión
continua.
• Es necesario vigilar a los niños para que no jueguen con el
aparato.
• La limpieza y mantenimiento de usuario del producto no
podrán ser realizados por niños sin supervisión.
• Mantenga todo el material de embalaje fuera del alcance de
los niños y deséchelo de forma adecuada.
1.2 Instrucciones generales de seguridad
• Este aparato está diseñado únicamente para almacenar
alimentos y bebidas.
• Este aparato está diseñado para uso doméstico en
interiores.
• Este aparato se puede utilizar en oficinas, habitaciones de
hotel, habitaciones de Bed&Breakfast, casas de campo y
ESPAÑOL 167

otros alojamientos similares donde dicho uso no exceda (en
promedio) los niveles de uso doméstico.
• Para evitar la contaminación alimentaria, respete las
siguientes instrucciones:
– no abra la puerta durante largos periodos de tiempo;
– limpie regularmente las superficies que pueden entrar en
contacto con los alimentos y los sistemas de drenaje
accesibles;
– guarde la carne y el pescado crudos en recipientes
adecuados en el frigorífico, de manera que no estén en
contacto con otros alimentos ni goteen sobre ellos.
• ADVERTENCIA: Mantenga libres de obstrucciones las
aberturas de ventilación del alojamiento del aparato o de la
estructura empotrada.
• ADVERTENCIA: No utilice dispositivos mecánicos u otros
medios para acelerar el proceso de descongelación,
excepto los recomendados por el fabricante.
• ADVERTENCIA: No dañe el circuito de refrigerante.
• ADVERTENCIA: No utilice aparatos eléctricos dentro de los
compartimentos de almacenamiento de alimentos del
aparato, a menos que sean del tipo recomendado por el
fabricante.
• No utilice agua pulverizada ni vapor para limpiar el aparato.
• Limpie el aparato con un paño suave humedecido. Utilice
solo detergentes neutros. No utilice productos abrasivos,
estropajos duros, disolventes ni objetos de metal.
• Cuando el aparato esté vacío durante un largo período,
apáguelo, descongélelo, límpielo, séquelo y deje la puerta
abierta para evitar que se desarrolle moho en el interior del
aparato.
• No almacene sustancias explosivas tales como latas de
aerosol con un propulsor inflamable en este aparato.
• Si el cable de alimentación sufre algún daño, el fabricante,
su servicio técnico autorizado o un profesional tendrán que
cambiarlo para evitar riesgos.
168 ESPAÑOL

2. INSTRUCCIONES DE SEGURIDAD
2.1 Instalación
ADVERTENCIA!
Sólo un técnico cualificado puede instalar
el aparato.
• Retire todo el embalaje.
• No instale ni utilice un aparato dañado.
• No utilice el aparato antes de instalarlo en
la estructura empotrada por motivos de
seguridad.
• Siga las instrucciones de instalación
suministradas con el aparato.
• Tenga cuidado al mover el aparato,
porque es pesado. Utilice siempre
guantes de protección y calzado cerrado.
• Asegúrese de que el aire pueda circular
alrededor del aparato.
• En la primera instalación otras invertir el
sentido de apertura de la puerta, espere al
menos 4 horas antes de conectar el
aparato a la alimentación eléctrica. Esto
es para permitir que el aceite regrese al
compresor.
• Desenchufe siempre el aparato antes de
llevar a cabo cualquier operación, por
ejemplo cambiar el sentido de apertura de
la puerta.
• No instale el aparato cerca de radiadores,
cocinas, hornos o placas de cocción, a
menos que se especifique lo contrario en
las instrucciones de instalación.
• No exponga el aparato a la lluvia.
• No instale el aparato en lugares con luz
solar directa.
• No instale este aparato en áreas
excesivamente húmedas o frías.
• Cuando mueva el aparato, levántelo por el
borde delantero para evitar rayar el suelo.
• El aparato contiene una bolsa de
desecante. No se trata de un juguete. No
es un alimento. No olvide desecharlo
inmediatamente.
2.2 Conexión eléctrica
ADVERTENCIA!
Riesgo de incendios y descargas
eléctricas.
ADVERTENCIA!
Al colocar el producto, asegúrese de que
el cable de alimentación no queda
atrapado o doblado.
ADVERTENCIA!
No utilice adaptadores de enchufes
múltiples ni cables prolongadores.
• El aparato debe conectarse a tierra.
• Asegúrese de que los parámetros de la
placa de características son compatibles
con los valores eléctricos del suministro
eléctrico.
• Utilice siempre una toma con aislamiento
de conexión a tierra correctamente
instalada.
• Asegúrese de no provocar daños en los
componentes eléctricos (como enchufe,
cable de alimentación, compresor).
Póngase en contacto con un electricista o
con el servicio técnico autorizado para
cambiar los componentes eléctricos.
• El cable de alimentación debe estar por
debajo del nivel del enchufe de
alimentación.
• Conecte el enchufe a la toma de corriente
únicamente cuando haya terminado la
instalación. Asegúrese de tener acceso al
enchufe del suministro de red una vez
finalizada la instalación.
• No desconecte el aparato tirando del
cable de conexión a la red. Tire siempre
del enchufe.
2.3 Uso
ADVERTENCIA!
Existe riesgo de lesiones, quemaduras,
descargas eléctricas o incendios.
El aparato contiene un gas inflamable,
isobutano (R600a), un gas natural con alto
grado de compatibilidad medioambiental.
Tenga cuidado para no dañar el circuito de
refrigerante que contiene isobutano.
ESPAÑOL 169

• No cambie las especificaciones de este
aparato.
• Está estrictamente prohibido usar el
producto incorporado de forma autónoma.
• No utilice otros aparatos eléctricos (como
máquinas de hacer helados) dentro de
aparatos de refrigeración, salvo que el
fabricante haya autorizado su utilización.
• Si se daña el circuito de refrigerante,
asegúrese de que no haya llamas ni
fuentes de ignición en la sala. Ventile la
sala.
• No deje que los objetos calientes toquen
las partes de plástico del aparato.
• No coloque refrescos en el congelador.
De esta forma se creará presión en el
contenedor de bebidas.
• No almacene gases ni líquidos
inflamables en el aparato.
• No coloque productos inflamables o
artículos mojados con productos
inflamables dentro, cerca o sobre el
aparato.
• No toque el compresor ni el condensador.
Están calientes.
• No retire ni toque elementos del
compartimento del congelador si sus
manos están mojadas o húmedas.
• No vuelva a congelar los alimentos que se
hayan descongelado.
• Siga las instrucciones del envase de los
alimentos congelados.
• Envuelva los alimentos en cualquier
material adecuado antes de ponerlos en el
congelador.
2.4 Iluminación interna
ADVERTENCIA!
Riesgo de descarga eléctrica.
• Este producto contiene una o más fuentes
de luz con clase de eficiencia energética
G.
• En cuanto a la(s) bombilla(s) de este
producto y las de repuesto vendidas por
separado: Estas bombillas están
destinadas a soportar condiciones físicas
extremas en los aparatos domésticos,
como la temperatura, la vibración, la
humedad, o están destinadas a señalar
información sobre el estado de
funcionamiento del aparato. No están
destinadas a utilizarse en otras
aplicaciones y no son adecuadas para la
iluminación de estancias domésticas.
2.5 Mantenimiento y limpieza
ADVERTENCIA!
Podría sufrir lesiones o dañar el aparato.
• Antes de proceder con el mantenimiento,
apague el aparato y desconecte el
enchufe de la red.
• Este equipo contiene hidrocarburos en la
unidad de refrigeración. Solo una persona
cualificada debe realizar el mantenimiento
y la recarga de la unidad.
• Examine periódicamente el desagüe del
aparato y límpielo si fuera necesario. Si el
desagüe se bloquea, el agua
descongelada se acumulará en la base
del aparato.
2.6 Asistencia tecnica
• Para reparar el aparato, póngase en
contacto con el centro de servicio
autorizado. Utilice solamente piezas de
recambio originales.
• Tenga en cuenta que la autorreparación o
la reparación no profesional puede tener
consecuencias de seguridad y podría
anular la garantía.
• Los siguientes repuestos estarán
disponibles durante 7 años después de
que el modelo se haya retirado del
mercado: termostatos, sensores de
temperatura, placas de circuito impreso,
fuentes de luz, manijas de puertas,
bisagras de puertas, bandejas y cestas.
Tenga en cuenta que algunas de estas
piezas de recambio solo están disponibles
para los reparadores profesionales, y que
no todas las piezas de recambio son
relevantes para todos los modelos.
• Las juntas de las puertas estarán
disponibles durante 10 años después de
que el modelo se haya retirado.
2.7 Desecho
ADVERTENCIA!
Existe riesgo de lesiones o asfixia.
170 ESPAÑOL

• Desconecte el aparato de la red.
• Corte el cable de conexión a la red y
deséchelo.
• Retire la puerta para evitar que los niños y
las mascotas queden encerrados en el
aparato.
• El circuito del refrigerante y los materiales
aislantes de este aparato no dañan la
capa de ozono.
• La espuma aislante contiene gas
inflamable. Póngase en contacto con las
autoridades locales para saber cómo
desechar correctamente el aparato.
• No dañe la parte de la unidad de
refrigeración que está cerca del
intercambiador de calor.
3. INSTALACIÓN
ADVERTENCIA!
Consulte los capítulos sobre seguridad.
ADVERTENCIA!
Consulte el documento de instrucciones
de instalación para instalar su aparato.
ADVERTENCIA!
Fije el aparato de acuerdo con las
instrucciones de instalación para evitar el
riesgo de inestabilidad.
ESPAÑOL 171

3.1 Dimensiones
B
A
H1
W1
D1
W2
D2
W3
D3
90°
Dimensiones generales ¹
H1 mm 1772
W1 mm 546
D1 mm 549
¹ la altura, anchura y profundidad del aparato
sin el asa
Espacio necesario en uso ²
H2 (A+B) mm 1816
W2 mm 546
D2 mm 551
A mm 1780
Espacio necesario en uso ²
B mm 36
² la altura, anchura y profundidad del aparato,
incluyendo la manija, más el espacio
necesario para la libre circulación del aire de
refrigeración
Espacio total necesario en uso ³
H3 (A+B) mm 1816
W3 mm 546
D3 mm 1068
³ la altura, anchura y profundidad del aparato,
incluido el mango, más el espacio necesario
para la libre circulación del aire de
172 ESPAÑOL

refrigeración, más el espacio necesario para
permitir la apertura de la puerta hasta el
ángulo mínimo que permita la extracción de
todo el equipo interno
3.2 Ubicación
Para garantizar el mejor funcionamiento del
aparato, no debe instalarlo en las
proximidades de la fuente de calor (horno,
estufas, radiadores, cocinas o fogones) ni en
un lugar con luz solar directa. No instale el
aparato cerca de radiadores, cocinas, hornos
o placas de cocción, a menos que se
especifique lo contrario en las instrucciones
de instalación.
Asegúrese de que el aire pueda circular
libremente alrededor de la parte posterior del
armario.
Este aparato debe instalarse en una
ubicación interior seca y bien ventilada.
Este aparato está destinado a ser utilizado a
una temperatura ambiente que oscila entre
10°C y 43°C.
Solo se puede garantizar el correcto
funcionamiento del aparato dentro del
rango de temperatura especificado.
Si tiene cualquier duda respecto al lugar
de instalación del aparato, consulte al
vendedor, a nuestro servicio de atención
al cliente o al centro de servicio
autorizado más cercano.
Puede que en algún momento sea
necesario desconectar el aparato de la
toma de corriente. Por lo que el enchufe
debe quedar accesible tras la instalación
del aparato.
3.3 Conexión eléctrica
• Antes de enchufarlo, asegúrese de que la
tensión y la frecuencia indicadas en la
placa de características se correspondan
con la fuente de alimentación doméstica.
• El aparato debe estar conectado a tierra.
El enchufe del cable de alimentación se
suministra con un contacto para este fin.
Si la toma de corriente doméstica no está
conectada a tierra, conecte el aparato a
una toma de tierra independiente de
acuerdo con la normativa vigente, con el
asesoramiento de un electricista
cualificado.
• El fabricante declina toda responsabilidad
si no se respetan las precauciones de
seguridad anteriores.
3.4 Requisitos de ventilación
El flujo de aire detrás del aparato debe ser
suficiente.
min. 200 cm2
min.
200 cm2
min.
38 mm
min.
38 mm
PRECAUCIÓN!
Consulte las instrucciones para realizar
la instalación.
3.5 Cambio del sentido de apertura
de la puerta
Consulte el documento separado con
instrucciones de instalación y de inversión de
la puerta.
PRECAUCIÓN!
En todas las fases del cambio de sentido
de la puerta, proteja la puerta de
arañazos con un material resistente.
ESPAÑOL 173

4. PANEL DE CONTROL
1 3 6
91112 10
4 52 7 8
1Indicador ECOMETER
2Extra Cool botón / indicador
3Indicador del compartimento frigorífico
4Indicador de alarma
5Indicador de alarma de puerta abierta
6Indicador del compartimento congelador
7Extra Freeze botón / indicador
8Filter Reset botón/indicador de alarma
9Botón/indicador de temperatura del
congelador
10 Indicador de cambio de filtro de aire
11 Botón/indicador de temperatura del
frigorífico
12 Tecla ECO
4.1 Encendido
Enchufe el aparato a la toma de corriente.
Para seleccionar un ajuste de temperatura
diferente, consulte "Regulación de
temperatura".
Si aparece en la pantalla, consulte
"Solución de problemas".
4.2 Apagado
1. Mantenga pulsado el botón de
temperatura del congelador durante 5
segundos.
La pantalla muestra parpadeando.
2. Una vez apagado el aparato, la pantalla
muestra .
3. Desconecte el enchufe de la toma de
corriente.
4.3 Regulación de temperatura
El rango de temperatura puede variar entre
-15 °C y -24 °C para el congelador y entre
2 °C y 8 °C para el frigorífico.
Pulse los botones de temperatura para
ajustar la temperatura del aparato.
La temperatura de ajuste recomendada es:
• +4 °C para el frigorífico
• -18 °C para el congelador
Puede ajustar manualmente la temperatura
recomendada con los botones de
temperatura o encendiendo el ECO función.
Consulte "ECO función" para obtener más
información
Los indicadores de temperatura muestran la
temperatura programada.
La temperatura programada se alcanza
en un plazo de 24 horas.
Tras un corte de suministro eléctrico, el
aparato recupera la temperatura
ajustada.
4.4 Apagado del frigorífico
Es posible apagar solo el compartimento
frigorífico dejando el compartimento
congelador encendido.
1. Mantenga pulsado el botón de
temperatura del frigorífico durante 5
segundos.
La pantalla muestra parpadeando.
2. Una vez apagado el compartimento
frigorífico, la pantalla muestra .
174 ESPAÑOL

4.5 Encendido del frigorífico
Para encender el frigorífico:
1. Mantenga pulsado el botón de
temperatura del frigorífico durante 5
segundos.
La pantalla muestra parpadeando.
2. El compartimento frigorífico se enciende
y se restablece la temperatura ajustada
anterior.
Para ajustar la temperatura, consulte
"Regulación de temperatura".
4.6 ECO función
La función ECO ajusta la temperatura óptima
para garantizar la conservación de los
alimentos y minimizar el consumo de
energía.
1. Para activar la función, pulse el botón
ECO.
La temperatura del frigorífico se ajusta a +4
°C y la temperatura del congelador a -18 °C.
2. Para desactivar la función, vuelva a
pulsar el botón ECO o seleccione una
temperatura de ajuste diferente (consulte
"Regulación de temperatura").
Después de desactivar la función ECO, la
temperatura del frigorífico se ajusta a +2 °C y
la temperatura del congelador a -20 °C.
La activación de la función ECO
desactiva las funciones Extra Cool y
Extra Freeze.
El indicador ECOMETER muestra el
consumo actual de energía del aparato.
Tres barras totalmente iluminadas
indican la configuración de mayor
eficiencia energética.
4.7 Extra Cool función
La función Extra Cool permite enfriar
rápidamente grandes cantidades de
alimentos calientes, por ejemplo, después de
hacer la compra, sin calentar alimentos ya
guardados en el compartimento frigorífico.
Para activar la función, pulse el botón Extra
Cool.
Se enciende el indicador Extra Cool. Cuando
la Extra Cool función está activada, el
ventilador puede funcionar automáticamente.
Esta función se detiene automáticamente
después de unas 6 horas. Cuando la función
está desactivada, el indicado Extra Cool se
apaga.
Pulse el botón Extra Cool para desactivar la
función Extra Cool antes de que se desactive
automáticamente.
Para ajustar una temperatura del
frigorífico diferente, apague la función
Extra Cool y consulte "Regulación de
temperatura".
4.8 Extra Freeze función
La función Extra Freeze se utiliza para
realizar primero una congelación previa y
después una congelación rápida del
compartimento congelador. Esta función
acelera la congelación de alimentos frescos e
impide que se calienten los alimentos ya
almacenados.
Para congelar alimentos frescos, active
la función Extra Freeze al menos 24
horas antes de colocar los alimentos
para completar la precongelación.
Para activar la función, pulse el botón Extra
Freeze.
Se enciende el indicador Extra Freeze. La
función Extra Freeze se detiene
automáticamente después de un máximo de
52 horas.
Pulse el botón Extra Freeze para desactivar
la función Extra Freeze antes de que se
desactive automáticamente.
4.9 Alarma de temperatura alta
Cuando la temperatura del compartimento
congelador aumenta (por ejemplo, debido a
un corte de suministro eléctrico), el indicador
de alarma parpadea, el indicador de
ESPAÑOL 175

temperatura del congelador muestra H° y
parpadea y el sonido está activado.
Para desactivar la alarma, pulse cualquier
botón.
El indicador de alarma y el sonido se apagan.
El indicador de temperatura del congelador
muestra H° durante 5 segundos antes de
volver a indicar la temperatura del
congelador.
La alarma se reinicia una hora después
de la desactivación hasta que se
restablecen las condiciones normales.
Si no se pulsa ningún botón, el sonido se
apaga automáticamente después de
aproximadamente una hora para evitar
molestias.
4.10 Alarma de puerta abierta
Si la puerta del frigorífico se deja abierta
unos 5 minutos o si la puerta del congelador
se deja abierta unos 80 segundos, el sonido
se activa y el indicador de alarma de puerta
abierta se enciende. La luz interna del
frigorífico también puede empezar a
parpadear.
La alarma se detiene después de cerrar la
puerta. Pulse cualquier botón para apagar el
sonido y el parpadeo de la luz interna del
frigorífico.
Si no se pulsa ningún botón, el sonido se
apaga automáticamente después de
aproximadamente una hora para evitar
molestias.
4.11 Indicador de cambio de filtro
de aire
Cuando el filtro de aire ha caducado y es
necesario sustituirlo, Indicador de cambio de
filtro de aire y el indicador de alarma Filter
Reset se encienden.
Consulte la sección "Instalación y sustitución
del filtro CleanAir+" en el capítulo "Cuidado y
limpieza" para ver las instrucciones de
sustitución.
Después de sustituir el filtro, pulse el botón
de alarma Filter Reset para apagarla.
4.12 Modo de ajuste
El modo de ajuste sirve para:
• Activar o desactivar el indicador
ECOMETER
• Activar o desactivar los sonidos del botón
• Cambie las unidades de temperatura de
°C a °F
• Restablezca el aparato a los ajustes de
fábrica
Activación del modo de ajuste
Para activar el modo de ajuste:
1. Mantenga pulsado el botón ECO durante
aproximadamente 3 segundos. Cuando
se está activando el modo de ajuste, en
la pantalla aparece un
parpadeante.
2. Una vez activado el modo de ajuste, en la
pantalla aparece .
Para desactivar el modo de ajuste, mantenga
pulsado el botón ECO durante 3 segundos
aproximadamente.
El modo de ajuste se desactiva
automáticamente si no se interactúa con el
panel de control durante 60 segundos.
Navegar por el modo de ajuste
1. Active el modo de ajuste (consulte
"Activación del modo de ajuste").
La pantalla muestra .
2. Pulse el botón de temperatura del
frigorífico (a la izquierda) para cambiar el
parámetro. Pulse el botón de temperatura
del congelador (a la derecha) para
cambiar el valor del parámetro.
Pantalla Parámetros prede‐
terminados
Indicador ECOMETER
Sonidos del botón
Unidades de temperatura
Ajustes de fábrica
ECOMETER indicador
Para encender o apagar el ECOMETER:
176 ESPAÑOL

1. Active el modo de ajuste (consulte
"Activación del modo de ajuste").
La pantalla muestra .
2. Toque repetidamente. El indicador
mostrará respectivamente para el
indicador activado o para el indicador
ECOMETER desactivado.
3. Mantenga pulsado el botón ECO durante
3 segundos aproximadamente para salir
del modo de ajuste.
Sonidos del botón
Puede activar o desactivar los sonidos del
botón en el modo ajuste. Para activar o
desactivar los sonidos:
1. Active el modo de ajuste (consulte
"Activación del modo de ajuste").
La pantalla muestra .
2. Toque repetidamente hasta que vea
. Toque para activar o desactivar
los sonidos. El indicador cambiará a
para los sonidos activados o para
desactivados.
3. Mantenga pulsado el botón ECO durante
3 segundos aproximadamente para salir
del modo de ajuste.
Unidades de temperatura
Con el modo de ajuste, puede cambiar de
Celsius a Fahrenheit la unidad de
temperatura que se muestra en el panel de
control. Para cambiar la unidad de
temperatura:
1. Active el modo de ajuste (consulte
"Activación del modo de ajuste").
La pantalla muestra .
2. Toque repetidamente hasta que vea
y . Toque el indicador que
muestra la unidad para seleccionar entre
para Celsius y para Fahrenheit.
3. Mantenga pulsado el botón ECO durante
3 segundos aproximadamente para salir
del modo de ajuste.
Ajustes de fábrica
Esta función restaura cada ajuste a los
ajustes predeterminados de fábrica. Para
restaurar los ajustes predeterminados de
fábrica:
1. Active el modo de ajuste (consulte
"Activación del modo de ajuste").
La pantalla muestra .
2. Toque repetidamente hasta que vea
y . Toque repetidamente
hasta que vea .
se convierte en parpadeante y
luego en fijo , lo que indica que se han
restaurado los ajustes de fábrica.
3. Mantenga pulsado el botón ECO durante
3 segundos aproximadamente para salir
del modo de ajuste.
5. USO DIARIO
5.1 Colocación de los estantes de la
puerta
Para permitir el almacenamiento de paquetes
de alimentos de varios tamaños, los estantes
de las puertas se pueden colocar a diferentes
alturas.
1. Tire gradualmente del estante hacia
arriba hasta que se suelte.
2. Reposición según sea necesario.
ESPAÑOL 177

Este modelo cuenta con una caja de
almacenamiento variable que se puede
desplazar lateralmente.
5.2 Estantes móviles
Las paredes del frigorífico cuentan con una
serie de guías para colocar los estantes del
modo que se prefiera.
Este aparato también está equipado con un
estante que consta de dos partes. La mitad
delantera del estante puede colocarse bajo la
segunda mitad para aprovechar mejor el
espacio.
Para plegar el estante:
1. Saque la mitad delantera con cuidado.
2. Deslícela en la guía inferior bajo la
segunda mitad.
1
2
No coloque el estante de vidrio por
encima del cajón de verduras para no
impedir la correcta circulación del aire.
5.3 Compartimento GreenZone
Hay un cajón extraíble en la parte inferior del
compartimento frigorífico.
El estante de vidrio de GreenZone incorpora
un dispositivo que regula su sellado y
proporciona una humedad óptima dentro del
cajón.
5.4 Extracción del cajón GreenZone
Se recomienda vaciar el cajón antes de
sacarlo del frigorífico.
Para retirar el cajón:
1. Saque el cajón del frigorífico.
178 ESPAÑOL

2. Levante la parte delantera del cajón.
3. Saque el cajón mientras lo levanta.
Para retirar la cubierta de vidrio del cajón
GreenZone:
1. Desbloquee el agarre lateral desde
ambos lados simultáneamente.
2
x2
1
2. Tire del soporte del estante de cristal
hacia usted.
5.5 Extracción de ExtraChill
Hay un cajón encima del cajón GreenZone.
Para retirar el cajón:
1. Saque el cajón del frigorífico.
2. Levante la parte delantera del cajón.
ESPAÑOL 179

3. Levante y gire el cajón para sacarlo del
aparato.
Para retirar la cubierta de vidrio del cajón
ExtraZone:
1. Desbloquee el agarre lateral desde
ambos lados simultáneamente.
2
x2
1
2. Tire del soporte del estante de cristal
hacia usted.
2
1
5.6 Control de humedad
El estante de vidrio del cajón GreenZone
incorpora un dispositivo que regula su cierre
hermético y proporciona una humedad
óptima en su interior.
No coloques ningún producto alimenticio
en el dispositivo de control de humedad.
180 ESPAÑOL

Para retirar el dispositivo de control de
humedad:
1. Abra el cajón debajo del estante de vidrio
y saque la tapa.
2. Si necesita sustituir la membrana blanca
del dispositivo, sujete el dispositivo por la
parte central y separe la membrana de la
tapa tirando de ella.
3. Coloque una nueva membrana en la tapa
presionando el borde de la membrana
sobre ella.
4. Vuelva a montar el control de humedad
en el cajón.
Dependiendo de la cantidad y el estado
de las frutas y verduras almacenadas en
el cajón GreenZone, puede producirse
condensación.
En tal caso, elimine la condensación con
un paño suave.
5.7 MULTIFLOW
El compartimento frigorífico está equipado
con un dispositivo MULTIFLOW que permite
enfriar los alimentos de forma más rápida y
eficaz, manteniendo asimismo una
temperatura más uniforme en cada parte del
compartimento frigorífico.
Este dispositivo se activa automáticamente
cuando es necesario.
ESPAÑOL 181

MULTIFLOW solo funciona con la puerta
cerrada.
No bloquee los orificios de ventilación
para permitir una mejor refrigeración.
No retire el panel MULTIFLOW.
No utilice agua pulverizada ni vapor para
limpiar el aparato. Para conocer las
instrucciones de limpieza, consulte el
capítulo "Cuidado y limpieza".
5.8 Filtro CleanAir+
En el aparato hay un filtro de carbón CleanAir
+.
El filtro purifica el aire para evitar los olores
no deseados en el compartimento del
frigorífico mejorando la calidad del
almacenamiento.
Al recibir el producto, el filtro y su carcasa de
plástico se hallan en una bolsa de plástico
junto con el resto de accesorios (consulte la
sección "Instalación y sustitución del filtro
CleanAir+" en el capítulo "Cuidado y
limpieza" para la instalación).
5.9 Bottle Stop
El accesorio evita que las botellas o latas se
muevan. Puede apilar las botellas o las latas
una encima de otra para ahorrar espacio en
el estante y organizar mejor el interior del
frigorífico.
El accesorio no requiere montaje ni
herramientas. Coloque el accesorio con la
base de silicona hacia abajo y empiece a
apilar las botellas.
La base de silicona del accesorio es
antideslizante: no se pega ni se desliza.
Almacene un máximo de 10 kg de
botellas y/o latas de diferentes tamaños
hasta dos filas de altura, como se indica
en la imagen.
Almacene solo botellas o latas cerradas,
colocándolas con la abertura mirando hacia
el frente.
No ponga alimentos sin envasar en
contacto directo con el accesorio.
182 ESPAÑOL

5.10 Congelación de alimentos
frescos
El compartimento del congelador es
adecuado para congelar alimentos frescos y
conservar a largo plazo los alimentos
congelados y ultracongelados.
Para congelar alimentos frescos, active la
Extra Freeze función al menos 24 horas
antes de introducir los alimentos en el
compartimento congelador.
Guarde los alimentos frescos distribuidos
uniformemente en el primer compartimiento o
cajón desde la parte superior.
La cantidad máxima de alimentos que
pueden congelarse sin añadir otros alimentos
frescos durante 24 horas, se indica en la
placa de datos técnicos (una etiqueta situada
en el interior del aparato).
Cuando haya finalizado el proceso de
congelación, el aparato vuelve
automáticamente al ajuste de temperatura
anterior (consulte "Función Extra Freeze").
Para obtener más información, consulte
"Sugerencias para congelar".
5.11 Almacenamiento de alimentos
congelados
Al activar un aparato por primera vez o
después de un periodo sin uso, déjelo en
marcha al menos durante 3 horas antes de
colocar productos en el compartimento con la
función Extra Freeze encendida.
Los cajones del congelador le aseguran una
búsqueda rápida y fácil de los alimentos que
desea encontrar.
Si se van a guardar cantidades grandes de
alimentos, retire todos los cajones y coloque
la comida en estantes.
Todos los alimentos deben estar como
mínimo a 15 mm de la puerta.
PRECAUCIÓN!
En caso de que se produzca una
descongelación accidental, por ejemplo,
por un corte del suministro eléctrico, si la
interrupción ha sido más prolongada que
el valor indicado en la placa de
características bajo el "tiempo de
elevación", los alimentos descongelados
se deben consumir rápidamente o
cocinar de inmediato y luego volverse a
congelar. Consulte "Alarma de
temperatura alta".
5.12 Descongelación
Los alimentos ultracongelados o congelados,
antes de consumirlos, pueden descongelarse
en el frigorífico o dentro de una bolsa de
plástico bajo agua fría.
Esta operación depende del tiempo
disponible y del tipo de alimento. Los trozos
pequeños pueden incluso cocinarse aún
congelados.
5.13 Producción de cubitos de hielo
Este aparato cuenta con una o varias
bandejas para la producción de cubitos de
hielo.
No utilice instrumentos metálicos para
retirar las bandejas del congelador.
1. Rellene estas bandejas con agua.
2. Ponga las bandejas de hielo en el
compartimento del congelador.
6. CONSEJOS
6.1 Consejos para ahorrar energía
• Congelador: La configuración interna del
aparato es la que garantiza el uso más
eficiente de la energía.
• Frigorífico: Se garantiza el consumo más
eficiente de energía en la configuración
con los cajones en la parte inferior del
aparato y los estantes distribuidos
uniformemente. La posición de los
contenedores de la puerta no afecta al
consumo de energía.
• No abra la puerta con frecuencia ni la deje
abierta más tiempo del necesario.
ESPAÑOL 183

• Congelador: Cuanto más frío sea el ajuste
de la temperatura, mayor será el consumo
de energía.
• Frigorífico: No fije una temperatura
demasiado alta para ahorrar energía, a
menos que lo requieran las características
del alimento.
• Si la temperatura ambiente es elevada y
el control de temperatura se ajusta a baja
temperatura y el aparato está totalmente
cargado, el compresor puede funcionar de
manera continua, provocando la
formación de escarcha o hielo en el
evaporador. En tal caso, ajuste el control
de temperatura hacia una temperatura
más elevada para permitir la
descongelación automática y ahorrar
energía.
• Asegure una buena ventilación. No cubra
las rejillas o los orificios de ventilación.
• Asegúrese de que los productos
alimenticios dentro del aparato permitan la
circulación de aire a través de los orificios
dedicados al efecto en el interior trasero
del aparato.
6.2 Sugerencias para congelar
• Active la función Extra Freeze al menos
24 horas antes de introducir los alimentos
en el compartimento congelador.
• Antes de congelar envuelva y selle los
alimentos frescos en: papel de aluminio,
film o bolsas de plástico, recipientes
herméticos con tapa.
• Para congelar y descongelar con más
eficacia, divida la comida en porciones
pequeñas.
• Se recomienda poner etiquetas y fechas
en todos sus alimentos congelados. Esto
ayudará a identificar los alimentos y a
saber cuándo deben utilizarse antes de su
deterioro.
• Los alimentos deben ser frescos al
congelarlos para preservar la buena
calidad. Especialmente las frutas y
verduras deben ser congeladas después
de cosecharlos para preservar todos sus
nutrientes.
• No congele las botellas o latas con
líquidos, en particular las bebidas que
contienen dióxido de carbono, ya que
pueden explotar durante la congelación.
• No coloque alimentos calientes en el
compartimiento del congelador. Enfríelos
a temperatura ambiente antes de
colocarlos dentro del compartimento.
• Para evitar aumentos en la temperatura
de comida ya congelada, no coloque
comida no congelada justo al lado.
Coloque los alimentos a temperatura
ambiente en la parte del compartimento
del congelador donde no hay alimentos
congelados.
• No coma cubitos de hielo, sorbetes o
helados inmediatamente después de
sacarlos del congelador. Existe riesgo de
quemaduras.
• No vuelva a congelar los alimentos
descongelados. Si la comida se ha
descongelado, cocínela, enfríela y luego
congélela.
6.3 Consejos para el
almacenamiento de alimentos
congelados
• El compartimento congelador es el
marcado con .
• Un buen ajuste de la temperatura que
garantice la conservación de los alimentos
congelados es una temperatura inferior o
igual a -18 °C.
Una temperatura más alta en el interior
del aparato puede reducir la vida útil.
• Todo el compartimento congelador es
adecuado para el almacenamiento de
alimentos congelados.
• Deje suficiente espacio alrededor de los
alimentos para permitir que el aire circule
libremente.
• Para un almacenamiento adecuado,
consulte la etiqueta de los envases de los
alimentos para ver su vida útil.
• Es importante envolver los alimentos de
tal manera que se evite que el agua, la
humedad o la condensación entren en su
interior.
6.4 Consejos de compra
Después de la compra:
• Asegúrese de que el envase no esté
dañado - los alimentos podrían estar
deteriorados. Si el paquete está hinchado
o mojado, es posible que no se haya
184 ESPAÑOL

almacenado en condiciones óptimas y que
la descongelación ya haya comenzado.
• Para limitar el proceso de descongelación,
compre los productos congelados al final
de su compra en el supermercado y
transpórtelos en una bolsa térmica y
aislada.
• Ponga los alimentos congelados
inmediatamente en el congelador después
de volver de la tienda.
• Si la comida se ha descongelado aunque
sea parcialmente, no la vuelva a congelar.
Se debe consumir lo antes posible.
• Respete la fecha de caducidad y la
información de almacenamiento del
paquete.
6.5 Vida útil en el congelador
Tipo de alimento Vida útil (meses)
Pan 3
Frutas (excepto cítricos) 6 - 12
Verduras 8 - 10
Sobras sin carne 1 - 2
Lácteos:
Mantequilla
Queso blando (p. ej. mozzarella)
Queso duro (p. ej. parmesano, cheddar)
6 - 9
3 - 4
6
Marisco:
Pescado graso (p. ej. salmón, caballa)
Pescado magro (p. ej. bacalao, platija)
Langostinos
Almejas y mejillones desconchados
Pescado cocinado
2 - 3
4 - 6
12
3 - 4
1 - 2
Carne:
Aves
Vacuno
Cerdo
Cordero
Salchichas
Jamón
Sobras con carne
9 - 12
6 - 12
4 - 6
6 - 9
1 - 2
1 - 2
2 - 3
6.6 Consejos para refrigeración de
alimentos frescos
• Un buen ajuste de temperatura que
asegure la conservación de los alimentos
frescos es una temperatura menor o igual
a +4°C.
Una temperatura más alta en el interior
del aparato puede reducir la vida útil de
los alimentos.
• Cubra el alimento con el envase para
preservar su frescura y aroma.
• Utilice siempre recipientes cerrados para
líquidos y para alimentos, para evitar
sabores u olores en el compartimento.
• Para evitar la contaminación cruzada
entre alimentos cocidos y crudos, cubra la
comida cocinada y sepárela de la cruda.
• Se recomienda descongelar los alimentos
dentro de la nevera.
• No coloque alimentos calientes dentro del
aparato. Asegúrese de que se hayan
enfriado a temperatura ambiente antes de
introducirlos.
ESPAÑOL 185

• Para evitar el desperdicio de alimentos,
los alimentos más recientes deben
colocarse siempre detrás de los viejos.
6.7 Consejos para la refrigeración
de alimentos
• El compartimento de alimentos frescos es
el marcado (en la placa de características)
con .
• Carne (cualquier variedad): guárdela en
un envoltorio adecuado y colóquela en el
estante de vidrio, sobre el cajón de las
verduras. Almacene la carne durante un
máximo de 1-2 días.
• Frutas y verduras: límpielas a fondo
(elimine la suciedad) y colóquelas en un
cajón especial (cajón para verduras).
• Es aconsejable no guardar en el frigorífico
las frutas exóticas como plátanos,
mangos, papayas, etc.
• Las verduras como tomates, patatas,
cebollas y ajos no deben guardarse en el
frigorífico.
• Queso y mantequilla: colóquelo en un
recipiente hermético, o envuélvalo en
papel de aluminio o en bolsas de
polietileno para eliminar todo el aire
posible.
• Botellas: ciérrelas con un tapón y
colóquelas en el estante para botellas de
la puerta o en el botellero (si dispone de
él).
• Consulte siempre la fecha de caducidad
de los productos para saber cuánto
tiempo debe conservarlos.
7. CUIDADO Y LIMPIEZA
ADVERTENCIA!
Consulte los capítulos sobre seguridad.
7.1 Limpieza del interior
Antes de utilizar el aparato por primera vez,
lave el interior y todos los accesorios internos
con agua templada y un jabón neutro para
eliminar el típico olor de un producto nuevo y
a continuación seque bien.
PRECAUCIÓN!
No utilice detergentes, polvos abrasivos
ni limpiadores a base de cloro o aceite,
ya que podrían dañar el acabado.
PRECAUCIÓN!
Los accesorios y las piezas del aparato
no deben lavarse en lavavajillas.
PRECAUCIÓN!
Limpie el panel de control con un paño
húmedo. No utilice ningún detergente.
Después de limpiar, seque el panel de
control con un paño suave.
7.2 Limpieza periódica
El equipo debe limpiarse de forma regular:
1. Limpie el interior y los accesorios con
agua templada y un jabón neutro.
2. Revise y limpie periódicamente las juntas
de la puerta para mantenerlas limpias y
sin restos.
3. Aclare y seque a fondo.
7.3 Descongelación del frigorífico
La descongelación del compartimento
frigorífico es automática. El agua que se
condensa fluye a un recipiente del compresor
y se evapora. El recipiente no se puede
quitar.
7.4 Descongelación del congelador
El congelador no forma escarcha. Esto
significa que, durante el funcionamiento, no
se forma escarcha ni en las paredes internas
del aparato ni sobre los alimentos.
7.5 Instalación y sustitución del
filtro CleanAir+
El filtro CleanAir+ es un filtro de carbón
activado que absorbe los malos olores y que
permite conservar el mejor sabor y aroma de
los alimentos sin riesgo de contaminación
cruzada de olores.
186 ESPAÑOL

Manipule el filtro de aire con cuidado
para evitar rayar su superficie.
El filtro de aire se suministra en una
bolsa de plástico que garantiza su
rendimiento.
Instale el filtro de aire antes de activar el
aparato.
1. Desembale el filtro de aire de la bolsa de
plástico.
2. Abra la carcasa de plástico y coloque la
superficie plisada en la rejilla, colocando
el filtro dentro del área marcada en la
superficie retículada.
3. Sujete el filtro hacia abajo mientras cierra
la carcasa de plástico hasta que oiga un
clic.
4. Retire el estante de cristal superior del
compartimento frigorífico. Deslice la
carcasa de plástico con el filtro de aire en
el lado izquierdo del estante de cristal.
5. Vuelva a introducir el estante de cristal en
el compartimento frigorífico. Procure no
golpear el filtro al insertar el estante de
cristal.
Sustitución del filtro de aire
1. Abra la carcasa de plástico.
ESPAÑOL 187

1
2
2. Tire del filtro de aire usado.
3. Desembale el filtro de aire nuevo de su
bolsa de plástico e insértelo en el cajón.
4. Cierre la carcasa de plástico.
5. Después de sustituir el filtro, pulse el
botón de alarma Filter Reset del panel de
control para apagar la alerta.
Para obtener el mayor rendimiento, coloque
la carcasa de plástico en el lugar adecuado
(a la izquierda del estante de cristal) y
sustituya el filtro de aire cada 6 meses.Para
más información, consulte "Indicador de
cambio de filtro de aire".
El filtro de aire es un accesorio
consumible y, como tal, no está cubierto
por la garantía.
Puede comprar filtros de aire nuevos a
su distribuidor local.
7.6 Periodos sin funcionamiento
Si el aparato no se utiliza durante un tiempo
prolongado, tome las siguientes
precauciones
1. Desconecte el aparato del suministro
eléctrico.
2. Retire todos los alimentos.
3. Limpie el aparato y todos los accesorios.
4. Deje las puertas abiertas para evitar
olores desagradables.
8. SOLUCIÓN DE PROBLEMAS
ADVERTENCIA!
Consulte los capítulos sobre seguridad.
8.1 Qué hacer si...
Problema Posible causa Solución
El aparato no funciona. El aparato está apagado. Encienda el aparato.
188 ESPAÑOL

Problema Posible causa Solución
El enchufe no está bien conectado a
la toma de corriente.
Conecte el aparato a la toma de co‐
rriente correctamente.
No hay tensión en la toma de co‐
rriente.
Conecte un aparato diferente a la
de corriente. Póngase en contacto
con un electricista cualificado.
El aparato hace ruido. El aparato no está bien apoyado. Compruebe que los soportes del
aparato están estables.
La alarma audible o visual está acti‐
vada.
El armario se ha encendido hace
poco.
Consulte "Alarma de temperatura al‐
ta" o "Alarma de puerta abierta".
La temperatura del aparato es de‐
masiado alta.
Consulte "Alarma de temperatura al‐
ta" o "Alarma de puerta abierta".
La puerta se queda abierta. Cierre la puerta.
El compresor funciona continua‐
mente.
La temperatura se ha ajustado de
manera incorrecta.
Consulte el capítulo "Panel de con‐
trol".
Se han introducido muchos alimen‐
tos al mismo tiempo.
Espere unas horas y vuelva a com‐
probar la temperatura.
La temperatura ambiente es dema‐
siado alta.
Consulte el capítulo "Instalación".
Los alimentos introducidos en el
aparato estaban demasiado calien‐
tes.
Deje que los alimentos se enfríen a
temperatura ambiente antes de
guardarlos.
La puerta no está bien cerrada. Consulte la sección "Cierre de la
puerta".
La función Extra Freeze está activa‐
da.
Consulte la sección “Función Extra
Freeze”.
La función Extra Cool está activada. Consulte la sección “Función Extra
Cool”.
El compresor no se pone en marcha
inmediatamente después de pulsar
“Extra Freeze” o “Extra Cool”, o tras
cambiar la temperatura.
El compresor se pone en marcha al
cabo de cierto tiempo.
Esto es normal, no se ha producido
ningún error.
La puerta está mal alineada o inter‐
fiere con la rejilla de ventilación.
El aparato no está nivelado. Consulte las instrucciones de insta‐
lación.
La puerta no se abre fácilmente. Ha intentado volver a abrir la puerta
inmediatamente después de cerrar‐
la.
Espere unos segundos entre el cie‐
rre y la reapertura de la puerta.
La bombilla no funciona. La bombilla está en modo de espe‐
ra.
Cierre y abra la puerta.
La bombilla es defectuosa. Póngase en contacto con el servicio
técnico autorizado más cercano.
Hay demasiada escarcha y hielo. La puerta no está bien cerrada. Consulte la sección "Cierre de la
puerta".
La junta de la puerta está sucia o
deformada.
Consulte la sección "Cierre de la
puerta".
ESPAÑOL 189

Problema Posible causa Solución
Los alimentos no están bien envuel‐
tos.
Envuelva mejor los productos.
La temperatura se ha ajustado de
manera incorrecta.
Consulte el capítulo "Panel de con‐
trol".
El aparato está completamente car‐
gado y ajustado a la temperatura
más baja.
Seleccione una temperatura más al‐
ta. Consulte el capítulo "Panel de
control".
La temperatura ajustada en el apa‐
rato es demasiado baja y la tempe‐
ratura ambiente demasiado alta.
Seleccione una temperatura más al‐
ta. Consulte el capítulo "Panel de
control".
El agua fluye por la placa posterior
del frigorífico.
Durante el proceso de descongela‐
ción automática, la escarcha se de‐
rrite en la placa posterior.
Es correcto.
Hay demasiada agua de condensa‐
ción en la pared posterior del frigorí‐
fico.
La puerta se abre con demasiada
frecuencia.
Abra la puerta solo cuando sea ne‐
cesario.
La puerta no se cierra completa‐
mente.
Asegúrese de que la puerta está ce‐
rrada completamente.
Los alimentos guardados no están
envueltos correctamente.
Envuelva los alimentos correcta‐
mente antes de guardarlos en el
aparato.
El agua fluye por el suelo. La salida de agua de descongela‐
ción no está conectada a la bandeja
de evaporación situada sobre el
compresor.
Acople la salida de agua de descon‐
gelación a la bandeja de evapora‐
ción.
No se puede ajustar la temperatura. La función Extra Freeze o la función
Extra Cool está activada.
Apague manualmente la función Ex‐
tra Freeze o la funciónExtra Cool, o
espere hasta que la función se de‐
sactive automáticamente antes de
ajustar la temperatura. Consulte la
sección “Función Extra Freeze” o
“Función Extra Cool”.
La temperatura del aparato es de‐
masiado baja/alta.
La temperatura no se ha ajustado
correctamente.
Seleccione una temperatura más al‐
ta/más baja.
La puerta no está bien cerrada. Consulte la sección "Cierre de la
puerta".
La temperatura de los productos es
demasiado alta.
Deje que la temperatura de los ali‐
mentos descienda a la temperatura
ambiente antes de guardarlos.
Se han guardado muchos alimentos
al mismo tiempo.
Guarde menos alimentos al mismo
tiempo.
La puerta se ha abierto con frecuen‐
cia.
Abra la puerta sólo si es necesario.
La función Extra Freeze está activa‐
da.
Consulte la sección “Función Extra
Freeze”.
190 ESPAÑOL

Problema Posible causa Solución
La función Extra Cool está activada. Consulte la sección “Función Extra
Cool”.
No hay circulación de aire frío en el
aparato.
Asegúrese de que el aire frío circula
libremente en el aparato. Consulte
el capítulo "Consejos".
aparece en la pantalla. El aparato está en el modo de de‐
mostración.
Para salir del modo de demostra‐
ción, mantenga pulsado los botones
Extra Cool y ECO durante unos 10
segundos hasta oír 3 pitidos breves.
Aparece el símbolo y es‐
tá encendido el indicador de alarma.
Problema de comunicación. Póngase en contacto con el centro
de servicio técnico más cercano. El
sistema de refrigeración seguirá
manteniendo fríos los alimentos, pe‐
ro no podrá ajustar la temperatura.
El símbolo , o
y el ajuste actual apare‐
cen alternativamente cada 5 segun‐
dos, y el indicador de alarma está
encendido.
Problema del sensor de temperatu‐
ra.
Póngase en contacto con el centro
de servicio técnico más cercano. El
sistema de refrigeración seguirá
manteniendo fríos los alimentos, pe‐
ro no podrá ajustar la temperatura.
Si el consejo anterior no ofrece
resultados, llame al servicio técnico
autorizado más cercano.
8.2 Cambio de la bombilla
El aparato está equipado con una luz LED
interior de larga duración.
Solo se permite al servicio técnico sustituir el
dispositivo de luz. Póngase en contacto con
el centro de servicio técnico autorizado.
8.3 Cierre de la puerta
1. Limpie las juntas de la puerta.
2. Si es necesario, ajuste la puerta.
Consulte las instrucciones de instalación.
3. Si es necesario, cambie las juntas
defectuosas de la puerta. Póngase en
contacto con el servicio técnico
autorizado.
ESPAÑOL 191

9. RUIDOS
SSSRRR!
CLICK!
HISSS!
BRRR!
BLUBB!
10. DATOS TÉCNICOS
La información técnica se encuentra en la
placa de datos técnicos situada en el interior
del aparato y en la etiqueta de consumo
energético.
El código QR de la etiqueta energética
suministrada con el aparato proporciona un
enlace web a la información relacionada con
el rendimiento del aparato en la base de
datos EPREL de la UE. Guarde la etiqueta
energética como referencia junto con el
manual de usuario y todos los demás
documentos que se proporcionan con este
aparato.
También puede encontrar la misma
información en EPREL accediendo desde el
enlace
https://eprel.ec.europa.eu
e
introduciendo el nombre del modelo y el
número de producto que se encuentran en la
placa de datos técnicos del aparato.
Consulte el enlace
www.theenergylabel.eu
para obtener información detallada sobre la
etiqueta energética.
192 ESPAÑOL

11. INFORMACIÓN PARA INSTITUTOS DE PRUEBAS
La instalación y la preparación del aparato
para cualquier verificación de EcoDiseño
deberá cumplir con EN 62552. Los requisitos
de ventilación, las dimensiones de los huecos
y las distancias mínimas traseras serán los
indicados en el Capítulo 3 de este Manual de
Usuario. Por favor, póngase en contacto con
el fabricante para cualquier otra información
adicional, incluyendo los planos de carga.
12. ASPECTOS MEDIOAMBIENTALES
Recicle los materiales con el símbolo .
Coloque el material de embalaje en los
contenedores adecuados para su reciclaje.
Ayude a proteger el medio ambiente y la
salud pública, así como a reciclar residuos de
aparatos eléctricos y electrónicos. No
deseche los aparatos marcados con el
símbolo junto con los residuos
domésticos. Lleve el producto a su centro de
reciclaje local o póngase en contacto con su
oficina municipal.
ESPAÑOL 193
*


222381197-C-152023
-
 1
1
-
 2
2
-
 3
3
-
 4
4
-
 5
5
-
 6
6
-
 7
7
-
 8
8
-
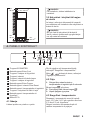 9
9
-
 10
10
-
 11
11
-
 12
12
-
 13
13
-
 14
14
-
 15
15
-
 16
16
-
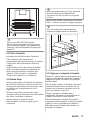 17
17
-
 18
18
-
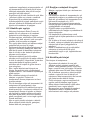 19
19
-
 20
20
-
 21
21
-
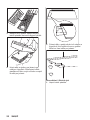 22
22
-
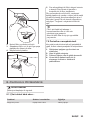 23
23
-
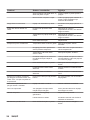 24
24
-
 25
25
-
 26
26
-
 27
27
-
 28
28
-
 29
29
-
 30
30
-
 31
31
-
 32
32
-
 33
33
-
 34
34
-
 35
35
-
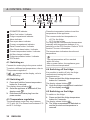 36
36
-
 37
37
-
 38
38
-
 39
39
-
 40
40
-
 41
41
-
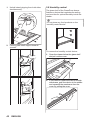 42
42
-
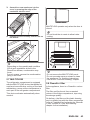 43
43
-
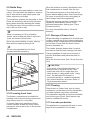 44
44
-
 45
45
-
 46
46
-
 47
47
-
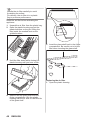 48
48
-
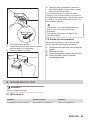 49
49
-
 50
50
-
 51
51
-
 52
52
-
 53
53
-
 54
54
-
 55
55
-
 56
56
-
 57
57
-
 58
58
-
 59
59
-
 60
60
-
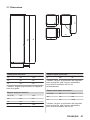 61
61
-
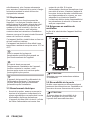 62
62
-
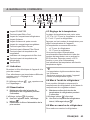 63
63
-
 64
64
-
 65
65
-
 66
66
-
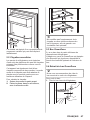 67
67
-
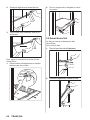 68
68
-
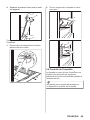 69
69
-
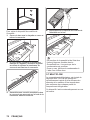 70
70
-
 71
71
-
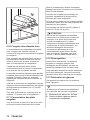 72
72
-
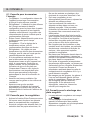 73
73
-
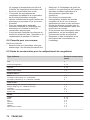 74
74
-
 75
75
-
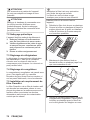 76
76
-
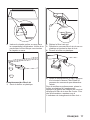 77
77
-
 78
78
-
 79
79
-
 80
80
-
 81
81
-
 82
82
-
 83
83
-
 84
84
-
 85
85
-
 86
86
-
 87
87
-
 88
88
-
 89
89
-
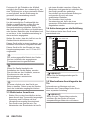 90
90
-
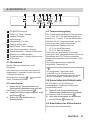 91
91
-
 92
92
-
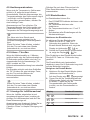 93
93
-
 94
94
-
 95
95
-
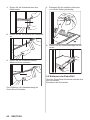 96
96
-
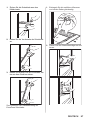 97
97
-
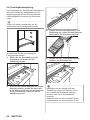 98
98
-
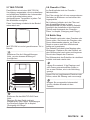 99
99
-
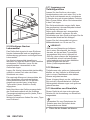 100
100
-
 101
101
-
 102
102
-
 103
103
-
 104
104
-
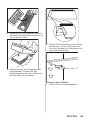 105
105
-
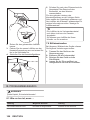 106
106
-
 107
107
-
 108
108
-
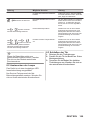 109
109
-
 110
110
-
 111
111
-
 112
112
-
 113
113
-
 114
114
-
 115
115
-
 116
116
-
 117
117
-
 118
118
-
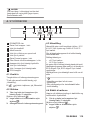 119
119
-
 120
120
-
 121
121
-
 122
122
-
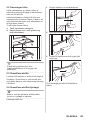 123
123
-
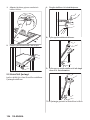 124
124
-
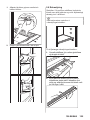 125
125
-
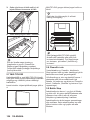 126
126
-
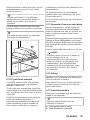 127
127
-
 128
128
-
 129
129
-
 130
130
-
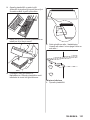 131
131
-
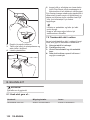 132
132
-
 133
133
-
 134
134
-
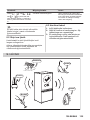 135
135
-
 136
136
-
 137
137
-
 138
138
-
 139
139
-
 140
140
-
 141
141
-
 142
142
-
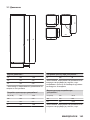 143
143
-
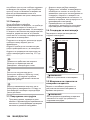 144
144
-
 145
145
-
 146
146
-
 147
147
-
 148
148
-
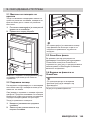 149
149
-
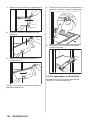 150
150
-
 151
151
-
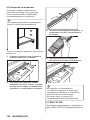 152
152
-
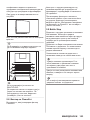 153
153
-
 154
154
-
 155
155
-
 156
156
-
 157
157
-
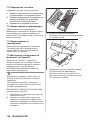 158
158
-
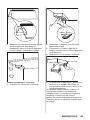 159
159
-
 160
160
-
 161
161
-
 162
162
-
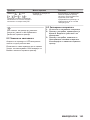 163
163
-
 164
164
-
 165
165
-
 166
166
-
 167
167
-
 168
168
-
 169
169
-
 170
170
-
 171
171
-
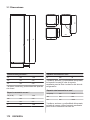 172
172
-
 173
173
-
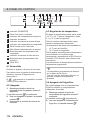 174
174
-
 175
175
-
 176
176
-
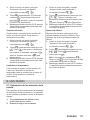 177
177
-
 178
178
-
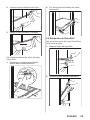 179
179
-
 180
180
-
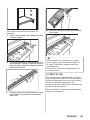 181
181
-
 182
182
-
 183
183
-
 184
184
-
 185
185
-
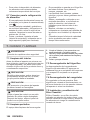 186
186
-
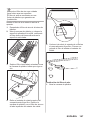 187
187
-
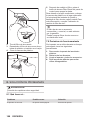 188
188
-
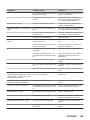 189
189
-
 190
190
-
 191
191
-
 192
192
-
 193
193
-
 194
194
-
 195
195
-
 196
196


AEG 8000-SERIEN TSC8M181DS KOMBISKAP Manual de usuario
- Tipo
- Manual de usuario
en otros idiomas
Otros documentos
-
Zanussi ZFC627WAP Manual de usuario
-
-
Candy CSC818FX Manual de usuario
-
Hoover HSF818FXK Manual de usuario
-
-
Beko GNE60520 El manual del propietario
-
-
-