La página se está cargando...

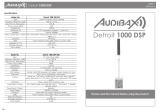
Detroit 1000X DSP
Please read the manual before using the product
USER´S
MANUAL
3
Detroit 1000X DSP
Specifications
Model
No.
Detroit 1000X DSP
Type
1pc column + 1pc 12'' subwoofer
Frequency Response (-6dB)
45 Hz - 20 kHz
Max. SPL (1m, free space)
125 dB
Power Output (RMS)
400W+200W
Impedance
4Ohms
Transducer HF
8pcs * 3" driver, 20mm voice coil
Transducer LF
12" subwoofer, 2.5" voice coil
Amplifier
Class-D amplifier
DSP Module DSP-100, 96 kHz, 24-bit DSP processor with preset modes: Monitor, DJ,
Live
Protection
Short circuit overheating, over-current
Controls
Power On / Off switch, main level, DSP modes switch
Indicators
Power, signal
Audio Input / Output
3 * Combo XLR/Jack input, 1 * L/R Jack input, 1 * Aux input, 1 * XLR
output
Power Input / Output
Powercon
Power Supply
230V 50/60 Hz
Enclosure
ABS/PP Plastic
Dispersion (H * V)
120° * 16°

Detroit 1000X DSP USER´S
MANUAL
1 2
Please read and keep all safety and use instructions. Important Safety Instructions
Refer to the user manual for more information about your Detroit 1000X DSP
1. Read these instructions.
2. Keep these instructions.
3. Heed all warnings.
4. Follow all instructions.
5. Do not use this apparatus near water.
6. Clean only with a dry cloth.
7. Do not block any ventilation openings. Install in accordance with the manufactu-
rer’s instructions.
8. Do not install near any heat sources such as radiators, heat registers, stoves, or
other apparatus (including amplifiers) that produces heat.
9. Do not defeat the safety purpose of the polarized or grounding-type plug. A
polarized plug has two blades with one wider than the other. A grounding-type plug
has two blades and a third grounding prong. The wider blade or third prong is
provided for your safety. If the provided plug does not fit in your outlet, consult an
electrician for replacement of the obsolete outlet.
10. Protect the power cord from being walked on or pinched, particularly at plugs,
convenience receptacles, and the point where it exits from the apparatus.
11. Only use attachments/accessories specified by the manufacturer.
13. Unplug this apparatus during lightning storms or when unused for long periods of
time.
14. Refer all servicing to qualified personnel. Servicing is required when the apparatus
has been damaged in any way such as power-supply cord or plug is damaged,
liquid has been spilled or objects have falleninto the apparatus, the apparatus has
been exposed to rain or moisture, does not operate normally, or has been dropped.
WARNINGS/CAUTIONS:
12. Use only with the cart, stand, tripod, bracket, or table specified by the
manufacturer or sold with the apparatus. When a cart is used, use caution
when moving the cart/apparatus combination to avoid injury from tip-over.
This symbol on the product means there is uninsulated, dangerous voltage
within the product enclosure that may present a risk of electrical shock.
This symbol on the product means there are important operating and
maintenance instructions in this guide.
Contains small parts which may be a choking hazard. Not suitable for
children under age 3.
This product contains magnetic material. Consult your physician on whether
this might affect your implantable medical device.
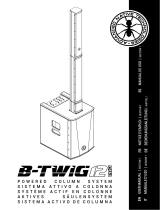
1. CH1/CH2/CH3/CH4 VOL:
Four Channels Volume Control.
2. Master VOL:
Master Volume Control.
3. Treble VOL:
Treble Volume Control.
4. Bass VOL:
Bass Volume Control.
5. Effect VOL:
Eect Volume Control.
6. Mode Switch:
Swipe to switch modes: Microphone, Guitar,
Line.
7. CH1/CH2/CH3 XLR Input:
Balanced XLR input for getting signals from
mixers or preamplifiers.
8. CH4 L/R Jack Input:
Balanced L / R Jack input for getting signals
from mixers or preamplifiers.
9. CH4 Aux Input:
Balanced Aux input for getting signals from
mixers or preamplifiers.
10. Indicator Light:
Power / Signal.
11. Bluetooth Button:
Press once to connect a Bluetooth device or
disconnect a paired Bluetooth device.
12. TWS Button:
Press once to connect a TWS device or
disconnect a paired TWS device.
13. DSP Preset:
There are three preset mode: Monitor / DJ /
Live.
14. Phase Switch:
Allows user to reverse phase 180°
15. Line Out:
Balanced XLR connectors connected in parallel
to the inputs to connect subwoofer.
16. AC Input:
Please Use AC input cable from the original
manufacturer only.
17. Power Switch:
Turns unit on or o.
System Setup
Connections and Controls
CH 1CH2 CH3 LINE OUT
CH4
Line Line Line
13
2
1. MONITOR
2. DJ
3. LIVE
DSP Preset
T W S
PHASE
SIGNAL
POWER
0°
180°
M I N M A X
M A S T E R
CLIP CLIP CLIP CLIP CLIP
TR E B L E TR E B L ETR E B L E
E F F E CT E F F E C TEF F E C T
V O L V O L V OL V O L
M I N M A X
M I N M A X
M I N M A X
M I N M A X
CH 1
M I N M A X
M I N M A X
M I N M A X
M I N M A X
CH2
M I N M A X
M I N M A X
M I N M A X
M I N M A X
CH3
M I N M A X
CH4
Detroit 1000X DSP

Detroit 1000X DSP
Por favor, lea el manual antes de usar el producto
MANUAL
DE USUARIO
3
Detroit 1000X DSP
Especificaciones
N º de Modelo.
Detroit 1000X DSP
Tipo
1 columna + 1 subwoofer de 12''
Respuesta de frecuencia (-6dB)
45 Hz - 20 kHz
Máx. SPL (1m, espacio libre)
125dB
Potencia de salida (RMS)
400W+200W
Impedancia
4 ohmios
Transductor de alta frecuencia
Controlador de 8 piezas * 3 ", bobina de voz de 20 mm
Transductor LF
Subwoofer de 12", bobina móvil de 2,5"
Amplificador
Amplificador de clase D
Módulo DSP
DSP-100, 96 kHz, procesador DSP de 24 bits con modos
preestablecidos: Monitor, DJ, Live
Proteccion
Sobrecalentamiento de cortocircuito, sobrecorriente
Control S
Interruptor de encendido/apagado, nivel principal, interruptor de
modos DSP
Indicadores
Potencia, señal
Entrada/salida de audio
3 entradas combinadas XLR/Jack, 1 entrada L/R Jack, 1 entrada
auxiliar, 1 salida XLR.
Entrada/salida de energía
Powercon
Fuente de alimentación
230V 50/60Hz
Recinto
Plástico ABS/PP
Dispersión (H * V)
120° * 16°

Detroit 1000X DSP MANUAL
DE USUARIO
1 2
Lea y guarde todas las instrucciones de seguridad y uso. Instrucciones de seguridad
importantes
Consulte el manual del usuario para obtener más información sobre su Detroit 1000X DSP
1. Lea estas instrucciones.
2. Guarde estas instrucciones.
3. Preste atención a todas las advertencias.
4. Siga todas las instrucciones.
5. No utilice este aparato cerca del agua.
6. Limpie solo con un paño seco.
7. No bloquee ninguna abertura de ventilación. Haga la instalación conforme a las
instrucciones del fabricante.
8. No lo instale cerca de fuentes de calor, como radiadores, rejillas de calefacción, estufas
u otros aparatos (incluidos los amplificadores) que produzcan calor.
9. No anule el propósito de seguridad del enchufe polarizado o con conexión a tierra. Un
enchufe polarizado tiene dos clavijas, una más ancha que la otra. Un enchufe con
conexión a tierra tiene dos clavijas y una tercera clavija de conexión a tierra. La hoja más
ancha o la tercera punta se proporciona para su seguridad. Si el enchufe provisto no
encaja en su tomacorriente, consulte a un electricista para reemplazar el tomacorriente
obsoleto.
10. Proteja el cable de alimentación para que no se pise ni se pellizque, especialmente en
los enchufes, receptáculos de conveniencia y el punto donde sale del aparato.
11. Utilice únicamente aditamentos/accesorios especificados por el fabricante.
13. Desenchufe este aparato durante tormentas eléctricas o cuando no se utilice durante
largos períodos de tiempo.
14. Encargue todo el servicio a personal cualificado. El servicio es necesario cuando el
aparato se ha dañado de alguna manera, como el cable de alimentación o el enchufe, se
ha derramado líquido o han caído objetos dentro del aparato, el aparato ha estado
expuesto a la lluvia o la humedad, no funciona con normalidad, o se ha caído.
ADVERTENCIAS/PRECAUCIONES:
12. Utilícelo únicamente con el carro, soporte, trípode, abrazadera o mesa
especificados por el fabricante o vendidos con el aparato. Cuando se utiliza un
carro, tenga cuidado al mover la combinación carro/aparato para evitar lesiones
por vuelco.
Este símbolo en el producto significa que hay voltaje peligroso no aislado dentro
de la carcasa del producto que pueda presentar un riesgo de descarga
eléctrica.
Este símbolo en el producto significa que hay instrucciones importantes de
operación y mantenimiento en esta guía.
Contiene piezas pequeñas que pueden ser un peligro de asfixia. No apto para
niños menores de 3 años.
Este producto contiene material magnético. Consulte a su médico si esto podría
afectar su dispositivo médico implantable.
Configuración del sistema
Conexiones y Controles
1. VOLUMEN DE CH1/CH2/CH3/CH4:
Control de volumen de cuatro canales.
2. MASTER VOL:
Control de volumen maestro.
3. TREBLE VOL:
Control de volumen de agudos.
4. BASS VOL:
Control de volumen de graves.
5. EFFECT VOL:
Control de volumen de efectos.
6. Cambio de modo:
Desliza para cambiar de modo: Micrófono,
Guitarra, Línea.
7. Entrada XLR CH1/CH2/CH3:
Entrada XLR balanceada para obtener señales
de mezcladores o preamplificadores.
8. Entrada de conector CH4 L/R:
Entrada balanceada L/R Jack para obtener
señales de mezcladores o preamplificadores.
9. Entrada auxiliar CH4:
Entrada auxiliar balanceada para obtener
señales de mezcladores o preamplificadores.
10. Luz indicadora:
Potencia / Señal.
11. Botón Bluetooth:
Presione una vez para conectar un dispositivo
Bluetooth o desconectar un dispositivo
Bluetooth emparejado.
12. Botón TWS:
Presione una vez para conectar un dispositivo
TWS o desconectar un dispositivo TWS
emparejado.
13. Preajuste DSP:
Hay tres modos preestablecidos: Monitor / DJ /
Live.
14. Interruptor PHASE:
Permite al usuario invertir la fase 180°
15. LINE OUT:
Conectores XLR balanceados conectados en
paralelo a las entradas para conectar
subwoofer.
16. AC INPUT:
Utilice únicamente cable de entrada de CA del
fabricante original.
17. Interruptor POWER:
Enciende o apaga la unidad.
CH 1CH2 CH3 LINE OUT
CH4
Line Line Line
13
2
1. MONITOR
2. DJ
3. LIVE
DSP Preset
T W S
PHASE
SIGNAL
POWER
0°
180°
M I N M A X
M A S T E R
CLIP CLIP CLIP CLIP CLIP
TR E B L E TR E B L ETR E B L E
E F F E CT E F F E C TEF F E C T
V O L V O L V OL V O L
M I N M A X
M I N M A X
M I N M A X
M I N M A X
CH 1
M I N M A X
M I N M A X
M I N M A X
M I N M A X
CH2
M I N M A X
M I N M A X
M I N M A X
M I N M A X
CH3
M I N M A X
CH4
Detroit 1000X DSP
1/4