

English
Quick start guide
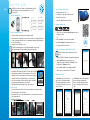
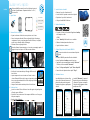
1 Unfold the required frame
2 Mount the frame with the hood
• The frame elastomer joint must be placed towards the outside.
• Fix the strips before stretching the hood on the frame’s corners. Do not tight fully the strips:
in order not to damage the hood cloth, it is recommended to adjust the strips tightening at
the end of the mounting.
• Stretch the hood on the frame’s corners.
3 Mount the hood + frame assembly on the base
• Check that the self-adhering trip to x the hood on the base is not xed.
• The transparent part must be oriented towards the user. The coloured
strip inside the hood is a visual mark: it must be placed on the opposite
side of the user. This coloured marked strip has to be positioned in
front of the arrow mark of the base. Position the frame’s corners with
retaining stops towards the window side of the hood.
• Tighten and x the self-adhering trip to x the hood on the base.
4 Position the rods
• Put the rods inside the hood. Place the rods on the dedicated receipt cups then adjust
them on the opposite corner of the hood.
• Position the rods to cross on the transparent side of the hood and on the opposite side
of the transparent part.
• Adjust the strips tightening.
5 minutes
5 Insert the batteries in the module
• Remove the batteries cover (1).
• Insert batteries* respecting carefully the polarity.
• Replace the batteries cover.
• Connect the DBM 620 module on the base.
1
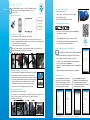
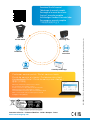
6 Download SmartKap App
• Flash the QR code to download SmartKap application on your
smartphone or tablet.
OR
• Write “SmartKap” in the search bar then validate.
• Download SmartKap application by pressing its icon.
• Follow your mobile device indications.
7 Connect the mobile device and the DBM 620 module
• Switch on the DBM 620 module by pressing the housing module.
• Launch SmartKap application by pressing its icon.
• The application opens automatically in “Balometer” mode.
If required, select “Manometer“ mode.
• Press “Connect a device” then “Search for devices”.
• Press the line of the required device then “Connect”.
Wireless connection must be activated on the mobile
device.
8 Display measurements
In “Balometer“ mode, select the air vent
type. Position the air ow meter thanks to
the animation explaining how to position
correctly the air ow meter on the air vent
then press “Close”.
In “Manometer“ mode, set the differential
pressure device, type and dimensions.
Position correctly the differential pressure
device on the required location then press
“Rec”.
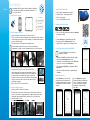
2 x 2’ 610 x 610 mm
3.35 x 3.35’ 1020 x 1020 mm
2.36 x 2.36’ 720 x 720 mm
2.36 x 4.33’ 720 x 1320 mm
1.38 x 4.99’ 420 x 1520 mm
Once the rst mounting carried out, a complete disassembly is not necessary:
the frame assembly can be stored with the hood mounted on the base.
*4 alkaline batteries LR6 AA 1.5V
Google Play and the Google Play logo are trademarks of Google LLC. / App Store is a service mark of Apple Inc.
The DBM 620 air ow meter allows control and balancing of airow
in air conditioning system. Operating temperature: -5 to +50 °C;
Protection: IP40
DISPONIBLE SUR

Français
Guide rapide
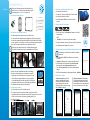
1 Déplier le cadre souhaité
2 Monter la hotte sur le cadre
• Le joint élastomère du cadre doit être placé vers l’extérieur.
• Fixer les sangles avant de positionner la hotte sur les coins du cadre. Ne pas serrer les
sangles au maximum : an de ne pas abîmer la toile de la hotte, il est recommandé d’ajuster
le serrage des sangles en n de montage.
• Tendre l’élastique de la hotte sur les coins du cadre.
3 Monter l’ensemble hotte + cadre sur la base
• Vérier que la bande auto-agrippante au niveau de la base n’est pas xée.
• La partie transparente de la hotte doit être placée vers l’utilisateur. La
languette de couleur à l’intérieur de la hotte permet de se repérer : elle doit
être à l’opposé de l’utilisateur. Cette languette de couleur est à positionner
en face de la èche repère située sur la base. Positionner les prolés
comportant les butées d’angle face à la partie vitrée de la hotte.
• Serrer et xer la bande auto-agrippante au niveau de la base.
4 Positionner les tiges de maintien
• Déposer les tiges à l’intérieur de la hotte.
• Placer les tiges sur les coupelles prévues à cet effet puis les ajuster sur le coin opposé de la
hotte. Positionner les tiges à croiser côté fenêtre et à l’opposé de la fenêtre.
• Ajuster le serrage des sangles.
5 minutes
5 Insérer les piles dans le module
• Enlever la trappe à piles (1).
• Insérer les piles* en veillant à bien respecter la polarité.
• Remettre la trappe à piles.
• Reconnecter le module DBM 620 sur la base.
1
6 Télécharger l’application SmartKap
• Flasher le QR code pour télécharger l’application SmartKap sur
votre smartphone ou tablette.
OU
• Taper « SmartKap » dans la barre de recherche et valider.
• Télécharger l’application SmartKap en appuyant sur son icône.
• Suivre les indications de votre appareil mobile.
7 Connecter l’appareil mobile et le module DBM 620
• Allumer le module DBM 620 en appuyant sur le bouton du module.
• Lancer l’application SmartKap en appuyant sur son icône.
• L’application s’ouvre automatiquement en mode « Balomètre ». Si
besoin, sélectionner le mode « Manomètre ».
• Appuyer sur « Connecter un appareil » puis sur « Rechercher des
appareils ».
• Appuyer sur la ligne de l’appareil souhaité puis sur « Connecter ».
La connexion sans l doit être activée sur le smartphone ou la tablette.
8 Afcher les mesures
En mode « Balomètre », sélectionner le
type de bouche. Positionner le débitmètre
grâce à l’animation expliquant comment
positionner correctement le débitmètre sur la
bouche puis appuyer sur « Fermer ».
En mode « Manomètre », régler les
paramètres de l’élément déprimogène, le type
et les dimensions de la gaine. Positionner
correctement l’élément déprimogène à l’endroit
souhaité puis appuyer sur « Rec ».
Une fois le premier montage effectué, un démontage complet n’est pas nécessaire : les
cadres se rangent dans les sacoches avec la toile montée.
610 x 610 mm
1020 x 1020 mm
720 x 720 mm
720 x 1320 mm
420 x 1520 mm
*4 piles alcalines LR6 AA 1.5 V
Google Play et le logo Google Play sont des marques de Google LLC. / App Store is a service mark of Apple Inc.
Le débitmètre DBM 620 permet le contrôle et l’équilibrage des débits
d’air en sortie de bouche. Température d’utilisation : -5 à +50 °C ;
Protection : IP40
DISPONIBLE SUR

Español
Guía rápida
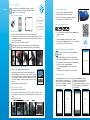
1 Desplegar el marco deseado
2 Montar la campana en el marco
• La junta de elastómero del marco debe colocarse hacia el exterior.
• Fije las correas antes de posicionar la campana sobre las esquinas del marco. No apriete las
correas al máximo: para no dañar la tela de la campana, se recomienda terminar de ajustar
las correas al nal del montaje.
• Tense la goma elástica de la campana en las esquinas del marco.
3 Montar el conjunto de campana + marco en la base
• Compruebe que la tira de velcro no esté jada a nivel de la base.
• La parte transparente de la campana debe estar situada del lado del
usuario. La lengüeta de color situada en el interior de la campana sirve
de orientación: debe estar situada del lado opuesto al usuario. Esta
lengüeta de color debe colocarse frente a la echa de referencia situada
en la base. Coloque los perles con topes de ángulo frente a la parte
acristalada de la campana.
• Apriete y je la tira de velcro a nivel de la base.
4 Posicionar las varillas de sujeción
• Coloque las varillas en el interior de la campana.
• Para cada varilla, coloque uno de sus extremos en la cuenca prevista a dicho efecto
y ajuste el otro extremo en la esquina opuesta de la campana. Una pareja de varillas
cruzadas debe quedar situada del lado de la ventana y la otra, del lado opuesto.
• Termine de apretar las correas.
5 minutos
5 Introducir las pilas en el módulo
• Retire la tapa del compartimento de las pilas (1).
• Introduzca las pilas* respetando la polaridad.
• Vuelva a colocar la tapa.
• Conecte el módulo DBM 620 a la base.
1
6 Descargar la aplicación SmartKap
• Escanee el código QR para descargar la aplicación SmartKap en
su smartphone o tableta
O
• Escriba «SmartKap» en la barra de búsqueda y valide.
• Descargue la aplicación SmartKap pulsando el icono.
• Siga las indicaciones que aparecen en su dispositivo móvil.
7 Conectar el dispositivo móvil y el módulo DBM 620
• Encienda el módulo DBM 620 pulsando el botón del módulo.
• Inicie la aplicación SmartKap pulsando el icono.
• La aplicación se abre automáticamente en modo «Balómetro».
Si es preciso, seleccione el modo «Manómetro».
• Pulse «Conectar un dispositivo» y seguidamente «Buscar
dispositivos».
• Pulse la línea del dispositivo deseado y seguidamente pulse
«Conectar».
La conexión inalámbrica debe estar activada en el
smartphone o la tableta.
8 Visualizar las mediciones
En modo «Balómetro», seleccione el tipo
de salida de aire. Siga las instrucciones de
la animación para posicionar correctamente
el caudalímetro en la salida de aire y pulse
«Cerrar».
En modo «Manómetro», ajuste los
parámetros del dispositivo deprimógeno,
el tipo y las dimensiones del conducto.
Posicione correctamente el dispositivo
deprimógeno en el lugar deseado y
pulse «Rec».
610 x 610 mm
1.020 x 1.020 mm
720 x 720 mm
720 x 1.320 mm
420 x 1.520 mm
Una vez realizado el primer montaje ya no es necesario volver desmontar
completamente el conjunto: los marcos de guardan en las bolsas con la tela montada.
*4 pilas alcalinas LR6 AA 1,5 V
Google Play y el logotipo de Google Play son marcas comerciales de Google LLC. / App Store is a service mark of Apple Inc.
El caudalímetro DBM 620 permite controlar y equilibrar los caudales de
aire a la salida de una salida de aire. Temperatura de utilización: -5 a
+50 °C ; Protección: IP40
DISPONIBLE SUR

Italiano
Guida menù rapido
1 Aprire il telaio
2 Montare il telaio con l’effusore
• Il giunto in elastomero del telaio deve essere posizionato verso l’esterno.
• Fissare le strisce prima di stendere l’effusore sugli angoli del telaio. Non stringere
completamente le strisce: per non danneggiare il tessuto dell’effusore, si consiglia di
regolare le strisce ssandole alla ne del montaggio.
• Posizionare l’effusore sugli angoli del telaio.
3 Montare l’effusore + assemblaggio del telaio sulla base
• Vericare che la striscia autoadesiva per il ssaggio dell’effusore sulla
base sia libera.
• La parte trasparente deve essere orientata verso l’utente. La striscia
colorata all’interno dell’effusore: sul lato opposto. Questa striscia colorata
deve essere posizionata davanti alla freccia. Bloccare gli angoli del telaio
verso il lato dell’effusore.
• Stringere e ssare la striscia autodesiva per bloccare il telaio alla base.
4 Posizionare le aste
• Inserire le aste dentro l’effusore. Posizionare le aste sulle apposite sedi, quindi regolarle
nell’angolo opposto dell’effusore.
• Posizionare le aste per attraversare il lato trasparente dell’effusore e sul lato opposto
della parte trasparente.
• Regolare le strisce di ssaggio.
5 minuti
5 Inserire le batterie nel modulo
• Rimuovere il coperchio del vano batterie (1).
• Inserire le batterie* rispettando con attenzione la polarità.
• Riposizionare il coperchio del vano batterie.
• Collegare il modulo DBM 620 alla base.
1
6 Download SmartKap App
• Fotografare il QR code per il download dell’applicazione SmartKap
sullo smartphone o tablet.
OPPURE
• Scrivere “SmartKap” nella barra di ricerca e convalidare.
• Effettuare il download premendo sulla sua icona.
• Seguire le indicazione e istruzioni.
7 Collegare il dispositivo mobile al modulo DBM 620
• Accendere il DBM 620 premendo sull’involucro del modulo.
• Avviare l’applicazione SmartKap premendo la sua icona.
• L’applicazione si apre automaticamente in modalità “Balometro”.
Se richiesto, selezionare modalità “Manometro“.
• Premere “Collegare un dispositivo” quindi “Ricerca dispositivi”.
• Premere la linea del dispositivo richiesto quindi “Collega”.
La connessione wireless deve essere attivata sul dispositivo
mobile.
8 Visualizzare le misure
In modalità «Balometro», selezionare il tipo
di presa d’aria. Posizionare il misuratore di
portata d’aria sulla presa d’aria seguendo
l’animazione di spiegazione, quindi premere
«Chiudi».
In modalità “Manometro“, impostare il
dispositivo di pressione differenziale, tipo
e dimensioni. Posizionare correttamente
il dispositivo sull’alloggiamento richiesto
quindi premere “Rec”.
610 x 610 mm
1020 x 1020 mm
720 x 720 mm
720 x 1320 mm
420 x 1520 mm
Una volta effettuato il primo montaggio, non è necessario uno smontaggio completo: il
gruppo telaio può essere riposto con l’effusore montato sulla base.
* 4 batterie alcaline LR6 AA 1.5 V
Google Play e il logo di Google Play sono marchi di Google LLC. / App Store is a service mark of Apple Inc.
Il balometro DBM620 permette di controllare e bilanciare la porta aria
nei sitemi di condizionamento. Temperatura di utilizzo: -5 a +50 °C;
Protezione: IP40
DISPONIBLE SUR

Deutsch
Kurzanleitung
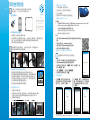
1 Den benötigten Rahmen entfalten
2 Die Messhaube auf den Rahmen montieren
• Die Elastomergelenke des Rahmens müssen nach außen zeigen.
• Vor dem Ausrichten der Messhaube auf den Rahmenecken die Riemen einlegen. Die
Riemen nicht strammziehen! Damit die Wandächen der Messhaube nicht beschädigt
werden, empehlt es sich, die Riemen erst am Ende des Montagevorgangs festzuziehen.
• Den elastischen Bund der Messhaube über die Rahmenecken ziehen.
3 Die Messhaube und den Rahmen auf den Ständer setzen
• Darauf achten, dass das Klettband am Ständer nicht festhängt.
• Das Fenster der Messhaube muss zum Benutzer hin zeigen. Die
farbige Zunge in der Messhaube dient der Orientierung: Sie muss
sich dem Benutzer gegenüber benden. Sie muss sich weiterhin
vor dem Markierungspfeil am Ständer benden. Die Prole mit den
Eckanschlägen müssen dem Fenster der Messhaube gegenüberliegen.
• Das Klettband am Ständer anziehen und festdrücken.
4 Die Spannstangen einsetzen
• Die Spannstangen innen in die Messhaube einsetzen.
• Die Stangen in die hierfür vorgesehenen Näpfe einsetzen und sie auf die
gegenüberliegende Ecke der Messhaube ausrichten. Die Stangen kreuzen sich jeweils
auf der Fensterseite und der dem Fenster gegenüberliegenden Seite.
• Die Riemen nachziehen.
5 Minuten
5 Die Batterien in das Elektronikmodul einsetzen
• Den Batteriedeckel anheben (1).
• Die Batterien* einsetzen und dabei auf die Polarität achten.
• Den Batteriedeckel wieder schließen.
• Das Elektronikmodul DBM 620 wieder an den Ständer
ansetzen.
1
6 Die App „SmartKap“ herunterladen
• Den QR-Code einlesen, um SmartKap auf Smartphone oder Tablet
herunterzuladen
ODER
• „SmartKap“ in die Suchleiste eingeben und bestätigen.
• Die App herunterladen, indem man das entsprechende Symbol antippt.
• Den Anweisungen des Mobilgeräts Folge leisten.
7 Die Datenverbindung zwischen Mobilgerät und Messmodul herstellen
• Das Elektronikmodul DBM 620 durch Drücken von dessen Taste
einschalten.
• SmartKap durch Antippen des entsprechenden Symbols starten.
• Die Anwendung öffnet sich automatisch im Balometermodus.
Wenn gewünscht, auf den Manometermodus einstellen.
• Zuerst „Ein Gerät anschließen“ und danach „Geräte suchen“
antippen.
• Die Zeile mit dem gewünschten Gerät antippen und danach „Verbinden“.
Auf Smartphone oder Tablet muss die drahtlose Verbindung
aktiviert sein.
8 Die Messwerte anzeigen
Im Balometermodus die Art des Luft-
durchlasses auswählen. Das Volumen-
strommessgerät mithilfe der Animation,
die das richtige Anordnen über dem
Luftdurchlass erläutert, positionieren und
dann „Schließen“ antippen.
Im Manometermodus die Einstellungen
für das Unterdruckelement sowie Art und
Abmessungen des Luftkanals vornehmen.
Das Unterdruckelement an der gewünschten
Stelle positionieren und auf „Rec“ tippen.
610 x 610 mm
1.020 x 1.020 mm
720 x 720 mm
720 x 1.320 mm
420 x 1.520 mm
Nach dem ersten Zusammenbau ist keine vollständige Demontage mehr
erforderlich: die Rahmenelemente passen samt Wandseiten in die Taschen.
*4 Alkalibatterien LR6 AA 1,5 V
Google Play und das Google Play-Logo sind Marken von Google LLC. / App Store is a service mark of Apple Inc.
Mit diesem Volumenstrommessgerät sind das Kontrollieren
und Austarieren von Luftströmen an Luftdurchlässen möglich.
Betriebstemperatur: -5 von +50 °C; Schutzart: IP40
DISPONIBLE SUR

Guia rápido
1 Desdobrar o quadro apropriado
2 Montar a hotte no quadro
• A junta em elastómero do quadro deve ser posicionada voltada para fora.
• Fixar as cintas antes de posicionar a hotte nos cantos do quadro. Não apertar as cintas
completamente: para não danicar a tela da hotte, é recomendável ajustar o aperto das
cintas ao m da montagem.
• Esticar o elástico da hotte nos cantos do quadro.
3 Montar o conjunto hotte + quadro na base
• Vericar se a ta de xação não está presa na base.
• A parte transparente da hotte deve ser posicionada voltada para o
utilizador. A lingueta colorida no interior da hotte facilita a orientação:
ela deve estar do lado oposto ao utilizador. Essa lingueta colorida deve
ser posicionada face à echa de orientação situada na base. Posicionar
os pers que comportam os batentes de ângulo face à parte de vidro
da hotte.
• Apertar e prender a ta de xação na base.
4 Posicionar as hastes de suporte
• Remover as hastes no interior da hotte.
• Colocar as hastes nos cadinhos previstos para o efeito e, depois, ajustá-los no canto
oposto da hotte. Posicionar as hastes a cruzar do lado da janela e do lado oposto da
janela.
• Ajustar o aperto das cintas.
5 minutos
5 Introduzir as pilhas no módulo
• Retirar a tampa do compartimento das pilhas (1).
• Introduzir as pilhas, respeitando a polaridade.
• Voltar a colocar a tampa do compartimento das pilhas.
• Ligar novamente o módulo DBM 620 na base.
1
6 Descarregar a aplicação SmartKap
• Ler o código QR para descarregar a aplicação SmartKap no seu
smartphone ou tablet
OU
• Introduzir «SmartKap» na barra de pesquisa e validar.
• Lançar a aplicação SmartKap, tocando no ícone correspondente.
• Seguir as indicações do seu dispositivo móvel.
7 Interligar o dispositivo móvel e o módulo DBM 620
• Ligar o módulo DBM 620 pressionando o botão do módulo.
• Lançar a aplicação SmartKap, tocando no ícone correspondente.
• A aplicação abre-se automaticamente em modo «Balometer». Se
necessário, selecionar o modo «Manómetro».
• Tocar em «Ligar um aparelho», e depois, em «Procurar
aparelhos».
• Tocar na liga do aparelho apropriado, e depois, em «Ligar».
A conexão sem os deve ser activada no smartphone
ou tablet.
8 Visualizar as medições
Em modo «Balometer», selecionar o tipo de
difusor. Posicionar o cone para medição de
caudal como indica a animação, que explica
como posicionar corretamente o cone sobre
o difusor, e tocar em «Fechar».
Em modo «Manómetro», ajustar os
parâmetros do elemento de pressão
diferencial, o tipo e as dimensões da
conduta. Posicionar corretamente o elemento
de pressão diferencial no local apropriado e
tocar em «Rec».
610 x 610 mm
1.020 x 1.020 mm
720 x 720 mm
720 x 1.320 mm
420 x 1.520 mm
Depois da primeira montagem, não será mais necessário uma desmontagem
completa: os quadros podem ser armazenados nas malas com a tela montada.
Português
*4 pilhas alcalinas LR6 AA 1.5 V
Google Play e o logótipo do Google Play são marcas comerciais da Google LLC. / App Store is a service mark of Apple Inc.
O cone para medição de caudal DBM 620 permite o controlo e
o equilíbrio dos caudais de ar à saída do difusor. Temperatura de
utilização: -5 a +50 °C; Proteção: IP40
DISPONIBLE SUR

中文
简明使用指南
1 展开风罩框架
2 把风罩帆布安装在框架上
• 风罩框架上的柔性密封圈朝向外侧。
• 先把风罩帆布上的绑带固定在框架上,然后再安上风罩帆布。不要把绑带拉至
最紧:以免损伤风罩帆布,建议在风罩安装的最后步骤再拉紧绑带。
• 把风罩框架四角的松紧带拉紧。
3 把装好框架的风罩整体固定在底座上
• 请查看定位垫圈位置的强力魔术贴不要固定在底座上。
• 安装时风罩顶部透明观察窗须朝向操作者。风罩内侧的有色布
条用来辨别安装角度:它必须位于操作者所在位置的另一侧。
有色布条应该和底座上的三角形标记对齐。带有角度限位卡扣
的型材需要安装在透明观察窗的对面。
• 拉紧和固定底座位置的绑带松紧程度。
4 安装风罩框架支撑杆
• 支撑杆放入风罩内侧。
• 把支撑杆放入风罩框架上预留的插孔,然后在风罩对角处进行微调。
把交叉支撑杆分别安装在风罩透明观察窗一侧和相对的另一侧。
• 调整绑带的松紧程度。
5分钟
5 在风量仪主机上安放电池
• 打开电池槽盖,取出旧电池(1)。
• 放入新电池*,注意电池正负极位置。
• 安上电池槽盖。
• 重新把DBM620风量仪主机连接到底座上。
1
6 下载移动应用软件SmartKap
苹果
• 扫描二维码下载SmartKap移动应用软件到智能手机或平板电脑上。
或者
• 在搜索引擎中输入“SmartKap”并确认。
• 点击该图标开始下载SmartKap移动应用软件。
• 按照手机或平板电脑提示步骤操作。
7 链接DBM620风量仪主机和移动终端
• 点击DBM620风量仪主机上的物理按键启动主机。
• 点击SmartKap移动应用软件图标激活软件。
• 应用软件打开后自动进入“风量罩”模式。如果需要,可以
选择“风压仪”模式。
• 点击“连接设备”,然后选择“搜索设备”。
• 选择所需的设备然后点击“连接”。
激活智能手机或平板电脑上的无线连接。
8 显示测量数值
在“风量罩”模式下选择出风口类型。
在动画视频指导下把风量仪正确地固定
在出风口上,然后点击“关闭”。
在“风压仪”模式下,设置风速探头的
参数、集气管的类型和尺寸。把风速探
头正确地固定在所需的位置,然后点
击“保存”。
610x610mm
1020x1020mm
720x720mm
720x1320mm
420x1520mm
风罩框架首次安装使用以后,不必将其完全拆卸:只需把框架、帆
布和底座简单折叠放入便携包即可。
*4节LR6AA1.5V电池
GooglePlay和GooglePlay標誌均為GoogleLLC的商標。/ App Store is a service mark of Apple Inc.
DBM620风量仪用于监控和调节通气孔的风量。
操作温度:-5~+50°C; 防护等级:IP40
安卓系统
• 可扫描QR码下载SmartKap应用,或登陆https://sauermanngroup.com/en-INT/
resource-center/softwares点击SmarKap(China)下载
• .apk文件可通过智能手机或平板电脑下载
• 从智能手机或平板电脑的下载文件中安装应用
• 按照您移动设备的指示进行操作

Certification and Homologation / Certification et Homologation
Certificación y Homologación / Certificazione e Omologazione /
Zertifizierung und Homologisierung / Certificação e Homologação
认证和许可
FCC Statement
This equipment has been tested and found to comply with the limits for a class B digital device,
pursuant to Part 15 of the FCC rules. These limits are designed to provide reasonable protection
against harmful interference in a residential installation. This equipment generates, uses and can
radiate radio frequency energy and, if not installed and used in accordance with the instructions,
may cause harmful interference to radio communications. However, there is no guarantee that
interference will not occur in a particular installation. If this equipment does cause harmful
interference to radio or television reception, which can be determined by turning the equipment
off and on, the user is encouraged to try to correct the interference by one or more of the
following measures:
• Reorient or relocate the receiving antenna
• Increase the separation between the equipment and receiver
• Connect the equipment to an outlet on a circuit different from that to which the receiver is
connected
• Consult the dealer or an experienced radio/TV technician for help
This device complies with Part 15 of the FCC rules. Operation is subject to the following two
conditions:
• This device may not cause harmful interference.
• This device must accept any interference received, including interference that may cause
undesired operation.
Any changes or modications to this equipment not expressly approved by Sauermann may cause
harmful interference and void the FCC authorization to operate this equipment.
IC Caution
This device contains licence-exempt transmitter(s)/receiver(s) that comply with Innovation, Science
and Economic Development Canada’s licence-exempt RSS(s). Operation is subject to the following
two conditions:
• This device may not cause interference,
• This device must accept any interference, including interference that may cause undesired
operation of the device.
L’émetteur/récepteur exempt de licence contenu dans le présent appareil est conforme aux CNR
d’Innovation, Sciences et Développement économique Canada applicables aux appareils radio
exempts de licence. L’exploitation est autorisée aux deux conditions suivantes :
• L’appareil ne doit pas produire de brouillage,
• L’appareil doit accepter tout brouillage radioélectrique subi, même si le brouillage est
susceptible d’en compromettre le fonctionnement.
Korea
This equipment is a home use (Class B) electromagnetic
wave suitability equipment and to be used mainly at home
and it can be used in all areas.
Class B Equipment (for
Home Use Broadcasting &
Communication Equipment)
Taiwan
Singapore
Complies with
IMDA Standards
[Dealer’s Licence No.]
(EN) Hereby, Sauermann Industrie SAS declares that the radio equipment type DBM 620 is in
compliance with Directive 2014/53/EU. The full text of the EU declaration of conformity is available at
the following internet address: www.sauermanngroup.com
(FR) Le soussigné, Sauermann Industrie SAS, déclare que l’équipement radioélectrique du type DBM
620 est conforme à la directive 2014/53/UE. Le texte complet de la déclaration UE de conformité est
disponible à l’adresse internet suivante: www.sauermanngroup.com
(ES) Por la presente, Sauermann Industrie SAS declara que el tipo de equipo radioeléctrico DBM 620
es conforme con la Directiva 2014/53/UE. El texto completo de la declaración UE de conformidad está
disponible en la dirección Internet siguiente: www.sauermanngroup.com
(IT) Il fabbricante, Sauermann Industrie SAS, dichiara che il tipo di apparecchiatura radio DBM 620 è
conforme alla direttiva 2014/53/UE. Il testo completo della dichiarazione di conformità UE è disponibile
al seguente indirizzo Internet: www.sauermanngroup.com
(DE) Hiermit erklärt Sauermann Industrie SAS, dass der Funkanlagentyp DBM 620 der Richtlinie
2014/53/EU entspricht. Der vollständige Text der EU-Konformitätserklärung ist unter der folgenden
Internetadresse verfügbar: www.sauermanngroup.com
(PT) O(a) abaixo assinado(a) Sauermann Industrie SAS declara que o presente tipo de equipamento de
rádio DBM 620 está em conformidade com a Diretiva 2014/53/UE. O texto integral da declaração de
conformidade está disponível no seguinte endereço de Internet: www.sauermanngroup.com
Directive / Directiva / Direttiva / Richtlinie / Diretiva 2014/53/EU

http://kimo-en.custhelp.com
QSG – DBM 620 – 07/10/22 – Non-contractual document – We reserve the right to modify the characteristics of our products without prior notice.
Download the full manual
Télécharger le manuel complet
Descargue el manual de usuario
Scarica il manuale completo
Vollständiges Handbuch herunterladen
Descarregar o manual completo
下载使用说明书全文
Customer service portal / Portail service clients
Portal de servicio al cliente / Portale servizio clienti
Kundendienste Portal / Portal de serviço aos clientes /
客服门户网站
Utilisez notre Portail service clients pour nous contacter
Use our Customer service portal to contact us
Contacte con nosotros a través del Portal de servicio al cliente
Utilizzate il nostro Portale servizio clienti per contattarci
Zur Kontaktaufnahme besuchen Sie bitte unser Kundendienste Portal
Utilize o nosso Portal de serviço aos clientes para nos contactar
使用客服门户网站联系我们
Sauermann Industries - ZA Bernard Moulinet - 24700 - Montpon - France
www.sauermanngroup.com
SmartKap mobile App
DBM 620
Air ow meter
Hotline
Calibration
Removable
measuring unit
Wireless
connection
-
 1
1
-
 2
2
-
 3
3
-
 4
4
-
 5
5
-
 6
6
-
 7
7
-
 8
8
-
 9
9
-
 10
10


en otros idiomas
- français: sauermann DBM 620 Mode d'emploi
- italiano: sauermann DBM 620 Guida utente
- English: sauermann DBM 620 User guide
- Deutsch: sauermann DBM 620 Benutzerhandbuch
- português: sauermann DBM 620 Guia de usuario
- 日本語: sauermann DBM 620 ユーザーガイド